1
SQL*Plus User’s Guide and
Reference
Release 3.3
Part No. A42562–1
The Relational Database Management System
SQL*Plus User’s Guide and Reference, Release 3.3
Part No. A42562–1
Copyright E 1986, 1992, 1994, 1995, 1996 Oracle Corporation
All rights reserved. Printed in the U.S.A.
Contributing Authors: Frank Rovitto
Contributors: Larry Baer, Lisa Colston, Roland Kovacs, Karen Denchfield–Masterson, Alison Holloway, Christopher Jones, Anita Lam, Nimish Mehta, Luan
Nim, Bud Osterberg, Richard Rendell, Farokh Shapoorjee, Larry Stevens, Andre
Touma
This software was not developed for use in any nuclear, aviation, mass
transit, medical, or other inherently dangerous applications. It is the
customer’s responsibility to take all appropriate measures to ensure the safe
use of such applications if the programs are used for such purposes.
This software/documentation contains proprietary information of Oracle
Corporation; it is provided under a license agreement containing restrictions on
use and disclosure and is also protected by copyright law. Reverse engineering
of the software is prohibited.
If this software/documentation is delivered to a U.S. Government Agency of
the Department of Defense, then it is delivered with Restricted Rights and the
following legend is applicable:
Restricted Rights Legend Use, duplication, or disclosure by the Government is
subject to restrictions as set forth in subparagraph (c)(1)(ii) of DFARS
252.227–7013, Rights in Technical Data and Computer Software (October 1988).
Oracle Corporation, 500 Oracle Parkway, Redwood City, CA 94065.
If this software/documentation is delivered to a U.S. Government Agency not
within the Department of Defense, then it is delivered with “Restricted Rights”,
as defined in FAR 52.227–14, Rights in Data – General, including Alternate III
(June 1987).
The information in this document is subject to change without notice. If you
find any problems in the documentation, please report them to us in writing.
Oracle Corporation does not warrant that this document is error free.
Oracle, SQL*Plus, SQL*Forms, and Oracle Spatial Data Option are registered
trademarks and Oracle7, Designer/2000, Developer/2000, Oralce Text Server
Option, Oracle Mobile Agents, Oracle Media Objects, and Oracle Office are
trademarks of Oracle Corporation.
All other products or company names are used for identification purposes only,
and may be trademarks of their respective owners.
Preface
T
he SQL*Plus (pronounced “sequel plus”) User’s Guide and Reference
introduces the SQL*Plus program and its uses. It also provides a
detailed description of each SQL*Plus command.
Audience
This Guide addresses business and technical professionals who have a
basic understanding of the SQL database language. If you do not have
any familiarity with this database tool, you should refer to the Oracle7
Server SQL Language Reference Manual. If you plan to use the PL/SQL
database language in conjunction with SQL*Plus, refer to the PL/SQL
User’s Guide and Reference for information on using PL/SQL.
Preface
i
How to Use this Guide Refer to the following tables for a list of topics covered by this Guide, a
description of each topic, and the number of the chapter that covers the
topic.
PART I
Understanding SQL*Plus
ii
Chapter
Number
Topic
Description
Introduction
Gives an overview of SQL*Plus, instructions on using this Guide, and information
on what you need to run SQL*Plus.
1
Learning
SQL*Plus Basics
Explains how to start SQL*Plus and enter
and execute commands. You learn by following step-by-step examples using sample tables.
2
Manipulating
Commands
Also through examples, helps you learn to
edit commands, save them for later use,
and write interactive commands.
3
Formatting
Query Results
Explains how you can format columns,
clarify your report with spacing and summary lines, define page dimensions and
titles, and store and print query results.
Also uses step-by-step examples.
4
Accessing
Databases
Tells you how to connect to default and
remote databases, and how to copy data
between databases and between tables on
the same database. Includes one example.
5
SQL*Plus User’s Guide and Reference
PART II Reference
Related Publications
Chapter
Number
Topic
Description
Command
Reference
Gives you a SQL*Plus command summary and detailed descriptions of each
SQL*Plus command in alphabetical
order.
6
COPY Command Lists copy command error messages,
Messages and
their causes, and appropriate actions
Codes
for error recovery.
Appendix
A
Release 3.3
Enhancements
Describes enhancements to SQL*Plus
in Release 3.3.
Appendix
B
SQL*Plus Limits
Lists the maximum values for elements of SQL*Plus.
Appendix
C
SQL Command
List
Provides a list of major SQL commands and clauses.
Appendix
D
Security
Explains how to restrict users’ access
to certain SQL*Plus and SQL commands.
Appendix
E
SQL*Plus
Commands from
Earlier Releases
Provides information on SQL*Plus
commands from earlier Releases.
Appendix
F
Glossary
Defines technical terms associated
with Oracle and SQL*Plus.
Glossary
Related documentation includes the following publications:
•
SQL*Plus Quick Reference
•
PL/SQL User’s Guide and Reference
•
SQL*Module User’s Guide and Reference
•
Oracle7 Server SQL Language Reference Manual
•
Oracle7 Server Concepts Manual
•
Oracle7 Server Administrator’s Guide
•
Oracle7 Server Application Developer’s Guide
•
Oracle7 Server Distributed Databases Manual
•
Oracle7 Server Utilities User’s Guide
•
Oracle7 Server Messages Manual
•
Oracle7 Server Migration Guide
•
Oracle7 Server Reference Manual
Preface
iii
Your Comments Are
Welcome
•
Oracle7 Server Tuning Guide
•
Oracle7 Parallel Server Manual
•
Programmer’s Guide to the Oracle Call Interface
•
Programmer’s Guide to the Oracle Precompilers
•
Programmer’s Guide to the Oracle Pro*C Precompiler
•
Pro*COBOL Supplement to the Oracle Precompilers Guide
•
Oracle installation and user’s manual(s) provided for your
operating system
Oracle Corporation values and appreciates your comments as an Oracle
user and reader of the manuals. As we write, revise, and evaluate, your
opinions are the most important input we receive. At the back of this
manual is a Reader’s Comment Form that we encourage you to use to
tell us both what you like and what you dislike about this (or other)
Oracle manuals. If the form is not at the end of this manual, or if you
would like to contact us, please use the following addresses and phone
numbers.
For documentation questions/comments, contact:
SQL*Plus Documentation Manager
Research & Development
Oracle Systems Australia Pty Ltd
324 St. Kilda Road
Melbourne VIC 3004
Australia
+61 3 9209 1600 (telephone)
+61 3 9699 1259 (fax)
For product questions/comments, contact:
SQL*Plus Product Manager
Research & Development
Oracle Systems Australia Pty Ltd
324 St. Kilda Road
Melbourne VIC 3004
Australia
+61 3 9209 1600 (telephone)
+61 3 9699 1259 (fax)
iv
SQL*Plus User’s Guide and Reference
Contents
PART I
UNDERSTANDING SQL*PLUS
Chapter 1
Introduction . . . . . . . . . . . . . . . . . . . . . . . . . . . . . . . . . . . . . . . . . . . .
Overview of SQL*Plus . . . . . . . . . . . . . . . . . . . . . . . . . . . . . . . . . . . .
Basic Concepts . . . . . . . . . . . . . . . . . . . . . . . . . . . . . . . . . . . . . . .
Who Can Use SQL*Plus . . . . . . . . . . . . . . . . . . . . . . . . . . . . . . .
Other Ways of Working with Oracle . . . . . . . . . . . . . . . . . . . .
Using this Guide . . . . . . . . . . . . . . . . . . . . . . . . . . . . . . . . . . . . . . . . .
Conventions for Command Syntax . . . . . . . . . . . . . . . . . . . . .
Sample Tables . . . . . . . . . . . . . . . . . . . . . . . . . . . . . . . . . . . . . . . .
What You Need to Run SQL*Plus . . . . . . . . . . . . . . . . . . . . . . . . . .
Hardware and Software . . . . . . . . . . . . . . . . . . . . . . . . . . . . . . .
Information Specific to Your Operating System . . . . . . . . . . .
Username and Password . . . . . . . . . . . . . . . . . . . . . . . . . . . . . .
Access to Sample Tables . . . . . . . . . . . . . . . . . . . . . . . . . . . . . . .
1–1
1–2
1–2
1–3
1–3
1–4
1–4
1–5
1–6
1–6
1–7
1–7
1–7
Chapter 2
Learning SQL*Plus Basics . . . . . . . . . . . . . . . . . . . . . . . . . . . . . . . .
Getting Started . . . . . . . . . . . . . . . . . . . . . . . . . . . . . . . . . . . . . . . . . .
Using the Keyboard . . . . . . . . . . . . . . . . . . . . . . . . . . . . . . . . . .
Starting SQL*Plus . . . . . . . . . . . . . . . . . . . . . . . . . . . . . . . . . . . .
Leaving SQL*Plus . . . . . . . . . . . . . . . . . . . . . . . . . . . . . . . . . . . .
Entering and Executing Commands . . . . . . . . . . . . . . . . . . . . . . . .
Running SQL Commands . . . . . . . . . . . . . . . . . . . . . . . . . . . . .
Running PL/SQL Blocks . . . . . . . . . . . . . . . . . . . . . . . . . . . . . .
Running SQL*Plus Commands . . . . . . . . . . . . . . . . . . . . . . . . .
2–1
2–2
2–2
2–3
2–4
2–5
2–6
2–9
2–10
Contents
v
Chapter 3
vi
Variables that Affect Running Commands . . . . . . . . . . . . . . .
Saving Changes to the Database Automatically . . . . . . . . . . .
Stopping a Command while It Is Running . . . . . . . . . . . . . . .
Collecting Timing Statistics on Commands You Run . . . . . .
Running Host Operating System Commands . . . . . . . . . . . .
Running SQL*Forms Forms . . . . . . . . . . . . . . . . . . . . . . . . . . . .
Getting Help . . . . . . . . . . . . . . . . . . . . . . . . . . . . . . . . . . . . . . . . . . . .
Listing a Table Definition . . . . . . . . . . . . . . . . . . . . . . . . . . . . . .
Listing PL/SQL Definitions . . . . . . . . . . . . . . . . . . . . . . . . . . . .
Controlling the Display . . . . . . . . . . . . . . . . . . . . . . . . . . . . . . .
Interpreting Error Messages . . . . . . . . . . . . . . . . . . . . . . . . . . .
2–12
2–12
2–13
2–14
2–14
2–14
2–14
2–14
2–15
2–15
2–15
Manipulating Commands . . . . . . . . . . . . . . . . . . . . . . . . . . . . . . . .
Editing Commands . . . . . . . . . . . . . . . . . . . . . . . . . . . . . . . . . . . . . .
Listing the Buffer Contents . . . . . . . . . . . . . . . . . . . . . . . . . . . .
Editing the Current Line . . . . . . . . . . . . . . . . . . . . . . . . . . . . . .
Adding a New Line . . . . . . . . . . . . . . . . . . . . . . . . . . . . . . . . . . .
Appending Text to a Line . . . . . . . . . . . . . . . . . . . . . . . . . . . . . .
Deleting Lines . . . . . . . . . . . . . . . . . . . . . . . . . . . . . . . . . . . . . . .
Editing Commands with a System Editor . . . . . . . . . . . . . . . .
Saving Commands for Later Use . . . . . . . . . . . . . . . . . . . . . . . . . . .
Storing Commands in Command Files . . . . . . . . . . . . . . . . . .
Placing Comments in Command Files . . . . . . . . . . . . . . . . . . .
Retrieving Command Files . . . . . . . . . . . . . . . . . . . . . . . . . . . .
Running Command Files . . . . . . . . . . . . . . . . . . . . . . . . . . . . . .
Nesting Command Files . . . . . . . . . . . . . . . . . . . . . . . . . . . . . . .
Modifying Command Files . . . . . . . . . . . . . . . . . . . . . . . . . . . .
Exiting from a Command File with a Return Code . . . . . . . .
Setting Up Your SQL*Plus Environment . . . . . . . . . . . . . . . . .
Storing and Restoring SQL*Plus System Variables . . . . . . . .
Writing Interactive Commands . . . . . . . . . . . . . . . . . . . . . . . . . . . .
Defining User Variables . . . . . . . . . . . . . . . . . . . . . . . . . . . . . . .
Using Substitution Variables . . . . . . . . . . . . . . . . . . . . . . . . . . .
Passing Parameters through the START Command . . . . . . .
Communicating with the User . . . . . . . . . . . . . . . . . . . . . . . . .
Using Bind Variables . . . . . . . . . . . . . . . . . . . . . . . . . . . . . . . . . . . . .
Creating Bind Variables . . . . . . . . . . . . . . . . . . . . . . . . . . . . . . .
Referencing Bind Variables . . . . . . . . . . . . . . . . . . . . . . . . . . . .
Displaying Bind Variables . . . . . . . . . . . . . . . . . . . . . . . . . . . . .
REFCURSOR Bind Variables . . . . . . . . . . . . . . . . . . . . . . . . . . . . . .
Tracing Statements . . . . . . . . . . . . . . . . . . . . . . . . . . . . . . . . . . . . . . .
Controlling the Report . . . . . . . . . . . . . . . . . . . . . . . . . . . . . . . .
3–1
3–2
3–3
3–3
3–5
3–5
3–6
3–6
3–7
3–7
3–10
3–11
3–12
3–13
3–14
3–14
3–15
3–15
3–17
3–17
3–17
3–22
3–24
3–26
3–27
3–27
3–27
3–28
3–31
3–31
SQL*Plus User’s Guide and Reference
Execution Plan . . . . . . . . . . . . . . . . . . . . . . . . . . . . . . . . . . . . . . . 3–31
Statistics . . . . . . . . . . . . . . . . . . . . . . . . . . . . . . . . . . . . . . . . . . . . 3–32
Tracing Parallel and Distributed Queries . . . . . . . . . . . . . . . . 3–34
Chapter 4
Chapter 5
Formatting Query Results . . . . . . . . . . . . . . . . . . . . . . . . . . . . . . . .
Formatting Columns . . . . . . . . . . . . . . . . . . . . . . . . . . . . . . . . . . . . .
Changing Column Headings . . . . . . . . . . . . . . . . . . . . . . . . . . .
Formatting NUMBER Columns . . . . . . . . . . . . . . . . . . . . . . . .
Formatting CHAR, VARCHAR2 (VARCHAR), LONG,
DATE, and Trusted Oracle Columns . . . . . . . . . . . . . . . . . . .
Copying Column Display Attributes . . . . . . . . . . . . . . . . . . . .
Listing and Resetting Column Display Attributes . . . . . . . . .
Suppressing and Restoring Column Display Attributes . . . .
Printing a Line of Characters after Wrapped Column
Values . . . . . . . . . . . . . . . . . . . . . . . . . . . . . . . . . . . . . . . . . . . . .
Clarifying Your Report with Spacing and Summary Lines . . . . .
Suppressing Duplicate Values in Break Columns . . . . . . . . .
Inserting Space when a Break Column’s Value Changes . . .
Inserting Space after Every Row . . . . . . . . . . . . . . . . . . . . . . . .
Using Multiple Spacing Techniques . . . . . . . . . . . . . . . . . . . . .
Listing and Removing Break Definitions . . . . . . . . . . . . . . . . .
Computing Summary Lines when a Break Column’s
Value Changes . . . . . . . . . . . . . . . . . . . . . . . . . . . . . . . . . . . . . .
Computing Summary Lines at the End of the Report . . . . . .
Computing Multiple Summary Values and Lines . . . . . . . . .
Listing and Removing COMPUTE Definitions . . . . . . . . . . . .
Defining Page and Report Titles and Dimensions . . . . . . . . . . . . .
Setting the Top and Bottom Titles and Headers and Footers
Displaying the Page Number and other SystemMaintained Values in Titles . . . . . . . . . . . . . . . . . . . . . . . . . . .
Listing, Suppressing, and Restoring Page Title Definitions .
Displaying Column Values in Titles . . . . . . . . . . . . . . . . . . . . .
Displaying the Current Date in Titles . . . . . . . . . . . . . . . . . . . .
Setting Page Dimensions . . . . . . . . . . . . . . . . . . . . . . . . . . . . . .
Sending Results to a File . . . . . . . . . . . . . . . . . . . . . . . . . . . . . .
Storing and Printing Query Results . . . . . . . . . . . . . . . . . . . . . . . . .
Sending Results to a Printer . . . . . . . . . . . . . . . . . . . . . . . . . . . .
4–1
4–3
4–3
4–5
Accessing SQL Databases . . . . . . . . . . . . . . . . . . . . . . . . . . . . . . . .
Connecting to the Default Database . . . . . . . . . . . . . . . . . . . . . . . .
Connecting to a Remote Database . . . . . . . . . . . . . . . . . . . . . . . . . .
Connecting to a Remote Database from within SQL*Plus . .
5–1
5–2
5–2
5–3
Contents
4–6
4–8
4–8
4–9
4–9
4–10
4–11
4–12
4–13
4–13
4–15
4–15
4–19
4–19
4–21
4–22
4–22
4–26
4–28
4–28
4–30
4–30
4–33
4–33
4–34
vii
Connecting to a Remote Database as You Start SQL*Plus . .
Copying Data from One Database to Another . . . . . . . . . . . . . . . .
Understanding COPY Command Syntax . . . . . . . . . . . . . . . .
Controlling Treatment of the Destination Table . . . . . . . . . . .
Interpreting the Messages that COPY Displays . . . . . . . . . . .
Specifying Another User’s Table . . . . . . . . . . . . . . . . . . . . . . . .
Copying Data between Tables on One Database . . . . . . . . . . . . . .
PART II
REFERENCE
Chapter 6
Command Reference . . . . . . . . . . . . . . . . . . . . . . . . . . . . . . . . . . . . .
SQL*Plus Command Summary . . . . . . . . . . . . . . . . . . . . . . . . . . . .
@ (”at” sign) . . . . . . . . . . . . . . . . . . . . . . . . . . . . . . . . . . . . . . . . . . . . .
@@ (double “at” sign) . . . . . . . . . . . . . . . . . . . . . . . . . . . . . . . . . . . .
/ (slash) . . . . . . . . . . . . . . . . . . . . . . . . . . . . . . . . . . . . . . . . . . . . . . . .
ACCEPT . . . . . . . . . . . . . . . . . . . . . . . . . . . . . . . . . . . . . . . . . . . . . . . .
APPEND . . . . . . . . . . . . . . . . . . . . . . . . . . . . . . . . . . . . . . . . . . . . . . .
BREAK . . . . . . . . . . . . . . . . . . . . . . . . . . . . . . . . . . . . . . . . . . . . . . . . .
BTITLE . . . . . . . . . . . . . . . . . . . . . . . . . . . . . . . . . . . . . . . . . . . . . . . . .
CHANGE . . . . . . . . . . . . . . . . . . . . . . . . . . . . . . . . . . . . . . . . . . . . . . .
CLEAR . . . . . . . . . . . . . . . . . . . . . . . . . . . . . . . . . . . . . . . . . . . . . . . . .
COLUMN . . . . . . . . . . . . . . . . . . . . . . . . . . . . . . . . . . . . . . . . . . . . . .
COMPUTE . . . . . . . . . . . . . . . . . . . . . . . . . . . . . . . . . . . . . . . . . . . . . .
CONNECT . . . . . . . . . . . . . . . . . . . . . . . . . . . . . . . . . . . . . . . . . . . . . .
COPY . . . . . . . . . . . . . . . . . . . . . . . . . . . . . . . . . . . . . . . . . . . . . . . . . .
DEFINE . . . . . . . . . . . . . . . . . . . . . . . . . . . . . . . . . . . . . . . . . . . . . . . .
DEL . . . . . . . . . . . . . . . . . . . . . . . . . . . . . . . . . . . . . . . . . . . . . . . . . . . .
DESCRIBE . . . . . . . . . . . . . . . . . . . . . . . . . . . . . . . . . . . . . . . . . . . . . .
DISCONNECT . . . . . . . . . . . . . . . . . . . . . . . . . . . . . . . . . . . . . . . . . .
EDIT . . . . . . . . . . . . . . . . . . . . . . . . . . . . . . . . . . . . . . . . . . . . . . . . . . .
EXECUTE . . . . . . . . . . . . . . . . . . . . . . . . . . . . . . . . . . . . . . . . . . . . . . .
EXIT . . . . . . . . . . . . . . . . . . . . . . . . . . . . . . . . . . . . . . . . . . . . . . . . . . .
GET . . . . . . . . . . . . . . . . . . . . . . . . . . . . . . . . . . . . . . . . . . . . . . . . . . . .
HELP . . . . . . . . . . . . . . . . . . . . . . . . . . . . . . . . . . . . . . . . . . . . . . . . . .
HOST . . . . . . . . . . . . . . . . . . . . . . . . . . . . . . . . . . . . . . . . . . . . . . . . . .
INPUT . . . . . . . . . . . . . . . . . . . . . . . . . . . . . . . . . . . . . . . . . . . . . . . . .
LIST . . . . . . . . . . . . . . . . . . . . . . . . . . . . . . . . . . . . . . . . . . . . . . . . . . . .
PAUSE . . . . . . . . . . . . . . . . . . . . . . . . . . . . . . . . . . . . . . . . . . . . . . . . .
PRINT . . . . . . . . . . . . . . . . . . . . . . . . . . . . . . . . . . . . . . . . . . . . . . . . . .
PROMPT . . . . . . . . . . . . . . . . . . . . . . . . . . . . . . . . . . . . . . . . . . . . . . .
REMARK . . . . . . . . . . . . . . . . . . . . . . . . . . . . . . . . . . . . . . . . . . . . . . .
viii
SQL*Plus User’s Guide and Reference
5–3
5–4
5–4
5–5
5–7
5–7
5–8
6–1
6–3
6–6
6–8
6–10
6–11
6–13
6–14
6–19
6–20
6–22
6–23
6–33
6–39
6–41
6–44
6–46
6–48
6–50
6–51
6–53
6–54
6–56
6–57
6–58
6–59
6–61
6–63
6–64
6–65
6–66
REPFOOTER . . . . . . . . . . . . . . . . . . . . . . . . . . . . . . . . . . . . . . . . . . . .
REPHEADER . . . . . . . . . . . . . . . . . . . . . . . . . . . . . . . . . . . . . . . . . . .
RUN . . . . . . . . . . . . . . . . . . . . . . . . . . . . . . . . . . . . . . . . . . . . . . . . . . .
RUNFORM . . . . . . . . . . . . . . . . . . . . . . . . . . . . . . . . . . . . . . . . . . . . .
SAVE . . . . . . . . . . . . . . . . . . . . . . . . . . . . . . . . . . . . . . . . . . . . . . . . . . .
SET . . . . . . . . . . . . . . . . . . . . . . . . . . . . . . . . . . . . . . . . . . . . . . . . . . . .
SHOW . . . . . . . . . . . . . . . . . . . . . . . . . . . . . . . . . . . . . . . . . . . . . . . . .
SPOOL . . . . . . . . . . . . . . . . . . . . . . . . . . . . . . . . . . . . . . . . . . . . . . . . .
SQLPLUS . . . . . . . . . . . . . . . . . . . . . . . . . . . . . . . . . . . . . . . . . . . . . . .
START . . . . . . . . . . . . . . . . . . . . . . . . . . . . . . . . . . . . . . . . . . . . . . . . . .
STORE . . . . . . . . . . . . . . . . . . . . . . . . . . . . . . . . . . . . . . . . . . . . . . . . .
TIMING . . . . . . . . . . . . . . . . . . . . . . . . . . . . . . . . . . . . . . . . . . . . . . . .
TTITLE . . . . . . . . . . . . . . . . . . . . . . . . . . . . . . . . . . . . . . . . . . . . . . . . .
UNDEFINE . . . . . . . . . . . . . . . . . . . . . . . . . . . . . . . . . . . . . . . . . . . . .
VARIABLE . . . . . . . . . . . . . . . . . . . . . . . . . . . . . . . . . . . . . . . . . . . . . .
WHENEVER OSERROR . . . . . . . . . . . . . . . . . . . . . . . . . . . . . . . . . .
WHENEVER SQLERROR . . . . . . . . . . . . . . . . . . . . . . . . . . . . . . . . .
Appendix A
COPY Command Messages and Codes
Appendix B
Release 3.3 Enhancements
Appendix C
SQL*Plus Limits
Appendix D
SQL Command List
Appendix E
Security
Appendix F
SQL*Plus Commands from Earlier Releases
6–67
6–68
6–71
6–72
6–73
6–74
6–94
6–97
6–98
6–101
6–103
6–104
6–105
6–108
6–109
6–113
6–114
Glossary
Index
Contents
ix
x
SQL*Plus User’s Guide and Reference
PART
I
Understanding
SQL*Plus
CHAPTER
1
Introduction
T
his chapter introduces you to SQL*Plus, covering the following
topics:
•
overview of the SQL*Plus program
•
definition of basic concepts
•
explanation of who can use SQL*Plus
•
description of other programs you can use with Oracle
•
command syntax conventions used in this Guide
•
sample tables you will use
•
equipment, software, and information you need to run SQL*Plus
Introduction
1–1
Overview of SQL*Plus
You can use the SQL*Plus program in conjunction with the SQL
database language and its procedural language extension, PL/SQL. The
SQL database language allows you to store and retrieve data in Oracle.
PL/SQL allows you to link several SQL commands through procedural
logic.
SQL*Plus enables you to manipulate SQL commands and PL/SQL
blocks, and to perform many additional tasks as well. Through
SQL*Plus, you can
Basic Concepts
1–2
•
enter, edit, store, retrieve, and run SQL commands and PL/SQL
blocks
•
format, perform calculations on, store, and print query results in
the form of reports
•
list column definitions for any table
•
access and copy data between SQL databases
•
send messages to and accept responses from an end user
The following definitions explain concepts central to SQL*Plus:
command
An instruction you give SQL*Plus or Oracle.
block
A group of SQL and PL/SQL commands related to
one another through procedural logic.
table
The basic unit of storage in Oracle.
query
A SQL command (specifically, a SQL SELECT
command) that retrieves information from one or
more tables.
query results
The data retrieved by a query.
report
Query results formatted by you through SQL*Plus
commands.
SQL*Plus User’s Guide and Reference
Who Can Use
SQL*Plus
The SQL*Plus, SQL, and PL/SQL command languages are powerful
enough to serve the needs of users with some database experience, yet
straightforward enough for new users who are just learning to work
with Oracle.
The design of the SQL*Plus command language makes it easy to use.
For example, to give a column labelled ENAME in the database the
clearer heading “Employee”, you might enter the following command:
COLUMN ENAME HEADING EMPLOYEE
Similarly, to list the column definitions for a table called EMP, you might
enter this command:
DESCRIBE EMP
Other Ways of Working Oracle serves as the foundation for a complete set of application
development, and office automation tools. These tools support every
with Oracle
phase of a system’s development and life cycle, from analysis and
design through implementation and maintenance.
Designer/2000
a set of second generation client/server
design tools
Developer/2000
a set of second generation client/server
development tools
Discoverer/2000
a set of end-user query tools
Programmer/2000
a set of 3GL programming language interfaces
Text Server Option
an option to include full text storage and
retrieval in databases
Spatial Data Option
an option to include multi-dimensional
(spatial) data in databases
Mobile Agents
a tool for applications using mobile and/or
detached clients
WebServer Option
a tool which enables database access through
Web browsers and the Internet
Gateways
a tool which enables access to data in
non-Oracle databases
Media Objects
a development tool for object-oriented
multimedia applications
Oracle Office
an electronic messaging (Email), calendar and
scheduling system
Introduction
1–3
Using this Guide
This Guide gives you information on SQL*Plus that applies to all
operating systems. Some aspects of SQL*Plus, however, differ on each
operating system. Such operating-system-specific details are covered in
the Oracle installation and user’s manual(s) provided for your system.
Use these operating-system-specific manuals in conjunction with the
SQL*Plus User’s Guide and Reference.
Throughout this Guide, examples showing how to enter commands use
a common command syntax and a common set of sample tables. Both
are described below. You will find the conventions for command syntax
particularly useful when referring to the reference portion of this Guide.
Conventions for
Command Syntax
The following two tables describe the notation and conventions for
command syntax used in this Guide.
Feature
Example
Explanation
uppercase
BTITLE
Enter text exactly as spelled; it
need not be in uppercase.
lowercase italics
column
A clause value; substitute an appropriate value.
words with specific
meanings
c
A single character.
char
A CHAR value—a literal in
single quotes—or an expression
with a CHAR value.
d or e
A date or an expression with a
DATE value.
expr
An unspecified expression.
m or n
A number or an expression with
a NUMBER value.
text
A CHAR constant with or without single quotes.
variable
A user variable (unless the text
specifies another variable type).
Table 1 – 1 Commands, Terms, and Clauses
Other words are explained where used if their meaning is not explained
by context.
1–4
SQL*Plus User’s Guide and Reference
Feature
Example
Explanation
vertical bar
|
Separates alternative syntax
elements that may be optional
or mandatory.
brackets
[OFF|ON]
One or more optional items. If
two items appear separated by
|, enter one of the items separated by |. Do not enter the
brackets or |.
braces
{OFF|ON}
A choice of mandatory items;
enter one of the items separated by |. Do not enter the
braces or |.
underlining
{OFF|ON}
A default value; if you enter
nothing, SQL*Plus assumes
the underlined value.
ellipsis
n...
Preceding item(s) may be repeated any number of times.
Table 1 – 2 Punctuation
Enter other punctuation marks (such as parentheses) where shown in
the command syntax.
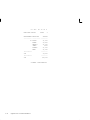
Sample Tables
Many of the concepts and operations in this Guide are illustrated by a
set of sample tables. These tables contain personnel records for a
fictitious company. As you complete the exercises in this Guide, imagine
that you are personnel director for this company.
The exercises make use of the information in two sample tables:
EMP
Contains information about the employees of the
sample company.
DEPT
Contains information about the departments in the
company.
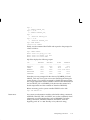
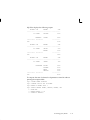
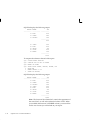
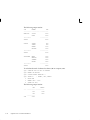
Figure 1 – 1 and Figure 1 – 2 show the information in these tables.
Introduction
1–5
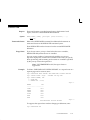
EMPNO
–––––
7369
7499
7521
7566
7654
7698
7782
7788
7839
7844
7876
7900
7902
7934
ENAME
–––––
SMITH
ALLEN
WARD
JONES
MARTIN
BLAKE
CLARK
SCOTT
KING
TURNER
ADAMS
JAMES
FORD
MILLER
JOB
MGR
–––––––– ––––
CLERK
7902
SALESMAN 7698
SALESMAN 7698
MANAGER 7839
SALESMAN 7698
MANAGER 7839
MANAGER 7839
ANALYST 7566
PRESIDENT
SALESMAN 7698
CLERK
7788
CLERK
7698
ANALYST 7566
CLERK
7782
HIREDATE
SAL
COMM
DEPTNO
––––––––––– –––––– –––––– ––––––
17–DEC–80
800
20
20–FEB–81
1600
300
30
22–FEB–81
1250
500
30
02–APR–81
2975
20
28–SEP–81
1250
1400
30
01–MAY–81
2850
30
09–JUN–81
2450
30
09–DEC–82
3000
20
17–NOV–81
5000
10
08–SEP–81
1500
0
30
12–JAN–83
1100
20
03–DEC–81
950
30
03–DEC–81
3000
20
23–JAN–82
1300
10
Figure 1 – 1 EMP Table
DEPTNO
–––––––––
10
20
30
40
DNAME
–––––––––––––
ACCOUNTING
RESEARCH
SALES
OPERATIONS
LOC
–––––––––––
NEW YORK
DALLAS
CHICAGO
BOSTON
Figure 1 – 2 DEPT Table
What You Need to Run SQL*Plus
To run SQL*Plus, you need hardware, software, operating system
specific information, a username and password, and access to one or
more tables.
Hardware and
Software
1–6
Oracle and SQL*Plus can run on many different kinds of computers.
Your computer’s operating system manages the computer’s resources
and mediates between the computer hardware and programs such as
SQL*Plus. Different computers use different operating systems. For
information about your computer’s operating system, see the
documentation provided with the computer.
SQL*Plus User’s Guide and Reference
Before you can begin using SQL*Plus, both Oracle and SQL*Plus must
be installed on your computer. Note that in order to take full advantage
of the enhancements in SQL*Plus Release 3.3, you must have Oracle7
Release 7.3. For a list of SQL*Plus Release 3.3 enhancements, see
Appendix B.
If you have multiple users on your computer, your organization should
have a Database Administrator (called a DBA) who supervises the use
of Oracle.
The DBA is responsible for installing Oracle and SQL*Plus on your
system. If you are acting as DBA, see the instructions for installing
Oracle and SQL*Plus in the Oracle installation and user’s manual(s)
provided for your operating system.
Information Specific to A few aspects of Oracle and SQL*Plus differ from one type of host
Your Operating System computer and operating system to another. These topics are discussed in
the Oracle installation and user’s manual(s), published in a separate
version for each host computer and operating system that SQL*Plus
supports.
Keep a copy of your Oracle installation and user’s manual(s) available
for reference as you work through this Guide. When necessary, this
Guide will refer you to your installation and user’s manual(s).
Username and
Password
When you start SQL*Plus, you will need a username that identifies you
as an authorized Oracle user and a password that proves you are the
legitimate owner of your username. The demonstration username,
SCOTT, and password, TIGER, may be set up on your system during the
installation procedure. In this case, you can use the Oracle username
SCOTT and password TIGER with the EMP and DEPT tables
(Figure 1 – 1 and Figure 1 – 2).
Multi-User Systems
If several people share your computer’s operating system, your DBA
can set up your SQL*Plus username and password. You will also need a
system username and password to gain admittance to the operating
system. These may or may not be the same ones you use with SQL*Plus.
Single-User Systems
If only one person at a time uses your computer, you may be expected to
perform the DBA’s functions for yourself. In that case, you can use the
Oracle username SCOTT and password TIGER. If you want to define
your own username and password, see the Oracle7 Server SQL Language
Reference Manual.
Access to Sample
Tables
Each table in the database is “owned” by a particular user. You may
wish to have your own copies of the sample tables to use as you try the
examples in this Guide. To get your own copies of the tables, see your
Introduction
1–7
DBA or run the Oracle-supplied command file named DEMOBLD (you
run this file from your operating system, not from SQL*Plus).
When you have no more use for the sample tables, remove them by
running another Oracle-supplied command file named DEMODROP.
For instructions on how to run DEMOBLD and DEMODROP, see the
Oracle installation and user’s manual(s) provided for your operating
system.
1–8
SQL*Plus User’s Guide and Reference
CHAPTER
2
Learning SQL*Plus
Basics
T
his chapter helps you learn the basics of using SQL*Plus, including
the following topics:
•
using the keyboard
•
starting and leaving SQL*Plus
•
running SQL commands, PL/SQL blocks, and SQL*Plus
commands
•
understanding variables that affect running commands
•
saving changes to the database automatically
•
stopping a command while it is running
•
collecting timing statistics on commands you run
•
running host operating system commands and SQL*Forms forms
•
listing a table definition
•
listing a PL/SQL definition
•
controlling the display
•
interpreting error messages
Read this chapter while sitting at your computer and try out the
examples shown. Before beginning, make sure you have access to the
sample tables described in Chapter 1.
Learning SQL*Plus Basics
2–1
Getting Started
To begin using SQL*Plus, you must first become familiar with the
functions of several keys on your keyboard and understand how to start
and leave SQL*Plus.
Using the Keyboard
Several keys on your keyboard have special meaning in SQL*Plus.
Table 2 – 1 lists these keys.
See your Oracle installation and user’s manual(s) for your operating
system to learn which physical key performs each function on the
keyboard commonly used with your host computer.
Note: A SQL*Plus key may perform different functions when
pressed in other products or the operating system.
Fill in each blank in Table 2 – 1 with the name of the corresponding
keyboard key. Then locate each key on your keyboard.
SQL*Plus
Key Name
Keyboard Key
Name
Function
[Return]
___________
End a line of input.
___________
Move cursor left one character to
correct an error.
___________
Suspend program operation and
display of output.
___________
Resume program operation and
output [Pause].
___________
Halt program operation; return to
the SQL*Plus command prompt.
___________
Exit SQL*Plus and return to the
host operating system.
[Backspace]
[Pause]
[Resume]
[Cancel]
[Interrupt]
Table 2 – 1 SQL*Plus Special Keys and their Functions
2–2
SQL*Plus User’s Guide and Reference
Starting SQL*Plus
Example 2–1
Starting SQL*Plus
Now that you have identified important keys on your keyboard, you are
ready to start SQL*Plus.
This example shows you how to start SQL*Plus. Follow the steps
shown.
1.
Make sure that Oracle has been installed on your computer.
2.
Turn on your computer (if it is off) and log on to the host operating
system (if required). If you are already using your computer, you
need not log off or reset it. Simply exit from the program you are
using (if any).
You should see one or more characters at the left side of the screen.
This is the operating system’s command prompt, which signals that
the operating system is ready to accept a command. In this Guide
the operating system’s prompt will be represented by a dollar sign
($). Your computer’s operating system prompt may be different.
3.
Enter the command SQLPLUS and press [Return]. This is an
operating system command that starts SQL*Plus.
Note: Some operating systems expect you to enter commands
in lowercase letters. If your system expects lowercase, enter the
SQLPLUS command in lowercase.
$ SQLPLUS
SQL*Plus displays its version number, the date, and copyright
information, and prompts you for your username (the text
displayed on your system may differ slightly):
SQL*Plus: Version 3.3 – on Fri June 30 09:39:26 1995
Copyright (c) Oracle Corporation 1979, 1994, 1995. All
rights reserved.
Enter user–name:
4.
Enter your username and press [Return]. SQL*Plus displays the
prompt “Enter password:”.
5.
Enter your password and press [Return] again. For your protection,
your password does not appear on the screen.
The process of entering your username and password is called
logging in. SQL*Plus displays the version of Oracle to which you
connected and the versions of available tools such as PL/SQL.
Learning SQL*Plus Basics
2–3
Next, SQL*Plus displays the SQL*Plus command prompt:
SQL>
The command prompt indicates that SQL*Plus is ready to accept
your commands.
If SQL*Plus does not start, you should see a message meant to help you
correct the problem. For further information, refer to the Oracle7 Server
Messages and Codes manual for Oracle messages, or to your operating
system manual for system messages.
Shortcuts to Starting
SQL*Plus
When you start SQL*Plus, you can enter your username and password,
separated by a slash (/), following the command SQLPLUS. For
example, if your username is SCOTT and your password is TIGER, you
can enter
$ SQLPLUS SCOTT/TIGER
and press [Return]. You can also arrange to log in to SQL*Plus
automatically when you log on to your host operating system. See the
Oracle installation and user’s manual(s) provided for your operating
system for details.
Leaving SQL*Plus
Example 2–2
Exiting SQL*Plus
When you are done working with SQL*Plus and wish to return to the
operating system, enter the EXIT command at the SQL*Plus command
prompt.
To leave SQL*Plus, enter the EXIT command at the SQL*Plus command
prompt:
SQL> EXIT
SQL*Plus displays the version of Oracle from which you disconnected
and the versions of tools available through SQL*Plus. After a moment
you will see the operating system prompt.
Before continuing with this chapter, follow steps 3, 4, and 5 of Example
2–1 to start SQL*Plus again. Alternatively, log in using the shortcut
shown under “Shortcuts to Starting SQL*Plus” above.
2–4
SQL*Plus User’s Guide and Reference
Entering and Executing Commands
Entering Commands
Your computer’s cursor, or pointer (typically an underline, a rectangular
block, or a slash), appears after the command prompt. The cursor
indicates the place where the next character you type will appear on
your screen.
To tell SQL*Plus what to do, simply type the command you wish to
enter. Usually, you separate the words in a command from each other by
a space or tab. You can use additional spaces or tabs between words, if
you wish, to make your commands more readable.
Note: You will see examples of spacing and indentation
throughout this Guide. When you enter the commands in the
exercises, you do not have to space them as shown, but you may
find them clearer to read if you do.
You can enter commands in capitals or lowercase. For the sake of clarity,
all table names, column names, and commands in this Guide appear in
capital letters.
You can enter three kinds of commands at the command prompt:
•
SQL commands, for working with information in the database
•
PL/SQL blocks, also for working with information in the
database
•
SQL*Plus commands, for formatting query results, setting
options, and editing and storing SQL commands and PL/SQL
blocks
The manner in which you continue a command on additional lines, end
a command, or execute a command differs depending on the type of
command you wish to enter and run. Examples of how to run and
execute these types of commands are found on the following pages.
Getting Help
To get online help for SQL*PLUS commands, type HELP at the
command prompt followed by the name of the command. For example:
SQL>HELP ACCEPT
If you get a response indicating that help is not available, consult your
database administrator. For more details about the help system, see the
HELP command in Chapter 6.
Executing Commands
After you enter the command and direct SQL*Plus to execute it,
SQL*Plus processes the command and redisplays the command prompt,
indicating that you can enter another command.
Learning SQL*Plus Basics
2–5
Running SQL
Commands
Example 2–3
Entering a SQL
Command
The SQL command language enables you to manipulate data in the
database. See your Oracle7 Server SQL Language Reference Manual for
information on individual SQL commands.
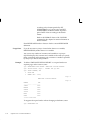
In this example, you will enter and execute a SQL command to display
the employee number, name, job, and salary of each employee in the
sample table EMP.
1.
At the command prompt, enter the first line of the command:
SQL> SELECT EMPNO, ENAME, JOB, SAL
If you make a mistake, use [Backspace] to erase it and re-enter.
When you are done, press [Return] to move to the next line.
2.
SQL*Plus will display a “2”, the prompt for the second line. Enter
the second line of the command:
2
FROM EMP WHERE SAL < 2500;
The semicolon(;) means that this is the end of the command. Press
[Return]. SQL*Plus processes the command and displays the results
on the screen:
EMPNO
––––––––––
7369
7499
7521
7654
7782
7844
7876
7900
7934
ENAME
––––––––––––
SMITH
ALLEN
WARD
MARTIN
CLARK
TURNER
ADAMS
JAMES
MILLER
JOB
SAL
–––––––––– ––––––––––
CLERK
800
SALESMAN
1600
SALESMAN
1250
SALESMAN
1250
MANAGER
2450
SALESMAN
1500
CLERK
1100
CLERK
800
CLERK
1300
9 rows selected
SQL>
After displaying the results and the number of rows retrieved,
SQL*Plus displays the command prompt again. If you made a
mistake and therefore did not get the results shown above, simply
re-enter the command.
The headings may be repeated in your output, depending on the
setting of a system variable called PAGESIZE. Whether you see the
message concerning the number of records retrieved depends on the
setting of a system variable called FEEDBACK. You will learn more
about system variables later in this chapter in the section “Variables
2–6
SQL*Plus User’s Guide and Reference
that Affect Running Commands”. To save space, the number of
records selected will not be shown in the rest of the examples in this
Guide.
Understanding SQL
Command Syntax
Just as spoken language has syntax rules that govern the way we
assemble words into sentences, SQL*Plus has syntax rules that govern
how you assemble words into commands. You must follow these rules if
you want SQL*Plus to accept and execute your commands.
Dividing a SQL Command into Separate Lines You can divide your
SQL command into separate lines at any points you wish, as long as
individual words are not split between lines. Thus, you can enter the
query you entered in Example 2–3 on one line:
SQL> SELECT EMPNO, ENAME, JOB, SAL FROM EMP WHERE SAL < 2500;
You can also enter the query on several lines:
SQL>
2
3
4
SELECT
EMPNO, ENAME, JOB, SAL
FROM EMP
WHERE SAL < 2500;
In this Guide, you will find most SQL commands divided into clauses,
one clause on each line. In Example 2–3, for instance, the SELECT and
FROM clauses were placed on separate lines. Many people find this
most convenient, but you may choose whatever line division makes
your command most readable to you.
Ending a SQL Command You can end a SQL command in one of three
ways:
•
with a semicolon (;)
•
with a slash (/) on a line by itself
•
with a blank line
A semicolon (;) tells SQL*Plus that you want to run the command. Type
the semicolon at the end of the last line of the command, as shown in
Example 2–3, and press [Return]. SQL*Plus will process the command
and store it in the SQL buffer (see “The SQL Buffer” below for details). If
you mistakenly press [Return] before typing the semicolon, SQL*Plus
will prompt you with a line number for the next line of your command.
Type the semicolon and press [Return] again to run the command.
Note: You cannot enter a comment (/* */) on the same line on
which you enter a semicolon.
A slash (/) on a line by itself also tells SQL*Plus that you wish to run the
command. Press [Return] at the end of the last line of the command.
Learning SQL*Plus Basics
2–7
SQL*Plus prompts you with another line number. Type a slash and press
[Return] again. SQL*Plus will execute the command and store it in the
buffer (see “The SQL Buffer” below for details).
A blank line tells SQL*Plus that you have finished entering the
command, but do not want to run it yet. Press [Return] at the end of the
last line of the command. SQL*Plus prompts you with another line
number.
Press [Return] again; SQL*Plus now prompts you with the SQL*Plus
command prompt. SQL*Plus does not execute the command, but stores
it in the SQL buffer (see “The SQL Buffer” below for details). If you
subsequently enter another SQL command, SQL*Plus overwrites the
previous command in the buffer.
Creating Stored Procedures Stored procedures are PL/SQL functions,
packages, or procedures. To create stored procedures, you use SQL
CREATE commands. The following SQL CREATE commands are used
to create stored procedures:
•
CREATE FUNCTION
•
CREATE PACKAGE
•
CREATE PACKAGE BODY
•
CREATE PROCEDURE
•
CREATE TRIGGER
Entering any of these commands places you in PL/SQL mode, where
you can enter your PL/SQL subprogram (see also “Running PL/SQL
Blocks” in this chapter). When you are done typing your PL/SQL
subprogram, enter a period (.) on a line by itself to terminate PL/SQL
mode. To run the SQL command and create the stored procedure, you
must enter RUN or slash (/). A semicolon (;) will not execute these
CREATE commands.
When you use CREATE to create a stored procedure, a message appears
if there are compilation errors. To view these errors, you use SHOW
ERRORS. For example:
SQL> SHOW ERRORS PROCEDURE ASSIGNVL
See Chapter 6 for a description of the SHOW command.
2–8
SQL*Plus User’s Guide and Reference
To execute a PL/SQL statement that references a stored procedure, you
can use the EXECUTE command. EXECUTE runs the PL/SQL statement
that you enter immediately after the command. For example:
SQL> EXECUTE :ID := EMP_MANAGEMENT.GET_ID(’BLAKE’)
See Chapter 6 for a description of the EXECUTE command.
The SQL Buffer
The area where SQL*Plus stores your most recently entered SQL
command or PL/SQL block is called the SQL buffer. The command or
block remains there until you enter another. Thus, if you want to edit or
rerun the current SQL command or PL/SQL block, you may do so
without re-entering it. See Chapter 3 for details about editing or
rerunning a command or block stored in the buffer.
SQL*Plus does not store the semicolon or the slash you type to execute a
command in the SQL buffer.
Note: SQL*Plus commands are not stored in the SQL buffer.
Executing the Current
SQL Command or
PL/SQL Block from the
Command Prompt
You can run (or rerun) the current SQL command or PL/SQL block by
entering the RUN command or the slash (/) command at the command
prompt. The RUN command lists the SQL command or PL/SQL block
in the buffer before executing the command or block; the slash (/)
command simply runs the SQL command or PL/SQL block.
Running PL/SQL
Blocks
You can also use PL/SQL subprograms (called blocks) to manipulate
data in the database. See your PL/SQL User’s Guide and Reference for
information on individual PL/SQL statements.
To enter a PL/SQL subprogram in SQL*Plus, you need to be in PL/SQL
mode. You are placed in PL/SQL mode when
•
You type DECLARE or BEGIN at the SQL*Plus command
prompt. After you enter PL/SQL mode in this way, type the
remainder of your PL/SQL subprogram.
•
You type a SQL command (such as CREATE FUNCTION) that
creates a stored procedure. After you enter PL/SQL mode in this
way, type the stored procedure you want to create.
SQL*Plus treats PL/SQL subprograms in the same manner as SQL
commands, except that a semicolon (;) or a blank line does not terminate
and execute a block. Terminate PL/SQL subprograms by entering a
period (.) by itself on a new line.
Learning SQL*Plus Basics
2–9
SQL*Plus stores the subprograms you enter at the SQL*Plus command
prompt in the SQL buffer. Execute the current subprogram by issuing a
RUN or slash (/) command. Likewise, to execute a SQL CREATE
command that creates a stored procedure, you must also enter RUN or
slash (/). A semicolon (;) will not execute these SQL commands as it
does other SQL commands.
SQL*Plus sends the complete PL/SQL subprogram to Oracle for
processing (as it does SQL commands). See your PL/SQL User’s Guide
and Reference for more information.
You might enter and execute a PL/SQL subprogram as follows:
SQL>
2
3
4
5
6
7
8
9
10
11
12
13
SQL>
DECLARE
x
NUMBER := 100;
BEGIN
FOR i IN 1..10 LOOP
IF MOD (i, 2) = 0 THEN
––i is even
INSERT INTO temp VALUES (i, x, ’i is even’);
ELSE
INSERT INTO temp VALUES (i, x, ’i is odd’);
END IF;
x := x + 100;
END LOOP;
END;
.
/
PL/SQL procedure successfully completed.
When you run a subprogram, the SQL commands within the
subprogram may behave somewhat differently than they would outside
of the subprogram. See your PL/SQL User’s Guide and Reference for
detailed information on the PL/SQL language.
Running SQL*Plus
Commands
You can use SQL*Plus commands to manipulate SQL commands and
PL/SQL blocks and to format and print query results. SQL*Plus treats
SQL*Plus commands differently than SQL commands or PL/SQL
blocks. For information on individual SQL*Plus commands, refer to the
following chapters of this Guide.
To speed up command entry, you can abbreviate many SQL*Plus
commands to one or a few letters. Abbreviations for some SQL*Plus
commands are described along with the commands in Chapters 3, 4, and
5. For abbreviations of all SQL*Plus commands, refer to the command
descriptions in Chapter 6.
2–10
SQL*Plus User’s Guide and Reference
Example 2–4
Entering a SQL*Plus
Command
This example shows how you might enter a SQL*Plus command to
change the format used to display the column SAL of the sample table
EMP.
1.
On the command line, enter this SQL*Plus command:
SQL> COLUMN SAL FORMAT $99,999 HEADING SALARY
If you make a mistake, use [Backspace] to erase it and re-enter.
When you have entered the line, press [Return]. SQL*Plus notes the
new format and displays the SQL*Plus command prompt again,
ready for a new command.
2.
Enter the RUN command to re-run the most recent query (from
Example 2–3). SQL*Plus reprocesses the query and displays the
results:
SQL> RUN
1 SELECT EMPNO, ENAME, JOB, SAL
2* FROM EMP WHERE SAL < 2500
EMPNO ENAME
JOB
SALARY
–––––––– ––––––––––––– –––––––––– ––––––––
7369 SMITH
CLERK
$800
7499 ALLEN
SALESMAN
$1,600
7521 WARD
SALESMAN
$1,250
7654 MARTIN
SALESMAN
$1,250
7782 CLARK
MANAGER
$2,450
7844 TURNER
SALESMAN
$1,500
7876 ADAMS
CLERK
$1,100
7900 JAMES
CLERK
$800
7934 MILLER
CLERK
$1,300
The COLUMN command formatted the column SAL with a dollar sign
($) and a comma (,) and gave it a new heading. The RUN command then
reran the query of Example 2–3, which was stored in the buffer.
SQL*Plus does not store SQL*Plus commands in the SQL buffer.
Understanding SQL*Plus
Command Syntax
SQL*Plus commands have a different syntax from SQL commands or
PL/SQL blocks.
Continuing a Long SQL*Plus Command on Additional Lines You
can continue a long SQL*Plus command by typing a hyphen at the end
of the line and pressing [Return]. If you wish, you can type a space
before typing the hyphen. SQL*Plus displays a right angle-bracket (>) as
a prompt for each additional line. For example:
SQL> COLUMN SAL FORMAT $99,999 –
> HEADING SALARY
Learning SQL*Plus Basics
2–11
Ending a SQL*Plus Command You do not need to end a SQL*Plus
command with a semicolon. When you finish entering the command,
you can just press [Return]. If you wish, however, you can enter a
semicolon at the end of a SQL*Plus command.
Variables that Affect
Running Commands
The SQL*Plus command SET controls many variables—called system
variables—the settings of which affect the way SQL*Plus runs your
commands. System variables control a variety of conditions within
SQL*Plus, including default column widths for your output, whether
SQL*Plus displays the number of records selected by a command, and
your page size. System variables are also called SET command variables.
The examples in this Guide are based on running SQL*Plus with the
system variables at their default settings. Depending on the settings of
your system variables, your output may appear slightly different than
the output shown in the examples. (Your settings might differ from the
default settings if you have a SQL*Plus LOGIN file on your computer.)
For more information on system variables and their default settings, see
the SET command in Chapter 6. For details on the SQL*Plus LOGIN file,
refer to the section “Setting Up Your SQL*Plus Environment” under
“Saving Commands for Later Use” in Chapter 3 and to the SQLPLUS
command in Chapter 6.
To list the current setting of a SET command variable, enter SHOW
followed by the variable name at the command prompt. See the SHOW
command in Chapter 6 for information on other items you can list with
SHOW.
Saving Changes to the
Database
Automatically
Through the SQL DML commands UPDATE, INSERT, and
DELETE—which can be used independently or within a PL/SQL
block—specify changes you wish to make to the information stored in
the database. These changes are not made permanent until you enter a
SQL COMMIT command or a SQL DCL or DDL command (such as
CREATE TABLE), or use the autocommit feature. The SQL*Plus
autocommit feature causes pending changes to be committed after a
specified number of successful SQL DML transactions. (A SQL DML
transaction is either an UPDATE, INSERT, or DELETE command, or a
PL/SQL block.)
You control the autocommit feature with the SQL*Plus SET command’s
AUTOCOMMIT variable. It has these forms:
2–12
SET AUTOCOMMIT ON
Turns autocommit on.
SET AUTOCOMMIT OFF
Turns autocommit off (the default).
SET AUTOCOMMIT n
Commits changes after n SQL commands or
PL/SQL blocks.
SQL*Plus User’s Guide and Reference
Example 2–5
Turning Autocommit
On
To turn the autocommit feature on, enter
SQL> SET AUTOCOMMIT ON
Until you change the setting of AUTOCOMMIT, SQL*Plus will
automatically commit changes from each SQL command or PL/SQL
block that specifies changes to the database. After each autocommit,
SQL*Plus displays the following message:
commit complete
When the autocommit feature is turned on, you cannot roll back changes
to the database.
To commit changes to the database after a number of SQL DML
commands or PL/SQL blocks, for example, ten, enter
SQL> SET AUTOCOMMIT 10
SQL*Plus counts SQL DML commands and PL/SQL blocks as they are
executed and commits the changes after the tenth SQL DML command
or PL/SQL block.
Note: For this feature, a PL/SQL block is regarded as one
transaction, regardless of the actual number of SQL commands
contained within it.
To turn the autocommit feature off again, enter the following command:
SQL> SET AUTOCOMMIT OFF
To confirm that AUTOCOMMIT is now set to OFF, enter the following
SHOW command:
SQL> SHOW AUTOCOMMIT
autocommit OFF
For more information, see the AUTOCOMMIT variable of the SET
command in Chapter 6.
Stopping a Command
while It Is Running
Suppose you have displayed the first page of a 50 page report and
decide you do not need to see the rest of it. Press [Cancel]. (Refer to
Table 2 – 1 at the beginning of this chapter to see how [Cancel] is
labelled on your keyboard.) SQL*Plus will stop the display and return to
the command prompt.
Note: Pressing [Cancel] will not stop the printing of a file that
you have sent to a printer with the OUT clause of the SQL*Plus
SPOOL command. (You will learn about printing query results
in Chapter 4.) You can stop the printing of a file through your
operating system; see your operating system manuals for
information.
Learning SQL*Plus Basics
2–13
Collecting Timing
Statistics on
Commands You Run
Use the SQL*Plus command TIMING to collect and display data on the
amount of computer resources used to run one or more commands or
blocks. TIMING collects data for an elapsed period of time, saving the
data on commands run during the period in a timer. See TIMING in
Chapter 6 and the Oracle installation and user’s manuals provided for
your operating system for more information.
To delete all timers, enter CLEAR TIMING at the command prompt.
Running Host
Operating System
Commands
You can execute a host operating system command from the SQL*Plus
command prompt. This is useful when you want to perform a task such
as listing existing host operating system files.
To run a host operating system command, enter the SQL*Plus command
HOST followed by the host operating system command. For example,
this SQL*Plus command runs a host command, DIRECTORY *.SQL:
SQL> HOST DIRECTORY *.SQL
When the host command finishes running, the SQL*Plus command
prompt appears again.
Running SQL*Forms
Forms
If the RUNFORM option was enabled during SQL*Plus installation, you
can also run a SQL*Forms form from the SQL*Plus command prompt.
To run a form, enter the SQL*Plus command RUNFORM followed by
the form name:
SQL> RUNFORM myform
Getting Help
While you use SQL*Plus, you may find that you need to list column
definitions for a table, or start and stop the display that scrolls by. You
may also need to interpret error messages you receive when you enter a
command incorrectly or when there is a problem with Oracle or
SQL*Plus. The following sections describe how to get help for those
situations.
Listing a Table
Definition
Example 2–6
Using the DESCRIBE
Command
2–14
To see the definitions of each column in a given table, use the SQL*Plus
DESCRIBE command.
To list the column definitions of the three columns in the sample table
DEPT, enter
SQL> DESCRIBE DEPT
SQL*Plus User’s Guide and Reference
The following output results:
Name
Null?
Type
––––––––––––––––––––––––––––––– ––––––– ––––––––––
DEPTNO
NOT NULL NUMBER(2)
DNAME
CHAR(14)
LOC
CHAR(13)
Note: DESCRIBE accesses information in the Oracle data
dictionary. You can also use SQL SELECT commands to access
this and other information in the database. See your Oracle7
Server SQL Language Reference Manual for details.
Listing PL/SQL
Definitions
Example 2–7
Using the DESCRIBE
Command
To see the definition of a function or procedure, use the SQL*Plus
DESCRIBE command.
To list the definition of a function called AFUNC, enter
SQL> DESCRIBE afunc
The following output results:
FUNCTION afunc RETURNS NUMBER
Argument Name
Type
In/Out
Default?
––––––––––––––– –––––––– –––––––– –––––––––
F1
CHAR
IN
F2
NUMBER
IN
Controlling the
Display
Suppose that you wish to stop and examine the contents of the screen
while displaying a long report or the definition of a table with many
columns. Press [Pause]. (Refer to Table 2 – 1 to see how [Pause] is
labelled on your keyboard.) The display will pause while you examine
it. To continue, press [Resume].
If you wish, you can use the PAUSE variable of the SQL*Plus SET
command to have SQL*Plus pause after displaying each screen of a
query or report. Refer to SET in Chapter 6 for details.
Interpreting Error
Messages
Example 2–8
Interpreting an Error
Message
If SQL*Plus detects an error in a command, it will try to help you out by
displaying an error message.
For example, if you misspell the name of a table while entering a
command, an error message will tell you that the table or view does not
exist:
SQL> DESCRIBE DPT
Object does not exist.
Learning SQL*Plus Basics
2–15
You will often be able to figure out how to correct the problem from the
message alone. If you need further explanation, take one of the
following steps to determine the cause of the problem and how to
correct it:
2–16
•
If the error is a numbered error for the SQL*Plus COPY
command, look up the message in Appendix A of this Guide.
•
If the error is a numbered error beginning with the letters “ORA”,
look up the message in the Oracle7 Server Messages and Codes
manual or in the Oracle installation and user’s manual(s)
provided for your operating system to determine the cause of the
problem and how to correct it.
•
If the error is unnumbered, look up correct syntax for the
command that generated the error in Chapter 6 of this Guide for a
SQL*Plus command, in the Oracle7 Server SQL Language Reference
Manual for a SQL command, or in the PL/SQL User’s Guide and
Reference for a PL/SQL block. Otherwise, contact your DBA.
SQL*Plus User’s Guide and Reference
CHAPTER
3
Manipulating
Commands
T
his chapter helps you learn to manipulate SQL*Plus commands,
SQL commands, and PL/SQL blocks. It covers the following topics:
•
editing a SQL*Plus command
•
using SQL*Plus commands to list and modify the command
currently stored in the buffer
•
editing commands with a system editor
•
creating and modifying command files to hold commands for
later use
•
retrieving and running command files
•
saving SQL*Plus environment settings
•
writing interactive commands that include user variables and
substitution variables
•
passing parameters to a command file
•
using bind variables and REFCURSOR variables
•
tracing SQL statements
Read this chapter while sitting at your computer and try out the
examples shown. Before beginning, make sure you have access to the
sample tables described in Chapter 1.
Manipulating Commands
3–1
Editing Commands
Because SQL*Plus does not store SQL*Plus commands in the buffer, you
edit a SQL*Plus command entered directly to the command prompt by
using [Backspace] or by re-entering the command.
You can use a number of SQL*Plus commands to edit the SQL command
or PL/SQL block currently stored in the buffer. Alternatively, you can
use a host operating system editor to edit the buffer contents.
Table 3 – 1 shows several SQL*Plus commands that allow you to
examine or change the command in the buffer without re-entering the
command.
Command
Abbreviation
Purpose
APPEND text
A text
adds text at the end of a line
CHANGE /old/new
C /old/new
changes old to new in a line
CHANGE /text
C /text
deletes text from a line
CLEAR BUFFER
CL BUFF
deletes all lines
DEL
(none)
deletes the current line
DEL n
(none)
deletes line n
DEL *
(none)
deletes the current line
DEL LAST
(none)
deletes the last line
DEL m n
(none)
deletes a range of lines (m to n)
INPUT
I
adds one or more lines
INPUT text
I text
adds a line consisting of text
LIST
L
lists all lines in the SQL buffer
LIST n
L n
LIST *
L *
lists the current line
LIST LAST
L LAST
lists the last line
LIST m n
L m n
lists a range of lines (m to n)
or
n
lists line n
Table 3 – 1 SQL*Plus Editing Commands
You will find these commands useful if you mistype a command or wish
to modify a command you have entered.
3–2
SQL*Plus User’s Guide and Reference
Listing the Buffer
Contents
Example 3–1
Listing the Buffer
Contents
Any editing command other than LIST and DEL affects only a single
line in the buffer. This line is called the current line. It is marked with an
asterisk when you list the current command or block.
Suppose you want to list the current command. Use the LIST command
as shown below. (If you have EXITed SQL*Plus or entered another SQL
command or PL/SQL block since following the steps in Example 2–3,
perform the steps in that example again before continuing.)
SQL> LIST
1 SELECT EMPNO, ENAME, JOB, SAL
2* FROM EMP WHERE SAL < 2500
Notice that the semicolon you entered at the end of the SELECT
command is not listed. This semicolon is necessary to mark the end of
the command when you enter it, but SQL*Plus does not store it in the
SQL buffer. This makes editing more convenient, since it means you can
add a new line to the end of the buffer without removing a semicolon
from the line that was previously the last.
Editing the Current
Line
Example 3–2
Making an Error in
Command Entry
The SQL*Plus CHANGE command allows you to edit the current line.
Various actions determine which line is the current line:
•
LIST a given line to make it the current line.
•
When you LIST or RUN the command in the buffer, the last line
of the command becomes the current line. (Using the slash (/)
command to run the command in the buffer does not affect the
current line, however.)
•
If you get an error message, the line containing the error
automatically becomes the current line.
Suppose you try to select the DEPTNO column but mistakenly enter it
as DPTNO. Enter the following command, purposely misspelling
DEPTNO in the first line:
SQL> SELECT DPTNO, ENAME, SAL
2 FROM EMP
3 WHERE DEPTNO = 10;
You see this message on your screen:
SELECT DPTNO, ENAME, SAL
*
ERROR at line 1:
ORA–0904: invalid column name
Manipulating Commands
3–3
Examine the error message; it indicates an invalid column name in line 1
of the query. The asterisk shows the point of error—the mistyped
column DPTNO.
Instead of re-entering the entire command, you can correct the mistake
by editing the command in the buffer. The line containing the error is
now the current line. Use the CHANGE command to correct the
mistake. This command has three parts, separated by slashes or any
other non-alphanumeric character:
•
the word CHANGE or the letter C
•
the sequence of characters you want to change
•
the replacement sequence of characters
The CHANGE command finds the first occurrence in the current line of
the character sequence to be changed and changes it to the new
sequence. If you wish to re-enter an entire line, you do not need to use
the CHANGE command: re-enter the line by typing the line number
followed by a space and the new text and pressing [Return].
Example 3–3
Correcting the Error
To change DPTNO to DEPTNO, change the line with the CHANGE
command:
SQL> CHANGE /DPTNO/DEPTNO
The corrected line appears on your screen:
1* SELECT DEPTNO, ENAME, SAL
Now that you have corrected the error, you can use the RUN command
to run the command again:
SQL> RUN
SQL*Plus lists the command, and then runs it:
1 SELECT DEPTNO, ENAME, SAL
2 FROM
EMP
3* WHERE
DEPTNO = 10
DEPTNO ENAME
SALARY
––––––– –––––––––– –––––––
10 CLARK
$2,450
10 KING
$5,000
10 MILLER
$1,300
Note that the column SAL retains the format you gave it in Example 2–4.
(If you have left SQL*Plus and started again since performing Example
2–4, the column has reverted to its original format.)
3–4
SQL*Plus User’s Guide and Reference
For information about the significance of case in a CHANGE command
and on using wildcards to specify blocks of text in a CHANGE
command, refer to CHANGE in Chapter 6.
Adding a New Line
To insert a new line after the current line, use the INPUT command.
To insert a line before line 1, enter a zero (“0”) and follow the zero with
text. SQL*Plus inserts the line at the beginning of the buffer and that line
becomes line 1.
SQL> 0 SELECT EMPNO
Example 3–4
Adding a Line
Suppose you want to add a fourth line to the SQL command you
modified in Example 3–3. Since line 3 is already the current line, enter
INPUT (which may be abbreviated to I) and press [Return]. SQL*Plus
prompts you for the new line:
SQL> INPUT
4
Enter the new line. Then press [Return]. SQL*Plus prompts you again
for a new line:
4
5
ORDER BY SAL
Press [Return] again to indicate that you will not enter any more lines,
and then use RUN to verify and rerun the query.
Appending Text to a
Line
Example 3–5
Appending Text to a
Line
To add text to the end of a line in the buffer, use the APPEND command:
1.
Use the LIST command (or just the line number) to list the line you
want to change.
2.
Enter APPEND followed by the text you want to add. If the text you
want to add begins with a blank, separate the word APPEND from
the first character of the text by two blanks: one to separate
APPEND from the text, and one to go into the buffer with the text.
To append a space and the clause DESC to line 4 of the current query,
first list line 4:
SQL> LIST 4
4* ORDER BY SAL
Next, enter the following command (be sure to type two spaces between
APPEND and DESC):
SQL> APPEND DESC
4* ORDER BY SAL DESC
Manipulating Commands
3–5
Use RUN to verify and rerun the query.
Deleting Lines
To delete lines in the buffer, use the DEL command:
1.
Use the LIST command (or just the line numbers) to list the lines
you want to delete.
2.
Enter DEL with an optional clause.
Suppose you want to delete the current line to the last line inclusive. Use
the DEL command as shown below.
SQL> DEL * LAST
DEL makes the following line of the buffer (if any) the current line.
For more information, see DEL in Chapter 6.
Editing Commands
with a System Editor
Your host computer’s operating system has one or more text editors that
you can use to create and edit host system files. Text editors perform the
same general functions as the SQL*Plus editing commands, but you may
find them more familiar.
You can run your host operating system’s default text editor without
leaving SQL*Plus by entering the EDIT command:
SQL> EDIT
EDIT loads the contents of the buffer into your system’s default text
editor. You can then edit the text with the text editor’s commands. When
you tell the text editor to save edited text and then exit, the text is loaded
back into the buffer.
To load the buffer contents into a text editor other than the default, use
the SQL*Plus DEFINE command to define a variable, _EDITOR, to hold
the name of the editor. For example, to define the editor to be used by
EDIT as EDT, enter the following command:
SQL> DEFINE _EDITOR = EDT
You can also define the editor to be used by EDIT in your user or site
profile. See “Setting Up Your SQL*Plus Environment” in Chapter 3 and
DEFINE and EDIT in Chapter 6 for more information.
3–6
SQL*Plus User’s Guide and Reference
Saving Commands for Later Use
Through SQL*Plus, you can store one or more commands in a file, called
a command file. After you create a command file, you can retrieve, edit,
and run it. Use command files to save commands for use over time,
especially complex commands or PL/SQL blocks.
Storing Commands in
Command Files
You can store one or more SQL commands, PL/SQL blocks, and
SQL*Plus commands in command files. You create a command file
within SQL*Plus in one of three ways:
•
enter a command and save the contents of the buffer
•
use INPUT to enter commands and then save the buffer contents
•
use EDIT to create the file from scratch using a host system text
editor
Because SQL*Plus commands are not stored in the buffer, you must use
one of the latter two methods to save SQL*Plus commands.
Creating a Command File
by Saving the Buffer
Contents
To save the current SQL command or PL/SQL block for later use, enter
the SAVE command. Follow the command with a file name:
SQL> SAVE file_name
SQL*Plus adds the extension SQL to the filename to identify it as a SQL
query file. If you wish to save the command or block under a name with
a different file extension, type a period at the end of the filename,
followed by the extension you wish to use.
Note that within SQL*Plus, you separate the extension from the
filename with a period. Your operating system may use a different
character or a space to separate the filename and the extension.
Example 3–6
Saving the Current
Command
First, LIST the buffer contents to see your current command:
SQL>
1
2
3
4*
LIST
SELECT DEPTNO, ENAME, SAL
FROM EMP
WHERE DEPTNO = 10
ORDER BY SAL DESC
If the query shown is not in your buffer, re-enter the query now. Next,
enter the SAVE command followed by the filename DEPTINFO:
SQL> SAVE DEPTINFO
Created file DEPTINFO
Manipulating Commands
3–7
You can verify that the command file DEPTINFO exists by entering the
SQL*Plus HOST command followed by your host operating system’s
file listing command:
SQL> HOST your_host’s_file_listing_command
You can use the same method to save a PL/SQL block currently stored
in the buffer.
Creating a Command File
by Using INPUT and
SAVE
If you use INPUT to enter your commands, you can enter SQL*Plus
commands (as well as one or more SQL commands or PL/SQL blocks)
into the buffer. You must enter the SQL*Plus commands first, and the
SQL command(s) or PL/SQL block(s) last—just as you would if you
were entering the commands directly to the command prompt.
You can also store a set of SQL*Plus commands you plan to use with
many different queries by themselves in a command file.
Example 3–7
Saving Commands
Using INPUT and
SAVE
Suppose you have composed a query to display a list of salespeople and
their commissions. You plan to run it once a month to keep track of how
well each employee is doing. To compose and save the query using
INPUT, you must first clear the buffer:
SQL> CLEAR BUFFER
Next, use INPUT to enter the command (be sure not to type a semicolon
at the end of the command):
SQL>
1
2
3
4
5
6
7
INPUT
COLUMN ENAME HEADING SALESMAN
COLUMN SAL HEADING SALARY FORMAT $99,999
COLUMN COMM HEADING COMMISSION FORMAT $99,990
SELECT EMPNO, ENAME, SAL, COMM
FROM EMP
WHERE JOB = ’SALESMAN’
The zero at the end of the format model for the column COMM tells
SQL*Plus to display a zero instead of a blank when the value of COMM
is zero for a given row. Format models and the COLUMN command are
described in more detail in Chapter 4.
Now use the SAVE command to store your query in a file called SALES
with the extension SQL:
SQL> SAVE SALES
Created file SALES
3–8
SQL*Plus User’s Guide and Reference
Note that you do not type a semicolon at the end of the query; if you did
include a semicolon, SQL*Plus would attempt to run the buffer contents.
The SQL*Plus commands in the buffer would produce an error because
SQL*Plus expects to find only SQL commands in the buffer. You will
learn how to run a command file later in this chapter.
To input more than one SQL command, leave out the semicolons on all
the SQL commands. Then, use APPEND to add a semicolon to all but
the last command. (SAVE appends a slash to the end of the file
automatically; this slash tells SQL*Plus to run the last command when
you run the command file.)
To input more than one PL/SQL block, enter the blocks one after
another without including a period or a slash on a line between blocks.
Then, for each block except the last, list the last line of the block to make
it current and use INPUT in the following form to insert a slash on a line
by itself:
INPUT /
Creating Command Files
with a System Editor
You can also create a command file with a host operating system text
editor by entering EDIT followed by the name of the file, for example:
SQL> EDIT SALES
Like the SAVE command, EDIT adds the filename extension SQL to the
name unless you type a period and a different extension at the end of
the filename. When you save the command file with the text editor, it is
saved back into the same file.
You must include a semicolon at the end of each SQL command and a
period on a line by itself after each PL/SQL block in the file. (You can
include multiple SQL commands and PL/SQL blocks.)
When you create a command file using EDIT, you can also include
SQL*Plus commands at the end of the file. You cannot do this when you
create a command file using the SAVE command because SAVE appends
a slash to the end of the file. This slash would cause SQL*Plus to run the
command file twice, once upon reaching the semicolon at the end of the
last SQL command (or the slash after the last PL/SQL block) and once
upon reaching the slash at the end of the file.
Manipulating Commands
3–9
Placing Comments in
Command Files
You can enter comments in a command file in one of three ways:
•
using the SQL*Plus REMARK command
•
using the SQL comment delimiters, /* ... */
•
using ANSI/ISO (American National Standards
Institute/International Standards Organization) comments, ––
Anything that is identified in one of these ways as a comment is not
parsed or executed by SQL*Plus.
Note: You cannot enter a comment on the same line on which
you enter a semicolon.
Using the REMARK
Command
Use the REMARK command on a line by itself in the command file,
followed by comments on the same line. To continue the comments on
additional lines, enter additional REMARK commands. Do not place a
REMARK command between different lines of a single SQL command.
REMARK Commissions report
REMARK to be run monthly.
COLUMN ENAME HEADING SALESMAN
COLUMN SAL HEADING SALARY FORMAT $99,999
COLUMN COMM HEADING COMMISSION FORMAT $99,990
REMARK Includes only salesmen.
SELECT EMPNO, ENAME, SAL, COMM
FROM EMP
WHERE JOB = ’SALESMAN’
Using /*...*/
Enter the SQL comment delimiters, /*...*/, on separate lines in your
command file, on the same line as a SQL command, or on a line in a
PL/SQL block. The comments can span multiple lines, but cannot be
nested within one another:
/* Commissions report
to be run monthly. */
COLUMN ENAME HEADING SALESMAN
COLUMN SAL HEADING SALARY FORMAT $99,999
COLUMN COMM HEADING COMMISSION FORMAT $99,990
SELECT EMPNO, ENAME, SAL, COMM
FROM EMP
WHERE JOB = ’SALESMAN’ /* Includes only salesmen. */
If you enter a SQL comment directly at the command prompt, SQL*Plus
does not store the comment in the buffer.
3–10
SQL*Plus User’s Guide and Reference
Using ––
You can use ANSI/ISO “––” style comments within SQL statements,
PL/SQL blocks, or SQL*Plus commands. Since there is no ending
delimiter, the comment cannot span multiple lines. For PL/SQL and
SQL, enter the comment after a command on a line or on a line by itself:
–– Commissions report to be run monthly
DECLARE ––block for reporting monthly sales
For SQL*Plus commands, you can only include “––” style comments if
they are on a line by themselves. For example, these comments are legal:
––set maximum width for LONG to 777
SET LONG 777
–– set the heading for ENAME to be SALESMAN
COLUMN ENAME HEADING SALESMAN
These comments are illegal:
SET LONG 777 –– set maximum width for LONG to 777
SET –– set maximum width for LONG to 777 LONG 777
If you entered the following SQL*Plus command, it would be treated as
a comment and would not be executed:
–– SET LONG 777
Retrieving Command
Files
If you want to place the contents of a command file in the buffer, you
must retrieve the command from the file in which it is stored. You can
retrieve a command file using the SQL*Plus command GET.
Just as you can save a query from the buffer to a file with the SAVE
command, you can retrieve a query from a file to the buffer with the
GET command:
SQL> GET file_name
When appropriate to the operating system, SQL*Plus adds a period and
the extension SQL to the filename unless you type a period at the end of
the filename followed by a different extension.
Manipulating Commands
3–11
Example 3–8
Retrieving a
Command File
Suppose you need to retrieve the SALES file in a later session. You can
retrieve the file by entering the GET command. To retrieve the file
SALES, enter
SQL>
1
2
3
4
5
6*
GET SALES
COLUMN ENAME HEADING SALESMAN
COLUMN SAL HEADING SALARY FORMAT $99,999
COLUMN COMM HEADING COMMISSION FORMAT $99,990
SELECT EMPNO, ENAME, SAL, COMM
FROM EMP
WHERE JOB = ’SALESMAN’
SQL*Plus retrieves the contents of the file SALES with the extension
SQL into the SQL buffer and lists it on the screen. Then you can edit the
command further. If the file did not contain SQL*Plus commands, you
could also execute it with the RUN command.
Running Command
Files
The START command retrieves a command file and runs the
command(s) it contains. Use START to run a command file containing
SQL commands, PL/SQL blocks, and/or SQL*Plus commands. Follow
the word START with the name of the file:
START file_name
If the file has the extension SQL, you need not add the period and the
extension SQL to the filename.
Example 3–9
Running a
Command File
To retrieve and run the command stored in SALES.SQL, enter
SQL> START SALES
SQL*Plus runs the commands in the file SALES and displays the results
of the commands on your screen, formatting the query results according
to the SQL*Plus commands in the file:
EMPNO
––––––––––
7499
7521
7654
7844
SALESMAN
SALARY COMMISSION
–––––––––– –––––––– ––––––––––
ALLEN
$1,600
$300
WARD
$1,250
$500
MARTIN
$1,250
$1,400
TURNER
$1,500
$0
To see the commands as SQL*Plus “enters” them, you can set the ECHO
variable of the SET command to ON. The ECHO variable controls the
listing of the commands in command files run with the START, @ and
@@ commands. Setting the ECHO variable to OFF suppresses the listing.
3–12
SQL*Plus User’s Guide and Reference
You can also use the @ (“at” sign) command to run a command file:
SQL> @SALES
The @ command lists and runs the commands in the specified command
file in the same manner as START. SET ECHO affects the @ command as
it affects the START command.
START, @ and @@ leave the last SQL command or PL/SQL block in the
command file in the buffer.
Running a Command File
as You Start SQL*Plus
To run a command file as you start SQL*Plus, use one of the following
four options:
•
Follow the SQLPLUS command with your username, a slash,
your password, a space, @, and the name of the file:
SQLPLUS SCOTT/TIGER
@SALES
SQL*Plus starts and runs the command file.
•
Follow the SQLPLUS command and your username with a space,
@, and the name of the file:
SQLPLUS SCOTT
@SALES
SQL*Plus prompts you for your password, starts, and runs the
command file.
Nesting Command
Files
•
Include your username as the first line of the file. Follow the
SQLPLUS command with @ and the filename. SQL*Plus prompts
for your password, starts, and runs the file.
•
Include your username, a slash (/), and your password as the
first line of the file. Follow the SQLPLUS command with @ and
the filename. SQL*Plus starts and runs the file.
To run a series of command files in sequence, first create a command file
containing several START commands, each followed by the name of a
command file in the sequence. Then run the command file containing
the START commands. For example, you could include the following
START commands in a command filenamed SALESRPT:
START
START
START
START
START
Q1SALES
Q2SALES
Q3SALES
Q4SALES
YRENDSLS
Note: The @@ command may be useful in this example. See the
@@ command in Chapter 6 for more information.
Manipulating Commands
3–13
Modifying Command
Files
You can modify an existing command file in two ways:
•
using the EDIT command
•
using GET, the SQL*Plus editing commands, and SAVE
To edit an existing command file with the EDIT command, follow the
word EDIT with the name of the file. For example, to edit an existing
filenamed PROFIT that has the extension SQL, enter the following
command:
SQL> EDIT PROFIT
Remember that EDIT assumes the file extension SQL if you do not
specify one.
To edit an existing file using GET, the SQL*Plus editing commands, and
SAVE, first retrieve the file with GET, then edit the file with the
SQL*Plus editing commands, and finally save the file with the SAVE
command.
Note that if you want to replace the contents of an existing command file
with the command or block in the buffer, you must use the SAVE
command and follow the filename with the word REPLACE. For
example:
SQL> GET MYREPORT
1* SELECT * FROM EMP
SQL> C/*/ENAME, JOB
1* SELECT ENAME, JOB FROM EMP
SQL> SAVE MYREPORT REPLACE
Wrote file MYREPORT
If you want to append the contents of the buffer to the end of an existing
command file, use the SAVE command and follow the filename with the
word APPEND:
SQL> SAVE file_name APPEND
Exiting from a
Command File with a
Return Code
If your command file generates a SQL error while running from a batch
file on the host operating system, you may want to abort the command
file and exit with a return code. Use the SQL*Plus command
WHENEVER SQLERROR to do this; see WHENEVER SQLERROR in
Chapter 6 for more information.
Similarly, the WHENEVER OSERROR command may be used to exit if
an operating system error occurs. See WHENEVER OSERROR in
Chapter 6 for more information.
3–14
SQL*Plus User’s Guide and Reference
You may wish to set up your SQL*Plus environment in a particular way
Setting Up Your
SQL*Plus Environment (such as showing the current time as part of the SQL*Plus command
prompt) and then reuse those settings with each session. You can do this
through a host operating system file called LOGIN with the file
extension SQL (also called your User Profile). The exact name of this file
is system dependent; see the Oracle installation and user’s manual(s)
provided for your operating system for the precise name.
You can add any SQL commands, PL/SQL blocks, or SQL*Plus
commands to this file; when you start SQL*Plus, it automatically
searches for your LOGIN file (first in your local directory and then on a
system-dependent path) and runs the commands it finds there. (You
may also have a Site Profile, for example, GLOGIN.SQL. See the
SQLPLUS command in Chapter 6 for more information on the
relationship of Site and User Profiles.)
Modifying Your LOGIN
File
You can modify your LOGIN file just as you would any other command
file. You may wish to add some of the following commands to the
LOGIN file:
SET
COMPATIBILITY
Followed by V6 or V7, sets compatibility to the
version of Oracle you specify. Setting
COMPATIBILITY to V6 allows you to run
command files created with Version 6 of Oracle.
SET NUMFORMAT
Followed by a number format (such as $99,999), sets
the default format for displaying numbers in query
results.
SET PAGESIZE
Followed by a number, sets the number of lines per
page.
SET PAUSE
Followed by ON, causes SQL*Plus to pause at the
beginning of each page of output (SQL*Plus
continues scrolling after you enter [Return]).
Followed by text, sets the text to be displayed each
time SQL*Plus pauses (you must also set PAUSE to
ON).
SET TIME
Followed by ON, displays the current time before
each command prompt.
See the SET command in Chapter 6 for more information on these and
other SET command variables you may wish to set in your SQL*Plus
LOGIN file.
Storing and Restoring
SQL*Plus System
Variables
You can store the current SQL*Plus system (“SET”) variables in a host
operating system file (a command file) with the STORE command. If
you alter any variables, this command file can be run to restore the
Manipulating Commands
3–15
original values. This is useful if you run a report that alters system
variables and you want to reset their values after the report has finished.
To store the current setting of all system variables, enter
SQL> STORE SET file_name
By default, SQL*Plus adds the extension “SQL” to the file name. If you
want to use a different file extension, type a period at the end of the file
name, followed by the extension. Alternatively, you can use the SET
SUFFIX command to change the default file extension.
Restoring the System
Variables
To restore the stored system variables, enter
SQL> START file_name
If the file has the default extension (as specified by the SET SUFFIX
command), you do not need to add the period and extension to the file
name.
You can also use the @ (“at” sign) or the @@ (double “at” sign)
commands to run the command file.
Example 3–10
Storing and Restoring
SQL*Plus System
Variables
To store the current values of the SQL*Plus system variables in a new
command file “plusenv.sql”:
SQL> STORE SET plusenv
Created file plusenv
Now the value of any system variable can be changed:
SQL> SHOW PAGESIZE
pagesize 24
SQL> SET PAGESIZE 60
SQL> SHOW PAGESIZE
pagesize 60
The original values of the system variables can then be restored from the
command file:
SQL> START plusenv
SQL> SHOW PAGESIZE
pagesize 24
3–16
SQL*Plus User’s Guide and Reference
Writing Interactive Commands
The following features of SQL*Plus make it possible for you to set up
command files that allow end-user input:
Defining User
Variables
Example 3–11
Defining a User
Variable
•
defining user variables
•
substituting values in commands
•
using the START command to provide values
•
prompting for values
You can define variables, called user variables, for repeated use in a single
command file by using the SQL*Plus command DEFINE. Note that you
can also define user variables to use in titles and to save you keystrokes
(by defining a long string as the value for a variable with a short name).
To define a user variable EMPLOYEE and give it the value “SMITH”,
enter the following command:
SQL> DEFINE EMPLOYEE = SMITH
To confirm the definition of the variable, enter DEFINE followed by the
variable name:
SQL> DEFINE EMPLOYEE
SQL*Plus lists the definition:
DEFINE EMPLOYEE
= “SMITH” (CHAR)
To list all user variable definitions, enter DEFINE by itself at the
command prompt. Note that any user variable you define explicitly
through DEFINE takes only CHAR values (that is, the value you assign
to the variable is always treated as a CHAR datatype). You can define a
user variable of datatype NUMBER implicitly through the ACCEPT
command. You will learn more about the ACCEPT command later in
this chapter.
To delete a user variable, use the SQL*Plus command UNDEFINE
followed by the variable name.
Using Substitution
Variables
Suppose you want to write a query like the one in SALES (see Example
3–7) to list the employees with various jobs, not just those whose job is
SALESMAN. You could do that by editing a different CHAR value into
the WHERE clause each time you run the command, but there is an
easier way.
Manipulating Commands
3–17
By using a substitution variable in place of the value SALESMAN in the
WHERE clause, you can get the same results you would get if you had
written the values into the command itself.
A substitution variable is a user variable name preceded by one or two
ampersands (&). When SQL*Plus encounters a substitution variable in a
command, SQL*Plus executes the command as though it contained the
value of the substitution variable, rather than the variable itself.
For example, if the variable SORTCOL has the value JOB and the
variable MYTABLE has the value EMP, SQL*Plus executes the
commands
SQL>
SQL>
2
3
BREAK ON &SORTCOL
SELECT &SORTCOL, SAL
FROM &MYTABLE
ORDER BY &SORTCOL;
as if they were
SQL>
SQL>
2
3
BREAK ON JOB
SELECT JOB, SAL
FROM EMP
ORDER BY JOB;
(The BREAK command suppresses duplicate values of the column
named in SORTCOL; BREAK is discussed in Chapter 4.)
Where and How to Use
Substitution Variables
You can use substitution variables anywhere in SQL and SQL*Plus
commands, except as the first word entered at the command prompt.
When SQL*Plus encounters an undefined substitution variable in a
command, SQL*Plus prompts you for the value.
You can enter any string at the prompt, even one containing blanks and
punctuation. If the SQL command containing the reference should have
quote marks around the variable and you do not include them there, the
user must include the quotes when prompted.
SQL*Plus reads your response from the keyboard, even if you have
redirected terminal input or output to a file. If a terminal is not available
(if, for example, you run the command file in batch mode), SQL*Plus
uses the redirected file.
After you enter a value at the prompt, SQL*Plus lists the line containing
the substitution variable twice: once before substituting the value you
enter and once after substitution. You can suppress this listing by setting
the SET command variable VERIFY to OFF.
3–18
SQL*Plus User’s Guide and Reference
Example 3–12
Using Substitution
Variables
Create a command filenamed STATS, to be used to calculate a subgroup
statistic (the maximum value) on a numeric column:
SQL> CLEAR BUFFER
SQL> INPUT
1 SELECT
&GROUP_COL,
2
MAX(&NUMBER_COL) MAXIMUM
3 FROM
&TABLE
4 GROUP BY &GROUP_COL
5
SQL> SAVE STATS
Created file STATS
Now run the command file STATS and respond as shown below to the
prompts for values:
SQL>
Enter
old
new
Enter
old
new
Enter
old
new
Enter
old
new
@STATS
value for group_col: JOB
1: SELECT
&GROUP_COL,
1: SELECT
JOB,
value for number_col: SAL
2:
MAX(&NUMBER_COL) MAXIMUM
2:
MAX(SAL) MAXIMUM
value for table: EMP
3: FROM
&TABLE
3: FROM
EMP
value for group_col: JOB
4: GROUP BY &GROUP_COL
4: GROUP BY JOB
SQL*Plus displays the following output:
JOB
MAXIMUM
–––––––––– ––––––––––
ANALYST
3000
CLERK
1300
MANAGER
2975
PRESIDENT
5000
SALESMAN
1600
If you wish to append characters immediately after a substitution
variable, use a period to separate the variable from the character. For
example:
SQL> SELECT * FROM EMP WHERE EMPNO=’&X.01’;
Enter value for X: 123
Manipulating Commands
3–19
will be interpreted as
SQL> SELECT * FROM EMP WHERE EMPNO=’12301’;
Avoiding Unnecessary
Prompts for Values
Suppose you wanted to expand the file STATS to include the minimum,
sum, and average of the “number” column. You may have noticed that
SQL*Plus prompted you twice for the value of GROUP_COL and once
for the value of NUMBER_COL in Example 3–12, and that each
GROUP_COL or NUMBER_COL had a single ampersand in front of it.
If you were to add three more functions—using a single ampersand
before each—to the command file, SQL*Plus would prompt you a total
of four times for the value of the number column.
You can avoid being reprompted for the group and number columns by
adding a second ampersand in front of each GROUP_COL and
NUMBER_COL in STATS. SQL*Plus automatically DEFINEs any
substitution variable preceded by two ampersands, but does not
DEFINE those preceded by only one ampersand. When you have
DEFINEd a variable, SQL*Plus substitutes the value of variable for each
substitution variable referencing variable (in the form &variable or
&&variable). SQL*Plus will not prompt you for the value of variable in
this session until you UNDEFINE variable.
Example 3–13
Using Double
Ampersands
To expand the command file STATS using double ampersands and then
run the file, first suppress the display of each line before and after
substitution:
SQL> SET VERIFY OFF
Now retrieve and edit STATS by entering the following commands:
SQL>
1
2
3
4
SQL>
2*
SQL>
2*
SQL>
2*
SQL>
3i
4i
5i
6i
3–20
GET STATS
SELECT &GROUP_COL,
MAX(&NUMBER_COL) MAXIMUM
FROM
&TABLE
GROUP BY &GROUP_COL
2
MAX(&NUMBER_COL) MAXIMUM
APPEND ,
MAX(&NUMBER_COL) MAXIMUM,
C /&/&&
MAX(&&NUMBER_COL) MAXIMUM,
I
MIN(&&NUMBER_COL) MINIMUM,
SUM(&&NUMBER_COL) TOTAL,
AVG(&&NUMBER_COL) AVERAGE
SQL*Plus User’s Guide and Reference
SQL> 1
1* SELECT &GROUP_COL,
SQL> C /&/&&
1* SELECT &&GROUP_COL,
SQL> 7
7* GROUP BY &GROUP_COL
SQL> C /&/&&
7* GROUP BY &&GROUP_COL
SQL> SAVE STATS2
created file STATS2
Finally, run the command file STATS2 and respond to the prompts for
values as follows:
SQL> START STATS2
Enter value for group_col: JOB
Enter value for number_col: SAL
Enter value for table: EMP
SQL*Plus displays the following output:
JOB
MAXIMUM
MINIMUM
TOTAL
AVERAGE
–––––––––– –––––––––– –––––––––– –––––––––– –––––––––
ANALYST
3000
3000
6000
3000
CLERK
1300
800
4150
1037.5
MANAGER
2975
2450
8275 2758.33333
PRESIDENT
5000
5000
5000
5000
SALESMAN
1600
1250
5600
1400
Note that you were prompted for the values of NUMBER_COL and
GROUP_COL only once. If you were to run STATS2 again during the
current session, you would be prompted for TABLE (because its name
has a single ampersand and the variable is therefore not DEFINEd) but
not for GROUP_COL or NUMBER_COL (because their names have
double ampersands and the variables are therefore DEFINEd).
Before continuing, set the system variable VERIFY back to ON:
SQL> SET VERIFY ON
Restrictions
You cannot use substitution variables in the buffer editing commands,
APPEND, CHANGE, DEL, and INPUT, nor in other commands where
substitution would be meaningless, such as REMARK. The buffer
editing commands, APPEND, CHANGE, and INPUT, treat text
beginning with “&” or “&&” literally, as any other text string.
Manipulating Commands
3–21
System Variables
The following system variables, specified with the SQL*Plus SET
command, affect substitution variables:
SET DEFINE
Defines the substitution character (by default the
ampersand “&”) and turns substitution on and off.
SET ESCAPE
Defines an escape character you can use before the
substitution character. The escape character
instructs SQL*Plus to treat the substitution
character as an ordinary character rather than as a
request for variable substitution. The default escape
character is a backslash (\).
SET VERIFY ON
Lists each line of the command file before and after
substitution.
SET CONCAT
Defines the character that separates the name of a
substitution variable or parameter from characters
that immediately follow the variable or
parameter—by default the period (.).
Refer to SET in Chapter 6 for more information on these system
variables.
Passing Parameters
through the START
Command
You can bypass the prompts for values associated with substitution
variables by passing values to parameters in a command file through the
START command.
You do this by placing an ampersand (&) followed by a numeral in the
command file in place of a substitution variable. Each time you run this
command file, START replaces each &1 in the file with the first value
(called an argument) after START filename, then replaces each &2 with
the second value, and so forth.
For example, you could include the following commands in a command
file called MYFILE:
SELECT * FROM EMP
WHERE JOB=’&1’
AND SAL=&2
In the following START command, SQL*Plus would substitute CLERK
for &1 and 7900 for &2 in the command file MYFILE:
SQL> START MYFILE CLERK 7900
When you use arguments with the START command, SQL*Plus
DEFINEs each parameter in the command file with the value of the
appropriate argument.
3–22
SQL*Plus User’s Guide and Reference
Example 3–14
Passing Parameters
through START
To create a new command file based on SALES that takes a parameter
specifying the job to be displayed, enter
SQL> GET SALES
1 COLUMN ENAME HEADING SALESMAN
2 COLUMN SAL HEADING SALARY FORMAT $99,999
3 COLUMN COMM HEADING COMMISSION FORMAT $99,990
4 SELECT EMPNO, ENAME, SAL, COMM
5 FROM EMP
6* WHERE JOB = ’SALESMAN’
SQL> CHANGE /SALESMAN/&1
6* WHERE JOB = ’&1’
SQL> 1
1* COLUMN ENAME HEADING SALESMAN
SQL> CHANGE /SALESMAN/&1
1* COLUMN ENAME HEADING &1
SQL> SAVE ONEJOB
Created file ONEJOB
Now run the command with the parameter CLERK:
SQL> START ONEJOB CLERK
SQL*Plus lists the line of the SQL command that contains the parameter,
before and after replacing the parameter with its value, and then
displays the output:
old
new
3:
3:
EMPNO
–––––––––
7369
7876
7900
7934
WHERE JOB = ’&1’
WHERE JOB = ’CLERK’
CLERK
SALARY COMMISSION
–––––––––– –––––––––– ––––––––––
SMITH
$800
ADAMS
$1,100
JAMES
$950
MILLER
$1,300
You can use any number of parameters in a command file. Within a
command file, you can refer to each parameter any number of times,
and can include the parameters in any order.
Note: You cannot use parameters when you run a command
with RUN or slash (/). You must store the command in a
command file and run it with START or @.
Before continuing, return the column ENAME to its original heading by
entering the following command:
SQL> COLUMN ENAME CLEAR
Manipulating Commands
3–23
Communicating with
the User
Three SQL*Plus commands—PROMPT, ACCEPT, and PAUSE—help
you communicate with the end user. These commands enable you to
send messages to the screen and receive input from the user, including a
simple [Return]. You can also use PROMPT and ACCEPT to customize
the prompts for values SQL*Plus automatically generates for
substitution variables.
Prompting for and
Accepting User Variable
Values
Through PROMPT and ACCEPT, you can send messages to the end user
and accept values as end-user input. PROMPT simply displays a
message you specify on-screen; use it to give directions or information
to the user. ACCEPT prompts the user for a value and stores it in the
user variable you specify. Use PROMPT in conjunction with ACCEPT
when your prompt for the value spans more than one line.
Example 3–15
Prompting for and
Accepting Input
To direct the user to supply a report title and to store the input in the
variable MYTITLE for use in a subsequent query, first clear the buffer:
SQL> CLEAR BUFFER
Next, set up a command file as shown below:
SQL> INPUT
1 PROMPT Enter a title up to 30 characters long.
2 ACCEPT MYTITLE PROMPT ’Title: ’
3 TTITLE LEFT MYTITLE SKIP 2
4 SELECT * FROM DEPT
5
SQL> SAVE PROMPT1
Created file PROMPT1
The TTITLE command sets the top title for your report. This command
is covered in detail in Chapter 4.
Finally, run the command file, responding to the prompt for the title as
shown:
SQL> START PROMPT1
Enter a title up to 30 characters long.
Title: Department Report as of 1/1/95
SQL*Plus displays the following output:
Department
DEPTNO
––––––––––
10
20
30
40
3–24
SQL*Plus User’s Guide and Reference
Report as of 1/1/95
DNAME
LOC
–––––––––––––– –––––––––––––
ACCOUNTING
NEW YORK
RESEARCH
DALLAS
SALES
CHICAGO
OPERATIONS
BOSTON
Before continuing, turn the TTITLE command you entered in the
command file off as shown below:
SQL> TTITLE OFF
Customizing Prompts for
Substitution Variable
Values
Example 3–16
Using PROMPT and
ACCEPT in
Conjunction with
Substitution Variables
If you want to customize the prompt for a substitution variable value,
use PROMPT and ACCEPT in conjunction with the substitution
variable, as shown in the following example.
As you have seen in Example 3–15, SQL*Plus automatically generates a
prompt for a value when you use a substitution variable. You can
replace this prompt by including PROMPT and ACCEPT in the
command file with the query that references the substitution variable. To
create such a file, enter the commands shown:
SQL> CLEAR BUFFER
buffer cleared
SQL> INPUT
1 PROMPT Enter a valid employee number
2 PROMPT For example: 7123, 7456, 7890
3 ACCEPT ENUMBER NUMBER PROMPT ’Emp. no.:
4 SELECT ENAME, MGR, JOB, SAL
5 FROM EMP
6 WHERE EMPNO = &ENUMBER
7
SQL> SAVE PROMPT2
Created file PROMPT2
’
Next, run the command file. SQL*Plus prompts for the value of
ENUMBER using the text you specified with PROMPT and ACCEPT:
SQL> START PROMPT2
Enter a valid employee number
For example: 7123, 7456, 7890
Emp. No.:
Try entering characters instead of numbers to the prompt for “Emp.
No.”:
Emp. No.: ONE
“ONE” is not a valid number
Emp. No.:
Because you specified NUMBER after the variable name in the ACCEPT
command, SQL*Plus will not accept a non-numeric value. Now enter a
number:
Manipulating Commands
3–25
Emp. No.: 7521
old
3: WHERE EMPNO = &ENUMBER
new
3: WHERE EMPNO =
7521
SQL*Plus displays the following output:
ENAME
MGR JOB
SALARY
–––––––––– –––––––––– ––––––––– ––––––––––
WARD
7698 SALESMAN
$1,250
Sending a Message and
Accepting [Return] as
Input
If you want to display a message on the user’s screen and then have the
user enter [Return] after reading the message, use the SQL*Plus
command PAUSE. For example, you might include the following lines in
a command file:
PROMPT Before continuing, make sure you have your account
card.
PAUSE Press RETURN to continue.
Clearing the Screen
If you want to clear the screen before displaying a report (or at any other
time), include the SQL*Plus CLEAR command with its SCREEN clause
at the appropriate point in your command file, using the following
format:
CLEAR SCREEN
Before continuing to the next chapter, reset all columns to their original
formats and headings by entering the following command:
SQL> CLEAR COLUMNS
Using Bind Variables
Suppose that you want to be able to display the variables you use in
your PL/SQL subprograms in SQL*Plus or use the same variables in
multiple subprograms. If you declare a variable in a PL/SQL
subprogram, you cannot display that variable in SQL*Plus. Use a bind
variable in PL/SQL to access the variable from SQL*Plus.
Bind variables are variables you create in SQL*Plus and then reference
in PL/SQL. If you create a bind variable in SQL*Plus, you can use the
variable as you would a declared variable in your PL/SQL subprogram
and then access the variable from SQL*Plus. You can use bind variables
for such things as storing return codes or debugging your PL/SQL
subprograms.
3–26
SQL*Plus User’s Guide and Reference
Because bind variables are recognized by SQL*Plus, you can display
their values in SQL*Plus or reference them in other PL/SQL
subprograms that you run in SQL*Plus.
Creating Bind
Variables
You create bind variables in SQL*Plus with the VARIABLE command.
For example
VARIABLE ret_val NUMBER
This command creates a bind variable named ret_val with a datatype of
NUMBER. See VARIABLE in Chapter 6. (To list all of the bind variables
created in a session, type VARIABLE without any arguments.)
Referencing Bind
Variables
You reference bind variables in PL/SQL by typing a colon (:) followed
immediately by the name of the variable. For example
:ret_val := 1;
This command assigns a value to the bind variable named ret_val.
Displaying Bind
Variables
To display the value of a bind variable in SQL*Plus, you use the
SQL*Plus PRINT command. For example
PRINT ret_val
This command displays a bind variable named ret_val. See PRINT in
Chapter 6.
Example 3–17
Creating, Referencing,
and Displaying Bind
Variables
To declare a local bind variable named id with a datatype of NUMBER,
enter
VARIABLE id NUMBER
Next, put a value of “1” into the bind variable you have just created:
BEGIN
:id := 1;
END;
If you want to display a list of values for the bind variable named id,
enter
PRINT id
Try creating some new departments using the variable:
EXECUTE :id
EXECUTE :id
EXECUTE :id
EXECUTE :id
PRINT id
COMMIT
:=
:=
:=
:=
dept_management.new(’ACCOUNTING’,’NEW YORK’)
dept_management.new(’RESEARCH’,’DALLAS’)
dept_management.new(’SALES’,’CHICAGO’)
dept_management.new(’OPERATIONS’,’BOSTON’)
Manipulating Commands
3–27
Note: dept_management.new refers to a PL/SQL function,
“new”, in a package (dept_management). The function “new”
adds the department data to a table.
REFCURSOR Bind Variables
SQL*Plus REFCURSOR bind variables allow SQL*Plus to fetch and
format the results of a SELECT statement contained in a PL/SQL block.
REFCURSOR bind variables can also be used to reference PL/SQL
cursor variables in stored procedures. This allows you to store SELECT
statements in the database and reference them from SQL*Plus.
A REFCURSOR bind variable can also be returned from a stored
function.
Note: You must have Oracle7, Release 7.3 or above to assign the
return value of a stored function to a REFCURSOR variable.
Example 3–18
Creating, Referencing,
and Displaying
REFCURSOR Bind
Variables
To create, reference and display a REFCURSOR bind variable, first
declare a local bind variable of the REFCURSOR datatype
SQL> VARIABLE dept_sel REFCURSOR
Next, enter a PL/SQL block that uses the bind variable in an OPEN ...
FOR SELECT statement. This statement opens a cursor variable and
executes a query. See the PL/SQL User’s Guide and Reference for
information on the OPEN command and cursor variables.
In this example we are binding the SQL*Plus dept_sel bind variable to
the cursor variable.
SQL> BEGIN
2
OPEN :dept_sel FOR SELECT * FROM DEPT;
3 END;
4 /
PL/SQL procedure successfully completed.
The results from the SELECT statement can now be displayed in
SQL*Plus with the PRINT command.
SQL> PRINT
DEPTNO
––––––––––
10
20
30
40
3–28
SQL*Plus User’s Guide and Reference
dept_sel
DNAME
––––––––––––––
ACCOUNTING
RESEARCH
SALES
OPERATIONS
LOC
–––––––––––––
NEW YORK
DALLAS
CHICAGO
BOSTON
The PRINT statement also closes the cursor. To reprint the results, the
PL/SQL block must be executed again before using PRINT.
Example 3–19
Using REFCURSOR
Variables in Stored
Procedures
A REFCURSOR bind variable is passed as a parameter to a procedure.
The parameter has a REF CURSOR type. First, define the type.
SQL> CREATE OR REPLACE PACKAGE cv_types AS
2
TYPE DeptCurTyp is REF CURSOR RETURN dept%ROWTYPE;
3 END cv_types;
4 /
Package created.
Next, create the stored procedure containing an OPEN ... FOR SELECT
statement.
SQL> CREATE OR REPLACE PROCEDURE dept_rpt
2
(dept_cv IN OUT cv_types.DeptCurTyp) AS
3 BEGIN
4
OPEN dept_cv FOR SELECT * FROM DEPT;
5 END;
6 /
Procedure successfully completed.
Execute the procedure with a SQL*Plus bind variable as the parameter.
SQL> VARIABLE odcv REFCURSOR
SQL> EXECUTE dept_rpt(:odcv)
PL/SQL procedure successfully completed.
Now print the bind variable.
SQL> PRINT
DEPTNO
––––––––––
10
20
30
40
odcv
DNAME
––––––––––––––
ACCOUNTING
RESEARCH
SALES
OPERATIONS
LOC
–––––––––––––
NEW YORK
DALLAS
CHICAGO
BOSTON
The procedure can be executed multiple times using the same or a
different REFCURSOR bind variable.
SQL> VARIABLE pcv REFCURSOR
SQL> EXECUTE dept_rpt(:pcv)
PL/SQL procedure successfully completed.
SQL> PRINT pcv
DEPTNO DNAME
LOC
–––––––––– –––––––––––––– –––––––––––––
10 ACCOUNTING
NEW YORK
20 RESEARCH
DALLAS
Manipulating Commands
3–29
30 SALES
40 OPERATIONS
Example 3–20
Using REFCURSOR
Variables in Stored
Functions
CHICAGO
BOSTON
Create a stored function containing an OPEN ... FOR SELECT statement:
SQL> CREATE OR REPLACE FUNCTION dept_fn RETURN –
>
cv_types.DeptCurTyp IS
2
resultset cv_types.DeptCurTyp;
3 BEGIN
4
OPEN resultset FOR SELECT * FROM DEPT;
5
RETURN(resultset);
6 END;
7 /
Function created.
Execute the function.
SQL> VARIABLE rc REFCURSOR
SQL> EXECUTE :rc := dept_fn
PL/SQL procedure successfully completed.
Now print the bind variable.
SQL> PRINT rc
DEPTNO DNAME
–––––––––– ––––––––––––––
10 ACCOUNTING
20 RESEARCH
30 SALES
40 OPERATIONS
4 rows selected.
LOC
–––––––––––––
NEW YORK
DALLAS
CHICAGO
BOSTON
The function can be executed multiple times using the same or a
different REFCURSOR bind variable.
SQL> EXECUTE :rc := dept_fn
PL/SQL procedure successfully completed.
SQL> PRINT rc
DEPTNO DNAME
LOC
–––––––––– –––––––––––––– –––––––––––––
10 ACCOUNTING
NEW YORK
20 RESEARCH
DALLAS
30 SALES
CHICAGO
40 OPERATIONS
BOSTON
4 rows selected.
3–30
SQL*Plus User’s Guide and Reference
Tracing Statements
You can automatically get a report on the execution path used by the
SQL optimizer and the statement execution statistics. The report is
generated after successful SQL DML (that is, SELECT, DELETE,
UPDATE and INSERT) statements. It is useful for monitoring and
tuning the performance of these statements.
Controlling the Report You can control the report by setting the AUTOTRACE system variable.
SET AUTOTRACE OFF
SET AUTOTRACE ON EXPLAIN
SET AUTOTRACE ON STATISTICS
SET AUTOTRACE ON
SET AUTOTRACE TRACEONLY
No AUTOTRACE report is
generated. This is the default.
The AUTOTRACE report shows
only the optimizer execution path.
The AUTOTRACE report shows
only the SQL statement execution
statistics.
The AUTOTRACE report includes
both the optimizer execution path
and the SQL statement execution
statistics.
Like SET AUTOTRACE ON, but
suppresses the printing of the
user’s query output, if any.
To use this feature, you must have the PLUSTRACE role granted to you
and a PLAN_TABLE table created in your schema. For more
information on the PLUSTRACE role and PLAN_TABLE table, see the
AUTOTRACE variable of the SET command in Chapter 6.
Execution Plan
The Execution Plan shows the SQL optimizer’s query execution path.
Both tables are accessed by a full table scan, sorted, and then merged.
Each line of the Execution Plan has a sequential line number. SQL*Plus
also displays the line number of the parent operation.
The Execution Plan consists of four columns displayed in the following
order:
Manipulating Commands
3–31
Column Name
Description
ID_PLUS_EXP
PARENT_ID_PLUS_EXP
Shows the line number of each
execution step.
Shows the relationship between each
step and its parent. This column is
useful for large reports.
PLAN_PLUS_EXP
Shows each step of the report.
OBJECT_NODE_PLUS_EXP
Shows the database links or parallel
query servers used.
The format of the columns may be altered with the COLUMN
command. For example, to stop the PARENT_ID_PLUS_EXP column
being displayed, enter
SQL> COLUMN PARENT_ID_PLUS_EXP NOPRINT
The default formats can be found in the site profile (for example,
glogin.sql).
The Execution Plan output is generated using the EXPLAIN PLAN
command. For information about interpreting the output of EXPLAIN
PLAN, see the Oracle7 Server Tuning guide.
Statistics
The statistics are recorded by the server when your statement executes
and indicate the system resources required to execute your statement.
The client referred to in the statistics is SQL*Plus. SQL*Net refers to the
generic process communication between SQL*Plus and the server,
regardless of whether SQL*Net is installed.
You cannot change the default format of the statistics report.
For more information about the statistics and how to interpret them, see
the Oracle7 Server Tuning guide.
Example 3–21
Tracing Statements for
Performance Statistics
and Query Execution
Path
If the SQL buffer contains the following statement:
SQL> SELECT D.DNAME, E.ENAME, E.SAL, E.JOB
2 FROM EMP E, DEPT D
3 WHERE E.DEPTNO = D.DEPTNO
The statement can be automatically traced when it is run:
SQL> SET AUTOTRACE ON
SQL> /
3–32
SQL*Plus User’s Guide and Reference
DNAME
––––––––––––––
ACCOUNTING
ACCOUNTING
ACCOUNTING
RESEARCH
RESEARCH
RESEARCH
RESEARCH
RESEARCH
SALES
SALES
SALES
SALES
SALES
SALES
ENAME
SAL JOB
–––––––––– –––––––––– –––––––––
CLARK
2450 MANAGER
KING
5000 PRESIDENT
MILLER
1300 CLERK
SMITH
800 CLERK
ADAMS
1100 CLERK
FORD
3000 ANALYST
SCOTT
3000 ANALYST
JONES
2975 MANAGER
ALLEN
1600 SALESMAN
BLAKE
2850 MANAGER
MARTIN
1250 SALESMAN
JAMES
950 CLERK
TURNER
1500 SALESMAN
WARD
1250 SALESMAN
14 rows selected.
Execution Plan
–––––––––––––––––––––––––––––––––––––––––––––––––––––––––––
0
SELECT STATEMENT Optimizer=CHOOSE
1
0
MERGE JOIN
2
1
SORT (JOIN)
3
2
TABLE ACCESS (FULL) OF ’DEPT’
4
1
SORT (JOIN)
5
4
TABLE ACCESS (FULL) OF ’EMP’
Statistics
––––––––––––––––––––––––––––––––––––––––––––––––––––––––––
148 recursive calls
4 db block gets
24 consistent gets
6 physical reads
43 redo size
591 bytes sent via SQL*Net to client
256 bytes received via SQL*Net from client
3 SQL*Net roundtrips to/from client
2 sort (memory)
0 sort (disk)
14 rows processed
Note: Your output may vary depending on the version of the
server to which you are connected and the configuration of the
server.
Manipulating Commands
3–33
Example 3–22
Tracing Statements
Without Displaying
Query Data
To trace the same statement without displaying the query data:
SQL> SET AUTOTRACE TRACEONLY
SQL> /
Execution Plan
–––––––––––––––––––––––––––––––––––––––––––––––––––––––––––
0
SELECT STATEMENT Optimizer=CHOOSE
1
0
MERGE JOIN
2
1
SORT (JOIN)
3
2
TABLE ACCESS (FULL) OF ’DEPT’
4
1
SORT (JOIN)
5
4
TABLE ACCESS (FULL) OF ’EMP’
Statistics
–––––––––––––––––––––––––––––––––––––––––––––––––––––––––––
0 recursive calls
4 db block gets
2 consistent gets
0 physical reads
0 redo size
599 bytes sent via SQL*Net to client
256 bytes received via SQL*Net from client
3 SQL*Net roundtrips to/from client
2 sort (memory)
0 sort (disk)
14 rows processed
This option is useful when you are tuning a large query, but do not want
to see the query report.
Example 3–23
Tracing Statements
Using a Database Link
To trace a statement using a database link:
SQL> SET AUTOTRACE TRACEONLY EXPLAIN
SQL> SELECT * FROM EMP@MY_LINK;
Execution Plan
–––––––––––––––––––––––––––––––––––––––––––––––––––––––––––
0
SELECT STATEMENT (REMOTE) Optimizer=CHOOSE
1
0
TABLE ACCESS (FULL) OF ’EMP’ MY_LINK.DB_DOMAIN
The Execution Plan shows the table being accessed on line 1 is via the
database link MY_LINK.DB_DOMAIN.
Tracing Parallel and
Distributed Queries
3–34
When you trace a statement in a parallel or distributed query, the
Execution Plan shows the cost based optimizer estimates of the number
of rows (the cardinality). In general, the cost, cardinality and bytes at
SQL*Plus User’s Guide and Reference
each node represent cumulative results. For example, the cost of a join
node accounts for not only the cost of completing the join operations,
but also the entire costs of accessing the relations in that join.
Lines marked with an asterisk (*) denote a parallel or remote operation.
Each operation is explained in the second part of the report. See the
Oracle7 Server Tuning guide for more information on parallel and
distributed operations.
The second section of this report consists of three columns displayed in
the following order:
Column Name
Description
ID_PLUS_EXP
Shows the line number of each
execution step.
Describes the function of the SQL
statement in the OTHER_PLUS_EXP
column.
OTHER_TAG_PLUS_EXP
OTHER_PLUS_EXP
Shows the text of the query for the
parallel server or remote database.
The format of the columns may be altered with the COLUMN
command. The default formats can be found in the site profile (for
example, glogin.sql).
Note: You must have Oracle7, Release 7.3 or greater to view the
second section of this report.
Example 3–24
Tracing Statements
With Parallel Query
Option
To trace a parallel query running the parallel query option:
SQL> CREATE TABLE T2_T1 (UNIQUE1 NUMBER) PARALLEL –
>
(DEGREE 6);
Table created.
SQL> CREATE TABLE T2_T2 (UNIQUE1 NUMBER) PARALLEL –
>
(DEGREE 6);
Table created.
SQL> CREATE UNIQUE INDEX D2_I_UNIQUE1 ON D2_T1(UNIQUE1);
Index created.
SQL> SET LONG 500 LONGCHUNKSIZE 500
SQL> SET AUTOTRACE ON EXPLAIN
SQL> SELECT /*+ INDEX(B,D2_I_UNIQUE1) USE_NL(B) ORDERED –
Manipulating Commands
3–35
>
2
3
*/ COUNT (A.UNIQUE1)
FROM D2_T2 A, D2_T1 B
WHERE A.UNIQUE1 = B.UNIQUE1;
SQL*Plus displays the following output:
Execution Plan
–––––––––––––––––––––––––––––––––––––––––––––––––––––––––––
0
SELECT STATEMENT Optimizer=CHOOSE (Cost=1
Card=263 Bytes=5786)
1
0
SORT (AGGREGATE)
2
1
NESTED LOOPS* (Cost=1 Card=263 Bytes=5785)
:Q8200
3
2
TABLE ACCESS* (FULL) OF ’D2_T2’
:Q8200
4
2
INDEX* (UNIQUE SCAN) OF ’D2_I_UNIQUE1’
(UNIQUE)
:Q8200
2 PARALLEL_TO_SERIAL SELECT /*+ ORDERED NO_EXPAND
USE_NL(A2) IN DEX(A2) PIV_SSF */
COUNT(A1.C0) FROM (SELECT/*+
ROWID(A3) */ A3.”UNIQUE1” FROM
”D2_T2” A3 WHERE ROWID BETWEEN :1
AND :2) A1, ”D2_T1” A2 WHERE
A1.C0=A2.”UNIQUE1”
3 PARALLEL_COMBINED_WITH_PARENT
4 PARALLEL_COMBINED_WITH_PARENT
Line 0 of the Execution Plan shows the cost based optimizer estimates
the number of rows at 263, taking 5786 bytes. The total cost of the
statement is 1.
Lines 2, 3 and 4 are marked with asterisks, denoting parallel operations.
For example, the NESTED LOOPS step on line 2 is a
PARALLEL_TO_SERIAL operation. PARALLEL_TO_SERIAL
operations execute a SQL statement to produce output serially. Line 2
also shows that the parallel query server had the identifier Q8200.
3–36
SQL*Plus User’s Guide and Reference
CHAPTER
4
Formatting Query
Results
T
his chapter explains how to format your query results to produce a
finished report. This chapter covers the following topics:
•
changing column headings
•
formatting NUMBER, CHAR, VARCHAR2 (VARCHAR), LONG,
DATE, and Trusted Oracle columns
•
copying, listing, and resetting column display attributes
•
suppressing duplicate values and inserting space for clarity
•
calculating and printing summary lines (totals, averages,
minimums, maximums, and more)
•
listing and removing spacing and summary line definitions
•
setting page dimensions
•
placing titles at the top and bottom of each page
•
displaying column values and the current date or page number in
your titles
•
listing and suppressing page title definitions
•
placing headers and footers at the beginning and end of reports
•
sending query results to a file or printer
Formatting Query Results
4–1
Read this chapter while sitting at your computer and try out the
examples shown. Before beginning, make sure you have access to the
sample tables described in Chapter 1.
4–2
SQL*Plus User’s Guide and Reference
Formatting Columns
Through the SQL*Plus COLUMN command, you can change the
column headings and reformat the column data in your query results.
Changing Column
Headings
When displaying column headings, you can either use the default
heading or you can change it using the COLUMN command. The
sections below describe how the default headings are derived and how
you can alter them with the COLUMN command.
Default Headings
SQL*Plus uses column or expression names as default column headings
when displaying query results. Column names are often short and
cryptic, however, and expressions can be hard to understand.
Changing Default
Headings
You can define a more useful column heading with the HEADING
clause of the COLUMN command, in the format shown below:
COLUMN column_name HEADING column_heading
See the COLUMN command in Chapter 6 for more details.
Example 4–1
Changing a Column
Heading
To produce a report from EMP with new headings specified for
DEPTNO, ENAME, and SAL, enter the following commands:
SQL>
SQL>
SQL>
SQL>
SQL>
2
3
COLUMN DEPTNO HEADING Department
COLUMN ENAME HEADING Employee
COLUMN SAL HEADING Salary
COLUMN COMM HEADING Commission
SELECT DEPTNO, ENAME, SAL, COMM
FROM EMP
WHERE JOB = ’SALESMAN’;
SQL*Plus displays the following output:
Department
––––––––––
30
30
30
30
Employee
Salary Commission
–––––––––– –––––––––– ––––––––––
ALLEN
1600
300
WARD
1250
500
MARTIN
1250
1400
TURNER
1500
0
Note: The new headings will remain in effect until you enter
different headings, reset each column’s format, or exit from
SQL*Plus.
To change a column heading to two or more words, enclose the new
heading in single or double quotation marks when you enter the
COLUMN command. To display a column heading on more than one
line, use a vertical bar (|) where you want to begin a new line. (You can
Formatting Query Results
4–3
use a character other than a vertical bar by changing the setting of the
HEADSEP variable of the SET command. See SET in Chapter 6 for more
information.)
Example 4–2
Splitting a Column
Heading
To give the column ENAME the heading EMPLOYEE NAME and to
split the new heading onto two lines, enter
SQL> COLUMN ENAME HEADING ’Employee|Name’
Now rerun the query with the slash (/) command:
SQL> /
SQL*Plus displays the following output:
Department
––––––––––
30
30
30
30
Employee
Name
Salary Commission
–––––––––– –––––––––– ––––––––––
ALLEN
1600
300
WARD
1250
500
MARTIN
1250
1400
TURNER
1500
0
To change the character used to underline each column heading, set the
UNDERLINE variable of the SET command to the desired character.
Example 4–3
Setting the Underline
Character
To change the character used to underline headings to an equal sign and
rerun the query, enter the following commands:
SQL> SET UNDERLINE =
SQL> /
SQL*Plus displays the following results:
Department
==========
30
30
30
30
Employee
Name
Salary Commission
========== ========== ==========
ALLEN
1600
300
WARD
1250
500
MARTIN
1250
1400
TURNER
1500
0
Now change the underline character back to a dash:
SQL> SET UNDERLINE ’–’
Note: You must enclose the dash in quotation marks; otherwise,
SQL*Plus interprets the dash as a hyphen indicating you wish to
continue the command on another line.
4–4
SQL*Plus User’s Guide and Reference
Formatting NUMBER
Columns
When displaying NUMBER columns, you can either accept the
SQL*Plus default display width or you can change it using the
COLUMN command. The sections below describe the default display
and how you can alter the default with the COLUMN command.
Default Display
A NUMBER column’s width equals the width of the heading or the
width of the FORMAT plus one space for the sign, whichever is greater.
If you do not explicitly use FORMAT, then the column’s width will
always be at least the value of SET NUMWIDTH.
SQL*Plus normally displays numbers with as many digits as are
required for accuracy, up to a standard display width determined by the
value of the NUMWIDTH variable of the SET command (normally 10).
If a number is larger than the value of SET NUMWIDTH, SQL*Plus
rounds the number up or down to the maximum number of characters
allowed.
You can choose a different format for any NUMBER column by using a
format model in a COLUMN command. A format model is a
representation of the way you want the numbers in the column to
appear, using 9’s to represent digits.
Changing the Default
Display
The COLUMN command identifies the column you want to format and
the model you want to use, as shown below:
COLUMN column_name FORMAT model
Use format models to add commas, dollar signs, angle brackets (around
negative values), and/or leading zeros to numbers in a given column.
You can also round the values to a given number of decimal places,
display minus signs to the right of negative values (instead of to the
left), and display values in exponential notation.
To use more than one format model for a single column, combine the
desired models in one COLUMN command (see Example 4–4). For a
complete list of format models and further details, see the COLUMN
command in Chapter 6.
Example 4–4
Formatting a NUMBER
Column
To display SAL with a dollar sign, a comma, and the numeral zero
instead of a blank for any zero values, enter the following command:
SQL> COLUMN SAL FORMAT $99,990
Now rerun the current query:
SQL> /
SQL*Plus displays the following output:
Formatting Query Results
4–5
Department
––––––––––
30
30
30
30
Employee
Name
Salary Commission
–––––––––– –––––––––– ––––––––––
ALLEN
$1,600
300
WARD
$1,250
500
MARTIN
$1,250
1400
TURNER
$1,500
0
Use a zero in your format model, as shown above, when you use other
formats such as a dollar sign and wish to display a zero in place of a
blank for zero values.
Note: The format model will stay in effect until you enter a new
one, reset the column’s format, or exit from SQL*Plus.
Formatting CHAR,
VARCHAR2
(VARCHAR), LONG,
DATE, and Trusted
Oracle Columns
When displaying CHAR, VARCHAR2 (VARCHAR), LONG, DATE, and
Trusted Oracle columns, you can either accept the SQL*Plus default
display width or you can change it using the COLUMN command. The
sections below describe the defaults and how you can alter the defaults
with the COLUMN command.
Default Display
The default width of CHAR and VARCHAR2 (VARCHAR) columns is
the width of the column in the database. (VARCHAR2 requires Oracle7.)
The display width of LONG columns defaults to the value of the
LONGCHUNKSIZE variable of the SET command.
For Oracle7, the default width and format of unformatted DATE
columns in SQL*Plus is derived from the NLS parameters in effect.
Otherwise, the default format width is A9. With Oracle Version 6, the
default width for DATE columns is nine characters. For more
information on formatting DATE columns, see the FORMAT clause of
the COLUMN command in Chapter 6.
The default display width for the Trusted Oracle datatypes MLSLABEL
and RAW MLSLABEL is the width defined for the column in the
database or the width of the column heading, whichever is longer. (Note
that the default display width for a Trusted Oracle column named
ROWLABEL is 15.)
Note: The default justification for CHAR, VARCHAR2
(VARCHAR), LONG, DATE, and Trusted Oracle columns is left
justification.
Changing the Default
Display
4–6
You can change the displayed width of a CHAR, VARCHAR2
(VARCHAR), LONG, DATE, or Trusted Oracle column by using the
COLUMN command with a format model consisting of the letter A (for
SQL*Plus User’s Guide and Reference
alphanumeric) followed by a number representing the width of the
column in characters.
Within the COLUMN command, identify the column you want to
format and the model you want to use:
COLUMN column_name FORMAT model
If you specify a width shorter than the column heading, SQL*Plus
truncates the heading. If you specify a width for a LONG column,
SQL*Plus uses the LONGCHUNKSIZE or the specified width,
whichever is smaller, as the column width. See the COLUMN command
in Chapter 6 for more details.
Example 4–5
Formatting a Character
Column
To set the width of the column ENAME to four characters and rerun the
current query, enter
SQL> COLUMN ENAME FORMAT A4
SQL> /
SQL*Plus displays the results:
Empl
Department Name
Salary Commission
–––––––––– –––– –––––––––– ––––––––––
30 ALLE
$1,600
300
N
30
30
WARD
MART
IN
$1,250
$1,250
500
1400
30
TURN
ER
$1,500
0
Note: The format model will stay in effect until you enter a new
one, reset the column’s format, or exit from SQL*Plus. ENAME
could be a CHAR or VARCHAR2 (VARCHAR) column.
If the WRAP variable of the SET command is set to ON (its default
value), the employee names wrap to the next line after the fourth
character, as shown in Example 4–5. If WRAP is set to OFF, the names
are truncated (cut off) after the fourth character.
The system variable WRAP controls all columns; you can override the
setting of WRAP for a given column through the WRAPPED,
WORD_WRAPPED, and TRUNCATED clauses of the COLUMN
command. See COLUMN in Chapter 6 for more information on these
Formatting Query Results
4–7
clauses. You will use the WORD_WRAPPED clause of COLUMN later
in this chapter.
Note: The column heading is truncated regardless of the setting
of WRAP or any COLUMN command clauses.
Now return the column to its previous format:
SQL> COLUMN ENAME FORMAT A10
Copying Column
Display Attributes
Example 4–6
Copying a Column’s
Display Attributes
When you want to give more than one column the same display
attributes, you can reduce the length of the commands you must enter
by using the LIKE clause of the COLUMN command. The LIKE clause
tells SQL*Plus to copy the display attributes of a previously defined
column to the new column, except for changes made by other clauses in
the same command.
To give the column COMM the same display attributes you gave to SAL,
but to specify a different heading, enter the following command:
SQL> COLUMN COMM LIKE SAL HEADING Bonus
Rerun the query:
SQL> /
SQL*Plus displays the following output:
Department
––––––––––
30
30
30
30
Listing and Resetting
Column Display
Attributes
Employee
Name
Salary
Bonus
–––––––––– –––––––––– ––––––––––
ALLEN
$1,600
$300
WARD
$1,250
$500
MARTIN
$1,250
$1,400
TURNER
$1,500
$0
To list the current display attributes for a given column, use the
COLUMN command followed by the column name only, as shown
below:
COLUMN column_name
To list the current display attributes for all columns, enter the COLUMN
command with no column names or clauses after it:
COLUMN
To reset the display attributes for a column to their default values, use
the CLEAR clause of the COLUMN command as shown below:
COLUMN column_name CLEAR
4–8
SQL*Plus User’s Guide and Reference
To reset the attributes for all columns, use the COLUMNS clause of the
CLEAR command.
Example 4–7
Resetting Column
Display Attributes to
their Defaults
To reset all columns’ display attributes to their default values, enter the
following command:
SQL> CLEAR COLUMNS
columns cleared
You may wish to place the command CLEAR COLUMNS at the
beginning of every command file to ensure that previously entered
COLUMN commands will not affect queries you run in a given file.
Suppressing and
Restoring Column
Display Attributes
You can suppress and restore the display attributes you have given a
specific column. To suppress a column’s display attributes, enter a
COLUMN command in the following form:
COLUMN column_name OFF
The OFF clause tells SQL*Plus to use the default display attributes for
the column, but does not remove the attributes you have defined
through the COLUMN command. To restore the attributes you defined
through COLUMN, use the ON clause:
COLUMN column_name ON
Printing a Line of
Characters after
Wrapped Column
Values
As you have seen, by default SQL*Plus wraps column values to
additional lines when the value does not fit within the column width. If
you want to insert a record separator (a line of characters or a blank line)
after each wrapped line of output (or after every row), use the RECSEP
and RECSEPCHAR variables of the SET command.
RECSEP determines when the line of characters is printed: you set
RECSEP to EACH to print after every line, to WRAPPED to print after
wrapped lines, and to OFF to suppress printing. The default setting of
RECSEP is WRAPPED.
RECSEPCHAR sets the character printed in each line. You can set
RECSEPCHAR to any character.
You may wish to wrap whole words to additional lines when a column
value wraps to additional lines. To do so, use the WORD_WRAPPED
clause of the COLUMN command as shown below:
COLUMN column_name WORD_WRAPPED
Formatting Query Results
4–9
Example 4–8
Printing a Line of
Characters after
Wrapped Column
Values
To print a line of dashes after each wrapped column value, enter the
following commands:
SQL> SET RECSEP WRAPPED
SQL> SET RECSEPCHAR ’–’
Now restrict the width of the column LOC and tell SQL*Plus to wrap
whole words to additional lines when necessary:
SQL> COLUMN LOC FORMAT A7 WORD_WRAPPED
Finally, enter and run the following query:
SQL> SELECT * FROM DEPT;
SQL*Plus displays the results:
DEPTNO DNAME
LOC
–––––––––– ––––––––––––––– ––––––––––
10 ACCOUNTING
NEW
YORK
–––––––––––––––––––––––––––––––––––––––––––––––––
20 RESEARCH
DALLAS
30 SALES
CHICAGO
40 OPERATIONS
BOSTON
If you set RECSEP to EACH, SQL*Plus prints a line of characters after
every row (after every department, for the above example).
Before continuing, set RECSEP to OFF to suppress the printing of record
separators:
SQL> SET RECSEP OFF
Clarifying Your Report with Spacing and Summary Lines
When you use an ORDER BY clause in your SQL SELECT command,
rows with the same value in the ordered column (or expression) are
displayed together in your output. You can make this output more
useful to the user by using the SQL*Plus BREAK and COMPUTE
commands to create subsets of records and add space and/or summary
lines after each subset.
The column you specify in a BREAK command is called a break column.
By including the break column in your ORDER BY clause, you create
meaningful subsets of records in your output. You can then add
formatting to the subsets within the same BREAK command, and add a
4–10
SQL*Plus User’s Guide and Reference
summary line (containing totals, averages, and so on) by specifying the
break column in a COMPUTE command.
For example, the following query, without BREAK or COMPUTE
commands,
SQL>
2
3
4
SELECT DEPTNO, ENAME, SAL
FROM EMP
WHERE SAL < 2500
ORDER BY DEPTNO;
produces the following unformatted results:
DEPTNO
––––––––
10
10
20
20
30
30
30
30
30
ENAME
––––––––––
CLARK
MILLER
SMITH
ADAMS
ALLEN
JAMES
TURNER
WARD
MARTIN
SAL
–––––––––
2450
1300
800
1100
1600
950
1500
1250
1250
To make this report more useful, you would use BREAK to establish
DEPTNO as the break column. Through BREAK you could suppress
duplicate values in DEPTNO and place blank lines or begin a new page
between departments. You could use BREAK in conjunction with
COMPUTE to calculate and print summary lines containing the total
(and/or average, maximum, minimum, standard deviation, variance, or
count of rows of) salary for each department and for all departments.
Suppressing Duplicate The BREAK command suppresses duplicate values by default in the
column or expression you name. Thus, to suppress the duplicate values
Values in Break
in a column specified in an ORDER BY clause, use the BREAK
Columns
command in its simplest form:
BREAK ON break_column
Note: Whenever you specify a column or expression in a
BREAK command, use an ORDER BY clause specifying the
same column or expression. If you do not do this, the breaks
may appear to occur randomly.
Formatting Query Results
4–11
Example 4–9
Suppressing Duplicate
Values in a Break
Column
To suppress the display of duplicate department numbers in the query
results shown above, enter the following commands:
SQL>
SQL>
2
3
4
BREAK ON DEPTNO
SELECT DEPTNO, ENAME, SAL
FROM EMP
WHERE SAL < 2500
ORDER BY DEPTNO;
SQL*Pus displays the following output:
DEPTNO ENAME
SAL
–––––––––– ––––––––––– –––––––––
10 CLARK
2450
MILLER
1300
20 SMITH
800
ADAMS
1100
30 ALLEN
1600
JAMES
950
TURNER
1500
WARD
1250
MARTIN
1250
Inserting Space when a You can insert blank lines or begin a new page each time the value
Break Column’s Value changes in the break column. To insert n blank lines, use the BREAK
command in the following form:
Changes
BREAK ON break_column SKIP n
To skip a page, use the command in this form:
BREAK ON break_column SKIP PAGE
Example 4–10
Inserting Space when a
Break Column’s Value
Changes
To place one blank line between departments, enter the following
command:
SQL> BREAK ON DEPTNO SKIP 1
Now rerun the query:
SQL> /
4–12
SQL*Plus User’s Guide and Reference
SQL*Plus displays the results:
DEPTNO ENAME
SAL
–––––––––– ––––––––––– –––––––––
10 CLARK
2450
MILLER
1300
Inserting Space after
Every Row
20 SMITH
ADAMS
800
1100
30 ALLEN
JAMES
TURNER
WARD
MARTIN
1600
950
1500
1250
1250
You may wish to insert blank lines or a blank page after every row. To
skip n lines after every row, use BREAK in the following form:
BREAK ON ROW SKIP n
To skip a page after every row, use
BREAK ON ROW SKIP PAGE
Note: SKIP PAGE does not cause a physical page break unless
you have also specified NEWPAGE 0.
Using Multiple
Spacing Techniques
Example 4–11
Combining Spacing
Techniques
Suppose you have more than one column in your ORDER BY clause and
wish to insert space when each column’s value changes. Each BREAK
command you enter replaces the previous one. Thus, if you want to use
different spacing techniques in one report or insert space after the value
changes in more than one ordered column, you must specify multiple
columns and actions in a single BREAK command.
First, add another column to the current query:
SQL>
1
2
3
4*
SQL>
SQL>
L
SELECT DEPTNO, ENAME, SAL
FROM EMP
WHERE SAL < 2500
ORDER BY DEPTNO
1 SELECT DEPTNO, JOB, ENAME, SAL
4 ORDER BY DEPTNO, JOB
Formatting Query Results
4–13
Now, to skip a page when the value of DEPTNO changes and one line
when the value of JOB changes, enter the following command:
SQL> BREAK ON DEPTNO SKIP PAGE ON JOB SKIP 1
To show that SKIP PAGE has taken effect, create a TTITLE with a page
number, enter
SQL> TTITLE COL 35 FORMAT 9 ’Page:’ SQL.PNO
Run the new query to see the results:
SQL> /
Page: 1
DEPTNO JOB
ENAME
SAL
–––––––––– ––––––––– –––––––––– ––––––––––
10 CLERK
MILLER
300
MANAGER
CLARK
2450
Page: 2
DEPTNO JOB
ENAME
SAL
–––––––––– ––––––––– –––––––––– ––––––––––
20 CLERK
SMITH
800
ADAMS
1100
Page: 3
DEPTNO JOB
ENAME
SAL
–––––––––– ––––––––– –––––––––– ––––––––––
30 CLERK
JAMES
950
SALESMAN
4–14
SQL*Plus User’s Guide and Reference
ALLEN
TURNER
WARD
MARTIN
1600
1500
1250
1250
Listing and Removing
Break Definitions
You can list your current break definition by entering the BREAK
command with no clauses:
BREAK
You can remove the current break definition by entering the CLEAR
command with the BREAKS clause:
CLEAR BREAKS
You may wish to place the command CLEAR BREAKS at the beginning
of every command file to ensure that previously entered BREAK
commands will not affect queries you run in a given file.
Computing Summary
Lines when a Break
Column’s Value
Changes
If you organize the rows of a report into subsets with the BREAK
command, you can perform various computations on the rows in each
subset. You do this with the functions of the SQL*Plus COMPUTE
command. Use the BREAK and COMPUTE commands together in the
following forms:
BREAK ON break_column
COMPUTE function LABEL label_name OF column column column
... ON break_column
You can include multiple break columns and actions, such as skipping
lines in the BREAK command, as long as the column you name after ON
in the COMPUTE command also appears after ON in the BREAK
command. To include multiple break columns and actions in BREAK
when using it in conjunction with COMPUTE, use these commands in
the following forms:
BREAK ON break_column_1 SKIP PAGE ON break_column_2 SKIP 1
COMPUTE function LABEL label_name OF column column column
... ON break_column_2
The COMPUTE command has no effect without a corresponding
BREAK command.
You can COMPUTE on NUMBER columns and, in certain cases, on all
types of columns. See COMPUTE in Chapter 6 for details.
Formatting Query Results
4–15
The following table lists compute functions and their effects:
Function
Effect
SUM
Computes the sum of the values in the column.
MINIMUM
Computes the minimum value in the column.
MAXIMUM
Computes the maximum value in the column.
AVG
Computes the average of the values in the column.
STD
Computes the standard deviation of the values in the
column.
VARIANCE
Computes the variance of the values in the column.
COUNT
Computes the number of non-null values in the column.
NUMBER
Computes the number of rows in the column.
Table 4 – 1 Compute Functions
The function you specify in the COMPUTE command applies to all
columns you enter after OFF and before ON. The computed values print
on a separate line when the value of the ordered column changes.
Labels for ON REPORT and ON ROW computations appear in the first
column; otherwise, they appear in the column specified in the ON
clause.
You can change the compute label by using COMPUTE LABEL. If you
do not define a label for the computed value, SQL*Plus prints the
unabbreviated function keyword.
The compute label can be suppressed by using the NOPRINT option of
the COLUMN command on the break column. See the COMPUTE
command in Chapter 6 for more details.
Example 4–12
Computing and
Printing Subtotals
To compute the total of SAL by department, first list the current BREAK
definition:
SQL> BREAK
break on DEPTNO skip 0 page nodup
on JOB skip 1 nodup
Now enter the following COMPUTE command and run the current
query:
SQL> COMPUTE SUM OF SAL ON DEPTNO
SQL> /
4–16
SQL*Plus User’s Guide and Reference
SQL*Plus displays the following output:
DEPTNO JOB
ENAME
SAL
–––––––––– ––––––––– –––––––––– ––––––––––
10 CLERK
MILLER
1300
MANAGER
CLARK
********** *********
sum
2450
––––––––––
3750
DEPTNO JOB
ENAME
SAL
–––––––––– ––––––––– –––––––––– ––––––––––
20 CLERK
SMITH
800
ADAMS
1100
********** *********
––––––––––
sum
1900
DEPTNO JOB
ENAME
SAL
–––––––––– ––––––––– –––––––––– ––––––––––
30 CLERK
JAMES
950
SALESMAN
********** *********
sum
ALLEN
TURNER
WARD
MARTIN
1600
1500
1250
1250
––––––––––
6550
To compute the sum of salaries for departments 10 and 20 without
printing the compute label:
SQL>
SQL>
SQL>
SQL>
2
3
4
COLUMN DUMMY NOPRINT
COMPUTE SUM OF SAL ON DUMMY
BREAK ON DUMMY SKIP 1
SELECT DEPTNO DUMMY, DEPTNO, ENAME, SAL
FROM EMP
WHERE DEPTNO <= 20
ORDER BY DEPTNO;
Formatting Query Results
4–17
SQL*Plus displays the following output:
DEPTNO
––––––––––
10
10
10
20
20
20
20
20
ENAME
SAL
–––––––––– ––––––––––
KING
5000
CLARK
2450
MILLER
1300
––––––––––
8750
JONES
FORD
SMITH
SCOTT
ADAMS
2975
3000
800
3000
1100
––––––––––
10875
To compute the salaries at the end of the report:
SQL>
SQL>
SQL>
SQL>
2
3
4
COLUMN DUMMY NOPRINT
COMPUTE SUM OF SAL ON DUMMY
BREAK ON DUMMY
SELECT NULL DUMMY, DEPTNO, ENAME, SAL
FROM EMP
WHERE DEPTNO <= 20
ORDER BY DEPTNO;
SQL*Plus displays the following output:
DEPTNO
––––––––––
10
10
10
20
20
20
20
20
ENAME
SAL
–––––––––– ––––––––––
KING
5000
CLARK
2450
MILLER
1300
JONES
2975
FORD
3000
SMITH
800
SCOTT
3000
ADAMS
1100
––––––––––
19625
Note: The format of the column SAL controls the appearance of
the sum of SAL, as well as the individual values of SAL. When
you establish the format of a NUMBER column, you must allow
for the size of sums you will include in your report.
4–18
SQL*Plus User’s Guide and Reference
Computing Summary
Lines at the End of the
Report
Example 4–13
Computing and
Printing a Grand Total
You can calculate and print summary lines based on all values in a
column by using BREAK and COMPUTE in the following forms:
BREAK ON REPORT
COMPUTE function LABEL label_name OF column column column
... ON REPORT
To calculate and print the grand total of salaries for all salesmen and
change the compute label, first enter the following BREAK and
COMPUTE commands:
SQL> BREAK ON REPORT
SQL> COMPUTE SUM LABEL TOTAL OF SAL ON REPORT
Next, enter and run a new query:
SQL> SELECT ENAME, SAL
2 FROM EMP
3 WHERE JOB = ’SALESMAN’;
SQL*Plus displays the results:
ENAME
SAL
–––––––––– ––––––––
ALLEN
1600
WARD
1250
MARTIN
1250
TURNER
1500
********** ––––––––
TOTAL
5600
To print a grand total (or grand average, grand maximum, and so on) in
addition to subtotals (or sub-averages, and so on), include a break
column and an ON REPORT clause in your BREAK command. Then,
enter one COMPUTE command for the break column and another to
compute ON REPORT:
BREAK ON break_column ON REPORT
COMPUTE function LABEL label_name OF column ON break_column
COMPUTE function LABEL label_name OF column ON REPORT
Computing Multiple
Summary Values and
Lines
You can compute and print the same type of summary value on different
columns. To do so, enter a separate COMPUTE command for each
column.
Formatting Query Results
4–19
Example 4–14
Computing the Same
Type of Summary
Value on Different
Columns
To print the total of salaries and commissions for all salesmen, first enter
the following COMPUTE command:
SQL> COMPUTE SUM OF SAL COMM ON REPORT
You do not have to enter a BREAK command; the BREAK you entered in
Example 4–13 is still in effect. Now, add COMM to the current query:
SQL> 1 SELECT ENAME, SAL, COMM
Finally, run the revised query to see the results:
SQL> /
ENAME
SAL
COMM
–––––––––– –––––––– ––––––––––
ALLEN
1600
300
WARD
1250
500
MARTIN
1250
1400
TURNER
1500
0
********** –––––––– ––––––––––
sum
5600
2200
You can also print multiple summary lines on the same break column.
To do so, include the function for each summary line in the COMPUTE
command as follows:
COMPUTE function LABEL label_name function
LABEL label_name function LABEL label_name ...
OF column ON break_column
If you include multiple columns after OFF and before ON, COMPUTE
calculates and prints values for each column you specify.
Example 4–15
Computing Multiple
Summary Lines on the
Same Break Column
To compute the average and sum of salaries for the sales department,
first enter the following BREAK and COMPUTE commands:
SQL> BREAK ON DEPTNO
SQL> COMPUTE AVG SUM OF SAL ON DEPTNO
Now, enter and run the following query:
SQL>
2
3
4
4–20
SELECT DEPTNO, ENAME, SAL
FROM EMP
WHERE DEPTNO = 30
ORDER BY DEPTNO, SAL;
SQL*Plus User’s Guide and Reference
SQL*Plus displays the results:
DEPTNO ENAME
SAL
–––––––––– –––––––––– ––––––––––
30 JAMES
950
WARD
1250
MARTIN
1250
TURNER
1500
ALLEN
1600
BLAKE
2850
**********
––––––––––
avg
1566.66667
sum
9400
Listing and Removing You can list your current COMPUTE definitions by entering the
COMPUTE Definitions COMPUTE command with no clauses:
COMPUTE
You can remove all the COMPUTE definitions by entering the CLEAR
command with the COMPUTES clause.
Example 4–16
Removing COMPUTE
Definitions
To remove all COMPUTE definitions and the accompanying BREAK
definition, enter the following commands:
SQL> CLEAR BREAKS
breaks cleared
SQL> CLEAR COMPUTES
computes cleared
You may wish to place the commands CLEAR BREAKS and CLEAR
COMPUTES at the beginning of every command file to ensure that
previously entered BREAK and COMPUTE commands will not affect
queries you run in a given file.
Formatting Query Results
4–21
Defining Page and Report Titles and Dimensions
The word page refers to a screenful of information on your display or a
page of a spooled (printed) report. You can place top and bottom titles
on each page, set the number of lines per page, and determine the width
of each line.
The word report refers to the complete results of a query. You can also
place headers and footers on each report and format them in the same
way as top and bottom titles on pages.
Setting the Top and
Bottom Titles and
Headers and Footers
As you have already seen, you can set a title to display at the top of each
page of a report. You can also set a title to display at the bottom of each
page. The TTITLE command defines the top title; the BTITLE command
defines the bottom title.
You can also set a header and footer for each report. The REPHEADER
command defines the report header; the REPFOOTER command defines
the report footer.
A TTITLE, BTITLE, REPHEADER or REPFOOTER command consists of
the command name followed by one or more clauses specifying a
position or format and a CHAR value you wish to place in that position
or give that format. You can include multiple sets of clauses and CHAR
values:
TTITLE position_clause(s) char_value position_clause(s)
char_value ...
BTITLE position_clause(s) char_value position_clause(s)
char_value ...
REPHEADER position_clause(s) char_value position_clause(s)
char_value ...
REPFOOTER position_clause(s) char_value position_clause(s)
char_value ...
The most often used clauses of TTITLE, BTITLE, REPHEADER and
REPFOOTER are summarized in the following table. For descriptions of
all TTITLE, BTITLE, REPHEADER and REPFOOTER clauses, see the
discussions of TTITLE and REPHEADER in Chapter 6.
4–22
SQL*Plus User’s Guide and Reference
Clause
Example
Description
COL n
COL 72
Makes the next CHAR value
appear in the specified column
of the line.
SKIP n
SKIP 2
Skips to a new line n times. If
n is greater than 1, n–1 blank
lines appear before the next
CHAR value.
LEFT
LEFT
Left-aligns the following
CHAR value.
CENTER
CENTER
Centers the following CHAR
value.
RIGHT
RIGHT
Right-aligns the following
CHAR value.
Table 4 – 2 Often-Used Clauses of TTITLE, BTITLE, REPHEADER
and REPFOOTER
Example 4–17
Placing a Top and
Bottom Title on a Page
To put titles at the top and bottom of each page of a report, enter
SQL> TTITLE CENTER –
>
’ACME WIDGET SALES DEPARTMENT PERSONNEL REPORT’
SQL> BTITLE CENTER ’COMPANY CONFIDENTIAL’
Now run the current query:
SQL> /
SQL*Plus displays the following output:
DEPTNO
––––––––––
30
30
30
30
30
30
ACME WIDGET SALES DEPARTMENT PERSONNEL REPORT
ENAME
SAL
–––––––––– ––––––––––
JAMES
950
WARD
1250
MARTIN
1250
TURNER
1500
ALLEN
1600
BLAKE
2850
COMPANY CONFIDENTIAL
Example 4–18
Placing a Header on a
Report
To put a report header on a separate page, and to center it, enter
SQL> REPHEADER PAGE CENTER ’ACME WIDGET’
Formatting Query Results
4–23
Now run the current query:
SQL> /
SQL*Plus displays the following output on page one
ACME WIDGET SALES DEPARTMENT PERSONNEL REPORT
ACME WIDGET
COMPANY CONFIDENTIAL
and the following output on page two
DEPTNO
––––––––––
30
30
30
30
30
30
ACME WIDGET SALES DEPARTMENT PERSONNEL REPORT
ENAME
SAL
–––––––––– ––––––––––
JAMES
950
WARD
1250
MARTIN
1250
TURNER
1500
ALLEN
1600
BLAKE
2850
COMPANY CONFIDENTIAL
To suppress the report header without changing its definition, enter
SQL> REPHEADER OFF
Positioning Title Elements
The report in the preceding exercises might look more attractive if you
give the company name more emphasis and place the type of report and
the department name on either end of a separate line. It may also help to
reduce the linesize and thus center the titles more closely around the
data.
You can accomplish these changes by adding some clauses to the
TTITLE command and by resetting the system variable LINESIZE, as the
following example shows.
4–24
SQL*Plus User’s Guide and Reference
You can format report headers and footers in the same way as BTITLE
and TTITLE using the REPHEADER and REPFOOTER commands.
Example 4–19
Positioning Title
Elements
To redisplay the personnel report with a repositioned top title, enter the
following commands:
SQL> TTITLE CENTER ’A C M E W I D G E T’ SKIP 1 –
> CENTER ================ SKIP 1 LEFT ’PERSONNEL REPORT’ –
> RIGHT ’SALES DEPARTMENT’ SKIP 2
SQL> SET LINESIZE 60
SQL> /
SQL*Plus displays the results:
A C M E W I D G E T
====================
PERSONNEL REPORT
DEPTNO
––––––––––
30
30
30
30
30
30
SALES DEPARTMENT
ENAME
SAL
–––––––––– ––––––––––
JAMES
950
WARD
1250
MARTIN
1250
TURNER
1500
ALLEN
1600
BLAKE
2850
COMPANY CONFIDENTIAL
The LEFT, RIGHT, and CENTER clauses place the following values at
the beginning, end, and center of the line. The SKIP clause tells
SQL*Plus to move down one or more lines.
Note that there is no longer any space between the last row of the results
and the bottom title. The last line of the bottom title prints on the last
line of the page. The amount of space between the last row of the report
and the bottom title depends on the overall page size, the number of
lines occupied by the top title, and the number of rows in a given page.
In the above example, the top title occupies three more lines than the top
title in the previous example. You will learn to set the number of lines
per page later in this chapter.
To always print n blank lines before the bottom title, use the SKIP n
clause at the beginning of the BTITLE command. For example, to skip
one line before the bottom title in the example above, you could enter
the following command:
BTITLE SKIP 1 CENTER ’COMPANY CONFIDENTIAL’
Formatting Query Results
4–25
Indenting a Title Element
Exercise 4–20
Indenting a Title
Element
You can use the COL clause in TTITLE or BTITLE to indent the title
element a specific number of spaces. For example, COL 1 places the
following values in the first character position, and so is equivalent to
LEFT, or an indent of zero. COL 15 places the title element in the 15th
character position, indenting it 14 spaces.
To print the company name left-aligned with the report name indented
five spaces on the next line, enter
SQL> TTITLE LEFT ’ACME WIDGET’ SKIP 1 –
> COL 6 ’SALES DEPARTMENT PERSONNEL REPORT’ SKIP 2
Now rerun the current query to see the results:
SQL> /
ACME WIDGET
SALES DEPARTMENT PERSONNEL REPORT
DEPTNO
––––––––––
30
30
30
30
30
30
ENAME
SAL
–––––––––– ––––––––––
JAMES
950
WARD
1250
MARTIN
1250
TURNER
1500
ALLEN
1600
BLAKE
2850
COMPANY CONFIDENTIAL
Entering Long Titles
If you need to enter a title greater than 500 characters in length, you can
use the SQL*Plus command DEFINE to place the text of each line of the
title in a separate user variable:
SQL> DEFINE LINE1 = ’This is the first line...’
SQL> DEFINE LINE2 = ’This is the second line...’
SQL> DEFINE LINE3 = ’This is the third line...’
Then, reference the variables in your TTITLE or BTITLE command as
follows:
SQL> TTITLE CENTER LINE1 SKIP 1 CENTER LINE2 SKIP 1 –
>
CENTER LINE3
Displaying the Page
Number and other
System-Maintained
Values in Titles
4–26
You can display the current page number and other system-maintained
values in your title by entering a system value name as a title element,
for example:
TTITLE LEFT system–maintained_value_name
SQL*Plus User’s Guide and Reference
There are five system-maintained values you can display in titles, the
most commonly used of which is SQL.PNO (the current page number).
Refer to the TTITLE command in Chapter 6 for a list of
system-maintained values you can display in titles.
Example 4–21
Displaying the Current
Page Number in a Title
To display the current page number at the top of each page, along with
the company name, enter the following command:
SQL> TTITLE LEFT ’ACME WIDGET’ RIGHT ’PAGE:’ SQL.PNO SKIP 2
Now rerun the current query:
SQL> /
SQL*Plus displays the following results:
ACME WIDGET
DEPTNO
––––––––––
30
30
30
30
30
30
PAGE:
1
ENAME
SAL
–––––––––– ––––––––––
JAMES
950
WARD
1250
MARTIN
1250
TURNER
1500
ALLEN
1600
BLAKE
2850
COMPANY CONFIDENTIAL
Note that SQL.PNO has a format ten spaces wide. You can change this
format with the FORMAT clause of TTITLE (or BTITLE).
Example 4–22
Formatting a
System-Maintained
Value in a Title
To close up the space between the word PAGE: and the page number,
re-enter the TTITLE command as shown:
SQL> TTITLE LEFT ’ACME WIDGET’ RIGHT ’PAGE:’ FORMAT 999 –
> SQL.PNO SKIP 2
Now rerun the query:
SQL> /
Formatting Query Results
4–27
SQL*Plus displays the following results:
ACME WIDGET
DEPTNO
––––––––––
30
30
30
30
30
30
PAGE:
1
ENAME
SAL
–––––––––– ––––––––––
JAMES
950
WARD
1250
MARTIN
1250
TURNER
1500
ALLEN
1600
BLAKE
2850
COMPANY CONFIDENTIAL
Listing, Suppressing,
and Restoring Page
Title Definitions
To list a page title definition, enter the appropriate title command with
no clauses:
TTITLE
BTITLE
To suppress a title definition, enter:
TTITLE OFF
BTITLE OFF
These commands cause SQL*Plus to cease displaying titles on reports,
but do not clear the current definitions of the titles. You may restore the
current definitions by entering
TTITLE ON
BTITLE ON
Displaying Column
Values in Titles
You may wish to create a master/detail report that displays a changing
master column value at the top of each page with the detail query
results for that value below. You can reference a column value in a top
title by storing the desired value in a variable and referencing the
variable in a TTITLE command. Use the following form of the
COLUMN command to define the variable:
COLUMN column_name NEW_VALUE variable_name
You must include the master column in an ORDER BY clause and in a
BREAK command using the SKIP PAGE clause.
Example 4–23
Creating a
Master/Detail Report
4–28
Suppose you want to create a report that displays two different
managers’ employee numbers, each at the top of a separate page, and
the people reporting to the manager on the same page as the manager’s
SQL*Plus User’s Guide and Reference
employee number. First create a variable, MGRVAR, to hold the value of
the current manager’s employee number:
SQL> COLUMN MGR NEW_VALUE MGRVAR NOPRINT
Because you will display the managers’ employee numbers in the title,
you do not want them to print as part of the detail. The NOPRINT
clause you entered above tells SQL*Plus not to print the column MGR.
Next, include a label and the value in your page title, enter the proper
BREAK command, and suppress the bottom title from the last example:
SQL> TTITLE LEFT ’Manager: ’ MGRVAR SKIP 2
SQL> BREAK ON MGR SKIP PAGE
SQL> BTITLE OFF
Finally, enter and run the following query:
SQL>
2
3
3
SELECT MGR, ENAME, SAL, DEPTNO
FROM EMP
WHERE MGR IN (7698, 7839)
ORDER BY MGR;
SQL*Plus displays the following output:
Manager:
7698
ENAME
SAL
DEPTNO
–––––––––– –––––––– ––––––––––
ALLEN
1600
30
WARD
1250
30
TURNER
1500
30
MARTIN
1250
30
JAMES
950
30
Manager:
7839
ENAME
SAL
DEPTNO
–––––––––– –––––––– ––––––––––
JONES
2975
20
BLAKE
2850
30
CLARK
2450
10
If you want to print the value of a column at the bottom of the page, you
can use the COLUMN command in the following form:
COLUMN column_name OLD_VALUE variable_name
SQL*Plus prints the bottom title as part of the process of breaking to a
new page—after finding the new value for the master column.
Formatting Query Results
4–29
Therefore, if you simply referenced the NEW_VALUE of the master
column, you would get the value for the next set of detail. OLD_VALUE
remembers the value of the master column that was in effect before the
page break began.
Displaying the Current You can, of course, date your reports by simply typing a value in the
title. This is satisfactory for ad hoc reports, but if you want to run the
Date in Titles
same report repeatedly, you would probably prefer to have the date
automatically appear when the report is run. You can do this by creating
a variable to hold the current date.
To create the variable (in this example named _DATE), you can add the
following commands to your SQL*Plus LOGIN file:
SET TERMOUT OFF
BREAK ON TODAY
COLUMN TODAY NEW_VALUE _DATE
SELECT TO_CHAR(SYSDATE, ’fmMonth DD, YYYY’) TODAY
FROM DUAL;
CLEAR BREAKS
SET TERMOUT ON
When you start SQL*Plus, these commands place the value of SYSDATE
(the current date) into a variable named _DATE. To display the current
date, you can reference _DATE in a title as you would any other
variable.
The date format model you include in the SELECT command in your
LOGIN file determines the format in which SQL*Plus displays the date.
See your Oracle7 Server SQL Language Reference Manual for more
information on date format models. For more information about the
LOGIN file, see “Modifying Your LOGIN File” in Chapter 3.
You can also enter these commands interactively at the command
prompt; see COLUMN in Chapter 6 for an example.
Setting Page
Dimensions
4–30
Typically, a page of a report contains the number of blank line(s) set in
the NEWPAGE variable of the SET command, a top title, column
headings, your query results, and a bottom title. SQL*Plus displays a
report that is too long to fit on one page on several consecutive pages,
each with its own titles and column headings. The amount of data
SQL*Plus displays on each page depends on the current page
dimensions.
SQL*Plus User’s Guide and Reference
The default page dimensions used by SQL*Plus are shown below:
•
number of lines before the top title: 1
•
number of lines per page, from the top title to the bottom of the
page: 24
•
number of characters per line: 80
You can change these settings to match the size of your computer screen
or, for printing, the size of a sheet of paper.
You can change the page length with the system variable PAGESIZE. For
example, you may wish to do so when you print a report, since printed
pages are customarily 66 lines long.
To set the number of lines between the beginning of each page and the
top title, use the NEWPAGE variable of the SET command:
SET NEWPAGE number_of_lines
If you set NEWPAGE to zero, SQL*Plus skips zero lines and displays
and prints a formfeed character to begin a new page. On most types of
computer screens, the formfeed character clears the screen and moves
the cursor to the beginning of the first line. When you print a report, the
formfeed character makes the printer move to the top of a new sheet of
paper, even if the overall page length is less than that of the paper.
To set the number of lines on a page, use the PAGESIZE variable of the
SET command:
SET PAGESIZE number_of_lines
You may wish to reduce the linesize to center a title properly over your
output, or you may want to increase linesize for printing on wide paper.
You can change the line width using the LINESIZE variable of the SET
command:
SET LINESIZE number_of_characters
Example 4–24
Setting Page
Dimensions
To set the page size to 66 lines, clear the screen (or advance the printer to
a new sheet of paper) at the start of each page, and set the linesize to 32,
enter the following commands:
SQL> SET PAGESIZE 66
SQL> SET NEWPAGE 0
SQL> SET LINESIZE 32
Now enter and run the following commands to see the results:
SQL> TTITLE CENTER ’ACME WIDGET PERSONNEL REPORT’ SKIP 1 –
> CENTER ’10–JAN–89’ SKIP 2
Formatting Query Results
4–31
SQL>
SQL>
SQL>
SQL>
2
3
COLUMN DEPTNO HEADING DEPARTMENT
COLUMN ENAME HEADING EMPLOYEE
COLUMN SAL FORMAT $99,999 HEADING SALARY
SELECT DEPTNO, ENAME, SAL
FROM EMP
ORDER BY DEPTNO;
SQL*Plus displays a formfeed followed by the query results:
ACME WIDGET PERSONNEL REPORT
10–JAN–89
DEPARTMENT
––––––––––
10
10
10
20
20
20
20
20
30
30
30
30
30
30
EMPLOYEE
SALARY
–––––––––– ––––––––––
CLARK
$2,450
KING
$5,000
MILLER
$1,300
SMITH
$800
ADAMS
$1,100
FORD
$3,000
SCOTT
$3,000
JONES
$2,975
ALLEN
$1,600
BLAKE
$2,850
MARTIN
$1,250
JAMES
$950
TURNER
$1,500
WARD
$1,250
Now reset PAGESIZE, NEWPAGE, and LINESIZE to their default
values:
SQL> SET PAGESIZE 24
SQL> SET NEWPAGE 1
SQL> SET LINESIZE 80
To list the current values of these variables, use the SHOW command:
SQL> SHOW PAGESIZE
pagesize 24
SQL> SHOW NEWPAGE
newpage 1
SQL> SHOW LINESIZE
linesize 80
Through the SQL*Plus command SPOOL, you can store you query
results in a file or print them on your computer’s default printer.
4–32
SQL*Plus User’s Guide and Reference
Sending Results to a
File
To store the results of a query in a file—and still display them on the
screen—enter the SPOOL command in the following form:
SPOOL file_name
SQL*Plus stores all information displayed on the screen after you enter
the SPOOL command in the file you specify.
Storing and Printing Query Results
Send your query results to a file when you want to edit them with a
word processor before printing or include them in a letter, memo, or
other document.
To store the results of a query in a file—and still display them on the
screen—enter the SPOOL command in the following form:
SPOOL file_name
If you do not follow the filename with a period and an extension,
SPOOL adds a default file extension to the filename to identify it as an
output file. The default varies with the host operating system; on most
hosts it is LST or LIS. See the Oracle installation and user’s manual(s)
provided for your operating system for more information.
SQL*Plus continues to spool information to the file until you turn
spooling off, using the following form of SPOOL:
SPOOL OFF
Creating a Flat File
When moving data between different software products, it is sometimes
necessary to use a “flat” file (an operating system file with no escape
characters, headings, or extra characters embedded). For example, if you
do not have SQL*Net, you need to create a flat file for use with
SQL*Loader when moving data from Oracle Version 6 to Oracle7.
To create a flat file with SQL*Plus, you first must enter the following
SET commands:
SET
SET
SET
SET
SET
SET
SET
NEWPAGE 0
SPACE 0
LINESIZE 80
PAGESIZE 0
ECHO OFF
FEEDBACK OFF
HEADING OFF
Formatting Query Results
4–33
After entering these commands, you use the SPOOL command as
shown in the previous section to create the flat file.
The SET COLSEP command may be useful to delineate the columns. For
more information, see the SET command in Chapter 6.
Sending Results to a
Printer
To print query results, spool them to a file as described in the previous
section. Then, instead of using SPOOL OFF, enter the command in the
following form:
SPOOL OUT
SQL*Plus stops spooling and copies the contents of the spooled file to
your host computer’s standard (default) printer. SPOOL OUT does not
delete the spool file after printing.
Example 4–25
Sending Query Results
to a Printer
To generate a final report and spool and print the results, create a
command filenamed EMPRPT containing the following commands.
First, use EDIT to create the command file with your host operating
system text editor. (Do not use INPUT and SAVE, or SQL*Plus will add
a slash to the end of the file and will run the command file twice—once
as a result of the semicolon and once due to the slash.)
SQL> EDIT EMPRPT
Next, enter the following commands into the file, using your text editor:
SPOOL
CLEAR
CLEAR
CLEAR
TEMP
COLUMNS
BREAKS
COMPUTES
COLUMN DEPTNO HEADING DEPARTMENT
COLUMN ENAME HEADING EMPLOYEE
COLUMN SAL HEADING SALARY FORMAT $99,999
BREAK ON DEPTNO SKIP 1 ON REPORT
COMPUTE SUM OF SAL ON DEPTNO
COMPUTE SUM OF SAL ON REPORT
SET PAGESIZE 21
SET NEWPAGE 0
SET LINESIZE 30
TTITLE CENTER ’A C M E W I D G E T’ SKIP 2 –
LEFT ’EMPLOYEE REPORT’ RIGHT ’PAGE:’ –
FORMAT 999 SQL.PNO SKIP 2
4–34
SQL*Plus User’s Guide and Reference
BTITLE CENTER ’COMPANY CONFIDENTIAL’
SELECT DEPTNO, ENAME, SAL
FROM EMP
ORDER BY DEPTNO;
SPOOL OUT
If you do not want to see the output on your screen, you can also add
SET TERMOUT OFF to the beginning of the file and SET TERMOUT ON
to the end of the file. Save the file (you automatically return to
SQL*Plus). Now, run the command file EMPRPT:
SQL> @EMPRPT
SQL*Plus displays the output on your screen (unless you set TERMOUT
to OFF), spools it to the file TEMP, and sends the contents of TEMP to
your default printer:
A C M E
EMPLOYEE REPORT
W I D G E T
PAGE:
1
DEPARTMENT EMPLOYEE
SALARY
–––––––––– –––––––––– ––––––––
10 CLARK
$2,450
KING
$5,000
MILLER
$1,300
**********
––––––––
sum
$8,750
20 SMITH
ADAMS
FORD
SCOTT
JONES
**********
sum
$800
$1,100
$3,000
$3,000
$2,975
––––––––
$10,875
COMPANY CONFIDENTIAL
Formatting Query Results
4–35
A C M E
EMPLOYEE REPORT
W I D G E T
PAGE:
2
DEPARTMENT EMPLOYEE
SALARY
–––––––––– –––––––––– ––––––––
30 ALLEN
$1,600
BLAKE
$2,850
MARTIN
$1,250
JAMES
$900
TURNER
$1,500
WARD
$1,250
**********
––––––––
sum
$9,400
**********
––––––––
sum
$29,025
COMPANY CONFIDENTIAL
4–36
SQL*Plus User’s Guide and Reference
CHAPTER
5
Accessing SQL
Databases
T
his chapter explains how to access databases through SQL*Plus,
and discusses the following topics:
•
connecting to the default database
•
connecting to a remote database
•
copying data between different databases
•
copying data between tables on the same database
Read this chapter while sitting at your computer and try out the
example shown. Before beginning, make sure you have access to the
sample tables described in Chapter 1.
Accessing SQL Databases
5–1
Connecting to the Default Database
In order to access data in a given database, you must first connect to the
database. When you start SQL*Plus, you normally connect to your
default Oracle database under the username and password you enter
while starting. Once you have logged in, you can connect under a
different username with the SQL*Plus CONNECT command. The
username and password must be valid for the database.
For example, to connect the username TODD to the default database
using the password FOX, you could enter
SQL> CONNECT TODD/FOX
If you omit the username and password, SQL*Plus prompts you for
them. You also have the option of typing only the username following
CONNECT and omitting the password (SQL*Plus then prompts for the
password). Because CONNECT first disconnects you from your current
database, you will be left unconnected to any database if you use an
invalid username and password in your CONNECT command.
You can disconnect the username currently connected to Oracle without
leaving SQL*Plus by entering the SQL*Plus command DISCONNECT at
the SQL*Plus command prompt.
The default database is configured at an operating system level by
setting operating system environment variables, symbols or, possibly, by
editing an Oracle specific configuration file. Refer to your Oracle
documentation for your operating system for more information.
Connecting to a Remote Database
Many large installations run Oracle on more than one computer. Such
computers are often connected in a network, which permits programs
on different computers to exchange data rapidly and efficiently.
Networked computers can be physically near each other, or can be
separated by large distances and connected by telecommunication links.
Databases on other computers or databases on your host computer other
than your default database are called remote databases. You can access
remote databases if the desired database has SQL*Net and both
databases have compatible network drivers.
You can connect to a remote database in one of two ways:
5–2
•
from within SQL*Plus, using the CONNECT command
•
as you start SQL*Plus, using the SQLPLUS command
SQL*Plus User’s Guide and Reference
To connect to a remote database using CONNECT, include a SQL*Net
Connecting to a
Remote Database from database specification in the CONNECT command in one of the
following forms (the username and password you enter must be valid
within SQL*Plus
for the database to which you wish to connect):
• CONNECT SCOTT@database_specification
• CONNECT SCOTT/TIGER@database_specification
SQL*Plus prompts you for a password as needed, and connects you to
the specified database. This database becomes the default database until
you CONNECT again to another database, DISCONNECT, or leave
SQL*Plus.
When you connect to a remote database in this manner, you can use the
complete range of SQL and SQL*Plus commands and PL/SQL blocks on
the database.
The exact string you enter for the database specification depends upon
the SQL*Net protocol your computer uses. For more information, see
CONNECT in Chapter 6 and the SQL*Net manual appropriate for your
protocol, or contact your DBA.
Connecting to a
Remote Database as
You Start SQL*Plus
To connect to a remote database when you start SQL*Plus, include the
SQL*Net database specification in your SQLPLUS command in one of
the following forms:
• SQLPLUS SCOTT@database_specification
• SQLPLUS SCOTT/TIGER@database_specification
You must use a username and password valid for the remote database
and substitute the appropriate database specification for the remote
database. SQL*Plus prompts you for username and password as
needed, starts SQL*Plus, and connects you to the specified database.
This database becomes the default database until you CONNECT to
another database, DISCONNECT, or leave SQL*Plus.
Once again, you can manipulate tables in the remote database directly
after you connect in this manner.
Note: Do not confuse the @ symbol of the connect string with
the @ command used to run a command file.
Accessing SQL Databases
5–3
Copying Data from One Database to Another
Use the SQL*Plus COPY command to copy data between databases and
between tables on the same database. With the COPY command, you
can copy data between databases in the following ways:
•
copy data from a remote database to your local database
•
copy data from your local (default) database to a remote database
(on most systems)
•
copy data from one remote database to another remote database
(on most systems)
Note: In general, the COPY command was designed to be used
for copying data between Oracle and non-Oracle databases. You
should use SQL commands (CREATE TABLE AS and INSERT)
to copy data between Oracle databases.
Understanding COPY
Command Syntax
You enter the COPY command in the following form:
COPY FROM database TO database action –
destination_table (column_name, column_name, –
column_name ...) USING query
Here is a sample COPY command:
COPY FROM SCOTT/TIGER@BOSTONDB –
TO TODD/FOX@CHICAGODB –
CREATE NEWDEPT (DNUMBER, DNAME, CITY)–
USING SELECT * FROM DEPT
To specify a database in the FROM or TO clause, you must have a valid
username and password for the local and remote database(s) and know
the appropriate database specification(s). COPY obeys Oracle security,
so the username you specify must have been granted access to tables for
you to have access to tables. For information on what databases are
available to you, contact your DBA.
When you copy to your local database from a remote database, you can
omit the TO clause. When you copy to a remote database from your
local database, you can omit the FROM clause. When you copy between
remote databases, you must include both clauses.
The COPY command behaves differently based on whether the
destination table already exists and on the action clause you enter
(CREATE in the example above). See “Controlling Treatment of the
Destination Table” later in this chapter.
5–4
SQL*Plus User’s Guide and Reference
By default, the copied columns have the same names in the destination
table that they have in the source table. If you want to give new names
to the columns in the destination table, enter the new names in
parentheses after the destination table name. If you enter any column
names, you must enter a name for every column you are copying.
Note: To enable the copying of data between Oracle and
non-Oracle databases, NUMBER columns are changed to
DECIMAL columns in the destination table. Hence, if you are
copying between Oracle databases, a NUMBER column with no
precision will be changed to a DECIMAL(38) column. When
copying between Oracle databases, you should use SQL
commands (CREATE TABLE AS and INSERT) or you should
ensure that your columns have a precision specified.
The USING clause specifies a query that names the source table and
specifies the data that COPY copies to the destination table. You can use
any form of the SQL SELECT command to select the data that the COPY
command copies.
Here is an example of a COPY command that copies only two columns
from the source table, and copies only those rows in which the value of
DEPTNO is 30:
SQL> COPY FROM SCOTT/TIGER@BOSTONDB –
> REPLACE EMPCOPY2 –
> USING SELECT ENAME, SAL –
> FROM EMPCOPY –
> WHERE DEPTNO = 30
You may find it easier to enter and edit long COPY commands in
command files rather than trying to enter them directly at the command
prompt.
Controlling Treatment
of the Destination
Table
You control the treatment of the destination table by entering one of four
control clauses—REPLACE, CREATE, INSERT, or APPEND.
The REPLACE clause names the table to be created in the destination
database and specifies the following actions:
•
If the destination table already exists, COPY drops the existing
table and replaces it with a table containing the copied data.
•
If the destination table does not already exist, COPY creates it
using the copied data.
Accessing SQL Databases
5–5
You can use the CREATE clause to avoid accidentally writing over an
existing table. CREATE specifies the following actions:
•
If the destination table already exists, COPY reports an error and
stops.
•
If the destination table does not already exist, COPY creates the
table using the copied data.
Use INSERT to insert data into an existing table. INSERT specifies the
following actions:
•
If the destination table already exists, COPY inserts the copied
data in the destination table.
•
If the destination table does not already exist, COPY reports an
error and stops.
Use APPEND when you want to insert data in an existing table, or
create a new table if the destination table does not exist. APPEND
specifies the following actions:
Example 5–1
Copying from a
Remote Database to
Your Local Database
Using CREATE
•
If the destination table already exists, COPY inserts the copied
data in the destination table.
•
If the table does not already exist, COPY creates the table and
then inserts the copied data in it.
To copy EMP from a remote database into a table called EMPCOPY on
your own database, enter the following command:
Note: See your DBA for an appropriate username, password,
and database specification for a remote computer that contains a
copy of EMP.
SQL> COPY FROM SCOTT/TIGER@BOSTONDB –
> CREATE EMPCOPY –
> USING SELECT * FROM EMP
SQL*Plus displays the following messages:
Array fetch/bind size is 20. (arraysize is 20)
Will commit when done. (copycommit is 0)
Maximum long size is 80. (long is 80)
SQL*Plus then creates the table EMPCOPY, copies the rows, and
displays the following additional messages:
Table EMPCOPY created.
14 rows selected from SCOTT@BOSTONDB.
14 rows inserted into EMPCOPY.
14 rows committed into EMPCOPY at DEFAULT HOST connection.
5–6
SQL*Plus User’s Guide and Reference
In this COPY command, the FROM clause directs COPY to connect you
to the database with the specification D:BOSTON–MFG as SCOTT, with
the password TIGER.
Notice that you do not need a semicolon at the end of the command;
COPY is a SQL*Plus command, not a SQL command, even though it
contains a query. Because most COPY commands are longer than one
line, you must use a hyphen (–), optionally preceded by a space, at the
end of each line except the last.
Interpreting the
Messages that COPY
Displays
The first three messages displayed by COPY show the values of SET
command variables that affect the COPY operation. The most important
one is LONG, which limits the length of a LONG column’s value.
(LONG is a datatype, similar to CHAR.) If the source table contains a
LONG column, COPY truncates values in that column to the length
specified by the system variable LONG.
The variable ARRAYSIZE limits the number of rows that SQL*Plus
fetches from the database at one time. This number of rows makes up a
batch. The variable COPYCOMMIT sets the number of batches after
which COPY commits changes to the database. (If you set
COPYCOMMIT to zero, COPY commits changes only after all batches
are copied.) For more information on the variables of the SET command,
including how to change their settings, see SET in Chapter 6.
After listing the three system variables and their values, COPY tells you
if a table was dropped, created, or updated during the copy. Then COPY
lists the number of rows selected, inserted, and committed.
Specifying Another
User’s Table
You can refer to another user’s table in a COPY command by qualifying
the table name with the username, just as you would in your local
database, or in a query with a database link.
For example, to make a local copy of a table named DEPT, owned by the
username ADAMS on the database associated with the SQL*Net connect
string BOSTONDB, you would enter
SQL> COPY FROM SCOTT/TIGER@BOSTONDB –
> CREATE EMPCOPY2 –
> USING SELECT * FROM ADAMS.DEPT
Of course, you could get the same result by instructing COPY to log in
to the remote database as ADAMS. You cannot do that, however, unless
you know the password associated with the username ADAMS.
Accessing SQL Databases
5–7
Copying Data between Tables on One Database
You can copy data from one table to another in a single database (local
or remote). To copy between tables in your local database, specify your
own username and password and the database specification for your
local database in either a FROM or a TO clause (omit the other clause):
SQL> COPY FROM SCOTT/TIGER@MYDATABASE –
> INSERT EMPCOPY2 –
> USING SELECT * FROM EMP
To copy between tables on a remote database, include the same
username, password, and database specification in the FROM and TO
clauses:
SQL> COPY FROM SCOTT/TIGER@BOSTONDB –
> TO SCOTT/TIGER@BOSTONDB –
> INSERT EMPCOPY2 –
> USING SELECT * FROM EMP
5–8
SQL*Plus User’s Guide and Reference
CHAPTER
6
Command Reference
T
his chapter contains descriptions of SQL*Plus commands, listed
alphabetically. Use this chapter for reference only. Each description
contains the following parts:
Purpose
Discusses the basic use(s) of the command.
Syntax
Shows how to enter the command. Refer to
Chapter 1 for an explanation of the syntax notation.
Terms and
Clauses
Describes the function of each term or clause
appearing in the syntax.
Usage Notes
Provides additional information on how the
command works and on uses of the command.
Examples
Gives one or more examples of the command.
A summary table that lists and briefly describes SQL*Plus commands
precedes the individual command descriptions.
To access online help for SQL*Plus commands, you can type HELP
followed by the command name at the SQL command prompt. For
example:
SQL> HELP ACCEPT
If you get a response that help is unavailable, consult your database
administrator. See the HELP command for more information.
You can continue a long SQL*Plus command by typing a hyphen at the
end of the line and pressing [Return]. If you wish, you can type a space
Command Reference
6–1
before typing the hyphen. SQL*Plus displays a right angle-bracket (>)
as a prompt for each additional line.
You do not need to end a SQL*Plus command with a semicolon. When
you finish entering the command, you can just press [Return]. If you
wish, however, you can enter a semicolon at the end of a SQL*Plus
command.
6–2
SQL*Plus User’s Guide and Reference
SQL*Plus Command Summary
Command
Description
@
Runs the specified command file.
@@
Runs a nested command file.
/
Executes the SQL command or PL/SQL block.
ACCEPT
Reads a line of input and stores it in a given user
variable.
APPEND
Adds specified text to the end of the current line in
the buffer.
BREAK
Specifies where and how formatting will change in a
report, or lists the current break definition.
BTITLE
Places and formats a specified title at the bottom of
each report page, or lists the current BTITLE
definition.
CHANGE
Changes text on the current line in the buffer.
CLEAR
Resets or erases the current value or setting for the
specified option, such as BREAKS or COLUMNS.
COLUMN
Specifies display attributes for a given column, or
lists the current display attributes for a single column
or for all columns.
COMPUTE
Calculates and prints summary lines, using various
standard computations, on subsets of selected rows,
or lists all COMPUTE definitions.
CONNECT
Connects a given username to Oracle.
COPY
Copies data from a query to a table in a local or
remote database.
DEFINE
Specifies a user variable and assigns it a CHAR
value, or lists the value and variable type of a single
variable or all variables.
DEL
Deletes one or more lines of the buffer.
DESCRIBE
Lists the column definitions for the specified table,
view, or synonym or the specifications for the
specified function or procedure.
DISCONNECT
Commits pending changes to the database and logs
the current username off Oracle, but does not exit
SQL*Plus.
EDIT
Invokes a host operating system text editor on the
contents of the specified file or on the contents of the
buffer.
Command Reference
6–3
6–4
Command
Description
EXECUTE
Executes a single PL/SQL statement.
EXIT
Terminates SQL*Plus and returns control to the
operating system.
GET
Loads a host operating system file into the SQL
buffer.
HELP
Accesses the SQL*Plus help system.
HOST
Executes a host operating system command without
leaving SQL*Plus.
INPUT
Adds one or more new lines after the current line in
the buffer.
LIST
Lists one or more lines of the SQL buffer.
PAUSE
Displays an empty line followed by a line containing
text, then waits for the user to press [Return], or
displays two empty lines and waits for the user’s
response.
PRINT
Displays the current value of a bind variable.
PROMPT
Sends the specified message or a blank line to the
user’s screen.
REMARK
Begins a comment in a command file.
REPFOOTER
Places and formats a specified report footer at the
bottom of each report, or lists the current
REPFOOTER definition.
REPHEADER
Places and formats a specified report header at the
top of each report, or lists the current REPHEADER
definition.
RUN
Lists and executes the SQL command or PL/SQL
block currently stored in the SQL buffer.
RUNFORM
Invokes a SQL*Forms application from within
SQL*Plus.
SAVE
Saves the contents of the SQL buffer in a host
operating system file (a command file).
SET
Sets a system variable to alter the SQL*Plus
environment for your current session.
SHOW
Shows the value of a SQL*Plus system variable or the
current SQL*Plus environment.
SPOOL
Stores query results in an operating system file and,
optionally, sends the file to a printer.
SQLPLUS
Starts SQL*Plus from the operating system prompt.
SQL*Plus User’s Guide and Reference
Command
Description
START
Executes the contents of the specified command file.
STORE
Saves attributes of the current SQL*Plus environment
in a host operating system file (a command file).
TIMING
Records timing data for an elapsed period of time,
lists the current timer’s title and timing data, or lists
the number of active timers.
TTITLE
Places and formats a specified title at the top of each
report page, or lists the current TTITLE definition.
UNDEFINE
Deletes one or more user variables that you defined
either explicitly (with the DEFINE command) or
implicitly (with an argument to the START
command).
VARIABLE
Declares a bind variable that can be referenced in
PL/SQL.
WHENEVER
OSERROR
Exits SQL*Plus if an operating system command
generates an error.
WHENEVER
SQLERROR
Exits SQL*Plus if a SQL command or PL/SQL block
generates an error.
Command Reference
6–5
@ (”at” sign)
Purpose
Syntax
Terms and Clauses
Runs the specified command file.
@ file_name[.ext] [arg...]
Refer to the following list for a description of each term or clause:
file_name[.ext]
Represents the command file you wish to run. If
you omit ext, SQL*Plus assumes the default
command-file extension (normally SQL). For
information on changing the default extension, see
the SUFFIX variable of the SET command in this
chapter.
When you enter @ file_name.ext, SQL*Plus searches
for a file with the filename and extension you
specify in the current default directory. If SQL*Plus
does not find such a file, SQL*Plus will search a
system-dependent path to find the file. Some
operating systems may not support the path
search. Consult the Oracle installation and user’s
manual(s) provided for your operating system for
specific information related to your operating
system environment.
arg...
Represent data items you wish to pass to
parameters in the command file. If you enter one or
more arguments, SQL*Plus substitutes the values
into the parameters (&1, &2, and so forth) in the
command file. The first argument replaces each
occurrence of &1, the second replaces each
occurrence of &2, and so forth.
The @ command DEFINEs the parameters with the
values of the arguments; if you run the command
file again in this session, you can enter new
arguments or omit the arguments to use the
current values.
For more information on using parameters, refer to
the subsection “Passing Parameters through the
START Command” under “Writing Interactive
Commands” in Chapter 3.
6–6
SQL*Plus User’s Guide and Reference
Usage Notes
You can include in a command file any command you would normally
enter interactively (typically, SQL, SQL*Plus commands, or PL/SQL
blocks).
An EXIT or QUIT command used in a command file terminates
SQL*Plus.
The @ command functions similarly to START.
If the START command is disabled (see “Disabling SQL*Plus, SQL, and
PL/SQL Commands” in Appendix E), this will also disable the @
command. See START in this chapter for information on the START
command.
SQL*Plus removes the SQLTERMINATOR (a semicolon by default)
before the @ command is issued. A workaround for this is to add
another SQLTERMINATOR. See the SQLTERMINATOR variable of the
SET command in this chapter for more information.
Example
To run a command filenamed PRINTRPT with the extension SQL, enter
SQL> @PRINTRPT
To run a command filenamed WKRPT with the extension QRY, enter
SQL> @WKRPT.QRY
Command Reference
6–7
@@ (double “at” sign)
Purpose
Syntax
Terms and Clauses
Runs a nested command file. This command is identical to the @ (“at”
sign) command except that it looks for the specified command file in
the same path as the command file from which it was called.
@@ file_name[.ext]
Refer to the following for a description of the term or clause:
file_name[.ext]
Represents the nested command file you wish to
run. If you omit ext, SQL*Plus assumes the default
command-file extension (normally SQL). For
information on changing the default extension, see
the SUFFIX variable of the SET command in this
chapter.
When you enter @@file_name.ext from within a
command file, SQL*Plus runs file_name.ext from the
same directory as the command file. When you
enter @@file_name.ext interactively, SQL*Plus runs
file_name.ext from the current working directory. If
SQL*Plus does not find such a file, SQL*Plus
searches a system-dependent path to find the file.
Some operating systems may not support the path
search. Consult the Oracle installation and user’s
manual(s) provided for your operating system for
specific information related to your operating
system environment.
Usage Notes
You can include in a command file any command you would normally
enter interactively (typically, SQL or SQL*Plus commands).
An EXIT or QUIT command used in a command file terminates
SQL*Plus.
The @@ command functions similarly to START.
If the START command is disabled, this will also disable the @@
command. See START in this chapter for further information on the
START command.
SQL*Plus removes the SQLTERMINATOR (a semicolon by default)
before the @@ command is issued. A workaround for this is to add
another SQLTERMINATOR. See the SQLTERMINATOR variable of the
SET command in this chapter for more information.
6–8
SQL*Plus User’s Guide and Reference
Example
Suppose that you have the following command filenamed PRINTRPT:
SELECT * FROM EMP
@EMPRPT
@@ WKRPT
When you START PRINTRPT and it reaches the @ command, it looks
for the command filenamed EMPRPT in the current working directory
and runs it. When PRINTRPT reaches the @@ command, it looks for the
command filenamed WKRPT in the same path as PRINTRPT and runs
it.
Command Reference
6–9
/ (slash)
Purpose
Syntax
Usage Notes
Executes the SQL command or PL/SQL block currently stored in the
SQL buffer.
/
You can enter a slash (/) at the command prompt or at a line number
prompt of a multi-line command.
The slash command functions similarly to RUN, but does not list the
command in the buffer on your screen.
Executing a SQL command or PL/SQL block using the slash command
will not cause the current line number in the SQL buffer to change
unless the command in the buffer contains an error. In that case,
SQL*Plus changes the current line number to the number of the line
containing the error.
Example
To see the SQL command(s) you will execute, you can list the contents
of the buffer:
SQL> LIST
1* SELECT ENAME, JOB FROM EMP WHERE ENAME = ’JAMES’
Enter a slash (/) at the command prompt to execute the command in
the buffer:
SQL> /
For the above query, SQL*Plus displays the following output:
ENAME
JOB
–––––––––– –––––––––
JAMES
CLERK
6–10
SQL*Plus User’s Guide and Reference
ACCEPT
Purpose
Syntax
Terms and Clauses
Reads a line of input and stores it in a given user variable.
ACC[EPT] variable [NUM[BER]|CHAR|DATE] [FOR[MAT] format]
[DEF[AULT] default] [PROMPT text|NOPR[OMPT]] [HIDE]
Refer to the following list for a description of each term or clause:
variable
Represents the name of the variable in which you
wish to store a value. If variable does not exist,
SQL*Plus creates it.
NUM[BER]
Makes the datatype of variable the datatype
NUMBER. If the reply does not match the
datatype, ACCEPT gives an error message and
prompts again.
CHAR
Makes the datatype of variable the datatype CHAR.
The maximum CHAR length limit is 240 bytes. If a
multi-byte character set is used, one CHAR may be
more than one byte in size.
DATE
Makes reply a valid DATE format. If the reply is
not a valid DATE format, ACCEPT gives an error
message and prompts again. The datatype is
CHAR.
FOR[MAT]
Specifies the input format for the reply. If the reply
does not match the specified format, ACCEPT
gives an error message and prompts again for a
reply. The format element must be a text constant
such as A10 or 9.999. See the COLUMN command
in this chapter for a complete list of format
elements.
Oracle date formats such as ’dd/mm/yy’ are valid
when the datatype is DATE. DATE without a
specified format defaults to the Oracle
NLS_DATE_FORMAT of the current session. See
the Oracle7 Server Administrator’s Guide and the SQL
Language Reference Guide for information on Oracle
date formats.
DEF[AULT]
Sets the default value if a reply is not given. The
reply must be in the specified format if defined.
PROMPT text
Displays text on-screen before accepting the value
of variable from the user.
Command Reference
6–11
NOPR[OMPT]
Skips a line and waits for input without displaying
a prompt.
HIDE
Suppresses the display as you type the reply.
To display or reference variables, use the DEFINE command. See the
DEFINE command in this chapter for more information.
Examples
To display the prompt “Password: ”, place the reply in a CHAR
variable named PSWD, and suppress the display, enter
SQL> ACCEPT pswd CHAR PROMPT ’Password:
’ HIDE
To display the prompt “Enter weekly salary: ” and place the reply in a
NUMBER variable named SALARY with a default of 000.0, enter
SQL> ACCEPT salary NUMBER FORMAT ’999.99’ DEFAULT ’000.0’ –
>
PROMPT ’Enter weekly salary: ’
To display the prompt “Enter date hired: ” and place the reply in a
DATE variable named HIRED with the format “dd/mm/yy” and a
default of “01/01/94”, enter
SQL> ACCEPT hired DATE FORMAT ’dd/mm/yy’ DEFAULT ’01/01/94’–
>
PROMPT ’Enter date hired: ’
To display the prompt “Enter employee lastname: ” and place the reply
in a CHAR variable named LASTNAME, enter
SQL> ACCEPT lastname CHAR FORMAT ’A20’ –
>
PROMPT ’Enter employee lastname:
6–12
SQL*Plus User’s Guide and Reference
’
APPEND
Purpose
Syntax
Terms and Clauses
Adds specified text to the end of the current line in the SQL buffer.
A[PPEND] text
Refer to the following for a description of the term or clause:
text
Represents the text you wish to append. If you
wish to separate text from the preceding characters
with a space, enter two spaces between APPEND
and text.
To APPEND text that ends with a semicolon, end
the command with two semicolons (SQL*Plus
interprets a single semicolon as an optional
command terminator).
Examples
To append a space and the column name DEPT to the second line of the
buffer, make that line the current line by listing the line as follows:
SQL> 2
2* FROM EMP,
Now enter APPEND:
SQL> APPEND DEPT
SQL> 2
2* FROM EMP, DEPT
Notice the double space between APPEND and DEPT. The first space
separates APPEND from the characters to be appended; the second
space becomes the first appended character.
To append a semicolon to the line, enter
SQL> APPEND ;;
SQL*Plus appends the first semicolon to the line and interprets the
second as the terminator for the APPEND command.
Command Reference
6–13
BREAK
Purpose
Specifies where and how formatting will change in a report, such as
•
suppressing display of duplicate values for a given column
•
skipping a line each time a given column value changes
•
printing COMPUTEd figures each time a given column value
changes or at the end of the report (see also the COMPUTE
command)
Also lists the current BREAK definition.
Syntax
BRE[AK] [ON report_element [action [action]]] ...
where:
report_element
Requires the following syntax:
{column|expr|ROW|REPORT}
action
Requires the following syntax:
[SKI[P] n|[SKI[P]] PAGE]
[NODUP[LICATES]|DUP[LICATES]]
Terms and Clauses
Refer to the following list for a description of each term or clause:
ON column [action [action]]
When you include action(s), specifies action(s) for
SQL*Plus to take whenever a break occurs in the
specified column (called the break column). (column
cannot have a table or view appended to it. To
achieve this, you can alias the column in the SQL
statement.) A break is one of three events:
•
a change in the value of a column or expression
•
the output of a row
•
the end of a report
When you omit action(s), BREAK ON column
suppresses printing of duplicate values in column
and marks a place in the report where SQL*Plus
will perform the computation you specify in a
corresponding COMPUTE command.
6–14
SQL*Plus User’s Guide and Reference
You can specify ON column one or more times. If
you specify multiple ON clauses, as in
SQL> BREAK ON DEPTNO SKIP PAGE ON JOB –
> SKIP 1 ON SAL SKIP 1
the first ON clause represents the outermost break
(in this case, ON DEPTNO) and the last ON clause
represents the innermost break (in this case, ON
SAL). SQL*Plus searches each row of output for the
specified break(s), starting with the outermost
break and proceeding—in the order you enter the
clauses—to the innermost. In the example,
SQL*Plus searches for a change in the value of
DEPTNO, then JOB, then SAL.
Next, SQL*Plus executes actions beginning with
the action specified for the innermost break and
proceeding in reverse order toward the outermost
break (in this case, from SKIP 1 for ON SAL toward
SKIP PAGE for ON DEPTNO). SQL*Plus executes
each action up to and including the action specified
for the first occurring break encountered in the
initial search.
If, for example, in a given row the value of JOB
changes—but the values of DEPTNO and SAL
remain the same—SQL*Plus skips two lines before
printing the row (one as a result of SKIP 1 in the
ON SAL clause and one as a result of SKIP 1 in the
ON JOB clause).
Whenever you use ON column, you should also use
an ORDER BY clause in the SQL SELECT
command. Typically, the columns used in the
BREAK command should appear in the same order
in the ORDER BY clause (although all columns
specified in the ORDER BY clause need not appear
in the BREAK command). This prevents breaks
from occurring at meaningless points in the report.
The following SELECT command produces
meaningful results:
SQL> SELECT DEPTNO, JOB, SAL, ENAME
2 FROM EMP
3 ORDER BY DEPTNO, JOB, SAL, ENAME;
All rows with the same DEPTNO print together on
one page, and within that page all rows with the
Command Reference
6–15
same JOB print in groups. Within each group of
jobs, jobs with the same SAL print in groups.
Breaks in ENAME cause no action because
ENAME does not appear in the BREAK command.
ON expr [action [action]]
When you include action(s), specifies action(s) for
SQL*Plus to take when the value of the expression
changes.
When you omit action(s), BREAK ON expr
suppresses printing of duplicate values of expr and
marks a place in the report where SQL*Plus will
perform the computation you specify in a
corresponding COMPUTE command.
You can use an expression involving one or more
table columns or an alias assigned to a report
column in a SQL SELECT or SQL*Plus COLUMN
command. If you use an expression in a BREAK
command, you must enter expr exactly as it
appears in the SELECT command. If the expression
in the SELECT command is a+b, for example, you
cannot use b+a or (a+b) in a BREAK command to
refer to the expression in the SELECT command.
The information given above for ON column also
applies to ON expr.
ON ROW [action [action]]
When you include action(s), specifies action(s) for
SQL*Plus to take when a SQL SELECT command
returns a row. The ROW break becomes the
innermost break regardless of where you specify it
in the BREAK command. You should always
specify an action when you BREAK on a row.
6–16
SQL*Plus User’s Guide and Reference
ON REPORT [action]
Marks a place in the report where SQL*Plus will
perform the computation you specify in a
corresponding COMPUTE command. Use BREAK
ON REPORT in conjunction with COMPUTE to
print grand totals or other “grand” computed
values.
The REPORT break becomes the outermost break
regardless of where you specify it in the BREAK
command.
Note that SQL*Plus will not skip a page at the end
of a report, so you cannot use BREAK ON REPORT
SKIP PAGE.
Refer to the following list for a description of each action:
SKI[P] n
Skips n lines before printing the row where the
break occurred.
[SKI[P]] PAGE
Skips the number of lines that are defined to be a
page before printing the row where the break
occurred. The number of lines per page can be set
via the PAGESIZE clause of the SET command.
Note that PAGESIZE only changes the number of
lines that SQL*Plus considers to be a page.
Therefore, SKIP PAGE may not always cause a
physical page break, unless you have also specified
NEWPAGE 0. Note also that if there is a break after
the last row of data to be printed in a report,
SQL*Plus will not skip the page.
NODUP[LICATES]
Prints blanks rather than the value of a break
column when the value is a duplicate of the
column’s value in the preceding row.
DUP[LICATES]
Prints the value of a break column in every selected
row.
Enter BREAK with no clauses to list the current break definition.
Usage Notes
Each new BREAK command you enter replaces the preceding one.
To remove the BREAK command, use CLEAR BREAKS.
Example
To produce a report that prints duplicate job values, prints the average
of SAL and inserts one blank line when the value of JOB changes, and
additionally prints the sum of SAL and inserts another blank line when
the value of DEPTNO changes, you could enter the following
Command Reference
6–17
commands. (The example selects departments 10 and 30 and the jobs of
clerk and salesman only.)
SQL>
SQL>
SQL>
SQL>
2
3
4
BREAK ON DEPTNO SKIP 1 ON JOB SKIP 1 DUPLICATES
COMPUTE SUM OF SAL ON DEPTNO
COMPUTE AVG OF SAL ON JOB
SELECT DEPTNO, JOB, ENAME, SAL FROM EMP
WHERE JOB IN (’CLERK’, ’SALESMAN’)
AND DEPTNO IN (10, 30)
ORDER BY DEPTNO, JOB;
The following output results:
DEPTNO
JOB
ENAME
SAL
––––––––– ––––––––– –––––––––– –––––––––
10 CLERK
MILLER
1300
*********
–––––––––
avg
1300
**********
sum
––––––––––
1300
30 CLERK
JAMES
*********
avg
SALESMAN
SALESMAN
SALESMAN
SALESMAN
*********
avg
**********
sum
6–18
SQL*Plus User’s Guide and Reference
ALLEN
MARTIN
TURNER
WARD
1045
––––––––––
1045
1760
1375
1650
1375
––––––––––
1540
––––––––––
7205
BTITLE
Purpose
Places and formats a specified title at the bottom of each report page or
lists the current BTITLE definition.
For a description of the old form of BTITLE, see Appendix F.
Syntax
Terms and Clauses
BTI[TLE] [printspec [text|variable] ...]|[OFF|ON]
Refer to the TTITLE command for additional information on terms and
clauses in the BTITLE command syntax.
Enter BTITLE with no clauses to list the current BTITLE definition.
Usage Notes
Examples
If you do not enter a printspec clause before the first occurrence of text,
BTITLE left justifies the text. SQL*Plus interprets BTITLE in the new
form if a valid printspec clause (LEFT, SKIP, COL, and so on)
immediately follows the command name.
To set a bottom title with CORPORATE PLANNING DEPARTMENT
on the left and a date on the right, enter
SQL> BTITLE LEFT ’CORPORATE PLANNING DEPARTMENT’ –
> RIGHT ’11 Mar 1988’
To set a bottom title with CONFIDENTIAL in column 50, followed by
six spaces and a date, enter
SQL> BTITLE COL 50 ’CONFIDENTIAL’ TAB 6 ’11 Mar 88’
Command Reference
6–19
CHANGE
Purpose
Syntax
Terms and Clauses
Changes the first occurrence of text on the current line in the buffer.
C[HANGE] sepchar old [sepchar [new [sepchar]]]
Refer to the following list for a description of each term or clause:
sepchar
Represents any non-alphanumeric character such
as “/” or “!”. Use a sepchar that does not appear in
old or new. You can omit the space between
CHANGE and the first sepchar.
old
Represents the text you wish to change. CHANGE
ignores case in searching for old. For example,
CHANGE /aq/aw
will find the first occurrence of “aq”, “AQ”, “aQ”,
or “Aq” and change it to “aw”. SQL*Plus inserts
the new text exactly as you specify it.
If old is prefixed with “...”, it matches everything
up to and including the first occurrence of old. If it
is suffixed with “...”, it matches the first occurrence
of old and everything that follows on that line. If it
contains an embedded “...”, it matches everything
from the preceding part of old through the
following part of old.
new
Usage Notes
Represents the text with which you wish to replace
old. If you omit new and, optionally, the second
and third sepchars, CHANGE deletes old from the
current line of the buffer.
CHANGE changes the first occurrence of the existing specified text on
the current line of the buffer to the new specified text. The current line
is marked with an asterisk (*) in the LIST output.
You can also use CHANGE to modify a line in the buffer that has
generated an Oracle error. SQL*Plus sets the buffer’s current line to the
line containing the error so that you can make modifications.
To re-enter an entire line, you can type the line number followed by the
new contents of the line. If you specify a line number larger than the
number of lines in the buffer and follow the number with text,
SQL*Plus adds the text in a new line at the end of the buffer. If you
specify zero (“0”) for the line number and follow the zero with text,
6–20
SQL*Plus User’s Guide and Reference
then SQL*Plus inserts the line at the beginning of the buffer (that line
becomes line 1).
Examples
Assume the current line of the buffer contains the following text:
4* WHERE JOB IS IN (’CLERK’,’SECRETARY’,’RECEPTIONIST’)
Enter the following command:
SQL> C /RECEPTIONIST/GUARD/
The text in the buffer changes as follows:
4* WHERE JOB IS IN (’CLERK’,’SECRETARY’,’GUARD’)
Or enter the following command:
SQL> C /’CLERK’,.../’CLERK’)/
The original line changes to
4* WHERE JOB IS IN (’CLERK’)
Or enter the following command:
SQL> C /(...)/(’COOK’,’BUTLER’)/
The original line changes to
4* WHERE JOB IS IN (’COOK’,’BUTLER’)
You can replace the contents of an entire line using the line number.
This entry
SQL> 2
FROM EMP e1
causes the second line of the buffer to be replaced with
FROM EMP e1
Note that entering a line number followed by a string will replace the
line regardless of what text follows the line number. Thus,
SQL> 2
c/old/new/
will change the second line of the buffer to be
2* c/old/new/
Command Reference
6–21
CLEAR
Purpose
Syntax
Resets or erases the current value or setting for the specified option.
CL[EAR] option ...
where option represents one of the following clauses:
BRE[AKS]
BUFF[ER]
COL[UMNS]
COMP[UTES]
SCR[EEN]
SQL
TIMI[NG]
Terms and Clauses
Examples
Refer to the following list for a description of each term or clause:
BRE[AKS]
Removes the break definition set by the BREAK
command.
BUFF[ER]
Clears text from the buffer. CLEAR BUFFER has
the same effect as CLEAR SQL, unless you are
using multiple buffers (see SET BUFFER in
Appendix F).
COL[UMNS]
Resets column display attributes set by the
COLUMN command to default settings for all
columns. To reset display attributes for a single
column, use the CLEAR clause of the COLUMN
command.
COMP[UTES]
Removes all COMPUTE definitions set by the
COMPUTE command.
SCR[EEN]
Clears your screen.
SQL
Clears the text from SQL buffer. CLEAR SQL has
the same effect as CLEAR BUFFER, unless you are
using multiple buffers (see SET BUFFER in
Appendix F).
TIMI[NG]
Deletes all timers created by the TIMING
command.
To clear breaks, enter
SQL> CLEAR BREAKS
To clear column definitions, enter
SQL> CLEAR COLUMNS
6–22
SQL*Plus User’s Guide and Reference
COLUMN
Purpose
Specifies display attributes for a given column, such as
•
text for the column heading
•
alignment of the column heading
•
format for NUMBER data
•
wrapping of column data
Also lists the current display attributes for a single column or all
columns.
Syntax
COL[UMN] [{column|expr} [option ...]]
where option represents one of the following clauses:
ALI[AS] alias
CLE[AR]
FOLD_A[FTER]
FOLD_B[EFORE]
FOR[MAT] format
HEA[DING] text
JUS[TIFY] {L[EFT]|C[ENTER]|C[ENTRE]|R[IGHT]}
LIKE {expr|alias}
NEWL[INE]
NEW_V[ALUE] variable
NOPRI[NT]|PRI[NT]
NUL[L] text
OLD_V[ALUE] variable
ON|OFF
WRA[PPED]|WOR[D_WRAPPED]|TRU[NCATED]
Terms and Clauses
Enter COLUMN followed by column or expr and no other clauses to list
the current display attributes for only the specified column or
expression. Enter COLUMN with no clauses to list all current column
display attributes.
Refer to the following list for a description of each term or clause:
{column|expr}
Identifies the data item (typically, the name of a
column) in a SQL SELECT command to which the
column command refers. If you use an expression
in a COLUMN command, you must enter expr
exactly as it appears in the SELECT command. If
the expression in the SELECT command is a+b, for
example, you cannot use b+a or (a+b) in a
Command Reference
6–23
COLUMN command to refer to the expression in
the SELECT command.
If you select columns with the same name from
different tables, a COLUMN command for that
column name will apply to both columns. That is, a
COLUMN command for the column ENAME
applies to all columns named ENAME that you
reference in this session. COLUMN ignores table
name prefixes in SELECT commands. Also, spaces
are ignored unless the name is placed in double
quotes.
To format the columns differently, assign a unique
alias to each column within the SELECT command
itself (do not use the ALIAS clause of the
COLUMN command) and enter a COLUMN
command for each column’s alias.
ALI[AS] alias
Assigns a specified alias to a column, which can be
used to refer to the column in BREAK, COMPUTE,
and other COLUMN commands.
Note: A SQL*Plus alias is different from a SQL
alias. See the Oracle7 Server SQL Language Reference
Manual for further information on the SQL alias.
CLE[AR]
Resets the display attributes for the column to
default values.
To reset the attributes for all columns, use the
CLEAR COLUMNS command.
FOLD_A[FTER]
Inserts a carriage return after the column heading
and after each row in the column. SQL*Plus does
not insert an extra carriage return after the last
column in the SELECT list.
FOLD_B[EFORE]
Inserts a carriage return before the column heading
and before each row of the column. SQL*Plus does
not insert an extra carriage return before the first
column in the SELECT list.
FOR[MAT] format
Specifies the display format of the column. The
format specification must be a text constant such as
A10 or $9,999—not a variable.
Character Columns The default width of CHAR
and VARCHAR2 (VARCHAR) columns is the
width of the column in the database. SQL*Plus
6–24
SQL*Plus User’s Guide and Reference
formats CHAR and VARCHAR2 (VARCHAR) data
left-justified. If a value does not fit within the
column width, SQL*Plus wraps or truncates the
character string depending on the setting of SET
WRAP. The width cannot exceed 32,767 or the
value set with SET MAXDATA. (VARCHAR2
requires Oracle7.)
A LONG column’s width defaults to the value of
SET LONGCHUNKSIZE or SET LONG, whichever
one is smaller.
A Trusted Oracle column of datatype MLSLABEL
or RAW MLSLABEL defaults to the width defined
for the column in the database or the length of the
column’s heading, whichever is longer. The default
display width for a Trusted Oracle column of
datatype ROWLABEL is 15.
To change the width of a CHAR, VARCHAR2
(VARCHAR), LONG, or Trusted Oracle column to
n, use FORMAT An. (A stands for alphanumeric.)
If you specify a width shorter than the column
heading, SQL*Plus truncates the heading. If you
specify a width for a LONG column, SQL*Plus
uses the LONGCHUNKSIZE or the specified
width, whichever is smaller, as the column width.
DATE Columns For Oracle7, the default width
and format of unformatted DATE columns in
SQL*Plus is derived from the NLS parameters in
effect. Otherwise, the default width is A9. In
Oracle7, the NLS parameters may be set in your
database parameter file or may be environment
variables or an equivalent platform-specific
mechanism. They may also be specified for each
session with the ALTER SESSION command. (See
the documentation for the Oracle7 Server for a
complete description of the NLS parameters).
You can change the format of any DATE column
using the SQL function TO_CHAR in your SQL
SELECT statement. You may also wish to use an
explicit COLUMN FORMAT command to adjust
the column width.
Command Reference
6–25
When you use SQL functions like TO_CHAR,
Oracle automatically allows for a very wide
column.
To change the width of a DATE column to n, use
the COLUMN command with FORMAT An. If you
specify a width shorter than the column heading,
the heading is truncated.
NUMBER Columns To change a NUMBER
column’s width, use FORMAT followed by an
element as specified in Table 6 – 1.
Element
Example(s)
Description
9
9999
Number of “9”s specifies number of significant
digits returned. Blanks are displayed for leading
zeroes and for a value of zero.
0
0999
9990
Displays a leading zero or a value of zero in this
position as a 0, rather than as a blank.
$
$9999
Prefixes value with dollar sign.
B
B9999
Displays a zero value as blank, regardless of “0”s
in the format model.
MI
9999MI
Displays “–” after a negative value. For a positive
value, a trailing space is displayed.
S
S9999
Returns “+” for positive values and “–” for negative values in this position.
PR
9999PR
Displays a negative value in <angle brackets>. For
a positive value, a leading and trailing space is
displayed.
D
99D99
Displays the decimal character in this position,
separating the integral and fractional parts of a
number.
G
9G999
Displays the group separator in this position.
C
C999
Displays the ISO currency symbol in this position.
L
L999
Displays the local currency symbol in this position.
, (comma)
9,999
Displays a comma in this position.
. (period)
99.99
Displays a period (decimal point) in this position,
separating the integral and fractional parts of a
number.
V
999V99
Multiplies value by 10 n, where n is the number of
“9”s after the “V”.
Table 6 – 1 Number Formats
6–26
SQL*Plus User’s Guide and Reference
Element
Example(s)
Description
EEEE
9.999EEEE
Displays value in scientific notation (format must
contain exactly four “E”s).
RN or rn
RN
Displays upper- or lowercase Roman numerals.
Value can be an integer between 1 and 3999.
DATE
DATE
Displays value as a date in MM/DD/YY format;
used to format NUMBER columns that represent
Julian dates.
Table 6 – 1 Number Formats
The MI and PR format elements can only appear in
the last position of a number format model. The S
format element can only appear in the first or last
position.
If a number format model does not contain the MI,
S or PR format elements, negative return values
automatically contain a leading negative sign and
positive values automatically contain a leading
space.
A number format model can contain only a single
decimal character (D) or period (.), but it can
contain multiple group separators (G) or commas
(,). A group separator or comma cannot appear to
the right of a decimal character or period in a
number format model.
SQL*Plus formats NUMBER data right-justified. A
NUMBER column’s width equals the width of the
heading or the width of the FORMAT plus one
space for the sign, whichever is greater. If you do
not explicitly use FORMAT, then the column’s
width will always be at least the value of SET
NUMWIDTH.
If a value does not fit within the column width,
SQL*Plus indicates overflow by displaying a
pound sign (#) in place of each digit the width
allows.
If a positive value is extremely large and a numeric
overflow occurs when rounding a number, then the
infinity sign (~) replaces the value. Likewise, if a
negative value is extremely small and a numeric
overflow occurs when rounding a number, then the
negative infinity sign replaces the value (–~).
Command Reference
6–27
With all number formats, SQL*Plus rounds each
value to the specified number of significant digits
as set with the SET NUMWIDTH command.
HEA[DING] text
Defines a column heading. If you do not use a
HEADING clause, the column’s heading defaults
to column or expr. If text contains blanks or
punctuation characters, you must enclose it with
single or double quotes. Each occurrence of the
HEADSEP character (by default, ’|’) begins a new
line. For example,
COLUMN ENAME HEADING ’Employee |Name’
would produce a two-line column heading. See the
HEADSEP variable of the SET command in this
chapter for information on changing the HEADSEP
character.
JUS[TIFY] {L[EFT]|C[ENTER]|C[ENTRE]|R[IGHT]}
Aligns the heading. If you do not use a JUSTIFY
clause, headings for NUMBER columns default to
RIGHT and headings for other column types
default to LEFT.
LIKE {expr|alias}
Copies the display attributes of another column or
expression (whose attributes you have already
defined with another COLUMN command). LIKE
copies only attributes not defined by another
clause in the current COLUMN command.
NEWL[INE]
Starts a new line before displaying the column’s
value. NEWLINE has the same effect as
FOLD_BEFORE.
NEW_V[ALUE] variable
Specifies a variable to hold a column value. You
can reference the variable in TTITLE commands.
Use NEW_VALUE to display column values or the
date in the top title. You must include the column
in a BREAK command with the SKIP PAGE action.
The variable name cannot contain a pound sign (#).
NEW_VALUE is useful for master/detail reports in
which there is a new master record for each page.
For master/detail reporting, you must also include
the column in the ORDER BY clause. See the
example at the end of this command description.
6–28
SQL*Plus User’s Guide and Reference
For information on displaying a column value in
the bottom title, see COLUMN OLD_VALUE.
Refer to TTITLE for more information on
referencing variables in titles. See COLUMN
FORMAT for details on formatting and valid
format models.
NOPRI[NT]|PRI[NT]
Controls the printing of the column (the column
heading and all the selected values). NOPRINT
turns the printing of the column off. PRINT turns
the printing of the column on.
NUL[L] text
Controls the text SQL*Plus displays for null values
in the given column. The default is a white space.
SET NULL controls the text displayed for all null
values for all columns, unless overridden for a
specific column by the NULL clause of the
COLUMN command.
OLD_V[ALUE] variable
Specifies a variable to hold a column value. You
can reference the variable in BTITLE commands.
Use OLD_VALUE to display column values in the
bottom title. You must include the column in a
BREAK command with the SKIP PAGE action.
OLD_VALUE is useful for master/detail reports in
which there is a new master record for each page.
For master/detail reporting, you must also include
the column in the ORDER BY clause.
For information on displaying a column value in
the top title, see COLUMN NEW_VALUE. Refer to
TTITLE for more information on referencing
variables in titles.
ON|OFF
Controls the status of display attributes for a
column. OFF disables the attributes for a column
without affecting the attributes’ definition. ON
reinstates the attributes.
WRA[PPED]|WOR[D_WRAPPED]|TRU[NCATED]
Specifies how SQL*Plus will treat a CHAR,
VARCHAR2, LONG, or DATE string that is too
wide for a column. WRAPPED wraps the string
within the column bounds, beginning new lines
when required. When WORD_WRAP is enabled,
Command Reference
6–29
SQL*Plus left justifies each new line, skipping all
leading whitespace (for example, returns, newline
characters, tabs and spaces), including embedded
newline characters. Embedded whitespace not on a
line boundary is not skipped. TRUNCATED
truncates the string at the end of the first line of
display.
Usage Notes
You can enter any number of COLUMN commands for one or more
columns. All column attributes set for each column remain in effect for
the remainder of the session, until you turn the column OFF, or until
you use the CLEAR COLUMN command. Thus, the COLUMN
commands you enter can control a column’s display attributes for
multiple SQL SELECT commands.
When you enter multiple COLUMN commands for the same column,
SQL*Plus applies their clauses collectively. If several COLUMN
commands apply the same clause to the same column, the last one
entered will control the output.
Examples
To make the ENAME column 20 characters wide and display
EMPLOYEE NAME on two lines at the top, enter
SQL> COLUMN ENAME FORMAT A20 HEADING ’EMPLOYEE |NAME’
To format the SAL column so that it shows millions of dollars, rounds
to cents, uses commas to separate thousands, and displays $0.00 when
a value is zero, you would enter
SQL> COLUMN SAL FORMAT $9,999,990.99
To assign the alias NET to a column containing a long expression, to
display the result in a dollar format, and to display <NULL> for null
values, you might enter
SQL> COLUMN SAL+COMM+BONUS–EXPENSES–INS–TAX ALIAS NET
SQL> COLUMN NET FORMAT $9,999,999.99 NULL ’<NULL>’
Note that the example divides this column specification into two
commands. The first defines the alias NET, and the second uses NET to
define the format.
Also note that in the first command you must enter the expression
exactly as you entered it (or will enter it) in the SELECT command.
Otherwise, SQL*Plus cannot match the COLUMN command to the
appropriate column.
To wrap long values in a column named REMARKS, you can enter
SQL> COLUMN REMARKS FORMAT A20 WRAP
6–30
SQL*Plus User’s Guide and Reference
For example:
CUSTOMER
DATE
QUANTITY REMARKS
–––––––––– ––––––––– –––––––– ––––––––––––––––––––
123
25–AUG–86
144 This order must be s
hipped by air freigh
t to ORD
If you replace WRAP with WORD_WRAP, REMARKS looks like this:
CUSTOMER
DATE
QUANTITY REMARKS
–––––––––– ––––––––– –––––––– –––––––––––––––––––––
123
25–AUG–86
144 This order must be
shipped by air freight
to ORD
If you specify TRUNCATE, REMARKS looks like this:
CUSTOMER
DATE
QUANTITY REMARKS
–––––––––– ––––––––– –––––––– ––––––––––––––––––––
123
25–AUG–86
144 This order must be s
In order to print the current date and the name of each job in the top
title, enter the following. (For details on creating a date variable, see
“Displaying the Current Date in Titles” under “Defining Page Titles
and Dimensions” in Chapter 4.)
SQL>
SQL>
SQL>
SQL>
>
SQL>
2
3
4
COLUMN JOB NOPRINT NEW_VALUE JOBVAR
COLUMN TODAY NOPRINT NEW_VALUE DATEVAR
BREAK ON JOB SKIP PAGE ON TODAY
TTITLE CENTER ’Job Report’ RIGHT DATEVAR SKIP 2 –
LEFT ’Job:
’ JOBVAR SKIP 2
SELECT TO_CHAR(SYSDATE, ’MM/DD/YY’) TODAY,
ENAME, JOB, MGR, HIREDATE, SAL, DEPTNO
FROM EMP WHERE JOB IN (’CLERK’, ’SALESMAN’)
ORDER BY JOB, ENAME;
Your two page report would look similar to the following report, with
“Job Report” centered within your current linesize:
Command Reference
6–31
Job Report
Job:
08/01/94
CLERK
ENAME
MGR HIREDATE
SAL
DEPTNO
–––––––––– ––––––– ––––––––– ––––––––––– ––––––––––
ADAMS
7788 14–JAN–87
1100
20
JAMES
7698 03–DEC–81
950
30
MILLER
7782 23–JAN–82
1300
10
SMITH
7902 17–DEC–80
800
20
Job Report
Job:
08/01/94
CLERK
ENAME
MGR HIREDATE
SAL
DEPTNO
–––––––––– ––––––– ––––––––– ––––––––––– ––––––––––
ALLEN
7698 20–JAN–81
1600
30
MARTIN
7698 03–DEC–81
950
30
MILLER
7782 23–JAN–82
1300
10
SMITH
7902 17–DEC–80
800
20
To change the default format of DATE columns to ’YYYY–MM–DD’,
you can enter
SQL> ALTER SESSION SET NLS_DATE_FORMAT = ’YYYY–MM–DD’;
The following output results:
Session altered
To display the change, enter a SELECT statement, such as:
SQL> SELECT HIREDATE
2 FROM EMP
3 WHERE EMPNO = 7839;
The following output results:
HIREDATE
––––––––––
1981–11–17
See the Oracle7 Server SQL Language Reference Manual for information on
the ALTER SESSION command.
Note that in a SELECT statement, some SQL calculations or functions,
such as TO_CHAR, may cause a column to be very wide. In such cases,
use the FORMAT option to alter the column width.
6–32
SQL*Plus User’s Guide and Reference
COMPUTE
Purpose
Syntax
Terms and Clauses
Calculates and prints summary lines, using various standard
computations, on subsets of selected rows, or lists all COMPUTE
definitions. (For details on how to create summaries, see “Clarifying
Your Report with Spacing and Summary Lines” in Chapter 4.)
COMP[UTE] [function [LAB[EL] text] ...
OF {expr|column|alias} ...
ON {expr|column|alias|REPORT|ROW} ...]
Refer to the following list for a description of each term or clause:
function ...
Represents one of the functions listed in Table 6–2.
If you specify more than one function, use spaces
to separate the functions.
Function
Computes
Applies to Datatypes
AVG
Average of non-null values
NUMBER
COU[NT]
Count of non-null values
all types
MAX[IMUM]
Maximum value
NUMBER, CHAR,
VARCHAR2 (VARCHAR)
MIN[IMUM]
Minimum value
NUMBER, CHAR,
VARCHAR2 (VARCHAR)
NUM[BER]
Count of rows
all types
STD
Standard deviation of nonnull values
NUMBER
SUM
Sum of non-null values
NUMBER
VAR[IANCE]
Variance of non-null values
NUMBER
Table 6 – 2 COMPUTE Functions
LAB[EL] text
Defines the label to be printed for the computed
value. If no LABEL clause is used, text defaults to
the unabbreviated function keyword. If text
contains spaces or punctuation, you must enclose it
with single quotes. The label prints left justified
and truncates to the column width or linesize,
whichever is smaller. The maximum length of a
label is 500 characters.
The label for the computed value appears in the
break column specified. To suppress the label, use
the NOPRINT option of the COLUMN command
on the break column.
Command Reference
6–33
If you repeat a function in a COMPUTE command,
SQL*Plus issues a warning and uses the first
occurrence of the function.
With ON REPORT and ON ROW computations,
the label appears in the first column listed in the
SELECT statement. The label can be suppressed by
using a NOPRINT column first in the SELECT
statement. When you compute a function of the
first column in the SELECT statement ON REPORT
or ON ROW, then the computed value appears in
the first column and the label is not displayed. To
see the label, select a dummy column first in the
SELECT list.
OF {expr|column|alias}...
Specifies the column(s) or expression(s) you wish
to use in the computation. (column cannot have a
table or view appended to it. To achieve this, you
can alias the column in the SQL statement.) You
must also specify these columns in the SQL
SELECT command, or SQL*Plus will ignore the
COMPUTE command.
If you use a SQL SELECT list alias, you must use
the SQL alias in the COMPUTE command, not the
column name. If you use the column name in this
case, SQL*Plus will ignore the COMPUTE
command.
If you do not want the computed values of a
column to appear in the output of a SELECT
command, specify that column in a COLUMN
command with a NOPRINT clause. Use spaces to
separate multiple expressions, columns, or aliases
within the OF clause.
In the OF clause, you can refer to an expression or
function reference in the SELECT statement by
placing the expression or function reference in
double quotes. Column names and aliases do not
need quotes.
ON {expr|column|alias|REPORT|ROW} ...
Specifies the event SQL*Plus will use as a break.
(column cannot have a table or view appended to it.
To achieve this, you can alias the column in the
SQL statement.) COMPUTE prints the computed
6–34
SQL*Plus User’s Guide and Reference
value and restarts the computation when the event
occurs (that is, when the value of the expression
changes, a new ROW is fetched, or the end of the
report is reached).
If multiple COMPUTE commands reference the
same column in the ON clause, only the last
COMPUTE command applies.
To reference a SQL SELECT expression or function
reference in an ON clause, place the expression or
function reference in quotes. Column names and
aliases do not need quotes.
Enter COMPUTE without clauses to list all COMPUTE definitions.
Usage Notes
In order for the computations to occur, the following conditions must
all be true:
•
One or more of the expressions, columns, or column aliases you
reference in the OF clause must also be in the SELECT command.
•
The expression, column, or column alias you reference in the ON
clause must occur in the SELECT command and in the most
recent BREAK command.
•
If you reference either ROW or REPORT in the ON clause, also
reference ROW or REPORT in the most recent BREAK command.
To remove all COMPUTE definitions, use the CLEAR COMPUTES
command.
Examples
To subtotal the salary for the “clerk”, “analyst”, and “salesman” job
classifications with a compute label of “TOTAL”, enter
SQL>
SQL>
SQL>
2
3
4
BREAK ON JOB SKIP 1
COMPUTE SUM LABEL ’TOTAL’ OF SAL ON JOB
SELECT JOB, ENAME, SAL
FROM EMP
WHERE JOB IN (’CLERK’, ’ANALYST’, ’SALESMAN’)
ORDER BY JOB, SAL;
Command Reference
6–35
The following output results:
JOB
ENAME
SAL
––––––––– –––––––––– ––––––––––
ANALYST
SCOTT
3000
FORD
3000
*********
––––––––––
TOTAL
6000
CLERK
SMITH
JAMES
ADAMS
MILLER
800
950
1100
1300
––––––––––
4150
WARD
MARTIN
TURNER
ALLEN
1250
1250
1500
1600
––––––––––
5600
*********
TOTAL
SALESMAN
*********
TOTAL
To calculate the total of salaries less than 1,000 on a report, enter
SQL>
SQL>
SQL>
SQL>
2
3
4
COMPUTE SUM OF SAL ON REPORT
BREAK ON REPORT
COLUMN DUMMY HEADING ’’
SELECT ’
’ DUMMY, SAL, EMPNO
FROM EMP
WHERE SAL < 1000
ORDER BY SAL;
The following output results:
SAL
EMPNO
––– –––––––––– –––––––––––
800
7369
950
7900
––––––––––
sum
5350
6–36
SQL*Plus User’s Guide and Reference
To compute the average and maximum salary for the accounting and
sales departments, enter
SQL>
SQL>
>
>
SQL>
2
3
4
5
BREAK ON DNAME SKIP 1
COMPUTE AVG LABEL ’Dept Average’ –
MAX LABEL ’Dept Maximum’ –
OF SAL ON DNAME
SELECT DNAME, ENAME, SAL
FROM DEPT, EMP
WHERE DEPT.DEPTNO = EMP.DEPTNO
AND DNAME IN (’ACCOUNTING’, ’SALES’)
ORDER BY DNAME;
The following output results:
DNAME
ENAME
SAL
–––––––––––––– –––––––––– ––––––––––
ACCOUNTING
CLARK
2450
KING
5000
MILLER
1300
**************
––––––––––
Dept Average
2916.66667
Dept Maximum
5000
SALES
**************
Dept Average
Dept Maximum
ALLEN
WARD
JAMES
TURNER
MARTIN
BLAKE
1600
1250
950
1500
1250
2850
––––––––––
1566.66667
2850
To compute the sum of salaries for departments 10 and 20 without
printing the compute label:
SQL>
SQL>
SQL>
SQL>
2
3
4
COLUMN DUMMY NOPRINT
COMPUTE SUM OF SAL ON DUMMY
BREAK ON DUMMY SKIP 1
SELECT DEPTNO DUMMY, DEPTNO, ENAME, SAL
FROM EMP
WHERE DEPTNO <= 20
ORDER BY DEPTNO;
Command Reference
6–37
SQL*Plus displays the following output:
DEPTNO
––––––––––
10
10
10
20
20
20
20
20
ENAME
SAL
–––––––––– ––––––––––
KING
5000
CLARK
2450
MILLER
1300
––––––––––
8750
JONES
FORD
SMITH
SCOTT
ADAMS
2975
3000
800
3000
1100
––––––––––
10875
If, instead, you do not want to print the label, only the salary total at
the end of the report:
SQL>
SQL>
SQL>
SQL>
2
3
4
COLUMN DUMMY NOPRINT
COMPUTE SUM OF SAL ON DUMMY
BREAK ON DUMMY
SELECT NULL DUMMY, DEPTNO, ENAME, SAL
FROM EMP
WHERE DEPTNO <= 20
ORDER BY DEPTNO;
SQL*Plus displays the following output:
DEPTNO
––––––––––
10
10
10
20
20
20
20
20
6–38
SQL*Plus User’s Guide and Reference
ENAME
SAL
–––––––––– ––––––––––
KING
5000
CLARK
2450
MILLER
1300
JONES
2975
FORD
3000
SMITH
800
SCOTT
3000
ADAMS
1100
––––––––––
19625
CONNECT
Purpose
Syntax
Connects a given username to Oracle.
CONN[ECT] [logon]
where:
logon
Requires the following syntax:
username[/password][@database_specification ]|/
Terms and Clauses
Refer to the following list for a description of each term or clause:
username
[/password]
Represent the username and password with which
you wish to connect to Oracle. If you omit username
and password, SQL*Plus prompts you for them. If
you enter a slash (/) or simply enter [Return] to the
prompt for username, SQL*Plus logs you in using a
default logon (see ”/” below).
If you omit only password, SQL*Plus prompts you
for password. When prompting, SQL*Plus does not
display password on your terminal screen.
/
Represents a default logon using operating system
authentication. You cannot enter a
database_specification if you use a default logon. In a
default logon, SQL*Plus typically attempts to log
you in using the username OPS$name, where name
is your operating system username. See the Oracle7
Server Administrator’s Guide for information about
operating system authentication.
database
specification
Consists of a SQL*Net connection string. The exact
syntax depends upon the SQL*Net
communications protocol your Oracle installation
uses. For more information, refer to the SQL*Net
manual appropriate for your protocol or contact
your DBA. SQL*Plus does not prompt for a
database specification, but uses your default
database if you do not include a specification.
Usage Notes
CONNECT commits the current transaction to the database,
disconnects the current username from Oracle, and reconnects with the
specified username.
Examples
To connect across SQL*Net using username SCOTT and password
TIGER to the database known by the SQL*Net alias as FLEETDB, enter
SQL> CONNECT SCOTT/TIGER@FLEETDB
Command Reference
6–39
To connect using username SCOTT, letting SQL*Plus prompt you for
the password, enter
SQL> CONNECT SCOTT
6–40
SQL*Plus User’s Guide and Reference
COPY
Purpose
Copies the data from a query to a table in a local or remote database.
Syntax
COPY {FROM username[/password]@database_specification|
TO username[/password]@database_specification|
FROM username[/password]@database_specification
TO username[/password]@database_specification}
{APPEND|CREATE|INSERT|REPLACE} destination_table
[(column, column, column ...)] USING query
Terms and Clauses
Refer to the following list for a description of each term or clause:
username[/password]
Represent the Oracle username/password you wish to
COPY FROM and TO. In the FROM clause,
username/password identifies the source of the data;
in the TO clause, username/password identifies the
destination. If you do not specify password in either
the FROM clause or the TO clause, SQL*Plus will
prompt you for it. SQL*Plus suppresses the display
of your response to these prompts.
database_specification
Consists of a SQL*Net connection string. You must
include a database_specification clause in the COPY
command. In the FROM clause,
database_specification represents the database at the
source; in the TO clause, database_specification
represents the database at the destination. The
exact syntax depends upon the SQL*Net
communications protocol your Oracle installation
uses. For more information, refer to the SQL*Net
manual appropriate for your protocol or contact
your DBA.
destination_table
Represents the table you wish to create or to which
you wish to add data.
(column, column, column, ...)
Specifies the names of the columns in
destination_table. You must enclose a name in
double quotes if it contains lowercase letters or
blanks.
Command Reference
6–41
If you specify columns, the number of columns
must equal the number of columns selected by the
query. If you do not specify any columns, the
copied columns will have the same names in the
destination table as they had in the source if COPY
creates destination_table.
USING query
Specifies a SQL query (SELECT command)
determining which rows and columns COPY
copies.
FROM username[/password]@database_specification
Specifies the username, password, and database
that contains the data to be copied. If you omit the
FROM clause, the source defaults to the database
to which SQL*Plus is connected (that is, the
database that other commands address). You must
include a FROM clause to specify a source database
other than the default.
TO username[/password]@database_specification
Specifies the database containing the destination
table. If you omit the TO clause, the destination
defaults to the database to which SQL*Plus is
connected (that is, the database that other
commands address). You must include a TO clause
to specify a destination database other than the
default.
6–42
APPEND
Inserts the rows from query into destination_table if
the table exists. If destination_table does not exist,
COPY creates it.
CREATE
Inserts the rows from query into destination_table
after first creating the table. If destination_table
already exists, COPY returns an error.
INSERT
Inserts the rows from query into destination_table. If
destination_table does not exist, COPY returns an
error. When using INSERT, the USING query must
select one column for each column in the
destination_table.
REPLACE
Replaces destination_table and its contents with the
rows from query. If destination_table does not exist,
COPY creates it. Otherwise, COPY drops the
existing table and replaces it with a table
containing the copied data.
SQL*Plus User’s Guide and Reference
Usage Notes
To enable the copying of data between Oracle and non-Oracle
databases, NUMBER columns are changed to DECIMAL columns in
the destination table. Hence, if you are copying between Oracle
databases, a NUMBER column with no precision will be changed to a
DECIMAL(38) column. When copying between Oracle databases, you
should use SQL commands (CREATE TABLE AS and INSERT) or you
should ensure that your columns have a precision specified.
The SQL*Plus SET variable LONG limits the length of LONG columns
that you copy. If any LONG columns contain data longer than the value
of LONG, COPY truncates the data.
SQL*Plus performs a commit at the end of each successful COPY. If
you set the SQL*Plus SET variable COPYCOMMIT to a positive value
n, SQL*Plus performs a commit after copying every n batches of
records. The SQL*Plus SET variable ARRAYSIZE determines the size of
a batch.
Some operating environments require that database specifications be
placed in double quotes.
Examples
The following command copies the entire EMP table to a table named
WESTEMP. Note that the tables are located in two different databases.
If WESTEMP already exists, SQL*Plus replaces the table and its
contents. The columns in WESTEMP have the same names as the
columns in the source table, EMP.
SQL> COPY FROM SCOTT/TIGER@HQ TO JOHN/CHROME@WEST –
> REPLACE WESTEMP –
> USING SELECT * FROM EMP
The following command copies selected records from EMP to the
database to which SQL*Plus is connected. SQL*Plus creates
SALESMEN through the copy. SQL*Plus copies only the columns
EMPNO and ENAME, and at the destination names them EMPNO and
SALESMAN.
SQL> COPY FROM SCOTT/TIGER@HQ –
> CREATE SALESMEN (EMPNO,SALESMAN) –
> USING SELECT EMPNO, ENAME FROM EMP –
> WHERE JOB=’SALESMAN’
Command Reference
6–43
DEFINE
Purpose
Syntax
Terms and Clauses
Specifies a user variable and assigns it a CHAR value, or lists the value
and variable type of a single variable or all variables.
DEF[INE] [variable]|[variable = text]
Refer to the following list for a description of each term or clause:
variable
Represents the user variable whose value you wish
to assign or list.
text
Represents the CHAR value you wish to assign to
variable. Enclose text in single quotes if it contains
punctuation or blanks.
variable = text
Defines (names) a user variable and assigns it a
CHAR value.
Enter DEFINE followed by variable to list the value and type of variable.
Enter DEFINE with no clauses to list the values and types of all user
variables.
Usage Notes
DEFINEd variables retain their values until one of the following events
occurs:
•
you enter a new DEFINE command referencing the variable
•
you enter an UNDEFINE command referencing the variable
•
you enter an ACCEPT command referencing the variable
•
you reference the variable in the NEW_VALUE or OLD_VALUE
clause of the COLUMN command and reference the column in a
subsequent SQL SELECT command
•
you EXIT SQL*Plus
Whenever you run a stored query or command file, SQL*Plus
substitutes the value of variable for each substitution variable
referencing variable (in the form &variable or &&variable). SQL*Plus will
not prompt you for the value of variable in this session until you
UNDEFINE variable.
Note that you can use DEFINE to define the variable, _EDITOR, which
establishes the host system editor invoked by the SQL*Plus EDIT
command.
6–44
SQL*Plus User’s Guide and Reference
If you continue the value of a DEFINEd variable on multiple lines
(using the SQL*Plus command continuation character), SQL*Plus
replaces each continuation character and carriage return you enter with
a space in the resulting variable. For example, SQL*Plus interprets
SQL> DEFINE TEXT = ’ONE–
> TWO–
> THREE’
as
SQL> DEFINE TEXT = ’ONE TWO THREE’
Examples
To assign the value MANAGER to the variable POS, type:
SQL> DEFINE POS = MANAGER
If you execute a command that contains a reference to &POS, SQL*Plus
will substitute the value MANAGER for &POS and will not prompt
you for a POS value.
To assign the CHAR value 20 to the variable DEPTNO, type:
SQL> DEFINE DEPTNO = 20
Even though you enter the number 20, SQL*Plus assigns a CHAR value
to DEPTNO consisting of two characters, 2 and 0.
To list the definition of DEPTNO, enter
SQL> DEFINE DEPTNO
DEFINE DEPTNO
= ”20” (CHAR)
This result shows that the value of DEPTNO is 20.
Command Reference
6–45
DEL
Purpose
Syntax
Terms and Clauses
Deletes one or more lines of the buffer.
DEL [n|n m|n *|n LAST|*|* n|* LAST|LAST]
Refer to the following list for a description of each term or clause:
n
Deletes line n.
n m
Deletes lines n through m.
n *
Deletes line n through the current line.
n LAST
Deletes line n through the last line.
*
Deletes the current line.
* n
Deletes the current line through line n.
* LAST
Deletes the current line through the last line.
LAST
Deletes the last line.
Enter DEL with no clauses to delete the current line of the buffer.
Usage Notes
DEL makes the following line of the buffer (if any) the current line. You
can enter DEL several times to delete several consecutive lines.
Note: DEL is a SQL*Plus command and DELETE is a SQL
command. For more information about the SQL DELETE
command, see the Oracle7 Server SQL Language Reference
Manual.
Examples
Assume the SQL buffer contains the following query:
1
2
3
4*
SELECT ENAME, DEPTNO
FROM EMP
WHERE JOB = ’SALESMAN’
ORDER BY DEPTNO
To make the line containing the WHERE clause the current line, you
could enter
SQL> LIST 3
3* WHERE JOB = ’SALESMAN’
followed by
SQL> DEL
6–46
SQL*Plus User’s Guide and Reference
The SQL buffer now contains the following lines:
1 SELECT ENAME, DEPTNO
2 FROM EMP
3* ORDER BY DEPTNO
To delete the second line of the buffer, enter
SQL> DEL 2
The SQL buffer now contains the following lines:
1 SELECT ENAME, DEPTNO
2* ORDER BY DEPTNO
Command Reference
6–47
DESCRIBE
Purpose
Syntax
Terms and Clauses
Lists the column definitions for the specified table, view, or synonym or
the specifications for the specified function or procedure.
DESC[RIBE] {[user.]table[@database_link_name] [column]|
[user.]object[.subobject]}
Refer to the following list for a description of each term or clause:
user
Represents the user who owns table or object. If you
omit user, SQL*Plus assumes you own table or
object.
table
Represents the table, view, or synonym you wish to
describe.
database_link_name
Consists of the database link name corresponding
to the database where table exists. For more
information on which privileges allow access to
another table in a different schema, refer to the
Oracle7 Server SQL Language Reference Manual.
Usage Notes
column
Represents the column in table you wish to
describe.
object
Represents the function or procedure you wish to
describe. If you want to describe a procedure that
is in a package, object is the name of the package.
subobject
Represents the function or procedure in a package
you wish to describe.
The description for tables, views, and synonyms contains the following
information:
•
each column’s name
•
whether or not null values are allowed (NULL or NOT NULL)
for each column
•
datatype of columns, for example, NUMBER, CHAR,
VARCHAR2 (VARCHAR), LONG, DATE, MLSLABEL, RAW
MLSLABEL, RAW, LONGRAW, or ROWID
•
precision of columns (and scale, if any, for a numeric column)
When you do a DESCRIBE, VARCHAR columns are returned with a
type of VARCHAR2.
6–48
SQL*Plus User’s Guide and Reference
The description for functions and procedures contains the following
information:
Example
•
the type of PL/SQL object (function or procedure)
•
the name of the function or procedure
•
the type of value returned (for functions)
•
the argument names, types, whether they are input or output,
and default values, if any
To describe the table EMP, enter
SQL> DESCRIBE EMP
DESCRIBE lists the following information:
Name
Null?
–––––––––––––––––––––––––––––– ––––––––
EMPNO
NOT NULL
ENAME
JOB
MGR
HIREDATE
SAL
COMM
DEPTNO
Type
––––––––––––
NUMBER(4)
CHAR(10)
JOB(9)
NUMBER(4)
DATE
NUMBER(7,2)
NUMBER(7,2)
NUMBER(2)
To describe a procedure called CUSTOMER_LOOKUP, enter
SQL> DESCRIBE customer_lookup
DESCRIBE lists the following information:
PROCEDURE customer_lookup
Argument Name
Type
–––––––––––––––––––––– ––––––––
CUST_ID
NUMBER
CUST_NAME
VARCHAR2
In/Out
Default?
–––––––– –––––––––
IN
OUT
To describe the procedure APROC in the package APACK, enter
SQL> DESCRIBE apack.aproc
DESCRIBE lists the following information:
PROCEDURE apack.aproc
Argument Name
––––––––––––––––––––––
P1
P2
Type
––––––––
CHAR
NUMBER
In/Out
Default?
–––––––– –––––––––
IN
IN
Command Reference
6–49
DISCONNECT
Purpose
Syntax
Usage Notes
Example
Commits pending changes to the database and logs the current
username out of Oracle, but does not exit SQL*Plus.
DISC[ONNECT]
Use DISCONNECT within a command file to prevent user access to the
database when you want to log the user out of Oracle but have the user
remain in SQL*Plus. Use EXIT or QUIT to log out of Oracle and return
control to your host computer’s operating system.
Your command file might begin with a CONNECT command and end
with a DISCONNECT, as shown below.
SQL> GET MYFILE
1 CONNECT ...
.
.
.
.
15* DISCONNECT
6–50
SQL*Plus User’s Guide and Reference
EDIT
Purpose
Syntax
Terms and Clauses
Invokes a host operating system text editor on the contents of the
specified file or on the contents of the buffer.
ED[IT] [file_name[.ext]]
Refer to the following for a description of the term or clause:
file_name[.ext]
Represents the file you wish to edit (typically a
command file).
Enter EDIT with no filename to edit the contents of the SQL buffer with
the host operating system text editor.
Usage Notes
If you omit the file extension, SQL*Plus assumes the default
command-file extension (normally SQL). For information on changing
the default extension, see the SUFFIX variable of the SET command in
this chapter.
If you specify a filename, SQL*Plus searches for the file in the current
working directory. If SQL*Plus cannot find the file in the current
working directory, it creates a file with the specified name.
The user variable, _EDITOR, contains the name of the text editor
invoked by EDIT. You can change the text editor by changing the value
of _EDITOR. See DEFINE for information about changing the value of
a user variable. If _EDITOR is undefined, EDIT attempts to invoke the
default host operating system editor.
EDIT alone places the contents of the SQL buffer in a file by default
named AFIEDT.BUF (in your current working directory) and invokes
the text editor on the contents of the file. If the file AFIEDT.BUF
already exists, it is overwritten with the contents of the buffer. You can
change the default filename by using the SET EDITFILE command. For
more information about setting a default filename for the EDIT
command, see the EDITFILE variable of the SET command in this
chapter.
Note: The default file, AFIEDT.BUF, may have a different
name on some operating systems.
If you do not specify a filename and the buffer is empty, EDIT returns
an error message.
To leave the editing session and return to SQL*Plus, terminate the
editing session in the way customary for the text editor. When you
leave the editor, SQL*Plus loads the contents of the file into the buffer.
Command Reference
6–51
Example
To edit the file REPORT with the extension SQL using your host
operating system text editor, enter
SQL> EDIT REPORT
6–52
SQL*Plus User’s Guide and Reference
EXECUTE
Purpose
Syntax
Terms and Clauses
Executes a single PL/SQL statement. The EXECUTE command is often
useful when you want to execute a PL/SQL statement that references a
stored procedure. For more information on PL/SQL, see your PL/SQL
User’s Guide and Reference.
EXEC[UTE] statement
Refer to the following for a description of the term or clause:
statement
Usage Notes
Represents a PL/SQL statement.
If your EXECUTE command cannot fit on one line because of the
PL/SQL statement, use the SQL*Plus continuation character (a hyphen)
as shown in the example below.
The length of the command and the PL/SQL statement cannot exceed
the length defined by SET LINESIZE.
Examples
The following EXECUTE command assigns a value to a bind variable:
SQL> EXECUTE :n := 1
The following EXECUTE command runs a PL/SQL statement that
references a stored procedure:
SQL> EXECUTE –
:ID := EMP_MANAGEMENT.HIRE(’BLAKE’,’MANAGER’,’KING’,2990,’SALES’)
Note that the value returned by the stored procedure is being placed in
a bind variable, :ID. For information on how to create a bind variable,
see the VARIABLE command in this chapter.
Command Reference
6–53
EXIT
Purpose
Syntax
Terms and Clauses
Terminates SQL*Plus and returns control to the operating system.
{EXIT|QUIT} [SUCCESS|FAILURE|WARNING|n|variable]
[COMMIT|ROLLBACK]
Refer to the following list for a description of each term or clause:
{EXIT|QUIT}
Can be used interchangeably (QUIT is a synonym
for EXIT).
n
Represents an integer you specify as the return
code.
variable
Represents a user-defined or system variable (but
not a bind variable), such as SQL.SQLCODE. EXIT
variable exits with the value of variable as the return
code.
SUCCESS
Exits normally.
FAILURE
Exits with a return code indicating failure.
WARNING
Exits with a return code indicating warning.
COMMIT
Saves pending changes to the database before
exiting.
ROLLBACK
Executes a ROLLBACK statement and abandons
pending changes to the database before exiting.
EXIT with no clauses commits and exits with a value of SUCCESS.
Usage Notes
EXIT allows you to specify an operating system return code. This
allows you to run SQL*Plus command files in batch mode and to detect
programmatically the occurrence of an unexpected event. The manner
of detection is operating system specific. See the Oracle installation and
user’s manual(s) provided for your operating system for details.
The key words SUCCESS, WARNING, and FAILURE represent
operating-system-dependent values. On some systems, WARNING and
FAILURE may be indistinguishable.
Note: SUCCESS, FAILURE, and WARNING are not reserved
words.
The range of operating system return codes is also restricted on some
operating systems. This limits the portability of EXIT n and EXIT
variable between platforms. For example, on UNIX there is only one
byte of storage for return codes; therefore, the range for return codes is
limited to zero to 255.
6–54
SQL*Plus User’s Guide and Reference
If you make a syntax error in the EXIT options or use a non-numeric
variable, SQL*Plus performs an EXIT FAILURE COMMIT.
For information on exiting conditionally, see the WHENEVER
SQLERROR and WHENEVER OSERROR commands later in this
chapter.
Example
The following example commits all uncommitted transactions and
returns the error code of the last executed SQL command or PL/SQL
block:
SQL> EXIT SQL.SQLCODE
The location of the return code depends on your system. Consult your
DBA for information concerning how your operating system retrieves
data from a program. See TTITLE in this chapter for more information
on SQL.SQLCODE.
Command Reference
6–55
GET
Purpose
Syntax
Terms and Clauses
Usage Note
Loads a host operating system file into the SQL buffer.
GET file_name[.ext] [LIS[T]|NOL[IST]]
Refer to the following list for a description of each term or clause:
file_name[.ext]
Represents the file you wish to load (typically a
command file).
LIS[T]
Lists the contents of the file.
NOL[IST]
Suppresses the listing.
If you do not specify a file extension, SQL*Plus assumes the default
command-file extension (normally SQL). For information on changing
the default extension, see the SUFFIX variable of the SET command in
this chapter.
If part of the filename you are specifying contains the word list or the
word file, you need to put the name in double quotes.
SQL*Plus searches for the file in the current working directory.
The operating system file should contain a single SQL statement or
PL/SQL block. The statement should not be terminated with a
semicolon.
If a SQL*Plus command or more than one SQL statement or PL/SQL
block is loaded into the SQL buffer from an operating system file, an
error occurs when the RUN or slash (/) command is used to execute
the buffer.
The GET command can be used to load files created with the SAVE
command. See the SAVE command in this chapter for more
information.
Example
To load a file called YEARENDRPT with the extension SQL into the
buffer, type
SQL> GET YEARENDRPT
6–56
SQL*Plus User’s Guide and Reference
HELP
Purpose:
Syntax
Terms and Clauses
Accesses the SQL*Plus help system.
HELP [topic]
Refer to the following for a description of the term or clause:
topic
Represents a SQL*Plus help topic. This can be a
SQL*Plus command (e.g., COLUMN), a SQL
statement (e.g., INSERT), a PL/SQL statement
(e.g., IF), or another topic in the help system
(e.g., comparison operators).
Enter HELP without topic to get help on the help system.
Usage Notes
You can only enter one topic after HELP. You can abbreviate the topic
(e.g., COL for COLUMN). However, if you enter only an abbreviated
topic and the abbreviation is ambiguous, SQL*Plus will display help for
all topics that match the abbreviation. For example, if you entered
SQL> HELP COMP
SQL*Plus would display help on COMPUTE followed by help on
comparison operators.
If you get a response indicating that help is not available, consult your
database administrator.
Example
To see a list of SQL*Plus commands and PL/SQL and SQL statements,
enter
SQL> HELP COMMANDS
Command Reference
6–57
HOST
Purpose
Syntax
Terms and Clauses
Executes a host operating system command without leaving SQL*Plus.
HO[ST] [command]
Refer to the following for a description of the term or clause:
command
Represents a host operating system command.
Enter HOST without command to display an operating system prompt.
You can then enter multiple operating system commands. For
information on returning to SQL*Plus, refer to the Oracle installation
and user’s manual(s) provided for your operating system.
Usage Notes
With some operating systems, you can use a “$” (VMS), “!” (UNIX), or
another character instead of HOST. See the Oracle installation and
user’s manual(s) provided for your operating system for details.
You may not have access to the HOST command, depending on your
operating system. See the Oracle installation and user’s manual(s)
provided for your operating system or ask your DBA for more
information.
SQL*Plus removes the SQLTERMINATOR (a semicolon by default)
before the HOST command is issued. A workaround for this is to add
another SQLTERMINATOR. See the SQLTERMINATOR variable of the
SET command in this chapter for more information on the
SQLTERMINATOR.
Example
To execute an operating system command, ls *.sql, enter
SQL> HOST ls *.sql
6–58
SQL*Plus User’s Guide and Reference
INPUT
Purpose
Syntax
Terms and Clauses
Adds one or more new lines of text after the current line in the buffer.
I[NPUT] [text]
Refer to the following for a description of the term or clause:
text
Represents the text you wish to add. To add a
single line, enter the text of the line after the
command INPUT, separating the text from the
command with a space. To begin the line with one
or more spaces, enter two or more spaces between
INPUT and the first non-blank character of text.
To add several lines, enter INPUT with no text. INPUT prompts you for
each line. To leave INPUT, enter a null (empty) line.
Usage Notes
Examples
If you enter a line number at the command prompt larger than the
number of lines in the buffer, and follow the number with text,
SQL*Plus adds the text in a new line at the end of the buffer. If you
specify zero (0) for the line number and follow the zero with text, then
SQL*Plus inserts the line at the beginning of the buffer (that line
becomes line 1).
Assume the SQL buffer contains the following command:
1
2
SELECT ENAME, DEPTNO, SAL, COMM
FROM EMP
To add an ORDER BY clause to the query, enter
SQL> LIST 2
2* FROM
EMP
SQL> INPUT ORDER BY ENAME
LIST 2 ensures that line 2 is the current line. INPUT adds a new line
containing the ORDER BY clause after the current line. The SQL buffer
now contains the following lines:
1 SELECT ENAME, DEPTNO, SAL, COMM
2 FROM EMP
3* ORDER BY ENAME
Command Reference
6–59
To add a two-line WHERE clause, enter
SQL>
2*
SQL>
3
4
5
LIST 2
FROM EMP
INPUT
WHERE JOB = ’SALESMAN’
AND COMM 500
INPUT prompts you for new lines until you enter an empty line. The
SQL buffer now contains the following lines:
1
2
3
4
5
6–60
SELECT ENAME, DEPTNO, SAL, COMM
FROM EMP
WHERE JOB = ’SALESMAN’
AND COMM 500
ORDER BY ENAME
SQL*Plus User’s Guide and Reference
LIST
Purpose
Syntax
Terms and Clauses
Lists one or more lines of the SQL buffer.
L[IST] [n|n m|n *|n LAST|*|* n|* LAST|LAST]
Refer to the following list for a description of each term or clause:
n
Lists line n.
n m
Lists lines n through m.
n *
Lists line n through the current line.
n LAST
Lists line n through the last line.
*
Lists the current line.
* n
Lists the current line through line n.
* LAST
Lists the current line through the last line.
LAST
Lists the last line.
Enter LIST with no clauses to list all lines.
Usage Notes
Example
The last line listed becomes the new current line (marked by an
asterisk).
To list the contents of the buffer, enter
SQL> LIST
You will see a listing of all lines in the buffer, similar in form to the
following example:
1
2
3
4*
SELECT ENAME, DEPTNO, JOB
FROM EMP
WHERE JOB = ’CLERK’
ORDER BY DEPTNO
The asterisk indicates that line 4 is the current line.
To list the second line only, enter
SQL> LIST 2
You will then see this:
2* FROM EMP
Command Reference
6–61
To list the current line (now line 2) to the last line, enter
SQL> LIST * LAST
You will then see this:
2 FROM EMP
3 WHERE JOB = ’CLERK’
4* ORDER BY DEPTNO
6–62
SQL*Plus User’s Guide and Reference
PAUSE
Purpose
Syntax
Terms and Clauses
Displays an empty line followed by a line containing text, then waits
for the user to press [Return], or displays two empty lines and waits for
the user’s response.
PAU[SE] [text]
Refer to the following for a description of the clause or term:
text
Represents the text you wish to display.
Enter PAUSE followed by no text to display two empty lines.
Usage Notes
Because PAUSE always waits for the user’s response, it is best to use a
message that tells the user explicitly to press [Return].
PAUSE reads input from the terminal (if a terminal is available) even
when you have designated the source of the command input as a file.
For information on pausing between pages of a report, see the PAUSE
variable of the SET command later in this chapter.
Example
To print “Adjust paper and press RETURN to continue.” and to have
SQL*Plus wait for the user to press [Return], you might include the
following PAUSE command in a command file:
SET PAUSE OFF
PAUSE Adjust paper and press RETURN to continue.
SELECT ...
Command Reference
6–63
PRINT
Purpose
Syntax
Terms and Clauses
Displays the current value of bind variables. For more information on
bind variables, see your PL/SQL User’s Guide and Reference.
PRI[NT] [variable ...]
Refer to the following for a description of the clause or term:
variable ...
Represents the names of the bind variables whose
values you wish to display.
Enter PRINT with no variables to print all bind variables.
Usage Notes
Bind variables are created using the VARIABLE command. For more
information and examples, see the VARIABLE command in this
chapter.
You can control the formatting of the PRINT output just as you would
query output. For more information, see the formatting techniques
described in Chapter 4.
To automatically display bind variables referenced in a successful
PL/SQL block or used in an EXECUTE command, use the
AUTOPRINT clause of the SET command. For more information, see
the SET command in this chapter.
Example
The following example illustrates a PRINT command:
SQL>
SQL>
2
3
SQL>
VARIABLE n NUMBER
BEGIN
:n := 1;
END;
PRINT n
N
––––––––––
1
6–64
SQL*Plus User’s Guide and Reference
PROMPT
Purpose
Syntax
Terms and Clauses
Sends the specified message or a blank line to the user’s screen.
PROMPT [text]
Refer to the following for a description of the term or clause:
text
Represents the text of the message you wish to
display. If you omit text, PROMPT displays a blank
line on the user’s screen.
Usage Notes
You can use this command in command files to give information to the
user.
Example
The following example shows the use of PROMPT in conjunction with
ACCEPT in a command file called ASKFORDEPT. ASKFORDEPT
contains the following SQL*Plus and SQL commands:
PROMPT
PROMPT Please enter a valid department
PROMPT For example: 10, 20, 30, 40
ACCEPT NEWDEPT NUMBER PROMPT ’DEPT:> ’
SELECT DNAME FROM DEPT
WHERE DEPTNO = &NEWDEPT
Assume you run the file using START or @:
SQL> @ASKFORDEPT
SQL*Plus displays the following prompts:
Please enter a valid department
For example: 10, 20, 30, 40
DEPT:>
You can enter a department number at the prompt DEPT:>. By default,
SQL*Plus lists the line containing &NEWDEPT before and after
substitution, and then displays the department name corresponding to
the number entered at the DEPT:> prompt.
Command Reference
6–65
REMARK
Purpose
Syntax
Usage Notes
Begins a comment in a command file. SQL*Plus does not interpret the
comment as a command.
REM[ARK]
The REMARK command must appear at the beginning of a line, and
the comment ends at the end of the line. A line cannot contain both a
comment and a command.
For details on entering comments in command files using the SQL
comment delimiters, /* ... */, or the ANSI/ISO comment delimiter, ––
..., refer to “Placing Comments in Command Files” in Chapter 3.
Example
The following command file contains some typical comments:
REM COMPUTE uses BREAK ON REPORT to break on end of table.
BREAK ON REPORT
COMPUTE SUM OF ”DEPARTMENT 10” ”DEPARTMENT 20” –
”DEPARTMENT 30” ”TOTAL BY JOB” ON REPORT
REM Each column displays the sums of salaries by job
REM one of the departments 10, 20, 30.
SELECT JOB,
SUM( DECODE( DEPTNO, 10, SAL, 0)) ”DEPARTMENT
SUM( DECODE( DEPTNO, 20, SAL, 0)) ”DEPARTMENT
SUM( DECODE( DEPTNO, 30, SAL, 0)) ”DEPARTMENT
SUM(SAL) ”TOTAL BY JOB”
FROM EMP
GROUP BY JOB
6–66
SQL*Plus User’s Guide and Reference
for
10”,
20”,
30”,
REPFOOTER
Purpose
Syntax
Terms and Clauses
Places and formats a specified report footer at the bottom of each
report, or lists the current REPFOOTER definition.
REPF[OOTER] [PAGE] [printspec [text|variable] ...] |
[OFF|ON]
Refer to the REPHEADER command for additional information on
terms and clauses in the REPFOOTER command syntax.
Enter REPFOOTER with no clauses to list the current REPFOOTER
definition.
Usage Notes
If you do not enter a printspec clause before the text or variables,
REPFOOTER left justifies the text or variables.
You can use any number of constants and variables in a printspec.
SQL*Plus displays the constants and variables in the order you specify
them, positioning and formatting each constant or variable as specified
by the printspec clauses that precede it.
Note: If SET EMBEDDED is ON, the report footer is
suppressed.
Example
To define “END EMPLOYEE LISTING REPORT” as a report footer on a
separate page and to center it, enter:
SQL>
SQL>
SQL>
2
3
REPFOOTER PAGE CENTER ’END EMPLOYEE LISTING REPORT’
TTITLE RIGHT ’Page: ’ FORMAT 999 SQL.PNO
SELECT ENAME, SAL
FROM EMP
WHERE SAL > 2000;
Page: 1
ENAME
SAL
–––––––––– ––––––––––
JONES
2975
BLAKE
2850
CLARK
2450
SCOTT
3000
KING
5000
FORD
3000
Page: 2
END EMPLOYEE LISTING REPORT
To suppress the report footer without changing its definition, enter:
SQL> REPFOOTER OFF
Command Reference
6–67
REPHEADER
Purpose
Syntax
Places and formats a specified report header at the top of each report,
or lists the current REPHEADER definition.
REPH[EADER] [PAGE] [printspec [text|variable] ...] |
[OFF|ON]
where printspec represents one or more of the following clauses used to
place and format the text:
COL n
S[KIP] [n]
TAB n
LE[FT]
CE[NTER]
R[IGHT]
BOLD
FORMAT text
Terms and Clauses
Refer to the following list for a description of each term or clause.
These terms and clauses also apply to the REPFOOTER command.
PAGE
Begins a new page after printing the specified
report header or before printing the specified
report footer.
Note: You must specify SET NEWPAGE 0 to create
a physical page break using this command.
text
Represents the report header or footer text. Enter
text in single quotes if you want to place more than
one word on a single line. The default is NULL.
variable
Represents a user variable or any of the following
system-maintained values:
•
SQL.LNO (current line number)
•
SQL.PNO (current page number)
•
SQL.RELEASE (current Oracle release number)
•
SQL.SQLCODE (current error code)
•
SQL.USER (current username)
To print one of these values, reference the
appropriate variable in the report header or footer.
You can format variable with the FORMAT clause.
6–68
SQL*Plus User’s Guide and Reference
OFF
Turns the report header or footer off (suppresses its
display) without affecting its definition.
ON
Turns the report header or footer on (restores its
display). When you define a report header or
footer, SQL*Plus automatically sets REPHEADER
or REPFOOTER to ON.
COL n
Indents to column n of the current line (backward
if column n has been passed). “Column” in this
context means print position, not table column.
S[KIP] [n]
Skips to the start of a new line n times; if you omit
n, one time; if you enter zero for n, backward to the
start of the current line.
TAB n
Skips forward n columns (backward if you enter a
negative value for n). “Column” in this context
means print position, not table column.
LE[FT],
CE[NTER], and
R[IGHT]
Left-align, center, and right-align data on the
current line respectively. SQL*Plus aligns following
data items as a group, up to the end of the printspec
or the next LEFT, CENTER, RIGHT, or COL
command. CENTER and RIGHT use the SET
LINESIZE value to calculate the position of the
data item that follows.
BOLD
Prints data in bold print. SQL*Plus represents bold
print on your terminal by repeating the data on
three consecutive lines. On some operating
systems, SQL*Plus may instruct your printer to
print bolded text on three consecutive lines, instead
of bold.
FORMAT text
Specifies a format model that determines the
format of following data items, up to the next
FORMAT clause or the end of the command. The
format model must be a text constant such as A10
or $999. See COLUMN FORMAT for more
information on formatting and valid format
models.
If the datatype of the format model does not match
the datatype of a given data item, the FORMAT
clause has no effect on that item.
If no appropriate FORMAT model precedes a given
data item, SQL*Plus prints NUMBER values
Command Reference
6–69
according to the format specified by SET
NUMFORMAT or, if you have not used SET
NUMFORMAT, the default format. SQL*Plus
prints DATE values according to the default
format.
Refer to the FORMAT clause of the COLUMN
command in this chapter for more information on
default formats.
Enter REPHEADER with no clauses to list the current REPHEADER
definition.
Usage Notes
If you do not enter a printspec clause before the text or variables,
REPHEADER left justifies the text or variables.
You can use any number of constants and variables in a printspec.
SQL*Plus displays the constants and variables in the order you specify
them, positioning and formatting each constant or variable as specified
by the printspec clauses that precede it.
Example
To define “EMPLOYEE LISTING REPORT” as a report header on a
separate page, and to center it, enter:
SQL>
SQL>
SQL>
2
3
REPHEADER PAGE CENTER ’EMPLOYEE LISTING REPORT’
TTITLE RIGHT ’Page: ’ FORMAT 999 SQL.PNO
SELECT ENAME, SAL
FROM EMP
WHERE SAL > 2000;
Page: 1
EMPLOYEE LISTING REPORT
Page: 2
ENAME
SAL
–––––––––– ––––––––––
JONES
2975
BLAKE
2850
CLARK
2450
SCOTT
3000
KING
5000
FORD
3000
6 rows selected.
To suppress the report header without changing its definition, enter:
SQL> REPHEADER OFF
6–70
SQL*Plus User’s Guide and Reference
RUN
Purpose
Syntax
Usage Notes
Lists and executes the SQL command or PL/SQL block currently
stored in the SQL buffer.
R[UN]
RUN causes the last line of the SQL buffer to become the current line.
The slash command (/) functions similarly to RUN, but does not list
the command in the SQL buffer on your screen.
Example
Assume the SQL buffer contains the following query:
SELECT DEPTNO FROM DEPT
To RUN the query, enter
SQL> RUN
The following output results:
1* SELECT DEPTNO FROM DEPT
DEPTNO
––––––––––
10
20
30
40
Command Reference
6–71
RUNFORM
Purpose
Invokes a SQL*Forms application from within SQL*Plus.
Note: You have access to this command only if your site chose
this option while installing SQL*Plus.
Syntax
Usage Notes
RUNFORM [options] form_name
The RUNFORM syntax is the same in both SQL*Plus and SQL*Forms.
If you are already in SQL*Plus, you can invoke a form more quickly in
this manner than by invoking a form from the system prompt because
you avoid a separate Oracle logon. See your SQL*Forms Operator’s
Guide for details on the correct syntax.
Note that when you use RUNFORM from within SQL*Plus, you may
not specify a username/password (you retain your current connection
to Oracle). If you wish to use a different username/password, use the
SQL*Plus CONNECT command to connect to the desired Oracle
username prior to issuing the RUNFORM command.
Example
To run a form named MYFORM, enter
SQL> RUNFORM MYFORM
6–72
SQL*Plus User’s Guide and Reference
SAVE
Purpose
Syntax
Terms and Clauses
Usage Notes
Saves the contents of the SQL buffer in a host operating system file (a
command file).
SAV[E] file_name[.ext] [CRE[ATE]|REP[LACE]|APP[END]]
Refer to the following list for a description of each term or clause:
file_name[.ext]
Specifies the command file in which you wish to
save the buffer’s contents.
CRE[ATE]
Creates the file if the file does not exist.
REP[LACE]
Replaces the contents of an existing file. If the file
does not exist, REPLACE creates the file.
APP[END]
Adds the contents of the buffer to the end of the
file you specify.
If you do not specify an extension, SQL*Plus assumes the default
command-file extension (normally SQL). For information on changing
this default extension, see the SUFFIX variable of the SET command in
this chapter.
If you wish to SAVE a file under a name identical to a SAVE command
clause (CREATE, REPLACE, or APPEND), you must specify a file
extension.
When you SAVE the contents of the SQL buffer, SAVE adds a line
containing a slash (/) to the end of the file.
If the filename you specify is the word file, you need to put the name in
single quotes.
Example
To save the contents of the buffer in a filenamed DEPTSALRPT with
the extension SQL, enter
SQL> SAVE DEPTSALRPT
To save the contents of the buffer in a filenamed DEPTSALRPT with
the extension OLD, enter
SQL> SAVE DEPTSALRPT.OLD
Command Reference
6–73
SET
Purpose
Syntax
Sets a system variable to alter the SQL*Plus environment for your
current session, such as
•
the display width for NUMBER data
•
the display width for LONG data
•
enabling or disabling the printing of column headings
•
the number of lines per page
SET system_variable value
where system_variable value represents a system variable followed by a
value, as shown below:
APPI[NFO]{ON|OFF|text}
ARRAY[SIZE] {20|n}
AUTO[COMMIT] {OFF|ON|IMM[EDIATE]|n}
AUTOP[RINT] {OFF|ON}
AUTOT[RACE] {OFF|ON|TRACE[ONLY]} [EXP[LAIN]] [STAT[ISTICS]]
BLO[CKTERMINATOR] {.|c}
CLOSECUR[SOR] {OFF|ON}
CMDS[EP] {;|c|OFF|ON}
COLSEP {_|text}
COM[PATIBILITY] {V6|V7|NATIVE}
CON[CAT] {.|c|OFF|ON}
COPYC[OMMIT] {0|n}
COPYTYPECHECK {OFF|ON}
CRT crt
DEF[INE] {’&’|c|OFF|ON}
ECHO {OFF|ON}
EDITF[ILE] file_name[.ext]
EMBEDDED {OFF|ON}
ESC[APE] {\|c|OFF|ON}
FEED[BACK] {6|n|OFF|ON}
FLAGGER {OFF|ENTRY|INTERMED[IATE]|FULL}
FLU[SH] {OFF|ON}
HEA[DING] {OFF|ON}
HEADS[EP] {||c|OFF|ON}
LIN[ESIZE] {80|n}
LONG {80|n}
LONGC[HUNKSIZE] {80|n}
MAXD[ATA] n
NEWP[AGE] {1|n}
6–74
SQL*Plus User’s Guide and Reference
NULL text
NUMF[ORMAT] format
NUM[WIDTH] {10|n}
PAGES[IZE] {24|n}
PAU[SE] {OFF|ON|text}
RECSEP {WR[APPED]|EA[CH]|OFF}
RECSEPCHAR {_|c}
SERVEROUT[PUT] {OFF|ON} [SIZE n] [FOR[MAT] {WRA[PPED]|
WOR[D_WRAPPED]|TRU[NCATED]}]
SHOW[MODE] {OFF|ON}
SQLC[ASE] {MIX[ED]|LO[WER]|UP[PER]}
SQLCO[NTINUE] {> |text}
SQLN[UMBER] {OFF|ON}
SQLPRE[FIX] {#|c}
SQLP[ROMPT] {SQL>|text}
SQLT[ERMINATOR] {;|c|OFF|ON}
SUF[FIX] {SQL|text}
TAB {OFF|ON}
TERM[OUT] {OFF|ON}
TI[ME] {OFF|ON}
TIMI[NG] {OFF|ON}
TRIM[OUT] {OFF|ON}
TRIMS[POOL] {ON|OFF}
UND[ERLINE] {–|c|ON|OFF}
VER[IFY] {OFF|ON}
WRA[P] {OFF|ON}
Terms and Clauses
Refer to the following list for a description of each term, clause, or
system variable:
APPI[NFO]{ON|OFF|text}
Sets automatic registering of command files
through the DBMS_APPLICATION_INFO
package. This enables the performance and
resource usage of each command file to be
monitored by your DBA. The registered name
appears in the MODULE column of the
V$SESSION and V$SQLAREA virtual tables. You
can also read the registered name using the
DBMS_APPLICATION_INFO.READ_MODULE
procedure.
ON registers command files invoked by the @, @@
or START commands. OFF disables registering of
Command Reference
6–75
command files. Instead, the current value of text is
registered. Text specifies the text to register when
no command file is being run or when APPINFO is
OFF. The default for text is “SQL*Plus.” If you enter
multiple words for text, you must enclose them in
quotes. The maximum length for text is limited by
the DBMS_APPLICATION_INFO package.
The registered name has the format nn@xfilename
where: nn is the depth level of command file; x is
’<’ when the command file name is truncated,
otherwise, it is blank; and filename is the command
file name, possibly truncated to the length allowed
by the DBMS_APPLICATION_INFO package
interface.
Note: To use this feature, you must have access to
the DBMS_APLICATION_INFO package. Run
DBMSUTIL.SQL (this name may vary depending
on your operating system) as SYS to create the
DBMS_APPLICATION_INFO package.
DBMSUTIL.SQL is part of the Oracle7 Server
product.
For more information on the
DBMS_APPLICATION_INFO package, see
“Registering Applications” in the Oracle7 Server
Tuning manual.
Note: APPINFO is not available with TRUSTED
Oracle.
ARRAY[SIZE] {20|n}
Sets the number of rows—called a batch—that
SQL*Plus will fetch from the database at one time.
Valid values are 1 to 5000. A large value increases
the efficiency of queries and subqueries that fetch
many rows, but requires more memory. Values
over approximately 100 provide little added
performance. ARRAYSIZE has no effect on the
results of SQL*Plus operations other than
increasing efficiency.
AUTO[COMMIT] {OFF|ON|IMM[EDIATE]|n}
Controls when Oracle commits pending changes to
the database. ON commits pending changes to the
database after Oracle executes each successful
INSERT, UPDATE, or DELETE command or
6–76
SQL*Plus User’s Guide and Reference
PL/SQL block. OFF suppresses automatic
committing so that you must commit changes
manually (for example, with the SQL command
COMMIT). IMMEDIATE functions in the same
manner as the ON option. n commits pending
changes to the database after Oracle executes n
successful SQL INSERT, UPDATE, or DELETE
commands or PL/SQL blocks. n cannot be less
than zero or greater than 2,000,000,000. The
statement counter is reset to zero after successful
completion of
•
n INSERT, UPDATE or DELETE commands or
PL/SQL blocks
•
a commit
•
a rollback
•
a SET AUTOCOMMIT command
Note: For this feature, a PL/SQL block is
considered one transaction, regardless of the actual
number of SQL commands contained within it.
AUTOP[RINT] {OFF|ON}
Sets the automatic PRINTing of bind variables. ON
or OFF controls whether SQL*Plus automatically
displays bind variables (referenced in a successful
PL/SQL block or used in an EXECUTE command).
For more information about displaying bind
variables, see the PRINT command in this chapter.
AUTOT[RACE] {OFF|ON|TRACE[ONLY]} [EXP[LAIN]] [STAT[ISTICS]]
Displays a report on the execution of successful
SQL DML statements (SELECT, INSERT, UPDATE
or DELETE). The report can include execution
statistics and the query execution path.
OFF does not display a trace report. ON displays a
trace report. TRACEONLY displays a trace report,
but does not print query data, if any. EXPLAIN
shows the query execution path by performing an
EXPLAIN PLAN. STATISTICS displays SQL
statement statistics.
Using ON or TRACEONLY with no explicit
options defaults to EXPLAIN STATISTICS.
Command Reference
6–77
The TRACEONLY option may be useful to
suppress the query data of large queries. If
STATISTICS is specified, SQL*Plus still fetches the
query data from the server, however, the data is
not displayed.
The AUTOTRACE report is printed after the
statement has successfully completed.
Information about Execution Plans and the
statistics is documented in the guide Oracle7 Server
Tuning.
To use the EXPLAIN option, you must first create
the table PLAN_TABLE in your schema. The
description of this table is specific to the version of
the database to which you are connected. Use
UTLXPLAN.SQL (this name may vary depending
on your operating system) to create PLAN_TABLE.
UTLXPLAN.SQL is part of the Oracle7 Server
product. Contact your DBA if you cannot create
this table.
To access STATISTICS data, you must have access
to several Dynamic Performance tables (for
information about the Dynamic Performance or
“V$” tables, see the Oracle7 Server
documentation). Access can be granted using the
role created in PLUSTRCE.SQL (this name may
vary depending on your operating system). You
must run PLUSTRCE.SQL as SYS and grant the
role to users who will use SET AUTOTRACE.
Contact your DBA to perform these steps.
When SQL*Plus produces a STATISTICS report, a
second connection to the database is automatically
created. This connection is closed when the
STATISTICS option is set to OFF, or you log out of
SQL*Plus.
The formatting of your AUTOTRACE report may
vary depending on the version of the server to
which you are connected and the configuration of
the server.
AUTOTRACE is not available when FIPS flagging
is enabled, or with TRUSTED Oracle.
6–78
SQL*Plus User’s Guide and Reference
See “Tracing Statements” in Chapter 3 for more
information on AUTOTRACE.
BLO[CKTERMINATOR] {.|c}
Sets the non-alphanumeric character used to end
PL/SQL blocks to c. To execute the block, you must
issue a RUN or / (slash) command.
CLOSECUR[SOR] {OFF|ON}
Sets the cursor usage behavior. ON or OFF sets
whether or not the cursor will close and reopen
after each SQL statement. This feature may be
useful in some circumstances to release resources
in the database server.
CMDS[EP] {;|c|OFF|ON}
Sets the non-alphanumeric character used to
separate multiple SQL*Plus commands entered on
one line to c. ON or OFF controls whether you can
enter multiple commands on a line; ON
automatically sets the command separator
character to a semicolon (;).
COLSEP { |text}
Sets the text to be printed between SELECTed
columns. If the COLSEP variable contains blanks or
punctuation characters, you must enclose it with
single quotes. The default value for text is a single
space.
In multi-line rows, the column separator does not
print between columns that begin on different
lines. The column separator does not appear on
blank lines produced by BREAK ... SKIP n and
does not overwrite the record separator. See SET
RECSEP in this chapter for more information.
COM[PATIBILITY] {V6|V7|NATIVE}
Specifies the version of Oracle to which you are
currently connected. Set COMPATIBILITY to V6
for Oracle Version 6 or V7 for Oracle7. Set
COMPATIBILITY to NATIVE if you wish the
database to determine the setting (for example, if
connected to Oracle7, compatibility would default
to V7). COMPATIBILITY must be correctly set for
the version of Oracle to which you are connected;
otherwise, you will be unable to run any SQL
commands. Note that you can set
COMPATIBILITY to V6 when connected to
Command Reference
6–79
Oracle7. This enables you to run Oracle Version 6
SQL against Oracle7.
Setting COMPATIBILITY to V6 and V7 affects how
SQL*Plus handles character data. Setting
COMPATIBILITY to V6 causes SQL*Plus to treat
CHAR column values as variable-length character
strings. Setting COMPATIBILITY to V7 causes
SQL*Plus to treat CHAR column values as
fixed-length character strings and VARCHAR2
(VARCHAR) column values as variable-length
character strings. See the Oracle7 Server
documentation for a list of changes from Version 6
to Oracle7.
CON[CAT] {.|c|OFF|ON}
Sets the character you can use to terminate a
substitution variable reference if you wish to
immediately follow the variable with a character
that SQL*Plus would otherwise interpret as a part
of the substitution variable name. SQL*Plus resets
the value of CONCAT to a period when you switch
CONCAT on.
COPYC[OMMIT] {0|n}
Controls the number of batches after which the
COPY command commits changes to the database.
COPY commits rows to the destination database
each time it copies n row batches. Valid values are
zero to 5000. You can set the size of a batch with
the ARRAYSIZE variable. If you set
COPYCOMMIT to zero, COPY performs a commit
only at the end of a copy operation.
COPYTYPECHECK {OFF|ON}
Sets the suppression of the comparison of
datatypes while inserting or appending to tables
with the COPY command. This is to facilitate
copying to DB2, which requires that a CHAR be
copied to a DB2 DATE.
CRT crt
6–80
SQL*Plus User’s Guide and Reference
Changes the default CRT file used in the SQL*Plus
RUNFORM command. To return to the original
default (before CRT was set), set CRT to nothing by
entering two double quotes (””) for crt.
If you want to use NEW.CRT during a form
invocation on a system where the default CRT is
OLD.CRT, you can either invoke the form by
SQL> RUNFORM –c NEW form_name
or
SQL> SET CRT NEW
SQL> RUNFORM form_name
The second method stores the CRT option so that
you do not need to respecify it for subsequent
RUNFORM commands during the same SQL*Plus
session.
DEF[INE] {&|c|OFF|ON}
Sets the character used to prefix substitution
variables to c. ON or OFF controls whether
SQL*Plus will scan commands for substitution
variables and replace them with their values. ON
changes the value of c back to the default ’&’, not
the most recently used character. The setting of
DEFINE to OFF overrides the setting of the SCAN
variable. For more information on the SCAN
variable, see the SET SCAN command in
Appendix F
ECHO {OFF|ON}
Controls whether the START command lists each
command in a command file as the command is
executed. ON lists the commands; OFF suppresses
the listing.
EDITF[ILE] file_name[.ext]
Sets the default filename for the EDIT command.
For more information about the EDIT command,
see EDIT in this chapter.
You can include a path and/or file extension. For
information on changing the default extension, see
the SUFFIX variable of this command. The default
filename and maximum filename length are
operating system specific.
EMBEDDED {OFF|ON}
Controls where on a page each report begins. OFF
forces each report to start at the top of a new page.
ON allows a report to begin anywhere on a page.
Set EMBEDDED to ON when you want a report to
Command Reference
6–81
begin printing immediately following the end of
the previously run report.
Note: When you use SET EMBEDDED ON and
change the pagesize with SET PAGESIZE n,
SQL*Plus finishes the current page using the
existing pagesize setting and, if required, begins a
new page with the new pagesize setting.
Note: When you use a BTITLE with SET
EMBEDDED ON, the second and subsequent
SELECT statements will always begin on a new
page. This is because SQL*Plus has no input read
ahead. Since SQL*Plus cannot anticipate whether
you will enter another SELECT statement or, for
example, EXIT, SQL*Plus has to complete
processing all output from the first SELECT
statement before it reads the next command. This
processing includes printing the BTITLE.
Therefore, given two SELECT statements,
SQL*Plus prints the final BTITLE of the first
SELECT statement before it processes the second.
The second SELECT statement will then begin at
the top of a new page.
Note: When you use a REPFOOTER with SET
EMBEDDED ON, no footer will be displayed.
ESC[APE] {\|c|OFF|ON}
Defines the character you enter as the escape
character. OFF undefines the escape character. ON
enables the escape character. ON changes the value
of c back to the default “\”.
You can use the escape character before the
substitution character (set through SET DEFINE) to
indicate that SQL*Plus should treat the substitution
character as an ordinary character rather than as a
request for variable substitution.
FEED[BACK] {6|n|OFF|ON}
Displays the number of records returned by a
query when a query selects at least n records. ON
or OFF turns this display on or off. Turning
feedback ON sets n to 1. Setting feedback to zero is
equivalent to turning it OFF.
6–82
SQL*Plus User’s Guide and Reference
FLAGGER {OFF|ENTRY|INTERMED[IATE]|FULL}
Checks to make sure that SQL statements conform
to the ANSI/ISO SQL92 standard. If any
non-standard constructs are found, the Oracle
Server flags them as errors and displays the
violating syntax. This is the equivalent of the SQL
language ALTER SESSION SET FLAGGER
command.
You may execute SET FLAGGER even if you are
not connected to a database. FIPS flagging will
remain in effect across SQL*Plus sessions until a
SET FLAGGER OFF (or ALTER SESSION SET
FLAGGER = OFF) command is successful or you
exit SQL*Plus.
When FIPS flagging is enabled, SQL*Plus displays
a warning for the CONNECT, DISCONNECT, and
ALTER SESSION SET FLAGGER commands, even
if they are successful.
The SET FLAGGER and ALTER SESSION SET
FLAGGER commands require Oracle7 Release 7.1
or greater.
FLU[SH] {OFF|ON}
Controls when output is sent to the user’s display
device. OFF allows the host operating system to
buffer output. ON disables buffering.
Use OFF only when you run a command file
non-interactively (that is, when you do not need to
see output and/or prompts until the command file
finishes running). The use of FLUSH OFF may
improve performance by reducing the amount of
program I/O.
HEA[DING] {OFF|ON}
Controls printing of column headings in reports.
ON prints column headings in reports; OFF
suppresses column headings.
HEADS[EP] {||c|OFF|ON}
Defines the character you enter as the heading
separator character. The heading separator
character cannot be alphanumeric or white space.
You can use the heading separator character in the
COLUMN command and in the old forms of
Command Reference
6–83
BTITLE and TTITLE to divide a column heading or
title onto more than one line. ON or OFF turns
heading separation on or off. When heading
separation is OFF, SQL*Plus prints a heading
separator character like any other character. ON
changes the value of c back to the default “|”.
LIN[ESIZE] {80|n}
Sets the total number of characters that SQL*Plus
displays on one line before beginning a new line. It
also controls the position of centered and
right-aligned text in TTITLE, BTITLE,
REPHEADER and REPFOOTER. You can define
LINESIZE as a value from 1 to a maximum that is
system dependent. Refer to the Oracle installation
and user’s manual(s) provided for your operating
system.
LONG {80|n}
Sets maximum width (in characters) for displaying
and copying LONG values. For Oracle7, the
maximum value of n is 2 gigabytes. For Oracle
Version 6, the maximum is 32,767.
LONGC[HUNKSIZE] {80|n}
Sets the size (in characters) of the increments in
which SQL*Plus retrieves a LONG value. When
retrieving a LONG value, you may want to retrieve
it in increments rather than all at once because of
memory size restrictions. Valid values are 1 to
whatever has been set with MAXDATA.
LONGCHUNKSIZE applies only to Oracle7.
6–84
MAXD[ATA] n
Sets the maximum total row width that SQL*Plus
can process. The default and maximum values of n
are system dependent. Consult the Oracle
installation and user’s manual(s) provided for your
operating system or your DBA for details.
NEWP[AGE] {1|n}
Sets the number of blank lines to be printed from
the top of each page to the top title. A value of zero
places a formfeed at the beginning of each page
(including the first page) and clears the screen on
most terminals.
NULL text
Sets the text that represents a null value in the
result of a SQL SELECT command. Use the NULL
clause of the COLUMN command to override the
setting of the NULL variable for a given column.
SQL*Plus User’s Guide and Reference
NUMF[ORMAT] format
Sets the default format for displaying numbers.
Enter a number format for format. For number
format descriptions, see the FORMAT clause of the
COLUMN command in this chapter.
NUM[WIDTH] {10|n}
Sets the default width for displaying numbers.
SQL*Plus rounds numbers up or down to the value
of SET NUMWIDTH.
PAGES[IZE] {24|n}
Sets the number of lines in each page. You can set
PAGESIZE to zero to suppress all headings, page
breaks, titles, the initial blank line, and other
formatting information.
PAU[SE] {OFF|ON|text}
Allows you to control scrolling of your terminal
when running reports. ON causes SQL*Plus to
pause at the beginning of each page of report
output. You must press [Return] after each pause.
The text you enter specifies the text to be displayed
each time SQL*Plus pauses. If you enter multiple
words, you must enclose text in single quotes.
You can embed terminal-dependent escape
sequences in the PAUSE command. These
sequences allow you to create inverse video
messages or other effects on terminals that support
such characteristics.
RECSEP {WR[APPED]|EA[CH]|OFF}
RECSEPCHAR { |c} Display or print record separators. A record
separator consists of a single line of the
RECSEPCHAR (record separating character)
repeated LINESIZE times.
RECSEPCHAR defines the record separating
character. A single space is the default.
RECSEP tells SQL*Plus where to make the record
separation. For example, if you set RECSEP to
WRAPPED, SQL*Plus prints a record separator
only after wrapped lines. If you set RECSEP to
EACH, SQL*Plus prints a record separator
following every row. If you set RECSEP to OFF,
SQL*Plus does not print a record separator.
Command Reference
6–85
SERVEROUT[PUT] {OFF|ON} [SIZE n] [FOR[MAT] {WRA[PPED]|
WOR[D_WRAPPED]|TRU[NCATED]}]
Controls whether to display the output (that is,
DBMS_OUTPUT.PUT_LINE) of stored procedures
or PL/SQL blocks in SQL*Plus. OFF suppresses the
output of DBMS_OUTPUT.PUT_LINE; ON
displays the output.
SIZE sets the number of bytes of the output that
can be buffered within the Oracle7 Server. The
default for n is 2000. n cannot be less than 2000 or
greater than 1,000,000.
When WRAPPED is enabled SQL*Plus wraps the
server output within the line size specified by SET
LINESIZE, beginning new lines when required.
When WORD_WRAPPED is enabled, each line of
server output is wrapped within the line size
specified by SET LINESIZE. Lines are broken on
word boundaries. SQL*Plus left justifies each line,
skipping all leading whitespace.
When TRUNCATED is enabled, each line of server
output is truncated to the line size specified by SET
LINESIZE.
For each FORMAT, every server output line begins
on a new output line.
Note: The output is displayed synchronously after
the stored procedure or PL/SQL block has been
executed by the Oracle7 Server.
For more information on
DBMS_OUTPUT.PUT_LINE, see your Oracle7
Server Application Developer’s Guide.
SHOW[MODE] {OFF|ON}
Controls whether SQL*Plus lists the old and new
settings of a SQL*Plus system variable when you
change the setting with SET. ON lists the settings;
OFF suppresses the listing. SHOWMODE ON has
the same behavior as the obsolete SHOWMODE
BOTH.
SQLC[ASE] {MIX[ED]|LO[WER]|UP[PER]}
Converts the case of SQL commands and PL/SQL
blocks just prior to execution. SQL*Plus converts
6–86
SQL*Plus User’s Guide and Reference
all text within the command, including quoted
literals and identifiers, as follows:
•
uppercase if SQLCASE equals UPPER
•
lowercase if SQLCASE equals LOWER
•
unchanged if SQLCASE equals MIXED
SQLCASE does not change the SQL buffer itself.
SQLCO[NTINUE] {> |text}
Sets the character sequence SQL*Plus displays as a
prompt after you continue a SQL*Plus command
on an additional line using a hyphen (–).
SQLN[UMBER] {OFF|ON}
Sets the prompt for the second and subsequent
lines of a SQL command or PL/SQL block. ON sets
the prompt to be the line number. OFF sets the
prompt to the value of SQLPROMPT.
SQLPRE[FIX] {#|c}
Sets the SQL*Plus prefix character. While you are
entering a SQL command or PL/SQL block, you
can enter a SQL*Plus command on a separate line,
prefixed by the SQL*Plus prefix character.
SQL*Plus will execute the command immediately
without affecting the SQL command or PL/SQL
block that you are entering. The prefix character
must be a non-alphanumeric character.
SQLP[ROMPT] {SQL>|text}
Sets the SQL*Plus command prompt.
SQLT[ERMINATOR] {;|c|OFF|ON}
Sets the character used to end and execute SQL
commands to c. OFF means that SQL*Plus
recognizes no command terminator; you terminate
a SQL command by entering an empty line. ON
resets the terminator to the default semicolon (;).
SUF[FIX] {SQL|text}
Sets the default file extension that SQL*Plus uses in
commands that refer to command files. SUFFIX
does not control extensions for spool files.
Command Reference
6–87
TAB {OFF|ON}
Determines how SQL*Plus formats white space in
terminal output. OFF uses spaces to format white
space in the output. ON uses the TAB character.
TAB settings are every eight characters. The default
value for TAB is system dependent.
Note: This option applies only to terminal output.
Tabs will not be placed in output files.
TERM[OUT] {OFF|ON}
Controls the display of output generated by
commands executed from a command file. OFF
suppresses the display so that you can spool
output from a command file without seeing the
output on the screen. ON displays the output.
TERMOUT OFF does not affect output from
commands you enter interactively.
TI[ME] {OFF|ON}
Controls the display of the current time. ON
displays the current time before each command
prompt. OFF suppresses the time display.
TIMI[NG] {OFF|ON}
Controls the display of timing statistics. ON
displays timing statistics on each SQL command or
PL/SQL block run. OFF suppresses timing of each
command. For information about the data SET
TIMING ON displays, see the Oracle installation
and user’s manual(s) provided for your operating
system. Refer to the TIMING command for
information on timing multiple commands.
TRIM[OUT] {OFF|ON}
Determines whether SQL*Plus allows trailing
blanks at the end of each displayed line. ON
removes blanks at the end of each line, improving
performance especially when you access SQL*Plus
from a slow communications device. OFF allows
SQL*Plus to display trailing blanks. TRIMOUT ON
does not affect spooled output.
TRIMS[POOL] {ON|OFF}
Determines whether SQL*Plus allows trailing
blanks at the end of each spooled line. ON removes
blanks at the end of each line. OFF allows SQL*Plus
to include trailing blanks. TRIMSPOOL ON does
not affect terminal output.
6–88
SQL*Plus User’s Guide and Reference
UND[ERLINE] {–|c|ON|OFF}
Sets the character used to underline column
headings in SQL*Plus reports to c. c cannot be an
alphanumeric character or a white space. ON or
OFF turns underlining on or off. ON changes the
value of c back to the default “–”.
VER[IFY] {OFF|ON}
Controls whether SQL*Plus lists the text of a SQL
statement or PL/SQL command before and after
SQL*Plus replaces substitution variables with
values. ON lists the text; OFF suppresses the
listing.
WRA[P] {OFF|ON}
Controls whether SQL*Plus truncates the display
of a SELECTed row if it is too long for the current
line width. OFF truncates the SELECTed row; ON
allows the SELECTed row to wrap to the next line.
Use the WRAPPED and TRUNCATED clauses of
the COLUMN command to override the setting of
WRAP for specific columns.
Usage Notes
SQL*Plus maintains system variables (also called SET command
variables) to allow you to establish a particular environment for a
SQL*Plus session. You can change these system variables with the SET
command and list them with the SHOW command.
SET ROLE and SET TRANSACTION are SQL commands (see the
Oracle7 Server SQL Language Reference Manual for more information).
When not followed by the keywords TRANSACTION or ROLE, SET is
assumed to be a SQL*Plus command.
Examples
The following examples show sample uses of selected SET command
variables.
APPINFO
To display the setting of APPINFO, enter:
SQL> SHOW APPINFO
SQL> appinfo is ON and set to “SQL*Plus”
To change the default text, enter:
SQL> SET APPI ’This is SQL*Plus’
SQL> SHOW APPINFO
SQL> appinfo is ON and set to “This is SQL*Plus”
To make sure that registration has taken place, enter:
Command Reference
6–89
SQL> VARIABLE MOD VARCHAR2(50)
SQL> VARIABLE ACT VARCHAR2(40)
SQL> EXECUTE DBMS_APPLICATION_INFO.READ_MODULE(:MOD, :ACT);
SQL> PRINT MOD
MOD
–––––––––––––––––––––––––––––––––––––––––––––––––––
This is SQL*Plus
CMDSEP
To specify a TTITLE and format a column on the same line:
SQL>
SQL>
SQL>
2
SET CMDSEP +
TTITLE LEFT ’SALARIES’ + COLUMN SAL FORMAT $9,999
SELECT ENAME, SAL FROM EMP
WHERE JOB = ’CLERK’;
The following output results:
SALARIES
ENAME
SAL
–––––––––– –––––––
SMITH
$800
ADAMS
$1,100
JAMES
$950
MILLER
$1,300
COLSEP
To set the column separator to “|”:
SQL>
SQL>
2
3
SET COLSEP ’|’
SELECT ENAME, JOB, DEPTNO
FROM EMP
WHERE DEPTNO = 20;
The following output results:
ENAME
|JOB
|
DEPTNO
–––––––––––––––––––––––––––––––
SMITH
|CLERK
|
20
JONES
|MANAGER |
20
SCOTT
|ANALYST |
20
ADAMS
|CLERK
|
20
FORD
|ANALYST |
20
COMPATIBILITY
To run a command file, SALARY.SQL, created with Version 6 of Oracle,
enter
SQL> SET COMPATIBILITY V6
SQL> START SALARY
6–90
SQL*Plus User’s Guide and Reference
After running the file, reset compatibility to V7 to run command files
created with Oracle7:
SQL> SET COMPATIBILITY V7
Alternatively, you can add the command SET COMPATIBILITY V6 to
the beginning of the command file, and reset COMPATIBILITY to V7 at
the end of the file.
ESCAPE
If you define the escape character as an exclamation point (!), then
SQL> SET ESCAPE !
SQL> ACCEPT v1 PROMPT ’Enter !&1:’
displays this prompt:
Enter &1:
HEADING
To suppress the display of column headings in a report, enter
SQL> SET HEADING OFF
If you then run a SQL SELECT command,
SQL> SELECT ENAME, SAL FROM EMP
2 WHERE JOB = ’CLERK’;
the following output results:
ADAMS
JAMES
MILLER
LONG
1100
950
1300
To set the maximum width for displaying and copying LONG values to
500, enter
SQL> SET LONG 500
The LONG data will wrap on your screen; SQL*Plus will not truncate
until the 501st character.
LONGCHUNKSIZE
To set the size of the increments in which SQL*Plus retrieves LONG
values to 100 characters, enter
SQL> SET LONGCHUNKSIZE 100
The LONG data will be retrieved in increments of 100 characters until
the entire value is retrieved or the value of SET LONG is reached.
Command Reference
6–91
SERVEROUTPUT
To enable the display of DBMS_OUTPUT.PUT_LINE, enter
SQL> SET SERVEROUTPUT ON
The following example shows what happens when you execute an
anonymous procedure with SET SERVEROUTPUT ON:
SQL>
2
3
4
Task
BEGIN
DBMS_OUTPUT.PUT_LINE(’Task is complete’);
END;
/
is complete.
PL/SQL procedure successfully completed.
The following example shows what happens when you create a trigger
with SET SERVEROUTPUT ON:
SQL> CREATE TRIGGER SERVER_TRIG BEFORE INSERT OR UPDATE –
>
OR DELETE
2 ON SERVER_TAB
3 BEGIN
4 DBMS_OUTPUT.PUT_LINE(’Task is complete.’);
5 END;
6 /
Trigger created.
SQL> INSERT INTO SERVER_TAB VALUES (’TEXT’);
Task is complete.
1 row created.
To set the output to WORD_WRAPPED, enter
SQL> SET SERVEROUTPUT ON FORMAT WORD_WRAPPED
SQL> SET LINESIZE 20
SQL> BEGIN
2 DBMS_OUTPUT.PUT_LINE(’If there is nothing left to do’);
3 DBMS_OUTPUT.PUT_LINE(’shall we continue with plan B?’);
4 end;
5 /
If there is nothing
left to do
shall we continue
with plan B?
To set the output to TRUNCATED, enter
SQL> SET SERVEROUTPUT ON FORMAT TRUNCATED
SQL> SET LINESIZE 20
6–92
SQL*Plus User’s Guide and Reference
SQL> BEGIN
2 DBMS_OUTPUT.PUT_LINE(’If there is nothing left to do’);
3 DBMS_OUTPUT.PUT_LINE(’shall we continue with plan B?’);
4 END;
5 /
If there is nothing
shall we continue wi
SQLCONTINUE
To set the SQL*Plus command continuation prompt to an exclamation
point followed by a space, enter
SQL> SET SQLCONTINUE ’! ’
SQL*Plus will prompt for continuation as follows:
SQL> TTITLE ’YEARLY INCOME’ –
! RIGHT SQL.PNO SKIP 2 –
! CENTER ’PC DIVISION’
SQL>
SUFFIX
To set the default command-file extension to UFI, enter
SQL> SET SUFFIX UFI
If you then enter
SQL> GET EXAMPLE
SQL*Plus will look for a filenamed EXAMPLE with an extension of UFI
instead of EXAMPLE with an extension of SQL.
Command Reference
6–93
SHOW
Purpose
Syntax
Shows the value of a SQL*Plus system variable or the current SQL*Plus
environment.
SHO[W] option
where option represents one of the following terms or clauses:
system_variable
ALL
BTI[TLE]
ERR[ORS] [{FUNCTION|PROCEDURE|PACKAGE|PACKAGE BODY|
TRIGGER|VIEW} [schema.]name]
LABEL
LNO
PNO
REL[EASE]
REPF[OOTER]
REPH[EADER]
SPOO[L]
SQLCODE
TTI[TLE]
USER
Terms and Clauses
Refer to the following list for a description of each term or clause:
system_variable Represents any system variable set by the SET
command.
ALL
Lists the settings of all SHOW options, except
ERRORS and LABEL, in alphabetical order.
BTI[TLE]
Shows the current BTITLE definition.
ERR[ORS] [{FUNCTION|PROCEDURE|PACKAGE|PACKAGE
BODY|TRIGGER|VIEW} [schema.]name]
Shows the compilation errors of a stored procedure
(includes stored functions, procedures, and
packages). After you use the CREATE command to
create a stored procedure, a message is displayed if
the stored procedure has any compilation errors.
To see the errors, you use SHOW ERRORS.
When you specify SHOW ERRORS with no
arguments, SQL*Plus shows compilation errors for
the most recently created or altered stored
6–94
SQL*Plus User’s Guide and Reference
procedure. When you specify the type (function,
procedure, package, package body, trigger, or
view) and the name of the PL/SQL stored
procedure, SQL*Plus shows errors for that stored
procedure. For more information on compilation
errors, see your PL/SQL User’s Guide and Reference.
schema contains the named object. If you omit
schema, SHOW ERRORS assumes the object is
located in your current schema.
Note: You must have DBA privilege to view other
schemas, or other schema’s object errors.
SHOW ERRORS output displays the line and
column number of the error (LINE/COL) as well
as the error itself (ERROR). LINE/COL and
ERROR have default widths of 8 and 65,
respectively. You can alter these widths using the
COLUMN command.
Example
LABEL
Shows the security level for the current session. For
more information, see your Trusted Oracle
Administrator’s Guide.
LNO
Shows the current line number (the position in the
current page of the display and/or spooled
output).
PNO
Shows the current page number.
REL[EASE]
Shows the release number of Oracle that SQL*Plus
is accessing.
REPF[OOTER]
Shows the current REPFOOTER definition.
REPH[EADER]
Shows the current REPHEADER definition.
SPOO[L]
Shows whether output is being spooled.
SQLCODE
Shows the value of SQL.SQLCODE (the SQL return
code of the most recent operation).
TTI[TLE]
Shows the current TTITLE definition.
USER
Shows the username under which you are
currently accessing SQL*Plus.
To list the current LINESIZE, enter
SQL> SHOW LINESIZE
Command Reference
6–95
If the current linesize equals 80 characters, SQL*Plus will give the
following response:
linesize 80
The following example illustrates how to create a stored procedure and
then show its compilation errors:
SQL> connect system/manager
SQL> create procedure scott.proc1 as
SQL> begin
SQL>
:p1 := 1;
SQL> end;
SQL> /
Warning: Procedure created with compilation errors.
SQL> show errors
Errors for PROCEDURE SCOTT.PROC1:
LINE/COL ERROR
––––––––––––––––––––––––––––––––––––––––––––––––––––––––
3/3
PLS–00049: bad bind variable ’P1’
SQL> show errors procedure proc1
No errors.
SQL> show errors procedure scott.proc1
Errors for PROCEDURE SCOTT.PROC1:
LINE/COL ERROR
––––––––––––––––––––––––––––––––––––––––––––––––––––––––
3/3
PLS–00049: bad bind variable ’P1’
6–96
SQL*Plus User’s Guide and Reference
SPOOL
Purpose
Syntax
Terms and Clauses
Stores query results in an operating system file and, optionally, sends
the file to a printer.
SPO[OL] [file_name[.ext]|OFF|OUT]
Refer to the following list for a description of each term or clause:
file_name[.ext]
Represents the name of the file to which you wish
to spool. SPOOL followed by file_name begins
spooling displayed output to the named file. If you
do not specify an extension, SPOOL uses a default
extension (LST or LIS on most systems).
OFF
Stops spooling.
OUT
Stops spooling and sends the file to your host
computer’s standard (default) printer.
Enter SPOOL with no clauses to list the current spooling status.
Usage Notes
Examples
To spool output generated by commands in a command file without
displaying the output on the screen, use SET TERMOUT OFF. SET
TERMOUT OFF does not affect output from commands run
interactively.
To record your displayed output in a filenamed DIARY using the
default file extension, enter
SQL> SPOOL DIARY
To stop spooling and print the file on your default printer, type
SQL> SPOOL OUT
Command Reference
6–97
SQLPLUS
Purpose
Syntax
Starts SQL*Plus from the operating system prompt.
SQLPLUS [[–S[ILENT]] [logon] [start]]|–?
where:
logon
Requires the following syntax:
username[/password]
[@database_specification]|/|/NOLOG
start
Allows you to enter the name of a command file
and arguments. SQL*Plus passes the arguments to
the command file as though you executed the file
using the SQL*Plus START command. The start
clause requires the following syntax:
@file_name[.ext][arg ...]
See the START command in this chapter for more
information.
Terms and Clauses
You have the option of entering logon. If you do not specify logon and
do specify start, SQL*Plus assumes that the first line of the command
file contains a valid logon. If neither start nor logon are specified,
SQL*Plus prompts for logon information.
Refer to the following list for a description of each term or clause:
username[/password]
Represent the username and password with which
you wish to start SQL*Plus and connect to Oracle.
If you omit username and password, SQL*Plus
prompts you for them. If you enter a slash (/) or
simply enter [Return] to the prompt for username,
SQL*Plus logs you in using a default logon (see ”/”
below).
If you omit only password, SQL*Plus prompts you
for password. When prompting, SQL*Plus does not
display password on your terminal screen.
/
6–98
SQL*Plus User’s Guide and Reference
Represents a default logon using operating system
authentication. You cannot enter a
database_specification if you use a default logon. In a
default logon, SQL*Plus typically attempts to log
you in using the username OPS$name, where name
is your operating system username. See the Oracle7
Server Administrator’s Guide for information about
operating system authentication.
/NOLOG
Establishes no initial connection to Oracle. Before
issuing any SQL commands, you must issue a
CONNECT command to establish a valid logon.
Use /NOLOG when you want to have a SQL*Plus
command file prompt for the username, password,
or database specification. The first line of this
command file is not assumed to contain a logon.
database_specification
Consists of a SQL*Net connection string. The exact
syntax depends upon the SQL*Net
communications protocol your Oracle installation
uses. For more information, refer to the SQL*Net
manual appropriate for your protocol or contact
your DBA.
Usage Notes
–S[ILENT]
Suppresses all SQL*Plus information and prompt
messages, including the command prompt, the
echoing of commands, and the banner normally
displayed when you start SQL*Plus. Use SILENT
to invoke SQL*Plus within another program so that
the use of SQL*Plus is invisible to the user.
–?
Makes SQLPLUS display its current version and
level number and then returns control to the
operating system. Do not enter a space between the
hyphen (–) and the question mark (?).
The SQL*Plus command may be known by a different name under
some operating systems, for example, plus33. See your SQL*Plus
installation documentation for further information on your specific
operating system.
SQL*Plus supports a Site Profile, a SQL*Plus command file created by
the database administrator. This file is generally named GLOGIN with
an extension of SQL. SQL*Plus executes this command file whenever
any user starts SQL*Plus and SQL*Plus establishes the Oracle
connection. The Site Profile allows the DBA to set up SQL*Plus
environment defaults for all users at a particular site; users cannot
directly access the Site Profile. The default name and location of the Site
Profile depend on your system. Site Profiles are described in more
detail in the Oracle installation and user’s manual(s) provided for your
operating system.
Command Reference
6–99
SQL*Plus also supports a User Profile, executed after the Site Profile.
SQL*Plus searches for a filenamed LOGIN with the extension SQL in
your current directory. If SQL*Plus does not find the file there,
SQL*Plus will search a system-dependent path to find the file. Some
operating systems may not support this path search.
If you fail to log in successfully to SQL*Plus because your username or
password is invalid or some other error, SQL*Plus will return an error
status equivalent to an EXIT FAILURE command. See the EXIT
command in this chapter for further information.
Examples
To start SQL*Plus with username SCOTT and password TIGER, enter
SQLPLUS SCOTT/TIGER
To start SQL*Plus, as above, and to make POLICY the default database
(where POLICY is a valid SQL*Net database connection string), enter
SQLPLUS SCOTT/TIGER@POLICY
To start SQL*Plus with username SCOTT and password TIGER and run a
command filenamed STARTUP with the extension SQL, enter
SQLPLUS SCOTT/TIGER @STARTUP
Note the space between TIGER and @STARTUP.
6–100
SQL*Plus User’s Guide and Reference
START
Purpose
Syntax
Terms and Clauses
Executes the contents of the specified command file.
STA[RT] file_name[.ext] [arg ...]
Refer to the following list for a description of each term or clause:
file_name[.ext]
Represents the command file you wish to execute.
The file can contain any command that you can run
interactively.
If you do not specify an extension, SQL*Plus
assumes the default command-file extension
(normally SQL). For information on changing this
default extension, see the SUFFIX variable of the
SET command in this chapter.
When you enter START file_name.ext, SQL*Plus
searches for a file with the filename and extension
you specify in the current default directory. If
SQL*Plus does not find such a file, SQL*Plus will
search a system-dependent path to find the file.
Some operating systems may not support the path
search. Consult the Oracle installation and user’s
manual(s) provided for your operating system for
specific information related to your operating
system environment.
arg ...
Represent data items you wish to pass to
parameters in the command file. If you enter one
or more arguments, SQL*Plus substitutes the
values into the parameters (&1, &2, and so forth) in
the command file. The first argument replaces each
occurrence of &1, the second replaces each
occurrence of &2, and so forth.
The START command DEFINEs the parameters
with the values of the arguments; if you START the
command file again in this session, you can enter
new arguments or omit the arguments to use the
old values.
For more information on using parameters, refer to
the subsection “Passing Parameters through the
START Command” under “Writing Interactive
Commands” in Chapter 3.
Command Reference
6–101
Usage Notes
The @ (“at” sign) and @@ (double “at” sign) commands function
similarly to START. Disabling the START command in the Product User
Profile also disables the @ and @@ commands. See the @ and @@
commands in this chapter for further information on these commands.
The EXIT or QUIT commands in a command file terminate SQL*Plus.
Example
A filenamed PROMOTE with the extension SQL, used to promote
employees, might contain the following command:
SELECT * FROM EMP
WHERE MGR=&1 AND JOB=’&2’ AND SAL>&3;
To run this command file, enter
SQL> START PROMOTE 7280 CLERK 950
SQL*Plus then executes the following command:
SELECT * FROM EMP
WHERE MGR=7280 AND JOB=’CLERK’ AND SAL>950;
6–102
SQL*Plus User’s Guide and Reference
STORE
Purpose
Saves attributes of the current SQL*Plus environment in a host
operating system file (a command file).
Syntax
STORE {SET} file_name[.ext] [CRE[ATE]|REP[LACE]|
APP[END]]
Terms and Clauses
Refer to the following list for a description of each term or clause:
SET
Saves the values of the system variables.
Refer to the SAVE command for information on the other terms and
clauses in the STORE command syntax.
Usage Notes
This command creates a command file which can be executed with the
START, @ or @@ commands.
If you want to store a file under a name identical to a STORE command
clause (that is, CREATE, REPLACE or APPEND), you must put the
name in single quotes or specify a file extension.
Example
To store the current SQL*Plus system variables in a file named
DEFAULTENV with the default command-file extension, enter
SQL> STORE SET DEFAULTENV
To append the current SQL*Plus system variables to an existing file
called DEFAULTENV with the extension OLD, enter
SQL> STORE SET DEFAULTENV.OLD APPEND
Command Reference
6–103
TIMING
Purpose
Syntax
Terms and Clauses
Records timing data for an elapsed period of time, lists the current
timer’s name and timing data, or lists the number of active timers.
TIMI[NG] [START text|SHOW|STOP]
Refer to the following list for a description of each term or clause:
START text
Sets up a timer and makes text the name of the
timer. You can have more than one active timer by
STARTing additional timers before STOPping the
first; SQL*Plus nests each new timer within the
preceding one. The timer most recently STARTed
becomes the current timer.
SHOW
Lists the current timer’s name and timing data.
STOP
Lists the current timer’s name and timing data,
then deletes the timer. If any other timers are
active, the next most recently STARTed timer
becomes the current timer.
Enter TIMING with no clauses to list the number of active timers.
Usage Notes
You can use this data to do a performance analysis on any commands
or blocks run during the period.
For information about the data TIMING displays, see the Oracle
installation and user’s manual(s) provided for your operating system.
Refer to SET TIMING ON for information on automatically displaying
timing data after each SQL command or PL/SQL block you run.
To delete all timers, use the CLEAR TIMING command.
Examples
To create a timer named SQL_TIMER, enter
SQL> TIMING START SQL_TIMER
To list the current timer’s title and accumulated time, enter
SQL> TIMING SHOW
To list the current timer’s title and accumulated time and to remove the
timer, enter
SQL> TIMING STOP
6–104
SQL*Plus User’s Guide and Reference
TTITLE
Purpose
Places and formats a specified title at the top of each report page or
lists the current TTITLE definition. The old form of TTITLE is used if
only a single word or string in quotes follows the TTITLE command.
For a description of the old form of TTITLE, see TTITLE in Appendix F.
Syntax
TTI[TLE] [printspec [text|variable] ...]|[OFF|ON]
where printspec represents one or more of the following clauses used to
place and format the text:
COL n
S[KIP] [n]
TAB n
LE[FT]
CE[NTER]
R[IGHT]
BOLD
FORMAT text
Terms and Clauses
Refer to the following list for a description of each term or clause.
These terms and clauses also apply to the BTITLE command.
text
Represents the title text. Enter text in single quotes
if you want to place more than one word on a
single line.
variable
Represents a user variable or any of the following
system-maintained values:
•
SQL.LNO (current line number)
•
SQL.PNO (current page number)
•
SQL.RELEASE (current Oracle release number)
•
SQL.SQLCODE (current error code)
•
SQL.USER (current username)
To print one of these values, reference the
appropriate variable in the title. You can format
variable with the FORMAT clause.
OFF
Turns the title off (suppresses its display) without
affecting its definition.
Command Reference
6–105
ON
Turns the title on (restores its display). When you
define a top title, SQL*Plus automatically sets
TTITLE to ON.
COL n
Indents to column n of the current line (backward
if column n has been passed). “Column” in this
context means print position, not table column.
S[KIP] [n]
Skips to the start of a new line n times; if you omit
n, one time; if you enter zero for n, backward to the
start of the current line.
TAB n
Skips forward n columns (backward if you enter a
negative value for n). “Column” in this context
means print position, not table column.
LE[FT],
CE[NTER], and
R[IGHT]
Left-align, center, and right-align data on the
current line respectively. SQL*Plus aligns following
data items as a group, up to the end of the printspec
or the next LEFT, CENTER, RIGHT, or COL
command. CENTER and RIGHT use the SET
LINESIZE value to calculate the position of the
data item that follows.
BOLD
Prints data in bold print. SQL*Plus represents bold
print on your terminal by repeating the data on
three consecutive lines. On some operating
systems, SQL*Plus may instruct your printer to
print bolded text on three consecutive lines, instead
of bold.
FORMAT text
Specifies a format model that determines the
format of following data items, up to the next
FORMAT clause or the end of the command. The
format model must be a text constant such as A10
or $999. See COLUMN FORMAT for more
information on formatting and valid format
models.
If the datatype of the format model does not match
the datatype of a given data item, the FORMAT
clause has no effect on that item.
If no appropriate FORMAT model precedes a given
data item, SQL*Plus prints NUMBER values
according to the format specified by SET
NUMFORMAT or, if you have not used SET
NUMFORMAT, the default format. SQL*Plus
6–106
SQL*Plus User’s Guide and Reference
prints DATE values according to the default
format.
Refer to the FORMAT clause of the COLUMN
command in this chapter for more information on
default formats.
Enter TTITLE with no clauses to list the current TTITLE definition.
Usage Notes
If you do not enter a printspec clause before the first occurrence of text,
TTITLE left justifies the text. SQL*Plus interprets TTITLE in the new
form if a valid printspec clause (LEFT, SKIP, COL, and so on)
immediately follows the command name.
See COLUMN NEW_VALUE for information on printing column and
DATE values in the top title.
You can use any number of constants and variables in a printspec.
SQL*Plus displays the constants and variables in the order you specify
them, positioning and formatting each constant or variable as specified
by the printspec clauses that precede it.
The length of the title you specify with TTITLE cannot exceed 2400
characters.
The continuation character (a hyphen) will not be recognized inside a
single-quoted title text string. To be recognized, the continuation
character must appear outside of the quotes, as follows:
SQL> TTITLE CENTER ’Summary Report for’ –
> ’the Month of May’
Examples
To define “Monthly Analysis” as the top title and to left-align it, to
center the date, to right-align the page number with a three-digit
format, and to display “Data in Thousands” in the center of the next
line, enter
SQL> TTITLE LEFT ’Monthly Analysis’ CENTER ’11 Mar 88’ –
> RIGHT ’Page:’ FORMAT 999 SQL.PNO SKIP CENTER –
> ’Data in Thousands’
The following title results:
Monthly Analysis
11 Mar 88
Data in Thousands
Page:
To suppress the top title display without changing its definition, enter
SQL> TTITLE OFF
Command Reference
6–107
1
UNDEFINE
Purpose
Syntax
Terms and Clauses
Deletes one or more user variables that you defined either explicitly
(with the DEFINE command) or implicitly (with an argument to the
START command).
UNDEF[INE] variable ...
Refer to the following for a description of the term or clause:
variable
Example
Represents the name of the user variable you wish
to delete. One or more user variables may be
deleted in the same command.
To undefine a user variable named POS, enter
SQL> UNDEFINE POS
To undefine two user variables named MYVAR1 and MYVAR2, enter
SQL> UNDEFINE MYVAR1 MYVAR2
6–108
SQL*Plus User’s Guide and Reference
VARIABLE
Purpose
Declares a bind variable that can then be referenced in PL/SQL. For
more information on bind variables, see “Using Bind Variables” in
Chapter 3. For more information about PL/SQL, see your PL/SQL
User’s Guide and Reference.
VARIABLE without arguments displays a list of all the variables
declared in the session. VARIABLE followed only by a variable name
lists that variable.
Syntax
Terms and Clauses
Usage Notes
VAR[IABLE] [variable [NUMBER|CHAR|CHAR (n)|VARCHAR2 (n)|
REFCURSOR]]
Refer to the following list for a description of each term or clause:
variable
Represents the name of the bind variable you wish
to create.
NUMBER
Creates a variable of type NUMBER with a fixed
length.
CHAR
Creates a variable of type CHAR (character) with a
length of one.
CHAR (n)
Creates a variable of type CHAR with a maximum
length of n, up to 255.
VARCHAR2 (n)
Creates a variable of type VARCHAR2 with a
maximum length of n, up to 2000.
REFCURSOR
Creates a variable of type REF CURSOR.
Bind variables may be used as parameters to stored procedures, or may
be directly referenced in anonymous PL/SQL blocks.
To display the value of a bind variable created with VARIABLE, use the
PRINT command. For more information, see the PRINT command in
this chapter.
To automatically display the value of a bind variable created with
VARIABLE, use the SET AUTOPRINT command. For more
information, see the SET AUTOPRINT command in this chapter.
Bind variables cannot be used in the COPY command or SQL
statements, except in PL/SQL blocks. Instead, use substitution
variables.
SQL*Plus REFCURSOR bind variables may be used to reference
PL/SQL 2.3 Cursor Variables, allowing PL/SQL output to be formatted
Command Reference
6–109
by SQL*Plus. For more information on PL/SQL Cursor Variables, see
your PL/SQL User’s Guide and Reference.
When you execute a VARIABLE ... REFCURSOR command, SQL*Plus
creates a cursor bind variable. The cursor is automatically opened by
an OPEN ... FOR SELECT statement referencing the bind variable in a
PL/SQL block. SQL*Plus closes the cursor after completing a PRINT
statement for that bind variable, or on exit.
SQL*Plus formatting commands such as BREAK, COLUMN,
COMPUTE and SET may be used to format the output from PRINTing
a REFCURSOR.
A REFCURSOR bind variable may not be PRINTed more than once
without re-executing the PL/SQL OPEN ... FOR statement.
Examples
The following example illustrates creating a bind variable and then
setting it to the value returned by a function:
SQL> VARIABLE id NUMBER
SQL> BEGIN
2
:id := emp_management.hire
3
(’BLAKE’,’MANAGER’,’KING’,2990,’SALES’);
4 END;
The bind variable named id can be displayed with the PRINT
command or used in subsequent PL/SQL subprograms.
The following example illustrates automatically displaying a bind
variable:
SQL>
SQL>
SQL>
2
3
4
SET AUTOPRINT ON
VARIABLE a REFCURSOR
BEGIN
OPEN :a FOR SELECT * FROM DEPT ORDER BY DEPTNO;
END;
/
PL/SQL procedure successfully completed.
DEPTNO
––––––––
10
20
30
40
6–110
SQL*Plus User’s Guide and Reference
DNAME
–––––––––––––
ACCOUNTING
RESEARCH
SALES
OPERATIONS
LOC
–––––––––––––
NEW YORK
DALLAS
CHICAGO
BOSTON
In the above example, there is no need to issue a PRINT command to
display the variable.
The following example creates some variables and then lists them:
SQL> VARIABLE id NUMBER
SQL> VARIABLE txt CHAR (20)
SQL> VARIABLE myvar REFCURSOR
SQL> VARIABLE
variable id
datatype NUMBER
variable txt
datatype CHAR(20)
variable myvar
datatype REFCURSOR
The following example lists a single variable:
SQL> VARIABLE txt
variable txt
datatype CHAR(20)
The following example illustrates producing a report listing individual
salaries and computing the departmental and total salary cost:
SQL>
2
3
4
5
6
7
8
VARIABLE RC REFCURSOR
BEGIN
OPEN :RC FOR SELECT DNAME, ENAME, SAL
FROM EMP, DEPT
WHERE EMP.DEPTNO = DEPT.DEPTNO
ORDER BY EMP.DEPTNO, ENAME;
END;
/
PL/SQL procedure successfully completed.
SQL>
SQL>
SQL>
SQL>
SQL>
SQL>
SQL>
SQL>
SQL>
SET PAGESIZE 100 FEEDBACK OFF
TTITLE LEFT ’*** Departmental Salary Bill ***’ SKIP 2
COLUMN SAL FORMAT $999,990.99 HEADING ’Salary’
COLUMN DNAME HEADING ’Department’
COLUMN ENAME HEADING ’Employee’
COMPUTE SUM LABEL ’Subtotal:’ OF SAL ON DNAME
COMPUTE SUM LABEL ’Total:’ OF SAL ON REPORT
BREAK ON DNAME SKIP 1 ON REPORT SKIP 1
PRINT RC
Command Reference
6–111
*** Departmental Salary Bill ***
Department
Employee
Salary
–––––––––––––– –––––––––––– ––––––––––
ACCOUNTING
CLARK
$2,450.00
KING
$5,000.00
MILLER
$1,300.00
**************
––––––––––
Subtotal:
$8,750.00
RESEARCH
ADAMS
FORD
JONES
SCOTT
SMITH
$1,100.00
$3,000.00
$2,975.00
$3,000.00
$800.00
––––––––––
$10,875.00
ALLEN
BLAKE
JAMES
MARTIN
TURNER
WARD
**************
Subtotal:
$1,600.00
$2,850.00
$950.00
$1,250.00
$1,500.00
$1,250.00
––––––––––
$9,400.00
Total:
––––––––––
$29,025.00
**************
Subtotal:
SALES
6–112
SQL*Plus User’s Guide and Reference
WHENEVER OSERROR
Purpose
Syntax
Terms and Clauses
Exits SQL*Plus if an operating system error occurs (such as a file I/O
error).
WHENEVER OSERROR {EXIT [SUCCESS|FAILURE|n|variable]
[COMMIT|ROLLBACK]|CONTINUE [COMMIT|ROLLBACK|NONE]}
Refer to the following list for a description of each term or clause:
EXIT [SUCCESS|FAILURE|n|variable]
Directs SQL*Plus to exit as soon as an operating
system error is detected. You can also specify that
SQL*Plus return a success or failure code, the
operating system failure code, or a number or
variable of your choice. See EXIT in this chapter for
details.
CONTINUE
Turns off the EXIT option.
COMMIT
Directs SQL*Plus to execute a COMMIT before
exiting or continuing and save pending changes to
the database.
ROLLBACK
Directs SQL*Plus to execute a ROLLBACK before
exiting or continuing and abandon pending
changes to the database.
NONE
Directs SQL*Plus to take no action before
continuing.
Usage Notes
If you do not enter the WHENEVER OSERROR command, the default
behavior of SQL*Plus is to continue and take no action when an
operating system error occurs.
Examples
The commands in the following command file cause SQL*Plus to exit
and COMMIT any pending changes if a failure occurs when writing to
the output file:
WHENEVER OSERROR EXIT SQL.OSCODE COMMIT
SPOOL MYLOG
UPDATE EMP SET SAL = SAL*1.1
COPY TO SCOTT/TIGER@HQDB –
REPLACE EMP –
USING SELECT * FROM EMP
SPOOL OUT
SELECT SAL FROM EMP
Command Reference
6–113
WHENEVER SQLERROR
Purpose
Syntax
Terms and Clauses
Exits SQL*Plus if a SQL command or PL/SQL block generates an error.
WHENEVER SQLERROR {EXIT [SUCCESS|FAILURE|WARNING|n|variable]
[COMMIT|ROLLBACK]|CONTINUE [COMMIT|ROLLBACK|NONE]}
Refer to the following list for a description of each term or clause:
EXIT [SUCCESS|FAILURE|WARNING|n|variable]
Directs SQL*Plus to exit as soon as it detects a SQL
command or PL/SQL block error (but after
printing the error message). SQL*Plus will not exit
on a SQL*Plus error. The EXIT clause of
WHENEVER SQLERROR follows the same syntax
as the EXIT command. See EXIT in this chapter for
details.
Usage Notes
CONTINUE
Turns off the EXIT option.
COMMIT
Directs SQL*Plus to execute a COMMIT before
exiting or continuing and save pending changes to
the database.
ROLLBACK
Directs SQL*Plus to execute a ROLLBACK before
exiting or continuing and abandon pending
changes to the database.
NONE
Directs SQL*Plus to take no action before
continuing.
The WHENEVER SQLERROR command is triggered by SQL command
or PL/SQL block errors, and not by SQL*Plus command errors.
If you do not enter the WHENEVER SQLERROR command, the default
behavior of SQL*Plus is to continue and take no action when a SQL
error occurs.
Examples
The commands in the following command file cause SQL*Plus to exit
and return the SQL error code if the SQL UPDATE command fails:
SQL> WHENEVER SQLERROR EXIT SQL.SQLCODE
SQL> UPDATE EMP SET SAL = SAL*1.1
The following SQL command error causes SQL*Plus to exit and return
the SQL error code:
SQL> WHENEVER SQLERROR EXIT SQL.SQLCODE
SQL> SELECT COLUMN_DOES_NOT_EXITS FROM DUAL;
6–114
SQL*Plus User’s Guide and Reference
SELECT COLUMN_DOES_NOT_EXITS FROM DUAL
*
ERROR at line 1:
ORA–00904: invalid column name
Disconnected from Oracle.....
The following SQL command error causes SQL*Plus to exit and return
the value of the variable MY_ERROR_VAR:
SQL> DEFINE MY_ERROR_VAR 99
SQL> WHENEVER SQLERROR EXIT MY_ERROR_VAR
SQL> UPDATE NON_EXISTED_TABLE SET COL1 = COL1 + 1;
UPDATE NON_ESISTED_TABLE SET COL1 = COL1 + 1
*
ERROR at line 1:
ORA–00942: table or view does not exist
Disconnected from Oracle.....
The following examples show that the WHENEVER SQLERROR
command does not have any effect on SQL*Plus commands, but does
on SQL commands and PL/SQL blocks:
SQL> WHENEVER SQLERROR EXIT SQL.SQLCODE
SQL> COLUMN ENAME HEADIING ”EMPLOYEE NAME”
Unknown COLUMN option ”HEADIING”
SQL> SHOW NON_EXISTED_OPTION
Unknown SHOW option ”NON_EXISTED_OPTION”
SQL> GET NON_EXISTED_FILE.SQL
Unable to open ”NON_EXISTED_FILE.SQL”
SQL>
Command Reference
6–115
The following PL/SQL block error causes SQL*Plus to exit and return
the SQL error code:
SQL>
SQL>
2
3
4
WHENEVER SQLERROR EXIT SQL.SQLCODE
BEGIN
SELECT COLUMN_DOES_NOT_EXITS FROM DUAL;
END;
/
SELECT COLUMN_DOES_NOT_EXITS FROM DUAL;
*
ERROR at line 2:
ORA–06550: line 2, column 10:
PLS–00201: identifier ’COLUMN_DOES_NOT_EXITS’ must be
declared
ORA–06550: line 2, column 3:
PL/SQL: SQL Statement ignored
Disconnected from Oracle.....
6–116
SQL*Plus User’s Guide and Reference
PART
II
Reference
APPENDIX
A
COPY Command
Messages and Codes
T
his appendix lists error messages generated by the COPY
command. For error messages generated by Oracle, refer to the Oracle7
Server Messages Manual.
CPY0002:
Illegal or missing APPEND, CREATE, INSERT, or REPLACE option
Cause:
An internal COPY function has invoked COPY with a create option
(flag) value that is out of range.
Action:
Please contact your Oracle Customer Support representative.
CPY0003:
Internal Error: logical host number out of range
Cause:
An internal COPY function has been invoked with a logical host
number value that is out of range.
Action:
Please contact your Oracle Customer Support representative.
COPY Command Messages and Codes
A–1
CPY0004:
Cause:
On an APPEND operation or an INSERT (when the table exists), at
least one column name in the destination table does not match the
corresponding column name in the optional column name list or in the
SELECT command.
Action:
Respecify the COPY command, making sure that the column names
and their respective order in the destination table match the column
names and column order in the optional column list or in the SELECT
command.
CPY0005:
Source and destination column attributes don’t match
Cause:
On an APPEND operation or an INSERT (when the table exists), at
least one column in the destination table does not have the same
datatype as the corresponding column in the SELECT command.
Action:
Respecify the COPY command, making sure that the datatypes for
items being selected agree with the destination. You can use TO_DATE,
TO_CHAR, and TO_NUMBER to make conversions.
CPY0006:
Select list has more columns than destination table
Cause:
On an APPEND operation or an INSERT (when the table exists), the
number of columns in the SELECT command is greater than the
number of columns in the destination table.
Action:
Respecify the COPY command, making sure that the number of
columns being selected agrees with the number in the destination table.
CPY0007:
A–2
Source and destination table and column names don’t match
Select list has fewer columns than destination table
Cause:
On an APPEND operation or INSERT (when the table exists), the
number of columns in the SELECT command is less than the number of
columns in the destination table.
Action:
Respecify the COPY command, making sure that the number of
columns being selected agrees with the number in the destination table.
SQL*Plus User’s Guide and Reference
CPY0008:
More column list names than columns in the destination table
Cause:
On an APPEND operation or an INSERT (when the table exists), the
number of columns in the column name list is greater than the number
of columns in the destination table.
Action:
Respecify the COPY command, making sure that the number of
columns in the column list agrees with the number in the destination
table.
CPY0009:
Fewer column list names than columns in the destination table
Cause:
On an APPEND operation or an INSERT (when the table exists), the
number of columns in the column name list is less than the number of
columns in the destination table.
Action:
Respecify the COPY command, making sure that the number of
columns in the column list agrees with the number in the destination
table.
COPY Command Messages and Codes
A–3
A–4
SQL*Plus User’s Guide and Reference
APPENDIX
B
Release 3.3
Enhancements
S
QL*Plus Release 3.3 provides a number of enhancements over
previous releases of SQL*Plus. This appendix describes the
enhancements for SQL*Plus Release 3.3.
Release 3.3 Enhancements
B–1
SQL*Plus Release 3.3 Enhancements
SQL*Plus Release 3.3 is a superset of SQL*Plus Release 3.2.
To exploit SQL*Plus Release 3.3 fully, you need Oracle7 Release 7.3.
SQL*Plus Release 3.3 gives you the following capabilities:
B–2
•
There is a new command named REPHEADER. The
REPHEADER command places and formats a specified report
header at the top of each report, or lists the current
REPHEADER definition.
•
There is a new command named REPFOOTER. The
REPFOOTER command places and formats a specified report
footer at the bottom of each report, or lists the current
REPFOOTER definition.
•
There is a new command named STORE. The STORE command
saves attributes of the current SQL*Plus environment in a host
operating system file (a command file).
•
The SET command now has an APPINFO clause. The APPINFO
clause sets automatic registering of command files through the
DBMS_APPLICATION_INFO package. This enables the
performance and resource usage of each command file to be
monitored by your DBA.
•
The SET command now has an AUTOTRACE clause. The
AUTOTRACE clause displays a report on the execution of
successful SQL DML statements (SELECT, INSERT, UPDATE or
DELETE). The report can include execution statistics and the
query execution path.
•
The SET SERVEROUTPUT command now has a FORMAT
clause. You can use WRAPPED, WORD_WRAPPED or
TRUNCATED with the FORMAT clause.
SQL*Plus User’s Guide and Reference
APPENDIX
C
SQL*Plus Limits
T
able C–1, on the following page, lists the limit, or maximum value,
of each of the SQL*Plus elements shown. The limits shown are valid for
most operating systems.
SQL*Plus Limits
C–1
Item
Limit
filename length
system dependent
username length
30 bytes
user variable name length
30 bytes
user variable value length
240 characters
command-line length
2500 characters
length of a LONG value entered
through SQL*Plus
LINESIZE value
LINESIZE
system dependent
LONGCHUNKSIZE value (requires
Oracle7)
MAXDATA value
MAXDATA value
system dependent
output line size
system dependent
line size after variable substitution
3,000 characters (internal only)
number of characters in a COMPUTE
command label
500 characters
number of lines per SQL command
500 (assuming 80 characters per line)
maximum PAGESIZE
50,000 lines
total row width
60,000 characters for VMS; otherwise,
32,767 characters
maximum ARRAYSIZE
5000 rows
maximum number of nested command files
20 for VMS, CMS, Unix; otherwise, 5
maximum page number
99,999
maximum PL/SQL error message size 2K (Oracle7)
512 Bytes (Oracle Version 6)
maximum ACCEPT character string
length
Table C – 1
C–2
SQL*Plus User’s Guide and Reference
240 Bytes
APPENDIX
D
SQL Command List
T
able D–1, on the following page, lists major SQL commands. Refer
to the Oracle7 Server SQL Language Reference Manual for full
documentation of these commands.
SQL Command List
D–1
Major SQL Commands and Clauses
ALTER
ANALYZE*
NOAUDIT
AUDIT
RENAME
COMMENT
REVOKE
COMMIT
ROLLBACK
CREATE
SAVEPOINT
DELETE
SELECT
DROP
SET ROLE*
EXPLAIN
SET TRANSACTION
GRANT
TRUNCATE*
INSERT
UPDATE
*
Requires Oracle7
Table D – 1 SQL Command List
D–2
LOCK TABLE
SQL*Plus User’s Guide and Reference
APPENDIX
E
Security
T
his appendix describes the available methods for controlling
access to database tables and SQL*Plus commands. The available
methods for security fall into two broad categories:
•
SQL*Plus PRODUCT_USER_PROFILE table
•
roles
Security
E–1
PRODUCT_USER_PROFILE Table
Various Oracle products use PRODUCT_USER_PROFILE, a table in the
SYSTEM account, to provide product-level security that supplements
the user-level security provided by the SQL GRANT and REVOKE
commands and user roles. (SET ROLE requires Oracle7.)
Overview
DBAs can use PRODUCT_USER_PROFILE to disable certain SQL and
SQL*Plus commands in the SQL*Plus environment on a per-user basis.
SQL*Plus—not Oracle—enforces this security. DBAs can even restrict
access to the GRANT, REVOKE, and SET ROLE commands to control
users’ ability to change their database privileges.
SQL*Plus reads restrictions from PRODUCT_USER_PROFILE when a
user logs in to SQL*Plus and maintains those restrictions for the
duration of the session. Changes to PRODUCT_USER_PROFILE will
only take effect the next time the affected users log in to SQL*Plus.
Creating the Table
You can create PRODUCT_USER_PROFILE by running the command
file named PUPBLD with the extension SQL as SYSTEM. The exact
format of the file extension and the location of the file are system
dependent. See the Oracle installation and user’s manual(s) provided
for your operating system or your DBA for more information.
Note: If the table is created incorrectly, all users other than
SYSTEM will see a warning when connecting to Oracle that the
PRODUCT_USER_PROFILE information is not loaded.
Table Structure
The PRODUCT_USER_PROFILE table consists of the following
columns:
PRODUCT
NOT NULL CHAR (30)
USERID
CHAR(30)
ATTRIBUTE
CHAR(240)
SCOPE
CHAR(240)
NUMERIC_VALUE
NUMBER(15,2)
CHAR_VALUE
CHAR(240)
DATE_VALUE
DATE
LONG_VALUE
LONG
Description and Use of Refer to the following list for the descriptions and use of each column
in the PRODUCT_USER_PROFILE table:
Columns
Product
E–2
SQL*Plus User’s Guide and Reference
Must contain the product name (in this case
“SQL*Plus”). You cannot enter wildcards or NULL
in this column. Also notice that the product name
SQL*Plus must be specified in mixed case, as
shown, in order to be recognized.
Userid
Must contain the username (in uppercase) of the
user for whom you wish to disable the command.
To disable the command for more than one user,
use SQL wild cards (%) or make multiple entries.
Thus, all of the following entries are valid:
•
SCOTT
•
CLASS1
•
CLASS% (all users whose names start with
CLASS)
•
% (all users)
Attribute
Must contain the name (in uppercase) of the SQL,
SQL*Plus, or PL/SQL command you wish to
disable (for example, GET). If you are disabling a
role, it must contain the character string “ROLES”.
You cannot enter a wildcard. See “Administration”
below for a list of SQL and SQL*Plus commands
you can disable. See “Roles” below for information
on how to disable a role.
Scope
SQL*Plus ignores this column. It is recommended
that you enter NULL in this column. Other
products may store specific file restrictions or other
data in this column.
Numeric_Value
SQL*Plus ignores this column. It is recommended
that you enter NULL in this column. Other
products may store numeric values in this column.
Char_Value
Must contain the character string “DISABLED” to
disable a SQL, SQL*Plus, or PL/SQL command. If
you are disabling a role, it must contain the name
of the role you wish to disable. You cannot use a
wildcard. See “Roles” below for information on
how to disable a role.
Date_Value
SQL*Plus ignores this column. It is recommended
that you enter NULL in this column. Other
products may store DATE values in this column.
Long_Value
SQL*Plus ignores this column. It is recommended
that you enter NULL in this column. Other
products may store LONG values in this column.
Security
E–3
Administration
The DBA username SYSTEM owns and has all privileges on
PRODUCT_USER_PROFILE. (When SYSTEM logs in, SQL*Plus does
not read PRODUCT_USER_PROFILE. Therefore, no restrictions apply
to user SYSTEM.) Other Oracle usernames should have only SELECT
access to this table, which allows a view of restrictions of that
username and those restrictions assigned to PUBLIC. The command
file PUPBLD, when run, grants SELECT access on
PRODUCT_USER_PROFILE to PUBLIC.
Disabling SQL*Plus, SQL,
and PL/SQL Commands
To disable a SQL or SQL*Plus command for a given user, insert a row
containing the user’s username in the Userid column, the command
name in the Attribute column, and DISABLED in the Char_Value
column.
The Scope, Numeric_Value, and Date_Value columns should contain
NULL. For example:
SCOPE
–––––
NUMERIC
VALUE
–––––––
CHAR
VALUE
–––––––
PRODUCT USERID
–––––––– ––––––
ATTRIBUTE
–––––––––
SQL*Plus SCOTT
HOST
DISABLED
SQL*Plus %
INSERT
DISABLED
SQL*Plus %
UPDATE
DISABLED
SQL*Plus %
DELETE
DISABLED
DATE
VALUE
–––––––
To re-enable commands, delete the row containing the restriction.
You can disable the following SQL*Plus commands:
E–4
•
EDIT
•
EXECUTE
•
EXIT
•
GET
•
HOST (or your operating system’s alias for HOST, such as $ on
VMS and ! on UNIX)
•
QUIT
•
RUN
•
SAVE
•
SET (see note below)
•
SPOOL
•
START
SQL*Plus User’s Guide and Reference
Note: Disabling the SQL*Plus SET command will also disable
the SQL SET ROLE and SET TRANSACTION commands.
Disabling the SQL*Plus START command will also disable the
SQL*Plus @ and @@ commands.
You can also disable the following SQL commands:
•
ALTER
•
ANALYZE (requires Oracle7)
•
AUDIT
•
CONNECT
•
CREATE
•
DELETE
•
DROP
•
GRANT
•
INSERT
•
LOCK
•
NOAUDIT
•
RENAME
•
REVOKE
•
SELECT
•
SET ROLE (requires Oracle7)
•
SET TRANSACTION
•
TRUNCATE (requires Oracle7)
•
UPDATE
•
VALIDATE (only for Oracle V6)
You can also disable the following PL/SQL commands:
•
BEGIN
•
DECLARE
Note: Disabling BEGIN and DECLARE does not prevent the
use of the SQL*Plus EXECUTE command. EXECUTE must be
disabled separately.
Disabling SET ROLE
From SQL*Plus, users can submit any SQL command. In certain
situations, this can cause security problems. Unless you take proper
precautions, a user could use SET ROLE to access privileges obtained
Security
E–5
via an application role. With these privileges, they might issue SQL
statements from SQL*Plus that could wrongly change database tables.
To prevent application users from accessing application roles in
SQL*Plus, you can use PRODUCT_USER_PROFILE to disable the SET
ROLE command. This allows a SQL*Plus user only those privileges
associated with the roles enabled when they started SQL*Plus. For
more information about the creation and usage of user roles, see your
Oracle7 Server SQL Language Reference and Oracle7 Server Administrator’s
Guide.
Disabling Roles
To disable a role for a given user, insert a row in
PRODUCT_USER_PROFILE containing the user’s username in the
Userid column, “ROLES” in the Attribute column, and the role name in
the Char_Value column.
Note: When you enter “PUBLIC” or “%” for the Userid
column, you disable the role for all users. You should only use
“%” or “PUBLIC” for roles which are granted to “PUBLIC”. If
you try to disable a role that has not been granted to a user,
none of the roles for that user are disabled.
The Scope, Numeric_Value, and Date_Value columns should contain
NULL. For example:
SCOPE
–––––
NUMERIC
VALUE
–––––––
CHAR
VALUE
–––––––
PRODUCT USERID
–––––––– ––––––
ATTRIBUTE
–––––––––
SQL*Plus SCOTT
ROLES
ROLE1
SQL*Plus PUBLIC
ROLES
ROLE2
DATE
VALUE
–––––––
During login, these table rows are translated into the command
SET ROLE ALL EXCEPT ROLE1, ROLE2
To ensure that the user does not use the SET ROLE command to change
their roles after login, you can disable the SET ROLE command. See
“Disabling SET ROLE” earlier in this appendix.
To re-enable roles, delete the row containing the restriction.
Roles
To provide for the security of your database tables in Oracle7 using
SQL commands, you can create and control access to roles. By creating
a role and then controlling who has access to it, you can ensure that
only certain users have access to particular database privileges.
E–6
SQL*Plus User’s Guide and Reference
Overview
Roles are created and used with the SQL CREATE, GRANT, and SET
commands:
•
To create a role, you use the CREATE command. You can create
roles with or without passwords.
•
To grant access to roles, you use the GRANT command. In this
way, you can control who has access to the privileges associated
with the role.
•
To access roles, you use the SET ROLE command. If you created
the role with a password, the user must know the password in
order to access the role.
For more information about roles, see your Oracle7 Server SQL Language
Reference, your Oracle7 Server Administrator’s Guide, and your Oracle7
Server Concepts Manual.
Security
E–7
E–8
SQL*Plus User’s Guide and Reference
APPENDIX
F
SQL*Plus Commands
from Earlier Releases
T
his appendix covers earlier versions of some SQL*Plus
commands. These older commands still function within SQL*Plus, but
SQL*Plus provides newer commands that have improved functionality.
SQL*Plus Commands From Earlier Versions
F–1
BTITLE (old form)
Purpose
Syntax
Usage Notes
Displays a title at the bottom of each report page.
BTI[TLE] text
The old form of BTITLE offers formatting features more limited than
those of the new form, but provides compatibility with UFI (a
predecessor of SQL*Plus). The old form defines the bottom title as an
empty line followed by a line with centered text. Refer to TTITLE (old
form) in this appendix for more details.
COLUMN DEFAULT
Purpose
Syntax
Usage Notes
Resets the display attributes for a given column to default values.
COL[UMN] {column|expr} DEF[AULT]
Has the same effect as COLUMN CLEAR.
DOCUMENT
Purpose
Syntax
Usage Notes
Begins a block of documentation in a command file.
DOC[UMENT]
For information on the current method of inserting comments in a
command file, refer to the section “Placing Comments in Command
Files” under “Saving Commands for Later Use” in Chapter 3 and to
REMARK in Chapter 6.
After you type DOCUMENT and enter [Return], SQL*Plus displays the
prompt DOC> in place of SQL> until you end the documentation. The
“pound” character (#) on a line by itself ends the documentation.
If you have set DOCUMENT to OFF, SQL*Plus suppresses the display
of the block of documentation created by the DOCUMENT command.
(See SET DOCUMENT later in this appendix.)
F–2
SQL*Plus User’s Guide and Reference
NEWPAGE
Purpose
Syntax
Usage Notes
Advances spooled output n lines beyond the beginning of the next
page.
NEWPAGE [1|n]
Refer to the NEWPAGE variable of the SET command in Chapter 6 for
information on the current method for advancing spooled output.
SET BUFFER
Purpose
Syntax
Usage Notes
Makes the specified buffer the current buffer.
SET BUF[FER] {buffer|SQL}
Initially, the SQL buffer is the current buffer. SQL*Plus does not require
the use of multiple buffers; the SQL buffer alone should meet your
needs.
If the buffer name you enter does not already exist, SET BUFFER
defines (creates and names) the buffer. SQL*Plus deletes the buffer and
its contents when you exit SQL*Plus.
Running a query automatically makes the SQL buffer the current
buffer. To copy text from one buffer to another, use the GET and SAVE
commands. To clear text from the current buffer, use CLEAR BUFFER.
To clear text from the SQL buffer while using a different buffer, use
CLEAR SQL.
SET DOCUMENT
Purpose
Syntax
Usage Notes
Displays or suppresses blocks of documentation created by the
DOCUMENT command.
SET DOC[UMENT] {OFF|ON}
SET DOCUMENT ON causes blocks of documentation to be echoed to
the screen. Set DOCUMENT OFF suppresses the display of blocks of
documentation.
See DOCUMENT in this appendix for information on the DOCUMENT
command.
SQL*Plus Commands From Earlier Versions
F–3
SET SCAN
Purpose
Syntax
Usage Notes
Controls scanning for the presence of substitution variables and
parameters. OFF suppresses processing of substitution variables and
parameters; ON allows normal processing.
SET SCAN {OFF|ON}
ON functions in the same manner as SET DEFINE ON.
SET SPACE
Purpose
Syntax
Usage Notes
Sets the number of spaces between columns in output. The maximum
value of n is 10.
SET SPACE {1|n}
The SET SPACE 0 and SET COLSEP ’’ commands have the same effect.
This command is obsoleted by SET COLSEP, but you can still use it for
backward compatibility. You may prefer to use COLSEP because the
SHOW command recognizes COLSEP and does not recognize SPACE.
SET TRUNCATE
Purpose
Syntax
Usage Notes
Controls whether SQL*Plus truncates or wraps a data item that is too
long for the current line width.
SET TRU[NCATE] {OFF|ON}
ON functions in the same manner as SET WRAP OFF, and vice versa.
You may prefer to use WRAP because the SHOW command recognizes
WRAP and does not recognize TRUNCATE.
TTITLE (old form)
Purpose
Syntax
F–4
Displays a title at the top of each report page.
TTI[TLE] text
SQL*Plus User’s Guide and Reference
Usage Notes
The old form of TTITLE offers formatting features more limited than
those of the new form, but provides compatibility with UFI (a
predecessor of SQL*Plus). The old form defines the top title as a line
with the date left-aligned and the page number right-aligned, followed
by a line with centered text and then a blank line.
The text you enter defines the title TTITLE will display.
SQL*Plus centers text based on the size of a line as determined by SET
LINESIZE. A separator character (|) begins a new line; two line
separator characters in a row (||) insert a blank line. You can change
the line separator character with SET HEADSEP.
You can control the formatting of page numbers in the old forms of
TTITLE and BTITLE by defining a variable named “_page”. The default
value of _page is the formatting string “page &P4”. To alter the format,
you can DEFINE _page with a new formatting string as follows:
SQL> SET ESCAPE / SQL> DEFINE _page = ’Page /&P2’
This formatting string will print the word “page” with an initial capital
letter and format the page number to a width of two. You can
substitute any text for “page” and any number for the width. You must
set escape so that SQL*Plus does not interpret the ampersand (&) as a
substitution variable. See the ESCAPE variable of the SET command in
Chapter 6 for more information on setting the escape character.
SQL*Plus interprets TTITLE in the old form if a valid new-form clause
does not immediately follow the command name.
If you want to use CENTER with TTITLE and put more than one word
on a line, you should use the new form of TTITLE documented in the
Reference portion of this Guide.
Example
To use the old form of TTITLE to set a top title with a left-aligned date
and right-aligned page number on one line followed by SALES
DEPARTMENT on the next line and PERSONNEL REPORT on a third
line, enter
SQL> TTITLE ’SALES DEPARTMENT|PERSONNEL REPORT’
SQL*Plus Commands From Earlier Versions
F–5
Glossary
A
account An authorized user of an operating
system or a product (such as Oracle Server
or SQL*Forms). Depending on the
operating system, may be referred to as ID,
User ID, login, etc. Accounts are often
created and controlled by a system
administrator.
alias In SQL, a temporary name assigned to a
table, view, column, or value within a SQL
statement, used to refer to that item later in
the same statement or in associated
SQL*Plus commands.
alignment The way in which data is
positioned in a field. It may be positioned
to the left, right, center, flush/left,
flush/right, or flush/center of the defined
width of a field.
anonymous block A PL/SQL program unit
that has no name and does not require the
explicit presence of the BEGIN and END
keywords to enclose the executable
statements.
argument A data item following the
command-file name in a START command.
The argument supplies a value for a
parameter in the command file.
array processing Processing performed on
multiple rows of data rather than one row
at a time. In some Oracle utilities such as
SQL*Plus, Export/Import, and the
precompilers, users can set the size of the
array; increasing the array size often
improves performance.
ASCII A convention for using digital data to
represent printable characters. ASCII is an
acronym for American Standard Code for
Information Interchange.
autocommit A feature unique to SQL*Plus
that enables SQL*Plus to automatically
commit changes to the database after every
successful execution of a SQL command or
PL/SQL block. Setting the AUTOCOMMIT
variable of the SET command to ON
enables this feature. Setting the
AUTOCOMMIT variable to n enables this
feature after every n successful INSERT,
UPDATE or DELETE commands or
PL/SQL blocks.
Glossary–1
B
bind reference A reference to a parameter
used to replace a single literal value (e.g., a
character string, number, or date)
appearing anywhere in a PL/SQL construct
or a SQL SELECT statement. For a bind
reference, you must precede the parameter
name with a colon (:).
bind variable A variable in a SQL statement
that must be replaced with a valid value, or
the address of a value, in order for the
statement to successfully execute.
bit The smallest unit of data. A bit only has
two possible values, 0 or 1. Bits can be
combined into groups of eight called bytes;
each byte represents a single character of
data. See also byte.
block In PL/SQL, a group of SQL and
PL/SQL commands related to each another
through procedural logic.
body A report region that contains the bulk
of the report (text, graphics, data, and
computations).
break An event, such as a change in the
value of an expression, that occurs while
SQL*Plus processes a query or report. You
can direct SQL*Plus to perform various
operations, such as printing subtotals,
whenever specified breaks occur.
break column A column in a report that
causes a break when its value changes and
for which the user has defined break
operations.
break group A group containing one or more
break columns.
break hierarchy The order in which
SQL*Plus checks for the occurrence of
breaks and triggers the corresponding
break operations.
Glossary–2
SQL*Plus User’s Guide and Reference
break order Indicates the order in which to
display a break column’s data. Valid
options are Ascending and Descending.
break report A report that divides rows of a
table into “sets”, based on a common value
in the break column.
buffer An area where the user’s SQL
statements or PL/SQL blocks are
temporarily stored. The SQL buffer is the
default buffer. You can edit or execute
commands from multiple buffers; however,
SQL*Plus does not require the use of
multiple buffers.
byte A group of eight sequential bits that
represents a letter, number, or symbol (i.e.,
character). Treated as a unit of data by a
computer.
C
CHAR datatype An Oracle datatype
provided for ANSI/ISO compatibility. A
CHAR column is a fixed-length column and
can contain any printable characters, such
as A, 3, &, or blanks, and can have from 1
to 255 characters or can be null.
character A single location on a computer
system capable of holding one alphabetic
character or numeric digit. One or more
characters are held in a field. One or more
fields make up a record, and one or more
records may be held in a file or database
table.
character string A group of sequential
letters, numerals, or symbols, usually
comprising a word or name, or portion
thereof.
clause A part of a SQL statement that does
not constitute the full statement; for
example, a “WHERE clause”.
client A user, software application, or
computer that requests the services, data,
or processing of another application or
computer (the “server”). In a two-task
environment, the client is the user process.
In a network environment, the client is the
local user process and the server may be
local or remote.
column A vertical space in a database table
that represents a particular domain of data.
A column has a column name and a specific
datatype. For example, in a table of
employee information, all of the employees’
dates of hire would constitute one column.
A record group column represents a
database column.
column expression An expression in a
SELECT statement that defines which
database column(s) are retrieved. It may be
a column name or a valid SQL expression
referencing a column name.
column heading A heading created for each
column appearing in a report.
command An instruction to or request of a
program, application, operating system, or
other software, to perform a particular task.
Commands may be single words or may
require additional phrases, variously called
arguments, options, parameters, and
qualifiers. Unlike statements, commands
execute as soon as you enter them.
ACCEPT, CLEAR, and COPY are examples
of commands in SQL*Plus.
command file A file containing a sequence of
commands that you can otherwise enter
interactively. The file is saved for
convenience and re-execution. Command
files are often called by operating-system
specific names. In SQL*Plus, you can
execute the command file with the START,
@ or @@ commands.
command line A line on a computer display
on which typed in commands appear. An
example of a command line is the area next
to the DOS prompt on a personal computer.
See also prompt.
command prompt The text, by default SQL>,
with which SQL*Plus requests your next
command.
comment A language construct for the
inclusion of explanatory text in a program,
the execution of which remains unaffected.
commit To make permanent changes to data
(inserts, updates, deletes) in the database.
Before changes are committed, both the old
and new data exist so that changes can be
stored or the data can be restored to its
prior state.
computation Used to perform runtime
calculations on data fetched from the
database. These calculations are a superset
of the kinds of calculations that can be done
directly with a SELECT statement. See also
formula column.
computed column See computation.
Glossary–3
configuration In SQL*Net, the set of
instructions for preparing network
communications, as outlined in the
SQL*Net documentation.
configuration files Files that are used to
identify and characterize the components of
a network. Configuration is largely a
process of naming network components
and identifying relationships among those
components.
connect To identify yourself to Oracle by
entering your username and password in
order to gain access to the database. In
SQL*Plus, the CONNECT command allows
you to log off Oracle and then log back on
with a specified username.
connect string The set of parameters,
including a protocol, that SQL*Net uses to
connect to a specific Oracle instance on the
network.
current line In an editor, such as the
SQL*Plus editor, the line in the current
buffer that editing commands will currently
affect.
D
database A set of operating system files,
treated as a unit, in which an Oracle Server
stores a set of data dictionary tables and
user tables. A database requires three types
of files: database files, redo log files, and
control files.
Glossary–4
SQL*Plus User’s Guide and Reference
database administrator (DBA) (1) A person
responsible for the operation and
maintenance of an Oracle Server or a
database application. The database
administrator monitors its use in order to
customize it to meet the needs of the local
community of users. (2) An Oracle
username that has been given DBA
privileges and can perform database
administration functions. Usually the two
meanings coincide. There may be more than
one DBA per site.
database link An object stored in the local
database that identifies a remote database,
a communication path to the remote
database, and optionally, a username and
password for it. Once defined, a database
link can be used to perform queries on
tables in the remote database. Also called
DBlink. In SQL*Plus, you can reference a
database link in a DESCRIBE or COPY
command.
database object Something created and
stored in a database. Tables, views,
synonyms, indexes, sequences, clusters,
and columns are all examples of database
objects.
database specification An alphanumeric
code that identifies a database, used to
specify the database in SQL*Net operations
and to define a database link. In SQL*Plus,
you can reference a database specification
in a COPY, CONNECT, or SQLPLUS
command.
database string A string of SQL*Net
parameters used to indicate the network
prefix, the host system you want to connect
to, and the system ID of the database on the
host system.
Data Control Language (DCL) The category
of SQL statements that control access to the
data and to the database. Examples are the
GRANT and REVOKE statements.
Occasionally DCL statements are grouped
with DML statements.
Data Definition Language (DDL) The
category of SQL statements that define or
delete database objects such as tables or
views. Examples are the CREATE, ALTER,
and DROP statements.
data dictionary A comprehensive set of
tables and views automatically created and
updated by the Oracle Server, which
contains administrative information about
users, data storage, and privileges. It is
installed when Oracle is initially installed
and is a central source of information for
the Oracle Server itself and for all users of
Oracle. The tables are automatically
maintained by Oracle. It is sometimes
referred to as the catalog.
Data Manipulation Language (DML) The
category of SQL statements that query and
update the database data. Common DML
statements are SELECT, INSERT, UPDATE,
and DELETE. Occasionally DCL statements
are grouped with DML statements.
data security The mechanisms that control
the access and use of the database at the
object level. For example, data security
includes access to a specific schema object
and the specific types of actions allowed for
each user on the object (e.g., user SCOTT
can issue SELECT and INSERT statements
but not DELETE statements using the EMP
table). It also includes the actions, if any,
that are audited for each schema object.
datatype (1) A standard form of data. The
Oracle datatypes are CHAR, VARCHAR2,
DATE, NUMBER, LONG, RAW, and
LONG RAW; however, the Oracle Server
recognizes and converts other standard
datatypes. (2) A named set of fixed
attributes that can be associated with an
item as a property. Data typing provides a
way to define the behavior of data.
DATE datatype A standard Oracle datatype
used to store date and time data. Standard
date format is DD–MMM–YY, as in
01–JAN–89. A DATE column may contain a
date and time between January 1, 4712 BC
to December 31, 4712 AD.
DBA See Database Administrator.
DCL See Data Control Language.
DDL See Data Definition Language.
default A clause or option value that
SQL*Plus uses if you do not specify an
alternative.
default database See local database.
directory On some operating systems, a
named storage space for a group of files. It
is actually one file that lists a set of files on
a particular device.
display format See format.
Glossary–5
display width The number of characters or
spaces allowed to display the values for an
output field.
DML See Data Manipulation Language (DML).
DUAL table A standard Oracle database
table named DUAL, which contains exactly
one row. The DUAL table is useful for
applications that require a small “dummy”
table (the data is irrelevant) to guarantee a
known result, such as “true.”
E
editor A program that creates or modifies
files.
end user The person for whom a system is
being developed; for example, an airline
reservations clerk is an end user of an
airline reservations system. See also
SQL*Plus.
error message A message from a computer
program (e.g., SQL*Plus) informing you of
a potential problem preventing program or
command execution.
expression A formula, such as SALARY +
COMMISSION, used to calculate a new
value from existing values. An expression
can be made up of column names,
functions, operators, and constants.
Formulas are found in commands or SQL
statements.
extension On some operating systems, the
second part of the full file specification.
Several standard file extensions are used to
indicate the type or purpose of the file, as in
file extensions of SQL, LOG, LIS, EXE, BAT,
and DIR. Called file type on some operating
systems.
Glossary–6
SQL*Plus User’s Guide and Reference
F
file A collection of data treated as a unit,
such as a list, document, index, note, set of
procedures, etc. Generally used to refer to
data stored on magnetic tapes or disks. See
also filename, extension, and file type.
filename The name component of a file
specification. A filename is assigned by
either the user or the system when the file
itself is created. See also extension and file
type.
file type On some operating systems, the
part of the filename that usually denotes
the use or purpose of the file. See extension.
format Columns contain information in one
of four types; users can specify how they
want a query to format information it
retrieves from character, number, date, or
long columns. For example, they can choose
to have information of type date appear as
14/08/90, or Tuesday Fourteenth August
1990, or any other valid date format.
format model A clause element that controls
the appearance of a value in a report
column. You specify predefined format
models in the COLUMN, TTITLE, and
BTITLE commands’ FORMAT clauses. You
can also use format models for DATE
columns in SQL date conversion functions,
such as TO_DATE.
form feed A control character that, when
executed, causes the printer to skip to the
top of a new sheet of paper (top of form).
When SQL*Plus displays a form feed on
most terminals, the form feed clears the
screen.
formula column Manually-created column
that gets its data from a PL/SQL procedure,
function, or expression, user exit, SQL
statement, or any combination of these.
function A PL/SQL subprogram that
executes an operation and returns a value
at the completion of the operation. A
function can be either built-in or
user-named. Contrast with procedure.
H
heading In SQL*Plus, text that names an
output column, appearing above the
column. See also column heading.
host computer The computer from which
you run SQL*Plus.
log in (or log on) To perform a sequence of
actions at a terminal that establishes a
user’s communication with the operating
system and sets up default characteristics
for the user’s terminal session.
log off (or log out) To terminate interactive
communication with the operating system,
and end a terminal session.
logon string A user-specified command line,
used to run an application that is connected
to either a local or remote database. The
logon string either explicitly includes a
connect string or implicitly uses a default
connect string.
LONG datatype One of the standard Oracle
datatypes. A LONG column can contain
any printable characters such as A, 3, &, or
a blank, and can have any length from 0 to
2 Gigabytes.
J
Julian date An algorithm for expressing a
date in integer form, using the SQL
function JDATE. Julian dates allow
additional arithmetic functions to be
performed on dates.
justification See alignment.
L
label Defines the label to be printed for the
computed value in the COMPUTE
command. The maximum length of a
COMPUTE label is 500 characters.
local database The database that SQL*Plus
connects to when you start SQL*Plus,
ordinarily a database on your host
computer. Also called a default database.
See also remote database.
N
network A group of two or more computers
linked together through hardware and
software to allow the sharing of data
and/or peripherals.
null A value that means, “a value is not
applicable” or “the value is unknown”.
Nulls are not equal to any specific value,
even to each other. Comparisons with nulls
are always false.
NULL value The absence of a value.
NUMBER datatype A standard Oracle
datatype. A NUMBER column can contain
a number, with or without a decimal point
and a sign, and can have from 1 to 105
decimal digits (only 38 digits are
significant).
Glossary–7
O
operating system The system software that
manages a computer’s resources,
performing basic tasks such as allocating
memory and allowing computer
components to communicate.
Oracle RDBMS The relational database
management system (RDBMS) developed
by Oracle Corporation. Components of the
RDBMS include the kernel and various
utilities for use by database administrators
and database users.
Oracle Server The relational database
management system (RDBMS) sold by
Oracle Corporation. Components of Oracle
Server include the kernel and various
utilities for use by DBAs and database
users.
output Results of a report after it is run.
Output can be displayed on a screen, stored
in a file, or printed on paper.
output file File to which the computer
transfers data.
P
packages A method of encapsulating and
storing related procedures, functions, and
other package constructs together as a unit
in the database. While packages provide the
database administrator or application
developer organizational benefits, they also
offer increased functionality and database
performance.
page A screen of displayed data or a sheet of
printed data in a report.
Glossary–8
SQL*Plus User’s Guide and Reference
parameter A substitution variable consisting
of an ampersand followed by a numeral
(&1, &2, etc.). You use parameters in a
command file and pass values into them
through the arguments of the START
command.
password A secondary identification word
(or string of alphanumeric characters)
associated with a username. A password is
used for data security and known only to
its owner. Passwords are entered in
conjunction with an operating system login
ID, Oracle username, or account name in
order to connect to an operating system or
software application (such as the Oracle
database). Whereas the username or ID is
public, the secret password ensures that
only the owner of the username can use
that name, or access that data.
PL/SQL The Oracle procedural language
extension of SQL. PL/SQL combines the
ease and flexibility of SQL with the
procedural functionality of a structured
programming language, such as IF
...THEN, WHILE, and LOOP. Even when
PL/SQL is not stored in the database,
applications can send blocks of PL/SQL to
the database rather than individual SQL
statements, thereby reducing network
traffic.
procedure A set of SQL and PL/SQL
statements grouped together as an
executable unit to perform a very specific
task. Procedures and functions are nearly
identical; the only difference between the
two is that functions always return a single
value to the caller, while procedures do not
return a value to the caller.
prompt (1) A message from a computer
program that instructs you to enter data or
take some other action. (2) Word(s) used by
the system as a cue to assist a user’s
response. Such messages generally ask the
user to respond by typing some
information in the adjacent field. See also
command line.
Q
query A SQL SELECT statement that
retrieves data, in any combination,
expression, or order. Queries are read-only
operations; they do not change any data,
they only retrieve data. Queries are often
considered to be DML statements.
query results The data retrieved by a query.
R
RAW datatype A standard Oracle datatype,
a RAW data column may contain data in
any form, including binary. You can use
RAW columns for storing binary
(non-character) data.
RDBMS (Relational Database Management
System) An Oracle Version 6 (and earlier)
term. Refers to the software used to create
and maintain the system, as well as the
actual data stored in the database. See also
Relational Database Management System,
Server, Oracle Server and Oracle RDBMS.
record A synonym for row; one row of data
in a database table, having values for one or
more columns.
Relational Database Management System
(RDBMS) An Oracle Version 6 (and
earlier) term. A computer program
designed to store and retrieve shared data.
In a relational system, data is stored in
tables consisting of one or more rows, each
containing the same set of columns. Oracle
is a relational database management
system. Other types of database systems
are called hierarchical or network database
systems.
remark In SQL*Plus, a comment you can
insert into a command file with the
REMARK command.
remote computer A computer on a network
other than the local computer.
remote database A database other than your
default database, which may reside on a
remote computer; in particular, one that
you reference in the CONNECT, COPY, and
SQLPLUS commands.
report (1) The results of a query. (2) Any
output, but especially output that has been
formatted for quick reading. In particular,
output from SQL*Plus, SQL*Report, or
SQL*ReportWriter.
reserved word (1) A word that has a special
meaning in a particular software or
operating system. (2) In SQL, a set of words
reserved for use in SQL statements; you
cannot use a reserved word as the name of
a database object.
roles Named groups of related privileges
that are granted to users or other roles.
Glossary–9
rollback To discard pending changes made
to the data in the current transaction using
the SQL ROLLBACK command. You can
roll back a portion of a transaction by
identifying a savepoint.
row (1) Synonym for record; one row of data
in a database table, having values for one or
more columns. Also called tuple. (2) One
set of field values in the output of a query.
See also column.
S
security level The combination of a
hierarchical classification and a set of
non-hierarchical compartments that
represent the sensitivity of information.
select To fetch rows from one or more
database tables using a query (the SQL
statement SELECT).
SELECT list The list of items that follow the
keyword SELECT in a query. These items
may include column names, SQL functions,
constants, pseudo-columns, calculations on
columns, and aliases. The number of
columns in the result of the query will
match the number of items in the SELECT
list.
SELECT statement A SQL statement that
specifies which rows and columns to fetch
from one or more tables or views. See also
SQL statement.
Server Oracle software that handles the
functions required for concurrent, shared
data access to an Oracle database. The
server portion receives and processes SQL
and PL/SQL statements originating from
client applications. The computer that
manages the server portion must be
optimized for its duties.
Glossary–10
SQL*Plus User’s Guide and Reference
session The time after a username connects
to an Oracle database and before
disconnecting, and the events that happen
in that time.
SET command variable See system variable.
spooling Sending or saving output to a disk
storage area. Often used in order to print or
transfer files. The SQL*Plus SPOOL
command controls spooling.
SQL (Structured Query Language) The
internationally accepted standard for
relational systems, covering not only query
but also data definition, manipulation,
security and some aspects of referential
integrity. See also Data Manipulation (DML)
language, Data Definition (DDL) language,
and Data Control (DCL) language.
SQL buffer The default buffer containing
your most recently entered SQL command
or PL/SQL block. SQL*Plus commands are
not stored in the SQL buffer.
SQL command See SQL statement.
SQL script A file containing SQL statements
that you can run in SQL*Plus to perform
database administration quickly and easily.
SQL statement A complete command or
statement written in the SQL language.
Synonymous with statement (SQL).
SQL*Forms A non-procedural tool for
creating, maintaining, and running
full-screen, interactive applications (called
“forms”) in order to see and change data in
an Oracle database. A fourth-generation
language for creating interactive screens for
use in block-mode, character-mode or bit
mapped environments. It has a define time
and a runtime component.
SQL*Loader An Oracle tool used to load
data from operating system files into Oracle
database tables.
SQL*Net An Oracle product that works with
Oracle Server and enables two or more
computers that run the Oracle Server to
exchange data through a third-party
network. SQL*Net supports distributed
processing and distributed database
capability. SQL*Net is an “open system”
because it is independent of the
communications protocol, and users can
interface SQL*Net to many network
environments.
SQL*Plus An interactive SQL-based
language for data manipulation, data
definition and the definition of access rights
for an Oracle database. Often used as an
end-user reporting tool.
statement (SQL) A SQL statement, and
analogous to a complete sentence, as
opposed to a phrase. Portions of SQL
statements or commands are called
expressions, predicates, or clauses. See also
SQL statement.
string Any sequence of words or characters
on a line.
substitution variable In SQL*Plus, a variable
name or numeral preceded by one or two
ampersands (&). Substitution variables are
used in a command file to represent values
to be provided when the command file is
run.
subtotal In a report, a total of values in a
number column, taken over a group of
rows that have the same value in a break
field. See also summary.
summary Summaries, or summary columns,
are used to compute subtotals, grand totals,
running totals, and other summarizations
of the data in a report.
summary line A line in a report containing
totals, averages, maximums, or other
computed values. You create summary
lines through the BREAK and COMPUTE
commands.
syntax The orderly system by which
commands, qualifiers, and parameters are
combined to form valid command strings.
system administrator A person responsible
for operation and maintenance of the
operating system of a computer.
system editor The text editor provided by
the operating system.
SYSTEM username One of two standard
DBA usernames automatically created with
each database (the other is SYS). The Oracle
user SYSTEM is created with the password
MANAGER. The SYSTEM username is the
preferred username for DBAs to use when
performing database maintenance.
system variable A variable that indicates
status or environment, which is given a
default value by Oracle or SQL*Plus.
Examples are LINESIZE and PAGESIZE.
Use the SQL*Plus commands SHOW and
SET to see and alter system variables.
T
table The basic unit of storage in a relational
database management system. A table
represents entities and relationships, and
consists of one or more units of information
(rows), each of which contains the same
kinds of values (columns). Each column is
given a column name, a datatype (such as
CHAR, VARCHAR2, DATE, or NUMBER),
and a width (the width may be
predetermined by the datatype, as in
DATE). Once a table is created, valid rows
of data can be inserted into it. Table
information can then be queried, deleted, or
updated. To enforce defined business rules
on a table’s data, integrity constraints and
triggers can also be defined for a table.
Glossary–11
table alias A temporary substitute name for
a table, defined in a query and only good
during that query. If used, an alias is set in
the FROM clause of a SELECT statement
and may appear in the SELECT list. See
also alias.
text editor A program run under your host
computer’s operating system that you use
to create and edit host system files and
SQL*Plus command files containing SQL
commands, SQL*Plus commands, and/or
PL/SQL blocks.
timer An internal storage area created by the
TIMING command.
title One or more lines that appears at the
top or bottom of each report page. You
establish and format titles through the
TTITLE and BTITLE commands.
transaction A logical unit of work that
comprises one or more SQL statements
executed by a single user. According to the
ANSI/ISO SQL standard, with which
Oracle is compatible, a transaction begins
with the user’s first executable SQL
statement. A transaction ends when it is
explicitly committed or rolled back by the
user.
truncate To discard or lose one or more
characters from the beginning or end of a
value, whether intentionally or
unintentionally.
Glossary–12
SQL*Plus User’s Guide and Reference
Trusted Oracle7 Oracle Corporation’s
multi-level secure database management
system product. It is designed to provide
the high level of secure data management
capabilities required by organizations
processing sensitive or classified
information. Trusted Oracle7 is compatible
with Oracle base products and applications,
and supports all of the functionality of
standard Oracle7. In addition, Trusted
Oracle7 enforces mandatory access control,
including data labeling, across a wide range
of multi-level secure operating system
environments.
type A column contains information in one
of four types: character, date, number or
long. The operations users can perform on
the contents of a column depend on the
type of information it contains. See also
format.
U
USERID A command line argument that
allows you to specify your Oracle username
and password with an optional SQL*Net
address.
username The name by which a user is
known to the Oracle server and to other
users. Every username is associated with a
private password, and both must be
entered to connect to an Oracle database.
See also account.
user variable A variable defined and set by
you explicitly with the DEFINE command
or implicitly with an argument to the
START command.
V
VARCHAR An Oracle Corporation datatype.
Specifically, this datatype functions
identically to the Oracle7 VARCHAR2
datatype (see definition below). However,
Oracle Corporation recommends that you
use VARCHAR2 instead of VARCHAR
because Oracle Corporation may change
the functionality of VARCHAR in the
future.
VARCHAR2 An Oracle Corporation
datatype. Specifically, it is a variable-length,
alpha-numeric string with a maximum
length of 2000 characters. If data entered for
a column of type VARCHAR2 is less than
2000 no spaces will be padded; the data is
stored with a length as entered. If data
entered is more than 2000, an error occurs.
(Note: This datatype is identical to the
Oracle Version 6 CHAR datatype, except
that its maximum length is 2000 instead of
255.)
variable A named object that holds a single
value. SQL*Plus uses bind substitution,
system, and user variables.
W
width The width of a column, parameter, or
layout object. Width is measured in
characters; a space is a character.
wrapping A reporting or output feature in
which a portion of text is moved to a new
line when the entire text does not fit on one
line.
Glossary–13
Index
. (period), 2–9
; (semicolon), 2–6
: (colon), bind variables, 3–26
& (ampersand), substitution variables, 3–18
# Pound sign, 6–27
$, number format, 4–5
@ (”at” sign)
in CONNECT command, 5–3, 6–39
in COPY command, 5–4, 6–41
in SQLPLUS command, 3–13, 5–3, 6–98
@ (”at” sign) command, 3–13, 3–16, 6–6
arguments, 6–6
command file, 3–13, 6–6
passing parameters to a command file, 6–6
similar to START, 3–13, 6–7, 6–102
@@ (double ”at” sign) command, 3–16, 6–8
command file, 6–8
similar to START, 6–8, 6–102
– (hyphen), continuing a long SQL*Plus
command, 2–11, 6–1
–? clause, 6–99
–– (comment delimiter), 3–11
–~ Negative infinity sign, 6–27
–SILENT clause, 6–99
* (asterisk)
in DEL command, 3–2, 6–46
in LIST command, 3–2, 6–61
/ (slash) command, 6–10
entered at buffer line–number prompt, 2–7,
6–10
entered at command prompt, 2–9, 6–10
executing current PL/SQL block, 2–10
executing current SQL command, 2–9
similar to RUN, 2–9, 6–10, 6–71
/ (slash), default logon, 6–39, 6–98
/*...*/ (comment delimiters), 3–10
/NOLOG option, 6–99
~ Infinity sign, 6–27
_EDITOR, in EDIT command, 3–6, 6–51
0, number format, 4–5
9, number format, 4–5
A
ACCEPT command, 3–24, 6–11
and DEFINE command, 6–44
CHAR clause, 6–11
customizing prompts for value, 3–25
DATE clause, 6–11
DEFAULT clause, 6–11
FORMAT clause, 6–11
HIDE clause, 6–12
NOPROMPT clause, 6–12
NUMBER clause, 3–25
PROMPT clause, 3–24, 6–11
Access, denying and granting, E–2
ALIAS clause, 6–24
ALL clause, 6–94
ALTER command, disabling, E–5
Ampersands (&)
in parameters, 3–22, 6–6, 6–101
substitution variables, 3–18
ANALYZE command, disabling, E–5
Index – 1
APPEND clause
in COPY command, 5–6, 6–42
in SAVE command, 3–14, 6–73
APPEND command, 3–2, 3–5, 6–13
APPINFO variable, 6–75
Arguments, in START command, 3–22, 6–101
ARRAYSIZE variable, 6–76
relationship to COPY command, 5–7, 6–43
AUDIT command, disabling, E–5
AUTOCOMMIT variable, 2–12, 6–76
AUTOPRINT variable, 6–77
AUTOTRACE variable, 3–31, 6–77
AVG function, 4–16
B
[Backspace] key, 2–2
Batch mode, 3–14, 6–54
BEGIN command, 2–9
disabling, E–5
Bind variables, 3–26
creating, 6–109
displaying, 6–64
displaying automatically, 6–77, 6–109
in PL/SQL blocks, 6–109
in SQL statements, 6–109
in the COPY command, 6–109
REFCURSOR, 3–28
Blank line
in PL/SQL blocks, 2–9
in SQL commands, 2–8
Blocks, PL/SQL, 1–2
continuing, 2–9
editing in buffer, 3–2
editing with host system editor, 3–6, 6–51
entering and executing, 2–9
listing current in buffer, 3–3
run from SQL buffer, 2–9
saving current, 3–7, 6–73
setting character used to end, 6–79
stored in SQL buffer, 2–9
storing in command files, 3–7
timing statistics, 6–88
within SQL commands, 2–8
BLOCKTERMINATOR variable, 6–79
Index – 2
BOLD clause, 6–69, 6–106
Break columns, 4–10, 6–14
inserting space when value changes, 4–12
specifying multiple, 4–13
suppressing duplicate values in, 4–11
BREAK command, 4–10, 6–14
and SQL ORDER BY clause, 4–10, 4–11, 4–13,
6–15
clearing BREAKS, 4–15
displaying column values in titles, 4–28
DUPLICATES clause, 6–17
inserting space after every row, 4–13
inserting space when break column changes,
4–12
listing current break definition, 4–15, 6–17
NODUPLICATES clause, 6–17
ON column clause, 4–11, 6–14
ON expr clause, 6–16
ON REPORT clause, 4–19, 6–17
ON ROW clause, 4–13, 6–16
printing ”grand” and ”sub” summaries, 4–19
printing summary lines at ends of reports,
4–19
removing definition, 6–22
SKIP clause, 4–13, 6–17
SKIP PAGE clause, 4–12, 4–13, 6–17
specifying multiple break columns, 4–13,
6–15
storing current date in variable for titles,
4–30
suppressing duplicate values, 4–11, 6–17
used in conjunction with COMPUTE, 4–15,
6–14, 6–16, 6–17, 6–35
used in conjunction with SET COLSEP, 6–79
used to format a REFCURSOR variable ,
6–110
Break definition
listing current, 4–15, 6–17
removing current, 4–15, 6–22
BREAKS clause, 4–15, 6–22
BTITLE clause, 6–94
BTITLE command, 4–22, 6–19
aligning title elements, 6–106
BOLD clause, 6–106
CENTER clause, 6–106
COL clause, 6–106
FORMAT clause, 6–106
indenting titles, 6–106
LEFT clause, 6–106
most often used clauses, 4–22
OFF clause, 6–105
old form, F–2
ON clause, 6–106
printing blank lines before bottom title, 4–25
referencing column value variable, 6–29
restoring current definition, 6–106
RIGHT clause, 6–106
SKIP clause, 6–106
suppressing current definition, 6–105
TAB clause, 6–106
TTITLE command, 6–19
Buffer, 2–9
appending text to a line in, 3–5, 6–13
delete a single line, 3–2
delete the current line, 3–2
delete the last line, 3–2
deleting lines from, 6–46
deleting a range of lines, 3–2, 6–46
deleting a single line, 6–46
deleting all lines, 3–2, 6–22, 6–46
deleting lines from, 3–6
deleting the current line, 6–46
deleting the last line, 6–46
executing contents, 2–9, 6–10, 6–71
inserting new line in, 3–5, 6–59
listing a range of lines, 3–2, 6–61
listing a single line, 3–2, 6–61
listing all lines, 3–2, 6–61
listing contents, 3–3, 6–61
listing the current line, 3–2, 6–61
listing the last line, 3–2, 6–61
loading contents into host system editor, 3–6,
6–51
saving contents, 3–7, 6–73
BUFFER clause, 3–2, 3–8, 6–22
BUFFER variable, F–3
C
[Cancel] key, 2–2, 2–13
CENTER clause, 4–23, 4–25, 6–69, 6–106
CHANGE command, 3–2, 3–3, 6–20
CHAR clause, 6–11
VARIABLE command, 6–109
CHAR columns
changing format, 4–6, 6–25
default format, 4–6, 6–24
CLEAR clause, 4–8, 6–24
CLEAR command, 6–22
BREAKS clause, 4–15, 6–22
BUFFER clause, 3–2, 3–8, 6–22
COLUMNS clause, 4–9, 6–22
COMPUTES clause, 4–21, 6–22
SCREEN clause, 3–26, 6–22
SQL clause, 6–22
TIMING clause, 6–22
CLOSECURSOR variable, 6–79
CMDSEP variable, 6–79
COL clause, 4–23, 4–26, 6–69, 6–106
Colons (:), bind variables, 3–26
COLSEP variable, 6–79
COLUMN command, 4–3, 6–23
ALIAS clause, 6–24
and BREAK command, 6–16
and DEFINE command, 6–44
CLEAR clause, 4–8, 6–24
DEFAULT clause, F–2
displaying column values in bottom titles,
4–29, 6–29
displaying column values in top titles, 4–28,
6–28
entering multiple, 6–30
FOLD_AFTER clause, 6–24
FOLD_BEFORE clause, 6–24
FORMAT clause, 4–5, 4–7, 6–24
formatting columns, 4–6
formatting NUMBER columns, 4–5, 6–26
HEADING clause, 4–3, 6–28
HEADSEP character, 6–28
JUSTIFY clause, 6–28
LIKE clause, 4–8, 6–28
listing a column’s display attributes, 4–8,
6–23
listing all columns’ display attributes, 4–8,
6–23
NEW_VALUE clause, 4–28, 4–30, 6–28
NEWLINE clause, 6–28
NOPRINT clause, 4–29, 6–29
NULL clause, 6–29
OFF clause, 4–9, 6–29
OLD_VALUE clause, 4–29, 6–29
Index – 3
ON clause, 4–9, 6–29
PRINT clause, 6–29
resetting a column to default display, 4–8,
6–24
restoring column display attributes, 4–9,
6–29
storing current date in variable for titles,
4–30, 6–31
suppressing column display attributes, 4–9,
6–29
TRUNCATED clause, 4–7, 6–29
used to format a REFCURSOR variable,
6–110
WORD_WRAPPED clause, 4–7, 4–9, 6–29
WRAPPED clause, 4–7, 6–29
Column headings
aligning, 6–28
changing, 4–3, 6–28
changing character used to underline, 4–4,
6–89
changing to two or more words, 4–3, 6–28
displaying on more than one line, 4–3, 6–28
suppressing printing in a report, 6–83
when truncated, 6–25
when truncated for CHAR and LONG columns, 4–7
when truncated for DATE columns, 4–7
when truncated for NUMBER columns, 4–5
Column separator, 6–79
Columns
assigning aliases, 6–24
computing summary lines, 4–15, 6–33
copying display attributes, 4–8, 6–28
copying values between tables, 5–4, 5–8, 6–41
displaying values in bottom titles, 4–29, 6–29
displaying values in top titles, 4–28, 6–28
formatting CHAR, LONG, and DATE, 4–6
formatting CHAR, VARCHAR, LONG, and
DATE, 6–24
formatting in reports, 4–3, 6–23
formatting MLSLABEL, RAW MLSLABEL,
ROWLABEL, 6–24
formatting NUMBER, 4–5, 6–26
listing display attributes for all, 4–8, 6–23
listing display attributes for one, 4–8, 6–23
names in destination table when copying,
5–5, 6–41
Index – 4
printing line after values that overflow, 4–9,
6–85
resetting a column to default display, 4–8,
6–24
resetting all columns to default display, 4–9,
6–22
restoring display attributes, 4–9, 6–29
setting printing to off or on, 4–29, 6–29
specifying values to be computed, 6–34
starting new lines, 6–28
storing values in variables, 4–28, 6–28
suppressing display attributes, 4–9, 6–29
truncating display for all when value overflows, 4–7, 6–89
truncating display for one when value overflows, 4–7, 6–30
wrapping display for all when value overflows, 4–7, 6–89
wrapping display for one when value overflows, 4–7, 6–29
wrapping whole words for one, 4–9
COLUMNS clause, 4–9, 6–22
Comma, number format, 4–5
Command file extension, 6–73, 6–87, 6–103
Command files, 3–7
aborting and exiting with a return code,
3–14, 6–113, 6–114
allowing end–user input, 3–17
creating with a system editor, 3–9
creating with INPUT and SAVE, 3–8
creating with SAVE, 3–7, 6–73
editing with GET and SAVE, 3–14
editing with host system editor, 3–14, 6–51
in @ (”at” sign) command, 3–13, 6–6
in @@ (double ”at” sign) command, 6–8
in EDIT command, 3–14, 6–51
in GET command, 3–11, 6–56
in SAVE command, 3–7, 3–8, 6–73
in SQLPLUS command, 3–13, 6–98
in START command, 3–12, 6–101
including comments in, 3–10, 6–66
including more than one PL/SQL block, 3–9
including more than one SQL command, 3–9
listing names with HOST command, 3–8
nesting, 3–13
passing parameters to, 3–22, 6–6, 6–101
registering, 6–75
retrieving, 3–11, 6–56
running, 3–12, 6–6, 6–101
running a series in sequence, 3–13
running as you start SQL*Plus, 3–13, 6–98
running in batch mode, 3–14, 6–54
running nested, 6–8
saving contents of buffer in, 3–7, 6–73
Command prompt
host operating system, 2–3
SQL*Plus, 2–4
Commands, 1–2
case, 2–5
collecting timing statistics on, 2–14, 6–104
disabling, E–4
host operating system, running from
SQL*Plus, 2–14, 6–58
listing current in buffer, 6–61
re–enabling, E–4
spaces, 2–5
SQL
continuing on additional lines, 2–7
editing in buffer, 3–2
editing with host system editor, 3–6, 6–51
ending, 2–7
entering and executing, 2–6
entering without executing, 2–8
executing current, 2–9, 6–10, 6–71
following syntax, 2–7
list of major, D–1
listing current in buffer, 3–3
saving current, 3–7, 6–73
setting character used to end and run, 6–87
SQL*Plus
abbreviations, 2–10
command summary, 6–3
continuing on additional lines, 2–11, 6–1
editing at command prompt, 3–2
ending, 2–12, 6–2
entering and executing, 2–10
entering during SQL command entry, 6–87
stopping while running, 2–13
storing in command files, 3–7
syntax conventions, 1–4
tabs, 2–5
types of, 2–5
variables that affect running, 2–12
writing interactive, 3–17
Comments
including in command files, 3–10, 6–66
using –– to create, 3–11
using /*...*/ to create, 3–10
using REMARK to create, 3–10, 6–66
COMMIT clause, 6–54
WHENEVER OSERROR, 6–113
WHENEVER SQLERROR, 6–114
COMMIT command, 2–12
COMPATIBILITY variable, 6–79
in LOGIN.SQL, 3–15
COMPUTE command, 4–11, 6–33
AVG function, 4–16
computing a summary on different columns,
4–19
COUNT function, 4–16
LABEL clause, 4–16, 4–19, 6–33
listing all definitions, 4–21, 6–35
MAXIMUM function, 4–16
maximum LABEL length, 6–33
MINIMUM function, 4–16
NUMBER function, 4–16
OF clause, 4–15, 6–34
ON column clause, 4–15, 6–34
ON expr clause, 6–34
ON REPORT clause, 4–19, 6–34
ON ROW clause, 6–34
printing ”grand” and ”sub” summaries, 4–19
printing multiple summaries on same column, 4–20
printing summary lines at ends of reports,
4–19
printing summary lines on a break, 4–15,
6–34
referencing a SELECT expression in OF, 6–34
referencing a SELECT expression in ON,
6–35
removing definitions, 4–21, 6–22
STD function, 4–16
SUM function, 4–16
used to format a REFCURSOR variable,
6–110
VARIANCE function, 4–16
COMPUTES clause, 4–21, 6–22
CONCAT variable, 3–22, 6–80
Index – 5
CONNECT command (SQL), disabling, E–5
CONNECT command (SQL*Plus), 5–2, 5–3,
6–39
and @ (”at” sign), 5–3, 6–39
database specification, 5–3
username/password, 5–2, 5–3, 6–39
CONTINUE clause
WHENEVER OSERROR, 6–113
WHENEVER SQLERROR, 6–114
Continuing a long SQL*Plus command, 2–11,
6–1
Conventions, command syntax, 1–4
COPY command, 5–4, 6–41
and @ (”at” sign), 5–4, 6–41
and ARRAYSIZE variable, 5–7, 6–43
and COPYCOMMIT variable, 5–7, 6–43
and LONG variable, 5–7, 6–43
APPEND clause, 5–6, 6–42
copying data between databases, 5–4
copying data between tables on one database, 5–8
CREATE clause, 5–6, 6–42
creating a table, 5–5, 5–6, 6–42
database specification, 5–4, 5–6, 5–8
destination table, 5–4, 6–41
determining actions, 5–4
determining source rows and columns, 5–5,
6–42
error messages, A–1
FROM clause, 5–4, 6–42
INSERT clause, 5–6, 6–42
inserting data in a table, 5–6, 6–42
interpreting messages, 5–7
mandatory database specification, 6–41
naming the source table with SELECT, 5–5,
6–42
query, 5–5, 6–42
referring to another user’s table, 5–7
REPLACE clause, 5–5, 6–42
replacing data in a table, 5–5, 6–42
sample command, 5–4, 5–5
specifying column names for destination,
6–41
specifying the data to copy, 5–5, 6–42
TO clause, 5–4, 6–42
username/password, 5–4, 5–6, 5–8, 6–41,
6–42
USING clause, 5–5, 6–42
Index – 6
when a commit is performed, 6–43
Copy command, specifying column names for
destination, 5–5
COPYCOMMIT variable, 6–80
relationship to COPY command, 5–7, 6–43
COPYTYPECHECK variable, 6–80
COUNT function, 4–16
CREATE clause
in COPY command, 5–6, 6–42
in SAVE command, 6–73
CREATE command
disabling, E–5
entering PL/SQL, 2–8
Creating flat files, 4–33
Creating the PRODUCT_USER_PROFILE
table, E–2
CRT files, changing default, 6–80
CRT variable, 6–80
Cursor Variables, 6–109
D
Database administrator, 1–7
Database changes, saving automatically, 2–12,
6–76
Database link names, in DESCRIBE command,
6–48
Database specifications
in CONNECT command, 5–3
in COPY command, 5–4, 5–6, 5–8
in SQLPLUS command, 5–3, 6–99
Databases
connecting to default, 5–2, 6–39
connecting to remote, 5–2, 6–39
copying data between, 5–4, 6–41
copying data between tables on a single, 5–8
disconnecting without leaving SQL*Plus,
5–2, 6–50
DATE clause, 6–11
DATE columns
changing format, 4–6, 6–25, 6–32
default format, 4–6
Date, storing current in variable for titles, 4–30,
6–28, 6–31
DB2
CHAR, 6–80
DATE, 6–80
DBMS_APPLICATION_INFO package, 6–75
DECLARE command, disabling, E–5
DECLARE command (PL/SQL), 2–9
DEFAULT clause, 6–11, F–2
DEFINE command, 3–17, 6–44
and host system editor, 3–6, 6–44
CHAR values, 6–44
substitution variables, 3–20, 6–44
DEFINE variable, 3–22, 6–81
DEL command, 3–2, 3–6, 6–46
using an asterisk, 3–2, 6–46
DELETE command, disabling, E–5
DEMOBLD, 1–8
DEMODROP, 1–8
DEPT table, 1–6
DESCRIBE command (SQL*Plus), 2–14, 6–48
database link name, 6–48
PL/SQL properties listed by, 6–49
table properties listed by, 6–48
Designer/2000, 1–3
Developer/2000, 1–3
DISABLED keyword, disabling commands,
E–3
Disabling
PL/SQL commands, E–5
SQL commands, E–4
SQL*Plus commands, E–4
DISCONNECT command, 5–2, 6–50
Discoverer/2000, 1–3
DOCUMENT command, F–2
REMARK as newer version of, F–2
DOCUMENT variable, F–3
DROP command, disabling, E–5
DUPLICATES clause, 6–17
E
ECHO variable, 3–12, 6–81
EDIT command, 3–6, 6–51
creating command files with, 3–9
defining _EDITOR, 3–6, 6–51
disabling, E–4
modifying command files, 3–14, 6–51
setting default file name, 6–81
EDITFILE variable, 6–81
EMBEDDED variable, 6–81
EMP table, 1–6
Empty line, displaying, 6–63
Enhancement list, Release 3.3, B–2
Error messages, interpreting, 2–15
Errors, making line containing current, 3–3
Escape characters, definition of, 6–82
ESCAPE variable, 3–22, 6–82
EXECUTE command, 6–53
disabling, E–4
Executing, a CREATE command, 2–8
Execution statistics, including in report, 6–77
EXIT clause
WHENEVER OSERROR, 6–113
WHENEVER SQLERROR, 6–114
EXIT command, 2–4, 6–54
disabling, E–4
COMMIT clause, 6–54
FAILURE clause, 6–54
in a command file, 6–102
ROLLBACK clause, 6–54
SUCCESS clause, 6–54
WARNING clause, 6–54
Exit, conditional, 6–113, 6–114
Extension, 6–73, 6–87, 6–103
F
FAILURE clause, 6–54
FEEDBACK variable, 6–82
File extension, 6–73, 6–87, 6–103
File extensions, 3–16
File names
in @ (”at” sign) command, 6–6
in @@ (double ”at” sign) command, 6–8
in EDIT command, 6–51
in GET command, 6–56
in SAVE command, 3–7, 6–73
Index – 7
in SPOOL command, 4–33, 6–97
in SQLPLUS command, 6–98
in START command, 6–101
Files
changing default CRT, 6–80
command files, 3–7
flat, 4–33
FLAGGER variable, 6–83
Flat file, 4–33
FLUSH variable, 6–83
FOLD_AFTER clause, 6–24
FOLD_BEFORE clause, 6–24
Footers
aligning elements, 6–69
displaying at bottom of page, 6–67
displaying page number, 6–68
displaying system–maintained values, 6–68
formatting elements, 6–69
indenting, 6–69
listing current definition, 6–67
restoring definition, 6–69
setting at the end of reports, 4–22
suppressing definition, 6–69
FORMAT clause, 6–11
in COLUMN command, 4–5, 4–7, 6–24
in REPHEADER and REPFOOTER commands, 6–69
in TTITLE and BTITLE commands, 4–27,
6–106
Format models, number, 4–5, 6–27
Formfeed, to begin a new page, 4–31, 6–84
Forms, running from SQL*Plus, 2–14, 6–72
FROM clause (SQL*Plus), 5–4, 6–42
G
Gateways, 1–3
GET command, 3–11, 6–56
disabling, E–4
LIST clause, 6–56
modifying command files, 3–14
NOLIST clause, 6–56
retrieving command files, 3–11, 6–56
GLOGIN.SQL, 3–15, 3–32, 3–35, 6–99
Index – 8
GRANT command, E–2
disabling, E–5
H
Headers
aligning elements, 4–24
displaying at top of page, 6–68
displaying page number, 6–68
displaying system–maintained values, 6–68
setting at the start of reports, 4–22
suppressing, 4–24
HEADING clause, 4–3, 6–28
HEADING variable, 6–83
Headings
aligning elements, 6–69
column headings, 6–83
formatting elements, 6–69
indenting, 6–69
listing current definition, 6–70
restoring definition, 6–69
suppressing definition, 6–69
HEADSEP variable, 6–83
use in COLUMN command, 4–4, 6–28
Help command, 6–57
Help, online, 2–5, 6–1, 6–57
HIDE clause, 6–12
HOST command, 2–14, 6–58
disabling, E–4
listing command file names with, 3–8
Host operating system
command prompt, 2–3
editor, 3–6, 6–51
file, loading into buffer, 6–56
running commands from SQL*Plus, 2–14,
6–58
hyphen, continuing a long SQL*Plus
command, 2–11, 6–1
I
Infinity sign (~), 6–27
Input
accepting [Return], 3–26, 6–63
accepting values from the user, 3–24, 6–11
INPUT command, 3–2, 3–5, 6–59
entering several lines, 6–59
using with SAVE to create command files,
3–8
INSERT clause, 5–6, 6–42
INSERT command, disabling, E–5
[Interrupt] key, 2–2
J
JUSTIFY clause, 6–28
K
Keyboard, significance of keys on, 2–2
Keys
[Backspace] key, 2–2
[Cancel] key, 2–2
[Interrupt] key, 2–2
[Pause] key, 2–2
[Resume] key, 2–2
[Return] key, 2–2
L
Labels, in COMPUTE command, 4–16, 6–33
LEFT clause, 4–23, 4–25, 6–69, 6–106
LIKE clause, 4–8, 6–28
Limits, SQL*Plus, C–1
Line numbers, for SQL commands, 2–6
Lines
adding at beginning of buffer, 6–59
adding at end of buffer, 6–59
adding new after current, 3–5, 6–59
appending text to, 3–5, 6–13
changing width, 4–31, 6–84
deleting all in buffer, 6–46
deleting from buffer, 3–6, 6–46
determining which is current, 3–3
editing current, 3–3
listing all in buffer, 3–2, 6–61
removing blanks at end, 6–88
LINESIZE variable, 4–24, 4–31, 6–84
LIST clause, 6–56
LIST command, 3–2, 6–61
determining current line, 3–3, 6–61
making last line current, 3–3, 6–61
using an asterisk, 3–2, 6–61
LNO clause, 6–68, 6–95, 6–105
LOCK TABLE command, disabling, E–5
Logging off
conditionally, 6–113, 6–114
Oracle, 5–2, 6–50
SQL*Plus, 2–4, 6–54
Logging on
Oracle, 5–2, 5–3, 6–39
SQL*Plus, 2–3, 6–98
LOGIN.SQL, 3–15, 6–100
including SET commands, 3–15
sample commands to include, 3–15
storing current date in variable for titles,
4–30
LONG columns
changing format, 4–6, 6–25
default format, 4–6, 6–25
setting maximum width, 6–84
setting retrieval size, 6–84
LONG variable, 4–6, 6–84
effect on COPY command, 5–7, 6–43
LONGCHUNKSIZE variable, 4–7, 6–25, 6–84
M
MAXDATA variable, 6–84
MAXIMUM function, 4–16
Media Objects, 1–3
Message, sending to screen, 3–24, 6–65
MINIMUM function, 4–16
MLSLABEL columns
changing format, 4–6
default format, 4–6, 6–25
Mobile Agents, 1–3
Index – 9
N
Negative infinity sign (–~), 6–27
NEW_VALUE clause, 4–28, 6–28
storing current date in variable for titles,
4–30, 6–28, 6–31
NEWLINE clause, 6–28
NEWPAGE command, F–3
NEWPAGE variable, 4–31, 6–84
NLS_DATE_FORMAT, 6–11, 6–32
NOAUDIT command, disabling, E–5
NODUPLICATES clause, 6–17
NOLIST clause, 6–56
NOLOG option, 6–99
NONE clause
WHENEVER OSERROR, 6–113
WHENEVER SQLERROR, 6–114
NOPRINT clause, 4–16, 4–29, 6–29
NOPROMPT clause, 6–12
NULL clause, 6–29
Null values, setting text displayed, 6–29, 6–84
NULL variable, 6–84
NUMBER clause, 3–25, 6–11
VARIABLE command, 6–109
NUMBER columns
changing format, 4–5, 6–26
default format, 4–5, 6–27
Number formats
$, 4–5
0, 4–5
9, 4–5
comma, 4–5
setting default, 6–85
NUMBER function, 4–16
NUMFORMAT variable, 6–85
in LOGIN.SQL, 3–15
NUMWIDTH variable, 6–85
effect on NUMBER column format, 4–5, 6–27
O
OF clause, 4–15, 6–34
OFF clause
in COLUMN command, 4–9, 6–29
Index – 10
in REPHEADER and REPFOOTER commands, 6–69
in SPOOL command, 4–33, 6–97
in TTITLE and BTITLE commands, 4–28,
6–105
OLD_VALUE clause, 4–29, 6–29
ON clause
in COLUMN command, 4–9, 6–29
in REPHEADER and REPFOOTER commands, 6–69
in TTITLE and BTITLE commands, 4–28,
6–106
ON column clause
in BREAK command, 4–11, 6–14
in COMPUTE command, 4–15, 6–34
ON expr clause
in BREAK command, 6–16
in COMPUTE command, 6–34
ON REPORT clause
in BREAK command, 4–19, 6–17
in COMPUTE command, 4–19, 6–34
ON ROW clause
in BREAK command, 4–13, 6–16
in COMPUTE command, 6–34
Online help, 2–5, 6–1, 6–57
Oracle Office, 1–3
ORDER BY clause
displaying column values in titles, 4–28
displaying values together in output, 4–10
OUT clause, 4–34, 6–97
Output
formatting white space in, 6–88
pausing during display, 2–15, 6–85
query results, 1–2
P
PAGE clause, 6–68
Page number
including in headers and footers, 6–68
including in titles, 6–105
Page number, including in titles, 4–14, 4–26
Pages
changing length, 4–31, 6–85
default dimensions, 4–31
matching dimensions to screen or paper size,
4–31
setting dimensions, 4–31
PAGESIZE variable, 2–6, 4–31, 6–85
in LOGIN.SQL, 3–15
Parameters, 3–22, 6–6, 6–101
Password, 1–7
in CONNECT command, 5–2, 5–3, 6–39
in COPY command, 5–4, 5–6, 5–8, 6–41
in SQLPLUS command, 2–3, 5–3, 6–98
Paths, creating, Installation and User’s Guide,
6–43
PAUSE command, 3–26, 6–63
in LOGIN.SQL, 3–15
[Pause] key, 2–2, 2–15
PAUSE variable, 2–15, 6–85
Performance, of SQL statements, 3–31
Performance, over dial–up lines, 6–88
Period (.), terminating PL/SQL blocks, 2–9
PL/SQL, 1–2, 2–9
blocks, PL/SQL, 2–9
executing, 6–53
formatting output in SQL*Plus, 6–109
listing definitions, 2–15
mode in SQL*Plus, 2–8
within SQL commands, 2–8
PLAN_TABLE table, 3–31, 6–78
PLUSTRACE role, 3–31
PLUSTRCE.SQL, 6–78
PNO clause, 6–68, 6–95, 6–105
Pound sign (#), 6–27
PRINT clause, 6–29
PRINT command, 6–64
Printing
bind variables automatically, 6–77
REFCURSOR variables, 6–110
SPOOL command, 6–97
PRODUCT_USER_PROFILE table, E–2
Programmer/2000, 1–3
PROMPT clause, 3–24, 6–11
PROMPT command, 3–24, 6–65
customizing prompts for value, 3–25
Prompts for value
bypassing with parameters, 3–22
customizing, 3–25
through ACCEPT, 3–24
through substitution variables, 3–18
PUPBLD.SQL, E–2
Q
Queries, 1–2
displaying number of records retrieved, 2–6,
6–82
in COPY command, 5–5, 6–42
Query execution path, including in report,
6–77
Query results, 1–2
displaying on–screen, 2–6
sending to a printer, 4–34, 6–97
storing in a file, 4–33, 6–97
QUIT command, 6–54
disabling, E–4
in a command file, 6–102
R
RAW MLSLABEL columns
changing format, 4–6
default format, 4–6, 6–25
Record separators, printing, 4–9, 6–85
RECSEP variable, 4–9, 6–85
RECSEPCHAR variable, 4–9, 6–85
REFCURSOR bind variables, 3–28
in a stored function, 3–28
REFCURSOR clause, VARIABLE command,
6–109
RELEASE clause, 6–68, 6–95, 6–105
REMARK command, 3–10, 6–66
RENAME command, disabling, E–5
REPFOOTER clause, 6–95
REPFOOTER command, 4–22, 6–67
aligning footer elements, 6–69
BOLD clause, 6–69
CENTER clause, 6–69
COL clause, 6–69
FORMAT clause, 6–69
indenting report footers, 6–69
Index – 11
LEFT clause, 6–69
most often used clauses, 4–22
OFF clause, 6–69
ON clause, 6–69
restoring current definition, 6–69
RIGHT clause, 6–69
SKIP clause, 6–69
suppressing current definition, 6–69
TAB clause, 6–69
REPHEADER clause, 6–95
REPHEADER command, 4–22, 6–68
aligning header elements, 4–25
aligning heading elements, 6–69
BOLD clause, 6–69
CENTER clause, 4–23, 6–69
COL clause, 4–23, 6–69
FORMAT clause, 6–69
indenting headings, 6–69
LEFT clause, 4–23, 6–69
most often used clauses, 4–22
OFF clause, 6–69
ON clause, 6–69
PAGE clause, 6–68
restoring current definition, 6–69
RIGHT clause, 4–23, 6–69
SKIP clause, 4–23, 6–69
suppressing current definition, 6–69
TAB clause, 6–69
REPLACE clause
in COPY command, 5–5, 6–42
in SAVE command, 3–14, 6–73
Report breaks, BREAK command, 6–14
Report columns, Columns, 6–24
Report titles, Titles, 6–105
Reports, 1–2
clarifying with spacing and summary lines,
4–10
creating bottom titles, 4–22, 6–19
creating footers, 6–67
creating headers, 6–68
creating headers and footers, 4–22
creating master/detail, 4–28, 6–28, 6–29
creating top titles, 4–22, 6–105
displaying, 6–77
formatting column headings, 4–3, 6–23
formatting columns, 4–5, 4–6, 6–23
Index – 12
starting on a new page, 6–81
[Resume] key, 2–2
Return code, specifying, 3–14, 6–54, 6–114
[Return] key, 2–2
REVOKE command, E–2
disabling, E–5
RIGHT clause, 4–23, 4–25, 6–69, 6–106
Roles, E–6
disabling, E–6
re–enabling, E–6
ROLLBACK clause, 6–54
WHENEVER OSERROR, 6–113
WHENEVER SQLERROR, 6–114
ROWLABEL columns
changing format, 4–6
default format, 6–25
Rows
performing computations on, 4–15, 6–33
setting maximum width SQL*Plus can process, 6–84
setting number retrieved at one time, 6–76
setting the number after which COPY commits, 6–80
RUN command, 2–9, 6–71
disabling, E–4
executing current PL/SQL block, 2–10
executing current SQL command or PL/SQL
block, 2–9
making last line current, 3–3
similar to / (slash) command, 2–9, 6–71
RUNFORM command, 2–14, 6–72
S
Sample tables, 1–5
access to, 1–7
DEMOBLD, 1–8
DEMODROP, 1–8
SAVE command, 3–7, 6–73
APPEND clause, 3–14, 6–73
CREATE clause, 6–73
disabling, E–4
modifying command files, 3–14
REPLACE clause, 3–14, 6–73
storing commands in command files, 3–7,
6–73
using with INPUT to create command files,
3–8
Saving environment attributes, 6–103
SCAN variable, F–4
SCREEN clause, 3–26, 6–22
Screen, clearing, 3–26, 6–22
Search paths, Installation and User’s Guide,
6–43
Security, PRODUCT_USER_PROFILE table,
E–2
SELECT command
and BREAK command, 4–10, 6–15, 6–16
and COLUMN command, 6–23
and COMPUTE command, 4–10, 6–34
and COPY command, 5–5, 6–42
and DEFINE command, 6–44
and ORDER BY clause, 4–10
disabling, E–5
storing current date in variable for titles,
4–30
SELECT statement, formatting results, 3–28
Semicolon (;)
in PL/SQL blocks, 2–9
in SQL commands, 2–6, 2–7
in SQL*Plus commands, 2–12, 6–2
not needed when inputting a command file,
3–9
not stored in buffer, 3–3
SERVEROUTPUT variable, 6–86
SET AUTOTRACE, 3–31
SET clause, 6–103
SET command, 2–12, 3–15, 6–74
APPINFO variable, 6–75
ARRAYSIZE variable, 5–7, 6–76
AUTOCOMMIT variable, 2–12, 6–76
AUTOPRINT variable, 6–77, 6–109
AUTOTRACE variable, 6–77
BLOCKTERMINATOR variable, 6–79
BUFFER variable, F–3
CLOSECURSOR variable, 6–79
CMDSEP variable, 6–79
COLSEP variable, 4–34, 6–79
COMPATIBILITY variable, 3–15, 6–79
CONCAT variable, 3–22, 6–80
COPYCOMMIT variable, 5–7, 6–80
COPYTYPECHECK variable, 6–80
CRT variable, 6–80
DEFINE variable, 3–22, 6–81
disabling, E–4
DOCUMENT variable, F–3
ECHO variable, 3–12, 6–81
EDITFILE variable, 6–81
EMBEDDED variable, 6–81
ESCAPE variable, 3–22, 6–82
FEEDBACK variable, 6–82
FLAGGER variable, 6–83
FLUSH variable, 6–83
HEADING variable, 6–83
HEADSEP variable, 4–4, 6–83
LINESIZE variable, 4–24, 4–31, 6–84
LONG variable, 4–6, 5–7, 6–84
LONGCHUNKSIZE variable, 6–84
MAXDATA variable, 6–84
NEWPAGE variable, 4–31, 6–84
NULL variable, 6–84
NUMFORMAT variable, 3–15, 6–85
NUMWIDTH variable, 4–5, 6–27, 6–85
PAGESIZE variable, 2–6, 3–15, 4–31, 6–85
PAUSE variable, 2–15, 3–15, 6–85
RECSEP variable, 4–9, 6–85
RECSEPCHAR variable, 4–9, 6–85
SCAN variable, F–4
SERVEROUTPUT variable, 6–86
SPACE variable, F–4
SQLCASE variable, 6–86
SQLCONTINUE variable, 6–87
SQLNUMBER variable, 6–87
SQLPREFIX variable, 6–87
SQLPROMPT variable, 6–87
SQLTERMINATOR variable, 6–87
SUFFIX variable, 6–87
TAB variable, 6–88
TERMOUT variable, 4–30, 6–88
TIME variable, 3–15, 6–88
TIMING variable, 6–88
TRIMOUT variable, 6–88
TRIMSPOOL variable, 6–88
TRUNCATE variable, F–4
UNDERLINE variable, 4–4, 6–89
used to format a REFCURSOR variable,
6–110
VERIFY variable, 3–18, 3–22, 6–89
Index – 13
WRAP variable, 4–7, 6–89
SET command variables, system variables,
2–12
SET ROLE command, disabling, E–5
SET TRANSACTION command, disabling,
E–5
SHOW clause, 6–104
SHOW command, 2–12, 6–94
ALL clause, 6–94
BTITLE clause, 6–94
ERRORS clause, 6–94
LABEL clause, 6–95
listing current page dimensions, 4–32
LNO clause, 6–95
PNO clause, 6–95
RELEASE clause, 6–95
REPFOOTER clause, 6–95
REPHEADER clause, 6–95
SPOOL clause, 6–95
SQLCODE clause, 6–95
TTITLE clause, 6–95
USER clause, 6–95
SHOWMODE variable, 6–86
SILENT clause, 6–99
Site Profile, 6–99
SKIP clause
in BREAK command, 4–12, 4–13, 6–17
in REPHEADER and REPFOOTER commands, 6–69
in TTITLE and BTITLE commands, 4–25,
6–106
in TTITLE, BTITLE, REPHEADER and REPFOOTER commands, 4–23
used to place blank lines before bottom title,
4–25
SKIP PAGE clause, 4–12, 4–13, 6–17
Slash (/) command, 6–10
using with files loaded with GET command,
6–56
SPACE variable, F–4
Spatial Data Option, 1–3
SPOOL clause, 6–95
SPOOL command, 4–32, 6–97
disabling, E–4
file name, 4–33, 6–97
OFF clause, 4–33, 6–97
Index – 14
OUT clause, 4–34, 6–97
turning spooling off, 4–33, 6–97
SQL buffer, 2–9
SQL clause, 6–22
SQL commands, list of major, D–1
SQL database language, 1–2
SQL DML statements, reporting on, 6–77
SQL.LNO
referencing in report headers and footers,
6–68
referencing in report titles, 6–105
SQL.PNO
referencing in headers titles and footers, 6–68
referencing in report titles, 6–105
SQL.PNO, referencing in report titles, 4–27
SQL.RELEASE
referencing in report headers and footers,
6–68
referencing in report titles, 6–105
SQL.SQLCODE
referencing in report headers and footers,
6–68
referencing in report titles, 6–105
using in EXIT command, 6–54
SQL.USER
referencing in report headers and footers,
6–68
referencing in report titles, 6–105
SQL*Forms, invoking from SQL*Plus, 2–14,
6–72
SQL*Net protocol, 5–3
SQL*Plus
basic concepts, 1–2
command prompt, 2–4
command summary, 6–3
exiting, 2–4, 6–54
exiting conditionally, 6–113, 6–114
limits, C–1
LOGIN.SQL, 3–15
overview, 1–2
running commands in batch mode, 3–14,
6–54
setting up environment, 3–15
shortcuts to starting, 2–4
starting, 2–3, 6–98
what you need to run, 1–6
who can use, 1–3
SQLCASE variable, 6–86
SQLCODE clause, 6–68, 6–95, 6–105
SQLCONTINUE variable, 6–87
SQLNUMBER variable, 6–87
SQLPLUS command, 2–3, 6–98
–? clause, 6–99
–SILENT clause, 6–99
/NOLOG clause, 6–99
and @ (”at” sign), 3–13, 5–3, 6–98
and EXIT FAILURE, 6–100
connecting to a remote database, 5–3
database specification, 5–3, 6–99
running command files, 3–13
unsuccessful connection, 6–100
username/password, 2–3, 6–98
SQLPREFIX variable, 6–87
SQLPROMPT variable, 6–87
SQLTERMINATOR variable, 6–58, 6–87
START clause, 6–104
START command, 3–12, 6–101
arguments, 3–22, 6–101
command file, 3–12, 6–101
disabling, E–4
passing parameters to a command file, 3–22,
6–101
similar to @ (”at” sign) command, 3–13, 6–7,
6–102
similar to @@ (double ”at” sign) command,
6–8, 6–102
Starting SQL*Plus, 2–3, 6–98
shortcuts, 2–4
Statistics, 3–31
STD function, 4–16
STOP clause, 6–104
STORE command, 3–15, 6–103
SET clause, 6–103
Stored functions, 3–28
Stored procedures, creating, 2–8
Substitution variables, 3–18
appending characters immediately after,
3–19
avoiding unnecessary prompts for value,
3–20
concatenation character, 6–80
DEFINE command, 3–20, 6–44
prefixing, 6–81
restrictions, 3–21
single and double ampersands, 3–20
system variables used with, 3–22
undefined, 3–18
where and how to use, 3–18
SUCCESS clause, 6–54
SUFFIX variable, 6–87
used with @ (”at” sign) command, 6–6
used with @@ (double ”at” sign) command,
6–8
used with EDIT command, 6–51
used with GET command, 6–56
used with SAVE command, 6–73
used with START command, 6–101
SUM function, 4–16
Summary lines
computing and printing, 4–15, 6–33
computing and printing at ends of reports,
4–19
computing same type on different columns,
4–19
printing ”grand” and ”sub” summaries (totals), 4–19
printing multiple on same break column,
4–20
Syntax
conventions, 1–4
COPY command, 5–4
Syntax rules
SQL commands, 2–7
SQL*Plus commands, 2–11
SYSDATE, 4–30
System variables, 2–12, 6–89
changing current settings, 6–74
listing current settings, 2–12, 6–94
listing old and new values, 6–86
storing and restoring, 3–15
used with substitution variables, 3–22
System–maintained values
displaying in headers and footers, 6–68
displaying in titles, 4–26, 6–105
formatting in titles, 4–27
Index – 15
T
TAB clause, 6–69, 6–106
TAB variable, 6–88
Tables, 1–2
access to sample, 1–7
controlling destination when copying, 5–5,
6–42
copying values between, 5–4, 5–8, 6–41
DEPT, 1–5
EMP, 1–5
listing column definitions, 2–14, 6–48
referring to another user’s when copying,
5–7
sample, 1–5
TERMOUT variable, 6–88
storing current date in variable for titles,
4–30
using with SPOOL command, 6–97
Text
adding to current line with APPEND, 3–5,
6–13
changing old to new with CHANGE, 3–3,
6–20
clearing from buffer, 3–2, 6–22
Text editor, host operating system, 3–6, 6–51
Text Server Option, 1–3
TIME variable, 6–88
in LOGIN.SQL, 3–15
TIMING clause, 6–22
TIMING command, 2–14, 6–104
deleting all areas created by, 6–22
deleting current area, 6–104
SHOW clause, 6–104
START clause, 6–104
STOP clause, 6–104
TIMING variable, 6–88
Titles
aligning elements, 4–24, 6–106
displaying at bottom of page, 4–22, 6–19
displaying at top of page, 4–22, 6–105
displaying column values, 4–28, 6–28, 6–29
displaying current date, 4–30, 6–28, 6–31
displaying page number, 4–26, 6–105, 6–107
displaying system–maintained values, 4–26,
6–105
formatting elements, 6–106
Index – 16
formatting system–maintained values in,
4–27
indenting, 4–26, 6–106
listing current definition, 4–28, 6–19, 6–107
restoring definition, 4–28, 6–106
setting at start or end of report, 4–22
setting lines from top of page to top title,
4–31, 6–84
setting lines from top title to end of page,
6–85
setting top and bottom, 4–22, 6–19, 6–105
spacing between last row and bottom title,
4–25
suppressing definition, 4–28, 6–105
TO clause, 5–4, 6–42
Tracing Statements, 3–31
for performance statistics, 3–32
for query execution path, 3–32
using a database link, 3–34
with parallel query option, 3–35
without displaying query data, 3–34
TRIMOUT variable, 6–88
TRIMSPOOL variable, 6–88
TRUNCATE command, disabling, E–5
TRUNCATE variable, F–4
TRUNCATED clause, 4–7, 6–29
Trusted Oracle columns
changing format, 4–6
default format, 4–6, 6–25
TTITLE clause, 6–95
TTITLE command, 4–22, 6–105
aligning title elements, 4–24, 6–106
BOLD clause, 6–106
CENTER clause, 4–23, 4–25, 6–106
COL clause, 4–23, 4–26, 6–106
FORMAT clause, 4–27, 6–106
indenting titles, 4–26, 6–106
LEFT clause, 4–23, 4–25, 6–106
listing current definition, 4–28, 6–107
most often used clauses, 4–22
OFF clause, 4–28, 6–105
old form, F–4
ON clause, 4–28, 6–106
referencing column value variable, 4–28,
6–28
restoring current definition, 4–28, 6–106
RIGHT clause, 4–23, 4–25, 6–106
SKIP clause, 4–23, 4–25, 6–106
suppressing current definition, 4–28, 6–105
TAB clause, 6–106
Tuning, 3–31
U
UNDEFINE command, 3–17, 6–108
and DEFINE command, 6–44
variable clause, 6–108
UNDERLINE variable, 4–4, 6–89
UPDATE command, disabling, E–5
USER clause, 6–68, 6–95, 6–105
User Profile, 3–15, 6–100
User variables, 3–17
defining, 3–17, 6–44
deleting, 3–17, 6–108
displaying in headers and footers, 6–68
displaying in titles, 6–105
in ACCEPT command, 3–24, 6–11
listing definition of one, 3–17, 6–44
listing definitions of all, 3–17, 6–44
Username, 1–7
connecting under different, 5–2, 6–39
in CONNECT command, 5–2, 5–3, 6–39
in COPY command, 5–4, 5–6, 5–8, 6–41
in SQLPLUS command, 2–3, 5–3, 6–98
USING clause, 5–5, 6–42
UTLXPLAN.SQL, 6–78
V
V$SESSION virtual table, 6–75
V$SQLAREA virtual table, 6–75
VALIDATE INDEX command, disabling, E–5
VARCHAR columns
changing format, 4–6
default format, 4–6, 6–24
VARCHAR2 clause, VARIABLE command,
6–109
VARCHAR2 columns
changing format, 4–6
default format, 4–6
VARIABLE command, 6–109
CHAR clause, 6–109
NUMBER clause, 6–109
REFCURSOR clause, 6–109
VARCHAR2 clause, 6–109
variable clause, 6–109
Variables
bind variables, 3–26
substitution variables, 3–18
system variables, 2–12
user variables, 6–44
VARIANCE function, 4–16
VERIFY variable, 3–18, 3–22, 6–89
W
WARNING clause, 6–54
WebServer Option, 1–3
WHENEVER OSERROR command, 6–113
COMMIT clause, 6–113
CONTINUE clause, 6–113
EXIT clause, 6–113
NONE clause, 6–113
ROLLBACK clause, 6–113
WHENEVER SQLERROR command, 3–14,
6–114
COMMIT clause, 6–114
CONTINUE clause, 6–114
EXIT clause, 6–114
NONE clause, 6–114
ROLLBACK clause, 6–114
WORD_WRAPPED clause, 4–7, 4–9, 6–29
WRAP variable, 4–7, 6–89
WRAPPED clause, 4–7, 6–29
Index – 17