1
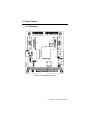
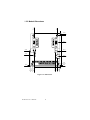
PCM-3524
VGA-to-TV PC/104 Module
Users Manual
Copyright
This document is copyrighted, © 2002. All rights are reserved. The original manufacturer reserves the right to make improvements to the products
described in this manual at any time without notice.
No part of this manual may be reproduced, copied, translated or transmitted in any form or by any means without the prior written permission of
the original manufacturer. Information provided in this manual is
intended to be accurate and reliable. However, the original manufacturer
assumes no responsibility for its use, nor for any infringements upon the
rights of third parties that may result from such use.
Acknowledgements
Award is a trademark of Award Software International, Inc.
VIA is a trademark of VIA Technologies, Inc.
IBM, PC/AT, PS/2 and VGA are trademarks of International Business
Machines Corporation.
Intel and Pentium are trademarks of Intel Corporation.
Microsoft Windows® is a registered trademark of Microsoft Corp.
RTL is a trademark of Realtek Semi-Conductor Co., Ltd.
ESS is a trademark of ESS Technology, Inc.
UMC is a trademark of United Microelectronics Corporation.
SMI is a trademark of Silicon Motion, Inc.
Creative is a trademark of Creative Technology LTD.
All other product names or trademarks are properties of their respective
owners.
For more information on this and other Advantech products, please visit
our websites at:
http://www.advantech.com
http://www.advantech.com/epc
For technical support and service, please visit our support website at:
http://support.advantech.com
This manual is for the PCM-3524.
Part No. 2006352400
1st Edition, Printed in Taiwan August, 2002
PCM-3524 User’s Manual
ii
FCC Class B
This equipment has been tested and found to comply with the limits for a
Class B digital device, pursuant to Part 15 of the FCC Rules. These limits
are designed to provide reasonable protection against harmful interference when the equipment is operated in a residential environment. This
equipment generates, uses and can radiate radio frequency energy. If not
installed and used in accordance with this user's manual, it may cause
harmful interference to radio communications. Note that even when this
equipment is installed and used in accordance with this user's manual,
there is still no guarantee that interference will not occur. If this equipment is believed to be causing harmful interference to radio or television
reception, this can be determined by turning the equipment on and off. If
interference is occurring, the user is encouraged to try to correct the interference by one or more of the following measures:
• Reorient or relocate the receiving antenna
• Increase the separation between the equipment and the receiver
• Connect the equipment to a power outlet on a circuit different from that
to which the receiver is connected
• Consult the dealer or an experienced radio/TV technician for help
Warning!
Any changes or modifications made to the
equipment which are not expressly approved by
the relevant standards authority could void your
authority to operate the equipment.
iii
Packing List
Before you begin installing your card, please make sure that the following
materials have been shipped:
• 1 ea. PCM-3524 module x 1 pc
• 4 ea. Screws (3mm) x 4 pcs
• 4 ea. Bronze stick (6mm) x 4 pcs
• 1 ea. D-sub 15 to D-sub 15 cable
• 1 ea. User's manual
If any of these items are missing or damaged, contact your distributor or
sales representative immediately.
Additional Information and Assistance
Step 1. Visit the Advantech web site at www.advantech.com where you
can find the latest information about the product.
Step 2. Contact your distributor, sales representative, or Advantech's customer service center for technical support if you need additional
assistance. Please have the following information ready before
you call:
• Product name and serial number
• Description of your peripheral attachments
• Description of your software (operating system, version, application
software, etc.)
• A complete description of the problem
• The exact wording of any error messages
PCM-3524 User’s Manual
iv
Safety Instructions
1. Read these safety instructions carefully.
2. Keep this User's Manual for later reference.
3. Disconnect this equipment from any AC outlet before cleaning. Use a damp
cloth. Do not use liquid or spray detergents for cleaning.
4. For plug-in equipment, the power outlet socket must be located near the
equipment and must be easily accessible.
5. Keep this equipment away from humidity.
6. Put this equipment on a reliable surface during installation. Dropping it or letting it fall may cause damage.
7. The openings on the enclosure are for air convection. Protect the equipment
from overheating. DO NOT COVER THE OPENINGS.
8. Make sure the voltage of the power source is correct before connecting the
equipment to the power outlet.
9. Position the power cord so that people cannot step on it. Do not place anything
over the power cord.
10. All cautions and warnings on the equipment should be noted.
11. If the equipment is not used for a long time, disconnect it from the power
source to avoid damage by transient overvoltage.
12. Never pour any liquid into an opening. This may cause fire or electrical shock.
13. Never open the equipment. For safety reasons, the equipment should be
opened only by qualified service personnel.
14. If one of the following situations arises, get the equipment checked by service
personnel:
a. The power cord or plug is damaged.
b. Liquid has penetrated into the equipment.
c. The equipment has been exposed to moisture.
d. The equipment does not work well, or you cannot get it to work according
to the user's manual.
e. The equipment has been dropped and damaged.
f. The equipment has obvious signs of breakage.
15. DO NOT LEAVE THIS EQUIPMENT IN AN ENVIRONMENT WHERE
THE STORAGE TEMPERATURE MAY GO BELOW -20° C (-4° F) OR
ABOVE 60° C (140° F). THIS COULD DAMAGE THE EQUIPMENT. THE
EQUIPMENT SHOULD BE IN A CONTROLLED ENVIRONMENT.
16. CAUTION: DANGER OF EXPLOSION IF BATTERY IS INCORRECTLY
REPLACED.REPLACE ONLY WITH THE SAME OR EQUIVALENT
TYPE RECOMMENDED BY THE MANUFACTURER, DISCARD USED
BATTERIES ACCORDING TO THE MANUFACTURER'S INSTRUCTIONS.
The sound pressure level at the operator's position according to IEC 704-1:1982 is
no more than 70 dB (A).
DISCLAIMER: This set of instructions is given according to IEC 704-1. Advantech disclaims all responsibility for the accuracy of any statements contained
herein.
v
Wichtige Sicherheishinweise
1. Bitte lesen sie Sich diese Hinweise sorgfältig durch.
2. Heben Sie diese Anleitung für den späteren Gebrauch auf.
3. Vor jedem Reinigen ist das Gerät vom Stromnetz zu trennen. Verwenden Sie
Keine Flüssig-oder Aerosolreiniger. Am besten dient ein angefeuchtetes Tuch
zur Reinigung.
4. Die NetzanschluBsteckdose soll nahe dem Gerät angebracht und leicht
zugänglich sein.
5. Das Gerät ist vor Feuchtigkeit zu schützen.
6. Bei der Aufstellung des Gerätes ist auf sicheren Stand zu achten. Ein Kippen
oder Fallen könnte Verletzungen hervorrufen.
7. Die Belüftungsöffnungen dienen zur Luftzirkulation die das Gerät vor überhitzung schützt. Sorgen Sie dafür, daB diese Öffnungen nicht abgedeckt werden.
8. Beachten Sie beim. AnschluB an das Stromnetz die AnschluBwerte.
9. Verlegen Sie die NetzanschluBleitung so, daB niemand darüber fallen kann.
Es sollte auch nichts auf der Leitung abgestellt werden.
10. Alle Hinweise und Warnungen die sich am Geräten befinden sind zu
beachten.
11. Wird das Gerät über einen längeren Zeitraum nicht benutzt, sollten Sie es vom
Stromnetz trennen. Somit wird im Falle einer Überspannung eine Beschädigung vermieden.
12. Durch die Lüftungsöffnungen dürfen niemals Gegenstände oder Flüssigkeiten
in das Gerät gelangen. Dies könnte einen Brand bzw. elektrischen Schlag auslösen.
13. Öffnen Sie niemals das Gerät. Das Gerät darf aus Gründen der elektrischen
Sicherheit nur von authorisiertem Servicepersonal geöffnet werden.
14. Wenn folgende Situationen auftreten ist das Gerät vom Stromnetz zu trennen
und von einer qualifizierten Servicestelle zu überprüfen:
a - Netzkabel oder Netzstecker sind beschädigt.
b - Flüssigkeit ist in das Gerät eingedrungen.
c - Das Gerät war Feuchtigkeit ausgesetzt.
d - Wenn das Gerät nicht der Bedienungsanleitung entsprechend funktioniert
oder Sie mit Hilfe dieser Anleitung keine Verbesserung erzielen.
e - Das Gerät ist gefallen und/oder das Gehäuse ist beschädigt.
f - Wenn das Gerät deutliche Anzeichen eines Defektes aufweist.
15. VOSICHT: Explisionsgefahr bei unsachgemaben Austausch der Batterie.Ersatz nur durch densellben order einem vom Hersteller empfohlenemahnlichen Typ. Entsorgung gebrauchter Batterien navh Angaben des
Herstellers.
Der arbeitsplatzbezogene Schalldruckpegel nach DIN 45 635 Teil 1000
beträgt 70dB(A) oder weiger.
DISCLAIMER: This set of instructions is given according to IEC704-1.
Advantech disclaims all responsibility for the accuracy of any statements
contained herein.
PCM-3524 User’s Manual
vi
Contents
Chapter
1 General Information ........................................2
1.1
1.2
1.3
Introduction ....................................................................... 2
Features ............................................................................. 2
Board Layout..................................................................... 3
1.3.1
1.3.2
Chapter
Placement ....................................................................... 3
Figure 1.1:Component Placement................................... 3
Module Dimensions ....................................................... 4
Figure 1.2:Dimensions.................................................... 4
2 Installation ........................................................6
2.2
Jumper Settings ................................................................. 7
2.2.1
2.2.2
2.2.3
2.2.4
2.2.5
2.3
Connectors......................................................................... 9
2.3.1
2.3.2
2.3.3
2.3.4
2.3.5
2.3.6
2.4
Table 2.3:Connectors ...................................................... 9
VGA Connector (CN2/CN3 16-pin)............................... 9
VGA Connector (CN1/CN4 15-pin)............................. 10
Composite Video Output Connector (CN5/J1)............. 10
DC Power Connector (CN6)......................................... 10
DC Power Connector Jack (J2)..................................... 10
S-Video Output Connector (CN7/J3) ........................... 10
Switches and VR ............................................................. 11
2.4.1
2.4.2
2.4.3
2.4.4
2.4.5
2.4.6
2.4.7
2.4.8
2.5
Table 2.1:Jumpers........................................................... 7
PAL/NTSC Video Output Select (JP1, JP2, JP4):.......... 7
Table 2.2:Output Mode Settings..................................... 7
PWRDN Power-Down Control (JP5) ............................. 8
RGB_OUT Enable (JP6) ................................................ 8
YUV_OUT Enable (JP8) ................................................ 8
POWER Selection (JP14) ............................................... 8
Table 2.4:Switches........................................................ 11
Reset (SW1).................................................................. 11
Position controls (SW2~5)............................................ 11
Table 2.5:Position Adjustment Switches ...................... 11
ZOOM TOGGLE (SW6) .............................................. 12
BLANK (SW7) ............................................................. 12
FREEZE (SW8) ............................................................ 12
FILTER MODE SELECTION (SW9).......................... 12
OVERSCAN (SW10) ................................................... 12
BRIGHTNESS (VR1)................................................... 12
Implementation of the PCM-3524................................... 13
2.5.1
2.5.2
Standalone..................................................................... 13
Plugged into Single Board Computer .......................... 13
vii
PCM-3524 User’s Manual
viii
CHAPTER
1
General Information
This chapter gives background
information on the PCM-3524 VGAto-TV PC/104 Module.
Sections include:
• Introduction
• Features
• Board Layout
1
Chapter 1
Chapter 1 General Information
1.1 Introduction
The PCM-3524 converts RGB video and sync from a standard VGA
source into broadcast quality NTSC or PAL video. Composite and SVideo outputs are compliant with SMPTE-170M and CCIR-656 specifications. A fully integrated 3-line adaptive flicker filter provides three
selectable operating modes. The PCM-3524 conforms to NTSC and PAL
standards using a single low-cost application circuit. Included is all of the
active circuitry required to generate a television signal with outstanding
image quality in a standalone application. Incoming VGA source signals
must be within a ±2% tolerance of 2X the frame and 2X the line rate of
the outgoing TV standard.
1.2 Features
• Flicker free VGA-to-TV signal converter
• 3-Channel 8 bit input conversion
• Multiple input formats: 640x480 60/75/85Hz, 800x600 60/75 Hz,
1024x768 60 Hz
• Multiple output formats - NTSC, NTSC-EIA, PAL-B/G/H/I
• Composite and S-video output formats
• Horizontal and vertical positioning control
• Configuration set by switches
• Internal color bars
• 3-Channel 9-bit output D/A converters
• Blanks to blue or black screen
PCM-3524 User’s Manual
2
1.3 Board Layout
1.3.1 Placement
JP12
JP11
JP10
JP9
JP8
JP7
JP6
JP5
JP4
JP3
JP2
JP1
SW10
SW9
SW8
SW7
SW6
SW5
SW4
SW3
SW2
SW1
16
15
1
2
CN3
CN1
VR1
CN2
CN4
12
8
2
103
15
1
16
102
J1
U3
J2
38
DC_9V
65
+12V
GND
CN6
GND
1
OSC1
3
+5V
CN5 1
64
39
JP14
J3
3
1
4
2
CN7
J4
64
2
63
D4
J5
2
40
1
39
AX10433
Figure 1.1: Component Placement
3
Chapter 1 General Information
7.62
79.81
1.3.2 Module Dimensions
95.89
90.81
69.65
45.03
44.54
32.19
27.43
5.08
PCM-3524 User’s Manual
4
0.00
13.72
Figure 1.2: Dimensions
8.64
78.74
85.09
0.00
90.17
0.00
CHAPTER
2
Installation
This chapter gives installation
information on the PCM-3524
VGA-to-TV PC/104 Module.
Sections include:
• Jumper Settings
• Connectors
• Switches
• Implementation
5
Chapter 2
Chapter 2 Installation
2.1 Jumpers
You may configure your card to match the needs of your application by
setting jumpers. A jumper is a metal bridge used to close an electric circuit. It consists of two metal pins and a small metal clip (often protected
by a plastic cover) that slides over the pins to connect them. To “close” a
jumper, you connect the pins with the clip. To “open” a jumper, you
remove the clip. Sometimes a jumper will have three pins, labeled 1, 2
and 3. In this case you would connect either pins 1 and 2, or 2 and 3.
open
closed
closed 2-3
The jumper settings are schematically depicted in this manual as follows:.
open
closed
closed 2-3
A pair of needle-nose pliers may be helpful when working with jumpers.
If you have any doubts about the best hardware configuration for your
application, contact your local distributor or sales representative before
you make any changes.
Generally, you simply need a standard cable to make most connections.
PCM-3524 User’s Manual
6
2.2 Jumper Settings
Making the proper jumper settings to configure the PCM-3524 to match
the needs of your application.
Table 2.1: Jumpers
JUMPER
JP1
JP2
JP3
JP4
JP5
JP6
JP7
JP8
JP9
JP10
JP11
JP12
JP14
NAME
TD0
TD1
RESERVED
PAL_NTSC
PWRDN
RGB_OUT
RESERVED
YUV_OUT
RESERVED
RESERVED
RESERVED
RESERVED
POWER Selection
Default
Short
Short
Open
Short
Short
Short
Open
Short
Open
Open
Open
Open
Short 2-3
2.2.1 PAL/NTSC Video Output Select (JP1, JP2, JP4):
Timing, sub-carrier frequency, and phase parameters are preprogrammed
into the module and correspond to worldwide NTSC and PAL standards.
Use TD0 and TD1 to select one of four sets of parameters to set up the
encoder. The frame rate of the graphics source must be twice the frame
rate of the selected video standard. Please see Table 2.2
Table 2.2: Output Mode Settings
NTSC
NTSC-EIA
PAL-BDGHI
PAL-N
PAL-Comb-N
PAL-M
JP4
Short
Short
Open
Open
Open
Short
JP2
Short
Short
Short
Short
Open
Open
7
JP1
Short
Open
Open
Short
Open
Short
Chapter 2 Installation
2.2.2 PWRDN Power-Down Control (JP5)
When closed, the PCM-3524 is fully operational and enabled. When
opened, the PCM-3524 is configured for minimum power consumption.
D/A converters and clocks are disabled. Previously established set-up
conditions are retained and remain in effect when PWRDN is shorted
again.
2.2.3 RGB_OUT Enable (JP6)
When opened to ON, the PCM-3524 is configured for RGB output, the
COMPOSITE, LUMA, and CHROMA will output R, G, and B respectively. When shorted to OFF, RGB output is disabled.
2.2.4 YUV_OUT Enable (JP8)
When open to ON, the PCM-3524 is configured for YUV output, the
COMPOSITE, LUMA, and CHROMA will output Y, U, and V respectively. When short to OFF, YUV output is disabled.
2.2.5 POWER Selection (JP14)
When short 1-2, the power source from +5V. When short 2-3, the power
source from regulator.
PCM-3524 User’s Manual
8
2.3 Connectors
Table 2.3: Connectors
Label
CN1
CN2
CN3
CN4
CN5
CN6
CN7
J1
J2
J3
Function
VGA output (DB15 female)
VGA output (16-pin box-header)
VGA input (16-pin box-header)
VGA input (DB15 female)
Composite Video output (2-pin header)
DC power in
S-Video output (4-pin header)
Composite Video output (RCA jack)
DC power in (DC power jack)
S-Video output (4pin mini-DIN)
2.3.1 VGA Connector (CN2/CN3 16-pin)
Pin
1
4
7
10
Signal
Red
N/A
N/A
AGND
Pin
2
5
8
11
Signal
AGND
Blue
DDC DAT
GND
Pin
3
6
9
12
13
16
AGND
N/C
14
Vert Sync
15
9
Signal
Green
AGND
GND
Horz
Sync
DDC CLK
1
2
3
4
5
6
7
9
8
10
11
13
15
12
14
16
Chapter 2 Installation
2.3.2 VGA Connector (CN1/CN4 15-pin)
Pin
1
4
7
10
13
Description
Red
N/A
AGND
GND
Horz Sync
Pin
2
5
8
11
14
Description
Green
GND
AGND
N/A
Vert Sync
Pin
3
6
9
12
15
Description
Blue
AGND
N/A
DDC DAT
DDC CLK
2.3.3 Composite Video Output Connector (CN5/J1)
Pin
1
2
Signal
COMP
GND
2.3.4 DC Power Connector (CN6)
Pin
1
2
Signal
+12V
GND
Pin
3
4
Signal
GND
+5V
2.3.5 DC Power Connector Jack (J2)
6~12V @ 600mA (9V Recommended)
2.3.6 S-Video Output Connector (CN7/J3)
Pin
1
2
3
4
Signal
GND
CSYNC
CHROMA
LUMA
PCM-3524 User’s Manual
10
2.4 Switches and VR
Table 2.4: Switches
SWITCH
SW1
SW2
SW3
SW4
SW5
SW6
SW7
SW8
SW9
SW10
VR1
FUNCTION
RESET
POS_U
POS_L
POS_R
POS_D
ZOOM
BLANK OUPUT
FREEZE OUTPUT
FILTER MODE SELECTS
OVERSCAN OR UNDERSCAN
BRIGHTNESS
All switches are pin-headers. Some sort of switches must be connected,
such as a button switches.
2.4.1 Reset (SW1)
Momentary contact reboots the system.
2.4.2 Position controls (SW2~5)
The position controls change the processor timing relative to incoming
video so that the viewed image may be shifted right or down, to reveal
portions of the image that may be found near the edges or in the overscan
areas. Vertical position is adjusted 2 lines per frame, for a total of 128
lines. Video image will revert to the most upper left position. In the 4-toggle position mode, reversion is not supported and all 4 positioning controls have to be used in order to scroll back the image. During Zoom
operation, the 4 positioning controls remain available, and are used for
panning the image across the active video area.
Table 2.5: Position Adjustment Switches
Switch
SW2
SW3
SW4
SW5
Position adjustment
up
left
right
down
11
Chapter 2 Installation
2.4.3 ZOOM TOGGLE (SW6)
When SW6 is pulsed, the video image size doubles in both the horizontal
and vertical directions (this makes the image 4x larger). The video image
display can be set back to normal size by another pulse.
2.4.4 BLANK (SW7)
When closed, a blank blue screen is displayed.
2.4.5 FREEZE (SW8)
When closed, writing to the external field store devices stops on the next
falling edge of VSYNC. When open, writing to the external field store
devices resumes on the next falling edge of VSYNC.
2.4.6 FILTER MODE SELECTION (SW9)
Vertical Filter Mode select. The 3-line flicker reduction filter may be configured for 3-line filtering, 2-line filtering, and no vertical filtering
modes. Pulsing the FILTER control will cycle through the different filtering modes.
3-lineÆ2-lineÆno filterÆcolor barsÆno filterÆ2-lineÆ3-line
2.4.7 OVERSCAN (SW10)
The video output is toggled between underscan and overscan. OVERSCAN is only available at 640 x 480 resolution.
2.4.8 BRIGHTNESS (VR1)
This VR adjusts brightness output.
PCM-3524 User’s Manual
12
2.5 Implementation of the PCM-3524
There are two basic ways to implement the PCM-3524 into your system:
2.5.1 Standalone
The user may adapt an AC-to-DC power supply, plug it into PCM-3524’s
CN6 or J2, and connect the VGA input to CN3 or CN4 to convert the
VGA RGB signal into a TV signal.
2.5.2 Plugged into Single Board Computer
The user can plug PCM-3524 into the PC/104 connector on the related
SBC for the power supply, and connect the VGA input to CN3 or CN4 to
convert the VGA RGB signal into a TV signal.
Note:
When attaching to a PC/104 connector,
please make sure that you orient the
PCM-3524 to the host board correctly.
Don’t attach it 180 degrees off!
13
Chapter 2 Installation
PCM-3524 User’s Manual
14