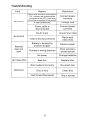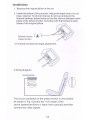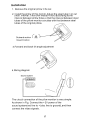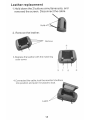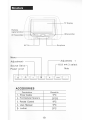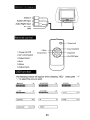
1
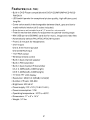
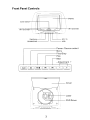
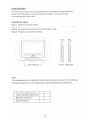
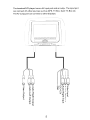
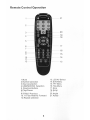
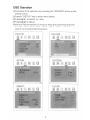
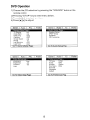
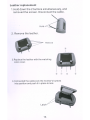
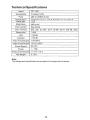
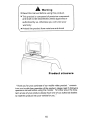
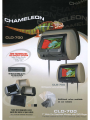
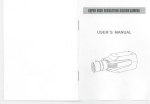
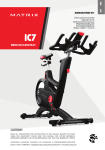
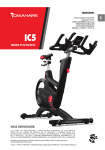
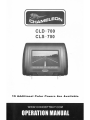
CLD-700
CLS-700
10 Additional Color Covers Are Available
CONTENTS
CLD-700
1.Features
------------------- 2
2. Front Panel Controls
3.lnstallation
- - - - - - - - - - - - - 3
- - - - - - - - - - - - - - - - - -
4
4.Remote Control Operation
- - - - - - - - - 6
5.0SD Operation - - - - - - - - - - - - - - - - 7
6.DVD Operation
- - - - - - - - - - - - - - - - 8
7.Dise Compatibility - - - - - - - - - - - - - - 9
8.Handling Discs - - - - - - - - - - - - - - - - . 9
9.Safety Precautions
- - - - - - - - - - - - -. 10
10.Troubleshooting - - - - - - - - - - - - - - 11
11.lnstallation ------------------12
12.Leather replacement
- - - - - - - - - - - - 13
13.Technical Specifications
CLS-700
1.Features
2.Warnings
- - - - - - - - -
14
- - - - - - - - - - - - - - - - - - - 15
- - - - - - - - - - - - - - - - - - - 16
3.Product Structure
- - - - - - - - - - - - - 16
4.lnstallation
- - - - - - - - - - - - - - - - -. 17
5.Leather replacement
- - - - - - - - - - -. 18
6.Structure
- - - - - - - - - - - - - - - - - - - 19
7.Accessories
- - - - - - - - - - - - - - - -, 19
8. Remote control
9.0SD function
- - - - - - - - - - - - - - - 20
- - - - - - - - - - - - - - . 20
1
Features (CLD-700):
• Built-in DVD Player compatible with DVD/VCD/MP3/MP4/CD-R/CDRW/DIVX
• LED backlit panels for exceptional picture quality, high efficiency and
long life
• Cover colors easily interchangeable between black, grey and tan to
match vehicle interior (all 3 colors included)
• Pole distance adjustable from 4"-7" apart for universal fit
• Free tilt mechanism allows for adjustment to optimal viewing angle
• Mini USB port and SD/MMC card slot for music, image and video files
• Automatically selects PALIATSC/ATSC MH system
• Front 3.5 mm jack for headphones
• 2 A/V inputs
One 3.5 mm front input jack
One wired RCA input
• 1 A/V RCA output
• Wireless remote control
• Built-in dual-channel speaker
• Built-in FM transmitter
• Built-in dual channellR transmitter
Ch A: 2.3MHz(left)-2.8MHz(right)
Ch B: 3.2MHz(left)-3.8MHz(right)
• 7"(16:9) TFT LCD display
• Resolution: 480(H) X 3(RGB) X 234(W)
• Number of Pixels: 336,960
• Brightness: 400 cd/m
2
• Power supply: DC +12V (1 0.6V-15.8V) .
• Power consumption: 12W
• Operating temperature:-1 O°C to +60°C.
• Dimensions: 11" x 6" x 14 :X"
• Weight: 3.7 Ibs.
2
Front Panel Controls
--+-4-<I-+-'-+-- Display
Cove r swit ch ----i"----+-;-..+-++-----,
Remote sensor.---t--rT~~~=;~;=::'::'::::::::::;;;~-l-.-t----1_
IR Transmitte
IR Transmitter
Earphone!-"":':':':""_--I
SD/MMC/MS
AV 2 in
L....---J
L....-----USB
Power /S ourc e select
Menu
Play/Stop
Prev
~Next
- Adjustment +
I
r~~/c
j]
I
[f---rn- -I] [r ~I/. -iJ [I-~~ J
I,
.
~ [I ':--1] WJ
'
'I
I
---~--
Cover
o
\ 10.1-4--1+---+--+---
,---=:#\--"""H~-
o
o
~~~~
\
0
=
DO
3
)0000
Las e r
DVD Drive r
Installation
First check fo make sure the appearance and installation specifications
match with the subject vehicle. Before you begin, choose the right
accessories and right tools.
Installation steps:
Step 1. Remove original pillow
Step 2. Choose the correct installation steel tube size, to ensure proper fit.
Step 3. Connect the power cord and the Video cable.
Step 4. Properly position the pillow.
-----------------........
135-185mm--
12mm steel tube
Note:
The appearance and installation specifications are not suited for all vehicles.
Please choose the correct appearance and installation specifications.
Connecting Power Line
1
12mm diameter steel tube
2
Remote controller
1
User's manual
1
4
The headrest DVD player has an AV input port and an output. The input port
can connect with other sources such as GPS, TV Box, Game TV-Box etc.
The AV output port can connect to other displays .
./
..
_--.,.----.-.~~--~~----.---
..
--~-r----_.
__
i
t
I
I
\
<
a.
CD
0
0
r ;0
_.
..... co
::J'"
0
C
0
---
"'C
C
Z
o
+ a.a.a.
_. _. (1)
a. a.
_.
0
C
(;)0»»<
() c C _.
»C C»
~ooo
0
"
< 'co_.; oCD.....r"'C::J-
CD
-- --- --- --
'"C
C
::J"'--C
-- --- --
_::J
::J"'C
"'C C
C
C
"'C
C
5
Remote Control Operation
1---
---21
2---
3
20
4
19
- 18
5
17
6
7
8
9
101112
13
1.Mute
2.Number selection
3.Source selection
4.USB/SD/DISC Selection
5. Direction Buttons
6.Play/Pause
7.Volume
8.9: Next/Previous
10.11: Fast Rewind/ Forward
12. Repeat selection
6
13.LCD AV Select
14.DVD Menu
15.TFT Menu
16.Title Menu
17.Stop
18.Enter
19.Audio
20.Angle
21.Power
OSO Operation
1)Choose the LCD selection by pressing the "SOURCE" button on the
remote control.
2)Pressing "SETUP" key to enter menu below.
3)Press["][T] to select an item.
4 )Press[ .... ][ ~] to adjust.
5)When the FM transmitter is turned on,there are 8 channels to choose
from:87.7, 88.1, 88.5, 88.9, 10?7 107.1, 107.5, 107.9. Tune your
radio to the corresponding frequency.
VOLUME
PICTURE
l~
~
. 1I
~.. ' ~l
t,'1
.~
.:/
~
:;
CO TRAST
COLOR
E GLISH
RE ET
.-
I~
.
~
til
1I
fl
\~~
....=-
~
•
lR
FM
50
50
7
OFF
OFF
DVD Operation
1)Choose the LCD selection by pressing the "SOURCE" button on the
remote control.
2)Pressing "SETUP" key to enter menu below.
3)Press[ ~][T] to select an item.
4 )Press[ <llIIII ][ ~ ] to adj ust.
PIC
Gener
-Audio Setup Page-
- General Setup PageTV Display
Angle Mark
OSD Lang
Captions
Screen Saver
HDCD
Last Momory
Logo Type
Speaker Setup
SPDIF Setup
Equalizer
3D Processing
PS
ON
ENG
OFF
ON
1X
OFF
DEF
Go To General Setup Page
Go To Audio Setup Page
Gener
- Preference Page-
Gener
- Video Setup pagesharpness
Brightness
Contrast
Logo
PIC
TV Type
Audio
Subtitle
Disc Menu
Parental
Password
default
Low
-08
-06
Go To Video $efup PaQe
PIC
NTSC
ENG
Others
ENG
GoTo Prefererlce.page
8
Disc Compatibility
Disc type
Disc format
Contents
Disc type
Disc type
Video CD
DVD video
DVD
Audio+ Video
VCD
Audio+ Video
Disc size
5 inches (12cm)
CD
Audio
Maximum playing fime
Approx.133 minutes(SS/SL)
Approx.242 minutes(SS/DL)
Approx.266 minutes(DS/SL)
Approx .484 minutes(DS/DL)
*SS:Single Sided ,DS:Double Sided,
SL:Single Layer ,DL :Dual Layer
Video CD
5 inches (12cm)
Approx.74 minutes
Audio CD
5 inches (12cm)
Approx. 74 minutes
CD-ROM
Audio CD
Mp3 : music file
WAV: music file
MPG: motion picture file
vas: DVD file
JPG: picture file
5 inches (12cm)
Handling Discs
Dust particles, scratches or twisting may cause sound disruption, poor sound quality
or poor screen image during play.
- Use a soft cloth to gently clean fingerprints and dust on the data surface (polished
side) of the disc
Never use anti-static spray or liquid, benzene, thinner or other chemical solvents
to clean discs. Such chemical solvents may damage the plastic surface of the
disc.
After playing discs, you are advised to place them inside their original cases to
prevent any damage to them.
Do not expose discs to direct sunlight, high humidity or high temperatures for long
periods of time. Discs may deform.
Do not write on the disc's signal surface. A sharp pen or ink may cause damage to
the surface of the disc.
The sound quality may vary among discs depending on their recording methods.
9
Safety Precautions
- This device is designed to be operated with a DC 12V grounded system.
- Do not allow any foreign substance to get into the disc slot.
- The device may not work in high or low temperatures. Stop using the
device until the temperature returns to a normal level. Operating
temperature range: 14°F-122°F)
Cleaning
- When cleaning the device, do not make contact with water. The device
may get damaged.
- Since chemical solvents may damage the surface of the unit, do not use
them for cleaning.
- Use a clean and dry cloth to clean.
Condensation
- When turning the heater on in the car during a rainy or humid day,
moisture may condense on the optical lens. If this occurs, the device
may not read the disc and will not function properly. In such a case, it is
advised to remove the disc from the device until the unit is dried.
Installation and Repairs
- Please install and operate the device as specified by this manual. If you
cannot install the device correctly yourself, take it to an authorized
dealer.
- Do not open the device by yourself for repairs. If the device does not
work properly, take it to an authorized dealer. (If you disassemble the
unit, you will void the warranty).
Video/Audio Trouble
- When driving on a rough road the unit is prone to severe shaking and
may experience video/audio problems. This is inevitable.
10
Troubleshooting
Fault
No power
Reason
Resolution
Yellow wire should be connected to
12v + source; red wire should be
connected to the ACC; black wire
should be connected to the ground
Connect power
correctly
Fuse burned out
Change fuse
Power cable is
disconnected
Connect power
correctly
NoAV input
Check Input video
Video lines disconnected
Reconnect
video lines
Battery is blocked by
protective paper
Remove paper
Pointed in wrong direction
Point remote to
remote sensor
No power
Change batteries
Bad disc
Replace disc
Disc loaded incorrectly
Re-insert disc
Disc is dirty
Clean disc
Fast forward/backward
This is normal
No picture
Remote
does not
work
Can't play Disc
Distortion
11
Installation
1. Remove the original pillow in the car.
2. Install the pillow of this monitor. Adjust the steel tube in or out
(max. interval: 7inch;min interval:4 inch) according to the
interval between pillow holes so that the interval between steel
tubes of the pillow monitor coincides with that between steel
tubes of the original pillow.
Outward motion
Inward motion
(.
3.Forward and back tilt angle adjustment
4.Wiring diagram
Sound system
The circuit connection of the pillow monitor is very simple.
As shown in Fig. Connect the +12V power of the
sound system(red line to +,black line to ground),and then
connect the video signals.
12
Leather replacement
1.Hold down the 2 buttons simultaneously, and
removed the screen. Disconnect the cable.
Hold
2. Remove the leather.
Remove
@
I
3.Replace the leather with the matching
color cover.
I
@®
4.Connected the cable,lock the monitor's buttons
into position and push it in place to lock.
Latch
13
(5)
®
Technical Specifications
Panel
Screen Size
Pixel
Temperature
Back light
Brightness
TFT LCD
7 Inches (16:9)
480 X 3 (RGB) X 234
Operation: 14 of - 122 of; Storage:-22 of -167 of
LED
400 cd 1m
2
Color system
PALINTSC
Disc Formats
DVD~ VeD~ eD~ MP3~ eR-R~ eD-RW~ DVD-R~ DVD-RW~
Resolution
~500
SIN
~90dB
Isolation
~65dB
Audio Input/Output
1.6V±20%
Video Input/Output
1V p-p ±20%
Power Supply
Power
DC 12V
::::; 12W
Product Dimensions 11" x 6" x 14 %
Net Weight
3.71bs
Note:
The design and specifications are subject to change without notice.
14
DveD
Features
(CLS-700):
• LED backlit panels for exceptional picture quality, high efficiency
and long life
• Cover colors easily interchangeable between black, grey and tan
to match vehicle interior (all 3 colors included)
• Pole distance adjustable from 4"-7" apartforuniversal fit
• Free tilt mechanism allows for adjustment to optimal viewing angle
• Automatically selects PAL/ATSC/ATSC MH system
• Built-in front 3.5mm AV input jack
• Front 3.5mm jack for headphones
• 2 A/V inputs
One 3.5mm front input jack
One wired RCA input
• Wireless remote control
• Built-in dual-channel speaker
• Built-in dual channellR transmitter
Ch A: 2.3MHz(left)-2.8MHz(right)
Ch B: 3.2MHz(left)-3.8MHz(right)
• 7"(16:9) TFT LCD display
• Resolution: 480(H) X 3(RGB) X 234(W)
• Number of Pixels: 336,960
• rightness: 400 cd/m2
• Power supply: DC +12V (1 0.6V-15.8V)
• Power consumption: 12W
• Operating temperature:-1 O°C to +60°C
• Dimensions: 11" x 6" x 14 %"
• Weight: 2.9 Ibs.
15
A
Warning
~
Read this manual before using this product.
~
This product is composed of precision components
and shall not be dissembled unless approved or
authorized by us, otherwise you will void your
warranty
~
Protect the product from moisture and shock
!
i
.
>:,.,'\..
'
\
\
)
/
Product structure
"Thank you for your purchase of our mobile video product. To ensure
long-term trouble free operation of the product, please read the following
operations manual before using the monitor. To further ensure the longterm service of your product, please have one of our authorized dealers
to install this product into your vehicle for you."
16
Installation
1. Remove the original pillow in the car.
2. Install the pillow of this monitor. Adjust the steel tube in or out
(max. interval: 7inch;min interval:4 inch) according to the
interval between pillow holes so that the interval between steel
tubes of the pillow monitor coincides with that between steel
tubes of the original pillow.
Outward motion
Inward motion
3. Forward and back tilt angle adjustment
4.Wiring diagram
Sound system
The circuit connection of the pillow monitor is very simple.
As shown in Fig. Connect the +12V power of the
sound system(red line to +,black line to ground),and then
connect the video signals.
17
Leather replacement
1.Hold down the 2 buttons simultaneously, and
removed the screen. Disconnect the cable.
Hold
2. Remove the leather.
Remove
@
I
3.Replace the leather with the matching
color cover.
I
@
CD
4.Connected the cable,lock the monitor's buttons
into position and push it in place to lock.
Latch
18
@
®
Structure
~~+--I-+~-+--
TFT 0 is pi a y
Remote
s ig naI wi nd OW----i---+-lh.
'--------~
IRTransmitter~~~~~~~~~~~~~~~~~~~~~~~~~
IRTransmitter
U
L.....-~~_
AV2In---~
Earphone
Me nu
Adjustme nt
Ad justment -
+
r-16:9 or 4:3 select
So urce SelectPo wer on/off
Mute
[~] [~] [W] [~ [bWl l~] [~]
ACCESSORIES
Quantity
Description
1 . Power Cable
1PC
2. Pole Diameter Spacers
3. Remote Control
2PCS
1PC
4. Users Manual
1PC
5.
2PC
Leather
19
Video in
0
Audio Left Input
~==C
0
Audio Right Input
~==C
DC+12V
~~~==q;
GND
Remote control
1.Power/on/off
5.Menu
1. Power On/Off
6.Adjustment-
t==::~~---Jl~ 2.lnput Video Switch
~~ClI"..
t--t1r-- 3.Adjustment+
~-II
2.AV1,AV2 Switch
~~~----fjt- 4.Exit aSD Display
3.Adjustment+
4.Exit
5.Menu
6.Adjustment-
OSD function
The following menus will appear when pressing "SEL" button,press "+"
"-" to select the one you want.
OSRIGHT
111111111111111111111
U TINT
20
····
20
1111111111111111111111111···..·..···....···....··
LANGUAGE
20
I
tD COLOR
I
1111111111111111111111111'"
I
1IIIIIIIIIIIIIIIIlllIl....·.....·......··....·1
1 MODE
IIR
ITCON
I SOURCE
1
ca CONTRAST
ENGLISH 1
...... VOLUME
I RESET
20
1111111111111111111111111·
20
· ·..
1
20
.
LD
I
338 Turnbull Canyon Road
City of Industry, CA91745
USA
Tel: (626) 968-8827
Fax: (626) 968-9916
Toll Free: (888) 830-1788
www.conceptbuy.com
NEW rECHNOLOGY
LED BACKLlr SCREEN
Better Picture Quality
Energy Efficient
Longer Life
.-.
o
~
M1111JS8 ,...l1li SlllMIC en sill f.
1ISIe,I..e•• YMeI files
ICLD-700 mod~ only)
Elslly 1IIIre.IIIII.'1 elVers
Ille. nlllllrlir I' '11r ,..Iell
IALL 3 COLOR COVERS INCWOEOI
•
Additional colors available
on our website
mm~nm~~jl(!j!jIn.. • • . -
Perfect match to CL5-700 without DVD Player
CLD·700
FEATURES:
• BUILT-IN DVD PLAYER COMPATIBLE WITH DVDf/CDilItP3il1tP4/CD-R/CD-RWIDIVX
• LED BACKLIT PANELS FOR EXCEPTIONAL PICTURE QUALITY, HIGH EFFICIENCY
AND LONG LIFE
• COVER COLORS EASILY INTERCHANGEABLE BETWEEN BLACK, GREY AND TAN TO
MATCH VEHICLE INTERIOR (ALL 3COLORS INCLUDED)
• POLE DISTANCE ADJUSTABLE FROM 4·-)" APART FOR UNIVERSAL FIT
• FREE TILT MECHANISM AllOWS FOR ADJUSTMENT TO OPTIMAL VIEWING ANGLE
• MINI USB PORT AND SDIMMC CARD SLOT FOR MUSIC, IMAGE AND VIDEO FILES
• AUTOMATICAllY SElECTS PAlJATSC/ATSC MH SYSTEM
• FRONT 3.5MM JACK FOR HEADPHONES
• 2AN INPUTS
- ONE 3.5MM FRONT INPUT JACK
- ONE WIRED RCA INPUT
• 1AN RCA OUTPUT
• WIRELESS REMOTE CONTROL
• BUILT-IN DUAL-CHANNEL SPEAKER
• BUILT-IN FM TRANSMmER
• BUILT-IN DUAl CHANNELIR TRANSMITTER
- CH A: 2.3MHZILEm-2.8MHZIRIGHTi
- CH B: 3.2MHZILEm-3.8MHl(RIGHTi
• )"(16:9) m LCD DISPLAY
• RESOLUTION: 430IH) X31RGBI X234(W)
• NUMBER OF PIXELS: 336,960
• BRIGHTNESS: 400 CDilIt 2
• POWER SUPPLY: DC +I2V 110.6V-15.8Vl.
• POWER CONSUMPTION: 12W
• OPfRATlIIG TEMPERATURE:-1O'C ~+6O'C.
• IlIIEJ1SIOIIS: 11" XS" X1n.
• WEIGHT: 3.1 LBS.
u.s.
Patent 7,176,987
U.S. Patent 7,597,394