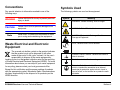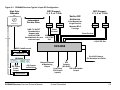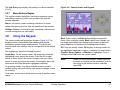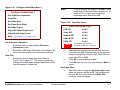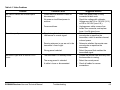
1
DRS4000 Receiver
RF & Low Latency HD Diversity Receiver
Put product photo (white background,
max. 9 in. W x 4 in. H) in graphic frame,
centered on page.
User and Technical Manual
Manual Part No. 400545-1 Rev. A November 2008
This page intentionally left blank.
Notices
About This Manual
Part number 400555-1
Adobe®, the Adobe logo, Acrobat®, and Reader® are registered
trademarks of Adobe Systems, Inc. in the United States and/or
other countries. Microsoft®, Windows®, and Internet Explorer®
are registered trademarks of Microsoft Corporation in the United
States and/or other countries. Firefox® is a registered trademark
of the Mozilla Foundation. Safari® is a trademark of Apple Inc.
registered in the U.S. and other countries.
Revision A November 2008
The information in this manual applies to the Microwave Radio
Communications (MRC) DRS4000 Receiver.
Copyright
The information in this manual may only be reproduced by the
purchaser strictly for its own internal use to the extent required
for its use of the product, and shall only be made available to
purchaser's employees who need access to this material. No
part of this material, nor any copies hereof, shall in any manner
be disclosed, disseminated, or made available by purchaser or
its employees to any other person, firm, or entity without the
express prior written consent of Microwave Radio
Communications nor shall the same in any manner be modified
or published for resale without the express prior written
authorization of Microwave Radio Communications.
© 2008 Microwave Radio Communications
Microwave Radio Communications
101 Billerica Avenue - Bldg. 6
North Billerica, MA 01862-1256 USA
TEL:
800.490.5700
+1.978.671.5700
FAX:
+1.978.671.5800
Proprietary Material
The information and design contained within this manual was
originated by and is the property of Microwave Radio
Communications. Microwave Radio Communications reserves
all patent proprietary design, manufacturing, reproduction use,
and sales rights thereto, and to any articles disclosed therein,
except to the extent rights are expressly granted to others. The
foregoing does not apply to vendor proprietary parts.
Microwave Radio Communications has made every effort to
ensure the accuracy of the material contained in this manual at
the time of printing. As specifications, equipment, and this
manual are subject to change without notice, Microwave Radio
Communications assumes no responsibility or liability
whatsoever for any errors or inaccuracies that may appear in this
manual or for any decisions based on its use. This manual is
supplied for information purposes only and should not be
construed as a commitment by Microwave Radio
Communications.
Quality Certification
Microwave Radio Communications is certified to ISO 9001:2000.
Authorized EU representative: Vislink PLC.
Printed in U.S.A.
DRS4000 Receiver User and Technical Manual
Notices-i
Conventions
Symbols Used
Pay special attention to information marked in one of the
following ways:
The following symbols are used on the equipment:
WARNING
CAUTION
Note
Follow WARNINGS closely to prevent personal
injury or death.
Symbol
WARNING: General Warning. Risk of Danger.
Follow CAUTIONS to prevent damage to the
equipment.
WARNING: Risk of Electric Shock.
Read Notes for additional information to assist
you in using and maintaining the equipment.
Waste Electrical and Electronic
Equipment
The crossed out dustbin symbol on the product indicates
that the product must not be disposed of with other
waste at the end of its life cycle. Instead, it is the user's
responsibility to dispose of the waste equipment by
handing it over to a designated collection point for the recycling
of Waste Electrical and Electronic Equipment (WEEE). For more
information about where you can drop off your waste equipment
for recycling, please contact your local government office.
Except for this notification and the proper marking of products
with the appropriate symbol, Microwave Radio Communications
disclaims responsibility for the disposal of its products per the
WEEE directive.
DRS4000 Receiver User and Technical Manual
Meaning
CAUTION: Electrostatic Discharge. Possible
Damage to Equipment.
Fuse - Identifies fuses or their location.
-OR-
Frame or Chassis Ground - Identifies the frame or
chassis terminal.
Earth Ground - Identifies the earth ground terminal.
Protective Earth Ground - Identifies any terminal
which is intended for connection to an external
conductor for protection against electric shock in
case of a fault, or the terminal on a protective earth
electrode.
Notices-ii
On-line Viewing
Viewing of this manual on-line requires Adobe Acrobat software
or Adobe Reader software, Version 5.0 and later. Click on the
following icon to download your FREE copy of the latest Adobe
Reader software.
When viewing this manual on-line, text displayed as blue
contains a hypertext link. Click on the blue hypertext link to
jump to that destination. If the destination link is also blue, click
on the blue destination link to return.
Warranty Information
Product Manufactured by MRC
a. Products manufactured by MRC are warranted against
defects in material and workmanship for a period of two (2) years
from date of delivery, as evidenced by MRC's packing slip or
other transportation receipt (unless otherwise noted).
b. MRC's sole responsibility under this warranty will be to either
repair or replace, at its option, any component which fails during
the applicable warranty period because of a defect in material or
workmanship, provided Buyer has promptly reported same to
MRC in writing. All replaced products and parts will become
property of MRC.
c. MRC will honor the warranty at the repair facility designated
by MRC. It is Buyer's responsibility to return, at its expense, the
allegedly defective product to MRC. Buyer must obtain a Return
Material Authorization (RMA) number and shipping instructions
from MRC prior to returning any product under warranty.
DRS4000 Receiver User and Technical Manual
Transportation charges for the return of the product to Buyer will
be paid by MRC within the United States. For all other locations,
the warranty excludes all costs of shipping, customs clearance
and other related charges. If MRC determines that the product is
not defective within the terms of this warranty, Buyer will pay
MRC all costs of handling, transportation, and repairs at the then
prevailing repair rates.
d. All the above warranties are contingent upon proper use of
the product. These warranties will not apply (1) if adjustment,
repair, or product or parts replacement is required because of
accident, unusual physical, electrical or electromagnetic stress,
neglect, misuse, failure of electric power, environmental controls,
transportation, failure to maintain properly or otherwise in
accordance with MRC specifications, or abuses other than
ordinary use; (2) if the product has been modified by Buyer or
has been repaired or altered outside MRC's repair facility, unless
MRC specifically authorizes such repairs or alterations in each
instance; or (3) where MRC serial numbers, warranty data or
quality assurance decals have been removed or altered.
e. Equipment shipped FOB from Microwave Radio
Communications shall become the property of the buyer upon
delivery and receipt from the carrier. Any damage in shipment
should be handled by the buyer directly with the carrier.
Immediately request the carrier’s inspection upon evidence of
damage during shipment. Do not return any Microwave Radio
Communications product to the factory until a Return Material
Authorization (RMA) number and shipping instructions have
been provided.
f. No person, including any dealer, agent or representative of
MRC is authorized to assume for MRC any other liability on its
behalf except as set forth herein. If any payment is due MRC for
services performed hereunder, it will be subject to the same
Notices-iii
payment terms as the original purchase.
Products Manufactured By Others
For products not manufactured by MRC, the original
manufacturer's or licensor's warranty will be assigned to Buyer to
the extent permitted by the manufacturer or licensor and is in lieu
of any other warranty, expressed or implied. For warranty
information on a specific product, a written request should be
made to MRC.
All Products
THE FOREGOING WARRANTIES AND REMEDIES ARE
EXCLUSIVE AND ARE IN LIEU OF ALL OTHER EXPRESS OR
IMPLIED WARRANTIES, OBLIGATIONS, AND LIABILITIES ON
THE PART OF MRC. EXCEPT FOR THE EXPRESS
WARRANTIES STATED HEREIN, MRC DISCLAIMS ALL
WARRANTIES ON PRODUCTS FURNISHED HEREUNDER,
INCLUDING, WITHOUT LIMITATION, ALL IMPLIED
WARRANTIES OF MERCHANTABILITY AND FITNESS FOR A
PARTICULAR PURPOSE. MRC WILL HAVE NO
RESPONSIBILITY FOR ANY PARTICULAR APPLICATION
MADE OF ANY EQUIPMENT.
Any description of equipment, whether in writing or made orally
by MRC or its agents, specification sheets, models, bulletins,
drawings, or similar materials used in connection with Buyer's
order are for the sole purpose of identifying the equipment and
will not be construed as an express warranty. Any suggestions
by MRC or its agents regarding use, application, or suitability of
the equipment will not be construed as an express warranty. No
warranties may be implied from any course of dealing or usage
of trade. Buyer agrees that the exclusion of all warranties, other
than those expressly provided herein, is reasonable.
DRS4000 Receiver User and Technical Manual
Notices-iv
Contents
Notices - - - - - - - - - - - - - - - - - - - - - - - - - - - - - - i
About This Manual - - - - - - - - - - - - - - - - - - - - - - - - - - i
Copyright - - - - - - - - - - - - - - - - - - - - - - - - - - - - - - - - - i
Proprietary Material - - - - - - - - - - - - - - - - - - - - - - - - - - i
Quality Certification - - - - - - - - - - - - - - - - - - - - - - - - - - i
Conventions - - - - - - - - - - - - - - - - - - - - - - - - - - - - - - - ii
Waste Electrical and Electronic Equipment - - - - - - - - - ii
Symbols Used - - - - - - - - - - - - - - - - - - - - - - - - - - - - - ii
On-line Viewing - - - - - - - - - - - - - - - - - - - - - - - - - - iii
Warranty Information - - - - - - - - - - - - - - - - - - - - - - - - iii
Product Manufactured by MRC - - - - - - - - - - - - - - - iii
Products Manufactured By Others - - - - - - - - - - - - iv
All Products - - - - - - - - - - - - - - - - - - - - - - - - - - - - iv
Introduction - - - - - - - - - - - - - - - - - - - - - - - - - 1-1
Chapter Overview - - - - - - - - - - - - - - - - - - - - - - - - How to Use This Manual - - - - - - - - - - - - - - - - - - - What This Manual Covers - - - - - - - - - - - - - - - - - - How It Is Organized - - - - - - - - - - - - - - - - - - - - - - For Whom It Is Written - - - - - - - - - - - - - - - - - - - - Related Documents - - - - - - - - - - - - - - - - - - - - - - Ordering Documentation - - - - - - - - - - - - - - - - - - - Calling for Parts or Service - - - - - - - - - - - - - - - - - Supported Repairs - - - - - - - - - - - - - - - - - - - - - - - Tell Us What You Think - - - - - - - - - - - - - - - - - - - - -
1-1
1-1
1-1
1-2
1-2
1-2
1-2
1-3
1-3
1-4
Product Description- - - - - - - - - - - - - - - - - - - 2-1
Chapter Overview - - - - - - - - - - - - - - - - - - - - - - - - Description - - - - - - - - - - - - - - - - - - - - - - - - - - - - Features - - - - - - - - - - - - - - - - - - - - - - - - - - - - - - Hardware Components - - - - - - - - - - - - - - - - - - - - Receiver - - - - - - - - - - - - - - - - - - - - - - - - - - - - -
DRS4000 Receiver User and Technical Manual
2-1
2-1
2-2
2-4
2-4
Antennas - - - - - - - - - - - - - - - - - - - - - - - - - - - - Low Noise Block Downconverters - - - - - - - - - - Firmware Components - - - - - - - - - - - - - - - - - - - - - Frequency Bands - - - - - - - - - - - - - - - - - - - - - - - - Standard/High Definition MPEG Decoding - - - - - - - COFDM Demodulation - - - - - - - - - - - - - - - - - - - - - Applications - - - - - - - - - - - - - - - - - - - - - - - - - - - - Compatibility - - - - - - - - - - - - - - - - - - - - - - - - - - - - Options - - - - - - - - - - - - - - - - - - - - - - - - - - - - - - - Block Downconverter Options - - - - - - - - - - - - - HD Decoding Upgrade - - - - - - - - - - - - - - - - - - Antenna Options - - - - - - - - - - - - - - - - - - - - - - RF Filter Options - - - - - - - - - - - - - - - - - - - - - - Mounting Options - - - - - - - - - - - - - - - - - - - - - - Power Options - - - - - - - - - - - - - - - - - - - - - - - - Decryption Options - - - - - - - - - - - - - - - - - - - - - SCM Single Input Demodulation Support - - - - - Packet Switching Option - - - - - - - - - - - - - - - - - -
2-4
2-4
2-4
2-4
2-5
2-5
2-5
2-5
2-5
2-5
2-6
2-6
2-6
2-6
2-6
2-7
2-7
2-7
Routine Operation - - - - - - - - - - - - - - - - - - - - 3-1
Chapter Overview - - - - - - - - - - - - - - - - - - - - - - - - Front Panel Displays and Connectors - - - - - - - - - - Rear Panel Connectors - - - - - - - - - - - - - - - - - - - - DIVERSITY Connectors - - - - - - - - - - - - - - - - - PACKET Connectors - - - - - - - - - - - - - - - - - - - SCM Connectors - - - - - - - - - - - - - - - - - - - - - - Other Connectors - - - - - - - - - - - - - - - - - - - - - - Powering the Receiver - - - - - - - - - - - - - - - - - - - - - Powering Up - - - - - - - - - - - - - - - - - - - - - - - - - Powering Down - - - - - - - - - - - - - - - - - - - - - - - Learning the Regions of the Control Screen - - - - - - Help Text Region - - - - - - - - - - - - - - - - - - - - - - RF Settings Region - - - - - - - - - - - - - - - - - - - - Preset Region - - - - - - - - - - - - - - - - - - - - - - - - -
3-1
3-1
3-3
3-3
3-4
3-4
3-4
3-5
3-5
3-5
3-5
3-6
3-6
3-6
Contents-1
Service Region- - - - - - - - - - - - - - - - - - - - - - - - - 3-6
Data Status Region - - - - - - - - - - - - - - - - - - - - - 3-6
Signal Displays Region - - - - - - - - - - - - - - - - - - 3-6
Menu Buttons Region - - - - - - - - - - - - - - - - - - - 3-7
Using the Keypad - - - - - - - - - - - - - - - - - - - - - - - - - 3-7
Using the Video Monitor - - - - - - - - - - - - - - - - - - - - 3-8
Using the Control Screen - - - - - - - - - - - - - - - - - - - 3-8
Using the Menus - - - - - - - - - - - - - - - - - - - - - - - - 3-11
Using the Setup Menu - - - - - - - - - - - - - - - - - - 3-11
Configuring Packet Switching - - - - - - - - - - - - 3-22
Using the Factory Setup Menu - - - - - - - - - - - 3-24
Using the Preset Menu - - - - - - - - - - - - - - - - - 3-29
Using the Options Menu - - - - - - - - - - - - - - - - - 3-31
Using the Camera Menu - - - - - - - - - - - - - - - - 3-31
Operating the Receiver Remotely - - - - - - - - - - - - 3-32
Starting the Web Browser Interface - - - - - - - - - 3-32
Common Features - - - - - - - - - - - - - - - - - - - - - 3-33
Using the Web Browser Interface - - - - - - - - - - 3-33
Troubleshooting - - - - - - - - - - - - - - - - - - - - - 4-1
Chapter Overview - - - - - - - - - - - - - - - - - - - - - - - - Video Problems - - - - - - - - - - - - - - - - - - - - - - - - - Audio Problems - - - - - - - - - - - - - - - - - - - - - - - - - General System Problems - - - - - - - - - - - - - - - - - - -
4-1
4-2
4-5
4-6
Installation- - - - - - - - - - - - - - - - - - - - - - - - - - 5-1
Chapter Overview - - - - - - - - - - - - - - - - - - - - - - - - Reviewing Customer Specifications - - - - - - - - - - - Unpacking the Components - - - - - - - - - - - - - - - - - Inspecting the Components - - - - - - - - - - - - - - - - - Reporting Any Damage - - - - - - - - - - - - - - - - - - - - Preparing the Site - - - - - - - - - - - - - - - - - - - - - - - - Testing the Antennas - - - - - - - - - - - - - - - - - - - - - - Installing the Receiver - - - - - - - - - - - - - - - - - - - - - Installing Antennas and Downconverters - - - - - - - - -
DRS4000 Receiver User and Technical Manual
5-1
5-1
5-1
5-2
5-2
5-2
5-4
5-5
5-6
Cabling Practices - - - - - - - - - - - - - - - - - - - - - - - 5-6
Selecting Coaxial Cables - - - - - - - - - - - - - - - - - - 5-7
Aligning Omnidirectional Antennas- - - - - - - - - - - 5-7
Installing Downconverters and Antennas - - - - - - - 5-8
Powering Up the First Time - - - - - - - - - - - - - - - - - - - 5-9
Audio Connections - - - - - - - - - - - - - - - - - - - - - - - - - 5-9
Video Connections - - - - - - - - - - - - - - - - - - - - - - - - 5-10
Monitor and Control Connectors - - - - - - - - - - - - - - 5-11
Data Connections- - - - - - - - - - - - - - - - - - - - - - - - - 5-11
Power Connections - - - - - - - - - - - - - - - - - - - - - - - 5-14
Optional Packet Connectors - - - - - - - - - - - - - - - - - 5-14
Replacement Parts - - - - - - - - - - - - - - - - - - - 6-1
Chapter Overview - - - - - - - - - - - - - - - - - - - - - - - - - 6-1
Replacements - - - - - - - - - - - - - - - - - - - - - - - - - - - - 6-1
Theory of Operation - - - - - - - - - - - - - - - - - - 7-1
System Architecture - - - - - - - - - - - - - - - - - - - - - - Block Downconverters - - - - - - - - - - - - - - - - - - RF Switching Module - - - - - - - - - - - - - - - - - - - Four-Channel Input Tuner Module - - - - - - - - - - COFDM DiversityModule - - - - - - - - - - - - - - - - - MPEG Decoder Module - - - - - - - - - - - - - - - - - Processor Module - - - - - - - - - - - - - - - - - - - - - Interface Module - - - - - - - - - - - - - - - - - - - - - - Power Supply - - - - - - - - - - - - - - - - - - - - - - - - - Packet-Based Switch Module - - - - - - - - - - - - - -
7-1
7-1
7-3
7-3
7-4
7-4
7-4
7-5
7-5
7-5
Channels and Frequencies - - - - - - - - - - - - - A-1
Appendix Overview - - - - - - - - - - - - - - - - - - - - - - - Initial Factory Settings - - - - - - - - - - - - - - - - - - - - - Pre-BAS 2 GHz Channel Plan (U.S.) - - - - - - - - 2 GHz Upper Channel Plan (non-U.S.) - - - - - - - 3 GHz Channel Plan - - - - - - - - - - - - - - - - - - - - 7 GHz Lower Channel Plan (U.S.) - - - - - - - - - - US 2 GHz Relocation Project - - - - - - - - - - - - - - - - -
A-1
A-1
A-2
A-2
A-3
A-3
A-4
Contents-2
Glossary - - - - - - - - - - - - - - - - - - - - - - - - - - - B-1
Specifications - - - - - - - - - - - - - - - - - - - - - - - C-1
Maximal Ratio Combining - - - - - - - - - - - - - - D-1
Appendix Overview - - - - - - - - - - - - - - - - - - - - - - - - D-1
Antenna Correlation- - - - - - - - - - - - - - - - - - - - - - - - D-1
MaxRC Diversity Technique - - - - - - - - - - - - - - - - - - D-1
Index - - - - - - - - - - - - - - - - - - - - - - - - - - - Index-1
DRS4000 Receiver User and Technical Manual
Contents-3
This page intentionally left blank.
DRS4000 Receiver User and Technical Manual
Contents-4
1
Introduction
1.1
Chapter Overview
When viewing this manual on-line, text displayed as blue
contains a hypertext link. Click on the blue hypertext link to
jump to that destination. If the destination link is also blue, click
on the blue destination link to return.
1.3
This chapter introduces you to the DRS4000 Receiver User and
Technical Manual – what it covers, how it is organized, and for
whom it is written. Other sections explain how to order manuals,
request service, or submit product feedback.
1.2
How to Use This Manual
What This Manual Covers
This manual describes how to operate and maintain the
DRS4000 Receiver. The DRS4000 is a diversity receiver system
(DRS) that comprises a rack-mounted, digital, microwave
receiver that supports multiple antenna inputs, SD and optional
HD decoding, MaxRC diversity techniques, and optional packet
switching features.
A CD-ROM, delivered with each DRS4000 Receiver, contains
PDF files for the User and Technical Manual and the Quick
Reference Card.
The User and Technical Manual and the Quick Reference Card
are also available for download through the MRC E-Synergy
Customer Portal. For more information or to obtain a user name
and password, please go to:
[photo of DRS4000 (similar to cover photo)]
http://www.mrcglobalsolutions.com/support/e_synergy_portal
Hardcopies of the User and Technical Manual are provided only
if they were requested when your equipment was ordered.
Viewing of this manual on-line requires Adobe Acrobat software
or Adobe Reader software, Version 5.0 and later. Click on the
following icon to download your FREE copy of the latest Adobe
Reader software.
DRS4000 Receiver User and Technical Manual
Introduction
1-1
1.4
How It Is Organized
1.7
The major topics are covered in the following order:
Ordering Documentation
Any of the above manuals may be ordered by contacting MRC
Customer Service:
Chapter
Description
1
Introduction
2
Product description
3
Routine operation
(0800 - 1900 hrs US ET)
4
Troubleshooting basic problems
Friday
5
Installation
8:00 AM - 5:00 PM Eastern Time (US)
6
Replacement parts
(0800 - 1700 hrs US ET)
7
Theory of operation
App. A
Channels and frequencies supported
App. B
Glossary of technical terms
App. C
Specifications
App. D
Maximal Ratio Combining
1.5
Business Hours:
8:00 AM - 7:00 PM Eastern Time (US)
Telephone: 800.490.5700 (Press 3)
+1.978.671.5700 (Press 3)
Fax: +1.978.671.5948
E-mail
•
For Whom It Is Written
Related Documents
•
Model number and serial number of the unit. This is
located on a label on the bottom of each unit.
•
Approximate purchase date.
•
Firmware revisions (depending upon the options
contained in your DRS4000 Receiver), which appear on
the control panel. To access this information:
-
DRS4000 Quick Reference Card (part no. 400547-1)
-
DRS4000 Receiver User and Technical Manual
[email protected]
When contacting Customer Service, please have the following
information available:
This manual is intended for use by trained microwave equipment
operators assigned to operate the DRS4000 Receiver. Users of
this manual should already be familiar with basic concepts of
radio, video, and audio.
1.6
Monday - Thursday
Introduction
Go to the Hardware Configuration screen as follows:
From the control panel, select SETUP and then select
Hardware Configuration.
Press OK to display the next screen, which lists all
installed hardware and software components and
revision levels.
1-2
1.8
Calling for Parts or Service
-
MRC Technical Support is available 24 hours a day, 7 days a
week. During regular business hours you can reach our expert
staff directly.
-
Business Hours: Monday - Friday
8:00 AM - 7:00PM Eastern Time (US)
1.9
(0800 - 1900 hrs US ET)
The DRS4000 Receiver requires specialized test equipment and
software to calibrate amplitude and frequency characteristics
after repair.
+1.978.671.5700 (Press 4)
E-mail:
Supported Repairs
The DRS4000 Receiver is designed to be compact, rugged, and
reliable.
Telephone: 800.490.5700 (Press 4)
Fax:
Go to the Hardware Configuration screen as follows:
From the control panel, select SETUP and then select
Hardware Configuration.
Press OK to display the next screen, which lists all
installed hardware and software components and
revision levels.
+1.978.671.5948
[email protected]
After regular business hours and on weekends and holidays, you
can also reach our expert staff as follows:
Telephone: +1.978.671.5929
Your call will be automatically forwarded to the on-call Technical
Support specialist.
There are NO supported field repairs to the DRS4000
Receiver.
Return the entire unit for factory repair.
If you attempt field repair, you risk damaging your
equipment. If your equipment is under warranty, you may
also affect your warranty coverage.
When contacting Technical Support, please have the following
information available:
•
Model number and serial number of the unit. This is
located on a label on the bottom of each unit.
•
Approximate purchase date.
•
Firmware revisions (depending upon the options
contained in your DRS4000 Receiver), which appear on
the control panel. To access this information:
DRS4000 Receiver User and Technical Manual
Introduction
1-3
1.10
Tell Us What You Think
We’d appreciate any comments or suggestions you have about
this manual or the product. Your feedback helps us provide you
with better manuals.
If you’re viewing this manual electronically, it’s easy – just click
on the link below to send us an e-mail.
Feedback
Or, you can e-mail our Technical Support team at:
[email protected]
Be sure to tell us what product you are writing about, and the title
of the manual.
DRS4000 Receiver User and Technical Manual
Introduction
1-4
2
Product Description
2.1
Chapter Overview
This chapter provides an overall description of the DRS4000
Receiver, its components, and its capabilities.
Here are the topics covered:
Topic
Page
Description
2-1
Features
2-2
Hardware Components
2-4
Receiver
2-4
Antennas
2-4
Low Noise Block Downconverters
2-5
Firmware Components
2-4
Frequency Bands
2-4
Standard/High Definition MPEG Decoding
2-5
COFDM Demodulation
2-5
Applications
2-5
Compatibility
2-5
Options
2-5
Antenna Options
2-6
Block Downconverter Options
2-5
RF Filter Options
2-6
Mounting Options
2-6
DRS4000 Receiver User and Technical Manual
Power Options
2-6
Decryption Options
2-7
HD Decoding Upgrade
2-6
SCM Single Input Demodulation Support
2-7
Packet Switching Option
2-7
2.2
Description
The DRS4000 Diversity Receiver System (DRS4000) is a high
performance, cost-effective COFDM receiver suitable for sports,
news, and outside broadcasts from ground-based or aircraftbased transmitters. The DRS4000 Receiver is ideal for Electronic News Gathering (ENG), Digital Video Broadcast (DVB),
mobile communication, wireless airborne networks, and Outside
Broadcast (OB) systems, as well as for applications that require
hands off antenna diversity or deploy multiple units for up to a
four site cellular system. The receiver consists of a 2RU rackmountable, digital, microwave receiver that supports four
antenna inputs. All functions can be operated from the front
control panel.
The DRS4000 Receiver uses the latest maximal ratio combining
(MaxRC) technology to optimize the quality of the transmitted
signal. The DRS4000 supports Coded Orthogonal Frequency
Division Multiplexing (COFDM) demodulation, Link Modulation
System (LMS-T) demodulation, MPEG decoding in either
standard definition or high definition (SD/HD), and optional
spectrum viewing, making it an excellent solution for expanding
and extending your remote capabilities.
The DRS4000 Receiver exhibits more sensitivity, provides a
cleaner video image, and minimizes multipath effects when
Product Description
2-1
compared to other microwave receivers.
2.3
The receiver operates on 100 to 260 VAC at 50 to 60 Hz. An
autosensing circuit detects actual line voltage.
The DRS4000 Receiver offers the following features:
You can readily change system parameters from the front panel
using a keypad and the control screen or by using a studiobased master controller. Frequently used settings can be saved
in one of 50 presets. A video monitor offers a display of live video
as well as an optional overlay of the RF spectrum.
In a typical DRS4000 system, each antenna is connected to a
low-noise block downconverter (BDC) by a short cable or direct
N-Type connector. The converters output a UHF signal through
coaxial cable to UHF input ports at the rear of the receiver. The
receiver and downconverters may be separated by up to 600
feet (183 m) depending on frequency and cable type.
Incoming signals and downconverter power travel on the same
cable using Bias-T interfaces in both the converter and the
DRS4000 Receiver. The DRS4000 Receiver samples the signalto-noise ratio (SNR) from all antennas, constructing an optimized
signal from one or more of the signals. High quality 75-ohm
coaxial cable (RG6 or RG11) should be used to connect the
receiver to the downconverters.
The COFDM demodulator and SD/HD MPEG decoder support
standard Digital Video Broadcast-Terrestrial (DVB-T) 2K
operation as well as the highly advanced Link Modulation
System-Terrestrial (LMS-T). LMS-T employs COFDM technology
in a proprietary format that utilizes powerful LDPC error
correction codes to achieve a 30% increase in throughput with a
corresponding increase in robustness over DVB-T. All MRC and
Link SD/HD ENG transmitters and wireless camera systems also
support LMS-T.
Figure 2-1 on page 2-3 depicts a typical configuration.
DRS4000 Receiver User and Technical Manual
Features
•
Two or four antenna inputs (DVB-T/LMS-T)
•
Maximal ratio combining diversity technology
•
ASI packet switching technology
•
Supports DVB-T and LMS-T demodulation technology
•
Front panel live video monitor
•
Real-time front panel monitoring for Signal-to-Noise
(SNR), Link Quality signal integrity (LQ), Receive Carrier
Level (RCL), and Bit Error Rate (BER)
•
Embedded real-time operating system accessible via front
panel control screen
•
Up to 50 programmable presets (saved settings) using the
DRS4000 front panel
•
Rack Mountable, compact (EIA 19-inch rack, 2RU height)
•
Supports 6, 7, and 8 MHz COFDM/DVB-T pedestals, and
10 and 20 MHz COFDM/LMS-T pedestals
•
Internal web server for remote management via any
networked computer
•
Controlling/configuring a remote camera
•
Compatible with MRC and Link Research low-noise block
downconverters (see Section 2.11.1 on page 2-5)
•
Interfaces with MRC CodeRunner4 and MRX4000 Plus
products at the 70 MHz IF level
•
Spectrum viewer option that overlays the video signal with
an RF spectrum (future option)
Product Description
2-2
Figure 2-1: DRS4000 Receiver Typical 4-Input SD Configuration
High Gain
Steerable
Sector RX
Antennas
Independent
Receive Sites
UltraScan II
Filter
BDC
LMS-T & DVB-T
Demodulation
Support with
Optional SCM
Demodulation for one
antenna Input
Control
BDC Support :
2, 3, 5, or 7 GHz
BDC Support :
2, 3, 5, or 7 GHz
Filter
BDC
Pole Mounted or
Angle Bracket
Mounted BDC
Package
Filter
BDC
Filter
BDC
Band
Control
Band Control
UHF Input/
+18.5V DC
Out
UHF Input/
+18.5V DC Out
DRS4000
MRC CodeRunner 4
CR4 Receiver
Dual ASI Outputs
(To Backhaul or L2014)
MRX4000
Com
SD Video/
Audio
Output
Slave Controller
ASI Output
to Backhaul
SDI
Network/Control
Outputs
& Monitoring
(SD &HD)
Output
SD Video/Audio
Low Delay
Output
SDI Output
(option)
DRS4000 Receiver User and Technical Manual
Product Description
2-3
2.4
Hardware Components
2.5
A typical installation consists of a receiver, antennas, low-noise
block downconverters, filters, and cables.
2.4.1
Receiver
The DRS4000 Receiver accepts 2 or 4 antenna inputs and
incorporates MaxRC diversity technology, COFDM
demodulation, SD/HD MPEG decoding, and DVB-T and LMS-T
demodulation modes. With a front panel video monitor and
control screen, the receiver takes up only 2 RU of space in a 19inch rack. The receiver can be operated locally or remotely via a
master controller.
Base models include:
•
DRS4000 4-input receiver with MaxRC, SD, and LMS-T
•
DRS4000 4-input receiver with MaxRC, SD, LMS-T, and
ASI Packet Switcher
2.4.2
Antennas
MRC offers several types of antennas and several models within
some antenna types. See Section 2.11.3 on page 2-6 for more
information.
2.4.3
Low Noise Block Downconverters
The DRS4000 Receiver is compatible with several MRC and
Link Research downconverters (LNBs). The downconverters
transform the incoming RF signal into UHF for input to the
receiver. See Section 2.11.1 on page 2-5 for more information.
DRS4000 Receiver User and Technical Manual
Firmware Components
The DRS4000 Receiver is controlled by software installed on
programmable read-only memory (PROM). You can access this
firmware via the front control screen, and use it to monitor the
incoming signal and control settings such as channel, frequency,
and RF band.
The firmware also provides a web browser interface that you can
access via a web browser on any PC or laptop computer as long
as both the DRS4000 Receiver and the computer are connected
to the same Local Area Network (LAN). You can also access the
web browser interface via a direct Ethernet connection. To learn
about this utility, refer to Chapter 3.
2.6
Frequency Bands
The DRS4000 Receiver can operate in one of several factoryprogrammed frequency bands. You can select the band via the
front control screen or via a master controller interface at the
studio or command center.
MRC offers a range of block downconverters and antennas
designed for each frequency range. The downconverters
transform the incoming RF signal to a 110 to 860 MHz VHF/UHF
signal while the DRS4000 Receiver is capable of accepting a
signal in the range of 70 to 860 MHz.
The following frequency bands are supported:
•
•
•
•
•
2 GHz
3 GHz (non-U.S.)
5 GHz
7 GHz
1.9 to 2.5 GHz / 6.4 to 7.1 GHz (dual band support option)
Product Description
2-4
2.7
Standard/High Definition MPEG
Decoding
The DRS4000 Receiver incorporates a Standard Definition (SD)
MPEG decoder. High Definition (HD) decoding is an option. The
SD decoder includes the following features:
•
4:2:2 or 4:2:0 chroma support
•
NTSC or PAL color television standard compliance with
four analog audio channels
•
Central receive sites
•
Outside Broadcasting (OB)
•
Portable Broadcasting
2.10
Compatibility
The DRS4000 Receiver is compatible with the following
transmitters:
•
MRC STRATA Portable Transmitter
•
SD-SDI output
•
PTX PRO Transmitter
•
AES/EBU Digital Audio
•
MTX5000 Transmitter
•
Wayside Data Channel
•
LINK XP
•
DVB-ASI Output
•
LINK XP HD (future)
2.11
Options
2.8
COFDM Demodulation
The DRS4000 Receiver incorporates a COFDM demodulator
that offers the following features:
•
DVB-T Compliant
•
LMS-T support
•
6, 7, 8, 10, and 20 MHz selectable pedestal bandwidth
•
QPSK, 16QAM, or 64QAM modulation
•
Bandwidth of 6 MHz, 7 MHz, 8 MHz, or Auto
2.9
Applications
The DRS4000 Receiver has several applications:
•
Electronic News Gathering (ENG)
DRS4000 Receiver User and Technical Manual
You can customize the DRS4000 Receiver by choosing any of
the following options.
2.11.1
Block Downconverter Options
The following block downconverters are available as options:
Link Models The following LNBs and filters are supported:
•
L3070 LNB base unit
•
L3030 Input filter for L3070 1.95 to 2.7 GHz
•
L3033 input filter for L3070 2.2 to 2.3 GHz
•
L3034 input filter for L3070 2.3 to 2.4 GHz
•
L3037 input filter for L3070 2.5 to 2.7 GHz
Product Description
2-5
•
L3060 input filter for L3070 3.4 to 3.6 GHz
•
L3080 input filter for L3070 6.425 to 7.125 GHz
The following types of antennas are available:
•
Omnidirectional These antennas are vertically polarized
and nonsteerable. Models include the Omni-Directional
Antenna and OmniPole Antenna.
•
Sector Scan These antennas include fixed-position
antennas such as sector panels. Models include
SectorScan.
•
Steerable (pan only) These antennas offer full 360degree rotation in azimuth. Models include ProScan and
UltraScan DR.
•
Steerable (pan and tilt) These antennas offer full
rotation in azimuth as well as tilt (elevation) control.
Models include MicroScan and Ellipse DR.
MRC Models The following LNBs are supported:
•
MRC 908149 LNB, 1.99 to 2.5 GHz
•
MRC 908149 LNB, 3.4 to 3.8 GHz
MRC Outdoor Unit This module contains an MRC 908144
LNB, Multi-point Microwave Distribution System (MMDS), also
known as Multi-channel Multi-point Distribution System, lightning
protection, Personal Communications Service (PCS) filter, and
other electronics in a weatherproof box. Input range is 1.99 to
2.5 GHz.
2.11.2
HD Decoding Upgrade
The DRS4000 base models include an SD MPEG decoder as
described in Section 2.7 on page 2-5. The HD option includes
the following features:
2.11.4
RF Filter Options
The following RF filters are available as options for mounting on
the foregoing blockdown converters:
•
4:2:2 or 4:2:0 chroma support
•
HD-SDI Output
•
Four analog audio channels
•
AES/EBU digital audio
2.11.5
•
ASI output
The DRS4000 Receiver is designed to mount in a standard EIA
19-inch rack, making it suitable for fixed mounting at a receive
site or for portable mounting in a vehicle. Only 2 rack units (RU)
of height are required.
2.11.3
Antenna Options
To take advantage of diversity combining, you need to select
either 2 or 4 antennas. MRC works with you to select the proper
antennas for your receive site, including your legacy antennas
where feasible.
DRS4000 Receiver User and Technical Manual
•
PCS / MMDS filter
•
BAS relocation filter
2.11.6
Mounting Options
Power Options
A voltage auto-sense feature detects input voltage, which can be
100 to 260 VAC at 50 to 60 Hz. A 3-prong power cable is
included.
Product Description
2-6
The rear power connector includes a removable fuse holder with
a pair of 2-amp glass fuses.
The DRS4000 Receiver does not currently support DC input.
2.11.7
Decryption Options
The receiver supports the Basic Interoperable Scrambling
System (BISS) and the Advanced Encryption Standard (AES):
•
BISS-1
•
BISS-E
•
AES-128 bit
2.11.8
SCM Single Input Demodulation Support
The receiver supports the MTX5000 Single Carrier Modem
(SCM) functionality.
2.11.9
Packet Switching Option
The packet switching option enables the addition of feature-rich
enhancements, including cellular diversity hubs and support for
existing central receivers through an ASI interface.
DRS4000 Receiver User and Technical Manual
Product Description
2-7
This page intentionally left blank.
DRS4000 Receiver User and Technical Manual
Product Description
2-8
3
Routine Operation
3.1
Chapter Overview
This chapter provides basic information that will enable you to
operate your DRS4000 Receiver.
Here are the topics covered:
Topic
Using the Control Screen
3-8
Using the Menus
3-11
Using the Setup Menu
3-11
Using the Preset Menu
3-29
Using the Factory Setup Menu
3-24
Using the Options Menu
3-31
Using the Camera Menu
3-31
Operating the Receiver Remotely
Page
3-32
Starting the Web Browser Interface
3-32
Front Panel Displays and Connectors
3-1
Common Features
3-33
Rear Panel Connectors
3-3
Using the Web Browser Interface
3-33
DIVERSITY Connectors
3-3
PACKET Connectors
3-4
SCM Connectors
3-4
Other Connectors
3-4
Powering the Receiver
3-3
Powering Up
3-5
Powering Down
3-5
Learning the Regions of the Control Screen
3-3
Help Text Region
3-6
RF Settings Region
3-6
Preset Region
3-6
Data Status Region
3-6
Signal Displays Region
3-6
Menu Buttons Region
3-7
Using the Keypad
3-7
Using the Video Monitor
3-8
DRS4000 Receiver User and Technical Manual
3.2
Front Panel Displays and
Connectors
The front panel provides a power switch, USB and Ethernet
connectors, LCD video monitor, LCD control screen, and
keypad. Figure 3-1 on page 3-2 shows details of the front panel.
POWER is controlled by a front panel On/Off switch.
The USB 2.0 connector allows you to install firmware updates
from MRC via a flash drive.
The RJ-45 ETHERNET connector allows you to connect the
receiver to a computer and use the DRS4000 web browser
interface to control the receiver.
The VIDEO MONITOR provides a live view of the video signal.
With the spectrum viewer option installed, the monitor also
displays the RF spectrum as an overlay to the video picture.
The Control Screen reports real-time data for the video signal
and shows current RF settings.
Routine Operation
3-1
Figure 3-1: DRS4000 Front and Rear Panels
DRS4000
I
0
BACK
POWER
USB
ETHERNET
OK
MONITOR
DIV E RS ITY
CTRL/MON1
B DC 1
B DC 2
CTRL/MON2
CV 1
CV 2
RS-232 CNTRL
A LA RM
WA Y S IDE DA TA
GE N LOCK
AC IN 10 0-12 0/200-240V
50
-60Hz , 2A
Blank Panel
CTRL/MON3
B DC 3
B DC 4
CTRL/MON4
S D S DI
CTRL/MON5
B DC 5
B DC 6
CTRL/MON6
70 MHz IN
HD S DI
AUDIO1
HD MON
AUDIO2
A S I OUT
AUDIO3
A S I OUT
AUDIO4
AES1
A S I IN
AES2
P OWE R
PACKET
Blank panel is standard .
Packet or SCM panel is optional .
SCM
ASI IN 1
ASI IN 2
ASI OUT 1
ASI IN 3
ASI OUT 2
ASI OUT 3
ASI IN 4
ASI OUT
70 MHz IN
ASI OUT
IP
SDI OUT
DRS4000 Receiver User and Technical Manual
Routine Operation
3-2
The Keypad consists of easy-to-use push buttons that give
access to all system parameters and settings.
3.3
Rear Panel Connectors
The rear panel contains the connectors for power, diversity
inputs and outputs, audio outputs, and networking. If the packet
switching subsystem is installed, the blank panel is replaced by
the PACKET connector panel. If the SCM subsystem is installed,
the blank panel is replaced by the SCM connector panel.
Figure 3-1 on page 3-2 shows the layout of the rear panel. For
more details, refer to the Installation chapter of the DRS4000
Receiver Technical Reference Manual.
WAYSIDE DATA This RS-232, 9-pin female connector is the
wayside channel, used for transfer of data such as global
positioning satellite (GPS) data or meta data from the MPEG
decoder. By using a standard RS-232 cable, you can connect the
receiver’s WAYSIDE DATA connector to a computer or an autotracking antenna system.
ALARM This DB-15 female connector connects to single-pole
single throw (SPST) switches for summary alarm data for
common faults and events and for site management control. One
SPST switch is for a minor alarm, one SPST switch is for a major
alarm, and four SPST switches are for site management.
The rear panel provides numerous inputs to and outputs from the
receiver. These inputs and outputs can be grouped as follows.
GEN LOCK This 75 ohm, female, BNC connector enables the
decoder output to lock to an external frame lock input. This can
either be SD Black & Burst or HD Tri-level input into the rear
panel BNC connector.
3.3.1
The Frame Sync function must be turned on via the Set Frame
Sync Menu in order to use GEN LOCK.
DIVERSITY Connectors
The following connectors provide inputs and outputs for the
optional diversity subsystem.
CNTL/MON 1 to CTRL/MON 6 The Control/Monitor connectors
are 5-pin Lemo sockets that provide control inputs and monitor
outputs for the adjacent downconverter. For example, CTRL/
MON 4 controls and monitors BDC 4.
BDC 1 to BDC 6 The Block Downconverter (BDC) connectors
are 50 ohm, TNC connectors that accept the UHF signals from
the downconverters and their corresponding antennas.
To power each downconverter, +20 VDC is applied to the coaxial
cable that runs from the BDC connector to the downconverter.
CV 1, CV 2 The Composite Video (CV) connectors are 75 ohm,
female, BNC connectors that output an analog video signal.
DRS4000 Receiver User and Technical Manual
SD SDI / HD SDI The Standard Definition (SD) Serial Digital
Interface (SDI) connector is a 75 ohm, female, BNC connector
that outputs a video data stream from the MPEG module that is
compliant with SMPTE 259M.
The High Definition (HD) SDI connector is a 75 ohm, female,
BNC connector that outputs a video data stream from the MPEG
module that is compliant with SMPTE 292M and SMPTE 299M.
Using a standard RG59 75-ohm video cable, you can connect
the receiver’s SDI output to a monitor that has an SDI input or
you can use an SDI-to-analog video converter to connect the
signal to a video monitor.
HD MON The HD Monitor connector is a 75 ohm, female, BNC
connector that provides a second output for monitoring the video
data stream.
Routine Operation
3-3
ASI OUT The two Asynchronous Serial Interface (ASI)
connectors are 75 ohm, female, BNC connectors that provide
ASI outputs for digital video and audio distribution. Using a
standard RG59 75-ohm video cable, you use the receiver’s ASI
output to backhaul the video/audio from a remote site.
ASI IN This 75 ohm, female, BNC connector accepts an ASI
signal input from another component. It is used for local
decoding of a SD/HD ASI stream when the receiver is placed in
external ASI mode. The outputs are on the HD SDI and HD MON
connectors only.
70 MHz IN This connector is a 75 ohm, female, BNC connector
that accepts input from another receiver. This is an alternative
input to BDC 1 and is selectable from the control screen menu.
AUDIO 1 to AUDIO 4 These mini-XLR connectors output
analog audio derived from the incoming RF signal. They can be
used as four monaural outputs or two stereo pairs depending on
how the remote transmitter is configured.
AES 1, AES 2 The two Audio Engineering Society (AES)
connectors are not currently implemented. AES audio is
compliant with SMPTE 299M and SMPTE 337M. AES 1 audio
output is available on the Audio 1 connector, and AES 2 audio
output is available on the Audio 3 connector.
3.3.2
PACKET Connectors
The following connectors provide inputs and outputs for the
optional packet switching subsystem.
ASI OUT These connectors are 75 ohm, female, BNC connectors that provide a diversity ASI output or a multiplexed ASI
output according to the mode set for the packet.
SDI OUT This connector is a 75 ohm, female, BNC connector
that outputs a digital video stream.
3.3.3
SCM Connectors
The following connectors comprise a future option. They will
provide inputs and outputs for the Single Carrier Modem (SCM)
subsystem.
ASI OUT 1 to ASI OUT 3 These connectors are 75 ohm,
female, BNC connectors that provide ASI outputs.
70 MHz IN This connector is a 75 ohm, female, BNC connector
that accepts input from a local receiver.
IP This Ethernet connector outputs simplex Ethernet data from
the transmitter.
3.3.4
Other Connectors
RS-232 CRNTL This connector is an RS-232, a DB-9 female
connector that can be used to remotely control the DRS4000
Receiver via a slave controller.
Power connector This connector accepts a standard 3-prong
cable for AC power. An auto-sense circuit accepts either 110 to
130 VAC or 205 to 260 VAC @ 2 amps. The 3-prong male end
must be modified for non-U.S. applications.
ASI IN 1 to ASI IN 4 These 75 ohm, female, BNC connectors
allow up to four ASI inputs from different receive sites, effectively
acting as a diversity switch. They can also be used as an ASI
multiplexer. The maximum bit rate is adjustable up to 40 Mbps.
DRS4000 Receiver User and Technical Manual
Routine Operation
3-4
3.4
Powering the Receiver
Figure 3-2: Initial Control Screen
The following subsections explain procedures for powering up
and powering down. If the receiver is installed at an unattended
central receive site, then it typically stays powered up for
extended periods of time.
3.4.1
Powering Up
To power up the receiver follow these steps.
1.
2.
3.
4.
3.4.2
Verify that the power cable is connected to the power
connector on the rear panel of the DRS4000 Receiver
and is connected to an AC power source.
Verify that all other cables are properly connected to
the receiver’s rear panel connectors.
Verify that the AC power source is turned on.
Set the power switch on the front panel to On (1). The
video monitor displays a blank screen and the control
screen goes through a power-up cycle: color bars, a
product ID screen, and finally the initial control screen
as shown in Figure 3-2.
The settings displayed will be those in effect when the
receiver was powered down. If there is no incoming
signal, the RCL, SNR, and Link Quality meters will
display their lowest values.
Powering Down
To power down the receiver, set the power switch on the front
panel to Off (0).
3.5
Learning the Regions of the
Control Screen
The control screen is a 3.5-inch diagonal LCD color monitor that
provides access to the receiver and all its functions. This screen
is the graphical user interface (GUI), the window into the settings
and functions of the receiver.
When you operate the receiver via the control screen, you can
monitor receive carrier level (RCL), signal-to-noise ratio (SNR),
and link quality for all incoming video signals. You can also
change receiver settings such as channel, frequency, and RF
band, and save them as presets as needed.
The control screen always displays the last saved settings.
DRS4000 Receiver User and Technical Manual
Routine Operation
3-5
3.5.1
For ease of use, the control screen is organized into the
following regions:
Help Text Region
•
Help text
•
RF settings
This region provides a brief description of each setting and menu
on the control screen. For example, when Chan is highlighted,
the help text says, “Change the current channel settings.”
•
Presets (up to 50)
3.5.2
•
Service (transmitter ID)
•
Data status
This region groups together the settings for the incoming RF
signal including channel, frequency, and RF band.
•
Signal displays
•
Menu buttons
3.5.3
These regions are identified in Figure 3-3 and explained in the
subsections that follow.
Preset Region
This region displays the current preset (a collection of settings
you previously stored) as a number and a text label.
3.5.4
Figure 3-3: Regions of the Control Screen
RF Settings Region
Service Region
This read-only setting displays the ID of the transmitter.
Help text
Current
RF settings
Preset/Service
Data Status
3.5.5
This region displays the following information:
•
BER (Bit Error Rate)
•
COFDM Lock
•
Vid Lock (video lock)
3.5.6
Signal
displays
Data Status Region
Signal Displays Region
This region displays real-time readings for all antenna inputs as
a set of animated vertical bars.
Menu buttons
The RCL group of readings displays receive carrier levels (RCL)
in dBm units.
The SNR group displays signal-to-noise ratios (SNR) in dB units.
DRS4000 Receiver User and Technical Manual
Routine Operation
3-6
The Link Qual group displays link quality as a derived number
(0 to 9).
3.5.7
Figure 3-4: Control Screen and Keypad
Menu Buttons Region
This region contains the buttons that lead to extensive menus
and settings screens by which you can adjust the way the
receiver operates.
Menus An overlay screen containing collections of similar
options that allow you to fine tune the operation of the receiver.
Settings Screens An overlay screen containing a title and one
or more settings that you can modify.
3.6
Using the Keypad
The control screen and keypad are shown in Figure 3-4. The
keypad consists of membrane type switches that provide
momentary contact closure when pressed. The layout and
function result in an intuitive, easy to use operation of the control
screen.
The keypad keys have the following functions:
Arrow Keys On the control screen, the arrow keys move the
highlighting cursor around the screen. Press the left or right
arrows to move across the screen, and press the up or down
arrows to move up or down the screen. For example, press the
down arrow and Chan becomes highlighted (selected).
Back From a menu, the Back button displays the previous
menu. From a settings screen, Back cancels any changes you
just made and displays the starting control screen or previous
menu. Back has no function at the starting control screen.
OK From the control screen, OK displays a settings screen for
the highlighted parameter or opens a submenu if a menu button
(Presets, Setup, Options, or Monitor) is highlighted. From a
settings screen, OK saves the current values.
Note
When you see the instruction “Select [function]”
it means you should use the arrow keys to move
the cursor to the desired function, and then
press OK.
Routine Operation
3-7
On a settings screen, use the up or down arrow to move to
another setting, and use the left or right arrows to change a value
for a setting.
On a menu, use the up or down arrow to move to another menu
option.
DRS4000 Receiver User and Technical Manual
3.7
2.5 GHz band, select a spacing (bandwidth) of 12 MHz
(BAS) or 17 MHz (pre-BAS). The Frequency changes
as you adjust any of these settings.
Using the Video Monitor
The video monitor is a 3.5-inch diagonal LCD color monitor that
provides a live view of the incoming video signal. With the
spectrum viewer option, the monitor overlays the video picture
with an RF spectrum of the signal.
Figure 3-5: Change Channel Menu
Change Channel
The video monitor is typically blank when there is no incoming
video signal.
If, for any reason, the receiver should lose the incoming signal,
the monitor will display either a freeze frame or a blue screen.
This setting is controlled by the Video Fail Mode menu under the
Setup menu.
Channel
1
Offset
(0)
Spacing
(12 MHz)
Frequency
3.8
Using the Control Screen
2031.500 MHz
For day-to-day operations, the control screen offers convenient
access to the most frequently used settings. Prior to acquiring an
incoming video signal, you can quickly set any or all of the
following settings to match the settings of the remote transmitter:
Note
Starting with Diversity Receiver board V3.5, the
receiver can autodetect transmitter bandwidth,
guard interval, and polarity.
Note
Channel (Chan) Follow these steps:
1.
2.
3.
4.
5.
To select a channel in the current RF band, select
Chan. This opens the menu as shown in Figure 3-5.
Press the left/right arrows to select a channel number.
Press the down arrow to move to the Offset setting.
Select an offset of 0 (zero), + (plus), or - (minus).
Move to the Spacing setting. If you are in the 1.9 to
DRS4000 Receiver User and Technical Manual
Routine Operation
If you have set up a custom channel plan via the
Factory Setup Menu, select a Spacing of (Cust). This
displays a password screen (to prevent unauthorized
changes to the signal bandwidth).
Enter the password (default is 0000) and press OK to
save these settings. This takes you to the control
panel.
To prevent unauthorized access, change this
password by going to the Factory Test screen
via the Factory Setup Menu. The Factory Test
screen is also password protected. The default
password is DRS4K. Change this password
also.
3-8
Frequency (Freq) Follow these steps:
1.
To select a frequency that is not in a standard band
plan, select Freq to open the Change Frequency
screen as shown in Figure 3-6.
Note
To change the RF band, you must install a
different set of BDCs and identify them via the
Factory Menu (see Section 3.9.3 on page 324).
Figure 3-6: Change Frequency
Mode Follow these steps:
Change Frequency
1.
Select Mode to open the menu shown in Figure 3-7.
Frequency
Figure 3-7: Change Modulation Mode Menu
2031.50 MHz
Channel
1
Offset
(0)
Spacing
(12 MHz)
Change Modulation Mode
DVB-T
LMS-T (10 MHz)
LMS-T (20 MHz)
2.
3.
Press the up/down arrows to change the value of each
digit, and press the right/left arrows to select another
different digit. The right-hand digit can contain 0 or 5
only. The frequency is always reported in MHz.
The lower half of the screen reports the channel,
offset, and spacing only if you select a frequency for
an assigned channel. This is an alternative method for
selecting a frequency.
Press OK to save this frequency.
RF Band Follow these steps:
1.
2.
Select RF Band to open the Change RF Band menu
(display only).
Press OK to return to the control screen.
DRS4000 Receiver User and Technical Manual
2.
Select the desired mode for the demodulator and
press OK to save this setting.
Modulation Type (Mod) This read-only setting displays the
modulation type of the transmitter, either QPSK (most robust),
16QAM, or 32QAM (least robust).
Bandwidth (BW) This read-only setting displays the bandwidth
of the signal pedestal. For DVB-T mode, the setting is either 6
MHz (most robust), 7 MHz, 8 MHz (least robust), or Auto. For
LMS-T mode, the setting is 10 MHz or 20 MHz.
Forward Error Correction (FEC) This read-only setting
displays the forward error correction calculated in the receiver.
Possible readings are 7/8 (most robust), 5/6, 3/4, 2/3, or 1/2
(least robust).
Routine Operation
3-9
Guard Interval (G/I) This read-only setting displays the guard
interval for the COFDM pedestal. Values can be either 1/32
(least robust), 1/16, 1/8, or 1/4 (most robust) and press OK to
save this setting.
Video Follow these steps:
1.
2.
3.
Select Video to open the Change Decoder Mode
menu.
Choose SD (PAL), SD (NTSC), or HD mode (if the HD
option is installed). The receiver then auto-detects the
video line standard. PAL stands for Phase Alternation
Line and NTSC stands for National Television System
Committee.
Press OK to save this setting.
Audio Follow these steps:
1.
2.
3.
Select Audio to open the Select Audio Output menu.
Select either channel A or B and select either Analog
or Digital audio mode. The default values are channel
A and Analog mode.
Press OK to save this setting.
Bit Rt Bit rate is a read-only display of the data rate for the
incoming signal, reported as Mbps (megabits per second).
Service This read-only setting displays the ID of the remote
transmitter.
BER (Bit Error Rate) This read-only setting displays the ratio of
bits of data containing errors (error bits) divided by the total
number of bits received in the signal, reported in real time.
Ideally a rate of 0.00 x 10⁻⁶ indicates a signal without any error
bits. As the signal degrades, the BER increases until the MPEG
decoder can no longer compensate for the errors and the signal
is lost. If the BER exceeds 1.0 x 10⁻⁴, take action to improve
signal quality.
COFDM Lock A green indicator means that the receiver is
demodulating the signal. A red indicator means that the receiver
cannot demodulate the signal.
Vid Lock A green indicator means that the receiver is decoding
the video signal. A red indicator means that the receiver cannot
decode the video signal.
Signal Displays This region displays real-time readings for all
antenna inputs as a set of animated vertical bars.
The RCL group of readings displays receive carrier levels (RCL)
in dBm units.
The SNR group displays signal-to-noise ratios (SNR) in dB units.
Polarity This read-only setting displays the OFDM polarity,
either Normal or Inverted.
The Link Qual group displays link quality as a derived number
(0 to 9).
Preset Follow these steps:
Colors and letters identify the specific antenna being measured.
In preceding Figure 3-3 on page 3-6, there are four antenna
inputs labeled A to D. The actual number or readings depends
on the number of antennas installed. The assignment of letters to
antenna inputs is controlled through the RF Switch Matrix
screen, an option on the Setup Menu.
1.
2.
3.
Select Preset to open the Load Preset screen, which
contains any presets you have created.
Select a preset to use for the current incoming signal.
Press OK to save this setting.
DRS4000 Receiver User and Technical Manual
Routine Operation
3-10
With no incoming signal, the RCL readings may be as low as -88
dBm. The SNR and Link Qual regions will be blank.
3.9
Using the Menus
The bottom region of the control screen displays four buttons
that lead to menus: Setup, Presets, Options, and Camera. To
open any of these menus, press the down arrow until you
highlight one of the menu names, then press OK to open the
menu.
The Setup menu provides options for configuring operating
parameters. The Presets menu allows you to store a group of
settings and quickly recall them for later use. The Options menu
provides additional features. The Camera menu is an optional
feature for controlling certain parameters of a broadcast camera
operating in wireless mode.
As a convention, “Select the XYZ option” means press the arrow
keys until that option is highlighted, then press OK.
Technical Tip To quickly open the Setup menu (if nothing is
highlighted), press the up arrow until the Setup
button is highlighted.
3.9.1
Using the Setup Menu
The Setup Menu is intended for configuring parameters that
need to remain in effect for the long term, such as IP address,
downconverter and filter types, and number of inputs.
With the Setup Menu, you can do any of the following tasks:
•
Configure hardware within the receiver
•
Select a downconverter RF band
•
Select a downconverter
•
Calibrate a downconverter
•
Route a downconverter signal to the appropriate decoder
•
Set up Internet Protocol (IP) addressing
•
Select audio and video settings
•
Set up encryption support
•
Turn site management switches on or off
•
Set up packet switching controls (optional)
•
Reset or recalibrate factory settings
To perform any of these tasks, select the Setup button on the
Control Screen. This displays the menu show in Figure 3-8. This
menu groups the setup features into several categories.
The following sections explain how to use each menu.
DRS4000 Receiver User and Technical Manual
Note
When viewing the PDF file for this manual, click
on any of the following menu options to jump to
the section that describes that option.
Routine Operation
3-11
Setting Up the RF Switch Matrix
Figure 3-8: Setup Menu
The RF Switch Matrix screen, shown in Figure 3-9, displays the
antenna/block downconverter inputs #1 to #4, and the
corresponding tuner inputs A to D. These tuner inputs
correspond to vertical color bars A to D in the signal display
regions of the control screen.
Setup Menu
Hardware Configuration
RF Switch Matrix and Input Routing
IP and MAC Address Configuration
The benefit of this screen is that you can quickly reroute your
antenna inputs in any order that is needed at your site. For
example, suppose that four sector scan antennas are installed
on the corners of a tower and randomly connected to the
DRS4000 Receiver at connectors BCD1 to BDC4. During
testing, you identified the antennas as shown in the Initial Input
column of Table 3-1.
Audio/Video Configuration
Encryption Support
Site Management Control
Packet Switching Configuration
Factory Setup
If you need the vertical color bars on the control screen to display
the north, east, south, and west antennas as color bars A to D,
then use the New Inputs column to help set up the RF Switch
Matrix screen.
Viewing the Hardware Configuration
To view the hardware configuration and a list of installed
hardware and revision levels, follow these steps:
1.
2.
Table 3-1: Switching Antenna Inputs
Select the Hardware Configuration option from the
Setup Menu to open the Hardware Configuration
screen. This screen lists the installed hardware and
software. For each component, the list includes the
component name, software revision level, and serial
number.
For the Processor Board, the software revision is 1.0
or higher. For the Diversity Receiver board, the
software revision is 3.5.
Press the OK button to return to the control screen.
DRS4000 Receiver User and Technical Manual
BDC#
Antenna
Initial Input
New Input
BDC#1
South
A
C
BDC#2
West
B
D
BDC#3
North
C
A
BDC#4
East
D
B
To set up the RF Switch Matrix, follow these steps:
1.
Routine Operation
Select the RF Switch Matrix and Input Routing
option from the Setup Menu to open the RF Switch
Matrix screen shown in Figure 3-9. With this screen
you can map the antenna inputs (connected to BDC
3-12
#1 to #4 on the rear panel of the receiver) to internal
tuners.
Figure 3-9: RF Switch Matrix Screen
RF Switch Matrix
Configuring TCP/IP Properties
If the receiver is connected to your local area network, you need
to configure it with an IP address, default gateway, and netmask.
Obtain this information from your IT staff and then use the
instructions on the following pages.
Decoder Input COFDM
Configuring an IP Address
IF Source
BDC#1
To configure the receiver’s IP address, follow these steps:
BDC#1
Input A
BDC#2
Input B
BDC#3
Input C
BDC#4
Input D
1.
From the Setup Menu, select the IP and MAC
Address Configuration option to open the IP Stack
Config menu as shown in Figure 3-10.
Figure 3-10: IP Stack Config Menu
IP Stack Config
2.
3.
4.
Note
5.
For Decoder Input, select COFDM or ASI.
For IF Source, select BDC#1 or External. If you
select External, then the BDC#1 item name changes
to External. This also places the receiver in 70 MHz IF
mode and only Input A (tuner A) is functional.
Select each BDC number and press the left/right
arrows to change the input letter.
Be sure to use each input letter only once. An
error box displays if you try to use the same
letter more than once.
Change IP Address
Change Default Gateway
Change Netmask
Display IP Settings
2.
Select Change IP Address to open the screen shown
in Figure 3-11.
Press OK to save the changes.
DRS4000 Receiver User and Technical Manual
Routine Operation
3-13
Configuring a Default Gateway
Figure 3-11: IP Address Config Screen
To configure the receiver’s default gateway, follow these steps:
IP Address Config
1.
Modify IP Address
192 . 168 .
1 . 123
2.
From the Setup Menu, select the IP and MAC
Address Configuration option to open the IP Stack
Config menu as shown in Figure 3-10 on page 3-13.
Select Change Default Gateway to open the screen
shown in Figure 3-12.
Done
Figure 3-12: Change Default Gateway Screen
Press OK to save settings or
press Back to exit without any changes
Default Gateway Config
Modify Default Gateway
3.
4.
5.
Select the Change IP Address option.The highlighted
cursor moves to the first digit on the left and new
instructions appear at the bottom of the screen.
Enter the IP address obtained from your IT staff. Use
the up-down arrows to change a value. The allowed
values vary from digit to digit. Use the left-right arrows
to move to a different digit.
Press OK to save the new IP address and press Back
to return to the Configure IP Stack menu.
CAUTION
Be sure to enter an IP address that is valid for
your local area Network (LAN), otherwise the
receiver will be unable to communicate with
your network.
192 . 168 .
Done
Press OK to save settings or
press Back to exit without any changes
3.
4.
5.
DRS4000 Receiver User and Technical Manual
1. 1
Routine Operation
Select the Modify Default Gateway option. The
highlighted cursor moves to the first digit on the left
and new instructions appear at the bottom.
Enter the default gateway obtained from your IT staff.
Use the up-down arrows to change a value. The
allowed values vary from digit to digit. Use the left-right
arrows to move to a different digit.
Press OK to save the new gateway and press Back to
return to the Configure IP Stack menu.
3-14
4.
CAUTION
Be sure to enter a default gateway that is valid
for your LAN, otherwise the receiver will be
unable to communicate with your network.
5.
Configuring a Netmask
To configure the receiver’s netmask gateway, follow these steps:
1.
2.
Enter the netmask obtained from your IT staff. Use the
up-down arrows to change a value. The allowed
values vary from digit to digit. Use the left-right arrows
to move to a different digit.
Press OK to save the new netmask and press Back to
return to the Configure IP Stack menu.
CAUTION
From the Setup Menu, select the IP and MAC
Address Configuration option to open the IP Stack
Config menu as shown in Figure 3-10 on page 3-13.
Select Change Netmask to open the screen shown in
Figure 3-13.
Be sure to enter a netmask that is valid for your
LAN, otherwise the receiver will be unable to
communicate with your network.
Figure 3-13: Netmask Config Screen
Netmask Config
Modify Netmask
255 . 255 .255 . 0
Done
Press OK to save settings or
press Back to exit without any changes
3.
Select the Modify Netmask option. The highlighted
cursor moves to the first digit on the left and new
instructions appear at the bottom.
DRS4000 Receiver User and Technical Manual
Routine Operation
3-15
Displaying IP Settings
Configuring Audio and Video Settings
To display the receiver’s network settings, follow these steps:
The receiver provides a two-part menu for configuring audio and
video settings. The following video line standards are autodetected and require no operator intervention.
1.
2.
From the Setup Menu, select IP and MAC Address
Configuration to open the IP Stack Config menu.
Select Display IP Settings to open the screen shown
in Figure 3-14.
The MAC address, which is a unique identifier for each
receiver, was factory installed and can be modified by
MRC personnel only.
Figure 3-14: View IP Settings Screen
SD: 525 NTSC color television format with 525 horizontal lines.
HD: 720p50 An ATSC video format for HDTV with 720
horizontal lines, “p” stands for progressive scan, 50 frames per
second (fps).
HD: 720p59 An ATSC video format with 720 horizontal lines,
progressive scan, 59 fps.
View IP Settings
HD: 720p60 An ATSC video format with 720 horizontal lines,
progressive scan, 60 fps.
IP Address
192.168.1.123
3.
SD: 625 PAL/SECAM color television format with 625 horizontal
lines.
Default Gateway
192.168.1.1
HD: 1080i25 An ATSC video format with 1080 horizontal lines,
“i” stands for interlaced scan, 25 fps.
Netmask
255.255.255.0
HD: 1080i29 An ATSC video format with 1080 horizontal lines,
interlaced scan, 29 fps.
MAC Address
00:1D:65:00:00:04
HD: 1080i30 An ATSC video format with 1080 horizontal lines,
interlaced scan, 30 fps.
Press OK to return to the Configure IP Stack menu.
DRS4000 Receiver User and Technical Manual
To configure audio and video settings, select the Audio/Video
Configuration option from the Setup menu to open the menu
shown in Figure 3-15.
Routine Operation
3-16
Figure 3-15: Configure Audio/Video Menu 1
Note
If “Use SI Service Information” is turned on, then
the Manual PID Selection Menu is read-only. To
modify a PID, first go to the Use Service
Information menu and set it to Off.
Configure Audio/Video 1
Use SI Service Information
View PIDs
Set Frame Sync
Figure 3-16: View PIDs Screen
Set Frame Sync Offset
View PIDs (Read Only)
Set Video Output
Adjust SD Video Output Level
PCR PID
0000
Adjust Audio Output Level
Video PID
0000
More... (See Figure 3-17 on page 3-18)
Audio A PID
0000
Audio B PID
0000
DATA PID
0000
Done
These values are read only.
Done
To modify, disable Use SI Service.
Use SI Service Information
1.
Select this option to open the Use SI Service
Information screen.
2.
Select On or Off, where On enables the setting of the
service that the receiver will automatically lock onto.
View PIDs
1.
Select this option to open the screen shown in
Figure 3-16 on page 3-17. This screen enables the
viewing of the video audio program identification (PID)
that the receiver is locked onto.
2.
Select an entry and then use the left-right arrows to
move from one digit to another and use the up-down
arrows to change the value of a digit. Valid PIDs can
range from 0000 to 9999.
3.
Press OK to stop modifying a value.
4.
Press OK again to save your new settings or Back to
cancel.
Set Frame Sync
1.
DRS4000 Receiver User and Technical Manual
Routine Operation
Select this option to open the Set Frame Sync menu
where the choices are On or Off. This function must
be set to On if you need to use the GEN LOCK
connector on the rear panel.
3-17
More
2.
Press OK to save the setting.
Set Frame Sync Offset
1.
Select this option to open the Edit Frame Sync Offset
screen. This offset allows a delay or advance of the
framelock in the range of 0000 to 9999, where 5000 is
the center of the range.
2.
Enter the offset in pixels. One pixel is approximately
74.63 nanoseconds.
Set Video Output
1.
Select this option to open the Set Video Output
screen, which controls the SD Video Source Color Bar
Generator.
2.
Set the color bar generator to On or Off as needed
and then press OK to save the settings.
Adjust SD Video Output Level
1.
Select this option to open the Adjust SD Video
Output Level screen. This screen allows you to set
the proper video sync level (40 IRE is the default). IRE
(Institute of Radio Engineers) is a unit of measurement
for the video level in which 1 IRE equals 7.14 mV.
2.
Press OK to save the setting.
Adjust Audio Output Level
1.
2.
Select this option to open the Adjust Audio Output
Level screen. This screen adjusts the SD audio output
level in tenths of a decibel. The highest value and
default is 6.0 which equals +8 dBm output level. This
affects all audio inputs.
Press OK to save the setting.
Select this option to display more audio/video options as shown
in Figure 3-17.
Figure 3-17: Configure Audio/Video Menu 2
Configure Audio/Video 2
Set RS-232 Data Output
Set Spectrum Overlay
Select Audio Output
Set Demodulator Switch
Enter Service Name
Video Fail Mode
Segmented Frame Format
Back...
Set RS-232 Data Output
1.
Select this option to open the Set RS232 Data Output
screen.
2.
Select either On or Off. When set to on, the receiver
can output wayside data.
3.
Press OK to save the setting.
Set Spectrum Overlay
1.
2.
DRS4000 Receiver User and Technical Manual
Routine Operation
Select this option to open the Set Spectrum Overlay
screen.
Select either On or Off. When set to on, this option
enables the video monitor to overlay the video picture
3-18
with an RF spectrum of the signal.
3.
Press OK to save the setting.
Select Audio Output
2.
1.
Select this option to open the Select Audio Output
screen. This screen allows you to select between an
Analog and AES/EBU Digital audio output. AES/EBU
represents the digital audio signal developed by the
Audio Engineering Society (AES) and the European
Broadcasting Union (EBU).
2.
Select either channel A or B, and either Analog or
Digital audio. The default values are channel A and
Analog output.
3.
Press OK to save the settings.
Set Demodulator Switch
1.
2.
3.
Select this option to open the Set Demodulator
Switch screen.
Select the input source to be decoded:
ASI In Allows for the decoding of an external SD/HD
ASI signal connected to the ASI Input BNC connector
on the rear panel.
COFDM Out Demodulates a 70MHz IF input.
SCM Out Enables the unit to decode an ASI stream
from the internal SCM option, but only if the SCM
option is installed.
Press OK to save the setting.
Use the up or down arrow keys to enter a name. Valid
characters include upper and lower case letters, 0 to
9, and punctuation. Press and hold the up or down
arrow key to rapidly scroll through the list.
3.
Press OK to save the service name.
Video Fail Mode
1.
2.
Select this option to open the Video Fail Mode menu.
Select either Freeze or Blue.
Freeze The monitor displays a freeze frame if the
signal is lost.
Blue The monitor displays a blue screen of death if
the signal is lost.
3.
Press OK to save the setting.
Segmented Frame Format
1.
2.
3.
Back
Select this option to open the Segmented Frame
Option menu. This option determines whether video
output is displayed as progressive or interlaced.
Select either On or Off.
Press OK to save the setting.
Select this option to display the Configure Audio/Video 1
menu.
Enter Service Name
1.
Select this option to open the Enter Service Name
screen. If you are receiving a multiplexed signal, you
can use this field to identify the specific signal you are
monitoring.
DRS4000 Receiver User and Technical Manual
Routine Operation
3-19
6.
Setting Up Encryption Support
To set up encryption support, follow these steps:
1.
2.
Contact the remote video crew and determine the type
of encryption being transmitted as well as the key.
Select the Encryption Support option from the Setup
menu to open the Encryption Configuration menu
as show in Figure 3-18.
Figure 3-18: Encryption Configuration Screen
Encryption Configuration
Encryption Mode
7.
8.
Use the up/down arrow keys to change the value of
each character. Press and hold the up/down arrow key
to rapidly scroll through the list.
Press the right arrow to move to the next character.
Press OK to save your changes.
Setting Up Site Management Switches
Site management switches are located with the receiver and
consist of normally open single-pole-single throw (SPST) relays.
These can be used to control external equipment or devices at
the receive site.
To set up these switches, select the Site Management Control
option from the Setup menu to open the Site Management
Menu as shown in Figure 3-19.
Off
Enter BISS-1 Key
Enter BISS-E Key
Figure 3-19: Site Management Menu
Enter BISS-E Injected ID
Enter AES Key
Site Management Menu
Edit Site Management
3.
Note
4.
5.
Use the left-right arrow keys to select an Encryption
Mode of either Off, ABS, BISS-1, BISS-E, or AES.
Activate Site Management
AES encryption is currently not supported.
Depending on the mode you selected, move down to
the corresponding option and press OK to open its
Change ... Key screen.
For BISS-1, enter a 12-digit hexadecimal key. For
BISS-E, enter a 16-digit hexadecimal key. For BISS-E
Injected ID, enter a 14-digit hexadecimal key.
DRS4000 Receiver User and Technical Manual
Edit Site Management
1.
Routine Operation
Select this option to open the menu as shown in
Figure 3-20 on page 3-21. This menu lets you relabel
any of the four site management switches.
3-20
Figure 3-20: Site Management Configuration Menu
Figure 3-21: Site Management Configuration Screen
Site Mgmt Configuration
Site Mgmt Configuration
Site Mgmt 1
Site Mgmt #1 Off
Site Mgmt 2
Site Mgmt #2 Off
Site Mgmt 3
Site Mgmt #3 Off
Site Mgmt 4
Site Mgmt #4 Off
2.
Select each Site Mgmt switch in turn to open a name
field.
3.
Use the up/down arrow keys to change the value of
each character. Press and hold the up/down arrow key
to rapidly scroll through the list. Valid characters
include upper and lower case letters, 0 to 9, and
punctuation.
4.
Press the right arrow to move to the next character.
5.
Press OK to save the switch name.
6.
Press Back to return to the Site Management Menu
as shown in Figure 3-19 on page 3-20.
Activate Site Management
1.
2.
3.
Select this option to open the screen as shown in
Figure 3-21.
For each switch, press the right arrow to turn it On or
Off. Press the down arrow to move to the next switch.
Press OK to save the changes.
DRS4000 Receiver User and Technical Manual
Routine Operation
3-21
3.9.2
Figure 3-22: Packet Switch Config Menu
Configuring Packet Switching
The following information describes Packet Switching, an
optional feature.
Packet Switch Config.
Unit Mode
The DRS4000 Receiver incorporates a four-input decoder for
four-input diversity and remuxing applications. The decoder
accepts standard 270 MHz ASI streams operating in either burst
or packet mode and can decode signals from all Link encoders
giving ultra-low delay.
The decoder is compatible with most other encoders, with some
restrictions (B Frames and field encoding are not accepted). The
unique diversity feature automatically selects the best signal
from the receiver’s four inputs. Outputs include SD with
embedded audio.
You can operate the decoder in the following ways:
ASI Mode
Default Service Name
ASI Bit Rate
Unit Mode
1.
Select this option to open the menu shown in
Figure 3-23.
Figure 3-23: Packet Switch Unit Mode Menu
•
As a four-channel diversity decoder
•
As a remux system remuxing four channels onto one ASI
stream
Packet Switch Unit Mode
Diversity
Remux
In all modes of operation only one service can be decoded.
To set up packet switching for the receiver, follow these steps:
1.
Select Packet Switch Configuration option from the
Setup menu to open the menu shown in Figure 3-22.
Use these options to configure the decoder.
2.
3.
DRS4000 Receiver User and Technical Manual
Routine Operation
Select Diversity to operate as a four-channel diversity
decoder. Select Remux to operate as a remux system.
Press OK to save the setting.
3-22
ASI Mode
1.
ASI Bit Rate
From the Packet Switch Config menu, select ASI
Mode to display the menu shown in Figure 3-24.
Figure 3-24: ASI Mode Menu
1.
From the Packet Switch Config menu, select ASI Bit
Rate to display the menu shown in Figure 3-25.
Figure 3-25: Update ASI Bit Rate
ASI Mode
Update ASI Bitrate
188 Byte
10.0000 Mbps
204 Byte
2.
Select 188 Byte or 204 Byte to specify the packet
length of the ASI stream. This value is determined by
the transmitter.
3.
Press OK to save the setting.
Default Service Name
1.
2.
3.
From the Packet Switch Config menu, select Default
Service Name to display a screen with a single line of
spaces.
Enter a service name using the up/down arrow keys to
change the value of each character and the left/right
arrow keys to move from character to character.
Press OK to save the setting.
DRS4000 Receiver User and Technical Manual
2.
3.
4.
Routine Operation
Enter the overall bit rate for the receiver (default value
is 10 Mbps and maximum bit rate is 40 Mbps). This
number must be set to accommodate the data stream
passing through. It does not matter if the bit rate is set
too high. Use this setting to limit the ASI output bit rate
where the output signal is being fed to a downstream
multiplexer.
Use the up/down arrow keys to change the value of
each character and the left/right arrow keys to move
from character to character.
Press OK to save the setting.
3-23
3.9.3
Selecting the BDC Type
Using the Factory Setup Menu
Prior to shipment, MRC configures each receiver to operate with
a predefined suite of settings, or to customized settings. The
Factory Setup Menu, available from the Setup Menu, is
primarily for use by MRC Technical Support personnel.
If, however, you replace a component or change the
configuration in any way, you need to reset or recalibrate certain
settings. To change the factory settings, follow these steps:
1.
2.
Note
Depending on the RF band in which you must operate, you need
to identify the type of BDCs installed. Follow these steps:
1.
Select the BDC Type and Band Control option from
the Factory Setup Menu to display a menu of
downconverter types as shown in Figure 3-27.
Figure 3-27: BDC Type and Band Control Menu
Select Setup from the control screen to open the
Setup menu.
Select Factory Setup to open the menu shown in
Figure 3-26.
BDC Type
Link
MRC LNB
MRC ODU
When viewing the PDF file for this manual, click
on any of the following menu options to jump to
the section that describes that option.
Current BDC: L3033
Figure 3-26: Factory Setup Menu
Factory Setup Menu
2.
BDC Type and Band Control
BDC Power
3.
RCL Calibration
Determine the model number of the downconverters
that ares connected to the receiver and select the
appropriate menu option. This displays a list.
Select your model number. This returns you to the
Factory Setup menu.
Upgrade Firmware
EEPROM Initialization
CAUTION
Edit Custom Plan
Upgrade Tuner
All downconverters connected to the receiver
must come from the same manufacturer and be
of the same frequency range. Do not mix
manufacturers or frequencies. Improper voltage
from the receiver could damage the BDC.
Factory Test
DRS4000 Receiver User and Technical Manual
Routine Operation
3-24
Setting BDC Power
Calibrating RCL
At the factory, power is set to On for all BDCs. To set power on or
off for each BDC, follow these steps:
To calibrate RCL for each BDC, follow these steps:
1.
2.
Select the BDC Power option from the Factory Setup
Menu. A confirmation box displays, telling you to make
sure the correct BDC is selected because improper
voltage could damage the BDC.
Press OK to continue or Back to select a different
BDC type. If you press OK, the menu shown in Figure
3-28 displays. With this menu, you can set power On
or Off for all BDCs or for individual ones.
1.
Select RCL Calibration from the Factory Setup
Menu to display the menu shown in Figure 3-29.
Figure 3-29: BDC Calibration Menu
BDC Calibration
BDC #1
BDC #2
BDC #3
Figure 3-28: BDC Power Settings Menu
BDC #4
BDC Power Settings
3.
4.
Global
All On
BDC#1
On
BDC#2
On
BDC#3
On
BDC#4
On
BDC#5
n/a
BDC#6
n/a
2.
Figure 3-30: Downconverter Calibration Screen
BDC #1
For Global select All Off, All On, or Individual.
If you select All On or All Off, press OK to save the
setting, which will be updated when you reopen this
menu. If you select Individual, you can move to any
BDC number, set it to On or Off as needed, and press
OK to save all settings.
DRS4000 Receiver User and Technical Manual
Select BDC #1 to open the BDC #1 calibration screen
as shown in Figure 3-30. This screen reports the
current receive carrier level (RCL) in real time and also
displays the status of the COFDM Lock.
IF Loss
0.0 dB
Offset
0.0 dB
RCL:
-35.5 dBm
COFDM Lock: Yes
Routine Operation
3-25
3.
4.
5.
6.
For IF Loss and enter the cable loss that you have
calculated for the cable you are using. The default
value is 0.00 dB. Use the left/right arrows to change
the value, and use the down arrow to move to the next
setting.
Note the Offset. This is a factory setting and should
not be changed.
Press OK to save this setting and return to the BDC
Calibration menu.
Select another BDC to calibrate and repeat steps 3 to
5 for each additional downconverter.
8.
Upgrading Firmware
This feature allows you to install the latest firmware from a
standard USB flash drive. MRC will periodically provide updates
via its E-Synergy Customer Portal. You can also install a
previous version of firmware should that become necessary.
9.
10.
To upgrade the firmware, follow these steps:
1.
2.
3.
4.
5.
6.
7.
Install a USB flash drive in your computer.
Open a web browser and go to the MRC web site
(http://www.mrcbroadcast.com/).
Select the E-Synergy Portal link and enter your user
name and password.
Locate the firmware for this product and download it to
the flash drive.
Remove the flash drive from the computer.
At the DRS4000 front panel, Select Upgrade
Firmware from the Factory Setup Menu. An
information box instructs you to insert the flash drive.
Insert the flash drive into the USB connector on the
DRS4000 Receiver User and Technical Manual
front panel. The Firmware Upgrade menu displays
one or more versions of firmware.
Select the version you downloaded. For example, the
firmware may be named:
Artillery_v_2_65_4000_2008_12_25.srec
where,
v_2_65 indicates the version,
4000 indicates the DRS model, and
2008_12_25 indicates year, month, and day released.
The screen will display a series of messages as it
installs the firmware. The final message “Verify
complete...” indicates that the firmware was
successfully installed.
Remove the flash drive, power down the receiver, wait
a few seconds, and then power up the receiver.
If the Preset field on the control panel shows No
memory, reset the memory as explained in the next
section, Initializing the EEPROM.
Initializing the EEPROM
You can erase all presets from memory by using this feature,
which affects only the stored presets and RCL calibrations.
CAUTION
This feature erases from memory all the presets
you have set up. It also erases the RCL
calibrations you performed, so you may want to
record those settings first.
If you need to restore the presets after erasing memory, you
should first manually record the name and settings for each one,
then recreate them via the Presets menu, as described in
Section 3.9.4 on page 3-29.
Routine Operation
3-26
To initialize memory, follow these steps:
1.
2.
3.
3.
Select EEPROM Initialization from the Factory
Setup Menu.
Read the instructions on the screen, press OK to
continue, and press OK to complete the procedure.
Press OK to return to the Factory Setup Menu.
Enter the password (default is 0000) and press OK to
display the menu shown in Figure 3-31.
Figure 3-31: Edit Custom Band Plan
Edit Custom Band Plan
1.7 - 1.9 GHz
Editing a Custom Band Plan
1.9 - 2.2 GHz
This feature allows non-U.S. users to customize the frequencies
assigned to each channel in the 2, 3, 5, or 7 GHz channel plans.
For each channel, you can specify a unique frequency for the
minus (-) offset, center frequency (0), and plus (+) offset. After
customizing all frequencies, you can activate them via the
Change Channel menu.
1.9 - 2.5 GHz
This feature is password-protected and the initial password is
0000. For security reasons, your IT staff should reset the
password as soon as possible after installation to prevent
unauthorized changes to the channel plans.
Note
2.2 - 2.3 GHz
2.2 - 2.5 GHz
2.3 - 2.4 GHz
2.3 - 2.7 GHz
More...
4.
The initial values for each channel and offset are
placeholders, so you must revise all of them to
your unique frequencies before activating them.
Since the procedure for all band plans is virtually the same, only
the 2 GHz band plan is explained.
To customize one or more frequencies, follow these steps.
1.
2.
Select the band plan that you need to modify or select
More to display more RF bands. This opens the Edit
N GHz Custom Plan menu similar to Figure 3-32 on
page 3-28, where “N” is the RF band you selected.
This screen consists of channel numbers down the left
side and three columns of frequencies (for the minus
offset, center frequency, and plus offset). Since these
are to be custom frequencies, the task is to change all
the values to match your operating conditions.
From the Setup Menu, select the Factory Setup
option.
From the Factory Setup Menu, select Edit Custom
Plan to open the password screen.
DRS4000 Receiver User and Technical Manual
Routine Operation
3-27
7.
8.
Figure 3-32: Edit 2 GHz Custom Plan
Edit 2 GHz Custom Plan
(-)
(0)
9.
(+)
1
1.7000
1.70500
1.71000
2
...
...
...
.
...
...
...
.
...
...
...
.
...
...
...
10
...
...
...
10.
Press OK to save the new frequency.
Repeat steps 4 to 7 until you have customized all
frequencies that you need.
Press Back several times until the Control Screen
displays.
Select Chan to open the menu shown in Figure 3-34.
Figure 3-34: Change Channel Menu
Change Channel
Channel
1
Offset
(0)
Spacing
5.
Select a frequency to be modified, for example
channel 1, plus (+) offset. This opens a screen similar
to Figure 3-33.
(12 MHz)
Frequency
1705.000 MHz
Figure 3-33: Edit Custom Frequency Screen
11.
14.
Select Spacing and use the right arrow to select a
value of (Cust).
At the Password screen, enter 0000 (the initial
password). At the Change Channel screen, the
customized frequency for the current channel and
offset will appear on the screen.
Select Channel and use the right arrow to scroll
through the channels. Your custom frequencies will
display as you scroll through the list.
Select the channel you need to monitor and press OK.
Routine Operation
3-28
Edit Custom Frequency
Frequency
12.
1 7 1 0. 0 0 MHz
Band: 1.7-1.9 GHz
Channel: 1
13.
Offset: (+)
6.
Use the up/down arrows to change each digit, and use
the left/right arrows to select another digit.
DRS4000 Receiver User and Technical Manual
Upgrading the Tuner
Creating and Saving a Preset
Some DRS4000 systems may have tuner boards older than
version 5. Use the Hardware Configuration options on the Setup
menu to check your tuner version. If it is earlier than version 5,
use the Upgrade Tuner option to load the latest version from the
firmware.
To create a preset, follow these steps:
1.
2.
Follow these steps:
1.
2.
3.
4.
From the Setup menu, select Upgrade Tuner. A
screen displays with a single line of spaces.
Enter the tuner code (2736) using the up/down arrows
to change the value, and the right arrow to move to the
next space.
Press OK and read the warning before continuing.
Press OK to save the continue or Back to cancel.
Adjust all the settings on the receiver for a particular
incoming video signal.
Select the Presets button on the bottom of the Control
Screen to display the menu shown in Figure 3-35.
Figure 3-35: Preset Menu
Preset Menu
Load Preset
Save Preset
Delete Preset
Factory Testing
The Factory Setup Menu provides a Factory Test option for
use by MRC personnel only. This option is password protected
to prevent accidental use by unauthorized personnel.
3.
3.9.4
4.
Using the Preset Menu
A preset is a collection of data stored in firmware that contains
all the receiver settings for a given situation that you need to
reuse frequently. The Preset Menu allows you to save a group of
settings with a unique name, quickly set the receiver to those
specific settings by loading a preset, and delete a preset if it is no
longer needed.
The DRS4000 Receiver supports up to 50 presets. Each preset
stores all the settings you can change from the control screen.
DRS4000 Receiver User and Technical Manual
5.
Routine Operation
Select Save Preset to open a screen consisting of one
line of spaces on which you can enter a description of
this preset.
For each space, the available characters are A to Z, a
to z, 0 to 9, and punctuation – in that order. Press and
hold the up/down arrow key to rapidly scroll through
the characters. Press the right arrow key to move to
the next character.
For example, if you frequently set the receiver to
channel 10 at 7 GHz, the preset name might be
CH10_7GHZ.
Press OK to save the preset. A confirmation screen
reports the preset name and number.
3-29
6.
7.
8.
Press OK to confirm or press Back to cancel. Note
that the current preset is still in effect.
At the control screen, adjust the receiver settings for
the next preset.
Repeat steps 2 to 6 to create another preset. When
you get to the Save Preset screen, the previously
saved preset name displays.
To quickly change receiver settings to match the incoming video
signal, you can load a preset (that you previously saved) instead
of manually changing each setting. After loading a preset, the
new settings will display on the control screen.
To load a preset, follow these steps:
2.
Select the Preset button from the control screen to
open the Preset Menu as shown in Figure 3-35 on
page 3-29.
Select Load Preset to open the menu similar to the
one shown in Figure 3-36.
Select the desired preset and press OK. This activates
all the settings stored in the preset and returns you to
the control screen.
Deleting a Preset
If you decide that you no longer need a preset, you can delete it
using the following steps:
1.
Loading a Preset
1.
3.
2.
3.
4.
Select the Presets button fro the control screen to
display the Preset Menu as show in Figure 3-35 on
page 3-29.
Select Delete Preset to open the Delete Preset menu
which looks very similar to the Load Preset menu in
Figure 3-36.
Select a preset and press OK to delete it.
At the confirmation screen, press OK to confirm or
press Back to cancel.
Note
After you delete a preset, the remaining presets
will be renumbered with new sequence
numbers.
Routine Operation
3-30
Figure 3-36: Load Preset Menu
Load Preset
1: CH1_2GHZ
2: CH5_7GHZ
3: CITY_HALL
4: AIRPORT
5: TRAIN_STA
DRS4000 Receiver User and Technical Manual
3.9.5
Using the Options Menu
3.9.6
Using the Camera Menu
The Options Menu provides additional features.
Note
Entering a License Code
After operating the receiver for a length of time, you may decide
to upgrade some of the features. MRC will supply a new license
code, which will activate the new features.
To enter a license code, follow these steps:
1.
2.
Select the Options button from the control screen.
This opens the Options Menu.
Select the Enter License Code option. This opens a
screen consisting of one line of spaces for the code.
CAUTION
3.
4.
5.
6.
If the license code is entered incorrectly, various
features could become deactivated.
Follow the on-screen instructions. For each space, the
available characters are A to Z, a to z, 1 to 0, and
punctuation – in that order.
Press and hold the up or down arrow key to rapidly
scroll through the character list. Press the right arrow
to move to the next character.
Press OK to save the new license code.
At the confirmation screen, press OK to confirm or
press Back to cancel. Pressing OK returns you to the
Options Menu.
DRS4000 Receiver User and Technical Manual
This menu is not yet implemented. You can
examine the menu options and values but they
have no effect on any remote cameras.
If you obtained a Link camera control system, you can use the
DRS4000 Receiver to control the Link wireless CCU interface.
Additional equipment is required, such as a UHF transmitter and
Operator Control Panel (OCP) configured with the receiver, and
a UHF receiver mounted on the camera.
This Camera menu allows an operator – usually working at a
portable studio near the remote camera crew – to set up the
receiver so it can transmit commands via a UHF transmitter to a
specific remote camera. The commands, which emanate from
the OPC module connected the receiver, control certain camera
features that would be difficult for the camera operator to adjust
during a live shoot.
To use the Camera menu, follow these steps:
1.
2.
3.
4.
Routine Operation
Select the Camera button from the control screen.
This opens the menu shown in Figure 3-37. Notice
that only the first item is active and is set to Disabled.
Select the first item to open the Camera Control
Enable menu.
Select Enabled. This returns you to the previous
menu but now several items are active.
Select Camera Type to open the Camera Control
Enable menu. Select either the Thomson, Sony, or
Ikgami camera. This returns you to the previous
menu.
3-31
3.10
Figure 3-37: Camera Menu
If the receiver is installed so that it can be conveniently
connected to your local area network, then you do not need to be
in front of the actual receiver to adjust its settings. You can
control and maintain it from any computer on the network via the
built-in DRS4000 web server.
Camera Control
Enable Camera Control
Camera Type
Camera Control Freq
UHF Transmit Power
Option Cmd
5.
6.
7.
8.
9.
Disabled
Thomson
450000 KHz
The web server is designed to serve up web pages in a
networked computer’s web browser. This web browser interface
mimics the menus and screens you can access from the
receiver’s control panel. Internet Explorer, Firefox, and Safari are
web browsers that can be used to connect remotely to the
receiver.
1.50 W
00000000000000
Select Camera Control Freq to open the Camera
Control Frequency screen. The default value is
450,000 KHz (450 MHz) and the valid range is from
450,000 to 470,000 KHz.
Use the up/down arrow keys to change the value of a
digit (excluding the leftmost digit). Use the left/right
arrow keys to move to another digit. Press OK to save
the setting and return to the Camera Control menu.
Select UHF Transmit Power to open the Camera
UHF Power screen. The default value is 1.5 W and
the valid range is from 0.1 to 2.0 W.
Use the up/down arrow keys to change the value of a
digit (excluding the leftmost digit). Use the left/right
arrow keys to move to another digit. Press OK to save
the setting and return to the Camera Control menu.
Do not select Option Cmd. This item is for future use
and has no current function.
DRS4000 Receiver User and Technical Manual
Operating the Receiver Remotely
3.10.1
Starting the Web Browser Interface
To access the receiver from a networked computer, follow these
steps:
1.
2.
3.
Routine Operation
Verify that the receiver is connected to the network.
There must be an Ethernet cable connected from the
receiver’s front panel to a nearby LAN connection.
Obtain the IP address for the receiver. This is
important in configurations where more than one
DRS4000 Receiver is connected to the network.
At the networked computer, open a web browser and
enter the receiver’s IP address into the browser’s
address field and press the Enter key. This opens the
DRS4000 web browser interface’s Monitor page as
shown in Figure 3-38 on page 3-33.
3-32
Figure 3-38: DRS4000 Web Interface: Monitor Page
select a value for a setting, you select from a pulldown menu or
click on a radio button.
3.10.3
Using the Web Browser Interface
Each link on the Monitor page opens a page that allows you to
modify that setting. For example, the Channel link opens a page
for changing the channel, offset, and spacing. Refer to “Using
the Control Screen” on page 3-8 for instructions on modifying
these settings.
The Presets page, shown in Figure 3-39, provides the same
features as found on the control panel’s Preset menu. Refer to
“Using the Preset Menu” on page 3-29 for instructions on using
presets.
Figure 3-39: DRS4000 Web Interface: Presets Page
3.10.2
Common Features
Each web page provides navigation buttons at the upper left.
The Monitor button returns you to the main control page from
anywhere in the web interface. The Monitor page contains the
same information as on the receiver’s control panel.
The Presets button opens the page for loading, saving, viewing,
and deleting presets.
The Setup button opens the page that contains all the receiver
parameters you can set up and modify.
The Setup page, shown partially in Figure 3-40 on page 3-34,
provides the same features as found on the control panel’s
Setup menu. Refer to “Using the Setup Menu” on page 3-11 for
instructions on modifying these settings.
If a page contains links, each link opens a page on which you
can select or change a value. For pages that require you to
DRS4000 Receiver User and Technical Manual
Routine Operation
3-33
Figure 3-40: DRS4000 Web Interface: Setup Page
DRS4000 Receiver User and Technical Manual
Routine Operation
3-34
4
4.1
Troubleshooting
Chapter Overview
This chapter provides troubleshooting procedures for technical
problems that an operator may encounter. The problems are
organized into the following categories: video, audio, and
general system.
For each component, a problem-cause-action table states one or
more possible causes. For each possible cause, the table
provides one or more suggested actions that you can use.
Perform the suggested actions until you either fix the problem or
determine that you need technical support from MRC.
The following troubleshooting topics are discussed. Whenever
the suggested action requires more than a few steps, a link takes
you to a separate procedure.
Topic
Page
Video Problems
4-2
Audio Problems
4-5
General System Problems
4-6
DRS4000 Receiver User and Technical Manual
Troubleshooting
4-1
4.2
Video Problems
The following table describes video problems.
Table 4-1: Video Problems
Problem
No video
Possible Cause
•
Loose or disconnected UHF cables at
receiver.
Loose cable at camera or transmitter.
Suggested Actions
•
Verify that all UHF cables are securely
fastened to BDC connectors at rear of
receiver.
•
Verify that all camera and transmitter
cables are securely fastened.
•
Verify the transmitter’s settings and
compare them to the receiver’s
settings. Correct any settings as
needed. See Section 3.8 on page 3-8.
•
Select the preset that matches the
transmitted signal.
•
Receiver set to the wrong RF band,
channel, or other setting.
•
Wrong preset is selected.
•
All the antennas or BDCs are
disconnected or damaged.
•
Check condition of all antennas, BDCs,
and the cables connected to them.
•
UHF cables connected to BDC5 or
BDC6 connector.
•
These connectors are currently nonfunctional. Use any of the other four
connectors.
DRS4000 Receiver User and Technical Manual
Troubleshooting
4-2
Table 4-1: Video Problems
Problem
No video in monitor and no control panel
display
Poor video quality
No receive signal level on receiver’s RCL
meter.
Possible Cause
Suggested Actions
•
Power cable for receiver is loose or
disconnected.
•
Make sure power cable is firmly
connected at both ends.
•
No power or insufficient power to
receiver.
•
Check line voltage with voltmeter.
Voltage must be 100 to 130 VAC (U.S.)
or 205 to 240 VAC (non-U.S.).
•
Fuses are blown.
•
•
Signal strength is low due to
interference or a weak signal.
•
Unplug power cable, remove fuse
holder from connector, and replace
fuses. Use 2A glass fuses.
Determine whether the remote crew
can relocate or reposition the
transmitter, switch to another channel,
or boost power.
•
Receive antennas in use are not in the
transmitter’s line of sight.
•
Determine whether the remote crew
can relocate or reposition the
transmitter.
•
Wrong preset selected.
•
•
The transmitter is in Standby mode.
•
Select the preset that matches the
transmitted signal.
Contact the remote crew and verify that
the transmitter is running.
•
The wrong preset is selected.
•
Select the correct preset.
•
A cable is loose or disconnected.
•
Check all cables for secure
connections.
DRS4000 Receiver User and Technical Manual
Troubleshooting
4-3
Table 4-1: Video Problems
Problem
Receive signal level OK but no video at
receiver.
Possible Cause
Suggested Actions
•
No video feed.
•
Contact the remote crew and verify that
the camera and transmitter are
powered up and connected.
•
Loose or disconnected video cable
between camera and transmitter.
•
Verify the connections between camera
and transmitter.
•
Incorrect video format specified (for
example, SD vs. HD).
•
Verify the video settings for the
receiver. From the control screen,
select SETUP, select Audio/Video
Configuration, and select and review
any of the video related menu options.
See the section on “Configuring Audio
and Video Settings” on page 3-16.
DRS4000 Receiver User and Technical Manual
Troubleshooting
4-4
4.3
Audio Problems
The following table describes audio problems.
Table 4-2: Audio Problems
Problem
No audio at studio/command center.
Audio received at studio/command center at a
very low level.
Possible Cause
Suggested Actions
•
No audio input.
•
Check the audio source.
•
Loose or disconnected audio cables.
•
Verify with the remote crew that the
audio cables are securely connected to
the transmitter.
•
Incorrect audio settings at receiver (for
example, Channel A vs. Channel B).
•
•
A microphone level signal is being
transmitted.
•
Verify the audio settings for the
receiver. From the control screen,
select SETUP, select Audio/Video
Configuration, and select and review
any of the audio related menu options.
See the section on“Configuring Audio
and Video Settings” on page 3-16.
Verify that the transmitter’s audio
outputs are at a line level.
•
Incorrect audio settings at receiver (for
example, Digital vs. Analog)
•
DRS4000 Receiver User and Technical Manual
Troubleshooting
Verify the audio settings for the
receiver. From the control screen,
select SETUP, select Audio/Video
Configuration, and select and review
any of the audio related menu options.
See the section on“Configuring Audio
and Video Settings” on page 3-16.
4-5
4.4
General System Problems
The following table describes general system problems.
Table 4-3: General System Problems
Problem
Cannot connect to the DRS4000 web server.
Receiver does not power up.
Possible Cause
Suggested Actions
Receiver is powered down or disconnected
from the network.
Verify that the receiver is powered up and that
it is connected to the network.
Receiver IP address is incorrect.
From the control screen, select Setup, select
IP and MAC Address Configuration, and
enter the correct IP address.
Power cable not connected.
Verify that the power cable is fully connected at
both ends.
Fuse is blown.
1.
2.
3.
4.
5.
DRS4000 Receiver User and Technical Manual
Troubleshooting
Set the power switch to off and
remove the power cable from the
receiver.
Remove the fuse holder from the
connector block and inspect the
fuses.
Replace fuses if needed.
Reinstall the fuse holder and power
cable.
Set the power switch to on.
4-6
5
Installation
5.1
Chapter Overview
This chapter provides instructions on unpacking and inspecting
the components, preparing the site, and installing the
components of the DRS4000 Receiver.
These instructions are written for technically-trained customer
installers (that is, for customers who have an IT staff or other
technical personnel responsible for installing electronic
equipment), and for MRC Technical Services personnel who
install such systems.
Video Connections
5-10
Data Connections
5-11
Power Connections
5-14
Powering Up the First Time
5-9
Audio Connections
5-9
5.2
Reviewing Customer
Specifications
Before installing any components, you, the customer, need to
review several details so that the installation can proceed in a
timely fashion. Use the following steps.
1.
Here are the topics covered:
Topic
Page
Reviewing Customer Specifications
5-1
Unpacking the Components
5-1
Inspecting the Components
5-2
Reporting Any Damage
5-2
Preparing the Site
5-2
Testing the Antennas
5-4
Installing the Receiver
5-5
Installing Antennas and Downconverters
5-6
Cabling Practices
5-6
Selecting Coaxial Cables
5-7
Aligning Omnidirectional Antennas
5-7
Installing Downconverters and Antennas
5-8
Audio Connections
5-9
DRS4000 Receiver User and Technical Manual
2.
3.
4.
5.3
Verify with the MRC Inside Sales representative that
all components for the customer order have been
shipped.
Set up an installation date and resolve with MRC any
open issues or questions about the customer order.
Verify that your site complies with all infrastructure
requirements (such as power and communications
lines).
If you require that Accepted Test Procedures must be
performed, identify the procedures and the person
who is to sign off the completed procedures.
Unpacking the Components
Each system is shipped after factory testing with all components
ready to install at your site. Components are packaged in
appropriate shipping containers.
Installation
5-1
CAUTION
5.5
Verify that all packing material has been
removed from any included antennas.
Should you discover any damage after unpacking the system,
report the damage by following these steps:
Adhere to the following guidelines when unpacking your new
equipment:
•
Unpack the equipment carefully to avoid accidental
damage.
•
Locate all parts and accessories in each container.
•
Verify that the items shipped agree with those listed on
the packing list.
•
5.4
DO NOT discard the container or packing material until
you have inspected the equipment and are sure there is
no shipping damage. The container and packing must be
available in case you need to file a damage claim with the
shipping carrier.
Inspecting the Components
After unpacking the equipment, MRC recommends that you
inspect all components and cabling using the following checklist:
•
Check for any dents or scratches. If the equipment is
dented or scratched, it may have suffered internal
damage as well.
•
Immediately file a claim with the shipping carrier.
•
Contact MRC Customer Service to determine the
disposition of the equipment. See Chapter 1 for contact
information.
•
Forward a copy of the damage report to MRC Customer
Service.
When contacting Customer Service, please have the following
information available:
•
Sales order number
•
Model number and serial number of all damaged items
5.6
Preparing the Site
The following requirements make initial installation easier and
allow room for future access and servicing. These requirements
focus on the equipment rack, ventilation, moisture, cabling,
power supply, and grounding.
Equipment Rack
The DRS4000 Receiver fastens to the mounting rails of a
standard EIA 19-inch (48.3 cm) equipment rack.
•
Check that the equipment is clean and dry.
•
Check that no cables or connectors are broken, damaged,
or loose.
•
Check that no switches or LED indicators are broken,
damaged, or loose.
DRS4000 Receiver User and Technical Manual
Reporting Any Damage
CAUTION
•
Installation
Do not overload the rack or load it unevenly.
Secure the rack to a solid surface.
Make certain that the rack and mounting rails are strong
5-2
and rigid enough to support all the equipment in the rack.
Moisture
•
The rack should be securely attached to a solid surface
such as a floor or wall to prevent movement or tipping
over.
Locate the equipment in an area protected from dripping water or
excessive humidity.
•
Position the rack to allow easy access to the front and
rear of the equipment. MRC recommends at least 18
inches (45.7 cm) clearance at the rear of the rack and at
least 36 inches (91.4 cm) clearance in front of the rack.
WARNING
•
The cables at the rear of the rack should not be pressed
against the rear of the equipment when closing doors.
This can stress the cables and may shorten their life.
Ventilation
Cabling
MRC recommends the following general practices be performed
at all installations.
Heat generated from components in the rack needs to be
ventilated. Proper ventilation is important for preventing
excessive hot spots from developing within the rack and
adversely affecting the components.
CAUTION
Temperatures inside a closed mounting area
can be significantly higher than the ambient
temperature. Always allow adequate ventilation.
•
If possible, install components in a climate-controlled
area.
•
Installation should allow adequate airflow around the
equipment. Exhaust air from the rack should be circulated
and mixed with room air, not trapped in a closed space.
•
When mounting components in an enclosed rack, it is
good practice to allow 1 RU (1.75 inches or 4.45 cm) of
space between each component. You can fill those
spaces with optional grillwork instead of blank panels.
DRS4000 Receiver User and Technical Manual
Indoor equipment is not designed to withstand
water or moisture. If water does penetrate the
chassis, it could cause equipment damage and/
or create a safety hazard.
•
Secure all cables at close intervals along their entire
lengths.
•
Protect cabling with added sheathing or padding
anywhere cabling passes through a hole or lies against an
obstruction.
•
Provide flex relief at any location where the cable must
change direction sharply, to maintain a smooth bend and
prevent kinking.
•
Provide strain relief at each connector to absorb any
pulling forces on the cable and prevent damage to the
connector.
Power Supply
Check the onsite electrical supply to be sure it can provide all the
power needed at the site without overloading. Power ratings for
equipment can be found on a rating plate, usually on the rear
panel. If necessary, consult a licensed electrician.
Installation
5-3
CAUTION
CAUTION
Be sure the power being supplied matches the
power required by the equipment.
5.7
CAUTION
CAUTION
Power supply cords and cables must be
protected. Do not run cords where they can be
stepped on. Protect cables against pinching and
chafing. Pay special attention to locations where
the cables enter or exit an enclosure or make a
sharp bend.
Ensure that the electrical supply is protected by
overcurrent protection devices as required by
the applicable electrical codes.
Testing the Antennas
All antennas for your configuration are tested at the factory to
ensure proper operation. Before installing them on a tower, mast,
or building at the receive site, you should test them on the
ground to ensure that they are still operating properly.
CAUTION
Test each antenna on the ground before
mounting it on a tower or building.
CAUTION
Verify that all packing material has been
removed from the antenna.
To test one or more antennas on the ground, follow these steps.
Grounding
1.
For safe operation, all equipment must be properly grounded.
•
Connect all equipment on a rack to a common ground.
•
Connect the common ground to a site ground.
•
The ground wire should be as short as possible, and
follow the straightest path possible.
2.
3.
CAUTION
Never modify a grounded power plug to connect
to an ungrounded receptacle.
Be sure the equipment grounding follows
applicable electrical codes.
DRS4000 Receiver User and Technical Manual
Installation
Set each antenna, the block downconverters BCDs),
and the DRS4000 Receiver on a worktable.
Connect a spare RF cable between an antenna and a
BCD. Repeat this until all antennas and BCDs are
connected. Refer to Figure 5-1 on page 5-5 for
connections details.
Connect a spare UHF cable from each BCD to an
BCD connector at the rear of the receiver. For
example, for a four antenna system, use the BCD1,
BCD2, BCD3, and BCD4 connectors.
5-4
Figure 5-1: Testing the Antennas
6.
Antenna 1
7.
RF Cable
8.
9.
Test Transmitter
BDC 1
DRS4000
BDC1
10.
UHF cable
4.
5.
-
Set up a test transmitter near the receive antennas.
Power it up and set it to standby mode.
Configure the transmitter for the settings you typically
use and record them for use with the receiver:
RF Band: 2 or 7 GHz
Channel
Modulation mode: DVB-T, LMS-T, or SCM
Modulation type: QPSK, 16QAM, or 32QAM
Bandwidth: 6 MHz or Auto
Guard interval: 1/32, 1/16, 1/8, or 1/4
SD or HD decoding
Video line standard
Audio: Analog or Digital
DRS4000 Receiver User and Technical Manual
5.8
Power up the receiver and use the Setup menu to
configure it to the same settings as for the transmitter.
Refer to Chapter 3, Using the Setup Menu, of the
DRS4000 Receiver Operator’s Guide for details.
For the receiver, also verify the Factory Setup menu.
Make sure that the Number of Inputs and BCD Type
are correctly set for your configuration.
Set the transmitter to Low Power Transmit mode.
Verify that the control screen on the receiver displays
a receive carrier level (RCL), signal-to-noise ratio
(SNR), and Link Quality reading for each antenna.
This indicates that the antenna is feeding the signal to
the receiver.
At the end of testing, power down all equipment and
disconnect all cables in preparation for installation.
Installing the Receiver
At the receive site, you can use an existing standard EIA 19-inch
rack or a rack ordered specifically for this configuration. Before
installing the receiver, identify the rack mounting holes you
intend to use.
Installation
Note
1. When installing components, leave 1 RU of
space between them for ventilation.
2. Installation is easier if one person holds the
component in place while another person
fastens the mounting screws.
3. If MRC installs the system, the installer
provides the mounting hardware; otherwise,
you, the customer, must supply these parts.
5-5
4.
Use the following steps to set up the components at each receive
site.
1.
Unpack the cartons containing the DRS4000
Receiver, the antennas, and the BCDs.
Line up the mounting holes on the component's front
panel with the selected mounting holes on the rack as
shown in Figure 5-2.
Insert the mounting screws and tighten them securely.
Be sure to provide about 1 RU of space above and
below the receiver for air flow.
2.
3.
Figure 5-2: Example of Rack Installation
Make sure the POWER switch is set to the Off (0)
position. Connect the power cable to the POWER
connector on the rear panel and connect the other end
to an AC receptacle.
5.9
Installing Antennas and
Downconverters
To feed the incoming signal to the receiver, you need to properly
install the antennas, downconverters, and associated cabling.
5.9.1
Cabling Practices
To install cabling for optimum performance and ensure minimal
maintenance, MRC recommends the following general practices:
Mounting
Screws
(typ.)
DRS4000
I
Space for air flow
•
Secure the cabling at close intervals along its entire
length.
•
Protect the cabling with added sheathing or padding if it
passes through a hole or lays against an obstruction.
•
Provide flex relief at any location where the cable must
change direction sharply, to maintain a smooth bend and
prevent kinking.
•
Provide strain relief at each connector to absorb any
pulling forces on the cable and prevent damage to the
connector.
CAUTION
DRS4000 Receiver User and Technical Manual
Installation
Do not run cables where they can be walked on.
Protect cables against pinching and chafing,
especially at locations where the cables enter or
exit an enclosure or make a sharp bend.
5-6
5.9.2
Selecting Coaxial Cables
For applications where you must connect the downconverters via
coaxial cables, use high quality UHF cable and use the shortest
lengths possible to prevent UHF signal loss. If long lengths of
cable are required, a UHF amplifier or gain block may be
required. Contact MRC for specific cable types and lengths to
use in your application.
If you do not connect the antennas directly to the
downconverters, you will have to fabricate your own antenna
mounting bracket. Remember that the distance between each
pair of antennas is critical for optimum performance.
5.9.3
Aligning Omnidirectional Antennas
For applications using omnidirectional antennas, proper
installation of the antennas will result in optimum performance. In
all installations, the minimum distance between any two
antennas is important.
Table 5-1 provides minimum separation distances for several
frequency ranges available with the DRS4000 Receiver. This is
the minimum recommended distance between any two
antennas.
Table 5-1: Minimum Separation Distances for Antennas
Frequency
Band
(Reference
Freq.) MHz
Recommended
Separation
(cm)
(inch)
Adjustment by 1/4
Wavelength
(mm)
(inch)
1700 to 1850
(1700)
52.94
20.84
44.12
1.74
1900 to 2200
(1900)
47.37
18.65
39.47
1.55
DRS4000 Receiver User and Technical Manual
Frequency
Band
(Reference
Freq.) MHz
Recommended
Separation
(cm)
(inch)
Adjustment by 1/4
Wavelength
(mm)
(inch)
2200 to 2500
(2200)
40.91
16.11
34.09
1.34
2300 to 2700
(2300)
39.13
15.41
32.61
1.28
4400 to 4700
(4400)
20.45
8.05
17.05
0.67
4800 to 5000
(4800)
18.75
7.38
15.63
0.62
6400 to 6500
(6400)
14.06
5.54
11.72
0.46
Also, the antennas must be plumb (vertical) for best
performance. The relative height of the antennas should be the
same but is not critical. For example, if the antennas are
mounted on a tower or a mast, the antennas must be mounted
vertically (all parallel to each other) and mounted at a similar
height on the tower or mast.
The separation distance between the antennas must be
measured from the center lines of the antennas as shown in
Figure 5-3. You should initially install the antennas at the
recommended minimum separation distance. If necessary,
increase the distance by quarter wavelengths.
Installation
5-7
Figure 5-4: Mounting Downconverter on Pole
Figure 5-3: Antenna Separation and Alignment
Antenna
Universal pole
mounting bracket
Heavy duty
band clamp
5.9.4
Block
downconverter
Installing Downconverters and Antennas
Each low-noise block downconverter (BCD) assembly includes a
block downconverter, universal pole mounting bracket, and a
heavy duty band clamp. The BCDs can be installed either on a
horizontal or a vertical pole assembly.
MRC recommends attaching the downconverter directly to the
antenna. When you attach the antennas directly to the BCD RF
INPUT connectors, then you must mount the antennas in the
same physical plane, that is, one antenna should not be tilted
with respect to the other antenna. See Figure 5-3.
To install the BCDs on a mounting pole when the antennas are
connected directly to the BCDs, perform the following steps for
each pair of antennas and BCDs:
1.
RF input
3.
4.
5.
Fasten the first BCD onto the mounting pole and
secure it firmly in position using the mounting bracket
and heavy duty band clamp. See Figure 5-4.
DRS4000 Receiver User and Technical Manual
2.
Installation
6.
Connect the first antenna securely to the BCD RF
INPUT connector.
Determine the minimum separation distance between
the two antennas per Table 5-1 on page 5-7.
Loosely fasten the second BCD to the mounting pole
using the heavy duty band clamp. Make sure that the
BCD is approximately at the correct separation
distance.
Connect the second antenna securely to the second
BCD’s RF INPUT connector.
Adjust the second antenna so it is parallel to the other
antenna and separated by the minimum
recommended distance.
5-8
7.
8.
9.
Note
Securely fasten the second BCD to the mounting pole.
Connect each BCD to the receiver using high quality
UHF cables.
Repeat these steps for the next pair of antennas.
Figure 5-5: Initial Control Panel
Signal quality will degrade if the antennas are
installed closer than the recommended
minimum separation distance.
The separation distance between the antennas will require fine
tuning for optimum performance. Always start at the minimum
recommended distance the antennas should be adjusted in
quarter wavelength increments, as shown in Table 5-1 on
page 5-7.
5.10
Powering Up the First Time
After installing the receiver, downconverters, antennas, and
associated cables, the system is ready to be powered up.
1.
2.
3.
4.
5.
Verify that the power cable is securely connected to
the power connector on the rear panel of the
DRS4000 Receiver.
Verify that all other cables are properly connected to
the receiver’s rear panel connectors.
Verify that the AC power source is turned on.
Connect the power cable to the AC power source.
Set the power switch to On (1). The receiver will
quickly power up and display the initial control panel
as shown in Figure 5-5. The receiver also powers up
the downconverters.
DRS4000 Receiver User and Technical Manual
5.11
Audio Connections
The mini-XLR connectors labeled AUDIO 1 to AUDIO 4 output
analog audio derived from the incoming RF signal. They can be
used as four monaural outputs or two stereo pairs depending on
how the remote transmitter is configured. Pinout information is
shown in Figure 5-6 on page 5-10 and Table 5-2 on page 5-10.
Installation
5-9
BDC 1 to BDC 6 The Block Downconverter (BDC) connectors
are 50 ohm, TNC connectors that accept the UHF signals from
the downconverters and their corresponding antennas.
Figure 5-6: Audio Connector
2
For all BNC video connectors, the signal is carried on the center
pin as shown in Figure 5-8.
1
Figure 5-8: Typical BNC Connector
3
Signal
Table 5-2: Pinouts for Audio Connector
Pinout
1
Ground
2
+
3
-
5.12
Ground
Signal Description
CV 1, CV 2 The Composite Video (CV) connectors are 75 ohm,
female, BNC connectors that output an analog video signal.
SD SDI / HD SDI The Standard Definition (SD) Serial Digital
Interface (SDI) connector is a 75 ohm, female, BNC connector
that outputs a video data stream from the MPEG module that is
compliant with SMPTE 259M.
Video Connections
For all TNC connectors, the signal is carried on the center pin
and voltage to the block downconverters is carried on the outer
ring as shown in Figure 5-7.
Figure 5-7: Typical TNC Connector
Signal
Ground
DRS4000 Receiver User and Technical Manual
The High Definition (HD) SDI connector is a 75 ohm, female,
BNC connector that outputs a video data stream from the MPEG
module that is compliant with SMPTE 292M and SMPTE 299M.
ASI OUT The two Asynchronous Serial Interface (ASI)
connectors are 75 ohm, female, BNC connectors that provide
ASI outputs for digital video and audio distribution.
ASI IN This 75 ohm, female, BNC connector accepts an ASI
signal input from another component. It is used for local
decoding of a SD/HD ASI stream when the receiver is placed in
external ASI mode. The outputs are on the HD SDI and HD MON
connectors only.
Installation
5-10
70 MHz IN This connector is a 75 ohm, female, BNC connector
that accepts input from another receiver. This is an alternative
input to BDC 1 and is selectable from the control screen menu.
5.13
Monitor and Control Connectors
CNTL/MON 1 to CTRL/MON 6 The 7-pin circular Lemo
connectors provide control inputs and monitor outputs for the
adjacent downconverter (BDC1 to BDC6). Pinout information is
shown in Figure 5-9 and Table 5-3.
Figure 5-9: Control/Monitor Connector
HD MON The HD Monitor connector is a 75 ohm, female, BNC
connector that provides a second output for monitoring the video
data stream. The control signal is carried on the center pin.
GEN LOCK This 75 ohm, female, BNC connector enables the
decoder output to lock to an external frame lock input. This can
either be SD Black & Burst or HD Tri-level input into the rear
panel BNC connector. The control signal is carried on the center
pin.
5.14
Data Connections
For the following connectors, the USB and Ethernet connectors
are on the front panel.
The USB 2.0 connector allows you to install firmware updates
from MRC via a flash drive. Pinout information for this connector
is shown in Figure 5-10 and Table 5-4.
Figure 5-10: USB Connector
Table 5-3: Pinouts for Control/Monitor Connector
Pinout
1
2
3
4
5
6
7
Signal Description
1 2 3 4
Power On Detect
Lock Detect A
Lock Detect B
H/L Band Select
Band Select 1
Band Select 2
Ground
DRS4000 Receiver User and Technical Manual
Installation
5-11
Table 5-4: Pinouts for USB Connector
Pinout
Name
Table 5-5: Pinouts for ETHERNET Connector
Pinout
Signal Description
1
VCC
+5 VDC
2
3
4
D-
Data -
D+
Data +
GND
Ground
The RJ-45 ETHERNET connector allows you to connect the
receiver to a computer and use the DRS4000 web browser
interface to control the receiver. Pinout information for this
connector is shown in Figure 5-11 and Table 5-5.
Figure 5-11: ETHERNET Connector
1
2
3
4
5
6
7
8
Signal Description
TX+
TXRX+
not used
not used
RXnot used
not used
ALARM This DB-15 female connector connects to single-pole
single throw (SPST) switches for summary alarm data for
common faults and events and for site management control. One
SPST switch is for a minor alarm, one SPST switch is for a major
alarm, and four SPST switches are for site management.
Pinout information for this connector is shown in Figure 5-12 and
Table 5-6 on page 5-13.
8
1
Figure 5-12: ALARM Connector
8
15
DRS4000 Receiver User and Technical Manual
Installation
1
9
5-12
Figure 5-13: WAYSIDE DATA Connector
Table 5-6: Pinouts for ALARM Connector
Pinout
1
2
3
4
5
6
7
8
9
10
11
12
13
14
15
5
1
Signal Description
SM1-COM
SM1-NO
SM2-COM
9
6
SM2-NO
SM3-COM
SM3-NO
Table 5-7: Pinouts for WAYSIDE DATA Connector
SM4-COM
Pinout
SM4-NO
ALM-MNR-COM
ALM-MNR-NO
ALM-MJR-COM
ALM-MJR-NO
not used
not used
not used
WAYSIDE DATA This RS-232, 9-pin female connector is the
wayside channel, used for transfer of data such as global
positioning satellite (GPS) data or meta data from the MPEG
decoder.
Pinout information for this connector is shown in Figure 5-13 and
Table 5-7.
DRS4000 Receiver User and Technical Manual
Signal Description
1
not used
2
3
4
5
6
7
8
9
TX OUT
RX IN
not used
GND
not used
not used
not used
not used
RS-232 CRNTL This connector is an RS-232, a DB-9 female
connector that can be used to remotely control the DRS4000
Receiver via a slave controller.
Pinout information for this connector is shown in Figure 5-14 on
page 5-14 and Table 5-8 on page 5-14.
Installation
5-13
5.16
Figure 5-14: RS-232 CRNTL Connector
5
1
9
The following connectors provide inputs and outputs for the
optional packet switching subsystem. For all BNC connectors,
the signal is carried on the center pin as shown in Figure 5-8 on
page 5-10.
ASI IN 1 to ASI IN 4 These 75 ohm, female, BNC connectors
allow up to four ASI inputs from different receive sites, effectively
acting as a diversity switch. They can also be used as an ASI
multiplexer. The maximum bit rate is adjustable up to 40 Mbps.
6
ASI OUT These connectors are 75 ohm, female, BNC connectors that provide a diversity ASI output or a multiplexed ASI
output according to the mode set for the packet.
Table 5-8: Pinouts for RS-232 Connector
Pinout
1
2
3
4
5
6
7
8
9
5.15
Optional Packet Connectors
Signal Description
not used
SDI OUT This connector is a 75 ohm, female, BNC connector
that outputs a digital video stream.
RX CNTRL
TX CNTRL
not used
GND
not used
TX Data
RX Data
not used
Power Connections
The POWER connector accepts a standard 3-prong cable for AC
power. An auto-sense circuit accepts either 110 to 130 VAC or
205 to 260 VAC @ 2 amps. The 3-prong male end must be
modified for non-U.S. applications.
DRS4000 Receiver User and Technical Manual
Installation
5-14
6
6.1
Replacement Parts
Chapter Overview
This chapter describes the replacement parts that are available
for the DRS4000 Receiver.
Since there are no supported field repairs on the DRS4000
Receiver, the only parts available are external cables and
fuses.
6.2
Replacements
The replacements parts for the DRS4000 Receiver are listed in
Table 6-1. If you need something that is not listed, ask your MRC
Sales Representative or consult the factory.
Table 6-1: Replacements Parts
Description
Comments
AC Power Cable
Connects AC power to the DRS4000
Receiver.
Fuses
(2) 2A 250 VAC
DRS4000 Receiver User and Technical Manual
Replacement Parts
6-1
This page intentionally left blank.
DRS4000 Receiver User and Technical Manual
Replacement Parts
6-2
7
Theory of Operation
7.1
This chapter provides technical information about the design and
function of the DRS4000 Receiver. This includes descriptions of
the functional modules that make up the system architecture.
If you are not familiar with the product information presented in
Chapter 2, we recommend that you review that chapter first.
Here are the topics covered:
Topic
System Architecture
Page
7-1
System Architecture
The DRS4000 Receiver is a two-channel or four-channel input,
COFDM diversity system that can support DVB-T and LMS-T
COFDM signals. The receiver is designed to support Standard
Definition (SD) and High Definition (HD) decoding.
Within the system architecture for the DRS4000 Receiver, there
are several key components as shown in the block diagram in
Figure 7-1 on page 7-2. The standard version product consists of
the following functional modules:
•
Block downconverters
•
RF switching module
Block Downconverters
7-1
•
Four-input channel tuner module
RF Switching Module
7-3
•
COFDM diversity module
Four-Channel Input Tuner Module
7-3
•
MPEG decoder module
COFDM DiversityModule
7-4
•
Processor module
MPEG Decoder Module
7-4
•
Interface module
Processor Module
7-4
Interface Module
7-5
•
AC to DC power supply
Power Supply
7-5
Packet-Based Switch Module
7-5
The following sections discuss the technical aspects of each of
these modules.
7.1.1
Block Downconverters
The DRS4000 Receiver can operate with either two or four block
downconverters (BDCs). These block downconverters can be
mounted on towers or buildings and can be directly connected to
antennas. The receiver supports either 2 GHz (1.99 to 2.5 GHz)
or 7 GHz (6.4 to 7.1 GHz). Options are available that support
other frequency bands such as 3 GHz and 4 GHz.
DRS4000 Receiver User and Technical Manual
Theory of Operation
7-1
Figure 7-1: DRS4000 Receiver Block Diagram
Packet option (rear panel)
HD MON
SDI
Converter
SD
SDI OUT
ASI OUT
RS-232
HD SDI
GEN LOCK
ASI OUT
ASI IN
70 MHz IN
ASI Input
Bias-T PWA
Decoder
ASI IN 3
Diversity
Demodulator
ASI Input
ASI IN 4
4 Channel
Tuner
4x4 RF
Switching
Matrix
BDC 1
BDC 2
Bias-T PWA
ASI OUT
ASI OUT
ALARM
Control
Screen
Front Panel
BDC 3
BDC 4
from overlay
Rear Panel
ASI IN 1
ASI IN 2
BDC 1 CTRL/MON
BDC 2 CTRL/MON
Processor Module
Interface Module
BDC 3 CTRL/MON
BDC 4 CTRL/MON
RJ-45
USB
Monitor
PCB
Video
Monitor
ODU Option
CV 1
CV 2
WAYSIDE DATA
Power Distribution PWA
AUDIO 4
AUDIO 3
AUDIO 2
AUDIO 1
Fans
AC/DC
Power Supply
SD SDI OUT
MPEG Decoder
AC
Input
Power
Switch
DRS4000 Receiver User and Technical Manual
Theory of Operation
7-2
Each BDC operates by mixing a Local Oscillator (LO) signal
together with the incoming RF signal and producing a UHF
output signal in the range of 110 to 860 MHz. The incoming
signal is filtered and then amplified by a Low Noise Amplifier
(LNA) and is sent along to the mixer. See Figure 7-2 for a
functional block diagram of the block downconverter circuitry.
The LO generates either a lower or a higher frequency (depending upon the BDC’s operating band) using a Phase Lock Loop
(PLL) synthesizer. The 2 GHz BDCs use a low-side local
oscillator (its frequency is on the low side of the RF band) while
the 7 GHz BDCs use a high-side local oscillator. The
synthesizer’s frequency is fixed and programmed via the onboard micro-controller. This LO frequency is then amplified and
filtered to reduce spurious signals before being applied to the
mixer.
In the mixer, the incoming RF signal is mixed with the LO signal
resulting in a signal equal to the difference between the two
signals. This signal is then amplified and low-pass filtered to
remove the signal representing the sum of the two signals.
Regulated DC power (+18.5 VDC) for the BDCs is supplied via
the BDC connectors on the same UHF cable that carries output
from the BDCs.
7.1.2
RF Switching Module
The RF switching module, which is controlled by the processor
module, provides a 4x4 switching matrix and allows selective
switching of antenna input ports to the four-channel input tuner
module. This allows users to customize their antenna input
selections.
Figure 7-2: Block Diagram of Downconverter
Band
Filter
Low-noise
amplifier
Local
oscillator
Amplifier
Mixer
Amplifier
Low pass
filter
RF Input
7.1.3
Low pass
filter
Four-Channel Input Tuner Module
The four-channel input tuner module is based on solid state
technology for commercial applications support using a common
tuner module. Embedded in this module are capabilities for 10
MHz and 20 MHz filtering. The 10 MHz filtering is to support
DVB-T signals and the 20 MHz filtering is used to support LMS-T
signals.
The tuner module translates the UHF frequency of the tuners
(110 to 860 MHz) to IF frequencies of either 70 MHz or 36.2
MHz. The tuner produces 70 MHz core (for LMS-T) or 36.2 MHz
(for DVB-T), which is digitally down-sampled into the Maximal
Ratio Combining (MaxRC) cores within the COFDM diversity
module.
Automatic gain control (AGC) is integrated in to the tuner module
providing approximately 65 dB of dynamic range.
The 4x4 RF switching module uses BCD controls for the
selection lines that are driven from the processor module.
DRS4000 Receiver User and Technical Manual
Theory of Operation
7-3
7.1.4
COFDM DiversityModule
The COFDM Diversity Module contains the Coded Orthogonal
Frequency Division Multiplexing (COFDM) demodulation and
diversity reception circuitry.
The IF signal is processed by the main demodulator integrated
circuits (ICs). The COFDM demodulator automatically detects
the key parameters of the incoming signal via the TPS
information and configures it accordingly.
These parameters include Modulation Type, Forward Error
Correction (FEC), Guard Interval (GI), and Spectrum Inversion
(SI). Only the bandwidth of the signal (6, 7, or 8 MHz) and the
receive channel and frequency need to be specified by the user.
In the DRS4000 Receiver, there are four COFDM demodulation
ICs. Each IC is responsible for demodulating the signal. The
four signals are combined using the Maximal Ratio Combining
(MaxRC) technique to produce one MPEG transport stream
signal with enhanced characteristics that provide an overall
diversity improvement factor. That improvement factor can be
about 4 to 5 dB for a two-input system and about 8 to 9 dB for a
four-input system, depending on channel characteristics.
•
Modulation Error Ratio (MER)
•
Signal to Noise Ratio (SNR)
You can view these measurements in real-time via the receiver’s
control panel.
7.1.5
MPEG Decoder Module
The MPEG decoder module supports SD and HD video. It has
two composite video output ports, one SD output port, and two
HD SDI output ports (one is for monitoring and the other is for
the standard signal).
From the MPEG Module, an SDI monitor output is run through
an SDI composite converter and is used to drive the video
monitor on the front panel.
The decoder module accepts a digital ASI signal from the
COFDM diversity board and recovers the compressed video
(either NTSC or PAL) and/or audio signals. The analog audio
outputs are used for four-channel audio; the digital audio outputs
are supported at the 75 ohm layer with multiple embedded AES/
EBU audio outputs. The module is also capable of linear passthourough mode.
This signal is subsequently output as two ASI streams, one for
driving the SD/HD MPEG decoder module, and one to be used
as the monitor output. See Appendix D for additional information
on MaxRC techniques.
Additional features provided by the MPEG decoder module
include a serial wayside data channel and BISS decryption
capabilities.
Each COFDM demodulator IC, once locked on to an incoming
signal, can provide important signal performance measurements
such as:
7.1.6
•
Received Carrier Level (RCL)
•
Link Quality (LQ)
•
Bit Error Ratio (BER)
DRS4000 Receiver User and Technical Manual
Processor Module
The Processor Module is an embedded computer that manages
OAM&P (Operations, Administration, Maintenance, and
Provisioning) functionality within the DRS4000 Receiver. The
Processor Module receives user input via a keypad on the front
panel of the receiver and through a network interface.
Theory of Operation
7-4
Software running on the Processor Module’s microprocessor
interprets user commands and relays them to the receiver’s
internal subsystems. Replies to user commands and system
status are output via an LCD screen on the front panel of the
receiver and through a network interface. Connections to other
DRS4000 internal subsystems are made by serial
communications channels.
•
Accepts four ASI signals, switches among them, and
generates four copies of the selected signal.
The Interface Module also contains an independent, dualchannel RS-232 transceiver.
7.1.8
Power Supply
The Processor Module contains an integrated USB 2.0compliant Host controller that supports low- and full-speed data
transfers for firmware upgrade purposes only. High-speed
transfer is not supported, nor are USB On-the-Go (OTG) devices
(USB devices that do not need a PC to communicate). A USB
connector on the front panel allows for firmware upgrades via a
flash drive.
The power supply accepts a range of AC input voltages from 105
to 260 VAC at 50 to 60 Hz. The power supply provides the DC
voltages required by the rest of the receiver’s hardware. Typical
output voltages are +24 VDC, +5 VDC, +12 VDC, and -12 VDC.
This module also contains a web server for remote management
via a PC’s web browser. The web server is accessed through the
RJ-45 Ethernet connector.
The Packet-Based Module is an option that can select the best
signal from four ASI inputs (with the same content) and generate
the best possible ASI stream on two outputs. It can be used to
gang multiple receive sites together using a cellular diversity
technique at the ASI level. The ASI output stream bitrate is
adjustable up to 40 Mbps.
7.1.7
Interface Module
The Interface Module provides a communication interface
between the DRS4000 Processor Module and the Block
Downconverters/Outdoor Units (BDCs/ODUs) attached to the
receiver. The Interface Module also provides an interface for
external alarms mechanisms attached to the DRS.
The Interface Module accepts a composite video signal from the
MPEG Decoder and generates two copies of it. The Interface
Module also provides the following functionality:
•
Accepts two audio streams and switches between them to
generate one audio stream output
•
Accepts two composite video signals and switches
between them to generate one video stream output
DRS4000 Receiver User and Technical Manual
The AC receptacle is protected by a pair of 2 amp fuses.
7.1.9
Packet-Based Switch Module
The Packet-Based Module can also decode the ASI stream if it is
in an SD format. The ability to decode an HD signal is not
provided. Individual channels can also be remuxed.
Note
Theory of Operation
When remultiplexing ASI signals it is essential
that each encoded service has a unique
Program Identification (PID). The unit does not
dynamically re-allocate PID values.
7-5
This page intentionally left blank.
DRS4000 Receiver User and Technical Manual
Theory of Operation
7-6
A
A.1
Channels and
Frequencies
A.2
This section lists the channels and frequencies for each RF band
covered by the DRS4000 Receiver. These frequencies are
preset at the factory, but can be modified using the DRS4000
Receiver Configuration Utility software.
Appendix Overview
This appendix describes the channels and frequencies that were
programmed into your DRS4000 Receiver at the factory. It also
provides details about the 2 GHz Relocation Project affecting
Broadcast Auxiliary Service (BAS) users.
Here are the topics covered:
Topic
Initial Factory Settings
Pre-BAS 2 GHz Channel Plan (U.S.)
2 GHz Upper Channel Plan (non-U.S.)
3 GHz Channel Plan
7 GHz Lower Channel Plan (U.S.)
US 2 GHz Relocation Project
DRS4000 Receiver User and Technical Manual
Initial Factory Settings
Page
A-1
A-2
A-2
A-3
A-3
A-4
Note
These frequency settings should be changed by
qualified technical personnel only.
Refer to the Society of Broadcast Engineers (SBE) web site
(http://www.sbe.org) for up-to-date information on local
frequency plans for Electronic News Gathering (ENG) and
Remote Pickup (RPU) operations.
Channels and Frequencies
A-1
A.2.1
A.2.2
Pre-BAS 2 GHz Channel Plan (U.S.)
The pre-BAS 2 GHz channel plan (17 MHz bandwidth), covering
1.9 to 2.5 GHz), is shown in Table A-1.
2 GHz Upper Channel Plan (non-U.S.)
The 2 GHz upper channel plan for non-U.S. products, covering
2.3 to 2.7 GHz), is shown in Table A-2.
Table A-2: 2 GHz Upper Channel Plan
Table A-1: Pre-BAS 2 GHz (17 MHz Bandwidth)
Channel
(-) Offset
(MHz)
(0) Center
(MHz)
(+) Offset
(MHz)
Pre-BAS
Channel
(-) Offset*
(MHz)
(0) Center
(MHz)
(+) Offset*
(MHz)
1
2300.000
2313.333
2326.666
1
1994.750
1999.000
2003.250
2
2339.999
2353.332
2366.665
2
2012.250
2016.500
2020.750
3
2379.998
2393.331
2406.664
3
2029.250
2033.500
2037.750
4
2419.997
2433.330
2446.663
4
2046.250
2050.500
2054.750
5
2459.996
2473.329
2486.662
5
2063.250
2067.500
2071.750
6
2499.995
2513.328
2526.661
6
2080.250
2084.500
2088.750
7
2539.994
2553.327
2566.660
7
2097.250
2101.500
2105.750
8
2579.993
2593.326
2606.659
8
2450.000
2458.500
2467.000
9
2619.992
2633.325
2646.658
9
2467.000
2475.250
2483.500
10
2659.991
2673.324
2686.657
10
2483.500
2491.750
2500.000
11
---
---
---
12
---
---
---
13
---
---
---
14
---
---
---
*For channels 1 to 7, offsets are ± 4.25 MHz. For channels 8 to
10, offsets vary as shown.
DRS4000 Receiver User and Technical Manual
Channels and Frequencies
A-2
A.2.3
3 GHz Channel Plan
A.2.4
The 3 GHz channel plan, covering 3.4 to 3.8 GHz, shown in
Table A-3.
Table A-3: 3 GHz Channel Plan
(-) Offset
(MHz)
(0) Center
(MHz)
(+) Offset
(MHz)
1
3406.250
3418.250
3431.250
2
3443.250
3455.250
3
3480.250
4
Channel
7 GHz Lower Channel Plan (U.S.)
The 7 GHz channel plan, covering 6.4 to 7.1 GHz), is shown in
Table A-4. Note that channels 11 to 14 provide the lower
frequencies in this range.
Table A-4: 7 GHz Lower Channel Plan
Channel
(-) Offset
(MHz)
(0) Center
(MHz)
(+) Offset
(MHz)
3467.250
1
6881.250
6887.500
6893.750
3492.250
3504.250
2
6906.250
6912.500
6918.750
3506.250
3518.750
3531.250
3
6931.250
6937.500
6943.750
5
3543.750
3556.250
3568.750
4
6956.250
6962.500
6968.750
6
3581.250
3593.750
3606.250
5
6981.250
6987.500
6993.750
7
3610.000
3620.000
3630.000
6
7006.250
7012.500
7018.750
8
3640.000
3650.000
3660.000
7
7031.250
7037.500
7043.750
9
3670.000
3680.000
3690.000
8
7056.250
7062.500
7068.750
10
3700.000
3710.000
3720.000
9
7081.250
7087.500
7093.750
11
3730.000
3740.000
3750.000
10
7106.750
7112.500
7118.750
12
3760.000
3770.000
3780.000
11
6431.250
6437.500
6443.750
13
3790.000
3800.000
3800.000
12
6456.250
6462.500
6468.750
14
3800.000
3800.000
3800.000
13
6481.250
6487.500
6493.750
14
6506.250
6512.500
6518.750
DRS4000 Receiver User and Technical Manual
Channels and Frequencies
A-3
A.3
US 2 GHz Relocation Project
The FCC has mandated that users who operate within the 1990
to 2110 MHz spectrum band (pre-BAS channels 1-7 shown in
Table A-1 on page A-2) must upgrade their equipment to operate
in the narrower 2025 to 2110 MHz range (BAS channels
1-7 only). The frequencies for the BAS 2 GHz channel plan are
shown in Table A-5 on page A-4.
As you upgrade your equipment to the new BAS 2 GHz channel
plan, you can easily reprogram your receiver using the DRS4000
Receiver Configuration Utility software.
Note
This relocation affects channels 1-7 only;
channels 8, 9, and 10 remain the same.
For more information, see the FCC Web site, document #FCC
03-280:
http://hraunfoss.fcc.gov/edocs_public/attachmatch/FCC-03-280A1.pdf
DRS4000 Receiver User and Technical Manual
Table A-5: 2 GHz BAS Channel Plan
BAS
Channel
(-) Offset*
(MHz)
(0) Offset
(MHz)
(+) Offset*
(MHz)
1
2028.500
2031.500
2034.500
2
2040.500
2043.500
2046.500
3
2052.500
2055.500
2058.500
4
2064.500
2067.500
2070.500
5
2076.500
2079.500
2082.500
6
2088.500
2091.500
2094.500
7
2100.500
2103.500
2106.500
8
2450.000
2458.500
2467.000
9
2467.000
2475.250
2483.500
10
2483.500
2491.750
2500.000
*For channels 1 to 7, offsets are ± 3.0 MHz. For channels 8 to
10, offsets vary as shown. When using channels 1 to 7, the
pedestal width cannot be more than 6 MHz.
Channels and Frequencies
A-4
B
Glossary
Table B-1: Useful Terms (Continued)
32QAM
The signal (video + audio) is imposed onto the 70
MHz carrier by varying both the phase and the
amplitude of the signal while keeping the frequency
constant. There are 32 possible combinations of
phase and amplitude that can be used to carry
information.
This section describes acronyms and abbreviations used in
communications, broadcasting, and in our products and
documentation.
Table B-1: Useful Terms
1RU
1 Rack Unit (1.75 inches in height)
1080i
1080i is a standard HDTV video mode.
1080 represents 1080 lines of vertical resolution and
the letter i represents “interlaced” or non-progressive
scan. 1080i usually assumes a wide screen aspect
ratio of 16:9, implying a horizontal resolution of 1920
pixels and a frame resolution of 1920 x 1080, or 2.07
million pixels.
16QAM
4 FSK
4-state Frequency Shift Keying
8 PSK
8-Phase Shift Keying
8QAM
8-state Quadrature Amplitude Modulation
The signal (video + audio) is imposed onto the 70
MHz carrier by varying both the phase and the
amplitude of the signal while keeping the frequency
constant. There are 8 possible combinations of
phase and amplitude that can be used to carry
information.
16-state Quadrature Amplitude Modulation
The signal (video + audio) is imposed onto the 70
MHz carrier by varying both the phase and the
amplitude of the signal while keeping the frequency
constant. There are 16 possible combinations of
phase and amplitude that can be used to carry
information.
2 FSK
2-state Frequency Shift Keying
2RU
2 Rack Unit (3.5 inches in height)
3RU
3 Rack Unit (5.25 Inches in height)
QuikVue HS Receiver User and Technical Manual
32-state Quadrature Amplitude Modulation
64QAM
64-state Quadrature Amplitude Modulation
The signal (video+audio) is imposed onto the 70 MHz
carrier by varying both the phase and the amplitude
of the signal while keeping the frequency constant.
There are 64 possible combinations of phase and
amplitude that can be used to carry information.
720p
Glossary
720 represents 720 lines of vertical resolution and
the letter p represents non-interlaced or progressive
scan. When broadcast at 60 frames per second,
720p features the highest temporal (motion)
resolution possible under the ATSC standard.
Progressive scanning reduces the need to prevent
flicker by filtering out fine details, so spatial
(sharpness) resolution is much closer to 1080i than
the number of scan lines would suggest.
B-1
Table B-1: Useful Terms (Continued)
A&C
Alarm and Control
ACU
AC to DC Converter Unit
ADPCM
Adaptive Differential Pulse Code Modulation
AES
Advanced Encryption Standard
AES
Audio Engineering Society
AES/EBU
Unofficial name for a digital audio standard
developed as a joint enterprise of the AES and the
EBU.
AFC
Automatic Frequency Control
AGC
Automatic Gain Control
AIS
Alarm Indication Signal (all one’s)
AMI
Alternate Mark Inversion, line code format for traffic
data.
AVG
Average
ASI
Asynchronous Serial Interface
A serial communications interface operating up to
270 Mbit/sec. Generally used in field news-gathering
operations.
ASYNC
Baseband
A composite signal in which video and audio signals
are combined together, with video occupying
approximately 0-4.5 MHz and audio modulated onto
subcarriers in the 5-6 MHz range.
BB
Baseband
BDC
Block Downconverter
BER
Bit Error Ratio
The Bit Error Rate is the percentage of bits that have
errors relative to the total number of bits in the signal.
The rate is an indication of how often a packet or
other data unit has to be retransmitted because of an
error.
BiasT
A type of interconnection between the IDU and the
ODU. In Bias T wiring, IF and DC are combined and
carried on the coax cable up the ODU; blocking
circuitry prevents the DC from entering the IDU.
BISS
Basic Interoperable Scrambling System
A means of encrypting and decrypting a digital signal
to prevent unauthorized reception. The encryption
and decryption are controlled by a digital key, which
is shared at both the transmitting and receiving
location.
Asynchronous
Digital communication in which there is no timing
requirement for transmission and in which the start of
each character is individually signaled by the
transmitting device.
ATSC
Table B-1: Useful Terms (Continued)
Advanced Television Systems Committee
The group that developed the ATSC digital television
standard for the US and other countries.
QuikVue HS Receiver User and Technical Manual
BISS-1
BISS encryption that uses a fixed key.
BISS-E
BISS encryption that uses an encrypted key.
BNC
Bayonet lock coaxial connector
BPF
Band Pass Filter
bps or b/sec
Bits per second
BPSK
Binary Phase Shift Keying
BW
Bandwidth
Glossary
B-2
Table B-1: Useful Terms (Continued)
CCITT
International Telegraph and Telephone Consultative
Committee
Table B-1: Useful Terms (Continued)
DAB
Digital Audio Broadcasting
dB
Decibel
A telecommunications standardizing committee of
the ITU.
CCPS
Command & Control Power Supply
CENELEC
European Committee for Electrotechnical
Standardization
CNR
Carrier-to-Noise Ratio
COFDM
Coded Orthogonal Frequency Division Multiplexing
Composite
(Baseband)
A band or grouping of frequencies and/or subcarriers,
including video, occupied by the signal in a radio
transmission system. Also called Baseband.
Co-channel
interference
Interference caused by two video transmitters
broadcasting on the same channel of the same
frequency (for example, on channel 2 in the 2 GHz
band).
CR4
Code Runner 4
Crossover
cable
A Category 5 (CAT5) network cable used to connect
two computers. The cable crosses over (reverses)
pins 1 and 3 and pins 2 and 6 of the cable’s RJ-45
connectors. The transmitter (TX) pins are therefore
connected to the corresponding receiver (RX) pins,
plus to plus and minus to minus.
CSI
Channel-State Information
CV
Composite Video
Video signal in which the chrominance (color) and
luminance (brightness) information are combined in
one signal. S-Video separates the chrominance and
luminance into individual signals.
CW
A logarithmic measurement of power or voltage,
applied to audio and RF signals.
dBm
A measure of RF signal strength defined as "decibels relative to one milliwatt (mW)." A 1 mW signal
has a signal strength of 0 dBm. A signal weaker than
1 mW has a negative dBm value, and a signal
stronger than 1 mW has a positive dBm value.
DCC
Distribution Command and Control
DCE
Data Communications Equipment
A device that communicates with a DTE device. In
practical terms, the DCE is usually a modem and the
DTE device is usually a computer.
Deemphasis
Reducing the amplitude of high frequency
components of an analog audio signal. Done on the
receive end of an analog link to take out emphasis
added on the transmit side.
DFT
Discrete Fourier Transform
DHCP
Dynamic Host Configuration Protocol
A protocol for automating the configuration of
computers that use TCP/IP.
DMUX,
DEMUX
Demultiplexer
DQPSK
Differential Quadrature (Quaternary) Phase-Shift
Keying
DRL
Data Return Link
Carrier Wave
QuikVue HS Receiver User and Technical Manual
Glossary
B-3
Table B-1: Useful Terms (Continued)
DS3
Digital Signal 3
Table B-1: Useful Terms (Continued)
EMC
Electromagnetic compatibility.
Emphasis
Boosting the amplitude of high frequency
components of an analog audio signal. Done on the
transmit side of an analog link to improve signal-tonoise ratio.
A device that communicates with a DCE device. In
practical terms, the DTE is usually a computer and
the DCE device is usually a modem.
ENG
Electronic News Gathering
ERRS
Errors
A channel capable of transmitting information
simultaneously in both directions.
ESD
Electrostatic Discharge
ET
Eastern Time (US)
DVB
Digital Video Broadcasting
ETSI
European Telecommunications Standards Institute
DVB-ASI
Digital Video Broadcasting - Asynchronous Serial
Interface
EVM
Error Vector Magnitude
FCC
Federal Communications Commission
44.736 Mbps data rate.
DTE
Duplex
Data Terminal Equipment
A widely-used MPEG-2 digital transport interface.
Physically the connection is made either with optical
fiber or 75 ohm coax with a BNC connector. Interface
can support data rates up to 270 Mb/sec.
FDM
Frequency Division Multiplexing
DVB-C
Digital Video Broadcasting - Cable
FEC
Forward Error Corrections
DVB-S
Digital Video Broadcasting - Satellite
FFT
Fast Fourier Transform
DVB-T
Digital Video Broadcasting - Terrestrial
FIFO
First In, First Out buffer
E1
2.048 Mbps data rate.
FIR
Finite Impulse Response
E3
34.368 Mbps data rate
FMT
FM Video Modulator or FM Transmitter
EIA
Electronic Industries Association
FPGA
Field Programmable Gate Array
FSK
Frequency-Shift Keying
FTP
File Transfer Protocol
FW
Firmware
GHz
Gigahertz (109 Hz)
GI
Guard Interval
GND
Ground
An industry association that establishes various
standards.
EBU
European Broadcasting Union
In addition to other activities, EBU produces technical
statements and recommendations for PAL television
systems.
QuikVue HS Receiver User and Technical Manual
The United States communications regulatory
agency.
Glossary
B-4
Table B-1: Useful Terms (Continued)
GPS
The Global Positioning System is a set of 24
satellites that are in 10,600-mile orbits above the
Earth. Owned and operated by the U.S. Department
of Defense, GPS enables people with ground
receivers to pinpoint their geographic location.
GUI
Graphic User Interface
Hashed
A visual cue on a graphical user interface consisting
of diagonal lines across the surface of a button. This
indicates that a button is not currently functional.
Table B-1: Useful Terms (Continued)
IP Address
An Internet Protocol (IP) address is a 32-bit number
(for example, 123.45.67.89 for IP version 4) or a 128bit number (for IP version 6) that identifies the
network device that is sending or receiving
information that is transmitted across a local area
network (LAN) or the Internet.
IRD
Integrated Receiver Decoder
IRE
1. Institute of Radio Engineers, an international
professional radio engineering association that
establishes various standards.
2. A unit of measurement, established by the IRE, in
which 1 IRE Unit =.00714 volts peak-to-peak (Vp-p)
and 140 IRE units equals 1 Vp-p.
HD
High Definition (video)
HDB3
High Density Bipolar 3 line code format for traffic
data.
HD-SDI
High Definition Serial Data Interface
ISI
Inter-Symbol Interference
A serial communications interface operating at 1.5
Gbit/sec.
ISO
International Standards Organization
Kbps
Kilobits per second
HPF
High Pass Filter
KHz
Kilo (1,000) Hz
HPU
High Power Unit
LAN
Local Area Network
H/W or HW
Hardware
LBO
Line Build Out
Hz
Hertz
Hz is a unit of frequency of one cycle per second. Hz
replaces the earlier term of “cycles per second”
(CPS).
LCD
Liquid Crystal Display
Lcl
Local
LED
Light Emitting Diode
ICI
Inter-Carrier Interference
LIU
Line Interface Unit
ICR
Inter-City Relay
LMS-T
Link® Modulation System - Terrestrial
ID
Identification
IDU
Indoor Unit
LNA
Low Noise Amplifier
IF
Intermediate Frequency
LNB
Low Noise Block Downconverter
IMD
Inter-Modulation Distortion
LNC
Low Noise Converter
I/O
Input/Output
LO
Local Oscillator
QuikVue HS Receiver User and Technical Manual
A proprietary algorithm system for modulation.
Glossary
B-5
Table B-1: Useful Terms (Continued)
Table B-1: Useful Terms (Continued)
LOS
Loss of Signal
NO
Normally Open (Relay or switch contacts)
LPF
Low Pass Filter
NRZ
Non-Return-to-Zero (Modulation)
LQ
Link Quality
NTSC
National Television System Committee
MAC
Address
The Media Access Control (MAC) address is a
unique identification number for a network device on
a local area network (LAN) or other network. This
number (a physical address such as 00-A1-B2-C3D4-5F) is stored in the device's network adapter and
is used to acquire an IP address for the device.
MaxRC
Maximal Ratio Combining
Mbps
Megabits per second
MER
Modulation Error Ratio
Color television standard used in the US. Provides
525 horizontal lines of resolution. Not compatible with
PAL or SECAM.
Null modem
cable
Modulation error ratio is a measure used to quantify
the performance of a digital radio transmitter or
receiver using digital modulation, such as QAM.
An RS-232 cable designed to connect two computers
(or other data sources) together. It has male DB9
connectors on each end, to mate with the DB9
female connectors on the PCs. With a null modem
connection, the transmit and receive connections are
crosslinked so that transmit (pin 3) on one end
connects to the receive (pin 2) on the other.
The term can also be applied to similar Ethernet
cables.
Also called a “Crossover Cable”.
MHz
Million (1,000,000) Hz
MPEG
Moving Picture Experts Group
OB
Outside Broadcast
M-QAM
M-order of Quadrature Amplitude Modulation
ODU
Outdoor Unit
MRC
Microwave Radio Communications
OFDM
Orthogonal Frequency Division Multiplexing
Multipath
An unpredictable set of reflections and/or direct
waves, each with its own degree of attenuation and
delay. Due to obstacles and reflectors in the signal’s
path, transmitted signals arrive at the receive
antenna from various directions over multiple paths
at slightly different times.
OOK
On-Off Keying
PA
Power Amplifier
PAL
Phase Alternation Line
MUX
Multiplexer
NC
Normally Closed (Relay or switch contacts)
N/C
No Connection
NICAM
Near-Instantaneous Companding and Multiplexing
QuikVue HS Receiver User and Technical Manual
Color television standard used in many European
countries. Provides 625 horizontal lines of resolution.
Not compatible with NTSC or SECAM.
Glossary
B-6
Table B-1: Useful Terms (Continued)
PAL-M
Phase Alternation Line
Table B-1: Useful Terms (Continued)
RCL
Received Carrier Level
Color television standard used in many European
countries. Provides 625 horizontal lines of resolution
with 50 lines per field. Not compatible with NTSC or
SECAM.
RCU
Receiver Control Unit
Rcvr
Receiver
Phase Alternation Line
RD
Receive Data
RDS
Radio Data System
Color television standard used in many European
countries. Provides 525 horizontal lines of resolution
with 60 lines per field. Not compatible with NTSC or
SECAM.
RF
Radio Frequency
RF Level
RF Power from the transmitter.
RFU
Radio Frequency Unit
PC
Personal Computer
RMA
Return Material Authorization
PCR
Program Clock Reference
RPU
Remote Pickup
PCS
Personal Communication Services, for example, for
cell phones and beepers.
R-S
Reed-Solomon
RSSI
Receiver Signal Strength Indicator
PER
Parity Error Rate
RX
Receiver
ØLK
Phase Lock
RXU
Receiver Unit
PID
Program Identification
RZ
Return to Zero
PLL
Phase Lock Loop
SBE
Society of Broadcast Engineers
POTS
Plain Old Telephone System.
Refers to standard analog phone service sometimes
used as a back up method for communications.
SC
Service Channel
SC
Single Carrier
SCM
Single Carrier Modem or Single Carrier Modulation
SD
Standard Definition
SD EMB
Synchronous Digital Interface Embedded
SDI
Serial Digital Interface
PAL-N
PRBS
Pseudo Random Bit Sequence
QAM
Quadrature Amplitude Modulation
QPSK
Quadrature Phase Shift Keying
The signal (video+audio) is imposed onto the 70 MHz
carrier by varying the phase of the signal while
keeping the amplitude and frequency constant. There
are 4 possible values of phase that can be used to
carry information.
QuikVue HS Receiver User and Technical Manual
The strength of a received RF signal in dBm.
A serial communications interface operating at 270
Mbit/sec. SDI can operate at 1.5 Gbit/sec for HD.
Glossary
B-7
Table B-1: Useful Terms (Continued)
SECAM
Table B-1: Useful Terms (Continued)
Sequence de Couleur Avec Memoire
S-Video
Color television standard used in France, Russia,
and other countries. Provides 625 horizontal lines of
resolution. Not compatible with NTSC or PAL. Not
supported by this product.
Video signal in which the chrominance (color) and
luminance (brightness) information are separated
into individual subcarrier signals. Also called Y/C
Video. Composite Video combines them into one
signal.
S/W or SW
Software
SER
Symbol Error Rate
SYNTH
Synthesizer
Setpt
Set point
T1
1.544 Mbps data rate
SFN
Single-Frequency Network
TC
Transmitter Control
SG
Signal Ground
TCP/IP
Transmission Control Protocol/Internet Protocol
SI
Service Information
Simplex
A channel capable of transmitting information in only
one direction.
Site ID
A physical location where any number of modems,
transmitters, or receivers are installed.
TCU
Transmitter Control Unit
SMPTE
Society of Motion Picture and Television Engineers
TD
Transmit Data
SNR
Signal-to-Noise Ratio
TFT
Thin film transistor, a type of LCD flat-panel display.
Spectral
regrowth
A phenomenon that occurs if a signal of limited
bandwidth is passed through an odd-order nonlinear
circuit. In this case, the output spectrum is wider than
the input spectrum and may interfere with signals on
adjacent frequencies.
TSL
Transmitter-to-Studio Link
TX
Transmitter
TXU
Transmitter Unit
USB
Universal Serial Bus
A serial connection that allows transfer rates of 480
Mbps for USB 2.0 and a 12 Mbps transfer rate for the
older USB 1.x version.
A set of protocols, developed in the 1970s for the
Internet, used to get data from one network device to
another.
SR16
Symbol Rate 16
STDBY
Standby
STL
Studio-to-Transmitter Link
VAC
Volts Alternating Current
Subcarrier
An electromagnetic signal that is used as a medium
for placing an information channel above another
information channel.
VCO
Voltage Controlled Oscillator
VCXO
Voltage Controlled Crystal Oscillator
VDC
Volts Direct Current
VF
Voice Frequency
QuikVue HS Receiver User and Technical Manual
Glossary
B-8
Table B-1: Useful Terms (Continued)
VFD
Vacuum Fluorescent Display. A low cost, voltagecontrolled device for displaying text and graphics with
high brightness and wide viewing angles.
VI
Video Input
Video
A term pertaining to the bandwidth and spectrum of
the signal that results from television scanning and
which is used to reproduce a picture.
VPN
A Virtual Private Network uses a public
telecommunication infrastructure, like the Internet, to
allow remote users to "tunnel into" an organization's
private network via security measures.
Vpp
Volts peak-to-peak
WAN
Wide Area Network
WEEE
Waste Electrical and Electronic Equipment
QuikVue HS Receiver User and Technical Manual
Glossary
B-9
This page intentionally left blank.
QuikVue HS Receiver User and Technical Manual
Glossary
B-10
C
Specifications
C/N Threshold . . . . . . . . . . . C/N – within 1 db of ETSI standard
for Gaussian & Rayleigh channel
COFDM Auto Sense Parameters . . . . . . .FEC, G/I, modulation,
This section provides the RF, electronic, physical, safety, and
power specifications for the DRS4000 Receiver.
spectrum polarity
RF/IF Stability . . . . . . . . . . . . . . . . . . . . . . . . . . . . . . . +/– 2 ppm
Note
MRC reserves the right to make changes to
specifications of products described in this
section at any time without notice and without
obligation to notify any person of such changes.
RF INPUT
RF/IF Bandwidth . . . . . 8MHz SAW, 10MHz SAW, 20MHz SAW
COFDM DIVERSITY
COFDM Diversity Technique . . . . . . . Maximal Ratio Combining
. . . . . . . . . . . . . . . . . . . . . . . . . . . . . . . . and Packet Switching
COFDM Diversity C/N improvement(@16QAM gaussian):. . . . .
RF Inputs . . . . . . . . . . . . . . . . . . . . . . . . . . . . . . . . . . . . . . . 2, 4
2 RF Inputs: –5 db typical / 4 RF Inputs: –8 db typical
RF Band Support . . . . . . . . . . . . . . . . . . . . . . . . .1.9 to 2.5 GHz
Doppler Frequency Increase . . . . . . . . . . . . . . . 2X improvement
2.3 to 2.7 GHz
DVB – ASI Output . . . . . . . . . . . . . . . . . . . . . . . . . . Monitor port
6.4 to 7.1 GHz
ASI Output Packet Length. . . . . . . . . . . . . . . . . . . . . . . 188 byte
1.9 to 2.5 GHz/6.4 to 7.1 GHz (dual band support)
ASI Output Driver . . . Able to drive 200 ft. of Belden 8281 cable
4.4 to 5.0 GHz (HS version only)
ASI Output Level . . . . . . . . . . . . . . . . . . . . . 800 mv pp +/– 10 %
RF Input Range . . . . . . . . . . . . . . . . . . . . –20dbm to –100dbm
Noise Figure . . . . . . . . . . . . . . . . . . . . . . . . . . . . . . . . . 4db max.
COFDM Bandwidth Support . . . . . . . . . . . . . . . . . . . . . . . . . . . .
6, 7, and 8 COFDM/DVB-T pedestals
10 and 20 MHz COFDM/LMS-T pedestals
IF Linearity . . . . . . . . . . . . . . . . . . . . . . . . . . . . . . . . . . . .>45 db
COFDM Compatibility . . . . . . . . . . . . ETSI EN 300 – 744 DVB-T
Modulation support . . . . . . . . . . . . . . . . . . . . DVB-T and LMS-T
DRS4000 Receiver User and Technical Manual
MPEG DECODER
MPEG Decoding . . . . . . . . . . . . Decoding of one video channel
Video Decoding . . . . . . . . . . . . . . . . . . . . . Autodetect decoding
Chroma support. . . . . . . . . . . . . . . . . . . . . . . . . . . . . 4:2:0/4:2:2
Line Standard . . . . . . . . . . . . . . . . . . . . . . . . . . . . 525/625 lines
GOP Structure . . . . . . . . . . . . . . . . . . . . . Variable GOP support
Horizontal resolution (SD) . . . . . . . . Autodetect – 720, 704, 544
Specifications
C-1
Horizontal resolution (HD) . . . . . . . .1280x720p 50/59.94/60 Hz
Audio Mode Support . . . . . . . . . . .Dual mono (4), 2 stereo pairs
1920x1080i 25/29.97/30 Hz
Audio Output Impedance. . . . . . . . . . . . . .600 ohms – balanced
1920x1080p 24/25/30/23.976/29.97 Hz
Audio Clip Level . . . . . . . . . . . . . . . . . . . . . . . . . . . . . . +17 dbm
1920x1080pSf 24/25/30/23.976/29.97 Hz
BISS (Basic Interoperable Scrambling System) . . . . . . . . . . . . .
Vertical Resolution (SD) . . . . . . . 576 (625 lines)/480 (525 lines)
BISS-1 BISS-E, AES-128 Bit
Bit rate support (SD) . . . . . . . . . . . . . . . . . Same as DVB-T table
Latency (Ultra Low Delay Software Licensable for 4 inputs) – SD
4:2:0: 3 to 15 Mbits
Standard Mode approx. 380 msec
4:2:2: 3 to 31 Mbits
Low Delay Mode approx. 100 msec
Bit Rate Support (HD). . . . MPEG-2 4:2:0MP@HL 8 to 80 Mbits
(MPEG mode and encoder dependent)
MPEG-2 4:2:2MP@HL 8 to 80 Mbits
Latency (Low Delay Mode – Link technology – HD. . . . . . . . . . .
Aspect Ratio . . . . . . . . . . . . . . . . . . . . . . . . . . . . . . . . . .4:3/16:9
Low delay mode – less than 65 msec
Composite Video Output. . . . . . . . . NTSC (w/wo pedestal)/PAL
max. for all resolution formats
Video Specification . . . . . . . . . . . . . . . . . Rec. ITU-R BT.470-4+
PHYSICAL
WAYSIDE CHANNEL
Mechanical Package . . . . . . . . . . . . . 2 RU 19-inch Rack Mount
Embedded Data Channel on MPEG Module . . . . . . . . . . . . . . .
Operating Temperature . . . . . . . . . . . . . . –10 to +50 degrees C
Using connectors on the RS-232 Port for DCE Path
Storage Temperature. . . . . . . . . . . . . . . . –40 to +70 degrees C
Data Rate: 1200/2400/4800/9600/19200/38400 autodetect
Vibration . . . . . . . . . . . . . . Meets RTCA/DO-160D section 8.5.2
Random Test Procedure figure 8.1
SDI OUTPUT
Category B, 0.7g rms.
Serial Digital Output (SDI) . . . . . . ANSI/SMPTE 259M Level C;
270 Mb/s, 525/625 Component;
2 Stereo Audio embedded output
SAFETY COMPLIANCE
Meets CE EN60950-Safety CE Compliance Standard:
SDI Output (HD) . . . . . . . . . . . . . . . . . . . . . . . . . . SMPTE292M
ETSI EN 301-751 – Harmonized European Standard
Audio Output. . . . . . . . . . . . . Analog & digital AES/EBU support
ETSI EN 301-390 – Spurious Emissions
DRS4000 Receiver User and Technical Manual
Specifications
C-2
ETSI EN 302-064-1 – RX Immunity Electromagnetic
Compatibility, part 1 & 2
CONNECTIONS
FCC Compliance . . . . . . . . . . . . . . . . . . . . . . . Part 15, Class A
Packet:
ASI Output (2) . . . . . . . . . . . . . . . . . . . . . .75 Ohm BNC Female
POWER REQUIREMENTS
SDI Output. . . . . . . . . . . . . . . . . . . . . . . . .75 Ohm BNC Female
AC Power Input: . . . Auto sense 100 to 130 VAC (110 nominal)/
205 to 240 VAC (220 VAC nominal)
ASI Input (4) . . . . . . . . . . . . . . . . . . . . . . .75 Ohm BNC Female
RS-232 . . . . . . . . . . . . . . . . . . . . . . . . . . . . . . . . . DB-9 Female
50 to 60 Hz
Power Consumption (Less BDC power): . . . . . . . . . . . 28 Watts
Power Input (AC) . . . . . . . . . . Standard U.S. 3-prong connector
Fuses . . . . . . . . . . . . . . . . . . . . . 2 glass fuses rated at 2A each
MaxRC Diversity:
BDC Input (4) . . . . . . . . . . . . . . . . . . . . . . . . . . . . 50 Ohm TNC
Composite Video Output (2) . . . . . . . . . . .75 Ohm BNC Female
SDI Output (SD) . . . . . . . . . . . . . . . . . . . .75 Ohm BNC Female
FRONT PANEL CONTROLS
SDI Output (HD) . . . . . . . . . . . . . . . . . . . .75 Ohm BNC Female
Keypad:. . . . . . . . . . . . . . Up, Left, Right, Down, Back, OK keys
HD Monitor Output . . . . . . . . . . . . . . . . . .75 Ohm BNC Female
FRONT PANEL DISPLAYS
Frame Lock . . . . . . . . . . . . . . . . . . . . . . . .75 Ohm BNC Female
RF Controls (Dependent on configuration):
ASI Input . . . . . . . . . . . . . . . . . . . . . . . . . .75 Ohm BNC Female
Audio Output (4) . . . . . . . . . . . . . . . . . . . . . . . . . . . . . mini-XLR
Preset number, channel frequency, channel offset
Optical Fiber Ports (4) . . . . . . . . . . . . . . . . . . . . . . . . . . Optional
Digital (COFDM):
RS-232 . . . . . . . . . . . . . . . . . . . . . . . . . . . . . . . . . DB-9 Female
Diversity (COFDM): COFDM bandwidth, S/N, previterbi/
post viterbi BER, LQ, FEC, guard interval, bit rate, modulation
Summary Alarm. . . . . . . . . . . . . . . . . . . . . . . . . . . DB-9 Female
Network/System Control . . . . . . . . . . . . . . . . . . . . . . RJ45/USB
Digital (MPEG):
ASI bit rate, wayside baud rate, chroma delay mode,
BISSkey/ID, video type, audio type, audio mode, video condition,
w/o pedestal, locked, audio condition – bit rate, locked
DRS4000 Receiver User and Technical Manual
Specifications
C-3
This page intentionally left blank.
DRS4000 Receiver User and Technical Manual
Specifications
C-4
D
D.1
Maximal Ratio
Combining
D.3
Any receiver utilizing the MaxRC diversity technique will have a
dedicated tuner on the input from each antenna, which then gets
fed into individual demodulators designed to support MaxRC
diversity.
Appendix Overview
This section provides a general overview of the Maximal Ratio
Combining (MaxRC) diversity implemented within the DRS4000
Receiver.
D.2
Antenna Correlation
For spatial diversity, one key assumption is that the receive
antennas are spaced far enough apart that the received signals
at each antenna are experiencing independent fading
characteristics to help the MaxRC diversity technique achieve
optimal performance. A MaxRC Diversity block diagram is
shown in Figure D-1 on page D-2.
The concept of correlation is easier to comprehend by looking at
the two figures below. Figure D-2 on page D-3 shows two signals
with low correlation and Figure D-3 on page D-4 shows two
signals with high correlation. Each figure has two channels
plotted after a fading channel.
When the two received channels have a low correlation factor,
this equates to the signals received experiencing dissimilar
fading characteristics that ultimately provide the best
performance for a diversity system. This is what you should be
aiming to achieve during the installation of the receive antennas.
DRS4000 Receiver User and Technical Manual
MaxRC Diversity Technique
Each individual demodulator performs both the FFT and the
channel estimation process on the incoming signals. Then by
using the pilot carriers embedded within the COFDM signal
along with other information, each demodulator is able to assess
each of the individual 2k carriers within the received signal and
assign a mathematical value associated with the level of
confidence relating to the degradation of that carrier and how
erroneous the data within is perceived to be.
Then by using a diversity bus between each of the
demodulators, a diversity algorithm looks at each carriers
confidence value and decides the ratio of which each input is
combined on a per-carrier basis.
This makes it possible to physically re-construct each of the
individual carriers enabling the receiver to provide the best
possible signal before applying the error correction.
The benefits of using the MaxRC diversity technique is its ability
to make use of the signal being received by any antenna in part
or full combination to reconstruct a damaged signal.
Maximal Ratio Combining
D-1
Figure D-1: MaxRC Diversity Block Diagram
Block
Downconverter
Diversity Receiver
Demodulator
Demodulator
Carrier
summation
according to
individual
weighting factors
Viterbi/RS
error
correction
MPEG
decoding
Block
Downconverter
DRS4000 Receiver User and Technical Manual
Maximal Ratio Combining
D-2
Figure D-2: Two Signals with Low Correlation
DRS4000 Receiver User and Technical Manual
Maximal Ratio Combining
D-3
Figure D-3: Two Signals with High Correlation
DRS4000 Receiver User and Technical Manual
Maximal Ratio Combining
D-4
Index
Numerics
4x4 switching module . . . . . . . . . . . . . . . . . . . . . . . . . 7-3
A
About This Manual . . . . . . . . . . . . . . . . . . . . . . Notices-i
Achitecture
system . . . . . . . . . . . . . . . . . . . . . . . . . . . . . . . . 7-1
Antenna options . . . . . . . . . . . . . . . . . . . . . . . . . . . . . 2-4
Applications . . . . . . . . . . . . . . . . . . . . . . . . . . . . . . . . . 2-5
Arrow keys . . . . . . . . . . . . . . . . . . . . . . . . . . . . . . . . . . 3-7
Audience, Intended . . . . . . . . . . . . . . . . . . . . . . . . . . . 1-2
Audio output . . . . . . . . . . . . . . . . . . . . . . . . . . . . . . . 3-19
Audio Output Level . . . . . . . . . . . . . . . . . . . . . . . . . . 3-18
Audio settings . . . . . . . . . . . . . . . . . . . . . . . . . . . . . . 3-16
B
Band plan
customizing . . . . . . . . . . . . . . . . . . . . . . . . . . . 3-27
BDC band control . . . . . . . . . . . . . . . . . . . . . . . . . . . 3-24
BDC power . . . . . . . . . . . . . . . . . . . . . . . . . . . . . . . . 3-25
BDC type . . . . . . . . . . . . . . . . . . . . . . . . . . . . . . . . . . 3-24
Bit error rate . . . . . . . . . . . . . . . . . . . . . . . . . . . . . . . 3-10
Block downconverters . . . . . . . . . . . . . . . . . . . . . 7-1, 7-3
C
Calibrating RCL . . . . . . . . . . . . . . . . . . . . . . . . . . . . . 3-25
Camera Control menu . . . . . . . . . . . . . . . . . . . . . . . .3-31
CAUTIONS . . . . . . . . . . . . . . . . . . . . . . . . . . . . Notices-ii
Channels and frequencies
2 GHz Relocation Project . . . . . . . . . . . . . . . . A-1
2 GHz upper channel plan (non-U.S.) . . . . . . . A-2
DRS4000 Receiver User and Technical Manual
3 GHz channel plan . . . . . . . . . . . . . . . . . . . . . A-3
7 GHz lower channel plan (U.S.) . . . . . . . . . . . A-3
BAS 2 GHz channel plan . . . . . . . . . . . . . . . . . A-4
factory settings . . . . . . . . . . . . . . . . . . . . . . . . A-1
pre-BAS 2 GHz (U.S.) . . . . . . . . . . . . . . . . . . . A-2
COFDM demodulation . . . . . . . . . . . . . . . . . . . . . . . . 2-2
COFDM diversity module . . . . . . . . . . . . . . . . . . . . . . 7-4
COFDM Lock . . . . . . . . . . . . . . . . . . . . . . . . . . . . . . 3-10
Color bar generator . . . . . . . . . . . . . . . . . . . . . . . . . 3-18
Compatibility, with transmitters . . . . . . . . . . . . . . . . . 2-5
Configuring
audio/video . . . . . . . . . . . . . . . . . . . . . . . . . . 3-16
IP address . . . . . . . . . . . . . . . . . . . . . . . . . . . 3-13
Connectors . . . . . . . . . . . . . . . . . . . . . . . . . . . . . . . . . 3-3
diversity . . . . . . . . . . . . . . . . . . . . . . . . . . . . . . 3-3
packet . . . . . . . . . . . . . . . . . . . . . . . . . . . 3-4, 5-14
SCM . . . . . . . . . . . . . . . . . . . . . . . . . . . . . . . . . 3-4
Control panel
settings . . . . . . . . . . . . . . . . . . . . . . . . . . . . . . 3-8
Control screen
data status region . . . . . . . . . . . . . . . . . . . . . . 3-6
help text . . . . . . . . . . . . . . . . . . . . . . . . . . . . . . 3-6
initial . . . . . . . . . . . . . . . . . . . . . . . . . . . . . . . . 3-5
live . . . . . . . . . . . . . . . . . . . . . . . . . . . . . . . . . . 3-6
menu buttons region . . . . . . . . . . . . . . . . . . . . 3-7
regions . . . . . . . . . . . . . . . . . . . . . . . . . . . . 3-5, 3-6
RF settings region . . . . . . . . . . . . . . . . . . . . . . 3-6
signal displays region . . . . . . . . . . . . . . . 3-6, 3-10
Control screen keypad . . . . . . . . . . . . . . . . . . . . . . . . 3-7
Conventions . . . . . . . . . . . . . . . . . . . . . . . . . . . .Notices-ii
Copyright . . . . . . . . . . . . . . . . . . . . . . . . . . . . . . Notices-i
Customizing
band plan . . . . . . . . . . . . . . . . . . . . . . . . . . . . 3-27
Index-1
D
Damage
reporting . . . . . . . . . . . . . . . . . . . . . . . . . . . . . . 5-2
Danger . . . . . . . . . . . . . . . . . . . . . . . . . . . . . . . . Notices-ii
Decoder . . . . . . . . . . . . . . . . . . . . . . . . . . . . . . . . 2-5, 2-6
MPEG . . . . . . . . . . . . . . . . . . . . . . . . . . . . . . . . 7-4
Decryption options . . . . . . . . . . . . . . . . . . . . . . . . . . . . 2-7
Default gateway . . . . . . . . . . . . . . . . . . . . . . . . . . . . . 3-14
Demodulator switch . . . . . . . . . . . . . . . . . . . . . . . . . . 3-19
Diversity connectors . . . . . . . . . . . . . . . . . . . . . . . . . . 3-3
Documents
Ordering . . . . . . . . . . . . . . . . . . . . . . . . . . . . . . 1-2
related . . . . . . . . . . . . . . . . . . . . . . . . . . . . . . . . 1-2
Downconverter . . . . . . . . . . . . . . . . . . . . . . . . . . 2-2, 2-4
Downconverter options . . . . . . . . . . . . . . . . . . . . 2-4, 2-5
Downconverters . . . . . . . . . . . . . . . . . . . . . . . . . 7-1, 7-3
E
EEPROM . . . . . . . . . . . . . . . . . . . . . . . . . . . . . . . . . . 3-26
Electric Shock . . . . . . . . . . . . . . . . . . . . . . . . . . Notices-ii
Electrostatic Discharge . . . . . . . . . . . . . . . . . . . Notices-ii
Encryption support . . . . . . . . . . . . . . . . . . . . . . . . . . 3-20
Equipment rack . . . . . . . . . . . . . . . . . . . . . . . . . . . . . . 5-2
F
Factory menu . . . . . . . . . . . . . . . . . . . . . . . . . . . . . . 3-24
Features . . . . . . . . . . . . . . . . . . . . . . . . . . . . . . . . . . . 2-2
Feedback . . . . . . . . . . . . . . . . . . . . . . . . . . . . . . . . . . . 1-4
Firmware
upgrading . . . . . . . . . . . . . . . . . . . . . . . . . . . .3-26
Firmware components . . . . . . . . . . . . . . . . . . . . . . . . . 2-4
Four-channel input tuner module . . . . . . . . . . . . . . . . 7-3
Frame Sync . . . . . . . . . . . . . . . . . . . . . . . . . . . . . . . . 3-17
Frame Synch Offset . . . . . . . . . . . . . . . . . . . . . . . . . 3-18
DRS4000 Receiver User and Technical Manual
Frequency bands . . . . . . . . . . . . . . . . . . . . . . . . . . . . 2-4
Front panel . . . . . . . . . . . . . . . . . . . . . . . . . . . . . . . . . 3-3
Fuse . . . . . . . . . . . . . . . . . . . . . . . . . . . . . . . . . .Notices-ii
Fuses . . . . . . . . . . . . . . . . . . . . . . . . . . . . . . . . . . . . . 2-7
G
Glossary . . . . . . . . . . . . . . . . . . . . . . . . . . . . . . . . . . . B-1
Ground
Earth . . . . . . . . . . . . . . . . . . . . . . . . . . . .Notices-ii
Frame or Chassis . . . . . . . . . . . . . . . . . .Notices-ii
Protective Earth . . . . . . . . . . . . . . . . . . . .Notices-ii
Grounding . . . . . . . . . . . . . . . . . . . . . . . . . . . . . . . . . 5-4
H
Hardware components . . . . . . . . . . . . . . . . . . . . . . . . 2-4
Hardware configuration . . . . . . . . . . . . . . . . . . . . . . 3-12
HD . . . . . . . . . . . . . . . . . . . . . . . . . . . . . . . . . . . . . . . 2-2
Help text . . . . . . . . . . . . . . . . . . . . . . . . . . . . . . . . . . . 3-6
High definition . . . . . . . . . . . . . . . . . . . . . . . . . . . . . . 2-2
High Definition (HD) . . . . . . . . . . . . . . . . . . . . . . . 2-5, 2-6
I
Initializing EEPROM . . . . . . . . . . . . . . . . . . . . . . . . . 3-26
Input tuner . . . . . . . . . . . . . . . . . . . . . . . . . . . . . . . . . 7-3
Inspecting components . . . . . . . . . . . . . . . . . . . . . . . 5-2
IP address . . . . . . . . . . . . . . . . . . . . . . . . . . . . . . . . 3-13
default gateway . . . . . . . . . . . . . . . . . . . . . . . 3-14
netmask . . . . . . . . . . . . . . . . . . . . . . . . . . . . . 3-15
IP setttings . . . . . . . . . . . . . . . . . . . . . . . . . . . . . . . . 3-16
ISO Certification . . . . . . . . . . . . . . . . . . . . . . . . . Notices-i
K
Keypad . . . . . . . . . . . . . . . . . . . . . . . . . . . . . . . . . . . . 3-7
front panel . . . . . . . . . . . . . . . . . . . . . . . . . . . . 3-7
Index-2
L
LAN . . . . . . . . . . . . . . . . . . . . . . . . . . . . . . . . . . . . . . . 2-4
License code . . . . . . . . . . . . . . . . . . . . . . . . . . . . . . .3-31
Local Area Network . . . . . . . . . . . . . . . . . . . . . . . . . . . 2-4
Local oscillator . . . . . . . . . . . . . . . . . . . . . . . . . . . . . . . 7-3
M
Manual
how organized . . . . . . . . . . . . . . . . . . . . . . . . . . 1-2
how to use . . . . . . . . . . . . . . . . . . . . . . . . . . . . . 1-1
topics covered . . . . . . . . . . . . . . . . . . . . . . . . . . 1-1
MaxRC . . . . . . . . . . . . . . . . . . . . . . . . . . . . . . . . . . . . 2-2
Memory
resetting . . . . . . . . . . . . . . . . . . . . . . . . . . . . . 3-26
Menu
Options . . . . . . . . . . . . . . . . . . . . . . . . . . . . . . 3-31
Presets . . . . . . . . . . . . . . . . . . . . . . . . . . . . . . 3-29
Setup . . . . . . . . . . . . . . . . . . . . . . . . . . . . . . . . 3-11
Menu buttons . . . . . . . . . . . . . . . . . . . . . . . . . . . . . . . . 3-7
Moisture . . . . . . . . . . . . . . . . . . . . . . . . . . . . . . . . . . . . 5-3
Monitor
video . . . . . . . . . . . . . . . . . . . . . . . . . . . . . . . . . 3-8
Mounting options . . . . . . . . . . . . . . . . . . . . . . . . . . . . . 2-6
MPEG . . . . . . . . . . . . . . . . . . . . . . . . . . . . . . . . . 2-5, 2-6
MPEG decoder module . . . . . . . . . . . . . . . . . . . . . . . . 7-4
MPEG decoding . . . . . . . . . . . . . . . . . . . . . . . . . . . . . 2-2
MRC
Customer Service . . . . . . . . . . . . . . . . . . . . . . . 1-2
fax . . . . . . . . . . . . . . . . . . . . . . . . . . . . . . . . 1-2
telephone . . . . . . . . . . . . . . . . . . . . . . . . . . . 1-2
Customer Technical Support
telephone . . . . . . . . . . . . . . . . . . . . . . . . . . . 1-3
MRC Customer Service
business hours . . . . . . . . . . . . . . . . . . . . . . . . . 1-2
DRS4000 Receiver User and Technical Manual
MRC Technical Support . . . . . . . . . . . . . . . . . . . . . . . 1-3
business hours . . . . . . . . . . . . . . . . . . . . . . . . 1-3
N
Netmask . . . . . . . . . . . . . . . . . . . . . . . . . . . . . . . . . . 3-15
Network address . . . . . . . . . . . . . . . . . . . . . . . . . . . 3-13
Notes . . . . . . . . . . . . . . . . . . . . . . . . . . . . . . . . .Notices-ii
O
Operating remotely . . . . . . . . . . . . . . . . . . . . . . . . . . 3-32
Options
decryption . . . . . . . . . . . . . . . . . . . . . . . . . . . . 2-7
downconverter . . . . . . . . . . . . . . . . . . . . . . . . . 2-5
mounting . . . . . . . . . . . . . . . . . . . . . . . . . . . . . 2-6
power . . . . . . . . . . . . . . . . . . . . . . . . . . . . . . . . 2-7
RF filter . . . . . . . . . . . . . . . . . . . . . . . . . . . . . . 2-6
Options Menu . . . . . . . . . . . . . . . . . . . . . . . . . . . . . . 3-31
Ordering documents . . . . . . . . . . . . . . . . . . . . . . . . . . 1-2
P
Packet connectors . . . . . . . . . . . . . . . . . . . . . . . 3-4, 5-14
Packet-Based Switch Module . . . . . . . . . . . . . . . . . . 7-5
Pedestals, supported . . . . . . . . . . . . . . . . . . . . . . . . . 2-2
PIDs . . . . . . . . . . . . . . . . . . . . . . . . . . . . . . . . . . . . . 3-17
Power options . . . . . . . . . . . . . . . . . . . . . . . . . . . . . . 2-7
Power Supply . . . . . . . . . . . . . . . . . . . . . . . . . . . . . . . 5-3
Power supply . . . . . . . . . . . . . . . . . . . . . . . . . . . . . . . 7-5
Powering down . . . . . . . . . . . . . . . . . . . . . . . . . . . . . . 3-5
Powering up . . . . . . . . . . . . . . . . . . . . . . . . . . . . . . . . 3-5
Preparing the site . . . . . . . . . . . . . . . . . . . . . . . . . . . . 5-2
Preset
creating . . . . . . . . . . . . . . . . . . . . . . . . . . . . . 3-29
deleting . . . . . . . . . . . . . . . . . . . . . . . . . . . . . 3-30
loading . . . . . . . . . . . . . . . . . . . . . . . . . . . . . . 3-30
Presets Menu . . . . . . . . . . . . . . . . . . . . . . . . . . . . . . 3-29
Index-3
Processor module . . . . . . . . . . . . . . . . . . . . . . . . . . . . 7-4
Proprietary notice . . . . . . . . . . . . . . . . . . . . . . . Notices-i
R
RCL
calibrating . . . . . . . . . . . . . . . . . . . . . . . . . . . .3-25
Rear panel . . . . . . . . . . . . . . . . . . . . . . . . . . . . . . . . . . 3-3
Receiver . . . . . . . . . . . . . . . . . . . . . . . . . . . . . . . . . . . 2-4
Regions of control screen . . . . . . . . . . . . . . . . . . . . . . 3-5
Remote operation . . . . . . . . . . . . . . . . . . . . . . . . . . . 3-32
Repairs
supported . . . . . . . . . . . . . . . . . . . . . . . . . . . . . 1-3
Replacement Parts . . . . . . . . . . . . . . . . . . . . . . . . . . . 6-1
External Cables . . . . . . . . . . . . . . . . . . . . . . . . . 6-1
Reporting damage . . . . . . . . . . . . . . . . . . . . . . . . . . . . 5-2
Return Material Authorization . . . . . . . . . . . . . Notices-iii
RF Bands . . . . . . . . . . . . . . . . . . . . . . . . . . . . . . . . . . 2-4
RF Filter options . . . . . . . . . . . . . . . . . . . . . . . . . . . . . 2-6
RF settings . . . . . . . . . . . . . . . . . . . . . . . . . . . . . . . . . 3-6
RF switch matrix . . . . . . . . . . . . . . . . . . . . . . . . . . . .3-12
RF switching module . . . . . . . . . . . . . . . . . . . . . . . . . . 7-3
RMA . . . . . . . . . . . . . . . . . . . . . . . . . . . . . . . . Notices-iii
RS-232 output . . . . . . . . . . . . . . . . . . . . . . . . . . . . . . 3-18
S
SCM connectors . . . . . . . . . . . . . . . . . . . . . . . . . . . . . 3-4
SD . . . . . . . . . . . . . . . . . . . . . . . . . . . . . . . . . . . . . . . . 2-2
SD Video Output Level . . . . . . . . . . . . . . . . . . . . . . . 3-18
Service
calling for . . . . . . . . . . . . . . . . . . . . . . . . . . . . . . 1-3
Service name . . . . . . . . . . . . . . . . . . . . . . . . . . . . . . 3-19
Setting encryption support . . . . . . . . . . . . . . . . . . . . . 3-20
Setup Menu . . . . . . . . . . . . . . . . . . . . . . . . . . . . . . . . 3-11
SI service information . . . . . . . . . . . . . . . . . . . . . . . . 3-17
Signal Displays . . . . . . . . . . . . . . . . . . . . . . . . . 3-6, 3-10
DRS4000 Receiver User and Technical Manual
Site
preparing . . . . . . . . . . . . . . . . . . . . . . . . . . . . . 5-2
Site management controls . . . . . . . . . . . . . . . . . . . . 3-20
Society of Broadcast Engineers . . . . . . . . . . . . . . . . . A-1
Specifications
customer . . . . . . . . . . . . . . . . . . . . . . . . . . . . . 5-1
Spectrum overlay . . . . . . . . . . . . . . . . . . . . . . . . . . . 3-18
Standard definition . . . . . . . . . . . . . . . . . . . . . . . . . . . 2-2
Standard Definition (SD) . . . . . . . . . . . . . . . . . . . 2-5, 2-6
Symbols Used . . . . . . . . . . . . . . . . . . . . . . . . . .Notices-ii
System architecture . . . . . . . . . . . . . . . . . . . . . . . . . . 7-1
T
Troubleshooting . . . . . . . . . . . . . . . . . . . . . . . . . . . . . 4-1
U
UHF output . . . . . . . . . . . . . . . . . . . . . . . . . . . . . . . . . 7-3
UHF ranges . . . . . . . . . . . . . . . . . . . . . . . . . . . . . . . . 2-4
Unpacking components . . . . . . . . . . . . . . . . . . . . . . . 5-1
V
Ventilation . . . . . . . . . . . . . . . . . . . . . . . . . . . . . . . . . 5-3
Vid Lock . . . . . . . . . . . . . . . . . . . . . . . . . . . . . . . . . . 3-10
Video fail mode . . . . . . . . . . . . . . . . . . . . . . . . . . . . 3-19
Video line standards . . . . . . . . . . . . . . . . . . . . . . . . . 3-16
Video monitor . . . . . . . . . . . . . . . . . . . . . . . . . . . . . . . 3-8
Video Output . . . . . . . . . . . . . . . . . . . . . . . . . . . . . . 3-18
Video output . . . . . . . . . . . . . . . . . . . . . . . . . . . . . . . 3-18
Video settings . . . . . . . . . . . . . . . . . . . . . . . . . . . . . . 3-16
View PIDs . . . . . . . . . . . . . . . . . . . . . . . . . . . . . . . . . 3-17
W
WARNINGS . . . . . . . . . . . . . . . . . . . . . . . . . . . .Notices-ii
Warranty Information . . . . . . . . . . . . . . . . . . . . Notices-iii
Waste electrical and electronic equipment . . . . .Notices-ii
Index-4
Web browser interface . . . . . . . . . . . . . . . . . . . . . . . 3-32
Web server . . . . . . . . . . . . . . . . . . . . . . . . . . . . . . . . . 2-4
DRS4000 Receiver User and Technical Manual
Index-5
DRS4000 Receiver User and Technical Manual
Index-6