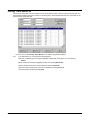
1
MOVE.IT USER MANUAL VERSION 4 Information in this document is subject to change without notice. Companies, names and data used in examples herein are fictitious unless otherwise noted. No part of this document may be reproduced or transmitted in any form or by any means, electronic or mechanical, for any purpose, without the express written permission of Run.IT Systems and Goldman Marcus, Inc.. © Goldman Marcus, Inc. All rights reserved, 2001 Run...It is a trademark of Goldman Marcus, Inc. Run.It! Retail Software System Move.It! Module • 1 MOVE.IT .......................................................................................................................................... 4 ABOUT MOVE.IT ..................................................................................................................................................................... 4 Accessing the Move.It Module........................................................................................................................................... 4 TRANSFER OVERVIEW ............................................................................................................................................................. 5 TRANSFER, TRANSFER ORDERS .............................................................................................................................................. 6 Creating a New Transfer Order......................................................................................................................................... 8 Creating a Transfer-In Order.......................................................................................................................................... 11 Creating a Transfer Out Order........................................................................................................................................ 13 Transferring Between Stores (Inter-Store Transfer)........................................................................................................ 15 Displaying the Stores on a Transfer Order ......................................................................................................................................16 Auto Distro ...................................................................................................................................................................... 18 Creating a Auto Distro .................................................................................................................................................... 18 Editing Distribution Information.....................................................................................................................................................20 Automatically Transferring Goods ..................................................................................................................................................21 Serialize ........................................................................................................................................................................... 22 TRANSFER, TRANSFERRED MERCHANDISE............................................................................................................................ 23 TRANSFER, CONFIRMATION OF TRANSFER ............................................................................................................................ 24 TRANSFER, SHOW CONFIRMATIONS ...................................................................................................................................... 25 TRANSFER, DISTRIBUTION TABLES ....................................................................................................................................... 26 TRANSFER, UPDATE DISTRIBUTION TABLES.......................................................................................................................... 27 Review Distribution Tables.............................................................................................................................................. 27 TRANSFER, KITS.................................................................................................................................................................... 28 Creating a New Kit .......................................................................................................................................................... 29 Disperse Kits.................................................................................................................................................................... 30 TRANSFER, BULK ITEMS ....................................................................................................................................................... 31 Creating a Bulk Item Breakup Kit ................................................................................................................................... 32 Disperse Bulk Item Breakup Kits..................................................................................................................................... 33 INVENTORY, NEW STYLES .................................................................................................................................................... 34 Entering a New Style ....................................................................................................................................................... 34 Specifying New Inventory General Detail ....................................................................................................................... 35 Specifying New Inventory Categories.............................................................................................................................. 35 Specifying New Inventory Settings................................................................................................................................... 36 Specifying New Inventory Sizes and Extensions .............................................................................................................. 36 INVENTORY, VIEW STYLES ................................................................................................................................................... 37 View and Edit Inventory .................................................................................................................................................. 38 Setting Customer Pricing Tables ..................................................................................................................................... 40 Additional Tasks from the Customer Pricing Table ........................................................................................................................40 INVENTORY, STOCK INFORMATION ....................................................................................................................................... 41 Changing the Display Type ............................................................................................................................................. 42 Quantities ........................................................................................................................................................................................42 Rental Pricing..................................................................................................................................................................................43 Analysis...........................................................................................................................................................................................43 Prices and Costs ..............................................................................................................................................................................44 Markdowns......................................................................................................................................................................................45 Price ................................................................................................................................................................................................45 2 • Move.It! Module Run.It! Retail Software System Average Cost ...................................................................................................................................................................................46 Last Cost .........................................................................................................................................................................................46 Rental ..............................................................................................................................................................................................46 Original Price ..................................................................................................................................................................................46 Other Prices (Suggested Retail, Original Price) ..............................................................................................................................46 Rates................................................................................................................................................................................................48 Set Commission Rate ......................................................................................................................................................................48 Set Spiff...........................................................................................................................................................................................48 Set Sales Tax ...................................................................................................................................................................................49 NVENTORY, REPORTS ............................................................................................................................................................ 50 INVENTORY, BARCODES REPRINT ......................................................................................................................................... 52 INVENTORY, CHANGE STYLE ATTRIBUTES ............................................................................................................................ 54 PRICING, BATCH PRICING ...................................................................................................................................................... 55 Creating a New Batch...................................................................................................................................................... 56 Processing Pricing Batches............................................................................................................................................. 57 PRICING, BATCH MARKDOWN ............................................................................................................................................... 58 Processing Batch Markdowns ......................................................................................................................................... 59 Specifying Exception Information ................................................................................................................................... 59 PRICING, MARKDOWN LIST ................................................................................................................................................... 61 Accessing the Markdown List Shortcut Menu.................................................................................................................. 62 Automatic Markdown Commit......................................................................................................................................... 62 PRICING, COUPON ................................................................................................................................................................. 63 Creating a New Coupon .................................................................................................................................................. 64 PRICING, TIMED SALE SETUP ................................................................................................................................................ 66 Creating a New Timed Sale ............................................................................................................................................. 67 Processing a Timed Sale.................................................................................................................................................. 68 PRICING, TIME SALES LIST .................................................................................................................................................... 69 PRICING, QUANTITY PRICING ................................................................................................................................................ 70 Creating a New Quantity Pricing Group......................................................................................................................... 71 ADMINISTRATION, BRAND MAINTENANCE ............................................................................................................................ 72 Adding a Brand ............................................................................................................................................................... 73 Attaching a Vendor.......................................................................................................................................................... 73 Attaching a Remit To ....................................................................................................................................................... 73 Attaching a Picture.......................................................................................................................................................... 73 ADMINISTRATION, SIZE AND EXTENSIONS MAINTENANCE .................................................................................................... 74 Size Runs.......................................................................................................................................................................... 74 Adding a Size Run............................................................................................................................................................ 74 Adding an Extension Run ................................................................................................................................................ 74 Shortcuts for Entering Size Run......................................................................................................................................................75 Additional Examples of Size Runs..................................................................................................................................................75 ADMINISTRATION, CATEGORY MAINTENANCE ...................................................................................................................... 76 Adding an Inventory Category ........................................................................................................................................ 76 ADMINISTRATION, REORDER POINTS .................................................................................................................................... 77 ADMINISTRATION, FAVORITE RUN ........................................................................................................................................ 78 ADMINISTRATION, LINKED ITEMS ......................................................................................................................................... 79 Linking Styles................................................................................................................................................................... 79 ADMINISTRATION, SUGGESTED ITEMS ................................................................................................................................... 80 Creating a New Suggested Item....................................................................................................................................... 80 ADMINISTRATION, SUBSTITUTE ITEMS .................................................................................................................................. 81 Creating a New Substitute Item ....................................................................................................................................... 81 Run.It! Retail Software System Move.It! Module • 3 Move.It About Move.It The Move.It module section covers transfers and Inventory functions and provides detailed instructions on creating, editing, and searching transfers and inventory. Run.It treats sized based and Non-sized based merchandise in different ways. The sizing mode preference must be selected in the File, For this computer Only Options. However you may over ride the preference by selecting Edit. from the tool bar can choosing NO-Size Mode and Size Mode selections. NOTE You can not mix size and non-size merchandise on the Transfers or Purchase Order. The differences between the modes include the following: When you are in No-Size Mode Transfer Orders can only contain No-Size merchandise. Kits can only be non-sized-based. Only No-Size styles can created in New Styles. Stock Information does not display a Size column. Inventory Reports display information in no-size format. When you are in Size Mode Transfer Orders can only contain Size merchandise. Kits can only be sized-based. Only Sized styles can created in New Styles. Stock Information displays a size column. Inventory Reports display information in size-based (grid) format. Accessing the Move.It Module 1. Launch Run.It and, on the main Run.It window, select the Move…It icon.In the Login dialog box, enter your User Name and Password, and select OK. The main Move.It window displays. 4 • Move.It! Module Run.It! Retail Software System Transfer Overview Transfers are one of the primary tools in Run.It for moving inventory into, out of, and between stores. Whenever you receive merchandise that is not from a purchase order, you must use a transfer. Whenever you move inventory out of your stores (without a return authorization) you must use a transfer. Whenever you move merchandise between your stores, you must use a transfer. NOTE Inter-store Transfers between locations can be created in both Move.It , Transfer Orders or within the Sell.It , Run Sales, Quick Transfer. If you need to make any corrections to your inventory quantities, use a transfer. Whenever a Physical Inventory count reconciles the Inventory On-Hands a Physical Adjustment Transfer is automatically created. Refer to the chapter called, Count.It. If you want to combine the functions of creating Inventory and creating a Transfer you can use a Transfer Order. Unlike Purchase Orders and RA’s, Transfers are only used for your internal inventory tracking. Therefore, if you are moving 10 styles at one time, you can either put all 10 styles on a single transfer or distribute them among multiple transfer orders. NOTE Since you can enter an unlimited number of transfer orders, it is highly recommended that you place no more than 20 styles on one transfer order. Normally, when a transfer order is saved, the inventory quantities of all the styles and stores are automatically updated. Each store that receives merchandise from a transfer order can confirm the quantities received. This helps to ensure that no pieces are lost or stolen in transit. NOTE If you select the Inventory adjusted upon transfer confirmations option (File, Options, Inventory/Orders) the inventory quantities of the stores receiving merchandise from a transfer order is not updated until the transfer is confirmed. Run.It! Retail Software System Move.It! Module • 5 Transfer, Transfer Orders Through the Transfer Orders function, you can move inventory into a store, out of a store, or between stores. WARNING NEVER use Transfer In to enter inventory received from another of your stores. Use inter-store transfers. Transfer In should ONLY be used to enter merchandise that is received from outside your business. Normally, inventory is automatically updated for all stores on the transfer when you save it. However, if you have selected the Inventory adjusted upon transfer confirmations option (found under File, Options, Inventory/Orders) inventory is not updated in stores (except the ones in which the transfer is entered) until they have confirmed the transfers. Refer to the section in this chapter entitled, “Transfer, Confirmation of Transfer.” WARNING Once a transfer method (Transfer In, Transfer Out, Inter-Store) has been selected and a style has been entered, the transfer type of that transfer order cannot be changed and you can not add stores. If you have already entered styles on the transfer order and you realize that you have selected the wrong type, the transfer order must be cancelled and you must start a new transfer of the correct type. Therefore, it is important that you make certain you have selected the correct transfer type for each transfer order that you enter. From the Move.It menu, select Transfer, Transfer Orders. The Transfer Orders window displays. 2. To view a list of transfer orders currently in the system for a given date range, do the following: In the Date (from) field, enter the applicable date in the format M/D/YYYY or, select the Calendar icon and select the date. The current date is the default. In the to field, enter the end date range in the format MM/DD/YYYY or, select the Calendar icon and select the date. If you have an existing transfer order #, clear the dates field and enter the number in the T/O# field. 6 • Move.It! Module Run.It! Retail Software System Select Search. All transfer orders matching the specified criteria is shown. 3. From the Transfer Orders window, you can also perform the following tasks: Create a new transfer order (to transfer items in, out, or between stores) by selecting New. Refer to the instructions in this section entitled, “Creating a New Transfer Order.” Depending upon your level of security access, you can either Edit or (View) a particular transfer order. Highlight the transfer order and select Edit or (View). You can edit or view transfers, and also print tickets. When you are finished with this transfer order select OK. A Transfer can only be edited on the date the transfer is created. Any next day modifications of inventory can be only be adjusted by creating a new transfer. Send a transfer order via facsimile by highlighting it in the list, and selecting Fax T/O. Print a transfer order by highlighting it in the list, and selecting Print T/O. Print the list of all transfer orders shown by selecting Print List. While viewing the transfer listing, you can use the mouse to right-click on an T/O to view the number of pieces moved in or out by store on this transfer order. It also shows the total cost of these pieces Close and exit the window by selecting Exit. Run.It! Retail Software System Move.It! Module • 7 Creating a New Transfer Order While viewing the Transfer Orders window, select New. 4. Make your selections/entries based on the guidelines below. 5. When all selections/entries are made, select OK. FIELD/BUTTON DESCRIPTION Transfer # By default all new transfers are labeled “New”. Transfer #’s are automatically assigned sequentially once the new transfer is saved by selecting OK. Line # This indicator, located near the top of the transfer order window, will let you know at any given time how many lines are currently on the transfer order. Expand [Compress] If you wish to alter the current display so that more line items are shown, select the Expand button. This automatically compresses the top portion of the window. To return the window to its original state, select Compress (which is what the Expand button is now called). Transfer In Transfer Out Inter Store Selects the type of transfer order this is. Transfer In brings merchandise to your store. Transfer Out sends merchandise to another location. Inter Store moves merchandise between stores. Once a transfer method has been selected and a style has been entered, the transfer type or store of that transfer order cannot be changed. If you have selected the wrong transfer type, the transfer must be cancelled and you must start a new transfer of the correct type. Transfer In increases your inventory by the quantity you transfer in Transfer Out reduces your inventory by the quantity you transfer Out Inter-store transfer reduces the inventory of the From store and increases the inventory of the To store. Date By default, the current date displays. This field cannot be edited. Comment Enter any comments that relate to this transfer order. View Price Controls whether the brand and price of the styles entered on the Transfer Order window are displayed or not. To include the price, select in the check box so a checkmark displays. To omit to price, leave the check box blank. Applies to size-based transfer orders only. Auto Distro Applies only to Inter Store transfers. Refer to the section in this chapter entitled, "Auto Distro." Tickets Printed Indicates that a tickets have been printed for this Transfer Order (On the T/O Window) 8 • Move.It! Module Run.It! Retail Software System Add Store Delete Store Adds and/or removes stores from the current transfer order. Select Add Store to open a dialog box through which you select the store/group. To delete a store, highlight the store in the store listing, select Delete, and confirm the deletion when prompted. Can modify stores after a style has been added to the T/O. Store Listing Displays a list of all stores currently selected for this transfer order. Use the Add Store/Delete Store buttons to change this listing. Style/Desc Allows you to select the styles to include in this transfer order. To add an item, do the following: Select in the cell below the Style/Desc column heading. (The cell should turn blue.) Enter the style number for the first style on this transfer (barcode #’s can not be entered into this field. If Run.It does not recognize this style number, you are prompted to search through existing styles, adding this as a new style. This style displays on the Transfer Order with its description. There is a row for each store and/or extension within the style. There is a column to enter a quantity for each size in this style’s size run if this is size-based merchandise. Size-based vs. No-size Transfers. For no-size, the cell under Quan is highlighted in blue. Enter the number of units being transferred in. Press Enter on your keyboard and the Cost cell is be highlighted. Change the cost to the amount that you are currently paying for each unit of the item if different than the displayed amount. If this item has serial numbers, select Serialize to enter the serial numbers that are being received Press Enter to go to the next line on the order. For size-based, the Cost on the first line is highlighted. Change this cost to the amount that you are currently paying for each unit of the item. After you have entered the cost, press Enter on your keyboard. The cell for the first size in the run will be highlighted in blue. Enter the quantity being transferred in for each size. Press Enter on your keyboard to go to the next cell. When you reach the end of a line, press Enter to go to the next line on the order. The total quantity being transferred in for each line will be shown in the Quan cell. Copy Run Copies the quantities from the previous line to the current line. This does not apply to items on the first line (since there is no line above this line). You should only use Copy Run if the current line and the line directly above it has exactly the same size run. Applies to size-based transfer orders only. View Item Displays the View Inventory window for the highlighted style. It shows the descriptors for the style and the full grid showing the inventory quantities for this style in each store. For more information on this display, refer to the section in this chapter entitled, “Inventory, View Styles.” Best Run Determines the optimal run for a specified quantity or cost of merchandise, based upon past sales of the item. Enter either the total number of pieces to transfer, or the total dollar amount to transfer for the current line of the order. Run.It produces a best run for the item. Applies to size-based transfer orders only. Kill Style Removes a style from the current transfer order. Highlight the item you want to completely remove, and select Kill Style. Serialize This button is used if you use serial numbers to catalog your inventory. This is only available for no-size merchandise. In order to utilize serial numbers you must also enable the Use Serial Numbers through File, Options. Add Styles Allows you to search and select groups of styles to be included on this transfer order. Tickets When selected, prints a ticket containing product information and barcodes for each piece that is on the current transfer order. In addition, the TKTS field is updated on the transfer order and transfer listing screen. UPC’s Used to view a style’s barcode and to add alternative barcodes, do the following: Select the line containing the barcode you want to add the alternative barcode. Select Enter Alternative barcode. In the Enter Alternative barcode field, select the barcode you want to add, and scan (or type) the alternative barcode. All the merchandise’s barcodes will be updated for all stores Auto Used to automatically enter transferred goods through a scanner and/or data collector. Run.It! Retail Software System Move.It! Module • 9 Alter Style Allows you to view and modify style information (department, price, etc.). To modify a particular style, highlight it, and select Alter Style. The View Inventory window displays, containing the descriptors for the style and the full inventory grid for each store. From the View Inventory button bar, select the button for the information you want to alter-Stock#, update price tables, Add Size/Ext. Make the changes in the applicable windows, and select OK. For more information on this display, refer to the section in this chapter entitled, “Inventory, View Styles.” Fav. Run 10 • Move.It! Module Transfers inventory based upon standard quantities you have set for this particular size run. For complete details on this function, refer to the section in this chapter entitled, "Administration, Favorite Runs." Run.It! Retail Software System Creating a Transfer-In Order A Transfer-In Order is used to do the following Add quantities of merchandise into specific store’s inventory Create new styles Create new styles and add quantities of merchandise into specific store’s inventory. When you first begin using the Run.It system, use the Transfer In option to enter all of your existing inventory. In addition, you also use Transfer In to enter newly received merchandise that is not on a purchase order WARNING If you want to transfer pieces from one of your stores to another of your stores, use Inter-Store Transfers. Do not use Transfer In. From menu, select Transfers, Transfer Orders. 6. In the Transfer Orders window, select New. The Transfer IN#NEW window displays. 7. Select Transfer IN. (Default selection) 8. In the Comment field, enter any details related to this transfer. 9. If applicable, add or delete any stores. Refer to the instructions in this chapter entitled, “Adding or Deleting a Store.” 10. In the middle of the window, and select the cell directly beneath the Style/Desc column, so that it is highlighted in blue. Then, do any of the following: Enter a complete style # and/or name, press Enter. Create a New Style. Enter the style of the item that you want to add to the inventory. If the style number you enter is not recognized, a window displays, giving you the choice of searching for the style or creating a new style. Select New Style. Enter the Brand and description of this style. Enter the prices and cost for this style. Set the categories and settings for this style. If this style has extensions, enter the extension scale. For size-based merchandise, you must also enter the size run for the style. When all information for this new style is set, select OK. The new style displays on the transfer order. For more information on entering a new style, refer to New Styles Chapter. Select Auto. Select Start and either scan the barcode tags or to download the data collector. Or select download from disk to select a barcode text file to download. Note: Make sure you print a barcode error list if you have errors. You cannot go back and print this at a later. When finished select done to return to the T/O. NOTE If Run.It does not recognize this style number, it gives you the option of searching through existing styles. Refer to the following options: Enter a partial style # and/or name. Search for a Style. If you know that a style is in your Run.It system, but you are not certain of its full style #/name, you can search for it. To search for the style #/name, enter any characters in the style/desc field and press Enter on your keyboard. A window displays on the window giving you the choice of creating a new style or searching for a style. Select Search for Style. The Pick Style window will be displayed. To find the style you want, enter search criteria either in the Quick Search tab or the Advanced Search tab and then select Search. If you leave all fields blank and select Search, all styles will be displayed. If you enter some characters in the style field, all styles starting with those characters will be displayed. When you find the style you want, highlight it and select OK. This style displays on the transfer order. Select Add Styles button. The Inventory listing window displays. To find the style you want, enter search criteria either in the Quick Search tab or the Advanced Search tab and then select Search. If you leave all fields blank and select Search, all styles are displayed. If you enter some characters in the style field, all styles starting with those characters will be displayed. When you find the style you want, highlight it and select OK. This style displays on the transfer order. Run.It! Retail Software System Move.It! Module • 11 11. The style displays on the Transfer Order with the corresponding description. A row displays for each store and/or extension within the style, along with a column for each size in this style’s size run (if this is sizebased merchandise). 12. If you are transferring size-based items, do the following: Change the entry in the Cost cell to the amount that you are currently paying for each unit of the item if necessary. Then press Enter. The cell for the first size in the run is highlighted in blue. Enter the quantity being transferred out for each size. When you press Enter, one of following occurs: If there is another cell in the current line, you move to that cell. If there are no additional cells in the current line, you move to the next line. Verify that the total shown in the Quan cell matches the total you want to transfer. 13. If you are transferring no-size items, do the following: For no-size, the cell under Quan is highlighted blue. Enter the number of units being transferred in. Press Enter on your keyboard and the Cost cell is highlighted. Change the cost to the amount that you are currently paying for each unit of the item if necessary. If this item has serial numbers, select Serialize to select the serial numbers that are being transferred out. Press Enter to go to the next line on the transfer. 14. When all styles have been entered on the T/O, do any of the following: Select Tickets to print tickets for the exact quantity listed on the transfer. Select UPC to add additional barcode #’s to the items listed on the transfer Select OK to save Transfer Order and to print the transfer order NOTE When a transfer order is finished, a report of the transfer may automatically be printed. This depends upon what is set for the Print Transfer Orders option in the File, Options, Options for this computer only . If NEVER is set, then a report will not be printed for the transfer order. If ALWAYS is set, then a report will automatically be printed after each transfer order is completed. If ASK is set, Run.It prompts you after each transfer order is completed as to whether or not you want to print a report. IF the option is left blank the default is ASK. 12 • Move.It! Module Run.It! Retail Software System Creating a Transfer Out Order A Transfer out is used to do the following, Remove quantities of merchandise out of a specific store’s inventory WARNING If you want to transfer pieces from one of your stores to another of your stores, use Inter-Store Transfers. Do not use Transfer Out. From menu, select Transfers, Transfer Orders. 15. In the Transfer Orders window, select New. The Transfer IN#NEW window displays. 16. Select Transfer OUT. 17. In the Comment field, enter any details related to this transfer. 18. If applicable, add or delete any stores. Refer to the instructions in this chapter entitled, Adding or Deleting a Store. 19. In the middle of the window, select the cell directly beneath the Style/Desc column, so that it is highlighted in blue. Then, do any of the following: Enter a complete style # and/or name, and press Enter. Select Auto. Select Start and either scan the barcode tags or to download the data collector. Or select download from disk to select a barcode text file to download. Note: Make sure you print a barcode error list if you have errors. You cannot go back and print this at a later. When finished select done to return to the T/O. NOTE If Run.It does not recognize this style number, it gives you the option of searching through existing styles. Refer to the following options: Enter a partial style # and/or name. Search for a Style. If you know that a style is in your Run.It system, but you are not certain of its full style #/name, you can search for it. To search for the style #/name, enter any characters in the style/desc field and press Enter on your keyboard. A window displays on the window giving you the choice of creating a new style or searching for a style. Select Search for Style. The Pick Style window will be displayed. To find the style you want, enter search criteria either in the Quick Search tab or the Advanced Search tab and then select Search. If you leave all fields blank and select Search, all styles will be displayed. If you enter some characters in the style field, all styles starting with those characters will be displayed. When you find the style you want, highlight it and select OK. This style displays on the transfer order. Select Add Styles button. The Inventory Listing window displays. To find the style you want, enter search criteria either in the Quick Search tab or the Advanced Search tab and then select Search. If you leave all fields blank and select Search, all styles will be displayed. If you enter some characters in the style field, all styles starting with those characters will be displayed. When you find the style you want, highlight it and select OK. This style displays on the transfer order. 20. The style displays on the Transfer Order with the corresponding description. A row displays for each store and/or extension within the style, along with a column for each size in this style’s size run (if this is sizebased merchandise). 21. If you are transferring size-based items, do the following: Change the entry in the Cost cell to the amount that you are currently paying for each unit of the item if necessary. Then press Enter. The cell for the first size in the run is highlighted in blue. Enter the quantity being transferred out for each size. When you press Enter, one of following occurs: If there is another cell in the current line, you move to that cell. If there are no additional cells in the current line, you move to the next line. Verify that the total shown in the Quan cell matches the total you want to transfer. Run.It! Retail Software System Move.It! Module • 13 22. If you are transferring no-size items, do the following: For no-size, the cell under Quan is highlighted blue. Enter the number of units being transferred out. Press Enter on your keyboard and the Cost cell is highlighted. Change the cost to the amount that you are currently paying for each unit of the item if necessary. If this item has serial numbers, select Serialize to select the serial numbers that are being transferred out. Press Enter to go to the next line on the transfer. 23. When all styles have been entered onto the T/O, do any of the following: Select Tickets to print tickets for the exact quantity listed on the transfer. Select UPC to add additional barcode #’s to the items listed on the transfer. Select OK to save Transfer Order and to print the transfer order. NOTE When a transfer order is finished, a report of the transfer may automatically be printed. This depends upon what is set for the Print Transfer Orders option in the File, Options. If NEVER is set, then a report will not be printed for the transfer order. If ALWAYS is set, then a report will automatically be printed after each transfer order is completed. If ASK is set, Run.It will ask you, after each transfer order is completed, whether or not you want to print a report. IF the option is left blank the default is ASK. 14 • Move.It! Module Run.It! Retail Software System Transferring Between Stores (Inter-Store Transfer) Inter-Store Transfers are used to move pieces of inventory from one of your stores to another. You will find this useful if you receive most of your purchase orders in a central location (such as a warehouse) and then transfer the merchandise out to your various stores. Whenever you move inventory from one store to another, you must use an Inter-Store Transfer. You can not create new inventory on an inter-store transfer. Normally, inventory is automatically updated in all stores on the transfer order when it is saved. However, if you have selected the Inventory adjusted upon transfer confirmations option in the Company Information (File, Options, Inventory/Orders), inventory is not updated in the stores (except the one in which the transfer is entered) until the receiving store has confirmed and accepted the inter-store transfer. Refer to the instructions in this chapter entitled, To transfer inventory between stores, do the following: From menu, select Transfers, Transfer Orders. 24. In the Transfer Orders window, select New. The Transfer IN#NEW window displays. 25. In the Transfer IN#NEW dialog box, select the Inter-Store button. 26. The From Store pull-down menu displays. Select the number of the store from which the merchandise on this transfer is leaving. 27. Enter any comments for this Transfer in the Comments field. 28. If applicable, add or remove a store(s). Refer to the instructions in this chapter entitled, "Adding or Removing a Store." NOTE If you want the units being transferred between the stores on this transfer to be based upon your Distribution Tables, check Auto Distro at the top of the screen. Refer to the discussion in this section entitled, “Auto Distro.” 29. In the middle of the window, and select the cell directly beneath the Style/Desc column, so that it is highlighted in blue. Then, do any of the following: Enter a complete style # and/or name, press Enter. Select Auto. Select Start and either scan the barcode tags or to download the data collector. Or select download from disk to select a barcode text file to download. Note: Make sure you print a barcode error list if you have errors. You cannot go back and print this at a later. When finished select done to return to the T/O. Run.It! Retail Software System Move.It! Module • 15 NOTE If Run.It does not recognize this style #/Name, it gives you the option of searching through existing styles. Refer to the following options: Enter a partial style # and/or name. Search for a Style. If you know that a style is in your Run.It system, but you are not certain of its full style #/name, you can search for it. To search for the style #/name, enter any characters in the style/desc field and press Enter on your keyboard. A window displays on the window giving you the choice of creating a new style or searching for a style. Select Search for Style. The Pick Style window will be displayed. To find the style you want, enter search criteria either in the Quick Search tab or the Advanced Search tab and then select Search. If you leave all fields blank and select Search, all styles will be displayed. If you enter some characters in the style field, all styles starting with those characters will be displayed. When you find the style you want, highlight it and select OK. This style displays on the transfer order. Select Add Styles button. The Inventory Listing window displays. To find the style you want, enter search criteria either in the Quick Search tab or the Advanced Search tab and then select Search. If you leave all fields blank and select Search, all styles will be displayed. If you enter some characters in the style field, all styles starting with those characters will be displayed. When you find the style you want, highlight it and select OK. This style displays on the transfer order. 30. The style displays on the Transfer Order with the corresponding description. A row displays for each store and/or extension within the style, along with a column for each size in this style’s size run (if this is sizebased merchandise). 31. If you are transferring size-based items, do the following: Change the entry in the Cost cell to the amount that you are currently paying for each unit of the item if necessary. Then press Enter. The cell of the TO store (White line) for the first size in the run is highlighted in blue. Enter the quantity being transferred in for each size. For each cell that you transfer in there will be a corresponding negative quantity on the store transferring out (Red line). You will not be able to enter quantities on the red line. When you press Enter, one of following occurs: If there is another cell in the current line, you move to that cell. If there are no additional cells in the current line, you move to the next line. Verify that the total shown in the Quan cell matches the total you want to transfer. 32. If you are transferring no-size items, do the following: For no-size, the cell under Quan is highlighted blue of the TO store (White line). Enter the number of units being transferred in. Press Enter on your keyboard and the Cost cell is highlighted.. Change the cost to the amount that you are currently paying for each unit of the item, if necessary. If this item has serial numbers, select Serialize to select the serial numbers that are being transferred in. Press Enter to go to the next line on the transfer. 33. When all styles have been entered onto item listing section, do any of the following: Select Tickets to print tickets for the exact quantity listed on the transfer. Select UPC to add additional barcode #’s to the items listed on the transfer. Select OK to save and print the transfer order. NOTE When a transfer order is finished, a report of the transfer may automatically be printed. This depends upon what is set for the Print Transfer Orders option in the File, Options. If NEVER is set, then a report will not be printed for the transfer order. If ALWAYS is set, then a report will automatically be printed after each transfer order is completed. If ASK is set, Run.It will ask you, after each transfer order is completed, whether or not you want to print a report. IF the option is left blank the default is ASK. Displaying the Stores on a Transfer Order The box in the upper right of the transfer order window displays the stores on this transfer with the quantity and cost of the merchandise transferred in and out for each store. You can add or remove stores from a transfer order as 16 • Move.It! Module Run.It! Retail Software System long as it does not yet have any merchandise on it. You cannot add or remove a store from a transfer order that already has merchandise on it. Adding a Store To add a store to the transfer listing, do the following: Select the Add Store button. The Store selection window displays. 34. In the Store# field, select the drop-down list arrow, and select the store you want to transfer items to/from/between. 35. To add a group of stores, do the following: Select the Group button. In the Storing Groups dialog box, highlight the desired group from the Store Groups list, then select OK. You are given the option of replacing the stores currently on the transfer with the stores in the group, or adding the selected group’s stores to the stores currently on the transfer. You cannot add a store to a transfer order that already has merchandise on it. NOTE Stores Groups are setup through the File, Options, Store Information, Groups. 36. When all selection/entries are made, select OK. Removing a Store You cannot remove a store from a transfer order that already has merchandise on it. To remove a store from the transfer listing, do the following: In the TRANSFER dialog box, highlight the store you want to remove from the transfer. 37. Select the Delete button. A confirmation window displays. 38. Select Yes. Total Pieces and Total Costs Each line displays the pieces and costs of merchandise being transferred to and from the stores on this order. The totals for each column on this list The box in the upper right of the window continuously updates the total number of Pieces In, Total In (cost of pieces in), Pieces Out and Total Out (cost of pieces out) of the transfer for each store. The Totals boxes show the combined Pieces In, Total In, Pieces Out and Total Out for all stores on this transfer order. Run.It! Retail Software System Move.It! Module • 17 Auto Distro This is used to automatically distribute transferred inventory from the warehouse to stores based upon inventory and sales data. The inventory can be distributed based upon straight Sales Activity, sales for a Brand, sales for a Department, sales for a Type, sales for a Price Point or a user-defined category. The distribution is further broken down within these categories by extension and size (if you have size-based inventory). Auto Distro is only for use with Inter-Store Transfers. Before Auto Distro can be used, the Distro Tables must first be generated. Creating a Auto Distro In the Transfer IN#NEW dialog box, select the Inter-Store button. 39. The From Store pull-down menu displays. Select the number of the store from which the merchandise on this transfer is leaving. 40. Enter any comments for this Transfer in the Comments field. 41. If applicable, add or remove a store(s). Refer to the instructions in this chapter entitled, "Adding or Removing a Store." 42. Select the checkbox next to the Auto Distro. The Distro Setup dialog box displays at the top of the screen. 43. In the Distro Method field, select the drop-down list arrow and choose the method (Sales Activity, Brand, Department, etc.) by which the inventory being transferred is distributed. NOTE If you choose Sales Activity, the Days for Analysis field appear. In this field, enter the number of days to base the distribution upon. 44. Select on the checkbox next to Reflect Current Inventory unless you want the distribution to be based solely upon sales. This means that if you are distributing by Brand and you select Reflect Current Inventory, the distribution will be based upon the quantity sold and the current stock quantities of the brand in each store. If you do not select Reflect Current Inventory, the distribution will only be based upon the quantity sold for the brand in each store. 45. In the % of Inventory to leave in warehouse field, enter the percentage of inventory being transferred that you want to leave at the warehouse. This percentage of inventory is removed from the data that the distribution is based upon. To select a warehouse location File, Options, General, Warehousing Store) 46. When all selections/entries are made, select OK. 18 • Move.It! Module Run.It! Retail Software System 47. In the middle of the window, and select the cell directly beneath the Style/Desc column, so that it is highlighted in blue. Then, do any of the following: Enter a complete style # and/or name, press Enter. Select Auto. Select Start and either scan the barcode tags or to download the data collector. Or select download from disk to select a barcode text file to download. Note: Make sure you print a barcode error list if you have errors. You cannot go back and print this at a later. When finished select done to return to the T/O. NOTE If Run.It does not recognize this style number, it gives you the option of searching through existing styles. Refer to the following options: Enter a partial style # and/or name. Search for a Style. If you know that a style is in your Run.It system, but you are not certain of its full style #/name, you can search for it. To search for the style #/name, enter any characters in the style/desc field and press Enter on your keyboard. A window displays on the window giving you the choice of creating a new style or searching for a style. Select Search for Style. The Pick Style window will be displayed. To find the style you want, enter search criteria either in the Quick Search tab or the Advanced Search tab and then select Search. If you leave all fields blank and select Search, all styles will be displayed. If you enter some characters in the style field, all styles starting with those characters will be displayed. When you find the style you want, highlight it and select OK. This style displays on the transfer order. Select Add Styles button. The Inventory Listing window displays. To find the style you want, enter search criteria either in the Quick Search tab or the Advanced Search tab and then select Search. If you leave all fields blank and select Search, all styles will be displayed. If you enter some characters in the style field, all styles starting with those characters will be displayed. When you find the style you want, highlight it and select OK. This style displays on the transfer order. 48. The style displays on the Transfer Order with the corresponding description. A row displays for each store and/or extension within the style, along with a column for each size in this style’s size run (if this is sizebased merchandise). In addition, the auto distribution will subtract quantities from the From Store and add quantities to the To Store. 49. If you are transferring size-based items, do the following: Change the entry in the Cost cell to the amount that you are currently paying for each unit of the item if necessary. Then press Enter. Verify that the total shown in the Quan cell matches the total you want to transfer. 50. If you are transferring no-size items, do the following: Press Enter on your keyboard and the Cost cell is highlighted. Change the cost to the amount that you are currently paying for each unit of the item if necessary. If this item has serial numbers, select Serialize to select the serial numbers that are being transferred out. Press Enter to go to the next line on the transfer. 51. When all styles have been entered onto item listing section, do any of the following: Select Tickets to print tickets for the exact quantity listed on the transfer. Select UPC to add additional barcode #’s to the items listed on the transfer. Select OK to save and print the transfer order. Run.It! Retail Software System Move.It! Module • 19 Editing Distribution Information While viewing the Distro Setup dialog box, select the Edit button. The Distro Tables dialog box displays. 52. Select Edit to view and manually adjust the distribution for a particular category such as department. This is the same as the Show Tables feature found in the Distro Tables menu. Example: There are 100 pair of Nike style number 555 sneakers in your warehouse. You want to distribute these sneakers amongst your three stores based upon the number of Nike sneakers in the stores. However, you want to keep 10% of these 100 sneakers in the warehouse. There are currently 12 units of Nike products in store#1, 30 units in store#2 and 8 units in store#3. After depressing the Inter Store button and setting the stores involved in this transfer, you select on the Auto Distro checkbox. For Distro Method you choose Brand. You select on the checkbox next to Reflect Current Inventory so there is now an check in it. In the % of inventory to leave in warehouse field you enter 10. Now you select OK to save the Distro Setup. In the field under Style/Desc, you enter 555 and press Enter. The quantities being transferred to each store are then automatically filled in. This is the distribution: 22 of these style#555 are transferred to store#1, 54 are transferred to store#2, 14 are transferred to store#3 and 10 are left in the warehouse. Therefore, there is now a total of 34 Nike units in store#1, 84 in store#2 and 22 in store#3. These numbers are in direct proportion to the original numbers of Nike products in each store. 20 • Move.It! Module Run.It! Retail Software System Automatically Transferring Goods Auto Transfer allows you to automatically transfer goods by using a scanning gun or barcode collector. It can be used for all three types of transfer. However, you can only download for one store at a time. Make certain that your prompt setting on the data collector match your Run.It setting. You can check this in File, Options, For this computer only, Invt While viewing the Transfer #New dialog box, select the Auto button. The Automatic Transfer dialog box displays. 53. In the Store field, do one of the following: If you are performing a Transfer In or a Transfer Out, select the number of the Store that is involved if there is more than one store on the T/O. If you are performing an Inter-Store Transfer, select the number of the Store that is receiving the merchandise if there is more than one store (Default is the T/O store). 54. Select Start if you are using data collector or scanning gun. Select download if using a barcode text file. If you are using a data collector, you should have already scanned all of the items into the collector. If so, begin the download process now. If you are using a laser gun, begin scanning now. While this is working you will see the barcodes on the window and be told how many barcodes have been scanned and how many errors have been found in the barcodes. Any errors (any barcode not recognized by your Run.It system) are stored. To print a list of these errors, select the Print Error List button. 55. When all selections/entries are made, select downloading or scanning is complete, select Done. The styles and units you are transferring automatically appear on the transfer order. You can now continue as you would with any other transfer. Run.It! Retail Software System Move.It! Module • 21 Serialize This button is used if you use serial numbers to catalog your inventory. This is only available for no-size merchandise. In order to utilize serial numbers you must also enable the Use Serial Numbers through File, Options. When transferring in inventory, you will use the Serialize button to enter the serial numbers for these new items. When transferring out or between stores you will use the Serialize button to choose the serial numbers being transferred from a list of the serial numbers for this style. After you have entered the units being transferred in or out on the transfer, select the Serialize button. 56. The Serial Number window displays with a blank field for each unit of the item. 57. Scan or type each of the serial numbers that are being received or transferred out. 58. When you have entered all the serial numbers being received for this item, select OK. 59. If you are doing an inter-store T/O the Serial Number window displays with a list of all the serial numbers of this style that are currently in the store that you are transferring from. 60. Scan (or type) each of the serial numbers that are being transferred out or being transferred in to the highlighted store. You can also double-select on the serial numbers you want. NOTE For Inter-Store, you will select only the serial numbers being transferred to the store on the transfer order that is currently selected. 61. Each serial number that is currently selected will be highlighted in yellow. NOTE If you want to de-select a serial number, either scan it again or double-select it again. It will no longer be highlighted in yellow. 62. When you have selected all of the appropriate serial numbers for this line on the transfer order, select OK. 22 • Move.It! Module Run.It! Retail Software System Transfer, Transferred Merchandise The Transferred Merchandise listing provides a summary of each line of receiving and shipping from purchase orders, RA’s and transfers. The Transferred Merchandise listing can either be viewed as a Standard List or a Detailed View. The Standard List displays each receiving line with its date, the associated transfer# or PO (RA) reference number, the store, the brand, style and extension of the item, the quantity received and the total cost of the received merchandise. The Detailed View shows all of this, plus the style’s description, and the store from which this merchandise was received (From Store). The From Store is only applicable if this merchandise was received from another store using an Inter-Store Transfer. With the exception of the Show T/O button, Transferred Merchandise is identical to Received Merchandise that is found in Order.It When searching for transfer orders, the PO# (Ref#) field refers to the computer-generated PO reference number. The PO# field refers to the actual vendor’s purchase order number that you enter on the PO’s. You can limit the list to show only merchandise that was transferred in or transferred out. If you select on the Transferred IN checkbox to select it, the resulting list will only show merchandise that was received in the stores (from Transfers In, Inter-Store Transfers, and PO’s). If you select Transferred OUT, the resulting list will only show merchandise that was moved out of the stores (from Transfers Out, Inter-Store Transfers, and RA’s). If you select neither, both merchandise received and moved out will be listed. You can also limit this list by the type of order that the merchandise was received or shipped from. If you select From PO or RA, the resulting list will display only merchandise on PO’s and RA’s. If you select Transfers Only, the list will display only merchandise on Transfer Orders. If you select neither, merchandise from all types of orders will be listed. From the menu select Transfer, Transferred Merchandise. The Transferred Merchandise window displays with a list of all merchandise transferred and received on the current day. 63. From this window you can perform the following tasks: Search for transferred merchandise by enter the applicable criteria in the fields, and selecting Start Search. Sort the current list by selecting Sort. Show a detailed view of the current list by clicking in the check box next to the Detailed View option. View an actual breakdown by size of units on a particular transfer line by highlighting the line you want to view the size run for and select Show Run. This shows the Transfer Detail for the selected item, including basic descriptors for the style, plus a breakdown, by size, of the quantities transferred in or out. The Show Run button is only available for size-based merchandise. View the full transfer order for a particular piece of merchandise by highlighting it in the list, and selecting Show T/O. Reprint a ticket by highlighting the item and selecting Reprint Tickets. Show the descriptors for the style and the full grid showing the inventory quantities for this style in each store by selecting View Item. Print the list of all transferred merchandise by selecting Print List. Close and exit the window by selecting Exit. Run.It! Retail Software System Move.It! Module • 23 Transfer, Confirmation of Transfer This is used to confirm that quantities transferred to a store have actually arrived at that store. You can view which merchandise has not yet been confirmed and which items are missing. This will help you keep tighter control of the transfer of inventory and limit internal theft. If you have selected the Inventory adjusted upon transfer confirmations option in File, Options, Inventory/Orders, inventory will not be affected by a transfer until the quantities on the transfer have been confirmed. To confirm a transfer order, you must be in the store that has received the merchandise. You can confirm part of the transfer or the entire transfer. From the menu, select Transfer, Confirmation of Transfer. The Confirm Transfer Order dialog box displays. 64. In the Please enter Transfer Order # field, enter the number of the transfer order you are confirming. 65. Select Confirm. All the styles on this transfer are displayed. 66. Enter the actual quantities received in the corresponding cells reflecting the text, "please confirm". NOTE Instead of entering the quantities, you can scan the items. In this case, be sure that you are ready to scan and then select Auto. Select Start and then scan (or download) the barcodes of the items that you are confirming then select Done when finished. 67. Are you ready to Accept Confirmation? Select OK to save your confirmations for this transfer order. 24 • Move.It! Module Run.It! Retail Software System Transfer, Show Confirmations From the menu, select Transfer, Show Confirmations. The Confirms window displays. By default, the Unconfirmed tab is selected. TAB DESCRIPTION Unconfirmed Lists each transfer line that is awaiting confirmation. Each line on the list shows an item with its transfer order number, the date it was transferred, the store that received it, the store it was transferred from and the quantity that was transferred. Confirmed This tab lists each transfer line that has been confirmed and is waiting to be accepted. Transfers are confirmed by using the Confirm T/O feature (see page 24). Accepting a transfer confirmation is the final approval on the transferred merchandise. Each line on this list shows an item with its transfer order number, the date it was transferred, the store that received it, the store it was transferred from, the quantity originally on the transfer order (Fst Qty), the quantity that was confirmed (New Qty), the difference in quantity, and the login name of the person that performed the confirmation (Who). You have two options when accepting transfer confirmations. One option is to accept confirmations individually by highlighting the line you want to accept and selecting Accept. The other option is to automatically accept all confirmations that have no quantity difference from the original transfer order. To accept all of the confirmations that do not have a discrepancy, select Accept ALL 0 Differences. When you accept a confirmation that has a difference between the original quantity on the transfer and the confirmed quantity, you will be asked if this is a Data Entry Error. If you select Yes, Run.It assumes that there was an error in the number of units entered when the transfer was originally written. Inventory in both stores will be adjusted based on the amount that has been confirmed. If you select No, Run.It assumes that there are missing pieces. These units are unaccounted for and may have been misplaced, lost or stolen. Accepted Lists each confirmed transfer line that has been accepted. Each line on the list shows an item with its transfer order number, the date it was transferred, the store that received it, the store it was transferred from, the quantity that was confirmed, the number of units unaccounted for, and the person who accepted the line. Exceptions Lists each transfer line that has pieces unaccounted for. These are the pieces that are missing and have either been lost or stolen. The Exceptions tab displays the same information as the Accepted tab, but only shows those transfer lines that have pieces unaccounted for. Run.It! Retail Software System Move.It! Module • 25 Transfer, Distribution Tables When transferring merchandise from the warehouse to stores (using an Inter-Store Transfer), you may want to base the number of units transferred to each store on current inventory and sales data. This is done automatically using the Distro Table. It sets up a table that determines how inventory should be distributed among your stores, based upon data for those stores. When transferring inventory into several stores, the inventory is automatically distributed between the stores, proportional to their sales. The Distro Tables are used for the Auto Distro on Inter-Store Transfers and Pre-Distro for Purchase Orders. Once you have updated the distribution tables, they are available for use with your transfers and PO’s. 26 • Move.It! Module Run.It! Retail Software System Transfer, Update Distribution Tables Distribution tables need to be updated From the menu, select Transfers, Update Distribution Tables. 68. In the field on the Distro Table window, enter the number of days of sales you want the distribution to be based upon. If you enter 30 days, then the distribution will be based upon the sales for the last 30 days (default). 69. Select OK to generate the tables. Select Yes to are you ready to Rebuild Distro tables. 70. Once the distribution table has been generated, you will be able to use the Auto Distro feature for InterStore Transfers and the Pre-Distro feature for Purchase Orders. Review Distribution Tables Once you have generated your distribution tables, you can review and manually change distribution information. You can review distribution tables using the following procedure. You can also view the distribution tables from an Inter-Store Transfer Order by enabling the Auto Distro checkbox and then selecting Edit. From the menu, select Transfers, Distro Tables buttons. 71. On the window that displays, select the inventory category (Brand, Department, Gender, Price Point or Type) you want. 72. Then select the setting of this category that you want to view. For instance, if you selected Brand for category, you will now select the name of the brand whose distribution you want to view. 73. Select View. The sales distribution for this setting is now displayed both as a list and as a pie graph. The list shows the percentage of sales for each store. The color-coded, pie graph provides a graphical representation of each store’s sales percentage NOTE You can adjust these percentages by highlighting the percentage you want to change and entering the new percentage for that store. However, it is recommended that you do NOT make changes to distribution tables since the purpose of the distribution tables is for merchandise to be distributed based upon your actual sales. 74. Select Print to print a copy of this distribution graph and list. 75. When you are finished viewing this particular distribution, select OK. You can now view additional distributions. 76. When you are finished viewing all distributions, select Exit. Run.It! Retail Software System Move.It! Module • 27 Transfer, Kits Kits are used if you take multiple styles that are in your inventory and put them together to form a single new style. An example of this is a gift box. For example, suppose that each gift box (style) contains a pair of gloves, scarf, and hat. For each gift basket you create, a pair of glove, a scarf and a hat a predetermined quantity of quantities will be removed from inventory and a single basket will be added to inventory. You can also create multiple items from one kit. From the menu, select Transfer, Kits. The Kit List window displays. 77. From this window, you can perform the following tasks: Create a new kit by selecting New. Refer to the instructions in this section entitled, “Creating a New Kit.” Edit an existing kit by highlighting the item in the list, selecting Edit, and making any necessary changes. Delete an existing kit by highlighting the kit in the list, and selecting Delete. Generate a report by selecting Print. Disperse the kit by selecting Disperse. Refer to the instructions in this section entitled, “Dispersing a Kit.” Close and exit the dialog box by selecting Exit. NOTE Do not mix inventoried and non-inventoried items. 28 • Move.It! Module Run.It! Retail Software System Creating a New Kit When you create a new kit, you are specifying what items go into the kit and what items come out. You are creating a template for the kit. Creating a new kit does not by itself have any effect on inventory; quantities are not affected until the kit is dispersed. From the menu, select Transfers, Kits. The Kit List window displayed. 78. Select New. The Kit dialog box displays. Under the Select Item to be Created section, select the Choose Style button. In the Choose Item dialog box, highlight an item that you want to be added to the kit, and select OK. If you want to create a new kit style, select New Style. Enter the style. When all information for this new style is set, select OK. For more information on entering a new style, refer to New Styles Chapter. 79. To add an item that is an element of this the kit, under the title Combine these items section, and select the Add button. In the Choose Item dialog box, highlight an item that you want to add to this kit, and select OK. 80. In the Quantity dialog box, enter the quantity of this item you want to add to the kit. Then, select OK. When you return to the Kit List, the selected item displays within the Combine these items list. Repeat for each additional item that is being used to create this kit. If you need to remove an item from the list, simply highlight the item, and select Delete. NOTE The Information section of the Kit window displays the total cost value of the items being Used to create the kit, the number of units that make each kit, and the number of units that the kit creates. 81. When you are finished entering all the information for this new kit, select OK to save the new kit information. Run.It! Retail Software System Move.It! Module • 29 Disperse Kits This is where you can disperse kits. Kits can only be dispersed if the items making up the kit have the available quantities. NOTE If you have selected the Makeup kits as needed (found under File, Options, Point of Sale/Inventory) kits can be dispersed at the register. While viewing the Kit window, highlight the applicable kit, and select the Disperse button. 82. In the Kit dialog box, select the Disperse button. 83. In the Kit Dispersal dialog box, do the following; In the Store field, select the drop-down list arrow, and select the store number (default current store). In the Please enter number of kits to makeup field, select in the field, and enter the applicable number of kits to makeup. Select the OK button. Stock quantities for all items involved in this kit are automatically updated, and a Transfer Order is automatically generated from the kit dispersal. This transfer can be viewed from the Transfer Listing. 84. When you return to the Kit dialog, select Exit. 30 • Move.It! Module Run.It! Retail Software System Transfer, Bulk Items Bulk Items Breakups are used if you want to take a single style comprised of multiple units and break them up into individual units under a separate style #. An example of this is a golf ball package. Suppose that each golf ball package contains 50 balls. You need to at times, breakup the package to sell the ball separately. When the golf ball package is broken up it will remove a quantity of 1 from the golf ball package style and add a quantity of 50 into the golf ball style in inventory. Creating a bulk Item breakup does not by itself have any effect on inventory; quantities are not affected until the bulk Item is dispersed. From the menu, select Transfer, Bulk Items. The Bulk Item Breakup Listing window displays. From this window, you can perform the following tasks: Add a new bulk item by selecting New. Edit an existing item by selecting Edit, and making any necessary changes. Delete an existing item by highlighting the item, and selecting Delete. Print an item by selecting Print. Disperse an item by selecting Disperse. Close and exit the window by selecting Exit. Run.It! Retail Software System Move.It! Module • 31 Creating a Bulk Item Breakup Kit When you create a Bulk Item Breakup kit, you are specifying which style will be broken up and into which style and the # of units will the original style be broken up into. You are creating a template for the Bulk Item break up kit. Creating a new Bulk Item break up does not by itself have any effect on inventory; quantities are not affected until the Bulk Item kit is dispersed. For example, if you create a golf ball package kit described above, no quantities are affected. When you disperse the Bulk Item kit then the inventory quantities are affected. From the menu, select Transfers, Bulk Items. The Bulk Item Listing window displays. 85. Select New. The Bulk Item dialog box displays. 86. Select the Choose Item button. In the Choose Item dialog box, highlight an item that you want to add to this kit, and select OK. 87. To add an item that is an element of this the kit, under the heading To Make, In the Quantity dialog box, enter the quantity of this item you want to add to the kit. Then, select OK. 88. In the Choose Item dialog box, highlight an item that you want to add to this kit, and select OK. If you want to create a new style. Select New Style. Enter the style of the item that you want to add to the inventory. Enter the Brand, style and description of this style. Enter the prices and cost for this style. Set the categories and settings for this style. If this style has extensions, enter the extension scale. For size-based merchandise, you must also enter the size run for the style. When all information for this new style is set, select OK. 89. The Information section of the Bulk Item dialog window displays the total cost value of the items being used to create the bulk Item kit, the number of units made, and the cost of each new unit. 90. When you are finished entering all the information, select OK to save the new Bulk Item kit information. 32 • Move.It! Module Run.It! Retail Software System Disperse Bulk Item Breakup Kits This is where you actually disperse bulk item kits. Kits can only be dispersed if the items originating style have the available on-hands. NOTE If you have selected the Makeup kits as needed (found under File, Options, Point of Sale/Inventory) Bulk item kits can be dispersed at the register. While viewing the Bulk item Breakup listing, highlight the applicable kit, and select the Disperse button. 91. In the Bulk Item Breakup dialog box, select the Breakup button. 92. In the Bulk Item Breakup Dispersal dialog box, do the following; In the Store field, select the drop-down list arrow, and select the store number (default current store). In the Please enter number of Items to breakup field, select in the field, and enter the applicable number. Select the OK button. Stock quantities for all items involved in this kit are automatically updated, and a Transfer Order is automatically generated from the Bulk item dispersal. This transfer can be viewed from the Transfer Listing. 93. When you return to the Bulk Item dialog, select Exit. Run.It! Retail Software System Move.It! Module • 33 Inventory, New Styles This is where you enter the detail information for each of your styles. The New Styles feature is available as an independent feature in Inventory. However, it is also used when you enter a new style from Transfer Orders, Purchase Orders, Special Orders and Buy Backs. When you enter a new style using the New Styles feature from the Inventory menu of Move ..It or Order…It, the style is only created in the store at which you enter it. Therefore, this style will only be sellable from that store. Unless, you have selected the create inventory for all stores option (found under File, Options, Inventory). This option automatically creates the style in all the stores. When you enter a new style, only the style itself is created. No actual quantities are entered. NOTE If you create a new style from a Transfer Order or Purchase Order, the style will automatically be created for all stores on the order. Therefore, all of the stores on the order are able to sell that item. Entering a New Style IMPORTANT Each style from a particular manufacturer must have its own individual style number. You may have to adjust the manufacturer’s style number to ensure that each style is different. For instance, if a company produces a product in two colors, and the company’s style number for that item is 92476 (regardless of the color), you assign a different style number for each color as you add the items to inventory—i.e., item 1’s style number is 92476-BLUE, and item 2’s style number is 92476-BURGUNDY. From the menu, select Inventory, New Styles. The New Inventory dialog box displays. 94. Complete the fields according to the guidelines below. 95. To add select inventory categories, select Categories. For each category, enter or select the appropriate choice. While it is not necessary that you enter all category information for a style, it is recommended. NOTE If you selected the Use Automatic Price Points option File, Options, General), the price point of the new style you are entering is automatically set when you enter its price. 96. While viewing the New Inventory window. To specify new inventory settings, select Settings. Refer to the instructions in this section entitled, “Specifying New Inventory Settings.” 97. To specify inventory sizes/extensions, select Sizes/Extensions. Refer to the instructions in this section entitled, “Specifying New Inventory Sizes/Extensions.” 98. When all selections/entries are made, select OK NOTE After you created a New Style then the next time you create a New Style, Run.It will ask you if you wish to copy from the previous style. If Yes is selected then all the New Styles window will be filled in with the previous styles information. 34 • Move.It! Module Run.It! Retail Software System Specifying New Inventory General Detail FIELD/BUTTON Brand DESCRIPTION Indicates the styles brand. Select in the box, and type the brand information. If the brand you enter is not recognized, the Brands window displays with a list of all known brands. If you find the brand you want on this list, highlight it and select OK. If the desired brand is not on the list, select New. Enter the new brand name and select OK. When you see the brand highlighted in the list, select OK. Copy from other Style You may find it useful to copy some information from an existing style. If so, select the Copy from other Style button. The Pick Style window displays with a list of all existing styles. Highlight the style you want to copy from, and select OK. All information from the selected style (except style number) is automatically copied. You should now follow the rest of the procedures and change any information that is different for this new style. Style Indicates the style for this brand. Enter a unique style # and/or name. However, multiple brands can have the same style number. For example, it is acceptable to have a style 302BE6 for brand GM and a style 302BE6 for brand ACME. Description Provides a brief description of this item. Select in the field, and enter the descriptive information. This is the description that displays on your barcode tickets, and that can be printed on your sales receipts. In addition, this description displays on many of the inventory reports. Additional Description If you want to enter an additional, longer description for the style and/or you want to make this style a Non-Inventoried Item, select in the Additional Description field. This long description can be printed on receipts. Cost The amount you pay for each unit of this style. Price The selling price for the item. Sug. Price The manufacturer’s suggested retail price (optional). Store Price Any additional price that is not represented by either the Price or Suggested Price (optional). In order to utilize Store Price you must also enable the Store Price field through File, Options, General. Calculator To automatically base the price upon the cost using either a markup percentage or a margin percentage do the following: Put an entry in either the Enter Profit Margin or the Or Enter Mark-Up field. The price after applying either of these numbers is shown in the Result section of the dialog box. To select a rounding method, in the To the Nearest section, select the button for the desired method Select OK. Specifying New Inventory Categories FIELD/BUTTON Categories DESCRIPTION The categories you use to classify merchandise in the inventory. These categories are Departments, Types, Sub-Types, Price-Points and up to four user-defined categories. The Departments, Types and Sub-Types are all linked. Therefore, when you highlight a particular department, only the types within that department will be listed. Similarly, when you highlight a particular type, only the sub-types belonging to that type are displayed. Price Points can be entered and when you enter new styles. However, if you have selected the Use Automatic Price Points option through File, Options, you can enter price points in the Auto Price Points window Run.It! Retail Software System Move.It! Module • 35 Specifying New Inventory Settings FIELD/BUTTON DESCRIPTION Comm% If you want employees to receive a specific commission percentage for selling a piece of this style, enter it in the Comm% field. For example, if you want the commission percentage to be 3.5%, enter 3.5 in the field. Spiff If you want employees to receive a flat dollar amount each time they sell a piece of this style, enter it in the Spiff field. For example, if you want a salesperson to receive 2 dollars every time he or she sells a piece of this style, enter 2 in the field. Ticket Printer Identifies the Ticket Printer that is going to be used to print this style’s barcode tickets (A or B) . Stock# If you assign stock numbers to your merchandise, enter this style’s stock number in the Stock# field. Weight (lbs) Enter the weight for this item in pounds. Tax Select the Sales Tax that is to be applied when selling this style. The default is Standard, which means that the Standard Sales Tax that was set for this store in Store Information is applied to the style. If you have selected Standard, when pieces of this style are transferred into other stores, they are automatically assigned the Standard Tax Rate of their current store. Apply to no tax under setting Any assigned tax exemption rules under File, options, Stores will be applied to this style. Non-inventoried item Select if you do not want to track any inventory quantities (on-hand, sold, received) for non-inventoried items. You may find it convenient to use the Non-Inventoried Item feature for items such as a services and clearance merchandise that you sell. Show on Kiosk Selection not in use (In product development) Sell on Web Selection not in use (In product development) Web Price Selection not in use (In product development) Specifying New Inventory Sizes and Extensions FIELD DESCRIPTION Sizes Sizes should be in the form of smallest size to largest size (e.g. 5-11). The Size Run is only applicable for size-based styles. There can be no more than 22 sizes in a particular size run with no one size larger then 6 characters. Refer to the instructions in this section entitled, Extensions Extensions are another way to breakdown a style. Extensions can be used for such things as inseams for pants and widths for footwear. Extensions can also be used for no-size styles. Each extension within a particular style will have a separate row in the style’s inventory grid. There can be no more than 22 extensions in a particular extension run with no one size larger then 6 characters. Refer to the instructions in this section entitled, 36 • Move.It! Module Run.It! Retail Software System Inventory, View Styles This allows you to view and edit and delete your styles. You can examine and modify a style’s descriptors. View Styles also lets you see the inventory grid showing the quantities of the style for each size and store. This grid displays current stock quantities, receiving, units sold and on-order quantities. In addition, if you can attach images to styles. The Inventory Listing can either be viewed as a Standard List or a Detailed View. The Standard List displays style with its brand, description, size run, extension run, plus its total quantity received, sold and on-hand. The Detailed View shows all of this, plus all eight inventory categories for each style. From the menu, select Inventory, View Styles. The Inventory Listing displays. 99. From this window, you can perform the following tasks: Search for styles by entering the applicable criteria in either the Quick Search or Advanced Search tabs, and selecting Search. View an item by highlight it in the list and selecting View. Refer to the instructions found in this section entitled, “Viewing Inventory.” Edit an existing item by highlighting the item in the list, selecting Edit, and making any necessary changes. Display the complete details for all styles by clicking in the check box for the Detailed View option. To modify this list, use the Search function. View the history for an item by highlighting the item, and selecting Ord His. This displays the complete purchase order history for the highlighted style. If you want to view the ordering history for a particular style, highlight it and select Ord His. The Ordering History for this style displays showing a line for each purchase order line and each RA line that includes this style. Each line shows the computer generated PO reference#, the store number, the order date, the ship date, the Vendor, the terms of the purchase order, the number of units ordered, the cost for each piece and the net cost for each piece. The Net Cost is based upon the discount from the vendor. If you want to view a breakdown (by size) of a particular line on this list, highlight it and select Show Run. Display customer pricing information by selecting Cust Pric. Refer to the instructions found in this section entitled, “Customer Pricing Tables.” Display the complete receiving history (positive and negative) for the highlighted style by selecting Rcv His. This includes every time this style was received from transfers and purchase orders/RA’s. If you want to view the receiving history for a particular style, highlight it and select Rcv His. The Receiving History for this style displays showing a line for each purchase order receiving line, RA shipping line and transfer line that includes this style. Each line shows the computer-generated PO reference# or TO#, the store number, the date, the ship date, the Vendor and terms (only for PO’s), the number of units received, the cost for each piece and the net cost for each piece. The Net Cost is based upon the discount from the vendor. Therefore, items received from transfers will not have a net cost. Print the list of items by selecting Print List. Delete an existing style by highlighting the style in the list, and selecting Delete. Close and exit the dialog box by selecting Exit. Run.It! Retail Software System Move.It! Module • 37 View and Edit Inventory This function allows you to see stock information (on hand, received/sold to date, current on order quantities), description/setting information (style status, misc. categories), and a picture of the item.. While viewing the Inventory Listing window, highlight the item you want to see, and select View or Edit. The View Inventory window for the selected style displays. By default, the Stock On Hand information displays. FIELD/BUTTON DESCRIPTION On Hand Displays a column for each of the style’s sizes (size-based merchandise only) and a row for each store and extension. Each row displays the average cost, (last) cost, current selling price, and markdown percentage. This markdown percentage is the percent difference between the current selling price and the original price. In addition, displays the breakdown of the units currently in stock. Received to Date Displays same information as above except the window displays the breakdown of the total number of units that have been received since the beginning of time. Sold to Date Displays same information as above except the window displays the breakdown of the total number of units that have been sold since the beginning of time. Current On Order Displays same information as columns as above except the window displays the breakdown of units that are on purchase orders and waiting to be received. Expand Alters the current display so that more information is shown. Once selected, the button changes to read, Compress. 38 • Move.It! Module Run.It! Retail Software System 100. Select the Description/Setting to view the style’s description and to modify the following information: FIELD/BUTTON 101. DESCRIPTION Style Status The Style Status characteristics can be used to as Exceptions to filter inventory reports in Know.It and price changes made from the Pricing menu Additional Description If you want to enter an additional, longer description for the style and/or you want to make this style a Non-Inventoried Item, select in the Additional Description field. This long description can be printed on receipts. Non-inventoried item Select if you do not want to track any inventory quantities (on-hand, sold, received) for non-inventoried items. You may find it convenient to use the Non-Inventoried Item feature for items such as a services and clearance merchandise that you sell. Ticket Printer Identifies the Ticket Printer that is going to be used to print this style’s barcode tickets. Weight (lbs) Enter the weight for this item in pounds. Show on Kiosk Selection not in use (In product development) Web Price Selection not in use (In product development) Sell on Web Selection not in use (In product development) Select Picture to view the style’s Picture. In Picture Detail dialog box, you can perform the following tasks: Obtain the picture from another source (e.g., scanner) by selecting Acquire. Erase the current picture by selecting Clear. Upload a picture from a disk by selecting Load from Disk. Then, select the path containing the disk. Save the current picture to a disk by selecting Save to Disk and specifying the destination location (the system hard drive, floppy diskette, etc.). Print the current picture by selecting Print. 102. In addition, you can perform the following tasks: FIELD/BUTTON 103. DESCRIPTION Stock # Change the stock # (A.KA. shelf# or bin#) by highlighting the item in the grid you want to change, and selecting Stock #. Change Price To modify the price for an item, highlight the item in the list, and select Change Price. In the Change Price dialog box, enter the price, indicate if this price is applicable for all stores, and whether this price is not to be treated as a markdown. Then select OK. Price Table To modify Sug Price, Store Price, Price & Cost at the item level for each location. In the change Inventory price/cost dialog box , enter price and/or cost change. The Advanced feature is only available for sized merchandise. Use the advanced feature to enter selected price/cost for size and extensions. Add Size/Ext Add new sizes/extensions to a style by selecting Add Size/Ext. The new information is placed at the end of the style’s run. Found under When all selections/entries have been made, select OK. Run.It! Retail Software System Move.It! Module • 39 Setting Customer Pricing Tables The customer pricing table allows you to set different prices for different customers. You may have one group of customers that you charge certain special prices, and another group of customers that you charge different prices. Each group in the Customer Pricing Table is assigned a letter of the alphabet. Therefore you can have up to 26 different customer pricing groups. The letter of a particular group in the customer pricing table then corresponds to the Pricing Code entered in each customer’s Personal information. For example, John Doe has C as his pricing code. Whenever you sell an item to John Doe, that item’s C price will be charged. If you sell John Doe an item that does not have a C price, the standard selling price will be charged. While viewing the Inventory Listing window, select Cust Price. The Customer Pricing Table displays. 104. If applicable, in the Ext field, select the drop-down list arrow, and select the extension. 105. In the Store field, select the drop-down list arrow, and select the store(current store default). 106. To enter a new pricing group for this item, select the New button. 107. In the Customer Pricing dialog box, do the following: In the Code field, enter the letter code (A – Z) of this pricing group. In the Price field, enter the price that is being charged to customers belonging to this group. Select the OK button. When you return to the Customer Pricing Table dialog box, this group displays on the item’s pricing table. 108. Repeat the above steps for each additional pricing group you want to add to this style. 109. When all selections/entries are made, select Exit. Additional Tasks from the Customer Pricing Table While viewing the Customer Pricing Table, you can also do the following: To modify an existing group in the customer pricing table, highlight the group, and select the Edit button. Then, make any changes to the code or the price, and select OK. To delete a particular group for an item, highlight the group, and select the Delete button. 40 • Move.It! Module Run.It! Retail Software System Inventory, Stock Information Stock Information provides several views of your inventory. Stock Information also provides you with the ability to change prices, commissions and tax rates. Each line on the Stock Information list is a particular SKU for a particular store. There is a separate line for each size (size-based merchandise only), extension and store within each style. Each of these lines displays different information about the SKU, depending upon which display is selected. From the menu select Inventory, Stock Information. The Stock Information window displays showing every SKU currently in Run.It By default, the Quantities option is selected as the Display type. 110. From this window, you can also perform the following tasks: Search for stock information based on criteria specified using the Quick Search or Advanced Search fields, and selecting Search. Change the display type by moving to the Display section, and clicking the radio button for the desired type. Refer to the instructions in this section entitled, “Viewing Alternate Display Information.” View and/or edit the displayed information by highlighting the item in the grid, and selecting View/Edit, making any desired changes. Close and exit the window by selecting Exit. Run.It! Retail Software System Move.It! Module • 41 Changing the Display Type Quantities This view displays the quantities for each SKU, including the current stock in your stores, the total number of units that have been sold, the total number of units received, and the number of units that are currently on order and backordered. The Quantities list also displays the barcode of each item. To view/edit detailed information for each line on the list, from the Stock Information window, select View/Edit. The Inventory Detail dialog box displays. BUTTON DESCRIPTION Qty Prc This allows you to view the quantity pricing for a particular SKU. Quantity pricing refers to a special price that is based upon the quantity that the customer is purchasing, such as 3 for $10. Quantity pricing is set by selecting Pricing, Quantity Pricing button. Serial # This displays each of the serial numbers for this SKU that are either currently in stock or have been sold. Each line on this Serial# list displays the number of the transfer order or PO on which it was received in this store, the date it was received, the date it was sold (if applicable) and the number of the receipt upon which it was sold (if applicable). The Serial# button is only available if you have selected the Use Serial Numbers option through File, Options, General. Rental Refer to the instructions in this section entitled, “Rental Pricing.” Price/Cost This displays the item’s average cost, the last cost, current price, original price, store suggested price and the manufacturer’s suggested retail. These amounts can all be modified here. History This displays the date a unit of this SKU was last sold, last received and first received. It also shows the total dollar amount of this item that you have purchased and the total dollar amount of it that you have sold. In addition, the History window displays a list of each time units of this merchandise were sold with the date of sale, the quantity, the price, any register markdown, the profit and the salesperson. 42 • Move.It! Module Run.It! Retail Software System Rental Pricing This allows you to view and modify the rental rates for this particular SKU. Just as with ordinary pricing, the rental rate for an item can always be changed at the point-of-sale. However, you can only set deposits and late fees for the item within Inventory. Rentals are only available if you have selected the Rentals through File, Options, General. While viewing the Inventory Detail dialog box, select Rental. The Rental dialog box displays. 111. Depress the button of the rental term you will use for this item (Daily, Weekly, Monthly, Hourly, Variable). The Variable term allows you to simply set the rental rate without specifying an amount of time. 112. Beneath the button you have depressed, enter the number of time units for the rental in the Standard Qty field. (This does not apply for the Variable method.) Example: If you rent this item for 3 days, you will depress the Daily button and enter 3 in the Standard Qty field. 113. In the Standard Price field, enter the amount you charge per time unit. 114. In the Late Charge field, enter a late charge that you want to charge the customer for being overdue. If the rental is daily, weekly or monthly, the late charge is assessed for every day that the item is overdue. If the rental is hourly, you can set the late charge to be applied either for every hour overdue or for every 15 minutes overdue. 115. If you want to charge the customer a deposit every time one of these items is rented, enter it in the Deposit field. 116. The Daily Pricing grid gives you the option of setting special rental rates for different days of the week. You can set the number of days of the rental if the customer rents on that particular day and the price, or you can enter a discount percentage for renting on that day. For example, you usually rent this item for 4 days at $100 per day, so you enter this information at the top of the Rental window. However, if a customer rents this item on a Thursday, they can have it for 5 days and at a 10% discount. In the Daily Pricing grid, go down to the Thursday row. In the #Days column, enter 5 and in the % Discnt column enter 10. Analysis The Analysis display is very similar to the Quantities display. However, the Analysis display does not show the units on order, the units back-ordered and the item’s barcode. Instead, Analysis shows the total dollar amount that you have purchased of the item (Bought), the total dollar amount of your sales of the item (Sales), and the last date that a unit of the item was sold. All other aspects of Analysis are identical to those of Quantities including the View/Edit button, which shows the Inventory Detail. Run.It! Retail Software System Move.It! Module • 43 Prices and Costs The Prices/Costs display shows the costs and prices for each item. This list shows the average cost, which is the average based upon each time you received the item, and the last cost, which is the cost you paid for a unit of this item the last time it was received. The Prices/Costs display also shows your current selling price (Price), and the price you originally sold the item for (Org Price). By selecting Sug Price or Store Price on the bottom left, the last column of the Prices/Costs list can display either the manufacturer’s suggested retail price or your store’s suggested retail price. In addition, the Prices/Costs display can be used to change the costs and prices for groups of items. These changes are affected by using the buttons on the bottom of the window. BUTTON DESCRIPTION Markdown This is used to markdown the selling price for a group of inventory. The price can be marked down based upon the current selling price, the manufacturer’s suggested retail, the store’s suggested retail or the original price. If you want to perform more detailed markdowns, you should use Batch Markdowns. To review a list of the back-office markdowns, refer to the section in this chapter entitled, “Pricing, Markdown List.” Price This is used to set a new price for a style or group of styles. Avg Cost Average cost refers to the average amount of money that you have paid for an item. The Cost on most Run.It reports is based upon the average cost. If you bought 10 pieces of an item for $5 each and then bought 10 more pieces of the same item for $10, the average cost of the item is $7.50. While you are given the ability to change the average cost here, it is recommended that you do NOT change the average cost of an item, since it is a number automatically calculated by Run.It Refer to the instructions in this section entitled, “Changing the Average Cost for an Item.” Last Cost Last Cost refers to how much you paid for an item the last time you received it. It is recommended that you only change the Last Cost if you did not enter a cost (or you entered an incorrect cost), the last time you received the item. Refer to the instructions in this section entitled, “Changing the Last Cost for an Item.” Rental Price This allows you to set rental rates for a group of inventory. Rental pricing is only applicable if you rent items from your stores. Refer to the instructions in this section entitled, “Setting Rental Prices.” Orig Price The original price is the price that was set for an item when it was first entered into Run.It The Original Price function is used to return the current selling price to the original price. Refer to the instructions in this section entitled, “Reverting Back to the Original Price.” Other Price This function is used to change the manufacturer’s suggested retail price, the store’s suggested retail price or the original price. Refer to the instructions in this section entitled, “Changing Other Prices.” 44 • Move.It! Module Run.It! Retail Software System When working in the Inventory, Stock Information, Prices/Costs function, there are numerous times when you select the inventory you want to change. Whenever you use the Inventory to be changed options, the following choices apply: Styles. All styles that match the search criteria will be affected by the type of change you make. You must enter something in the Style field of the search criteria to be able to use this method. Complete Brand. All items within the selected brand that will be changed. For example, if for your search criteria at the top, you select brand GM, department FOOTWEAR and Store 3, then all footwear items in store 3 that are of brand GM will be affected by the commission rate change. You must enter a brand in the search criteria to be able to use this method. Categories. All items within the selected categories will be changed. You must use the Advanced Search criteria for this method since categories must be used. Complete Store. All items within the selected store will be changed. You must enter a store number in the search criteria to be able to use this method. All Stores. All items in all stores that match the search criteria will be changed. Markdowns From the Prices/Costs display of Stock Information, select Markdown. 117. Select the Quick Search or Advanced Search criteria that define the items you want to markdown. 118. Select the Inventory to be changed. 119. Select Search. The Markdown Inventory dialog box displays. 120. Depress the $ button if you want to markdown by a dollar amount. Depress % if you want to markdown by a percentage. 121. If you are performing a markdown by dollar amount, enter the dollar amount in the field provided. If you are marking-down by a percentage, enter the percentage in the field. 122. From the Nearest list, choose the rounding method for the new price. You can round the marked-down price to the nearest $.99, nearest dollar, nearest $.49 or $.99 (depending on which is closer) or use the exact price. 123. Under the Markdown From list, select the price from which you want to take this markdown. For example, if you choose to markdown by $5 using the store’s suggested retail price and the store’s suggested retail price is $30, your new selling price will be $25. 124. Choose whether to commit or not to commit the markdown at this time using the Don’t Commit option. If the Don’t Commit checkbox is blank, the markdown takes effect immediately. However, if Don’t Commit is selected, this markdown does not immediately take effect. Instead, it is transferred to the Markdown List from which it can be committed at a later time (Pricing, Markdown list) . 125. Select OK. If the markdown was committed, the Price column is updated based upon the markdown. For example, if you wanted to markdown all Reebok merchandise in store 3 by 5% of the manufacturer’s suggested retail, and you wanted your prices to end with either .99 or .49, do the following: Select Markdown. In the Brand field enter REEBOK. In the Store field enter 3. Select Complete Brand from the Inventory to be Changed menu. Select Search and the Markdown Inventory window displays on window. Select the % button. Select the Suggested Retail radio button. Make sure that the Don’t Commit checkbox is blank. Select the $.49/$.99 radio button. In the field provided, enter 5. Select OK. A list of all Reebok merchandise in store 3 displays with new prices. Price This is used to set a new price for a style. Run.It! Retail Software System Move.It! Module • 45 NOTE Normally when you make a price change here, it will be considered a back-office markdown on your reports. If you do not want this price change to be considered a back-office markdown, select Do NOT treat price change as markdown. From the Prices/Costs display of Stock Information, select Price. 126. Enter the style whose price you want to change in either the Quick Search or Advanced Search window. 127. Select Search. 128. In the Change Inventory Price window, enter the new price for the selected style. 129. Select OK. The Price column shows the new prices. Average Cost From the Prices/Costs display of Stock Information, select Avg Cost. 130. Enter the style whose Average Cost you want to change in either the Quick Search or Advanced Search window. 131. Select Search. 132. In the Change Average Cost of Inventory window, enter the new average cost for the selected items. 133. Select OK. The Avg Cost column shows the new average costs. Last Cost From the Prices/Costs display of Stock Information, select Last Cost. Enter the Last Cost whose price you want to change in either the Quick Search or Advanced Search window. Select Search. In the Change Last Cost of Inventory window, enter the new last cost for the selected items. Select OK. The Last Cost column shows the new last costs. Rental From the Prices/Costs display of Stock Information, select Rental Price. 134. Select the Quick Search or Advanced Search criteria that define the items whose price you want to change. 135. Select the Inventory to be changed. 136. Select Search. The Rental Pricing window displays. Refer to the instructions in this chapter entitled, “Rental Pricing.” Original Price From the Prices/Costs display of Stock Information, select Orig Price. 137. Select the Quick Search or Advanced Search criteria that define the items whose price you want to change. 138. Select the Inventory to be changed. 139. Select Search. 140. On the Change Inventory Back to Original Price window, select OK. The prices for the selected items have been returned to their original values. Other Prices (Suggested Retail, Original Price) From the Prices/Costs display of Stock Information, select Other Price. 141. Select the Quick Search or Advanced Search criteria that define the items whose prices you want to change. 142. Select the Inventory to be changed. 143. Select Search. 144. On the Set Other Prices window, select the Price to Change (Suggested Retail, Store Price or Original Price). 46 • Move.It! Module Run.It! Retail Software System 145. In the field provided, enter the new price. 146. Select OK. The appropriate prices are updated. Run.It! Retail Software System Move.It! Module • 47 Rates The Rates display shows the commission percentage, spiff and tax rates for each item. A commission rate is the percentage of the price of an item that a salesperson receives for selling that item. A spiff is a flat dollar amount that a salesperson receives for selling an item. The Rates display can also be used to change the commission rates, spiffs and tax rates for items. Select the quick search or advanced search criteria that define the items whose commission you want to change. Select Search 147. In the Set Commission Rate window, enter the new commission rate for the selected items. 148. Select OK. The appropriate commission rates will be updated. Set Commission Rate From the Rates display of Stock Information, depress the Set Comm Rate button. Select the Quick Search or Advanced Search criteria that define the items whose commission rates you want to change. Select the Inventory to be changed. Select Search. In the Set Commission Rate window, enter the new commission rate for the selected items. Select OK. The appropriate commission rates will be updated. Set Spiff A spiff is a flat dollar amount a salesperson receives for selling an item. If you set a spiff of $3 on a style, every time a salesperson sells a piece from that style, he or she receives $3. From the Rates display of Stock Information, select Set Spiff. 149. Enter the Quick Search or Advanced Search criteria that define the items whose spiffs you want to change. 150. Select the Inventory to be changed. 151. Select Search. 152. In the Set Spiff window, enter the new spiff for the selected items. 153. Select OK. The appropriate spiffs will be updated. 48 • Move.It! Module Run.It! Retail Software System Set Sales Tax From the Rates display of Stock Information, select Set Sales Tax. 154. Enter the Quick Search or Advanced Search criteria that define the items whose tax you want to change. 155. Select the Inventory to be changed. 156. Select Search. 157. In the Set Sales Tax window, enter the new tax rate for the selected items—e.g., for a tax rate of 8.25%, enter 8.25. 158. Select OK. Run.It! Retail Software System Move.It! Module • 49 nventory, Reports These reports allow easy access to information about your inventory. Inventory reports can be limited to a particular brand, style, department, styles received during a certain range of dates, and numerous other criteria from which you may choose. The reports are sorted by brand. Each style on the report is further broken down by store (unless you select Combine Stores) and extension (if applicable). For size-based merchandise, the inventory reports are displayed in a grid format that shows the quantities for each size of the styles. Next to each style, the report displays its current selling price and the last cost you paid for a unit of it. Each particular type of report is discussed in this section. The following are brief descriptions of the different types of reports: On Hand. Displays a breakdown of the quantity of each style that is currently in stock in your stores. The Total On Hand is the total number of units shown on this report. Cost Value is the total amount you spent for all the units on this report. This cost value is based upon the average cost of each style on the report. Retail Value is the total retail value for all units on this report. This retail value is based upon your current selling price for each style. History. Displays the quantity received, sold, and on hand for the styles. The Total Received is the total number of received units on this report. The Total Sold is the total number of sold units on this report. The Total On Hand is the total number of on hand units shown on this report. Cost Value is the total amount you spent for all the units on this report. This cost value is based upon the average cost of each style on the report. Retail Value is the total retail value for all units on this report. This retail value is based upon your current selling price for each style. On Order. Displays the quantity currently on order, back-ordered and on hand for the styles. The Total On Order is the total number of on order units on this report. The Total Back Ordered is the total number of back ordered units on this report. The Total On Hand is the total number of on hand units on this report. Cost Value is the total amount you spent for all the units on this report. This cost value is based upon the average cost of each style on the report. Retail Value is the total retail value for all units on this report. This retail value is based upon your current selling price for each style. To Reorder. Displays the styles that have fallen below minimum stock requirements that were set in Reorder Points. This report shows the number of units currently on hand, on order for each item as well as their minimum stock requirements. The bottom row of each grid on the report is Reorder, which shows the number of units that must be ordered to bring the items back to their maximum desired quantities. The Pieces to Reorder is the total number of units to Reorder on this report. The Amount to Reorder is the total cost to order these pieces. This amount is calculated based upon the last cost of each item. You will find the To Reorder function useful when you want to maintain a certain quantity of an item in stock. You must first set stock requirements in Reorder Points for the To Reorder report to be of any use. Fill In. Displays the quantity received, sold, and on hand for the styles in a given time span. Based on sales this report displays inventory that was sold and received during the entered range of transaction and received dates. The Total Received is the total number of received units shown on this report. The Total Sold is the total number of sold units on this report. The Total On Hand is the total number of on hand units shown on this report. Cost Value is the total amount you spent for all the units on this report. This cost value is based upon the average cost of each style on the report. Retail Value is the total retail value for all units on this report. This retail value is based upon your current selling price for each style. You must enter the transaction date range. 50 • Move.It! Module Run.It! Retail Software System To view inventory reports, do the following: From the menu, select Inventory, Reports. The Inventory Reports window displays. 159. Select the button for the type of report you want to view (On Hand, History, On Order, To Reorder, Fill In). 160. In the fields provided, enter any criteria with which you want to limit the report information. You may further limit On Hand, History, and On Order reports by selecting on the Show only what’s in stock checkbox. For the Fill In report, enter the range of transaction dates in the Transaction Dates fields. 161. If you select Combine Stores, the report will not be broken-down by stores and therefore the quantities for each style will be a total for all stores. 162. For the On Hand, History, On Order and Fill In reports you have the option to Hide Costs and Totals. If this is selected, no costs appear on the report and neither will the Total Retail Value. 163. For these four reports, you also have the option of showing the full category breakdown for each style on the report. If you want the categories displayed on the report, select Show Categories. 164. When you are ready to view the desired report, select Run Report. A new window is opened and your report displays (looking something like that shown below). Run.It! Retail Software System Move.It! Module • 51 Inventory, Barcodes Reprint This feature allows you to reprint barcode tickets for any item. The Barcodes/Reprint Tickets style listing can either be viewed as a Standard List or a Detailed View. The Standard List displays each style with its brand, description, size run, extension run, plus its total quantity received, sold and on-hand. The Detailed View shows all of this, plus all 8 inventory categories for each style. To switch to the Detailed View, select on the Detailed View checkbox so that it becomes marked. From the menu, select Inventory, Barcodes/Reprint. The Barcodes/Reprint Tickets style listing displays showing a list of all styles currently in Run.It This list is identical to the Inventory Listing. 165. To modify this list so it only displays the desired styles, enter the criteria in the Quick Search or Advanced Search fields, then select Search. The desired list of styles displays. 166. Highlight the style whose tickets you want to print, and select Barcodes/Reprint Tickets. The Barcodes/Reprint Tickets dialog box displays. 52 • Move.It! Module Run.It! Retail Software System 167. From this dialog box, you can perform the following tasks: BUTTON DESCRIPTION Copy Run Prints the same number of tickets for one line on the grid as for the line directly above it, use Copy Run. This is a quick tool that helps you avoid having to enter each quantity individually. Select on the line you want to fill in, and then select Copy Run. The ticket run for this line becomes the same as the ticket run for the line directly above it. This button is only applicable for size-based inventory. Current Stock Prints tickets for all units currently in stock for a particular line, use this button. This is another button that helps eliminate the need to manually enter all of the quantities being printed. Highlight the line for which you want to set the quantity of tickets to print, then select Current Stock. The cells in this line are automatically filled in with the current stock quantities. Print Tickets When you are ready to print the tickets, select Print Tickets. You will be asked to verify that you want to print the tickets. If you have selected Ask When Printing as the ticket type for this printer through File, Options, Options for this computer only the Ticket Type window displays with a choice of ticket types. Select the button of the ticket type you are using and select OK. The tickets print. Change Barcodes To add alternative barcodes, do the following: 1. Select Change barcodes. 2. Select the barcode on the left side of the window that you want to add an alternative barcode for. 3. Select the box underneath Enter Alternative barcode. 4. In the Enter Alternative barcode field, select the barcode you want to add, and scan (or type) the alternative barcode. Select the “+” to accept the barcode. To remove the alternative barcode highlight the alternative barcode and select “X” Once you change a barcode here, it is changed in inventory, so you will not need to make this change elsewhere. Run.It! Retail Software System Move.It! Module • 53 Inventory, Change Style Attributes This function enables you to implement change style attributes on large groups of styles. Changes on style attributes do not effect style historical information. From the menu, select Inventory, Change Style Attributes. The Inventory Listing window displays. 168. Enter the criteria for the items you want to find on either the Quick Search and Advanced Search tabs. Then select Search. The list of items matching the criteria displays. 169. To choose all the items shown, pick Select All. Likewise, to delete all the items currently chosen, select De-Select All. Or click in the box to the left to mark the styles you want to change. 170. When all choices are made, select Change Attributes. The Change Style Attributes dialog box displays. 171. Make the desired changes by doing the following: Click in the check box in front of an item (e.g., Change Department) so a checkmark appears. Click the drop-down list arrow in the corresponding field (e.g., New Department), and choose the new attribute from those shown. 172. When all selections/entries are made, select OK, select Exit 54 • Move.It! Module Run.It! Retail Software System Pricing, Batch Pricing This enables you to implement a number of price changes simultaneously. Batch Pricing allows you to create a list (or batch) of styles for which price changes will be specified. These price changes do not go into effect immediately, however. Once created, the batch becomes available for processing. It is not until you process a batch that its price changes are applied. All processed changes to the selling price (Current Price) are considered markdowns and are placed on the Markdown List. (Refer to the section of this chapter entitled, "Pricing, Markdown List.") From the menu, select Inventory, Batch Pricing. The Batch Price Changes dialog box displays. 173. From the dialog box, you can perform the following tasks: Create a new batch by selecting New. Refer to the instruction in this section entitled, “Creating a New Batch.” Edit an existing batch by selecting Edit. Delete a batch by highlight the applicable batch, and selecting Delete. Process a batch by selecting Process 1. Clear all batches by selecting Clear Batches. Process all batches by selecting Process Batches. Close and exit the dialog box by selecting Exit. Run.It! Retail Software System Move.It! Module • 55 Creating a New Batch While viewing the Batch Price Changes dialog box, select New. 174. Using the Quick or Advanced searches, enter the criteria for the styles whose prices you want to change and select Search. The list of styles that match the search criteria displays under Add these items. The number of styles in this list is shown in parentheses next to Add these items. To replace this list of styles by selecting Search Again and repeating this step. 175. If you want to further limit the styles whose prices that changed, select Set Exception. Enter the desired Exception Information and select OK. Refer to the section in this chapter entitled, “Pricing, Markdown, Entering Exception Information.” 176. In the New Price field, enter the new price for this item. In the Store field, enter the number of the store that is affected by this price change. (If the Store field is left blank, the price change is applied in all stores.) From the Price to Change list, select the price that is changed to the New Price. (Current Price refers to your standard selling price for the item.) NOTE You can only specify specific prices. If you want to change price by percentage or a specific dollar amount Refer to the section in this chapter entitled, “Pricing, Markdown Entering Exception Information.” 177. You can add items to this pricing batch one at a time, or you can add all of the items on the Add these items list simultaneously. To add items individually to the batch, highlight an item on the list that you want to add to the batch. Select the 1 arrow button. That item is added to the list of batch styles on the right. The other option is to add all the items on the Add these items list to the batch at one time. In the New Price field, enter the new price that is applied to all the items on the list. In the Store field, enter the number of the store that is affected by this price change. (If the Store field is left blank, the price change applies to this style in all stores.) From the Price to Change list, select the price that is changed to the New Price. Select the All arrow button. All the items from the Add these items list are added to the list of batch styles on the right. NOTE If you set exceptions, only those styles that meet the exceptions criteria will be added to the list on the right. 178. In the Batch Name field at the top of the window, enter a unique name for this pricing batch. This helps track your batches. 179. When all the desired price changes appear in the batch on the right, select OK to save this batch of price changes. 56 • Move.It! Module Run.It! Retail Software System Processing Pricing Batches This is the procedure that is used to actually put your batch price changes into effect. When you process changes to the Current Price of an item, those price changes are treated like markdowns. They are available for viewing and modification on the Markdown List. Changes to Suggested Price, Store Price and Original Price automatically take effect when they are processed. From the menu, select Pricing, Batch Pricing. There are two methods for processing batches: If you only want to process a particular batch, highlight it on the list. Styles in Batches shows the styles in this batch with its price changes. Search and Exception Details shows the criteria used to define the items in this batch. To process this batch, select Process 1. You are asked if you want to commit the price changes on the batch at this time. If you select Yes, the markdowns on the batch (Current Price changes) will be committed immediately. If you select No, the markdowns will remain Not Committed. They can be committed at a later time from the Markdown List If you want to process all the batches on the list, select Process Batches. This will process all the listed batches that have not yet been processed. Select Yes, to indicate you are ready to process the batches. When you are requested whether you want to clear all batches. If you answer Yes you will no longer be able to edit or view the batch. If you answer No you will be able to view the batches until you manually clear the batch. 180. All of the Current Price changes on the processed batches will now be viewable on the Markdown List. Run.It! Retail Software System Move.It! Module • 57 Pricing, Batch Markdown This is a convenient tool for performing back-office markdowns. It provides much more flexibility than the simple Markdown feature in Stock Information. You can markdown various groups of merchandise at the same time. This describes how you create a new batch and add markdowns to it. Creating a new batch does not automatically apply the markdowns. The markdowns are not applied until the batch is processed and then committed. Processing batches is described in the next section. To enter a new batch markdown: From the menu, select Pricing, Batch Markdowns. The Batch Markdown dialog box displays. 181. Select New. 182. Using the Quick or Advanced searches, enter the criteria for the styles whose prices you want to change and select Search. The list of styles that match the search criteria displays under Add these items. The number of styles in this list is shown in parentheses next to Add these items. To replace this list of styles by selecting Search Again and repeating this step. 183. If you want to further limit the styles whose prices that changed, select Set Exception. Enter the desired Exception Information and select OK. Refer to the section in this chapter entitled, “Pricing, Markdown, Entering Exception Information 184. Enter either the dollar amount off, the percent off, or the percent added (markup) in the appropriate field. If the markdown is by a dollar amount, enter it in the $ Off field. If the markdown is by a percentage, enter it in the % Off field. In the Store field, enter the number of the store that will be affected by this markdown. (If the Store field is left blank, the markdown will be applied in all stores.) On the Markdown from list, select the price (current, original, suggested, etc.) upon which this markdown will be based. From the to nearest list, select the rounding method to be applied to the marked-down prices. 185. You can add items to this batch one at a time, or you can add all of the items on the Add these items list simultaneously. To add items individually to the batch, highlight an item on the list that you want to add to the batch. Select the 1 arrow button. That item is added to the list of batch styles on the right. The other option is to add all the items on the Add these items list to the batch at one time. Select the All arrow button. All the items from the Add these items list will be added to the list of batch styles on the right. NOTE If you set exceptions, only those styles that meet the exceptions criteria will be added to the list on the right. 186. Enter a name for this batch markdown. Naming the batch is not required, but is helpful for tracking purposes. 187. If you want this markdown to go into effect at a future date, enter this date in the Commit on (Date) field. This is a proposed date that can be referenced but will not go in effect until the markdown is processed. 188. When all of the desired markdowns appear in the batch on the right, select OK to save this batch of markdowns. 58 • Move.It! Module Run.It! Retail Software System Processing Batch Markdowns This is the procedure that is used to actually put your batch markdowns into effect. When you process batch markdowns, you are asked if you want to commit them immediately. All batch markdowns that have been processed can be viewed and committed (or uncommitted) from the Markdown List. To process and perform additional work on batch markdowns: From the menu select Inventory, Batch Markdowns. 189. There are two methods for processing batches: If you want to process only a particular batch, first highlight it on the list. Styles in Batches will show all of the styles in this batch along with the value of the markdown. Search and Exception Details shows the criteria used to define the items in this batch. To process this batch, select Process 1. You will be asked if you want to commit the markdowns on the batch at this time. If you select Yes, the markdowns on the batch will be committed immediately. If you select No, the markdowns will remain Not Committed. If you want to process all batches that are listed, select Process Batches. 190. All of the markdowns in the processed batch(es) are now be viewable on the Markdown List (see page 59). Specifying Exception Information The Exception Information allows you to further limit the merchandise that will be in your batches. Only those items that meet the search criteria and all of the exceptions that you enter will be available for the batch. The Exception Information can be considered to be additional search criteria for the batches. NOTE Most of the settings in the Exception Information can be set for At least or No more than. At least means that you are setting the minimum values that appear on this report. No more than means that you are setting the maximum values that displays on this report. FIELD DESCRIPTION Sell thru The (minimum or maximum) Sell Thru percentage and the number of days that this percentage is based upon Units Sold The (minimum or maximum) number of units sold and the number of past days in which these units must have been sold. Normally this number of units sold refers to a total of all stores. However, if you select In Any 1 Store then at least one store alone must meet the requirement. Units on Hand The (minimum or maximum) number of units currently in stock. Normally this number of units on hand refers to a total of all stores. However, if you select In Any 1 Store then at least one store alone must meet the requirement. Units on Order The (minimum or maximum) number of units currently on order. Run.It! Retail Software System Move.It! Module • 59 Nothing on Order When selected, only styles with nothing currently on order will be available for the batch. Days on the Floor The (minimum or maximum) number of days that the item has been in stock. Retail Sales The (minimum or maximum) dollar amount of sales and the number of past days in which these sales must have occurred. Normally this retail sales refers to a total of all stores. However, if you select In Any 1 Store then at least one store alone must meet the requirement. On Hand at Retail The (minimum or maximum) value of the units currently in stock at their retail value. Normally this retail value refers to a total of all stores. However, if you select In Any 1 Store, then at least one store alone must meet the requirement. Style Status Allows you to limit the report to certain items based upon their style status. For each of the 5 independent, style status categories, select whether you want to view only those items that are set to NO, only those items that are set to YES or both items that are set to yes and items that are set to no (All). The Style Status of a style is automatically set in Inventory and can be manually adjusted. Refer to the section of this chapter entitled, "Inventory, View Styles." Markdown % Range The desired back-office markdown percentage range. Only those items that have a markdown percentage within this range are available for the batch. Price Range Enter the desired price range. Only those items that are currently priced within this range will be available for the batch. 60 • Move.It! Module Run.It! Retail Software System Pricing, Markdown List This displays a list of inventory items on which back office markdowns have been entered. Each line shows the date the markdown was entered and the date the markdown was committed (if it has been committed). The line also shows the store, style, extension, previous price, marked-down price, and the committed status. If the Advanced Lists option has been selected (File, Options, Options for this computer only, Show Advanced Lists), the list will also show Markdown %, Suggested Price, and Store Suggested Price. The previous price (Prev Pr) is the selling price of the item at the time that the markdown was entered. Price is the selling price that results from the markdown. If the committed status (Cm) is True, then the markdown is currently in effect. If the committed status is False, then the markdown is not currently in effect. From the menu select Pricing, Markdown List. The Markdown List window displays showing the list of all back office markdowns that have been entered for a specific date range. This list can be narrowed by entering search criteria in the fields at the top of the window. Date refers to the date upon which the markdown was entered. Date Committed refers to the date upon which the markdown was committed. (This only applies to markdowns that have been committed.) Commit On (Date) refers to the date upon which the markdown is scheduled to be committed. This only applies to markdowns entered in Batch Markdowns with a Commit On Date. Batch# can be used to limit the list to markdowns from a particular pricing or markdown batch. 191. The markdown list can be further limited to show only committed or non-committed markdowns. If you select Not Comtd, only those markdowns that have not been committed will be listed. If you select Committed, only those markdowns that have been committed will be listed. If you select All, then all matching markdowns are listed. 192. When you have entered the criteria for the list, select Search. The desired list of markdowns displays. 193. From the window, you can also perform the following tasks: Print the current list of markdowns by selecting Print List. Print barcode tickets for all items on the current markdown list by selecting Tickets. A ticket is printed for each unit that is currently in stock. Delete a non-committed markdown by highlighting it in the list, and select Delete. Delete all non-committed markdowns by selecting Del ALL (By search criteria). Uncommit an item by highlighting it on the list and selecting Uncommit, Uncommit all items by selecting UnCmt/ALL (By search criteria). Commit an item by highlight it on the list and selecting Commit. The markdown takes effect and the selling price in inventory is automatically updated. Commit all items by selecting Commit All (By search criteria).. Close and exit the window by selecting Exit. Run.It! Retail Software System Move.It! Module • 61 Accessing the Markdown List Shortcut Menu While viewing the Markdown List window, move to the item for which you want to view additional information (such a the item details, ordering/receiving history, and/or unit sales). 194. Using the mouse, right-click once. A shortcut menu displays. 195. Click on the shortcut menu item you want to view. View Item. The descriptors for the style and the full grid showing the inventory quantities for this style in each store. Ordering History. Includes a line for each purchase order line and RA line for the style, computergenerated PO reference#, store number, order date, ship date, due date, Vendor, terms of the purchase order, number of units ordered, and the cost and net cost for each piece. The Net Cost reflects the discount from the vendor. If you want to view a breakdown (by size) of a particular line on this list, highlight it and select Show Run. Receiving History. Details every time this style was received from transfers, purchase orders/RA’s. Each line shows the computer-generated PO reference# or TO#, store number, ship date, Vendor and terms (only for PO’s), number of units received, and the cost and net cost for each piece. The net cost reflects the discount from the vendor. Therefore, items received from transfers do not have a net cost. Unit Sales. Inventory quantities of this item for this store and total for all stores including total units received, sold, and on-hand. Also displays total number of units sold since this markdown was committed. This feature is not available if the markdown has not yet been committed. Automatic Markdown Commit This feature is not found on a button. However, if you have selected one of the Automatically Commit Markdowns (when entering Move.It or Order.It) options through File, Options, the Automatic Markdown Commit window automatically appears when you log in to Move.It or Order.It This window shows any markdowns that have a Commit On Date within the last 6 days (including today) that have not yet been committed. If you have selected the For ALL Stores option, markdowns in all stores that should be committed are shown. If you have selected the For Current Store ONLY option, markdowns in your store that should be committed are shown. To commit all of the markdowns for which the Automatic Markdown Commit window is referring, select Commit. To print each of the markdowns for which the Automatic Markdown Commit window is referring, select Print List. 62 • Move.It! Module Run.It! Retail Software System Pricing, Coupon Coupons enable you to create sales promotions based upon a specific coupon presented at the time of sale. Coupons require a barcode # that you can either type or scan into the coupon detail dialog box. To work with coupons, do the following: From the menu, select Pricing, Coupon. The Coupon Listing window displays. 196. In the Enter Coupon Name to Find field, type the coupon name (if known). All coupons matching the information entered are displayed. 197. From this dialog box, you can also perform the following tasks: Create a new coupon by selecting New. Refer to the instructions in this section entitled, “Creating a New Coupon.” Edit an existing coupon by highlight the coupon in the list, selecting Edit, and making any changes. Print a coupon by highlighting the coupon and selecting Print. Print a list of all coupons by selecting Print List. Delete a coupon by highlighting the coupon and selecting Delete. Close and exit the dialog box by selecting Exit. Run.It! Retail Software System Move.It! Module • 63 Creating a New Coupon While viewing the Coupon Listing window, select New. The Coupon Detail dialog box displays. 198. Enter the name of the coupon promotion. 199. Scan or type barcode in to barcode field. Run.It can also generate a coupon # if this field is left blank. 200. Select either %, $, or 1 Free. 201. Select any required merchandise needed to activate the promotion. 202. Select any stores that will have the coupon active 203. Select any addition restrictions regarding date (day) time active and de-active 204. Select any merchandise to included within the coupon promotion 205. When all selections/entries are made, select selections/entries are made, select OK. 64 • Move.It! Module Run.It! Retail Software System Run…It allows you to create multiple coupons promotions that can be based on the following methods % or $ Off selected merchandise % or $ Off selected merchandise with a purchase of selected merchandise % or $ Off selected merchandise with any merchandise purchase % or $ Off any merchandise purchase with any merchandise purchase % or $ Off any merchandise purchase with a minimum dollar purchase Free Item with a purchase of selected merchandise Coupons allow you to specify the following rules and limitations on their use: A specific % or $ amount off merchandise purchased with the coupon A specific maximum # of units to be discounted with the coupon A specific minimum # of units required purchased items to activate the coupon A specific minimum purchase $ required to activate the coupon A specific list of required merchandise to be purchased to activate the coupon A specific list of stores to have the coupon active A specific day or date and time of activation and deactivation A specific list of items that can be discounted by the coupon. FIELD DESCRIPTION Name Enter a name for this coupon. Barcode Enter the barcode number to be associated with this coupon. Run.It will generate coupon # if field is left blank. % Off, $ Off, Get 1 Free Select the type of coupon. Based on your selection, the remaining fields in the dialog box change. % Off. Specifies the percentage off, and the minimum quantity and/or purchase amounts in order to use the coupon. $ Off. Specifies the dollar amount for the coupon based on quantity and/or purchase amounts. Get 1 Free. Specifies the number of items the customer needs to purchase to get an item free. Required Purchase Items Tab Specifies what item(s) the customer is required to purchase in order to use the coupon. If left blank no item is required to activate promotion. Stores Tab Designates which stores this coupon applies to. Restrictions Tab Identifies the active and expiration days, dates/times to use this coupon. Coupon Items Specifies any items that are included within the coupon promotion. Run.It! Retail Software System Move.It! Module • 65 Pricing, Timed Sale Setup Timed Sales are special sales on merchandise for a set period of time. An example of a timed sale is a Back to School sale. You set up the range of dates for each sale, the merchandise that is on the sale and the sale prices. During the period of the sale, each sale item will automatically be sold at the sale price. After the sale is over, the sale items will automatically return to their inventory price. A timed sale on an item is NOT considered a markdown and has no effect on the item’s inventory price. From the menu, select Pricing, Timed Sale Setup. The Batch Timed Sales dialog box displays. 206. From this dialog box, you can perform the following tasks: Create a new timed sale by selecting New. Refer to the instructions in this section entitled, “Creating a New Timed Sale.” Edit an existing timed sale item by highlighting it in the list and selecting Edit. Delete an existing timed sale item by highlight it in the list and selecting Delete. Process all timed sale items by selecting Process All. Process an individual timed sale item by highlighting it in the list and selecting Process 1. Remove all timed sale batches by selecting Clear All. Close and exit the dialog box by selecting Exit. 66 • Move.It! Module Run.It! Retail Software System Creating a New Timed Sale Creating a new batch does not automatically schedule the sale. The sale is not scheduled until the batch is processed. Processing batches is described in the next section. Once a timed sale is processed, it is scheduled and will automatically go into effect on its starting date. From the menu, select Pricing, Timed Sale Setup. The Batch Timed Sales dialog box displays. Select New. The Style Search dialog box displays. 207. Using the Quick or Advanced searches, enter the criteria for the styles whose prices you want to change and select Search. The list of styles that match the search criteria displays under Add these items. The number of styles in this list is shown in parentheses next to Add these items. To replace this list of styles by selecting Search Again and repeating this step. 208. If you want to further limit the styles whose prices that changed, select Set Exception. Enter the desired Exception Information and select OK. Refer to the section in this chapter entitled, “Pricing, Markdown, Entering Exception Information 209. Enter either the New price, $ Off, or % Off, in the appropriate field. In the Store field, enter the number of the store that will be affected by this timed Sale. (If the Store field is left blank, the timed sale will be applied in all stores.) In the Dates of Sale fields, enter the range of dates that this Timed Sale (Inclusive). 210. You can add items to this batch one at a time, or you can add all of the items on the Add these items list simultaneously. To add items individually to the batch, highlight an item on the list that you want to add to the batch. Select the 1 arrow button. That item is added to the list of batch styles on the right. The other option is to add all the items on the Add these items list to the batch at one time. Select the All arrow button. All the items from the Add these items list will be added to the list of batch styles on the right. NOTE If you set exceptions, only those styles that meet the exceptions criteria will be added to the list on the right. 211. Enter a name for this batch Timed Sale. Naming the batch is not required, but is helpful for tracking purposes. 212. If you need to delete an item, simply highlight the item under the Review Items listing, and select Delete. If you want to delete all items shown, select Delete All. 213. When all of the desired sale items appear in the batch on the right, select OK to save this batch of Timed Sale. Run.It! Retail Software System Move.It! Module • 67 Processing a Timed Sale If you only want to process a particular batch, do the following: Highlight it on the list. 214. Styles in Batches shows all of the styles in this batch with the sale Amt and dates. 215. Search and Exception Details shows the criteria used to define the items in this batch. 216. To process this batch, select Process 1. The Timed Sales in the batch is processed immediately. If you want to process all batches that are listed, do the following: Select Process Batches. 217. Select Yes to process the batches. 218. Select Yes again if you want the batches that were just processed to be cleared from the list. 68 • Move.It! Module Run.It! Retail Software System Pricing, Time Sales List This is the procedure that is used to actually put your timed sales into effect. When you process a timed sale, it is automatically scheduled and goes into effect on its starting date. All timed sales that have been processed can be viewed from the Timed Sale List. From the menu, select Pricing, Timed Sale List. The Sales Listing window displays. 219. From this window, you can perform the following tasks: Search for a sales listing by entering the applicable criteria (date, brand, style, etc.) and selecting Search. Delete a sale from the list by highlighting the item and selecting Delete Sale. Deleting all sales shown in the current window by selecting Delete All. Print a list of all the items shown in the current window by selecting Print List. Close and exit the window by selecting Exit. Run.It! Retail Software System Move.It! Module • 69 Pricing, Quantity Pricing Quantity Pricing refers to special prices that are charged when more than one of an item is purchased. An example of a quantity price is selling an item at 3 for $10. Run.It allows you to set multiple quantity pricing levels for any item. You can set quantity pricing for an entire group of items at one time. Once you have set the quantity pricing for an item, it can be viewed from Stock Information. Refer to the section in this chapter entitled, "Inventory, View Styles." From the menu, select Pricing, Quantity Pricing. The Quantity Pricing Groups dialog box displays. 220. From the dialog box, you can perform the following tasks: Create a new pricing group by selecting New. Refer to the instructions in this section entitled, “Creating a New Quantity Pricing Group.” Edit an existing group by highlighting the group, selecting Edit, and making the applicable changes. Delete an existing group by highlighting the group, and selecting Delete. Print a quantity-pricing group by selecting Print. Close and exit the dialog box by selecting Exit. 70 • Move.It! Module Run.It! Retail Software System Creating a New Quantity Pricing Group From the menu, select Pricing, Quantity Pricing. The Quantity Pricing Group dialog box displays. 221. Select New. The Style Search dialog box displays. 222. Using the Quick or Advanced searches, enter the criteria for the styles whose prices you want to set for qty pricing and select Search. The list of styles that match the search criteria displays under Add these items. The number of styles in this list is shown in parentheses next to Add these items. To replace this list of styles by selecting Search Again and repeating this step. 223. If you want to further limit the styles that you want to set qty pricing, select Set Exception. Enter the desired Exception Information and select OK. Refer to the section in this chapter entitled, “Pricing, Markdown, Entering Exception Information 224. In the Store field, enter the number of the store that will be affected by quantity pricing.(If the Store field is left blank, the quantity pricing will be applied in all stores.) 225. Enter a unique name for this quantity-pricing group. Then, to enter a quantity pricing level, select the green plus sign. In the resulting window, enter the number of units and price that is charged when selling that number of units—e.g., to sell 5 items for $100, enter 5 in the Units field, and 100 in the Price field. To remove an item, highlight it, and select the red minus sign. Then select OK 226. Select and set the qty and pricing. You can add items to this batch one at a time, or you can add all of the items on the Add these items list simultaneously. To add items individually to the batch, highlight an item on the list that you want to add to the batch. Select the 1 arrow button. That item is added to the list of batch styles on the right. The other option is to add all the items on the Add these items list to the batch at one time. Select the All arrow button. All the items from the Add these items list will be added to the list of batch styles on the right. NOTE If you set exceptions, only those styles that meet the exceptions criteria will be added to the list on the right. 227. If you need to delete an item, simply highlight the item under the Review Items listing, and select Delete. If you want to delete all items shown, select Delete All. 228. When all the quantity-pricing items appear on the right, select OK to save this sale. Run.It! Retail Software System Move.It! Module • 71 Administration, Brand Maintenance This allows you to track all of your brands. Brands can be entered in various places throughout Run.It, such as when you enter a new style and practically anywhere that you can search by Brand. Using Brands, you can view and add brands at any time. In addition, this Brands feature allows you to attach vendors and Remit To companies to a brand for use with purchase orders and payables. You can attach a Vendor, a Remit To or both to a particular brand. If you attach both to a particular brand, when you enter a PO for that brand, the Vendor will automatically appear on the PO entry window, but the terms for the PO will be those of the attached Remit To; e.g., Nike, Calvin Klein, Hewlett Packard. From the menu, select Administration, Brand Maintenance. The Brands dialog box displays with a list of all the brands currently in your Run.It system. 229. From this dialog box, you can also perform the following tasks: Search for a particular brand by entering the criteria in the Search for Brand field. Attach a vendor to a brand by selecting Attach Vendor. Refer to the instructions in this section entitled, “Attaching a Vendor.” Attach a company to a brandy by selecting Attach Remit to. Refer to the instructions in this section entitled, “Attaching a Remit To.” Add a new brand by selecting New and, in the New Brand dialog box, enter the new brand. “Adding a Brand” Attach an image to a listed item by highlighting the image and selecting Image. Refer to the instructions in this section entitled, “Attaching a Picture.” Delete a brand by highlighting the brand name and selecting Delete. Deleting brand does not delete the brand from the inventory. Styles attached to a brand will remain inventory under the deleted brand name. Close and exit the dialog box by selecting OK. 72 • Move.It! Module Run.It! Retail Software System Adding a Brand This is used to add a brand. A brand is needed when creating a new style, purchase order (RA) and advanced searches. From the menu, select Administration, Brand Maintenance. The Brands dialog box displays with a list of all the brands currently in your Run.It system 230. Select New. The New Brand dialog box displays. 231. Enter in Brand and select OK. Attaching a Vendor This is used to attach a particular vendor to a brand, for use with purchase orders. Once selected, the vendor becomes attached to the brand and when entering a purchase order containing this brand, the attached vendor automatically appears on the PO header window. From the menu, select Administration, Brand Maintenance. The Brands dialog box displays with a list of all the brands currently in your Run.It system 232. Highlight the brand that you want to attach a vendor to and select Attach Vendor. The Contacts dialog box displays. 233. Highlight the vendor you want to attach and select OK. If the desired vendor is not shown, use the Search feature. NOTES When a brand has a vendor attached to it, the Attach Vendor button becomes the Detach Vendor button. Select this button to detach the vendor from this brand. While viewing the Brands dialog box, you may want to see the details for a particular vendor. If so, select the View Vendor button. Attaching a Remit To This is used to attach a particular company to a brand for use with payables. Once selected, the company becomes attached to the brand and when entering a payable for this brand, the attached company automatically appears in the Expense window. From the menu, select Administration, Brand Maintenance. The Brands dialog box displays with a list of all the brands currently in your Run.It system 234. Highlight the brand that you want to attach to and select Attach Remit To. The Contacts dialog box displays. 235. Highlight the company you want to attach and select OK. If the desired vendor is not shown, use the Search feature. NOTES When a brand has a vendor attached to it, the Attach Remit To button becomes the Detach Remit To button. Select this button to detach the company from this brand. While viewing the Brands dialog box, you may want to see the details for a company. If so, select the Show Remit To button. Attaching a Picture While viewing the Brands dialog box, highlight the line item to which you want to attach an image, and select Image. 236. In the Picture Detail dialog box, you can perform the following tasks: Obtain the picture from another source (e.g., scanner) by selecting Acquire. Erase the current picture by selecting Clear. Upload a picture from a disk by selecting Load from Disk, and selecting the path containing the disk. Save the current picture to a disk by selecting Save to Disk and specifying the destination location (the system hard drive, floppy diskette, etc.). Print the current picture by selecting Print. Close and exit this dialog box by selecting Exit. Run.It! Retail Software System Move.It! Module • 73 Administration, Size and Extensions Maintenance Size Runs This function provides a listing of all the different size scales you have entered into Run.It The list displays a breakdown of each size in the highlighted size run. You have the ability to add new size scales and remove size scales that are no longer used. In addition, you can view a list of all the styles associated with a particular size scale. Size scales are applicable only for size-based merchandise. Adding a Size Run From the menu select Administration, Size and Extensions Maintenance. The Sizes/Extensions window displays with the Sizes tab displayed by default. It contains a list of the size runs that were entered. Each size of the highlighted run displays 237. Select New Run. The run definition field is now active. 238. Enter in the size run. Applying a size short cuts if applicable 239. Enter a run caption name to help identify the size run. For example: Women’s shoes sizes. 240. Select Save Changes. Adding an Extension Run An extension is a criterion other than size that is used, together with the main size scale, to further define merchandise. You can also use extensions to breakdown a no-size style. Examples of extensions are inseams for pants (32, 34, 36) and widths for footwear (D, E, EEE). This Extension Scales list provides a listing of each extension scale you have entered when creating your styles. The list displays a breakdown of each extension in the highlighted extension run. You have the ability to remove extension scales that are no longer used. In addition, you can view a list of all the styles associated with a particular extension scale. The size scale shortcuts--discussed in the section entitled, “Shortcuts for Entering Size Scales”--can also be used for extension scales. From the menu select Administration, Size and Extensions Maintenance. The Sizes/Extensions window displays with the Sizes tab displayed by default. To view the list of current extension runs, select the Extension Runs tab. 241. Select New Run. The run definition field is now active. 242. Enter in the extension run. Applying a extension short cuts, if applicable. 243. Enter a run caption name to help identify the extension run. For example, women’s shoes widths. 244. Select Saves Changes. 74 • Move.It! Module Run.It! Retail Software System FIELD DESCRIPTION New Run Add a new extension run by selecting New Run Copy Run Copy the details for an existing run by selecting Copy Run. Change caption Modify the caption for a run by selecting Change Caption. Enter the new caption in the Run Caption field at the cursor insertion point Save changes Save any new runs or changed runs made by selecting Save Changes. Cancel Discard any changes by selecting Cancel Changes Delete Remove a particular run by highlighting it and selecting Delete. Run.It does not allow you to delete a size/extension run if there are any existing styles using that run. Styles View a list of all the styles that use the highlighted size/extension by selecting Styles. The list shows the style number, brand, description, department and type of each associated style. Shortcuts for Entering Size Run This section provides a few quick tips for entering your sizes. There are four symbols used to simplify the entering of size runs for new inventory. The dash, equal sign and plus sign can ONLY be used for runs that only contains numbers. All other size scales must have each size in the run separated by a comma. The comma (,) acts as a divider between sizes. A comma entered between two numbers in a size run means that there is no size in between those two sizes in the run. The dash (-) tells Run.It to include every half size in between the two numbers that have the dash between them. Example: A size run is entered as 1-4. This means that the run includes the sizes 1, 1.5, 2, 2.5, 3, 3.5, 4. The equal sign (=) tells Run.It to include every whole size in between the two numbers that have the equal sign between them. Example: A size run is entered as 28=32. This means that the run includes the sizes 28,29,30,31,32. The plus sign (+) tells the computer to include every second whole size in between the two numbers that have the plus between them. Example: A size run is entered as 34+40. This means that the run includes the sizes 34,36,38,40. Additional Examples of Size Runs Scenario 1: You want to use a size run of 6,6.5,7,7.5,8,8.5,9,10,11,12. Enter it as 6-9,10=12. Scenario 2: You want to use a size run of Small, Medium, Large, Extra Large. Enter it as S,M,L,XL. Scenario 3: You want to use a child shoe run of 12,13,1,1.5,2,2.5,3,3.5,4,4.5,5,5.5,6. Enter it as 12,13,1-6. Scenario 4: You want to use the size run for jeans of 28,29,30,31,32,33,34,35,36,38,40,42,44. Enter it as 28=36,38+44. Run.It! Retail Software System Move.It! Module • 75 Administration, Category Maintenance This provides a listing of each of the categories you use to classify merchandise in inventory. These categories are Departments, Types, Sub-Types, Price-Points and up to four user-defined categories. Even though the third and fourth user-defined categories can have different names, they share the same pick list. That is why the Inventory Categories window only shows 3 user-defined categories. The fourth category has the same pick list as the third category. The user-defined categories are set in the File, Options. The Departments, Types and Sub-Types are all linked. Therefore, when you highlight a particular department, only the types within that department will be listed. Similarly, when you highlight a particular type, only the sub-types belonging to that type are displayed. Price Points can be entered both on the Inventory Categories window and when you enter new styles. However, if you have selected the Use Automatic Price Points option through File, Options, you can enter price points in the Auto Price Points window. Adding an Inventory Category From the menu, select Administration, Category Maintenance. The Inventory Categories window displays with a list of the inventory categories you have previously entered. 245. While viewing the Inventory Categories window, select the column tab for the inventory category you want to add a category field name. 246. Move to the bottom of the column, and select New. The New [Department/Type/Sub Type, Price Point, Season, etc] dialog box displays. 247. In the field, enter the new category field name, then select OK. 248. To enable the Quick Find feature for use at the point of sale, click in the check box next to the applicable department. When the checkbox is selected, that department is available use the Quick Find function at the point-of-sale to locate an item. If you want to enable this feature for an entire department, select all check boxes. FIELD DESCRIPTION New Add a new inventory category by selecting New Delete Delete an item by highlighting the category, and selecting Delete. Deleting categories does not delete the categories from the inventory. Styles attached to a category will remain in inventory under the deleted category name. Image Attach an image to an item by selecting Image. Print Print a breakdown all inventory categories by selecting Print Exit Close and exit the window by selecting Exit 76 • Move.It! Module Run.It! Retail Software System Administration, Reorder Points Reorder Points allows you to set the minimum and maximum number of pieces you want to always have in stock for a particular item. Once you enter these reorder points, both the To Reorder Inventory Report and Auto Order feature in Order.It become available to you. If you fall below the minimum number, then the To Reorder and Auto Order reports provide the number of units needed in order to reach the maximum desired quantity. The Reorder Points style listing can either be viewed as a Standard List or a Detailed View. The Standard List displays each style with its brand, description, size run, extension run, plus its total quantity received, sold and onhand. The Detailed View shows all of this, plus all eight inventory categories for each style. From the menu, select Administration, Reorder Points. The Reorder Points Style listing window displays. 249. To modify the contents of the list, enter your criteria in the Quick Search or Advanced Search fields and select Search. The new list of desired styles displays. 250. Highlight the style whose reorder points you want to set and select Reorder Points. The Reorder Points dialog box displays. The middle of the window displays this style’s full grid and looks like the View Inventory window except that there are twice as many columns. There are rows for each store and extension. For size-based merchandise, there are two columns for each size. The green columns are for the minimum stock requirements and the pink columns are for the maximum stock requirements. For nosize merchandise there are simply two columns: a green and a pink. 251. Enter the minimum number of units you want to maintain in the Min (green) columns and enter the maximum number you want to have in the Max (pink) columns. The totals for each store and the grand total will update with each addition or change you make. 252. If you are on a particular line of the grid and you want to copy the reorder points from the line directly above, select Copy Reorder Run. This makes entering your Reorder Points much easier, especially if you want to maintain the same stock quantities for multiple stores and extensions. 253. If you want to remove all reorder points for the current style, select Clear Reorder Points. Run.It! Retail Software System Move.It! Module • 77 Administration, Favorite Run A Favorite Run is a size run that has standard quantities specified which may be re-used repeatedly when ordering merchandise. Favorite Runs are useful for purchase orders and can also be used for transfers. Instead of having to manually type in each quantity that you are ordering, you may select a Favorite Run. Since Favorite Runs are size runs, they are only available for size-based merchandise. From the menu, select Administration, Favorite Runs. The Favorite Runs window displays with a list of your size runs. 254. To view or create Favorite Runs for a particular size scale, highlight that run and select View. A new Favorite Runs dialog box displays. All the previously entered Favorite Runs for this size run are displayed. Each Favorite Run is on a different line. 255. To modify one of these existing Favorite Runs, highlight the cell you want to change and type the quantity you want. To enter a new Favorite Run, select on the first blank line and enter the quantities. Each favorite run will be assigned a letter starting with A. 256. When you are finished examining this size run’s Favorite Runs, select Exit 257. If you want to remove a particular Favorite Run from a size scale, Click on that line of that Favorite Run and select Delete. This Favorite Run will no longer be available when you make orders. 258. When you are finished with all Favorite Runs, select Exit. 78 • Move.It! Module Run.It! Retail Software System Administration, Linked Items This is used to link certain items to others. When the base item is sold, all the items linked to this base item are automatically added to the receipt. You may find Linked Items convenient if you always sell certain items together. As an example of the use of linked items, consider soda bottle deposits. If you link the deposit to the soda item, whenever you scan a soda bottle at the register, a line for the deposit will automatically appear on the Sale Window. In order to be able to use Linked Items at the register, you must enable the Linked Items at Register option through File, Options. From the menu bar, select Administration, Linked Items. The Linked Items List window displays. 259. From this window, you can perform the following tasks: Search for items by entering the applicable criteria and selecting Search. Create a new linked item by selecting New. Refer to the instructions in this section entitled, “Linking Styles.” Delete an item by highlighting the item, and selecting Delete. Or, delete all items shown by simply selecting Delete All. Print a list of the current items by selecting Print List. Close and exit the window by selecting Exit. Linking Styles To link one single style to another single style, do the following: While viewing the Linked Items List, select New. The Link Items dialog box displays. 260. Highlight the base style you want from the When purchasing these items list on the right side. 261. Double-click the linked style on the Add these items list. These two styles are now linked will be displayed on the left side of the window.. 262. If you want to link every styles shown, select Link All on the left with the style highlighted on the right side of the window. 263. When all selections/entries are made, select Exit. Run.It! Retail Software System Move.It! Module • 79 Administration, Suggested Items This function is used if a particular item is a complement to the item the customer is purchasing Whenever the base item is sold, a window displays at the register offering the suggested substitute for the customer for purchase. From the menu bar, select Administration, Suggested Items. The Suggested Items List window displays. 264. From this window, you can perform the following tasks: Search for items by entering the applicable criteria and selecting Search. Create a new item by selecting New. Refer to the instructions in this section entitled, “Creating a New Suggested Item.” Delete an item by highlighting the item, and selecting Delete. Or, delete all items shown by simply selecting Delete All. Print a list of the current items by selecting Print List. Close and exit the window by selecting Exit. Creating a New Suggested Item From the menu bar, select Administration, Suggested Items. The Suggested Items List window displays. 265. While viewing the Suggested items list window, select New. The Suggest Items Setup dialog box displays. 266. From the left side of the Suggest Items Setup window using the Quick or Advanced searches, enter the criteria for the styles that you want to be suggested and select Search. The list of styles that match the search criteria displays. 267. From the right side of the Suggest Items Setup window using the Quick or Advanced searches, enter the criteria for the styles that you want to use as base styles when requesting the suggested item and select Search. The styles that match the search criteria displays. Double click on the style on the left side of the window to be linked with the style on the right 268. If you want to link every style shown for suggestion, select Accept Suggestions. 269. When all selections/entries are made, select Exit. 80 • Move.It! Module Run.It! Retail Software System Administration, Substitute Items This function is used to attach substitutions for an item that is currently not in stock. Substitute suggestions are viewed at the register by selecting View Item. Highlight the item that is out of stock and select on the Substitute button. A list of substitute items to suggest displays along with the current stock quantities of these items. From the menu, select Administration, Substitute Items. The Substitute Items List window displays. 270. From this window, you can perform the following tasks: Search for items by entering the applicable criteria and selecting Search. Create a new item by selecting New. Refer to the instructions in this section entitled, “Creating a New Substitute Item.” Delete an item by highlighting the item, and selecting Delete. Or, delete all items shown by simply selecting Delete All. Print a list of the current items by selecting Print List. Close and exit the window by selecting Exit. Creating a New Substitute Item From the menu, select Administration, Substitute Items. 271. In the Substitute Items List window, select the New button. The Substitute Items Setup dialog box displays. 272. To setup your substitution list, do the following: On the right side, select the item you want to indicate a substitution for. If you want to search for an item, enter the criteria on either the Quick and Advanced tab. When the item is shown under the When out of these items list, move to the left side, and select the item(s) you recommended as the substitution from the right side of the window. Double click on the left side of the window to link each item individually or multiple selections. If you want to search for an item, enter the criteria on either the Quick and Advanced tab. When all selections/entries are made, select Accept Substitutions. Then, select Exit. − Run.It! Retail Software System Move.It! Module • 81