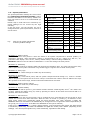
1
SYSTEM MANUAL Radio fire alarm system SeCa CC100 PREMIUM Edition FZ290415 Contents 1. CC100 PREMIUM radio fire alarm control panel ............................................................................. 4 1.1 Versions ........................................................................................................................... 4 1.2 Function ........................................................................................................................... 4 1.3 Operation and display elements .......................................................................................... 4 1.4 Installing the control panel ................................................................................................. 5 1.5 Switching the CC100P radio fire alarm control panel (initialization) on...................................... 5 1.6 Configuration menu ........................................................................................................... 5 1.7 Function keys ................................................................................................................... 9 1.8 System registration ......................................................................................................... 10 1.9 General reset for a system component ............................................................................... 11 1.10 Commissioning .............................................................................................................. 11 2 Model 100 PREMIUM radio repeater ......................................................................................... 13 2.1 Function ......................................................................................................................... 13 2.2 Operation and display elements ........................................................................................ 13 2.3 Installing the 100 PREMIUM radio repeater ......................................................................... 13 2.4 Turning on the model 100P radio telephone dialler (initialization) .......................................... 14 2.5 Assigning the system components ..................................................................................... 14 3 Model 100 PREMIUM radio control module ................................................................................ 14 3.1 Function ......................................................................................................................... 14 3.2 Operation and display elements ........................................................................................ 14 3.3 Addressing / connecting the relay: .................................................................................... 14 3.4 Installing the 100 PREMIUM radio control module ................................................................ 15 3.5 Turning on the model 100P radio control module (initialization)............................................. 16 3.6 Assignment of detector events to the relay contacts ............................................................ 16 3.7 Expanding the 100P radio control module to 4 or 6 relay contacts ......................................... 16 4 Model S smoke detector with S 100 PREMIUM radio module ....................................................... 17 4.1 Function ......................................................................................................................... 17 4.2 Operation and display elements ........................................................................................ 17 4.3 Installing the model S 100P or SAB 100P radio smoke detector ............................................. 17 4.4 Initialization.................................................................................................................... 17 5 Temperature detector with 01 100 PREMIUM radio module ......................................................... 18 5.1 Function ......................................................................................................................... 18 5.2 Operation and display elements ........................................................................................ 18 5.3 Installing the 01 100P radio temperature detector ............................................................... 18 5.4 Initialization.................................................................................................................... 18 6 100 PREMIUM radio push-button alarm .................................................................................... 19 6.1 Function ......................................................................................................................... 19 6.2 Operation and display elements ........................................................................................ 19 6.3 Installing the 100P push button alarm ................................................................................ 19 6.4 Turning the device on (initialization) .................................................................................. 19 7 MIDI 100 PREMIUM radio siren and flasher ............................................................................... 20 7.1 Function ......................................................................................................................... 20 7.2 Configuration .................................................................................................................. 20 7.3 Installing the 100P MIDI ................................................................................................... 20 7.4 Turning the device on (initialization) .................................................................................. 20 8 Medium / Large 100 PREMIUM radio telephone dialler ................................................................ 21 8.1 Function ......................................................................................................................... 21 8.2 Operation and display elements ........................................................................................ 21 8.3 Installing the radio telephone dialler .................................................................................. 21 8.4 Turning on the radio telephone dialler (initialization) ............................................................ 21 8.5 Configuring the radio telephone dialler ............................................................................... 22 8.6 Call service ..................................................................................................................... 24 8.7 Resetting all system and line parameters ........................................................................... 25 9 Events and their signals ......................................................................................................... 25 9.1 Missing status reports ...................................................................................................... 25 9.2 Malfunction due to outside signals ..................................................................................... 25 9.3 Battery malfunction ......................................................................................................... 26 9.4 No status from repeater ................................................................................................... 26 9.5 Power failure .................................................................................................................. 26 9.6 Start-up ......................................................................................................................... 26 9.7 Tampering ...................................................................................................................... 26 9.8 Alarm ............................................................................................................................ 27 © Copyright SeCa GmbH Page 2 of 32 SeCa CC100 PREMIUM system manual Fundamentals for the authorized professional installer 9.9 Signalling alarms from other detectors ............................................................................... 27 10 Operational statuses ............................................................................................................ 28 10.1 Monitored operation ....................................................................................................... 28 10.2 Unmonitored operation ................................................................................................... 28 10.3 Service operation .......................................................................................................... 28 11 Radio module status information ........................................................................................... 29 12 Miscellaneous ...................................................................................................................... 29 12.1 Technical data ............................................................................................................... 29 12.2 Conformity ................................................................................................................... 29 © Copyright SeCa GmbH Page 3 of 32 1. CC100 PREMIUM radio fire alarm control panel 1.1 Versions The CC100 PREMIUM radio fire alarm control panel is available in three models: 1. a version with an integrated power adaptor, 2. a version with a plug-in power unit, and 3. a version for the installer. In all versions, the functionality is identical. The only difference is in the energy supply. Versions 1 and 2 differ only in that they are supplied with power though an internal and external power adaptor (plug-in power unit). Version 3 is developed specially for installers and comes without a power supply. It is intended for surveying buildings to test their suitability for radio technology. This work is made easier by the absence of a power supply. It is not suitable for permanent operation, because the batteries have only about a 35-hour operating capacity (without relays). 1.2 Function This is a state-of-the-art radio fire alarm control panel with special project planning, commissioning and service functions, as well as an additional PC interface for easy design, operation and maintenance of the system. The following system components can be logged in at the control panel: 1. Radio repeater (cascadable in threes), 2. Radio hazard detector (smoke, temperature and push-button), as well as 3. Radio signalling devices (sirens, flashers, telephone diallers for remote signalling). In addition, integration of interface and control modules allows operation of signal generators and actuators, along with connection to wired systems. 1.3 Operation and display elements Programming keys P1 to P6 (double assignment) Not assigned Not assigned Relays PIN code System parameters Radio telephone dialler P P P P P P 1 2 3 4 5 6 Alarm Alarm Alarm Alarm Alarm Alarm group group group group group group 1 2 3 4 5 6 To protect against unintentional activation, the programming keys are recessed. They are used for system component registration and for configuration. With a short press on the key, the display shows the next free address for registering a system component, and the LED for the corresponding group blinks. Pressing the key longer, until the LED goes out, puts you into the configuration menu. Both modes can be left by pressing the key again. LED for status sensors Display Function keys F1 to F4 (from right to left) LED for control panel status Function keys Pressing F1 through F4 brings up the functions necessary for operation and service (see their corresponding sections in this manual). Display and LEDs Display: In status monitoring mode, the display shuts itself off after 10 minutes of inaction. Pressing the F3 function key turns it on for about 10 seconds. LED for system component status (upper part of display): When an event arrives, the corresponding status LED lights up (Detector = malfunctions including power failure, Battery = battery replacement and Radio = status report breakdown). Pressing function key F3 activates the display to show the event’s system component address as well as that of the group displayed by the LED. © Copyright SeCa GmbH Page 4 of 32 SeCa CC100 PREMIUM system manual Fundamentals for the authorized professional installer LED for control panel status: (underneath the display): The system is working perfectly if only the Power LED glows in status monitoring mode. If it blinks, the control panel isn’t getting any supply voltage and will then work on emergency power (approx. 35 hours if there is no alarm). The Fault LED blinks, if there is a control panel malfunction. The Battery LED blinks if the emergency power batteries need to be replaced. The Sound Off LED signals that all of the system’s acoustic signal generators are temporarily shut off. The Check Off LED lights when the control panel is in unmonitored operation. In this mode, no malfunctions can be shown, but arriving alarms are signalled. This LED also lights when the control panel is connected to the PC; in this mode complete signalling is taken over by the PC. The Test On LED lights up in maintenance mode (visual or visual plus acoustic alarm check – Configuration menu P5, System parameters 8 (Maintenance), setting 2 or 3. In this mode alarms are not forwarded and are signalled only visually (setting 2) or with a short acoustic tone (setting 3). 1.4 Installing the control panel CC100P radio fire alarm control panel with integrated power adaptor Please use VDE-tested connecting clamps for the power connection from the control panel to the supply line. The separator and additional short circuit protection in the building installation must conform to EN60950 / VDE 0805. The installation must be performed only by qualified electricians in observance of applicable regulations. 1. First place the batteries for the emergency power supply into the battery compartment, making sure to observe the correct polarity. Then connect the battery compartment to the battery clip. Note: In order to initialize the emergency power function it is necessary to connect the control panel to the power supply (230V) by using the cable with plug. 2. Before connecting the control panel to the supply line, please pull the plug and cut the connection to the emergency power supply by releasing the battery clip. The control panel should be currentless by now. Please secure the control panel against unintentional reactivation. 3. Before mounting the control panel, please make sure the 230V power supply is currentless and secured against unintentional reactivation. 4. Prepare the connector cable for connection with the supply line by cutting off the plug and stripping off the insulation of the connecting wires. Now plug the connecting wires of the control panel and the 230V AC power supply in their respective connecting clamps. 5. Use the included screws and anchors for installing the control panel. Install the lower screws first, and then the upper ones. 6. Then turn the 230V AC power supply on and reconnect the emergency power. CC100P radio fire alarm control panel with plug-in power unit The installation is done as described above, but there is no connection to the power supply line. Therefore the installation doesn’t need to be done by a professional electrician. Simply connect the plug-in power unit to the connector socket after you have connected the emergency power batteries and have installed the control panel. 1.5 Switching the CC100P radio fire alarm control panel on (initialization) After power is connected, the device undergoes a self-test and then the green Power LED and the red Check Off LED light up to indicate that there is no sensor status monitoring; the number 100 appears in the display. 1.6 Configuration menu P 1 and P 2 – not assigned No. © Copyright SeCa GmbH Event Display 1 Alarm Group 1 1_ _0 2 Alarm Group 2 2_ _0 3 Alarm Group 3 3_ _0 4 Alarm Group 4 4_ _0 5 Alarm Group 5 5_ _0 Page 5 of 32 P 3 – Relays (events and assignment) Three relays can be controlled through the adjacent events. The display shows the first number of the events, and the second shows the assigned relay. Choose the event with the F4 and the relay with the F3 key. 6 Alarm Group 6 6_ _0 7 Sensor malfunction 7_ _0 8 Control panel malfunction 9 not assigned No display 10 not assigned No display 11 Collective alarm 11_ _0 12 Collective failure Operating mode: 0-static, 1pulsed 12_ _0 13 Fig.: 8_ _0 13_ _0 Events for relays (factory default 0 – no relay assigned) Assignment of the DSUB-15 plug (relay connector cable) A B C Contact assignment Relay A B C Relay 1 Contact 1 Contact 6 Contact 11 Relay 2 Contact 4 Contact 3 Contact 2 Relay 3 Contact 15 Contact 10 Contact 5 Note: The assignment of the cable colour to the contacts is included with the connector cable (item No. 4100080). Please note that the colour indicators — for technical reasons — may differ. Important: Use only the contacts indicated here, because otherwise the control panel can be destroyed! P 4 – PIN Here an individual PIN can be entered; the factory default setting is 1111. The PIN prevents unauthorized access and for certain functions is requested several times (such as when deleting). To make the configuration easier, an entered PIN works for 10 min. after the most recent activity (keystroke). Modifications are made with the function keys F3 (setting the number) and F4 (confirming the number and changing to the next place). The PIN query can be deactivated though setting “0000” (until the next general reset). © Copyright SeCa GmbH Page 6 of 32 SeCa CC100 PREMIUM system manual Fundamentals for the authorized professional installer P 5 – System parameters The system parameter settings are reserved for the authorised professional installer. Unprofessional alterations to the factory default settings can lead to errors or to unintentional operations! Please keep in mind that errors caused by improper settings are not covered by the legal warranty. In the P5 menu, use the function key F4 to change between system parameters, and F3 to set the value. No . System parameter Setting Default 1 = 100 sec. 1 Status reports 1-3 3 2 Sensitivity 1-6 2 3 Fuzzy logic 0 0 4 System key 1-50 1-50 1-3 3 <10000 00 1 = high factory default 6 Status reports indirect System stability 7 Detector horns (global) 0-1 0 0 = off 8 Service 0-3 1 1 = on 9 Memory sound event 0-3 3 see below 0 0 factory default 0-1 0 0-400 days 5 factory default 10 Not assigned Fig.: Overview of system parameters at factory default settings 11 Heterogeneous system 12 Not assigned Reset maintenance interval Automatic commission14 ing with topology build SE A Parameter 1: Status reports Sets the maximum time period in which the status of all system components is checked (battery replacement, operation, radio connection). Setting 1 corresponds to 100 sec., setting 2 to 200 sec., etc. (Tolerance until display: max. 15 sec., factory default setting: 300s according to EN54-25). Attention: Watch out for the effects of Parameter 2. It can also change the time period! Parameter 2: Sensitivity Depends on the settings for building data and the desired notification time. The value set tells how many status report failures (radio connection only) should trigger a signal to the CC100P control panel. Parameter 3: Fuzzy logic Special functions: These settings are made only at the factory. Parameter 4: System key Upon registration, each control panel, and the system components that belong to it, receive a number that is unique to the system and is set here. Keep in mind that this number must be different for separate systems in the same range, because otherwise malfunctions will result. Parameter 5: Status reports, indirect These settings are made only at the factory. Parameter 6: System stability Display of absent status reports: 6_00 indicates a failure without outside signals, and 6‾ˉ00 a failure due to them. Change the display using F1, reset by pressing F1 and F3 at the same time until the PIN is requested; then enter the PIN. Parameter 7: Detector horn All hazard detectors with an internal horn can be configured here, such that they can be turned on when alarms are received from other detectors. When the horn is turned on (setting 1), all detectors of the same group (alarm line) acoustically signal the alarm situation from other detectors. A MIDI 100 PREMIUM radio siren and flasher can additionally be configured so as to signal the alarm independently of the group (see Configuration of the MIDI 100 PREMIUM in this system manual). If the horn is shut off (setting 0 = factory default setting), only the detector that senses the alarm signals it acoustically. Additionally, the MIDI 100 PREMIUM can signal this visually with a flasher (depending on the settings). The control panel signals every event acoustically, regardless of this setting. © Copyright SeCa GmbH Page 7 of 32 Note: At commissioning, the setting will always be assigned (globally) to all detectors. An individual setting can be made only with the CC100 PREMIUM Assistant software. The MIDI 100 PREMIUM’s visual signal (flash) cannot be turned off. When there is an alarm, it flashes – depending on the setting – with or independently from the affected group (alarm line). Parameter 8: Service Maintenance to the system is done according to applicable standards and regulations. It is recommended that it be done at least once a year. Setting to setting 1 provides a reminder after 400 days through an acoustic signal, which sounds approximately every 40 seconds if maintenance is due. The display shows SE_1. The signal can be shut off temporarily by setting the value to 0. The maintenance interval (parameter SE) is reset after maintenance has been performed. For alarm testing the sensors without the CC100 PREMIUM Assistant software, set value 2 (visual only) or 3 (visual and acoustic), the Test On LED glows at this setting. If the alarms are acknowledged at the control panel, they are not forwarded. Parameter 9: Memory sound event The control panel can be notified approximately every 45 seconds when event reports, such as for malfunctions or alarms, have been acknowledged. This can be done by an acoustic signal or additionally by a visual display. (See Point 1 “Display and LEDs”.) The following settings are possible: Setting 0 - no signal Setting 1 - acoustic and visual signal Setting 2 - no acoustic signalling but only visual, radio malfunctions are automatically reset as soon as they have ended. Setting 3 - (factory default) acoustic and visual signal for expired alarms, sensor and battery malfunctions (no acoustic signal for radio malfunctions that are reset automatically). Parameter 10: unassigned Parameter 11: Heterogeneous system These settings are made only at the factory. Parameter 12: unassigned Parameter SE: Maintenance interval Display of SE_0 = within maintenance interval, and SE_1 = expired maintenance interval (400 days). Pressing the F3 key shows the time elapsed since the previous service. Press F1 and F3 simultaneously to reset the maintenance interval to its original value of 0. Entering the PIN one last time confirms the process. Parameter 14: Automatic commissioning Pressing F1 and F2 starts automatic commissioning, transferring the set parameters. Detectors with too weak a signal during commissioning are automatically integrated through repeaters. If commissioning is successful, the display shows “P3”. After unsuccessful commissioning, F0 to F15 are displayed. Confirm this result by pressing F1. If commissioning is not successful, the error code (F0 to F16) is displayed, along with the detector or repeater that caused the termination. An error code between F5 and F9 indicates an error caused by a repeater (communication problems due to a weak signal). The other error codes indicate errors due to communication problems between the control panel and repeaters on one end, and the other system components on the other. Note: Be aware that commissioning is also terminated if the set minimum signal strengths are not reached. To change them, you need the CC100 PREMIUM Assistant software. © Copyright SeCa GmbH Page 8 of 32 SeCa CC100 PREMIUM system manual Fundamentals for the authorized professional installer P 6 – controlling the radio telephone dialler First press F3 to determine the dialler model (choices: 0 for no dialler, 2 for medium or 4 for large). Then order the events to the dialler’s input lines as follows: In the display the first number shows the event and the second shows the assigned input line of the dialler. Choose the event with the F4 key and the input line with the F3 key. Fig.: Events for dialler without an assigned line (factory default setting). No. Event Display 1 2 3 4 5 6 7 Alarm Group 1 Alarm Group 2 Alarm Group 3 Alarm Group 4 Alarm Group 5 Alarm Group 6 System component malfunction Control panel malfunction 1__0 2__0 3__0 4__0 5__0 6__0 7__0 8 9 10 Collective alarm Collective failure 8__0 9__0 10__0 Note: Event forwarding through the dialler to a corresponding call number must be set at the dialler (see Configuring the radio telephone dialler). 1.7 Function keys Pressing F1 through F4 brings up the special functions necessary for operation and service. Pressing two keys at the same time, and the length of time they are pressed, brings up the functions detailed below: Status and signal strength System components F3 Scrolling with the F3 key brings up the addresses of all registered system components. The glowing LED shows each one’s group and — if available — the status for malfunctions. The addresses contain strokes that indicate the status within the radio network (two dashes e.g. “7=01” for sensors and signalling devices, three dashes “9 01” for the 100 PREMIUM radio repeater) and the signal strength prefixed at commissioning. If there is not enough signal strength for commissioning, a stroke is shown at that place (- = 01). A commissioning value can be missing due to preset topology that has not been measured. For that reason, this approach is not recommended. Collective-call feature (all LED groups off) F2+F3 All detectors with activated horns (see Parameter 7) are called. This type of calling is suitable for checking mute switching of system components, because only system components with activated horns respond. When the control panel is in normal operating mode (no address on the display and all LED groups off), press F2+F3 until the display shows FF and a revolving zero as a symbol of the calling process. In monitored operation, the call duration is a maximum of 25 sec., and in unmonitored operation 120 sec. (regardless of the chosen settings or topology) for individual detectors. With the radio siren/flasher of the MIDI 100 PREMIUM, the flasher activates if the siren is muted. Pressing F2+F3 again ends the call. If the call does not end, after about three minutes the horns turn themselves off autonomously (time out), and the flashers will change their interval from 2 to 8 seconds. The flasher can be stopped only by a new call with the OFF signal. Attention: Pressing the keys alternately turns the collective-call feature either on or off. The display shows a right-rotating zero (OFF) or a left-rotating zero (ON). If a call is ended improperly, the next call can send an OFF or ON signal. In that case, repeat the process! Single call F4 Set the desired address of the detector that is to call by scrolling in the display using the F3 key, then immediately press F4 until the display shows the detector address at the left, and at the right a rotating zero to indicate the calling process. Maximum call duration is 25 sec. The detector responds intermittently with a short (activated horn) or long uninterrupted melody (deactivated horn). This function is suitable for testing the horn settings and for identifying individual detectors. List of indirect system components (repeater address in display) F2+F3 To receive the assignment of the system components to their respective repeater, use F3 to scroll to the desired repeater address (e.g., 9 01), and then immediately press F2 and F3 briefly. You can use F3 to call up all assigned addresses. To get the normal display back, use F1 to delete these addresses one after the other. © Copyright SeCa GmbH Page 9 of 32 Mute switching during an alarm F2 If an alarm is signalled acoustically, you can use F2 to shut it off temporarily for about 3 minutes, in order to determine the cause. All actions are reset within 20 sec. (max. 36 sec.), the display remains and the Sound Off LED blinks. After that time has expired, the actions are enabled again within 30 sec. Note: If during that time an alarm from another sensor is received, mute switching is cancelled. Confirm an event F1 Malfunctions or alarms can be confirmed through F1 (version 60 and above). Their associated signals to the control panel are reset immediately, and those to the other system components are reset after about 20 sec. (max. 36 sec.). Note: A dialler-forwarded alarm that has already been triggered at the time of confirmation can no longer be reset. Deleting individual addresses (approx. 10 sec.) F1 Set the desired address of the detector that is to delete by scrolling in the display using the F3 key, then immediately press F1 until the LED group and address stop blinking. Entering the PIN one last time confirms the process. General reset (approx. 10 sec.) F1+F3 Press F1 and F3 until all group LEDs stop blinking. Entering the PIN one last time confirms the process. If all settings are reset to factory default, only the system key and the data in event memory remain. Other functions In addition to those mentioned above, the following functions can be performed only with the CC100 PREMIUM Assistant software: Configuring dual detector dependency (four pairs) Determining minimum signal strengths for automatic topology build-up Individual detector horn settings Restart function for subsequent commissioning of individual system components. Measuring battery voltage and the current signal strength of all or individual system components Visualizing and printing various logs and topologies Signal strength charts (values for the system components to all repeaters and to the control panel) Integrated analyser function 1.8 System registration Registering the system components 1. Before you do the registrations, go into configuration menu P5 and set the system parameter 8 to the value of 3 (visual and acoustic alarm testing). This prevents an unintentionally sent test alarm from triggering a collective alarm. 2. Register the system components under their respective groups, therefore briefly press the corresponding programming key, and the next free address will be shown. 3. Then briefly press twice the programming key of the radio module on the participant to be registered. 4. Successful registration will be indicated at the control panel by a long glow of the corresponding group’s LED and by the appearance of the received radio signal in the display. 5. After about 10 sec., the group’s LED shut off, and the control panel is ready to register more system components. Registration errors: Failed registration can have various causes. The following are common mistakes that you should rule out: The registration mode was not activated at the control panel. The radio module has already been logged on and is addressed. Do a general reset of the radio module and log in again. When in doubt, you can use the CC100 PREMIUM Assistant software to read out the data (see Chapter 11, Radio module status information). The login has occurred immediately after the voltage was applied. Previously addressed radio modules are in receiver mode for the first 30 seconds after the voltage is applied. Meanwhile, all other functions are locked, so a login or test alarm is not possible. Wait 30 sec. and then repeat the process. The system component has no power (battery not connected or drained, etc.). © Copyright SeCa GmbH Page 10 of 32 SeCa CC100 PREMIUM system manual Fundamentals for the authorized professional installer The radio module is not compatible (status information readout), is for a different system or is defective. The registration process is interrupted by an outside radio signal or strong electromagnetic fields. Eliminate these causes or perform the registration process outside the field of interference. Double programming An attempt to double program a system component that is already registered is indicated at the control panel by the Detector LED lighting and by the component’s address appearing in the display. System limitation A radio telephone dialler can be operated for the CC100P radio fire alarm control panel. It must be registered in Group 6. For a CC100P radio fire alarm control panel, five 100 PREMIUM radio control modules and five 100 PREMIUM radio repeaters with 16 addresses each can be operated and registered to groups as desired. This does not take the repeater addresses into account. Altogether, 100 system components can be administered. 1.9 General reset for a system component Press and hold the programming key on the radio module until its LED blinks (after about 10 seconds), and then (after 5 more seconds) stays on. Now let up on the programming key. The LED stops blinking and the process is finished. All parameters have been reset to factory default. 1.10 Commissioning Automatic commissioning 1. Setting the system key, (configuration menu P5, system parameter 4, values 1-50) 2. Set the system parameters if the factory default settings are not desired. For this, please follow the operating manual exactly! Setting changes must be done only by trained professional installers. 3. Registering system components (see Point 1.8) 4. To begin commissioning with automatic topology build-up, call up configuration menu P5, and use F4 to bring up the parameters until 14_A appears. Then press the function keys F1+F2 at the same time until the right digit appears as a rotating zero in the display. Successful completion is indicated by P3. After confirmation with the F1 function key, commissioning is successfully completed. A commissioning error is indicated by F0 to F15. This message is also confirmed with the F1 key. Use F3 to call up the addresses for the system components responsible for the error (see Error messages during commissioning). Depending on how complex the topology is, commissioning can take between 8 (no repeaters, no cascade) and 34 minutes (5 repeaters, 3 cascades). If it significantly exceeds this time, it is usually because of missing detectors (or ones that are not ready for operation). Progress is shown by displaying the level (0 to 15), and there can be repetitions. Abbreviated commissioning F1+F2 (approx. 5 sec.) This commissioning method is preferred only if the radio system’s previous topology has been working error-free, because there is no need to rebuild the radio network and the topology is retained! After service, during import of new system parameters, or after replacement of a battery or detector, this commissioning method is therefore recommended. For this, press the F1 and F2 function keys (without bringing up configuration menu P5) until the right-hand number appears in the display as a rotating zero. Successful completion is indicated by P3 and is confirmed with the F1 function key. Error messages during commissioning If commissioning ends in an error due to changing environmental conditions, missing system components (including a missing battery) or insufficient signal strength, you will receive a report on the time of the termination (F0 to F15) and the addresses of the system components causing it. Note that termination also occurs if the specified minimum signal strength is not reached. Possible causes and remedies 1. Is the signal strength for a displayed sensor too weak for a stable range? Alter the project plan, change the relevant location and repeat the commissioning. 2. Battery not connected, substandard or at low capacity. Replace the batteries! When in doubt, measure the voltage under load! All system CC100 PREMIUM detectors run on premium batteries. Use only those recommended by the manufacturer. 3. Several system components with the same address? Send a test alarm from the registered sensors and make sure that there are no other detectors in the range that have the same address from earlier registrations or systems with the same system key. Alternatively you can make a detector call to seek out detectors with the same address. If there are sensors with the same address, © Copyright SeCa GmbH Page 11 of 32 remove them from the system or give them a new system key (Attention: Requires general reset of system components). 4. Changing environmental conditions Try to keep environmental conditions as constant (bad) as possible, and for the duration of the commissioning prevent furniture from being moved, electric devices from being switched on, and other disturbances in the immediate vicinity of the system components. Turn off other radio systems that are on the same frequency. If there are elevators in the building, it may be necessary to test their effects in various stopping positions. 5. Radio module installed wrong In rare cases, the radio modules are not installed right. Check the remarks under Point 3.3. If none of the actions mentioned above succeed, faulty sensors and/or radio modules, or an inadequacy in the building could be the cause. Make sure that a defective device is not the cause by testing it under known conditions. If the building is not suitable for a radio system, you can replace it with a combined system or a conventional solution. In either case, contact your supplier’s technical support. © Copyright SeCa GmbH Page 12 of 32 SeCa CC100 PREMIUM system manual Fundamentals for the authorized professional installer 2 Model 100 PREMIUM radio repeater 2.1 Function Device for extending the radio link between system components and the CC100 PREMIUM radio fire alarm control panel as well as other repeaters (cascading), forwarding of alarms and status reports from a maximum of 16 system components (without repeaters). In a SeCa CC100 PREMIUM system, five 100 PREMIUM radio repeaters can be operated and up to three cascades can be built. This results in a quadrupled range. 2.2 Operation and display elements Programming key To protect against unintentional activation, the programming keys are recessed. They are used for registering the 100 PREMIUM radio repeater to the control panel, and for performing a general reset. Prog. key What the displays mean: Display Status display Red display (blinking) No display Operational display Green display Yellow display (blinking) Red display (blinking) 2.3 Meaning Unmonitored operation, must be commissioned by an installer Monitored operation Power supply operation Emergency battery malfunction Power failure Status display Operational display Emergency power off key At the side, recessed to prevent unintentional activation; please use a blunt object. Installing the 100 PREMIUM radio repeater Using the power cable 1. Open the device by unscrewing and lifting the housing cover. Always pull the plug before opening. 2. If necessary, remove the emergency power batteries and remove the factory-delivered insulation strips (at initial assembly). 3. To install the device on a wall, please use the screws and screw anchors included. The diagonal slots in the rear wall of the repeater help in mounting. 4. Insert the batteries, making sure to observe the correct polarity. 5. Screw the housing cover back on and connect the device’s power cable to a 230V European socket. Fixed connection to building installation Please use VDE-tested connecting clamps for the connection. The separator and additional short circuit protection in the building installation must conform to EN60950 / VDE 0805. The installation must be performed only by qualified electricians. Please observe applicable regulations. 1. Before installation, cut the power from the supply line, and secure it against unintentional reactivation. 2. Open the device by unscrewing and lifting the housing cover. 3. If necessary, remove the emergency power batteries and remove the factory-delivered insulation strips (at initial assembly). 4. Remove the device’s connector cable from the screw terminal on the printed circuit board and the strain relief. 5. Lead the end of the supply line cable through the hole on the underside of the housing and fasten the connector cables to the clamps (N lead, L1 lead). 6. To install the device on a wall, please use the screws and screw anchors included. The diagonal slots in the rear wall of the repeater help in mounting. 7. Insert the batteries, making sure to observe the correct polarity. 8. Screw the housing cover back on and turn the 230V AC power supply back on. © Copyright SeCa GmbH Page 13 of 32 2.4 Turning on the model 100P radio telephone dialler (initialization) Power supply ON: The supply voltage is connected; the model 100 PREMIUM radio repeater initializes itself and is ready for system registration and commissioning in 2 minutes. The “Operation” display glows green, and the “Status” display blinks red. Note: If the “Operation” display glows yellow after initialization is over, there is a malfunction in the emergency power batteries. Check to see that the insulation strips present upon delivery have been removed and that the batteries are in the right polarity positions. If the batteries are dead, they must be replaced. Power OFF: After cutting off power to the model 100 PREMIUM radio repeater, use a blunt object to press the recessed emergency power OFF button for about 2 seconds, in order to shut off the device and to obtain the emergency power battery capacity. The Operation and Status displays go off. 2.5 Assigning the system components System components whose signals are to be forwarded through a model 100 PREMIUM radio repeater are registered automatically during automatic commissioning. The signal strength of all system components to the control panel and to all model 100 radio repeaters is measured and serves as the basis for the topology build-up. The CC100 PREMIUM Assistant software shows these values in a signal strength chart with an evaluation. 3 Model 100 PREMIUM radio control module 3.1 Function Controls up to 6 potential-free relay contacts with freely programmable events using the CC100P radio fire alarm control panel. The 100 PREMIUM radio control module is equipped at the factory with 2 relays, and with the relay module for the model 100P radio control module (ordered separately as item No. 4800025) can be expanded to 4 or 6 relays. When an event is reset at the CC100P radio fire alarm control panel, the relay resets itself as well. Transfer of internal status reports per EN 54-25. Five 100P PREMIUM radio control modules can be run in a single system. 3.2 Operation and display elements Programming key To protect against unintentional activation, the programming keys are recessed. They are used for registering the 100 PREMIUM radio control module to the control panel, and for performing a general reset. What the displays mean: Display Meaning Status display At full operation, the display is off, but it shows programming progress at initialization or general reset. See the following description. Operational display Green display Power supply operation Yellow display (blink- Emergency battery malfuncing) tion Red display (blinking) Power failure 3.3 SeCa 100P radio control module Prog. key Status display Operational display Emergency power off key At the side, recessed to prevent unintentional activation; please use a blunt object. Addressing / connecting the relay: The model 100 PREMIUM radio control module can be assembled with 3 plug-in relay modules for the 100P radio control module (4800025), each of which has 2 potential-free switch contacts. For the relay © Copyright SeCa GmbH Page 14 of 32 SeCa CC100 PREMIUM system manual Fundamentals for the authorized professional installer module, addresses from 1 to 3 must be given. These can be assigned using the jumper on the relay module, as shown below. From the factory, the 100P radio control module is delivered with one relay module and the assigned address of 1. Relay module for 100P radio control module Addressing Relay module / relay numbering: Jumper 12 3 Jumper Relay Relay Slot Relay module Clamps 1 2 3 4 5 6 7 8 9 10 Not to be used. 3.4 Address Relay module Relay numbering (left to right) 1 Relay 1 Relay 2 2 Relay 3 Relay 4 3 Relay 5 Relay 6 Connecting the relay (switch contacts): Clamps 1-6 of the spring clamp bar are for connecting the relay contacts. Relays 1 and 2 are configured at the factory as normally open. Contact type: 0.5 A, 60V AC/DC. Clamps 7-10 are reserved for a special configuration. Please do not use them in this application. Installing the 100 PREMIUM radio control module Using the power cable 1. Open the device by unscrewing and lifting the housing cover. Always pull the plug before opening. 2. If necessary, remove the emergency power batteries and remove the factory-delivered insulation strips (at initial assembly). 3. To install the device on a wall, please use the screws and screw anchors included. The diagonal slots in the rear wall of the 100P radio control module help in mounting. 4. Connecting the relay: Relay 1 and 2 are pre-wired at the factory as normally open. Although a variant relay connection is possible, we recommend using the cable included. 5. Insert the batteries, making sure to observe the correct polarity. 6. Screw the housing cover back on and connect the device’s power cable to a 230V European socket. Fixed connection to building installation Please use VDE-tested connecting clamps for the connection. The separator and additional short circuit protection in the building installation must conform to EN60950 / VDE 0805. The installation must be performed only by qualified electricians. Please observe applicable regulations. 1. Before installation, cut the power from the supply line, and secure it against unintentional reactivation. 2. Open the device by unscrewing and lifting the housing cover. 3. If necessary, remove the emergency power batteries and remove the factory-delivered insulation strips (at initial assembly). 4. Remove the device’s connector cable from the screw terminal on the printed circuit board and the strain relief. 5. Lead the end of the supply line cable through the hold on the underside of the housing and fasten the connector cables to the clamps (N lead, L1 lead). 6. To install the device on a wall, please use the screws and screw anchors included. The diagonal slots in the rear wall of the 100P radio control module help in mounting. 7. Connecting the relay: Relay 1 and 2 are pre-wired at the factory as normally open. Although a variant relay connection is possible, we recommend using the cable included. Insert the batteries, making sure to observe the correct polarity. 8. Screw the housing cover back on and turn the 230V AC power supply back on. © Copyright SeCa GmbH Page 15 of 32 3.5 Turning on the model 100P radio control module (initialization) Power supply ON: After the supply voltage is connected, the model 100 PREMIUM radio control module initializes itself and is ready for system registration and commissioning after 2 minutes. The “Operation” display glows green, and the “Status” display is off. Note: If the “Operation” display blinks yellow after initialization is over, there is a malfunction in the emergency power batteries. Check to see that the insulation strips present upon delivery have been removed and that the batteries are in the right polarity positions. If the batteries are dead, they must be replaced. Power OFF: After cutting off power to the model 100P radio control module, use a blunt object to press the recessed emergency power OFF button for about 2 seconds, in order to shut off the device and to obtain the emergency power battery capacity. The Operation and Status displays go off. 3.6 Assignment of detector events to the relay contacts For assigning events to the relay contacts, the following is the factory default setting: Relay 1 = collective alarm Relay 2 = collective malfunction In variation from this standard setting you can set up individual assignment of events to the relay contacts with the help of the CC100 PREMIUM Assistant software. 3.7 Expanding the 100P radio control module to 4 or 6 relay contacts Adding two additional relay modules for the 100P radio control module (4800025) allows it to be expanded to a maximum of 6 relay contacts. Please be aware of the following specifics. Note on installing the relay modules: After pulling the electrical plug, opening the device and removing the emergency power batteries, plug the relay module into the slot provided (see the illustration under No. 3.3) and fasten in the module with the screws provided. Note on addressing and initializing the relay modules: Now address the add-on relay modules as in No. 3.3. Then the relay modules must be initialized once, the first time the main power is turned on. During this initialization, the 100P radio control module recognizes and stores the number and addresses of the added relay modules. Do as follows: 1. Hold the Programming key down while turning the power on. 2. The Operation display is off, and the Status display slowly blinks and then goes off. 3. Now the Operation display shows the added relay modules in sequence, as follows: Yellow = Relay module with address 3 recognized Red = Relay module with address 2 recognized Green = Relay module with address 1 recognized 4. Finally, the Operation display goes off, and the Status display begins to blink quickly. This ends the initialization. The process lasts about 10 sec. 5. Let up on the Programming key, and the 100 PREMIUM radio control module now starts initialization according to No. 3.5. Note on assigning detector events to the relay contacts For assigning events to the relay contacts, the following setting is automatically given when the relay modules are initialized: Relay 1 = collective alarm Relay 2 = collective malfunction Relay 3 = system component malfunction Relay 4 = control panel malfunction In variation from this standard setting you can set up individual assignment of events to the relay contacts with the help of the CC100 PREMIUM Assistant software. © Copyright SeCa GmbH Page 16 of 32 SeCa CC100 PREMIUM system manual Fundamentals for the authorized professional installer 4 Model S smoke detector with S 100 PREMIUM radio module 4.1 Function This smoke detector (EN 14604) has a plug-in S 100 PREMIUM radio module for transmitting alarms and malfunctions. It optionally includes tamper switches for transmitting tampering reports as alarm. As soon as the smoke detector has been removed from the detector socket, the tamper switch reports an alarm to the CC100 radio fire alarm control panel. It additionally signals alarms and malfunctions using an LED and horn on the detector (85 db at 3 m). 4.2 Operation and display elements The S smoke detector has a test key for checking the device’s functions. Function test: If the model S smoke detector is operating correctly, a signal sounds when the test key is pressed. If no signal sounds, replace the battery. If there is still no signal sound when the function test is repeated, the model S smoke detector is defective and must be replaced. An LED integrated into the test key and the horn give acoustic and visual signals of the device’s alarm and operational statuses. Please adhere to the “Operation and alarm signals” chart on page 2 of the model S smoke detector’s installation and operating manual. 2 1 The S 100 PREMIUM radio module has an LED (1), a programming key (2) and if necessary a tamper switch (3); see the figure to the right. 3 For the detector with the radio module, please use the provided 9V lithium battery, type LM 9V-P, for a battery life of about 2 years (at factory default settings). This expected battery life does not take into account alerts and frequent commissioning, and it assumes normal environmental conditions. 4.3 Installing the model S 100P or SAB 100P radio smoke detector Information on installing the device, and instructions about the place of installation, are described in the model S smoke detector’s installation and operating manual. To install the S 100 PREMIUM radio module, do as follows: If necessary, remove the batteries from the smoke detector. Plug the radio module into the socket, and leave jack 1 (when there are 6 jacks) free, according to the drawing nearby. Now reattach the battery. After correct initialization (Point 3.4) and successful system registration (Point 1.6), lock the S smoke detector by rotating in the preinstalled socket. Battery 1 2 3 4 5 6 RWM S Note: If you are using the tamper reporting option, make sure that you use the appropriate socket with contact; otherwise this function will not work. 4.4 Initialization After the battery is connected, the radio module initializes, which is indicated by a blinking LED. After 5 sec. the LED stops blinking and the radio module is ready for system assignment and commissioning. If the radio module does not initialize (the LED stays off) after the battery is connected, repeat the process. Note: Previously addressed radio modules are in receiver mode for the first 30 sec. after the voltage is applied. Meanwhile, all other functions are locked. © Copyright SeCa GmbH Page 17 of 32 5 Temperature detector with 01 100 PREMIUM radio module 5.1 Function Temperature detector reports ambient temperature rise, triggers at 57°C, with plug-in 01 100 PREMIUM radio module for transmitting alarms and status reports to the CC100 PREMIUM radio fire alarm control panel or 100 PREMIUM radio repeater. It additionally signals alarms and malfunctions using an LED and horn on the detector. 5.2 Operation and display elements The temperature detector has a test key for checking the device’s functions. Function test: If the temperature detector is operating correctly, a signal sounds when the test key is pressed. If no signal sounds, replace the battery. If there is still no signal sound when the function test is repeated, the temperature detector is defective and must be replaced. An LED and the integrated horn give acoustic and visual signals of the device’s alarm and operation statuses. Please adhere to the “Operation and warning signals” chart on page 14 of the temperature detector’s installation and operating manual. 1 2 The 01 100 PREMIUM radio module has an LED (1) and a programming key (2); see the figure to the right. For the detector with the radio module, please use the provided 9V lithium battery, type LM 9V-P, for a battery life of about 2 years (at factory default settings). This expected battery life does not take into account alerts and frequent commissioning, and it assumes normal environmental conditions. 5.3 Installing the 01 100P radio temperature detector Information on installing the device, and instructions about the place of installation, are described in the temperature detector’s installation and operating manual (page 9 f.). To install the 01 100 PREMIUM radio module, do as follows: If necessary, remove the batteries from the temperature detector. Plug the radio module into the socket. Now reattach the battery. After correct initialization (Point 4.4) and successful system registration (Point 1.6), lock the temperature detector by rotating in the pre-installed socket. 5.4 Initialization After the battery is connected, the radio module initializes, which is indicated by a blinking LED. After 10 sec. the LED stops blinking and the radio module is ready for system assignment and commissioning. If the radio module does not initialize (the LED stays off) after the battery is connected, repeat the process. Note: Previously addressed radio modules are in receiver mode for the first 30 sec. after the voltage is applied. Meanwhile, all other functions are locked. © Copyright SeCa GmbH Page 18 of 32 SeCa CC100 PREMIUM system manual Fundamentals for the authorized professional installer 6 100 PREMIUM radio push-button alarm 6.1 Function Manual triggering (such as for house alarms) for transferring alarms, malfunctions and tampering to the 100 PREMIUM radio fire alarm control panel. It additionally signals alarms, tampering and malfunctions using an LED and horn on the alarm box itself. 6.2 Operation and display elements Keys 1 Alarm button - triggers an alarm 2 Horn reset - shuts off the signal (horn and LED) of an alarm triggered by the 100P push button alarm. 3 programming key of the integrated radio module Displays “Alarm” LED “Batterie” LED “Status” LED What the displays mean Local alarm / tampering report: Alarm from another detector: Battery replacement display: + - + - Prog.-taste 3 Status Alarm 1 Batterie 2 4 Horn and LED signal at 1-second intervals. Horn and LED signal at 2-second intervals. Short signal tone and blinking “Batterie” LED every 45 sec. Tamper switch Tear-off loop (see figure to the right): The end of the cable with the jumper is put onto both middle rods of the jumper 4, and the cable end with the grommet is attached to the wall. 6.3 Installing the 100P push button alarm To install the detector, please use the screws and screw anchors included. The diagonal slots in the rear wall of the detector (at the lower left and upper right corners) help in mounting. To secure the grommet of the tamper-proof seal, use the opening in the bottom centre of the rear wall of the housing, and the screw and screw anchor intended for the purpose. Finally, install the batteries, observing the polarity in the battery compartment. 6.4 Turning the device on (initialization) After the batteries are connected, the device initializes. The Alarm and Battery LEDs blink in sequence and the horn gives a short signal. In addition, the radio module’s LED blinks for 5 sec. Then the 100P radio push button alarm is ready for system registration and commissioning. If the device does not initialize (the LED of the radio module stays off) after the batteries are connected, repeat the process. Note: Previously addressed radio modules are in receiver mode for the first 30 sec. after the voltage is applied. Meanwhile, all other functions are locked. © Copyright SeCa GmbH Page 19 of 32 7 MIDI 100 PREMIUM radio siren and flasher 7.1 Function Signal device for visual (flasher) and optional acoustic (siren) alarm signalling. The siren stops its acoustic signal automatically after 4 to 30 minutes — depending on the setting chosen — if no new alarm is reported. After 4 to 30 minutes (depending on the setting chosen), the flasher changes its interval from 2 to 8 seconds. It can only be reset at the control panel by confirming the alarm. 7.2 Configuration Use jumper J5 to define which alarms in the system should be signalled through the MIDI 100 PREMIUM radio siren and flasher. J5 plugged in: Alarm signals to all detectors from groups 1 – 6 = factory default settings. J5 open: Alarm signals to all detectors from the group in which the 100P MIDI is also registered. LED and Programming key (P key) of the radio module Jumper J5 Jumper J4 Use jumper J4 to determine the duration of the acoustic signal (horn) during an alarm: 4 3 2 1 4 3 2 1 4 minutes (= factory default settings) 30 minutes. Note: This setting can be made only through the jumper and not through the control panel or the CC100 PREMIUM Assistant software! If you want to alter the setting after system registration of the MIDI 100 PREMIUM radio siren and flasher, first remove the batteries. For an acoustic alarm display, it is necessary to activate the horn for alarms from other detectors (Configuration menu P5, System parameter 7, “Detector horn”). This configuration is done at the CC100P radio fire alarm control panel (only global ON or OFF for all) or by using the CC100 PREMIUM Assistant software (individual). The factory default setting for this system parameter (= detector horn off) shuts off the acoustic signal. 7.3 Installing the 100P MIDI Remove the socket from the device by turning counter clockwise. Install the socket in the desired location. After configuration of jumper J5, insert both 3V CR123A lithium batteries into the battery compartment, observing the correct polarity. After successful system registration, lock the 100P MIDI by turning it rightward in the socket. 7.4 Turning the device on (initialization) After the battery is connected, the radio module initializes, which is indicated by a blinking LED. After 5 sec. the LED stops and the radio module is ready for system assignment and commissioning. If the radio module does not initialize (the LED stays off) after the battery is connected, repeat the process. Note: Previously addressed radio modules are in receiver mode for the first 30 sec. after the voltage is applied. Meanwhile, all other functions are locked. © Copyright SeCa GmbH Page 20 of 32 SeCa CC100 PREMIUM system manual Fundamentals for the authorized professional installer 8 Medium / Large 100 PREMIUM radio telephone dialler 8.1 Function This analogue telephone dialler for forwarding alarms and malfunctions by voice message has 2 (Medium) or 4 (Large) input lines. Eight call numbers can be stored. Radio control from the control panel through an integrated radio module enables spatially separate installations of the radio telephone dialler and control panel, speaker phone capability, remote control and querying of info-store etc. possible. 8.2 Operation and display elements Radio / motherboard: LED and Programming key (P key) Operational display: Display stays lit = power supply operation Display off = power failure Display blinks = battery replacement Operational display Keyboard: Keyboard Symbol meanings and functions SYSTEM PROG RUFNR ZUST UHR AUFN / ABHÖR TEST INFO Menu for setting system parameters Programming the input lines for the dialler Entering call numbers Activating the dialler Clock time entry Recording and inspection of voice messages Call service testing after programming is completed Calling up information memory JA NEIN STOP Page through a function’s parameters and import factory default settings Setting/changing parameters Confirms setting values Erasing call numbers Interrupts the function, imports settings previously confirmed with JA 8.3 Installing the radio telephone dialler 1. Open and remove the cover frame of the housing. 2. Connect the dialler's power adaptor to the NT connector terminal of the dialler. Because of the integrated rectifier, there is no need to observe the polarity. 3. Connect both 3V batteries (observing the polarity). 4. Switch on the power supply. Observe the sequence, because only then will the need for battery replacement be displayed on the control panel. 5. Connect the model radio telephone dialler using the included cable and the N port for fax machines. 8.4 Turning on the radio telephone dialler (initialization) After the power supply is turned on, the radio module initializes, which is indicated by a blinking LED. After 5 sec. the LED stops and the radio module is ready for programming. If the radio module does not initialize (the LED stays off) after the battery is connected, repeat the process. Note: Previously addressed radio modules are in receiver mode for the first 30 sec. after the voltage is applied. Meanwhile, all other functions are locked. © Copyright SeCa GmbH Page 21 of 32 8.5 Configuring the radio telephone dialler The basic functions for commissioning a telephone dialler are briefly shown here. You will find complete information in the user manual for the automatic dialling and announcement device. Alternatively, a programming set is available for configuring the radio telephone dialler; it consists of PC software and a connector cable. The radio telephone dialler is configured in the inactive state and is PIN protected (factory default PIN = 1234). Please observe the following sequence: UHR – entering the clock time and date Begin configuring the radio telephone dialler by setting the clock time and date. Press the UHR function key. The cursor is underneath the display for the hour hand. Confirm the values entered through the keyboard (hours, minutes, day, month, year) with JA. The function ends automatically when the last entry has been confirmed with JA. SYSTEM - setting the system parameters Here the basic device settings and the system parameters are established. Press the SYSTEM function key. The display shows “Default? Since you shouldn’t import all of the preset factory default system parameters, use the key to page to the parameters to be modified (see chart). The preset values are modified using the key (which leads you through the parameters of the stored setting possibilities). Then confirm the modified settings with the JA key. Numerical parameters are entered by pressing the key once (now the display blinks) and the number keys, and they are confirmed with JA. Once an entry has been confirmed with JA, the device jumps to the next parameter. The STOP key terminates the system programming, and the entries previously confirmed with the JA key are taken over. Parameters Default Remark AKTIV 2 Public line access Dial tone off. NEIN NEIN JA setting for activating dial tone evaluation Start fees Start speaking NEIN Accept NEIN Accept Quit. Speak NEIN Accept RS-Ende 55 NEIN JA setting for cancelling the call service by dialling 55 on the telephone Number of calls PIN 0 10 1234 Re1 on 005 Re2 on 005 Accept Accept *) Accept, number of call signals after which the call is switched to the telephone call device when calling the number (e.g., for the speaker phone function). Setting personal codes, if desired Accept, The switching time of relay 1, relevant only if Re1 is activated in line programming. sec. Re1 *) If the telephone system provides public line access at a number other than 0, set it as follows: Press the key once; the preset “0” blinks. Press the NEIN key and - - - appears in the display. Now enter the desired numbers using the keyboard, and confirm the entry with JA. RUFNR – Enter the call number In this function you can store up to 8 call numbers for landlines or mobile phones. Press the RUFNR function key. The upper line of the display shows 1 as the storage position number for the first call number to be entered. Now press the function key, type in the call number, and confirm your entry with JA. The radio telephone dialler jumps to the next call number. End the function using the STOP key. Note: If the radio telephone dialler is connected to a substation, before entering the call number press the key a second time, and the display will show a “+” sign as the placeholder for public line access. Unless the placeholder is entered, the radio telephone dialler dials the call number without public line access, even if 0 or another number is programmed into the system for public line access. For multiple call numbers the entry sequence is not important. An entered call number will be changed as follows. As you page through the RUFNR menu with the key to the call number, press the key and the NEIN key to erase it. New entry as described above. © Copyright SeCa GmbH Page 22 of 32 SeCa CC100 PREMIUM system manual Fundamentals for the authorized professional installer PROG – programming the input lines Here you set whether and how the radio telephone dialler evaluates events on the input lines. On the Medium radio telephone dialler, 2 input lines can be configured, and on the Large radio telephone dialler, 4 can be configured. On both devices a power failure can be configured as an additional “virtual” line. Lines 1 - 4 Default Remark Evaluation - Contact # = alarm evaluation OPEN Radio control Specific time 005 sec. Accept, time after which line evaluation is begun. Reaction. 001 sec. Accept, time between line event and beginning of call service SprZeit in SprZeit. Std Accept, time unit for lock time, alternative entry value: Minutes 001 Std Accept, lock time for new evaluation of line. Re1 NEIN Accept, if relay 2 is not switched (Large radio telephone dialler) Re2 NEIN sec. Re1 e.g., 1 2 4, please give only the storage position numbers in the sequence desired for call service. Beforehand, enter the call numbers in the RUFNR function. Rufnr _ Dialling attempts 4 Accept, number 1 – 15 Power failure The network (breakdown) line is an additional virtual event portal. To evaluate the power failure, the radio telephone dialler must have an emergency power supply (e.g., a radio telephone dialler emergency power battery or two 3V lithium batteries). Programming is done similar to input lines 1 - 4, but with the following differences: There is no contact (radio control) entry. In connection with the alarm evaluation entry, enter the time in minutes that is to be considered a power failure under duration. Recommendation: Accept the preset of 1min. There is no “number of calls” setting. AUFN – Voice message recording In order to start up the radio telephone dialler, the main messages (line messages for the program lines, the start, general and end messages) must mandatorily be recorded. The help messages have already been recorded at the factory. To record the voice messages, press the AUFN function key, and the display will first show the message to be spoken for line 1 (= “L1#Meld?”). Press the JA key to start recording. After recording is completed, the message is automatically played back and the radio telephone dialler changes to the next recording, e.g., “L2#Meld?”. Note the message sequence, the recording time and the suggested message texts in the chart below. The recorded message texts can be changed through cross-talk or by rerecording. The main messages are deleted when all parameters are reset to factory default settings (see Point 7.7). Display Time Rec. Suggested report texts L1#Meld? 4 sec. Fire alarm, all areas L2# Meld? 4 sec. Malfunction, all areas L3# Meld? 4 sec. System component malfunction L4# Meld? 4 sec. Control panel malfunction N# Meld? Startmeldung? (start message) Allgemeinmeld.? (general message) Endmeldung? (end message) Hilfsmeldungen? – (help messages) 4 sec. Power failure 8 sec. Automatic call. After the signal tone, please press 55 on your telephone. 14 sec. Automatic dialler of ...(enter address) After the signal tone, please press 55 on your telephone to confirm receipt of the message. Are recorded at the factory. 8 sec. © Copyright SeCa GmbH Page 23 of 32 ZUST – Activating the radio telephone dialler After configuration is complete and the call service has been tested successfully, switch the Medium / Large radio telephone dialler to active. The status change is PIN protected. To switch into the active state, press the ZUST key. The display will show “akt. 1?”. Confirm the change of state by pressing the JA key. Now line 1 of the display will show the state “active 1”, and line 2 will show the line evaluation programming. Example: 1#2-3-4-N# 1# = Line 1 alarm evaluation 2- = Line 2- no evaluation 3- = Line 3 no evaluation 4- = Line 4 no evaluation N = Power failure evaluation Pressing the ZUST key, entering the PIN code and confirming the display message “not active?” by using the JA key, the radio telephone dialler is switched back to the inactive mode. INFO - Info-store readout All line events, such as the status modifications “active” / “inactive” are filed in the event memory, which stores 50 data sets. When the memory is full, the oldest information is overwritten with incoming data. After a successful query, the stored data can be deleted. Pressing the JA key performs the deletion. If the data should remain stored, press the STOP key to close the function. Special functions The special functions, such as the speaker phone function or remote query and control over a telephone connection, are explained thoroughly in the manual to the telephone device. Configuration errors The radio telephone dialler does not trigger Has FUNK been set under Contact in the PROG menu? Please check P6 – Controlling the radio telephone dialler from your control panel (determining the model and assigning reports to the dialler’s input line). Triggering occurs, but takes a long time Checking the switching and reaction time in the input line programming. The radio telephone dialler doesn’t get a line System programming - Is the public line access correctly programmed and “Placeholder +” taken into account as the first character for call number entry? Have you connected the dialler to the N port for fax machines? The radio telephone dialler cannot be switched to the status “activ” Have all message texts been recorded? Note: If not, the display shows “Messages?” or “Help messages?” Have you used the correct PIN code? If PIN cannot be detected, it can only be read and reset at the factory. Call service cannot be cancelled by dialling 55 Is call service termination on 55 set to JA in the system programming? 8.6 Call service The call service can be started under the following requirements: The line programming is completed, the radio telephone dialler is switched to active, the sharp time and reaction time have expired The call service progress is shown on the display. Call service will continue until the preset number of call attempts has been reached or until one of the receivers – when appropriately set – confirms the call service by dialling 55 and thereby cuts off. Once this has ended, the registered line event is displayed by blinking the type of line evaluation (e.g., #). If so programmed, a lock time follows, in which there is no reaction to any other line events. Process: 1. The programmed call numbers are called one after another in the defined sequence and repeated according to the number of programmed dialling attempts. 2. If there is a busy signal, the radio telephone dialler breaks the connection and after 5 sec. dials the next call number. 3. When there is a dial tone, the start report goes for 60 sec., followed by a tone and a pause. If the receiver of the call confirms the request in the start message after the signal tone by dialling 55, then the radio telephone dialler recognizes that a connection has been made and starts the general message, the line message and then the end message. 4. Confirmation by dialling 55 subsequent to the end message ends the call service. © Copyright SeCa GmbH Page 24 of 32 SeCa CC100 PREMIUM system manual Fundamentals for the authorized professional installer Test call service Requirements: The radio telephone dialler is connected to the N port for fax machines; the device is in an inactive state. After activating the function by pressing the TEST key twice, page through with to the desired line, and press the JA key to start the call service. End the test by pressing the STOP key. 8.7 Resetting all system and line parameters To reset all system and line parameters to factory default settings, and to delete all recorded message texts, activate the SYSTEM function. The display shows Default. Pressing the JA key twice restores the factory default settings. Then end the function by pressing the STOP key. The clock time, date and help reports are not affected by resetting to factory default. 9 Events and their signals The following events are recognized and signalled: 9.1 Missing status reports This report occurs in monitored operation and indicates that at the moment of testing there was no communication between the control panel and the system component. It is displayed through the “Radio” LED and a prolonged display of the address (a blinking display would indicate outside signals). The status report can be missing for various reasons. For example, the following are possible: a) Radio communication may be temporarily interrupted due to environmental conditions, b) The system component may be out of operation (no voltage or low voltage, so that transmission and reception are not possible), c) The system component may have been removed from the system (out of range), or d) The system component may be defective. To analyze the error, it is best to proceed systematically in the following order: (1) Read the event memory using the CC100 PREMIUM Assistant software (menu: “Service” → Event memory → “Open” → “Read from control panel”) to determine how often the error has occurred. If this is an isolated error in the affected system component, the cause is very probably changing environmental conditions. Then check the signal strength (over a longer period, if possible). If it is less than 6 (factory default for commissioning) or if it very strongly fluctuates, changing the topology can fix the problem. For this you can use the CC100 PREMIUM Assistant software’s Analyser function in the context menu. (2) If there is a lasting breakdown in status reporting of more than an hour, and subsequent automatic restart (every two hours) has failed several times, you should check whether the system component is still at the same position as during commissioning. Use the Analyser function to try to reach the system components or set off an alarm. If that doesn’t work, environmental conditions have changed since the last commissioning. Fix this by changing the topology. For this you can use the CC100 PREMIUM Assistant software’s Analyser function in the context menu. If the system components cannot be reached, or no alarm can be set off, bring the system component near the assigned repeater or the control panel and try again. If this doesn’t work, replace the battery and try again. If all attempts fail, a defect cannot be ruled out. In that case, contact your supplier. With appropriate parameter settings (9 “Event memory tone”), reporting will automatically be reset as soon as communication is restored. Important: If, after an hour of failed communication, the system components automatically switch themselves into an asynchronous operational state, that means that they are no longer sending status reports. All affected system components will be restarted automatically by the control panel every two hours. This stops after successful recommissioning or after 15 failed attempts. 9.2 Malfunction due to outside signals Malfunctions due to outside signals are reported if status reports are missing and at the same time outside signals of a certain strength are measured in the atmosphere. They are displayed through the “Radio” LED and a blinking display of the address. The entries in the event memory give you information on whether the malfunctions are isolated or cumulative. Depending on how often they occur, you should try © Copyright SeCa GmbH Page 25 of 32 to find their source and remove it. With appropriate parameter settings (9 “Event memory tone”), reporting will automatically be reset as soon as there are no more malfunctions due to outside signals. 9.3 Battery malfunction This report appears when the integrated measurement values are lower than the threshold for battery replacement. They must be below the threshold three consecutive times before the report is sent to the control panel. The malfunction is displayed through the “Battery” LED above the system component display and below the display of the control panel. Note that the thresholds for individual system components differ. For system components, the report must always be reset manually. For the control panel, this happens automatically, as soon as the cause has been remedied. If premium or manufacturer original batteries are used, their capacity is sufficient to run the system components for 30 more days after the threshold has been reached. The control panel can run for 20 more hours in emergency power mode. Batteries of inadequate quality can quickly drop below the voltage threshold even though they may show sufficient capacity. This often causes miscalculations. 9.4 No status from repeater This report appears only in the main window of CC100 PREMIUM Assistant, and not at the control panel. This report indicates that a repeater is no longer communicating with the control panel. In such a situation, no status reports are received for the system components that communicate through it. This report is not stored in the event memory and is automatically reset as soon as communication is restored. 9.5 Power failure The control panel can report a power failure only in system components running on emergency power. The report is shown by the “Detector” LED. The status must always be reset manually. A power failure at the control panel is signalled by the blinking “Power” LED. The reset occurs as soon as power is restored. Important: Right after the start-up message, the system components remain on “receive” for 30 sec., during which time you cannot send a test alarm or execute a registration process. 9.6 Start-up This report appears only in the main window of CC100 PREMIUM Assistant, and not at the control panel. It indicates that a system component is no longer communicating with the control panel and/or has reinitialized itself. The “Restart” function will automatically put it back into operation. This report will be saved in event memory. Important: If, after an hour of failed communication, the system components automatically switch themselves into an asynchronous operational state, that means that they are no longer sending status reports. All affected system components will be restarted automatically by the control panel every two hours. This stops after successful recommissioning or after 15 failed attempts. 9.7 Tampering A tampering report from a smoke or push-button alarm with a tamper switch immediately sends an alarm to the control panel and is displayed as an Alarm. The local alarm ends as soon as the smoke detector is reinstalled in its socket or when the jumper on the push-button alarm’s tamper-proof seal is set back on the bridge. At the control panel, the alarm must be reset manually. This report will be saved in the event memory. Note: To prevent local signalling when replacing a smoke detector battery, briefly press the detector’s test button before removing the detector from the socket. To prevent alarm forwarding, you must first put the control panel into service operation. © Copyright SeCa GmbH Page 26 of 32 SeCa CC100 PREMIUM system manual Fundamentals for the authorized professional installer 9.8 Alarm Smoke and temperature detectors, and radio push-button alarms, signal a local alarm with a loud interval tone and a flashing LED. They radio transmit it to the control panel. At the control panel, the report is displayed by the “Group” LED belonging to the detector’s alarm zone. The address of the detector triggering the alarm appears in the display. Depending on the operational statuses and settings, the alarm is forwarded to the other system components in the same alarm zone (see also Signals alarms and other detectors). In the process, the radio telephone dialler is addressed before all other system components (internal alerts). If no delay has been set for the alarm call to the dialler, the call will go out immediately. For smoke and temperature detectors, the local alarms are automatically reset as soon as their cause has been remedied (smoke or temperatures above 57°C). To shut off local signalling at the radio push-button alarm, press the “Reset Horn” button. The detector’s horn and LED shut off. Important: Forwarding and associated signalling of an alarm going to the control panel depend on the following settings: Horn configuration (see P 5 – System Parameters) For acoustic signalling of alarms from other detectors, the horns must correspondingly be configured to ON. This setting will be transmitted during commissioning. Configuring the MIDI 100 PREMIUM radio siren and flasher (see MIDI 100 PREMIUM radio siren and flasher). Through the jumpers, you can distinguish between an alert confined to the alarm zone and a global one (J5), or between an alarm duration for acoustic (siren) signalling of 4 and 30 minutes (J4). These settings can only be made when the power is off. CC100 PREMIUM radio fire alarm control panel operational status (see Operational statuses) In service mode and with a PC connection, alarm forwarding is shut off. Alarm forwarding occurs during unmonitored and monitored operation. Except for radio telephone diallers, depending on the topology, it can last longer in unmonitored operation, until all system components have received the alarm. 9.9 Signalling alarms from other detectors If the sensors’ detector horn is switched on to signal alarms from other detectors (configured at the control panel or with the PC software), then these alarms are indicated within 25 sec. by the horn and the blinking “Alarm” LED. The horn and LED shut off within 20 sec. (max. 36 sec.) after the alarm has been reset at the control panel or automatically after 3 min. Mute switching of the alarm at the control panel likewise causes temporary mute switching of the horn of the detectors within a maximum of 20 sec. (max. 36 sec.). If the model 100 PREMIUM MIDI radio siren/flasher receives the alarm of an assigned detector through the CC100 radio fire alarm control panel, it then signals it within 25 sec. through a siren and flasher, if the horn function is turned on. After the alarm is reset at the control panel, the siren and flasher shut off within 25 sec. If the alarm is not reset within 4 or 30 min. (depending on the settings chosen), then the siren shuts off automatically and the flasher interval changes from 2 sec. to 8 sec. Mute switching (temporarily) of the alarm at the control panel likewise causes, within a max. of 25 sec., the siren and flasher to be shut off for 3 minutes. After this time has expired, or when a new alarm has arrived, mute switching is lifted again. © Copyright SeCa GmbH Page 27 of 32 10 Operational statuses The various operational statuses are shown on the control panel display. The following operational statuses can be displayed: Unmonitored mode Monitored mode 100 0 to 6 In monitored operation the following additional statuses can be appear; the values are added then. No status report +10 Partially monitored system +50 Thus the following values can result: a) 0 to 6 - (monitored operation), b) 10 to 16 - (monitored operation with temporary suppression of missing status reports, c) 50 to 56 - (partially monitored operation, individual system components are not assigned), and d) 60 to 66 - (combination of b and c – partially monitored operation with temporary suppression of missing status reports). 10.1 Monitored operation Monitored operation is also referred to as the “normal” operational state. To achieve this, the system must be successfully put into operation. Then all system components are monitored. For this purpose all status reports are regularly exchanged (every 100 to 300 seconds, depending on settings). These contain information on any battery or operational malfunctions, as well as the signal strength and other technical parameters. The reports are received independently of operational status, but alarm forwarding varies. In monitored operation, the alarms that have priority are forwarded immediately to the radio telephone dialler. Then all other system components are addressed. If these are appropriately set, they signal the alarm acoustically and visually (LED) for about three minutes. This process takes a maximum of 25 sec. The horn and LED shut off within 20 sec. (max. 36 sec.) after the alarm has been reset at the control panel or automatically after 3 min. If the model 100 PREMIUM MIDI radio siren/flasher receives the alarm, it then signals this visually, and also acoustically if the horn function is on. After the alarm is reset at the control panel, the siren and flasher shut off within 25 sec. If the alarm is not reset within 3 min., the siren shuts off automatically and the flasher interval changes from 2 sec. to 8 sec. 10.2 Unmonitored operation Alarms are also transmitted in unmonitored operation and signalled at the control panel, as well as forwarded (as long as communication is guaranteed). However, in contrast to monitored operation, forwarding can take up to 120 sec., depending on the number of repeaters. Information on any battery or operational malfunctions, as well as the signal strength and other technical parameters, cannot be transmitted. At the control panel, you can recognize this operating mode by a glowing “Check Off” LED and the number 100 on the display. 10.3 Service operation For maintenance and service work, the control panel can be run in a special maintenance mode. With these settings the “Test On” LED glows. The alarms are acknowledged accordingly at the control panel, they are not forwarded (not through the radio telephone dialler and relays). In maintenance mode, you can use Parameter 8 to make service settings. Recommendation: Always record the annual service or maintenance work in the maintenance log (CC100 PREMIUM Assistant), test the alarm reports and check the signal strengths and battery voltage. © Copyright SeCa GmbH Page 28 of 32 SeCa CC100 PREMIUM system manual Fundamentals for the authorized professional installer 11 Radio module status information With the CC100 PREMIUM Assistant software, the software versions and status information (address, group, horn settings and production parameters) of the detectors, signal devices and radio repeaters can be displayed. These data are radio transmitted as follows: Press and hold the programming key on the radio module until its LED blinks (after about 10 sec.), and then release the key. You can now read the information on your PC’s display. Note: Be very careful to let up on the programming key after the LED has begun to blink. If you hold the key down longer — until the LED stays lit continuously — a general reset occurs. Then you have to register the system components to the control panel again. 12 Miscellaneous 12.1 Technical data The technical data on the system components are described in detail in our product information. 12.2 Conformity When used as intended, all of the components described in this system manual conform to the R&TTE guidelines (1999/5/EG). © Copyright SeCa GmbH Page 29 of 32 M A Alarm 5, 6, 8, 9, 10, 17, 18, 19, 25, 26, 27, 28 Alarm forwarding 8, 10, 26, 27, 28 Alarm zone 27 Automatic commissioning 8, 11 B Battery 4, 5, 26 C Check Off 5 Collective-call feature 9 Configuration menu 4, 5, 10, 11, 20 Confirm an event 10 Contact assignment 6 D Deleting individual addresses 10 Detector 4, 11, 26 Detector horn 7, 20, 27 Dialler 9, 10, 11, 20, 21, 22, 23, 24, 27, 28 Maintenance interval 7, 8 Memory tone 7, 8 Mute switching during an alarm 10 O Operational statuses 27, 28 P PIN 4, 6, 7, 8, 10, 21, 22, 23, 24 Power 5, 26 Programming key 10 Programming keys 4 R Radio 5, 25 Radio telephone dialler 4 Relay 6, 22, 23, 28 Relay connector cable 6 Relays 4 Restart 25, 26 S E Error 8, 10, 11, 24, 25 F Fault 5 Function key 4, 5, 6, 8, 9, 10, 11, 22, 23 Function keys 4, 8, 9, 10, 11 G General reset 6, 10, 11, 12 L LED for control panel status 5 LED for system component status 4 List of indirect system components 9 Service 4, 7, 8, 9, 11, 25, 28 Signal strength 9, 10, 12, 14, 25, 28 Single call 9 Sound Off 5, 10 Status reports 7, 12, 25, 26, 28 System stability 7 System components 4, 7, 8, 9, 10, 11, 12, 14, 16, 23, 25, 26, 27, 28, 29 System key 7, 10, 11, 12 System parameter 7, 10, 11, 20 System parameters 4, 5, 7, 11, 21, 22, 27 System stability 7 T Test On 5, 8, 28 Edition FZ290415 SeCa CC100 PREMIUM system manual Fundamentals for the authorized professional installer © Copyright SeCa GmbH Page 31 of 32 www.seca-online.de SeCa GmbH Schwabenmatten 17a 79292 Pfaffenweiler Germany Telephone +49 (0) 7664/504030 Fax +49 (0) 7664/504040 www.seca-online.de [email protected] © Copyright SeCa GmbH Page 32 of 32