1
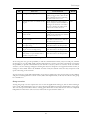
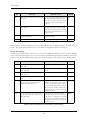
The Prototype
will upon joining a group be presented for the contact list. The test cases presented in Table 7-8 have this
as their starting point.
No.
Test case
Desired result
Result
T-6.1
No contacts in the list
The user is only capable of entering
the menu.
NT
T-6.2
Select a contact
A screen for writing a message to the
chosen contact appears.
NT
T-6.3
Write a non-empty message in the box
that appears upon choosing a contact,
and click OK.
The message is sent to the contact,
and the user returns to the contact list
view.
NT
T-6.4
Write an empty message in the box
that appears upon choosing a contact,
and click OK.
An error message is displayed to the
user, and the user returns to the message screen.
NT
T-6.5
Write a message that contains more
than 256 characters.
Not possible. The user will not be
allowed to tpye more characters than
256.
NT
T-6.6
Write an message, non-empty or
empty, and click CANCEL in the
message-box.
No message is sent, and the user
returns to the contact list screen.
NT
T-6.7
Click the MENU button
The user is confronted with the contact list menu.
NT
T-6.8
Recieve a message from a contact
when viewing the contact list.
The message will be displayed in the
recieve message view.
NT
T-6.9
In the recieve message view, choose
cancel.
The contact list will pop up.
NT
T-6.10
In the recieve message view, choose
reply.
The user will be presented for a
screen that gives him the possibility to
write a message, as for T-6.3 to T-6.6.
NT
T-6.11
NT
Receive a message from a contact
The message is stored for later
when writing or recieve a message to/ retrieval, that is to say, when the user
form another user.
leaves the current screen and return to
the contact list view.
Table 7-8 Test specification and result for contact overview (public mode)
Private mode is not implemented in the current version of the prototype, and so the above tests have not
been performed.
Contact list menu (private mode)
Testing the contact list menu requires the user to start the application and log in private mode, with or
without other changes to the setup. From the group overview, the user must select a group to join, and
will upon joining a group be presented for the contact list. In the contact list view, the user must click
the MENU button. The test cases is presented in Table 7-9 have this as their starting point.
No.
Test case
Desired result
Result
T-7.1
Select “Setup” from the menu and
click OK
Same result as T-5.8.
NT
T-7.2
Select “Add contact” from the menu
and click OK.
Enters the screen for adding a new
contact.
NT
Table 7-9 Test specification and result for contact editing (private mode)
91