1
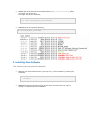
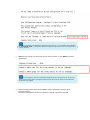
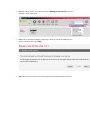
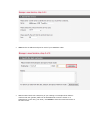
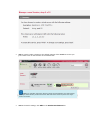
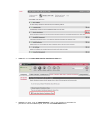
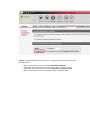
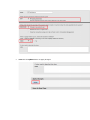
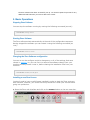
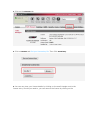
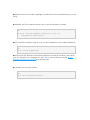
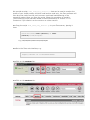
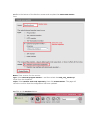
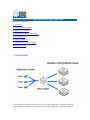
Zeus Quick Start Guide | Basic Operations | Help | Doc Links |
Zeus Quick Start Guide
1. Introduction
2. Downloading Zeus Software
3. Installing Zeus Software
4. Integrate Zeus Software with WANdisco
5. Basic Operations
6. Setting up IP Sharing
7. Installing the node monitoring script
8. Getting more help
1. Introduction
Zeus software has been selected to provide a high-availability, application specific
load balancing solution for use in conjunction with WANdisco Clustering products.
This brief quick start guide shows you how to set up the Zeus software to load
balance between nodes in a Subversion MultiSite cluster.
1.1 Before you begin
You must install, configure and start Zeus software as the Root user. Root privileges are necessary
to bind to the restricted lower ports.
You may login as the Root user with the following:
su
Password: ********
Ensure that you have your Zeus license key saved to your installation directory (e.g.
/usr/local/zeus) before starting.
We would have sent you the license key via email, contact WANdisco sales if you're unable to find your
license key.
See Installing a new Zeus license
2. Downloading Zeus Software
This sections shows you how to get the Zeus software.
•
2.1 Download the Zeus software from the WANdisco download website to your
installation server.
Ensure you download the appropriate (32-bit or 64-bit) version.
Zeus software requires approximately 250MB of disk space during installation.
Removing temporary installation files cuts the required drive space to about 100MB.
•
2.2 Extract the archive file to the install directory (i.e. /usr/local/zeus), where
you saved your license key.
You might use the tar command:
tar -zxvf ZeusTM_60r3_Linux-x86.tgz
•
2.3 Change to the new Zeus directory:
• cd ZeusTM_60r3_Linux-x86
3. Installing Zeus Software
This section covers the software installation.
•
3.1 From the Zeus install directory (see step 2.3), run the installer by entering the
command
./zinstall
•
3.2 Read through the product license, press return to read to the end. Type in
"accept" to continue with the installation.
•
3.3 You'll be prompted for an installation path. Press Enter to accept the default path
/usr/local/zeus.
You can install the software anywhere on your file system, but you should not install it in
the same directory as any other Zeus products.
•
3.4 The Zeus software is now installed, you're prompted to continue with the setup.
Click Enter to proceed.
If you choose to complete the configuration later, you can return to this point in the
setup by running
<ZEUSHOME>/zxtm/configure
•
3.5 Enter the absolute path to the Zeus software license key (we'll have provided this
in an email) and click Enter.
If you continue to install without referencing a license key, you'll complete the installation
in "unlicensed mode", in which the software will start, but will not allow you to configure and
run any services.
•
3.6 Enter an owning user and group for the zxtm process, or click Enter to leave it
unrestricted.
The Zeus software must be configured and started as root, but it can be run as any user.
Running the process with no privileges ensures that it can never be used to compromise the
security of your system.
•
3.7 The management of the Zeus software can be restricted to a single IP for
improved security.
To restrict management access to a single IP, enter Y. Otherwise enter N.
•
3.8 If you selected Y in step 3.8 you'll be prompted for the IP address on which the
Zeus software can be managed.
•
3.9 For the first installation you'll be creating a new cluster, option "C". Just press
Enter.
The Zeus installer is able to detect pre-existing Zeus clusters on the network. When
installing additional load balancers, you're able to add them automatically to a preexiting cluster. If you add the load balancer to an existing cluster, it will automatically
inherit the settings of the load balancers already in the cluster.
•
3.10 Select a password to use when logging in to the Zeus Administration Server. The
Username is automatically "admin".
•
3.11 To set the Zeus software to automatically start when the server boots, enter "Y".
Otherwise, enter "N".
•
3.12 The setup configuration is now complete. The Zeus software will start up and
you'll be directed to the web interface of the Zeus Administration Server.
Open a browser and point it at
https://<Server IP or hostname>:9090/
When you access the website for the first time you will see an error message because
of the invalid SSL certificate. Nevertheless, the connection is completely encrypted and
you can safely confirm the error message.
4. Integrate Zeus Software with WANdisco
This section covers the software installation.
•
4.1 Enter the Zeus Administration Server with the Username "admin" and the
password that you provided in step 3.11. Click Login.
•
4.2 The Zeus Administration Server is broken down into four areas, The Menu bar,
Traffic Managers Bar, Services and Events Log.
Click on the Help button on the menu bar for a brief explanation of what everything
does.
•
4.3 Next, add a service, using the first option "Manage a new service" from the
"Wizards:" drop-down menu.
•
4.4 A pop-up window will appear, beginning a series of 4 steps for adding a new
service (virtual server). Click Next.
•
4.5 Enter a name for the service, and confirm what protocol and port it will use.
•
4.6 Enter the IP address and port for each of your WANdisco nodes.
•
4.7 The wizard ends with a Summary of your settings. In example shown below it
confirms that web (port80) traffic will be load balanced across the cluster on a
selected port (in this case, port 5000). Click Finish to close the wizard and return to
the main screen.
•
4.8 You need to make a change to the default settings of the WANdisco service you
just created. Click on the title link on the Default Pool.
WANdisco's replication technology doesn't support the load balancing of a single session,
applying IP-based session persistence ensures that each client session is pinned to a single
node in the cluster.
•
4.9 On the Pool's settings, click Edit on the Session Persistence bar.
•
4.10 Click on the Create New Session Persistence Class link.
•
4.11 Enter a name, such as "IP Persistence", click on the checkbox to associate the
persistence with the WANdisco pool, then click the Create Class button.
•
4.12 Set the basic settings of the Persistence, by assigning the following values using
the radio buttons.
o
o
o
Which session method should be used? IP-based persistence
What action should the pool take if the session data is invalid or cannot
contact the node specified by the session? Choose a new node to use
When a session failure occurs, should the session be deleted? Yes
•
4.13 Click the Update button to Apply Changes.
•
4.14 Confirm that the configuration update has been accepted.
The Zeus software has been successfully set up. You should repeat the process for any
additional load balancers you wish to add to the cluster.
•
4.15 Back on the Pool's settings screen, edit the Timeout Settings.
•
4.16 Update the connect_timeout, keepalive_timeout and timeout values to 0.
Then click Update under the 'Apply Changes' at the bottom of the screen.
•
4.17 Test that the Zeus software is handling traffic. Browse to one of your WANdisco
nodes, using the port you assigned for load balancing (port 80 was used as an
example in step 4.5 although it can be any port).
You'll be able to access the node on the load balancing port, and also see the traffic
management details by viewing the Connections tab on the Activity section of the
Zeus Administration Server screen.
The Zeus software has been successfully set up. You should repeat the process for any
additional load balancers you wish to add to the cluster
5. Basic Operations
Stopping Zeus Software
You can stop the software running by running the following command (as root):
<ZEUSHOME>/stop-zeus
Starting Zeus Software
The Zeus software starts automatically at the end of the configuration sequence.
Having stopped the software you can restart it using the following command (as
root):
<ZEUSHOME>/start-zeus
Changing the Zeus Software configuration
You can re-run the configure script to change any or all of the settings that were
chosen in section 4. or you can use it to remove the software cleanly from your
machine and any cluster it was in, before clearing the installation files from your
machine.
<ZEUSHOME>/zxtm/configure
Installing a new Zeus license
You don't need to have a valid license installed in order to start the Zeus service or
web interface, however, you should use this procedure to install your license before
going into production.
1. Open the Zeus web interface and click on the System button on the top menu bar.
2. Click on the Licenses tab.
3. Click on Browse and find your license key file. Then Click Install Key.
4. You can now view your license details by clicking on the small triangle next to the
license entry. Should you need to, you can remove the license by clicking on the
checkbox and clicking the Removed Selected Keys button.
6. Setting up IP Sharing
With IP sharing you can ensure that the multi-hosted IP module shares incoming
data traffic for an IP address across multiple hosts in a cluster. This has the
advantage of evening out the load distributed across every active node, even when
some nodes have failed.
Single-hosted traffic IPs often end up with an uneven distribution of load when failure occurs, as an
entire IP's load is transferred to a single machine when the original host fails.
Requirements
•
•
•
•
Operating system: Linux
Kernal Versions: 2.6.8.1 - 2.6.31
Zeus Software Version:
o IP Transparency: 4.0 or higher
o Multi-hosted IPs: 6.0 or greater
IP Transparency module (ztrans) (click to download)
6.1 Install Zeus on two machines.
6.2 Install the IP Transparency module: (ztrans)
6.3 Ensure the kernel headers package is installed for the kernal/distribution you are
using.
6.4 Unpack the Zeus modules tarball, and cd into the directory created:
•
• # tar -xzf zeus_modules_installer-2.1.tgz; cd
zeus_modules_installer-2.1
6.5 To install all modules, login as root, run the installation script "install_modules.pl":
•
• # ./install_modules.pl
6.6 The script will attempt to build and install both the kernel modules, and should
give you a helpful error message if it fails. If you have problems, see the Kernel
Modules installation guide PDF provided by Zeus.
6.7 Restart Zeus on both nodes:
•
• # /etc/init.d/zeus restart
6.8 Check both Zeus nodes are running, then from the Zeus Administration Server
click on the drop-down wizard and select Join a cluster
6.9 Follow the wizard to complete the clustering, selecting which other Zeus node
you wish to join in the new cluster.
6.10 It's now time to configure a traffic IP group. From the Zeus Administration
Server go to Services > Traffic IP Groups.
6.11 Under the "Create a new Traffic IP Group" section fill in as a per this screenshot:
6.12 Once you have a traffic IP group you can bind services to it as shown below:
6.13 IP Sharing is now set up.
For more information visit the Zeus Knowledge Hub
Troubleshooting
The following articles may help you if you problems relating to your Zeus IP Sharing:
Why Can't users connect to my multi-host?
Multi-hosted IP addresses with Zeus Software
Zeus Timeout Settings
7. Installing the node monitoring script
We provide a script, zeus_read_only_monitor.pl that can be used to monitor the
status of your cluster nodes, should a node become read-only, the Zeus software will
then drop the node from the pool to ensure continued load balancing of the
remaining nodes. Once you have the script, follow this procedure to install it.
The monitoring script has been tested on Zeus Software up to version 3.7.10.
Contact us if you need to run the monitor on a later version.
7.1 Copy the script zeus_read_only_monitor.pl to your Zeus server, placing it
here:
/usr/local/zeus/<zxlb-(version) or zxtm(version)>/conf/scripts/
e.g. /usr/local/zeus/zxtm-6.0r4/conf/scripts
7.2 Go to the Zeus web interface, e.g.
https://<Server IP or hostname>:9090/
7.3 Click on the Catalogs link.
7.4 Click on the Monitors tab.
7.5 Go to the bottom of the Monitors screen and complete the Create new monitor
form.
Name: Enter a name for the monitor.
type: Select External program monitor... and then select the read_only_monitor.pl
script from the dropdown.
scope: Select Monitor each node separately, then click Create Monitor. The page will
refresh to confirm that the configuration has been updated.
7.6 Click on the Services button.
7.7 Click on the Pools tab.
7.8 Click on your chosen pool's Edit link.
7.9 Click on the Edit link for the Health Monitoring section.
7.10 Select your new monitor from the dropdown and click Add Monitor. Ensure that
the Passive monitoring is set to Yes, if not select it and click Update.
The monitor script is now installed. It's important that if you upgrade your version of
the Zeus software that you check back with WANdisco to ensure that the script
remains compatible
8. Getting more help
Documentation
You can download a copy of the Zeus software User Manual for information about
advanced configuration, function and troubleshooting.
Knowledge Hub
Go to the Zeus Knowledge Hub http://knowledgehub.zeus.com/docs for
support, knowledgebase articles and further documentation.
Copyright © 2010 WANdisco
All Rights Reserved
This product is protected by copyright and distributed under licenses restricting copying, distribution and decompilation.