1
Renoise 2.7 User Manual
Renoise 2.7 User Manual
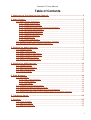
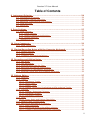
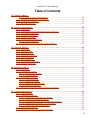
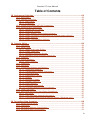
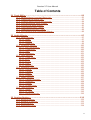
Table of Contents
1 Welcome to the Renoise User Manual ......................................................1
2 Main Screen............................................................................................2
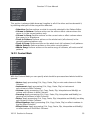
2.1 Main Screen Overview....................................................................................2
2.1.1 Upper Status Bar....................................................................................3
2.1.2 Global Song Control ...............................................................................3
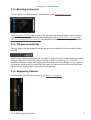
2.1.3 Loading/Saving Files & Song Visualisation .............................................3
2.1.4 Selecting Instruments ............................................................................4
2.1.5 GUI presets/switching ............................................................................4
2.1.6 Sequencing Patterns ..............................................................................4
2.1.7 Creating Patterns ...................................................................................5
2.1.8 Applying FX ............................................................................................5
2.1.9 Lower Status Bar....................................................................................5
2.2 Guide Yourself Through the Interface: Tooltips ..............................................6
2.3 Renoise Work-flow: Learning the Keys ...........................................................6
3 Setting Up Audio Devices ........................................................................7
3.1 Default Setup .................................................................................................7
3.2 Audio Preferences ..........................................................................................7
3.3 Audio Setup on Windows................................................................................8
3.4 Audio Setup on Mac OSX................................................................................9
3.5 Audio Setup on Linux .....................................................................................9
3.6 Latency & Sample Rates ..............................................................................10
4 Setting Up MIDI-Devices ........................................................................11
4.1 Default Setup ...............................................................................................11
4.2 Monitoring MIDI-IO .......................................................................................11
4.3 MIDI Preferences ..........................................................................................12
4.4 Device Setup ................................................................................................12
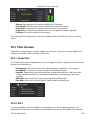
5 Disk Browser.........................................................................................14
5.1 Overview ......................................................................................................14
5.1.1 File Types Selector ...............................................................................14
5.1.2 Folder Panel .........................................................................................15
5.1.3 File Panel .............................................................................................16
5.2 Expanding the Disk Browser ........................................................................18
5.3 Loading Multiple Entries at Once..................................................................18
5.4 Navigating the Disk Browser with the Keyboard ..........................................19
5.5 Importing Raw Audio Files (Convert Any File to Audio Sample) ...................19
6 Transport Panel ....................................................................................20
7 Scopes..................................................................................................22
7.1 Track Scopes ................................................................................................22
7.2 Master Scopes..............................................................................................23
7.3 Master Spectrum..........................................................................................23
i
Renoise 2.7 User Manual
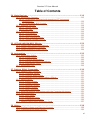
Table of Contents
8 Instrument Selector ..............................................................................24
8.1 Instruments in Renoise ................................................................................24
8.2 Instrument Selector Overview......................................................................24
8.3 Modifying, Copy/Pasting Instruments ...........................................................24
8.4 Drag and Drop..............................................................................................25
8.5 Shortcuts......................................................................................................26
9 Song Settings .......................................................................................27
9.1 Song Settings ...............................................................................................27
9.1.1 Player Options......................................................................................27
9.1.2 Pattern/Sequence Highlighting ............................................................28
9.1.3 Groove Settings ...................................................................................29
9.2 Template Song .............................................................................................30
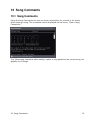
10 Song Comments ..................................................................................31
10.1 Song Comments.........................................................................................31
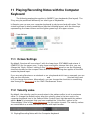
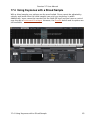
11 Playing/Recording Notes with the Computer Keyboard..........................32
11.1 Octave Settings..........................................................................................32
11.2 Velocity value.............................................................................................32
11.3 Computer Keyboard Limitations.................................................................33
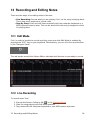
12 Recording and Editing Notes................................................................34
12.1 Edit Mode ...................................................................................................34
12.2 Live Recording ...........................................................................................34
12.3 Entering Notes Step By Step ......................................................................35
12.4 Real-time and Manual Quantization ...........................................................35
12.5 Polyphonic vs. Monophonic Recording .......................................................36
12.6 Entering Chords with the Computer Keyboard ...........................................36
13 Pattern Editor .....................................................................................37
13.1 Patterns......................................................................................................37
13.2 Tracks ........................................................................................................37
13.2.1 Sequencer Tracks ..............................................................................37
13.2.2 Send Tracks .......................................................................................38
13.2.3 Master Track ......................................................................................38
13.2.4 Adding, Removing, Duplicating and Re-ordering Tracks ....................39
13.3 Columns .....................................................................................................39
13.3.1 Adding / Removing Columns ..............................................................39
13.3.2 Sub-Note Columns .............................................................................40
13.3.3 Sub-Effect Columns............................................................................41
13.4 Lines...........................................................................................................41
13.4.1 Lines, Beats and Pattern Resolution ..................................................41
13.5 Pattern Editor Control Panel .......................................................................42
13.6 Editing and Navigating in Patterns.............................................................42
13.6.1 Basic Shortcuts ..................................................................................42
13.6.2 Advancing mode in the effect columns..............................................43
13.6.3 Column/Track/Selection/Pattern Shortcuts.........................................43
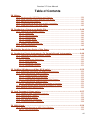
ii
Renoise 2.7 User Manual
Table of Contents
13 Pattern Editor
13.6.4 Drag & Drop of Selections..................................................................43
13.7 Recording of Notes into Patterns ...............................................................44
13.8 Recording of Effects ...................................................................................44
13.9 Applying Effects .........................................................................................44
14 Pattern Sequencer ..............................................................................45
14.1 Overview ....................................................................................................45
14.2 Creating/Cloning/Adding/Removing Patterns .............................................46
14.3 Decoupled Playback ...................................................................................46
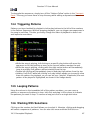
14.4 Triggering Patterns ....................................................................................47
14.5 Looping Patterns ........................................................................................47
14.6 Working With Selections ............................................................................47
14.6.1 Drag and Drop ...................................................................................48
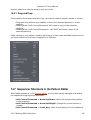
14.7 Sequencer Shortcuts in the Pattern Editor .................................................48
15 Pattern Matrix.....................................................................................50
15.1 Overview ....................................................................................................50
15.2 Matrix Blocks..............................................................................................50
15.3 Drag and Drop............................................................................................51
15.4 Selection & Mouse......................................................................................52
15.5 Muting Blocks .............................................................................................52
15.6 Basic Shortcuts ..........................................................................................52
15.7 Visualization Options..................................................................................52
15.8 Colouring Blocks.........................................................................................53
16 Advanced Edit .....................................................................................54
16.1 Overview ....................................................................................................54
16.2 Processing Scope .......................................................................................54
16.2.1 Section to Process..............................................................................54
16.2.2 Content Mask .....................................................................................55
16.3 Performing Actions .....................................................................................56
16.3.1 Cut/Copy/Paste ..................................................................................56
16.3.2 Modifying Notes .................................................................................56
16.3.3 Modifying Instruments .......................................................................57
16.3.4 Modifying Effects................................................................................58
16.4 Advanced Edit and Pattern Editor Interaction ............................................59
17 Sample Keyzones ................................................................................60
17.1 The Interface ..............................................................................................60
17.2 Creating Keyzones .....................................................................................60
17.2.1 Selecting & Adjusting the Zones ........................................................60
17.2.2 Inserting & Deleting Zones ................................................................61
17.2.3 Automatically Assigning Zones to Samples .......................................61
17.2.4 Assigning A Basenote To A Keyzone ..................................................62
17.2.5 Using Instrument Envelopes ..............................................................62
17.3 Note On/Off Layers.....................................................................................62
17.4 Using Keyzones with a Sliced Sample ........................................................63
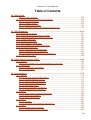
iii
Renoise 2.7 User Manual
Table of Contents
18 Instrument Settings ............................................................................64
18.1 MIDI Input...................................................................................................64
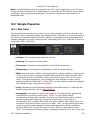
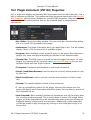
18.2 Sample Properties ......................................................................................66
18.2.1 Main Panel .........................................................................................66
18.2.2 Envelopes ..........................................................................................67
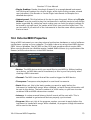
18.3 Plugin Instrument (VST/AU) Properties.......................................................72
18.4 External MIDI Properties.............................................................................73
18.4.1 Setting Up VST Paths .........................................................................74
18.4.2 Selecting a PlugIn ..............................................................................74
18.4.3 Plugin Aliases (multi-timbral plugins).................................................76
18.4.4 Plugin FX Aliases (routing MIDI to existing plugin effects) .................77
18.4.5 Plugin Routing....................................................................................78
18.4.6 Plugin Compatibility Settings .............................................................79
19 Sample Editor .....................................................................................80
19.1 Overview ....................................................................................................80
19.2 Wave View .................................................................................................80
19.2.1 Upper and Lower Rulers.....................................................................80
19.2.2 Lower Zoom Bar.................................................................................81
19.2.3 Navigate Using the Mouse .................................................................81
19.2.4 Navigate Using Keyboard Shortcuts...................................................82
19.3 Drawing......................................................................................................82
19.4 Slicing Markers...........................................................................................82
19.4.1 Slice Controls .....................................................................................83
19.5 Snapping ....................................................................................................83
19.6 Zooming .....................................................................................................83
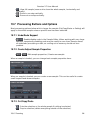
19.7 Processing Buttons and Options.................................................................84
19.7.1 Undo/Redo Support ............................................................................84
19.7.2 Create/Adjust Sample Properties .......................................................84
19.7.3 Cut/Copy/Paste ..................................................................................84
19.7.4 Amplitude & Offset.............................................................................85
19.7.5 Fading ................................................................................................85
19.7.6 Reverse & Swap .................................................................................85
19.7.7 Process Track FX ................................................................................85
19.7.8 Loop Controls .....................................................................................85
19.7.9 Play/Stop and Record .........................................................................86
19.7.10 Current Selection Range Indicator ...................................................86
19.8 Loop Fine Editor .........................................................................................86
19.9 Mix-Paste and other Copy/Paste Operations ..............................................87
19.9.1 Mix-Paste ...........................................................................................87
19.9.2 Copy Into New Sample/Instrument ....................................................87
19.9.3 Copy/Paste With External Sample Editors (Windows only).................87
20 Recording New Samples ......................................................................88
20.1 Audio Device Setup ....................................................................................88
20.2 Overview ....................................................................................................89
20.3 Recording Without Quantization ................................................................91
20.4 Recording With Quantization .....................................................................91
iv
Renoise 2.7 User Manual
Table of Contents
21 Track DSPs..........................................................................................92
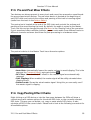
21.1 Adding Effects From the Effects List ..........................................................92
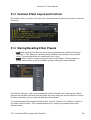
21.2 Organizing the Effects List .........................................................................93
21.3 Common Effect Layout and Controls..........................................................94
21.4 Storing/Recalling Effect Presets .................................................................94
21.5 Pre and Post Mixer Effects..........................................................................95
21.6 Copy/Pasting Effect Chains ........................................................................95
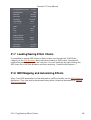
21.7 Loading/Saving Effect Chains .....................................................................96
21.8 MIDI Mapping and Automating Effects .......................................................96
22 Audio Effects.......................................................................................97
22.1 Delay Devices ............................................................................................97
22.1.1 Delay..................................................................................................97
22.1.2 Reverb ...............................................................................................99
22.1.3 mpReverb ..........................................................................................99
22.2 Dynamics Devices ....................................................................................100
22.2.1 Bus Compressor ...............................................................................100
22.2.2 Compressor......................................................................................100
22.2.3 Gate .................................................................................................101
22.2.4 Maximizer ........................................................................................101
22.3 Filter Devices ...........................................................................................102
22.3.1 Comb Filter ......................................................................................102
22.3.2 EQ 5 .................................................................................................102
22.3.3 EQ 10 ...............................................................................................103
22.3.4 Filter.................................................................................................103
22.3.5 Mixer EQ ..........................................................................................105
22.4 Modulation Devices ..................................................................................105
22.4.1 Chorus..............................................................................................105
22.4.2 Flanger.............................................................................................105
22.4.3 Phaser ..............................................................................................106
22.4.4 Ringmod...........................................................................................106
22.5 Shape Devices..........................................................................................107
22.5.1 Cabinet Simulator ............................................................................107
22.5.2 Distortion .........................................................................................108
22.5.3 LofiMat .............................................................................................109
22.5.4 Scream Filter....................................................................................109
22.6 Tools Devices ...........................................................................................109
22.6.1 Gainer ..............................................................................................110
22.6.2 DC Offset .........................................................................................110
22.6.3 Stereo Expander ..............................................................................110
23 Routing Devices ................................................................................112
23.1 #Line-In Device........................................................................................112
23.2 #ReWire-In Device ...................................................................................112
23.3 #Send Device ..........................................................................................113
23.4 #Multiband Send......................................................................................114
v
Renoise 2.7 User Manual
Table of Contents
24 Meta Devices ....................................................................................116
24.1 Automation Devices .................................................................................116
24.1.1 *Instrument Automation(Automating VST instrument
parameters) ...........................................................................................116
24.1.2 *Instrument MIDI Control .................................................................117
24.2 Mapping Devices ......................................................................................118
24.2.1 *Hydra Device..................................................................................118
24.2.2 *XY Pad ............................................................................................118
24.3 Modulation Devices ..................................................................................119
24.3.1 *LFO Device .....................................................................................119
24.3.2 *Velocity Device...............................................................................120
24.3.3 *Key-Tracking Device.......................................................................121
24.3.4 *Signal Follower Device ...................................................................121
25 VST/AU/LADSPA/DSSI Effects..............................................................123
25.1 Plugin Effect Layout and Options .............................................................123
25.2 Plugin Compatibility Settings ...................................................................123
25.3 Sending Notes to Plugin Effects ...............................................................124
26 Automation .......................................................................................125
26.1 Automation Editor ....................................................................................125
26.1.1 Zoom Levels.....................................................................................126
26.1.2 Creating Automation........................................................................126
26.1.3 Editing Automation Envelopes .........................................................126
26.1.4 Automation Tools .............................................................................128
26.2 Automation List ........................................................................................129
27 Pattern Effect Commands ..................................................................130
27.1 Pattern Effect Columns ............................................................................130
27.1.1 Ticks and Values ..............................................................................130
27.1.2 Ticks vs. Note Delays .......................................................................131
27.1.3 Recording and Editing Pattern Effects .............................................131
27.2 Effect Listing ............................................................................................131
27.2.1 Effect Column ..................................................................................132
27.2.2 Volume Column................................................................................133
27.2.3 Panning Column ...............................................................................134
27.2.4 Delay Column...................................................................................134
27.2.5 MIDI Commands...............................................................................134
27.3 Entering Multiple Digit Values with the Computer Keyboard ...................135
27.4 Effect Examples .......................................................................................135
27.4.1 Pitch Slide ........................................................................................135
27.4.2 Breakbeat Tricks ..............................................................................136
27.4.3 Programming Delays........................................................................136
27.5 Pattern Effects Quick Reference Card ......................................................137
28 Mixer ................................................................................................138
28.1 Pre/Post Volume and Panning Concept ....................................................138
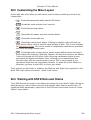
28.2 Customizing the Mixer Layout..................................................................139
vi
Renoise 2.7 User Manual
Table of Contents
28 Mixer
28.3
28.4
28.5
28.6
28.7
Working with DSP Effects and Chains ......................................................139
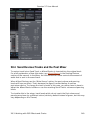
Send Devices/Tracks and the Post Mixer..................................................140
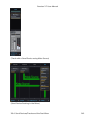
Adjusting Level Meters .............................................................................142
Controlling the Mixer with a MIDI Controller.............................................142
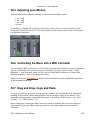
Drag and Drop, Copy and Paste ...............................................................142
29 Rendering a Song as an Audio File .....................................................144
29.1 Opening the Render Dialog ......................................................................144
29.1.1 Overview..........................................................................................144
29.1.2 Part to Render..................................................................................144
29.1.3 Destination.......................................................................................145
29.1.4 Render Mode....................................................................................145
29.1.5 Render Options ................................................................................145
29.2 Hidden rendering feature .........................................................................146
29.3 Sinc Interpolation .....................................................................................146
30 Quickly Rendering Parts of the Song ..................................................148
31 Rendering Plugin Instruments To Sample Based Instruments ..............149
31.1 Opening the Plugin Grabber Dialog..........................................................149
31.2 Overview ..................................................................................................150
31.2.1 Instrument Selection........................................................................150
31.2.2 MIDI Options ....................................................................................150
31.2.3 Sampling Options.............................................................................151
31.2.4 Sampling Format..............................................................................151
32 ReWire (Windows and Mac OS X only) ................................................152
32.1 Start/Stop Procedure for ReWire Applications ..........................................152
32.2 Using Renoise as ReWire Master..............................................................153
32.2.1 Routing Audio To Renoise ................................................................153
32.2.2 Trigger MIDI from Renoise ...............................................................153
32.2.3 Automating ReWired synths like Reason .........................................154
32.3 Using Renoise as ReWire Slave ................................................................154
32.3.1 Setting up Transport Sync Mode in Renoise.....................................155
32.4 General Notes about Renoise as Master or Slave.....................................155
32.5 ReWire Demo Restrictions .......................................................................156
33 Jack Transport (Linux only) ................................................................157
33.1 Levels of Jack Transport Control...............................................................157
33.2 Dealing with Tempo .................................................................................157
33.3 Dealing with Loops ...................................................................................158
33.4 PDC and Jack Transport............................................................................158
33.5 Configuring Jack Transport .......................................................................158
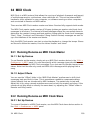
34 MIDI Clock.........................................................................................159
34.1 Running Renoise as MIDI Clock Master ....................................................159
34.1.1 Set Up Devices.................................................................................159
vii
Renoise 2.7 User Manual
Table of Contents
34 MIDI Clock
34.1.2 Adjust Offsets...................................................................................159
34.2 Running Renoise as MIDI Clock Slave ......................................................159
34.2.1 Set Up Devices.................................................................................159
34.2.2 Adjust Offsets...................................................................................160
34.2.3 Adjust Smoothing.............................................................................160
34.2.4 Loading New Songs Without Losing Sync.........................................160
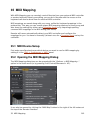
35 MIDI Mapping ....................................................................................161
35.1 MIDI Device Setup ....................................................................................161
35.2 Opening the MIDI Mapping Dialog............................................................161
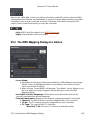
35.3 The MIDI Mapping Dialog at a Glance ......................................................162
35.4 Create Mappings ......................................................................................164
35.5 Remove Mappings....................................................................................165
35.6 Import/Export Mappings...........................................................................165
35.7 Set, Trigger and Toggle Mappings............................................................165
35.8 Dynamic Mappings...................................................................................167
35.8.1 Selected Track Mappings .................................................................167
35.8.2 Selected DSP FX Mapping ................................................................168
35.8.3 Sequencer Navigation & Triggering .................................................168
35.9 The Duplex Tool .......................................................................................168
36 Open Sound Control (OSC) .................................................................169
36.1 Setup........................................................................................................169
36.1.1 The Default OSC Implementation of Renoise ...................................170
36.2 Examples .................................................................................................174
36.2.1 TouchOSC via Duplex.......................................................................175
36.2.2 Pure Data .........................................................................................175
37 Preferences.......................................................................................176
37.1 Audio ........................................................................................................176
37.1.1 Device Settings (Windows) ..............................................................177
37.1.2 Device Settings (OSX) ......................................................................177
37.1.3 Device Settings (Linux) ....................................................................178
37.1.4 Multi CPU/Core support ....................................................................179
37.1.5 Automatic PDC .................................................................................179
37.1.6 CPU Load and Threshold ..................................................................179
37.1.7 Metronome & Precount ....................................................................179
37.2 MIDI..........................................................................................................179
37.2.1 MIDI Master Keyboard/Mapping .......................................................180
37.2.2 MIDI Clock Master ............................................................................180
37.2.3 MIDI Clock Slave ..............................................................................181
37.3 OSC ..........................................................................................................181
37.3.1 Server ..............................................................................................182
37.3.2 Renoise OSC messaging protocols...................................................182
37.4 Files..........................................................................................................183
37.4.1 Wave Import Options .......................................................................183
37.4.2 Raw Audio Import Options ...............................................................184
viii
Renoise 2.7 User Manual
Table of Contents
37 Preferences
37.4.3 Device Chain Import Options ...........................................................184
37.4.4 MIDI Import Options .........................................................................184
37.4.5 Song/Instrument Export Options ......................................................184
37.5 Keys .........................................................................................................185
37.5.1 Keyboard Mapping List.....................................................................185
37.5.2 Importing/Exporting Keyboard Mappings .........................................185
37.5.3 Keyboard Repeat Rate .....................................................................186
37.5.4 Mouse Repeat Rate ..........................................................................186
37.6 GUI ...........................................................................................................186
37.6.1 Global...............................................................................................186
37.6.2 Pattern Editor...................................................................................187
37.6.3 Pattern Sequencer ...........................................................................187
37.6.4 Envelope Editor................................................................................187
37.6.5 Scopes .............................................................................................187
37.7 Theme ......................................................................................................187
37.7.1 Theme Files......................................................................................188
37.7.2 Color Settings ..................................................................................188
37.7.3 Global Color Filters...........................................................................188
37.7.4 Graphic ............................................................................................188
37.8 Plugins/Misc .............................................................................................188
37.8.1 Audio Unit Plugins (OSX only) ..........................................................189
37.8.2 LADSPA Plugins (Linux only) ............................................................189
37.8.3 VST Plugins (Windows, Mac & Linux) ...............................................189
37.8.4 Plugins General (Windows, Mac & Linux) .........................................189
37.8.5 Backup .............................................................................................190
37.8.6 Misc..................................................................................................190
38 Keyboard Shortcuts...........................................................................191
38.1 Keyboard Focus Concept..........................................................................191
38.2 Customising and Printing Shortcuts .........................................................191
38.3 List of Default Shortcuts...........................................................................192
38.4 List of Important Shortcuts.......................................................................192
38.4.1 Global...............................................................................................193
38.4.2 Pattern Editor...................................................................................193
ix
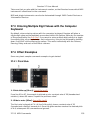
1 Welcome to the Renoise User Manual
Welcome to the Renoise user manual. Renoise provides a large number of features
which perform a wide variety of tasks for music and sound creation. This manual will
help you to understand how everything works by explaining all available aspects of
Renoise in detail. You can use the category list to look through the various topics, or
use the search function to find something specific.
You can also find a quickstart guide, a beginner's video tutorial and version of this
manual online at the official Renoise site: http://tutorials.renoise.com
If you have any questions or suggestions, then please don't hesitate to contact us.
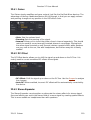
Copyright © 2010 by the Renoise authors. All rights reserved. All other product and company names are registered
trademarks of their respective owners. The Renoise User Manual was created by Vincent Voois [vV], Sato Takashi [sato],
Dac Chartrand [Conner_BW], Eduard Müller [taktik] and Duncan Hemingway [Achenar]
1 Welcome to the Renoise User Manual
1
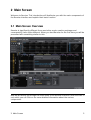
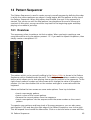
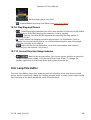
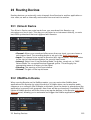
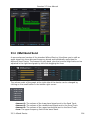
2 Main Screen
Welcome to Renoise. This introduction will familiarise you with the main components of
the Renoise interface and explain their basic function.
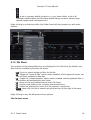
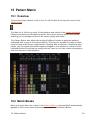
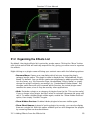
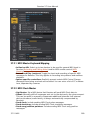
2.1 Main Screen Overview
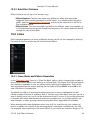
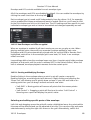
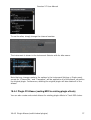
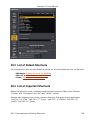
Renoise is significantly different from most other music creation packages and
consequently it also looks different. When you load Renoise for the first time you will be
presented with something similar to this:
Now we will briefly go through the main areas of the Renoise interface. Note the links in
red, which you can click on for more detailed information about the various
components.
2 Main Screen
2
Renoise 2.7 User Manual
2.1.1 Upper Status Bar
Located at the very top of the interface is the Upper Status Bar.
The left section of the status bar offers a variety of menu options. To the right of this is
a VU meter showing the current master volume level, the MIDI controls (MIDI Mapping
button, MIDI I/O LEDs), Song Timer and the current CPU usage.
2.1.2 Global Song Control
Just below the Upper Status Bar on the left-hand side are the basic Transport Panel
controls.
From here you can start/stop the song and access basic editing features such as Edit
Mode (record) and the metronome.
2.1.3 Loading/Saving Files & Song Visualisation
To the right of the transport panel are the Disk Browser and Scopes.
Using the Disk Browser you can load or save songs, instruments, samples, DSP chains
and skins/themes. Upon first loading Renoise you will see a list of demo songs here.
Double click on a song to load it, then press play to see and hear Renoise in action.
The various Scopes help you to visually analyse the song. Switch between the Scopes
and Disk Browser using the four tabs located above this area.
2.1.1 Upper Status Bar
3
Renoise 2.7 User Manual
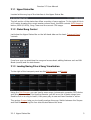
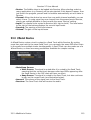
2.1.4 Selecting Instruments
To the right of the Disk Browser / Scopes area is the Instrument Selector.
The Instrument Selector allows you to choose the instrument that you wish to play or
record with, using either the computer keyboard or an external MIDI keyboard. Also,
VST/AU or external MIDI instruments will appear in this section when they are loaded.
2.1.5 GUI presets/switching
Directly above the Instrument Selector are a series of buttons that are used to affect
the GUI.
A set of eight global preset buttons are used to switch between various sections of the
interface and are accessed by either clicking on them or pressing F1 - F8 on the
keyboard. Renoise comes with eight presets already stored by default. To the right of
this are two buttons which show/hide the upper or lower sections of the interface and
the full screen button, which fully covers the desktop.
2.1.6 Sequencing Patterns
Located at the far left of the screen is the Pattern Sequencer.
2.1.4 Selecting Instruments
4
Renoise 2.7 User Manual
Renoise uses a sequence of patterns to arrange the structure of a song and the Pattern
Sequencer is used to create, copy and organise your patterns.
2.1.7 Creating Patterns
To the right of the Pattern Sequencer and occupying the main central space is the
Pattern Editor.
This is the main tool for composing and editing within Renoise. Although it may look
intimidating to beginners, the method of adding/recording notes into tracks using the
Pattern Editor is actually incredibly simple.
2.1.8 Applying FX
Beneath the central area is the panel for Track DSPs:
This displays and controls all of the effects that are being applied to the current track
(the track which the cursor is in). Besides the typical DSP effects
(Renoise/VST/AU/LADSPA) you can also assign routing devices to send/receive audio,
and meta devices such as LFOs that do not affect audio, but are instead used to alter
parameters and automation.
2.1.9 Lower Status Bar
Finally, at the very bottom is the Lower Status Bar.
2.1.6 Sequencing Patterns
5
Renoise 2.7 User Manual
At significant points, Renoise will display information regarding its status and current
operations here. If you wish to see the Tip of the Day dialog box again, click on the
Renoise logo at the right.
2.2 Guide Yourself Through the Interface: Tooltips
As you are using Renoise watch out for Tooltips, which can be seen by hovering the
mouse pointer over a button or part of the interface for a second. Almost every button
in Renoise will provide you with a small tip about its function.
2.3 Renoise Work-flow: Learning the Keys
While Renoise supports drag'n'drop and mouse gestures, it is primarily a
keyboard-based application. As such, there are keyboard shortcuts for practically every
function. To view the available shortcuts, select "Help->List Keyboard Shortcuts..." from
the Upper Status Bar. If you are interested in a shortcut specific to an interface area,
you can right-click to open a context menu. Finally, the keyboard shortcuts can also be
customised in the "Edit->Preferences->Keys" menu.
A list of most important shortcuts can also be found in the Keyboard Shortcuts
section in this manual.
2.1.9 Lower Status Bar
6
3 Setting Up Audio Devices
Audio devices are what enables your computer to create the sounds you hear. This is
not necessarily a sound-card; it can also be built into your computer's hardware.
Regardless of whatever generates the actual sound output, what you control in Renoise
is a driver, which is what allows the hardware and software to communicate.
3.1 Default Setup
By default, Renoise is configured to use the system's default audio output device at a
high latency, ensuring that in most cases Renoise is ready to go and output can be
heard. No input device (something you can record with) is selected by default. Because
the default settings are often not optimal for your particular machine, you should have
a quick look at the Audio Preferences in case adjustments can be made.
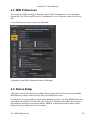
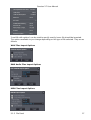
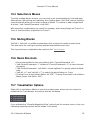
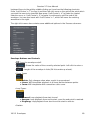
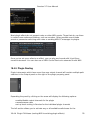
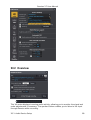
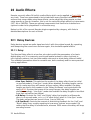
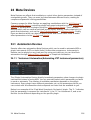
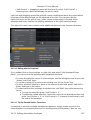
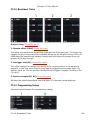
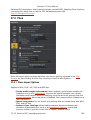
3.2 Audio Preferences
To change the audio settings in Renoise, select "Edit->Preferences" from the Upper
Status Bar. On OSX you will find the "Preferences" in the "Renoise" menu at the very
left.
In the Preferences menu, select the Audio tab:
3 Setting Up Audio Devices
7
Renoise 2.7 User Manual
(Example of the Audio Preferences tab on Windows)
What follows is a quick overview of how to set up devices. For a more detailed
explanation of the Audio Preferences, take a look at the Preferences section of the
manual.
3.3 Audio Setup on Windows
On Windows you will have the choice between two different audio architectures:
• Direct Sound: This is the Windows default setup for audio and will work with all
devices that are recognised by Windows. It is reliable, but also has a relatively
high latency (the time it takes for the sound output by Renoise to be heard).
Direct Sound only offers one stereo channel as input or output, so if your
sound-card offers multiple audio channels you will not be able to use them in
Renoise via this method.
• ASIO: An audio architecture created specifically for professional audio
applications such as Renoise. It offers low latencies and combines recording and
playback into one driver, making recording more reliable and stable. It also
allows software to access multiple channels at once. So if your sound card has
more than one output, you can directly address them in various ways when using
3.2 Audio Preferences
8
Renoise 2.7 User Manual
ASIO.
Because of its many advantages, using ASIO is highly recommended. Even if your
sound-card does not provide ASIO drivers (i.e. your device does not show up in the ASIO
device list in Renoise), you could try out a free general ASIO driver for Windows:
ASIO4All. This driver will work with most audio hardware, but may not be as reliable as
your specific sound-card vendor's official drivers.
3.4 Audio Setup on Mac OSX
On OSX there is only one driver architecture present and it will work out of the box on
all available Macs. Named Core Audio, it is similar to ASIO, offering low latencies and
allowing the use of multiple sound-card outputs (when present) in Renoise.
To use Core Audio, simply select the device for output and recording and then select
the latency and sample rate you want to use. Please see below for a more detailed
description of the latency and sample rate setup.
3.5 Audio Setup on Linux
On Linux you have the choice between two different architectures:
• ALSA: This is the default audio architecture on most Linux systems and it should
work out of the box in Renoise. In most cases it is very fast and reliable, but may
require some fine-tuning before being usable. Please see the notes just below for
more info about the "tweaking" that is needed for Linux Audio in general.
• Jack: Not installed by default on many Linux systems, but this is still a relatively
common and advanced way to access your sound hardware. Jack does not just
bridge Renoise to your sound-card, but also allows the routing of audio between
multiple applications (provided they also support Jack). Please visit the official
Jack audio pages at jackaudio.org for more detailed information.
Configuring Linux for Audio in general: Many Linux distributions are, by default, not
optimized to the standards required for real-time audio creation in Renoise. So when
using either ALSA or JACK with Renoise it is recommended to:
• use a real-time kernel
• configure PAM (/etc/security.conf) to allow Renoise and other applications to
create low latency and high priority tasks
Both topics are described in depth in our Linux FAQ. For more information on the
subject, this general Linux and Audio FAQ is also recommended: linuxaudio.org
3.3 Audio Setup on Windows
9
Renoise 2.7 User Manual
3.6 Latency & Sample Rates
Latency is the time that it takes for sounds output by Renoise to be played on your
speakers or headphones. The lower the latency, the quicker Renoise will respond to
what you play or modify. So lower latencies are preferable, but they also require more
CPU power to maintain. If the CPU becomes overloaded then the audio will start to
crackle and choke. If you hear such crackles in the sound output, the first thing you
should do is increase the latency via the Preferences menu.
The sample rate defines how much detail is contained within the sound that you hear.
The higher the sample rate, the more detail. 44,100 Hz is the rate that is used by CD
players, so that rate offers an excellent playback quality. Whether higher rates result in
a noticeably better listening experience is debatable, but they do offer increased
resolution for effects. Rates below 44,100 Hz are not recommended because there is an
audible reduction in sound quality.
Note that CPU consumption is affected by the sample rate. A doubling of the sample
rate roughly corresponds to a doubling of CPU consumption in Renoise, because
everything requires twice the number of calculations. So be aware that when using
higher rates you will reach your computer's processing power limit sooner.
3.6 Latency & Sample Rates
10
4 Setting Up MIDI-Devices
You can connect external MIDI devices to Renoise in order to play notes or record
controllers (automation). This is often done with a MIDI master keyboard or an external
synthesizer which is capable of sending MIDI. While it is possible to use the computer
keyboard to enter notes in Renoise, it is not velocity sensitive and can only map two
and half octaves at once. So a MIDI keyboard is highly recommended when you want to
accurately record "live" playing.
Using the MIDI Mapping function, you can externally map things like starting/stopping
the song, changing sequences, levelling tracks and FX etc. This can be done by either
mapping regular notes from a master keyboard, or with MIDI hardware which is
dedicated to the task, such as MIDI controllers and mixers.
With the MIDI clock you can sync external MIDI capable devices to the Renoise clock or
vice versa.
To play external MIDI instruments from within Renoise you just use "MIDI Instruments",
which do not need to be set up via the Preferences menu. You can find the relevant
information in the Instrument Settings section of the manual.
4.1 Default Setup
By default, Renoise is set up to use the first two devices it finds as input devices. If you
don't have more than two devices, MIDI IO might work right out of the box for you. To
verify that Renoise recognises your MIDI keyboard or controller, load up a sample and
press notes on the keyboard. If you can't hear what you're playing, you should open up
the Preferences menu and have a look at the settings.
4.2 Monitoring MIDI-IO
To the right of the menu options within the Upper Status Bar will be either two or four
small LEDs. If there are four LEDs then the left set refer to MIDI Clock signals, while the
right set refer to general MIDI transfers. If there is no MIDI Clock set up, then there will
be only two LEDs, representing general MIDI transfers. Every message that is sent from
Renoise will blink the red LED, while every message that is received by Renoise will
blink the green.
4 Setting Up MIDI-Devices
11
Renoise 2.7 User Manual
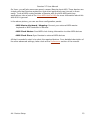
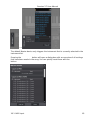
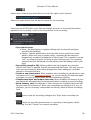
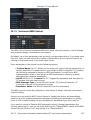
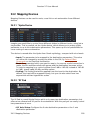
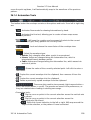
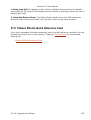
4.3 MIDI Preferences
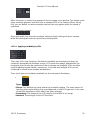
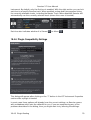
To change the MIDI settings in Renoise, select "Edit->Preferences" from the Upper
Status Bar. On OSX you will find the "Preferences" in the "Renoise" menu at the very
left.
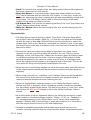
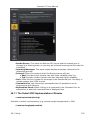
In the Preferences menu, select the MIDI tab:
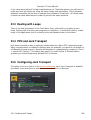
(Example of the MIDI Preferences tab on Windows)
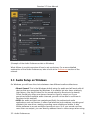
4.4 Device Setup
Clicking on one of the device drop down boxes shows a list of the currently installed
MIDI devices. Simply select the one that you would like to use.
On Windows, you may find the same entry appearing twice, one with WDM before the
name and one without. If that's the case, then your sound-card or MIDI device offers
two different drivers for the same device. WDM is a new kind of driver which offers
better timing, so select this one if it works.
4.3 MIDI Preferences
12
Renoise 2.7 User Manual
On Linux, you will also see some generic names (Renoise Input A/B). These devices are
virtual ports that Renoise registers so that other applications can connect to them
easily. To do all MIDI routing outside of Renoise with the ALSA MIDI patch-bay
applications, take a look at the Linux MIDI HowTo FAQs for more information about this
and ALSA in general.
In the above picture, you can see three configuration panels:
• MIDI Master Keyboard / Mapping: Connect your external MIDI master
keyboard or MIDI controller to Renoise
• MIDI Clock Master: Send MIDI clock timing information to other MIDI devices
• MIDI Clock Slave: Sync Renoise to external MIDI devices
All that is needed to start is to select the required devices. For a detailed description of
the other advanced settings, take a look at the Preferences section of the manual.
4.4 Device Setup
13
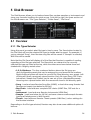
5 Disk Browser
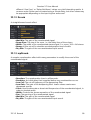
The Disk Browser allows you to load and save files, preview samples or instruments and
store your favourite locations for quick access. From left to right, the three sections of
the Disk Browser are: "File Types Selector", "Folder Panel", "File Panel".
5.1 Overview
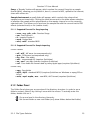
5.1.1 File Types Selector
Using this panel you select what file type to load or save. The Save button located in
the File Panel will use the selected file type to decide what to export. For example, if
you've selected "Song", then Renoise song files will be saved. If "Sample" is selected,
WAV files will be saved.
Note that the File Panel will display all of the files that Renoise is capable of reading,
regardless of the file type selected. The files which are relevant to the currently
selected file type are listed at the top, while the others are shown below them and
shaded with a slightly muted colour.
• 1,2,3,4 Buttons - The four numbered buttons above the file types are
user-configurable presets that can be assigned to your favourite file locations.
Right-clicking a button will store the current File Panel directory as a preset. Left
clicking will recall a previously stored location. Each file type (Song, DSP Chain,
Instrument, Sample and Theme) has its own set of four customisable presets.
Hovering over a preset button with the mouse will show its full directory path.
• Song - Load and save Renoise Song files (XRNS), or load other song formats that
Renoise can import (see below for full list)
• Dsp Chain - Load and save complete DSP chains (XRNT files, DSP sets for a
track)
• Instrument - Load and save Renoise Instruments (XRNI files)
• Sample - Load (see below for full list) and save common audio sample formats
(saving will always save in WAV format)
• Theme - Load and save Renoise Theme presets (XML files) / colour settings for
the Renoise interface
Depending on the file type selected, Renoise may also show some additional options &
buttons:
5 Disk Browser
14
Renoise 2.7 User Manual
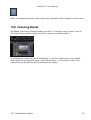
Song: a "Render" button will appear, which renders the current Song into a sample
format (WAV), allowing you to publish it, burn it, convert to MP3, upload to the internet,
share with others etc.
Sample/Instrument: a small slider will appear, which controls the volume that
samples are pre-heard with. Clicking the small arrow next to the slider allows selection
of whether the sample will be played back on the master channel or on the currently
selected track. This allows you to pre-hear the sample file with the current track's DSP
effects (selected track) or not (master track).
5.1.1.1 Supported Formats For Song Importing
• .xrns, .rns, .ptk, .ntk - Renoise Songs
• .xm - FastTracker II
• .it - ImpulseTracker II
• .mod - Amiga Mod
• .mid, .midi - standard MIDI
5.1.1.2 Supported Formats For Sample Importing
5.1.1.2.1 Lossless
• .aif, .aiff - AIF wave (uncompressed only)
• .wav - PCM wave (uncompressed only)
• .fla, .flac - Flac audio
• .aifc - compressed AIF (requires Quicktime)
• .au, .snd - rare Mac formats (requires Quicktime)
• .caf - Core Audio file format used by many Apple apps (requires Quicktime)
5.1.1.2.2 Lossy
• .ogg - Ogg Vorbis
• .mp2, .mp3 - standard MP2/3 (requires Quicktime on Windows or mpeg123 on
Linux)
• .m4a, .mp4 .mp4a, .aac - new MP4, AAC format (requires Quicktime)
5.1.2 Folder Panel
The Folder Panel gives you an overview of the directory structure. In order to see a
folder's content, select it by clicking it once with the mouse. To actually enter the
folder, double click on it.
•
•
- Go up one level in the directory hierarchy
- Set current folder as new root folder (only show folders below that folder)
5.1.1 File Types Selector
15
Renoise 2.7 User Manual
•
- A set of common default locations, i.e. your home folder, a list of all
available installed disks and Renoise's default library contents (demo songs,
default samples and instruments etc.)
Right clicking on a directory within the Folder Panel will also present you with more
options:
5.1.3 File Panel
The contents of the selected directory are displayed in the File Panel. By default, only
files that are readable by Renoise are shown.
- Type in a search phrase to filter the file-list
- Toggle the "show all files" option (when enabled, all file types are shown, not
just the ones readable by Renoise)
• - Toggle the "sample preview" option (when enabled, selecting sample files in
the browser will automatically play them)
• - Show or hide sub-folders present in the File Panel
• - Create a new folder in the currently selected directory
• - Delete the selected file (move it to the system's recycle bin)
•
- Save a file (the file is named using the text box to the right of the save
button)
•
•
Right clicking on any file will present more options:
File-Context menu
5.1.2 Folder Panel
16
Renoise 2.7 User Manual
"Load file with options" can be used to specify exactly how a file should be imported.
The options available to you change depending on the type of file selected. They are as
follows:
WAV Files Import Options
RAW Audio Files Import Options
MIDI Files Import Options
5.1.3 File Panel
17
Renoise 2.7 User Manual
DSP Chain Files Import Options
5.2 Expanding the Disk Browser
The Disk Browser area can be enlarged by clicking the "More" button, causing it to
expand across the centre frame. The Instrument Selector will also be rescaled to
match. While expanded, the "More" button becomes a highlighted "Less" button, which
collapses the Disk Browser back to its original size. Pressing "ESC" while expanded also
shrinks the Disk Browser.
5.3 Loading Multiple Entries at Once
You can load multiple sample or instrument entries by ctrl-clicking individual files
and/or shift-clicking to select a range of them. The selected files can then be loaded
using the context menu or dragged into a specific spot. Samples can be dragged into
the instrument-list area and have an instrument created for each sample, or dragged
into the sample-list area and be loaded into a single instrument.
5.2 Expanding the Disk Browser
18
Renoise 2.7 User Manual
5.4 Navigating the Disk Browser with the Keyboard
The default keyboard focus of Renoise is set to control the Pattern Editor, but you can
also activate other parts of the interface for keyboard navigation. You can achieve this
through by any of the following methods:
• Right click on the File Panel or Folder Panel to show the context menu and select
"(Set Keyboard Focus here)"
• Navigate the keyboard focus through the various interface areas with the
[Control/Command + Tab], [Control/Command + Shift Tab] shortcuts
• Click with the middle mouse button on the File Panel or Folder Panel
5.5 Importing Raw Audio Files (Convert Any File to Audio
Sample)
Renoise is able to load anything (yes, any file type) as an audio sample file. In order to
do this:
• Select the "Sample" category in the File Selector
• Make sure the "Show All Files" option is enabled
• Double click a file which is not normally recognized as a sample file (TXT
document, JPEG picture, AVI movie etc.)
• Additionally, right-clicking on the file and selecting "Load File with Options" gives
you additional options for importing (sample rate, bit depth etc.)
5.4 Navigating the Disk Browser with the Keyboard
19
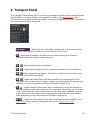
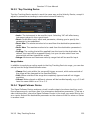
6 Transport Panel
The Transport Panel allows you to control song playback and alter other relevant global
options. When the upper frame of the interface is hidden (see Main Screen), the
Transport Panel controls will still be usable, as they are collapsed into a small horizontal
bar just below the Upper Status Bar.
•
- Master Volume. This slider corresponds to the volume of the
Master Track and so controls the overall volume of the song.
•
- Auto adjust the Master Volume level to avoid clipping (the volume is
automatically lowered when clipping occurs).
•
/
- Start playing the song or pattern.
•
/
- Toggle pattern looping, which constantly repeats the current pattern.
•
/
- Stop song/pattern playback. Click twice or right-click to activate Panic:
stopping all sounds immediately.
•
/
- Toggle Edit Mode. With Edit Mode enabled, all notes played via the
keyboard are recorded into the pattern. Notes can be recorded while the song is
stopped or as the song/pattern is playing (if Pattern Follow is on).
•
/
- Toggle Pattern Follow mode. When enabled, the cursor will follow the
playback position down the pattern as the song plays. This allows you to record
"live", inserting notes at the current point in the song. When disabled, you can
freely move the cursor around as the song plays, inserting notes and making
edits wherever you like (most useful with pattern looping on).
•
/
- Toggle the metronome. Extra metronome options are available in the
Preferences menu and via the Options menu in the Upper Status Bar.
6 Transport Panel
20
Renoise 2.7 User Manual
• Block Loop - This causes a section of the current pattern to be looped and
works independent of the full pattern loop option. The value box to the right
allows you to adjust the exact fraction size of the looping section. If you need to
concentrate on recording and editing only a small section of a pattern, then this
option can be very useful.
• Beats / Min. - The current tempo of the song, also known as BPM. As well as
whole numbers, the value box can accept numbers with a decimal point, e.g.
125.5. To do this, double click on the value box and enter a new BPM value with
the keyboard. To adjust the tempo as the song is playing, you can use the
Pattern Effect F0XX, where XX is the new BPM in hexadecimal. See Pattern
Effect Commands for more info.
• Lines / Beat. - This changes the number of lines in the Pattern Editor that make
up a musical beat. The higher the LPB, the greater the resolution available to you
for editing notes, effects and automation. This can be also be adjusted as the
song is playing via the Pattern Effect F1XX, where XX is the new LPB value in
hexadecimal. See Pattern Effect Commands for more info.
• Keyb. Octave - The current octave of both the computer keyboard and external
MIDI keyboard. Moving this value up and down alters the octave of the notes
played and hence their pitch. Please see Playing Notes with the Computer
Keyboard for more information about playing and recording notes with the
computer keyboard.
6 Transport Panel
21
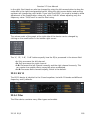
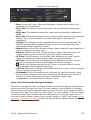
7 Scopes
The scopes provide a visual representation of your song, allowing you to examine the
frequency and amplitude of the final audio signal or see what's currently happening in
each individual track.
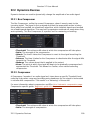
7.1 Track Scopes
The Track Scopes show the audio output from all tracks simultaneously. The waveform
represents not just the volume of the sound, but also its basic frequency characteristics
(bass sounds will appear broad and flat, while high pitches look sharp and jagged). MIDI
instruments, which only send MIDI events and thus have no audio visualisation, are
represented by a small red dot in the lower-right corner of the scopes.
Layout
Track names and numbers are shown in the top-left and lower-left corners respectively.
If the track is routed to a send-track, this will be shown after the track number in the
form >X, where X is the number of the send-track.
The name and number of the currently selected track are signified by highlighted text.
You can also navigate through the various tracks by clicking on their name.
Mouse Operations
• Toggle tracks on/off with the left mouse button.
• Solo / unsolo a track by right-clicking it.
• Mute a track at the current point in the Pattern Sequence (see Pattern Matrix)
with the middle mouse button.
• Scroll through tracks by using the mouse scroll-wheel.
If you have set the track-function to Mute in the Preferences menu, the scope will
display Mute instead of OFF.
7 Scopes
22
Renoise 2.7 User Manual
7.2 Master Scopes
The Master Scopes display the audio produced by the Master Track in stereo. It can be
a useful visual tool for examining the amplitude of the left and right channels of your
final mix.
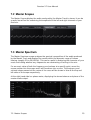
7.3 Master Spectrum
The Master Spectrum scope analyses the spectral composition of the audio produced
by the Master Track and displays the results within the dynamic range of human
hearing (roughly 20 to 20,000 Hz). This can be useful in analysing the character of your
music and noting whether any frequencies are dominating or lacking in the mix.
For an exact value of both the frequency and volume at a specific point, move the
mouse pointer into the scope and it will transform into a cross. The frequency and
volume values present at the centre of the cross will be shown in blue at the top and
left sides of the scope respectively.
At the right-hand side is a phase meter, displaying the stereo balance and phase of the
master audio output.
7.2 Master Scopes
23
8 Instrument Selector
The organisation of instruments and samples in a song is done through the Instrument
Selector. Unlike other sequencers, an instrument in Renoise, such as a piano, is not
necessarily bound to a single track; you can play the piano on any track you like.
Additionally, in the case of sample based instruments, the sound can be used on
multiple tracks simultaneously.
8.1 Instruments in Renoise
An instrument in Renoise may be comprised of one or more of the following:
• One or more audio samples set up in the Instrument Settings, possibly layered
and modulated through the use of Envelopes.
• A plugin instrument (VST or Audio Unit) as set up and loaded in the Instrument
Settings.
• A MIDI instrument (VST or Audio Unit) as set up in the Instrument Settings.
8.2 Instrument Selector Overview
The Instrument Selector lists the instruments currently loaded into the song. The
currently selected instrument is highlighted and will be played back and recorded when
editing or recording notes into patterns. Instruments are numbered on the left and this
number is used by the Pattern Editor to refer to each specific instrument during
playback.
To add a new empty slot or remove an instrument from the list, use the + and - buttons
on the left hand side.
8.3 Modifying, Copy/Pasting Instruments
8 Instrument Selector
24
Renoise 2.7 User Manual
Right clicking on the Instrument Selector presents you with some extra options. Note
that there are actually two context menus; one for the instrument list and one for the
sample list.
• Rename: Give an instrument/sample a new name.
• Render Plugin To Instrument: Available for plugin instruments only. This will
create a sample-based instrument from the selected plugin instrument. After
rendering, the new instrument replaces the plugin, which is also unloaded. Using
this method you can share Renoise songs with people who may not have a
specific plugin.
• Render Plugin To New Instrument: Again, only available for plugin
instruments. This will create a new sample-based instrument from the selected
plugin instrument. The new instrument is placed into an empty instrument slot,
leaving the original plugin untouched.
• Delete Unused Instruments: Will remove and unload all instruments which
are unused, i.e. not played on any pattern within the song.
• Delete Unused Samples: Will remove and unload all samples within
instruments that are unused, i.e. not played on any pattern within the song.
• Save Instrument/Sample As... : Export an instrument/sample to a file for later
use and importing. This can also be done in the Disk Browser.
8.4 Drag and Drop
The two lists can be reorganized by dragging and dropping instruments/samples in the
Instrument Selector. When this is done, Renoise automatically adjusts the numerical
reference of instruments within the Pattern Editor, ensuring that the song still plays the
same. If you wish to swap or replace one instrument with another, you can do so by
copy/pasting it, or by remapping it in the Advanced Edit panel.
Samples can be dragged and dropped from the Disk Browser to the instrument or
sample list. Dragging multiple samples into the sample list at once will automatically
8.3 Modifying, Copy/Pasting Instruments
25
Renoise 2.7 User Manual
create a multi-sample instrument. Sample or instrument files can also be dragged and
dropped from Windows Explorer (PC) or Finder (OSX). Note that in this case the
currently selected instrument slot will be used, possibly overwriting an existing
instrument.
8.5 Shortcuts
• ALT + UP/DOWN: Select previous/next instrument in the list.
• NUMPAD KEYS -/+: Select previous/next instrument in the list.
• ALT + LEFT/RIGHT: Select previous/next page in the Instrument Selector.
• NUMPAD KEYS 1-9: Select first to ninth instrument currently visible in the list.
• ALT + SHIFT + UP/DOWN: Scrolls through the list of samples contained in the
current instrument.
8.4 Drag and Drop
26
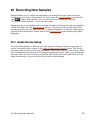
9 Song Settings
9.1 Song Settings
The Song Settings panel configures options which apply to the whole song, such as
general playback behaviour or Groove Settings.
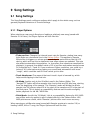
9.1.1 Player Options
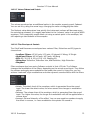
When starting a new song in Renoise or loading a relatively new song (saved with
Renoise 2.0 or later), the Player Options will look like this:
• Ticks per line: Changes the internal event rate for Renoise, stating how many
ticks make up a horizontal line in the Pattern Editor. This applies to Sample
Effects like re-triggers or volume gates, and also to meta devices like the LFO
device, which will use this to determine how often values are updated. This rate
also affects automation interpolation, i.e. how often line values are smoothed for
playback. In general, the default value of 12 is just fine and makes musical sense
(it is divisible by 2, 3 and 4). If you need even higher resolution, you could try a
value of 16. Lower values may make your sounds and automation a bit more
"rough", which could be useful if that's what you're after.
• Track Headroom: The amount that each track's input is lowered by, which
helps avoid clipping in the final mix.
• 09 Mode: Applies only to the 09 effect used in the Pattern Editor. The
"Amiga/FT2" option will slice samples into chunks that are 256 bits long, starting
from the beginning of the sample. The "Renoise" mode will divide the whole
sample into 256 pieces, where 00 is the start of the sample and FF is the start of
the final piece. This is mainly a compatibility feature used to achieve slightly
better playback for old XM / MOD files.
• Pitch Mode: As with the "09 Mode", this is a compatibility feature for XM / MOD
sound files and only applies to pitch related effects in the Pattern Editor. XM /
MOD pitches are coarse, while "Renoise" pitches offer much more accuracy.
When opening an old Renoise song (saved with Renoise previous to version 2.0) or
loading a MOD, XM or IT song, the Player Options will look like this:
9 Song Settings
27
Renoise 2.7 User Manual
(This shows the panel in Renoise 1.x compatibility mode)
(This shows the panel in Renoise 2.0 - 2.6 compatibility mode)
• Upgrade to latest version - Upgrade the song to the new Renoise 2.0
playback behaviour (mainly using Lines Per Beat instead of the old "Speed"
value).
• LPB mode - Set up how Renoise should pass Beat and BPM information on to
plugins. Selecting "BPM & Ticks" will cause Renoise to try and double or half the
transmitted BPM, depending on the Speed settings used. "Only BPM" will just
transmit the set BPM value.
• 09/Pitch Mode - see Player Options above.
9.1.2 Pattern/Sequence Highlighting
9.1.1 Player Options
28
Renoise 2.7 User Manual
• Highlight every xx lines - Indicates every xxth row in the Pattern Editor with a
highlighted colour. When this is set to LPB, Renoise will automatically highlight
rows for every beat. This is typically the most useful setting, but other
configurations can be helpful depending on the particular song.
• Default pattern length - Set the default pattern length for newly created
patterns.
• Highlight every xx blocks - Highlights every xxth block in the Pattern
Sequencer.
• Highlight block offset - Start the block highlighting after the stated amount of
patterns. Useful to skip an introduction section, for example.
9.1.3 Groove Settings
With the Groove Settings you can shift playback of lines in the pattern back and forth,
allowing you to create a swinging feeling for the whole song.
The following diagram demonstrates what each slider does:
In other words, a groove of 25% means the first note will be extended to 125%, while
the second note will be shortened to 75% and triggered with a 25% delay, creating the
groove/swing. Technically speaking, a 100% groove would mean that the second note
is triggered together with the third.
9.1.2 Pattern/Sequence Highlighting
29
Renoise 2.7 User Manual
Groove Settings & LPB Settings:
Note that the numbers 0&1, 1&2, 2&3, 3&4 only apply to line numbers when using a
Lines Per Beat Setting of 4. If, for example, you used an LPB of 8, then Renoise would
apply the first slider setting to lines 0, 1, 2 and 3, and not just 0 and 1.
It's not vitally important to understand the exact technical details here, since groove is
about adding a feeling to the beats. The best way to get a feel for the settings is to just
play around with them. To make it easier to hear what's going on when you do, try
adding something like a steady hi-hat line, which will be triggered fast and often.
9.2 Template Song
A Template Song is a special song file which is used as the initial document when
Renoise is loaded or when creating a new song. By default, a new song is blank. If,
however, you would like every new song to be created with a specific set of tracks,
DSPs, instruments and/or MIDI mappings etc, then you can create such a base song and
save it as a template.
It is possible to bypass a template song and use a blank one instead without having to
delete it. To do this, select "File->New Song (no Template)" from the menu options in
the Upper Status Bar.
• Save: Saves the current song as the new template
• Delete: Delete the existing template song (if one is exists)
9.1.3 Groove Settings
30
10 Song Comments
10.1 Song Comments
Using the Song Comments box you can leave notes either for yourself or for others
when sharing a song. The comments can be displayed via the menu, "View->Song
Comments..."
The "Show song comments after loading" option is only applied to the current song, not
globally for all songs.
10 Song Comments
31
11 Playing/Recording Notes with the Computer
Keyboard
Note: The following explanation applies to QWERTY type keyboards (See layout). The
Z-key may be positioned differently on other type of keyboards.
In Renoise you can use your computer keyboard to play/record and edit notes. This
virtual keyboard is always enabled and has the following layout, with the blue keys
representing the lower octave and the lighter green keys the upper octave:
11.1 Octave Settings
By default, Renoise will use octave 3 with the lower keys (ZXCVBNM) and octave 4
(QWERTYU) for the upper ones. To play lower and higher octaves than this, you can
change the "Keyb. Octave" setting in the Transport Panel panel or use the keyboard
shortcuts located on the numpad. Note that the octave setting also applies to the MIDI
master keyboard input.
If you are using Renoise on a notebook or on a keyboard which has no numpad, you can
also use the shortcuts, "Left Control + [" and "Left Control + ]" (the two keys next
to P) to change the octave. Alternatively, you can change the shortcuts to something
else through the Keys panel in the "Edit->Preferences" menu.
11.2 Velocity value
By default, the velocity used to record notes in the pattern editor is set to maximum
value. To change the default value, alter the velocity value in the box next to the
computer keyboard icon in the Pattern Editor Control Panel right beneath the pattern
editor. Note:It is important that you have enabled the "Velocities" option in the
"Record&play" filter of the midi preferences for this option to work. The velocity values
are routed back as a midi command into the midi input handler.
11 Playing/Recording Notes with the Computer Keyboard
32
Renoise 2.7 User Manual
11.3 Computer Keyboard Limitations
To simply edit and record notes in the Pattern Editor, the computer keyboard will do the
job just fine. You can even use the computer keyboard for Recording and Editing Notes
as the song is playing. Unfortunately, most computer keyboards do not allow all key
combinations to be pressed at the same time, nor are they velocity sensitive. So when
the accurate recording of "live" playing is essential, the use of a simple MIDI master
keyboard is highly recommended. See Setting Up MIDI Devices on how to configure
your MIDI master keyboard.
11.3 Computer Keyboard Limitations
33
12 Recording and Editing Notes
There are two ways of recording notes in Renoise:
• Live Recording: Record what you are playing "live", as the song is playing back.
This is how most sequencers record notes.
• Step By Step: Enter and edit notes manually with the computer keyboard or a
MIDI keyboard, step by step. This can be done while the song is stopped or while
it's playing back.
12.1 Edit Mode
First, in order to be able to record anything, make sure that Edit Mode is enabled by
pressing the "ESC" key on your keyboard. Alternatively, you can click the record button
in the Transport Panel:
The red border around the Pattern Editor indicates that Renoise is now ready to record.
12.2 Live Recording
To record notes "live":
1. Ensure that Pattern Follow is ON ( ) in the Transport Panel.
2. Start the song playing with Edit Mode enabled.
3. Play notes with the computer keyboard or your MIDI master keyboard.
12 Recording and Editing Notes
34
Renoise 2.7 User Manual
The played notes will now be recorded into the track at the current playback position in
the Pattern Editor.
Tips: To enable Edit Mode and start playing with a single button press, you can also use
the "Right Shift" key. To just start playing, you can use either the "Spacebar" or "Right
Ctrl". Pressing the "Right Alt" key will start playing, but also with looping of the current
pattern enabled.
Extra Tip: To enable a count-in for live recording, turn on the Metronome pre-count via
the Options menu in the Upper Status Bar. You can also adjust the amount of bars the
count-in lasts here.
12.3 Entering Notes Step By Step
To record notes step by step while playback is stopped, simply enter notes with Edit
Mode enabled. The note will be inserted into the Note column at the current cursor
position and the cursor will move downwards within the Pattern Editor. The amount of
lines that the cursor moves by can be changed with the Edit Step value at the bottom
of the Pattern Editor, which can even be set to zero:
To record notes step by step while the song is playing:
1. Ensure Pattern Follow is OFF ( ) in the Transport Panel.
2. Start the song playing with Edit Mode enabled.
3. Enter notes with the computer keyboard or your MIDI master keyboard.
So to clarify, the Pattern Follow button
recoding and step by step modes.
allows you to switch between the live
Shortcuts: To quickly switch Pattern Follow ON and OFF you can use the "Scroll Lock"
key. To quickly change the Edit Step value you can use "Left Ctrl + 1,2,3,4,5,6,7,8,9,0".
12.4 Real-time and Manual Quantization
When recording notes "live", by default they will be recorded with the highest possible
precision using the Note Delay column in the Pattern Editor. The note delay column
allows you to delay notes with a precision of 1/256th of a line.
If you do not want to precisely record your notes, you can let Renoise quantize them
either in real-time or after recording something. This is done with the quantize controls
in the Pattern Editor control bar:
12.2 Live Recording
35
Renoise 2.7 User Manual
The "Q" button enables or disables live quantization, while the value box to the right
specifies the quantization value in lines. Use the drop down menu next to the value box
to manually quantize a range within the current pattern after recording.
12.5 Polyphonic vs. Monophonic Recording
The chord mode button located in the Pattern Editor control bar allows you to toggle
the recording a single note at a time, or chords (i.e. multiple notes simultaneously) (
).
Sequential (monophonic) recording can often be better when recording drums or
monophonic instruments.
12.6 Entering Chords with the Computer Keyboard
When entering notes step by step with the computer keyboard, Renoise will by default
place all notes entered sequentially. If you want to quickly insert chords without live
recording, you can do this by holding down "Left Shift" while entering the notes. This
will automatically create columns to the right and enter the new notes there.
Note that MIDI keyboards will always record chords when pressing more than one note
at a time.
12.4 Real-time and Manual Quantization
36
13 Pattern Editor
The Pattern Editor is the main editor used to create music in Renoise. Instruments are
recorded by entering notes onto lines in the order that they are to be played, from top
to bottom. A pattern can contain multiple tracks, typically one for each different
instrument and each with their own separate set of effects. Songs are created by
arranging a sequence of patterns with the Pattern Sequencer.
13.1 Patterns
A pattern is simply a block of time containing the notes played by different instruments
in different tracks. The easiest way to understand this is to load in a demo song by
double-clicking on it in the Disk Browser and observing what happens after you press
Play with the "Spacebar".
As the horizontal bar moves down the pattern, it plays the notes that it encounters on
the way. When the end of a pattern is reached, the song moves on to the next pattern
in the sequence, as controlled by the Pattern Sequencer. So, a pattern is usually used
to represent a specific section of a song that may be repeated again in future. The
length and speed of a pattern can be changed, so the exact nature of a specific pattern
can vary wildly depending on the whims of the composer.
13.2 Tracks
There are three different types of track in Renoise:
13.2.1 Sequencer Tracks
13 Pattern Editor
37
Renoise 2.7 User Manual
These are tracks which can record instruments onto lines within a Note Column. Each
track also features Effect Columns, which are used to apply effect commands to
instruments and to control Track DSPs.
13.2.2 Send Tracks
Send Tracks are fed audio from other tracks using "Send Devices" and are typically
used to apply the same set of Track DSPs to multiple tracks at once. Notes cannot be
entered into Send Tracks and so they only feature Effect Columns, which are used to
control the DSPs.
13.2.3 Master Track
13.2.1 Sequencer Tracks
38
Renoise 2.7 User Manual
The Master Track is where all other tracks automatically feed their audio. Effects placed
on the Master Track will therefore affect the final output of the entire song. Notes
cannot be entered into the Master Track and so it only features Effect Columns, which
are used to control the DSPs.
13.2.4 Adding, Removing, Duplicating and Re-ordering Tracks
To add or remove tracks, you can use the "Edit->Insert New Track" (Left
Control/Command + T) and "Edit->Delete Track" (Left Control/Command + Left Shift +
T) commands from the menu in the Upper Status Bar. If the currently selected track is a
Sequencer Track, then a new Sequencer Track will be added to the right of it. If the
currently selected track is a Send Track or the Master Track, then another Send Track
will be added.
To reposition a track, click on its name, hold the button down and drag the track to
either side. This can be done in both the Pattern Editor and the Mixer.
To duplicate tracks, you can use the "Edit->Duplicate Track" (Left Control/Command +
D) command from the menu in the Upper Status Bar.
13.3 Columns
There are two types of columns in tracks:
1. Note columns, used to record instruments by entering notes.
2. Effect columns, used to apply effects and control DSPs.
13.3.1 Adding / Removing Columns
To add/remove Note or Effect columns, you can use the small +/- icons next to the
track names. Alternatively, you can use the shortcut, "Left Control/Command + Left
Shift + left/right arrow key" to either add/remove a Note or Effect column, depending
on where the cursor is (place it where you would like that column type to be
duplicated).
13.2.3 Master Track
39
Renoise 2.7 User Manual
Please Note: All numbers in the effect columns and note sub-columns are notated in
hexadecimal (counting from 0 to 16, where decimal is 0 to 10). If you are unfamiliar
with hexadecimal, then you can read an explanation of it here.
13.3.2 Sub-Note Columns
Note columns also have three extra sub-columns each, which are used to control the
following parameters on a per-line basis: volume, panning and delay.
• Note: e.g. C-4, A#3. The first two characters represent the musical note, while
the third character is the octave number. The notes are not entered letter by
letter like a text editor, but like a piano, using the computer keyboard or a MIDI
master keyboard.
• Instrument Number: The instrument that will play the note. This is
automatically entered when the note is recorded, but it can be changed by hand.
• Volume: (00-80) - The note velocity/volume. Additional effects can also be
triggered from here; see the Pattern Effect Commands section of the manual for
more details.
• Panning: (00-80) - The panning of the note. This can only be applied to
sample-based instruments in Renoise (MIDI and VST plugins will be unaffected by
values in this sub-column). Additional effects can also be triggered from here;
see Pattern Effect Commands.
• Delay: (00-FF) - A time delay added to the note.
By default, the panning and delay columns are not visible. To show/hide them you can
use the keyboard shortcuts, "Left Control/Command + Left Shift + V (Volume), P
(Panning), D (Delay)", or you can press the corresponding buttons in the Pattern
Editor's control bar, located at the bottom of the editor:
13.3.1 Adding / Removing Columns
40
Renoise 2.7 User Manual
13.3.3 Sub-Effect Columns
Effect columns are set up in the format: xxyy.
• Effect Number: The first two digits (xx) define the effect that should be
triggered (like a cutoff parameter in a DSP effect, or a sample effect like pitch
glide). See the Pattern Effect Commands section of the manual for a full list of
the available effects.
• Effect Value: The next two digits (yy) define the effect's value. For example, to
a cutoff parameter this would change the frequency, for a pitch glide this would
change the rate of the glide.
13.4 Lines
Each individual pattern can have a different length, which can be changed by altering
the value in the box at the top left of the Pattern Editor:
13.4.1 Lines, Beats and Pattern Resolution
In the Transport Panel there is a "Lines Per Beat" option, which changes the number of
lines in the Pattern Editor that make up a musical beat. The higher the LPB, the greater
the resolution available to you for editing notes, effects and automation. This can be
also be adjusted as the song is playing via the Pattern Effect F1XX, where XX is the
new LPB value in hexadecimal.
By default the LPB is 4, meaning that placing a note on every highlighted line will
create a simple 4/4 beat in a pattern that is 16 lines long. How many lines you use for a
beat is totally up to you, but it can be important to get it correct if you're using Renoise
to interact with other beat-based instruments or sequencers, (e.g. plugins which use
beat timings) or when syncing a Renoise song with other applications via ReWire.
When working with time signatures other than 4/4, it's useful to set your number of
lines in a pattern to a factor of the time signature's numerator multiplied by the LPB.
For example, when working in 3/4 and a LBP of 4, you could use a pattern length of 12,
13.3.3 Sub-Effect Columns
41
Renoise 2.7 User Manual
24 or 48; when working in 5/4 you could use a pattern length of 20 or 40 etc. This will
allow you to place your notes on exact pattern lines without having to delay notes with
the delay column.
You can turn off the LPB highlighting via the Song Settings tab.
13.5 Pattern Editor Control Panel
At the bottom of the Pattern Editor is a control panel:
• Single Track Edit Mode: When enabled, only the currently selected track will
be shown in the Pattern Matrix.
• Pattern Wrap Mode: Decides what will happen upon reaching the end of a
pattern when entering notes step-by-step in Edit Mode. When enabled, the cursor
will move to the top of the next pattern in the sequence. When disabled, the
cursor will move back to the top of the current pattern.
• Pattern Automation Recording Mode: When enabled, right-clicked and MIDI
mapped parameters are recorded into Automation instead of the pattern's
Effects Column.
• Chord Mode: Toggles the recording of a single note at a time, or chords (i.e.
multiple notes simultaneously) when recording "live".
• Quantize Controls: Toggles live quantization. The value box to the right
specifies the quantization value in lines. Use the drop down menu next to the
value box to manually quantize a selected area of the current pattern after
recording.
• Edit Step: Sets how many lines the cursor should skip down in the Pattern Editor
when entering a note or effect.
• Computer Keyboard Velocity: Sets the playback and record velocity of notes
played with the computer keyboard.
• Vol/Pan/Dly: Toggles the volume, panning and delay sub-columns.
• FX: Quickly show and add pattern effect commands.
13.6 Editing and Navigating in Patterns
Before anything can be recorded into the Pattern Editor, Edit Mode needs to be
enabled, which is done by either pressing the "ESC" key or the record button in the
Transport Panel.
13.6.1 Basic Shortcuts
Moving the cursor around in the Pattern Editor can done with the arrow keys. The Page
Up/Down buttons will move the cursor up and down 16 lines at a time. To quickly jump
to the next note column press "TAB", while "Left Shift + TAB" will jump back to the
previous note column. "F9", "F10", "F11" and "F12" will move to the beginning, first
quarter, half, last quarter of the pattern, respectively. Hit "End" to skip to the last note
13.4.1 Lines, Beats and Pattern Resolution
42
Renoise 2.7 User Manual
in a pattern.
To select an area in the Pattern Editor, hold down the "Left Shift" key while moving
around with the arrow keys. This can also be done by left-clicking and dragging with the
mouse. The selection can also be cut, copied and pasted using the standard keys: "Left
Control/Command + X (Cut), C (Copy), V (Paste)".
A selection can also be made by starting with "Left Control/Command + B" and ending
with "Left Control/Command + E".
13.6.2 Advancing mode in the effect columns
When entering an effect column value, the cursor automatically advances to the next
row in contrary what happens in most spread-sheet applications. If you want your
cursor to advance to the right position, simply hold the left shift-modifier key and the
cursors advances to the right.
13.6.3 Column/Track/Selection/Pattern Shortcuts
To quickly edit, copy and paste in the Pattern Editor:
• F1 + MODIFIER: Transpose one note down
• F2 + MODIFIER: Transpose one note up
• F3 + MODIFIER: Cut
• F4 + MODIFIER: Copy
• F5 + MODIFIER: Paste
• F6 + MODIFIER: Flip
• F11 + MODIFIER: Transpose one octave down
• F12 + MODIFIER: Transpose one octave up
Where MODIFIER is:
• Left
• Left
• Left
• Left
CONTROL/COMMAND: Whole Pattern
SHIFT: Current Track
CONTROL/COMMAND + SHIFT: Current Column
ALT: Selection in the Pattern
13.6.4 Drag & Drop of Selections
To quickly move and copy a selection of notes or effects, you can also use the mouse.
First mark an area in the pattern by left-clicking and dragging, then re-click and hold on
the selected area with the mouse and drag the selection to a new position. Holding
down the "Left Control/Command" key while dropping will copy the selection instead of
moving it.
13.6.1 Basic Shortcuts
43
Renoise 2.7 User Manual
13.7 Recording of Notes into Patterns
Instead of editing notes step by step, you can also record "live". This is done by playing
the song with Edit Mode enabled and recording the notes using the keyboard. For a
more detailed description, have a look at the Recording and Editing Notes section.
13.8 Recording of Effects
To quickly record DSP parameter changes into a pattern, click and drag any slider in
the Track DSPs panel with the right mouse button. This can also be done as the song is
playing. For more information, see Recording and Editing Pattern Effects .
13.9 Applying Effects
Finally, to get a full list and detailed description of the effects available for use in the
Effect Columns, take a look at Pattern Effect Commands section of the manual.
13.7 Recording of Notes into Patterns
44
14 Pattern Sequencer
The Pattern Sequencer is used to create a song's overall progress by defining the order
in which the various patterns are played. A song begins with the pattern at very top of
the Pattern Sequencer. When this pattern has finished, the next in the sequence is
started. This carries on until the final pattern has played and the end of the song is
reached. At this point, a song can either loop back to the beginning again and keep
playing or be made to just stop.
14.1 Overview
The sequencer refers to patterns via their number. When you begin creating a new
song there will be only one pattern present: "0". If you want to repeat this pattern, then
simply create a new pattern "0".
The pattern which you're currently editing in the Pattern Editor is shown in the Pattern
Sequencer with a shaded border around it. To the left of each pattern number is a play
button which allows you to start playing from a specific position in the sequence. To the
right of each pattern number are two arrows which change the value of the pattern
number. You can also double-click on the number and type in a new value with the
keyboard.
Above and below the two arrows are some extra options. From top to bottom:
• Insert a new empty pattern.
• Insert a clone of the current pattern.
• Remove the current pattern from the sequence.
• Insert a new pattern into the sequence with the same number as the current
pattern.
To organise your patterns and keep track of the song sequence, you can also name
each pattern. Click and drag the right edge of the Pattern Sequencer over to the right.
This will expand it and reveal the name slots. Click on a slot and enter a name with the
14 Pattern Sequencer
45
Renoise 2.7 User Manual
keyboard, finishing with "Enter".
14.2 Creating/Cloning/Adding/Removing Patterns
Create a new empty pattern
Clicking the circled button creates an empty pattern,
numbered here as "1". This new empty pattern is inserted
below pattern "0".
Clone the current pattern
Clicking the Clone Pattern button creates a new pattern,
numbered here as "1" and duplicates all of the note, effects
and automation data from pattern "0". So cloning is the same
as copying & pasting everything from an old pattern to a new
one.
Insert a new instance of the selected pattern
Clicking the circled [+] button will insert a new instance of
pattern "0". Clicking the [-] button removes the current
pattern. If you edit pattern "0", all instances of pattern "0" will
be changed.
14.3 Decoupled Playback
You can detach the playback position from the current edit position, letting you edit a
pattern while other patterns are playing:
14.1 Overview
46
Renoise 2.7 User Manual
To decouple the sequencer, simply turn off the "Pattern Follow" option in the Transport
Panel. This way you never have to stop the song while editing a separate section.
14.4 Triggering Patterns
Patterns can be scheduled for playback via the play buttons to the left of the numbers
in the Pattern Sequencer. Without stopping playback, you can trigger new sequences in
the song in real-time. This lets you freely change the order of playback to sketch out
and improvise new ideas.
• While the song is playing, left-clicking on a specific play button will move the
sequence on to that position as soon as the current pattern reaches the end.
• While the song is playing, clicking with the right mouse button will immediately
jump to and play that pattern without starting from the top.
• Double-left-clicking will immediately jump to and play that pattern from the top.
• Holding "Left Shift" while left-clicking on a play button allows you to specify more
than one pattern for playback, so you can set up a "playlist" of patterns (the next
pattern to be played is highlighted, as shown in the image above).
14.5 Looping Patterns
Using the column to the immediate left of the pattern numbers, you can cause a
pattern or sequence of patterns to loop. Left-click and drag in this column to indicate
the patterns you want to loop. To remove a loop just click on a single slot twice.
14.6 Working With Selections
Clicking on the number slot itself allows you to select it. Likewise, clicking and dragging
will select a sequence of patterns. You can also click once and then Shift-click on
14.3 Decoupled Playback
47
Renoise 2.7 User Manual
another pattern to select a range in just two clicks.
14.6.1 Drag and Drop
Once patterns have been selected, they can then be copied, pasted, moved or cloned.
• Drag and Drop without any modifier to move the selected patterns to a new
position.
• Holding down "Left Control/Command" will create a copy of the selected
patterns.
• Holding down "Left Control/Command + Left Shift" will insert clones of the
selected patterns.
Right-clicking on any pattern number will bring up a menu with available shortcuts and
yet more operations that can be applied to a selection:
14.7 Sequencer Shortcuts in the Pattern Editor
While editing patterns in the Pattern Editor, you can also quickly navigate and modify
the sequence using keyboard shortcuts:
• Left Control/Command + Arrow Up/Down: Select the next/previous pattern
in the sequence.
• Left Control/Command + Arrow Left/Right: Change the current pattern's
number.
• Left Control/Command + Insert Key: Insert a new pattern into the sequence.
14.6 Working With Selections
48
Renoise 2.7 User Manual
• Left Control/Command + Delete Key: Delete the current pattern from the
sequence.
• Left Control/Command + Spacebar: Schedules the pattern currently being
edited for playback. This only works with decoupled playback enabled.
• Left Control/Command + Left Shift + Spacebar: Immediately plays the
pattern currently being edited. This only works with decoupled playback enabled.
14.7 Sequencer Shortcuts in the Pattern Editor
49
15 Pattern Matrix
15.1 Overview
To open the Pattern Matrix, click on the "P<>M" button at the top left corner of the
Pattern Editor:
The Matrix is a "bird's eye view" of the patterns and tracks in the pattern sequence.
Patterns and tracks are divided into blocks that can be moved, copied and pasted,
enabling you to manage the flow of the music quickly and easily.
The Pattern Matrix also allows the muting of different tracks in duplicate patterns
(indicated with a cross in the picture below). This way it is possible to create a whole
song (or song draft) from a single pattern. Starting with one pattern containing many
tracks, you can repeat this pattern again and again in the sequencer, but then mute
individual blocks to build up the song structure. Later on you can create new patterns
from the original to add variations.
15.2 Matrix Blocks
When you input data into a track in the Pattern Editor, a coloured block automatically
appears in the current track and sequence position in the Pattern Matrix.
15 Pattern Matrix
50
Renoise 2.7 User Manual
The blocks can be re-sized by clicking the small and large square icons under the
"P<>M" button:
Left-clicking these icons changes the height of the blocks, while right-clicking changes
their width.
15.3 Drag and Drop
To move a block from one place to another, select a block by left-clicking and releasing,
then dragging and dropping it into the desired place.
• Hold down "Left Control/Command" while dragging to copy blocks instead of just
moving them.
• Hold down "Left Control/Command + Left Shift" while dragging to copy the
blocks and place them into a newly created pattern.
15.2 Matrix Blocks
51
Renoise 2.7 User Manual
15.4 Selection & Mouse
To select multiple blocks at once, you can click on an unselected block, hold and drag.
Alternatively, left-clicking and releasing, then holding down "Left Shift" before clicking a
second time will allow you to select a range of blocks. To remove or add a single block
at a time, "Left Control/Command + left-click".
With these key combinations you could, for example, select everything from Track 1 to
Track 5, then exclude a single block in Track 2.
15.5 Muting Blocks
"Left Alt + left-click" or middle-mousebutton-click on blocks to mute/un-mute them.
This also works for muting/un-muting multiple selected blocks at once.
This key and mouse combination also works in the Track Scopes.
15.6 Basic Shortcuts
• Clone selected blocks into new patterns with "Control/Command + K".
• "Left Control/Command + I" instead of "Control/Command + V" to insert instead
of pasting.
• "Left Control/Command + Left Shift + Arrow Up/Down" to quickly select multiple
rows.
• "Left Alt + P" and "Left Alt + T" to select the whole Pattern or Track.
• To bring Focus to the Pattern Editor, hit "ESC". To bring Focus back to the Pattern
Matrix, press "Left Shift + ESC".
15.7 Visualization Options
Right-click in the Pattern Matrix to view the context menu, where you can choose to
show/hide the Track Names, the colours and the VU Meters.
If you activate the "Visualize Repeating Slots" option from the context menu, a tiny icon
indicating repeating content will be shown in the slot(s).
15.4 Selection & Mouse
52
Renoise 2.7 User Manual
When the repeating content spans many slots, a gradient will be applied to their colour.
15.8 Colouring Blocks
By default, blocks are coloured equally per track. To change a track's colour, click on
the small colour indicator below the track's name in the Pattern Matrix.
It is possible to colour each block individually. To do this, select one or more blocks,
then right-click on them and select "Set Custom Color..." in the context menu. The
custom colours will still be used if the blocks are copied.
15.7 Visualization Options
53
16 Advanced Edit
To open the Advanced Edit panel, click on the "A<>E" button at the top right of the
Pattern Editor:
16.1 Overview
The Advanced Edit panel allows you to perform batch operations on pattern and
automation data, such as transposing notes, remapping instrument numbers,
interpolating effect command values etc. There are multiple sections to the Advanced
Edit panel, which can be hidden/shown to either take up less space or to fully reveal
their options. Each section deals with a specific topic of modification.
16.2 Processing Scope
The first thing that needs to be set up is what should be edited and where this should
take place. This is done with the "Section to Process" and "Content Mask" panes at the
top:
16.2.1 Section to Process
16 Advanced Edit
54
Renoise 2.7 User Manual
This section is always visible because it applies to all of the other sections beneath it,
by defining what part of the song will be affected:
• Selection: Perform actions on what is currently selected in the Pattern Editor.
• Column in Pattern: Perform actions on the note or effect column where the
cursor is, in the current pattern only.
• Column in Song: Perform actions on the current note or effect column where
the cursor is, in all patterns.
• Track in Pattern: Perform actions on the whole track (all columns) in the
currently selected pattern only.
• Track in Song: Perform actions on the whole track (all columns) in all patterns.
• Whole Pattern: Perform actions on the entire current pattern.
• Whole Song: Perform actions on the entire song; all columns, all tracks and all
patterns.
16.2.2 Content Mask
With the Content Mask you can specify what should be processed and what should be
ignored:
• Notes: Apply processing (Cut, Copy, Paste, Flip) on note sub-columns in Note
Columns.
• Instrument: Apply processing (Cut, Copy, Paste, Flip) on instrument
sub-columns in Note Columns.
• Volume: Apply processing (Cut, Copy, Paste, Flip, Interpolate and Modify) on
volume sub-columns in Note Columns.
• Panning: Apply processing (Cut, Copy, Paste, Flip, Interpolate and Modify) on
panning sub-columns in Note Columns.
• Delay: Apply processing (Cut, Copy, Paste, Flip, Interpolate and Modify) on delay
sub-columns in Note Columns.
• Effect Number: Apply processing (Cut, Copy, Paste, Flip) on effect numbers in
the the Effect Columns.
• Effect Value: Apply processing (Cut, Copy, Paste, Flip, Interpolate and Modify)
on effect values in the Effect Columns.
16.2.1 Section to Process
55
Renoise 2.7 User Manual
• Automation: Apply processing on graphical Automation attached to the tracks.
Copy/pasting Automation in general only works when copying patterns or tracks,
not selections.
• Left clicking on the individual check-box enables/disables a mask.
• Right clicking enables a mask, but disables all other masks (solo).
16.3 Performing Actions
All other panels allow you to modify the content you've specified in various ways:
16.3.1 Cut/Copy/Paste
• Cut: Copy then delete the content. Not all selections have clipboards and in
those cases the "Cut" button will be changed to "Delete".
• Copy: Copies the selected content. Not available for all selections.
• Paste: Pastes previously copied content.
• Flip: Reverse the content in place in the time-line (starting content will become
ending content). When applying this to selections which cover more than one
pattern, the patterns will be flipped one by one.
• Shrink: Halves the length of time that the content takes to play. Note that if the
content does not have enough room to be placed on individual lines after being
shrunk, some of the content will be removed.
• Expand: Doubles the length of time that the content takes to play. This is
especially useful when doubling the Lines Per Beat value to add more resolution.
If you were to only double the LPB without expanding the content, then it would
just play twice as fast as before.
Mix-Paste: When pasting with mix-paste enabled, empty notes, instruments, effects
etc. are not copied. This way you can merge the copied selection with the existing
content that you're pasting on top of.
16.3.2 Modifying Notes
16.2.2 Content Mask
56
Renoise 2.7 User Manual
• Safe Mode: Applies transpose settings only when the transposed note does not
fall outside of the available octave range in Renoise. With Safe Mode disabled,
notes that fall below C-0 or above B-9 will be removed.
• Apply to: Either apply the following operation to all instruments in the current
selection, or just the one specified in the value box.
• Transpose: Transpose notes a semitone or an octave at a time.
• Mirror: Swaps every note's height around the specified "center note". This can
be very useful for creating variations of melodies.
• Preserve Lengths: When using the quantize function, Note-Offs will not be
quantized, but will retain their original distance from the Note-On.
• Quantize: Quantize notes by the given subline factor (the factor used in the
note delay column). 100 sublines (256 in decimal) make up one full line. For
example, to quantize by 3 lines, you would use 300 sublines.
• Nudge: Moves notes up/down by the specified amount of sublines.
16.3.3 Modifying Instruments
• Src instr.: Select the instrument number that should be modified.
• Dest. Instr.: Set the destination instrument number that the source instrument
should be transformed into.
• Swap: Swap the source and destination instruments within the selection.
• Remap: Use the destination instrument for all matching source instruments in
the given range.
• Delete: Delete the source instruments within the selection.
16.3.2 Modifying Notes
57
Renoise 2.7 User Manual
16.3.4 Modifying Effects
Using these controls you can interpolate, fill in values, create fades for a given effect,
or apply mathematical operations on effect values (multiply, divide, sub, add,
randomize and humanize).
16.3.4.1 Interpolating Values
Suppose you wanted to create a volume fade in a track between the pattern lines 00
and 64. You could type the values in manually, line by line. However, you can instead
specify the desired starting and ending values of the fade on lines 00 and 64. Then by
selecting the area from 00 to 64 in the appropriate track and using interpolation, the
intermediate numbers will automatically and accurately be filled in.
• Lin: Create a linear range.
• Log: Create a logarithmic range.
• Exp: Create an exponential range.
Note that Renoise will require valid starting and ending values in order to perform
interpolations. When interpolating effect column values, you must also ensure that the
starting and ending effects use the same effect numbers.
To quickly interpolate selections in the Pattern Editor, you can also use the shortcuts,
"Left Control/Command + I" to interpolate linearly and "Left Control/Command + L" to
interpolate logarithmically.
16.3.4.2 Modifying Values
• Apply Perform the following action, modified by the specified value.
♦ Set: Set all values in the selection to the specified value.
♦ Add: Add the specified value to the existing values.
♦ Sub: Subtract the specified value from the existing values.
♦ Mul: Multiply the existing values by the specified value.
♦ Div: Divide the existing values by the specified value.
♦ Hum: Randomise the existing values by adding or subtracting a number
within the specified value range.
16.3.4 Modifying Effects
58
Renoise 2.7 User Manual
Tip: Humanizing can be used to randomize note delay, volume and panning for
instruments. Small variations to such values can create a more human feel.
For example, to humanize drum note delays in a single track for the whole song:
1. In "Section to Process", enable "Track In Song".
2. In the "Content Mask", enable "Delays" only.
3. Set '"10"' as the factor in "Modifying Values" and select "Hum" as the processing
type.
4. Move the cursor to a drum track in the Pattern Editor.
5. Hit the "Apply" button in "Modifying Values".
You can try repeatedly pressing the "Apply" button, or use values other than "10" to
make the effect stronger.
16.4 Advanced Edit and Pattern Editor Interaction
Content Mask settings in the Advanced Edit panel (as well as the mix-paste option) also
apply to the Pattern Editor's regular Cut, Copy, Paste and Flip commands. So you can
apply the mask settings and use Pattern Editor shortcuts to quickly affect selections.
Note that neither Drag and Drop of selections in the Pattern Editor, nor any operation in
the Pattern Matrix are influenced by the Advanced Edit options.
16.4 Advanced Edit and Pattern Editor Interaction
59
17 Sample Keyzones
The Sample Keyzones tab is used to create areas of note triggering for sample-based
instruments across a variety of key ranges and velocities. It is also possible to create
and overlap zones for instruments with multiple samples. This can be done for both
Note-On (key press) and Note-Off (key release) inputs, via separate layers.
17.1 The Interface
The Sample Keyzones interface consists of a large central section showing the zones
above a keyboard, with various options above and below. The keyboard represents the
various notes that can be played within Renoise along the horizontal plane, while the
velocity key-press range of 00-80 is shown vertically. This grid is used to create the
range of the keyzones for an instrument.
Placing the mouse pointer over the grid or keyboard and scrolling the mouse wheel will
zoom in/out, giving you access to more/less detail horizontally. The scrollbar beneath
the keyboard can be used to move around while zoomed in.
The keys of the keyboard can played by left-clicking on them. Playing notes via any
method will highlight the current key(s) being pressed and also display them on the
grid according to the velocity. Right clicking on a key will change the Basenote of the
current zone, transposing its pitch, an option that can also be adjusted via the value
box in the bottom left corner of the interface.
17.2 Creating Keyzones
17.2.1 Selecting & Adjusting the Zones
The shaded area(s) within the grid represents the velocity and key zone that will trigger
the assigned sample(s). A zone can be selected by left-clicking on it or using the zone
17 Sample Keyzones
60
Renoise 2.7 User Manual
selection menu in the top left of the interface. You can also select the desired sample
and its associated zone in the Instrument Settings tab. Multiple zones can be selected
at once by either left-click dragging or "Shift + left-click"-ing to select a range or "Ctrl +
left-click"-ing individual zones. The currently selected zone(s) will be highlighted.
As the notes are played on the keyboard, the zones of corresponding samples are
automatically selected. You can turn this behaviour off by unchecking the box at the
top left corner of the interface.
The range of a selected zone (or multiple zones) can be adjusted by left-click-dragging
its edge or changing the values shown in the bottom left of the interface. A selected
zone (or zones) can also be moved around as a whole by left-clicking on it and moving
the mouse while holding the button down. It is possible to have overlapping zones, so
that multiple samples can be triggered at once with a single key.
17.2.2 Inserting & Deleting Zones
To insert a new keyzone, place the mouse pointer over the vertical column of the key
you would like to be used and right-click to open the context menu. From the "Insert
New" sub-menu, select the sample you would like to use this new zone for. A single
sample can have multiple zones spread around the grid. They also have the possibility
of overlapping, which will simultaneously trigger the same sample multiple times.
Alternately, select one or more samples from the sample-list and drag them into the
keyzone area, where they can be distributed across two octaves per sample, one
octave per sample or one key per sample (adjusted by moving the mouse pointer up
and down in the grid).
A zone can be deleted by selecting it and pressing "Delete" or "Backspace", or using
the right-click menu and selecting "Remove".
17.2.3 Automatically Assigning Zones to Samples
Pressing the Distribute button in the top right corner of the interface will evenly
distribute the number of samples in an instrument across the entire key range.
Just to the left of this, the Drumkit button will assign each sample to a single key,
starting from the note selected in the value box to the right. Using the menu button just
to the right of the Drumkit button, two additional options can be selected. "Use White
Keys Only", will obviously only assign zones to the white keys, while "First Octave for
Transposing" will assign an entire octave to the first sample of the instrument.
17.2.1 Selecting & Adjusting the Zones
61
Renoise 2.7 User Manual
17.2.4 Assigning A Basenote To A Keyzone
To assign a basenote to a keyzone, first select the keyzone and then either right-click
the key of the keyboard you wish to use or change the value with "Basenote" value box
in the lower-left corner of the interface. The basenote of the currently selected keyzone
is shown by a black dot on that key of the keyboard.
When keyzones are created by dragging and dropping from the sample-list or Disk
Browser, the basenote will be automatically assigned. The basenote for a keyzone will
be unchanged when moving it around in the grid.
17.2.5 Using Instrument Envelopes
At the bottom right corner of the interface is the "Use Instrument Envelopes"
button. With this you can enable and disable the use of the Instrument Envelopes for
each individual keyzone.
To the left of this is the "Map Velocity To Volume" button, which will, when
disabled, always play the sample at full volume. This can be useful when mapping
samples which are already sampled at lower volumes.
17.3 Note On/Off Layers
At the top left of the interface are two buttons that switch the grid focus between
creating keyzones for Note-On and Note-Off inputs. This gives you the option of
triggering samples for both the pressing and releasing of a key. The Basenote and Use
Instrument Envelopes options also function independently between layers.
By assigning a note no keyzone in the Note-On layer, but having one in Note-Off, it is
possible to have a sound only play when a key is released.
17.2.4 Assigning A Basenote To A Keyzone
62
Renoise 2.7 User Manual
17.4 Using Keyzones with a Sliced Sample
With a sliced sample your options are far more limited. Zones cannot be adjusted by
velocity and (aside from the initial sample) can only be a single key in width.
Additionally, zones cannot be inserted into the Note-Off layer and you have no control
over the use of Instrument Envelopes. However, the Drumkit button and its options are
still available.
17.4 Using Keyzones with a Sliced Sample
63
18 Instrument Settings
As already described in the Instrument Selector section of this manual, instruments
play an important role in Renoise. An instrument in Renoise (such as a piano sound) is
not necessarily bound to a single specific track; you can play the piano instrument on
any track you want. Additionally, in the case of sample based instruments, they can
even be played on multiple tracks simultaneously.
To edit an instrument, select it from the list in the Instrument Selector panel. An
instrument in Renoise may be one or a combination of the following and the settings for
each type can be edited by selecting the appropriate tab:
• one or multiple audio samples, possibly layered and modulated -> Sample
Properties
• a plugin instrument (VST or Audio Unit) -> Plugin Instrument (VST/AU) Properties
• a MIDI instrument (VST or Audio Unit) -> External MIDI Properties
18.1 MIDI Input
By default, the MIDI Input section is closed. To open it, press the button at the top of
the panel at the far left. Here you can assign a MIDI input device to an instrument or
even several different instruments. You can also specify the MIDI channel which the
instrument is activated by, as well as assign it to be played on a particular track within
Renoise. These options are particularly useful when performing live.
18 Instrument Settings
64
Renoise 2.7 User Manual
--->
The default Master device only triggers the instrument that is currently selected in the
instrument list.
Pressing the "Show All" button will open a dialog box with an overview of all routings
that have been made in the song. You can quickly reset them with the "Clear All"
button.
18.1 MIDI Input
65
Renoise 2.7 User Manual
Note: A single Renoise track only supports up to 12 notes triggering at once. So when
linking several instruments to a single device it is possible for this limit to be exceeded,
resulting in some notes going unplayed. To avoid this, assign each instrument to a
dedicated track.
18.2 Sample Properties
18.2.1 Main Panel
Sample based instruments may contain one or more samples, which are shown in the
sample list. When multiple samples are loaded into an instrument, it is the properties of
the currently selected sample that will be edited. It is possible to edit the properties of
multiple samples at once by selecting them individually with Ctrl + left-click or across a
range with 'Shift + left-click.
• Volume: The overall sample playback volume.
• Panning: The panning of the sample.
• Transpose: Transpose note playback in semi-tonal increments.
• Finetuning: Fine-tuning the transposition of the Transpose setting.
• NNA: New Note Action. When a note is played in a column while an existing note
is still is the process of playing, the NNA value specifies how the previous note
should stop (if at all). By default, notes in the same column will "cut off" each
other. To achieve polyphony, you normally just use multiple columns. But by
setting the NNA to "Continue" or "Note Off", you can create a sustained playback
with multiple notes using just one column.
• Loop: Determines how the sample playback should be looped. To edit/view the
sample loops precisely, use the Sample Editor.
• Interpolate: The quality at which the sample is re-sampled when generating
notes different from the original pitch. "Cubic" is a very good default
interpolation setting which results in the best real-time sound quality. "Linear"
sounds rougher when playing a sample at a lower pitch. By turning the
interpolation "Off", samples will sound a bit more metallic and rough, which can
be useful if that's the kind of sound you're after. "Off" can also sound good when
using very short looped samples as wave-table generators. When rendering
songs as WAV files, you will have the choice of another interpolation mode:
"Sinc". This method is the best quality re-sampling method, but is very, very slow
18.2 Sample Properties
66
Renoise 2.7 User Manual
and so cannot be used for real-time playback. When selecting "Sinc", only
"Cubic" interpolated samples will be replaced with "Sinc". Samples with "Linear"
and "Off" interpolations will use those original modes.
• Sync: When enabled, the sample will be automatically pitched up or down so
that it lasts for a certain amount of pattern lines, adjusted via the value box. As a
consequence, the sample is "locked" and you will be unable to use it at other
pitches. It will also automatically update its pitch if the song changes BPM. Useful
for syncing drumbeat loops. Alternatively, press the "T" button, which will
automatically adjust the Transpose and Finetuning settings to the correct values,
leaving you free to change them and play the sample at other pitches.
• Autoseek: The default behaviour for a sample in Renoise is that it can only be
heard during playback from when the note is initially triggered. Enabling
Autoseek causes the sample to behave like a traditional audio channel, meaning
that the sample can be heard at any point during its playback in a song. Highly
recommended for vocals, background ambience and other lengthy recorded
audio.
• Autofade: Automatically inserts a quick fade at the beginning and end of a
sample. Useful for preventing clicking.
18.2.2 Envelopes
Located to the right of the main Sample Properties panel, the Envelopes section is
closed by default. To open it, press the button at the top of the panel.
18.2.2.1 Enabling / Disabling Envelopes
The various envelope types are listed along the left side: Volume, Panning, Pitch, Cutoff
and Resonance. Below this are the Env and LFO buttons, which switch between the
18.2.1 Main Panel
67
Renoise 2.7 User Manual
Envelope and LFO controls available for each envelope type.
All of the envelopes and LFOs are disabled by default. You can enable the envelopes by
clicking the small check box at the top left:
/
Each envelope type is turned on/off independently from the others. So if, for example,
you've enabled the Volume envelope and want to enable Pitch too, you'll need to click
on the Pitch button and click on its check box. The LFO settings are also specific to each
individual envelope type and so have to be enabled and changed separately as well.
18.2.2.2 How Envelopes and LFOs are applied
When an envelope is enabled it will start running as soon as you play a note. When
playing multiple notes, there will be a seperate envelope applied to each note.
Envelopes and LFOs are automatically synced with the current BPM in Renoise. Each
highlighted vertical line in the envelope grid is one beat; 24 "ticks" in an envelope
makes one beat.
Loop settings define how the envelope loops over time. A sustain point holds envelope
playback at that point until the note is released (OFF in the Pattern Editor). When the
note is released, envelope playback resumes from the sustain point.
18.2.2.3 Creating and Modifying Envelopes
Double-clicking in the envelope where no point is set will create a new point.
Double-clicking on an existing point will remove it. Right-clicking and selecting the
"Draw Tool" will allowing you to quickly draw a shape. If you click and hold on an
existing point then you can drag it around and set a new value.
• "Left Shift" + Moving points will remove all points that the mouse pointer
touches.
• "Left Control" + Dragging a point will fine-tune its value. "Left Control" +
Hovering over a point will display the point's value.
Selecting and editing specific parts of the envelope
Left-click and dragging across the grid will create a highlighted area. Any points within
this area will be selected and can be adjusted all at once. You can also copy and paste
selected areas by using the right-click menu on the grid. Alternatively, switch the
18.2.2 Envelopes
68
Renoise 2.7 User Manual
keyboard focus to the grid by middle-clicking on it and use the following shortcuts.
Press "Left Control + C" to copy it and then left-click once on the grid at the point which
you wish the area to be inserted. Now press "Left Control + V" to paste the copied
selection once, or "Left Control + P" to paste it continuously until the end of the
envelope. You can also insert with "Left Control + I", which will move the existing
waveform to the right.
The right-click menu also contains some additional options in the Process sub-menu:
Envelope Buttons and Controls
•
•
- Turns the envelope on/off.
- Shows the value of the currently selected point. Left-click to enter a
new value.
•
- Length of the envelope in ticks (24 ticks make up a beat).
• Curve Types:
♦ Points: Only changes value when a point is encountered.
♦ Linear: Will interpolate playback in a linear fashion between points.
♦ Curve: Will interpolate with a smoother cubic curve.
• Loop Types:
♦ Forward: Loop playback from start to end.
♦ Reverse: Loop playback from end to start, once the end point is reached.
♦ PingPong: Loop playback from start to end to start to end etc.
• Sustain:
18.2.2 Envelopes
69
Renoise 2.7 User Manual
When turned on, a sustain line appears in the envelope curve window. The sustain point
stops envelope playback until the note is released (OFF in the Pattern Editor). Using
this, you can define a custom envelope section that only applies while the sound is
sustained.
• Envelope Presets:
Store and recall your favourite envelope settings. Right-clicking will store a preset,
while left-clicking will restore a previously stored preset.
18.2.2.4 Applying and Modifying LFOs
There two LFOs (Low Frequency Oscillators) available per envelope and they run
constantly alongside the envelope curves. LFO values are always applied after the
envelopes, but can also be used even if the envelopes are disabled. LFOs are often
used for adding looped vibrato, tremolo etc. to sounds and multiple LFOs can be
combined to create more complex modulations.
There are 4 types of oscillators available for the Instrument Envelopes:
•
Type:
• Phase: This defines the value where the oscillation begins. The exact nature of
how the phase value affects the sound depends on the LFO type and, in the case
of the filter envelopes, which effect has been selected.
• Frequency: The speed of the LFO (relative to the BPM of the song).
• Amount: The strength of the LFO the effect.
18.2.2 Envelopes
70
Renoise 2.7 User Manual
18.2.2.5 Volume Fadeout and Sustain
The volume envelope has an additional option in the sustain property panel: Fadeout.
You can set it by using the arrow keys, changing the value or dragging the slider.
The Fadeout value determines how quickly the instrument volume will decrease upon
the note being released. It is roughly equivalent to the "release" value in a typical ADSR
envelope. This is especially useful when not using a sustain point in the envelope, but
still requiring a slow fadeout of the samples.
18.2.2.6 Filter Envelopes & Controls
The Cutoff and Resonance envelopes have various Filter, Distortion and EQ types to
choose from:
• LowPass Filters: LP 2x2 pole, LP 2 pole, LP biquad, LP Moog, LP Single
• HighPass Filters: HP 2x2 pole, HP 2 pole, HP Moog
• EQs: EQ -15, EQ -6, EQ +6, EQ +15, Peaking EQ
• Distortion: Distortion, Distortion Low, Mid Distortion, High Distortion
• RingMod
Filter envelopes also have extra Follower controls in their LFO tab. The Follower
changes the modulation of the filters, depending on the actual sound input. They follow
the volume and apply more modulation the louder the sound is. Using this, you can
achieve "wah-wah" style modulations and other dynamic sounds effects with the filters.
• Attack: The attack level of the envelope, which is generated from the sound
input. The lower the attack value, the more severe the changes in modulation
will be.
• Release: The release time of the envelope, which is generated from the sound
input. The higher the value, the longer the modulation will still be applied after a
volume drop.
• Amount: General intensity of the effect. You can use negative numbers to apply
the effect in reverse, i.e. more modulation the quieter the sound is.
18.2.2 Envelopes
71
Renoise 2.7 User Manual
18.3 Plugin Instrument (VST/AU) Properties
VST or Audio Unit plugins are basically MIDI instruments that run within Renoise - like a
built in software synthesizer. This means that they behave as described in the External
MIDI Properties section below. Besides the common MIDI properties, they also offer a
custom GUI, audio routing options and can be rendered down to sample-based
instruments.
• Ext. Editor: Opens the editor window. This can either be a Renoise-alike dialog
box or a custom GUI provided by the plugin.
• Instrument: The plugin instrument which you would like to use. This will initially
display "None". Click to show a list of available plugins.
• Program: When available, select a specific patch in the plugin. Note that some
plugins only allow changing and setting up patches in their external editor.
• Channel No.: The MIDI channel that will be used to trigger the plugin. For most
plugins any channel will do, but when using multi-timbral plug-ins you can play
multiple sounds with one plugin instance.
• Transpose: Transpose note playback in semi-tonal increments.
• Preset (Load/Save/Rename): Load or save the currently active preset to a file
for later use.
• Bank (Load/Save): Load or save all currently active presets to a file for later
use.
• Volume: The overall playback volume of the instrument.
• ? : Set up compatibility options for the plugin. Hovering the mouse over this
button will display some information about the plugin, such as latency, where the
file is loaded from etc.
• Auto Suspend: When enabled, Renoise will completely shut off the plugin when
it is no longer producing sound. This is mainly done to reduce CPU usage. While
plugins are Auto Suspended they will automatically wake up as soon as they are
triggered again by playing notes or automation. Additionally, while suspended
you will be unable to play the plugin by clicking on the virtual piano keys in its
custom GUI.
18.3 Plugin Instrument (VST/AU) Properties
72
Renoise 2.7 User Manual
• Plugin Grabber: Render the plugin (freeze it) to a sample-based instrument.
Left-clicking will replace the current plugin, while right-clicking creates a brand
new instrument. See Render or Freeze Plugin Instruments to Samples for a
detailed description.
• Output panel: Click the button at the top to open the panel. When using Plugin
Aliases it may be useful to play the instruments in multiple tracks to keep things
better organised. By setting up track routing you can force the plugin's output to
be bound to a single track, no matter which track you send the notes from. This
can be useful if you wish all of the instruments to use the same effects present in
that one track.
18.4 External MIDI Properties
Using a MIDI instrument you can play external synthesizer hardware or control software
synthesizers running on your computer. The latter is done by using virtual MIDI devices
(MIDI Yoke on Windows, the IAC BUS on Mac OSX) and programs which receive MIDI.
When running Renoise as a ReWire master, loaded ReWire slaves (e.g. synthesizers like
Reason) will also show here as virtual MIDI devices.
• Device: The MIDI device which you would like to send MIDI to. Without setting
up a device, no MIDI data can be transferred, so this is your first priority when
creating a MIDI instrument.
• Channel: The MIDI channel that will be used to trigger the MIDI device.
• Transpose: Transpose note playback in semi-tonal increments.
• Bank: When set, this is the bank number you want to apply before the
instrument is loaded with songs. When disabled, no bank change information will
be sent to the device. The bank number is a 14-bit value, so you have to enter
combined LSB and MSB values when needed.
• Latency: A custom manual latency that all events will be sent with. This is
sometimes needed to get external devices properly synchronised.
• Program: When set, this is the program number you want to apply before the
instrument is loaded with songs. When disabled, no program change information
will be sent to the device.
18.4 External MIDI Properties
73
Renoise 2.7 User Manual
• Note Length: When enabled (not INF), the MIDI instrument will behave as if it
has a finite duration, like unlooped samples have. When disabled, Note OFFs
must be explicitly sent and added in order to stop playing Note ONs. This can be
especially useful while playing drum samples, since you no longer have to
manually turn every single one off.
• Mode: Specifies how Renoise should handle latency (the delay until the sound is
audible):
♦ ext. MIDI: The MIDI device is routed to an external synthesizer, which
then produces its own sound.
♦ Line-in Ret: The MIDI device is routed to an external synthesizer, but the
audio signal is routed back to Renoise via a #Line-In Device.
18.4.1 Setting Up VST Paths
Plugins (VSTs or Audio Units) are external components that are installed on your
computer. Renoise will try locate them automatically, but on occassion may be unable
to do so. If you have plugins installed but they don't appear in Renoise, you can specify
directories where Renoise should look via the "Edit->Preferences->Plug/Misc" menu.
See the Plugins/Misc section of the Preferences for more information.
18.4.2 Selecting a PlugIn
18.4.1 Setting Up VST Paths
74
Renoise 2.7 User Manual
18.4.2.1 Selecting a plugin
Initially, the Instrument box will show "None". Click on it to select, search and organize
plug-ins. To select a plugin, double click on its name. To unload it, select "None" from
the list.
18.4.2 Selecting a PlugIn
75
Renoise 2.7 User Manual
18.4.2.2 Quickly searching and selecting a plugin with the keyboard
As soon as the plugin list is opened, you can start typing in the search field. If, for
example, you want to load a plugin called "Filter Modulator", then typing "Filter" will list
only plugins which have the term "Filter" in their plugin category or name. To select a
plugin using the keyboard, hit the "TAB" key to set the focus on the plugin list, then
navigate with the arrow keys to the desired plugin and hit "ENTER". Hitting "ESCAPE"
will close the list without selecting anything.
18.4.2.3 Organising/customising the plugin list
Right-clicking on a plugin name will bring up a context menu with the following options:
• Rename/Move: Opens up a new dialog which lets you change the plugin
category and/or name. The plugin's name is displayed as "VendorName: Plugin
Name" by default. You can either create new subgroups by adding another topic
into the name, e.g. "My Favourite Plugs: VendorName: Plug-in Name" or simply
change the plugin's name by renaming it to, "VendorName: Better Name". Any
changes made here will only be saved within Renoise; the actual plugin name
remains the same, since it may be used by other applications.
• Hide: Excludes a plugin or a category of plugins from the list. This can be useful
if you no longer use a plugin, but don't want to uninstall it because old songs still
use it. To make a hidden plugin visible again, enable the "Show Hidden Devices"
option, then simply "Unhide" it again.
• Show Hidden Devices: Enables hidden plugins to become visible again.
• Show Short Names: Instead of sorting plugins by vendor, you can also display
them as a single list. With this option enabled you can still categorise the plugins
by renaming them as described above.
18.4.3 Plugin Aliases (multi-timbral plugins)
Some plugins allow the playback of multiple sounds from a single instance of the
instrument. This is achieved by channelling them through different MIDI channels. This
is not absolutely necessary, as you can always create a new plugin instrument for a
new sound, but it can be helpful to save on CPU consumption. To find out if your plugin
supports this, search for the keyword "multi-timbral" or "routing" in the plugin's
manual.
To make use of this feature in Renoise, use Plugin Aliases:
First load your chosen plugin, then select a free instrument slot in the Instrument
Selector. Click again on the plugin list and notice at the top of the list is the new
category, "VST Aliases" (or "AU Aliases" if you've used an Audio Unit). The aliases refer
to the previously loaded plugin. Double-click on one of the aliases in the list to create it.
18.4.2 Selecting a PlugIn
76
Renoise 2.7 User Manual
To use the alias, simply change the channel number:
The instrument is shown in the Instrument Selector with its alias name:
Note that any changes made to the options in the Instrument Settings > Plugin panel,
except for "Channel No." and "Transpose", will be applied to all of the aliases, as well as
the original plugin. Furthermore, deleting the original plugin will also delete all of the
aliases.
18.4.4 Plugin FX Aliases (routing MIDI to existing plugin effects)
You can also create and control aliases for existing plugin effects in Track DSP chains.
18.4.3 Plugin Aliases (multi-timbral plugins)
77
Renoise 2.7 User Manual
Most plugin effects do not support notes or other MIDI events. Those that do, use them
to control more advanced features, such as vocoders. Other possible uses include
preset or parameter switching with notes or sending MIDI CC messages to plugins.
Once you've set up an alias to an effect, you can play and record with it just like a
normal instrument. You can also use a *MIDI Control Device to automate it with MIDI.
18.4.5 Plugin Routing
Plugin instruments which have more than one output channel will contain multiple path
selectors in the Output panel on the right of the plugin property-panel.
Expanding the panel by clicking on the arrow will display the following options:
• enable/disable output channels for the plugin
• name/rename a bus
• set up track routing in Renoise for the individual plugin channels
The left section allows you to activate any or all available audio buses for the
18.4.4 Plugin FX Aliases (routing MIDI to existing plugin effects)
78
Renoise 2.7 User Manual
instrument. By default, only the first bus is enabled. With the right section you can lock
each bus to a specific Renoise track. When enabled, a drop-down box appears listing
the currently available tracks, including the Master Track. When disabled, Renoise will
automatically use the currently selected track (where the cursor is located).
Each bus also indicates whether it is Stereo (
) or Mono (
).
18.4.6 Plugin Compatibility Settings
This dialog will appear after clicking on the "?" button in the VST Instrument Properties
section after a plugin is loaded.
In most cases these options will already have the correct settings, as Renoise comes
with a database which sets the defaults for you. If you are experiencing any of the
problems described in the dialog, then you might want to try altering the settings.
18.4.5 Plugin Routing
79
19 Sample Editor
Renoise has a strong focus on samples as instruments, featuring many pattern effects
to modify their playback, and to aid with this there is a built-in Sample Editor. New
samples (mostly for short looping wavetable) can also be created here with the simple
drawing function.
Any changes made within the Sample Editor are exclusive to the samples of that
particular Renoise song. The source samples are never modified unless you explicitly
save and overwrite the file by saving it in the Disk Browser. Besides being
non-destructive to the sample files, the Sample Editor also supports full and endless
undo/redo-ing. This can create an unwanted overhead when used with very large
samples, so this feature can be disabled. See below for more information.
19.1 Overview
The editor is divided into three parts:
1. The upper bar with the sample selection options, sample name, rate and
bit-depth on the left. The draw, slice and snapping controls on the right.
2. The central area displaying the waveform with two horizontal rulers along the top
and bottom. Here you view the sample that is currently selected and choose
what you want to edit. Loop points and slice markers are also displayed here.
3. The lower section featuring the buttons and options used to edit or modify the
sample.
19.2 Wave View
19.2.1 Upper and Lower Rulers
You can individually set the upper and lower rulers' display measure by right-clicking on
them and selecting an option from the context menu:
19 Sample Editor
80
Renoise 2.7 User Manual
19.2.2 Lower Zoom Bar
As an alternative to using the mouse or keyboard shortcuts to navigate around in the
waveform, you can use the zoom-bar beneath the Lower Ruler to scroll or zoom. Drag
the bar in the middle to scroll and drag the handles to extend/shrink the waveform
view. Clicking on a free space next to the bar will jump a page in that direction.
19.2.3 Navigate Using the Mouse
• Left Mouse Button:
♦ Single-click sets an offset/cursor position.
♦ Click and drag spans an area in the editor.
♦ Click and drag with "Left Shift" extends/shrinks either side of the selection
area.
♦ Double-click selects the entire visible area of the waveform.
♦ Click, drag and move the cursor outside the wave editor to the left or right
to zoom out. Holding down "Left Control" while doing so will speed up the
zooming. Holding down "Left Shift" while doing so will scroll instead of
zoom.
• Right Mouse Button:
♦ Single-click opens a context menu.
♦ Click and drag extends/shrinks either side of the selection area (same as
left-click and drag with "Left Shift").
♦ Click, drag and move the cursor outside the wave editor to the left or right
to zoom out. Holding down "Left Control" while doing so will speed up the
zooming. Holding down "Left Shift" while doing so will scroll instead of
zoom.
• Middle Mouse Button:
♦ Single-click a point in the sample: Plays the sample from the clicked
position to the end of the visible waveform.
♦ Click and drag plays the selected area of waveform.
• Scroll Wheel:
♦ Zoom in/out of the waveform view.
♦ Hold "Left Alt" while scrolling to scroll horizontally instead of zooming.
Note that the waveform view will zoom from the position of the mouse pointer. So, to
get a closer look of a specific area, hold the mouse pointer over that area and start
scrolling with the mouse wheel.
19.2.1 Upper and Lower Rulers
81
Renoise 2.7 User Manual
19.2.4 Navigate Using Keyboard Shortcuts
• Arrow Left/Right: Move cursor to the left/right. In combination with "Left Shift",
a selection is created.
• Arrow Down/Up: Zoom in/out at the cursor position.
• PageDown/PageUp: Zoom in/out vertically.
• Home/End Key: Move cursor to the start/end of the waveform. In combination
with "Left Shift", a selection is created.
• Enter: Play/restart the sample from cursor position.
Default operations such as Copy/Paste ("Left Control/Command + C", "Left
Control/Command + V") etc. are available as well.
19.3 Drawing
With Draw Mode
enabled you can freely draw on the central sample waveform
area with the mouse. Simply hold down the left mouse button and drag to draw. This
can be incredibly useful for making adjustments to existing sounds, such as removing
clicks.
To draw a brand new sample, enable draw mode, select an empty instrument slot and
then draw in the waveform area. You will then be prompted to create a new sample,
whose parameters you can adjust via the dialog box.
19.4 Slicing Markers
With Renoise's slice markers you can non-destructively split a sample in slices, which
can correspond to individual drum hits, notes, vocal phrases etc. You are then able to
trigger them from the keyboard or via the 09xx Pattern Effect Command, where the xx
value corresponds to a particular slice.
As you add slices to the sample, the Sample Keyzones editor will automatically lay
these out across the keyboard according to its current Drum Kit settings, allowing you
to trigger each slice from a different key on the keyboard.
The individual sample slots in a sliced sample cannot be directly edited. However, all
sample options like looping, volume, pan etc. are editable per slice. A newly created
slice will inherit the master sample's Instrument Settings values.
Left-click dragging on the slice tabs at the top of the waveform will allow you to move
the markers around. Right-clicking on a slice tab will bring up a menu with the option to
select all markers, delete the current marker or delete all markers.
The slicing controls are located at the top right of the Sample Editor interface.
19.2.4 Navigate Using Keyboard Shortcuts
82
Renoise 2.7 User Manual
19.4.1 Slice Controls
- Activating the Slice button will change the mouse pointer to the Slice
Marker Tool. With this you can left-click on the waveform to it into different
sections.
•
- Automatically insert markers into the waveform at points where
beats/transients are detected.
•
- The sensitivity of the auto-slicing beat detection can be adjusted using
this value box. Higher values will lead to more markers being inserted.
•
- Toggles whether a slice will continue playing the rest of the waveform once
it has reached the end or not.
•
19.5 Snapping
The Snapping controls are located at the top right of the Sample Editor interface.
Snapping applies to the waveform when selecting with the mouse, using keyboard
shortcuts to navigate, and when applying and dragging loop points. It can be useful to
have "0 Crossing" enabled, as this will ensure that cutting and pasting parts of a
sample do not produce clicks in the audio, because the start and end points will always
match up at 0.
Selecting "09 Effect" will snap to the 09 markers typically shown along the bottom of
the waveform, while selecting "Markers" will cause the selection to "stick" to sample
slice markers as the mouse pointer approaches them.
Snapping to beats (the length of time for a single beat) is useful when cutting out beats
from loops, in combination with the "Copy Into New Instrument" context
menu/keyboard shortcut.
19.6 Zooming
The Zooming controls are located at the bottom right of the Sample Editor interface.
19.4.1 Slice Controls
83
Renoise 2.7 User Manual
•
- View full sample (zoom out to show the whole sample, horizontally and
vertically).
•
- Zoom in one step vertically.
•
- Zoom out one step vertically.
19.7 Processing Buttons and Options
Most processing options below which change the sample (Cut/Copy/Paste or Fading) will
apply to the whole sample unless a specific area has been selected.
19.7.1 Undo/Redo Support
•
- Enable/disable undo in the Sample Editor. When working with very large
samples, temporarily disabling undo may be useful to save time. Renoise saves
all undo/redo processing on disk, so running out of memory should not be a
problem.
19.7.2 Create/Adjust Sample Properties
•
/
- Edit sample properties / Create new sample.
When a sample is loaded, you can change basic sample properties here:
When no sample is loaded, you can create a new sample. This can be useful to create
small looped hand-drawn samples:
19.7.3 Cut/Copy/Paste
•
•
- Cuts the selection or the whole sample if nothing is selected.
- Crop to selection (delete everything outside of the selection).
19.6 Zooming
84
Renoise 2.7 User Manual
•
•
- Copy the selection or whole sample into the clipboard.
- Paste the clipboard content into the waveform at the cursor position, or
paste over the selected area.
•
- Mix-Paste the clipboard content with the selection.
19.7.4 Amplitude & Offset
•
- Change the volume of the sample or selection (will open up a dialog to
specify the exact amount).
•
- Raises the volume of the sample or selection to the maximum possible
value without clipping.
•
- Centre the sample or selection to the DC-line. Fixes vertical DC offsets.
19.7.5 Fading
•
- Fade the sample in linearly (you can also fade in logarithmically via the
context menu or shortcuts).
•
- Fade the sample out linearly (you can also fade out logarithmically via the
context menu or shortcuts).
•
- Mix the left part of the selection with the right part of the selection by
fading them together. This is useful to create smooth loops. Try cross fading the
loop range only.
19.7.6 Reverse & Swap
•
•
- Reverses the sample or selection.
- Cross-reverse the sample or selection by reversing each stereo channel in
the opposite manner (left channel is mirrored to the right, right channel is
mirrored to the left).
19.7.7 Process Track FX
•
- Apply the current track's DSP effect chain to the sample. This way you can
apply native or plugin effects directly to the sample's waveform. Note that this
will not extend the length of the sample (in the case of reverbs, delays etc.
where the effect lasts longer than the original sample length).
•
- Smooths the sample. A simple interpolation which removes hiss and sharp
edges from the waveform. Useful to smooth out hand-drawn samples.
19.7.8 Loop Controls
•
- Set loop start point from the current cursor position. When a selection is
present, the loop start and end points will be set to the selection area.
•
- Set loop end point from the current cursor position. When a selection is
present, the loop start and end points will be set to the selection area.
•
- Toggles whether a sample will finish its current loop upon a Note-Off.
19.7.3 Cut/Copy/Paste
85
Renoise 2.7 User Manual
•
- Set the loop type or turn it off.
•
- Enable/disable the Loop Fine Editor (see Loop Fine Editor).
19.7.9 Play/Stop and Record
- Start/Stop playing sample from the cursor position to the end of the visible
waveform, or Start/Stop playing the selection if one is present.
•
- Set the note that will be played when pressing the Play button or
pressing "Enter".
• - Select where the sample should be played back: On the Master Track to
bypass the current track's effects, or on the selected track to hear the sample
with the currently active effects.
•
- Open up the record dialog box, to record new samples from various
sources (e.g. microphone, line-in etc.).
•
19.7.10 Current Selection Range Indicator
•
- Next to the record button, the current cursor position or selection
range positions are shown in the format of the Lower Ruler. To change the
format, right-click on the Lower Ruler and choose from the list.
19.8 Loop Fine Editor
The Loop Fine Editor shows you a sample-precise overview of the loop start and end
points, which is extremely useful for creating smooth loops. In most cases, loops should
start and end at the same amplitude value to avoid clicks.
19.7.8 Loop Controls
86
Renoise 2.7 User Manual
19.9 Mix-Paste and other Copy/Paste Operations
19.9.1 Mix-Paste
Renoise offers a simple Mix-Paste functionality. To use it, simply copy a sample or a
selection of a sample into the clipboard, then click on Mix-Paste. A dialog will appear
that offers options on how to mix the clipboard content with the existing content:
19.9.2 Copy Into New Sample/Instrument
You can automatically copy regions of a sample into either a new sample in the current
instrument or a new instrument. This is done via the right-click context menu or
keyboard shortcuts. This can be very useful when copying parts of a large sample for
further playback and editing.
19.9.3 Copy/Paste With External Sample Editors (Windows only)
Renoise shares its clipboard content with the system on Windows, meaning you can
quickly swap around sample data to and from Renoise when using an external sample
editor that supports this feature. In many external editors you have to select/activate
this feature first. To find out how to do this, please look at the external editor's manual
and search for the keywords: "System Clipboard", "Copy".
19.8 Loop Fine Editor
87
20 Recording New Samples
Renoise allows you to create new samples by recording them from various sources,
including a line-in jack or microphone. To do so, open the Sample Editor and press the
small
button. Alternatively, you can open the record dialog by choosing,
"File->Record New Sample..." from the main menu.
Bringing up the record dialog and controlling the main record options can be mapped to
a MIDI Controller with the MIDI Mapping options. This way you can quickly make new
recordings using just your MIDI controller or master keyboard. To map the opening and
closing of the record panel, switch over to the Sample Editor before opening the MIDI
Mappings.
20.1 Audio Device Setup
To record new samples in Renoise, you first have to configure the device you want to
use for recording, which is done in the "Edit->Preferences->Audio" panel. This is only
necessary when using Direct-Sound (Windows), Core Audio (OSX) or ALSA (Linux). ASIO
is pre-configured to be used as a recording and playback source. When your soundcard
has more than one input channel, you will be able to set this as the input device in the
Audio Preferences, or you can select this in the recording dialog.
20 Recording New Samples
88
Renoise 2.7 User Manual
20.2 Overview
•
This VU meter displays incoming audio activity, allowing you to monitor the signal and
make adjustments if necessary. The speaker button enables you to listen to the input
through Renoise while recording.
20.1 Audio Device Setup
89
Renoise 2.7 User Manual
•
Select which channel you would like to record: left, right or both (stereo).
•
Select the audio device that will be the source for the recording.
•
Select the track DSP effect chain (the list displays all tracks in the song) that will be
applied to the recording, or just to the the preview of the recording.
• Sync start & stop:
♦ None - No quantization is applied. Hitting start or stop will start/stop
recording immediately.
♦ Pattern - Applies quantization from the start to the end of the current
pattern. When the song or pattern plays, recording will be started or
stopped only at pattern boundaries or block loops. This is useful to record
"live" e.g. playing a guitar riff along to your Renoise song. The resulting
samples can then be placed into the patterns and will always match your
song.
• Record Dry (monitor FX): When enabled, the input signals are recorded
without the Track FX applied, but will be previewed with them. This way you can
hear and record exactly what will be played later when adding the recorded
sample to the selected track.
• Create a new instrument: When enabled, each recording is placed into an new
instrument slot in the Instrument Selector, so you can simply hit start/stop again
and again to create multiple takes without overwriting anything.
• Compensate input and output latencies: When enabled, the latency of your
soundcard will automatically be compensated when creating synced recordings.
• Extra Latency (ms): Soundcards or other devices can introduce latencies that
Renoise may not be aware of. When your recordings are slightly out of sync on
playback, you can manually compensate the latency offset of future recordings
here.
•
Start or stop the recording (changes into "Stop" when recording has
started).
•
Closes the recorder window when no recording is taking place. While
recording, this will "Cancel" the current recording.
20.2 Overview
90
Renoise 2.7 User Manual
20.3 Recording Without Quantization
Once everything is set up, hit "Start" to begin recording. A red border will appear
around the dialog box to indicate that recording is active. To stop recording and load
the sample into the instrument slot, simply hit the "Stop" button. Currently active
recordings can be thrown away by pressing "Cancel".
20.4 Recording With Quantization
When using the quantization (sync start/stop) option, Renoise will make sure that
recordings are started or stopped at pattern boundaries only. To use the sync you have
to start playing the song first. A green bar will then show the current playback progress.
20.3 Recording Without Quantization
91
21 Track DSPs
Each track in Renoise has its own set of audio effects which are grouped into an effect
chain. The chain can be a collection of built-in Audio Effects effects, plugins
(VST/AU/LADSPA Effects) or Meta Devices.
DSP effects can be freely moved around within the chains. Using the Mixer, they can be
moved from track to track. They also can be organized, copied, pasted or saved as a
file for later use.
With Routing Devices you can send or receive signals at any point in a chain. Meta
Devices do not change the actual audio signal, but instead alter the effect parameters
of a DSP in any of the tracks.
21.1 Adding Effects From the Effects List
To the left of the Track DSPs panel is a list of available effects, categorised like so:
• Audio Effects (Native FX)
• Routing Devices
• Meta Devices
• VST/AU/LADSPA Effects
Plugin instruments will not show up in the track effect list. Instruments are handled with
the Instrument Settings.
You can quickly search for an effect by typing a part of its name into the search bar at
the top of the list. This also works for categories, so typing in "VST" will show only VST
plugins in the list.
To add an effect from the list, either double-click on it or drag and drop it into the chain
at the desired position. You can also drag and drop an effect into other tracks using the
Mixer:
21 Track DSPs
92
Renoise 2.7 User Manual
21.2 Organizing the Effects List
By default, the plugin effects list is sorted by vendor name. Clicking the "More" button
next to the search field will vertically expand the list, giving you more room to organise
the effects.
Right-clicking on a plugin name will bring up a context menu with the following options:
• Rename/Move: Opens up a new dialog which lets you change the plugin
category and/or name. The plugin's name is displayed as "VendorName: Plugin
Name" by default. You can either create new subgroups by adding another topic
into the name, e.g. "My Favourite Plugs: VendorName: Plug-in Name" or simply
change the plugin's name by renaming it to, "VendorName: Better Name". Any
changes made here will only be saved within Renoise; the actual plugin name
remains the same, since it may be used by other applications.
• Hide: Excludes a plugin or a category of plugins from the list. This can be useful
if you no longer use a plugin, but don't want to uninstall it because old songs still
use it. To make a hidden plugin visible again, enable the "Show Hidden Devices"
option, then simply "Unhide" it again.
• Show Hidden Devices: Enables hidden plugins to become visible again.
• Show Short Names: Instead of sorting plugins by vendor, you can also display
them as a single list. With this option enabled you can still categorise the plugins
by renaming them as described above.
21.1 Adding Effects From the Effects List
93
Renoise 2.7 User Manual
21.3 Common Effect Layout and Controls
Each effect that you add to the chain has a standard set of buttons to perform common
functions:
21.4 Storing/Recalling Effect Presets
: Right-clicking A or B stores the current parameter set, while left-clicking
restores it. This allows you quickly switch between two presets and compare
them. The stored presets are saved with your song.
•
: Select, edit or create presets for the current effect. Clicking upon the
preset name shows a list of available presets, along with some options:
•
By clicking "Save as", the current parameters will be saved into a new preset. Saved
presets are stored by Renoise and will show up every time you use the device in future.
Presets created by you can also be deleted and renamed.
To save/load parameter presets to/from disk, use the "Import" and "Export" options in
the same context menu. This method allows you to share your presets with other
Renoise users.
21.3 Common Effect Layout and Controls
94
Renoise 2.7 User Manual
21.5 Pre and Post Mixer Effects
Two devices are always present in every track and cannot be removed or repositioned:
the pre and post mixer devices. The pre-mixer device is located at the beginning of
each DSP chain and controls the volume and panning of the track's incoming signal
(audio from the track in the Pattern Editor).
The post-mixer is located at the end of the DSP chain and controls the volume and
panning of the sound leaving the track. By default, the audio is routed to the Master
Track, but this can be changed through the Mixer or the "Routing" tab of the pre-mixer.
If your soundcard offers multiple channels, you can route audio from different tracks to
different channels and even send them for post-processing to a hardware mixer.
The post-mix device in the Master Track has a few extra options:
• Auto Gain: Automatically lowers the master volume to avoid clipping. This is the
same as the Transport Panel's auto gain button:
• DC-Filter: When enabled, DC offsets in the master signal are automatically
removed.
• Soft Clipping: When enabled, the master signal will be softly saturated when
clipping occurs.
• Peaks Levels: Shows the actual master signal. Using this you can easily see if
the master signal is clipping.
21.6 Copy/Pasting Effect Chains
Right clicking on a DSP device or into the free space between the DSPs will show a
context menu with various options for the whole DSP chain, or the currently selected
DSP chain. This way you can delete, cut, copy or paste whole DSP chains, or also
minimize all DSP in the current chain. Please have a look at the following screenshot for
all available options:
21.5 Pre and Post Mixer Effects
95
Renoise 2.7 User Manual
21.7 Loading/Saving Effect Chains
It is possible to export DSP chains to disk for later use through the "DSP Chain"
category in the Disk Browser. Note that when loading in DSP chains, Renoise will
replace the existing chain with the new one. You can avoid this by right-clicking the
DSP chain file in the Disk Browser and then selecting, "Load file with options...".
21.8 MIDI Mapping and Automating Effects
Every Track DSP parameter can be attached to a MIDI controller via the MIDI Mapping
dialog box. They can also be automated using either Graphical Automation or Pattern
Effect Commands.
21.6 Copy/Pasting Effect Chains
96
22 Audio Effects
Renoise currently offers 24 built-in audio effects which can be applied as Track DSPs on
any track. These are guaranteed to be included with every Renoise installation. This
ensures that songs made using these effects can be played by other people on their
setup exactly as you do. However, this is not the case with plugin effects or instruments
(VST, AU or LADSPA). These are optional components that have to be installed on a
system in order to be played back in a Renoise song.
Below is a list of the current Renoise plugins organised by category, with links to
detailed descriptions for each of them:
22.1 Delay Devices
Delay devices repeat an audio signal and mix it with the original sound. By repeating
and dampening the sound over and over again, this simulates spatial effects.
22.1.1 Delay
The Renoise Delay effect is a two-line echo device with the parameters of a classic
digital delay unit. It is commonly used to add spatial echoes in either rhythmic or
non-rhythmic patterns, but has other subtle uses such as short-delay induced 'width'.
The available parameters allow for versatile use, both creatively and for more practical
mixing applications.
• Line Sync Switch: This switches the mode of the delay effect from the initial
un-synced mode to "Line Sync" mode. When disabled, the delay lengths can be
set to a value and they will remain at those values. When enabled, the delay
lengths are tied to the numbers in the "Delay Set Boxes" and synced with the
song's BPM. So when the tempo of the song changes, the delay lengths are
altered accordingly. "Line Sync" mode also enables the delay lengths to be offset
from their set values (see below).
• L/R Delay: Controls the "Left" and "Right" delay line lengths in milliseconds
when in un-synced mode, or in a -/+% offset from 0 when in "Line Sync" mode.
The delay range that can be set is from 1 ms to 2000 ms.
• L/R Feedback: Controls the amount of diminishing feedback for the "Left" and
"Right" delay lines, roughly equating to how many 'echoes' are sounded. 0%
means that the delay is sounded once, whereas 100% means the delay will keep
sounding forever.
22 Audio Effects
97
Renoise 2.7 User Manual
• Send: This controls the volume of the 'wet' delay output (where 0db equates to
the same volume as the input sound).
• Delay Set Boxes: In un-synced mode, a beat-step value (relative to current
BPM) can be selected and 'set' with the "Set" button. In "Line Sync" mode, the
values can altered as the song is playing and will also automatically change with
song tempo. The "L/R Offset" can be used to offset the timing of the delay
relative to the value specified in the box.
• L/R Output Pan: This controls the panning position of the "Left" (top slider) and
"Right" (bottom slider) delay outputs.
• Mute Src. Button: Mutes the source signal (the 'dry' sound), leaving only the
delayed echoes.
Tips and tricks
• The Delay device can be used as a classic 'Send Echo': Place the Delay effect
into a Send Track and enable "Mute Src.", so that the dry signal will not double
up with the source. Now add a #Send Device into the source track, select the
chosen Send Track as the "Receiver" and adjust the "Amount" sent. If you apply
the Send Device in this way to multiple tracks, then they can all make use of the
same echo effect.
• Panning the input and output of the delay is important: If an input sound
happens on the left, then the echoes will sound on the left. This may not be
desirable, so the "L/R Output Pan" sliders can be used to place the delay output
in a different position than the input. Common usages of this feature include
panning the outputs to the centre to create a mono echo, or a left/right swap
where the output echoes happen on the opposite side of the input. This can be
very useful for filling out the spatial characteristics of a mix.
• When both the L and R delay lengths are set to the same value, then the panning
of the output sound automatically becomes mono (unless the output pans are
adjusted).
• When using a 'Send Echo', "HighPass" and "LowPass" filters can be placed after
the output of the Delay device to simulate acoustic echo properties and to
remove unwanted frequencies from cluttering the mix.
• When the "Delay/Offset" settings change, or the "Delay Set Boxes" value is
altered and "Set" is pressed, a quick 'scrubbing' sound is heard that simulates
the 'tape delay' speed change sound. This also occurs when in "Line Sync" mode
when either the BPM or LPB change, or when the "Delay Set Boxes" value is
altered.
• As an alternative to stereo expansion effects, the Delay can be used to create
wider ambience. Example settings could be: "Delay" = 7-11 ms, "Feedback" =
0%, swapped panning on the "Output Pans" and a "Send" value somewhere
between -18db to -8db. This technique is even more effective in a 'Send Echo',
with the output filtered to focus on the mid-frequencies.
• Sometimes simplistic percussive and melodic input sounds can turn into
complex, exciting rhythmic flows by using rhythmic delays. Experimenting with
22.1.1 Delay
98
Renoise 2.7 User Manual
different "Line Sync" or "Delay Set Boxes" values can yield interesting results. A
common echo rhythm can be created using a 6-beat delay, but other values may
be appropriate depending on the input rhythm and sound.
22.1.2 Reverb
A straightforward reverb effect.
• Wet Mix: The gain of the reverberated signal.
• Room Size: The size of the room, i.e. the delay time of the echoes.
• Width: The width of the reverberated stereo signal. 0 = mono, 100 = full stereo.
• Damp: A filter cut-off to simulate sound-absorption level of walls.
• Dry Mix: The gain of the non-reverberated input sound.
22.1.3 mpReverb
A complex reverberation effect with many parameters to modify the sound of the
reverberated signal.
• Duration: The reverberation time in milliseconds.
• Predelay: An initial delay that is applied before any reverberation occurs.
• Low Cut: The cut-off frequency of the dampening filter.
• Low Gain: The gain of the dampening filter. Lower values create more
dampened sounds.
• Color: Used to attenuate or boost mid-frequencies of the reverberated signal, in
order to simulate walls.
• Width: Controls the stereo separation of the reverberated signal.
• Pan: The panning of the reverberated signal.
• Wet Mix: The gain of the reverberated signal.
• Dry Mix: The gain of the non-reverberated input sound.
22.1.2 Reverb
99
Renoise 2.7 User Manual
22.2 Dynamics Devices
Dynamic devices are used to dynamically change the amplitude of an audio signal.
22.2.1 Bus Compressor
The Bus Compressor, unlike the normal Compressor, doesn't merely react to the
incoming signal. The signal is first analysed and then the appropriate action is taken.
Short peaks are handled via a feed-back algorithm, while constant signals are handled
via a feed-forward algorithm. This way both compression methods are used where they
work optimally. The Bus Compressor is a perfect tool for mastering or levelling.
• Threshold: The minimum dB value at which the compression will take place.
• Ratio: The strength of the compression.
• Attack: The time it takes the Compressor to react to the signal breaching the
Threshold.
• Release: The time it takes for the Compressor to deactivate after the signal falls
beneath the Threshold.
• Makeup: The volume boost that is applied to the output.
• Knee: The point at which the signal will begin to be gradually compressed as it
approaches the Threshold. This allows for a softer, more natural sounding
compression.
22.2.2 Compressor
A Compressor "squashes" an audio signal as it rises above a specific Threshold level,
reducing its dynamic range and providing extra headroom for the signal to be boosted
in volume after compression. This results in a "fattening" of the sound.
For more information about compression and EQs: John Vestman's compression page.
Compression specific guide: Beginner's guide to compressors.
• Threshold: The minimum dB value at which the compression will take place.
• Ratio: The strength of compression.
22.2 Dynamics Devices
100
Renoise 2.7 User Manual
• Attack: The time it takes the Compressor to react to the signal breaching the
Threshold.
• Release: The time it takes for the Compressor to deactivate after the signal falls
beneath the Threshold.
• Makeup: The volume boost that is applied to the output.
22.2.3 Gate
A Gate only allows a signal to be heard if it exceeds a specific volume Threshold. This
can, for example, be used to silence a constant low noise floor from a signal, or to cut
out low volume parts of complex signals (such as drum loops). Using the Gate's input
filters you can analyse and therefore gate certain frequency ranges or instruments.
• Threshold: The minimum dB value at which audio signals will heard.
• Attack: The time it takes the Gate to react to the signal breaching the
Threshold.
• Hold: Determines how long the signal will be held after the signal has fallen
below the Threshold, delaying the Release phase.
• Release: The time it takes for the Gate to fully deactivate after the signal falls
below the Threshold. Longer Release times will result in slower fade-outs.
• Floor: Setting this volume level above zero will merely reduce the gated sound
instead of silencing it.
• Env. Input: Click to listen to the input after it has been affected by the High and
Low Pass filters. Useful to hear exactly what part of the signal will be affected by
the Gate.
• High Pass: The frequency of the High Pass filter applied to the input. The output
signal is not affected by the filters.
• Low Pass: The frequency of the Low Pass filter applied to the input. The output
signal is not affected by the filters.
• Gate/Duck: Duck mode reverses the behaviour of the Gate: the Floor volume
will be applied when the signal falls below the Threshold.
22.2.4 Maximizer
The Maximizer is a hard limiter which boosts and limits audio signals. It will hard-clip a
signal that exceeds the Threshold, but then soften the Release when it falls back under
that Threshold (contrary to plain hard-clipping). The Maximizer is often used for final
mastering to block any stray, unnecessary peaks without harsh sounding full
hard-clipping.
22.2.2 Compressor
101
Renoise 2.7 User Manual
• Boost: Gain applied to the signal before the Threshold.
• Threshold: The dB value that the Maximizer limits the input to.
• Peak Rel.: Compression release factor for peaks (transients).
• Slow Rel.: Compression release factor for non-peaks (constant signals).
• Ceiling: Final gain applied to the output.
The small red LED below the VU meters indicates when the Peak Rel. factor is being
used.
22.3 Filter Devices
Audio filters manipulate a sound's frequency spectrum. There are various digital and
analogue emulation filters present in Renoise:
22.3.1 Comb Filter
The Comb Filter adds a delayed version of the signal to itself, causing constructive and
destructive interference.
• Frequency: The rate at which the delayed signal is applied to the original.
• Feedback: The direction and strength of the delayed signal.
• Inertia: Determines how fast parameter changes are applied. Low Inertia will
create sweeping effects by noticeably sliding from one parameter setting to
another.
• Wet Mix: How much of the processed signal should be kept.
• Dry Mix: How much of the original, clean signal should be kept.
22.3.2 EQ 5
A 5-band equalizer which amplifies or attenuates up to five frequency bands. The
frequencies to the left of the sliders are adjustable, as are the Qs (width of the bands)
22.2.4 Maximizer
102
Renoise 2.7 User Manual
to the right. Each band can also be changed by using the left mouse button to drag the
node dots in the right-hand graphical panel. Using the right mouse button and moving
up/down will change the notch width. If you hold "Left Shift", the node is locked to allow
adjustment of the amplification value only, while "Left Alt" allows adjusting only the
frequency value. "Ctrl/Cmnd" is used for fine tuning.
The volume scale of the graph at the right side of the device can be changed by
clicking on the small button in the bottom right corner:
The "L", "R", "L-R", "L+R" buttons specify how the EQ is processed in the stereo field:
• L: Only processes the left channel.
• R: Only processes the right channel.
• L-R: Processes the left channel normally and the right channel inversely. This
can create nice spatial effects, especially when modulated.
• L+R: Processes both channels equally, which is the default.
22.3.3 EQ 10
The EQ 10 device is identical to the 5 band equalizer, but with 10 bands and different
frequency and Q defaults.
22.3.4 Filter
The Filter device contains many filter types and models.
22.3.2 EQ 5
103
Renoise 2.7 User Manual
The available Filter models are:
• 24dB 4 Pole: A standard, fast, digital bi-quad filter, as used in many audio
applications.
• 24dB Moog: An experimental but fast Moog filter emulation, with a very unique
sound and resonance near to self-oscillation.
• Butterworth 4n: A fourth order Butter-worth filter. Butter-worth filters are
designed to have a frequency response which is as flat as mathematically
possible in the passband, precisely cutting off frequencies.
• Butterworth 8n: An eighth order Butter-worth filter, which has an even flatter
frequency response than the fourth order version.
Each model has five types of filter:
• Low Pass: Passes low frequency signals but attenuates frequencies higher than
the cutoff value.
• High Shelf: Attenuates signals with frequencies lower than the cutoff value with
a custom amount of gain.
• Band Pass: Passes frequencies within a certain range and attenuates
frequencies outside of that range.
• Band Reject: Passes most frequencies unaltered but attenuates those in a
specific range to very low levels.
• Low Shelf: Attenuates signals with frequencies higher than the cutoff value with
a custom amount of gain.
• High Pass: Passes high frequency signals but attenuates signals lower than the
cutoff value.
Each filter type has up to four parameters:
• Cutoff: Sets the cutoff frequency for the currently selected filter model and
type.
• Resonance/Q: Creates a ringing feedback loop for frequencies around the cutoff
value.
• Gain: Available for Low/High Shelf filters only. Adjusts the gain of the attenuated
frequencies.
• Inertia: Determines how fast parameter changes are applied. Low Inertia will
create sweeping effects by noticeably sliding from one parameter setting to
another. This can be useful to soften the effect of cutoff changes applied to
sounds with mostly low frequencies.
22.3.4 Filter
104
Renoise 2.7 User Manual
22.3.5 Mixer EQ
The Mixer EQ is a standard EQ that was designed to sound and behave like common DJ
mixers.
22.4 Modulation Devices
Modulation Devices apply various types of oscillators to enrich the sound.
22.4.1 Chorus
As the name implies, a Chorus effect enriches the sound by layering on differently
pitched duplicates of itself. This can be especially useful to make simple wave shapes
deeper and warmer.
• Rate: Frequency of the applied modulation.
• Depth: Modulation depth.
• Feedback: Amount of feedback that is injected into the signal.
• Delay: Delay before the modulation is played.
• Dry/Wet: Specify how much of the clean and modulated sounds are kept.
• Phase: Phase offset of the modulation, applied to only the right channel to
create a stereo effect.
• Filter type selection: Type of filter that is applied to the modulated signal.
• Filter Freq.: Filter frequency that is applied to the modulated signal.
• Filter Reso.: Filter resonance that is applied to the modulated signal.
22.4.2 Flanger
A Flanger mixes two identical signals together, with one of them delayed by a small and
gradually changing amount.
22.3.5 Mixer EQ
105
Renoise 2.7 User Manual
• Amount: Modulated signal volume. Negative values will invert the signal.
• Rate: Modulation frequency.
• Amplitude: Modulation amount.
• Feedback: Feedback, applied to the modulated signal.
• Delay: Phase offset of the modulated signal.
• Phase: Phase offset of the modulation, applied to only the right channel to
create a stereo effect.
• Filter type selection: Type of filter that is applied to the modulated signal.
• Filter Freq.: Filter frequency that is applied to the modulated signal.
• Filter Reso.: Filter resonance that is applied to the modulated signal.
22.4.3 Phaser
A Phaser uses a series of filters to create peaks and troughs in the frequency spectrum.
The positions of the peaks and troughs are modulated so they vary over time, creating
a sweeping effect.
• Floor: Lower frequency boundary of the filter modulation.
• Ceiling: Upper frequency boundary of the filter modulation.
• LFO Rate: Frequency of the filter modulation.
• Depth: Strength of the modulation.
• Feedback: Amount of feedback that is applied to the modulated signal.
• Phase: Phase offset of the modulation, applied to only the right channel to
create a stereo effect.
• Stages: Number of used filters. The more filters are used, the stronger the
effect.
22.4.4 Ringmod
Ring modulation simply multiplies an incoming signal with an oscillator. Low
frequencies can be used to modulate the panning or volume of the signal. High
frequencies will add a new harmonic frequency to signal.
22.4.2 Flanger
106
Renoise 2.7 User Manual
• Oscillator: The type of oscillator waveform to be applied.
• Frequency: The frequency of the Oscillator.
• Amount: The amplitude of the Oscillator.
• Phase: Phase offset between the left and right channels' oscillation.
• Inertia: Determines how fast parameter changes are applied. Low Inertia will
create sweeping effects by noticeably sliding from one parameter setting to
another.
22.5 Shape Devices
Shape Devices modify the amplitude of the signal in various ways.
22.5.1 Cabinet Simulator
The Cabinet Simulator emulates the sound of hardware amplification cabinets. It
features a tube that is used for distortion and a built in EQ. This effect is recommended
for bass, synth, guitar or drums, to add roughness to your sound. Also try combining it
with the other Shape Devices and/or chaining multiple Cabinet Devices for interesting
effects.
• Cabinet: Select the type of the Cabinet that should be used. There are bass,
guitar and various other models available.
• Routing: Set how the Cabinet Simulator should internally route the signal
through the cabinet, EQ and tube.
• Gain: Amount of Gain applied in the tube. More Gain will result in more
distortion.
• Wet Mix: How much of the processed signal should be kept.
• Dry Mix: How much of the original, clean signal should be kept.
• EQ: A standard EQ with 5 bands and Q settings. See EQ 5 for a detailed
description.
• Mono/Stereo: When set to Mono, incoming stereo signals will be combined and
processed as a mono signal only. The Cabinet is twice as fast in Mono, so this
can be useful to save on CPU consumption if the input signal is mono.
22.4.4 Ringmod
107
Renoise 2.7 User Manual
22.5.2 Distortion
The Distortion effect is a versatile way of changing an input sound in real-time to
produce a range of characteristic distortion sounds, from traditional overdrive to bizarre
sonic extremes.
• Mode Type - Four buttons select the type of distortion:
♦ Razor: Razor mode cuts off the top of the waveform by amplifying and
clamping the signal, also known as clipping. This gives the traditional
digital overdrive sound that is quite harsh and full in character.
♦ Shape: Similar to Razor mode, except that instead of clipping, the signal
is saturated. This results in a warmer sounding overdrive that emulates
analogue distortion.
♦ Fold: Instead of clipping or saturating, part of the waveform is folded back
towards the DC line, giving the waveform a slightly triangular shape. This
is an aggressive foldback type distortion that mangles the sound and
growls fiercely at high gain.
♦ Shift: Shift mode generates a new waveform from the original by folding
amplitudes below the DC line. The introduced DC offset is corrected by
shifting the signal. This is a noise-floor distortion with a very scratchy
sounding character.
• Drive: Controls the amount of distortion. Depending on the selected mode,
different amounts of drive produce different sound characteristics.
• Tone: Controls a pre-filter for adjusting distortion colour. Values above 0% add
brightness to the sound, whereas values below 0% dull the sound.
• Wet Mix: Controls the output volume of distorted sound. Initially set to full
volume.
• Dry Mix: Controls the volume of the unaltered original signal. Initially set to
silent.
Tips and tricks
• The Wet Mix will usually need to be reduced, depending on the amount of
distortion applied.
• Sometimes the distortion can sound too harsh or 'cold' - this can be countered by
adding a small amount of Dry Mix to add warmth.
• Extreme distortion can bring out a lot of harmonic overtones and high frequency
detail - sometimes not all of it is desired. This can be controlled with a Low Pass
Filter after the distortion effect.
22.5.2 Distortion
108
Renoise 2.7 User Manual
22.5.3 LofiMat
The LofiMat degrades the input signals quality by either lowering the bit-depth or
lowering the effective sample rate of the signal. Applied softly, this can add nice
harmonics.
• Bit Crunch: The applied bit-depth.
• Quality: The applied sample rate.
• Noise: Amount of extra noise that should be added to the signal. The noise will
also be degraded by the Bit Crunch.
• Wet Mix: How much of the processed signal should be kept.
• Dry Mix: How much of the original, clean signal should be kept.
22.5.4 Scream Filter
The Scream Filter is a unique combination of a Filter and a Shift Distortion. Because of
the resonating and distorted feedback, it often sounds as if it is screaming, hence the
name.
• Type: Select the basic filter type: Low or High Pass.
• Distortion: How much distortion should be applied.
• Cutoff: Cutoff frequency of the filter.
• Resonance: Amount of resonance applied to the filter.
• Inertia: Determines how fast parameter changes are applied. Low Inertia will
create sweeping effects by noticeably sliding from one parameter setting to
another.
22.6 Tools Devices
The Tools Devices are a small set of utilities which are often useful to "correct" sounds.
22.5.3 LofiMat
109
Renoise 2.7 User Manual
22.6.1 Gainer
The Gainer simply amplifies and pans a signal, just like the Pre/Post-Mixer devices. The
advantage of having a dedicated device for this though, is that you can apply volume
and panning changes at any position in the DSP effect chain.
• Gain: Sets the volume level.
• Panning: Sets the panning of the signal.
• Inverse: Allows you to invert the phase of each channel separately. This should
mainly be used to correct wrongly inverted phases in recordings. Playing back
the same signal inverted on one channel creates a spacial effect when speakers
are very near to the ear, like with headphones, but further away this is barely
audible.
22.6.2 DC Offset
The DC Offset device allows you to shift the signal up and down on the DC line. It is
mainly used to correct unwanted DC offsets from signals.
• DC Offset: Shift the signal up or down on the DC line. Use the Scopes to analyse
the changes.
• Auto DC: When enabled, incorrect DC offsets will be automatically corrected by
the device.
22.6.3 Stereo Expander
The Stereo Expander can strengthen or attenuate the stereo effect of a stereo signal.
Surround effects can enrich the stereo field of a mono signal by creating spatial effects.
This is more audible on headphones than with speakers.
22.6.1 Gainer
110
Renoise 2.7 User Manual
• Expand: Emphasises or attenuates the differences between the left and right
channel.
• Surround: Adds a spatial stereo effect to the signal. This will phase-shift some
frequencies of the signal on a single channel to create a stereo effect.
• Mono Mix: When using the Expand option to create a mono signal, you can
define which part of the stereo signal should be kept. "L+R" will use the average
of both channels.
22.6.3 Stereo Expander
111
23 Routing Devices
Routing devices can externally route channels from Renoise to another application or
vice versa, as well as internally route audio from one track to another.
23.1 #Line-In Device
The #Line-in Device can route inputs from your soundcard into Renoise, e.g.
microphone or line-in jack. This way you can listen to an instrument directly, or route
back MIDI synthesizers that are triggered with Renoise.
• Channel: When your soundcard offers more than one input, you can choose a
sub-channel here. The recording device is set up in the Audio Preferences.
• Input: The channel to be routed to Renoise (left, right or both). The level meter
to the right of the buttons displays the current input levels.
• Latency: Select from "Live Recording Mode" for guitar, vocals etc. or "MIDI
Return Mode" for re-routed Renoise triggered synths. This will apply the
appropriate amount of latency to the signal.
• Panning: The panning of the input stream.
• Volume: The gain of the input stream.
23.2 #ReWire-In Device
When running Renoise as the ReWire master, you can route other ReWire slave
applications into Renoise by using this device. A ReWire slave can be another audio
sequencer or a softsynth like VSampler or Kontakt. Once the device is selected and the
application is opened, both program's time-lines will be synchronised. If available, MIDI
inputs of ReWire devices will then show up as regular devices in the Renoise Instrument
Settings panel, allowing you to automate and trigger the ReWire applications from
Renoise.
23 Routing Devices
112
Renoise 2.7 User Manual
• Device: The ReWire slave to be loaded into Renoise. After selecting a device,
many applications (e.g. Reason) will be auto-started. If this doesn't happen, then
just launch the program yourself and it should be automatically set as a slave to
Renoise.
• Channel: When the device has more than one audio channel available, you can
select it here. To route more than one channel from the same slave to Renoise,
simply use multiple #ReWire-In Devices with the same "Device" setting.
• Input: The channel to be routed to Renoise (left, right or both). The level meter
to the right of the buttons displays the current input levels.
• Panning: The panning of the input stream.
• Volume: The gain of the input stream.
23.3 #Send Device
A #Send Device routes a track's output to a Send Track within Renoise. By routing
more than one track to the same Send Track, you can apply the same DSP effect chain
to the audio from multiple tracks simultaneously. A Send Track can also make use of a
#Send Device, so there are many possibilities available for complex routing.
• Mute/Keep Source:
♦ Mute Source: The signal is muted after it is routed to the Send Track,
meaning that the current track becomes silent and DSPs appearing after
the Send Device in the DSP chain will have no effect.
♦ Keep Source: The signal is routed to the Send Track, but also continues
to play on the current track (see illustration below).
• Amount: The volume of the signal sent to the Send Track.
• Receiver: The Send Track that will receive the audio.
23.2 #ReWire-In Device
113
Renoise 2.7 User Manual
23.4 #Multiband Send
A more advanced version of the standard #Send Device, this allows you to split an
audio signal into three discreet frequency bands and individually route them to
different Send Tracks. The Amount of each band, plus the Low and High limits can be
adjusted in the right-hand graph by left-click dragging the lines.
The volume scale of the graph at the right side of the device can be changed by
clicking on the small button in the bottom right corner:
• Amount 1: The volume of the lower band signal sent to the Send Track.
• Amount 2: The volume of the middle band signal sent to the Send Track.
• Amount 3: The volume of the upper band signal sent to the Send Track.
• Low: The upper frequency limit of the lower band.
23.3 #Send Device
114
Renoise 2.7 User Manual
• High: The lower frequency limit of the upper band.
Each Amount slider has two additional options to the right of it:
• Mute/Keep Source: Determines whether the original signal is muted or
continues to play on the current track.
• Receiver: The Send Track that will receive the audio from this frequency band.
23.4 #Multiband Send
115
24 Meta Devices
Meta Devices are effects that modulate or control other device parameters instead of
manipulating audio. They can even be linked between different tracks, making for
complex and powerful routing possibilities.
Common usages for Meta Devices are applying modulations with the *LFO Device or
*Signal Follower Device, controlling plugin instrument automation via the *Automation
Device, or sending MIDI to plugins using the *MIDI Control Device. There are also
devices which can use various real-time inputs (notes, velocity, audio output etc.) to
guide their behaviour, such as the *Key-Tracking Device or *Velocity Device. Finally,
there are devices which can also be used to route and control other meta or audio
effect parameters via the *XY Pad and *Hydra.
24.1 Automation Devices
Renoise offers two automation Meta Devices which can be used to automate MIDI or
plugin instruments (VSTs or Audio Units). Unlike other sequencers, instruments in
Renoise can be played on any track and, by using such devices, you can bind their
automation through Pattern Effect Commands or Graphical Automation.
24.1.1 *Instrument Automation(Automating VST instrument parameters)
The (Plugin) Automation Device directly broadcasts parameter value changes to plugin
instruments instead of using MIDI. You can manually select which parameter you want
to send or automate. The number of available parameters depends on the plugin
instrument. Every plugin has a different parameter set, so the parameters which you
can control with an automation device depends on those that are available to you.
Below is an example of the "East-West Symphonic Orchestra" plugin. The "1:" indicates
that the parameter is reserved for instrument 1, the "2:" for instrument 2, and so on.
But this can be different depending on the specific plugin.
24 Meta Devices
116
Renoise 2.7 User Manual
24.1.2 *Instrument MIDI Control
The MIDI Control Device broadcasts MIDI pitch bend, channel pressure, control change
and program change commands to instruments.
By default, up to four parameters can be freely configured per device. If you need more
than this, then you can extend the number of parameters up to a total of fourteen by
clicking on the small arrow in the lower-right corner.
Every parameter in the device has the following options:
• "Custom Name" for CC: Allows you to name your control change parameters, to
specify what the CC number does in your plugin or MIDI instrument. CC numbers
can be freely assigned in plugins or MIDI instruments. You will find a MIDI
implementation chart in your plugin or MIDI synthesizer's reference manual,
describing the available parameters.
• On/Off for PB or CP. A number for CC: Toggles the parameter and specifies the
CC number that you want to send.
• MIDI Message Type: Can be PB (pitch bend), CP (Channel Pressure), CC
(controller change) or Prg (program change).
• Parameter Value: The actual value that is sent or automated.
The MIDI channel cannot be configured in this device; it always uses the instrument's
channel setting.
As soon as a song with a MIDI Control Device is loaded, the device will immediately
send out all of its enabled parameter messages. Disabling the parameters or setting
them to "Off" avoids sending out any messages for parameters you don't want to.
If you want to control a General MIDI instrument quickly (through parameters like
volume, panning etc.), you can do so by selecting the "General MIDI" preset of the MIDI
Control Device (click on "Init" and change it to "General MIDI").
24.1.1 *Instrument Automation(Automating VST instrument parameters)
117
Renoise 2.7 User Manual
24.2 Mapping Devices
Mapping Devices can be used to route, cross-link or mix automation from different
devices.
24.2.1 *Hydra Device
Imagine you would like to control three different sliders in different tracks, using just a
single slider. This is possible via the Hydra device, which allows you to map a single
parameter to up to nine destination parameters. This opens up a lot of possibilities for
cross-routing or macro automation.
The device is named after the Hydra from Greek mythology, a serpent with nine heads.
• Input: The parameter to be mapped to the destination parameters. This value
can either be changed by moving the slider in the GUI, by Pattern Effect
Commands or via Graphical Automation.
• Dest: The parameter which you want to map to. As soon as a valid connection is
made, the Min and Max values will appear and the destination becomes active.
To invert a mapping (e.g. control volume from 0 dB to -INF dB, instead of -INF dB
to 0 dB), simply swap the Min and Max values.
• Scaling: The scaling that will be applied from the input to the destination. By
default, the input will be mapped linearly, but you can also select from two
exponential and two logarithmic scales.
24.2.2 *XY Pad
The XY Pad is a small Hydra Device which only maps two destination parameters, but
offers a two dimensional XY pad for the automation. With the pad you can easily control
two parameters at once.
• X/Y Axis Setup: Configure the X axis destination parameter or the Y axis
destination parameter.
24.2 Mapping Devices
118
Renoise 2.7 User Manual
• Dest & Scaling: See *Hydra Device.
• Auto Reset: Toggles whether releasing the mouse button on the XY pad will
cause the device to jump back to the specified values, much like an
auto-centring joystick.
24.3 Modulation Devices
Modulation Devices, as the name suggests, modulate other effect parameters. They
can be triggered and synced by pattern effect commands, automation, velocity values
and even note values and volume envelopes of audio data.
24.3.1 *LFO Device
The LFO Device allows you to easily create a constantly looping Automation. Any effect
parameters can be modulated this way, even those of plugin effects or instruments
which cannot normally be modulated within the plugin itself.
LFO Device using a sine wave:
LFO Device using a custom shape:
• Reset: Left-clicking resets the LFO's current phase, while right-clicking will
automate the reset by placing a command in the current track's effect column.
LFOs run constantly, even while the song is stopped. In order to sync the LFO's
cycle to the song, you have to automate the "Reset" button. See below for more
details.
• Modulation
♦
♦
♦
♦
24.2.2 *XY Pad
shape:
- Sine wave oscillator.
- Sawtooth oscillator.
- Pulse oscillator.
- Random oscillator.
119
Renoise 2.7 User Manual
♦
Allows you to draw a custom waveform. If you set the custom
wavelength to match the Frequency value, then one automation grid point
becomes equal to one Pattern Editor line.
• Dest.: Destination track, effect and parameter, allowing you to specify the
parameter to be modulated.
• Amplitude: The maximum range that should be applied to the destination
parameter. 100% will modulate the full range.
• Offset: The modulation offset applied to the destination parameter.
• Frequency: The speed of the modulation in Lines per Cycle. For example, an
LPC of eight will cycle the LFO once every eight pattern lines.
Syncing LFOs
The "Reset" button can be triggered with the pattern effect command: x7yy, where x
stands for the position of the LFO device in the DSP chain (if it's the first device: 1, if
the second: 2 etc.) and yy is the offset value:
• 00 restarts the LFO from the beginning.
• 40 restarts the LFO from a quarter of the way through of the cycle.
• 80 restarts the LFO from halfway through the cycle.
• C0 restarts the LFO from three quarters of the way through the cycle.
24.3.2 *Velocity Device
The Velocity Device adds another dimension of control by responding to the velocity
values of notes. For example, when modulating a Filter's cutoff value with a Velocity
Device, the sound of an instrument can then be drastically altered by pressing the keys
harder or softer.
• Instr.: The instrument to be used for input. Selecting "All" will affect every
instrument played in the current track.
• Dest.: Destination track, effect and parameter, allowing you to specify the
parameter to be modulated.
• Dest. Min: The minimum value to be used from the destination parameter's
range.
• Dest. Max: The maximum value to be used from the destination parameter's
range.
• Scaling: The scaling that will be applied from the input to the destination. By
default, the input will be mapped linearly, but you can also select from two
exponential and two logarithmic scales.
• Range: Minimum and maximum velocity range that will be used for input.
24.3.1 *LFO Device
120
Renoise 2.7 User Manual
24.3.3 *Key-Tracking Device
The Key-Tracking Device works in much the same way as the Velocity Device, except it
adjusts a parameter according to note value instead of velocity.
• Instr.: The instrument to be used for input. Selecting "All" will affect every
instrument played in the current track.
• Dest.: Destination track, effect and parameter, allowing you to specify the
parameter to be modulated.
• Dest. Min: The minimum value to be used from the destination parameter's
range.
• Dest. Max: The maximum value to be used from the destination parameter's
range.
• Scaling: The scaling that will be applied from the input to the destination. By
default, the input will be mapped linearly, but you can also select from two
exponential and two logarithmic scales.
• Range: Minimum and maximum velocity range that will be used for input.
Range Modes
In addition to applying a scaling mode to the Key-Tracking Device's range, you can also
set up how the range should handle notes:
• Clamp: Each note within the range will trigger an event, while notes outside of
the range will be clamped to the specified limits.
• Soft: Notes outside of the range are completely ignored and will not trigger
anything.
• Octave: Notes played on different octaves will be handled equally, e.g. a C-5 will
have the same effect as a C-4 or C-3.
24.3.4 *Signal Follower Device
The Signal Follower Device analyses a track's audio output via volume tracking, much
like compressors do, and then uses it to automate a destination parameter. To set up a
side-chaining effect, place the Signal Follower Device in the track you would like to use
as a carrier and set the destination parameter as the volume of the Pre-mixer or Gainer
in another track.
24.3.3 *Key-Tracking Device
121
Renoise 2.7 User Manual
• Dest.: Destination track, effect and parameter, allowing you to specify the
parameter to be modulated.
• Dest. Min: The minimum value to be used from the destination parameter's
range.
• Dest. Max: The maximum value to be used from the destination parameter's
range.
• Dest. Off: Offsets the destination's min and max values equally by the specified
amount. This can be especially useful when you want to automate the
modulation.
• Scaling: The scaling that will be applied from the input to the destination. By
default, the input will be mapped linearly, but you can also select from two
exponential and two logarithmic scales.
• Attack: Attack rate of the volume envelope. Lower values will respond quicker to
volume changes in the audio input.
• Release: Release rate of the volume envelope. Higher values will cause the
volume tracking to react more softly when the input's volume drops.
• LP Filter: Cutoff frequency of a LowPass Filter applied to the input. Used to
restrict the frequency range that will trigger the volume envelope.
• HP Filter: Cutoff frequency of a HighPass Filter applied to the input. Used to
restrict the frequency range that will trigger the volume envelope.
• : Listen to the filtered input signal only. Gives you a better idea of how the
signal will affect the destination parameter.
• L/R/L+R: Select which channel(s) should be used for the input's volume tracking:
left (L), right (R) or both (L+R).
• Lookahead: Shifts the envelope back in time by the specified amount, which
can be used for snappier attack rates. Activating this will add some latency to
the device, so this option will only work if "Automatic Plugin Delay
Compensation" is enabled via the "Options" menu.
Cross Track Routing with the Signal Follower
Unlike the other Meta Devices, the Signal Follower cannot affect devices that appear on
tracks to the left of its own host track. It is also unable to control effects on the same
track as itself, if that device appears before it in the DSP chain. Such tracks and effects
will show in the "Dest." box with the suffix: "(N/A)" (i.e. Not Available). This is necessary
to ensure that the Signal Follower does not add latency to the song's signal chain. If
you want to affect a track or device that currently shows as "(N/A)", then simply reorder
the tracks or reorder your effects so that the Signal Follower appears before (to the left
of) the desired parameter.
24.3.4 *Signal Follower Device
122
25 VST/AU/LADSPA/DSSI Effects
Plugin effects (VSTs on Windows, VSTs or Audio Units on OSX, VSTs, LADSPAs or DSSIs
on Linux) can be added and used just like any of the other Track DSPs in Renoise, but
you may have to configure them with the Plugin Compatibility Settings. If you can't find
your plugins in the Track DSP list, then please have a look at the Plugin Preferences
section.
25.1 Plugin Effect Layout and Options
Besides the usual track effect settings, plugin effects may have a few extra options:
•
•
•
- Show/Hide the plugin parameters.
- Open the plugin's custom external editor.
- Set up compatibility options for the plugin. Hovering the mouse over this
button will display some information about the plugin, such as latency, where the
file is loaded from etc.
25.2 Plugin Compatibility Settings
25 VST/AU/LADSPA/DSSI Effects
123
Renoise 2.7 User Manual
This dialog will appear after clicking on the "?" button in the VST Instrument Properties
section after a plugin is loaded.
In most cases these options will already have the correct settings, as Renoise comes
with a database which sets the defaults for you. If you are experiencing any of the
problems described in the dialog, then you might want to try altering the settings.
25.3 Sending Notes to Plugin Effects
Most plugin effects do not support notes or other MIDI events. Those that do, use them
to control more advanced features, such as vocoders. Other possible uses include
preset or parameter switching with notes or sending MIDI CC messages to plugins. This
is only possible with Audio Units and VST plugins. Neither LADSPA nor DSSI devices on
Linux support this feature.
You can also send notes and other MIDI events to effect plugins via FX alias
instruments. For more information, take a look at Plugin Effect Aliases in the Instrument
Settings.
25.2 Plugin Compatibility Settings
124
26 Automation
Automation is the recording and playback of parameter changes over time. A
parameter in this case is a DSP effect parameter, such as a Filter's Cutoff or Resonance.
Every DSP device in Renoise can be automated. Automation can be achieved by two
separate methods: graphically or with Pattern Effect Commands. Automation of plug-in
instruments and their parameters is also possible by using an *Automation Device.
The easiest way to create Automation is to record it. This can be done by clicking,
holding and moving a DSP effect's slider with the right mouse button while playing back
the song. Depending on the Automation setting in the Pattern Editor's Control Bar ( /
), your changes will then be recorded as either pattern effects or as graphical
envelopes.
To quickly create an empty Automation and switch over to the Automation Editor, you
can also click on the small rectangle to the right of each parameter:
(automation rectangles next to the parameter are blue for the first three parameters
here)
26.1 Automation Editor
The Automation Editor consists of two main parts. To the left you will see a list of all
available parameters and devices for the the currently active track. To the right of this
is the envelope editor, where you will draw and edit the Automation. Beneath the
envelope editor are a series of options and buttons used to edit and modify the
envelope.
The envelope grid is labelled along the x-axis at the top with numbers that represent
time. The values of the current parameter are represented along the y-axis.
The Automation Editor will follow the progress of a song's playback as it playing. To
turn off this behaviour, allowing you to edit any part of the automation while a song is
playing, disable Pattern Follow mode in the Transport Panel.
26 Automation
125
Renoise 2.7 User Manual
26.1.1 Zoom Levels
You can zoom in and out of the Automation envelope by placing mouse pointer over the
grid and scrolling the mouse wheel. The default zoom level is one pattern and so the
numbers along the x-axis show the pattern line numbers. Zooming in you can begin to
see fractions of lines all the way down to 1/256th, allowing for incredible resolution
should you need it. Zooming out you can see individual patterns and eventually the
entire song. The pattern you are currently editing is highlighted, which you can change
by clicking on another.
When Lock is enabled, the zoom level is shown beneath the grid in the Automation
Toolbar and can be changed there too.
26.1.2 Creating Automation
To create an Automation point, select a parameter from the Automation List and then
double-left-click somewhere inside the grid. Alternatively, double-click on the
parameter, which will create an envelope and insert a point at line 0 with the
parameter's current value.
To create pre-specified line-patterns, rightclick on the automation grid area and expand
the "Process" option, there you can select the options"Create random points", "Create
linear curve" and "create exponential curve".
See also editing with the mouse
When an Automation already exists for the current pattern, that parameter's name will
be highlighted in the Automation List.
26.1.3 Editing Automation Envelopes
Once you've created an Automation, it can be edited with the mouse or keyboard in
various ways:
26.1.3.1 Editing with the Mouse
Double-clicking in the envelope where no point is set will create a new point.
Double-clicking on an existing point will remove it. If you click and hold on an existing
point then you can drag it around and set a new value. You can also use the Draw tool
located in the bottom left of the toolbar to manually draw in a waveform. If the Snap
mode is off or enabled and set to "Grid", then the waveform will be drawn at the
resolution of the current zoom level.
• "Left Shift" + Moving points will remove all points that the mouse pointer
touches.
26.1.1 Zoom Levels
126
Renoise 2.7 User Manual
• "Left Control" + Dragging a point will fine-tune its value. "Left Control" +
Hovering over a point will display the point's value.
Left-click and dragging across the grid will create a highlighted area. Any points within
this area will be selected and can be adjusted all at once. You can also use the
right-click menu on the grid to copy, paste, paste continuously to the end of the
envelope and insert (moves the existing waveform to the right) selected areas.
The right-click menu also contains some additional options in the Process sub-menu:
26.1.3.2 Editing with the Keyboard
If you middle-click on the envelope, or right-click and select "(Set Keyboard Focus
Here)", you can control the envelope with keyboard shortcuts:
• To move the selection cursor in the envelope, use the left/right arrow keys or the
"Home" and "End" keys.
• To create a new point or remove an existing one, hit the "Enter" key.
• To enter an exact value for a point in the numerical edit field, press "Left Shift +
Enter" and type in the value.
• To select parts of the envelope, hold down the "Left Shift" key while moving the
cursor.
♦ To copy the selection press "Left Control + C".
♦ To paste the copied selection, move the cursor to the desired position and
press "Left Control + V", or "Left Control + P" to paste it continuously until
the end of the envelope.
26.1.3.3 Tip For Smooth Pattern Transitions
To maintain a smooth envelope between two patterns, simply create a point in the
second pattern's envelope and move it to the beginning of the pattern. Now, as you
26.1.3 Editing Automation Envelopes
127
Renoise 2.7 User Manual
move the point up/down, it will automatically snap to the waveform of the previous
pattern.
26.1.4 Automation Tools
The toolbar below the envelope contains a few options and tools. From left to right they
are:
•
- Activates Draw mode for drawing Automations by hand.
•
- Activates the Line tool, allowing you to create a linear ramp across
multiple patterns.
•
- Will snap the creation and movement of points to the current
resolution of the grid, every pattern line or every beat.
•
- Lock and choose the zoom factor of the envelope view.
•
- Select the envelope type:
♦ Points: Only changes value when a point is encountered.
♦ Linear: Values are changed along the Automation line, which is
interpolated linearly between points.
♦ Cubic: Values are changed along the Automation line, which eases into
and out of points.
•
- Shows the value of the currently selected point. Left-click to enter a
new value.
- Copies the current envelope into the clipboard, then removes it from the
editor.
•
- Copies the current envelope into the clipboard.
•
- Pastes a previously copied envelope from the clipboard.
•
•
- These are slots used to store presets (right-mouse button =
store, left-mouse button = recall). The presets are saved in the preferences, so
they are retained when loading or starting new songs.
• Processing tools:
♦
- Flip the curve or points in the current selection across the vertical-axis
(flip values).
♦
- Flip the curve or points in the current selection across the
horizontal-axis (flip times).
♦
- Shifts the current selection to the left or right. Will wrap around the
edges of the selection, or the pattern if none is selected.
26.1.4 Automation Tools
128
Renoise 2.7 User Manual
26.2 Automation List
The list indicates which parameters are automated with a small icon next to their name.
Left-clicking on a parameter will select it, while double-clicking on a parameter which
has no Automation will create a new blank envelope.
Right-clicking on a name allows you to delete the Automation for the current pattern or
the whole song. This also applies when right-clicking on a DSP device name, which will
delete the Automation for all of the effect's parameters.
The search field at the top of the list allows you to quickly find a parameter or effect.
Enabling the "Automated Only" button will only show effects in the list which are
already automated.
26.2 Automation List
129
27 Pattern Effect Commands
Track DSP parameters can be automated with either Graphical Automation or pattern
effects. Pattern effects are numerical control codes used in the Pattern Editor that allow
you to change the value of parameters.
Besides controlling Track DSPs, the pattern effect commands also allow various
manipulations of sample instruments. These can only be done via pattern effects and
are one of the things that differentiates Renoise from other sequencers. Examples
include: starting to play a sample from the middle (09 effect), then playing it in reverse
(0B effect), panning it fully to the left (pan column), pitching it up a bit (01 effect) and
finally gliding it down one octave (05 effect). All this can be expressed precisely and
easily with the Pattern Editor.
27.1 Pattern Effect Columns
Next to the note column(s) are the columns which control volume, panning, delay and
pattern effect commands:
By default, the panning and delay columns are not visible. To show/hide them you can
use the keyboard shortcuts, "Left Control/Command + Left Shift + V (Volume), P
(Panning), D (Delay)", or you can press the corresponding buttons in the Pattern
Editor's control bar, located at the bottom of the editor:
27.1.1 Ticks and Values
To understand how the sample-based effects work, you should understand how Renoise
interprets them.
27 Pattern Effect Commands
130
Renoise 2.7 User Manual
1. Patterns are divided into lines where you can place effects and notes. The Lines
Per Beat setting in the Transport Panel defines how many lines make up a
musical beat.
2. Ticks divide each line into a smaller fraction. This tick fraction is configurable
(Ticks Per Line in the Song Settings), but is a 12th of a line by default.
Many sample commands make use of these ticks, while Automation playback and
interpolation are also calculated at the tick rate.
27.1.2 Ticks vs. Note Delays
As noted above, Renoise also has a note delay column, which lets you delay the note to
the left of it on the same line. These delays do not use ticks, but instead always divide
a line into 256 slices.
27.1.3 Recording and Editing Pattern Effects
Values are entered using the row of numbers above the letters on the keyboard, not
the numberpad, which is reserved for quickly switching between instruments in the
Instrument Selector. Entering a value will place it at that exact digit in the column. For
example, if you are at the first digit in the Volume column and press '8', the value will
become '80'. If you want the value to be '08', then move the cursor over to the second
digit using the arrow keys and press '8' there.
If you are not yet familiar with the Pattern Editor, then please have a look at the
Recording and Editing Notes section of this manual, which provides you with a basic
understanding of the pattern editing concepts of Renoise.
27.2 Effect Listing
• xx and xy are place-holders whose meanings are explained in the effect
command descriptions. They should be replaced with values to create an effect.
xx means both digits are one whole value. xy means that the x and y are
separate values.
• Effect Column commands are applied to all of the notes in the track to the left of
them. If you wish to create effects for specific notes in a track only, use the extra
commands available for the volume and panning columns.
• All values noted below are Hexadecimal.
• Similar effect styles are highlighted with the same colour in the Pattern Editor
(e.g. pitch up, down and glide are all red, though the exact colour depends on
the Theme).
• When typing commands into the Pattern Editor, Renoise will show a small
summary about them in the Lower Status Bar.
27.1.1 Ticks and Values
131
Renoise 2.7 User Manual
• Slide commands (pitch/volume/glide) continue to slide up or down by the last
valid value if no value (00) is entered. This way you can quickly enter a series of
slide commands without having to repeat the same value again and again.
• You can use the small FX drop down menu at the bottom of the Pattern Editor as
quick reference:
27.2.1 Effect Column
27.2.1.1 Sample Commands
Most of the effects listed here only apply to sample-based instruments and will have no
effect on MIDI or plugin instruments, as Renoise does not have full control over
properties like playback directions, pitch glides etc. The arpeggio, retrigger and delay
commands, however, will work with MIDI and plugin instruments.
• 00xy - Arpeggio (x = first note offset, y = second note offset).
• 01xx - Pitch slide up (01 is 1/16th semitone, 08 is a half semitone, 10 is one
semitone).
• 02xx - Pitch slide down (01 is 1/16th semitone, 08 is a half semitone, 10 is one
semitone).
• 03xx - Set channel volume (represents range from -60 to +3db).
• 04xy - Volume slicer. x = volume factor (0 = 0%, F = 100%), applied at tick
number y.
• 05xx - Glide to specified note with step xx (01 is 1/16th semitone, 08 is a half
semitone, 10 is one semitone).
• 06xx - Volume slide up with step xx (0601 inserted 256 times will slide from 0 to
full volume, 067F inserted twice will do the same).
• 07xx - Volume slide down with step xx.
• 08xx - Change the track pre-mixer's panning (00 = full left, 80 = center, FF =
full right).
• 09xx - Trigger sample at slice number xx, (00 is the sample's start, FF the last
slice).
• 0Axx - Track surround width.
• 0Bxx - Play sample backwards (B00) or forwards again (B01 during play when
sample is playing backwards). Can also be combined with the 09xx effect.
• 0Cxx - Change the track pre-mixer's volume (represents range from -INF to
+3db).
• 0Dxx - Delay all notes by xx ticks.
• 0Exy - Retrigger a note every y ticks with volume x, where x represents:
♦ 0 No volume change
♦ 1 -1
♦ 2 -2
♦ 3 -4
♦ 4 -8
♦ 5 -16
♦ 6 *2/3
♦ 7 *1/2
♦ 8 No change
♦ 9 +1
27.2 Effect Listing
132
Renoise 2.7 User Manual
♦ A +2
♦ B +4
♦ C +8
♦ D +16
♦ E *3/2
♦ F *2
• 0Fxy Vibrato (x = speed, y = depth).
27.2.1.2 Track DSP Commands
You can also change any Track DSP effect parameters with pattern effect commands.
The sample commands all start with 0, e.g. 05 for glide, but Track DSPs also make use
the first number to specify which effect in the chain is being altered:
xyzz -> x is the the xth effect in the chain, y is the yth parameter in the device. For
example: let's say you have a Filter as the first effect in the DSP effect chain, then 12FF
will set the Filter's Resonance to the maximum value (1 = Filter device (the first effect),
2 = Resonance (the second parameter), FF = maximum value).
You can also enable and disable effects with track DSP commands:
• xF00 - Turn effect x off.
• xF01 - Turn effect x on.
Moving a slider in the Track DSPs panel will also show the pattern effect code in the
Lower Status Bar. Right-clicking a slider will automatically record the parameter
changes into the Effect Column when Automation recording is set to pattern effects (
- located at the bottom of the Pattern Editor in the control bar).
27.2.1.3 Global Commands
• F0xx - Set Beats Per Minute (BPM) (20 - FF, 00 = stop song)
• F1xx - Set Lines Per Beat (LPB) (01 - FF, 00 = stop song).
• F2xx - Set Ticks Per Line (TPL) (01 - 10).
• F3xx - Set track's output routing to channel xx (00 is the master track, other
values refer to available channels of the soundcard).
• F4xx - Toggle song groove on/off (see Song Settings) (00 = turn off, 01 or higher
= turn on).
• FBxx - Pattern break. The current pattern finishes immediately and jumps to
next pattern at line xx (hex).
• FCxx - Set master volume (00 - FF, -INF to 3 dB).
• FDxx - Pause pattern playback by xx lines.
• FF00 - Stop all effects and notes in the track.
27.2.2 Volume Column
• 00 - 7F - Set note volume (velocity) of current note column.
• 9x - Volume slide up in the current note column, with step x * 10 (91 = 0610 in
effect column, 92 = 0620 in effect column etc.)
• Ax - Volume slide down in the current note column, with step x * 10 (A1 = 0710,
27.2.1 Effect Column
133
Renoise 2.7 User Manual
A2 = 0720 etc.)
• Bx - Play sample in the current note column backwards (0 is backwards, 1 is
forwards again).
• Dx - Delay a note by x ticks (0 - F).
• Ex - Retrigger a note every x ticks (0 - F).
• Fx - Cut the note after x ticks (0 - F).
27.2.3 Panning Column
• 00 - 80 - Set panning of current note column: (00 = full left, 40 = center, 80 =
full right).
• 9x - Panning slide left with step x (0 - F).
• Ax - Panning slide right with step x (0 - F).
• Bx - Play sample in the current note column backwards (0 is backwards, 1 is
forwards again).
• Dx - Delay a note by x ticks (0 - F).
• Ex - Retrigger a note every x ticks (0 - F).
• Fx - Cut the note after x ticks (0 - F).
Note: The panning/volume Ex version of retrigger does not restart the sample from the
beginning, while the 0Exy effect command does. This behaviour is intended to give you
a choice of two different retrigger modes.
27.2.4 Delay Column
The delay column can only be used to delay note or note off values:
• 40 - 25% delay
• 80 - 50% delay
• C0 - 75% delay
27.2.5 MIDI Commands
With C0 in the panning column and a valid instrument number next to it, you can also
send MIDI commands via pattern effects:
--- 0A C0 017F -> will send a control change to the MIDI or plug-in
instrument 0A, with control change number 01 and a value of 7F
• C0
• C1
• C2
• C3
-
Controller change message (xx = controller number, yy = controller value).
Pitch bend (xx main value amount, yy = fine value amount).
Program change (yy = program number from 00 - 7F).
Channel pressure (monophonic after-touch) (yy = pressure amount).
Note: Insert the Cx MIDI commands in the panning column of the right-most note
column, next to the effect column. MIDI commands show a different syntax colour than
when they function as panning values and a 0000 value is automatically filled in on the
effect column.
27.2.2 Volume Column
134
Renoise 2.7 User Manual
Take care that you also add the instrument number, so that Renoise knows which MIDI
instrument it should use for the command.
MIDI and plugin instruments can also be Automated through *MIDI Control Devices or
*Automation Devices.
27.3 Entering Multiple Digit Values with the Computer
Keyboard
By default, when entering values with the computer keyboard, Renoise will place a
single digit value and immediately move down within the Pattern Editor by the number
of lines specified by the Edit Step. If you want to enter multiple digit values in a single
line without this occurring between each value entry, this can be achieved by holding
down "Left Shift" while entering the values. This works individually with the Volume,
Panning, Delay and each of the Effect columns.
27.4 Effect Examples
Some very basic sample command examples to get started:
27.4.1 Pitch Slide
1. Pitch slide up [01xx]: Sound file (mp3)
From line 00 to 07, the sample is pitched up at a constant rate of 28 (hexadecimal
notation), where 00 means "repeat the previous value".
2. Glide to note [05xx]: Sound file (mp3)
The first note is played at C-4. At line 04 the pitch rises a constant rate of 20
(hexadecimal notation) towards A-4. Once the glide reaches reaches the desired pitch
of A-4, subsequent 05 commands are ignored.
27.2.5 MIDI Commands
135
Renoise 2.7 User Manual
27.4.2 Breakbeat Tricks
Original Loop: Sound file (mp3)
1. Sample offset [09xx]: Sound file (mp3)
The offset command works by splitting a sample into 256 equal parts. The larger the
sample, the more inaccurate this command will be. As the range of values is 00 to FF,
0980 plays the sample from halfway through and 0940 plays the sample from one
quarter of the way through.
2. Retrigger note [Ex] : Sound file (mp3)
This effect replays the sample very quickly at its current position in the waveform
playback. x sets how many ticks to count before retriggering the sample again. By
default, there are 12 ticks per line. Setting E4 will retrigger a sample 3 times per line
(12÷4=3).
3. Reverse sample [B0, B1]: Sound file (mp3)
B0 plays the sample backwards from that point. B1 resumes normal playback.
27.4.3 Programming Delays
Here are two techniques for programming a delay:
27.4.2 Breakbeat Tricks
136
Renoise 2.7 User Manual
1. Delay note [Dx]: Dx delays by ticks. A line is divided into equal ticks, the default
value being 12. By using the D8 command in the volume or panning column, the note is
delayed by 8 ticks.
2. Using the Delay Column: The Delay Column divides a line into 256 equal parts
and so is much more precise than ticks. Use this column to get more accuracy.
27.5 Pattern Effects Quick Reference Card
If you can't remember all those commands, here is a small reference card which can be
printed out and put next to your monitor. Thanks to Paul Merchant for creating and
sharing this.
• Pattern Effects Reference Card
27.4.3 Programming Delays
137
28 Mixer
If you are familiar with hardware mixer consoles, the Mixer in Renoise will look familiar
to you. It provides a quick overview of all available tracks, DSP effects and output
levels. This is especially useful in the last production stage, when you are finished with
the main song structure and need to concentrate on polishing the final mix.
The Mixer also allows you to display a subset of track effect parameters which you can
customise. Using this, you can prepare your songs for live performance by showing only
the parameters you would like to concentrate on adjusting.
28.1 Pre/Post Volume and Panning Concept
Volume and panning controls in the Mixer can be set up to show two different levels:
• Pre: Volume and panning levels which are applied after instrument playback, but
before track DSP effects are applied.
• Post: Volume and panning levels which are applied after all track DSP effects are
applied. This is the final sound leaving the track and being fed into the Master
Track.
The idea behind the Pre/Post mix separation is that you should use the Pre levels while
composing the song. Automation, like the fade-in of tracks, should be applied here or
with a Gainer Device. Post volume and panning levels cannot be automated and should
only be used in the final mixing stage to balance the mix.
28 Mixer
138
Renoise 2.7 User Manual
28.2 Customizing the Mixer Layout
At the right side of the Mixer you will notice a set of buttons relating to some of the
components:
•
- Show/hide parameter labels above DSP sliders.
•
- Show/hide mute and solo track controls.
•
- Show/hide panning sliders.
•
- Show/hide VU meters and main volume faders.
•
- Show/hide volume edit box.
•
- Show/hide custom track delays. Entering a negative value will play the
track before others, while a positive value will play it after. This is only available
for Sequencer Tracks. This can be useful to compensate small latency problems
with MIDI and plugin based tracks.
•
- Show/hide audio routing control. Audio routing defines where the track's
final output will be send to. Selecting "Master" will send the output to the Master
Track and through its DSP effect chain. Selecting a dedicated output of your
soundcard will bypass the Master Track, allowing you to separate and mix
Renoise tracks with an external mixer console. This is only possible if your
soundcard allows the use of multiple channels. To make use of this feature on
Windows, you have to use ASIO; on Linux, Jack Audio.
Track colours can be shown or hidden in the Mixer as well. Right-click anywhere in the
Mixer DSP chain section and select, "Show Track Colors".
28.3 Working with DSP Effects and Chains
Track DSP devices are shown in the Mixer rack above the track levels. Right-clicking an
effect brings up a set of options for both that specific effect and the whole chain. To
show/hide effect parameters, right-click on the DSP and choose them from the "Show
Sliders" menu option.
28.2 Customizing the Mixer Layout
139
Renoise 2.7 User Manual
28.4 Send Devices/Tracks and the Post Mixer
To route a track into a Send Track, a #Send Device is inserted into the original track.
For a full explanation of how this works, see #Send Device in the Routing Devices
section of the manual. In the Mixer, the #Send Device's slider controls the amount of
audio that is sent to the send track.
When #Send Devices use the "Mute Source" option, the post volume and panning
levels will have no effect. That's because the signal is muted before it reaches
post-mixer device. To change the track's levels in this case, you either have to have to
adjust the #Send Device's slider or use the receiving Send Track's volume and panning
levels.
To visualize this in the mixer, track levels which do not reach the Post volume and
panning are shown by a different colour (white by default instead of green, but this may
vary depending on the Theme):
28.3 Working with DSP Effects and Chains
140
Renoise 2.7 User Manual
(Track with a Send Device using Mute Source)
(Send Device Routing in the Mixer)
28.4 Send Devices/Tracks and the Post Mixer
141
Renoise 2.7 User Manual
28.5 Adjusting Level Meters
Volume level meters display volume in one of four available scales:
• -24 - 0dB
• -48 - 0dB
• -96 - 0dB
• Linear
To disable or change the scaling for all meters, right-click on any level meter in the
mixer and choose from the list. This also works for the master level meter at the top of
the Renoise interface.
28.6 Controlling the Mixer with a MIDI Controller
You can attach MIDI controllers to the Pre/Post volume and mute/solo controls, allowing
you to comfortably mix a song using the controller. To do so, select "View -> Midi
Mapping..." from the main menu or click on the "MIDI Map" button at the top of the
Renoise interface, next to the main VU meter.
Have a look at the MIDI Mapping section of the manual for a more detailed description
of the available features.
28.7 Drag and Drop, Copy and Paste
To copy a DSP from one track to the another, simply click and drag it to a new place.
Holding "Left Control" while dropping the DSP will create a copy of the device. The
standard cut/copy/paste commands also work in the Mixer ("Left Control + X", "Left
Control + C", "Left Control + V").
Note: Copying or moving an effect from one track to another will not move device's
Automation(s) as well. When moving a device, the original Automation(s) will be
removed.
28.5 Adjusting Level Meters
142
Renoise 2.7 User Manual
28.7 Drag and Drop, Copy and Paste
143
29 Rendering a Song as an Audio File
To create an audio file from your song you have to render it. Rendering is only enabled
in the registered version of Renoise. As well as exporting the whole song as a .wav, you
can also save and reuse parts of a song. By rendering each track into a separate file
you can even post-process your tracks in other multi-track audio editors.
Renoise cannot directly render .mp3 files, only uncompressed .wav files. Those .wav
files can then be easily converted to .mp3 files with free external applications.
29.1 Opening the Render Dialog
You can open the Render dialog by either hitting the "Render" button in the Disk
Browser with the "Song" category selected, or by using the main menu option: "File ->
Render Song To Disk...". To quickly render, resample and reuse parts of the song in the
Pattern Editor, see Render & Resample Parts of the Song.
29.1.1 Overview
29.1.2 Part to Render
This specifies which part of the song you want to render. Note that muted tracks and
columns are never rendered by Renoise, making it easy to exclude tracks you don't
want to export.
29 Rendering a Song as an Audio File
144
Renoise 2.7 User Manual
• Entire Song: Renders the entire song.
• Selection in Sequence: Render only a selected pattern range from the Pattern
Sequencer. You can also select this range in the Pattern Sequencer directly by
using the Pattern Sequencer's context menu: "Render Sequence Selection To
Sample...".
• Selection in Pattern: Renders only the area selected in the current pattern
(see Render & Resample Parts of the Song). This can also be quickly done using
the Pattern Editor's context menu: "Render Selection To Sample...".
29.1.3 Destination
This determines where the .wav file should be saved and under which name. Hitting the
"Browse" button will prompt you to select the folder where you would like the rendered
files to be saved. Enter the name of the file in the text field next to the "Browse"
button. The destination file(s) will always be standard .wav audio files.
29.1.4 Render Mode
Rendering Offline is faster, more accurate and allows more options. Rendering in
real-time will simply play the song and record the output. This allows the recording of
Line-In Devices and MIDI instruments. Some plug-in instruments and effects may render
incorrectly when run faster than real-time, so use this mode for those occasions.
29.1.5 Render Options
• Interpolation: Select the resampling quality that should be used in the
rendering process. "Cubic" is what you've heard when playing back and
composing the song. "Arguru's Sinc" is a very precise interpolation mode that
cannot be used in real-time and so only is available when rendering. This mode
results into the best possible sample playback quality, but may also lead into
some unwanted effects. Please see Sinc Interpolation for more details.
• Sample Rate: Select a sample-rate for the rendering process. By default, the
currently active sample-rate is selected and it is recommended to use this. Many
DSPs may sound slightly different at other rates, so changing the rate may result
in a slightly different sound from what you expect. Some external VST or AU
plugins don't even support sample-rate changes. If you change the rate to
something other than the default, then listen back to the rendered result to
ensure that everything is correct. Alternatively, play back your song in Renoise
using the different rate first and fine-tune the song when needed. This can be
done by changing the sample-rate in the "Edit -> Preferences -> Audio" tab.
• Bit Depth - Select the bit-depth of the resulting .wav file. Renoise internally
renders in 32-bit float, the highest quality, so you should use this format when
you plan to reuse the rendered song in other applications. CDs use 16-bit with a
sample-rate of 44,100 kHz, so you can choose to render in this format for
burning songs directly to CD (bear in mind the potential issues with changing
your default sample-rate as noted above, though).
29.1.2 Part to Render
145
Renoise 2.7 User Manual
• Save each track into a separate file: When enabled, the song will not be
rendered into a single file, but instead will create one file per track. This can be
useful if you want to export loops (when used in conjunction with "Selection in
Sequence/Pattern") or to post-process the tracks in an external multi-track audio
editor. Note that completely silent tracks will be deleted at the end of the
rendering process.
• Save each pattern into a separate file: When enabled, this creates new files
for every single position in the Pattern Sequencer (not just each numbered
pattern once). This is extremely useful to quickly cut and export your song as a
set of loops. Note that completely silent patterns will be deleted at the end of the
rendering process.
• Priority: To render a batch of songs as quickly as possible, the rendering
process bypasses your soundcard. Unfortunately, some plugin instruments and
effects render incorrectly when they run faster than real-time. As a workaround
for those plugins, Renoise also offers a pseudo-real-time priority rendering mode.
If you use plugin synths (VSTi/AUs) or effects and the resulting files do not sound
as they should, try rendering again using the "Real" mode.
29.2 Hidden rendering feature
• Sequence marker positions: When rendering your song output to a Wave file:
All the sequence positions are written along the wave file allowing you to more
easily cutting up your work in external editors or when you are a developer even
develop own internal play-routines that allows you playing the rendered output
from any precise sequencer position. (Integration of multi-song concepts into one
wave-file)
29.3 Sinc Interpolation
As already mentioned in the Render Options, Renoise offers an alternative way to
resample during rendering: the "Sinc" interpolation mode. Interpolation occurs when
playing back a sample at a note other than its original frequency. "Linear" and "Cubic"
interpolations do this roughly and quickly but with excellent results.
"Sinc" mode interpolates as precisely as possible, preserving the original character and
shape of samples when played at different pitches. The drawbacks are that this
processing is very slow and things may no longer sound exactly as they did during
normal playback. If, for example, you drastically pitch up a hi-hat or another sample
with a lot of high frequencies, then the "Sinc" mode will often sound a lot smoother.
Although this smoother sound is technically more "perfect", it may not be what you
want to hear. Here is an extreme example:
• Cubic rendered vs. Arguru rendered
29.1.5 Render Options
146
Renoise 2.7 User Manual
If this is the case, then you can explicitly disable the "Sinc" interpolation for some
samples. For more information regarding this, see "Interpolate" in the Sample
Properties section of the manual.
29.3 Sinc Interpolation
147
30 Quickly Rendering Parts of the Song
By using the Render Dialog in Renoise, you can already quickly and comfortably render
the whole song as an audio file, or render only small parts of it in order to reuse them.
This technique is called re-sampling or freezing, and can be used to either generate
new samples and instruments, or to render down parts of the song which require a lot
of CPU power.
To avoid opening up the render dialog, then rendering and reloading the wav file again
and again, Renoise offers a shortcut which automates all of this for you. To do this,
select one or more lines within the Pattern Editor, then right click on the Pattern Editor
and select "Render Selection To Sample..." from the context menu. Alternatively, you
can use the shortcut "Left Control/Command + Alt + Shift + R". The newly created
sample will be loaded into the next free instrument slot.
If you want to create sample-based instruments from plugin instruments, you can also
use a dedicated function in Renoise to do so. See Render or Freeze Plugin Instruments
to Samples for more information.
30 Quickly Rendering Parts of the Song
148
31 Rendering Plugin Instruments To Sample
Based Instruments
The Plugin Grabber allows you to create sample-based instruments out of any plugin
based instrument (VSTi/Audio Units). You can also quickly render and replace (freeze) a
plugin instrument this way.
Replacing a plugin with samples has advantages:
• When sharing your Renoise .xrns song file, your song can be opened and played
back on any computer with Renoise, without the need for the plugin to be
installed.
• Sample-based instruments always use less CPU power than plugins, because
samples can be played back and pitched instead of being synthesized and
generated on the fly.
• When not replacing, but creating new instruments with the grabber, you can
quickly sample your favorite synthesizer sounds and create a small sample
library for later processing and sound mangling. Samples in Renoise also can be
manipulated in many ways that plugins cannot. For example, you can control the
playback pitch, direction and offset at any time in the pattern with the Pattern
Effect Commands.
Replacing a plugin with samples also has disadvantages:
• Automation of plugin synthesizer parameters with an Automation Device will only
work with the original plugin. The Automation can no longer be applied to the
rendered samples.
• Samples always are limited in length. Even though you can apply cross-fading to
create smooth loops in Renoise with the grabber, such automatic loops may not
always sound as detailed as the original.
31.1 Opening the Plugin Grabber Dialog
To directly sample and then replace a plugin instrument, you can use the record button
in the Instrument Settings. Left-clicking the record button will set the grabber to
replace the plugin (render the plugin and then unload it). Right-clicking will set the
grabber to render the plugin into a new instrument slot.
Alternatively, you can right-click the plugin instrument in the Instrument Selector and
then choose "Render Plugin To Instrument..." or "Render Plugin To New Instrument...".
Finally, you can also bring up the grabber by selecting "File -> Render Plugin To
Instrument..." from the main menu.
31 Rendering Plugin Instruments To Sample Based Instruments
149
Renoise 2.7 User Manual
31.2 Overview
31.2.1 Instrument Selection
• Source: The plugin to be rendered. Only plugin instruments that can be grabbed
will show in the list. Plugin instrument and effect aliases cannot be grabbed and
so will not be listed.
• Destination: Where the resulting samples will be placed after rendering.
"Current instrument" will overwrite the actual source instrument.
• Remove the source plugin after rendering: When enabled, the plugin will be
unloaded after the rendering has finished. Unloading the plugin can be undone,
just like any other operation, with "Left Control + Z".
Note: These options will be set up for you automatically when either clicking the record
button in the Instrument Settings or launching the plugin grabber from the Instrument
Selector. You still can change the settings after a rendering, so you can record a batch
of instruments without opening and closing the dialog.
31.2.2 MIDI Options
• Note Range: The note range to be rendered. This and the "Step" option define
how many samples will be created in the resulting instrument. When more than
one sample is rendered, a multi-sample instrument will be created. "Set From
Song" will parse your song and automatically fill in the range, using the lowest
played note as the lower boundary and the highest played note as upper
boundary.
31.2 Overview
150
Renoise 2.7 User Manual
• Step: How many samples should be rendered in the "Note Range". Setting this
to 1 will individually render every single note. Setting this to 12 will render one
sample per octave. The more samples are rendered, the closer the rendered
result will be to the original.
• Velocity Range: The Note-On velocity that will be used to trigger the
instrument when sampling it. Plugins may modulate some of their settings
depending on the velocity.
• Step: How many samples should be rendered in the "Velocity Range". Setting
this to 1 will render only a single sample for the entire velocity range. The more
samples are rendered, the closer the rendered result will be to the original.
31.2.3 Sampling Options
• Auto-loop samples (cross-fade): When enabled, the sample is cross-faded
and looped. Cross-fading creates a smooth, click-free loop and so is incredibly
useful for pads or other long sounds. Enabling cross-fading will also disable the
"Tail" (Note-Off) settings below.
• Duration: The duration in milliseconds of the Note-On phase, before a Note-Off
is sent to the plugin. With cross-fading enabled, this will be the total length of the
sample. Entering a number into the right value box and hitting "Set" will apply
the correct length calculated from the line duration.
• Tail: How long the Note-Off phase should last. This is needed to sample the
sustain phase of plugin instruments. Entering a number into the right value box
and hitting "Set" will apply the correct length calculated from the line duration.
• Fadeout Tail: When enabled, the tail/sustain phases of the samples are cleanly
faded out to zero.
31.2.4 Sampling Format
• Bit depth: The destination format of all rendered samples. 32-bit will create the
highest quality files, but also the largest in terms of file size. 16 or 24 are good
alternative bit depths, which still sound excellent and create smaller files.
• Channels: Allows the option of forcing the rendering to take place in stereo or
mono.
31.2.2 MIDI Options
151
32 ReWire (Windows and Mac OS X only)
ReWire allows you to connect and synchronise multiple software applications, so that
you can run them side by side while passing Audio/MIDI information between them.
ReWire is available on Windows/Mac only, but on Linux, Jack Transport can be used to
do similar things.
For example, you could connect Renoise to Logic and program your drums in Renoise
while arranging the bulk of your song in Logic. Or you could connect both Reason and
Ableton Live to Renoise, then arrange your track in Renoise, control Reason's built-in
synthesizers and play around with clips in Live.
ReWire has two modes, both of which are fully supported by Renoise:
• ReWire Master: Commonly known as a Mixer application, the master controls
other ReWire slaves. A ReWire master has exclusive control of the soundcard,
while slaves must route audio through the master application. There can be
multiple slaves, but only one master.
• ReWire Slave: Also known as a ReWire Synth application. Slaves are controlled
by a ReWire master and feed their audio back into it. They receive MIDI from the
master, but can also send MIDI to the master and ask it to reposition itself.
Because Renoise can be either Master or Slave, you can use it with any application that
supports ReWire.
32.1 Start/Stop Procedure for ReWire Applications
Starting: The ReWire master application should be started first, then the slave(s).
Closing: Close the ReWire slave application(s) first, then close the master.
Important: When working on songs, you must save them separately in both
applications. You must also load them up individually when continuing a session.
ReWire only handles Audio and MIDI routing and so will not automatically
exchange/restore songs or patches.
The basic workflow is:
1.
2.
3.
4.
5.
Start ReWire master (and load a pre-saved session).
Start ReWire slave (and load a pre-saved session).
Work on the song.
Save the session and close ReWire slave.
Save the session and close ReWire master.
32 ReWire (Windows and Mac OS X only)
152
Renoise 2.7 User Manual
32.2 Using Renoise as ReWire Master
First, make sure that no other ReWire master application is open. Start Renoise,
automatically making it the master, then in the "Track DSPs" tab select a "#ReWire-In
Device" and add it anywhere in the song (Send Tracks are the ideal place to use this
meta device).
32.2.1 Routing Audio To Renoise
Use the "Device" option to select a slave from the list. In most cases the slave will
automatically launch. If not, then launch the application manually.
The audio signal from the slave will be routed into Renoise via the "#ReWire-In Device".
Both applications are now bound together and everything is automatically configured
for you. If you hit play in Renoise, the slave will start playing too. If you navigate around
in the song, the slave will follow. If you change the playback in the slave, Renoise will
follow.
If you want to capture another audio bus from the same slave, simply add another
"#ReWire-In Device" and select the same slave but choose a different bus. This will
allow you to stream multiple buses from the same application.
32.2.2 Trigger MIDI from Renoise
If a slave has MIDI inputs, you will find them listed as regular MIDI devices in the
Renoise External MIDI Instrument Settings. This way you could, for example, use
Reason synths from within Renoise.
32.2 Using Renoise as ReWire Master
153
Renoise 2.7 User Manual
32.2.3 Automating ReWired synths like Reason
As soon as you've created a ReWire MIDI instrument you can use the "*Instr.
MIDI-Control" device in Renoise to automate it. If the synth supports this, the mapped
parameters will be shown there so you know which CC number automates which
parameter.
32.3 Using Renoise as ReWire Slave
First, start the music application that will be designated as the master. After the master
application has launched, start Renoise. Renoise will ask you if it should run as slave.
Click "Yes".
32.2.2 Trigger MIDI from Renoise
154
Renoise 2.7 User Manual
In many cases you will then have to explicitly tell the master to use Renoise as a slave.
In most multi-track sequencers this is done by selecting Renoise as "Audio Input".
Please refer to the master's documentation for more details. Once you have routed
Renoise into the master mixer, you are ready to go and the audio signal from Renoise
will be routed into the host. Starting, stopping, and navigating through the song will be
synchronized in both apps.
32.3.1 Setting up Transport Sync Mode in Renoise
When running Renoise as a ReWire slave, you have two choices regarding how Renoise
should sync to the master. This can be set up in the Audio Preferences, but only after
Renoise is already running as a ReWire slave:
• Full Transport Sync: Any changes to the time-line in Renoise and the ReWire
master will be synced. This is very useful for creating a song in multiple
applications at once.
• BPM & Bar Sync: You can start, stop and navigate freely in Renoise while the
time-line of both applications remains beat-synced. Very useful for
improvisations or live mixing.
• Automatically compensate latencies: The ReWire protocol does not allow the
passing of latencies that either the master or slave are using. When running
Renoise as a slave and the song makes use of plugins which introduce latency,
Renoise must shift its time-line to compensate and ensure synchronicity. This
shifting may unfortunately lead to missed first notes upon starting the song or
pattern.
32.4 General Notes about Renoise as Master or Slave
Some ReWire slaves may have limited control over the transport. It's up to the ReWire
master to allow transport changes (or not). For example, some ReWire masters might
ignore tempo changes, loop changes or position changes. This is not the fault of
32.3 Using Renoise as ReWire Slave
155
Renoise 2.7 User Manual
Renoise, but rather a limitation in the ReWire implementation of the designated master
application.
32.5 ReWire Demo Restrictions
If you have purchased Renoise and are a registered user, there are no restrictions. If
you are using the free demo, then ReWire has some limitations. These are:
1. When Renoise is the master, only the first stereo pair is used.
2. When Renoise is a slave, the demo version will occasionally generate a small,
subtle hiss.
32.4 General Notes about Renoise as Master or Slave
156
33 Jack Transport (Linux only)
Jack Transport adds the ability to sync Renoise with multiple Jack clients on Linux. This
allows audio programs to be in sync with each other, all connected via Jack Transport.
You can start, stop and relocate the play position from any of the Jack enabled
applications. All software "jacked into" the session will react and synchronise
accordingly.
33.1 Levels of Jack Transport Control
Level 1: Each Jack client has the power to start, stop and relocate (change the
playback position of) the transport. This is represented in either seconds or sample
time.
Level 2: Only one Jack client can control the Time Base, which is the tempo, time
signature and beat position.
Most applications support the first level of Jack Transport control. The second level is, at
the time of writing, rarely supported. If there is more than one application running
which supports the Time Base, Jack will select one automatically.
33.2 Dealing with Tempo
Tempo information is exchanged only when the synchronized application supports Time
Base. As stated above, most applications do not support this and so you will have to set
the tempo manually.
33 Jack Transport (Linux only)
157
Renoise 2.7 User Manual
In the case where all Jack Transport applications are Time Base aware, you still have to
make sure that all clients are using the same tempo and automation. This is because
playback relocation will be done in sample time instead of "beat time". All clients need
to have the same base tempo in order to jump to the same positions.
33.3 Dealing with Loops
There is no loop information in the Time Base. Every client will try to apply its own
loops, fighting with the other Jack programs to reposition. To avoid this conflict, enable
loops in the application that is currently active and disable them in the others.
33.4 PDC and Jack Transport
Jack doesn't provide a way to explicitly handle latencies. When PDC (automatic plugin
delay compensation) is enabled in Renoise and, for example, you want to use Ardour to
tell Renoise to jump to pos 0, Renoise will attempt to compensate by jumping to "Pos 0
+ overall PDC Latency". This offset may result in a small misfire. If this becomes a
problem you should temporarily disable PDC in Renoise.
33.5 Configuring Jack Transport
The option to turn on Jack is in the Audio Preferences panel. Jack Transport is disabled
by default, even when Jack is selected as the audio device in Renoise.
33.2 Dealing with Tempo
158
34 MIDI Clock
MIDI Clock is a MIDI protocol that allows the syncing of playback (transport and tempo)
of multiple sequencers, synthesizers, drum machines etc. This can be external MIDI
hardware, other software on your computer, or software running on other computers
and connected to Renoise via MIDI cables.
There are two MIDI Clock modes: master and slave. Renoise fully supports both modes.
The MIDI Clock master sends a series of 24 ppqn (pulses per quarter note) beat clock
messages to all slaves. The interval of these messages allows the connected slaves to
determine the master's tempo and beat position. Along with the 'beat clock' messages,
'Start', 'Stop', 'Continue' and 'Relocation' (Song Position Pointer) messages are sent to
sync the timelines of the master and slaves.
Only the MIDI Clock master can start or stop the playback or change the tempo. Slaves
are forced to follow the master, thus the terms 'master' and 'slave'.
34.1 Running Renoise as MIDI Clock Master
34.1.1 Set Up Devices
To use Renoise as the master, simply set up a MIDI Clock master device in the "Edit ->
Preferences -> MIDI" panel. You can also specify which message types should be sent
from Renoise. Send only MIDI Clock messages if you just want to transfer tempo to the
slaves. Note that Renoise only sends out MIDI clock messages while playing back a
song.
34.1.2 Adjust Offsets
You can use the "Offset" slider in the "MIDI Clock Master" preferences to shift clock
messages back and forth in time. This is sometimes needed to compensate delays
(phase offsets) that are introduced by MIDI hardware. The easiest way to test and
adjust this is by using a steady metronome sound on both the master and slave. If the
sounds do not play back on exactly the same beat, try adjusting the "Offset" slider in
Renoise until they match.
34.2 Running Renoise as MIDI Clock Slave
34.2.1 Set Up Devices
To connect Renoise to a MIDI Clock master, use the MIDI Clock slave device section in
the "Edit -> Preferences -> MIDI" panel.
34 MIDI Clock
159
Renoise 2.7 User Manual
To quickly enable and disable the connection to the master clock, use the small 'Clock'
button in the Renoise Transport Panel, next to the BPM. This icon will only show up
when a MIDI Clock slave device has been set.
Important: A MIDI device must be selected and the sync clock mode icon must be
enabled to sync Renoise to other devices. After you have done this, you should notice a
small green blinking LED at the top of the Renoise interface:
The LEDs next to the small clock icon show the MIDI Clock input in green and output in
red.
34.2.2 Adjust Offsets
As with the MIDI Clock master mode, you can correct small offsets between Renoise
and the master with the "Offset" slider in the preferences. Again, the easiest way to
test and adjust the offset is by using a steady metronome on both the master and
slave. If the sounds are not in sync, try adjusting the offset slider in Renoise until they
match.
34.2.3 Adjust Smoothing
MIDI messages often only have very rough timing, so the beat clock messages
transferred from a MIDI Clock master to Renoise may be imperfect. Depending on how
precise the incoming MIDI clock stream is, you can use this option to set how fast
Renoise should react to changes from the MIDI Clock master. The higher the Smoothing
value, the more stable the sync will be, but the slower Renoise will react to 'real' BPM
changes from the master. Try playing around with the Smoothing to find a good value
for your setup.
34.2.4 Loading New Songs Without Losing Sync
You can detach and reattach Renoise to a running master at any time without losing
sync. To do so, simply stop the song in Renoise when running as MIDI Clock slave,
instead of stopping the master. Now you can even load a new song and hit start again,
whereupon Renoise will resync itself as smoothly as possible to the master, which is
still playing. This is extremely useful when playing live, because you can continuously
run a master and also switch songs in Renoise. When reattaching Renoise in this
manner, the closer you start playing to an on-beat, the less correction will be needed
and the smoother the adjustment will be.
34.2.1 Set Up Devices
160
35 MIDI Mapping
With MIDI Mapping you can remotely control Renoise from your external MIDI controller
or master keyboard. Nearly everything you can do in Renoise with the mouse or the
keyboard can also be done from an external MIDI controller.
MIDI mappings are saved along with your song, unlike the keyboard mappings in the
preferences. This way you can create unique MIDI mapping sessions for every song and
also share the settings by either using Template Songs or by importing/exporting
common MIDI mappings in the MIDI dialog (see below).
Renoise will never automatically detect your MIDI controller and configure the
mappings for you. You have to manually (at least once for a Template Song) set up the
controller.
35.1 MIDI Device Setup
First make sure Renoise knows which device you want to use for MIDI mapping by
setting it in the "Edit -> Preferences -> MIDI" panel.
35.2 Opening the MIDI Mapping Dialog
The MIDI Mapping dialog box can be opened with the "Options -> MIDI Mapping..."
option in the main menu (or by pressing "Left Control/Command + M"):
It can also be opened by clicking the "MIDI Map" button to the right of the VU meters at
the top of the Renoise interface:
35 MIDI Mapping
161
Renoise 2.7 User Manual
Next to the "MIDI Map" button you will also find two small LEDs which show the MIDI
input/output that Renoise receives/sends. If you are in doubt about whether your MIDI
controller is set up and connected correctly to Renoise, then watch the green LED
(input), which should blink when you use the controller.
• Left: MIDI Clock (if enabled in the MIDI Preferences)
• Right: General MIDI input and output
35.3 The MIDI Mapping Dialog at a Glance
• Learn Mode:
♦ Highlights all the parts of Renoise available for MIDI Mapping (see image
below). Select a highlighted button or parameter, then press a note or
move a controller to assign.
♦ When clicked, "Learn Mode" will become "Test Mode", which allows you to
test out what you've just mapped without having to close the MIDI
Mapping dialog.
• Available & Active Mappings: Clicking the arrow will unfold a list of the
currently available and active mappings.
• Selected parameter: Displays the currently mapped parameter in Renoise.
♦ Channel: The MIDI channel currently mapped from your controller.
♦ CC No: The CC number currently mapped from your controller.
♦ CC Type: The type of MIDI CC controller.
◊ Absolute 7 bit: Use the CC value as an absolute value.
35.2 Opening the MIDI Mapping Dialog
162
Renoise 2.7 User Manual
◊ Relative signed bit: Increase at [065 - 127], decrease at [001 063].
◊ Relative signed bit 2: Increase at [001 - 063], decrease at [065 127].
◊ Relative bin offset: Increase at [065 - 127], decrease at [063 000].
◊ Relative two's comp: Increase at [001 - 64], decrease at [127 065].
♦ Min: When mapping, for example, a MIDI fader or encoder to an effect
parameter in Renoise, this allows you to set up the lower boundary of the
controller.
♦ Max: This allows you to set up the upper boundary of the controller in
Renoise. Tip: Swap min and max values to reverse the controller.
• Prefer 'Setting' instead of 'Toggling' On/Off states: Specify how the
controller should change things that are turned On/Off in Renoise. See Set,
Trigger and Toggle Mappings for a detailed description.
• Allow mapping the same Note/CC more than once: When enabled, you can
assign the same controller button or fader (the same MIDI message) to multiple
things in Renoise. As an example, this could be used for cross-fades of two track
volume parameters.
• Record MIDI mapped parameters to automation: When enabled, any
parameter changes you make with the MIDI controller will be recorded into either
the Pattern Editor or Automation Editor. This only applies when Edit Mode is
enabled.
Note that the highlighted colour may vary according to the current theme:
35.3 The MIDI Mapping Dialog at a Glance
163
Renoise 2.7 User Manual
35.4 Create Mappings
• Click on a highlighted parameter or button.
• Send MIDI from your controller (press a key, push a button, move a fader etc.)
Renoise will automatically map the selected parameter to the chosen key/button/fader
of the controller.
35.4 Create Mappings
164
Renoise 2.7 User Manual
Note: When using endless encoders, which may send one of the relative CC modes
noted above, slowly turn it to the left in order to map it. This allows Renoise to estimate
how the encoder works (guess the relative CC modes) and stop you from having to
keep manually resetting the mode.
35.5 Remove Mappings
To remove a mapping, open the MIDI Mapping dialog and click on the mapped part of
the Renoise GUI. Then hit the Backspace or Delete key on your keyboard. Alternatively,
press the "Clear" button next to the parameter description:
To clear all of the mapped parameters, click the "Clear" button at the top of the dialog
(next to the "Load" and "Save" buttons).
35.6 Import/Export Mappings
If you want to share MIDI mappings you've set up, you can do so by importing/exporting
them. To export, click on the "Save" button at the top of the dialog. This will prompt
you for a file name and a location to save the mappings to. Exported settings can be
imported by clicking the "Load" button and selecting a file.
Note that Renoise will not import/export parameter mappings as these are specific to
Track DSP effects and so will be completely different for every song. What is
imported/exported though, are the parameters found under "Global Mappings" in the
"Available and active mappings" list, such as Start/Stop, select/trigger sequences etc.
If you want to repeatedly use the same mappings for your songs, then it might be
useful to create a Template Song. Because all mappings are saved with a song, you can
set up your favourite mappings in a blank song and save this as a template, enabling
them by default for every new song.
35.7 Set, Trigger and Toggle Mappings
The list of "Available and active mappings" shows you all the possible parameters and
functions that can be mapped in Renoise. This list contains far more entries than what
is shown highlighted in the GUI. For example, there are mappings to select the
currently active track, to control the selected Track DSP effects and much, much more.
Further, many things can be mapped in more than one way. Note the postfix of the
mapping names in the list: [Trigger], [Toggle] or [Set]
35.5 Remove Mappings
165
Renoise 2.7 User Manual
• [Trigger]: Whenever your controller sends a command to Renoise, ignoring any
values or states from the MIDI messages. This is, for example, used for things
like "Start Playing" or "Stop Playing".
• [Toggle]: Allows the controller to only change an On/Off value, ignoring any
values or states from the MIDI messages.
• [Set]: Allows the controller to specify exactly when something is On or Off,
giving it total control.
To understand the difference between [Toggle] and [Set] better, let's take a look at
what commands MIDI controllers may send out. Here is an example for a button that
sends a MIDI controller change message:
A)
Button
Button
Button
Button
Pressed: Controller with Value 127 (or something above 64) is sent.
Released: Controller with Value 0 (or something below 64) is sent.
Pressed again: Same as before.
Released again: Same as before.
B)
Button
Button
Button
Button
Pressed: Controller with Value 127 (or something above 64).
Released: Nothing.
Pressed again: Controller with Value 0.
Released again: Nothing.
35.7 Set, Trigger and Toggle Mappings
166
Renoise 2.7 User Manual
C)
Button
Button
Button
Button
Pressed: Controller with Value 127 (or something above 64).
Released: Nothing.
Pressed again: Controller with Value 127 is sent again.
Released again: Nothing.
Some controllers may use use protocol A, others B or C, or even other non-listed
combinations. Renoise needs to deal with all of these possibilities, which is why the
[Toggle] and [Set] options exist.
Now let's say you want to set something On or Off in Renoise. You have to tell Renoise
how it should deal with the incoming messages. Take the global "Edit Mode" as an
example, where there exists two variants for it in the list of available MIDI mappings:
• Edit Mode [Toggle]: Will ignore Controller Values of 0, so you can use
controller protocol A or C.
• Edit Mode [Set]: Will not ignore Controller Values of 0, but will instead interpret
them as "state": CC value > 64 On, CC value < 64 Off, so you can use controller
protocol B with encoders or faders.
If you are unsure what the right mode is for your controller, simply try out both
variants. If this works, then select that variant for the other mappings, because it's very
likely that the controller sends MIDI in the same manner for the other buttons too. Note
that Renoise will always choose the [Toggle] variant when executing MIDI "Learn
Mode".
To automatically choose [Set] or [Toggle]:
When clicking on something in the Renoise GUI to create mappings, the "Prefer
'Setting' instead of 'Toggling' On/Off states" option in the MIDI mapping dialog defines
which mappings should be used for your controller. [Set] will be selected when the
option is enabled, otherwise [Toggle] is used. This way you only have to decide which
type of mapping you want and can quickly create the mapping without using the
"Available And Active Mappings" list.
35.8 Dynamic Mappings
The list of "Available and active mappings" shows you all the possible parameters and
functions that can be mapped in Renoise. This list contains far more entries than what
is shown highlighted in the GUI. For example:
35.8.1 Selected Track Mappings
• Global Mappings/Navigation/Tracks: Allows you to switch over to the next or
previous track in Renoise.
• Global Mappings/Track Muting/Current Track: Allows you to mute/unmute
the currently selected track.
35.8 Dynamic Mappings
167
Renoise 2.7 User Manual
• Global Mappings/Track Levels/Volume/Current Track: Allows you to control
the volume of the current track.
• Global Mappings/Track Levels/Panning/Current Track: Allows you to
control the panning of the current track.
Using this you can control every track in a song with just a few buttons and faders on
your controller.
35.8.2 Selected DSP FX Mapping
The same is also possible for Track DSPs:
• Global Mappings/Navigation/Track DSPs/Select: Mapping the selection of
DSPs.
• Global Mappings/Track DSPs/Selected FX/Parameter #XX: Controlling up
to 32 DSP parameters.
• Global Mappings/Track DSPs/Selected FX (Mixer Subset)/Parameter
#XX: Controlling up to 32 DSP parameters in the Mixer.
When using the "Selected FX (Mixer Subset)" mappings, only the DSP parameters which
are seen in the Mixer can be controlled. This allows you to customise which parameters
are seen (right-click on the FX in the Mixer and choose a parameter from the "Show
Sliders" option) and controlled, so you can quickly and easily navigate through a small
subset of parameters during a live performance.
35.8.3 Sequencer Navigation & Triggering
Just like the track and DSP effects, the sequencer can be also be controlled in a
dynamic manner. Feel free to explore this on your own, using the above information as
a guide.
35.9 The Duplex Tool
Renoise Tools are downloadable packages that extend the functionality of the program,
using the Renoise Scripting API. Created with this, Duplex is a flexible system for using
external controllers in Renoise. When you install Duplex, each supported device has a
number of configurations that control important Renoise parameters like the Mixer,
Matrix or Effects. You can combine these so-called 'applications' to form your own,
unique mix of features. For example, some pre-installed device configurations have
entries like 'Mixer+Effect'.
You can download and find more information about the Duplex Tool at its page in the
Renoise Tools section of the site.
35.8.1 Selected Track Mappings
168
36 Open Sound Control (OSC)
Open Sound Control was created as a successor to the MIDI control protocol. It enables
communication between computer software, sound synthesizers and other multimedia
devices that support OSC.
Its advantages over MIDI include: an open-ended and dynamic URL-style symbolic
naming scheme, symbolic and high-resolution numeric argument data, pattern
matching language to specify multiple recipients of a single message, high resolution
time tags and "bundles" of messages whose effects must occur simultaneously. The
protocol is also not bound by specific hardware (i.e. MIDI cables and ports) and can be
transferred across any network connection, even remotely via the internet.
This makes OSC much more powerful than MIDI, but due to its open-ended
specification, both the OSC client (which sends OSC data) and the OSC server (which
receives data, i.e. Renoise) must be separately configured, unlike MIDI which is
essentially "Plug & Play".
For more general information about OSC, see the OSC Wikipedia page and the official
OSC homepage.
36.1 Setup
Renoise can use OSC in one of two ways:
1. Using Renoise as an OSC server (OSC receiver) via a preconfigured OSC message
set.
2. Using the fully configurable and customisable Renoise scripting API. This allows
you to send and receive any form of OSC message and define your own
communication protocol, but obviously requires programming knowledge. See
the Renoise Scripting API pages for more information.
To setup Renoise as an OSC server, open the OSC options panel by choosing "Edit ->
Preferences -> OSC" from the main menu:
36 Open Sound Control (OSC)
169
Renoise 2.7 User Manual
• Enable Server: This starts the Renoise OSC server and the network port is
changed to a listening state, so you may get a firewall warning the first time this
is enabled.
• Incoming Messages: This panel simply displays messages relevant to the
networking process.
• Protocol: Select the protocol which the Renoise server will use:
♦ Udp: Provides a high transfer rate with lower reliability than Tcp.
♦ Tcp: Provides a lower transfer rate than Udp with higher reliability.
• Port: Select the Port number for messages to be transferred over. Generally, a
number greater than 1024 is used.
• Command List: Lists the various commands that it is possible to use to
communicate with Renoise.
• Explanation Panel: When clicking on a command in the Command List, an
explanation of what the command does is displayed here.
36.1.1 The Default OSC Implementation of Renoise
• /renoise/evaluate(string)
Evaluate a custom Lua expression (e.g. renoise.song().transport.bpm = 234).
• /renoise/song/bpm(number)
36.1 Setup
170
Renoise 2.7 User Manual
Set the song's current BPM value [32 - 999].
• /renoise/song/edit/mode(boolean)
Set the song's global Edit Mode on or off.
• /renoise/song/edit/octave(number)
Set the song's current octave value [0 - 8].
• /renoise/song/edit/pattern_follow(boolean)
Enable or disable the global Pattern Follow mode.
• /renoise/song/edit/step(number)
Set the song's current Edit Step value [0 - 8].
• /renoise/song/lpb(number)
Set the song's current Lines Per Beat value [1 - 255].
• /renoise/song/record/chord_mode(boolean)
Enable or disable the global Chord Mode.
• /renoise/song/record/metronome
Enable or disable the metronome.
• /renoise/song/record/metronome_precount
Enable or disable the global metronome precount.
• /renoise/song/record/quantization_step(number)
Set the global Record Quantization step value [1 - 32].
• /renoise/song/record/quantization(boolean)
Enable or disable the global Record Quantization.
• /renoise/song/sequence/schedule_add(number)
Add a scheduled sequence playback position.
• /renoise/song/sequence/schedule_set(number)
Replace the currently scheduled sequence playback position.
• /renoise/song/sequence/slot_mute(number, number)
36.1.1 The Default OSC Implementation of Renoise
171
Renoise 2.7 User Manual
Mute the specified track at the specified sequence slot in the matrix.
• /renoise/song/sequence/slot_unmute(number, number)
Unmute the specified track at the specified sequence slot in the matrix.
• /renoise/song/sequence/trigger(number)
Set the playback position to the specified sequence position.
• /renoise/song/tpl(number)
Set the song's current Ticks Per Line value [1 - 16].
• /renoise/song/track/XXX/device/XXX/bypass(boolean)
Set the bypass status of a device [true or false].
(XXX is the device index, -1 chooses the currently selected device)
• /renoise/song/track/XXX/device/XXX/set_parameter_by_index(number,
number)
Set the parameter value of a device [0 - 1].
(XXX is the device index, -1 chooses the currently selected device)
• /renoise/song/track/XXX/device/XXX/set_parameter_by_name(string,
number)
Set the parameter value of a device [0 - 1].
(XXX is the device index, -1 chooses the currently selected device)
• /renoise/song/track/XXX/mute
Mute track XXX.
(XXX is the device index, -1 chooses the currently selected device)
• /renoise/song/track/XXX/output_delay(number)
Set track XXX's delay in ms [-100 - 100].
(XXX is the device index, -1 chooses the currently selected device)
• /renoise/song/track/XXX/postfx_panning(number)
Set track XXX's post FX panning [-50 - 50].
(XXX is the device index, -1 chooses the currently selected device)
• /renoise/song/track/XXX/postfx_volume_db(number)
Set track XXX's post FX volume in dB [-200 - 3].
(XXX is the device index, -1 chooses the currently selected device)
36.1.1 The Default OSC Implementation of Renoise
172
Renoise 2.7 User Manual
• /renoise/song/track/XXX/postfx_volume(number)
Set track XXX's post FX volume [0 - db2lin(3)].
(XXX is the device index, -1 chooses the currently selected device)
• /renoise/song/track/XXX/prefx_panning(number)
Set track XXX's pre FX panning [-50 - 50].
(XXX is the device index, -1 chooses the currently selected device)
• /renoise/song/track/XXX/prefx_volume_db(number)
Set track XXX's pre FX volume in dB [-200 - 3].
(XXX is the device index, -1 chooses the currently selected device)
• /renoise/song/track/XXX/prefx_volume(number)
Set track XXX's pre FX volume [0 - db2lin(3)].
(XXX is the device index, -1 chooses the currently selected device)
• /renoise/song/track/XXX/prefx_width(number)
Set track XXX's pre FX width [0, 1].
(XXX is the device index, -1 chooses the currently selected device)
• /renoise/song/track/XXX/solo
Solo track XXX.
(XXX is the device index, -1 chooses the currently selected device)
• /renoise/song/track/XXX/unmute
Unmute track XXX.
(XXX is the device index, -1 chooses the currently selected device)
• /renoise/transport/continue
Continue playback.
• /renoise/transport/loop/block_move_backwards
Move the Block Loop one segment backwards
• /renoise/transport/loop/block_move_forwards
Move the Block Loop one segment forwards
• /transport/loop/block(boolean)
Enable or disable pattern Block Loop.
36.1.1 The Default OSC Implementation of Renoise
173
Renoise 2.7 User Manual
• /renoise/transport/loop/pattern(boolean)
Enable or disable looping the current pattern.
• /renoise/transport/loop/sequence(number, number)
Disable or set a new sequence loop range.
• /renoise/transport/panic
Stop playback and silence all playing instruments and DSPs.
• /renoise/transport/start
Start playback or restart playing the current pattern.
• /renoise/transport/stop
Stop playback.
• /renoise/trigger/midi(number)
Trigger a raw MIDI event.
arg#1: the MIDI event as number
• /renoise/trigger/note_off(number, number, number)
Trigger a Note-Off.
arg#1: instrument (-1 chooses the currently selected one)
arg#2: track (-1 for the current one)
arg#3: note value (0-119)
• /renoise/trigger/note_on(number, number, number, number)
Trigger a Note-On.
arg#1: instrument (-1 for the currently selected one)
arg#2: track (-1 for the current one)
arg#3: note value (0-119)
arg#4: velocity (0-127)
Note that the default OSC implementation can be extended by editing the file
"GlobalOscActions.lua" in the "Scripts" folder, found within the directory where you
installed Renoise (on OSX this is found in the app bundle).
36.2 Examples
36.2 Examples
174
Renoise 2.7 User Manual
36.2.1 TouchOSC via Duplex
The Duplex Tool comes with a Device preset for TouchOSC, an iPhone / iPod Touch /
iPad app, that allows those devices to control Renoise via OSC. To use it, select
"TouchOSC" from the "Device" pulldown menu in the Duplex Browser and adjust the
configuration as needed within the "Settings" dialog box. Then, using the TouchOSC
app on the Apple device, you can change the values of the various knobs and sliders on
the screen to control various features of Renoise.
Duplex uses Renoises Scripting API to communicate with touch OSC, so its fully
configurable, and can also be used as en example on how to wrap up your own OSC
implementation in Renoise.
36.2.2 Pure Data
PD (aka Pure Data) is a real-time graphical programming environment for audio, video,
and graphical processing. PD was created to explore ideas of how to further refine the
Max paradigm with the core ideas of allowing data to be treated in a more open-ended
way and opening it up to applications outside of audio and MIDI, such as graphics and
video. There are different versions available to download for PC, Mac and Linux.
36.2.2.1 Using PD With Renoise Via OSC
• First install PD, then download, unzip and open the "test-renoise-osc.pd" file
within PD.
• In the top left corner you can set the port number to match the OSC port number
you have chosen for Renoise [connect localhost XXXX]. With Edit Mode (Ctrl + E)
you can edit the numbers.
• To the right, you can start and stop playing Renoise with the [send / renoise /
transport / start] and [send / renoise / transport / stop] buttons.
• The test program comes with a set of commands already loaded in. Make sure a
sample is loaded into into slot 00 within Renoise and press the "chord-test"
button in PD. You should hear a chord being played. You can also click on the
individual commands to hear the individual notes.
• If you would like to enter new OSC messages yourself:
♦ Select from the menu "Put -> Message", place the box on the screen and
enter your desired command (check the OSC Command List for available
commands).
♦ Connect the new message box by hovering over the bottom left corner
(the cursor will become a circle) then clicking and dragging over to the
"sendOSC" box.
♦ Cancel edit mode with (Ctrl + E) and click the box to send the message to
Renoise via OSC.
36.2.1 TouchOSC via Duplex
175
37 Preferences
The Renoise Preferences panel lets you set various general options for the program,
such as soundcard settings, MIDI device settings, how files are loaded/saved etc. These
settings need to be set only once and will be applied to all songs and sounds you create
with Renoise.
To open the Preferences panel, choose "Edit -> Preferences..." from the main menu
(Windows + Linux). On the Mac, choose "Renoise -> Preferences...".
When setting up Renoise for the first time, you should only need to tweak the Audio
and MIDI pages. The rest of the default options should be sufficient until you are more
familiar with Renoise. The Setting Up Audio Devices and Setting Up MIDI Devices
sections of the manual can help you with the initial setup.
37.1 Audio
37 Preferences
176
Renoise 2.7 User Manual
37.1.1 Device Settings (Windows)
• Device Type: Determines the sound driver that Renoise will use. On Windows
you will have the choice between DirectSound and ASIO. If available, ASIO is
highly recommended as it provides better timing with MIDI instruments and
lower latencies in general.
• In Device: (DirectSound only) If you have multiple soundcards installed, you will
be able to select the one you want to use with Renoise here. Choose "Primary
Device" to use the system's default.
• Out Device: (DirectSound only) If you have multiple soundcards installed, you
will be able to select the one you want to use with Renoise here. Choose
"Primary Device" to use the system's default.
• Sample Rate: Select the Sample Rate for playback. All internal audio processing
in Renoise will be done at this rate. The higher the Sample Rate, the more
detailed the results will be, but also the more CPU power will be used.
• Latency: (DirectSound only) Set the buffer size affecting overall latency. Higher
numbers will reduce the possibility of crackling sound at high CPU usage, but will
also cause more latency (the time it takes the sound from Renoise to reach an
output and be heard).
• Use hardware buffers: (DirectSound only) This option may speed up playback
processing a bit, but only some soundcards support this. If you enable this
option, then experiment with recording in the Sample Editor before deciding to
use it permanently, as it may cause issues. If you experience strange results
then disable this function.
• Dither: Apply dithering to the audio stream when the soundcard uses a bit depth
of 8 or 16 bit. 24 and 32 bit audio is never dithered.
• Limit to stereo in/out: (ASIO only) If you have a multi-IO soundcard, you can
disable all inputs and outputs except for the main stereo pair. This may lead to
better performance when you don't need the other channels.
• Control Panel: (ASIO only) Opens the ASIO driver's control panel where you can
configure your soundcard in more detail.
• Reinitialize: Shut down and then reopen all connections to the
soundcard/driver. May be useful for troubleshooting.
37.1.2 Device Settings (OSX)
• In Device: If you have multiple soundcards installed, you will be able to select
the one you want to use with Renoise here.
• Out Device: If you have multiple soundcards installed, you will be able to select
the one you want to use with Renoise here.
• Sample Rate: Select the Sample Rate for playback. All internal audio processing
in Renoise will be done at this rate. The higher the Sample Rate, the more
detailed the results will be, but also the more CPU power will be used.
• Latency: Set the buffer size affecting overall latency. Higher numbers will
reduce the possibility of crackling sound at high CPU usage, but will also cause
more latency (the time it takes the sound from Renoise to reach an output and
be heard).
• Dither: Apply dithering to the audio stream when the soundcard uses a bit depth
of 8 or 16 bit. 24 and 32 bit audio is never dithered.
37.1.1 Device Settings (Windows)
177
Renoise 2.7 User Manual
• Reinitialize: Shut down and then reopen all connections to the
soundcard/driver. May be useful for troubleshooting.
37.1.3 Device Settings (Linux)
Setting up Linux for fast and reliable audio usage can be quite complex, depending on
the distribution you are using. For general questions and FAQs regarding sound output
on Linux, take a look at the Linux FAQ.
• Device Type: Determines the sound driver that Renoise will use. On Linux you
have the choice between ALSA and Jack. ALSA will be available on all setups. Jack
is more advanced, but also harder to set up and may have to be installed
manually. Jack is highly recommended though, because it allows you to use
several Jack based audio applications at once with the ability to route audio
between them.
• In Device:
♦ ALSA: If you have multiple soundcards installed, you will be able to select
the one you want to use with Renoise here.
♦ Jack: Select the number of input pairs you would like to pass over to Jack.
• Out Device:
♦ ALSA: If you have multiple soundcards installed, you will be able to select
the one you want to use with Renoise here.
♦ Jack: Select the number of output pairs you would like to pass over to
Jack.
• Sample Rate: (ALSA only) Select the Sample Rate for playback. All internal
audio processing in Renoise will be done at this rate. The higher the Sample
Rate, the more detailed the results will be, but also the more CPU power will be
used.
• Buffer Size: (ALSA only) The base buffer size that should be used for audio
processing in Renoise. Higher numbers will reduce the possibility of crackling
sound at high CPU usage, but will also cause more latency (the time it takes the
sound from Renoise to reach an output and be heard).
• Periods/Buffer: (ALSA only) How many "Buffer Sizes" should be used. The final
latency for ALSA playback is: "Periods/Buffer" * "Buffer Size". Some drivers
need three buffers to work reliably, while others need only two. If you hear
crackling output from Renoise, try changing this value or the setting for "In
Device".
• Use realtime priority: (ALSA only) On most 'out of the box' Linux systems,
applications are not allowed to execute realtime performance critical tasks. They
are needed for realtime audio processing though, so they should be enabled
when possible. Please see the Linux FAQ for more info about this topic. If you
cannot configure your system to allow realtime tasks, then you can disable
Renoise from trying with this option.
• Enable Transport Support: (Jack only) Send and receive time and transport
information to/from other applications that are running with Jack. This is only
useful to sync multiple audio applications together. If you are only running
Renoise, this option should be disabled.
• Dither: Apply dithering to the audio stream when the soundcard uses a bit depth
of 8 or 16 bit. 24 and 32 bit audio is never dithered.
• Reinitialize: Shut down and then reopen all connections to the
37.1.2 Device Settings (OSX)
178
Renoise 2.7 User Manual
soundcard/driver. May be useful for troubleshooting.
37.1.4 Multi CPU/Core support
• Multi CPU/Core support: If you have a processor with multiple CPUs or cores,
you can adjust how Renoise makes use of them for realtime audio processing. By
default, all cores are used, which is highly recommended.
37.1.5 Automatic PDC
• Automatic PDC: This automatically compensates all delays that some Renoise
internal effects and VST/AU plugins introduce. Used to ensure all tracks and
instruments are played back in sync. If you are troubleshooting, you may want to
temporarily disable this option.
37.1.6 CPU Load and Threshold
• When the CPU is above, For at least: - When the conditions are fulfilled,
Renoise executes Panic (instantly stops all playback). This option prevents very
high CPU loads from freezing your computer.
37.1.7 Metronome & Precount
• Beats Per Bar: Set how many beat clicks (see Lines Per Beat below) should be
treated as a bar.
• Lines Per Beat: Set how many lines in Renoise should make up a beat for the
metronome.
• Precount: Toggles the precount option for live recording and the amount of bars
to precount.
37.2 MIDI
37.1.3 Device Settings (Linux)
179
Renoise 2.7 User Manual
37.2.1 MIDI Master Keyboard/Mapping
• In Device A/B: Select up to two devices to be used for general MIDI input in
Renoise (Recording and Editing Notes) and for MIDI remote control (MIDI
Mapping).
• Record and Play (various): Toggle the input and recording of specific MIDI
messages for Renoise. This only applies to recording into patterns and realtime
playback.
• Ignore specific controllers: Explicitly prevent certain MIDI Control Change
messages from being received and recorded. You can enter a list of CC numbers
here, separated by commas.
37.2.2 MIDI Clock Master
• Out Device: Set a MIDI device that Renoise will send MIDI Clock data to.
• Offset: Manually shift all messages sent out to the devices by the given amount.
This can be useful to manually compensate additional latencies that external
devices introduce (audio latency is always automatically compensated by
Renoise).
• Send clock: Include sending MIDI Clock pulse messages.
• Send start/stop: Include sending MIDI Clock start/stop messages.
• Send song position pointers: Include sending MIDI Clock song position
messages.
37.2 MIDI
180
Renoise 2.7 User Manual
• Send MIDI Machine Control (MMC): In addition to the MIDI clock, also send
MMC sysex messages to sync external devices to Renoise.
37.2.3 MIDI Clock Slave
• In-Device: Select the MIDI Device that Renoise will use to receive MIDI Clock
messages. When enabled, you can slave Renoise to a MIDI Clock master (a
device which sends MIDI Clock messages). As soon as a MIDI Clock device is set,
you will see a new option in the Transport Panel. This option must be enabled to
activate sync from external devices and so can also be used to toggle sync
quickly without having to constantly open the Preferences.
• Offset: Manually shift incoming timing information by the given amount. This
can be useful to manually compensate extra latencies that the external MIDI
Clock devices introduce (audio latency is always automatically compensated by
Renoise).
• Smoothing: MIDI messages often only have very rough timing, so the beat clock
messages transferred from a MIDI Clock master to Renoise may be imperfect.
Depending on how precise the incoming MIDI clock stream is, you can use this
option to set how fast Renoise should react to changes from the MIDI Clock
master. The higher the Smoothing value, the more stable the sync will be, but
the slower Renoise will react to 'real' BPM changes from the master. Try playing
around with the Smoothing to find a good value for your setup.
37.3 OSC
37.2.2 MIDI Clock Master
181
Renoise 2.7 User Manual
Open Sound Control
37.3.1 Server
Enable the server by checking the checkbox. Note that when enabling the server, you
are opening up a port that listens to incomming traffic upon that port. If you are not
planned to use OSC messaging between Renoise and any other OSC client, you are
advised to leave the OSC server off. Beneath the checkbox is the messaging log
window that shows you the incoming data and gives feedback if the data is send
correctly or not correctly
• Protocol: Either choose UDP (local network and anything close) or TCP (Remote
networks requiring more secure feedback if packages arrive)
• Port: Portnumber, by default 8000 but can be changed to any desired port.
37.3.2 Renoise OSC messaging protocols
Renoise holds four sub-trees in its own messaging tree /renoise/:
• evaluate - Send Lua strings for Renoise to evaluate
• song - Send song specific triggers to activate
• transport - Send transport specific triggers to activate
• trigger - Send note specific triggers to activate
37.3 OSC
182
Renoise 2.7 User Manual
Detailed OSC description: http://tutorials.renoise.com/wiki/OSC_Mapping Other locations
containing info about how to use the OSC Messaging system visit
http://scripting.renoise.com/
37.4 Files
Note: All import options mentioned below can also be quickly accessed in the Disk
Browser by right-clicking the file, then choosing "Load File with Options..."
37.4.1 Wave Import Options
Applies to WAV, FLAC, AIF, OGG and MP3 files.
• Create multi-sample instruments: When enabled, and multiple samples are
loaded at once in the Disk Browser, Renoise will load all samples into a single
instrument and create a drum kit mapping, using the drum kit settings from the
Sample Keyzones. When the option is disabled, each sample will be loaded into a
new instrument.
• Ignore loop points: Do not import loop settings that are saved along with WAV,
FLAC and AIF files.
• Autoset 'Sync' Settings: When loading samples, Renoise automatically
estimates a good beat-sync value in the Instrument Settings, overwriting
previous values. If you don't want this to happen, disable it here.
37.3.2 Renoise OSC messaging protocols
183
Renoise 2.7 User Manual
37.4.2 Raw Audio Import Options
Applies to any non-audio files that are forced to be loaded as audio. See Importing Raw
Audio for more details.
• Bits: Bit-rate that should be applied to the imported raw sample.
• Sample Rate: Sample rate of raw samples.
• Skip header bytes: Will skip the specified number of bytes and not treat them
as audio data.
• Big Endian: Select the byte order that should be used for the raw sample
import. Only applies to bit depths of 16 or more.
37.4.3 Device Chain Import Options
Applies to XRNT files.
• Replace Existing Chain: When enabled, loading a device chain will completely
erase all existing devices first. When disabled, the imported chain is appended.
37.4.4 MIDI Import Options
Applies to MID or MIDI files.
• Create instruments: Create instruments based upon the instruments used in
the MIDI file. When disabled, only notes and CC events are imported and so
instruments have to be set up manually.
• Create *MIDI-Control Devices: Create MIDI Control devices to import and send
MIDI control change messages (e.g. modulation wheel).
• Lines per Beat: Set the Lines Per Beat resolution that should be used for the
new song. The higher the value, the more precisely MIDI events can be plotted
into the new song.
• Lines per Pattern: Divide the imported MIDI song into patterns of the given
length.
• MIDI Device: Choose the MIDI device for selecting the MIDI instruments from
(and send output to).
37.4.5 Song/Instrument Export Options
Applies to exported XRNI (Renoise Instrument files) and XRNS (Renoise Song Files).
• Sample Format: Select how samples are stored in Renoise song or instrument
files. XRNI and XRNS files are regular zip files with a custom extension, so it is
possible to open them with any tool which can use zip files (e.g. WinRar/WinZip
on Windows, Stuff-it on OSX) and extract all of the samples manually. "Flac" will
result in smaller files and should be used by default. "Wav" files might be useful
if you later want to extract the files and use them in other programs.
37.4.2 Raw Audio Import Options
184
Renoise 2.7 User Manual
37.5 Keys
37.5.1 Keyboard Mapping List
All of the keyboard shortcuts in Renoise can be re-configured. Above the list you can
choose the Focus of the mappings, which changes the part of the interface that the
shortcuts apply to. Selecting "All" will give an overview of all existing keyboard
shortcuts in Renoise, making it easier to search for a specific setting.
There are many mappings which are not assigned by default, so if you need to create
one that does not exist yet, take a look at the available mappings in the relevant
section. To change or create a keyboard mapping, select the mapping in the list and
click on the "New Assignment" box. Press the key combination you would like to use
and then hit the 'Assign' button. If the given combination is already used somewhere
else you will be warned of this. The new configuration will be saved automatically.
37.5.2 Importing/Exporting Keyboard Mappings
•
•
•
•
- Load a saved set of key-bindings.
- Save a custom set of key-bindings.
- Reset to the default key-bindings.
- Display the current key-binding layout in your default browser in a
print-friendly format.
37.5 Keys
185
Renoise 2.7 User Manual
37.5.3 Keyboard Repeat Rate
• Repeat Rate: Configure how fast Renoise repeats key presses.
37.5.4 Mouse Repeat Rate
• Left-Click Repeat Rate: Set how fast changes to a value with a left-click should
be repeated (e.g. increasing the BPM using the small arrows).
• Right-Click Repeat Rate: Same as above, but for right mouse button clicks.
37.6 GUI
The GUI options allow the customisation of the general display behaviour in Renoise.
37.6.1 Global
• Show tooltips: Toggles the displaying of tooltips when the mouse pointer
hovers over a significant part of the interface for a second.
• Enable GUI effects: When enabled, Renoise will use animations in some parts
of the interface, e.g. smooth scrolling, fading of menus, transparency etc. Disable
37.5.3 Keyboard Repeat Rate
186
Renoise 2.7 User Manual
this option if you dislike them or are using a very slow computer.
• Use more compatible GFX updates: (Windows only) Uses a possibly slower
method of drawing the Renoise GUI with your graphics card. This option should
be kept on unless it needs to be disabled to avoid problems with multi-monitor
setups.
• Frame Rate: Set how fast the Renoise GUI will update itself. Lower values
require less CPU power, while higher values result in a more responsive user
interface. Disabling the frame rate will allow Renoise to use the necessary
amount of CPU power to update the GUI as responsively as possible.
37.6.2 Pattern Editor
• Single mouse click navigation: This allows a single left-click in a pattern to
move the cursor to that exact position when Edit Mode is on. When Edit Mode is
off, it also allows a single left-click to move the cursor to that column without
changing the pattern line. A double-click will always move the cursor to that
exact position regardless of whether this option is enabled or not.
• Instant Drag & Drop: When enabled, clicking upon a selected area in the
Pattern Editor will instantly start to drag the selection. When disabled, you have
to click and hold for a second to drag.
• Position number format: Use either decimal or hexadecimal for the Pattern
Editor line numbers.
37.6.3 Pattern Sequencer
• Separate edit & play positions (with pattern follow): When enabled, the
sequencer's playback position will be detached from the edit position when
Pattern Follow is disabled.
♦ Pattern Follow mode On: Edit and play positions are linked, so the
pattern currently playing is always the one that is edited.
♦ Pattern Follow mode Off: Edit and play positions are separated, so you
can edit a pattern that is not currently playing.
37.6.4 Envelope Editor
• Single click to create new points: When enabled, reverts to the old behaviour
of a single left-click to create new points in envelopes.
37.6.5 Scopes
• Show track names in scopes: Activating this will remove the track names
from the Scopes and display their track numbers instead.
37.7 Theme
37.6.1 Global
187
Renoise 2.7 User Manual
37.7.1 Theme Files
Import/Export the current colour settings to a file. Theme files can also be
Imported/Exported in the Disk Browser.
37.7.2 Color Settings
Change individual colour settings. Colours are organized into multiple categories.
37.7.3 Global Color Filters
Adjust all colour settings at once by applying Hue, Saturation or Value changes to them.
37.7.4 Graphic
Change the texture set and bevel amounts that are used for the current Theme.
37.8 Plugins/Misc
37.7 Theme
188
Renoise 2.7 User Manual
37.8.1 Audio Unit Plugins (OSX only)
• Enable the use of Audio Unit plugins in Renoise.
37.8.2 LADSPA Plugins (Linux only)
• Enable the use of LADSPA plugins in Renoise.
37.8.3 VST Plugins (Windows, Mac & Linux)
• Select up to two folders where Renoise should scan for VST plugin files. The
folders can be temporarily deactivated with the small check boxes.
37.8.4 Plugins General (Windows, Mac & Linux)
• Rescan previously failed plugins: When hitting the "Rescan" button, Renoise
will try to open plugins that failed to open in previous scans. Plugins which
caused a crash upon scanning are never rescanned though, unless you delete
the VST cache files in the Renoise preferences folder. When this option is
disabled, hitting the "Rescan" button will only look for new plugins.
• Rescan: Rescan for new plugins or try to rescan previously failed plugins (see
above).
37.8 Plugins/Misc
189
Renoise 2.7 User Manual
• Scan for new plugins on startup: By default, Renoise will always start
scanning for new plugins when launched. If you have a large amount of plugins
installed then disabling this option can vastly improve startup time. If disabled,
then after installing new plugins you will have manually scan for them with the
"Rescan" button, as described above.
37.8.5 Backup
• Autosave backup: When enabled, Renoise will periodically save backups of
your current song. For existing songs, the backups are saved into a new folder
named after the song. For Untitled songs, the backups will be saved into the
Renoise preferences folder.
• Save while playing: When enabled, backups will be saved as songs are
playing, which could possibly cause interruptions in the audio. If you want to
avoid this while composing, disable this option.
• Every x minutes: How often backups should be saved.
• Keep x backups: Specify how many revisions of the backups should be kept.
• Save at: Instead of being saved next to the original song files, you can specify a
folder to place the backups.
37.8.6 Misc
• Autoplay song after loading: When enabled, Renoise will automatically start
playback as soon as a song is loaded.
• Stop playing notes on pattern sequence navigation: When navigating
around in the Pattern Sequencer, Renoise will stop all playing notes and then
skip over to the new pattern to continue playback, avoiding 'hanging' notes. You
can disable this behaviour here.
• Update automation on song position changes: When navigating around in
the Pattern Sequencer, Renoise will ensure that any changes to pattern or
envelope Automations are correctly updated. You can disable this behaviour
here.
• Space rec/stop mode
♦ Renoise: Use the space key to start/stop playing.
♦ FT2: Use the space key to stop the song or toggle Edit Mode if the song is
already stopped.
• Mute mode (left click):
♦ Off: After a track is muted, any existing sounds may carry on until
finished, but notes and other events will not be triggered (Soft Mute).
♦ Mute: The track is played back completely and can be immediately
silenced/unmuted without affecting how any of the sounds are executed
(Mixer Mute).
• Solo mode (right click):
♦ Solo: Solo-ing and unsolo-ing track will retain the mute states of all other
tracks.
♦ Mute all others: Solo-ing a track will cause all other tracks to be muted.
Unsolo-ing will unmute all other tracks.
37.8.4 Plugins General (Windows, Mac & Linux)
190
38 Keyboard Shortcuts
Renoise features an enormous amount of keyboard shortcuts, but in the previous topics
we often only noted a few of the important ones. Besides those, there are many other
shortcuts available and even unassigned shortcuts, which you can customise yourself if
they fit well into your work-flow.
38.1 Keyboard Focus Concept
Renoise utilises a shortcut Focus system for the keyboard, which means that most
keyboard shortcuts only apply to a specific region in the interface. We will refer to
those as local. Other shortcuts apply to all regions and we will refer to them as global.
The currently focused area in Renoise is surrounded with small orange corners:
To change the Focus area, you can either:
• Click anywhere in Renoise with the middle mouse button.
• Left-click anywhere in Renoise while holding down the "Left Alt" key.
• Right-click anywhere in Renoise and choose "(Set Keyboard Focus Here)" from
the context menu.
• Use the shortcuts "Left Control/Command + TAB" or "Left Control/Command +
Left Shift + TAB".
Here is a small example on how to use the Focus:
When you start up Renoise, the Pattern Editor is focused by default. If you use the
arrow keys then the Pattern Editor's cursor will start moving around. Now left-click
somewhere in the Disk Browser while holding down the "Left Alt" key, which will set the
Focus to the Disk Browser. Notice that the orange corners now surround the Disk
Browser and the arrow keys move around to select files and folders.
The idea behind this is that the main components of Renoise (such as the Pattern
Editor) should always be ready for editing. The keyboard Focus should not move loosely
around, unless you want it to. If you want it to, you can change it via the "View->Lock
Keyboard Focus" option in the Upper Status Bar.
38.2 Customising and Printing Shortcuts
Using the menu panel "Edit->Preferences->Keys", you can customise any keyboard
shortcut and also print out a list of the currently set shortcuts. To print the shortcuts,
simply click the
button in this dialog:
38 Keyboard Shortcuts
191
Renoise 2.7 User Manual
38.3 List of Default Shortcuts
For convenience, here are the default shortcuts for all three platforms that run Renoise:
• Windows: Default Shortcuts for Windows
• Mac OS X: Default Shortcuts for OS X
• Linux: Default Shortcuts on Linux
38.4 List of Important Shortcuts
Below is a list of the most commonly used keyboard shortcuts (Mac users: Replace
"Control" with "Command" and "Alt" with "Option" below):
Renoise also supports most of the common shortcuts that apply to any application:
"Left Ctrl + X" (Cut), "Left Ctrl + C" (Copy), "Left Ctrl + V" (Paste), "Left Ctrl + Z"
(Undo), "Left Ctrl + Y" (Redo).
38.2 Customising and Printing Shortcuts
192
Renoise 2.7 User Manual
38.4.1 Global
38.4.1.1 Panel Switching
• F1, F2, F3, F4, F5, F6, F7, F8: Activate Window Layout Presets
Tip: You can save and customise the layouts by right-clicking on the 1, 2, 3, 4, 5, 6, 7,
8 buttons at the top right of the Renoise interface. The current keyboard Focus is also
saved with the preset.
38.4.1.2 Play and Record
• Space: Start/Stop playing.
• Enter: Only play the line directly under the cursor (play step by step).
• Right Alt: Start playing and looping the current pattern.
• Right Ctrl: Start playing the song.
• Right Shift: Start playing the song with Edit Mode enabled.
• Escape: Toggle Edit Mode.
• Numpad Enter: Activate Block Loop and start playing.
38.4.1.3 Instruments
• Numpad / *: Decrease/increase keyboard octave.
• Numpad - +: Decrease/increase instrument slot selection.
• Numpad 1-9: Select instrument from instruments visible in the Instrument
Selector.
• Left Alt + Left/Right Arrow Keys: Jump up/down a page in the Instrument
Selector.
• Left Alt + Up/Down Arrow Keys: Select previous/next instrument.
38.4.2 Pattern Editor
38.4.2.1 Edit Step & Navigation
• Left Ctrl & - +: Decrease/increase the Edit Step value.
• Left Ctrl & 1-0: Set the Edit Step number.
• Left Ctrl & Shift & 1-0: Set note quantize amount.
• Arrow Keys: Navigate through the Pattern Editor.
• PageUp/PageDown: Move up/down in pattern.
• Home/End: Go to start/end line of pattern.
• F9: Move cursor to line 0.
• F10: Move cursor 25% of the way down the pattern.
• F11: Move cursor to the centre of the pattern.
• F12: Move cursor 75% of the way down the pattern.
38.4.1 Global
193
Renoise 2.7 User Manual
38.4.2.2 Note-Off
• Caps-Lock: Insert Note-Off when Edit Mode is enabled.
38.4.2.3 Cut/Copy/Paste
• Left Ctrl + X: Cut selection to clipboard.
• Left Ctrl + C: Copy selection to clipboard.
• Left Ctrl + V: Paste contents from clipboard to target.
• Backspace: Delete all notes and effect commands at the current line in the
track and scroll everything beneath the current line up.
• Insert: Insert clean row into track and push all notes and effects in current track
down.
• Left Ctrl + Left Shift + Delete: Delete note under cursor and scroll column
beneath current note up.
• Left Ctrl + Left Shift + Insert: Insert clean row into column and push all data
in current column down.
• Left Ctrl + Left Shift + Left/Right arrow: Remove/add note or effect column.
• Left
• Left
• Left
• Left
• Left
• Left
• Left
• Left
• Left
Shift + F3: Cut current track.
Shift + F4: Copy current track.
Shift + F5: Paste current track.
Ctrl + F3: Cut current pattern.
Ctrl + F4: Copy current pattern.
Ctrl + F5: Paste current pattern.
Alt + F3: Cut current selection in pattern.
Alt + F4: Copy current selection in pattern.
Alt + F5: Paste current selection in pattern.
38.4.2.4 Pattern Sequencer
• Left
• Left
• Left
• Left
• Left
• Left
Ctrl
Ctrl
Ctrl
Ctrl
Ctrl
Ctrl
+
+
+
+
+
+
Left/Right Arrow Keys: Change number of current pattern.
Up/Down Arrow Keys: Move to prev/next pattern in sequence.
Home: Go to first pattern in sequence.
End: Go to last pattern in sequence.
Insert: Insert new pattern into sequence.
Delete: Delete current pattern in sequence.
38.4.2 Pattern Editor
194