1
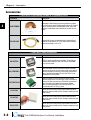
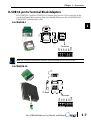
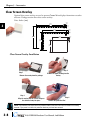
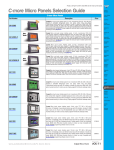
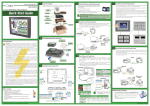
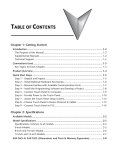
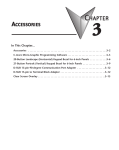
Accessories
Chapter
3
In this Chapter...
Accessories.................................................................................................................. 3-2
C-more Micro Programming Software...................................................................... 3-3
D-SUB 15-pin 90-degree Communication Port Adapter........................................... 3-6
D-SUB 15-pin to Terminal Block Adapters................................................................. 3-7
Clear Screen Overlay.................................................................................................. 3-8
C
UL
R
US
Chapter 3 - Accessories
1
2
3
4
5
6
7
8
9
10
11
12
13
14
A
B
C
D
Accessories
3-2
Part Number
C-more Micro Programming Software & Programming Cable
Description
C-more Micro Windows-based programming software for C-more
EA1 and EA3 series panels. Package includes software CD. Requires
USB port connection from PC to C-more Micro panel. Cables sold
separately. Downloadable version available from the Web site at no
charge.
EA-MG-PGMSW
Standard USB 2.0 cable with Standard-A plug to Standard-B plug,
suitable for all USB devices. 6 ft. (1.8 m) cable shown as example.
Maximum cable length is 15 ft (4.5 m).
USB-CBL-AB6
C-more Micro Panel Accessories
Part Number
Description
DSUB PLC serial communications port adapter, 15-pin 90-degree.
Compatible with C-more EA7 series, EA9-T6CL(-R) and C-more
Micro 4 or 6-inch panels.
EA-ADPTR-4
EA-COMCON-3
DSUB port adapter, 15-pin to 6-terminal RS-422/485, right angle
connector, plugs into the 15-pin serial port on rear of touch panel to
allow wire terminal connections for an RS-422/485 communication
cable. Compatible with C-more EA7 series, EA9-T6CL(-R), and
C-more Micro 4 or 6-inch panels.
EA-COMCON-3A
DSUB port adapter, 15-pin to 6-terminal RS-422/485, straight
connector, plugs into the 15-pin serial port on rear of touch panel to
allow wire terminal connections for an RS-422/485 communication
cable. Compatible with C-more EA9 series panels, C-more
Micro EA3 series panels and EA1-S3x with EA1-MG-SP1. Not
recommended with EA9-T6CL(-R) panels.
EA-6-COV2
Optional clear screen overlay used to protect C-more 6-inch Micro
displays from minor scratches and wear. Package contains three clear
screen overlays.
EA-8-COV2
Optional clear screen overlay used to protect C-more 8-inch Micro
displays from minor scratches and wear. Package contains three clear
screen overlays.
EA-10-COV2
Optional clear screen overlay used to protect C-more 10-inch Micro
displays from minor scratches and wear. Package contains three clear
screen overlays.
®
EA3-USER-M Hardware User Manual, 2nd Edition
Chapter 3 - Accessories
C-more Micro Programming Software
C-more® Micro Programming Software is a spin-off of
its powerful sibling C-more Touch Panel programming
software. It offers very high end features designed to
reduce your configuration time. Simply drag and drop
the objects from the object bar (right side of screen) onto
the the screen construction area. Then configure your
PLC tags and click on the objects you wish to use. Use the built-in simulator to review your
work on your PC before ever downloading your project!
Thumbnail project preview pane
Helps keep track of multi-screen projects.
Built-in user object/screen libraries
Save time by re-using your custom objects
and screens.
Scrolling object selection window
Lets you find the object you want fast. Just
drag and drop it on the screen.
Scrolling help window
Gives you helpful information on each object
Built-in project simulator
• Runs your project on your PC
• Test all of your screens before downloading
• Time savings pays for the panel
PC Requirements:
Following are the minimum system requirements for running C-more Micro Programming
Software, EA-MG-PGMSW, on a PC:
• Operating System - Windows® 7 (32 and 64 bit), Windows 8 (32 and 64 bit); Windows 8.1
(32 and 64 bit)
• 150 MB free hard-disk space
• CD-ROM or DVD drive for installing software from the CD, or internet access to download free
programming software
• USB port for project transfer from software to touch panel
EA3-USER-M Hardware User Manual, 2nd Edition
®
1
2
3
4
5
6
7
8
9
10
11
12
13
14
A
B
C
D
3-3
Chapter 3 - Accessories
1
2
3
4
5
6
7
8
9
10
11
12
13
14
A
B
C
D
C-more Micro Programming Software (cont’d)
C-more Micro Panel Objects
Object
Graphic
Object
Shape objects, just like with drawing tools, allow the user to insert
shapes, such as a straight line, circle, or rectangle drawing into a
project. When a Shape is inserted into a project, a window opens to
allow the user to setup all available parameters for the Line object.
Some of the uses for Shape Objects include but are not limited to adding
callouts, pointers, or indicators.
The Numeric Entry object is used to enter a value from your Panel to a
PLC Register. This object, when selected, opens a Numeric Keypad that
allows the user to enter a new value that will be written to the assigned
Tag Name. The Numeric Entry supports numeric Signed Decimal,
Unsigned Decimal, BCD, and Floating Point data types with up to 11
digits, including decimal points. User Defined Alpha Numeric Prefix and
Suffix values are also supported.
The Frame object allows the user to insert a Frame to the project
that can be used to Frame other objects. Some of the uses for Frame
object include but are not limited to graphically separating objects for
different operations that may appear on one screen and emphasizing
pushbuttons or other objects that may require more attention by the
operator.
The Increment/Decrement Value object is used to add or subtract a
value by pressing a button on the Panel. Basically the object uses two
Tags, one to read a value from and another to write a modified value
to. The Increment/Decrement Value supports numeric Signed Decimal,
Unsigned Decimal, BCD, and Floating Point data types with up to 11
digits, including decimal points. The Increment and decrement values
are also user selectable.
The Pushbutton object is available from the Button Category of the
Object List window. The Pushbutton object is an electronic version of
a typical Pushbutton normally found on control panels. The Pushbutton
object can be used to activate or deactivate components assigned to a
Discrete Tag Name.
The Real Time Graph object displays the value stored in up to eight
PLC tags, over a history of up to 24 points each. One point is added
at each refresh.
The Switch object is an electronic version of a typical Switch that
normally can be found on control panels. The Switch object can be used
to activate or deactivate components assigned to a Discrete Tag Name.
The Line Graph object displays the values of up to 24 PLC address
points. Up to eight address arrays can be displayed. The line is drawn
in its entirety at each refresh.
The Radio Button object is an electronic version of a set of buttons
that have a similar appearance to the classic radio tuning buttons. The
Radio Button allows a minumum of two buttons and a maximum of
eight buttons. The operation of Radio Buttons only allows one button
to be On at a time.
The Analog Meter object is used to display the current value of a
Tag Name.
The Indicator Button object is available from the Button Category of the
Object List window. The Indicator Button object is an electronic version
of a typical Indicator Button normally found on control panels. The
Indicator Button is a combination of a Pushbutton and an Indicator Light.
The Indicator Button can be used to activate or deactivate components
assigned to a Discrete Tag Name.
The Bar Graph object is used to monitor up to two assigned Tag Names
continuously. This object has various appearances depending upon the
relative value of the tags. The Bar Graph can be used to create digital
versions of level, current, and flow meters to name a few samples, or
gauges that measure speed and other measurable data.
The Tri-State Switch Object consists of a set of three Pushbuttons that
allow to configure the first button to the left as a Reset that turns the
other two buttons Off, and configure the other two buttons with individual
Discrete Tag Names.
The Bitmap Button object offers the ability to use a Bitmap graphic
to perform the functions of a Button. This allows users to create their
own graphics and implement them within the software project. The
Bitmap Button object can be used to activate or deactivate components
assigned to a Discrete Tag Name.
The Indicator Light object is an electronic version of a typical Indicator
Light normally found on industrial control panels. The Indicator Light can
be configured to display the status of the assigned Discrete Tag Name.
The Static Bitmap offers the ability to display a Bitmap graphic on
any screen. The Static Bitmap does not change state. Refer to the
Dynamic Bitmap Object if you require the graphic object to change
state based on a Tag Value in your PLC. The dialog box for a “Static
Bitmap” object allows you to “read from disk” and select a graphic file
for import. Graphics must be in one of the following formats: .BMP
.WMF .JPG .JPEG
The Graphic Indicator Light object is a more enhanced version of the
“Indicator Light Object” that allows the user to choose more detailed
graphics to display the status of a tag. This object is an electronic
version of a typical Indicator Light normally found on industrial control
panels. The Indicator Light can be configured to display the status of the
assigned Discrete Tag Name.
The Dynamic Bitmap object offers the ability to make an object using
two different Bitmap graphics that will display one graphic when the Tag
is On and a different graphic when the Tag is Off. Use your own bitmap
designs or use some of the bitmaps provided with the software that are
located in the User Graphic Library.
The Numeric Display consists of a frame that displays a real-time
numeric value according to the value of data received from an assigned
Tag Name. The Numeric Display supports numeric Signed Decimal,
Unsigned Decimal, BCD, and Floating Point data types with up to 11
digits, including decimal point. User Defined Alpha Numeric Prefix and
Suffix values are also supported.
The Multi-State Bitmap (version 2.50 and later) displays one of up to
16 images based on the status of a tag value assigned to each image.
It can be used to create animation.
C-more Micro Panel Objects continued at top of next page.
3-4
®
EA3-USER-M Hardware User Manual, 2nd Edition
Graphic
Chapter 3 - Accessories
C-more Micro Programming Software (cont’d)
Object
C-more Micro Panel Objects
Graphic
Object
Graphic
Recipe objects make it easy to make a large number of tag changes
with the push of a single button. Create Recipes with up to 99 entries,
and multiple sets of values. Then just push a button to load an entire set
of values into the group of recipe tags.
The Text Entry object is used to enter an ASCII string. Two entry
options allow use of an on-screen keypad or the hardware function keys
to enter characters.
The Static Text object is used to display a Frame with a personalized
Message. This Frame and Message can be placed on any screen and
any location within the screen.
The Screen Change Pushbutton object is available from the Control
Category of the Object List window. The Screen Change Pushbutton
object is a pushbutton that can be configured to activate another
screen in the project. This object may be edited to various colors and
sizes. Users can configure the button to activate the Power-Up screen,
Forward Screen, Previous Screen, or any one of the project screens.
The Lookup Text object is used to display a Frame with a personalized
Message. This Frame and Message can be placed on any screen and
any location within the screen. The object is always displayed like a sign
but is configured to display only the message prompted by an assigned
Tag Name. Messages are retrieved from a Message Database which is
configured by the user with text defined by the user. The Lookup Text
Object will scroll text up to 128 characters.
The Screen Selector object is available from the Control Category of
the Object List window. This object is an enhanced version of the Screen
Change pushbutton in that it offers many more features and defaults
with data from screens in the project. This helps to save time by not
having to create Screen change buttons for each screen. This object
may be edited to various colors and sizes.
The Dynamic Text object is used to display text that is retrieved from
data stored in a Tag. The Tag Name is assigned to registers in the PLC
that contain set character data. The data can be stored in the PLC in
ASCII format and may include information such as machine numbers,
locations, part numbers, and such. The Message can be configured to
be visible (Trigger) when an associated Tag Name is On or Off. This
object can be placed on any screen and any location within the screen.
The Dynamic Text Object will scroll text up to 40 characters.
The Adjust Contrast object is used to allow the operator to adjust the
Panel Display Contrast. The default Display setting often works in most
applications, however lighting may vary based on the location of each
application. In these cases the operator can use this object to make
adjustments. The current display setting value will appear on the top of
the button and will change as the arrow keys are pressed. This button
can be modified to various sizes.
The Scroll Text object is available from the Text Category of the
Object List window. The Scroll Text object is an electronic version
of a marquee. It is similar to the Static Text Object. If the text in the
object does not fit in the window, it will scroll from right to left across
the window. The Scroll Text object does not require a Tag Name
assignment. The Scroll Text Object has a maximum character limit of
128 characters.
The Function object is used to assign the panels function key buttons
to a particular action as well as assigning the control of the LED On/Off
status. When a button has been assigned as a shift button, the then F1
through F5 will become F6 through F10. The Function Object buttons
will activate when the hardware button is pressed or when the object is
pressed on the screen. The object size is restricted so that the keys will
line up with the hardware function keys on the panel.
EA3-USER-M Hardware User Manual, 2nd Edition
®
1
2
3
4
5
6
7
8
9
10
11
12
13
14
A
B
C
D
3-5
Chapter 3 - Accessories
3-6
The EA-ADPTR-4 adapter plugs into the 15-pin serial port on the rear of the C-more Micro
panel to allow a PLC communication cable to be plugged in at a 90 degree angle to reduce
panel depth requirements. 15-pin straight through pin-out. UL Recognized.
EA-ADPTR-4
Date code
1.605
[40.8]
1
2
3
4
5
6
7
8
9
10
11
12
13
14
A
B
C
D
D-SUB 15-pin 90-degree Communication Port Adapter
Country of Origin
KOYO ELECTRONICS INDUSTRIES CO., LTD.
EA-ADPTR-4
IOIOI – PLC
1.873
[47.6]
0.793
[20.2]
NOTE: Due to comm port orientation EA-ADPTR cannot be used with EA3-T8CL and EA3-T10CL.
®
EA3-USER-M Hardware User Manual, 2nd Edition
Chapter 3 - Accessories
D-SUB 15-pin to Terminal Block Adapters
EA-COMCON-3 and EA-COMCON-3A adapters plug into the 15-pin serial port on the
rear of the C-more Micro panel to allow wire terminal connections for an RS-422/RS-485/
DH-485 PLC communication cable.
EA-COMCON-3
Date code
1.756
[44.6]
Country of Origin
TERM
RD+
RD–
SD+
EA-COMCON-3
SD–
GND
KOYO ELECTRONICS INDUSTRIES CO., LTD.
1.126
[28.6]
1.873
[47.6]
TERM
RD+
RD–
SD+
SD–
GND
Terminals
NOTE: Due to comm port orientation EA-COMCON-3 cannot be used with EA3-T8CL and EA3-T10CL.
EA-COMCON-3A
0.60
[15.3]
2.07
[52.6]
0.68
[17.4]
1.70
[43.2]
EA3-USER-M Hardware User Manual, 2nd Edition
TERM
RD+
RD–
SD+
SD–
GND
Terminals
®
1
2
3
4
5
6
7
8
9
10
11
12
13
14
A
B
C
D
3-7
Chapter 3 - Accessories
1
2
3
4
5
6
7
8
9
10
11
12
13
14
A
B
C
D
Clear Screen Overlay
3-8
Optional clear screen overlays are used to protect C-more Micro displays from minor scratches
and wear. Package contains three clear screen overlays.
Units: Inches [mm]
0.197
[5.0]
8.906
[226.2]
0.157
[4.0]
EA-10-COV2
0.197
[5.0]
7.315
[185.8]
0.157
[4.0]
EA-8-COV2
6.614
[168.0]
0.197
[5.0]
4.913
[124.8]
5.441
[138.2]
EA-6-COV2
0.157
[4.0]
3.795
[96.4]
Clear Screen Overlay Installation
Step 2
Step 1
Remove the overlay from the package
Remove the paper backing from the
overlay
Step 3
Align the overlay with the screen and press
the adhesive firmly into place
Step 4
Remove the protective film*
*NOTE: The protective cover ships with a thin protective sheet on the face of the cover that needs to be carefully
removed. If your panel is not clear, the protective sheet may not have been removed.
®
EA3-USER-M Hardware User Manual, 2nd Edition