1
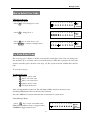
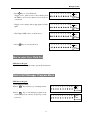
Manager Guide
Manager Guide
This User Guide tells you how to operate your intruder alarm system. To simplify this User
Guide we have assumed that the alarm system has been installed by a professional intruder alarm
system installer (the installer), and that the system is operating in a “typical” way. Aspects of you
system that are not “typical” will be described by your installer.
NOTE: If you have any questions about your intruder alarm system, then consult your installer,
see contact details at the front of this User Guide.
Indications on the system
Indications
LED steady on indication
LED flashing indication
LED off
Internal Sound
External Device: Strobe
External Siren: Bell
Using System
After you have finish system settings, you can use the system now. This section gives an
operation instructions how to set and unset the system as well as how to reset after an alarm.
1
Manager Guide
Table of Contents
Manager Guide................................................................................................................ 1
Indications on the system .............................................................................................. 1
Using System .................................................................................................................. 1
Table of Contents ........................................................................................................... 2
LCD Keypad .................................................................................................................... 3
How to Set the System ................................................................................................................. 3
How to OMIT a zone(s) ............................................................................................................... 4
Unsetting the System ................................................................................................................... 5
How to UNSET from Alarm and RESET the system .................................................................. 5
How to use Panic Alarm on keypad............................................................................................. 6
How to Set up the system............................................................................................................. 6
How to go into Manager Program Mode ..................................................................................... 6
1 = Setup Codes ........................................................................................................................... 7
2 = View Event Log................................................................................................................... 10
3 = How to Authorize engineer access....................................................................................... 11
4 = How to set Chime Zone ....................................................................................................... 11
6 = How to Setup Set Time........................................................................................................ 12
7 = How to Setup Set Date......................................................................................................... 12
8= How to Show Help file ......................................................................................................... 13
9 = Test System.......................................................................................................................... 15
How to Exit Manager Program Menu........................................................................................ 17
LED Keypad ...................................................................................................................18
How to Set the System ............................................................................................................... 18
How to OMIT a zone(s) ............................................................................................................. 19
Unsetting the System ................................................................................................................. 19
How to UNSET from Alarm and RESET the system ................................................................ 20
How to use Panic Alarm on keypad........................................................................................... 20
How to Set up the system........................................................................................................... 21
How to go into Manager Program Mode ................................................................................... 21
1 = Setup Codes ......................................................................................................................... 21
2 = View Event Log................................................................................................................... 23
3 = How to Authorize engineer access....................................................................................... 24
4 = How to set Chime Zone ....................................................................................................... 25
6 = How to Setup Set Time........................................................................................................ 25
7 = How to Setup Set Date......................................................................................................... 25
8= How to Show Help file ......................................................................................................... 25
9 = Test System.......................................................................................................................... 26
How to Exit Manager Program Menu........................................................................................ 27
2
Manager Guide
LCD Keypad
How to Set the System
Full Set
When you leave your premises you will need to set the intruder alarm system.
Before setting the system you should ensure that the premises have been completely vacated and
that all doors and windows are closed. Ensure that pets do not have access to the protected areas
as they can cause a false alarm.
Part Set
If your installer has programmed your system for PART SET operation you will be able to set
some zones of the system while others remain unset. Part set operation is often used at night time,
and it will permit you to walk free around the bedrooms while the living area and outside doors
are protected. Your system may have 2 part-set programs called Part 1 and Part 2 .
Before Part-setting the system you should ensure that all doors and windows are closed. Ensure
that pets do not have access to the protected areas. Your installer may have instructed you to use
a different keypad to the one normally used to set the system.
Note: · There will be no exit beeps if Silent Exit mode was programmed.
· You should wait until you hear that the exit beep has stopped before assuming that the
system has set.
LCD Remote Keypad :
·System is in Day mode.
·Enter 4-digit manager or user code and wait later.
e.g. press
0
1
2
3
· manager using 3 seconds.
· user select arm mode
Press
Or press
Or press
Or press
SET
OMT
I
&
RESET
00:01:00
DAY
08-Aug
Enter your code
***
===Welcome ===
Manager
key to select Full arm mode,
key to select Part 1 arm mode,
To Set Select
[Full]
[P1] [P2]
key to select Part 2 arm mode.
key to exit.
·Exit and check system faults.
System fault could be: Tamper Zone, PA Zone, Fire Zone, Zone N tamper (when EOLR function
enable), CP tamper, Detector Tamper, RKP Tamper, Bell Box Tamper.
3
Manager Guide
·If it has faults in system,
you can see the fault from LCD and
the fault tone will be generated, you should to solve the fault
to allow system to set.
e.g. Detector 1 abnormal.
·When no faults, it will display “Exit–No Faults” and the
exit tone will be generated, it will go to the mode that you selected
until the exit time has finished, if press SET key will quick set
the system.
·Arm mode is set.
Exit Faults…
Z1:Zone 1
Exit error beep
Exit–No Faults
Count down beep
00:01:45
08-Aug
Note: “To Set Select **** ” will be displayed the mode that you set if not disabled in
Engineer Mode/ Setup Programs/ Exit mode.
How to OMIT a zone(s)
If you cannot set the alarm system because a detector is faulty and in constant alarm you may
need to omit is zone from the alarm system. A zone which has been omitted cannot cause an
alarm. Omitted zones will be restored after the system is unset.
Before a zone can be omitted it has to be enabled by the engineer as “Setup zone attrs/Omit
Allowed” zone.
LCD Remote Keypad :
·System work in setting mode, add the set mode is chosen .
( for more information see “How to Setting the System”)
I
·Press OMT
key to go into omit zone window, and display
first omit allowed zone.
·Select a omit allowed zone using
OMT
I
or
&
key.
·Press PROG key to accept and continue setting
or press RESET key to cancel omit function.
To Set Select
[Full]
[P1] [P2]
Exit–No Faults
OMIT ZONE
Z3:Zone 3
OMIT ZONE
Z4:Zone 4
·System work in setting mode
Exit–No Faults
4
Manager Guide
Unsetting the System
When you enter your premises you will need to unset (turn off) the system.
LCD Remote Keypad :
·System is in the SET mode
00:05:45
·Enter the premises by the agreed entry route.
The system produces an entry tone. The LCD shown need unset.
·Enter 4-digit manager or user code.
e.g. press 0 1 2 3 (manager default code)
·manager unset 3 seconds.
08-Aug
Unset System Now
Enter your code
***
Exit stopping by
Manager
·System will be reset and work in DAY mode.
00:26:15 08-Aug
DAY
CAUTION: Entering an invalid user code will operate the code tamper. After 9 incorrect code
entries a full alarm condition will be generated.
How to UNSET from Alarm and RESET the system
You can unset the system in SET and reset it after an alarm, Tamper or PA.
The system will be programmed to be reset by the user or engineer. This is dependent on System
flags set up. See Engineer mode / Setup System/ Flags 1.
e.g. Zone 3 trigger alarm
LCD Remote Keypad :
·System work in SET mode
00:26:15 08-Aug
·Enter manager / user code
e.g. press 0 1 2 3 (manager code)
Exit stopping by
Manager
·It will stop system in alarm and the LCD keypad will
display the message of newest alarm event.
(the display will scroll the following two screens)
5
Intruder Alarm
Z3: Zone 3
Reset Required
Enter your code
Manager Guide
·Enter manager/ user/ engineer code reset. ?
?
?
?
·Day mode
System Reset
00:26:15 08-Aug
DAY
How to use Panic Alarm on keypad
Should you need to attract attention, the full alarm signal can be activated at emergency by
pressing 0 and 5 together
Press 0 & 5 simultaneously, the system and external sounder will sound immediately.
How to Set up the system
The full menu structure for the panel can only be accessed while in Manager Program Mode. The
structure is shown in the following table:
MENU OPTIONS
1 Setup Codes
6 Set Time
2 View alarm Log
7 Set Date
3 Authorize Engineer
8 Show Help File
4 Set Chime Zone
9 Test System
&
Note: LED Remote keypad
Set Chime Zone.
How to go into Manager Program Mode
LCD Remote Keypad:
·System work in Day mode
·Go into Manager Menu
Press PROG 0 1 2
01:28:16
DAY
08-Aug
Enter your code
*****
3
·Manager Menu hint.
MANAGER MENU
Setup Codes?
6
Manager Guide
1 = Setup Codes
There are 10 user codes can be created and set by LCD Keypad in the system,, all are 4-digit and
can be set to any number from 0000 to 9999. The access codes ensure that only authorized users
can operate the system.
1 = user 1, 2 = user 2, 3 = user 3, 4 = user 4, 5 = user 5, 6 = user 6, 7 = user 7,
8 = user 8, 9 = user 9, 0 = user10.
User 1 – User10 codes:
The user 1 to user 10 codes have the same operation for testing and Setting and Unsetting,
changing their own code.
Holiday code:
The purpose of this code is to allow access to the property whilst the manager is absent. The
Holiday access code is programmed by the Manager and is only valid until the manager use’s
the system. At this point the Holiday code becomes invalid and is no longer accepted by the
control panel.
Manager code
To operate the alarm system you will need to use a code. A code is 4 digits long, and can be
any number from 0000 to 9999. By default manager code is 0 1 2 3 but you
should change this as soon as possible.
NOTE: Entering an invalid user code over 4 times, the keypad will be locked out 90
seconds. After 9 incorrect code entries an alarm/ tamper condition will be generated.
7
Manager Guide
How to change User Name
This option allows each of the users to be given a name.
e.g. Change User 1 name to Bill.
LCD Remote Keypad:
Under Manager Menu.
·Press 1 PROG keys go into Setup Codes function.
·Press
… 9 or 0 or
that you want to set.
Note:
1
1 =user 1,
OMT
I
or
2 = user 2, …
0
&
key to select a code
= user 10
or press
&
key to select Holiday, Manager.
·Press
PROG
to accept and go into set the user.
·Press 1
·Press
&
PROG
MANAGER MENU
Setup Codes?
SELECT CODE
User 1?
SETUP CODE
Change Name?
keys go into setup change user name function.
USER NAME
User 1
?
USER NAME
User _
?
key, it will clear the last character.
USER NAME
?
I
·Press OMT
key, it will clear the line text.
[0]..[9] key have different characters.
0 _0
1 ,)?1
2
abc2
3
def3
4 ghi4
5
6 mno6
7
pqrs7
8 tuv8
·Press 2
jkl5
wxyx9
key twice within 3 seconds, 'B' can be shown on LCD.
9
·Press SET key, it will toggles capitals (exchange between capital
and lowercase), ABC-abc. default input capital character.
·Press 4 key thrice, each press key interval 3 seconds,
'i' can be shown on LCD.
·Input “ll” string.
·Press PROG key to accept input and save the text,
·Press RESET key will without change the text and exit.
8
USER NAME
B
?
USER NAME
Bi
?
USER NAME
?Bill
SETUP CODE
Change Code?
Manager Guide
How to change User Code
This option allows each of the users to be given a code.
LCD Remote Keypad:
Under Manager Menu.
·Press 1 PROG keys go into Setup Codes function.
·Press
… 9 or 0 or
that you want to set.
Note:
1
1 =user 1,
or press
·Press
OI
MT
or
2 = user 2, …
0
&
key to select a code
SELECT CODE
User 1?
= user 10
&
key to select Holiday, Manager.
PROG
to accept and go into set the user.
SETUP CODE
Change Name?
·Press 2
key to select Change Code function.
·Press
key go into Change Code function.
PROG
MANAGER MENU
Setup Codes?
SETUP CODE
Change Code?
USER CODE
****
?
·If no code programmed, then display
USER CODE
....
·Input 4-digit, if you input error key, the error tone will
be generated.
?
·Press PROG to save. If the 4-digits is the same as old, then display
and error tone generate,
press any key to leave, it goes to “Delete Code”
·Press RESET key will without change the code and exit.
·Press RESET RESET key to return to manager menu.
Duplicate Code!
SETUP CODE
Delete Code?
How to delete User Code
LCD Remote Keypad:
Under Manager Menu.
·Press 1 PROG keys go into Setup Codes function.
·Press
… 9 or 0 or
that you want to set.
Note:
1
1 =user 1,
OI
MT
2 = user 2, …
or
0
&
key to select a code
MANAGER MENU
Setup Codes?
SELECT CODE
User 1?
= user 10
or press
&
key to select Holiday,
·Press
PROG
to accept and go into set the user.
Manager
SETUP CODE
Change Name?
9
Manager Guide
·Press 3
key to select Delete Code function.
·Press
key will delete the user code..
PROG
SETUP CODE
Delete Code?
Code Deleted!
·Press any key to go to modify next code, if the code is
“Manager codes”, it will leave “Setup Codes” and
go to next menu “View Event Log”.
Press RESET to return to manager menu.
MANAGER MENU
View Event Log?
2 = View Event Log
The event log gives a display of all the events that have taken place. The events are arranged by
date and time. Up to 250 events can be stored in the memory. When the log reaches 250 events
and another event takes place, the first event drops out. The system is known as FILO (First In
Last Out).
To view the event log:
LCD Remote Keypad :
Under Manager Menu
·Press 2 key to select View Event Log function.
·Press
PROG
to accept and most recent event shown first.
·View other event log using
OMT
I
·View event time and date using
or
PROG
&
key.
MANAGER MENU
View Event Log?
Code Change
05:User 5
Code Change
04:User 4
Time : 00 : 28
Date : 08 - Aug
key.
·Press any key to return the currently event log when you view
the time and data of it.
·Press RESET to accept and return back to manager menu..
Code Change
04:User 4
MANAGER MENU
Authorise Engr?
·Finished and return to next option.
·Or press RESET to exit manager menu.
10
Manager Guide
3 = How to Authorize engineer access
Should you require the manager to authorize Engineer access. It is accessed directly form Day
mode via the Manager code.
LCD Remote Keypad:
• Enter Manager program mode
Press PROG 0 1 2 3
•
•
•
MANAGER MENU
Setup Codes?
Press 3 key to require the Manage to authorize Engineer
access.
Press PROG to accept. It will give a 3hr window to operate
the Engineer operation mode.
Press
PROG
MANAGER MENU
Authorise Engr?
Engr Authorised
for 3 hours
to accept, the accept tone will be generated.
MANAGER MENU
Set Chime Zones?
•
Press RESET to go back DAY mode and within 5 seconds
Input engineer code, authorize into engineer mode 3 hours.
00:26:15 08-Aug
DAY
4 = How to set Chime Zone
If a Security Zone is programmed as Chime, you can hear special tone when it is triggered in
DAY mode.
Note: The zone must be set to security for chime to be set.
LCD Remote Keypad:
Under Manager Menu.
·Press 4 PROG keys go into Set Chime Zone function.
·Select a chime zone, and then press
Note:
1 =zone 1, 2 =zone 2, … 0
·Press
·Press
·Press
OMT
I
or
PROG
RESET
&
PROG
to accept
= zone 10
MANAGER MENU
Set Chime Zone?
CHIME ZONE
Zone 1?
Chime
ON
key to toggle ON/OFF,
to save, or press RESET to cannel. it goes to next zone.
to return to Manager menu.
11
CHIME ZONE
Zone 2?
Manager Guide
6 = How to Setup Set Time
The time can be modified in hours, minutes in the format HH:MM. you must set it correctly, or
else System will generate an error tone and not save the changes.
*
Time and Date will be lost once the power supply from both main power and backup battery are cut
LCD Remote Keypad:
Under Manager Menu.
·Press 6 to select Set Time function.
·Press
PROG
MANAGER MENU
Set Time?
Set Time HH:MM
00:00
to accept. Display current time.
set new time to 12:02
·Press 1 2 0 2 number keys.
Set Time HH:MM
12:02
·Press PROG to save it and clear second time, or press
cancel, it will exit and go to “Set Date”.
RESET
to
MANAGER MENU
Set Date?
7 = How to Setup Set Date
Before to set the date, you should select day for the date that you want to set. Using 1 - 7
I or & key to change day, pressing PROG key to save, pressing RESET key to not change.
or OMT
The date can be changed in day, month, year format DD/MM/YY. The method of set date is the
same as how to set time.
e.g. Set current system date: Tuesday, 28-08-2009
LCD Remote Keypad:
Under Manager Menu.
·Press 5
7 to select Set Date function.
·Press
PROG
MANAGER MENU
Set Date?
SELECT DAY
Monday?
to accept. Display current week.
·Select a week day No 2 , and Press
PROG
to accept.
·Enter system date: Day/Mon/Year(6-digits)
SELECT DAY
Tuesday?
Date: DD/MM/YY
08/08/08
12
Manager Guide
·Press 2
8
0
8
0
·Press PROG to save it, or press
and go to “Show Help?”.
9
RESET
number keys.
Date: DD/MM/YY
28/08/09
to cancel, it will exit
MANAGER MENU
Show Help?
8= How to Show Help file
It shows you to use the function key in different operation.
LCD Remote Keypad:
Under Manager Menu.
·Press 8
·Press
&
PROG
keys go into Show help function.
MANAGER MENU
Show Help?
In help screens,
[▼] for nextpage
key show next page.
·Press RESET to cancel at any time, it will exit and
go to “Test System?”. Else help file finish will exit.
13
MANAGER MENU
Test System?
Manager Guide
·Help file as follow:
In help screens,
[ ] for nextpage
[▲] key gives
PREVIOUS option.
When viewing
Event Log...
[▲] for previous
page,
[R] Key always
Quits Menu.
Most recent
shown first
or [R] key
to QUIT help
When entering
Numbers...
[P] shows time
and date
In Set mode...
[P] Accepts
[▼] Backspces.
[▼] previous
event (older)
[S] for Full mode
or Quick Set
[R] Quits.
[▲] next
event (newer)
[▲] key for
Part 1 mode
When entering
Names...
[R] to quit.
[▼] key for
Part 2 mode
[P] Accepts
[▼] Backspces.
Challenger Tel
****************
In Menus...
[R] Quits Withou
change to name
This is the end
of the help page
[P] key Accepts,
or Selects.
Text is entered
same as mobile
[▼] key gives
NEXT option.
[S] toggles
capitals, ABC-abc
▼
Note: [P] using
[▲] using
PROG
key,
[R] using
OMT
I
key, [▼] using
RESET
&
key, [S] using
key.
14
SET
key,
Manager Guide
9 = Test System
This function has three parts in Test System: Test output, Walk Test, View Walk Test.
How to Test Outputs
The test outputs are: 0 = BELL, 1 = Strobe, 2 = Speaker,
LCD Remote Keypad :
Under Manager Menu.
·Press 9 key to select Test System function.
·Press
PROG
MANAGER MENU
Test System?
TEST SYSTEM
Bell?
key go into test system bell item.
·Press 0 key to select Bell output test.
·Press PROG key to test system bell.
TEST SYSTEM
Bell?
·If press 1 key to select Strobe output test.
·Press PROG key to test system strobe.
TEST SYSTEM
Strobe?
·If press 2 key to select speaker output test.
·Press PROG key to test system speakers.
TEST SYSTEM
Speaker?
·Press PROG key to accept and The toggle test outputs ON,
or press RESET key , it will leave the menu “Test System”.
·Press any key stop output and menu return to next test option.
If the test output is “Abort”, it will go to “Walk Test”.
15
TEST SYSTEM
Walk Test?
Manager Guide
How to enter Walk Test
The walk test function allows check each Zone trigger, Zone tamper, Detect Tamper, Control
panel tamper, BellBox tamper, Remote Keypad tamper. if order to verify that they are
functioning correctly. A tone is generated as each zone or tamper is activated (opened).
e.g. Trigger zone 1, zone 1 tamper, Control panel tamper.
LCD Remote Keypad :
Under Manager Menu.
·Press 9 PROG keys go into Test System function.
·Press 8
key to select Walk Test function.
·Press
key go into walk test.
PROG
TEST SYSTEM
Bell?
TEST SYSTEM
Walk Test?
Walk Test
·Trigger zone 1, the toggle Zone will display in LCD,
if it isn’t displayed, to check the Zone that you triggered.
Zone Tested
Z1:Zone 1
·Trigger zone 1 tamper, the toggle Tamper will display
in LCD, if it isn’t displayed, to check the Tamper that
you trigger.
Zone Tamper
Z1: Zone 1
·Trigger Control panel tamper, the toggle Tamper
will display in LCD, if it isn’t displayed, to check the
Tamper that you trigger.
CP Tamper
·Press any key to exit “Walk Test”, then you can view walk Test.
Or when ‘Exit Walk Test’ = ON, it will automatically exit after
20 minutes.
TEST SYSTEM
View Walk Test?
How to enter View Walk Test
To operate the “View Walk Test” as follow:
LCD Remote Keypad :
Under Manager Menu.
·Press 9 PROG keys go into Test System function.
·Press 9 key to select Walk Test function.
TEST SYSTEM
Bell?
TEST SYSTEM
View Walk Test?
16
Manager Guide
·Press
·Press
PROG
key go into walk test.
Zone Tested
Z1:Zone 1
&
key to see the next news
Zone Tamper
Z1:Zone 1
·when you see “Finished” press
or
Press
RESET
PROG
key to exit.
Finished?
key to exit.
How to Exit Manager Program Menu
LCD Remote Keypad :
Under Manager Menu.
RESET key return to top of manager menu.
·Press
·Press
key to exit manager program mode,
return to Day mode, and two accept beep sound are heard .
RESET
17
MANAGER MENU
Setup Codes?
00:28:08 08-Aug
DAY
Manager Guide
LED Keypad
How to Set the System
Full Set
When you leave your premises you will need to set the intruder alarm system.
Before setting the system you should ensure that the premises have been completely vacated and
that all doors and windows are closed. Ensure that pets do not have access to the protected areas
as they can cause a false alarm.
Part Set
If your installer has programmed your system for PART SET operation you will be able to set
some zones of the system while others remain unset. Part set operation is often used at night time,
and it will permit you to free walk around the bedrooms while the living are and outside doors
are protected. Your system may have 2 part-set programs called Part 1 and Part 2 .
Before Part-setting the system you should ensure that all doors and windows are closed. Ensure
that pets do not have access to the protected areas. Your installer may have instructed you to use
a different keypad to the one normally used to set the system.
Note: · There will be no exit beeps if Silent Exit mode was programmed.
· You should wait until you hear that the exit beep has stopped before assuming that the
system has set.
LED Remote Keypad :
·System is in Day mode and supply power 1 minute
later.
·Enter User code/Manager code ? ? ? ?
Day LED will flash 5 second, then you can
select arm mode.
·Press
Or press
Or press
Or press
SET
OMT
I
&
RESET
key to select Full arm mode,
key to select Part 1 arm mode,
key to select Part 2 arm mode.
key to exit.
·If it has faults in system, you can see the fault
from LED and the fault tone will be generated,
you should to solve the fault to set the system.
e.g. Detector 1 abnormal.
1 2 3 4 5 6 7 8 A B
Day
PA
TAMP
1 2 3 4 5 6 7 8 A B
Day
PA
TAMP
1 2 3 4 5 6 7 8 A B
Day
PA
TAMP
1 2 3 4 5 6 7 8 A B
Day
PA
TAMP
Exit error beep
18
Manager Guide
·Press
SET
key quick set the system.(Optional)
Count down beep
·After you selected arm mode, Day LED became
steady.
1 2 3 4 5 6 7 8 A B
Day
PA
TAMP
How to OMIT a zone(s)
If you cannot set the alarm system because a detector is faulty and in constant alarm you may
need to omit is zone from the alarm system. A zone which has been omitted cannot cause an
alarm. Omitted zones will be restored after the system is unset.
Before a zone can be omitted it has to be enabled by the engineer as “Setup zone attrs/Omit
Allowed” zone.
LED Remote Keypad :
·System work in setting mode, add the set mode
is chosen.( for more information see
“How to Setting the System”)
·Press OMT
key to go into omit zone window,
I
and all omit allowed zone is lit.
1 2 3 4 5 6 7 8 A B
Day
PA
TAMP
1 2 3 4 5 6 7 8 A B
Day
PA
TAMP
e.g. To omit zone 4
Press 4 to omit zone 4, the corresponding LED OFF. 1 2 3 4 5 6 7 8 A B
Press same key to toggle ON/OFF.
Note: 1-9 key= zone1 –zone 9, 0 key = zone 10.
·Press PROG key to accept and continue setting
or press RESET key to cancel omit function.
·System will now set.
Day
PA
TAMP
1 2 3 4 5 6 7 8 A B
Day
PA
TAMP
1 2 3 4 5 6 7 8 A B
Day
PA
TAMP
Unsetting the System
When you enter your premises you will need to unset (turn off) the system.
LED Remote Keypad :
1 2 3 4 5 6 7 8 A B
Day
PA
TAMP
1 2 3 4 5 6 7 8 A B
Day
PA
TAMP
·System is in Set mode.
·Enter User code/Manager code ?
System returns to Day mode.
?
?
?
19
Manager Guide
CAUTION: Entering an invalid user code will operate the code tamper. After 9 incorrect keys
pushes a full alarm condition will be generated.
How to UNSET from Alarm and RESET the system
You can unset the system in SET and reset it after an alarm, Tamper or PA.
The system will be programmed to be reset by the user or engineer. This is dependent on System
flags set up. See Engineer mode / Setup System/ Flags 1.
e.g. Zone 3 trigger alarm
LED Remote Keypad :
·System is in Set mode.
·Enter User code/Manager code ? ? ? ?
It will stop sound in alarm and the LED keypad will
show alarm event. First event is flashing, other lit.
·Enter User code/Manager code ?
System returns to Day mode.
?
?
?
1 2 3 4 5
6 7 8 A B
Day
PA
TAMP
1 2 3 4 5
6 7 8 A B
Day
PA
TAMP
1 2 3 4 5
6 7 8 A B
Day
PA
TAMP
How to use Panic Alarm on keypad
Should you need to attract attention, the full alarm signal can be activated at emergency by
pressing 0 and 5 together
Press 0 & 5 simultaneously, the system and external sounder will sound immediately.
20
Manager Guide
How to Set up the system
The full menu structure for the panel can only be accessed while in Manager Program Mode. The
structure is shown in the following table:
MENU OPTIONS
1 Setup Codes
6 Set Time
2 View alarm Log
7 Set Date
3 Authorize Engineer
8 Show Help File
4 Set Chime Zone
9 Test System
Note: LED Remote keypad
&
Set Chime Zone.
How to go into Manager Program Mode
LCD Remote Keypad:
·System work in Day mode
1 2 3 4 5
6 7 8 A B
Day
PA
TAMP
·Go into Manager Menu.
Press PROG 0 1 2 3
1 2 3 4 5
6 7 8 A B
Day
PA
TAMP
1 = Setup Codes
There are 2 user codes can be set by LED Keypad in the system .All are 4-digit and can be set to
any number from 0000 to 9999. The access codes ensure that only authorized users can operate
the system.
1 = user 1, 2 = user 2, 3 = Holiday, 6 = Manager .
User 1 – User2 codes:
The user 1 –user 2 codes have the same operation for testing and Setting and Unsetting,
changing their own code.
Holiday code:
The purpose of this code is to allow access to the property whilst the manager is absent. The
Holiday access code is programmed by the Manager and is only valid until the manager use’s
the system. At this point the Holiday code becomes invalid and is no longer accepted by the
control panel.
21
Manager Guide
Manager code
The operate the alarm system you will need to use a code. A code is 4 digits long, and can
be any number from 0000 to 9999. By default manager code is 0 1 2 3 but you
should change this as soon as possible.
NOTE: Entering an invalid user code will operate the code tamper. After 9 incorrect
key-push a full alarm condition will be generated.
How to change User Name
LED Remote Keypad:
The LED Remote Keypad cannot program user names.
How to change User Code
This option allows each of the users to be given a code.
LED Remote Keypad:
1 2 3 4 5 6 7 8 A B
Under Manager Menu.
·Press 1 to select Setup User codes.
·Press 1
to change User 1.
·Enter the new user 1 code (4 digits)
? ? ? ? New code
·Press PROG key to save. If the 4-digit is the same
as old, the error tone will be generated.
·Press RESET key will cancel and return.
22
Day
PA
TAMP
1 2 3 4 5 6 7 8 A B
Day
PA
TAMP
1 2 3 4 5 6 7 8 A B
Day
PA
TAMP
1 2 3 4 5 6 7 8 A B
Day
PA
TAMP
Manager Guide
How to delete User Code
LED Remote Keypad:
Under Manager Menu.
·Press 1 to select Setup User codes.
1 2 3 4 5 6 7 8 A B
Day
PA
TAMP
·Press 1 to change User 1.
1 2 3 4 5 6 7 8 A B
Day
PA
TAMP
I key to delete user 1 code.
·Press OMT
·Press RESET RESET to return to manager menu.
1 2 3 4 5 6 7 8 A B
Day
PA
TAMP
2 = View Event Log
The event log gives a display of all the events that have taken place. The events are arranged by
date and time. Up to 16 events can be stored in the memory. When the log reaches 16 events and
another event takes place, the first event drops out. The system is known as FILO (First In Last
Out).
To view the event log:
Led Remote Keypad:
1 Jump to oldest event
Press:
2 Move one event older
3 Move one event newer
4 Jump to newest event
9 Clear all alarm event
After selecting Alarm Log the zone, PA and Tamper LED’s will show the latest event
A flashing LED indicates the zone that was first activated.
Any other LED lit was activated after the first event but before system unset.
Under Manager Menu.
·Press 2 key to select view alarm event.
LED 1flashing indicate Zone 1 is triggered first.
TAMPER is triggered after Zone 1
1 2 3 4 5 6 7 8 A B
23
Day
PA
TAMP
Manager Guide
·Press
RESET
to leave view alarm log menu.
1 2 3 4 5
6 7 8 A B
Day
PA
TAMP
1 2 3 4 5 6 7 8 A B
Day
PA
TAMP
1 2 3 4 5 6 7 8 A B
Day
PA
TAMP
How to clear all alarm events?
Under Manager Menu.
·Press
2
key to select view alarm event.
·Press 9 to clear all alarm events.
System all LEDs would be dark and emit
a confirm sound to indicate clear all alarm event.
Acknowledge
·Press RESET to leave view alarm log menu.
·Press RESET RESET to leave manager menu.
1 2 3 4 5 6 7 8 A B
Day
PA
TAMP
3 = How to Authorize engineer access
You should require the manager to authorize Engineer access. It is accessed directly form Day
mode via the Engineer code.
LED Remote Keypad:
·Enter Manager program mode.
·Press PROG 0 1 2 3
·Press 3 to authorize Engineer access.
Then Engineer can access program mode
within 3hr hour.
·Press to
RESET
1 2 3 4 5
6 7 8 A B
Day
PA
TAMP
1 2 3 4 5
6 7 8 A B
Day
PA
TAMP
1 2 3 4 5
6 7 8 A B
Day
PA
TAMP
leave the current menu.
24
Manager Guide
4 = How to set Chime Zone
If a Security Zone is programmed as Chime, you can hear special tone when it is triggered in
DAY mode.
Note: The zone must be set to security to be set.
LED Remote Keypad:
·Under Manager mode
·Press & key go into Set Chime Zone function.
And zone 3 LED ON indicates the zone set chime.
1 2 3 4 5 6 7 8 A B
Day
PA
TAMP
e.g. Set Zone1, for Chime function.
·Press 3 key cannel zone 3 chime.
1 2 3 4 5 6 7 8 A B
Day
PA
TAMP
·Press 1
1 2 3 4 5 6 7 8 A B
Day
PA
TAMP
1 2 3 4 5
Day
PA
TAMP
4
keys to select Chime zone.
·Press PROG to accept the change.
Or press RESET to cancel.
6 = How to Setup Set Time
LED Remote Keypad:
The LED Remote Keypad cannot set time.
7 = How to Setup Set Date
LED Remote Keypad:
The LED Remote Keypad cannot set date.
8= How to Show Help file
LED Remote Keypad:
The LED Remote Keypad cannot operate the menu item.
25
6 7 8 A B
Manager Guide
9 = Test System
This function has three parts in Test System: Test output, Walk Test, View Walk Test.
How to Test Outputs
The test outputs are: 0 = BELL, 1 = Strobe, 2 = Speaker
LED Remote Keypad :
Under Manager Menu.
·Press 9 key to Select Test System.
1 2 3 4 5 6 7 8 A B
Day
PA
TAMP
·Press 0 key to select Bell test.
1 2 3 4 5
6 7 8 A B
Day
PA
TAMP
6 7 8 A B
Day
PA
TAMP
Bell on
·Press 1 key to select Strobe test.
1 2 3 4 5
Strobe on
·Press 2 key to select Speaker test.
1 2 3 4 5 6 7 8 A B
Day
PA
TAMP
Alarm sound
·Press
RESET
1 2 3 4 5 6 7 8 A B
key to exit current level.
Day
PA
TAMP
How to enter Walk Test
The walk test function allows check each Zone trigger, Zone tamper, Detect Tamper, Control
panel tamper, BellBox tamper, Remote Keypad tamper. if order to verify that they are
functioning correctly. A tone is generated as each zone or tamper is activated (opened).
e.g. Trigger zone 1, zone 1 tamper, Control panel tamper.
LED Remote Keypad :
Under Manager Menu.
·Press 9 key to Select Test System.
1 2 3 4 5 6 7 8 A B
26
Day
PA
TAMP
Manager Guide
·Press 8 key to select Walk test.
1 2 3 4 5 6 7 8 A B
Trigger zone 1, when a zone is successfully tested,
the LED is on, Zones are added to list as each one
is activated.
Day
PA
TAMP
·Trigger zone 1 tamper and its appropriate led will
light.
1 2 3 4 5
6 7 8 A B
Day
PA
TAMP
·The Tamper LED comes on when tested.
1 2 3 4 5
6 7 8 A B
Day
PA
TAMP
·Press
1 2 3 4 5
6 7 8 A B
Day
PA
TAMP
RESET
key to exit current level.
How to enter View Walk Test
LED Remote Keypad :
The LED Remote Keypad cannot operate the menu item.
How to Exit Manager Program Menu
LED Remote Keypad :
Under Manager Menu.
RESET key return to top of manager menu.
·Press
·Press
key to exit manager program mode,
return to Day mode, and two accept beep sound
are heard .
1 2 3 4 5 6 7 8 A B
Day
PA
TAMP
1 2 3 4 5 6 7 8 A B
Day
PA
TAMP
RESET
27