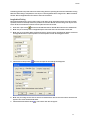
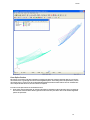
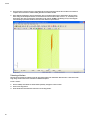
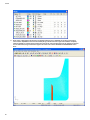
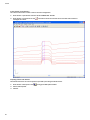
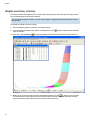
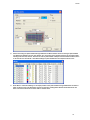
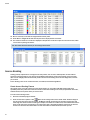
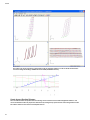
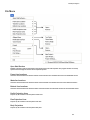
1
ShipCAM
www.ShipConstructor.com
© Copyright 2012 ShipConstructor Software Inc. – Jan. 31, 13
ShipConstructor 2013 ShipCAM
Published 2013-01-31
Copyright
Copyright © 2012 ShipConstructor Software Inc.
Information in this ShipConstructor manual is the property of ShipConstructor Software Inc. No part of it can be reproduced, translated,
resold, rented, adapted, modified, stored in a retrieval system or transmitted in any form or by any means, in whole or in part. All Rights
Reserved.
Trademarks
ShipConstructor
AutoMagic
SmartParts
Database Driven Relational Object Model
DDROM
Are all registered trademarks of ShipConstructor Software Inc.
ShipConstructor Software Inc.
Suite 304
3960 Quadra Street
Victoria, BC
Canada V8X 4A3
Toll Free:
Phone:
Fax:
1-888-210-7420
1-250-479-3638
1-250-479-0868
Information:
Support:
Sales:
[email protected]
[email protected]
[email protected]
Website:
www.ShipConstructor.com
SHIPCONSTRUCTOR LICENSE AGREEMENT
BEFORE PROCEEDING WITH THE INSTALLATION, YOU MUST ACCEPT THE TERMS OF THIS
AGREEMENT. INDICATE YOUR ACCEPTANCE OR REJECTION OF THIS AGREEMENT BY CLICKING ON THE
APPROPRIATE BUTTON. IF YOU CLICK ON “REJECT,” INSTALLATION WILL ABORT.
1. License Grant. ShipConstructor Software Inc., #304 – 3960 Quadra Street,
Victoria, B.C. Canada, V8X 4A3 (“SSI”) grants to the person accepting this
Agreement (the “Licensee”) a non-exclusive, non-transferable right to use (the
“License”) in object code form those program modules, application programming
interface (“API”), any other materials provided by SSI under this Agreement, and all
upgrades, revisions, fixes, updates or enhancements to any of the foregoing
(“Licensed Materials”) specified in the Licensee’s purchase order or request
(“Invoice) solely on the software and hardware listed in the Licensed Materials
manual (“System Configuration”).
2. Academic Institutions/Trial Versions.
A. In the event that the Licensee qualifies as an academic institution user in
accordance with SSI’s specifications (an “Academic Licensee”), the Academic
Licensee and its faculty, employees and students may use the Licensed Materials
for the singular purpose of either teaching, training users or undertaking
research provided that the Licensed Materials, and all copies of the Licensed
Materials, remain at all times at the Academic Licensee’s premises and the
Licensed Materials are used for no other purpose than that set forth above. The
above restrictions are in addition to the restrictions on use set out in Section 5
below.
B. In the event that the Licensee receives a trial version of the Licensed Materials
for evaluation purposes, the terms and conditions of this Agreement, excluding
Sections 15-19, shall continue to apply subject to the following provisions:
(a)
the License pursuant to Section 1 above shall terminate at the end of
the specified trial period;
(b)
the Licensee shall return the Hardware Key to SSI immediately upon
expiry of the specified trial period and in any event within 28 days of
the expiry of the specified trial period;
(c)
in the event that the Licensee does not return the Hardware Key in
accordance with Section 2B.(b) above, SSI shall be entitled to invoice
the Licensee for and the Licensee shall pay for the costs of the
Hardware Key plus all shipping and handling expenses and SSI
administrative charges; and
(d)
in the event that the Licensee elects to and does acquire a License, the
terms and conditions of this Agreement, excluding Section 2B herein,
shall continue on and apply.
3. Ownership. All rights, title and interests in and to the Licensed Materials and related
documentation shall remain the sole property of SSI. Licensee shall not remove or
alter any proprietary rights notices on the Licensed Materials and the
documentation, and shall reproduce such notices on any copies that it makes.
Licensee shall be liable for the security of the Licensed Materials and the
documentation in its possession.
4. Expertise Required. Licensee is responsible for evaluating whether the Licensed
Materials meets Licensee’s requirements, and for operating the Licensed Materials
and the results obtained. The Licensed Materials are intended for ship modeling and
construction purposes only, and must be used by a person who has expertise and
knowledge in this field. The Licensed Materials requires independent confirmation of
the reliability and accuracy of all designs, drawings and other Licensed Materials
output. An SSI representative may be made available under a separate consulting
agreement, at the Licensee’s request to provide training and consultation on the
operation or integration of licensed materials.
5. Limitations on Use.
Licensee shall:
(a)
not make more copies of the Licensed Materials than are necessary for the
Licensee’s installation of the Licensed Materials and shall only create
backup copies for archival or emergency restart purposes;
(b)
maintain a log of the number of and location of all originals and copies of
the Licensed Materials;
(c)
include SSI’s copyright, trademark and proprietary notices on any
complete or partial copies of the Licensed Materials in the same form and
location as the notice on any original work;
(d)
not attempt to defeat any copy protection;
(e)
not modify, any documentation, including any user manuals;
(f)
not modify, translate, reverse engineer, decompile or disassemble the
Licensed Materials;
(g)
not sublicense, transfer, assign, sell, loan, rent or lease the Licensed
Materials other than as permitted in this Agreement;
(h)
use the Licensed Materials for its own internal use only;
(i)
not permit any third party to use the Licensed Materials; and
(j)
thoroughly test any and all custom interfaces in accordance with general
engineering principles.
6. Delivery and Installation. All Licensed Materials will be delivered in an electronic
format by media or method as SSI may elect and will be sent to the Licensee’s
designated email address or shipping address as specified in the Invoice. Licensee
agrees to be responsible for installation of the Licensed Materials.
7. Term of License. The License term commences on the delivery of the Licensed
Materials to the Licensee, and, subject to Section 2B above, is either perpetual if so
requested on the Order, or on a month to month rental or lease basis. If Licensee
chooses a lease option the license converts to a perpetual term on Licensee’s
payment of the balance of the perpetual License fee (prior monthly payments
receiving 80% credit). All Licenses are subject to termination in accordance with
this Agreement.
8. System Configuration. Operation of the Licensed Materials requires use of the
specified System Configuration, which Licensee shall acquire and implement. SSI
shall not be responsible for any operational problems caused by the System
Configuration.
9. Security. The Licensed Materials includes security elements which support the
detection of unauthorized use or copying of the software and which may (a)report
such unauthorized use or copying to the Licensee, and (b)if applicable based on
Licensee’s configuration, may report back specific user information such as User
name and email address.
10.Hardware Keys. Licensed Materials use requires “Hardware Keys” supplied by SSI,
which can be used only at the site(s) authorized by SSI. In the event of a failure of
the Licensee’s System Configuration, the Licensee may upon advising SSI use the
Hardware Keys and Licensed Materials on another system and/or location.
11.License Fees. Licensee shall pay to SSI the License fees applicable for the Licensed
Materials as set out in and in accordance with SSI’s Invoice.
12.Services. Support services after the Warranty Period (as defined in Section 15
below) are provided by SSI under the terms of the SSI Subscription Agreement.
Installation, consulting, training and implementation services, if requested by the
Licensee, shall be provided by separate agreement and at an additional charge.
13.Taxes. All amounts payable by Licensee to SSI are exclusive of all commodity taxes,
including but not limited to applicable sales, use, value added, custom duties, excise
taxes and other similar government charges, all of which will be paid by Licensee. If
Licensee is required by law to withhold any taxes, then Licensee shall pay SSI a
gross amount of money such that the net amount received by SSI after deducting or
withholding the required taxes is equal to the amount of the fee originally charged
by SSI.
14.Interest Charges. If any amount payable under this Agreement is not paid within 30
days of becoming due, SSI shall have the right to impose a charge of 2% per month
(24% annually) on the unpaid balance of the amount, from the due date until the
date of receipt of all amounts in arrears including interest.
15.Purchase Orders. Any purchase order (an “Order”) delivered by Licensee shall at
all times be deemed to incorporate this Agreement by reference and shall be subject
to the applicable provisions of this Agreement. Any provisions of an Order shall not
apply and shall not be binding upon SSI unless they relate to information which was
requested by SSI. In the event of a conflict or an inconsistency between the
provisions of an Order and the terms and conditions of this Agreement, this
Agreement shall govern and supersede to the extent of such conflict or
inconsistency.
16.Limited Warranty. SSI warrants that during a period of 90 days from the date of
delivery of the Licensed Materials to Licensee (the “Warranty Period”), the
Licensed Materials will perform substantially in accordance with the Licensed
Materials documentation specifications, when used in accordance with this
Agreement on a properly operating System Configuration. SSI’s sole obligation
under this Warranty, and Licensee’s exclusive remedy, shall be to use reasonable
commercial efforts to correct Errors (a bug, defect or other problem incurred by a
user in operating the Software that prevents the Software from performing in a
manner consistent with the applicable specifications set out in the User Manual) that
the Licensee identifies to SSI through fixes or workarounds free of charge. If SSI
determines that it is unable to make the Licensed Materials perform substantially as
warranted, Licensee may terminate the License and receive a refund of a portion of the
License Fees paid to date.
17. WARRANTY EXCLUSIONS. THE LIMITED WARRANTY CONTAINED IN SECTION 15 IS
IN LIEU OF ALL OTHER WARRANTIES, EXPRESS OR IMPLIED. ALL OTHER
CONDITIONS, WARRANTIES, AND REPRESENTATIONS, EITHER EXPRESS OR
IMPLIED, ARE EXCLUDED, INCLUDING BUT NOT LIMITED TO CONDITIONS,
REPRESENTATIONS AND WARRANTIES RELATING TO MERCHANTABILITY AND
FITNESS FOR A PARTICULAR PURPOSE. SSI DOES NOT WARRANT THAT THE
LICENSED MATERIALS ARE COMPLETELY ERROR FREE OR THAT ITS OPERATION WILL
BE CONTINUOUS AND UNINTERRUPTED.
18.Maintenance Services. Licensee may elect, to obtain maintenance, support and
upgrade services from SSI in accordance with and subject to the terms of SSI’s
standard Subscription Agreement.
19.Loss of Data. SSI shall not be responsible for any loss of or damage to files or data
caused by the Licensed Materials, or be required to restore or rebuild files or data.
Licensee shall implementing adequate backup procedures to avoid any loss of files
and data.
20. Modifications. SSI may, from time to time, provide the Licensee with revisions to
the Licensed Materials (the “Revised Licensed Materials”). The Licensee shall test
any external applications using the revised API before implementing the new
version. While it is SSI’s intention that the Revised Licensed Materials shall be
backward-compatible with the immediately prior version of the Licensed Materials,
SSI does not guarantee or warrant that this shall be so, and SSI shall have no
liability whatsoever to the Licensee for any failure of the Revised Licensed Materials
to be backward compatible with any prior version of the Licensed Materials.
Modifications requested by the Licensee shall be subject to prior written agreement
as to scope and fees payable. Ownership of all Licensed Materials modifications
shall vest in SSI. SSI does not warrant, guarantee or otherwise commit to
supporting Licensed Materials that has been superseded by Revised Licensed
Materials.
21.Confidential Information. Each party will not use the confidential information of the
other party for any purpose except for the purpose described in this Agreement, and
shall not disclose it to any other person except on a confidential basis to its
employees and representatives who have a need-to-know the confidential
information for such purposes. This Section 23 shall not apply to confidential
information which (a) is or has become readily available to the public in the same
form other than by an act or omission of the receiving party, (b) was lawfully
obtained in the same form by the receiving party from a third party not under an
obligation of confidence to the disclosing party, (c) was in the receiving party’s
possession in the same and material form prior to its receipt from the disclosing
party and did not otherwise originate from the disclosing party, or (d) is required to
be disclosed by operation of law.
22. Audit Rights. Upon reasonable notice by SSI, which shall be delivered on no more
than an (annual?) basis, Licensee shall provide a signed statement verifying its
compliance with the terms of this Agreement. SSI shall also have the right, upon
reasonable notice and no more than on an annual basis, to inspect Licensee’s
facilities to verify Licensee’s compliance with such terms. Any such inspection or
audit shall be conducted either by SSI or by representatives authorized by SSI to
complete the inspection. If such inspections or audits disclose that the Licensee has
installed, accessed or permitted access to the Licensed Materials in a manner that is
not permitted under this Agreement, then Licensee shall be liable to pay for any
unpaid license fees as well as the reasonable costs of the audit.
23.Termination. This Agreement may be terminated by either party, immediately by
written notice, if the other party commits a breach of any material provision of this
Agreement, including a failure to make payment when due, and fails to correct or
rectify such breach within 30 days of receipt of the notice requesting it to do so.
SSI shall be entitled to place time-lock devices and other disabling features in the
Licensed Materials that become effective in the event that the Licensee has failed to
comply with its payment obligations hereunder and as set out in SSI Invoices.
24.Effect of Termination.
Upon termination of this Agreement Licensee shall
immediately cease using the Licensed Materials, and within 14 days of termination
return all Hardware Keys to SSI.
25.CONSEQUENTIAL DAMAGES. IN NO EVENT SHALL SSI BE LIABLE FOR ANY LOSS
OF DATA OR PROFITS, ECONOMIC LOSS OR SPECIAL, INDIRECT, INCIDENTAL,
CONSEQUENTIAL OR PUNITIVE DAMAGES WITH RESPECT TO THIS AGREEMENT
OR THE LICENSED MATERIALS, HOWEVER CAUSED, EVEN IF SSI HAD OR SHOULD
HAVE HAD ANY KNOWLEDGE OF THE POSSIBILITY OF SUCH DAMAGES.
26.DAMAGES LIMITATION. THE MAXIMUM LIABILITY OF SSI FOR ALL CLAIMS AND
DAMAGES OF ANY KIND, WHETHER FOR FUNDAMENTAL BREACH OR ANY OTHER
CAUSE UNDER THIS AGREEMENT, SHALL BE LIMITED IN THE AGGREGATE TO THE
TOTAL OF ALL FEES PAID BY LICENSEE.
27.LIMITATION OF NON-APPLICABILITY. IN SOME JURISDICTIONS THE EXCLUSION
OR LIMITATION OF WARRANTIES OR LIABILITY MAY NOT BE APPLICABLE, AND IN
SUCH JURISDICTIONS SSI HEREBY LIMITS ITS LIABILITY TO THE FULLEST EXTENT
PERMITTED BY LAW.
28.Applicable Law. This Agreement shall be subject to and construed in accordance
with the laws of the Province of British Columbia, Canada, excluding its conflict of
laws rules and the application of the UN Convention on Contracts for the
International Sale of Goods.
29.References. SSI shall be allowed to incorporate Licensee’s name in SSI’s customer
reference list and to use it for marketing.
30.Dispute. If any dispute arises under this Agreement, a good faith attempt to resolve
the dispute will be made by senior management of both parties at a mutually
agreeable site and time. If the parties are unable to reach agreement within 30
days after a request for such meeting, the dispute shall be referred to arbitration in
English, before one arbitrator in Victoria, British Columbia, Canada, in accordance
with the Commercial Arbitration Act of the British Columbia.
31.Entire Agreement. This Agreement contains the entire agreement between the
parties and shall supersede all prior discussions and agreements between the parties
regarding its subject matter.
32.Amendment. Any amendment of this Agreement must be in writing and signed by
duly authorized representatives of the parties.
33.Waiver. The waiver by any party of a breach by the other party of this Agreement
shall not be construed as a waiver by such party of any succeeding breach by the
other party of the same or another provision.
34.Assignments. Licensee may not assign or transfer the License or Licensee’s rights or
obligations under this Agreement without SSI’s prior written consent, and any such
assignment or transfer without consent shall be null and void. A transfer of all or
substantially all of the voting stock of the Licensee shall constitute a transfer for
these purposes and shall be subject to SSI’s prior written consent.
35.Successors and Assigns. This Agreement will bind and enure to the benefit of the
parties and their respective successors and permitted assigns.
36.Severability. In the event that any provision of this Agreement is declared invalid,
illegal or unenforceable by a court having jurisdiction, then the remaining provisions
shall continue in full force and effect.
37.Force Majeure. Except as related to Licensee’s obligation to make payments to SSI,
neither party shall be liable for delays or non-performance if such delays or nonperformance are beyond such party's reasonable control. A delayed party shall
promptly notify the other party in writing stating the cause of the delay and its
expected duration and shall use commercially reasonable efforts to remedy a delay
or non-performance as soon as reasonably possible.
38.Survival. The provisions of Sections 3, 5, 11, 13, 14, 17 and 20-30 shall survive the
expiry or termination of this Agreement.
39.Language. It is the express will of the parties that this Agreement and related
documents have been prepared in English. C’est la volonté expresse des parties que
la présente Convention ainsi que les documents qui s’y rattachent soient rédiges en
anglais.
#363338
28/05/2010
Contents
Contents
Introduction
1
Example Project.................................................................................................................................................... 1
Hands-On Demo.................................................................................................................................................... 2
Tutorial
2
Fairing .................................................................................................................................................................... 3
Selecting Commands...............................................................................................................................................................3
Download Demo Project..........................................................................................................................................................3
Fairing Projects .........................................................................................................................................................................4
Opening Files Window -- Sorting.............................................................................................................................................7
Toolbars......................................................................................................................................................................................8
Views...........................................................................................................................................................................................9
Multiple Views ........................................................................................................................................................................ 10
Removing Multiple Views ..................................................................................................................................................... 12
Changing Colors..................................................................................................................................................................... 12
Fairing a Station..................................................................................................................................................................... 13
Knuckles and Straightening Stations................................................................................................................................. 15
Checking Fairness.................................................................................................................................................................. 16
Longitudinal Fairing............................................................................................................................................................... 17
Location File Editing.............................................................................................................................................................. 22
LoftSpace.............................................................................................................................................................27
LoftSpace Basics ................................................................................................................................................................... 27
Surface Generation................................................................................................................................................................ 31
Cross Spline Surface ............................................................................................................................................................. 33
Developable Surface ............................................................................................................................................................. 36
Intersect Surfaces.................................................................................................................................................................. 39
Trimming a Surface............................................................................................................................................................... 40
Creating a Deck Surface....................................................................................................................................................... 43
Fillet ......................................................................................................................................................................................... 45
Frame Lofting......................................................................................................................................................48
Cutting Sections..................................................................................................................................................................... 48
Producing Frame Marks and Inserting Cutouts ................................................................................................................ 51
Expanding Plates................................................................................................................................................59
Expanding a Bow Fashion Plate .......................................................................................................................................... 66
Expanding the Plate with the Bow Thruster Intersection ................................................................................................ 68
Shell Expansion ..................................................................................................................................................70
Weights and Center of Gravity .........................................................................................................................72
i
Contents
Inverse Bending..................................................................................................................................................76
Create Inverse Bending Frames.......................................................................................................................................... 76
Create Inverse Bending Stringers........................................................................................................................................ 78
PinJigs ..................................................................................................................................................................80
PrintOffsets .........................................................................................................................................................82
Congratulations! .................................................................................................................................................85
Reference Section
86
Projects................................................................................................................................................................86
New Project............................................................................................................................................................................. 86
Open Project........................................................................................................................................................................... 87
Project Settings...................................................................................................................................................................... 87
Licensing..............................................................................................................................................................89
Configurations........................................................................................................................................................................ 89
Create a Modified Project..................................................................................................................................................... 92
Project Examples................................................................................................................................................93
Hard-Chine Vessels................................................................................................................................................................ 93
Single-Surface Round Bilge Hulls........................................................................................................................................ 94
Multiple-Surface Round Bilge Hulls .................................................................................................................................... 95
LoftSpace Program
97
General Features................................................................................................................................................97
Selecting Objects ................................................................................................................................................................... 97
Blocks Window....................................................................................................................................................................... 97
Context Menu ......................................................................................................................................................................... 98
File Menu .............................................................................................................................................................99
Open ShipCAM File ................................................................................................................................................................ 99
Import DXF File ....................................................................................................................................................................101
Import IDF File......................................................................................................................................................................102
Import IGES Files .................................................................................................................................................................103
Group Visible Blocks............................................................................................................................................................104
Save Compressed................................................................................................................................................................104
Export DXF File .....................................................................................................................................................................105
Export IDF..............................................................................................................................................................................105
Export GHS............................................................................................................................................................................106
Preferences...........................................................................................................................................................................107
Project ...................................................................................................................................................................................107
Blocks Menu..................................................................................................................................................... 107
Select.....................................................................................................................................................................................107
Unload....................................................................................................................................................................................107
Create ....................................................................................................................................................................................108
Move ......................................................................................................................................................................................108
Transpose..............................................................................................................................................................................108
Reverse Vertices ..................................................................................................................................................................108
ii
Contents
Reverse Lines .......................................................................................................................................................................108
Mirror Half-Breadth..............................................................................................................................................................108
Scale ......................................................................................................................................................................................108
Rotate....................................................................................................................................................................................109
Sort Lines ..............................................................................................................................................................................109
Automatically Sort Lines.....................................................................................................................................................109
Trim........................................................................................................................................................................................109
Mesh Lines............................................................................................................................................................................110
Outlines .................................................................................................................................................................................111
Remove Vertices Below Tolerance....................................................................................................................................111
Exchange Coordinates ........................................................................................................................................................111
Smooth Fans ........................................................................................................................................................................112
Connect Lines.......................................................................................................................................................................112
Plate Stock Settings............................................................................................................................................................112
Lines Menu ....................................................................................................................................................... 113
Select.....................................................................................................................................................................................114
Delete ....................................................................................................................................................................................114
Move ......................................................................................................................................................................................114
Reverse Vertices ..................................................................................................................................................................114
Reverse Lines .......................................................................................................................................................................114
Mirror Half-Breadth..............................................................................................................................................................114
Rotate....................................................................................................................................................................................114
Connect .................................................................................................................................................................................115
Trim........................................................................................................................................................................................115
Extend > By Amount............................................................................................................................................................115
Extend > To Line...................................................................................................................................................................115
Reverse Vertices ..................................................................................................................................................................116
Thin Vertices .........................................................................................................................................................................116
Remove Vertices Below Tolerance....................................................................................................................................116
Vertices Menu .................................................................................................................................................. 116
Select.....................................................................................................................................................................................116
Delete ....................................................................................................................................................................................116
Move ......................................................................................................................................................................................116
Vertex Context Menu ...........................................................................................................................................................116
Tools Menu ....................................................................................................................................................... 117
Offset Editor..........................................................................................................................................................................117
Surface Generation......................................................................................................................................... 119
General Procedure for Generating a Surface..................................................................................................................120
Cross Spline Surface ...........................................................................................................................................................120
B-Spline Surface...................................................................................................................................................................121
Developable Surface ...........................................................................................................................................................122
Straight Section Surface.....................................................................................................................................................122
Project Lines..................................................................................................................................................... 123
Intersect Surfaces................................................................................................................................................................124
Deck Surfaces ......................................................................................................................................................................125
How to Create a Sideline Deck..........................................................................................................................................126
How to Create a Centerline Deck......................................................................................................................................127
Offset Surface.......................................................................................................................................................................128
Fillet .......................................................................................................................................................................................128
iii
Contents
Planar Sections................................................................................................................................................ 129
Plane Parallel Sections > Frames, Waterlines, Buttocks..............................................................................................130
Oblique > Two Points ..........................................................................................................................................................132
Oblique > Three Points........................................................................................................................................................132
Oblique > Point & Angle .....................................................................................................................................................132
Connect Sections.................................................................................................................................................................132
Show Porcupines .................................................................................................................................................................132
Options ..................................................................................................................................................................................133
LinesFairing Program
134
Mathematical Background ............................................................................................................................ 135
File Menu .......................................................................................................................................................... 135
Open.......................................................................................................................................................................................135
Save .......................................................................................................................................................................................135
Save As..................................................................................................................................................................................135
Save Splines .........................................................................................................................................................................135
Make Line Offsets................................................................................................................................................................136
View Menu ........................................................................................................................................................ 137
Vertex Window .....................................................................................................................................................................137
View > Colors........................................................................................................................................................................139
View > Control Vertex Move Direction ..............................................................................................................................140
References Menu ............................................................................................................................................ 140
Line ........................................................................................................................................................................................140
Circle......................................................................................................................................................................................140
Files........................................................................................................................................................................................140
Remove References............................................................................................................................................................140
Frames...................................................................................................................................................................................141
Waterlines.............................................................................................................................................................................141
Buttock lines.........................................................................................................................................................................141
Surface Setup.......................................................................................................................................................................141
Remove Surface...................................................................................................................................................................144
Recalculate Sections...........................................................................................................................................................144
Spline Edit Toolbar .......................................................................................................................................... 144
Move to Nearest Control Vertex.........................................................................................................................................144
Delete Control Vertex ..........................................................................................................................................................144
Insert Control Vertex............................................................................................................................................................144
Redistribute Evenly..............................................................................................................................................................144
Space Using Location File ..................................................................................................................................................145
Break > Unbreak..................................................................................................................................................................145
Flatten Line...........................................................................................................................................................................145
Delete Line............................................................................................................................................................................146
Duplicate Line ......................................................................................................................................................................146
Move Line..............................................................................................................................................................................146
Settings Toolbar............................................................................................................................................... 146
Previous Line ........................................................................................................................................................................146
Next Line ...............................................................................................................................................................................147
Previous Vertex ....................................................................................................................................................................147
iv
Contents
Next Vertex............................................................................................................................................................................147
Display Spline Porcupine....................................................................................................................................................147
Display Section Porcupine..................................................................................................................................................147
Decrease Porcupine Scale .................................................................................................................................................147
Increase Porcupine Scale...................................................................................................................................................147
Previous Section ..................................................................................................................................................................147
Next Section..........................................................................................................................................................................147
Porcupine as Curvature.......................................................................................................................................................148
Porcupine as Slope..............................................................................................................................................................148
Porcupine as 1/Slope .........................................................................................................................................................148
Decrease Step......................................................................................................................................................................148
Increase Step........................................................................................................................................................................148
Track Control Vertex ............................................................................................................................................................148
Synchronize Scale................................................................................................................................................................148
Keyboard Shortcuts......................................................................................................................................... 149
StringerCutouts Program
149
File Menu .......................................................................................................................................................... 152
Open Frames........................................................................................................................................................................152
Open References .................................................................................................................................................................152
Save Cutout Marks ..............................................................................................................................................................153
Save Stringer Surfaces........................................................................................................................................................153
Save Plate Marks.................................................................................................................................................................154
Open Cutout Marks..............................................................................................................................................................154
Open Frames with Cutouts.................................................................................................................................................154
Save Frames with Cutouts..................................................................................................................................................154
Mark Options........................................................................................................................................................................154
Plane Menu ...................................................................................................................................................... 155
Constant Half-Breadth.........................................................................................................................................................155
Constant Height ...................................................................................................................................................................155
Tilted Plane > Two Points...................................................................................................................................................155
Tilted Plane > Three Points................................................................................................................................................155
Tilted Plane > Point & Angle..............................................................................................................................................155
Girth Menu........................................................................................................................................................ 155
Constant Girth from Bottom ..............................................................................................................................................155
Constant Girth from Top .....................................................................................................................................................156
Proportional Girth ................................................................................................................................................................156
Projection Menu .............................................................................................................................................. 156
Plan Projection.....................................................................................................................................................................156
Profile Projection .................................................................................................................................................................156
Body Projection ....................................................................................................................................................................156
Cutouts Menu................................................................................................................................................... 157
Open Cutouts........................................................................................................................................................................157
Open Cutout References.....................................................................................................................................................157
Insert Cutouts.......................................................................................................................................................................158
DXF Export.............................................................................................................................................................................158
Troubleshooting............................................................................................................................................... 159
v
Contents
PlateExpand Program
160
File Menu .......................................................................................................................................................... 161
Open Surface........................................................................................................................................................................161
Expand Multiple Plates .......................................................................................................................................................161
Frame Line Locations > Open............................................................................................................................................162
Waterline Locations > Open...............................................................................................................................................162
Buttock Line Locations > Open .........................................................................................................................................162
Profile Projection Lines > Open.........................................................................................................................................162
Plan Projection Lines > Open.............................................................................................................................................162
Body Projection Lines > Open............................................................................................................................................162
Oblique Plane .......................................................................................................................................................................162
Penetration Surface > Open ..............................................................................................................................................162
Remove .................................................................................................................................................................................162
View Menu ........................................................................................................................................................ 163
Colors.....................................................................................................................................................................................163
Properties Bar ......................................................................................................................................................................163
Mesh Menu....................................................................................................................................................... 164
Transpose..............................................................................................................................................................................164
Reverse Vertices ..................................................................................................................................................................164
Reverse Lines .......................................................................................................................................................................164
Save Mesh.............................................................................................................................................................................164
Build Menu ....................................................................................................................................................... 164
Options ..................................................................................................................................................................................164
Expand Surface Menu..................................................................................................................................... 176
Save DXF Expanded Plate ..................................................................................................................................................176
Show Original Mesh.............................................................................................................................................................176
Show Expanded Plate .........................................................................................................................................................176
Show Forming Templates...................................................................................................................................................176
Show Deformation Table....................................................................................................................................................176
Show Strain Map..................................................................................................................................................................176
Show Strain Map 3D ...........................................................................................................................................................176
Decrease Strain Scale.........................................................................................................................................................176
Increase Strain Scale ..........................................................................................................................................................176
Show Strain Scale................................................................................................................................................................176
Creaing a Plate Expansion Drawing ............................................................................................................. 177
Troubleshooting............................................................................................................................................... 177
ShellExpand Program
178
File Menu .......................................................................................................................................................... 179
Open Shell Surface..............................................................................................................................................................179
Frame Line Locations..........................................................................................................................................................179
Waterline Locations ............................................................................................................................................................179
Buttock Line Locations .......................................................................................................................................................179
Profile Projection Lines.......................................................................................................................................................179
Plan Projection Lines ..........................................................................................................................................................179
vi
Contents
Body Projections ..................................................................................................................................................................179
Oblique Plane .......................................................................................................................................................................180
Penetration Surface ............................................................................................................................................................180
View Menu ........................................................................................................................................................ 180
Colors.....................................................................................................................................................................................180
Build Menu ....................................................................................................................................................... 180
Options ..................................................................................................................................................................................180
Expand Surface ....................................................................................................................................................................182
Show Original 3D .................................................................................................................................................................182
Show Expanded....................................................................................................................................................................182
DXF Export Menu............................................................................................................................................. 182
Save Expanded Plate ..........................................................................................................................................................182
Steps to Create a Shell Expansion Drawing................................................................................................ 183
Troubleshooting............................................................................................................................................... 184
InverseBend Program
184
File Menu .......................................................................................................................................................... 185
Open Frames........................................................................................................................................................................185
Open Mark Lines..................................................................................................................................................................185
Open Stringers......................................................................................................................................................................185
Open Stringer End Locations .............................................................................................................................................185
Open Frame Line Locations ...............................................................................................................................................185
Open Waterline Locations..................................................................................................................................................186
Open Buttock Locations......................................................................................................................................................186
View Menu ........................................................................................................................................................ 186
Show Original Frames or Stringers ...................................................................................................................................186
Show Straight Frames or Stringers...................................................................................................................................186
Show Curved Frames or Stringers.....................................................................................................................................186
Colors.....................................................................................................................................................................................187
Inverse Bend Menu ......................................................................................................................................... 187
Options ..................................................................................................................................................................................187
Export DXF.............................................................................................................................................................................188
Make Inverse Bend..............................................................................................................................................................189
Steps to Create Inverse Bending Frames.................................................................................................... 189
Steps to Create Inverse Bending Stringers ................................................................................................. 189
PinJig Module
190
Toolbars ............................................................................................................................................................ 190
File Menu .......................................................................................................................................................... 191
Open Plates ..........................................................................................................................................................................191
Open Frame Locations........................................................................................................................................................191
Save Pin Table......................................................................................................................................................................191
vii
Contents
Open Pin Array .....................................................................................................................................................................191
Save Pin Array ......................................................................................................................................................................191
Build Menu ....................................................................................................................................................... 192
Options ..................................................................................................................................................................................192
Make PinJig ..........................................................................................................................................................................193
Rotate....................................................................................................................................................................................193
Shift Plates X and Y to (0, 0)..............................................................................................................................................193
Generate Pin Array on Seams ...........................................................................................................................................193
Export to DXF........................................................................................................................................................................193
Auto Level Menu.............................................................................................................................................. 193
Select Upper Left Corner.....................................................................................................................................................193
Select Upper Right Corner..................................................................................................................................................193
Select Lower Left Corner ....................................................................................................................................................194
Select Lower Right Corner..................................................................................................................................................194
Auto Level .............................................................................................................................................................................194
Steps to Create PinJigs................................................................................................................................... 194
Troubleshooting............................................................................................................................................... 194
PrintOffsets Module
195
Toolbars ............................................................................................................................................................ 195
File Menu .......................................................................................................................................................... 196
Open Buttock Lines .............................................................................................................................................................196
Open Waterlines ..................................................................................................................................................................196
Open Longitudinal Lines.....................................................................................................................................................196
Frame Lines > For Waterline Offsets................................................................................................................................196
Frame Lines > For Buttock Line Offsets...........................................................................................................................196
Open Frame Knuckles.........................................................................................................................................................196
Open Design Offsets............................................................................................................................................................196
Save Offsets..........................................................................................................................................................................196
Offsets Menu.................................................................................................................................................... 196
Construct Offset Table ........................................................................................................................................................196
Open Offsets in Text Editor.................................................................................................................................................197
Options ..................................................................................................................................................................................198
How to Create Offsets..................................................................................................................................... 198
Appendix
199
File Conventions .............................................................................................................................................. 199
Project File........................................................................................................................................................ 200
Geometry File Format..................................................................................................................................... 201
Location File Format....................................................................................................................................... 201
Other File Formats .......................................................................................................................................... 201
viii
Contents
INI File Format ................................................................................................................................................. 201
Index
203
ix
Introduction
Introduction
ShipCAM provides program modules for fairing and lofting for the construction of ship hulls. ShipCAM puts a 3D mold loft
on your desk. Join the large number of loftsmen, structural designers, and naval architects worldwide who improve
efficiency and product quality using ShipCAM. Naval architects can now offer a full lofting service to the shipbuilder.
ShipCAM is easy to use and can be learned in about five days of training.
ShipCAM gives the shipbuilder very sophisticated tools to perform many tasks:
•
Enter the table of offsets or import data from ship design programs like Fastship, MultiSurf, Napa, Rhino, and
Autoship.
•
Fair the ship hull to a given lines plan.
•
Create a 3D surface model using developable, straight section, and compound curved B-Spline surfaces.
•
Cut sections through the surface model for frames, waterlines, and buttock-lines and use any skewed plane for any
other internal structure.
•
Mark frames at stiffener intersections and insert and size the cutouts automatically.
•
Layout seams and butts and trim the 3D surface model into individual plates.
•
Expand developable and compound curved plates.
•
Create multiple decks.
•
Intersect and trim any two arbitrary surfaces (for example, bow thruster and hull intersection).
•
Fit fillets between surfaces.
•
Calculate offset surfaces for plate thickness or neutral axis of plating.
•
Exchange information with CAD systems.
•
Exchange information with the BHS/GHS hydrostatics program.
•
Perform shell expansion drawings with all the plate markings.
•
Calculate weights and centers of gravity of hull surface and plates.
•
Generate PinJig drawings.
•
Calculate inverse bending curves for frames and stringers made from stock profiles.
Example Project
The tutorial section of the ShipCAM manual steps you through the fairing and lofting procedure of an example project. A
sample bulbous bow tanker hull is provided and gives you the opportunity to try many program features. It will take you
two to three hours to work through the tutorial.
1
Tutorial
Hands-On Demo
This is a hands-on demo program. This demo program is the real program, only the SAVE function is disabled if you do not
have a hardware lock. All calculations are the same as when using the full program. This gives you an opportunity to
evaluate the real software.
Tutorial
ShipCAM is comprised of the following eight modules. To start a module, click on the Windows Start Menu and select
Programs > ShipConstructor2009.
LoftSpace
LinesFairing
StringerCutouts
PlateExpand
ShellExpand
InverseBend
PinJig
PrintOffsets
The program is divided into several modules because each module uses a special user interface.
2
•
The LoftSpace module contains all general lofting functions. You will spend most of your time in this module while
working on a lofting project.
•
The LinesFairing module deals with fairing lines for traditional sections such as stations 3D surfaces splines or 2D
layouts for stiffeners and seams and butts. It also creates a wide variety of surfaces and can cut sections to aid the
fairing of complex hull surfaces.
•
The StringerCutout module lets you specify and calculate intersections of longitudinal stiffeners with frames and
automatically size, orient, and insert cutouts into the frames.
Tutorial
•
The PlateExpand module can expand any type of developable or complex-curvature plate into a flat pattern including
all markings.
•
The ShellExpand module provides traditional shell expansion drawings for classification and help with the layout of
internal structure and seams and butts.
•
The InverseBend module creates inverse bending curve drawings for frames and longitudinal stiffeners, including
twisted ones.
•
The PinJig module creates PinJig drawings from shell plating for several types of jig configurations.
•
The PrintOffsets module prints fully formatted offset booklets for all hull related data.
Fairing
Shipbuilders generally receive their project information as a lines plan and a table of offsets or as a computer generated
surface model made from a hull design software program.
When shipbuilders receive a lines plan and a table of offsets, they have to enter the offsets into ShipCAM and fair the hull
from these. In the case of a hard-chine hull with developable or straight section surface, only the knuckle lines have to be
faired longitudinally. ShipCAM creates all required surfaces from the faired knuckle lines. For round bilge vessels the
offsets are faired to create smooth stations. ShipCAM then calculates offsets for fairing in the longitudinal direction.
Longitudinal fairing can be complex, and good planning will save a lot of work. With experience you will develop methods
that produce accurate results quickly, even for complexly shaped hulls.
ShipConstructor Software Inc. has developed a unique method that fits B-splines through the given offsets while
maintaining excellent fairing properties. This combination makes ShipCAM the best PC-based fairing program available
for shipyards or designers who have to match a given table of offsets.
What If I Already Have a Hull Design Program?
Fairing stations and longitudinals is the most time consuming and skill demanding part of the lofting process. Much time
can be saved if the vessel was designed with a hull design program such as FastShip, AutoShip, MaxSurf, BaseLine, or
others. Surfaces, longitudinals, or any other geometry can be imported into ShipCAM. ShipCAM provides a direct interface
to FastShip using the IDF file format in the form of surface meshes, or NURBS surfaces. ShipCAM can also import any
surface mesh that is in the form of a DXF polymesh surface. Another popular file format supported by ShipCAM is the
IGES 128 format for NURBS type surface descriptions.
Data can be imported at several different stages of the fairing process:
•
Import a 2D body plan of stations. The stations would then be moved to their true location in the X direction. Use the
data to start fairing.
•
Import the faired longitudinals and knuckles. These can be used directly to generate surfaces.
•
Import the surface meshes.
•
Import IGES 128 NURBS.
Selecting Commands
For the demo, all commands that you will perform are numbered as shown below. The menu item that starts the
command is listed in bold text, and menus are separated by an arrow. The button shortcut appears after the menu
command.
Example: To select Open from the File menu is shown as below.
1.
Select File > Open or click
.
Download Demo Project
The following tutorial requires demo data which is available on the web:
1.
Download the following file to your computer.
www.shipconstructor.com/downloads/2009/ShipCAMDemoProject.exe
2.
Run the self-extracting program.
3
Tutorial
3.
Click Unzip.
Fairing Projects
ShipCAM organizes data into projects. A project consists of all data for one ship hull. All data files for a project are stored
in one directory on your hard drive. Each directory has a special project file that stores your project settings, such as
lofting units, CAD units, and more.
We begin by starting the LinesFairing module.
4
4.
Start the LinesFairing module by clicking on the Start Menu and selecting ShipConstructor2009 > ShipCAM
LinesFairing. The Running in demo mode window appears if you do not have a hardware lock. You can run the
program in demo mode without a hardware lock, but you will not be able to save any files. All files required for this
demo are included in the demo project data.
5.
The program starts up as shown in the next figure. The program title bar shows the open project file name and the
running program module name. On startup of a ShipCAM module, the last project worked on is loaded. When you
start ShipCAM for the first time, the project C:\ShipCAMDemo\Demo should be loaded as shown in the title bar. If
this is not the case, you need to change this now to the Demo project directory.
Tutorial
To change the project (only if the demo project is not the current project)
1.
Choose File > Project > Open Project.
5
Tutorial
2.
The file Open window appears. Select the folder C:\ShipCAMDemo\Demo located where you extracted the demo
data and open the file Demo.SCP.
You are now ready to access the demo project files from any program module.
You can rearrange the docking windows on the left to better use the screen space.
6
Tutorial
Opening Files Window -- Sorting
7
Tutorial
1.
Choose File > Open or click
. The file Open window appears. You can sort the files in any order by clicking on the
column header. For example, click on the column header Names to sort alphabetically and click again to sort reverse
alphabetically. Try the same for any other column header.
Tip: Sort by Modified when transferring files between program modules. The last saved file will be listed first, making
selection easy.
2.
Select the file HULL.STO and click OK. The station lines are displayed for fairing. The stations appear in profile view.
This is not the best view for stations. We will investigate how to set the best view.
Toolbars
ShipCAM provides toolbars as shortcuts to frequently used commands. You can dock the toolbars on any side of the
program window or keep them floating inside the window.
The visibility of toolbars is controlled with the View > Toolbars command. Visible toolbars have a check mark in front of
the menu item. Use the customization you prefer. All program modules save the custom settings.
8
Tutorial
Views
Each module in ShipCAM has a View menu and toolbar that allows you to change the viewpoint of the active view.
Set user-defined view
Body View
Rotate View
Zoom All
Plan View
Zoom Out
Zoom In
Profile View
User-defined View
ZoomWindow
Selecting a Viewpoint
ShipCAM has three standard viewpoints (PLAN, PROFILE, and BODY) and one custom viewpoint. The custom viewpoint is
specified by a point in 3D space, as if you where standing at that point and looking in the direction of the origin.
To select a viewpoint
1.
Select View > Body or click
to display the stations in Body view.
9
Tutorial
2.
Try some other viewpoints using the Set Viewpoint function.
Multiple Views
ShipCAM supports up to four views, allowing you to view the same geometry in different views or zooms.
To select multiple views
1.
10
Select View > Split Window. The cursor will move to the center of the display and let you choose the position where
you want to split the window. Select the center of the display. The display is updated and four views appear.
Tutorial
2.
Scroll bars are only present in the active view. Click in each window and select the view you like.
11
Tutorial
3.
Use View > Zoom In to zoom closer in to the currently active view.
Note: LinesFairing, by default, behaves differently from any other ShipCAM program module. LinesFairing
synchronizes the zoom scale and pan position between all windows. The active control vertex is always centered in all
views. You have the option to switch this off. On the toolbar, find the Track Control Vertex and Synchronize Zoom
Scale buttons
and click on them so that they appear not pressed:
.
Removing Multiple Views
You can remove the split views by double-clicking on the bars between the windows or moving the divider to the edge of
the display.
Hint: Displaying multiple windows slows down the display refresh process. If a large amount of data is displayed,
reduce the number of views to speed up the refresh process.
Changing Colors
Each module lets you select custom display colors.
12
Tutorial
To change colors
1.
Select View > Colors to change the display colors. The Colors window appears. The table lists all the elements of the
display that the user can change the color of or turn off.
2.
Double-click on the color box beside the Attribute to change the color with the Color window.
3.
Change the colors as you prefer them now or come back and do it later.
Fairing a Station
Before fairing stations, you have to enter offsets for the table of offsets (not shown in this tutorial). LinesFairing makes a
copy of the offsets and calls these control vertices. The control vertices are then modified automatically so that the spline
passes through the entered offsets. The control vertices are displayed as small crosses (horizontal and vertical line). The
offsets are displayed as small Xs (diagonal lines).
13
Tutorial
14
1.
We want to step through the stations now. Make sure the active view is a body view. It is best to have only a single
view for this part of the demo.
2.
Click PgDwn or PageUp
a few times and watch the active station in the display and the station name in the
Fairing Spline on the left side change. Stop when you are at Station 9.25 as indicated in the Fairing Spline window.
3.
Click the right arrow or left arrow keys,
, until the Control Vertex is at 4. Observe the large cross jump from
control vertex to control vertex and observe the X, Y, and Z values of that vertex appearing in the Fairing Spline
window.
4.
To move a control vertex, hold down the Shift key and press the up arrow key several times. Observe the large cross
moving up and watch the Z value change in the Fairing Spline window. For each key pressed, the control vertex is
moved up the distance of the Step value, (positive Z direction) 0.1 meters in this case. You can also press the up and
down buttons beside the X, Y, and Z values in the Fairing Spline window.
5.
The Offset Distance Table below shows the distance of the spline from the entered offsets in the three principal
directions. The distance to the offset closest to the control vertex is highlighted. Press Enter to recalculate the spline.
Notice that the dY and dZ values in the distances table are large now in the neighborhood of the highlighted offset,
because we moved the spline a considerable distance.
Tutorial
Note: During fairing, only the control vertices are changed. The entered offsets remain the same.
Knuckles and Straightening Stations
Often a station has knuckles or a certain area of a station has to be straight, while others are curved. ShipCAM offers a
breakpoint feature to accomplish this.
1.
Make sure the current control vertex is still vertex 4 on Station 9.25. Press Ctrl+B
. The spline is broken at the
control vertex creating a break point. The color of the active control vertex changes to magenta.
2.
Activate control vertex 10 on the same station. Press Ctrl+B
3.
Click the Flatten button,
, then activate control vertex 4 again. Watch a thick line drawn from control vertex 10 to
the current position as you move along the control vertices.
4.
When at vertex 4, press Enter. The Flatten Line window appears. Click OK.
5.
Press Enter to finish the flatten process and recalculate the spline. The station is flattened between both control
vertices.
again to create another break point.
15
Tutorial
Checking Fairness
ShipCAM uses curvature porcupines to check fairness. The following buttons control the porcupine display of the stations:
Switches porcupine display on or off.
Increases porcupine scale.
Decreases porcupine scale.
Displays curvature. Use curvature to check the fairness of the stations.
Displays slope. Use slope, for example, to check if the station is fairing horizontally into a flat bottom.
Displays 1/slope. Use 1/slope for areas of splines that are almost vertical.
Many users ask: “What tells me that the station is smooth? What scale do I use?” There is no absolute answer to this
question. Curvature is defined as 1/radius. The radius value is different if you work in meters, millimeters, feet, or inches,
even if the object is the same size. The curvature is different because of the units you choose, not the size of the object.
The best solution is to move a control vertex a given distance (say 3 mm or 3/16 inch -- remember the spline moves only
2/3 the distance) and watch the curvature change. Make sure you know how far away the previous and next control
vertices are. Compare the change to the accuracy that you can achieve on the loft floor or how exact you can actually
fabricate the vessel.
16
Tutorial
LinesFairing provides many other features for station fairing. However, explaining all of them here would take too long.
When the station fairing is completed, the next step is to create longitudinal offsets using the File > Make Line Offsets
function. Then the longitudinal lines are faired to create fair hull surfaces.
Longitudinal Fairing
Fairing the longitudinal lines is the last step in fairing. In the demo, the aft and forward sections of the hull are faired
separately because the mid-body stations are parallel to the centerline. We will check the fairing of the aft part of the
hull. To do this, we will calculate a surface from the splines and then cut sections.
1.
Select File > Open or click
and select the file AFT.LGO. Click OK. Click No when asked to save modified lines.
2.
Make sure you are in body view on a longitudinal spline and control vertex near the middle of the aft hull.
3.
Make sure you are on Fairing Spline 4 and Control Vertex 4. Use the Page Up and Page Down buttons and the Left
and Right Arrow buttons on your keyboard or use the drop-down menu on the fairing spline control.
4.
Click the Surface Setup button,
5.
Make sure your settings are the same as shown in the window above. Click OK. A surface mesh is calculated and
appears. Your screen should look like below.
6.
Click the Show-Hide Surface button,
. Go to the Cross Spln tab. The Settings window appears.
, if the surface mesh does not appear.
17
Tutorial
7.
18
Click the Show-Hide Surface button,
, again to switch the display of the surface mesh off, as it obscures the more
important information we need. Please remember that all sections are based on cutting through this surface mesh,
even if the surface is invisible. You can also use the window accessed via the View > Colors menu to change the
visibility or color of the Estimate Surface.
Tutorial
8.
Select References > Frames > Display or click
and select the file FRAMES.LOC. Click OK. In the next window,
click NO. Frame sections are calculated and displayed.
9.
To display the curvature on the frame section, click the Show/Hide cut section porcupine
porcupine scale: either half,
, or double,
button. Adjust the
, the porcupine.
10. Use the Previous cut section and Next cut section
buttons to step through the frames until the highlighted
section is near the active control vertex. You will see a display similar to the one below.
19
Tutorial
11. You will also get a porcupine on the longitudinal fairing splines, which can be confusing. Click the Show/Hide
Porcupine
button to toggle these off.
12. Move the active control vertex (Fairing spline 4 vertex 4) down 0.2 meters and press Enter. Remember to hold down
the Shift key and use the arrow keys to shift a vertex or use the spin controls beside the Z value. With each click, the
vertex will be moved 0.1 meters as indicated in the Step box.
13. Click the Recalculate Sections button,
. The program recalculates the surface and the sections. The new sections
appear as shown below. The frame curvature shows large unfairness now because we changed the longitudinal
spline.
20
Tutorial
14. We can also show the unfairness on waterlines. Select View > Split Window to create multiple views. Remove the
vertical divider by dragging it all the way to one side. This creates just two views.
15. Make the top view Profile view. Make the bottom view Plan view. The display should look similar to the one below.
16. Select References > Waterlines > Display or click
The waterlines are displayed.
and select the file WATER.LOC. Click No in the next window.
17. Use the Previous cut section and Next cut section buttons,
nearest to the active control vertex is highlighted.
, to step through the waterlines until the one
21
Tutorial
You can now fair in one view while looking at the results in both views.
Location File Editing
Location files store just the location names of traditional intersection planes [that is, transverse sections (frames),
horizontal sections (waterlines), and longitudinal sections (buttock lines)] to be cut through the surfaces. The sections are
calculated on demand from the surface meshes.
To edit location files
1.
22
Select References > Waterlines > Display and enter WTEST for the file name. This file does not exist. Select Yes
when prompted if you want to create the file.
Tutorial
2.
Enter 10 for the number of intersection planes. Click OK.
3.
In the WTEST.LOC editing window, enter 1.5 for the first waterline location and 1.75 for the second waterline
location. With the second location highlighted, press the Apply current spacing to remaining locations button,
.
You should see a display as shown below. Click Save. Waterlines are calculated and displayed. You can now use this
file any time that you want to calculate waterlines at these locations.
23
Tutorial
24
Tutorial
4.
Use the buttons for Previous cut section and Next cut section,
nearest to the active vertex is highlighted.
, to step through the waterlines until the one
5.
Zoom in using the zoom button, . Make sure both buttons are in the pressed state,
, to synchronize zoom
scale and active vertex centering between the views. You should see a view as shown below. Observe that the
waterlines, just as the frame, near the change in the longitudinal are unfair. We will now gradually correct this
unfairness. We previously moved the control vertex on the longitudinal spline down by 0.2 meters. We will now move
it up in small steps to get a feeling for fairing in two views.
25
Tutorial
6.
Make sure Profile view is active. Click on the down arrow button next to the Step value to reduce the step to 0.01
meters.
7.
Now shift the control vertex up using the Shift + Up Arrow Key method or by pressing the up arrow button next to the
Z value box a few times. Press Enter to recalculate the spline and then click the Recalculate Sections button,
The unfairness in the waterline should become less.
26
.
Tutorial
8.
Repeat the step above until you have achieved a smooth waterline.
9.
Check the frame section in body view to verify that the surface is smooth.
Note: Just like fairing on the loft floor, in ShipCAM you check the fairness of a hull by making sure that all
sections are smooth. The big advantage here is that all sections are calculated from a 3D surface and that they
can be updated in a very short time. This lets you go through many more optimization cycles than could ever be
done on the loft floor.
LoftSpace
LoftSpace is the most used program module in ShipCAM. About 15 formerly independent program modules are now
combined in this single program.
LoftSpace Basics
Group Files
Using these files you can combine many ShipCAM files and make them accessible by loading just one file. For example,
you can have one file containing all design surfaces, another containing all plates for a construction block, and so on.
1.
Start the LoftSpace program module.
2.
Select Files > Open ShipCAM File or click
. In the Files of type: window, select Grouped Files. The display now only
lists grouped files. These files contain the names of all files that make up a logical group of data, such as all design
surfaces, all plates for unit 12, and so on. Select the file designsurfs.GRP and click OK.
27
Tutorial
You will see a display similar to the one below.
28
Tutorial
The Blocks Window
Block refers to any type of file loaded in LoftSpace. These can be surfaces, sections such as frames, stringer marks, or
plate seams and butts.
1.
Click on the Show Blocks button,
, to display the Blocks window.
2.
The Blocks window lists all files that are loaded. To change the color of a block, click on the color box. An AutoCAD
style window lets you change the color. Select the color you want and click OK.
29
Tutorial
For full details on the Blocks window, see Blocks Window (page 97). Here are some of the fields that are available:
30
•
The light bulb
•
The X-Ln field indicates if the cross-lines of a surface are visible. Any mesh surface consists of many points. ShipCAM
can display the surface by connecting the points in just a direction or two.
•
The Desc. field shows the resolution of the surfaces or the number of lines for other file types.
•
The Stk. field can contain the plate stock assigned to a surface. This is only possible if you use ShipCAM in
conjunction with a ShipConstructor database that supplies the stock data.
•
The Throw field indicates the throw direction from the molded line.
3.
Click on any one name in the Block window and then right-click. Select Properties from the right-click menu.
4.
The Surface Properties window lists the main properties of the selected item. Click Cancel.
indicates if a file is visible or not.
Tutorial
5.
To unload all data, select Blocks > Unload > Unload All or click
. Click OK.
Surface Generation
You can generate the following types of surface with LoftSpace:
•
Cross spline surface
•
B-spline fitted surface
•
Developable surface
•
Straight section surface
All surfaces are created from faired longitudinal splines, which are represented as polylines. In preparation to create
some hull surfaces, we load all required longitudinal splines into LoftSpace.
To load longintudinal splines to LoftSpace
1.
Select Files > Open ShipCAM File or click
and select File of Type Longitudinal Splines Files (*.lgs), then click on
the files AFT.LGS, FORWARD.LGS and SKEG.LGS. Hold down the Ctrl key to select multiple files.
31
Tutorial
2.
32
You will see a window similar to the one below when you select a 3D viewpoint,
.
Tutorial
Cross Spline Surface
This surface is most often used when replicating a compound curvature hull. It has the advantage that you can force the
mesh surface lines to go through each vertex on the longitudinal splines. The resulting surface is represented by a dense
mesh in 3D space. In a typical case, 50 to 300 longitudinal polylines with 200 to 3000 vertices each are calculated. The
more complex the hull surface is, the more vertices are required.
To create a cross spline surface for the forward bow area
1.
Select Tools > Surface Generation. On complex commands it is advisable to observe the status text in the lower left.
The status bar now shows Select block to generate surface from then press Enter. Click on the forward longitudinal
splines and press Enter.
33
Tutorial
34
2.
The successful block selection is confirmed by drawing it as dashed polylines and marking the first and last vertex on
each polyline with a small colored square. The status text confirms this by stating 1 Block selected.
3.
Press Enter. The Surface Generation wizard appears.
4.
Start Line and End Line mark the first and last line between which the surface is to be calculated. By default the first
and last lines are selected. Other settings can be useful for other applications, such as hard chine vessels. Under
Surface Type, select Cross Spline and click Next.
Tutorial
5.
Set the settings as shown above. Resolution 191 creates a surface mesh with 191 lines. Iterations 5 runs 5 error
correction iterations to get the resulting surface close to any vertex on the selected splines. Click Finish. The
calculation will take just a few seconds.
6.
The window above shows the maximum deviation of the surface from any vertex on the longitudinal splines. You can
choose higher iterations to achieve a closer match in the surface generation wizard. Click OK.
7.
The figure above shows the resulting surface. The surface name is added as UNTITLED01.MSH to the Blocks window.
It has a resolution of 191 by 600 vertices.
8.
Use different views and zooms to investigate the result.
35
Tutorial
9.
To name the new surface, click on the Name field in the Blocks window to highlight the name and then click again.
Pause between clicks long enough that you do not double-click. Type the name FWD.MSH.
10. We will make the new surface invisible, since redrawing the new surface takes some time and we want to go on
from here. To do this, click on the light bulb,
, in the ON column of the FWD.MSH block.
Developable Surface
This function calculates the ruling lines of developable surfaces. A developable surface is always calculated from two high
resolution polylines that mark the plate edges. A surface is developable if the program can find straight lines between the
two edges that have the same surface normal vector direction at each end of the straight line. These lines are called
rulings.
To calculate ruling lines of a developable surface
1.
36
Switch to View > Profile and zoom into the aft area of the hull. You should see a view similar to the one below.
Tutorial
2.
Select Tools > Surface Generation. Watch the status text in the lower left corner. Click on any of the lines of the
SKEG.LGS file and press Enter.
3.
The Surface Generation wizard appears. Select Surface Type Developable.
4.
Click Next. Another wizard appears. Use settings as shown below. Click Finish.
5.
The developable surface appears. The green color indicates that it is developable as shown. However, the fan at the
leading edge is not good for production. We will try some other settings.
6.
Switch the visibility of this surface OFF in the Blocks window. Press Enter. The surface wizard appears again if you did
not select any other commands. If the wizard does not appear, select TOOL > Surface Generation again. Set the
settings as shown below.
37
Tutorial
7.
Click Finish. The skeg surface should now look as shown below. Using a higher parallelity eliminated the fan at the
forward edge.
8.
Try different views and zooms to investigate the skeg surface.
9.
Name the final skeg surface SKEG.DEV using the same techniques as before. Unload the remaining untitled surface.
The Blocks window appears.
Note: There are cases when a portion of the surface is not developable. In that case, the non-developable area is
covered by a ruled surface. Non-developable rulings are then displayed in red.
Using the same techniques as described for Cross Spline Surfaces, make a surface from the file AFT.LGS that is
already loaded. We need this surface in the next step. Name the surface AFT.MSH.
Hint: Switch the visibility of all other blocks off to simplify selection. Make sure to select HALFSIDING for the Start
Line and UPPER TANGENT for the End Line.
38
Tutorial
Intersect Surfaces
We hope it was not too difficult to create the surface for the aft of the hull.
To find the intersection of the skeg with the aft hull
1.
Set the Blocks window as shown below.
2.
The screen should look similar to the one below when in profile view and zoomed in to the aft surface area.
3.
Select Tools > Intersect Surfaces. Hold down the Shift key and pick both visible surfaces by clicking on them or
dragging a window from right to left. Press Enter.
4.
The following window appears. Select Intersection Type Both and click OK.
39
Tutorial
5.
The intersection of the two surfaces is calculated. This is a time-consuming process that can take a few minutes to
complete. The intersection is added as SKEG_AFT.SIN to the Blocks window.
6.
Select different viewpoints to view the intersection line. You should be able to get a view similar to the one shown
below. Using the Set Viewpoint window, use the third choice from the bottom left, or enter -1, 0, -1 manually in the
Vpoint boxes. The color was changed by left-clicking on the color for AFT.MSH. Left-clicking on any of the assigned
colors will bring up the Color window for the color of the block that you clicked on.
Trimming a Surface
The trim surface function is required to trim the skeg surface back to the intersection with the hull. It is also used to trim
large design surfaces with seams and butts to individual hull plates.
To trim a surface
40
1.
Set the visibility of the blocks as shown below. Optionally, change the colors to match.
2.
Zoom to the skeg surface.
3.
Select Profile from the View menu and zoom in to the skeg surface.
Tutorial
4.
Select Blocks > Trim. Pick the intersection line SKEG_AFT.SIN and press ENTER.
5.
Pick the skeg surface SKEG.DEV and press Enter. Use the settings shown below. Click Trim.
6.
The two resulting surfaces appear. Unload the upper surface and name the trimmed surface SKEGTRIM.DEV.
41
Tutorial
42
Tutorial
Creating a Deck Surface
ShipCAM can generate deck surfaces starting with either a deck centerline or a faired longitudinal that defines the side of
the deck. ShipCAM can use five different kinds of deck camber styles.
To create a fore deck from a centerline
1.
Select File > Open ShipCAM File or click
. Select the files FCSTLDECK.LGS and 15FCSTL.MSH and click OK. The
file FCSTLDECK.LGS contains a faired centerline of the deck. The file 15FCSTL.MSH is the forecastle hull surface. The
deck has to be trimmed to this surface.
2.
Set the visibility with the Blocks window as shown below. Set a 3D viewpoint to (1, 1, 1) and zoom in to the forecastle
area so that your screen appears similar to what is shown below.
43
Tutorial
44
3.
Select Tools > Deck Surface > Centerline Deck. Pick the centerline (watch the status text in the lower left corner).
Press Enter. The line will be highlighted by a dotted line and colored ends.
4.
Use the mouse to pick the side surfaces and press Enter.
5.
The Deck Options window appears. Verify that the settings are the same as below.
Tutorial
6.
7.
ShipCAM supports the following shapes for deck surfaces:
•
Sine Curve
•
Radius Curve
•
Parabolic Curve
•
Flat and Slope
•
Faired Camber
Click OK. The generated deck appears. Name the deck surface FCSTLDECK.MSH.
Fillet
This function generates a constant radius fillet surface between two surfaces. The fillet surface can be thought of as the
surface generated by rolling a ball between two surfaces so that the ball touches both surfaces at all times. We will
generate a fillet between the skeg and the aft surface now.
To create a fillet surface
1.
Select a Body View and set the visibility with the Blocks window as shown below. You can use the Blocks window
button,
, to switch the Blocks window on or off. The window becomes very big if you size it so that you can see all
block data without scrolling. You might want to resize it to a smaller size if your screen is not very large.
45
Tutorial
2.
46
Select Tools > Fillet Surface. We will use a new picking technique now. In AutoCAD, you can drag a rectangle to
select entities. ShipCAM uses the same functionality. Drag a window from left to right and all entities completely
inside the window are selected. Drag a window from right to left, and all entities that cross the window are selected.
Just as shown below, drag a window from right to left to select the surfaces AFT.MSH and SKEGTRIM.DEV. Press
Enter.
Tutorial
3.
A new screen appears. You might have to move the Fillet window to get a clear view. Enter a Radius of 0.2 meters.
Click the Change Direction button until the normal vectors point to the outside of both surfaces. The vectors indicate
on which side of each surface the ball is rolling. Click Intersection Type > Both. Then click OK.
4.
The program calculates the fillet and displays it. This might take a while.
5.
Zoom in and investigatee the fillet surface.
We will now go on to preparing data for CAD detailing.
47
Tutorial
Frame Lofting
The process of lofting frames and other parts in preparation for CAD detailing can be divided into four sections:
•
Cutting Sections -- Frames, bulkheads, waterlines, and buttock lines are cut from the 3D surface model.
•
Marks and Stringers -- Reference lines are marked on the 3D model for any longitudinal or stringer shape.
•
Frame Cutouts -- Automatically inserts cutouts or notches in frames at marked positions using any cutout shape.
•
Export to DXF -- Available only if you have a hardware lock.
Cutting Sections
All planar sections are cut using the LoftSpace module. These include Frame Lines, Transverse Sections, Waterlines,
Buttock Lines, and Oblique Sections.
To cut a section
48
1.
First we will unload all the data to start with our hull design surfaces. Select Blocks > Unload All or click
to unload the data. Click No to All when asked to save the data.
. Click OK
2.
Select Files > Open ShipCAM File or click
surfaces of the hull.
3.
Set a viewpoint of (10, 1, -1).
4.
For the next steps, you can use the menu items on the Planar Sections menu or use the buttons on the toolbar.
5.
Select Planar Sections > Plane Parallel > Frame Lines or click
6.
Select the file FRAMES.LOC and click OK. The FRAMES.LOC location file contains the positions in the X direction of
the frames to be cut. A message box asks you if you want to edit the locations. Click Yes.
7.
The location editing window appears, allowing you to edit the locations. Do not change anything, just click Save.
and select the file DESIGNSURF.GRP that contains all the design
.
Tutorial
8.
All visible design surfaces are cut at the specified frame locations and then displayed on the screen. The Blocks
window shows a new block with the name UNTITLEDnn.FRM.
9.
Use the Blocks window to switch off the visibility of all blocks, except UNTITLED.FRM. Inspect the frames.
49
Tutorial
10. Switch the visibility of all blocks on again.
11. Cut waterlines using the file WATER.LOC in a similar way.
12. Cut buttock lines using the file BUTTOCKS.LOC in a similar way.
13. Switch all surfaces off, except cut frames, waterlines, and buttock lines.
14. Use the Blocks window to change the colors of the frames, buttock lines, and waterlines to achieve a good contrast
between them.
50
Tutorial
15. You can also experiment with oblique planes.
Producing Frame Marks and Inserting Cutouts
This is a two-step process that uses the StringerCutouts module. First, marks are generated where the stringers intersect
with the frames. Second, the cutout is inserted at those intersections using the marks for location, rotation, and scaling.
For the following examples we will insert cutouts of three different types with the following sizes and settings:
•
Bottom stringers are L-shapes, measure 150 mm by 90 mm, and are perpendicular to the hull.
•
Side stringers are L-shapes, measure 120 mm by 70 mm, with flange horizontal in body view.
•
Mouse holes for a keelson plate of 11 mm thickness are 15 mm high and vertical up.
Marking the Bottom Stringers
We mark on the bottom stringers by projecting a set of layout lines in the plan view onto the frames. The layout lines can
be made in ShipCAM or drawn in 2D in AutoCAD.
To mark stringers
1.
Start the StringerCutouts module by clicking on the Start menu and select ShipConstructor2009 > ShipCAM
StringerCutouts.
51
Tutorial
52
2.
Select File > Open Frames or click
3.
Select Body view.
4.
Select File > Mark Options or click
and select the file U12.FRM. Click OK. The frames for unit 12 appear.
. Change the settings in the window so they match the ones below. Click OK.
Tutorial
5.
Select Projection > Plan Projection and select the file STR_BTM.PMK. Click OK. The stringer layout lines are projected
onto the frames.
Inserting Cutouts for the Bottom Stringers
In the next step we will insert the cutouts at the position of the marks. The cutout has been designed in AutoCAD at
nominal size and saved as a DXF file.
To insert cutouts
1.
Choose Cutouts > Open Cutout and select the file CUT15X9.DXF. The nominal cutout appears at the origin. Zoom in
to the cutout. Select Zoom All,
.
53
Tutorial
2.
54
Select Cutouts > Insert Cutouts or click
. The program places a copy of the standard cutout at all marked
positions and rotates and scales it to match the frame marks. Then the frame line and the cutout are trimmed to
each other and connected to create a single polyline for each frame.
Tutorial
3.
Zoom in to some of the cutouts.
Marking the Side Stringers
Now use the same techniques as before to create marks for the side stringers.
To mark the side stringer
1.
Select File > Mark Options or click
. Change the settings as shown below. Click OK.
55
Tutorial
2.
Select Projection > Profile Projection and select the file STR_SIDE.PMK. Click OK. A message appears asking if you
want to erase the existing marks. Click Yes. The marks are calculated and displayed.
Inserting Cutouts for the Side Stringers
Next we insert the cutouts for the side stringers.
To insert the cutouts
56
1.
Select Cutouts > Open Cutouts and select the file CUT12X7.DXF. Click OK.
2.
Select Cutouts > Insert Cutouts or click
. The screen should look like the screen below.
Tutorial
Marking the Keelson
1.
Select File > Mark Options or click
. Change the settings as shown below. Click OK.
2.
Select Projection > Plan Projection and select the file STR_KLSN.PMK. Click OK. A message appears asking if you
want to erase the existing marks. Click Yes to remove the previous marks. The new marks are calculated and
displayed. You need to zoom in on the lower part on the frames to see the marks because they are very small.
57
Tutorial
Insert Cutouts for the Keelson
The cutout for the keelson consists of two arcs and some straight lines.
1.
Select Cutouts > Open Cutouts and select the file CUTMSHL.DXF. Click OK.
2.
Select Cutouts > Insert Cutouts or click
investigate the cutouts.
. The keelson cutouts are inserted. Use the view and zoom functions to
Exporting Frames with Cutouts
The finished frame lines can now be exported to your CAD system using the DXF file format.
58
1.
Select Cutouts > DXF Export or click
2.
Set the desired options.
3.
Click OK.
to bring up the DXF Options window.
Tutorial
2D Export – This option allows you to tile the frames. This is a convenient feature for having all frames in the same
drawing. You can set the text size for the frame names.
3D Export – This option produces a DXF file that can be immediately used by ShipConstructor for detailing. All
frames are 2D polylines in 3D space. Each frame polyline is on its own UCS.
Note: You can only complete this function if you have a hardware lock.
Expanding Plates
A ship hull consists of many plates. The selected plate size is limited based on the available stock size or by a
combination of the amount of compound curvature and the forming process that is used. Areas of large compound
curvature require small plate sizes while single curvature or un-curved areas can be treated as very large plates. The
figure below shows an example of plates for the bulbous bow tanker.
To create individual plates from the design surfaces, you have to define seams and butts for all plates. This is usually
carried out using the LoftSpace and LinesFairing modules. You can also lay out seams and butts in your CAD system. The
seams and butts can be in 2D or 3D. In both cases, the design surfaces are trimmed to individual plates using the
LoftSpace module surface trimming function. The individual plates are then saved to files. We will now expand some
prepared plates, one simple plate near the mid-ship area, a plate near the bulb with a bow thruster intersection, and a
plate on the bulb across the center line.
59
Tutorial
To expand the near-mid-ship plate
60
1.
Start the PlateExpand program module.
2.
Choose File > Open Surface or click
and select the file U12P05.MSH. Click OK. The compound curvature plate
appears. Roll lines are calculated and displayed on the plate. Roll lines connect points of same dead-rise. The
expanded plate should be rolled along the roll lines when forming it.
3.
Select View > Split Window and set up views similar to the ones shown below. Right now you have only the plate
loaded. The other items will follow.
4.
To create frames, select File > Frame Line Locations > Open and select the file FRAMES.LOC. Click OK. Click No. The
frames are calculated and displayed.
5.
Select Files > Waterline Locations > Open and select the file WATER.LOC. Click OK. Click No. The waterlines are
calculated and displayed.
6.
Select File > Buttock Line Locations > Open and select the file BUTTOCK.LOC. Click OK. Click No. The buttocks are
calculated and displayed.
7.
Select File > Profile Projection Lines > Open, select the files STR_SIDE.PMK and STR_TTOP.PMK and click OK. These
are the side stringers and the tank top.
8.
Select File > References > Open and select the file U12.OUT. Click OK. These are the outlines of all plates in unit 12.
Tutorial
9.
You might want to zoom out in some of the views to see how the plate is located within this construction unit.
10. At the bottom of the program window change the Throw direction to Port.
11. The plate stock can only be set when linking ShipCAM to a ShipConstructor database. We are not doing this in this
tutorial.
12. Select Build > Options or click
to bring up the Settings window.
13. Click the Templates tab. Select the settings as shown and click OK. We will explain the available options later.
61
Tutorial
14. Select Build > Expand Surface or click
. The plate is expanded and appears in one of the windows. To determine
which one is the expanded plate, highlight each one of the windows and observe the state of the buttons in the
toolbar. The window that shows the Show Expanded Plate button depressed shows the expanded plate. Use the
zoom and pan functions to investigate the expanded plate.
15. Use the toolbar buttons to change what appears in each view.
Show Original 3D Surface
Show Expanded Plate
Show Strain on Expanded Plate
Show Strain on 3D Plate
Decrease Strain Scale
Increase Strain Scale
Show Plate Details Table
Show Forming Templates
16. The expanded plate can now be saved to a DXF file if you have a hardware lock.
The figure below shows one of the many possibilities of displaying the results of the expansion. The upper left
window displays a body view of the unexpanded 3D plate with templates and the outlines of all plates in this unit.
The upper right window shows the forming templates. The lower left window shows the expanded plate with the
strain map superimposed, and the lower right window shows the expanded plate with all markings inside a stock
plate.
62
Tutorial
We will now explain, in brief, some of the settings in the expand Settings window. Some are explained later in detail
during the examples.
General Settings
Stretch Expanded Plate
Select Build > Options or click
to bring up the Settings window.
63
Tutorial
None – Use this when you do not want to correct any expansion due to compound curvature in the plate.
Min Strain Zero – Use this when you use line heating to form the plate, which shrinks the plate. All small elements in the
expanded plate are larger or the same size as the same element on the 3D plate. After using line heating the plate
should achieve the desired size.
Max Strain Zero – Use this when the plate is shaped using a method that stretches the material.
See General Tab under PlateExpand Program (page 160) for more details.
Stock Settings
Sets the stock plate size and adds extra material to any plate edge. In general, it is sufficient to add stock only at unit
breaks. Stock on all plate edges is only required on highly compound curved plates.
See Stock Tab (page 171) for details.
64
Tutorial
DXF Settings
This tab lets you configure how this program generates the DXF drawing file.
See DXF Tab (page 172) for details.
Layers Settings
The Layers tab sets the layer names and colors that are used in the DXF file.
65
Tutorial
See Layers Tab (page 175) for details.
Expanding a Bow Fashion Plate
Bow fashion plates are particularly difficult and many lofting programs cannot handle these at all. ShipCAM can expand
them easily and can now also expand using fashion forming templates.
66
1.
Choose File > References > Remove to remove the current references.
2.
Choose File > References > Open and select the file U14.OUT. These are the outlines of all plates in unit 15.
3.
Choose File > Open Surface or click
and select the file U14UN03.MSH. Click OK. One of the compound curvature
plates of the bulbous bow, symmetrical about the centerline, appears. This is the one on top of the bulb.
4.
Choose Build > Options or click
. Click on the Templates tab (see Templates Tab (page 171) for details). Set
Generate Templates to Bow Fashion.
Tutorial
5.
Click Options. The Bow Fashion Template settings appear. Verify the following values and click OK.
6.
Select Build > Expand Surface or click
to expand the plate.
7.
Activate the upper-right window. Click
templates appear.
to display the forming templates. Select Plan View. The 2D forming
8.
To see how the forming templates are positioned in 3D, activate the upper-left window and click
surface. Try different 3D viewpoints and zooms.
9.
The upper-right window shows the fashion template across the bow plate, plus two longitudinal templates running
along center line, one on the outside and the other on the inside of the shell plating.
to show the 3D
67
Tutorial
10. Activate the lower left window and click
to show the strain map. The strain map of the expanded plate appears
and shows large areas with high deformation. This plate will need some serious shaping.
11. Activate the lower right window and click
the one above.
to show the expanded plate. You should now have a display similar to
You can now expand any of the U14Unnn.MSH plates by just opening the surface and expanding it. All of them
require the same settings.
Expanding the Plate with the Bow Thruster Intersection
The bow thruster is a simple cylinder that was designed in AutoCAD by drawing two circles at each end. These were then
imported via LoftSpace and converted into a surface mesh.
To expand the plate
68
1.
Choose File > Open Surface and select the file U14U02B.MSH. Click OK. All markings, such as frames, are
recalculated automatically.
2.
Choose File > Penetration Surface > Open, select U14BowThruster.MSH, and click OK.
3.
The following window appears. Select Both for the Intersection Type.
Tutorial
4.
Select No when asked to save the intersection.
5.
Choose Build > Expand Surface or click
6.
Set the windows to display as shown below. You can clearly see the expanded bow thruster intersection in the plate.
Using this option, it is easy to generate correctly expanded holes in the formed plate. Of course, the holes would only
be cut after forming the plate. However, the NC cutting machine will mark the holes correctly onto the plate.
to expand the plate.
Tip: Expanding even complex shaped plates with intersections is easy and precise with ShipCAM. The thruster
surface was created using AutoCAD. You can use these steps to make one yourself.
7.
Export some plate outlines or other references from ShipCAM to AutoCAD in 3D to DXF using LoftSpace. You will use
these as visual guides for your own experiments. Make sure that you know what units your ShipCAM project is in
(currently in meters) and what unit you want to use while working in AutoCAD (currently in millimeters).
69
Tutorial
8.
Import the DXF file to AutoCAD.
9.
In AutoCAD, draw the centerline of the bow thruster tube.
10. Make a UCS with the Z axis along the centerline and draw circles at either end.
11. Set the SURFTAB1 (2) parameters. You want to have at least 100 lines along the surface.
12. Make a ruled surface from the two end circles.
13. Save the thruster surface alone in a DXF formatted file.
14. Import the DXF surface into ShipCAM.
15. Save the surface and use it for marking penetration during plate expansion.
Shell Expansion
The ShellExpand module expands the girth of transverse sections. The resulting drawing keeps the true longitudinal
coordinates while the transverse sections are expanded to produce a 2D drawing. The shell expansion is always based on
a high number of closely spaced transverse sections.
Expanding the shell
70
1.
Start the ShellExpand program.
2.
Select File > Open Shell Surfaces or click
Designsurfs.GRP.
3.
Select File > Frame Line Locations > Open and select the file FRAMES.LOC. Click OK. Click No when asked to edit the
location file. The 3D frames are calculated.
4.
Select File > Buttock Line Locations > Open and select the file BUTTOCK.LOC. Click OK. Click No when asked to edit
the location file.
5.
Select File > Waterline Locations > Open and select the file WATER.LOC. Click OK. Click No when asked to edit the
location file.
6.
Select File > Profile Projection Lines > Open, select the files STR_SIDE.PMK and STR_TTOP.PMK, and click OK.
7.
Select File > Plan Projection Lines > Open, select the files STR_BTM.PMK and STR_KLSN.PMK, and click OK.
8.
Now we have all the information on the 3D surfaces ready to be expanded.
9.
Select Build > Options or click
, set the file type to Group Files (*.grp), and select the file
. Select the settings as shown in the Settings window.
Tutorial
10. Choose Build > Expand Surface or click
. The shell expansion takes place. It will take a few seconds to run.
11. Set up two windows as shown and select one to show the 3D set up and the other one to show the expansion.
12. Check the 3D geometry in different views to confirm that it is correct. You can also split the window into two or four
views.
13. The shell expansion is now ready for export via DXF to your CAD system for annotation and final detailing.
71
Tutorial
Weights and Center of Gravity
This function calculates the weights and centre of gravity (CG) of hull plating. The results show the area, weight, and CGs
for each individual plate and for all plates combined.
Note: In order for this module to function, you have to link LoftSpace to a ShipConstructor database. We will do this in
the steps below.
To calculate the weights and centers of gravity
72
1.
Start the LoftSpace program or switch to it if it is already running.
2.
If you already have data loaded, select Blocks > Unload All Data or click
asked to save data.
3.
Select File > Open ShipCAM File
4.
Make sure you are in a body view. Also ensure that the Blocks window is up. (Click
to bring it up.) For each plate
you will find columns for stock (Stk.), Throw, and any extra material on the left (L), right (R), bottom (B), and top (T)
edges. The window currently shows that none of these values have been set yet.
. Click OK to unload the data. Click No if
, select the file U12.GRP, and click OK. This file contains nine plates for unit 12.
Tutorial
5.
Select Blocks > Plate Stock Settings. In the display window select plates …00 through …05. Press Enter.
6.
You will see a window that tells you that LoftSpace is not currently linked to a ShipConstructor database. Locate the
database file that is associated with this project and log in to it. Loftspace needs to find the plate stock material
data.
73
Tutorial
7.
74
In the Add Stock Info window, select PL12 for the Stock, set the Throw direction to Down, and ask for an extra 25
mm (0.025 m) of material on the right (forward) side of the plates. Click OK.
Tutorial
8.
Observe the settings for plates U12P00 through U12P05 in the Blocks window. The throw setting for plate U12P05
says Starboard. LoftSpace uses the main direction of a curved plate as the direction indicator. For the bottom plates
selecting Down was fine; however, this does not work for plate U12P05. LoftSpace used the default Starboard, which
is not what we want. Use Blocks > Plate Stock Settings for plate U12P05 alone and adjust the Throw to Port.
9.
Select Blocks > Plate Stock Settings. In the display window select plates U12P06 through U12P09. Set the Stock to
PL10, the Throw to Port, and add 25 mm stock on the right. The resulting Blocks window should look like the one
below. Increase the Throw and R column width to view the values.
75
Tutorial
10. We are now ready to calculate the weight and CG for these plates.
11. Select Blocks > Weights & CGs and select all plate in the display window. Press Enter.
12. The results are written to a text file and displayed in Notepad. The text file also reports area and surface area, which
can be used for painting calculations.
Note: The results will not be shown if you are running in demo mode.
Inverse Bending
Creating perfectly shaped frames or stringers from stock profiles, such as L-bars, Holland profiles, or T-bars without
expensive forming templates is easy using the InverseBend module. Simply create inverse bending curves and scribe
them onto the straight profiles. Next bend the profiles until the inverse bending curves become straight lines, and then
you are done.
Inverse bending curves can be created for frames, non-twisted, and twisted longitudinals.
Create Inverse Bending Frames
Using frame traces on the hull surface and some simple settings, you can produce CAD DXF drawings with stock
expanded profiles. The profiles have marks and offsets for the inverse bending curve and let you put buttock line marks,
waterline marks, and any other marks you want on them.
To create inverse bending frames
76
1.
Start the InverseBend program module.
2.
Select Inverse Bend > Options or click
. Make sure all settings match what is shown below. The Beam Height is
the size of the beam in the plane of bending. The Margins exclude small portions of the beam near the upper and
lower edge that cannot be used for scribing (for example, if the beam has a radius bevel). Extend Neutral extends the
beam on the neutral axis (for example, if you require extra stock). Offset Spacing defines how closely you want the
offsets to be calculated. The Neutral Axis is the axis about which the beam will bend; look this up in the
Tutorial
manufacturer table. Overlap specifies how much two inverse bending curves have to overlap if more than one
bending curve is required.
3.
We will set up four different views now. Select View > Split Window and make four views.
4.
Activate the upper left view and select View > Show Original Frames or Stringers or click
. Click on Body View
.
5.
Activate the upper right view and select View > Show Original Frames or Stringers or click
Set the viewpoint to (5, 1, 1)
.
. Click on 3D View
.
6.
Activate the lower left view and select View > Show 3D Curved Frames or Stringers or click
Set the viewpoint to (5, 1, 1)
.
. Click on 3D View
7.
Activate the lower right view and select View > Show Straight Frames or Stringers or click
. Click on Plan View
8.
Select File > Open Frames and select the file U12IBND.FRM. Click OK. The file contains the frames that will be made
from stock profile.
9.
Select File > Mark Lines > Open and select the file U12IBND.FMK. Click OK. These are the marks of the longitudinal
stringers that were generated for the side stiffeners using the StringerCutouts module.
10. Select File > Open Buttock Line Locations, select the file BUTTOCK.LOC, and click OK. Click No when asked to edit
the location file.
11. Select File > Open Waterline Locations and select the file WATER.LOC. Click OK. Click No when asked to edit the
location file.
12. Select Inverse Bend > Make Inverse Bend or click
calculates the inverse bending curves.
. The program expands the profiles with all marking and
77
.
Tutorial
The profiles can now be exported to a DXF drawing in 2D for production drawings or in 3D for the 3D model. Please
view the resulting DXF drawing U12IBND.DXF in the DEMO\DRAWINGS directory.
Create Inverse Bending Stringers
The InverseBend module also produces inverse bending curves for twisted and non-twisted longitudinal stiffeners. You
use the InsertCutout module to prepare the stiffener files by loading closely spaced sections and creating stiffener marks.
The stiffener marks are then saved as developable surfaces.
78
Tutorial
The Inverse Bending program uses a two-step process to create the inverse bending information. First it develops the
twisted stiffeners represented by the loaded developable surfaces into flat plates, which will be shown in the lower left
window. Next the flat plates are straightened, which will be shown in the lower right window.
Tip: Group the stiffener surfaces together using a group file.
1.
Activate the upper left window and set it to Plan View.
2.
Select File > Remove all Data for the new expansion.
3.
Select File > Open Stringers and select the file STRINGER.GRP. Click OK. The file contains some example stringers
that will be made from stock profile.
4.
Select File > Open Stringer End Locations and select the file U12STRCT.LOC. Click OK. Click No when asked to edit
the location file. Use view and zoom to investigate the forward ends of the stringers. You will see marks near the
forward end of the stringers. No marks are visible at the aft end, because the cut position is outside the surfaces.
However, as you will recall, in the settings window we asked the program to extend the profiles by 100 mm on both
ends. The endcut marks will show up in the expanded surface.
5.
Select File > Open Frame Line Locations and select the file FRAMES.LOC. Click OK. Click No when asked to edit the
location file.
6.
Select Inverse Bend > Make Inverse Bend or click
. The program calculates the inverse bending expanded curves.
The resulting straightened profiles with all marks are displayed in plan view.
The profile can now be exported to a DXF drawing in 2D for production drawings or in 3D for the 3D model. Please
view the resulting DXF drawing, U12ILNG.DXF, in your CAD system.
79
Tutorial
PinJigs
The PinJigs module calculates the information required to build a PinJig for the assembly of construction modules. The
assembly is output as a DXF drawing of the PinJig with a table of pin heights and the angle between the normal and the
pin at each pin location. The following will demonstrate how to create a PinJig for the side plates of the U12 unit.
To create a PinJig drawing
1.
Start the PinJigs program module.
2.
Split the window into four views and set up a profile, plan, body, and 3D view window.
3.
Select File > Open Plates or click
U12P08.MSH.
4.
Select File > Open Frame Locations and select the file FRAMES.LOC. Click OK. Click No. The frames are marked and
used as references for setting up the assembly.
and select the files U12P05.MSH, U12P06.MSH, U12P07.MSH, and
We want to generate a PinJig with a good down-hand welding position. To achieve this, the plates will be rotated. We
will do this in two steps. First we will rotate the plates into an approximate horizontal position. Second, we will use
the automatic optimization to find the best horizontal positioning for welding.
5.
Select Build > Rotate or click
values as below and click OK.
. The Rotate Plate window appears, letting you specify rotation angles. Set the
6.
The plates are nearly horizontal. To rotate the plates into the best position we will now use the auto-leveling feature.
7.
Select Auto Level > Select Upper Left Corner and then pick the upper left corner point in the plan view. The picked
corner point is indicated with a large cross.
8.
Select Auto Level > Select Upper Right Corner and then pick the upper right corner point in the plan view.
9.
Select Auto Level > Select Lower Left Corner and then pick the lower left corner point in the plan view.
10. Select Auto Level > Select Lower Right Corner and then pick the lower right corner point in the plan view.
11. Select Auto Level > Auto Level and
. The plates are now oriented in the best horizontal position.
12. Select Build > Options. Set the same values shown below. Click OK.
80
Tutorial
13. Select Build > Generate pin-array on seams and select the file PINJIG.LOC. Click No. The file contains the distance of
the pins from the left side of the assembly.
14. Next, a message box asks for the maximum distance between pins. Enter 1.5. This assures that an extra pin is
located at the midpoint between two seam pins if the distance is larger than 1.5 m. The locations of the pins are
calculated and the pins are displayed as crosses in plan view.
15. Set up four views as shown below.
16. Select Build > Make PinJig, and the following images should appear:
81
Tutorial
PrintOffsets
The PrintOffsets module lets you generate a table of offsets for buttock lines, waterlines, longitudinal lines, frame lines,
frame knuckles, and design offsets. In this example we will make the frame offsets for the entire hull at waterline
locations every meter above baseline.
To print frame line offsets on water planes
82
1.
Start the PrintOffsets program.
2.
Select File > Frame Lines > Waterline Offsets and select the file HULL.FRM. Click OK. Switch to the isometric view
FROM FWD STBD UP.
3.
Select Offsets > Construct Print Offsets, select the file WATER.LOC, and click OK. Click No when asked to edit the
locations. The table of offsets is previewed for printing.
Tutorial
83
Tutorial
84
4.
The table of offsets can now be printed or saved to an ASCII text file for use in a word processor. Click Close.
5.
Select Offsets > Open Offsets in Text Editor or click
to open the table of offsets in an editor. Notepad is the
default editor, but the editor can be changed in the options. See PrintOffsets Module (page 195) for details.
Tutorial
Congratulations!
You have completed the ShipCam tutorial. We hope that you enjoyed your tour of just a few of the powerful capabilities of
ShipCAM. We appreciate your time and interest. We hope we were successful in providing you with enough information to
evaluate our system. As with most software, the first experience can seem a little intimidating.
It would be nearly impossible to show all of the features of ShipCAM here. If you feel that there are important functions
that you require, please do not hesitate to contact ShipConstructor and ask if ShipCAM already has the particular
capability or if it is planned as a future enhancement.
85
Reference Section
Reference Section
Projects
This first part of the reference section deals with ShipCAM concepts, such as setting up projects and how to deal with
hard-chine and round-bilge vessels.
The second part of this section deals with the commands of the individual modules.
A ShipCAM project consists of all files for one hull. All files belonging to a ShipCAM project are stored in one single folder
on your hard disk. Every project must have a project settings file, which stores common information to the project. It has
the extension .SCP. These settings include lofting units, CAD units, and so on. See the Appendix for details about the
project file.
Each ShipCAM program module has a Project menu in the File menu. This is the menu you use for many procedures:
•
Create a new project
•
Open a project
•
Change the project settings
•
Create a modified project
New Project
The New Project function creates a new empty folder for the new project and creates a project settings file in the folder.
The name of the project file consists of the name of the project folder plus the extension .SCP. For example, the project
TUG12 will be located in the folder TUG12. There will be a project settings file called TUG12.SCP in the folder.
To create a new project
86
1.
Start or activate any one of the ShipCAM program modules.
2.
Choose File > Project > New Project. The Create Project window appears.
•
Name -- Enter the name of the new project.
•
Directory – Lists the location of the project files. If you use Browse to locate a folder, select the parent of the
project directory. The new project folder is created inside the parent folder.
3.
Click Create to create the new project.
4.
The Project Settings window appears. Set the settings as you require. The Project Settings Tab (page 88) section
explains the options of this window in detail.
Reference Section
Open Project
This function opens a project by opening the project file in a ShipCAM project folder. Use this function to switch between
projects. Once you have selected a project, all program modules will access the same project by default.
To open a project
1.
Choose File > Project > Open Project. Browse for the folder you want to use and select the SCP file in that folder.
ShipCAM reads the project settings from the SCP file and will only list the files in this folder when opening a data file.
Project Settings
The project settings can be modified from any ShipCAM program module. The following window shows the settings that
are used for all modules.
To open the project settings window
1.
Choose File > Project > Project Settings. The window provides two tabs to access the data.
87
Reference Section
Project Settings Tab
Output Path -- Destination folder of all DXF file output.
Output Tolerance -- During export to DXF format, ShipCAM will test the distance between data points on polylines. If they
fall within this tolerance, they are removed. This greatly reduces the number of points on a polyline, which reduces file
size, speeds up display, and, most importantly, reduces potential problems while NC cutting. If points are too close
together, there may be too much data for the cutting machine, and the NC program may not be able to be loaded into the
available memory or the NC controller may choke on the rapid sequence of data points. As a guideline use these values:
•
mm units -- Use 0.5 mm or 0.0005 m.
•
inches units -- Use 1/32” or 1/64”.
Lofting Units – The units used in ShipCAM.
CAD Units -- The units used when outputting to DXF files.
Note: ShipCAM will automatically convert the lofting units to CAD units when exporting to DXF. CAD units are always
mm or inches. When using architectural units in AutoCAD (Feet-Inches-Fractions) the drawing is in inches, but the
display is in feet.
X-Coordinate -- The display direction of the X coordinate. World shows X increasing to the right; US-Reversed shows X
increasing to the left.
Format Text in Feet -- Check this option when the CAD units are in inches but you want ShipCAM to produce any
dimensions in Feet.
ShipConstructor Tab
This tab lets you log on to a ShipConstructor database. This link is required if you want to integrate expanded plates into a
ShipConstructor model, perform weight and CG calculations, or use batch mode expansion.
Use Database -- Check this box to link ShipCAM to the ShipConstructor database of the project.
Project Database -- Lists the database currently in use. Use the browse button to change the database file.
Current user -- Name of the currently logged in user. All ShipConstructor actions are logged under the user name.
Log On -- Use this button to log on as a different user.
88
Reference Section
Licensing
Licensing for ShipCAM uses a hardware lock. The lock is a small device that plugs into your computer’s USB port. The
locks store specific information that the individual ShipConstructor software modules look up at different times. Your lock
can be re-programmed to enable new versions and additional software options.
ShipConstructor Lock
Configurations
Standalone Computer
If you have a standalone system, all you need to do is attach the dongle to the USB port of your computer.
89
Reference Section
Network License Server
Note: This configuration requires a network lock.
On the Server Computer
See the Project Management manual for how to set up the network license server.
On the Client Computers
You need to configure ShipCAM to connect to the network license server.
90
1.
Start a ShipCAM module (LoftSpace). You may see a warning message like the following.
2.
Run Help > About LoftSpace. The About ShipCAM window appears.
Reference Section
3.
Click License Server Settings to change the server to connect to. The Network License Settings window appears.
4.
Change <Local Computer> to Server (where Server is the name or IP address of your network license server
computer). You can change the name in the list by double-clicking the name.
Local Computer is actually IP address 127.0.0.1. Do not change the port setting unless instructed to. If you remove
all computers from the list, <Local Computer> is added automatically.
5.
Click OK to return to the About ShipCAM window.
6.
Click Acquire to get a license.
Common Licensing Problems
91
Reference Section
This indicates that the LicenseServer Service is not running on the computer you are trying to connect to or that the
computer does not exist.
Create a Modified Project
The Create Modified Project function lets you create a project from an existing project with the capability to scale and
move the geometry data. The Create Modified Project function is only available from the LoftSpace module. Use this
function to scale an existing design, convert the units of measure, or move the origin.
Example – Convert a vessel with American notation (origin at the bow, positive X direction going aft) to a conventional
notation (origin at the aft, positive X direction going forward). The LBP is 100. In order to convert the length direction we
have to scale the length by -1.0 and move the length of the hull surface 100 units forward. Change the project settings
and make sure to change the X coordinate from US-Reversed to World.
To create a modified project
92
1.
Start the LoftSpace module.
2.
Select File > Project > Create Modified Project. The following window appears.
3.
In the Scale section enter any scaling that you want to perform. You can enter individual scaling factors for any
direction. A value of 1.0 means no change in size, values between 1.0 and 0.0 will result in a smaller vessel, values
above 1.0 will result in a larger vessel.
4.
In the Move section, enter any changes to the relative position of the vessel to the origin point.
5.
Click the Destination Folder Browse button to specify the new project.
Reference Section
6.
Navigate to the parent folder for the new project.
7.
Click New Folder and enter a name for the new project. In this case TUG14.
8.
Open the folder. Click Select.
9.
This returns you to the Create Modified Project window. The Destination Folder field now contains the path to the
new project.
10. Click OK to create the new modified project.
Note: If files already exist for the destination project, the program prompts you to overwrite the existing files.
Project Examples
Hard-Chine Vessels
These are the simplest vessels. ShipCAM has proven to be an excellent tool for desiging these types of vessels from
scratch. The surfaces definition plate edges are defined by the mathematical rules of developable surfaces, or by straight
section surfaces. Occasionally you will also find some surfaces to be of compound curvature. Only the plate edges need to
93
Reference Section
be entered and faired. Plate edges are generally the keel line, all knuckles (chines), and the sheer. Waterlines and
buttock lines that might be given in the design drawing are not used.
To fair a hard-chine vessel and create the surfaces
1.
Enter the table of offsets for the plate edges using the LoftSpace program, using one line for each edge. Save the
offsets to an .LGO file.
2.
Fair the longitudinal plate edges using the LinesFairing program. Save the faired lines as high-resolution splines.
3.
Calculate developable or straight section surfaces using the LoftSpace program.
In general, only the lower and upper edges of each plate are required. Often the upper edge of one surface is the
lower edge of the next surface. For example, the Keel Line and Chine Line are the plate edges for the bottom plate.
The next figure shows the resulting ruling lines of the bottom plate for a tugboat. The surface is represented by
connecting the end points of each calculated ruling line with a straight line. The end points of all ruling lines lie on
the two plate edges. The ruling lines become shorter as they approach the forward and aft end of the plate. The first
and last ruling line may have zero length, if the faired lines meet in a single point at both ends.
The splines for the side plate edges do not meet in a single point. The hull looks open. This seems unusual, but the
ends of the plate are just straight lines, and these will be represented by the ruling-lines that connect the first
vertices on each longitudinal and the last vertices on each longitudinal. The figure below shows the profile view of
the developable surface between the Chine Line and the deck at sideline. In this case the ruling lines at both ends of
the surface are not of length zero.
The bulwark surface is generated by following the same procedure for the side surface.
Single-Surface Round Bilge Hulls
Single-surface round bilge hulls, shown below, require a two-step fairing process. In most cases the station or frame
offsets are the starting point. In most cases the offsets of the stem profile are also required. The following steps list the
principle operations.
To fair a single-surface round bilge hull
94
1.
Enter the table of offsets for the stations, including the stem profile, using the LoftSpace program. Save the offsets
to a file with the extension .STO.
2.
Fair the station offsets using the LinesFairing program. Create longitudinals offsets from the faired stations and save
them to a file with the extension .LGO.
3.
Fair the longitudinals using the LinesFairing program. Save the faired lines as high-resolution splines.
4.
Create a wire-frame mesh of the fitted surfaces from the faired longitudinals using the LoftSpace program.
Reference Section
During the fairing process it is important to keep in mind that the objective is to create a surface mesh from the
faired longitudinals. Each station is faired separately to the given offsets during the station fairing. The longitudinal
offsets are calculated at equal intervals along the girth of each station. Next, the longitudinals are faired, particularly
in the high curvature areas of bow and stern. Finally, the wire-frame surface mesh is created as shown below.
Multiple-Surface Round Bilge Hulls
These are the most complex hull forms and require considerable planning before starting the fairing process. Usually
these hulls should be divided into a number of surfaces. Each surface can be of a different type. Natural edges for
surfaces are flat of side, flat of bottom, knuckles, and the like.
Consider the following figure showing a hull with multiple surfaces. Only two of the six surfaces have been faired, the aft
(teal colored) and forward round surface (green and brown). The forward area consists of two surfaces now. Initially it was
faired as one surface covering the green and the brown areas, plus a portion close to mid-ship above the deck that was
later trimmed away. All other surfaces have been either generated simply by extracting edges from the faired fore and aft
curved surfaces (flat of side and bilge) or by extracting one edge, mirroring it about center line, and trimming the surface
to centerline (flat bottom plus rise in the aft, shown in blue).
95
Reference Section
It is important to understand that ShipCAM describes the shape of the plating for the vessel. When starting a project, the
ship can be divided suitably to make it easy to handle complex structures. Quite often the question comes up: “Where is
the module to do a transom?” The answer is that the transom is just another surface, which could be faired with the hull
lines or faired separately.
Similar approaches are used for superstructures, sponsons, skegs, keels, tank tops, and more.
The next two figures show, on the left, the surface model generated in ShipCAM for the hull and super structure of a small
police boat, and, on the right, the same surfaces combined with internal structure in a ShipConstructor model.
96
LoftSpace Program
LoftSpace Program
LoftSpace is the main module of ShipCAM. It combines many lofting functions into one single program. In LoftSpace you
can do any of the following:
•
Enter offsets.
•
Create developable, straight section, and compound curvature surfaces.
•
Cut frames and other sections.
•
Intersect surfaces.
•
Project onto surfaces.
•
Fillet surfaces.
•
Trim surfaces.
•
Import and export surface and line data with CAD systems.
•
Import NURBS files from IGES 128 or IDF formatted files.
•
Create decks.
•
Perform many 3D surface manipulations to produce a production-ready surface model.
General Features
Selecting Objects
Selecting objects in the geometry editor is done by using the mouse to pick or capture an area. Selecting objects can be
done from any viewpoint. LoftSpace lets you select vertices, lines, or blocks (a grouping of lines). When objects are
selected they are highlighted using dotted lines. Vertices are highlighted by dotted squares around each vertex.
Entities are selected in one of four ways:
•
Click on an entity. Clicking on another entity will de-select the previously select one and select the new one.
•
Hold down the Shift or Ctrl key and click on entities to select all of the clicked entities.
•
Holding the left mouse button down and dragging a selection rectangle from left to right will select all entities that
fall completely into the selection area.
•
Holding the left mouse button down and dragging a selection rectangle from right to left will select all entities that
include a portion in the selection area.
Blocks Window
The Blocks window lets you see all the blocks (files) that are loaded in a tabular format.
97
LoftSpace Program
Name -- The filename from which the block originated. This field can be modified to rename a block or file.
Color -- The color of the lines in a block. To change a color of a block, click the color area. The color is not a saved property
of the block.
ON -- Flag that allows you to not display a block. A block that is turned off cannot be selected but all the data remains
loaded.
X-Ln -- Flag that allows you to turn the cross lines on or off. This only applies when all the lines in a block have the same
number of vertices.
Desc. -- A description of the contents of a file or block. If the block is a surface then the number of lines and the number
of vertices are shown. The description is not a saved property of the block.
Stk. -- The stock of the mesh surface. This only applies to surfaces that have the stock set using Manager. This is a saved
property of a mesh surface block.
Throw -- The direction of the plate surface’s throw. This is determined from the normal vector at the center point of the
plate. This is a saved property of a mesh surface block.
L – The amount of green material to add to the left edge of the plate during plate expansion. The left edge is located on
the plate where the first vertices of the lines are.
R -- The amount of green material to add to the right edge of the plate during plate expansion. The right edge is located
on the plate where the last vertices of the lines are.
B -- The amount of green material to add to the bottom edge of the plate during plate expansion. The bottom edge is the
first line of the mesh.
T -- The amount of green material to add to the top edge of the plate during plate expansion. The top edge is the last line
of the mesh.
Mod – If a flag appears in the Name column beside a block, it indicates that a block has been modified since it was
loaded or last saved. The flag is shown in the tanle below on U11P00.MSH, which has had its plate stock (Stk) changed to
PL10 since the last time it was saved.
Context Menu
The Blocks window has a context menu that appears when you right-click on a block name. The menu gives you access to
the most commonly used functions.
98
LoftSpace Program
File Menu
Open ShipCAM File
Displays a window to open one or more ShipCAM files.
99
LoftSpace Program
Files of type -- Lets you limit the files displayed in the main window. A ShipCAM project often consists of many files. By
default, All Compatible Files is set to show all files. Use any of the other options to limit the type of files displayed.
New Group -- Select any number of files in the main window and click New Group. For example, the names of all plates
for a construction unit can be saved to a .GRP file. Later, you can recall all the plates for the construction unit by selecting
this group file.
Group Edit -- Select a group file and click Group Edit. The window lets you remove files from the group file.
100
LoftSpace Program
Import DXF File
Lets you import DXF files created by any CAD program. These files may be in 2D or 3D. ShipCAM can import the following
types of entities from DXF files:
•
LINE
•
ARC (will be automatically converted to a polyline)
•
CIRCLE (will be automatically converted to a polyline)
•
POLYLINE regular, curve-fit, spline-fit (arc segments are converted to line segments the same as ARCS)
•
LWPOLY
•
2D POLYLINE
•
3D POLYLINE
•
3D polygon mesh
The DXF Import Options window lets you select the unit conversion to scale the data and exchange co-ordinates when the
data in the CAD system uses a different co-ordinate system than ShipCAM. Use this also to convert 2D frame sections
into a 3D reference model. In this case, you exchange X to Y and Y to Z. Once loaded, all frame section will be at 0.0
length. Just move each section to the appropriate location and you have a 3D model.
101
LoftSpace Program
Import IDF File
The IMSA-IDF format was defined by the International Marine Software Associates, of which ShipConstructor Software
Inc. is an active member. The IDF format is specifically designed for the purposes of the marine industry. ShipCAM can
read the Section format, the Surface Mesh format, and NURBS surfaces.
When importing NURBS surfaces, LoftSpace converts them to the standard ShipCAM type mesh surface. You will be
prompted to specify the minimum number of vertices in U and V directions that LoftSpace should create for the mesh.
LoftSpace will try to match your value. However, the NURBS algorithm allows only certain numbers of vertices to be
created. LoftSpace will create the mesh with values at the nearest higher value to the value specified. For example, in the
following case the resulting surface happens to be a 23x22 mesh.
102
LoftSpace Program
Import IGES Files
LoftSpace can read the IGES 128 entity, which is a NURBS surface description using the IGES interface. Enter the
required minimum mesh density in the U and V columns for each surface.
Note: Due to some differences detected in the IGES import and the original surface, we recommend using a
conversion function included in the ShipCAM Import Utility in AutoCAD.
IGES2MSH
The IGES2MSH command can be run directly from AutoCAD if the ShipCAM Import utility is installed. This utility is
installed by default when ShipConstructor is installed.
To use the IGES2MSH function
1.
Start AutoCAD.
2.
Run SC Utilities > ShipCAM > Convert IGES to MSH or type IGES2MSH. The IGES File Import window appears.
3.
Select the file you want to convert and then click Open.
4.
Next, enter the number of vertices in the MSH file in the U direction. The default value should be a good value to use.
The number is the Resolution Factor (in this case 10) multiplied by the number of control points in the U direction. If
you select Prompt for each surface, then you can specify the number of vertices in U and V directions separately.
5.
The Save As window appears.
103
LoftSpace Program
6.
Save the mesh to your ShipCAM project folder. A name is given by default that lets you quickly finish if you have
multiple surfaces in the file.
7.
The resulting ShipCAM surfaces are not trimmed.
Group Visible Blocks
Groups the names of all visible blocks into a .GRP group file. This lets you open the same files simply by selecting the
group file. Use this, for example, to group the plates of a construction unit together. The group file stores only the file
names, no actual data.
Save Compressed
Saves all currently loaded data files into one single compressed data file. This lets you store many files in a single file.
104
LoftSpace Program
Export DXF File
This function lets you interchange data with virtually any CAD program. The following window gives you all the options to
write the data in the form you need. If you use AutoCAD, the ShipCAM Import utility is a simpler way to load the geometry
in CAD. From AutoCAD, type SCIN.
Note: This function exports all visible blocks. Blocks that are set invisible are not exported.
DXF Export Options Window
Export Mesh As -- Export all mesh surfaces as the type of entity selected.
Dimensions -- Export the data in 2D or 3D. If 2D exporting is checked, the View field is used to determine the
transformation to 2D.
View -- The view that the data is exported in if 2D export is selected.
Snap planar lines -- Snap the vertices of planar lines to the nearest whole value (1/100th millimeter, 1/100,000th meter,
1/10000th foot, or 1/1000th inch).
Layers -- Determines which layers the data will be placed on.
Text on Line -- Output a text string in the middle of each line.
Text Size -- The height, in output units, of the text label if text is output.
Tile FRM, BTK, WLN -- Tiles each line in the following types of blocks.
FRMs are tiled horizontally only when Body View is exported.
BTKs are tiled vertically only when Profile View is exported.
WLNs are tiled vertically only when Plan View is exported.
Spacing -- Distance in design units to shift adjacent lines when tiling.
Bevel Angles -- Exports the bevel angle information as text at each vertex, if the block contains bevel information.
Export IDF
This function can export sections or meshes to the IMSA IDF file format. Only the visible blocks are exported. Multiple files
can be written to the same IDF file. However, you cannot write sections and meshes to the same IDF file.
To export as sections
1.
Select Files > Export IDF File > As Sections.
2.
In the Save File window, enter the file name. Click OK.
3.
In the IDF file options, make sure that you have selected the appropriate section type for each block.
105
LoftSpace Program
To export as meshes
Follow the procedure for exporting as sections, only choose Files > Export IDF File > As Meshes. This option writes the
visible blocks to an IDF formatted file.
Export GHS
Exports the visible LoftSpace data files to the hydrostatic .GF format. The data has to consist of sections (frames). This
procedure must be done after creating a 3D surface model of the hull.
To export files to GHS
106
1.
Load all the hull surfaces.
2.
Cut transverse sections with sufficient density to maintain hull definition. The distance between sections should be
less than 1/20th of the length of the hull with closer spacing at positions where the hull changes shape dramatically.
3.
Save the transverse sections and remove all other data that was loaded using the Blocks window bar.
4.
With only transverse sections loaded, select Export GHS File from the File menu. The GHS Export Options window
appears.
5.
Select the water type intended for the vessel and click OK.
6.
The standard file Save As window appears. Type the name of the GF file to export and click Save.
7.
For each block of sections a component name is required.
LoftSpace Program
The GF file can now be loaded into BHS or GHS for hydrostatic calculations.
Preferences
1.
Select File > Preferences to set the preferences. The Preferences window appears.
Selection Cursor Size -- The size of the cursor box used when picking objects.
Display objects using non-uniform colors -- Picks unique colors for each block. Otherwise chooses color based on block
type.
Show Mesh cross lines on load -- Displays the cross lines for surfaces when the block is loaded. Otherwise only the lines
are displayed.
Project
See Projects (page 86) for details.
Blocks Menu
These functions are available from the Blocks menu. Some functions are also available from the Context menu.
Select
Lets you pick blocks. After selecting, right-click the mouse to display the Context menu. Use any one of the functions by
selecting it.
Unload
Prompts you to pick the blocks to unload from memory.
107
LoftSpace Program
Unload All -- Unloads all blocks from memory.
Unload Hidden -- Unloads all blocks from memory that are currently hidden.
Unload Visible -- Unloads all blocks from memory that are currently visible.
Create
Creates a new empty block.
Move
Prompts you to pick one or more blocks. Moves selected blocks by the specified amount.
Transpose
Transpose the lines of a block. Only available when a block has the same number of vertices per line. Think of a fish net.
The lines of the fish net cross each other. Each crossing is a vertex in a block. We can follow our fish net lines horizontally
from one crossing vertex to the next one, or we can do the same vertically. Transposing the lines in a block does nothing
more than re-arrange the order in which the crossing points are visited, horizontally or vertically. This function is
important when trimming surfaces.
Reverse Vertices
Each line (polyline) consists of two or more vertices. The first vertex is marked by a green cross and the last one by a red
cross when the line is selected. The vertex number increases from the green to the red cross. This function reverses the
order of the vertices.
Reverse Lines
Reverses the order of lines of selected blocks. For example, if you have 11 stations from 0 to 10, use this function to
reverse the order from 10 to 0.
Mirror Half-Breadth
Mirrors the block about the centerline. You can keep the original block or erase it with the next window that appears. The
mirrored block has _M attached to the file name.
Scale
Scales selected blocks by a specified scaling factor. Scale proportionally will use the X scale for all directions, even if
different scales are entered.
108
LoftSpace Program
Rotate
Rotates selected blocks around the three primary axes. The order of rotation about the axes is X axis rotation, Y axis
rotation, and then Z axis rotation.
Sort Lines
Lets you manually sort the lines in a block. The logical order of the lines within a block is important if the block represents
a surface. For example, you might assemble a surface by extracting lines from adjacent surfaces. The resulting surface
might consist of lines that are not in the correct order (that is, stations that are out of sequence).
1.
Choose Blocks > Sort Lines.
2.
Pick the first line and press Enter. The color of the first sorted line changes.
3.
Pick the next line using the arrow keys (do not use the mouse to pick) to step through the lines. Press Enter.
4.
Repeat until all the lines are sorted.
Automatically Sort Lines
Sorts lines by comparing the distances between the vertices on each line.
Trim
Trims selected blocks to selected cut lines. ShipCAM can only detect one intersection per line.
1.
Choose Blocks > Trim.
2.
The command line in the lower left display border reads Select cutting lines then press enter.
3.
Select the cutting lines. The cutting lines and the lines of the block should cross each other. It is important to switch
the XLn option in the Blocks window off to be able to see the direction of the lines in the block to trim.
4.
The command line will say Select the block to trim and press enter. Select the block you want to trim.
109
LoftSpace Program
5.
6.
The Trim Surface window gives you several options.
•
Keep Block > Before trim line -- Keeps the portion of the lines in the block before the trim line. This is the portion
between the first vertex on each line, marked by a green cross and the trim line.
•
Keep Block > After trim line -- Keeps the portion of the lines in the block after the trim line. That is, between the
trim line and the red cross marking the last vertex on the line.
•
Reverse Vertices -- This function reverses the vertex order on each line before the trimming operation.
•
Hide surface being trimmed -- The function makes a copy of the surface while trimming. The original surface
remains intact. However, it is best to hide the surface being trimmed as it would obstruct the view of the
resulting trimmed surface.
After choosing your options, click Trim to trim the surface.
Mesh Lines
The menu has three options.
•
Equally Spaced -- Use this option to create the same number of vertices on all lines in a block. Some functions
require that all lines have the same number of vertices. For example, if you want to create a developable surface,
both edges of the plate must have the same number of vertices. The Mesh Equally Spaced window appears. It shows
the block name and the smallest and largest number of vertices found on the lines in the block.
Number of vertices per line in mesh -- The default value is the number of vertices found in the line with the most
vertices. In general this is the best value to choose. However, the number of vertices depends very much on the
shape of each line and the length. Choosing a higher number of vertices does not improve the shape of the polyline.
All vertices are calculated on the existing polyline. In some cases you might want to reduce the number of vertices. If,
for example, the lines describe the edges of flat rectangular plates, such as those found in superstructures.
Transpose after mesh -- Use this option if you need a transposed block for the next operation, such as trimming. We
provided the option here as it is repeatedly used when trimming hundreds of plates from the design surfaces.
•
110
At Locations – Prompts you to pick a location file. This file contains the proportional values at which you want to
generate vertices along the existing lines. These values range from 0 to 100 percent.
LoftSpace Program
•
At Distances -- Prompts you to pick a location file, in which you specify values that you want to calculate new vertices
on each 3D line at. The distances are measured on the 3D length of each line. The function will always include the
first and the last vertex on each line.
Outlines
Generate the four edges or outlines of a surface to a new block. This function is useful after trimming the design surfaces
of the hull into individual plates. Using this function, you get all plate edges, which can be exported to CAD for plotting in
three 2D views or 3D. Also, use this function in preparation for shell expansion drawings. The plate edges can be
projected onto the expanded sections to create a shell expansion drawing with all seams and butts. You can choose to
keep the four edges as separate lines or have LoftSpace join them for you.
Remove Vertices Below Tolerance
Removes vertices below a chord tolerance. ShipCAM removes vertices using the following algorithm. If the Chord
Distance 1 is greater than the tolerance, then Vertex 2 is not removed. Otherwise if the Chord Distance 1 is less than the
specified tolerance, the Chord Distances 2 and 3 are checked. If the larger distance is less than the output tolerance,
then Vertices 2 and 3 are removed.
Exchange Coordinates
Lets you switch coordinates. Select the blocks you want to exchange coordinates and press Enter. The Exchange
Coordinate window lets you set which coordinates to switch.
111
LoftSpace Program
Smooth Fans
When generating developable surfaces, conical shapes can result with the apex of the cone at the plate edge. This is
represented by several ruling lines that come together at one point (see next figure). This can cause problems when
filleting and offsetting and can cause jagged sections if several of these follow in sequence. This function moves the
vertices of ruling lines a small distance along the edge of the plate (see second figure).
Connect Lines
Connects two lines. If the end of the first line does not meet the end of the second line, you have a choice of connecting
the shortest end points of the end of the first line to the start of the second line.
Plate Stock Settings
Lets you set the plate stock for one or more plates. You have to use this feature if you want to calculate the weight and
center of gravity (CG) and if you want to use the multiple-plate-expand option in the PlateExpand program.
Consider the following display. Several plates are loaded into LoftSpace. None of the plates has a plate stock, throw
direction, or extra stock material assigned. LoftSpace, therefore, cannot determine weight and CG, nor can PlateExpand
expand all of these plates in a single batch operation. This would require the information for the expansion process to be
included in the DXF output file.
112
LoftSpace Program
1.
Choose Blocks > Plate Stock Settings. In the display window, select plates 00 through 05 and press Enter.
2.
In the Add Stock Info window, select the Stock PL12, set the Throw direction to Down and ask for an extra 25 mm of
material (0.025m) on the right (forward) side of the plates. Click OK.
3.
Observe the settings for plates 00 through 05 in the Blocks window. The Throw setting for plate 05 indicates
Starboard. LoftSpace uses the main direction of a curved plate as the direction indicator. For the bottom plates
selecting Down was fine. However, this does not work for plate 05. LoftSpace used the default Starboard, which is
not what we want. Use Blocks > Plate Stock Settings for plate 05 only and adjust the Throw to Port.
Lines Menu
These functions are available from the Lines menu. The most common functions are also available from the lines Context
menu.
113
LoftSpace Program
Select
Lets you pick lines then right-click to bring up a menu of functions to perform on the selected lines.
Delete
Removes selected lines from the block.
Move
Moves selected lines by a specified amount.
Reverse Vertices
Each line (polyline) consists of two or more vertices. The first vertex is marked by a green cross and the last one by a red
cross when the line is selected. The vertex numbers increase from the green cross to the red cross. This function reverses
the order of the vertices.
Reverse Lines
Reverses the order of lines of selected blocks. For example, if you have 11 stations from 0 to 10, use this function to
reverse the order from 10 to 0.
Mirror Half-Breadth
Mirrors the lines about the centerline. You can keep the original lines or erase them with the next window that appears.
Rotate
Rotates selected blocks around the three primary axes. The order of rotation about the axes is X axis rotation, Y axis
rotation, and then Z axis rotation.
114
LoftSpace Program
Connect
Connects two lines. If the end of the first line does not meet the end of the second line, you have a choice of connecting
the shortest end points of the end of the first line to the start of the second line.
Trim
Trims selected lines to cutting lines.
To trim lines
1.
Select Trim from the Line menu.
2.
Pick the cut lines and then press ENTER.
3.
Pick the line to trim and then pick the side of the line to trim off. You can then pick more lines to trim to the same
trimming lines.
Extend > By Amount
Extends selected lines by the amount that you enter.
To extend selected lines by an amount
1.
Choose Extend > By Amount from the Line menu.
2.
Pick the lines that you want to extend and press Enter. The Extend Line window appears.
3.
Enter the extend length and ends to extend and click OK.
Extend > To Line
Extends the selected lines to an existing line in the current view. This function depends on the viewpoint. Only Plan,
Profile, and Body views can be used.
To extend selected lines to an existing line in the current view
1.
Select Extend > To Line from the Line menu.
2.
Pick the line that you want to extend to and then press Enter.
3.
Pick the lines that you want to extend and then press Enter.
115
LoftSpace Program
Reverse Vertices
Reverses the order of the vertices on selected lines. The logical order of vertices is important for some operations. For
example, a surface only makes sense if all lines in the surface have all the vertices running in the same general direction.
Thin Vertices
Thins vertices by keeping only every nth vertex on the selected lines, where n is a value set after selecting lines and
pressing Eneter. If n is 2, every second vertex is kept.
Remove Vertices Below Tolerance
Reduces the number of vertices on straight portions of lines. ShipCAM removes vertices using the following algorithm. If
the Chord Distance 1 is greater than the tolerance, then Vertex 2 is not removed. If the Chord Distance 1 is less than the
specified tolerance, the Chord Distances 2 and 3 are checked. If the larger distance is less than the output tolerance,
then Vertices 2 and 3 are removed.
Vertices Menu
This menu lets you manipulate individual vertices.
Select
Select vertices. Once vertices are selected, you can right-click to get the vertex context menu.
Delete
Deletes vertices by selecting them using the mouse and pressing Enter.
Move
Moves the vertices by a specified amount.
Vertex Context Menu
Delete -- Deletes the selected vertices.
116
LoftSpace Program
Move by -- Moves the specified vertices by a specified amount.
Move to -- Moves the specified vertices to a specified point.
Break Apart at -- Breaks a line into two lines at the specified vertex. Select only one vertex.
Tools Menu
Offset Editor
It is important to understand how ShipCAM organizes data to be able to enter offsets efficiently and plan how they are
entered. ShipCAM deals with three types of data:
•
Vertex -- A point in 3D space consisting of a value for X, Y, and Z or Length, Half-Breadth, and Height accordingly.
•
Line -- A sequence of at least two, but most likely more, vertices. It is important to note that the sequence in which
the vertices are entered is important. A line can and should have a name.
•
Block -- This is a collection of two or more lines stored in a named file. A block can be a surface, several frame
sections, or any number of oddly shaped lines.
Offsets or vertices are entered using the following procedure. As you enter or change a vertex, the result is shown in
the display window or windows, if multiple views are set.
When to Use the Offset Editor
Use the Offset Editor in the following instances:
•
You are starting a vessel from scratch and you have a lines plan of a vessel but no drawing.
If it is a hard chine vessel, enter offsets of the lines that define the plate edges.
If it is a round bilge vessel, enter offsets for stations and frames (or both) plus forward profile.
•
You require butts for breaking up large surfaces into individual plates. Define each butt by two vertices.
•
You want to set exact values for individual vertices in a surface or any other data file.
To enter offsets in a new file
1.
Create a new line by choosing Lines > Create. The New Block window appears.
117
LoftSpace Program
2.
Enter a name for the new block. Select the correct file type for your types of offsets. Use LGO (Longitudinal Offsets)
for hard chine vessels, STO (Station Offsets) for round bilge vessels, and PMK (Plate Marks) for plate butts and
similar supporting files. Click OK.
3.
This brings up the Line Editor. ShipCAM automatically adds one line with the name 1 to the new block, and adds two
vertices with 0.0 values to the line. A line has to have a minimum of two vertices.
To edit existing files
You can also edit the offsets of existing files.
1.
Make sure you are running LoftSpace and have two or more files loaded.
2.
Select Tools > Offset Editor. The Line Editor appears.
3.
Use the Block drop-down box in the upper left corner to select the block you want to edit, or you can use Line >
Select and click on the line in the main display window. This will bring up the offsets of the picked line in the Offset
Editor.
4.
Use the buttons (explained in Step 5) to move between blocks, lines, and vertices.
5.
Click on an offset cell in the window to activate the edit mode for that vertex value.
Previous or Next Block
Previous or Next Line
Space Down
Copy Down
Copy
Paste
Create NewLine
Space Down is used when you want to use even spacing between vertices, such as station spacing on a chine line.
Highlight the X value of a vertex for which the spacing is constant. Click on Space Down. The function calculates the
difference to the value above the currently highlighted value. This difference is then used to calculate all values
below the highlighted value. For example, the first station is at 0, the second at 2.5. Highlight the 2.5 value and click
Space Down. The values 5, 7.5, 10 and so on are entered.
118
LoftSpace Program
Copy Down is used when all values below the current vertex are the same for the further vertices. For example, if you
are entering a station at 5.0, enter 5.0 in the first field and click Copy Down. All fields below are filled with the value
5.0.
Keyboard Shortcuts
The Offset Editor table must have the input focus in order to use the following keyboard shortcuts. To make the Offset
Editor table have the input focus, click anywhere on the table. The current selected cell will have a dotted rectangle on its
border if the table has the input focus.
Shortcut Key
Function
Insert
Inserts a new vertex before the current vertex
Delete
Deletes the current vertex
Home
Sets the current cell to the top of the table
End
Sets the current cell to the bottom of the table
Ctrl+Y
Uses the spacing from the previous vertex coordinate to the
current vertex coordinate and applies it to the remaining
vertices
Ctrl+D
Uses the current vertex coordinate for the remaining vertices
Ctrl+T
Sorts in ascending order all the coordinates in the current
column of coordinates from the current position onwards
Surface Generation
The hull, superstructure, or any other part of a vessel can be described by fairing lines in transverse and longitudinal
directions and then calculating a surface from these lines. The Generate Surface function provides ways to generate four
types of surfaces:
•
Cross spline surface
•
B-spline fitted surface
•
Developable surface
•
Straight section surface
The resulting surfaces are stored in two different file types:
1.
Mesh Surface *.MSH file is used for compound curvature surfaces, surfaces curved in two independent directions.
The surface mesh consists of the coordinate triplets of all surface mesh points in 3D space. The vertices are
connected by straight elements in longitudinal and transverse direction. Generally, a mesh surface consists of 10 to
several hundred lines and 100 to more than 1000 vertices. The surface mesh is generated by CROSS SPLINE or BSPLINE SURFACE. The STRAIGHT SECTION SURFACE module is, under certain conditions, also used to produce a
surface mesh.
2.
Developable Surface *.DEV file is used for developable surfaces. It consists of the coordinate triplets of both end
points of the ruling lines. The surface consists of a high number of straight lines (several hundred to over one
thousand) that are given by two end points each. Additional information about developability is stored in the file
format.
Ship hulls can consist of just one surface or a number of surfaces. Sometimes two adjacent surface plates share a
common plate edge longitudinal. For example, the bottom plate and the side plate may share a chine line as a
common plate edge, or a forecastle may share the lower plate edge with a forward section of the upper edge of the
side plate.
Developable and straight section surfaces are always calculated from the plate edge information only. For example,
the plate edges can be given by the following combinations:
•
The fairbody and the chine line for a bottom plate.
•
The chine and sheer line for a side plate.
•
The bottom and top edge of a keel.
119
LoftSpace Program
•
The bottom and top edge of a transom.
The shape between the plate edges is completely determined by the mathematical rules. Waterline and buttock line
information, if present in a table of offsets, should not be used.
Fitted surfaces are calculated from a larger number of longitudinals, generally four or more faired longitudinals. Two
longitudinals describe the plate edges, and the intermediate longitudinals describe the shape (flare or flam).
Complex structures such a bulbous bow vessel can be described with this method.
General Procedure for Generating a Surface
To create a surface from faired splines
1.
Load the faired lines in the LoftSpace module.
2.
Select Surface Generation from the Tools menu. The command line reads Select block to generate surface from and
press Enter.
3.
With the mouse, pick the block containing the faired lines.
4.
Press Enter. The Generate Surface wizard appears.
5.
Select the type of surface you want to create and the lines that will represent the top and bottom edges.
6.
For B-spline and cross spline surface generation, all the lines in between the start line and end line are used to
generate a shaped surface.
For developable and straight section surfaces, only the selected start and end lines are used for the surface
generation.
7.
Click Next.
8.
Change the surface settings if needed and click Finish. The surface is placed in a new block.
9.
If the surface you generated needs to be changed and recreated, press Enter or Right-click to bring up the Generate
Surface wizard again.
Cross Spline Surface
Cross spline surfaces are calculated from a series of faired longitudinal lines. In general, this type of surface is used for
round bilge hulls or for bow and aft sections of hard chine hulls. This is the best surface type when recreating a complex
shape from a table of offsets.
The function calculates splines across the faired longitudinal lines, creating a dense surface mesh. This improves the
resolution transverse to the faired splines. For example, you might have faired 15 longitudinal splines along the length of
the ship. Now you need one hundred or more vertices to create each frame exactly. This function does just that for you.
120
LoftSpace Program
Resolution -- The number of vertices in the transverse direction for the surface mesh. Higher curvatures require more
vertices.
Iterations -- Number of iterations the algorithm uses to fit the surface mesh. A large number of iterations reduces the
deviation between the transverse splines and the longitudinals but increases the calculation time. In general, three to five
iterations will reduce the maximum deviation to a small enough amount (that is, less than 1 mm or 1/16 inch). Zero
iterations will create the smoothest surface, as any unfairness in the longitudinal splines will be reduced.
B-Spline Surface
The B-Spline Surface function calculates a surface mesh by increasing the mesh density in longitudinal and transverse
directions at the same time.
This function should be used mainly when designing a hull from scratch or when it is not important to match the given
offsets exactly.
Lines in Patch – The number of longitudinal lines to generate between the lower and upper edges.
Stations in Patch – The number of transverse lines to generate.
Approximate – Calculates a B-spline fitted surface using a standard B-spline surface algorithm from the loaded splines
and places the surface in a new block.
Interpolate -- Calculates a B-spline surface that is forced to pass through the longitudinal splines and places the surface in
a new block. In some cases the surface may show unwanted effects.
Note: Use extreme care when using B-spline interpolation, especially when used in conjunction with splines saved with
proportionally spaced vertices, or when the longitudinals are spaced unevenly. In some cases the surface can reverse
on itself in small regions that are not immediately visible.
121
LoftSpace Program
Developable Surface
This function calculates a developable single-curvature surface from two plate edge lines. Developable means that the
complete surface can be expanded into 2D by rolling the plate from 3D to 2D.
Parallelity -- Parameter used to define the parallelity of the rule lines in the developable surface. Values can range
between 0 and 200. The ruling lines are calculated by determining the best ruling line beginning at the starting boundary
ruling line.
Values for Parallelity
0-4:
Low parallelity. Can cause the ruling lines to form fans.
5-20:
Medium parallelity. Fan development is somewhat suppressed.
21-199:
High parallelity.
200+:
Ruled surface.
Max Dev. twist angle -- The twist angle is the angle between the two surface tangent vectors at both ends of a ruling line.
The maximum twist angle is the angle below which the surface is considered to be developable (blue ruling lines) and
above which the surface is considered non-developable (green ruling lines). Angles between 1 and 6 degrees deliver
practical results.
Reverse Vertices -- Reverse the order of vertices of the lines used to generate the surface. The lines used to generate the
surface are returned to their original order when the surface is generated.
Display Developability -- Show the developability of the generated surface. The developability is indicated by different line
colors.
Green -- Developable
Red -- Undevelopable
Use Display Developability in the View menu to show or hide the developability.
Straight Section Surface
These surfaces guarantee that all transverse sections cut through this surface will be straight lines. The resulting surface
may or may not be developable. Most often you will find areas of high twist in the bow or stern region. The following color
codes are used:
122
•
Green – Developable straight section surface
•
Yellow – Questionable developability
•
Red – Undevelopable
LoftSpace Program
Display Developability -- Show the developability of the generated surface. The developability is indicated by different
line colors.
•
Green – Developable
•
Cyan – Slightly warped
•
Red – Undevelopable
Project Lines
The Project Lines function projects lines on 3D surfaces and generates 3D lines. Use this function, for example, to project
a stringer layout onto the hull surface. You can design the layout in CAD in 2D plan view and then transfer the polylines
using DXF file format. Use the project function to get the 3D lines required to generate the internal structure.
Lines can be projected onto surfaces in three principle directions:
•
XY Plane – Projects lines in Plan view
•
XZ Plane -- Projects lines in Profile view
•
YZ Plane – Projects lines in Body view
To project and generate lines
1.
Open the files containing the surfaces and the files containing the lines you want to project.
2.
Select Tools > Project Lines.
3.
Pick the blocks you want to project lines onto and press Enter.
4.
Select the blocks containing the projection lines and press Enter. The Projections window appears.
123
LoftSpace Program
Direction -- The direction to project the lines.
•
Plan -- Lines are projected in the Z direction.
•
Profile -- Lines are projected in the Y direction.
•
Body -- Lines are projected in the X direction.
Join – Takes lines being projected, from the same line onto different surfaces, and joins them together. Lines will be
joined if he distance between the ends is less than the tolerance (given in design units).
Chord Tol. Thinning -- Removes vertices below the chord tolerance using the same method described in Remove
vertices below tolerance under Lines Menu (page 113).
Remove Vertices -- Removes vertices that are closer than the tolerance.
We will give you an example of creating a deck from a faired sideline deck. There are three steps involved:
•
Use the Fairing module and fair the outside line of a deck in profile view only. Do not worry about any halfbreadth. Save the result as a spline.
•
Use the LoftSpace module to project the faired spline on the side surface using the project lines function.
•
Generate a deck using the projected sideline.
Intersect Surfaces
This function finds the true intersection line between two surfaces. In some cases there can be gaps in the intersection
line or the function cannot determine how to connect the segments. As a result, two or more intersection polylines may
be generated.
Imagine the two surfaces as being constructed from wires (wire-frame model) and that one of the surfaces is covered by
a plastic film. The plastic film will have holes where the wires of the other surface poke through. The function calculates
the intersection by finding the points where the wires punch the holes in the plastic film. The Intersection Surface Options
window lets you select which surface represents the wires and which surface represents the plastic film.
To find intersection lines between two surfaces
124
1.
Select Tools > Intersect Surfaces.
2.
Click on the two surfaces you want to have intersect.
3.
The Intersection Surface Options window appears. Pick the intersection option you want.
LoftSpace Program
4.
Click OK. The intersection will be calculated and displayed.
Deck Surfaces
LoftSpace can generate deck surfaces using six different camber types from either a deck centerline or from a deck
sideline or side edge. The deck calculations for the sine, radius by camber, and parabolic curve are based on three
parameters:
•
The type of camber
•
The maximum half-breadth
•
The amount of camber at maximum half-breadth
Note: The deck shapes will be different between the centerline and side edge deck when using Sine Curve,
Radius Curve by Camber, and Parabolic Curve.
•
For the deck made from a centerline, the camber board is calculated as shown in the figure below using the Camber
at the Design Half-Breadth and the type of curve. This camber board is then placed with the center position on each
point on the deck centerline. The transverse line is trimmed where it intersects with the side surface.
•
If the deck is made from the side line, for each point on the side edge the half-breadth value is found, and the
camber is then proportionally scaled using the ratio of the design half-breadth to the current half-breadth. Using the
new camber at this location and the curve type, the camber shape is calculated.
For the Radius, Flat and Slope, and Faired Camber board, the shapes of the deck camber are identical for the
centerline and sideline options.
The shape of the curve initially:
ShipCAM can produce six different kinds of deck styles:
Sine Curve -- The deck camber is calculated using the sine function.
Radius Curve -- The deck camber is an arc with a specified, constant radius.
Radius Curve by Camber -- The deck camber is an arc. The specified camber is used.
Parabolic Curve -- The deck camber is calculated using the parabolic shape function.
Flat and Slope -- A deck with a flat center and sloping sides is generated. The width of the flat center and the slope angle
can be modified.
Faired Camber Board -- The deck camber is defined by a faired station spline. Use the LinesFairing to fair the camber
board. Make sure that the outside of the board is at least as wide as the widest point of the deck. The outside point has to
be at a vertical location or 0, while the center point has to be at a Y of 0. Use the figure below as a guide for the design of
the camber board. Save the camber board as an STS (station spline) file.
125
LoftSpace Program
Important: The first vertex on the camber board has to be the outside point, the last vertex has to be the one at the
centerline.
Deck Options Window
The options for each type of deck are entered using the Deck Options window.
Number of Lines -- The number of longitudinal lines that will be created in the deck surface. This number determines how
fine or coarse your frame sections will be for NC cutting. A good guideline is to have about 1 vertex for every 3 mm or 1/8
inch in camber height.
Camber -- Amount of rise in the deck at its widest point as specified by half-breadth value.
Half-Breadth -- The half-breadth at the position where the camber is determined. Initially shows maximum half-breadth
when sideline deck is chosen. Should be greater than or equal to the maximum half-breadth. In general the camber board
is defined to a specific width. Use the value from the lines plan.
Angle of Slope -- The angle of the sloping plate in a flat and slope deck.
Generate Full Breadth Deck -- Flag to indicate you want to create a deck that is mirrored across the centerline. The result
is one single surface for port and starboard side.
How to Create a Sideline Deck
A sideline deck is generated from a faired longitudinal on the side of the hull. The following procedure outlines the steps
involved in generating a sideline deck.
To generate a sideline deck
126
1.
Make sure the file containing the deck’s side edge is loaded in LoftSpace.
2.
Select Tools > Deck Surface > Sideline Deck.
3.
Pick the side edge, and press Enter.
4.
The Deck Options window appears.
LoftSpace Program
5.
Select the style of deck you want to generate and enter the parameters used by that style of deck.
6.
Click OK. The generated deck appears.
How to Create a Centerline Deck
A centerline deck is generated from a deck centerline and one or more side surface of the hull. The program
automatically finds the intersection with the side surfaces and trims the camber board.
To generate a centerline deck
1.
Make sure the centerline and all required side surfaces are loaded into LoftSpace.
2.
Select a viewpoint so that the centerline and the side surfaces can be easily selected.
3.
Select Tools > Deck Surface > Centerline Deck.
4.
Pick the centerline and press Enter.
5.
Pick the side surfaces and press Enter.
6.
The Deck Options window appears.
7.
Select the style of deck you want to generate and enter the parameters used by that style of deck.
8.
Click OK. The generated deck appears.
Note: The vertices on the deck centerline determine which locations the camber board will use to calculate the
deck surface. The centerline should be a faired spline with vertices spaced closely enough so that the side of the
deck fits well. In the example below, the first deck surface was created from a centerline that was too coarse in
the forward section of the deck. The second figure shows the deck surface much improved. In general you want
to have the deck camber boards spaced closer together in the bow area, or anywhere else where the intersection
of the deck with the side surfaces is highly curved in plan view. Use the proportional spacing option when saving
splines from LinesFairing to generate a faired center spline with closer spaced vertices in the bow area than midships.
127
LoftSpace Program
Offset Surface
Offsets a surface by a thickness. For example, use this function to calculate the outside surface of shell plating from the
molded line surface.
To offset a surface
1.
Select Tools > Offset Surface or click
2.
Pick the surface you want to offset and press Enter.
.
3.
In the Offset Surface window, enter the offset value and select the direction of offset. Click OK.
Fillet
Generates a fillet surface of constant radius between two surfaces. Think of generating the fillet surface by rolling a ball
between the two surfaces with the ball touching both surfaces at all times.
To create a fillet surface
1.
Select Tools > Fillet.
2.
Pick the two surfaces you want to create the fillet between using the mouse. Press Enter.
3.
The Fillet window appears. Surface normal indicator lines appear so that you can select which fillet surface will be
generated. The indicators should point toward the side of each surface that the imaginary ball used to generate the
fillet is on.
Resolution -- The number of vertices generated between the two contact points of the ball with the surfaces.
128
LoftSpace Program
Radius -- The radius of the ball that is used to calculate the fillet surface.
Intersection Type -- The type of intersection used to find the center of the ball along the fillet.
Direction Change -- Clicking Direction Change lets you select on which side of the surfaces the ball will roll. The ball is
rolled on the same side of the surface that the normal indicator lines are on.
Direction Indicator Length -- The length of the indicator lines can be changed using the +, >, and - buttons.
Planar Sections
This group of functions is used to create frame lines, waterlines, buttock lines and canted sections by intersecting the
vessel’s surfaces at given locations. Sections can only be cut on surfaces, such as meshes, MSH, and developables, DEV.
The sections are always cut on all visible files. Blocks that are switched off are ignored.
129
LoftSpace Program
Planar options
Cut Frames
Cut Buttock Lines
Cut Waterlines
Cut Oblique Using Two Points
Cut Oblique Using Three Points
Cut Oblique Using One Point and One Angle
Highlight Sections
Remove Vertices -- Removes vertices that are closer than the tolerance. This is important in order to avoid problems
with NC controllers.
Plane Parallel Sections > Frames, Waterlines, Buttocks
Location files can be created when starting to cut sections. In this example we will cut frame sections.
To cut frame sections
130
1.
Load any number of hull surfaces into LoftSpace.
2.
Select Planar Section > Plane Parallel > Frame Lines. A Locations window appears to let you select a location file, or
you can type a new file name to create a new location file.
3.
If you are creating a new file, the following window appears. Enter the number of frames you want to create. You can
add or delete locations at any later time.
LoftSpace Program
4.
If you selected a file, a message box asks you if you want to edit the locations. Click Yes.
5.
The Edit Locations window appears as shown below. Use the toolbar to edit the locations.
Add Location At End
Add Location Before Selected
Delete Location
Delete All Locations
Space Locations
Name Locations
Print Locations
6.
Change the locations to suit your needs.
7.
Use the Name Location function to name the locations. Highlight the location at which you want to start naming.
Then click the Name Locations button,
.
8.
Click OK to name the locations from the current position downwards.
9.
You can repeat the same procedure from any location. For example, you might have half frame spacing and full
frame spacing changing at Frame 9. Highlight Frame 0 and do a frame location naming with half frame spacing for
the name. Then click on Frame 9 and repeat with full frame spacing.
10. Click Save to save the location file and generate the frame lines.
11. Switch views to Body view to inspect the frame lines.
131
LoftSpace Program
Oblique > Two Points
Cut a single section through the visible surfaces using two points to specify the cutting plane.
In the Two Point Oblique Plane window, select the plane you want to specify the points in and then set the values for
Point 1 and Point 2. The resulting section will be stored in a new block.
Oblique > Three Points
Cut a single section through the visible surfaces using three points to specify the cutting plane. The resulting section will
be stored in a new block. Use the Three Point Oblique Plane window to specify the location of the three points and then
press OK.
Oblique > Point & Angle
Defines a cutting plane by selecting a plane to which the cutting plane will be perpendicular, and a point and an angle in
that plane.
Use the Point & Angle Oblique Plane window to enter to coordinates of the point and the angle and then press OK.
Connect Sections
Connects the sections that were just cut. Use this function if you did not check Join Tolerance in the Options window.
Show Porcupines
Lets you highlight the individual sections and show the porcupine. Use this function to do one of the following:
132
•
Check if the sections are connected properly. You might have unexpected gaps between two surface edges that
cause small breaks in frames.
•
Check the fairness of the sections. Use the curvature display to do this.
•
Check special conditions of sections, such as horizontal or vertical areas. Do this using the slope options.
LoftSpace Program
Increase or Decrease Porcupine Scale -- Increases or decreases the scale of the porcupine.
Previous or Next Section -- Activates the previous or next section. Use this function to step through sections.
Porcupine as Curvature -- This displays the porcupine as curvature. Curvature is calculated as 1 > radius of a circle
that can be drawn through any three adjacent points on the spline.
Porcupine as Slope -- This displays the porcupine as slope, or rise over run. Use this function when the spline or
section is between horizontal and 45 degrees in the current view.
Porcupine as 1/Slope -- This displays the porcupine as 1/slope, or run over rise. Use this function when the spline or
section is between 45 degrees and vertical in the current view.
Options
The Planar Sections Options window defines how the cut sections will be treated.
133
LinesFairing Program
Join -- Sections are generally cut on several surfaces. The surfaces might have common edges. You can choose to connect
the sections on the individual surfaces. For example, a frames section on a hard-chine hull might intersect on the keel
plate, the bottom plate, and the side plate. You want to connect the individual sections of each frame to one single
polyline. Minute deviations may exist at the plate edges, causing small gaps in the polyline sections. For this reason a
connection tolerance for the sections cut at the same location on two joint surfaces has to be specified.
Chord Tol. Thinning -- Removes vertices below the chord tolerance using the same method described in Remove vertices
below tolerance under Lines Menu (page 113). It is only necessary to have closely spaced vertices on the sections in
areas of high curvature. Straight or almost straight sections can have much wider spaced vertices. Using a tolerance of
about 0.5 mm or 1/32 inch in general reduces the DXF file size by about 80 percent, compared to using all vertices. This
will increase all CAD drafting operations dramatically, and also keep the NC code file size smaller. NC code file size can
be a critical factor, especially with older controllers.
Remove Vertices -- Removes vertices that are closer together than specified. Use this option to avoid problems during NC
cutting. Most NC controllers will have problems when vertices are too close together.
LinesFairing Program
The LinesFairing program provides all the tools necessary for lines fairing, and thus creating a 3D surface model, which in
turn is the basis for all further lofting functions. With LinesFairing you can load offset files generated using LoftSpace, fair
stations, generate offsets for longitudinals, fair longitudinals, create surfaces, and check the fairness of the surfaces.
134
LinesFairing Program
Mathematical Background
ShipCAM uses special fourth order B-splines for the fairing of stations and longitudinals. B-splines have many advantages
over other spline algorithms. A major advantage is local control. This means that a change to the control polygon will
change the spline locally in the vicinity of the change to the control polygon. The next figure shows a control polygon
where one control vertex has been moved one unit up. Fourth order B-splines move two thirds of the distance a control
vertex has been moved (see below). The spline moves one sixth of the distance in the same direction at the location of
the neighbor vertices to the left and right of the moved vertex. All other areas further away are not affected.
The spline does not pass through the control polygon, an occurence called approximation. ShipCAM applies a special
technique that forces the spline to pass through the control polygon. This feature is called interpolation and is used when
the fairing program reads new design offsets. ShipCAM initially calculates a B-spline approximation and calculates the
distances between the spline and the control polygon (design offsets). Then it makes a copy of the design offsets (control
polygon or control vertices) and moves these until the spline passes through the design offsets. This procedure is called Bspline interpolation.
File Menu
Open
Opens a station offset file or longitudinal offset file for fairing. If the offsets have not been faired (no control points or
breakpoints files), new control vertices are calculated so that the B-splines created from those control points intersect all
offset vertices.
Save
Saves the line offsets, the control points, and the breakpoint locations to their respective files.
Save As
Saves the line offsets, the control points, and the breakpoint locations to their respective files, using a new filename.
Save Splines
Saves the high-resolution splines. Also saves the line offsets, the control points, and the breakpoint locations to their
respective files. The Save Splines window appears:
135
LinesFairing Program
The spline can be saved using two different vertex distributions.
Equal -- Distributes the vertices along the spline, equally spaced.
Proportional -- Distributes the vertices proportionally to the spacing of the control vertices. The spline vertices are spaced
closer together where the control vertices are spaced closely.
Note: Use proportional spacing with care. Use this option only when all splines have a similar distribution of control
vertices.
Make Line Offsets
Calculates offsets for longitudinals from the faired stations. Each station can have breakpoints. A breakpoint is a knuckle
and is the natural boundary for a surface or plate edge. All stations must have the same number of breakpoints. A station
without any breakpoints (round bilge hull) has one surface. A typical one surface hull would be a rounded sailboat shape.
To create line offsets
The Define Lines wizard appears for making line offsets.
136
1.
Enter the number of longitudinal offsets for each patch.
2.
Change the line names to suit your needs. The first and last lines on a patch are common to the adjacent patches.
That is, the last line of Patch 1 is the first line of Patch 2.
3.
Click Next to edit the next patch or Finish if you are editing the last patch.
LinesFairing Program
Options
The Options window appears when Fairing Options is selected.
Beep on change of fairing spline -- Flag to indicate if a beep occurs when changing lines. This is useful to know if you have
accidentally changed lines while fairing.
AutoSave -- Saves the lines every 20 recalculations of the spline.
Activate nearest control vertex on mouse click – Activates the control vertex, for editing, nearest where you clicked the
mouse.
View Menu
Vertex Window
The three information windows are best displayed at the left side of the program window as show in the figure below.
137
LinesFairing Program
The vertex window displays this information about the current images:
Fairing Spline -- The name of the currently active spline. This can be selected by using the drop-down control.
Control Vertex -- The number of the currently active control vertex.
X, Y, Z -- The location of the currently active control vertex. You can use the spin control to change the location of the
vertex or enter a value directly into the control.
Step -- The distance the currently active control vertex will move when clicking in the spin control or using the Shift key in
conjunction with the cursor keys.
138
LinesFairing Program
Splines visibility control window. Use this window to view and hide individual fairing splines.
Offset Differences -- Displays the distances of the control fairing spline to the offset vertices. The offset nearest the
currently active control vertex is highlighted.
View > Colors
Displays the color control window. Use this window to customize the color and visibility of the many individual items
LinesFairing can display.
139
LinesFairing Program
View > Control Vertex Move Direction
Displays a window that lets you set the directions in which holding down the Shift key and cursor key presses will move
the control vertex when working in a 3D view. For example, you might be fairing in a view that is almost a body view, but
for some reason you like to view the bottom of the vessel from slightly underneath. While in this view, choose View >
Control Vertex Move Direction and click Y for the horizontal movement and Z for the vertical movement. Thus, the cursor
keys will act as if working in a body view.
References Menu
Line
Displays a straight reference line. The 3D start and end points are entered in the Reference Line window. The color of the
reference line can be changed with the Colors function on the View menu.
Circle
Displays a reference circle. The Reference Circle window appears. The circle is defined by its center point, its radius and
the plane parallel to the circle. The color of the reference circle can be changed with the Colors function on the View
menu.
Files
Loads any number of geometry files as references.
Remove References
Removes all references from memory and display.
140
LinesFairing Program
Frames
Cuts transverse sections through the approximation surface using the current surface setup settings. To remove the
frames from the display select Frames > Remove.
Waterlines
Cuts waterlines through the approximation surface using the current surface setup settings. To remove the frames from
the display select Waterlines > Remove.
Buttock lines
Cuts buttock lines through the approximation surface using the current surface setup settings. To remove the frames
from the display select Buttock lines > Remove.
Surface Setup
A surface can be generated from the fairing splines. While fairing individual splines, it is important to be able to judge the
shape and fairness of the resulting surface. All cut sections are based on the surface. The fairing module supports six
types of approximation surfaces.
Vertices > Spline -- This value is present on all tabs. This controls how smooth the surface polygon will be in the direction
of the splines.
Number of Spline vertices between control vertices – This number controls how many vertices will be calculated between
each two control vertices. Consider a spline that is controlled by 11 vertices. If you specify 10 spline vertices for each
interval then you will have 101 vertices on this spline.
Note: Make sure that the spline with the least number of control vertices creates the minimum number of vertices
you want each spline to have. If, for example, the spline with the least vertices has 11 vertices and you want 200
vertices per spline, then you should specify at least 20 vertices between control vertices.
Surface Setup > Longitudinals
The sections are calculated cutting the longitudinals only. This is the simplest and fastest way to create a surface. Use
this only if you have a slow computer, or to get the initial fairing approximately right. Later in the fairing, use one of the
other options.
Surface Setup > Meshed Longitudinals
This option is similar to the Longitudinals option. However, a mesh is created first and the sections are calculated by
intersecting with the mesh lines. This option creates a much better section, especially when intersecting along the faired
splines rather than across them. For example, cutting waterlines on faired longitudinals is better using this option.
141
LinesFairing Program
However, this option does not calculate a smooth surface between the longitudinals. Use one of the other four options to
judge the final fairing.
Surface Setup > Cross Spline Surface
This option calculates a cross spline surface. This is the best option when fairing a round bilge hull and matching an
offset table closely. See LoftSpace (page 27) for an explanation of the cross spline surface.
Surface Setup > Developable Surface
This option calculates a developable surface. See LoftSpace (page 27) for an explanation of the developable surface.
142
LinesFairing Program
Surface Setup > B-Spline Surface
This option calculates a B-Spline surface. See LoftSpace (page 27) for an explanation of the B-Spline surface.
Surface Setup > Straight Section Surface
This option calculates a straight section surface. See LoftSpace (page 27) for an explanation of the Straight Section
surface.
143
LinesFairing Program
Remove Surface
Hides the reference surface from the display if it is currently displayed or displays the surface when currently hidden.
Recalculate Sections
Recalculates the reference surface. Use this function when fairing a spline. After moving control vertices, press Enter to
recalculate the spline. Then click
to recalculate the sections.
Spline Edit Toolbar
Move to Nearest Control Vertex
Moves the currently active control vertex to the nearest offset. Use this function when the offset is at an exactly
defined location, such as a tangent point in a station. In general you also break the faired spline at this position.
Delete Control Vertex
Deletes the current control vertex.
Insert Control Vertex
Inserts a new control vertex halfway between the currently active control vertex and the next control vertex. If the
current vertex is the last control vertex, then the new control vertex will be beyond the last vertex by half the distance to
the previous control vertex.
Redistribute Evenly
Spaces all control vertices evenly along the 3D length of the spline. The control vertices are placed so that the spline
will be passing through the same points nearest to the new locations. By default the window displays the current number
of control vertices.
144
LinesFairing Program
The active control vertex must be the first control vertex or a break point. The function spaces evenly from the current
control vertex to the last control vertex or to the next break point if one exists.
When to Use
Use this function to create smooth splines. Often offsets are given at full, half, and maybe even quarter spacing. Using
control vertices that change spacing dramatically along the length of the spline makes it impossible to create a smooth
faired spline.
Station offsets are often given on waterlines and buttock lines. Thus you can end up with two vertices very close together,
creating a poor distribution of control vertices.
Our experience is that it is best to space all control vertices evenly before attempting fairing. Break positions should be
defined before spacing the control vertices evenly.
Space Using Location File
Spaces all control vertices along the length of the 3D spline using a location file containing percentage positions. The
values range from 0 to 100 percent.
When to Use
Use this function when the curvature of the spline changes a large amount along the length of the spline. If, for example,
you are fairing a bulbous bow hull longitudinally, the aft and mid portion of the hull has very little shape in the
longitudinal direction. However, in the bow area there is a lot of shape in each longitudinal. To simplify fairing you should
have the vertices spaced far apart in the aft and mid area and close together in the bow area. You set up a location file,
for example, with the values:
0, 5, 10, 15, 20, 25, 30, 35, 40, 45, 50, 55, 60, 65, 70, 75, 79, 82.5, 85.5, 88, 90, 92, 94, 96, 97.5, 98.8, 99.6, 100.
Break > Unbreak
Breaks the spline at the current control vertex or unbreaks if it is broken already. Use this to generate knuckle points
or defined tangent points on splines.
Flatten Line
Flattens a spline between tow control vertices. Use this procedure to move to the control vertex at which you want to start
the flat portion of the spline.
Click the Flatten button,
. And then use the arrow keys to move to the other end of the flat portion of the spline. A thick
straight line indicates the flat portion of the spline.
Press Enter when done. A window appears asking you in which direction to move the control vertices. Select the option
that is most perpendicular to the straight line. For example, if you are in profile view and the flat portion is mostly
longitudinal, then the move direction would be in the Z direction, up and down.
Click OK when done. The spline is flattened between the two control vertices.
145
LinesFairing Program
Note: The flat portion is one interval shorter than the selected control vertices if the start and end vertices are not
break points. The spline will fair tangentially into the flat portion if the start and end control vertices of the flat portion
are not break points.
Ends of flattened portion are not break points.
Ends of flattened portion are break points.
Delete Line
Deletes the currently active line.
Duplicate Line
Duplicates the currently active line.
Move Line
Moves the currently active spline by the specified amount.
Settings Toolbar
Previous Line
Press this button to move to the previous spline.
146
LinesFairing Program
Next Line
Press this button to move to the next spline.
Previous Vertex
Press this button to move to the previous vertex.
Next Vertex
Press this button to move to the next vertex.
Display Spline Porcupine
Displays or hides the porcupine of the current spline.
Display Section Porcupine
Displays or hides the porcupine of the current section.
Decrease Porcupine Scale
Decreases the scale of the porcupine.
Increase Porcupine Scale
Increases the scale of the porcupine.
Previous Section
Activates the previous section. Use this function to move the section porcupine between sections.
Next Section
Activates the next section. Use this function to move the section porcupine between sections.
147
LinesFairing Program
Porcupine as Curvature
This displays the porcupine as curvature. Curvature is calculated as 1 > radius of a circle that can be drawn through
any three adjacent points on the spline.
Porcupine as Slope
This displays the porcupine as slope, or rise over run. Use this function when the spline or section is between
horizontal and 45 degrees in the current view.
Porcupine as 1/Slope
This displays the porcupine as 1/slope, or run over rise. Use this function when the spline or section is between 45
degrees and vertical in the current view.
Decrease Step
Decreases the value by which a control vertex will be moved every time the Shift +Arrow keys are pressed.
Increase Step
Increases the value by which a control vertex will be moved every time the Shift +Arrow keys are pressed.
Track Control Vertex
Ensures that the currently active control vertex is always in the center of all views. Switch this option off when you do
not want to center the active control vertex.
Synchronize Scale
Ensures that the scale between all views is the same.
148
StringerCutouts Program
Keyboard Shortcuts
Shortcut Key
Function
Page Up
Select the next line for fairing
Page Down
Select the previous line for fairing
Home
Make the first control vertex on the line the active control
vertex
End
Make the last control vertex on the line the active control vertex
Delete
Delete the active control vertex
Insert
Insert a new control vertex after the current control vertex
Enter
Recalculate spline
+
Increase step
-
Decrease step
Ctrl+B
Set active control vertex to be a breakpoint
Ctrl+N
Move active control vertex to nearest offset vertex
Ctrl+Z
Zoom by a selected factor
Shift+Down
Move active control vertex down by the step distance
Shift+Up
Move active control vertex up by the step distance
Shift+Left
Move active control vertex left by the step distance
Shift+Right
Move active control vertex right by the step distance
F6
Decrease the scale of the porcupine curvature
F7
Increase the scale of the porcupine curvature
Ctrl+F6
Decrease the scale of the porcupine curvature of cut sections
Ctrl+F7
Increase the scale of the porcupine curvature of cut sections
StringerCutouts Program
149
StringerCutouts Program
StringerCutouts is used for three procedures:
150
•
Generate marks on frames for cutouts
•
Insert cutouts or notches in frames
•
Generate stringers surfaces for expansion
StringerCutouts Program
Marks are generated on frames using a variety of methods. The marks are represented by lines that assume you are
using an L-shaped profile, even if you use a different type. The marks are just place holders for when you later insert
cutouts and can also be used to be exported as developable surfaces when the stiffeners are to be NC cut from plate.
•
The cutout geometry must be defined in a DXF file. All cutout information must be 2D in the World XY plane.
151
StringerCutouts Program
The cutout drawing must conform to the following guidelines:
•
The cutout shape is a polyline (or lightweight polyline), which can consist of straight lines and arcs.
•
The polyline must be designed so that it will intersect with the frame under all situations. For this reason the “legs”
should extend down far enough to intersect the frame line.
•
The polyline for the cutout must be on the layer SHAPE.
•
There must be a line on the layer HEIGHT to represent the nominal height of the profile of the stringer.
•
There must be a line on the layer WIDTH to represent the nominal width of the profile of the stringer.
•
Orient the cutout in a manner similar to as shown above, with the web of the profile in the positive Y direction and
the flange of the profile in the positive X direction.
When cutouts are inserted, the size of the cutout is automatically adjusted according to the stretching required for
the intersection angles of the stringer and the frames.
File Menu
Open Frames
Opens frames files generated by the LoftSpace program for marking or for inserting cutouts.
Open References
Opens files for display reference. You can load any type of ShipCAM file for references. For example, you might want to
load plate seams and butts to ensure they do not cross your stiffeners.
152
StringerCutouts Program
Save Cutout Marks
After calculating marks for stringers you might need to save them for later use.
Save Stringer Surfaces
Saves each stringer surface to a separate file. The files can be named automatically using the line or location name that
is generated for the stringers, or they can be named manually. The program will always save the heel surface. The
optional toe surface (upper horizontal part) is only required if you want to include the surfaces in a 3D CAD model.
Stringer surfaces are used for two functions:
•
Plate expansion to cut the stringer from flat plate using the PlateExpand program.
•
Inverse bending for stringers made from profiles using the InverseBend program.
The files can be named automatically using the names of the intersection planes or lines that were used to generate
the stringers.
You will be prompted to enter a name for each file if you choose not to use automatic naming. The H at the end of
the name indicates the heel portion of the stringer.
153
StringerCutouts Program
Save Plate Marks
Saves the contact lines (foot points) of the stringers with the plates. The plate marks obtain the names of the location
used to generate the marks. These marks are handy references to be used in LoftSpace when laying out seams and are
also used in ShellExpand to create shell expansions with the stringers marked.
Open Cutout Marks
Opens frame marks files that have been saved using Save Cutout Marks. Used for insertion into the frames with cutouts.
Open Frames with Cutouts
Opens frames that already had cutouts previously inserted. Use this when you decide to add more cutouts to frames.
Save Frames with Cutouts
Saves frames with cutouts. This is a special file type that includes the definition of the cutouts. ShipCAM does not
normally save this type of file.
Note: Only StringerCutouts can read this file type.
Mark Options
Allows modification of the size and orientation of the stringers.
Options Window
Stringer Width -- The nominal width of the stringer profile. The stringer marks will always be represented as an L, even
when using a flat-bar of a T. It is important to note that the width lines are only used to size the cutout during insertion.
Stringer Height -- The nominal height of the stringer profile.
Stretching -- If checked, the cutouts will be stretched depending on the proportional difference of the sizes of the marking
lines to the stringer width and height. Stretching is required when the intersection between the frames and the stringers
is not perpendicular.
Show Frames -- When checked, the frames appear in the main window.
Show Stringers -- When checked, the stringers appear in the main window.
Show Marks -- When checked, the marks appear in the main window.
Toe Direction -- Use this to create stringers with the throw toeing inboard or outboard.
Stringer Angle -- Controls the angle of the stringer to the shell surface. When Normal is checked, the stringers will be
perpendicular to the shell surface in body view. When Normal is not checked, the Angle value in degrees will be used. A
value of 90 generates a stiffener that is perpendicular up; a value of 180 generates a stiffener that is pointed horizontally
154
StringerCutouts Program
inboard. On opposite side of frame lines is used to create stringers perpendicular to the shell on the outside of the
frames. Use this on double hulls.
From Frame … To Frame … -- Use this to limit the frames a set of stringers covers.
Plane Menu
Creates stringer marks defined by planes.
Constant Half-Breadth
Mark the frames at any number of constant half-breadth (for example, buttocks, parallel to center-plane).
Constant Height
Mark the frames on any number of planes parallel to the waterline plane.
Tilted Plane > Two Points
Mark the frames on a single plane described by two points. See Planar Sections (page 129) for details on two point plane
options.
Tilted Plane > Three Points
Mark the frames on a single plane described by three points. See Planar Sections (page 129) for details on three point
plane options.
Tilted Plane > Point & Angle
Mark the frames on a single plane described by a point and angle. See Planar Sections (page 129) for details on point
and angle plane options.
Girth Menu
Constant Girth from Bottom
Marks the frames at locations measured along the girth of the frames from the bottom or start of the frames. You will be
prompted to select a location file that lists the girth lengths.
155
StringerCutouts Program
Constant Girth from Top
Marks the frames at locations measured along the girth of the frames from the top or end of the frames. A location file
determines the girth lengths to mark. You will be prompted to select a location file that lists the girth lengths.
Proportional Girth
Places marks by calculating the length of the girth of each frame and then dividing the girth length proportionally as
specified in a location file. You will be prompted to select a location file that lists the girth proportions. The proportions
are measured from the bottom of the frames (0 percent is the start of the frame and 100 percent is the end of the
frame).
Projection Menu
Produces stringers by projecting lines, splines, or polylines onto the frames. You can produce these files using LoftSpace,
LinesFairing, or a CAD program.
Plan Projection
Marks frames by projecting lines in plan view onto the frames. The frames are marked where the projection lines
intersect the frames in plan view. The function asks you to select files containing the lines to project.
Profile Projection
Marks frames by projecting lines in profile view onto the frames. The frames are marked where the projection lines
intersect the frames in profile view. The function asks you to select files containing the lines to project.
Body Projection
Marks frames by projecting lines in body view onto the frames. The frames are marked where the projection lines
intersect the frames in body view. The function asks you to select files containing the lines to project.
156
StringerCutouts Program
Cutouts Menu
Open Cutouts
Opens the 2D DXF file containing the shape and dimensions of the nominal cutout.
The cutout file must conform to the following guidelines:
•
The cutout shape is a polyline that can consist of straight lines and arcs.
•
The polyline must be designed so that it will intersect with the frame under all situations. The legs have to be long
enough for this to happen.
•
The polyline for the cutout must be on a layer named SHAPE.
•
The file must have two straight lines. One must be on the layer HEIGHT and the other on the layer WIDTH. The height
and width lines give the nominal size of the profile used. Insert cutouts adjusts the size of the cutout automatically,
according to the stretching required for the intersection angles of the stringer and the frames.
Open Cutout References
With the cutout you can load references that will be placed at the same position as the cutouts. For example, you can
draw the profile shape of the stiffener. The profile shape will then be placed at the same position as the stringer marks
giving a realistic look. The references are also included in the DXF export file, and can thus be used to add items that will
simplify the detailing process.
157
StringerCutouts Program
Insert Cutouts
Inserts the cutouts at the marked locations, rotates the cutout into the requested orientation, trims the cutout and frame
and connects all the elements to single polyline frames. Inserting cutouts requires you to have the following files loaded:
•
A frames file (.FRM) or a frame lines file (.FCT)
•
Frame marks (.FMK)
•
Cutout shape (.DXF)
DXF Export
Saves the frames with or without cutouts to DXF file. The DXF Options window shows the options available. You will also
be prompted to add frame marks to the DXF file.
Dimensions -- You can export to DXF using a 2D or 3D format. In 2D all frames will be in the world co-ordinate system (X,
Y). In 3D the frames will be in 3D space. For each frame a UCS will be in the resulting drawing in the plane of the frame.
The UCSs are named the same as the frames.
Tile Frames Horizontally -- Available for 2D export only.
Tile Spacing -- The distances between each two frames. Use a value larger than the maximum frame width to avoid
overlapping frames.
Snap planar lines to nearest whole value -- Using floating point conversion may result in values that are slightly off from
the desired values. For example a frame might be located at 30000 mm, but converting results in a value of 29999.97
mm. This could cause problem during the detailing process, as the CAD system will not consider two items in the same
158
StringerCutouts Program
plane if one is at 30000 mm, the other at 29999.97 mm. Snapping to the nearest whole value will eliminate this
problem.
Export Bevel Angles -- LoftSpace can calculate the bevel angles between the frame and the shell plating. These can later
be used to control a beveling-capable NC cutting machine.
DXF Output Text Size -- The height of the text in the 2D DXF drawing in output units.
Output Tolerance -- Reduces the number of vertices on near straight segments of the frames. See Blocks Menu (page
107) for details on this option.
Troubleshooting
Problem: Stringers twist unexpectedly at certain frames. For example, all of a sudden the stiffener switches from the
inside to the outside of the frame, or, for the proportional girth option, it jumps up and down the frames.
Solution: Using LoftSpace, check the direction of the frames to make sure they are all going in the same direction. If they
are not, correct them by reversing the vertices of the misdirected frames.
Problem: Inserting semicircular cutouts does not generate the expected results.
Solution: Divide the 180º arc into two 90º arcs. ShipCAM does not trim correctly if one element intersects the frame on
both sides of a cutout.
159
PlateExpand Program
PlateExpand Program
After the 3D surface model generation is completed using LinesFairing and LoftSpace, butts and seams are defined and
the large hull surfaces are divided into small plates. The selected plate size is determined by the available stock size, by
the amount of compound curvature, and by the available forming process. Areas of large compound curvature (bulbous
bow) require small plate sizes, while single curvature or flat areas can be expanded in large plates. The design surfaces
have to be trimmed into individual plates before expanding. The general process for compound curvature plate expansion
includes the following steps:
160
•
Load the plate mesh.
•
Load all markings you need on the plate. You only need to load these once. All plates loaded later will use the same
markings (frames, waterlines stringers, and so on).
•
Set the options (templates, stock, and so on).
•
The expansion algorithm always works on the mesh elements. The program begins in the middle of the plate and
works from there to the outsides. Because of the compound curvature expansion, some of the mesh elements will
deform. This also means that the next elements are based on already deformed elements. The amount of
deformation depends on the amount of compound curvature in the selected mesh area.
•
Save the plate to a DXF file that can be imported into a ShipConstructor product model or your CAD program.
PlateExpand Program
File Menu
Open Surface
Loads and displays the plate surface to be expanded and calculates any defined sections, projections, and surfacesurface intersections.
Expand Multiple Plates
This function saves enormous amounts of time and reduces human error rates significantly. The function automatically
loads plates, expands them using the settings specified in the plate data, and saves them to DXF files. The plate stock,
offset direction to the neutral axis, and any extra stock material should be set beforehand using LoftSpace. See Blocks
Menu (page 107) for details on how to do this.
161
PlateExpand Program
To expand a sample plate first
1.
Load one plate.
2.
Load the frames, buttock lines, waterlines, and any other files for marking.
3.
Configure the expansion options.
4.
Expand the sample plate and save the DXF to ensure the results are as desired.
Note: You need to be logged into a ShipConstructor database to take advantage of this option.
5.
Select Files > Expand Multiple Plates. All the surfaces are displayed in the left list (Surfaces) of the window that
appears.
6.
Select the plates you want to expand and click the >> button. The plate names are moved from the Surfaces list to
the Plates To Expand list.
7.
Click Expand to expand the plates. The expanded plate DXF output files will be the same name as the mesh surface
file. If a DXF file of the same name already exists, you will see a prompt to overwrite the file.
Frame Line Locations > Open
Loads a location file with the locations of the frame lines and calculates the frame sections. The same file is
automatically used to calculate sections on all subsequently loaded surfaces.
Waterline Locations > Open
Loads a location file with the locations of the waterlines and calculates the waterline sections. The same file is
automatically used to calculate sections on all subsequently loaded surfaces.
Buttock Line Locations > Open
Loads a location file with the locations of the buttock lines and calculates the buttock line sections. The same file is
automatically used to calculate sections on all subsequently loaded surfaces.
Profile Projection Lines > Open
Projects any 2D or 3D lines onto the plate in profile view. Use this function mainly to project stringers onto the surfaces.
Plan Projection Lines > Open
Projects any 2D or 3D lines onto the plate in plan view. Use this function mainly to project stringers onto the surfaces.
Body Projection Lines > Open
Projects any 2D or 3D lines onto the plate in body view. Use this function mainly to project stringers onto the surfaces.
Oblique Plane
An oblique plane defined by one of three options (two points and a plane; a point, an angle, and a plane; or three points)
is intersected with the surface to expand. The resulting intersection lines are displayed.
Penetration Surface > Open
Intersects a selected surface with the surface to expand. The resulting intersection lines appear.
Remove
Removes any sections, projections, or references.
162
PlateExpand Program
View Menu
Colors
Display the Colors window to control the color and visibility of the individual items.
Properties Bar
This dockable window shows the extents of the 3D surface, the extents of the expanded surface, the plate stock and
throw direction of the plate, and the minimum and maximum strain.
The Plate Stock list is filled with plate stock in the linked ShipConstructor database. The throw is determined from the
normal at the center point of the mesh surface. The stock and throw can be set in the Properties bar or in the Stock and
Throw function in LoftSpace.
163
PlateExpand Program
Mesh Menu
These functions let you manipulate the plate meshes to achieve the desired results.
Transpose
Transposes the internal data matrix. See Blocks Menu (page 107) for details on this function.
Reverse Vertices
Reverses the logical sequence of the vertices on each line in the plate mesh data. See Blocks Menu (page 107) for details
on this function.
Reverse Lines
Reverses the logical sequence of the lines in the plate mesh data. See Blocks Menu (page 107) for details on this
function.
Save Mesh
Saves the manipulated mesh data so it can be used next time without changes.
Build Menu
Options
Displays the Settings window to set the plate expansion options. Be sure to set these options to achieve the desired
results.
164
PlateExpand Program
General Tab
Generate Roll Lines -- Generates roll line marks on the 3D surface and 2D expanded plate. Roll lines are lines connecting
the same dead-rise angle on the frames in body view.
Straight roll lines indicate a surface with no compound curvature. The lines may be parallel to each other or arranged like
a fan.
165
PlateExpand Program
Curved roll lines indicate compound curvature.
166
PlateExpand Program
Display Mesh Cross Lines – Displays or hides the cross lines of the plate surface. When the cross lines are off, you only
see the primary direction of the plate surface mesh. The plate is composed of a surface mesh. Generally a surface mesh
is displayed by connecting all mesh vertices in longitudinal and transverse directions. However, for plate expansion the
primary and secondary direction of the mesh vertices is important. In general, the primary mesh direction should be in
longitudinal direction; this ensures the best expansion results. For complex plates, such as bulbous bow plates, try the
two options and use the one that generates the least strain in the expanded plate. Use Build > Transpose Mesh to change
the primary direction of the mesh lines.
167
PlateExpand Program
Display Mesh Cross Lines ON
168
PlateExpand Program
Primary mesh lines in longitudinal direction
169
PlateExpand Program
Primary mesh lines in transverse direction
Open as Bow Fashion -- This option requires that the mesh lines are running in longitudinal direction. Upon opening, a
buttock line is cut down the center and a new distribution of vertices is calculated using surface normals. This ensures an
expansion specifically required by our Japanese customers.
Offset to Neutral Axis -- Offsets the surface mesh to the neutral axis before expanding the mesh. This requires that
PlateExpand is logged into a ShipConstructor database in order to look up plate stock information.
Rotate Expansion to Smallest Rectangle -- Rotates the plate to the smallest rectangle. This function simplifies the nesting
process and makes sure that the plate can fit the available stock size.
Not rotated to smallest rectangle
170
PlateExpand Program
Plate rotated to smallest rectangle
Strain Scale -- The scale used to show strain in the expanded plate.
Note: Obtain the maximum strain your yard can handle in plates of different material and thickness. This is best done
by getting feedback from production about plates that produced problems during production. Then set the strain
scale so that the red color indicates exceeding the found values.
Stock Tab
The Stock settings tab lets you set the maximum stock plate size and the extra stock on each expanded plate edge. A
warning message appears if the expanded plate exceeds the maximum stock dimensions.
Max. Stock Width -- The width of the stock plate.
Max. Stock Length -- The length of the stock plate.
Top -- The margin added to the top of the expanded plate.
Bottom -- The margin added to the bottom of the expanded plate.
Left – The margin added to the left of the expanded plate (the right side when using US-reversed coordinates).
Right -- The margin added to the right of the expanded plate (the left side when using US-reversed coordinates).
Templates Tab
Forming templates are used to shape the plates in the workshop, away from the hull frames. By default, the function
creates a template on each frame. You can then choose to use fewer templates. On plates with little shape, three
templates are sufficient.
Show in original mesh view -- Displays the templates in the original mesh viewport.
171
PlateExpand Program
On other side of plate -- Places the templates on the other side of the plate. This is typically done after an expansion that
shows the templates on the wrong side.
Templates -- Two types of templates can be generated. Standard (on frames) creates a template for every frame section
in the plane of that section. Bow Fashion templates are for centerline plates only. Bow fashion templates are typically
used where standard templates are not close to perpendicular to the plate (the plate has a steep rise). The following
window shows the options for setting up the Bow Fashion templates.
•
Template Spacing -- The spacing between adjacent templates.
•
Offset -- The distance from the start. The start corresponds to the start of the mesh.
•
Stem Template Height – The height of the two stem templates.
•
Plate Thickness -- The thickness of the plate. The stem templates will account for the thickness and place a gap
between them, corresponding to the thickness of the plate.
Template Type -- The style of template to generate, strip, or plate. Use strip templates when checking the plate by laying
the plate on the shop floor with the inside facing up and placing the templates by hand on the related frame mark. Use
plate template when making a forming jig. Erect the templates on the shop floor with the contact side with the plate
facing upwards. Then place the plate, with the inside facing downwards, onto the erected templates.
Strip Template
Plate Template
Sight Line Height -- The height of the sight line mark above the frame trace contact point on the plate on both end
templates. A straight sight line connects the marks of the two end templates. The sight-line heights are automatically
calculated for the intermediate templates.
Height -- The height of each template (only used for strip templates).
Edge Margin -- Amount to extend the template beyond the edges of the plate.
Mirror Sightline -- Mirrors the sightline mark. The sightline normally points in the direction of the last line (top) of the
plate. This function points the sightline in the direction of the first line (bottom) of the plate.
Sightline Angle 45 Deg. -- The horizontal line of the sightline is angled downward to produce a half-arrow up.
DXF Tab
172
PlateExpand Program
Save 3D mesh -- Saves the 3D mesh into the DXF file. This option is required when you want to include the plates in the
ShipConstructor model. The 3D mesh takes the place of the solid for regular parts.
Mesh reduction -- The mesh surfaces can consists of thousands of points. The 3D ShipConstructor model uses the surface
mesh only for visual representation, not for any calculation. Thus a high density of data points is not required, and a small
file size for display speed is desired. Enter a number between 0.1 (1/10 of the data density is saved, so a 100x50 mesh
will be reduced to 10x5) and 1.0 (no reduction). A good start value is 0.25.
Save Forming Control -- Saves the distances on the edges of the plate from corner points to the nearest frames and
between frames for the 3D plate, for the 2D plate, and the differences between the two. Using this information, it is much
easier for the plate former to layout the line heating or bumping sequence.
Save Deformation Info – Saves a table of text containing the information about the 3D and 2D dimension of all plate
mesh lines, including any length differences in absolute values and in percentages. If you use a monospaced font, the
columns will line up.
Save Layout (Plan, Profile, Body) -- Adds the three principal views of the 3D plate with all markings and references to the
DXF drawing.
Developable -- These options only apply to developable surfaces.
•
Save Dev. Ruling Lines -- Adds the ruling lines of the developable surface to the DXF file. Use these lines to pre-roll
the plate before placing it on the frames.
•
Output every nth -- Outputs every nth ruling line. A developable plate generally consists of several hundred ruling lines
to achieve an accurate expansion. However, you only need 10 or 20 rulings to guide the rolling process. Using every
10th line will output rulings 10, 20, 30, and so on.
Text Size -- This is the text size in DXF output units for all marking text, such a frame names.
Strain Auto Save -- The function adds the strain coloring to the DXF file if the strain in the expanded plate exceeds the set
value. Use this option if you want to plot colored output for complex plates to aid the forming process.
Lofting Offsets -- This function adds lofting offset to the DXF drawing file for manually laying out the plate. Use this
function when you are not NC processing the plates but manually laying out the shape for cutting and marking.
173
PlateExpand Program
•
Lofting Offsets > Save -- Check this option to add lofting offsets to the DXF drawings file.
•
Lofting Offsets > Grid Spacing -- This is the distance between the grid lines. Anytime a plate edge or a marking
crosses a grid line, an offset location will be added as text to the drawing.
Templates -- Options for the forming templates.
Templates > Save -- If checked, templates will be added to the DXF drawing file. Each template has text identifying the
frame name, the backsets, the bracket angle, and the sight line height. The bracket angle is the angle measure on the
sight line between the frame and the plate. For example, at mid-ship the angle will be 90 degrees, in the bow area the
angle will be smaller than 90 degrees, and in the aft area the angle will be larger than 90 degrees.
Templates > Stack on top of each other -- Besides the regular templates, the drawing will contain templates that are
stacked on top of each other as shown in the figure below.
174
PlateExpand Program
Layers Tab
The Layers tab lets you set the colors and layers that objects are written to when the expanded plate is output to a DXF
file. To change a value, double-click on it. The color changes only affect the colors used in the DXF file, not in the
PlateExpand screen display.
In general you want a setup similar to the following when you are NC processing and using colors to distinguish process
types:
•
Color red for all outside cuts.
•
Color green for all inside cuts.
•
Color blue for all markings.
•
Any other color for all non-process items.
When you are NC processing using layers to distinguish process types, use the following setup:
•
Layer NCOUT for all outside cuts.
•
Layer NCINS for all inside cuts.
•
Layer NCMRK for all markings.
•
Any other layer for all non-process items.
When linking to a ShipConstructor model you should place all production-relevant information on the layer _PRD and
all other information on a different layer. The plate edges should be in the OUTSIDE cut color specified in
ShipConstructor, all marking in the MARKING color and all other information on the production layer should be in the
NO-PROCESS color.
175
PlateExpand Program
Expand Surface Menu
Expands the surface and all desired lines from 3D to 2D and displays the results.
Save DXF Expanded Plate
Save the expanded plate to a DXF file. The following options are available:
Rotate Expanded Plate
Angle -- Rotates the expanded plate by the specified degrees (a positive angle rotates the plate counter-clockwise).
Smallest Rectangle -- Rotates the plate so that it uses the smallest possible rectangle.
Show Original Mesh
Shows the original plate in the current view.
Show Expanded Plate
Shows the expanded plate, if the plate has been expanded, in the current view.
Show Forming Templates
Shows the forming templates, in 3D, in the current view.
Show Deformation Table
Shows the deformation table, as explained earlier under DXF Export tab.
Show Strain Map
Shows the 2D color strain map.
Show Strain Map 3D
Shows the 3D color strain map in the orientation of the original plate.
Decrease Strain Scale
Decreases the range of strain values in the strain map.
Increase Strain Scale
Increases the range of strain values in the strain map. Use this to increase the contrast of the colors to show strain.
Show Strain Scale
Displays the color code bar for the strains in the expanded plate along the bottom of the window with the strain values
the colors represent.
176
PlateExpand Program
Creaing a Plate Expansion Drawing
To create a plate expansion drawing
1.
Load the plate you want to expand.
2.
Load all marking and reference lines you require.
3.
Set the options to generate the desired expanded plate and forming templates.
4.
Expand the plate.
5.
Check the results and strain map.
6.
Save the expanded plate as a DXF file.
7.
Open the DXF file in CAD. Make any changes you require.
8.
Nest the plate if it does not completely fill a stock plate.
9.
NC process the plate.
TMPLT_FR_114
PROFILE VIEW
BODY VIEW
TransverseBackset=15.5
Long.Backset=3.9
BracketAngle=76
SightlineHeight=350.0
TMPLT_FR_113
TransverseBackset=21.4
Long.Backset=25.1
BracketAngle=77
SightlineHeight=369.4
TMPLT_FR_112
TransverseBackset=27.3
Long.Backset=40.6
BracketAngle=77
SightlineHeight=383.0
TMPLT_FR_111
PLAN VIEW
Upr1
Upr2
Long.Backset=50.1
BracketAngle=78
SightlineHeight=390.7
TMPLT_FR_110
TransverseBackset=37.4
Upr8
Lwr7
Lwr8
Upr9
Upr10
Long.Backset=53.8
BracketAngle=78
SightlineHeight=392.5
FR_114
Lwr6
Lwr5
FR_113
g_1 _1
FrmDiag
PlateDia
FR_112
PlateDia
FrmDiag_
g_2 2
Upr7
FR_111
Lwr4
Upr6
FR_110
Lwr3
Upr5
FR_109
Lwr2
Upr4
FR_108
FR_107
FR_106
Lwr1
TransverseBackset=32.8
Upr3
Lwr9 Lwr10
TMPLT_FR_109
Plate Checking Data
TransverseBackset=42.3
Long.Backset=52.8
BracketAngle=79
SightlineHeight=389.6
File: B13P05
3 D PLATE CORNERS
LEFT TOP
X=69410.0 Y=6440.9 Z=1400.0
RIGHT TOP
X=75350.0 Y=5038.3 Z=1400.0
RIGHT BOTTOM X=75350.0 Y=4759.1 Z=974.8
LEFT BOTTOM X=69410.0 Y=5813.5 Z=503.2
PLATE PERIMETER ENCL. RECTANGLE 6093.0 by 1106.5
ADDED STOCK ENCL. RECTANGLE 6115.8 by 1207.4
TMPLT_FR_108
TransverseBackset=48.0
Long.Backset=46.8
BracketAngle=79
SightlineHeight=381.7
TMPLT_FR_107
TransverseBackset=55.1
Long.Backset=35.6
BracketAngle=80
SightlineHeight=368.7
ROLL_65.5
WL_1.2500
ROLL_61.5
0
.000
BT_5
FR_114
FR_113
ROLL_49.5
FR_112
SIGHTLINE
ROLL_57.
5
ROLL_53.5
FR_111
FR_110
ROLL_45.5
FR_109
FR_108
FR_107
FR_106
ROLL_41.5
000
BT_6.0
TMPLT_FR_106
TransverseBackset=63.9
Long.Backset=18.8
BracketAngle=80
SightlineHeight=350.0
LINE
Upr10
Upr9
Upr8
Upr7
Upr6
Upr5
Upr4
Upr3
Upr2
Upr1
Lwr10
Lwr9
Lwr8
Lwr7
Lwr6
Lwr5
Lwr4
Lwr3
Lwr2
Lwr1
3DEdgeLgth
114.2
684.3
682.1
680.5
679.4
678.4
677.0
675.4
673.7
560.1
112.9
677.1
676.1
674.9
673.6
672.4
671.1
669.9
668.6
556.3
PlateDiag_1 = 6057.1
PlateDiag_2 = 6188.1
FrmDiag_1 = 5391.6
FrmDiag_2 = 5520.8
2DEdgeLgth Diff3D2DEdge
114.2
0.0
684.5
0.2
682.4
0.3
680.7
0.2
679.5
0.1
678.4
0.1
677.3
0.2
675.8
0.4
674.1
0.5
560.6
0.5
113.0
0.0
677.2
0.1
676.3
0.2
675.2
0.3
673.8
0.2
672.5
0.1
671.4
0.3
670.2
0.3
669.0
0.4
556.7
0.4
3DStrtLght
114.2
684.3
682.1
680.5
679.4
678.4
677.0
675.4
673.7
560.1
112.9
677.1
676.1
674.9
673.6
672.4
671.1
669.9
668.6
556.3
2DStrtLght
114.2
684.5
682.4
680.7
679.5
678.4
677.3
675.8
674.1
560.6
113.0
677.2
676.3
675.2
673.8
672.5
671.4
670.2
669.0
556.7
Plate Deformation Table
UNITS = MILLIMETERS
LINE
3-D LENGTH
15
6105.1
14
6102.3
13
6099.3
12
6096.4
11
6093.2
10
6089.8
9
6086.4
8
6082.8
7
6079.0
6
6075.3
5
6071.2
4
6067.1
3
6062.8
2
6058.0
1
6053.1
EXP. LENGTH
6107.6
6104.2
6100.8
6097.3
6093.8
6090.1
6086.5
6082.8
6079.0
6075.4
6071.5
6067.7
6063.9
6059.7
6055.4
DIFFERENCE
2.5
1.9
1.4
1.0
0.6
0.3
0.1
-0.0
-0.0
0.1
0.3
0.7
1.1
1.7
2.3
%-DIFFERENCE
+0.0404
+0.0315
+0.0233
+0.0161
+0.0100
+0.0052
+0.0017
-0.0000
-0.0000
+0.0019
+0.0056
+0.0110
+0.0185
+0.0278
+0.0384
LONGITUDINAL BACKSET
= 57.4
TRANSVERSE BACKSET
= 38.4
MINIMUM STRAIN
= -0.000 %
MAXIMUM STRAIN
= 0.080 %
MAXIMUM LENGTH DIFFERENCE = 2.5
MINIMUM LENGTH DIFFERENCE = -0.0
Typical DXF drawing generated by PlateExpand
Troubleshooting
Problem: Strain is extremely high in an area where it is not expected.
Solution: Possibly you have the lines of the plate running transversely instead of longitudinally. ShipCAM expects the lines
of a plate to run longitudinally. In the General tab of the Options window, uncheck Display Mesh cross lines. If your lines
are running transversely, transpose the surface using Transpose Mesh in the Build menu.
You could also have very slender mesh rectangles. If this is the case, re-mesh the surface so the mesh rectangles are not
so slender. The aspect ratio of the mesh rectangles should not exceed 1/10.
You may have trimmed the plate to have irregular or jagged edges. Instead of trimming before expanding, expand the untrimmed plate and just mark the trim line on the expanded plate. Then use CAD to trim the plate to the edges
177
ShellExpand Program
ShellExpand Program
The ShellExpansion module is based on the expansion of transverse sections only. All longitudinal dimensions stay true.
All transverse dimensions are girth dimensions. The transverse sections are expanded so that the X coordinates remain
the same. All geometry can be marked onto the expanded sections. For example, you can mark the following geometry
onto the expanded section drawing:
178
•
Frame lines
•
Buttock lines
•
Waterlines
•
Profile Projections
•
Plan Projections
•
Body Projections
•
Oblique Planes
•
Surface Penetrations
ShellExpand Program
File Menu
Open Shell Surface
Displays a window to open the shell surfaces that will be used for the shell expansion. The program will later cut closely
spaced sections through the surfaces for the expansion process.
Frame Line Locations
Loads the selected location file with the locations of the frame lines and calculates the lines for the loaded hull surface.
Waterline Locations
Loads the selected location file with the locations of the waterlines and calculates the lines for the loaded hull surface.
Buttock Line Locations
Loads the selected location file with the locations of the buttock lines and calculates the lines for the loaded hull surface.
Profile Projection Lines
Projects any 2D or 3D lines onto the plate in Profile view.
Plan Projection Lines
Projects any 2D or 3D lines onto the plate in Plan view.
Body Projections
Projects any 2D or 3D lines onto the plate in Body view.
179
ShellExpand Program
Hint: Plate seams, plate butts, and stringers can be projected onto the surface.
Oblique Plane
An oblique plane defined by one of three combinations (two points and a plane; a point, an angle, and a plane; or three
points) is intersected with the hull surface. See Planar Sections (page 129) for details on cutting oblique sections.
Penetration Surface
Opens a surface to intersect with the plate to be expanded. For example, open the bow thruster intersection with the bow
plate.
View Menu
Colors
Displays the Color window that lets you customize the colors used for the individual items.
Build Menu
Options
Select Build > Options or click the options
shell expansion generation.
180
button to display the Settings window. This window lets you customize the
ShellExpand Program
Shell Tab (Build Settings)
No. of Transverse Sections -- The number of transverse sections to be cut through the shell surfaces. The closer the
sections are spaced, the better the resulting shell expansion will be. On a small boat, 200 sections might be sufficient
while a large vessel might require 1000 sections or more, depending on the complexity of the hull shape.
Base Line -- The type of base line to use when expanding the shell.
•
Water Plane -- The specified water plane will be a straight line.
Note: It is a common error to specify a water plane of zero on a hull with surfaces that have their lower edge right at
0.0. If there is a flat bottom, then the water plane is ambiguous, as a water plane would cut the flat bottom at any
half-breadth. In this case, specify a negative water plane, say of 1m, and later move the shell expansion drawing
down by 1m.
Water plane set below flat bottom
Water plane set 1.2 m above double bottom
•
Buttock Plane Location – The specified buttock plane will be a straight line.
•
Lower Plate Edge -- The lower plate edge will be a straight line.
Lower plate edge expansion
Plane Location -- The location of the base line plane. For a water plane, the location is the Z location; for a buttock plane
the location is the Y location.
DXF Output Text Size -- Size in output units of the text in the DXF drawing of the shell expansion.
181
ShellExpand Program
Layers Tab (Build Settings)
Specifies the colors and visibility of the display items.
Expand Surface
Expands and displays the surface with all markings, using the settings in the Options window. The expanded surface is
displayed in the active view if there is only one viewport.
Show Original 3D
Displays the 3D hull surface with all the 3D marking lines in the active viewport.
Show Expanded
Displays the expanded surface with all the expanded marking lines in the active viewport. If no expansion has been
performed, the view will be blank. This function is useful when setting up multiple views.
DXF Export Menu
Save Expanded Plate
Save the shell expansion drawing to a DXF file. All lines have names shown as text strings mid-way along their length.
Each intersection of a stringer, seam or similar object with a frame has a girth value represented. The names of all plates
are automatically inserted in the center of the plate. All plate edges are also marked.
182
ShellExpand Program
Steps to Create a Shell Expansion Drawing
You need three things to create a shell expansion drawing:
•
Plate surfaces or design surfaces.
•
Locations for frames, buttock lines, waterlines.
•
Any projection lines used for marking (for example, longitudinal stringers and plate seams).
To create a shell expansion drawing
1.
Open all the hull plates or surfaces. It is best if you use the individual plates because the seams and plate names will
be marked automatically on the expanded shell drawing.
2.
Open the Settings window to check the number of transverse sections. This number is used to cut equally spaced
sections over the entire length of the surfaces. It determines the resolution of the expanded lines. The larger the
number, the longer it takes to calculate the shell expansion, but the more smooth the resulting lines. In practice, it is
good to try a small number first (1 foot or 300mm between sections) to view rough results. Then, increase the
number when you are satisfied with the results.
3.
Set up the layers to your specification and select the baseline type about which you want to expand.
4.
Expand the shell. The expanded shell will be displayed.
5.
Save the expanded shell to a DXF file.
6.
Open the DXF file in you CAD system and detail the drawing.
183
InverseBend Program
Troubleshooting
Problem: Waterlines or buttock lines have small zigzags.
Solution: This usually happens on hard-chine vessels near the chine or when multiple sections have been connected to
one transverse section (for example, on bulbous bow hulls there is a long connection between the upper side of the bulb
and the lower side of the forpeak). Only a manual fix is available for now. The DXF drawing must be repaired in your CAD
system. Use the PEDIT > EDIT VERTEX > STRAIGHTEN function.
Problem: Expansion shifts the bow portion to centerline for bulbous bow hull.
Solution: The results are mathematically correct. This can only be fixed manually from the results. It is easy to stretch the
points of the bow section to improve the results.
InverseBend Program
The InverseBend program converts frame traces and twisted stringers to straightened profiles with inverse bending
curves, offsets, and any marks for waterlines, buttocks, frames, and stringer intersections. Inverse bending curves are
used to form accurate frames or stringers from stock profile without expensive and time-consuming forming templates.
Simply scribe the inverse bending curves onto the straight profiles. Then bend the profiles until the inverse bending curves
become straight lines.
184
InverseBend Program
InverseBend produces a DXF CAD drawing with the curved and straightened profiles. Each straightened profile consists of
one or more overlapping inverse bending curves, offsets for the curve points, and marks for waterline, buttock lines, and
any other marks.
Note: See Inverse Bending (page 76) in the Tutorial for an example on how to run InverseBend.
File Menu
InverseBend can create inverse bending for:
•
Frames
•
Stringers
Use the first two menu items (Open Frames, Open Marks) for loading the data for inverse bending of frames.
Use the second two menu items (Open Stringer, Open Stringer End Locations) for loading the data for inverse bending of
stringers.
Then load any location files for the marking of frames, waterlines, and buttocks.
Open Frames
Loads frame lines generate by LoftSpace to be inverse bent to straight profiles and then displays them.
Open Mark Lines
Loads stringer-marking lines generated with StringerCutout. The marking lines indicate where stringers intersect with the
frame profiles.
Open Stringers
Loads stringer surfaces or other longitudinal structures to be converted to straight profiles. The stringer surfaces are
generated using LoftSpace and saving the heels of the stringer as developable surfaces.
Open Stringer End Locations
Loads the locations of the ends of the stringer for marking on the straight profiles. Use this if the stringer surfaces extend
past the desired end location of the stringers. The location should contain just two values, one for the aft and one for the
forward end location of the stringers.
Open Frame Line Locations
Loads a frame location file. Use this for inversed bending of stringers only.
185
InverseBend Program
Open Waterline Locations
Loads a waterline location file. Use this for inversed bending of frames or stringers.
Open Buttock Locations
Loads a buttock location file. Use this for inversed bending of frames or stringers.
View Menu
Show Original Frames or Stringers
Sets the currently active window to be used for the display of the loaded frame lines or stringer surfaces.
Show Straight Frames or Stringers
Sets the currently active window to be used for the display of the straightened profiles with the inverse bending
information.
Show Curved Frames or Stringers
Sets the currently active window to be used for the display of two objects:
186
InverseBend Program
•
Frame lines still curved, but with the profile thickness indicated, the inverse bending curves, and any marks
displayed.
•
Stringer surfaces expanded (if twisted) but still curved with the inverse bending curves marked and any marks
displayed.
Colors
Displays the Color window to set the visibility and colors of the individual display items.
Inverse Bend Menu
Options
Displays the Options window that lets you change the settings for the inverse bending.
187
InverseBend Program
Beam Height -- The beam height of the straight profiles. The value is expressed in design units.
Lower Margin -- The distance from the lower edge of the profile below which nothing can be scribed. (This is usually due to
a radius at the lower end of the profile.)
Upper Margin -- The distance from the upper edge of the profile above which nothing can be scribed.
Neutral Axis % -- The neutral bending axis location relative to the height of the beam. The neutral axis is usually set by the
manufacturer of the profiles. The value is represented as a percentage of the Beam Height. For example, with a 60
percent neutral axis and a beam height of 200 mm, the neutral axis would be at 120 mm.
Extend Neutral -- The length that the profile is extended beyond the end of the bending curve. The profile is extended at
both ends.
Offset Spacing -- The spacing at which the offsets for the bending curves will be calculated. The spacing begins from the
left end of the bending curve.
Overlap -- The amount the inverse bending curves are overlapped if more than one curve is required for the profile. This
occurs if the beam backset is larger than the distance between the lower margin and the upper margin. The inverse
bending curves should overlap to achieve a perfectly shaped profile.
Output DXF Text Size -- The size of the text placed on the inverse bending profiles to mark the offsets.
Export DXF
Saves the inverse bending profiles with all marking to a DXF file. The following options are available when exporting.
Export to
•
2-D Production (Straight) -- Saves the straight stiffeners with the bend offsets for production.
•
3-D Model -- Saves the frames or longitudinals in 3D with all the marking generated.
Snap Planar -- Using floating point conversion may result in values that are slightly off from the desired values. For
example, a frame might be located at 32000 mm, but converting results in a value of 29999.97 mm. This could cause
188
InverseBend Program
problem during the detailing process, as the CAD system will not consider two items in the same plane if one is at 30000
mm and the other at 29999.97 mm. Snapping to the nearest whole value eliminates this problem.
Output DXF Text Size -- The size of the text placed on the inverse bending profiles to mark the offsets.
Make Inverse Bend
Calculates the inverse bending curves and all markings and displays them in the Straight Frames or Stringers view.
Steps to Create Inverse Bending Frames
Note: See Inverse Bending (page 76) for an example on how to run InverseBend.
The following procedure shows how to generate inverse bending curve frames.
1.
Select Files > Open Frames and select a file containing exactly the frames to be inverse bent. Typically these are
generated from the planar sections function in the LoftSpace module. All frames have to be made up from the same
profile. Use LoftSpace to generate separate frame files for each profile size.
2.
Select Files > Open Marks and select the files containing the marks. The marks are usually generated using the
StringerCutouts.
3.
Open waterline and buttock line locations as desired.
4.
Select Inverse Bend > Options and modify the settings as appropriate for the profiles you are using.
5.
Select Inverse Bend > Make Inverse Bend to calculate the straight profiles. The profiles are then displayed in the
straight frames or stringers view.
6.
Select Inverse Bend > Export DXF to create the CAD DXF file.
7.
Open the DXF in your CAD program and investigate the results.
Steps to Create Inverse Bending Stringers
The following procedure shows how to generate inverse bending curve frames.
1.
Select Files > Open Stringers and select the files containing the stringer surfaces. All stringers have to be made from
the same profile size. If you have different sizes, then you have to repeat these steps for the files of each profile size.
2.
Select Files > Open Stringer End Locations and select the location file with the end locations of the stringers.
3.
Open frame line, waterline, and buttock line locations as desired.
4.
Select Inverse Bend > Options and modify the settings as appropriate for the profiles you are using.
5.
Select Inverse Bend > Make Inverse Bend to calculate the straight profiles. The profiles are then displayed in the
straight frames or stringers view.
6.
Select Inverse Bend > Export DXF to create the CAD DXF file.
7.
Open the DXF in your CAD program and investigate the results.
189
PinJig Module
PinJig Module
PinJig calculates the information required to build a PinJig for the assembly of construction modules. The data is output
as a DXF drawing of the PinJig with a table of pin heights and the angle between the normal and the pin at each pin
location.
Note: See PinJigs (page 80) for an example on how to run PinJigs.
Toolbars
Open Plate Surface
Save Pin Table
Export in DXF Format
Print
Options
190
PinJig Module
Make PinJig
Rotate the Plates
Auto-level the Plates
Shift the Plates to (0,0)
Set the Minimum Pin Height
File Menu
Open Plates
Opens surface files that represent the plating of a construction module.
Note: Loading the surface files does not offset the surfaces by the plate thickness. You may need to create offset
surfaces depending on the orientation of the assembly (right side up or right side down).
Open Frame Locations
Loads a frames location file. The frame traces on the plates are calculated and displayed. This function is primarily used
for construction modules where it is hard to distinguish between the forward and aft end of the module. The frame traces
and frame location names are output to the DXF drawing. The default color for the frames is cyan. If you are going to add
frame locations, make sure you do so prior to rotating and shifting the plates.
Save Pin Table
Saves the table of pin locations, pin heights, and normal angles to a formatted ACSII text file. The file has the extension
PIN.
Open Pin Array
Loads a pin array layout file (*.PLC) containing a saved layout.
Save Pin Array
Saves a pin array layout to file (*.PLC).
191
PinJig Module
Build Menu
Options
Displays the Options window for the PinJig module.
General Tab
Base Length -- The length of the displayed base lines, which are represented as crosses at the bottom of each pin. Only
for display purposes.
Initial Pin Height -- The height of the pins before the heights are calculated. Only for display purposes.
Normal Line Length – The length of the normal lines shown where the pin contacts the plate when the PinJig is made.
Only for display purposes.
Min Pin Height -- Shifts the plates vertically so that the minimum Z value of the plates is at a specified height. This
ensures that the shortest pin will not be shorter than the specified value.
Shift Plates X and Y to (0, 0) -- Shifts the plates horizontally so that the minimum X value and the minimum Y value of the
plates will be zero.
Pin Layout Tab
Lets you create or modify the pin grid layout.
Generate Pin Layout -- Check this option to generate a regular pin grid as specified by the values. Keep this option unchecked if you loaded a previously save pin array file or if you have created pins on seams.
Number of Columns of pins -- The number of columns available on your PinJig.
Number of Rows of pins -- The number of rows available on your PinJig.
192
PinJig Module
X spacing -- The distance in longitudinal direction between the columns.
X offset -- The distance in longitudinal direction that the first pin is from the origin.
Y spacing -- The distance in transverse direction between the rows.
Y offset -- The distance in transverse direction that the first pin is from the origin.
Make PinJig
Calculates the height of the pins and the transverse angle at each pin location. The pins are displayed at correct height
and the transverse normal vectors are shown at the contact point of each pin with the hull surface.
Rotate
Rotates the plates about any of the three principal axes to orient the plates into the most favorable position. The plates
are rotated from their original position. Rotation of the plates can also be accomplished using the Auto Level function.
Shift Plates X and Y to (0, 0)
Shifts the plates horizontally so that the minimum X value and the minimum Y value of the plates will be zero. Plates
are automatically shifted if the plates are rotated or auto-leveled.
Generate Pin Array on Seams
Generates pins so that the pins will be exactly underneath the seams of the plate. The function asks you for a location file
containing the seam locations. Additionally, you can specify a maximum width, above which an additional pin will be
inserted between the pins underneath the plate. This ensures proper support of wide plates.
Export to DXF
Saves the PinJig information to a DXF file. The contents of the file are:
•
A table containing the X and Y location, pin height and transverse contact angle of each pin.
•
Plan, profile, and body views of all plate outlines with the pins.
Auto Level Menu
Auto leveling is performed by first identifying four points (usually the outermost plate corners), using the corner selection
functions, and then running the auto level function to rotate the plates.
Select Upper Left Corner
Lets you define the position of the upper left corner of the construction assembly for auto-leveling. Use the mouse to click
near the upper left corner of the plates in Plan view. A cross indicates the nearest plate corner to the picked location. Only
plate corners can be picked.
Select Upper Right Corner
Lets you define the position of the upper right corner of the construction assembly for auto-leveling. Use the mouse to
click near the upper right corner of the plates in Plan view. A cross indicates the nearest plate corner to the picked
location. Only plate corners can be picked.
193
PinJig Module
Select Lower Left Corner
Lets you define the position of the lower left corner of the construction assembly for auto-leveling. Use the mouse to click
near the lower left corner of the plates in Plan view. A cross indicates the nearest plate corner to the picked location. Only
plate corners can be picked.
Select Lower Right Corner
Lets you define the position of the lower right corner of the construction assembly for auto-leveling. Use the mouse to
click near the lower right corner of the plates in Plan view. A cross indicates the nearest plate corner to the picked
location. Only plate corners can be picked.
Auto Level
Levels the plates using the four defined corners. The plates are rotated so that both diagonals connecting the four
corners are horizontal, yielding, in general, the best down-hand welding position.
Steps to Create PinJigs
Note: See PinJigs (page 80) for an example on how to run PinJigs.
To create a typical Pin Jig assembly for a construction module
1.
Use LoftSpace to offset the plates from the molded line to the outside. It is a good idea to generate group files for
grouping the names of the plates for each construction block for which PinJigs have to be generated.
2.
Select File > Open Plates and load the offset plates.
3.
Orient the plates into assembly position by using the auto-level feature or manually rotating the plates using the
rotate function.
4.
Shift the plates to the origin.
5.
Shift the plates to the minimum pin height.
6.
Set the pin grid properties using one of three methods:
•
Use the Pin Layout function to define a grid of pins.
•
Use Generate pin array on seams.
•
Open a previously saved pin array layout.
7.
Select Build > Make PinJig. Check the normal pins to confirm the pins are correct.
8.
Save the DXF drawing of the PinJig layout.
9.
Investigate the CAD drawing using you CAD program.
Troubleshooting
Problem: Normal lines are on the wrong side of the plates.
Solution: Try reversing the order of the lines on the plates.
194
PrintOffsets Module
PrintOffsets Module
The PrintOffsets module lets you generate a table of offsets for buttock lines, waterlines, longitudinal lines, frame lines,
frame knuckles, and design offsets.
Toolbars
Save Offset Table
Print Preview
Print
Change Font
Options
Construct Offset Table
Open Offsets in Text Editor
195
PrintOffsets Module
File Menu
Open Buttock Lines
Opens buttock lines for producing buttock line offsets.
Open Waterlines
Opens waterlines for producing waterline offsets.
Open Longitudinal Lines
Opens longitudinal lines (*.LGS, *.PMK, *.SIN, *.OBQ, *.PRJ) for producing offsets at specified locations.
Frame Lines > For Waterline Offsets
Opens frame lines (*.FRM) for formatted printing of the waterline offsets.
Frame Lines > For Buttock Line Offsets
Opens frame lines (*.FRM) for formatted printing of the buttock line offsets.
Open Frame Knuckles
Opens frame knuckles (*.FKN) for formatted printing.
Open Design Offsets
Opens design offset files (*.LGO, *.STO) for formatted printing of the offsets.
Save Offsets
Saves the offset table to an ASCII text file. The file is formatted with spaces to align columns.
Offsets Menu
Construct Offset Table
Builds the table of offsets. A location file may need to be selected depending on the type of offsets you want to make.
When the offsets are generated, the table is shown as a print preview. Click Close to end the print preview. You can now
save the offsets to file using File > Save Offsets.
196
PrintOffsets Module
Open Offsets in Text Editor
Creates a temporary file containing the table of offsets and opens them in your editor specified in the options. Use
this function only after you have run the Construct Offset Table function.
197
PrintOffsets Module
Options
Opens the Print Offset Options window containing all the options for printing offsets.
Decimal Places -- The number of decimal places of accuracy to output. Only applies to decimal formats.
Characters per line -- The maximum number of characters on a line. This determines the number of columns in the table
of offsets.
Column Width -- The width of the offset table columns in characters.
Frame Offset Layout -- Determines how the table of offsets is laid out. If Horizontal is chosen, each column is a location
(Longitudinal lines only).
Viewing Editor -- The path to your editor for viewing the table of offsets.
Set Printer Font -- Sets the font that the table will be printed in. Use a monospaced font like Courier so the columns
are aligned properly.
How to Create Offsets
Note: See PrintOffsets (page 82) for an example on how to run PrintOffsets.
198
1.
Open the lines you want to create offsets from, using the appropriate open function from the File menu.
2.
Select Construct Offset Table from the Offsets menu. If necessary, load the location file containing the locations to
take offsets.
3.
When the print preview of the offsets appears, check the numbers and layout to confirm they are correct, and then
click Close.
4.
If necessary, change the options and construct the offset table.
5.
Select Save Offsets from the File menu and save the offsets to a text file.
Appendix
Appendix
File Conventions
All ShipCAM files for a project are stored in a single directory. This project directory has the name of the project.
ShipCAM stores the data for the fairing and manufacturing data in several different files. The file types, a description of
the contents are given in the table below. You do not need to know all the details for normal use of ShipCAM. However,
the information below is very helpful if you want to write your own software that interfaces with ShipCAM.
199
Appendix
File
Description
BTK
Buttock lines
CGR
Weights and centers of gravity of plates
DEV
Developable surface
DXF
AutoCAD Data Exchange Format
FCT
Frames with inserted cutouts
FKN
Frame knuckles. Contains the coordinates of vertices at the
intersections with plate edges
FMK
Frame marks. Marks for cutouts or setup of frames
FRM
Frames lines
GF
Hull information for stability programs
IDF
IMSA data format
LGB
Longitudinal fairing breakpoints
LGC
Longitudinal fairing control points
LGO
Offsets for longitudinals
LGS
Faired, high resolution, longitudinal splines
LOC
Locations, a one dimensional array of locations for intersection
planes or girth lengths
MSH
Surface mesh
OBQ
Oblique planar sections
OUT
Outlines
PMK
Plate marks
PRJ
Projection lines
SCP
Project file
STB
Station breakpoints
STC
Station control points
STO
Station offsets
STR
Stringer surface
STS
Station Spline
WLN
Waterlines
Project File
The project file must exist in each project directory. It has the extension SCP.
Note: Never change the project file manually. Always use the menu File > Project > Project Settings, which bring up
the Project Settings window.
200
Appendix
Geometry File Format
ShipCAM geometry files hold the 3D information of polylines and surfaces. Surfaces are represented by a number of
polylines that have the same number of vertices each, thus the vertices can be connected in longitudinal and transverse
direction forming a surface mesh. The mesh can be compared to a fishing net that covers your hull.
The file starts with an integer number that indicates the number of polylines in this file.
Each polyline starts with an integer number that specifies the number of vertices on the polyline and the line name. The
line name is the one entered by the offset editor, given in a location file for lines that are the result of planar sections, or
in the case of surfaces is just a running number.
Files of this type can be generated easily with a text editor or with programs that you can develop in you own company for
special in-house situations.
Location File Format
ShipCAM location files hold the 1D information of locations. The file starts with an integer number that indicates the
number of locations in this file. Each line of locations consists of the location name, if given, and the location value. The
location name is the one entered by the location editor.
Other File Formats
ShipCAM has other formats for two special files, the break points files, *.STB and *.LGB, and the frame line files with the
inserted cutouts, *.FCT. These files should not be edited manually.
INI File Format
Each module contains an INI file in the program directory (C:\ShipCAM) that contains all the settings that are not changed
from project to project. This includes window positions and color settings.
201
Index
Index
A
auto level menu 193
B
blocks menu
LoftSpace 107
blocks window 29, 97
bow fashion plate 66
bow thruster intersection 68
break 145
build menu
PinJig 192
PlateExpand 164
ShellExpand 180
C
center of gravity 72
centerline deck 127
Color 98, 107
colors 12
compress 104
cutouts
export frame 58
insert 51, 53, 158
keelson 58
references 157
cutouts menu
StringerCutouts 157
cutting sections 48
D
deck options window 126
design 105, 110–11
Developable 110
DXF
export 158
export in LoftSpace 105
export options window 105
export PinJig 193
import in LoftSpace 101
text size 188
text style 181
DXF 3, 48, 53–59, 69, 71, 88
DXF 112
DXF 123
DXF 151
DXF export menu 182
E
expand surface menu 176
expanding plate
bow thruster intersection 68
expanding plates 59
extend 115
F
fairing 3
longitudinal 17
station 13
fairness 16
fashion plate 66
file conventions 199
file menu
InverseBend 185
LinesFairing 135
PinJig 191
PlateExpand 161
PrintOffsets 196
ShellExpand 179
StringerCutouts 152
fillet 45, 128
flatten 145
frame lofting 48
frame marks 51
G
geometry file format 201
GHS
export LoftSpace 106
girth 155, 156
proportional 156
girth menu
StringerCutouts 155
group files 27
group visible blocks 104
H
hull design program 3
I
IDF
203
Index
export LoftSpace 105
import in LoftSpace 102
IGES
import in LoftSpace 103
IGES 3
IGES2MSH 103
INI file format 201
inverse bend menu 187
inverse bending 76
create frames 76, 189
create stringers 78
InverseBend 76–78, 184
K
keelson 57
cutout 58
keyboard shortcuts 119, 149
knuckles 15
L
licensing 89
common problems 91
network license server 90
lines menu
LoftSpace 113
LinesFairing 59, 94, 134
location file editing 22
location file format 201
LoftSpace 27, 31, 48, 59, 68, 90, 92, 97, 106,
111, 118, 120, 130, 134, 152–54, 159, 163,
194
basics 27
Context Menu 98
file menu 99
longitudinals 141
M
mesh lines 110
mesh menu
PlateExpand 164
mirror half-breadth 108
N
NURBS 102
NURBS 3
nverse bending
create stringers 189
O
oblique 132
offset editor 117
when to use 117
offsets
create 198
204
line 136
table 196
text editor 197
offsets menu 196
opening files window 7
other file formats 201
P
parallelity 38, 122
PinJig 190
general tab 192
pin layout tab 192
PinJig toolbar 190
PinJigs 80
create 194
planar sections 129
planar sections toolbar 130
plane menu
StringerCutouts 155
plate expansion drawing 177
plate stock settings 112
PlateExpand 112, 160, 177
DXF tab 172
general tab 165
layers tab 175
stock tab 171
templates tab 171
porcupine 132
curvature 148
scale 147
section 147
slope 148
spline 147
porcupine 16
preferences window 107
Printing 82
PrintOffsets 82, 195
PrintOffsets toolbar 195
project file 200
project lines 123
project settings window 87
project settings tab 88
ShipConstructor tab 88
projection menu
StringerCutouts 156
projects 4, 86
hard-chine vessel 93
new 86
open 87
project settings 87
properties bar 163
R
recalculate sections 144
reference 86
references menu
LinesFairing 140
rotate 109
round bilge hulls
Index
multiple surface 95
single surface 94
S
select objects 97
settings toolbar 146
settings window
DXF settings tab 65
general settings tab 63
layers settings tab 65
stock settings tab 64
shell expansion 70
shell expansion drawing 183
ShellExpand 178
shell tab 181
sideline deck 126
smooth fans 112
sort lines 109
spacing 131, 193
spline edit toolbar 144
split window 10
stations 108–9
Straight 145
straightening stations 15
strain map 176
StringerCutouts 77, 149
stringers
bottom 53
inverse bending 78, 189
mark bottom 51
side 55
surface
B-spline 121, 143
cross spline 33, 120, 142
deck 43, 125
developable 36, 122, 142
generate 31, 119, 120
generation wizard 34
intersect 39, 124
offset 128
remove 144
setup 141
straight section 122, 143
stringer 153
trim 40
V
vertices
remove below tolerance 111
reverse 108, 114, 116
thin 116
vertices menu
LoftSpace 116
view menu
InverseBend 186
LinesFairing 137
PlateExpand 163
ShellExpand 180
views 9, 10
multiple views 10
remove multiple 12
viewpoint 9
Views 77, 115
W
weights 72
T
text editor 197
tools menu
LoftSpace 117
trim 109
Trimming 110–11, 115
troubleshooting
PinJig 194
PlateExpand 177
ShellExpand 184
StringerCutouts 159
205