1
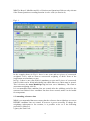
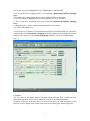
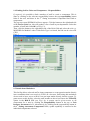
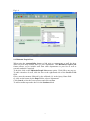
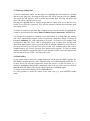
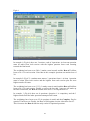
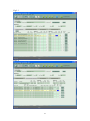
Table of Contents
Section 1: Reference Data.
1.1 Setting up reference data
1.2 Amending reference data
1.3 Notes
1.4 Responsibilities
1.5 Stand alone mark sheet
1.6 Maintain People Lists
1.7 Copy Previous Years reference data
3
4
5
6
6
7
8
Section 2: Component Marks
2.1 Creating candidate lists
2.1.1 Bulk creation of lists
2.1.2 Individual component lists
2.2 Loading component marks
2.3 Penalties
2.4 Other features of the component screens
2.5 Deleting/Adding Data
2.6 Find facility
9
9
9
10
11
12
13
13
Section 3: Module Grades
3.1
3.2
3.3
3.4
3.5
3.6
3.7
3.8
3.9
External flag
Notes
Overriding reference data
Copy 1st Sit Mark
Upload to CIS
Find facility
Module grades by candidate
Amendments to grade after upload to CIS
Repeated Modules
14
14
15
18
18
18
18
19
19
Section 4: Exam Question Recording
4.1 Setting up reference data
4.1.1 Min/Max function
4.1.2 Best of function
4.2 Changing exam reference data
4.3 Loading exam marks
1
20
21
24
27
27
Section 5: Creating 2nd Sitting candidates
5.1
5.2
5.3
5.4
5.5
Resits linked to a failed module
Resits linked to failed components
2nd Sitting Weightings
Copy 2nd Sitting Mark
Upload 2nd Sitting Mark
Section 6: Degree Determination Report
30
31
31
34
35
35
Section 7: Scaling
7.1 Scaling a component
Appendix A:
38
Upload UG Award
2
40
1.
Reference Data
(v2.0)
1.1
Setting Up Reference Data in DAS
Select (click) Reference Data
Select Assessment Components
The cursor will be in the Unit Code field: enter the code e.g. GEO115 and click on
Search.
Ensure that the correct occurrence is being displayed (Occurr field should default to
the current session – if not use the Next Occurrence or Previous Occurrence arrows
in the tool bar to scroll through the occurrences).
To view data for a specific session only, enter the wildcard followed by the year in the
Ocurr field e.g. %10 for the 2010/11 session.
Once the correct occurrence has been selected, click on the Assessment Component
arrow, the cursor will move into the Assm Comp field, then press the tab key: a
system generated code will now appear in the Assm Comp field.
Enter the Weighting for this component.
The weightings for each Assessment Type must add up to 100 (see “method” below,
and example overleaf)
Tab on to Grade Band
(this will default to the Undergraduate 100 point scale, for Graduate units use the
arrowed box to select 100 Grad).
Tab on to Mand/Opt
This indicates if it is mandatory or optional to pass the component. If any component
is set to mandatory and the outcome is fail, then the overall module outcome will also
be a fail, irrespective of the calculated grade.
Tab on to Method
This is the actual form of assessment the student undertakes for this component. In
practice it is recommended that users just use WE for Written Exams and CW
(Coursework) for all others. This is because the exact name of the component; and
thus the method, can be recorded in the Description.
Tab to Max Mark
This defaults to 100 but can be overwritten if a component is marked differently (e.g.
if a piece of work is marked out of 40 enter this value in the max mark field.
Tab to Description
Enter the description of the component e.g. Exam, Essay or Presentation etc.
Once a component has been added, click the Save icon in the top left hand corner.
Click on Insert Record to enter details of the next component.
Once all the components have been set up you can click on the Check Weights
button which will check that each assessment type adds up to 100.
The Exam to Coursework ratio is set at the top of the screen by completing the Exam
Weighting and Assm Weighting fields.
3
N.B. The Best of, Min/Max and No. of Sections and Questions fields are only relevant
if the Exams Questions recording function is to be used (see Section 4).
Fig.1.1
In the example shown in Fig.1.1 there is one exam and two pieces of coursework
(weighted 70:30), with an exam to coursework weighting of 40/60. None of the
components are mandatory to pass.
In Fig 1.2 there is one exam which is mandatory to pass and 2 pieces of coursework
both of which can be failed individually but which taken as a whole must be passed.
This is because the Assm Mand/Opt flag has been set to Mandatory. The exam to
assessment weighting is 80/20.
It is recommended that candidate lists are created after the add/drop period for the
semester has finished. Once candidate lists have been created, marks can be loaded
for components.
1.2 Amending reference data
N.B It is recommended that users ensure that the reference data weightings are correct
BEFORE candidate lists are created. If however it proves necessary to change the
weightings subsequent to list creation, it is possible to do so if the following
procedure is followed:
i) Query the Unit Code
4
ii) Use the mouse to highlight the first weighting box to be amended
iii) Type in the new weighting and (very important!) press tab before saving.
Save
This ensures the change filters down to any students on the component.
iv) Use the mouse to highlight the second weighting box to be amended
v) Type in the new weighting and (very important!) press tab before saving.
Save
vi) Repeat stages iv and v until all amendments have been made
vii) Click on the Save icon
You will receive a number of confirmation messages to which the Yes box should be
clicked before the Transaction Complete message appears in the dialogue box at the
bottom of the form. Use the Check Weightings button to check your amendments
Fig 1.2
1.3 Notes
The box next to the Notes button is ticked which indicates that a Note has been
entered for this unit. A note can be added or viewed by clicking this button.
A feature of DAS is that when a note is entered, the user can control whether or not
the note is to be displayed on exam board reports by clicking the Board Flag field.
5
1.4 Linking Staff to Units and Components – Responsibilities
If required, it is possible to link a member of staff to a unit or component. This is
done by clicking on the relevant responsibility button: the top responsibility button
links to the unit, and those in the 1st Sitting Assessment Component block link to
components.
The pop-up screen SDEP0020 will now appear. Click the button to the right hand side
of the Person Code box, this will produce a list of staff in your department. Select the
member of staff and click OK (see Fig 1.3).
Then, click the button to the right hand side of the Role field and select the role e.g.
MODLDR for Module Leader. If this Role Type is selected, the link can be viewed in
CIES.
Fig 1.3
1.5 Stand Alone Marksheet
This facility allows selected staff to input component or exam question marks directly
into a marksheet that is accessed via a URL on a browser. Staff using this marksheet
do not need to have access to DAS but can input marks directly into the system. To
grant access to this facility, select the staff member as above but choose the UPDATE
option in the ROLE field (see Fig 1.4). A person can be given access to all
components for a unit by clicking the Responsibility button at the top or Unit
Instance Occurrence level. Alternatively, by clicking on the responsibility button in
the 1st Sitting Assessment Components block, update capability is restricted to the
individual components selected.
6
Fig 1.4
1.6 Maintain People Lists
When using the responsibility button to link units or components to staff, the drop
down list will only include staff in your department. The Maintain People Lists
feature allows you to include staff from other departments in your list as well as
research students if required.
To do this, click on the Maintain People Lists menu option. Click OK to any pop-up.
To add a member of staff, click the box to the right hand side of the Person Code
field.
Either enter the surname followed by the wildcard (%) in the Query Name field.
Or click on the button by the Dept field to select a department.
Click Search, select the correct person and click on Save
To add a student repeat the above in the Students block
7
1.7 Copy Previous Years Facility
When setting up reference data for subsequent sessions, it is possible to copy across
this data from the previous occurrence. If the reference data has not changed since the
previous year, click the Copy Previous button and the data will copy across into the
new occurrence. If the reference data is largely, but not exactly the same, this facility
can still be used. Simply copy the data and then make the changes.
N.B. This facility will also copy across Exam Question Recording data if this is being
used.
8
2. Component Marks
2.1 Creating candidate lists
The candidate lists can be created in 2 ways.
2.1.1 Bulk Creation of Lists
Select utilities and Bulk Create 1st Sit cands.
Type in the 3 digit Department code followed by the wildcard (%), and click on the
Search icon. All units that have reference data set up will be listed. Use the tick box
on the right hand side to select the units you wish to create candidates for and click
the Create Candidates button.
Alternatively you can further refine your original search. For example, you may wish
to create candidates for the AUT SEM modules for 2010/11 only. To do this, type in
the 3 digit department code as before and then type AUT SEM 10 in the Occurrence
box. Click Search. Instead of clicking the individual check boxes you can now click
Check All before creating the candidates.
2.1.2 Individual component Lists
Select Component Marks, First Sitting
In the Unit Code box enter the unit code, tab into the Occur Code, enter %10 (for the
2010/11 session) and click search.
Information for the first component will appear: click Create Candidates. A
confirmation box will appear asking if you wish to continue; click Yes.
To move on to the next component, use the Assessment Component icon to navigate
to the top of the page and then click on the Next Component icon to select
component 2. Click on Create Candidates as above.
9
Fig 2.1
2.2 Loading Component Marks
Marks can be entered in the Mark1 column and then tabbing twice takes you to the
next student. The system will automatically populate the Agreed field with this mark.
It is important to note that it is this Agreed Mark which is used in the calculations to
determine the module grade.
Some departments will wish to record the mark given by a second marker and this can
be done in the Mark2 column. Similarly, if required, the initials of the markers can be
recorded in the Inits columns.
Please note that the system will take the mark from the Mark2 field and use it to
overwrite the Agreed mark as a default. However the Agreed mark can be manually
overwritten if desired. For example, if it is decided to split the difference between the
marks awarded by Marker 1 and Marker 2, the Agreed mark can be adjusted as in Fig
2.2.
10
Fig 2.2
In this example, the 1st marker awarded 36 and the system populated the Outcome
with F. However the 2nd marker awarded 44. It was agreed that the actual mark would
be 41 and so this was input into the Agreed field. An information message pointed out
that the component had now been passed and so the Outcome was also changed to P
by the user. It can also be seen that the user has entered a note which is considered to
be of relevance to the exam board.
2.3 Penalties
In practice few departments use 3rd markers and so some users have converted this
field into an area where penalties can be awarded (e.g. for late submission). In the
example shown a penalty of 5 marks has been deducted. The agreed mark was
manually overwritten by the user (61 minus 5) and a note has been entered to this
effect although this note has not been deemed relevant to the exam board.
11
Fig 2.3
2.4 Other features of the component screens
Notes can be added by clicking on the Notes button adjacent to the student. The
Board flag will default to Yes but can be turned off by clicking on it.
The Sort button enables the user to list the candidates in Student Registration Number
order.
Clicking the Statistics button provides a breakdown of the marks for this component
e.g. standard deviation, median, mean etc.
The Int flag can be clicked to show if a particular component for a candidate has been
internally moderated.
Double clicking in the Reg No. field will give more details about a student (e.g.
Registration Status, Programme Code and Period of Study).
12
2.5 Deleting/Adding Data
To delete component marks use the mouse to highlight the first mark to be deleted
and press the space bar. Pressing tab will move the cursor into the next box (Inits1).
The space bar can again be used to delete any initials data. Pressing tab again will
move the cursor onto the next record.
Deleting the Agreed mark is similar except that the cursor will move onto the next
record every time tab is pressed. You will be asked to confirm any deletions upon
leaving the screen.
To delete a student record from the components list, use the mouse to highlight the
record in question and click on the Delete Student from Component Class list icon.
If a unit has been linked to a student record subsequent to creating lists, the student
will NOT automatically appear in the Assessment Component list(s). Clicking on
Create Candidates for each component will create a record for ALL students who
are linked to that Unit Code. This is still possible even if marks have already been
entered for those linked, and so you will be able to add late additions or corrections to
the class list in this way. Please note however that ALL students with a link will be
included and so any records you may have deleted will reappear. To find out which
students are linked to a particular unit view the Module Grades screen described in the
next section or browse CIES – the data is the same.
2.6 Find facility
If you wish to enter a mark for a single student for whom only the SRN is known, the
find facility enables this to be done without having to scroll through the whole list. To
do this: access the relevant component, ensure the cursor is in the list block (i.e. a
student is highlighted and not the component code at the top of the screen), click on
Search. Enter the SRN of the record required and click on Search again.
To return to the full list simply click on Search twice.
It is also possible to search by names in the same way, e.g. enter SMITH% under
name.
13
3. Module Grades
This screen gives the overall picture for a module, showing the agreed mark for each
component and the calculated module grade. In Fig 3.1 a class list is shown for
GEO101 with the component marks for a highlighted student showing at the bottom
of the screen.
The calculated module grade is shown for all except the first student. This is because
there is no mark for component 2 and so DAS is unable to make a calculation (it can
also be seen that there is a note against this student’s component 2). Clicking the
Registration Details tab gives more information on the student (Programme Code,
Period, Registration Status and Fee Status).
There are also click buttons for statistics and to change the sort order: surname, SRN
and grade.
3.1 External Flag
This can be ticked if you wish to record when a student’s work has been assessed by
an External examiner.
3.2 Notes
The notes field can be clicked to add notes and the Board Flag ticked if it is relevant
to an Exam Board.
Fig 3.1
14
3.3 Overriding Reference Data
It will sometimes be necessary to override reference weighting for an individual
student. This will usually occur when a student retakes a unit externally.
In example 3.2 the student is taking GEO101 which normally consists of 3
components, however, this particular student is only to be assessed in the examined
component and so there will be no marks for the other 2 components.
To do this:i) Delete the student from the 2 components not being taken in Component Marks –
First Sitting.
ii) Access Module Grades – By Module. Select the unit and highlight the student
using the mouse and then click on the All Units Button. This accesses a screen
showing all units for the student.
iii) Highlight GEO101 and enter 100 in the RUL ExWt box as shown in Fig 3.2 (this
overrides the top level which for all other students is 80:20 Exams to Assessments).
iv) Click on the RUL Assessment Components tab and enter the weighting for this
student’s assessment which in this case will be 100 (Fig 3.3).
In example 3.4 and 3.5 the student is going to be assessed on one piece of coursework
which will provide 40% of the unit grade and one exam which will provide the other
60% of the assessment.
i) Delete the student from the component not being taken in Component Marks –
First Sitting.
ii) Select the unit and highlight the student as in ii) above.
iii) Highlight GEO101 and enter 40 and 60 in the relevant RUL Wt boxes (see Fig
3.4).
iii) Click on the RUL Assessment Components tab and enter the weightings for this
student’s assessment which in this case must be 100 as there is 1 component for each
assessment method and each assessment method has to add up to 100 (see Fig 3.5).
It is also possible to access an individual student via the Module Grades – By
Candidate menu option and repeat the process described above.
15
Fig 3.2
Fig 3.3
16
Fig 3.4
Fig 3.5
17
3.4 Copy 1st Sit Mark
Once the reference data has been set up correctly and marks are present for all the
components that make up a module, DAS calculates the module grade. If all the
marks have been loaded and no grades are shown in the calc field, check that the
reference data for the unit is correct as this is the most likely cause. If individual
grades are missing, double clicking in the empty calc field produces a pop-up error
report.
At this point it is still possible to amend component marks as the calculation will still
take such changes into account.
Once the user is satisfied that the weightings and marks are correct, the Copy 1st Sit
Mark button can be clicked. This will populate the Grade and Outcm fields;
rounding up, or down, the 2 decimal places from the calculated grade. You should
then click Save. It is still possible to manually overwrite module grades after the
Copy process has been carried out; for example a grade may be augmented to take
into account extenuating circumstances. If required a note could be entered to
highlight this. N.B. If the Copy 1st Mark button is clicked again, any manual changes
will be overwritten, although a pop up message will warn you of this.
Please note that the copy facility may not work for students on research programmes.
This is because most RTP modules are only reported as Pass/Fail.
3.5 Uploading Module Grade to CIS
Once you are ready to upload the marks to CIS enter the date in OK Sit 1 and then
click the Confirm button. If some students do not have a grade to upload you may
receive a message informing you of missing data, click OK to upload. For the same
reason as above, module marks for research students will not be uploaded, although a
value of P or F entered in the Outcm field will upload provided no grade is present.
Likewise, values of NA or DE etc can be uploaded by entering these in the Outcm
field and ensuring the Grade field is blank.
3.6 Find Facility
This facility is the same as that described in 2.6. To do this: access the relevant
module, ensure the cursor is in the list block (i.e. a student is highlighted and not the
module code at the top of the screen), click on Search which will clear the list and
enter the SRN for the student required, then click Search again.
To return to the full list simply click Search twice.
It is also possible to search by names in the same way, e.g. enter SMITH% under
name.
3.7 Module Grades by Candidate
This facility allows the user to access an individual student record. If preferred,
changes to reference data can also be made here
This menu option also allows notes to be entered against an individual student that are
not necessarily related to any particular unit or component. Students can be queried by
18
either their registration number or Query name (i.e. surname%). Click the Notes box,
select a Note Type and enter the note. It is also possible to select a cohort of students
by clicking the Query Registrations button and entering the programme code etc.
For example, by selecting a cohort and using the note type of BOARD it is possible to
enter the recommendations of an exam board into this field. This can then be printed
onto a basic results sheet (using Web Reports) and handed to PGT students. An enddate field can be used to signify when the note is no longer relevant.
3.8 Amendments to grade after upload to CIS
Occasionally a grade needs to be changed after the results have been uploaded into
CIS; after an exam board for example. The change can be made by using the mouse to
highlight the grade in question (either in Module Grades – by module or by
candidate) and then typing in the new grade followed by tab, then click Save. If the
change alters the outcome a pop-up box will appear warning you of the fact. If this
happens, click OK, amend the outcome, and click on Save as above.
DO NOT click the Copy First Mark button after upload to CIS as it will overwrite
any manual changes to grades that you may have made.
Before exiting it is recommended that CIS is checked to confirm that the change has
been made correctly. This is easily done by clicking on the All Units button against
the record concerned, and then clicking on the View All Modules tab. This screen
shows the CIS module record. To return to your previous position, click Exit.
Changes can still be made in this way after the deadline set by the Taught
Programmes Office has passed. However, before the change can be saved a pop-up
screen will appear informing you that the Confirm button will need to be clicked.
Once this is done a Result Amendment Form will appear which should be completed.
This will be automatically emailed to TPO once the OK button has been clicked.
Again, it is recommended that the CIS screen is checked to confirm that the correct
change has been applied.
3.9 Repeated Modules
Modules that have been taken in a previous session are highlighted by a red star to the
right of the candidate’s name for easy identification. Double clicking the mouse on
the red star will pop up the results obtained in any previous attempt(s).
19
4. Exam Question Recording
4.1 Setting up Reference Data
From the Assessments menu select Reference Data – Assessment Components and
then enter the unit code, ensuring that the correct occurrence (e.g. AUT SEM 10) is
showing before proceeding further.
Click on the Sections box on the right hand side of the relevant component (i.e. that
set up as the examined component). A pop-up screen will appear.
Click on Add Sections and add the number of Sections required (e.g. if there is a
section A and a section B, enter 2).
Click on Add Questions against section A – a pop-up screen will appear: enter the
number of questions, the weighting, marks out of (usually 100 but other values can be
entered) and whether the questions are compulsory or optional. Click OK
In example 4.1 there are 6 questions on the paper and it is expected that 4 will be
answered (hence the weighting of 25.00). They are marked out of 100 and all are
optional.
Fig 4.1
The basic reference data set up as above will produce a grid with cells against which
question marks can be entered (see Section 4.2), although there will be no validation
(e.g. if a student takes 5 questions, all 5 marks will count towards the final
calculation).
If a question is Compulsory you can enter C in the Complsry box (see Fig 4.2).
Likewise, weightings can be amended in this screen for individual questions.
20
Fig 4.2
In this example, the marks grid described in Section 4.2 will highlight students who
have not got a mark for Question1 which has now been set as Compulsory in the
reference data.
Further validation that the correct combination of questions in given sections have
been answered, can be set up by using the Min/Max and Best Of functions.
4.1.1 Min/Max Function
Example 1
This exam consists of 1 section which contains 8 questions of which 4 are to be taken.
None are compulsory and all are marked out of 100.
Click Add Sections enter 1 and click OK
Click Add Questions enter the number (8), the weight (25), mark out of (100) and
Comp/Opt (O). Click OK.
21
Fig 4.3
Finally, to reflect the fact that 4 questions are to be taken, enter 4 in the Min Qstns
field and 4 in the Max Qstns field (see Fig 4.3). This will validate the marks entered
against a student. N.B. The Min/Max facility will only work for Optional questions.
Click Save to exit.
Example 2
There are 4 questions in Section A of which 2 must be taken. Question 1 is
compulsory. Section A questions have a weighting of 30%
There are 4 questions in Section B of which any 2 can be taken. Section B questions
have a weighting of 20%.
Click Add Sections, enter 2 and click OK. Click Add Questions against Section A.
Enter the number (4), weighting (30), Mark out of (100) and Comp/opt (O).
Click Add Questions against Section B and enter 4, 20, 100 and O. Next, you will
need to change Question 1 to compulsory which is done in the Complsry field shown
in Fig 4.4
22
Fig 4.4
Finally, enter 1 in the Min/Max fields for Section A. (Question 1 is compulsory and
the rules applied by the Min/Max function only apply to Optional questions), and 2 in
the Min/Max fields for Section B.
Example 3
There are 2 sections, each of 4 questions. 3 questions must be answered but at least 1
question must be taken from each section i.e. 1 from A and 2 from B, OR 2 from A
and 1 from B.
23
Fig 4.5
The validation is set up as in Fig 4.5 above. 2 sections of 4 optional questions, each
with a weight of 33.33. The Min/Max fields reflect that either 1 or 2 questions can be
taken in each section.
To apply the rule that a maximum of 3 questions are to be taken overall, click on Save
to return to the Assessment Component screen and enter 3 in the Max Qst field.
4.1.2 Best of Function
This is used when a student can discard low marks. For example, 4 questions may be
answered in an exam but only the top 3 marks are carried into the calculation.
N.B. When setting up reference data either the Best Of function OR the Min/Max
function can be used: they cannot be used together.
24
Fig 4.6
In example 1 (Fig 4.6), there are 2 sections, each of 4 questions. At least one question
must be taken from each section with the highest question from each counting
towards the final mark.
The weighting has been set to 50% (2 marks count in total) and the Best of Field has
been set to 1 for each section. Note that in this example questions are marked out of
20.
In example 2 (Fig 4.7) a student must answer 3 questions from 6. At least 1 question
must be taken from each section and the highest from each section plus the next
highest mark will count.
The weighting has been set to 33.33 (3 marks count in total) and the Best of field has
been set to 1 for each section. Finally, to reflect the fact that 3 answers will make up
the final exam mark, the Best of field has been set to 3 at component level.
In example 3 (Fig 4.8) there are 8 questions. Question 1 is compulsory and the 3
highest marks from the other questions attempted will count.
The weightings have been set to 25 (4 questions in total) and the Complsry flag for
question 1 has been set. Finally, the Best of field against section A has been set to 3.
This is because the Best of function only works for Optional questions.
25
N.B. Compulsory questions should be set up in reference data in isolation from the
Best of or Min/Max functions as shown in example 3 (Fig 4.8).
Fig 4.7
Fig 4.8
26
If required, it is also possible to add the initials of a marker for each question by use
of the Init1 and Init2 fields as in Fig 4.8. These initials will show in the spreadsheet
where question marks are entered (Fig 4.9).
4.2 Making changes to Exam Reference Data
Deletion of reference data at this level is possible by using the Delete Sections and
Delete Questions buttons. Users can delete data in the opposite order to which it was
added i.e. section C, followed by, B followed by A. A Question cannot be deleted if
marks for that question are present against students.
Extra questions or sections can be inserted after initial set-up by using the Add
Sections/Add Questions buttons, although this is not possible if examination marks
exist.
It is important therefore to ensure that the reference data is correct before adding
marks for exam questions.
4.3 Loading exam marks
In the sample reference data shown in Fig. 4.9 there are 6 questions of which 3 are to
be answered: question 1 is compulsory and any 2 others must be taken
Click on Component Marks – First Sitting and Search for unit code (in this
example GEO223 is entered in the Unit Code field and %10 in the Occur field). If
necessary use the next component icon to select the required component.
If the exams reference data was set up before creating the candidate lists click on the
Questions button. If the exams reference data was set up after the candidate list
creation, simply create the exams mark sheet by clicking on the Create Candidates
button. The Questions button will now be visible; click on this to access the mark
sheet (Fig 4.9).
Marks for exam questions have been entered for these students.
If the rules set up in the reference data have not been adhered to, a red asterisk will
show against the student. For example, student Addams has not got a mark for
question 1 which is compulsory, and student Alcock has only got marks for 2
questions when 3 should have been answered. Double clicking on the red asterisk
produces a pop-up with a message explaining why the student has not taken the
correct combination of questions.
Similarly, double clicking in the calc field produces a pop-up listing of marks used in
making this calculation, which is especially useful when the Best of function is used.
27
Fig. 4.9
It is important to note that the calculation will always take into account all the marks
entered for a student (unless, of course, the Best of function is used). For example, in
example 4.9 student Balmer has marks for 4 questions when only 3 should have been
answered, and so has the exaggerated calculated mark of 75.99. Because the reference
data has been set up correctly however, the red asterisk warns the user that this
student’s marks need checking.
If you need to refer to the exams questions reference data it is possible to view it by
clicking the View Ref Data button towards the top right hand side of the screen,
although to amend it you will need to return to Reference data menu. Clicking the
Exit icon returns the user to the mark sheet.
Finally, once the user is satisfied that everything is in order; clicking the Copy Quest
Mark button uploads the calculated mark from the mark sheet into the Agreed field
at the component level, which thus becomes the mark for the exam and is carried
forward into the calculation for the module grade.
Students with a red asterisk will NOT upload into the Agreed field however. It is left
to the user to decide how to mark these exceptions. For example, in the case of
student Balmer, by returning to the mark sheet the user may decide to delete one mark
which will then produce a calculation made on the correct number of marks (i.e.3).
Clicking the Copy Quest Mark for a second time will copy all the calculated grades
into the agreed mark again. For the other 2 exceptions the user may enter their own
mark into the agreed mark. For example, Gomez achieved a pass mark of 54.99 but
28
didn’t answer the compulsory question. It is likely that departments will apply a
penalty of their own choosing and whichever mark is arrived at can be entered into
the Agreed Mark.
The Agreed mark at component level can of course be overridden if required, but it
should be noted that whenever the Copy Quest Mark upload is clicked, any changes
made to the calculated mark at component level will be overwritten. However, any
Agreed mark manually entered for the asterisked students will be unaffected because
the Copy function only populates the agreed mark field if there is no asterisk.
29
5. Creating 2nd Sitting candidates
There are two ways of creating 2nd sitting candidates, depending on how the resit
assessment is to be administered. The first option allows the creation of a resit list for
each candidate that failed the first sitting, irrespective of which component or
components were failed. The second option allows the user to produce resit candidate
lists for each component failed, provided that the overall module was also failed.
5.1 Resits linked to a failed module
This method is used when all students who failed the module are to be linked to a
single resit event irrespective of which component(s) they may have failed.
From the Assessments menu select Reference Data, Assessment Components and
enter the module code. To ensure that the correct occurrence is selected it is
recommended that the wild card followed by the session is entered in the Occur box
(e.g. %10 in the example shown). Click Search.
Clicking the 2nd Sitting box of the first Assessment Component produces the pop-up
screen shown below.
Fig. 5.1
30
Ensure that the box labelled Create Candidates for Module Failed is ticked and
enter a description if required. Click Save. If the 2nd sitting event is to be an
examination it is possible to set up questions as described in section 4 by clicking on
the Sections box within the pop-up screen.
Once the reference data has been set up, the 2nd sitting candidates can be created by
returning to the Assessments menu and selecting Component Marks Second Sitting.
Enter the Unit code and occurrence as described above and perform the Search.
Clicking on the Create Candidates box will create the 2nd sitting candidates for this
sitting.
Alternatively, you can bulk create the 2nd sitting candidates for all your modules by
selecting Utilities, followed by Bulk Create 2nd Sit Cands.
5.2 2nd Sitting candidates linked to failed component
This method is used when a 2nd Sitting event is required for each component failed
(provided that the overall module result is F or NA for the 1st Sitting).
From the Assessments menu select Reference Data, Assessment Components and
enter the module code. To ensure that the correct occurrence is selected it is
recommended that the wild card followed by the session is entered in the Occur box
(e.g. %10 in the example shown).Click Search.
Clicking the 2nd Sitting box of the first Assessment Component produces the pop-up
screen shown in Fig. 5.1 above.
Click in the Create Candidates for Module Failed box so that it is unticked and
click Save. If required a description can be entered. In addition exam questions can
also be set up by clicking Sections. (see Section 4).
Repeat this process for each of the 1st Sitting Assessment Components ensuring that
the Create Candidates for Module Failed box is unticked for each.
Once the reference data has been set up, the 2nd sitting candidates can be created by
returning to the Assessments menu and selecting Component Marks Second Sitting.
Enter the Unit code and occurrence as described above and click Search. Clicking on
the Create Candidates box will create the 2nd sitting candidates for this component.
Use the Next Component icon to move on to the next component and repeat.
Alternatively, you can bulk create the 2nd sitting candidates for all your modules by
selecting Utilities, followed by Bulk Create 2nd Sit Cands.
5.3 2nd Sitting Weightings
The marks from Sitting 1 will still be carried into the calculation for the 2nd sitting
grade as can be seen in Fig. 5.2. Clicking on the Sitting 2 Marks tab will open up the
screen to show sitting 2 data.
31
Fig 5.2
The mark obtained in the resit is 70 (assessment code GEO347-AUT-SEM-10-1R)
but the calculated grade is 55. This is because the mark of 40 from the 1st sitting
coursework has been included in the calculation. Depending on how the department
administers 2nd sitting exams, the weightings for each student may need to be
overwritten as described in Section 3.3. For example, if the 2nd sitting grade is to be
determined simply by the resit exam then the reference data should be changed as in
Fig 5.3 where the 2nd Sitting RUL ExWt has been set to 100, thus overwriting he 1st
sitting reference data (which had a 50/50 split between exam and coursework), and
Fig 5.4 where any components not needed for the 2nd sitting calculation have been set
to zero under RAC Wt2.
32
Fig 5.3
Fig 5.4
33
5.4 Copy 2st Sit Mark
Once the reference data has been set up correctly and marks are present for all the
components that make up a module, DAS calculates the module grade. At this point it
is still possible to amend component marks as the calculation will still take such
changes into account.
Once the user is satisfied that the weightings and marks are correct, the Copy 2nd Sit
Mark button can be clicked. This will populate the Grade and Outcm fields;
rounding up, or down, the 2 decimal places from the calculated grade. It will also cap
Level 2 and Level 3 modules at 40% (50 % for PG’s).You should then click Save. It
is still possible to manually overwrite module grades after the Copy process has been
carried out; for example a grade may be augmented to take into account extenuating
circumstances. If required a note could be entered to highlight this. N.B. If the Copy
2nd Mark button is clicked again, any manual changes will be overwritten, although a
pop up message will warn you of this.
5.5 Upload 2nd Sitting Grade to CIS
This is identical to the 1st sitting upload described on page 14 except that the 2nd
Sitting fields on the right hand side of the screen are used.
34
6. Degree Determination Report
This facility calculates the Final Degree classification for final year students and can
be accessed via the Assessments menu by selecting CIS Modules – Award Grades.
Detailed instructions in its use can be obtained from the Taught Programmes Office.
Occasionally it may prove necessary to discount some results (e.g. when there has
been a change of programme), or calculate a result obtained at Level 3 as a level 2
unit.
For the Degree Determination report to take these exceptions into account when
calculating the final classification users should select CIS Modules_Unit results by
candidate and enter the SRN or name of the student concerned. Execute the query
and click the Amend Level box.
In Fig. 6.1 it can be seen that GEO206 has been taken twice, once in 2009 and again
in 2010, however only one grade is expected to count towards the final classification.
This is the mark obtained in 2010. However this is to be calculated as a Level 2 and
not a Level 3 module.
Fig 6.1
Firstly, by clicking the Ignore in calculation box against the AUT SEM 09
occurrence, the report will exclude this result. Secondly, by clicking the box on the
35
right of the Registration Code for calculation field it is possible to select another
Level of study (in this case Period B) at which the grade of 40% will be calculated.
This report can be printed off and provides detailed information for each student. In
some cases however, departments may wish to download this data into spreadsheets
so that the data can be presented in a format of their own choosing. To do this, select
Option12 – Departmental Assessments in CIES and then Option 4 Degree Prediction
Summary.
36
7. Scaling of Marks
Currently this facility is available only at component level and where Exam Question
data exists. It allows users to scale up or down either an examination paper or an
individual exam question.
7.1
Scaling a Component
To do this access the component marks screen in the usual way (either first or second
sitting) and click on the Scale Component box in the top block. The pop-up shown in
Fig 7.1 will appear.
Fig. 7.1
Enter the scaling factor and select the Method (either Percent or number of marks)
and click OK. A Confirmation pop-up will appear; again click YES if you wish to
continue. The marks in the Calc field will then be scaled by the appropriate factor and
the Scaled box in the top block will now be ticked warning the user that the
component has been scaled.
37
7.2 Scaling a question
To do this, access the Questions Recording screen by clicking the Questions box in
Component Marks. Select the question to be scaled by double clicking the first mark
box under that question heading (in the example shown the box with an entered mark
of 45). The pop-up box shown in Fig. 7.2 will appear, again asking the user to enter
both the scaling factor and method.
Fig.7.2
Click OK and click and then click the confirmation if you wish to continue. The
marks will now be scaled in the Calc field. All marks for the question scaled will be
highlighted in a different colour and the question number will be marked by ** as
shown in Fig. 7.2. Double clicking in the Calc field for a given candidate will also
give details of how the mark has been calculated. See Fig 7.3.
To remove the scaling from an individual question simply click one of the highlighted
marks to access the pop-up, use the mouse to highlight the factor and delete this, and
click the arrow on the right of the scaling method and click on the “blank” under
38
percent. Click OK. To remove scaling from a component, click the Scale Component
box to access the pop-up and repeat the process described above.
Fig 7.3
39
APPENDIX A
The University of Sheffield
Student Services Department
How to upload UG Award recommendations in
the Corporate Information System (CIS)
This method to upload UG award recommendations (degree classifications) using
CIS directly, replaces the previous file transfer protocol (ftp) method for uploading
files of award recommendations onto CIS. This new method can be used equally by
departments who use the Departmental Assessments System (DAS) and by those
departments who do not use DAS.
Before carrying out this procedure, departments should have uploaded/confirmed all
module results on CIS for their final year undergraduate students, and degree award
recommendations should have been discussed and agreed by departmental
Examination Boards.
Login to CIS
Open your web browser (e.g. Internet Explorer) and go to the University Home
Page (www.shef.ac.uk).
Log into MUSE with your Username and password.
Click on the Staff Applications tab. Locate the Corporate Information System
section on the screen. Click on CIS.
Log in to CIS with your Username and Password.
Select Applications > Student > Assessments from the CIS menu bar.
Select Results > Upload UG Award from the CIS menu bar. The SDEP0031
"Upload Award Class" screen will display
n.b. If you are a DAS user you can also access the same screen by selecting
Applications > Departmental and then Assessments > CIS Modules > Upload
UG Award.
Display Student Cohort
Enter data in the relevant query fields to locate the correct student cohort.
e.g. 'Prog' = ECNU02, 'Occur' = %09, 'Period' = C
Click on the Execute Query icon in the CIS toolbar. A list of students in the
relevant cohort will be displayed in the Registrations block.
Ensure that the value in the 'Credits' field is correct. If not select the correct
value.
i.e. 240 credits for 3 year Bachelor degrees, 360 credits for 4 year Integrated
Master degrees, 280 credits for 4 year Bachelor degrees with a language
year abroad.
Do Calculation
40
Click on the Do Calculation button.
This will populate the various fields under the main column areas 'Calculation 1',
'Calculation 2' and 'Combined'.
The Preliminary Classifications for Calculation 1, Calculation 2 and the Combined
Classification are displayed. Where these Preliminary Classifications fall into the
borderline range, then a red asterisk indicates a Borderline Classification.
The default sort order for the student cohort list is by surname. If desired, you
can resort the list by selecting a different field from the Sort Option drop down
list. Sorting is possible by name, by registration number, by the Calculation 1
mean or by the Combined Classification. To retain the calculated figures in all
the fields, tick the 'Auto Calculation' box prior to re-sorting.
Copy Award
Click on the Copy Award button to copy the 'Combined Prelim Class' values into
the 'Award Class' field.
This will copy the degree classification values calculated for the Combined
Preliminary Classification into the 'Award Class' field as follows:
Values in 'Combined
Prelim' Class
1
1*
2.1
2.1*
2.2
2.2*
3
3*
Pass
Pass*
Fail
Fail*
Board
* asterisk flagged in red
Copied to
'Award Class'
1
2.1
2.2
3
P
F
The following example shows what the CIS screen would look like at this stage.
41
'Combined
Class' copie
'Award Clas
Not copied:
Combined
Classificatio
is Borderlin
Not copied:
Student has
not obtaine
enough cre
As indicated in the table and screen above, a blank will be left in the 'Award Class'
field for a student following 'Copy Award' processing, if any of the following
circumstances apply:
o
o
o
The 'Combined Prelim Class' field is Borderline, i.e. a red asterisk is
displayed
The 'Combined Prelim Class' displays a value of Board, i.e. the Combined
Classification cannot be calculated from Calculation 1 and Calculation 2
(and the Examination Board will have had to agree an award
recommendation based on all the evidence before them and which best
reflects the student's overall performance).
The student has not obtained the correct number of credits as indicated
in the 'Credits Obtnd' field.
For each student where the 'Award Class' field is blank, now manually enter into
the 'Award Class' field, the award recommended by the departmental
Examination Board following their discussions and agreement about borderline
candidates etc.:
The UG award recommendation codes that can be entered into the 'Award Class'
field include:
Code
Interpretation
1
First Class Honours Degree
2.1
Second Class Division One Honours Degree
2.2
Second Class Division Two Honours Degree
3
Third Class Honours Degree
P
Pass (i.e. Ordinary Degree or Unclassified Sub-degree Qualification,
e.g. ADV DIP)
42
F
Fail
H
Unclassified Honours Degree (for programmes in the Faculty of
Medicine only)
M
Merit (for Diploma programmes in TILL only)
D
Distinction (for Diploma programmes in TILL only)
n.b. where an Examination Board has very exceptionally agreed an award
recommendation that is different to the classification indicated by the
methodology contained in the General Regulations for First Degrees, i.e. where
the Board is invoking Regulation 41 and will seek Faculty confirmation to do this,
a classification that has been automatically calculated and loaded into the
'Award Class' field can be overwritten.
You can save the information displayed on screen at this stage, by clicking the
Save icon in the CIS toolbar, and come back to this screen later for further
manipulation if necessary.
Upload Award
When you are satisfied all the information is complete, click on the Upload
Award button.
The award recommendation data will be "uploaded" onto CIS, and all other
updating on CIS will be automatically carried out on the students' records, i.e.
creating the attainment, applying end dates and applying the correct Registration
status, e.g. SC (Successful Completion), FAIL (FINAL), etc.
The 'Upload Date' in the top right hand corner of the CIS screen will be
automatically populated and stored on the CIS student records.
Once the data has been uploaded any attempt to run the upload process again
will check if the data has already been uploaded.
Note that records with a blank Award Class are not uploaded and students with
an existing Registration Status of FAIL (FINAL), WH (FINAL), NA (FINAL), DE
(FINAL) are not uploaded, i.e. the upload process rejects these.
Further Information/Error Messages
The 'Units' button next to each student in the cohort list, will call the ‘Unit Results by
Candidate’ screen (SSTU5801) in 'query only' mode, where all unit results for an
individual student can be viewed if necessary.
Double click the mouse button on the 'Surname' field, to display a box giving a
summary of the classification calculation information for the student.
Double click the mouse button on the 'Title' field (programme title) to display a box
showing any error
43