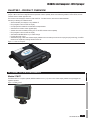
1
IC18 SPRAYER
JOB COMPUTER
U S E R
Software version 1.06
M A N U A L
COPYRIGHTS
© 2012 TeeJet Technologies. All rights reserved. No part of this document or the computer programs described in it may be reproduced,
copied, photocopied, translated, or reduced in any form or by any means, electronic or machine readable, recording or otherwise, without
prior written consent from TeeJet Technologies.
TRADEMARKS
Unless otherwise noted, all other brand or product names are trademarks or registered trademarks of their respective companies or
organizations.
LIMITATION OF LIABILITY
TEEJET TECHNOLOGIES PROVIDES THIS MATERIAL “AS IS” WITHOUT WARRANTY OF ANY KIND, EITHER EXPRESSED OR
IMPLIED. NO COPYRIGHT LIABILITY OR PATENT IS ASSUMED. IN NO EVENT SHALL TEEJET TECHNOLOGIES BE LIABLE FOR
ANY LOSS OF BUSINESS, LOSS OF PROFIT, LOSS OF USE OR DATA, INTERRUPTION OF BUSINESS, OR FOR INDIRECT,
SPECIAL, INCIDENTAL, OR CONSEQUENTIAL DAMAGES OF ANY KIND, EVEN IF TEEJET TECHNOLOGIES HAS BEEN ADVISED OF
SUCH DAMAGES ARISING FROM TEEJET TECHNOLOGIES SOFTWARE.
To ensure optimal use of the equipment, please read this manual thoroughly. Please contact TeeJet Technologies Customer Support or an
authorized TeeJet Technologies dealer if additional support is required.
RESPONSIBILITY FOR USE OF THIS PRODUCT
Regarding responsibility for use of this product, we refer to our sales and delivery terms which states:
Product Usage
Any use of the product is at the sole risk of the buyer. The buyer is therefore not entitled to any form for compensation caused by, for
example, any of the following:
►Disturbance to/from any electronic services or products that do not conform to the standards for CE marketing;
►Missing or poor signal coverage or a succession hereof from external transmitters/receivers used by the buyer; Functional faults which
apply to or from a PC-program or PC equipment not delivered by the seller;
►Faults that may arise from the buyers’ negligence to react to warnings and fault messages from the product or that can be traced to
negligence and/or absent constant control of the work carried out in comparison to the planned job.
When implementing any new equipment the buyer must take great care and pay attention. Any doubts as to the correct operation/use
should result in contacting the seller’s service department.
ISOBUS Job Computer : IC18 Sprayer
Table of Contents
CHAPTER 1– PRODUCT OVERVIEW
OPTIONAL SYSTEM COMPONENTS
1
1
CHAPTER 2 – GETTING STARTED
3
START UP
3
APPLICATION MODE
3
PAGE LAYOUT AND NAVIGATION
4
Home Screen....................................................................................................................................................................4
Transport Mode................................................................................................................................................................4
Operation Mode................................................................................................................................................................5
Main Setup Mode..............................................................................................................................................................6
Main Setup Menu Icons and Section Overviews....................................................................................................7
CHAPTER 3 – MAIN SETUP IN SPRAYER MODE
Main Setup Screen................................................................................................................................................................................. 8
Master Screen.......................................................................................................................................................................................... 9
Home Screen............................................................................................................................................................................................ 9
8
COUNTERS10
JOB PARAMETERS
OVERVIEW
Trip Counters..........................................................................................................................................................................................11
Active Trip Counter............................................................................................................................................... 11
Area Counter........................................................................................................................................................ 11
Distance Counter.................................................................................................................................................. 11
Time Counter........................................................................................................................................................ 11
Volume Counter.................................................................................................................................................... 11
Campaign Counters.............................................................................................................................................................................11
Area Counter........................................................................................................................................................ 11
Volume Counter.................................................................................................................................................... 11
Time Counter........................................................................................................................................................ 11
Total Counters........................................................................................................................................................................................12
Area Counter........................................................................................................................................................12
Volume Counter....................................................................................................................................................12
Time Counter........................................................................................................................................................12
Export Counters....................................................................................................................................................................................12
13
GETTING STARTED
Active Trip Counter...............................................................................................................................................13
Preset Application Rates.......................................................................................................................................13
Nozzle...................................................................................................................................................................13
MACHINE14
98-05204 R1 UK
APPENDIX
OPERATION
SETUP
Filling.........................................................................................................................................................................................................14
Actual Content......................................................................................................................................................14
Density..................................................................................................................................................................14
Density Factor.......................................................................................................................................................15
Full Tank................................................................................................................................................................15
Operation................................................................................................................................................................................................15
Application Rate Step...........................................................................................................................................15
Speed Source.......................................................................................................................................................15
Simulated Speed..................................................................................................................................................15
Implement Parameters.......................................................................................................................................................................16
Section Width..................................................................................................................................................................16
Boom Section Width.............................................................................................................................................16
One-Touch Equal Widths......................................................................................................................................16
i
ISOBUS Job Computer : IC18 Sprayer
Nozzle Preset Setup.......................................................................................................................................................16
Nozzle Preset.......................................................................................................................................................16
Nozzle Type..........................................................................................................................................................16
Nozzle Size...........................................................................................................................................................16
Low Pressure Limit...............................................................................................................................................17
High Pressure Limit..............................................................................................................................................17
Reference Flow.....................................................................................................................................................17
Reference Pressure..............................................................................................................................................17
Factory Settings....................................................................................................................................................17
Regulation Parameters...................................................................................................................................................18
Valve Calibration, Rough......................................................................................................................................18
Valve Calibration, Fine..........................................................................................................................................18
Nozzle Spacing.....................................................................................................................................................18
Regulation Mode...................................................................................................................................................18
Calibrations.............................................................................................................................................................................................19
Implement Speed Sensor...............................................................................................................................................19
Manual Calibration................................................................................................................................................19
Automatic Calibration............................................................................................................................................19
Flow Sensor....................................................................................................................................................................19
Manual Calibration................................................................................................................................................19
Automatic Calibration............................................................................................................................................19
Alarm Configurations..........................................................................................................................................................................20
CAN Speed Source Timeout.................................................................................................................................20
Active Trip Count Information................................................................................................................................20
Tank Content Minimum.........................................................................................................................................20
OEM...........................................................................................................................................................................................................20
USER INTERFACE
21
Use Preferred VT..................................................................................................................................................21
This IC18..............................................................................................................................................................21
Pair with Switchbox...............................................................................................................................................21
Pair with BoomPilot ECU......................................................................................................................................21
Currently Paired With Information.........................................................................................................................21
Show Number on Soft Key...................................................................................................................................21
Sprayer Number (FI).............................................................................................................................................21
COMMUNICATION22
HELP22
OVERVIEW
GETTING STARTED
Diagnostic...............................................................................................................................................................................................23
Test Input........................................................................................................................................................................23
Test Output.....................................................................................................................................................................23
Liquid Valve PWM Dutycycle................................................................................................................................23
Liquid Valve Direction...........................................................................................................................................23
Master Valve.........................................................................................................................................................23
Section Valves......................................................................................................................................................23
VT Data...........................................................................................................................................................................24
TECU..............................................................................................................................................................................24
About........................................................................................................................................................................................................24
SETUP
CHAPTER 4 – OPERATION MODE
25
AUTOMATIC OR MANUAL REGULATION MODE
25
OPERATION MODE OVERVIEW
26
OPERATION
Keys Descriptions...........................................................................................................................................................27
Section and Icon Descriptions........................................................................................................................................27
Master Screen........................................................................................................................................................................................28
Home Screen..........................................................................................................................................................................................29
APPLICATION RATE OPTIONS
APPENDIX
ii
www.teejet.com
29
ISOBUS Job Computer : IC18 Sprayer
Target Rate Percentage Increase/Decrease.................................................................................................................................29
Regulation Valve Manual Open/Close..........................................................................................................................................29
Target Rate..............................................................................................................................................................................................30
With Switchbox...............................................................................................................................................................30
Without Switchbox..........................................................................................................................................................30
BOOM SECTIONS
31
On/Off Sections from the Left or Right.........................................................................................................................................31
Without Switchbox..........................................................................................................................................................31
With Switchbox...............................................................................................................................................................31
Start/Stop Application........................................................................................................................................................................32
Without Switchbox..........................................................................................................................................................32
With Switchbox...............................................................................................................................................................32
Master Stop Key....................................................................................................................................................................................32
With Switchbox...............................................................................................................................................................32
INFORMATION KEY
33
TRANSPORT MODE
34
35
APPENDIX B - UNIT SPECIFICATIONS
37
APPENDIX
OPERATION
SETUP
GETTING STARTED
OVERVIEW
APPENDIX A - FACTORY SETTINGS & RANGES
98-05204 R1 UK
iii
ISOBUS Job Computer : IC18 Sprayer
CHAPTER 1– PRODUCT OVERVIEW
Congratulations on the purchase of your new IC18 ECU built on the ISOBUS architecture. This IC18 unit has the capability of either
sprayer or NH3 control when integrated into the implement of either capability. When used within the guidelines of this manual, the IC18
controller will be a reliable application tool.
This manual covers the Sprayer functions of the IC18 ECU. For NH3 functions, see manual number 98-05230.
Use with your existing VT or Matrix® 570VT
• Works seamlessly and displays on any ISOBUS VT
• Easy navigation menu and data rich display
• IC18 Sprayer ECU suitable for use with NH3 and liquid fertilizer
• Automatic boom section control upgrade option
• Variable rate control available providing your VT has GPS and task control capability
• Easy navigation menu and data rich display
• Add additional ISOBUS ECUs as your needs change
• Provides basic rate control
• Standardized plugs, cables and software simplify installation and connectivity and result in true “plug and play” technology. IC18 ECU
resides on the implement, reducing hardware in the cab
Figure 1-1: IC18 Job Computer
OVERVIEW
OPTIONAL SYSTEM COMPONENTS
Matrix 570VT
APPENDIX
OPERATION
SETUP
GETTING STARTED
The Matrix 570VT is a simple to operate, ISOBUS-certified 14.5 cm (5.7″) colour touch screen display suitable for bright daylight and
nighttime operation
Figure 1-2: Matrix 570VT
98-05204 R1 UK
1
ISOBUS Job Computer : IC18 Sprayer
Switchbox
Manual section control with remote master capibility. The switchboxs are available in two configurations.
►9 sections output or 8 sections and a master output
►6 sections output or 5 sections and a master output
Figure 1-3: Switchboxes
IC18 Spreader Electronic Control Unit
Use with your existing VT or the Matrix 570VT for dry product application
• Works seamlessly and displays on any ISOBUS VT
• Easy navigation menu and data rich display
• Add additional ISOBUS ECUs as your needs change
• Provides basic rate control or variable rate if the connecting VT has variable rate task control capabilities
• Standardized plugs, cables and software simplify installation and connectivity and result in true “plug and play” technology. IC18 ECU
resides on the implement, reducing hardware in the cab
Figure 1-4: IC18 Spreader Electronic Control Unit
OVERVIEW
BoomPilot Electronic Control Unit for IC18
GETTING STARTED
BoomPilot (automatic boom section control) is possible in combination with software built into the IC18 Sprayer/NH3 Electronic Control Unit
(ECU). The ECU should be combined with the appropriate cable to interface with your BoomPilot system, spray controller and/or spraying
machine for quick and easy installation. Electronic Control Units and their related cables are designed to control as many boom sections as
the spray controller to which they are connect, up to a maximum of 9 boom sections.
Figure 1-5: BoomPilot Electronic Control Unit
SETUP
OPERATION
APPENDIX
2
www.teejet.com
ISOBUS Job Computer : IC18 Sprayer
CHAPTER 2 – GETTING STARTED
• A firm touch is required when selecting a screen icon.
• Settings are NOT automatically saved when selected. The ACCEPT KEY
must be selected to save the setting. Select the
ESCAPE KEY
to escape without saving settings and return to the previous menu.
• The console needs to be cycled off and back on when changing or attaching equipment to the system.
• The menu structure on your display might vary from the one displayed in this User Manual depending on the virtual terminal being
used.
START UP
Power is continuously supplied to the job computer. The virtual terminal will give access to the job computer options and operation.
Figure 2-1: Master Screen - Crop Sprayer Mode
Matrix VT Setup Key
IC18 Crop Sprayer
Other options as available on
ISOBUS system
Master Screen Key
APPLICATION MODE
The IC18 job computer is programed to be either a sprayer or NH3 applicator. This setting has been established before leaving the factory,
but it can be changed after purchase with assistance from TeeJet Technologies Customer Service or your local dealer through the OEM
setup menu options.
Figure 2-2: Crop Sprayer
Cnt
1
470 l
1.14 ha
+
5.0
1 3 11
42
l/ha
OVERVIEW
km/h
5%
GETTING STARTED
0
bar
Figure 2-3: NH3 Applicator
0.0
km/h
+
5%
1 3 11
0.00 ha
0.0
SETUP
0 kgN
kg/min
0.0
0.0
kg/ha
kg/ha
OPERATION
1
This manual discusses specifically the functions and options in Crop Sprayer Mode. See the specific IC18 NH3 User Manual for functions
and options in NH3 Mode.
98-05204 R1 UK
3
APPENDIX
Cnt
ISOBUS Job Computer : IC18 Sprayer
PAGE LAYOUT AND NAVIGATION
The Master Screen gives access to the systems currently available on your VT. From the Master Screen, the Home Screen gives access
to the IC18’s available functions.
Home Screen
The Home Screen gives access to the IC18’s available functions: Operation Mode, Transport Mode and Main Setup.
Figure 2-4: Home Screen - Crop Sprayer Mode
Operation Mode
Regulation Mode
Current selection, Auto/Manual, is highlighted with a green dot.
Transport Mode
Main Setup Mode
Toggle Preset Target Rate
Master Screen Key
Quick View
Information Based on Current Active Trip
Transport Mode
While in Transport Mode, all operation functions are locked off and cannot be activated.
Figure 2-5: Transport Mode
Home Key
Speedometer
OVERVIEW
Master Screen Key
GETTING STARTED
SETUP
OPERATION
APPENDIX
4
www.teejet.com
ISOBUS Job Computer : IC18 Sprayer
Operation Mode
Information on the Operation screen will vary depending on the parameters set by the user and the OEM.
Figure 2-6: Operation Mode Screen Overview
Applied Area
Applied Volume
Active Trip Count Number
Alert Warning
Cnt
5
Speed/Application Information
5.2
Remaining Tank Contents
km/h
Density
Flow Based or Pressure Based
4070 l
Target Rate Indicator
Application Rate
Target Rate Percentage Increase/Decrease
1.14 ha
Cnt
5
5.2
1 3 11
mph
4 0 7 0+ g a5 %l
2 8 35
Cnt
l/ha
50.0
1 3 11
mph
Boom Sections
Nozzle Type
Recommended Pressure Range
1.14 ac
+
5%
4070 gal
1.14 ac
283
+
5%
283
G PA
1 3 11
G PA
0
bar
1
Current Working Pressure
0
psi
1
Current Pressure Rate
ECU ID Number
0
psi
NH3 Mode Active
Auto/Manual Mode Key
1.14 ha
5.2
1 3 11
mph
4 0 7 0+ g a5 %l
2 8 35
Cnt
l/ha
50.0
1 3 11
mph
1.14 ac
+
5%
4070 gal
283
G PA
1 3 11
1.14 ac
+
5%
283
G PA
Manual Mode Regulation Valve Close Key
(flow and pressure will decrease)
Home Key
Next Page Key
Start/Stop Key
Left Boom Sections On Key
Master Stop Key
Left Boom Sections Off Key
Information Key
Right Boom Sections On Key
Tank Filling Shortcut Key
0
bar
1
0
psi
1
0
psi
Right Boom Sections Off Key
Master Screen Key
OVERVIEW
5
Toggle Preset Target Rates Key
Automatic Mode Boost/Step % Increase Key
Automatic Mode Boost/Step % Decrease Key
GETTING STARTED
km/h
Cnt
SETUP
5.2
4070 l
OPERATION
5
APPENDIX
Cnt
Manual Mode Regulation Valve Open Key
(flow and pressure will increase)
98-05204 R1 UK
5
ISOBUS Job Computer : IC18 Sprayer
Main Setup Mode
The main setup menu contains six options. Each of these options either directly access settings or additional menus.
Figure 2-7: Main Setup Screen
Home Key
Back One Screen
Forward One Screen
Up One Selection
Down One Selection
Master Screen Key
The table below outlines the additional menus and directs you to the setup pages for further information.
MAIN SETUP MODE MENU STRUCTURE
|
Counters
(pages 10-12)
|
|
|
|
|
Job Parameters
(pages 13)
Machine
(pages 14-20)
User Interface
(pages 21)
Communication
(pages 22)
Help
(pages 22-24)
Trip
Filling
Campaign
Operation
Total
Diagnostic
Section width
About
Implement parameters – Nozzle preset setup
Export Counters
Implement speed sensor – Calibrations
Flow sensor
Regulation parameters
Alarm configurations
OEM
– Sensor presence
Implement parameters
Valve setup
Tank setup
Regulation details
Clear total counters
NOTE: Select functions may not be visible due to OEM settings, available
equipment or sensors.
OVERVIEW
GETTING STARTED
SETUP
OPERATION
APPENDIX
6
www.teejet.com
The OEM setup menu is password protected and the settings in this menu are
directly related to the fitted OEM equipment. Refer to the IC18 Sprayer/NH3
OEM Setup Manual for information regarding OEM settings.
ISOBUS Job Computer : IC18 Sprayer
Main Setup Menu Icons and Section Overviews
Figure 2-8: Enter Selection Screens
Selection
Slide Bar with Decrease One Selection
and Increase One Selection Arrows
Accept Key
Escape Key
Number Pad
Close Number Pad Key
Range Maximum
Range Minimum
Zoom In Key
Zoom Out Key
Open Number Pad Key
Available Selections
Up One Selection
Accept Key
Escape Key
Description
Section or Icon
Description
Accept Key
Accepts the new selection
Slider
Close Number Pad
Key
Minimizes the number pad
Slide to the left to decrease or right to
increase the selection
Slide Bar
Decrease One
Selection Arrow
Decreases the setting
Down One
Selection Arrow
Highlights the selection below
Selects the setting by pressing and
releasing on the slide bar or pressing and
dragging the Slider to a designated value.
Range for a specific setting is displayed on
the slide bar.
Escape Key
Escapes without saving changes
Up One Selection
Arrow
Highlights the selection above
Increase One
Selection Arrow
Increases the setting
Zoom In
Key
Narrows slide bar range. Gray = maximum
zoom level.
Number Pad
Use the numbers to set the selection value
Open Number Pad
Key
Maximizes the number pad
Zoom Out
Key
Expands slide bar range. Gray = minimum
zoom level.
Selection
Displays the current or new selection
APPENDIX
OPERATION
SETUP
Section or Icon
GETTING STARTED
OVERVIEW
Down One Selection
98-05204 R1 UK
7
ISOBUS Job Computer : IC18 Sprayer
CHAPTER 3 – MAIN SETUP IN SPRAYER MODE
Main Setup Mode configures the Counters, Job Parameters, Machine, User Interface, Communication and Help options.
NOTE:The menu structure on your display might vary from the one displayed in this User Manual depending on the virtual
terminal being used.
Figure 3-1: Main Setup Screen
Home Key
Back One Screen
Forward One Screen
Up One Option
Down One Option
Master Screen Key
MAIN SETUP MODE MENU STRUCTURE
|
Counters
(pages 10-12)
|
|
|
|
|
Job Parameters
(pages 13)
Machine
(pages 14-20)
User Interface
(pages 21)
Communication
(pages 22)
Help
(pages 22-24)
Trip
Filling
Diagnostic
Campaign
Operation
About
Total
Implement parameters – Section width
Export Counters
Implement speed sensor
Flow sensor
– Calibrations
Alarm configurations
Nozzle preset setup
Regulation parameters
OEM
The OEM setup menu is password protected and the settings in this menu are directly related to the fitted OEM equipment. Refer to the IC18 Sprayer/NH3 OEM Setup
Manual for information regarding OEM settings.
Main Setup Screen
OVERVIEW
GETTING STARTED
SETUP
OPERATION
NOTE: Settings are NOT automatically saved when selected. The ACCEPT KEY must be selected to save the setting. Select the
ESCAPE KEY to escape without saving settings and return to the previous menu.
To access the Main Setup screens:
1. Select IC18 SPRAYER KEY
from the Master Screen.
2. Select MAIN SETUP SCREEN KEY
from the Home Screen.
3. Select from:
►Counters – used to provide an overview of various system counters:
◄ Trip – used to display information regarding area, distance, time and amount applied.
◄ Campaign – used to display information regarding area, amount applied and time for all trips
◄ Total – used to display information regarding area, amount applied, and time for all activity
◄ Export Counters – allows counter information to be exported in HTML or CSV format
►Job Parameters – used to configure application settings including active trip counter, application rate and nozzle type.
►Machine – used to configure machine settings:
◄ Filling – establishes the amount of material remaining in the tank and the density of that material.
◄ Operation – establishes Application Rate Step, Speed Source, and Simulated Speed
◄ Implement Parameters – establishes the Section Width, Nozzle Preset Setup and Regulation Parameters
◄ Calibrations – establishes either manual or automatic settings of the sensors
◄ Alarm Configurations – establishes alarms for CAN Speed Source Timeout, Active Trip Count Information mode and Tank
Content Minimum
◄ OEM – The OEM setup menu is password protected and the settings in this menu are directly related to the fitted OEM
equipment. Refer to the OEM Setup Manual for information regarding OEM settings.
APPENDIX
8
www.teejet.com
ISOBUS Job Computer : IC18 Sprayer
►User Interface – used to allow the operator to select the system virtual terminal (VT), switchbox pairing, BoomPilot ECU pairing and
soft key numbering as well as view serial numbers and ECU identification numbers:
►Communication – used to establish the IC18's ability to communicate with an external computer:
►Help – allows the operator to choose between Diagnostics and the About screen:
◄ Diagnostic – used to troubleshoot input/output of the controller (sensor or actuator).
◄ About – used to provide information on the console such as software version, build number, etc
NOTE: The menu structure on your display might vary from the one displayed in this User Guide depending on the virtual terminal being
used. This User Guide will display all possible options.
Master Screen
The Master Screen gives access to the systems currently available on your VT.
• To view the Master Screen options, select MASTER SCREEN KEY
in bottom right corner of any screen.
Figure 3-2: Master Screen
Master Screen Key on Main Setup Screen
Home Screen
APPENDIX
OPERATION
SETUP
GETTING STARTED
OVERVIEW
The Home Screen gives access to the IC18’s available functions: Operation Mode, Transport Mode and Main Setup.
• To view the Home Screen, select HOME KEY
in the top right corner of any screen.
Figure 3-3: Home Screen
Home Key on Main Setup Screen
98-05204 R1 UK
9
ISOBUS Job Computer : IC18 Sprayer
COUNTERS
The Counters Menu provides an overview of various system counters including Trip Counters, Campaign Counters and Total Counters.
From this screen one can also Export Counters.
|
Counters
|
Job Parameters
MAIN SETUP MENU
|
Machine
|
User Interface
|
Communication
Trip
Campaign
Total
Export Counters
1. From the Main Setup Screen , select COUNTERS.
2. Select from:
►Trip – used to display information regarding area, distance, time and amount
applied
►Campaign – used to display information regarding area, amount applied and
time for all trips
►Total – used to display information regarding area, amount applied, and time
for all activity
►Export Counters – allows counter information to be exported in HTML or
CSV format
NOTE: Settings are NOT automatically saved when selected. The
ACCEPT KEY
must be selected to save the setting. Select the
ESCAPE KEY
to escape without saving settings and return to
the previous menu.
OVERVIEW
GETTING STARTED
SETUP
OPERATION
APPENDIX
10
www.teejet.com
Figure 3-4: Counters
|
Help
ISOBUS Job Computer : IC18 Sprayer
Trip Counters
Trip Counters displays information regarding area, distance, time and amount
applied. The trip that is active is displayed/active on the Operations Screen.
Figure 3-5: Trip Counters Menu
Active Trip Counter
One of up to ten (10) Active Trip Counters can be selected to view the desired trip
information. The trip that is “active” is displayed/active on the Operation Screen.
• To select the Active Trip Counter, use the number pad or slide bar.
• To clear the Trip Counters, select TRASH CAN KEY
. A confirmation
screen will be displayed.
Area Counter
Displays applied coverage area for the selected Active Trip.
Distance Counter
Displays distance traveled for the selected Active Trip.
Figure 3-6: Confirm Counter Clearance
Time Counter
Displays time traveled for the selected Active Trip.
Volume Counter
Displays volume of material applied during the selected Active Trip.
Campaign Counters
Campaign Counters display information regarding area, amount applied and time
for all trips.
• To clear the Campaign Counters, select TRASH CAN KEY
. A confirmation Figure 3-7: Campaign Counters
screen will be displayed.
Area Counter
Displays total applied coverage area for all trips.
Volume Counter
Displays total volume of material applied during all trips.
OVERVIEW
Time Counter
Displays total time traveled for all trips
APPENDIX
OPERATION
SETUP
GETTING STARTED
Figure 3-8: Confirm Campaign Clearance
98-05204 R1 UK
11
ISOBUS Job Computer : IC18 Sprayer
Total Counters
Total Counters displays information regarding area, amount applied, and time for all Figure 3-9: Total Counters
activity. Total Counters can only be cleared in the OEM menu.
Area Counter
Displays total applied coverage area for all trips.
Volume Counter
Displays total volume of material applied during all trips.
Time Counter
Displays total time traveled for all trips.
Export Counters
Export Counters allows counter information to be exported in HTML or CSV format. Export Counters
HTML files can be viewed from an internet browser. CSV files can be viewed as
Excel sheets.
• To export a HTML file, select HTML KEY
. A confirmation screen will be
displayed.
• To export a CSV file, select CSV KEY
. A confirmation screen will be
displayed.
For data transfer, an optional cable is required. Contact your local dealer for
additional information.
Figure 3-10: Confirm Export Counters
OVERVIEW
GETTING STARTED
SETUP
OPERATION
APPENDIX
12
www.teejet.com
ISOBUS Job Computer : IC18 Sprayer
JOB PARAMETERS
Job Parameters configures application settings. Options include Active Trip Counter, Preset Application Rates and Nozzle.
|
Counters
1. From the Main Setup Screen
MAIN SETUP MODE MENU STRUCTURE
|
Job Parameters
|
Machine
|
User Interface
, select JOB PARAMETERS.
|
Communication
|
Help
Figure 3-11: Job Parameters
NOTE: Settings are NOT automatically saved when selected. The
ACCEPT KEY
must be selected to save the setting. Select the
ESCAPE KEY
to escape without saving settings and return to
the previous menu.
Active Trip Counter
Active Trip Counter selects one of up to ten (10) active trip counters to view the
desired trip information. The trip that is “active” is displayed/active on the Operation
Screen.
• To select the Active Trip Counter, use the number pad or slide bar.
NOTE: The selected trip counter will have all data modified (added too) when
additional operations are activated. If current trip counter is not cleared,
the new data will be added to the existing data.
Preset Application Rates
Preset Application Rates define up to five (5) target rates of product being applied per hectare/acre. These settings will set the same for all
active trips. Target rates set to "0.0" will not be in included in the TOGGLE PRESET TARGET RATE options
on the Operation Screen
or Home Screen.
• To select the Application Rate, use the number pad or slide bar.
APPENDIX
OPERATION
SETUP
GETTING STARTED
OVERVIEW
Nozzle
Nozzle selects the nozzle type. This setting will set the same for all active trips. The five (5) available nozzle types are preset under
Main --> Machine --> Implement Parameters --> Nozzle Preset Setup.
• To select the Nozzle type, select an option from the drop down menu or use the UP/DOWN ARROWS to highlight the option.
98-05204 R1 UK
13
ISOBUS Job Computer : IC18 Sprayer
MACHINE
Machine configures machine settings. Options include Filling, Operation, Implement Parameters, Calibrations,
Alarm Configurations and OEM.
|
Counters
MAIN SETUP MODE MENU STRUCTURE
|
Job Parameters
|
Machine
|
User Interface
|
Communication
|
Help
Filling
Operation
Implement parameters – Section width
Implement speed sensor – Calibrations
Flow sensor
Alarm configurations
Nozzle preset setup
Regulation parameters
OEM
The OEM setup menu is password protected and the settings in this menu are directly related to the fitted OEM equipment.
Figure 3-12: Machine
1. From the Main Setup Screen , select MACHINE.
2. Select from:
►Filling – establishes the amount of material remaining in the tank and the
density of that material.
►Operation – establishes Application Rate Step, Speed Source, and
Simulated Speed.
►Implement Parameters – establishes the Section Width, Nozzle Preset
Setup and Regulation Parameters.
►Calibrations – establishes either manual or automatic settings of the
sensors.
►Alarm Configurations – establishes alarms for CAN Speed Source Timeout,
Active Trip Count Information mode and Tank Content Minimum
►OEM – The OEM setup menu is password protected and the settings in this
menu are directly related to the fitted OEM equipment. Refer to the OEM Manual for information regarding OEM settings.
NOTE: Settings are NOT automatically saved when selected. The ACCEPT KEY
must be selected to save the setting. Select the
ESCAPE KEY
to escape without saving settings and return to the previous menu.
Filling
OVERVIEW
Filling establishes the amount of material remaining in the tank and the density of
that material.
Different options will be available depending on if a tank sensor is installed.
NOTE: The size of the tank is established in the OEM menu. This is the number
that will repopulate when the Full Tank Key
is pressed.
GETTING STARTED
SETUP
Actual Content
Actual Content displays the current volume of content in the tank. The volume can
be manually adjusted.
• To adjust the volume, use the number pad or slide bar.
NOTE: When a tank sensor is active, the actual content can not be changed
manually.
OPERATION
Density
Density establishes the density of the material being applied. It can be set to either
“fertilizer” or “water”.
• To select the Density, select an option from the drop down menu or use the
UP/DOWN ARROWS to highlight the option.
NOTE: If “Fertilizer” is selected, a Density Factor option appears.
APPENDIX
14
www.teejet.com
Figure 3-13: Filling
ISOBUS Job Computer : IC18 Sprayer
Density Factor
Density Factor establishes the weight per volume setting based on the type of fertilizer being used.
• To select the Density Factor, use the number pad or slide bar.
The fertilizer’s ability to flow is affected by a number of factors. These factors may vary with each batch and it may change due to weather
(humidity, etc.). In order to accommodate for this, the job computer uses a density factor to compensate for the nature of the applied
fertilizer.
Full Tank
Full Tank returns the Actual Content volume value to the maximum volume of the tank
• To reset the Actual Content value, press the FULL TANK KEY
.
Operation
Operation establishes Application Rate Step, Speed Source and Simulated Speed. Figure 3-14: Operation
Application Rate Step
Application Rate Step is the percent of increase/decrease “boost” of the active
application rate at which the product is being applied.
• To select the percentage, use the number pad or slide bar.
Speed Source
Speed Source selects whether to base the machine’s speed on input from the
CAN, an Implement or a Simulated source. Selecting “Implement” will allow for
the configuration of pulses per 100 meters. Selecting “Simulated” will allow for
simulated speed to be entered using the “Edit Value” option. Selecting “CAN”
allows for speed being supplied by the ISOBUS CAN (usually from the TECU) to be
used.
• To select the Speed Source, select an option from the drop down menu or use Figure 3-15: Step % Increase/Decrease
Cnt
5
4070 l
1.14 ha
the UP/DOWN ARROWS to highlight the option.
NOTE: If “Implement” is selected, refer to the Calibrations section for further
5.0
283
instructions.
+
l/ha
OVERVIEW
28
SETUP
GETTING STARTED
bar
OPERATION
1 3 11
APPENDIX
Simulated Speed
Simulated Speed establishes a speed to be used when using the Simulated Speed
source.
• To select the Simulated Speed, use the number pad or slide bar.
km/h
5%
98-05204 R1 UK
15
ISOBUS Job Computer : IC18 Sprayer
Implement Parameters
Implement Parameters establishes the following:
►Section Width – sets the spraying width during application.
►Nozzle Preset Setup – where up to five (5) sets of nozzle options can be
established to set the nozzle type, size, low/high pressure limit, reference flow
and reference pressure.
►Regulation Parameters – where adjustments to the valve calibration, nozzle
spacing and regulations mode can be established.
Figure 3-16: Implement parameters
Section Width
Section Width sets the spraying width during application.
Boom Section Width
Section Width establishes the boom sections widths for each boom section.
Figure 3-17: Section Width
NOTE: The number of boom sections available is set on the Implement
Parameters screen in the OEM section.
• To select the Boom Section Width, use the number pad or slide bar.
When the section widths are changed, power must be cycled in order to update the
TASC Controller on the VT.
One-Touch Equal Widths
One-Touch Equal Widths sets all boom section widths to the value set for #1 Boom
Section.
• To set all boom section widths, press the EQUAL SECTION WIDTH KEY
.
Nozzle Preset Setup
Nozzle Preset Setup establishes up to five (5) sets of nozzle options setting the
nozzle type, size, low/high pressure limit, reference flow and reference pressure.
Figure 3-18: Nozzle Preset Setup
Nozzle Preset
Each one of up to five (5) Nozzle Presets can be selected to establish different sets
of nozzle options.
• To select the Nozzle Preset set, use the number pad or slide bar.
OVERVIEW
GETTING STARTED
Nozzle Type
Nozzle Type sets whether the nozzle’s size will be selected from a general section
of established tips or a optional user tip.
• To select the Nozzle Type, select an option from the drop down menu or use
the UP/DOWN ARROWS to highlight the option.
Nozzle Size
Nozzle Size sets the nozzle from a list of established sizes (see chart below) or
from a optional user tip.
• To select the Nozzle Size, select an option from the drop down menu or use
the UP/DOWN ARROWS to highlight the option.
SETUP
Established Nozzle Sizes and Colors
OPERATION
Size
Color
Size
Color
01
Orange
05
Brown
015
Green
06
Grey
02
Yellow
08
White
025
Purple
10
Light Blue
03
Blue
15
Light Green
04
Red
20
Black
APPENDIX
16
www.teejet.com
Figure 3-19: Nozzle Size on the Operating Screen
ISOBUS Job Computer : IC18 Sprayer
When “General” nozzle type is selected and a establised nozzle size is selected, the Low Pressure Limit, High Pressure Limit, Reference
Flow and Reference Pressure fields will be automatically set with the standard settings for the specific nozzle chosen. These setting can
be manually adjusted.
Low Pressure Limit
Low Pressure Limit establishes the limit for the lowest allowed operating pressure for the selected nozzle type.
• To select the Low Pressure Limit, use the number pad or slide bar.
High Pressure Limit
High Pressure Limit establishes the limit for the highest allowed operating pressure Figure 3-20: Recommended Pressure Range bar and
High Pressure Limit on the Operating
for the selected nozzle type.
Screen
• To select the High Pressure Limit, use the number pad or slide bar.
Reference Flow
Reference Flow establishes the value for the volume applied over a specific time
(GPM or LPM).
• To select the Reference Flow, use the number pad or slide bar.
Reference Pressure
Reference Pressure establishes the pressure value at which the application rate is
true (ISO=2 bar).
• To select the Reference Pressure, use the number pad or slide bar.
IMPORTANT! Always refer to the nozzle pressure values recommended by the
supplier when setting the nozzle pressure.
Figure 3-21: Confirm Factory Settings
APPENDIX
OPERATION
SETUP
GETTING STARTED
OVERVIEW
Factory Settings
Factory Settings resets all nozzle settings to the default settings for the selected
nozzle size and type.
• To reset the Factory Settings, select FACTORY SETTINGS KEY
.A
confirmation screen will be displayed.
•
98-05204 R1 UK
17
ISOBUS Job Computer : IC18 Sprayer
Regulation Parameters
Regulation Parameters establishes adjustments to the valve calibrations, nozzle
spacing and regulations mode.
NOTE: Adjusting the Valve Calibration settings involves significant changes and
adjustments should therefore be made in small steps.
Figure 3-22: Regulation Parameters
Valve Calibration, Rough
Rough regulation value calibration allows you to regulate the setting of the
regulating valve to accommodate different application needs. Operating conditions
may necessitate a higher or lower response setting for the regulating valve. This
value adjusts the setting for coarse adjustments in relation to a large percentage
outside of the target application rate
►If the system is too slow in finding the correct rate, the values should be
increased.
►If the system is too unstable, the values should be decreased.
• To select the Valve Calibration, Rough, use the number pad or slide bar.
If your system is plumbed in a bypass mode, the valve setting number of 9 works very well in most applications
If your system is plumbed in a throttling mode, start with a valve setting number of 3 and adjust the number according to your application
requirements. Low flow situations will require a slower response time. Adjusting agitation volumes to accommodate the regulating valve to
work in a more fully open position allows for a faster response time, with little to no searching.
NOTE: This setting value can be adjusted to optimize system performance. If you notice that the valve seems to “search” for the
programmed application rate by cycling the pressure up and down continuously, reduce the number until the “searching” is
minimized or eliminated. Conversely, a higher number will increase the valve response time and “speed up” the rate of adjustment.
OVERVIEW
Valve Calibration, Fine
Fine regulation value calibration allows you to regulate the setting of the regulating valve to accommodate different application needs.
Operating conditions may necessitate a higher or lower response setting for the regulating valve. This digit adjsuts the setting for the fine
tune adjustment in relation to a small percentage close to the target application rate.
►If the system is too slow in finding the correct rate, the values should be increased.
►If the system is too unstable, the values should be decreased.
• To select the Valve Calibration, Fine, use the number pad or slide bar.
If your system is plumbed in a bypass mode, the valve setting number of 5 works very well in most applications.
If your system is plumbed in a throttling mode, start with a valve setting number of 3 and adjust the number according to your application
requirements. Low flow situations will require a slower response time. Adjusting agitation volumes to accommodate the regulating valve to
work in a more fully open position allows for a faster response time, with little to no searching.
NOTE: This setting value can be adjusted to optimize system performance. If you notice that the valve seems to “search” for the
programmed application rate by cycling the pressure up and down continuously, reduce the number until the “searching” is
minimized or eliminated. Conversely, a higher number will increase the valve response time and “speed up” the rate of adjustment.
GETTING STARTED
Nozzle Spacing
Nozzle Spacing establishes the distance between the nozzles on the boom.
• To select the Nozzle Spacing, use the number pad or slide bar.
Regulation Mode
Regulation Mode determines if the rate control is pressure based or flow based.
• To select the Regulation Mode, select an option from the drop down menu or use the UP/DOWN ARROWS to highlight the option.
SETUP
OPERATION
APPENDIX
18
www.teejet.com
ISOBUS Job Computer : IC18 Sprayer
Calibrations
Figure 3-23: Calibrations
Calibrations establishes either manual or automatic settings of the sensors.
NOTE: For specific calibration options to appear, a specific sensor needs to be
installed. Sensor availability is activated on the Sensor Presence screen in
the OEM section.
Implement Speed Sensor
The Implement Speed Sensor establishes the wheel pulses over a specified
distance. This value can be established manually or calibrated automatically.
Manual Calibration
Manual calibration establishes the pulses based on a user entered value.
• To select the Pulses per Distance, use the number pad or slide bar.
Automatic Calibration
Automatic calibration establishes the pulses using the automatic calibration
function.
• To calibrate the pulses per distance, select CALIBRATION KEY
.
• Follow the series of instructions displayed.
• Select the ACCEPT KEY
to complete the calibration
The counted wheel pulses will be displayed during the automatic calibration.
Figure 3-24: Implement Speed Sensor
Flow Sensor
The Flow Sensor establishes the pulses per gallon/liter. This value can be
established manually or calibrated automatically.
Manual Calibration
Manual calibration establishes the calibration and limits based on user entered
values.
• To select the Flow Meter Calibration, use the number pad or slide bar.
• To select the Low Limit, use the number pad or slide bar.
• To select the High Limit, use the number pad or slide bar.
Figure 3-25: Flow Sensor
APPENDIX
OPERATION
SETUP
GETTING STARTED
OVERVIEW
Automatic Calibration
If the number of pulses per gallon/liter for the flow meter is not known or to make
sure the value is correct, automatic calibration establishes the calibration and limits.
• To calibrate the flow sensor, select CALIBRATION KEY
.
• Follow the series of instructions displayed.
• Select the ACCEPT KEY
to complete the calibration
The pulses counted will be displayed during the automatic calibration.
An option to enter a Collected Volume is displayed if there is no calculated volume.
• To enter the Collected Volume, use the number pad or slide bar.
98-05204 R1 UK
19
ISOBUS Job Computer : IC18 Sprayer
Alarm Configurations
Alarm Configurations establishes alarms on or off as well as sets their trigger level. Figure 3-26: Alarm Configurations
CAN Speed Source Timeout
CAN Speed Source Timeout establishes how long the system can operate after the
CAN speed source input is lost before the alarm is triggered.
• To select the CAN Speed Source Timeout time, use the number pad or slide
bar.
Active Trip Count Information
Active Trip Count Information sets the associated alarm to on or off. This alarm is
only displayed at powered up. It tells the user which trip counter is active.
• To select the Active Trip Count Information mode, select an option from the
drop down menu or use the UP/DOWN ARROWS to highlight the option.
Figure 3-27: Machine to OEM
Tank Content Minimum
Tank Content Minimum establishes the minimum volume level at which an alarm
will sound. Without a Tank Sensor, the minimum is determined by calculating the
difference between the established actual tank content volume and the calculated
applied content volume. With a Tank Sensor, the minimum is directly related to the
sensor reading.
• To select the minimum volume, use the number pad or slide bar.
OEM
The OEM setup menu is password protected and the settings in this menu are
directly related to the fitted OEM equipment. To obtain an access code, contact
your local dealer or TeeJet Technologies Customer Service.
To access the OEM screens:
1.
2.
3.
4.
5.
6.
OVERVIEW
GETTING STARTED
From the Main Setup Screen , select MACHINE.
Select OEM.
Select the Access Code Entry Box to the right of the menu option.
Use the number pad or slide bar to enter the access code.
Select the ACCEPT KEY
to complete the unlock process
Select from:
►Sensor presence – used to establish sensors for Flow, Liquid Pressure, Fill
Flow and the Tank
►Implement parameters – used to establish the Sprayer Mode, Number of
Sections and Circulation
►Valve setup – used to establish the Regulation Valve Type, Section Valve
Behavior and Section Valve Type
►Tank setup – used to establish maximum and minimum tank content, Auto
Filling mode and Auto Filling Offset value
►Regulation details – used to adjust the control of the regulation valve
►Clear total counters – used to delete the Total Count system counter for
Area, Volume and Time back to the default settings
SETUP
NOTE: Settings are NOT automatically saved when selected. The
ACCEPT KEY
must be selected to save the setting. Select the
ESCAPE KEY
to escape without saving settings and return to
the previous menu. OEM
OPERATION
APPENDIX
20
www.teejet.com
Figure 3-28: OEM Unlock
ISOBUS Job Computer : IC18 Sprayer
USER INTERFACE
User Interface allows the operator to select the system virtual terminal (VT), switchbox pairing, BoomPilot ECU pairing and soft key
numbering as well as view serial numbers and ECU identification number.
|
Counters
1. From the Main Setup Screen
MAIN SETUP MODE MENU STRUCTURE
|
Job Parameters
|
Machine
|
User Interface
, select USER INTERFACE.
|
Communication
|
Help
Figure 3-29: User Interface
NOTE: Settings are NOT automatically saved when selected. The
ACCEPT KEY
must be selected to save the setting. Select the
ESCAPE KEY
to escape without saving settings and return to
the previous menu.
Use Preferred VT
Use Preferred VT sets the virtual terminal preference to either on or off. If “On” is
selected, the preferred VT will be used. If “Off” is selected, the system will arbitrarily
select which VT to use (if more than one VT is available on the ISOBUS CAN).
NOTE: This should always be set to "off" unless another VT is on the CAN bus.
• To set the Use Preferred VT mode, select an option from the drop down menu
or use the UP/DOWN ARROWS to highlight the option.
This IC18
Displays IC18's serial number and associated ECU identification number.
Figure 3-30: Sprayer Number
Pair with Switchbox
The pairing of a switchbox can be set to be done automatically, not at all or to a
specific switchbox ECU ID number on the CAN network.
• To set the Switchbox pairing, select an option from the drop down menu or use
the UP/DOWN ARROWS to highlight the option.
OVERVIEW
Pair with BoomPilot ECU
The pairing of a BoomPilot ECU can be set to be done automatically, not at all or to
a specific BoomPilot ECU ID number on the CAN network.
• To set the BoomPilot ECU pairing, select an option from the drop down menu
or use the UP/DOWN ARROWS to highlight the option.
GETTING STARTED
Currently Paired With Information
Displays the current ECU ID numbers for a paired switchbox or BoomPilot ECU.
• If no switchbox or BoomPilot ECU is on the system, "none" will be shown.
• If a specific switchbox or BoomPilot ECU has been chosen to be paired with
and it is not available on the system, "none" will be shown.
SETUP
Show Number on Soft Key
Show Number on Soft Key establishes if a user assigned identification number will
be visible on the Master Screen, Home Screen and Operation Screen.
• To set the Soft Key Number mode, select an option from the drop down menu
or use the UP/DOWN ARROWS to highlight the option.
NOTE: Typically used only if more than one (1) IC18 ECU is on the CAN bus.
If “Yes” is selected, a Sprayer Number (FI) option appears.
APPENDIX
OPERATION
Sprayer Number (FI)
Sprayer Number is the identification number referring specifically to the IC18 ECU
referenced under the "This IC18" information row on the User Interface screen.
• To set the Sprayer Number, use the number pad or slide bar.
98-05204 R1 UK
21
ISOBUS Job Computer : IC18 Sprayer
COMMUNICATION
Communication establishes the IC18's ability to communicate with an external computer.
|
Counters
1. From the Main Setup Screen
MAIN SETUP MODE MENU STRUCTURE
|
Job Parameters
|
Machine
|
User Interface
|
Communication
|
Help
Figure 3-31: Communication
, select COMMUNICATION.
HELP
The Help menu allows the operator to choose between Diagnostics and the display of information about serial number, CAN BUS
information, etc. These menus are typically accessed upon Customer Service personnel request only.
|
Counters
MAIN SETUP MODE MENU STRUCTURE
|
Job Parameters
|
Machine
|
User Interface
|
Communication
|
Help
Diagnostic
About
Figure 3-32: Help
OVERVIEW
1. From the Main Setup Screen , select HELP.
2. Select from:
►Diagnostic – used to troubleshoot input/output of the controller (sensor or
actuator).
►About – provides information on the console such as software version, build
number, etc.
GETTING STARTED
NOTE: Settings are NOT automatically saved when selected. The
ACCEPT KEY
must be selected to save the setting. Select the
ESCAPE KEY
to escape without saving settings and return to
the previous menu.
SETUP
OPERATION
APPENDIX
22
www.teejet.com
ISOBUS Job Computer : IC18 Sprayer
Diagnostic
Diagnostic is used to troubleshoot input/output of the controller (sensor or actuator). Figure 3-33: Diagnostic
►Test Input – displays the input high and low values on the installed sensors.
►Test Output – sets the Liquid Valve PWM Dutycycle percentage as well as if
Liquid Valve Direction, Master Valve, Fill Valve and Section Valves 1-9 are on or
off.
►VT – provides information regarding the virtual terminal controller.
►TECU – provides information regarding the TECU.
Test Input
Test Input displays the input high and low values on the installed sensors.
• To reset the sensors to "0",
select TRASH CAN KEY
.
Test Output
Figure 3-34: Test Input
Test Output sets the Liquid Valve PWM Dutycycle percentage as well as if Liquid
Valve Direction, Master Valve, Fill Valve and Section Valves 1-9 are on or off.
Liquid Valve PWM Dutycycle
Liquid Valve PWM Dutycycle is used to test the regulating valve at different
percentages of duty cycle.
• To set the Liquid Valve PWM Dutycycle, use the number pad or slide bar.
Liquid Valve Direction
Liquid Valve Direction is used to verify the option of the Liquid valve direction is
correct to a specific duty cycle.
• Set the Liquid Valve PWM dutycycle to the percentage to be tested.
• Change the Liquid valve direction to "on" and the liquid valve will open at the
specific dutycycle.
• Change it back to off and the valve will close.
Figure 3-35: Test Output
OVERVIEW
Master Valve
Master Valve is used to test if the Master Valve is operating correctly. If you
change the setting to "on", the valve will open, change it to "off" and the valve will
close.
• To set the Master Valve, select an option from the drop down menu or use the
UP/DOWN ARROWS to highlight the option.
APPENDIX
OPERATION
SETUP
GETTING STARTED
Section Valves
Section Valves is used to test if the section Valve is operating correctly. If you
change the setting to "on", the valve will open, change it to "off" and the valve will
close.
• To set the Section Valves, select an option from the drop down menu or use
the UP/DOWN ARROWS to highlight the option.
98-05204 R1 UK
23
ISOBUS Job Computer : IC18 Sprayer
VT Data
The Virtual Terminal (VT) menu provides information regarding the virtual terminal Figure 3-36: VT Data
controller (i.e., address version, etc.).
• If more terminals/controllers are used, switch between these by pressing the
GO TO NEXT VT KEY
.
• Press the DELETE OBJECT POOL KEY
to delete saved information on
the VT. This forces the VT to upload all information from the IC18 on the next
power cycle.
NOTE: Restart the IC18 Job Computer to implement and display changes.
TECU
The TECU is a control unit, residing on the tractor, that performs basic
functions such as power handling, speed info, etc. The TECU data are
displayed on this page.
Figure 3-37: TECU
About
The About screen provides information on the IC18 such as software version, build
number, etc. This information may become useful in case of technical support.
Figure 3-38: About
OVERVIEW
GETTING STARTED
SETUP
OPERATION
APPENDIX
24
www.teejet.com
ISOBUS Job Computer : IC18 Sprayer
CHAPTER 4 – OPERATION MODE
The Operation Screen accesses the working aspects of the IC18 including boom section control, rate control and trip/count/
application information.
NOTE: Settings are automatically saved when selected.
NOTE:The menu structure on your display might vary from the one displayed in this User Manual depending on the virtual
terminal being used.
AUTOMATIC OR MANUAL REGULATION MODE
Automatic regulation mode will automatically adjust the application rate based on the current speed in reference to the target
rate. The target rate can be adjusted using the Boost/Step % Increase/Decrease Keys
on the Operation Screen.
Preset Application Rates define up to five (5) target rates for product being applied per hectare/acre. These can be toggled
using the Toggle Preset Target Rate Key
on the Operation Screen or Home Screen.
Manual regulation mode will retain an established regulation valve setting regardless of speed. The regulation valve setting
can be adjusted using the Regulation Valve Open/Close Keys
on the Operation Screen.
If a switchbox is being used to control the boom sections, automatic or manual regulation mode can be set on the Operation Screen.
When using the IC18, not a switchbox, for boom section control, automatic or manual regulation mode needs to be
established on the Home Screen before entering Operation Mode.
1. On the Home Screen
or Operation Screen , establish Automatic Operation Mode or Manual Operation Mode by
pressing the AUTO/MANUAL KEY
so that the green dot is on AUTO (automatic) or the hand (manual) accordingly.
Auto/Manual Key on Operation Screen
1.14 ha
+
1 3 11
283
l/ha
0
bar
1
OVERVIEW
5.2
km/h
5%
GETTING STARTED
4070 l
SETUP
5
OPERATION
Cnt
APPENDIX
Figure 4-1: Auto/Manual Key on Home Screen
98-05204 R1 UK
25
ISOBUS Job Computer : IC18 Sprayer
OPERATION MODE OVERVIEW
Information on the Operation screen will vary depending on the parameters set by the user and the OEM.
Figure 4-2: Operation Mode Screen Overview
Applied Area
Applied Volume
Active Trip Count Number
Alert Warning
Cnt
5
Speed/Application Information
5.2
Remaining Tank Contents
km/h
Density
Flow Based or Pressure Based
4070 l
Target Rate Indicator
Application Rate
Target Rate Percentage Increase/Decrease
1.14 ha
Cnt
5
5.2
1 3 11
mph
4 0 7 0+ g a5 %l
2 8 35
Cnt
l/ha
50.0
1 3 11
mph
Boom Sections
Nozzle Type
Recommended Pressure Range
1.14 ac
+
5%
4070 gal
1.14 ac
283
+
5%
283
G PA
1 3 11
G PA
0
bar
1
Current Working Pressure
0
psi
1
Current Pressure Rate
ECU ID Number
0
psi
NH3 Mode Active
Auto/Manual Mode Key
Cnt
5
5.2
km/h
4070 l
Cnt
Manual Mode Regulation Valve Open Key
(flow and pressure will increase)
1.14 ha
5
5.2
1 3 11
mph
4 0 7 0+ g a5 %l
2 8 35
Cnt
l/ha
50.0
1 3 11
mph
1.14 ac
+
5%
4070 gal
283
G PA
1 3 11
1.14 ac
+
5%
283
G PA
Manual Mode Regulation Valve Close Key
(flow and pressure will decrease)
Home Key
Next Page Key
Start/Stop Key
Left Boom Sections On Key
Master Stop Key
Left Boom Sections Off Key
Information Key
Right Boom Sections On Key
Tank Filling Shortcut Key
0
bar
1
0
psi
OVERVIEW
1
0
psi
Right Boom Sections Off Key
Master Screen Key
Toggle Preset Target Rates Key
Automatic Mode Boost/Step % Increase Key
Automatic Mode Boost/Step % Decrease Key
GETTING STARTED
SETUP
OPERATION
APPENDIX
26
www.teejet.com
ISOBUS Job Computer : IC18 Sprayer
Keys Descriptions
Icon
Description
Home Key
Press to return to the Home Screen
Start/Stop Key
Press to start or stop application
Information Key
Press to toggle between display modes
Boost/Step Percentage
Increase/Decrease Keys
Press to establish the required boost percentage step, i.e. the step size, at which the
application rate is to increase/decrease with the boost function
Manual Mode Regulation
Valve Open Keys
Press
Press
Toggle Preset Target Rates
Key
Press to toggle between established target application rates
Auto/Manual Key
Press to toggle between automatic and manual application modes.
Automatic regulation mode will automatically adjust the application rate based on the current
speed in reference to the target rate.
Manual regulation mode will retain an established regulation valve setting regardless of speed.
Tank Filling Shortcut Key
Press for one-press access to the Tank Filling setup screen
Master Stop Key
Press to stop all application, close all regulation valves and change to manual regulation mode
Next Page Key
Press to toggle between soft key options
Boom Sections On/Off
Keys
to open the regulation valve
to close the regulation valve
Press to turn on sections to left
turn off sections from right
, turn off sections from left
, turn on sections to right
or
Description
Job Information
This information bar displays the active count number,
applied volume and applied area
Count Number
Displays the current active trip or job number
Applied Volume
Displays volume applied for the selected count number
Applied Area
Displays applied area for the selected count number
Cnt
1
0 l
0.00 ha
Displays vehicle speed or volume applied per minute or projected area per hour to be covered or
projected total area remaining to be covered depending upon which view is active.
The Information Key toggles
between display modes.
Remaining Tank Contents
Displays the remaining tank content
NOTE: If no tank sensor is fitted or the contents are not entered in the Tank Filling
Menu prior to spraying, Tank Contents may not display the correct amount.
Application Rate
Displays the actual application rate per hectare/acre
NOTE: When the Master is “On” the actual application rate per hectare/acre will be displayed.
When the Master is “Off” the target rate is displayed and the TARGET RATE ICON
appears
Alarm
OPERATION
Displays boost percentage step, i.e. the step size, at which the application rate is to
increase/decrease with the boost function
Displayed if an alarm condition is active
APPENDIX
Target Rate Percentage
Increase/Decrease
SETUP
Speed/Application Information
GETTING STARTED
Section or Icon
OVERVIEW
Section and Icon Descriptions
98-05204 R1 UK
27
ISOBUS Job Computer : IC18 Sprayer
Section or Icon
Description
Flow Based or Pressure Based
Icons
These symbols will only appear if both a flow sensor and a pressure sensor are installed.
Flow Based - displayed if a regulation is based on flow
Pressure Based - displayed if regulation is based on pressure.
Density
Displays a “D” to the left of the tank icon if the density is set to “Fertilizer” instead of water.
D
Boom Sections
Displays the active
and inactive
boom sections as well as if they are on
(spray is blue) or off
(spray is gray).
NOTE: The color on the boom sections indicates
the color of the selected nozzle type.
Circulation SC
If Circulation is installed and selected in the OEM Menu, “SC” (Semi Circulation) or “CC” (Full
Circulation) will be displayed.
CC
NH3 Mode Active
NH3
Displays if the unit is in NH3 mode.
Sprayer ID Number
Displays the soft key number assigned to the displayed IC18 ECU.
Nozzle Information
This information section displays the nozzle type, recommended
pressure range, current working pressure and high pressure limit.
28
bar
Nozzle Type
Displays the selected nozzle type
Recommended Pressure
Range
Displays the recommended pressure range for the selected nozzle (the
green area indicates the pressure range). The pressure range will change
depending upon the selected nozzle, working speed, etc.
IMPORTANT! ALWAYS REFER TO THE RECOMMENDED PRESSURE RANGE AS FAILURE
TO DO SO MAY RESULT IN UNEVEN SPRAY PATTERNS.
Current Working Pressure
Displays the current working pressure
NOTE: This pressure range should not exceed
the recommended pressure range.
IMPORTANT! ALWAYS REFER TO THE RECOMMENDED NOZZLE PRESSURE VALUES
WHEN SETTING NOZZLE PRESSURE.
Current Pressure Rate
Displays the current pressure to the nozzle
28
bar
OVERVIEW
Master Screen
GETTING STARTED
The Master Screen gives access to the systems currently available on your VT.
• To view the Master Screen options, select MASTER SCREEN KEY
in bottom right corner of any screen.
Figure 4-3: Master Screen
Master Screen Key on Operation Mode Screen
Cnt
1
0.0
km/h
0 l
1 3 11
0.00 ha
0
l/ha
SETUP
OPERATION
0
bar
APPENDIX
28
www.teejet.com
ISOBUS Job Computer : IC18 Sprayer
Home Screen
The Home Screen gives access to the IC18’s available functions: Operation Mode, Transport Mode and Main Setup.
• To view the Home Screen, select HOME KEY
in the top right corner of any screen.
Figure 4-4: Home Screen
Home Key on Operation Mode Screen
Cnt
1
0.0
km/h
0 l
1 3 11
0.00 ha
0
l/ha
0
bar
APPLICATION RATE OPTIONS
Target Rate Percentage Increase/Decrease
Target Rate Percentage Increase/Decrease Keys increase/decrease the
application target rate per the established percentage set in the Machine
Operation setup screen under Application Rate Step. Automatic regulation
mode will automatically adjust the application rate based on the current
speed in reference to the target rate. Preset Application Rates define up to
five (5) target rates of product being applied per hectare/acre. These can
be toggled using the Toggle Preset Target Rate Key
on the Operation
Screen or Home Screen.
• To adjust the Target Rate, press the BOOST/STEP % INCREASE/
DECREASE KEYS
.
Figure 4-5: Target Rate Percentage Increase/
Decrease
Cnt
1
0 l
0.00 ha
+
0.0
km/h
1 3 11
5%
25
l/ha
0
bar
0.0
km/h
1 3 11
OVERVIEW
0 l
0.00 ha
0
l/ha
GETTING STARTED
1
0
bar
SETUP
Cnt
OPERATION
The regulation valve setting can be adjusted using the Regulation Valve
Open/Close Keys
on the Operation Screen. Manual regulation
mode will retain an established regulation valve setting regardless of
speed.
• To adjust the regulation valve, press the REGULATION VALVE
OPEN/CLOSE KEYS
.
Figure 4-6: Regulation Valve Manual Open/Close
APPENDIX
Regulation Valve Manual Open/Close
98-05204 R1 UK
29
ISOBUS Job Computer : IC18 Sprayer
Target Rate
Preset Application Rates define up to five (5) target rates of product being applied per hectare/acre. These settings will set the same for
all active trips. Target rates set to “0.0” will not be included in the toggle preset target rate options
on the Operation Screen or Home
Screen.
If a switchbox is being used to control the boom sections, current target application rate can be set on the Operation Screen.
When a switchbox is not connected to the system current target application rate needs to be established on the Home Screen before
entering Operation Mode.
With Switchbox
• To toggle between Target Application Rates, press the TOGGLE PRESET
TARGET RATE KEY
.
Figure 4-7: Target Application Rate
Cnt
1
470 l
1.14 ha
+
5.0
km/h
1 3 11
42
l/ha
0
bar
Without Switchbox
• To toggle between Target Application Rates, press the TOGGLE PRESET
TARGET RATE KEY
.
OVERVIEW
GETTING STARTED
SETUP
OPERATION
APPENDIX
30
www.teejet.com
5%
Figure 4-8: Target Application Rate
ISOBUS Job Computer : IC18 Sprayer
BOOM SECTIONS
Boom Sections displays the active
and inactive
boom sections as well as if they are on
(spray is blue) or off
(spray is gray).
Figure 4-9: Boom Sections
The color on the boom sections indicates the color of the selected nozzle type.
Cnt
Established Nozzle Sizes and Colors
Size
Color
Size
Color
01
Orange
05
Brown
015
Green
06
Grey
02
Yellow
08
White
025
Purple
10
Light Blue
03
Blue
15
Light Green
04
Red
20
Black
1
0 l
0.0
0.00 ha
0
1 3 11
km/h
l/ha
0
bar
On/Off Sections from the Left or Right
When a switchbox is not connected for boom section control, booms sections are
controlled using the Boom Sections On/Off Keys.
Without Switchbox
• To adjust the sections on the left, press the LEFT BOOM SECTIONS ON/OFF Figure 4-10: Left Off
Cnt
1
0 l
KEYS
.
• To adjust the sections on the right, press the RIGHT BOOM SECTIONS ON/
0.0
1 3 11
OFF KEYS
.
km/h
0.00 ha
16.5
l/ha
With Switchbox
If a switchbox is being used to control the boom sections, boom sections will be
controlled by the switchbox.
Figure 4-12: Operations Screen With Switchbox
0
bar
1 3 11
16.5
l/ha
0
l/ha
0
OVERVIEW
bar
Figure 4-11: Right Off
Cnt
0
bar
1
0.0
km/h
0 l
0.00 ha
16.5
1 3 11
Cnt
GETTING STARTED
1 3 11
0.00 ha
0.00 ha
l/ha
1
0.0
km/h
0 l
0.00 ha
0
bar
1 3 11
16.5
l/ha
SETUP
0.0
km/h
0 l
0.0
km/h
0 l
0
OPERATION
1
1
bar
APPENDIX
Cnt
Cnt
98-05204 R1 UK
31
ISOBUS Job Computer : IC18 Sprayer
Start/Stop Application
When a switchbox is not connected for boom section control, starting/stopping application is controlled using the Start/Stop Key.
Without Switchbox
• To start or stop the application, press the START/STOP KEY
.
Figure 4-13: Spraying Stopped
Cnt
With Switchbox
5.0
If a switchbox is being used to control the boom sections, starting/stopping
application will be controlled by the switchbox.
Figure 4-15: Operations Screen With Switchbox
Cnt
1
0.0
km/h
0 l
1 3 11
1
km/h
20 l
1 3 11
0.25 ha
25
l/ha
0.00 ha
25
l/ha
0
bar
Figure 4-14: Spraying Started
Cnt
1
5.0
0
bar
km/h
20 l
1 3 11
0.25 ha
27.8
l/ha
38
bar
Master Stop Key
OVERVIEW
Master Stop Key is used to stop all application, close all regulation valves and
change to manual regulation mode.
• To stop all application, close all regulation valves and change to manual
regulation mode, press the STOP KEY
.
This is designed to be like an emergency stop button.
Figure 4-16: Spraying In Progress
Cnt
1
5.0
km/h
20 l
1 3 11
0.25 ha
26.7
l/ha
With Switchbox
GETTING STARTED
If a switchbox is being used to control the boom sections, the Master Stop Key will
override the Master Switch on the switchbox and turn off any boom application in
progress.
38
bar
Figure 4-17: Master Stop Pressed
Cnt
1
SETUP
5.0
km/h
20 l
1 3 11
0.25 ha
25
l/ha
OPERATION
0
bar
APPENDIX
32
www.teejet.com
ISOBUS Job Computer : IC18 Sprayer
INFORMATION KEY
Information Key toggles the Speed/Application Information section on the Operation Screen between the display modes.
• Vehicle speed
• Volume applied per minute
• Projected area per hour to be covered based on current speed, target rate and tank level
• Projected total area remaining to be covered based on current target rate and current tank level
Figure 4-18: Information Key
Cnt
Vehicle speed
1
0 l
0.0
0.00 ha
0
1 3 11
km/h
Cnt
l/ha
1
0 l
0.00 ha
0
bar
0.0
Volume applied per minute
Cnt
1
0
1 3 11
LPM
0 l
l/ha
0.00 ha
0
Projected area per hour
0.0
ha/h
0
1 3 11
Cnt
bar
l/ha
1
0 l
0.00 ha
0
0
GETTING STARTED
OVERVIEW
l/ha
0
bar
SETUP
1 3 11
OPERATION
ha
bar
APPENDIX
Projected total area remaining
0.0
98-05204 R1 UK
33
ISOBUS Job Computer : IC18 Sprayer
TRANSPORT MODE
While in Transport Mode, all operation functions are locked off and cannot be activated. Transport Mode displays the speed in analogue
mode.
Figure 4-19: Transport Mode
Home Key
►Gives access to the IC18’s available functions: Operation Mode,
Transport Mode and Main Setup
Speedometer
Master Screen Key
►Gives access to the systems currently available on your VT
OVERVIEW
GETTING STARTED
SETUP
OPERATION
APPENDIX
34
www.teejet.com
ISOBUS Job Computer : IC18 Sprayer
APPENDIX A - FACTORY SETTINGS & RANGES
JOB PARAMETERS
Description
Factory Setting
Range
User Setting
Active Trip Counter
1
1 - 10
1
2
3
4
5
6
7
8
9
10
Preset Application Rate #1
Preset Application Rate #2
Preset Application Rate #3
0.0 GPA (US)
0.0 l/ha
0.0 GPA (UK)
0.0 - 700.6 (US)
0.0 - 6553
0.0 - 583.4 (UK)
#1
#2
#3
Preset Application Rate #4
#4
Preset Application Rate #5
#5
Nozzle
Established
under
Machine-->
Implement
Parameters-->
Nozzle Preset
Setup
MACHINE
Tank Filling
Range/Options
0 lbN (US)
0 kgN
0 lbN (UK)
0 - 12000
0 - 5443
0 - 12000
Density
Water
Water
Fertilizer
Density Factor
6.68 Lb/Gal (US)
0.80 kg/l
8.02 Lb/Gal (UK)
6.68 - 16.69 (US)
0.80 - 2.00
8.02 - 20.04 (UK)
Description
Factory Setting
Range/Options
Application Rate Step
5%
1 - 20
Speed Source
CAN
CAN
Implement
Simulated
Simulated Speed
0.0 mile/h / km/h
0.0 - 99.9
User Setting
OVERVIEW
Factory Setting
Actual Content
GETTING STARTED
Description
SETUP
Operation
APPENDIX
OPERATION
User Setting
98-05204 R1 UK
35
ISOBUS Job Computer : IC18 Sprayer
Implement Parameters
Regulation Parameters
Description
Factory Setting
Range
Valve Calibration, Rough
19
1 - 19
Valve Calibration, Fine
9
1-9
Nozzle Spacing
19.7 in
50 cm
1.0 - 787.4
1.0 - 1999.9
Regulation Mode
Flow Based
Pressure Based
Flow Based
Description
Factory Setting
Range
Section Width
118 in. / 300 cm
1 - 9999
Description
Factory Setting
Range/Options
Nozzle Preset
1
1-5
Nozzle Type
General
General
User Tip
Nozzle Size
025 (purple)
01 Orange
015 Green
02 Yellow
025 Purple
03 Blue
04 Red
05 Brown
06 Grey
08 White
10 Light Blue
15 Light Green
20 Black
Low Pressure Limit
14 psi
1.0 bar
0 - 369
0.0 - 25.5
High Pressure Limit
58 psi
4.0 bar
0 - 369
0.0 - 25.5
Reference Flow
0.25 GPM (US)
0.81 l/min
0.18 GPM (UK)
0.00 - 26.42 (US)
0.00 - 999.99
0.00 - 22.00 (UK)
Reference Pressure
40 psi (US)
2.00 bar
29 psi (UK)
1 - 1450 (US)
0.10 - 99.99
1 - 1450 (UK)
User Setting
Section Width
User Setting
Nozzle Preset Setup
OVERVIEW
GETTING STARTED
SETUP
OPERATION
APPENDIX
36
www.teejet.com
User Setting
ISOBUS Job Computer : IC18 Sprayer
Calibrations
Implement Speed Sensor
Description
Factory Setting
Range/Options
Pulses per Distance
0
0 - 33445
Description
Factory Setting
Range/Options
CAN Speed Source Timeout
4 sec
0 - 999
Active Trip Count Imformtaion
Off
Off
On
Tank Content Minimum
0 GAL (US)
0 liters
0 GAL (UK)
0 - 2641 (US)
0 - 9999
0 - 2199 (UK)
Description
Factory Setting
Range/Options
Use Perferred VT
Off
Off
On
Pair with Switchbox
Auto
Auto
None
<<specific ID #>>
Pair with BoomPilot ECU
Auto
Auto
None
<<specific ID #>>
Show Number on Soft Key
No
No
Yes
Sprayer Number (FI)
1
1-9
User Setting
Alarm Configurations
User Setting
USER INTERFACE
User Setting
Dimensions
19.05 x 18.42 x 6.03 cm
Weight
0.644kg
Connector
30 position Cinch pins. A1-K3
OVERVIEW
APPENDIX B - UNIT SPECIFICATIONS
90% non-condensing
Input/Output
ISO 11783 (ISOBUS)
Power Requirement
<9 watts @12 VDC
SETUP
Humidity
OPERATION
-40 to +85°C
APPENDIX
Operating
GETTING STARTED
30 position Cinch pins. L1-Y3
Environmental
98-05204 R1 UK
37
I C18 S P R AYE R
J O B CO M P U T E R
U S E R
Software Version 1.06
TeeJet Aabybro
Mølhavevej 2
DK 9440 Aabybro
Denmark
98-05204 R1 UK
© TeeJet Technologies 2012
M A N U A L