1
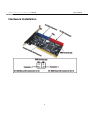
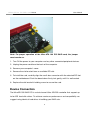
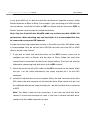
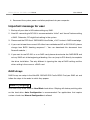
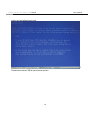
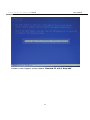
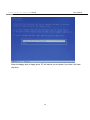
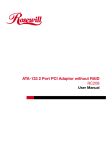
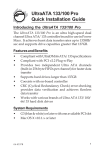
ULTRA ATA/133 PCI RAID Card RC200 User Manual ULTRA ATA/133 PCI RAID Card RC200 User Manual Contents Feature and benefits 3 System requirement 3 Package contents 3 Hardware installation 4 Device connection 5 Important message for user 7 RAID introduction RAID 0 7 RAID 1 9 RAID 0+1 12 Driver installation 13 Quick guide 14 Detail guide 21 2 ULTRA ATA/133 PCI RAID Card RC200 User Manual Features and Benefits Silicon Image SiI 0680 Compliant with UltraDMA6 ATA/133 specifications Compliant with PCI v2.2 Plug-n-Play Provides two independent Ultra ATA channels Full ACPI power management support Supports Ultra DMA 0-6 and Multi-word DMA 0-2 Supports hard drives larger than 137GB Supports RAID 0(Striping), RAID1(Mirroring) and RAID 0+1 (Mirror+Striping) CRC(Cyclical Redundancy Check) error-checking provides data verification and achieves flawless data transfer Achieves burst data transfer rates up to 133MB/sec Works with various brand of Ultra ATA 133/100/66/33 hard disk drives System Requirements Pentium-class computer with an available PCI slot Windows® 98SE/ME/NT 4.0/2000/XP/Server 2003 Package Contents UltraATA 133 PCI Adapter Driver CD User Manual ATA 133 IDE cable x2 3 ULTRA ATA/133 PCI RAID Card RC200 User Manual Hardware Installation 4 ULTRA ATA/133 PCI RAID Card RC200 User Manual Note: For proper operation of the Ultra ATA 133 PCI RAID card, the jumper must remain on. 1. Turn Off the power to your computer and any other connected peripheral devices. 2. Unplug the power cord from the back of the computer. 3. Remove your computer’s cover. 4. Remove the slot bracket from an available PCI slot. 5. To install the card, carefully align the card’s bus connector with the selected PCI slot on the motherboard. Push the board down firmly, but gently, until it is well seated. 6. Replace the slot bracket’s holding screw to secure the card. Device Connection The UltraATA 133 RAID PCI is a dual channel Ultra ATA/133 controller that support up to for IDE hard disk drives. To achieve maximum performance and compatibility we suggest using identical hard drives in building your RAID sets. 5 ULTRA ATA/133 PCI RAID Card RC200 User Manual In any given RAID set, it’s best to install the hard drives on separate channels, either Master to Master or Slave to Slave. For example, if you are setting up a RAID set with two hard drives, install the first drive on IDE1 as Master and the second on IDE2 as Master. Use the same concept for multiple hard drives. Note: Only the 40-pin/80-wire UltraATA cable can achieve hard disk UDMA 133 performance. When attaching only two hard drives it is recommended that they be connected on separate IDE channels. In order to achieve high-speed data transfer, a 40-pin/80-wire Ultra ATA ribbon cable is recommended. Also, do not mix Ultra ATA/133 hard disk with slow IDE or ATAPI devices on the same channel. 1. If you plan to install two hard disk drives on the IDE1 channel, make sure to configure one drive as Master and the drive as Slave. Follow the hard drive manufacturer’s instructions for the correct jumper setting. The same rule must be followed for connecting hard disk drives to the IDE2 channel. 2. Attach on end of the Ultra ATA cable to the IDE1 connector on the board. Make sure pin 1 on the cable (indicated by the stripe) matches pin 1 on the IDE1 connector. 3. Install the hard disk drive to your computer. Attach the end connector of the Ultra ATA cable to the end connector on the hard disk drive. Make certain that pin 1 on the cable(indicated by the stripe) matches pin 1 on the hard disk drive’s connector to IDE2 Note: The ribbon cable has two connectors. If you have one hard disk drive, connect it to the end connector of cable. If you have a second hard disk drive, connect it to the middle connector of cable. 6 ULTRA ATA/133 PCI RAID Card RC200 User Manual 4. Reconnect the system power and other peripherals to your computer. Important message for user 1. Backup all your data in HD before setting any RAID. 2. New HD connecting to RC-200 is recommended to “initial” and “format” before setting a RAID. Otherwise, PC might find nothing in the system. 3. Please read the PDF file of “SATARAID5-UserGuide_v1.40” for basic RAID knowledge. 4. If you want to boot from correct HD either from motherboard HD or RC-200 HD, please change from BIOS “booting sequence”.(You can download this document from Rosewill website.) 5. If you want to use RC-200 as a un-RAID card, please do not enter the RAID BIOS and set any RAID set at the beginning of booting. You can jump to P13 directly to complete the driver installation. The only different is ignoring the step of RAID setting and the driver setting is the same as a RAID card. RAID Arrays RAID Arrays are setup in the UltraATA 133 RAID PCI Card’s BIOS. Find your RAID set and follow the steps in the order in which they appear. RAID 0 (Striping) This RAID array to be used on New/Blank hard drives. Striping will destroy existing data on the hard drive. Auto Configuration is recommended. For applications that require custom chunk size, Manual Configuration is offered. 7 ULTRA ATA/133 PCI RAID Card RC200 User Manual For Manual Setup 1. As the BIOS boots press F3 when prompted to enter the RAID BIOS. 2. At the next screen press F2 to form a RAID set. 3. Press F1 to create RAID 0. 4. Choose the chunk size to be used in the RAID set(64 is recommended). 5. Choose the number of hard drives in your stripe set. 6. Assign the hard drives to be used. For optimal performance, alternate hard drives from separate IDE channels. 7. After all hard drives are entered, press Y to create the RAID set. 8. Press ESC to exit the RAID BIOS and boot your computer. 9. Continue with FDISK and FORMAT steps as if you are installing a conventional hard drive. For Auto Setup 1. As the BIOS boots press F3 when prompted to enter the RAID BIOS. 2. At the next screen press F2 to form a RAID set. 3. Press F1 to create RAID 0. 4. Press A for Auto Setup. 5. Enter the number of hard drives in the stripe set. 6. Press Y to accept the configuration. 7. Configure another RAID set or press ESC to reboot. 8. Continue with FDISK and FORMAT steps as if you are installing a conventional hard drive. 8 ULTRA ATA/133 PCI RAID Card RC200 User Manual RAID 1 (Mirror ) For Manual Setup *For New/Blank Hard Drives Recommended for all fresh HD without data. 1. As the BIOS boots press F3 when prompted to enter the RAID BIOS. 2. At the next screen press F2 to from a RAID set. 3. Press F2 to create RAID 1. In a Mirror set the source drive needs to be equal to or smaller than the destination drive. For optimal performance the source drive and destination drive should be on separate IDE channels. 4. Answer N to Auto Setup. 5. Assign Source drive, then assign Destination drive. 6. Assign N when asked to Copy from Source to Destination. 7. Answer Y to Enable Auto-Rebuild. 8. When asked Are you Sure? Press Y to accept. 9. Press ESC to exit the RAID BIOS and boot the computer. *For Existing Hard Drives with Data Recommended for one/two original HD with data to mirror with one/two fresh empty HD 1. As the BIOS boots press F3 when prompted to enter the RAID BIOS. 2. Press F2 to enter the RAID setup screen. 3. Press F2 to from RAID set 1. 4. Answer N to Automatic setup. 9 ULTRA ATA/133 PCI RAID Card RC200 User Manual 5. Assign Source drive, then assign Destination drive. 6. Press Y to copy from Source to Destination drive. 7. Press N to Offline copy. 8. Answer Y to enable Auto-Rebuild. 9. When asked Are You Sure?, press Y to accept. 10. Press ESC to exit the RAID BIOS. For Auto Setup *Use this setup on New/Blank hard drives only. 1. As the BIOS boots press F3 when prompted to enter the RAID BIOS. 2. Press F2 to create a RAID Set. 3. Press F2 to create Mirror Set. 4. Press Y to use Auto Setup. 5. Press Y to accept the configuration. 6. Configure another RAID set or press ESC to reboot. 7. Continue with FDISK and FORMAT steps as if you were installing a conventional hard drive. Creating a SPARE Drive When a hard drive failure occurs in a mirror set, the auto-rebuild feature enables a drive designated as SPARE to become the new member of the mirror set. 1. As the BIOS boots press F3 when prompted to enter the RAID BIOS. 2. Press F3 to create a spare drive. 3. Enter the drive number of the hard drive. 10 ULTRA ATA/133 PCI RAID Card RC200 User Manual 4. Press Y to confirm your choice. The spare drive will be created and listed as the last set. 5. Press ESC to exit the RAID BIOS. 6. The SPARE drive will not be seen by Windows, however, it remains in the background waiting to rebuild the mirror in the event of a hard drive failure. Rebuilding a Failed Mirror Set If a SPARE drive was not configured, the steps below will guide you in rebuilding a failed mirror set. 1. As the BIOS boots press F3 when prompted to enter the RAID BIOS. 2. Press F1 to dissolve an Array. 3. Press the number of the Mirrored array to be dissolved. 4. Press Y to confirm. Be sure you delete the correct Array. 5. Press ESC to exit the RAID BIOS, then immediately turn off the computer. 6. Replace the bad drive with a new hard drive of equal or greater size, then restart the computer. 7. During boot press F3 to enter the RAID BIOS. 8. Press F2 to create an Array. 9. Press F2 to create a Mirrored Array. 10. Answer N for automatic setup. 11. Enter the number of the Source (good) drive. 12. Enter the number of the Destination (new) drive. 13. Answer Y to copy from Source to Destination drive. 14. Answer N to decline Offline Copy. 11 ULTRA ATA/133 PCI RAID Card RC200 User Manual 15. Answer Y to enable Auto-rebuild. 16. When asked Are You Sure?, Press Y to accept. 17. Press ESC to exit the RAID BIOS and reboot the computer. RAID 0+1 (Mirror+Striping) This RAID array to be used on New/Blank hard drives only, striping destroys existing data on the hard drive. RAID 0+1 requires at least four hard drives. For Manual Setup 1. As the BIOS boots press F3 when prompted to enter the RAID BIOS. 2. At the next screen press F2 to from a RAID set. 3. Press F3 to create RAID 0+1. 4. Choose the chunk size by pressing the appropriate number key(64 is recommended). 5. Enter the first Source drive, then enter the second source drive. 6. Note: To optimize performance, configure both source drives to be from different channels and configure both destination drives to be from different channels. 7. Enter the first destination drive, then enter the second destination drive. 8. Enter Y to accept the RAID configuration. 9. On the following screen press ESC to exit the RAID configuration utility and reboot the computer. 10. Continue with FDISK and FORMAT steps as if you were installing a conventional hard drive. 12 ULTRA ATA/133 PCI RAID Card RC200 User Manual For Auto Setup 1. As the BIOS boots press F3 when prompted to enter the RAID BIOS. 2. Press F2 to create a RAID set. 3. Press F3 to create a Mirrored-Striped set. 4. Press A to Auto configure. 5. Press Y to accept the configuration. 6. Press ESC to reboot. 7. Continue with FDISK and FORMAT steps as if you were installing a conventional hard drive. Rebuilding a Failed RAID 0+1 Set The steps below will guide you in rebuilding a failed Mirror-Stripe set. 1. Replace the failed drive with one of identical size or of large capacity. Note: It is recommended to replace the bad drive with an identical drive, or with a drive of the same make. In all cases, the replacement drive must be of equal or larger capacity then the bad drive. 2. Start the computer and during boot press F3, when prompted, to enter the RAID BIOS. 3. Press F3 to assign a Spare drive. 4. Press the number corresponding to the new drive. 5. When asked Are You Sure?, Press Y to accept. 6. Press ESC to exit the RAID BIOS and reboot the computer. 7. Continue with FDISK and FORMAT steps as if you were installing a conventional hard drive. 13 ULTRA ATA/133 PCI RAID Card RC200 User Manual Deleting RAID Arrays 1. As the BIOS boots press F3 when prompted to enter the RAID BIOS. 2. Press F1 to dissolve a RAID set. 3. Enter the number of the RAID set to be deleted. 4. Answer Y to remove the RAID set. 5. Press ESC when finished to reboot. Resolving Conflicts If after a disk failure, the replacement disk was previously part of a RAID set (or used in another system), it may have conflicting metadata, specifically in reference to the drive connection information. If so, this will prohibit the RAID set from being either created or rebuilt, in order for the RAID set to function properly, this old metadata must be first overwritten with the new metadata. To resolve this, press F4, the correct metadata, including the correct drive connection information, will be written to the replacement disk. Driver Installation Quick guide: 1. If you want to add RC-200 to an existing OS, set up RC-2090 into a PCI slot. Enter the OS and install RC-200 with driver disk. In this case, PC is booting up by an existing HD connecting to motherboard. After RC-200 is installed complete, you can add HD and set the RAID by RAID BIOS. 2. If you want to add RC-200 to a new PC without any OS, you need to boot the OS from 14 ULTRA ATA/133 PCI RAID Card RC200 User Manual HD connecting to RC-200 instead of motherboard. Please follow below steps a~f to complete the installation. a. Put the driver (the driver must fit the OS you want to install to the HD) into a floppy disk and keep it in the floppy drive. b. Plug the HD. Turn on PC and press F3 to complete the RAID set. After you complete, save and left the setting. c. Inset Windows installation disk and start the windows installation. d. Press F6 at the beginning as the blue screen scanning. This will let PC boot from a HD controller instead of motherboard HD. e. Keep the floppy in floppy drive and follow the installation. Press “S” when the screen 15 ULTRA ATA/133 PCI RAID Card RC200 User Manual shows as the following picture. C Choose the correct OS for your future system. 16 ULTRA ATA/133 PCI RAID Card RC200 User Manual If below screen happens, please choose “Standard PC with C-Step i486”. 17 ULTRA ATA/133 PCI RAID Card RC200 User Manual Keep the floppy disk in floppy drive. PC will notice you as below if you take it off from the drive. 18 ULTRA ATA/133 PCI RAID Card RC200 User Manual The installation of RC-200 by floppy drive will be completed and the system will detect the HD which now plug on the card. After you install RC-200 successfully by floppy disk, installation will lead you back to the same screen as below and then press “enter” to left the setting. 19 ULTRA ATA/133 PCI RAID Card RC200 User Manual f. Once the system can find the HD connecting to RC-200, you can follow the normal steps to complete the Windows installation. 3. If you want to create a mirror with a HD with existing OS and a fresh HD, the data on existing HD will copy to fresh HD and boot as RAID 1. In addition, based on the above situation, if a bootable HD on the RC200 is desired. It means in this case you will boot our computer from RC200 instead of motherboard. Please follow the following instructions. a~d to complete the installation. a. Install RC-200 to an existing OS HD connecting to motherboard. b. After RC-200 install complete, turn off PC. Take the original HD off from motherboard and connect to RC-200. Take another fresh HD to connect to RC-200 20 ULTRA ATA/133 PCI RAID Card RC200 User Manual for setting mirror. c. Turn on PC and enter RAID BIOS to set mirror. Choose “Manual” and then select the original HD as the data source to complete mirror. The copy will take a long time depending on your HD capability. After data copy complete, save and left RAID BIOS. Important message: If you choose the wrong HD source at the step of “manual”, all your data will be lost. d. Reboot your PC and now you can enter your OS with RAID 1. (Please change the booting sequence in CMOS if necessary) Detail guide: For Windows® 98 SE *For New Windows® 98SE Installation Setup the RAID Array prior to Windows installation. 1. Install the board and follow Microsoft procedures to install Windows® 98 SE accordingly. 2. Once Windows has been installed, right click My Computer and click Properties. Select Device Manager tab. 3. Double click PCI RAID Controller listed under Other Devices. 4. Select Driver tab, then click Update Driver button. 5. Insert the driver CD into the CD-ROM Drive and click Next. 6. Select Search for the best driver for your device(Recommended) from the following dialog box and type 21 ULTRA ATA/133 PCI RAID Card RC200 User Manual 7. D:\RC-200\raid (Note: “D:\” represents the drive letter assigned to the CD-ROM drive you are using. If D is not letter of your CD-ROM drive, substitute D with the correct drive letter), then click Next. 8. Click Next again, then Finish. 9. Restart Windows to complete driver installation. *For Existing Windows® 98SE Installation 1. Setup the RAID Array prior to driver installation. 2. Install the board and boot up Windows® 98SE. 3. At the Add New Hardware Wizard, click Next. 4. Select Search for the best driver for your device and click Next. 5. Insert the driver CD into the CD-ROM Drive and click Next. 6. Select Search for the best driver for your device(Recommended) from the following dialog box and type 7. D:\RC-200\raid (Note: “D:\” represents the drive letter assigned to the CD-ROM drive you are using. If D is not letter of your CD-ROM drive, substitute D with the correct drive letter), then click Next. 8. Click Next again, then Finish. 9. Restart Windows to complete driver installation. For Windows® ME *For New Windows® ME Installation 1. Setup the RAID Array prior to Windows installation. 2. Install the board and follow Microsoft procedures to install Windows® ME accordingly. 22 ULTRA ATA/133 PCI RAID Card RC200 User Manual 3. Once Windows has been installed, right click My Computer and click Properties. Select Device Manager tab. 4. Double click PCI RAID Controller listed under Other Devices. 5. Select Driver tab, then click Update Driver button. 6. Insert the driver CD into the CD-ROM Drive and click Next. 7. Select Search for the best driver for your device(Recommended) from the following dialog box and type 8. D:\RC-200\raid (Note: “D:\” represents the drive letter assigned to the CD-ROM drive you are using. If D is not letter of your CD-ROM drive, substitute D with the correct drive letter), then click Next. 9. Click Next again, then Finish. 10. Restart Windows to complete driver installation. *For Existing Windows® ME Installation 1. Setup the RAID Array prior to driver installation. 2. Install the board and boot up Windows® ME. 3. At the Add New Hardware Wizard, click Next. 4. Select Search for the best driver for your device and click Next. 5. Insert the driver CD into the CD-ROM Drive and click Next. 6. Select Search for the best driver for your device(Recommended) from the following dialog box and type 7. D:\RC-200\raid (Note: “D:\” represents the drive letter assigned to the CD-ROM drive you are using. If D is not letter of your CD-ROM drive, substitute D with the correct drive letter), then click Next. 23 ULTRA ATA/133 PCI RAID Card RC200 User Manual 8. Click Next again, then Finish. 9. Restart Windows to complete driver installation. *To Verify Windows® 98SE/ME Installation 1. Right-click My Computer, then click Properties, Select Device Manager tab. 2. Double click SCSI Controllers, Silicon Image SiI 0680 ultra-133 Medley ATA Raid Controller should be listed. 3. Highlight Silicon Image SiI 0680 ultra-133 Medley ATA Raid Controller and click Properties. A message this device is working properly is displayed in the dialog box, the driver has been correctly installed. If any error message is displayed, remove Silicon Image SiI 0680 ultra-133 Medley ATA Raid Controller and restart your system. For Windows® NT 4.0 *For New Windows® NT 4.0 Installation A new installation requires a floppy disk for the driver installation. To make this floppy disk, copy the contents of the “RC-200\raid” folder, found on the driver CD, onto a blank floppy disk then follow the directions below. 1. Setup the RAID Array prior to Windows® NT 4.0 installation. 2. Install the board and follow Microsoft procedures to install Windows NT 4.0 accordingly. 3. At the Windows NT Setup screen, press F6 to specify and add the driver. 4. Press S, select Other, then press Enter. 5. Insert the driver diskette and press Enter. 6. Select Silicon Image SiI 0680 ultra-133 Medley ATA Raid Controller and press Enter. 24 ULTRA ATA/133 PCI RAID Card RC200 User Manual 7. Press Enter to continue and follow on-screen instructions to complete Windows NT 4.0 installation. *For Existing Windows® NT 4.0 Installation 1. Setup the RAID Array prior to driver installation. 2. Install the board and boot up Windows® NT 4.0 3. Double click My Computer/Control Panel/SCSI Adapters, then click Drivers tab. 4. Click Add… then Have Disk… 5. Insert the driver CD, type D:\RC-200\raid (Note: “D:\” represents the drive letter assigned to the CD-ROM drive you are using. If D is not letter of your CD-ROM drive, substitute D with the correct drive letter), then click OK 6. Highlight Silicon Image SiI 0680 ultra-133 Medley ATA Raid Controller and click OK. 7. Click OK, restart Windows NT 4.0 to complete driver installation. *To Verify Windows® NT 4.0 Installation 1. Double click My Computer/Control Panel/SCSI Adapters. 2. Highlight Silicon Image SiI 0680 ultra-133 Medley ATA Raid Controller from SCSI Adapters listing and click Properties. A message this device is working properly is displayed in the dialog box, the driver has been correctly installed. For Windows® 2000 *For New Windows® 2000 Installation A new installation requires a floppy disk for the driver installation. To make this floppy disk, 25 ULTRA ATA/133 PCI RAID Card RC200 User Manual copy the contents of the “RC-200\raid” folder, found on the driver CD, onto a blank floppy disk then follow the directions below. 1. Setup the RAID Array prior to Windows installation. 2. Install the board and follow Microsoft procedures to install Windows ®2000 accordingly. 3. Restart your system when prompted during Windows’ installation. 4. At the Windows 2000 screen, press F6 to install the driver. 5. Insert the driver diskette. Press S, then press Enter. 6. Select Silicon Image SiI 0680 ultra-133 Medley ATA Raid Controller and press Enter. 7. Press Enter to continue and follow on-screen instructions to complete installation. *For Existing Windows® 2000 Installation 1. Setup the RAID Array prior to driver installation. 2. Install the board and boot up Windows® 2000. 3. At the Found New Hardware Wizard, click Next. 4. Select Search for a suitable driver for my device(recommended) and click Next. 5. Check the option Specify a location and then click Next to continue. 6. Insert the driver CD into CD ROM Drive, and they type D:\RC-200\raid (Note: “D:\” represents the drive letter assigned to the CD-ROM drive you are using. If D is not letter of your CD-ROM drive, substitute D with the correct drive letter), then click OK. 7. Click Next again, then Finish. 8. Restart Windows to complete driver installation. 26 ULTRA ATA/133 PCI RAID Card RC200 User Manual For Windows® XP/Server 2003 *For New Windows® XP/Server 2003 Installation A new installation requires a floppy disk for the driver installation. To make this floppy disk, copy the contents of the “RC-200\raid” folder, found on the driver CD, onto a blank floppy disk then follow the directions below. 1. Setup the RAID Array prior to Windows installation. 2. Install the board and follow Microsoft procedures to install Windows ®XP/Server 2003 accordingly. 3. Restart your system when prompted during Windows’ installation. 4. At the Windows XP/Server 2003 screen, press F6 to install the driver. 5. Insert the driver diskette. Press S, then press Enter. 6. Select Silicon Image SiI 0680 ultra-133 Medley ATA Raid Controller and press Enter. 7. Press Enter to continue and follow on-screen instructions to complete installation. 8. When the Software Installation warning pops up. Click Yes. And when the Hardware Installation warning pops up, click Yes again. *For Existing Windows® XP/Server 2003 Installation 1. Setup the RAID Array prior to driver installation. 2. Install the board and boot up Windows. 3. At the Found New Hardware Wizard, click Next. 4. Choose “Install from a list or specific location(Advanced), and then click Next to continue. 5. Choose Search for the best driver in these location and check the option Include this location in the search. 27 ULTRA ATA/133 PCI RAID Card RC200 User Manual 6. Inset the driver CD into CD ROM Drive, and they type D:\RC-200\raid (Note: “D:\” represents the drive letter assigned to the CD-ROM drive you are using. If D is not letter of your CD-ROM drive, substitute D with the correct drive letter), then click OK. 7. The Hardware Installation window pops up, click Continue Anyway, the Finish. 8. Click Next again, then Finish. 9. Restart Windows to complete driver installation. *To Verify Windows® 2000/XP/Server 2003 Installation 1. Right click My Computer and click Manage. 2. Select Device Manager. 3. Double click SCSI and RAID Controller, then double click Silicon Image SiI 0680 ultra-133 Medley ATA Raid Controller to display driver properties. A message this device is working properly is displayed in the dialog box, the driver has been correctly installed. Thank you for purchasing a quality Rosewill Product. Please register your product at : www.rosewill.com/ for complete warranty information and future support for your product. 28