1
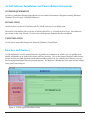
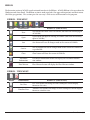
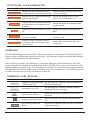
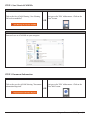
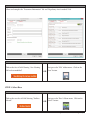
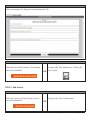
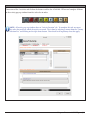
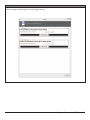
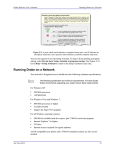
ACAM
U.S. AIR FORCE
AIR CONFORMITY APPLICABILITY MODEL
QUICK START GUIDE
Version 5.0
January 2014
Prepared for:
Air Force Civil Enginer Center
319 N. Frank Luke Drive, Bldg. 1438
San Antonio, Tx 78226
Prepared by:
Solutio Environmental, Inc.
13003 Jones-Maltsberger Rd.
San Antonio, Tx 78247
INTRODUCTION
As amended, Section 176(c) of the Clean Air Act (CAA) requires federal agencies to assure and make evident
that every action and decision conforms to applicable air quality requirements including State Implementation
Plan (SIP) for purposes of attaining the National Ambient Air Quality Standards (NAAQS). The U.S. Environmental Protection Agency (EPA) published its final conformity rules in November 1993 (amending 40 Code
of Federal Regulations (CFR) 51 and 93); establishing procedures and requirements that federal agencies must
satisfy in determining whether a certain action will conform. The conformity regulations differentiate federal
actions into transportation actions and non-transportation-related actions; however, most Air Force proposed
actions consist of non-transportation related projects. Therefore, the Air Force has developed an automated
screening tool known as the Air Conformity Applicability Model (ACAM) to perform a simplified General Conformity Rule Applicability Analysis for non-transportation proposed actions and projects.
The ACAM is a computer model used by Air Force planners and Environmental Impact Analysis Process (EIAP)
personnel in the determination of general conformity applicability for proposed actions in nonattainment or
maintenance designated areas. This tool is used to identify proposed actions and alternatives which would likely
result in no or minimal emission increases, and those actions which may require further air quality analysis
and undergo a general conformity determination. ACAM calculates criteria pollutants, hazardous air pollutants (HAPs), and greenhouse gases (GHG) for proposed Air Force action and alternatives. The model works by
calculating potential emissions from the sources associated with the proposed action while requiring minimal
inputs from the user. The resultant calculations are entered into standardized reports that follow the requirements for the Air Force’s Record of Conformity Analysis (ROCA) reporting format.
TECHINICAL ASSISTANCE
For additional information or technical assistance, contact:
FRANK CASTANEDA, III, P.E., GS-14, DAF
Air Force Air Quality Subject Matter Expert
Compliance Technical Support Branch
HQ AFCEC/CZTQ
Email: [email protected]
Phone: 210.925.3237
Operator: 210.572.7341, x-125
Solutio Environmental, Inc.
ACAM Developer
Website: www.AQhelp.com/ACAM.html
Email: [email protected]
Introduction | 1
ACAM Software Installation and Uninstallation Instructions
SYSTEM REQUIREMENTS
ACAM is a standalone desktop application for use on Standard Government Computers running Microsoft
Windows XP service pack 3 through Windows 8.
INSTALLATION
Obtain the latest version of ACAM from AFCEC eDash website or www.AQhelp.com.
To install ACAM, double-click to run the ACAM installer File (e.g. ACAMSetup111413.exe), then follow the
instructions in the Setup Wizard. ACAM creates a desktop icon automatically after installation.
UNINSTALLATION
ACAM can be uninstalled through the Microsoft Window’s Control Panel.
Interface and Features
ACAM implements a results-oriented interface to provide an environment in which a user can quickly create,
modify, and finalize an air analysis for various Air Force activities. The results-oriented interface inherits many
designs and features from Microsoft Word and other Office products to give a familiar feel, allowing a user to
have exsisting knowledge of how the program operates. The interface is divided into three main sections ribbon,
status panel, and workspace.
RIBBON
STATUS
PANEL
WORKSPACE
Figure 1 - ACAM Application Main Sections
Introduction | 2
RIBBON
The first main section of ACAM’s results-oriented interface is the Ribbon. ACAM’s Ribbon is the area above the
Workspace and Status Panel. The Ribbon section is made up of tabs (the upper white portion) and their menus
(the lower grey portion). This section gives the user easy 2-click access to all functions in the program.
RIBBON - FILE MENU
Button
Button Name
New
Button Use (What It’s For?)
New button will create a new ACAM file (and close the currently open
ACAM file).
Open
Open button will open an existing ACAM file (and close the currently
open ACAM file).
Save
Save button will save all changes made to the current ACAM file.
Save As
Close
Save As button will save all changes made to the current ACAM file in
a specified file.
Close button will close the current ACAM file.
Document
Information
Document Information button will display the Document Information window.
Fleet Mixture
Fleet Mixture button will display the Fleet Mixture window.
RIBBON - VIEW MENU
Button
Button Name
List View
Timeline View
Button Use (What It’s For?)
List View button will change ACAM’s Workspace current display
format to a list view.
Timeline View button will change ACAM’s Workspace current display
format to a timeline view.
Introduction | 3
RIBBON - BASE MENU
Button
Button Name
Select Base
Button Use (What It’s For?)
Select Base button will display the Select Base window.
Edit Base
Edit Base button will display the Edit Base window.
Reset Base
Reset Base button will return all base data to its original default data.
Clear Base
Clear Base button will remove all base data from ACAM file.
RIBBON - INSERT MENU
Button
Button Name
Aircraft
Button Use (What It’s For?)
Aircraft button will display the Aircraft window.
Fire Training
Fire Training button will display the Fire Training window.
Paint Booth
Paint Booth button will display the Paint Booth window.
Degreaser
Construction /
Demolition
Heating
Degreaser button will display the Degreaser window.
Construction / Demolition button will display the degreaser window.
Heating button will display the Heating window.
Emergency
Generator
Emergency Generator button will display the Emergency Generator
window.
Personnel
Personnel button will display the Personnel window.
Tanks
Tanks button will display the Tank window.
Introduction | 4
RIBBON - REPORT MENU
Button
Button Name
Microsoft
Word Reports
Button Use (What It’s For?)
Microsoft Word Reports button will display the Microsoft Word
Report window.
RIBBON - HELP MENU
Button
Button Name
Help
Technical Support
About
Button Use (What It’s For?)
Help button will open a copy of the ACAM User Manual.
Technical Support button will display the Technical Support window.
About button will display the About window.
STATUS PANEL
The second main section of ACAM’s results-oriented interface is the Status Panel. ACAM’s Status Panel is the
area left of the Workspace. The main focus of the Status Panel is to give the user a quick and easy to use summary of the minimum requirements needed to generate an ACAM Report with the current ACAM file. This section
is broken up into four parts (starting from top to bottom): Base Selection, ACAM Warnings, Document Information, and Application Information.
Base Selection displays information about the Air Force base that the air analysis is for. This includes the base
name and state that the base is located in.
ACAM warnings displays a list of tasks that are the minimum requirements to complete an ACAM file. This part
of the Status Panel list out all of the tasks required to complete an ACAM file and generates an ACAM Report in
order from top to bottom (the first task is the top warning and the last task is the bottom).
NOTE: The best way to complete an ACAM file is to start at the top of the ACAM warnings list and work
your way down. Doing this will allow the user to take advantage of all the smart features that make completing an ACAM file easy.
Document Information displays data about the currently opened ACAM file. This will display who created the
ACAM file and what version of the ACAM file is opened.
Application Information displays data about the ACAM program. This is where a user can see what version of
the ACAM program he/she has.
Introduction | 5
STATUS PANEL - ACAM WARNINGS LIST
Warning / Button
Task Required to Complete
What the button does when clicked
Button will save all changes made to the
Indicates that the ACAM file has been
modified and the user should save the file. current ACAM file.
Indicates that the Proposed Action Information is not complete.
Button will navigate the user’s workspace to the “USAF Action” tab.
Indicates that the Document Information
and Regualtory Area Standards are not
complete.
Button will display the Document Information window.
Indicates that no Air Force base is selected.
Button will display the Select Base window.
Indicates that no Activities have been add- Button will navigate the user’s ribbon to
ed to the ACAM file.
the “Insert” tab.
Indicates that the ACAM file needs to
re-calculate when air emissions steady
state will occur.
Button will re-calculate air emissions
steady state.
WORKSPACE
The third and final main section of ACAM’s results-oriented interface is the Workspace. ACAM’s Workspace
is the area below the Ribbon and right of the Status Panel. The Workspace section is made up of tabs and pages
(similar to Microsoft Excel’s tabs and worksheets).
There are three types of tabs in the Workspace: USAF Action, Alternative, and Add Alternative. The USAF
Action tab displays the Proposed Action Information of the ACAM file. This is where a user can enter the title
and description of a proposed action. The Alternative tabs (can have 1 to 3 Alternative tabs) displays summary
information about all activities added to the ACAM file in ether a list or timeline view. The Add Alternative tab
just adds a new alternative tab to the ACAM file up to three tabs.
WORKSPACE - TABS / BUTTONS
Tab / Button
Tab / Button Name
What the tab / button does when clicked
Proposed Action Information Tab will display the proposed action information tab
(USAF Action) Tab
on the user’s workspace.
Alternative (1 to 3) Tab
Tab will dispaly the alternative summary information tab on the user’s workspace.
Add Alternative Button
Button will add a new alternmative to the ACAM
document.
Remove Alternative Button
Button will remove the currently displayed alternative.
Re-Calculate Steady State
Button
Button will re-calculate steady state for the currently
displayed alternative.
Introduction | 6
Flow and Results-Oriented Design
ACAM’s results-oriented design also provides the user with an clear and easy to follow path for completing an
ACAM Report. This is achieved with three interface designs: the status panel, check and status forms, and numbered status tabs.
The Status Panel
As stated previously, the Status Panel gives the user a quick and easy to use summary of the minimum requirements needed to generate an ACAM Report with the current ACAM file. You can think of the Status Panel as
a roadmap for creating an ACAM Report. This road map contains two great features that makes using ACAM
fast and easy. The first feature is every warning listed in the ACAM Warnings list is a button that will either open
the approprate window or navigate a user to the area in ACAM that needs to be completed. The second feature
is warnings listed in the ACAM Warnings list are in the optimal order, from top to bottom, for completing an
ACAM file. These features provide the user with a one stop shop for completing an ACAM file.
NOTE: A user can click on the first ACAM warning until all of the warnings are gone to complete an
ACAM file.
Check and Status Forms
Every screen or form that requires user input in ACAM follows the same design; a Check Form Button (Figure
2) at the bottom of the form and a Form Completion Status Indicater (Figure 2) at the top of the form. Clicking
on the check button will start a validation process in which ACAM will check the entire form for correctness and
completion. If any field is incorrectly filled out or empty, ACAM will highlight the field(s) in red and the form
completion status indicater will display “Incomplete”. If all fields are filled out correctly, ACAM will update the
form completion status indicater with “Complete”. Check and Status Forms provide the user with immediate
feedback on the correctness and completion of all user inputs for any given form in ACAM.
1 Form Completion Status Indicater
2 Check Form Button
Figure 2 - ACAM Check and Status Forms
Introduction | 7
Numbered Status Tabs
A window that contains multiple forms inplements ACAM’s numbered status tabs (Figure 3). Numbered status
tabs are tabs that indicate the completion status of the form in the tab area and are ordered in a way that allows
the user to take advantage of all the smart features that make completing an ACAM file easy.
NOTE: Some smart features and automations in ACAM require the user to complete all tab in the order
that they are numbered.
Figure 3 - ACAM Numbered Status Tabs
Introduction | 8
BASIC ACAM OPERATIONS
Running and Exiting ACAM
Windows usually provides more than one way to perform a task, and starting ACAM is no exception. The standard way to get ACAM started is by double-clicking the ACAM program icon (Figure 1) on your desktop. This
will open a new ACAM file.
Another way to start ACAM is by double-clicking the name or icon of an ACAM file (Figure 2) in Windows
Explorer or My Computer. This will open the ACAM file that the user double-clicked on.
Figure 1 - Program Icon
Figure 2 - File Icon
Exiting ACAM is just like any other Microsoft Office product, just click on the “x” icon in the upper right hand
corner. (Figure 3)
Note: Upon exiting ACAM, if there are any unsaved changes to the current ACAM file, the user will be prompted with the option to save.
Figure 3 - “x” Icon
Basic ACAM Operations | 9
ACAM Files and Reports
ACAM has two basic outputs, ACAM file (.ACAM - Figure 2) and ACAM report (a Microsoft Word document).
These outputs are vastly different but can be easily confused. To help understand the difference we will compare
ACAM to Microsoft Word and its outputs.
ACAM FILE
ACAM like Microsoft Word can create files, ACAM creates .ACAM files and Word creates .docx files. These files
can be used to store and share user inputs. ACAM files just like Word files can be emailed and shared with anyone. Just like word a user can open an ACAM file, make changes to the file, and email the update file to someone
else. The ACAM file provides users with immense flexibility in usage and storage.
ACAM files can be created by either opening a new ACAM program or clicking on the “New” button (Figure 4)
in the “File” ribbon menu.
Figure 4 - “New” button
ACAM REPORT
An ACAM report can be thought of as the final product of an ACAM file. Similarly, a printed paper from Word
can be thought of as the final product of a Word file. ACAM reports display the final estimated total air emission
generated by the activities in an ACAM file. ACAM reports just like files can be email and shared with anyone.
ACAM reports can be created after an ACAM file is complete and has no warrnings listed in the Status Panel.
Reports are created in the reports window accessed by clicking on the “MS Report” button (Figure 5) in the “Report” ribbon menu.
Figure 5 - “MS Report” button
ACAM Views
ACAM allows the user to analyze and interact with data through two different layouts called “views”; List View
and Timeline View. ACAM Views will only change the layout of the ACAM workspace and can be easly changed
by navigating to the “View” ribbon menu.
List View like that name suggests, list all data in easy to read summary blocks (each block represents an activity).
Basic ACAM Operations | 10
Each summary block will show the activity’s total tons (if activity has an end date) or yearly tons (if activity is
indefinite) for each criteria pollutant precursors. Activities can be modified by clicking on the “Edit” button.
Activities can be deleted by clicking on the “Delete” button.
Timeline View provides the user with an interactive timeline for all activities. The timeline is broken up by year
blocks and displays emission thresholds for that year (If the total yearly emissions are below emission thresholds,
then the number will represent total tons under emission thresholds and have a green indicator arrow. If the
total yearly emissions are above emission thresholds, then the number will represent total tons over emission
thresholds and have an red indicator arrow.)
Basic ACAM Operations | 11
Basic ACAM Operations | 12
9 STEPS TO CREATE AN ACAM REPORT
Introduction
ACAM can create air emission analysis reports in 9 easy steps. To make this process even easier, ACAM also
provides an interactive roadmap (Status Panel) to guide the user through all of the steps. In this section of the
guide we will show all of the steps being completed using the interactive Status Panel and the Ribbon Menu.
THE 9 STEPS TO CREATE AN ACAM REPORT
Step 1: Save/Create ACAM File
Step 2: Document Information
- Save Changes to ACAM File
Step 3: Select Base
- Save Changes to ACAM File
Step 4: Proposed Action Information
- Save Changes to ACAM File
Step 5: Add Activity
- Save Changes to ACAM File
Repeat Step 5 until all needed Activities are added
Step 6: Calculate Steady State
- Save Changes to ACAM File
Step 7: Analyze Proposed Action
- Save Changes to ACAM File
Step 8: Re-Calculate Steady State
- Save Changes to ACAM File
Step 9: Create ACAM Report
9 Steps to Create an ACAM Report | 13
STEP 1: Save/Create ACAM File
STEP 1-1
INTERACTIVE STATUS PANEL
Click on the first ACAM Warning “Save Warning.
File has been modified”.
RIBBON MENU
OR
Navigate to the “File” ribbon menu. Click on the
“Save” button.
STEP 1-2
Name and save an ACAM file on your computer.
STEP 2: Document Information
STEP 2-1
INTERACTIVE STATUS PANEL
Click on the new first ACAM Warning “Document
Information Required”.
RIBBON MENU
OR
Navigate to the “File” ribbon menu. Click on the
“Doc Info” button.
9 Steps to Create an ACAM Report | 14
STEP 2-2
Fill out and complete the “Document Information” Tab and “Regulatory Area Standards” Tab.
STEP 2-3
INTERACTIVE STATUS PANEL
Click on the first ACAM Warning “Save Warning.
File has been modified”.
RIBBON MENU
OR
Navigate to the “File” ribbon menu. Click on the
“Save” button.
STEP 3: Select Base
STEP 3-1
INTERACTIVE STATUS PANEL
Click on the new first ACAM Warning “No Base
Selected“.
RIBBON MENU
OR
Navigate to the “Base” ribbon menu. Click on the
“Select” button.
9 Steps to Create an ACAM Report | 13
STEP 3-2
Complete the “Base” Window by first selecting the appropriate base from the “Base List”. (If your base is not on
the list select the closes base to your base that is in the same state) Then click on the “Ok” button.
STEP 3-3
INTERACTIVE STATUS PANEL
Click on the first ACAM Warning “Save Warning.
File has been modified“.
RIBBON MENU
OR
Navigate to the “File” ribbon menu. Click on the
“Save” button.
STEP 4: Proposed Action Information
STEP 4-1
INTERACTIVE STATUS PANEL
Click on the new first ACAM Warning “Proposed
Action Information Required“.
WORKSPACE
OR
Click on the “USAF Action” tab in the ACAM
workspace.
9 Steps to Create an ACAM Report | 14
STEP 4-2
Fill out and complete the “Proposed Action Information” Tab.
STEP 4-3
INTERACTIVE STATUS PANEL
Click on the first ACAM Warning “Save Warning.
File has been modified“.
RIBBON MENU
OR
Navigate to the “File” ribbon menu. Click on the
“Save” button.
STEP 5: Add Activity
STEP 5-1
INTERACTIVE STATUS PANEL
Click on the new first ACAM Warning “At Least
One Activity Required“.
RIBBON MENU
Navigate to the “Insert” ribbon menu.
OR
9 Steps to Create an ACAM Report | 13
STEP 5-2
Choose one of the 9 activities and click on the button to add to the ACAM file. Fill out and complete all forms
on the activity pop-up window from first tab to last in order.
NOTE: All activity pop-up windows have an “Activity Location” tab. To complete this tab, user must
first select the county in which the activity occurred. The is done by selecting a county from the “County
Selection List” and clicking on the right arrow button. Then check on all regulatory areas that apply.
9 Steps to Create an ACAM Report | 14
STEP Optional
OPTIONAL
Repeat Step 5-2 to add all needed activities.
STEP 5-3
INTERACTIVE STATUS PANEL
Click on the first ACAM Warning “Save Warning.
File has been modified“.
RIBBON MENU
OR
Navigate to the “File” ribbon menu. Click on the
“Save” button.
STEP 6: Calculate Steady State
STEP 6-1
INTERACTIVE STATUS PANEL
Click on the new first ACAM Warning “At Lease
One Activity Required“.
STEP 6-2
WORKSPACE
OR
INTERACTIVE STATUS PANEL
Click on the first ACAM Warning “Save Warning.
File has been modified“.
Change ACAM’s view to timeline. Then click on
the “Steady State” button on ACAM’s workspace.
RIBBON MENU
OR
Navigate to the “File” ribbon menu. Click on the
“Save” button.
9 Steps to Create an ACAM Report | 15
STEP 7: Analyze Proposed Action
STEP 7-1
WORKSPACE
Use timeline view or list view to analyze all emissions and make approprate changes to ACAM to mitigate any
problems.
9 Steps to Create an ACAM Report | 16
STEP 7-2
INTERACTIVE STATUS PANEL
RIBBON MENU
Click on the first ACAM Warning “Save Warning.
File has been modified“.
OR
Navigate to the “File” ribbon menu. Click on the
“Save” button.
STEP 8: Re-Calculate Steady State
STEP 8-1
INTERACTIVE STATUS PANEL
WORKSPACE
Click on the new first ACAM Warning “At Lease
One Activity Required“.
STEP 8-2
OR
Change ACAM’s view to timeline. Then click on
the “Steady State” button on ACAM’s workspace.
INTERACTIVE STATUS PANEL
RIBBON MENU
Click on the first ACAM Warning “Save Warning.
File has been modified“.
OR
Navigate to the “File” ribbon menu. Click on the
“Save” button.
STEP 9: Create ACAM Report
STEP 9-1
RIBBON MENU
Navigate to the “Insert” ribbon menu. Click on the “MS Word” button.
9 Steps to Create an ACAM Report | 17
STEP 9-2
Choose a report and click on the “Create Report” buton.
9 Steps to Create an ACAM Report | 18