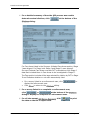
1
QIS Pilot
Training Guide
for 32-bit Windows® operating systems
October 6, 2006
Information in this training guide is subject to
change without notice.
All brand or product names are trade names,
service marks, trademarks, or registered
trademarks of their respective companies or
organizations.
Systems Environment
Application Development: MS Visual C++
version 7.1
Desktop Database: MS Access 2000 or
MS Access 2000 RTE
Server Database: Oracle Enterprise Server
version 9.2.0
Oracle Call Interface and Objects for OLE
version 10.1.0.0
MS Internet Explorer version 5.5 (Service Pack
2) or later to support the integrated Internet
browser
Optional System Environments
MAPI Compliant E-mail client to support e-mail
transfer of survey information
This document can be viewed
online or printed in a duplex (twosided) format. Blank pages have
been inserted as needed for correct
pagination in the printed copy.
Table of Contents
Introduction................................................................................................... 5
ASPEN and QIS .................................................................................................. 7
QIS Structured Survey Process ........................................................................ 8
Installation and Setup ................................................................................. 11
Exercise 1: Install and Set Up ASPEN 8.5Q ...................................................
Task 1: Install ASE 8.5Q...............................................................................
Task 2: Configure QIS in ASE ......................................................................
Task 3: Create a QIS security group in ACO ................................................
13
13
16
17
QIS Surveys in ASPEN ............................................................................... 19
Exercise 2: Create a QIS Survey .....................................................................
Task 4: Create a survey in ACO ...................................................................
Task 5: Export the survey and MDS data from ACO ....................................
Task 6: Import the survey and MDS data into ASE ......................................
Task 7: Enable decryption in ASE ................................................................
21
21
23
25
27
QIS Survey Process.................................................................................... 29
Training Guide
Exercise 3: Prepare for Stage I........................................................................
Task 8: Start the QIS DCT from ASE............................................................
Task 9: Process imported MDS data ............................................................
Task 10: Print initial Stage I forms ................................................................
Task 11: Reconcile Census Sample and Resident Pool...............................
Task 12: Discharge a resident from the Resident Pool ................................
Task 13: Print revised Census Sample Report .............................................
Task 14: Export Stage I sample data ............................................................
Task 15: Import Stage I sample data ............................................................
31
31
34
35
36
36
37
37
38
Exercise 4: Complete the Stage I survey process.........................................
Task 16: Collect Stage I data and enter it in the QIS DCT............................
Task 17: Back up (Export) Stage I survey data.............................................
Task 18: Merge (Import) Stage I survey data................................................
Task 19: Back up merged Stage I survey data .............................................
39
39
40
41
42
10/6/06
3
Table of Contents
Exercise 5: Prepare for Stage II.......................................................................
Task 20: Process Stage I data ......................................................................
Task 21: Print transition forms ......................................................................
Task 22: Create Stage II sample ..................................................................
Task 23: Print initial Stage II forms ...............................................................
Task 24: Assign Stage II tasks......................................................................
Task 25: Print the Stage II Report.................................................................
Task 26: Export Stage II sample data to secondary laptops.........................
Task 27: Import Stage II sample data ...........................................................
43
43
44
44
45
45
46
47
48
Exercise 6: Complete the Stage II survey process........................................
Task 28: Collect Stage II data and enter it in the QIS DCT...........................
Task 29: Back up (Export) Stage II survey data............................................
Task 30: Merge (Import) Stage II survey data...............................................
Task 31: Back up merged Stage II survey data ............................................
Task 32: Print the Potential Citation Report..................................................
49
49
49
50
51
51
Post-survey ................................................................................................. 53
Exercise 7: Transfer and View QIS Data.........................................................
Task 33: Transfer citations from the QIS DCT to ASE..................................
Task 34: Archive a QIS survey and data in ACO..........................................
Task 35: View a QIS survey summary in ACO .............................................
Task 36: Export archived QIS data from ACO ..............................................
Task 37: Import and view archived QIS data in the QIS DCT.......................
55
55
55
57
63
63
Troubleshooting.......................................................................................... 65
Troubleshooting ASPEN 8.5Q ......................................................................... 67
4
10/6/06
QIS Pilot
Introduction
In this section, you will be introduced to:
D QIS integration in ASPEN
D QIS structured survey process
Training Guide
10/6/06
5
6
10/6/06
QIS Pilot
ASPEN and QIS
ASPEN and QIS
The Quality Indicator Survey (QIS) process was developed to ensure that
Nursing Home surveys address all regulatory areas in a comprehensive and
consistent manner. It is based on the use of quality of care indicators (QCIs)
that cover both the process and outcome of care at the facility and resident
levels. See “ QIS Structured Survey Process“ on page 8 for more detail.
A custom application, the QIS Data Collection Tool (DCT), is used throughout
the QIS process to automate and simplify the survey sampling process, data
collection and entry, and the processing and evaluation of survey results.
ASPEN 8.5Q integrates QIS both directly and indirectly. You can create and
transfer QIS surveys in ASPEN, open the QIS DCT from ASPEN Survey Explorer
(ASE), and export and import QIS survey data to and from the QIS DCT and
ASPEN as shown below.
ASPEN/QIS Data Flow
Training Guide
10/6/06
7
QIS Structured Survey Process
QIS Structured Survey Process
The QIS process was designed to provide a structured approach to surveys of
Nursing Homes that:
•
Examines the full range of regulatory Care Area systematically and
consistently.
•
Identifies quality of care and quality of life problems accurately and
consistently.
•
Uses Minimum Data Set (MDS) data and information gathered onsite to full
advantage.
•
Automates selection of Care Areas of concern and potential citations.
•
Improves documentation of findings throughout the survey process.
QIS surveys are conducted in two stages. Stage I is an initial quality
assessment that uses several resident samples and a comprehensive set of
quality of care indicators (QCIs) to identify resident Care Areas that should be
more thoroughly investigated in Stage II. When the rate of a QCI exceeds an
established threshold, it triggers a Care Area for Stage II examination.
Stage II is a more in-depth investigation of Care Areas identified in Stage I.
Critical Element Pathways (CEs) established for each Care Area guide the
surveyor in a systematic review of the triggered Care Areas. The CEs assist
surveyors in determining if the facility is in compliance with the associated
regulations (F tags).
The QIS process also includes investigation of facility-level issues. Facility
review tasks can either staged or non-staged. Staged facility-level reviews are
triggered as a result of information gathered Stage I and are performed in
Stage II. Non-staged facility-level reviews are conducted in either or both
Stage I and Stage II.
The following diagram illustrates the various components and progression of
the QIS process.
8
10/6/06
QIS Pilot
QIS Structured Survey Process
QIS Process
Training Guide
10/6/06
9
10
10/6/06
QIS Pilot
Installation and Setup
This exercise will teach you to:
D Install ASE 8.5Q
D Configure QIS in ASE
D Create a QIS security group in ACO
Training Guide
10/6/06
11
12
10/6/06
QIS Pilot
Install and Set Up ASPEN 8.5Q
Exercise 1:Install and Set Up ASPEN 8.5Q
Components:
•
ACO/ARO 8.5Q
All pilot states will upgrade to ACO 8.5Q. A thin install for ACO 8.5Q will be
available on the QTSO web site.
All ROs will upgrade to ARO 8.5Q via third-party installation.
•
ASE 8.5Q
All pilot surveyors will upgrade to ASE 8.5Q and install the QIS DCT 3.0 and
MS Access 2000 RTE, if Access 2000 isn’t already loaded.
Task 1:Install ASE 8.5Q
You will install the Microsoft Access 2000 Runtime Engine (RTE), if Access 2000
isn’t already loaded, and the QIS DCT 3.0 along with ASE 8.5Q.
Before you begin:
•
Make sure all applications are closed.
•
Optional: If you plan to use ASE to connect to Aspen Central Office (ACO)
data stored on the Oracle server, you must be sure the Oracle 10g client
upgrade has been applied to your machine and that Oracle's
TNSNAMES.ORA connection file has been properly implemented (see the
ASPEN 8.1 installation guide for details).
Due to communication protocols used by the QIS DCT to connect to ASPEN in
the current implementation, the QIS DCT and Access 2000 RTE files should be
installed only to the default folders indicated by the Installer.
1
Insert the ASE 8.5Q Install CD.
2
Click
3
Select Run from the menu, then click
drive.
4
Select SETUP.EXE, then click
5
On the Welcome screen, click
Training Guide
on the Taskbar at the lower left of your screen.
10/6/06
to locate your CD
13
Install and Set Up ASPEN 8.5Q
6
On the Select Features screen, click the ASE checkbox to select
and perform a Full install.
The Full option installs ASE 8.5Q, including the QIS DCT and Access 2000
RTE, on a standalone computer. The Client and Shared install options are
not available for ASE 8.5Q.
Install the QIS DCT
7
Click
to begin configuring the QIS Field Tool (QIS
DCT) installation.
8
On the Welcome Screen for the QIS Field Tool Install,
click
9
Click
Files\QIS.
to accept the default Destination of C:\Program
10 On the Ready to Install the Program screen, click
install the QIS DCT application.
to
11 On the InstallShield Wizard Completed screen, clear the checkbox
to display the release notes and click
You are now asked, "Do you need to load the Microsoft Access 2000
Runtime Engine?"
14
10/6/06
QIS Pilot
Install and Set Up ASPEN 8.5Q
12 Answer
if you do not have Access 2000 loaded on your
machine and continue with the next two steps.
Answer
only if you already have Access 2000 loaded on your
machine. The Installer will complete the QIS DCT install and proceed to
the ASE 8.5Q install (step 15).
Having versions of MS Access other than 2000 on your machine may cause
problems when you run QIS DCT.
Install Access 2000 RTE
Note: If you already have Access 2000 on your machine, you do not need to
install the RTE, so you will skip the next two steps.
13 On the Microsoft Access 2000 Runtime Ready to Install screen,
click the button next to Install Now to accept the default folder,
which should be C:\Program Files\Microsoft Office\ART\Office.
Do not select Customize to specify another folder for installation of the
RTE.
14 When you see the message saying, “Microsoft Access 2000
Runtime Setup completed successfully”, click
Install ASE 8.5Q
15 On the ASE Install screen, click
to accept the default
Destination location, which should be C:\Program Files\ASE.
Do not select
16 Click
to specify an alternate Destination.
to finish the installation process.
17 If you are prompted to restart your computer, select Yes to restart
now, then click
18 Click
to close the Installer.
You will still need to configure QIS (see Task 2 below).
Training Guide
10/6/06
15
Install and Set Up ASPEN 8.5Q
Task 2:Configure QIS in ASE
In order for ASPEN to “know about” QIS surveys and data, you must specify
the paths to QIS field data, the QIS DCT executable, and the Access 2000 RTE
executable.
The connectivity between ASE, the QIS DCT, and various databases is shown in
the following diagram.
ASE/QIS DCT Connectivity
16
10/6/06
QIS Pilot
Install and Set Up ASPEN 8.5Q
1
From the System menu in ASE, select System Configuration, QIS
Settings to open the QIS Settings dialog.
2
to navigate to and enter (by
Enter manually, or click Find
clicking Open in the Open dialog) the following paths:
3
•
QIS Data - path to the Access database containing QIS field data
•
QIS Tool - Access database containing the QIS DCT executable and
links to the field data
•
Access 2000 - path to the Access 2000 RTE executable
Click
to save the settings and close the dialog.
Task 3:Create a QIS security group in ACO
ACO - A QIS security group must exist in the Menu Security Editor before
anyone can work with QIS surveys. Only members of this group can create and
modify QIS surveys. For the QIS pilot, an 8.5Q database patch creates the QIS
security group for you in ACO.
Do not remove the QIS security group installed by the 8.5Q database patch.
ARO - A QIS security group is not available in ARO. Only ACO users who are
members of the QIS security group can export QIS surveys. ARO users can,
however, view QIS surveys and run the QIS DCT.
Training Guide
10/6/06
17
18
10/6/06
QIS Pilot
QIS Surveys in ASPEN
This exercise will teach you to:
D Create a survey in ACO
D Export the survey and MDS data from ACO
D Import the survey and MDS data into ASE
D Enable decryption in ASE
Training Guide
10/6/06
19
20
10/6/06
QIS Pilot
Create a QIS Survey
Exercise 2:Create a QIS Survey
QIS surveys can be created only for NHs with resident records available. A QIS
survey includes MDS Resident Assessment and threshold data that is processed
in the QIS DCT during a QIS structured survey process. Only members of the
QIS security group can create a QIS survey.
Not all survey types can be QIS surveys as determined by policy (See Appendix
P in the SOM). For example, recertification surveys or revisits can be QIS
surveys. Initial certification surveys can’t be QIS because they do not include
MDS data. Standalone complaint surveys can’t be QIS, but a combined
recertification/complaint survey can be QIS.
To create a QIS survey, you must:
•
Create the survey in ACO if it doesn’t already exist.
•
Export it as QIS from ACO to a transfer file, i.e., export the survey and
associated MDS data.
•
Import the survey and MDS data into ASE from the transfer file.
Note: ASPEN 8.5Q is backward compatible to ASPEN 8.5, 8.2, and 8.1, but QIS
surveys are not supported by 8.5, 8.2, and 8.1.
Task 4:Create a survey in ACO
You have a choice of places to access the survey creation function in ACO. QIS
surveys cannot be created in ASE.
1
Use one of the methods below to open the Define Survey or Create
Health/LSC Survey dialog:
•
On the ACO toolbar, click
•
From the File menu, select New Survey.
•
On the Alpha or Type tab,
right-click the Surveys node of
the facility you plan to survey,
and select New Survey.
•
On the Certification & Surveys tab of the Certification dialog, scroll
to the Survey List section and click
Training Guide
10/6/06
21
Create a QIS Survey
2
In the Define Survey or Create Health/LSC Survey dialog, enter the
Start and Exit dates.
The Exit date must be the same as or later than the Start date.
3
Select the Status.
This is the survey status. Open is selected by default.
4
Click
to view information about the current facility in the
Facility Definition dialog.
The information in this view is read-only.
5
Select the survey Type.
6
Select the Regulation(s) that apply to the survey.
7
If you want to define the Team Roster, click
•
In the Select Surveyors dialog, select the names of one or more
surveyors you want on the team for this survey. Click
to
save your additions and return to the Define Survey or Create Health/
LSC Survey dialog.
8
Select the Type of Survey and Extent(s).
You can select more than one of each if appropriate.
9
Click
A message asks if you want to proceed to Citation Manager.
10 Click
if you want to go to the Citation Manager now to
set up the survey team, for example, or click
22
10/6/06
if not.
QIS Pilot
Create a QIS Survey
Task 5:Export the survey and MDS data from ACO
From ACO, you can export one or more QIS surveys, i.e., the surveys and
associated MDS data, in an encrypted format to a transfer location. You can
then import the QIS survey(s) from the export transfer file into ASE for use with
the QIS DCT.
The export/import procedures in this guide generally assume you are using
floppies to transfer data, but you can also use memory sticks and shared
network folders. Although ASPEN doesn’t support the direct connect method for
import of QIS surveys, it is a viable option for export.
An export is cancelled if you specify a survey is QIS and ACO doesn’t find
resident data for the facility.
Note: You cannot export QIS and non-QIS surveys simultaneously.
1
If you are exporting data to a floppy disk, insert the disk into the
floppy drive.
The floppy should be labelled (A) ASPEN MDS Data per the QIS DCT
Technical Support Staff User Manual.
2
In ACO, locate and select the QIS survey in the Tree or List view,
and drag it to
in the toolbar.
Although you will probably export just one QIS survey at a time, it is
possible to export multiple surveys from Tree view one by one. Each
additional survey is appended to the transfer file.
3
In the Export dialog, specify your transfer location.
•
Select ASPEN Transfer Location and then select the transfer drive
from the drop-down list, e.g., A: if you are using a floppy.
-or•
Select Other Location. Enter the transfer location path, or click
Find
to navigate and select the location. ASPENTx.zip is the
default export transfer file name. You can assign another name if you
wish.
4
In the Resident Assessment
Transfer dialog,
click
to accept the
default selection of Transfer QIS
Data.
Training Guide
10/6/06
23
Create a QIS Survey
The Resident Assessment Transfer dialog is displayed only when you
export NH surveys and only for if you are a member of the QIS security
group.
By accepting the default, you are designating the survey as QIS. If you do
not want to export the survey as QIS, clear the checkbox.
5
Click
Messages indicate the progress of the transfer process. When transfer of
the MDS Resident Assessment tables for a survey is complete, the
Transfer Info dialog appears with a summary of the MDS data that’s been
transferred.
6
Click
to continue the transfer of survey data.
If you are exporting more than one QIS survey, the Resident
Assessment Transfer and Transfer Info screens appear for each.
When the transfer process is complete, the survey(s) have been
encrypted and compressed, and stored in the transfer location. Now
surveyors can import the QIS survey(s), i.e., the survey(s) and MDS data,
into ASE on their laptops to use with the QIS field tool.
24
10/6/06
QIS Pilot
Create a QIS Survey
Task 6:Import the survey and MDS data into ASE
In order to perform a structured QIS survey, encrypted MDS data for the facility
involved must be imported into ASE to be processed in the QIS DCT. After
exporting a QIS survey, i.e., the survey and MDS data for the facility, from ACO
to a transfer location (a floppy), you can import it into ASE. It is generally
imported onto the primary laptop.
Transfer files are encrypted to protect confidential information as it is
transmitted. The data must be decrypted upon import into ASE, so be sure
decryption is enabled before you attempt the import. See Task 7 below.
1
If you are importing data from a floppy disk, insert the disk
containing the export transfer file with the QIS survey(s) you
want to import.
The floppy containing the QIS survey with MDS data for the facility to be
surveyed is labelled (A) ASPEN MDS Data per the QIS DCT Technical
Support Staff User Manual.
2
On the ASE toolbar, click
You should not use Import My Surveys
to import QIS surveys. You
will not be prevented from importing QIS surveys, but they will be
imported as non-QIS.
3
In the Import dialog, select Surveys as the Import Type.
4
Do one of the following:
5
•
Select ASPEN Transfer Location and then select the transfer location
from the drop-down list, e.g., A: if you are using a floppy.
•
Select Zip file and enter the transfer file path, or click Find
locate and select the file.
to
Click
ASE searches for the export transfer file. When the file is located, the
Select Survey(s) to Import dialog appears. It lists the surveys contained
in the transfer file.
Training Guide
10/6/06
25
Create a QIS Survey
6
Select the survey(s) you want to import; choose
import all of the surveys in the export transfer file.
to
The survey(s) are imported from the export transfer file and are decrypted
and decompressed. Messages indicate the progress of the import process.
When import of the MDS Resident Assessment tables for a survey is
complete, the Transfer Info screen appears with a summary of the MDS
data that’s been imported.
7
Click
If you import more than one QIS survey, the Transfer Info screen appears
for each. When the whole process is finished, a message indicates the
import was successful or not. If successful, the imported survey(s) are
now included in the list of surveys on Tree view tabs.
The data you import to your laptop, including PHI data, is no longer encrypted,
so it is not automatically protected. It is your responsibility to take every
precaution to ensure that the data on your laptop is protected.
26
10/6/06
QIS Pilot
Create a QIS Survey
Task 7:Enable decryption in ASE
You must enable decryption the first time you use the Import function in ASE.
If decryption is not enabled when you attempt an import, you will receive a
message. To enable decryption, you provide the decryption password.
1
In ASE, select System, System Configuration, Enable Decryption.
2
In the Set Decryption dialog, select Enabled and click
3
In the Enable Decryption dialog, enter the password, and
click
A message confirms that decryption is enabled.
❑ To disable decryption, select Disabled in the Set Decryption dialog.
Each state can configure its own decryption password in ACO. From the
System menu, select System Configuration, State Customization, and
enter the system administration password. In the State Customization
dialog, click
and provide the requested
information in the Edit Password Dialog.
Training Guide
10/6/06
27
28
10/6/06
QIS Pilot
QIS Survey Process
These exercises will teach you how to use
the QIS DCT to:
D Prepare for Stage I
D Complete the Stage I survey process
D Prepare for Stage II
D Complete the Stage II survey process
Training Guide
10/6/06
29
30
10/6/06
QIS Pilot
Prepare for Stage I
Exercise 3:Prepare for Stage I
Before arriving at the facility for the survey, the Team Coordinator must
complete offsite data preparation on the primary laptop. This includes:
•
Processing imported MDS data
•
Printing initial Stage I forms
The onsite Stage I preparation tasks include:
•
Reconciling the Census Sample and Resident Pool
•
Printing the revised Census Sample Report
•
Exporting Stage I sample data to secondary laptops
Task 8:Start the QIS DCT from ASE
The QIS DCT is used throughout the QIS process to structure and automate
data collection and decision making. Surveyors can start the QIS DCT on their
laptops from ASE.
The exercises in this section run through the steps in using the QIS DCT to
complete the QIS survey process. You can also check applicable sections in the
QIS DCT Technical Support Staff User Manual, QIS DCT Software User Manual,
and the QIS Surveyor Training Manual.
1
Locate and right-click a survey on any tab in the Tree view or in
the List view and select Citation Manager.
If the Add Team Member dialog appears, it means that you are not a
member of the survey team. Select the option you want and
click
Training Guide
10/6/06
31
Prepare for Stage I
2
In the Citation Manager dialog, click
This button is available only for QIS surveys.
The QIS DCT splash screen appears and then the Logon Screen.
3
32
Select the applicable Current Surveyor name and Laptop Type.
10/6/06
QIS Pilot
Prepare for Stage I
4
Training Guide
Click
to open the QIS DCT.
10/6/06
33
Prepare for Stage I
Task 9:Process imported MDS data
Offsite
Primary laptop
The Team Coordinator runs a utility in the QIS DCT that generates Admission
and Census samples for Stage I and calculates the MDS QCIs for the MDS data
that was imported into ASE (see Task 6). The QCIs will be used in Stage II.
1
Start the QIS DCT from ASE.
See Task 8.
For Laptop Type, select Primary. A message displays for several seconds
while the QIS DCT generates the Admission and Census samples.
2
On the Process MDS Data screen that appears, click the Process
MDS Data Now button.
A warning message indicates that this process can be quite lengthy.
3
Click Yes to calculate the MDS QCIs.
Depending on the volume of MDS data and the speed of the primary
laptop's processor, the MDS QCI calculations may take 15-25 minutes.
After the QCI calculations are complete, the Stage I Sample screen
appears. You can view the Admission and Census samples that have been
generated. The MDS QCIs are stored for use in Stage II.
34
10/6/06
QIS Pilot
Prepare for Stage I
Task 10:Print initial Stage I forms
Offsite
Primary laptop
1
Start the QIS DCT from ASE.
See Task 8.
2
From the Reports menu, select each of the following options, then
click
to print the indicated Stage I forms. Click Close to close
each report preview screen.
•
New Admit Form option prints the New Admission Information Form.
The Team Coordinator will provide the New Admission Information
Form to the facility upon arrival, ask the facility to list all new
admissions within the previous 30 days, and request that the facility
return the completed form to the survey team as soon as possible.
•
Discharge Form option prints the Discharge Information Form.
The Team Coordinator will provide the Discharge Form to the facility
upon arrival, ask the facility to list discharges not readmitted within
the previous 30 days, and request that the facility return the
completed form to the survey team as soon as possible.
•
Admission Sample option prints the Admission Sample report.
You need to print two copies.
One copy is for the survey team to use onsite to check off record
reviews as they are completed. Records review is an unassigned task,
so all survey team members will conduct these reviews between
completion of other assigned survey tasks. Consequently, the printed
Admission Sample report is used to mark record reviews as having
been completed.
The second copy is for the facility to use when gathering discharged
residents’ medical records for review by the survey team. The survey
team will use the resident census provided by the facility to reconcile
residency/discharge status for residents in the Admission Sample
report before providing the report to the facility. Additionally, current
residents' names will be blacked out before the list is given to the
facility.
•
Census Sample option prints the Census Sample report.
The Census Sample will be modified onsite using the resident census
and the New Admission Information Form provided by the facility to
reflect only current residents, assigned units and room numbers, and
surveyor assignments.
Training Guide
10/6/06
35
Prepare for Stage I
Task 11:Reconcile Census Sample and Resident Pool
Onsite
Primary laptop
Before the Stage I investigation, you will need to reconcile the Census Sample
with the facility-provided Resident Census. As needed, you will add new
residents to the Census Sample and update the Resident Census records.
In addition to the Census Sample, the Resident Pool must be reconciled with
the facility’s records. When the QIS DCT selects the Stage II Sample, it will
select current facility residents ahead of residents who have been discharged,
so the Resident Pool should be completely current.
For a description of the Sample screen and instructions on reconciling the
Census Sample with the Resident Census, adding new residents to the Census
Sample, updating Census residents, etc., see the following section in the QIS
DCT Software User Manual:
☞ “Stage I - Sample Screen”
Task 12:Discharge a resident from the Resident Pool
Onsite
Primary laptop
1
Start the QIS DCT from ASE.
See Task 8.
2
From the Stage I Sample screen, select Resident Pool as the
Resident List to display.
3
In the left pane, select the resident to be discharged, and click the
Discharge/Readmit Resident button.
4
Click Yes in the confirmation message.
The residency status icon next to the resident's name changes
from green
, indicating that the resident is in the facility, to
blue
, indicating that the resident is discharged from the
facility.
36
10/6/06
QIS Pilot
Prepare for Stage I
Task 13:Print revised Census Sample Report
Onsite
Primary laptop
1
Start the QIS DCT from ASE.
See Task 8.
2
From the Reports menu, select Census Sample.
3
Click
, change the Number of Copies to 4, and select OK to print
the Census Sample report.
Provide one copy to each surveyor.
4
Click Close to close the Census Sample report preview screen.
Task 14:Export Stage I sample data
Onsite
from Primary laptop
1
Start the QIS DCT from ASE.
See Task 8.
2
If you are exporting Stage I sample data to a floppy disk, insert
the disk into the floppy drive.
The floppy should be labelled (1) S1 Sample per the QIS DCT Technical
Support Staff User Manual.
If you have a flash memory disk rather than a floppy, insert it into the
primary laptop's universal serial bus (USB) port.
3
From the Utilities menu, select Export Data.
4
On the Export Data screen, click the Export Stage I Sample Data
button.
5
In the Browse for Folder dialog, specify the export transfer
location, e.g., A: if you are using a floppy, and click OK.
The Stage I sample data file will be saved as Sampdata.zip.
6
Training Guide
Click OK in the message that appears when the export is
complete.
10/6/06
37
Prepare for Stage I
Task 15:Import Stage I sample data
Onsite
onto Secondary laptops
1
Start the QIS DCT from ASE.
See Task 8.
2
If you are importing Stage I sample data from a floppy disk, insert
the disk into the floppy drive.
The floppy containing the sample data is labelled (1) S1 Sample per the
QIS DCT Technical Support Staff User Manual.
If the Stage I sample data is on a flash memory disk rather than a floppy,
insert it into the secondary laptop's USB port.
3
From the Utilities menu, select Import Data.
4
On the Import Data screen, click the Import Stage I Sample Data
button.
5
In the Select a location dialog, select the transfer location, e.g., A:
if you are using a floppy, and click OK.
The Stage I sample data file is named Sampdata.zip.
6
38
Repeat this procedure for all secondary laptops to complete the
distribution of Stage I sample data.
10/6/06
QIS Pilot
Complete the Stage I survey process
Exercise 4:Complete the Stage I survey process
Task 16:Collect Stage I data and enter it in the QIS DCT
Onsite
Secondary laptops
For instructions on collecting and entering Stage I data, see the following
sections in the QIS DCT Software User Manual:
☞ “Stage I - Data Entry Screen”
☞ “QCI Results Screen”
Skip patterns
In the Stage I Survey screen, certain questions need to be answered only when
required by the response to a previous question. Questions that should be
skipped based on answers to a previous question are part of a "skip pattern"
and appear in italics and in gray (instead of black or red).
Example
Skip Pattern Applicable
Question 1 - Does the resident currently have a contracture?
If the answer is No, then:
Question 2 - Does the resident have a splint device in place?
will be skipped (and appear in italics and gray).
Example
Skip Pattern Not Applicable
Question 1 - Does the resident currently have a contracture?
If the answer is Yes, then:
Question 2 - Does the resident have a splint device in place?
will be available (and appear in red until answered, and then will turn black).
Because a skip pattern becomes applicable based on the answer to a previous
question, it is essential that the questions in the Stage I Admission and Stage I
Census review be answered in the sequence that they appear on the screen.
Failure to answer questions in sequence may cause delays or conflicts in the
software and during review.
When a surveyor has answered all of the questions about a resident, except for
those questions that are skipped, the resident's name will appear in black,
indicating that the resident's initial assessment is complete.
Training Guide
10/6/06
39
Complete the Stage I survey process
Task 17:Back up (Export) Stage I survey data
Onsite
from Secondary laptops
At the end of each day of the Stage I survey process (and when the laptops are
left for an extended period), the survey data in the QIS DCT must be backed
up, i.e., exported from all secondary laptops. Then it is merged (imported) on
the primary laptop.
Note: When entry of all Stage I survey data is complete on each secondary
laptop, you will use this same procedure to export all the Stage I data for
merging on the primary laptop.
1
Start the QIS DCT from ASE.
See Task 8.
2
If you are exporting Stage I survey data to a floppy disk, insert the
disk into the floppy drive.
The floppy should be labelled (2) [Surveyor/Laptop Name] S1 & S2
Backup per the QIS DCT Technical Support Staff User Manual.
If you have a flash memory disk rather than a floppy, insert it into the
laptop's USB port.
3
From the Utilities menu, select Export Data.
4
On the Export Data screen, click the Export Stage I Survey Data
button.
5
In the Browse for Folder dialog, specify the export transfer
location, e.g., A: if you are using a floppy, and click OK.
The Stage I survey data file will be saved as Survdata.zip.
40
6
Click OK in the message that appears when the export is
complete.
7
Repeat this procedure for all secondary laptops to complete the
backup of Stage I survey data.
10/6/06
QIS Pilot
Complete the Stage I survey process
Task 18:Merge (Import) Stage I survey data
Onsite
onto Primary laptop
After Stage I survey data on each secondary laptop has been backed up
(exported), it is merged (imported) on the primary laptop.
1
Start the QIS DCT from ASE.
See Task 8.
2
If you are importing a secondary laptop's Stage II survey data
from a floppy disk, insert the disk into the floppy drive.
The floppy containing the survey data is labelled (2) [Surveyor/Laptop
Name] S1 & S2 Backup per the QIS DCT Technical Support Staff User
Manual.
If the Stage II survey data is on a flash memory disk rather than a floppy,
insert it into the primary laptop's USB port.
3
From the Utilities menu, select Import Data.
4
On the Import Data screen, click the Import Stage I Survey Data
button.
5
In the Select a location dialog, select the transfer location, e.g., A:
if you are using a floppy, and click OK.
The Stage I survey data file is named Survdata.zip.
6
Click OK in the message that appears when the import is
complete.
7
Repeat this procedure with the data from each secondary laptop
to complete the backup/merging of Stage I survey data.
Training Guide
10/6/06
41
Complete the Stage I survey process
Task 19:Back up merged Stage I survey data
Onsite
Primary laptop
After you import/merge the Stage I survey data from all secondary laptops, you
need to create a backup of the merged Stage I survey data on the primary
laptop.
1
Start the QIS DCT from ASE.
See Task 8.
2
If you are backing up merged Stage I survey data on a floppy disk,
insert the disk into the floppy drive.
The backup floppy containing the survey data is labelled (3) Merged S1
Data per the QIS DCT Technical Support Staff User Manual.
If you are backing up merged Stage I survey data on a flash memory disk
rather than a floppy, insert it into the primary laptop's USB port.
3
42
Complete steps 3-6 of Task 17 to back up the merged Stage I
survey data.
10/6/06
QIS Pilot
Prepare for Stage II
Exercise 5:Prepare for Stage II
Task 20:Process Stage I data
Onsite
Primary laptop
The QIS DCT processes Stage I QCI results and displays them in the QCI
Results screen.
1
Start the QIS DCT from ASE.
See Task 8.
2
From the View Screen menu, select QCI Results.
After the QIS DCT processes and loads QCI results, the QCI Results screen
appears. You can view the results by QCI, Resident, or Care Area.
Training Guide
•
The left pane displays results in a tree that expands to provide details
about the QCI, Resident, or Care Area being viewed.
•
In the upper right pane, click the Display Responses button to display
the Quality Indicator, the source of the data, the question, the answer,
and the Surveyor, Date, and Time the response was entered.
•
When the responses are displayed in the upper right pane, click the
Show Logic button to list the criteria that caused the resident to meet
the condition.
•
The lower right pane provides Additional Information About This
Quality Indicator.
10/6/06
43
Prepare for Stage II
Task 21:Print transition forms
Onsite
Primary laptop
❑ Start the QIS DCT from ASE.
See Task 8.
Stage I Relevant Findings
1
From the Reports menu, select Stage I Relevant Findings.
2
On the Select Residents for Relevant Findings Report screen, select
a Sample Group (All is the default) and a Sort Order (Resident
Name is the default).
3
Select the Residents To Appear On Relevant Findings Report.
Use Shift+click to select consecutive names, or Ctrl+click to select
nonconsecutive names.
4
Click the Preview Report button to view the report.
5
To print a copy of the Stage I Relevant Findings Report for each
surveyor, click
6
and select the applicable Number of Copies.
Click Close to close the Stage I Relevant Findings Report preview
screen.
QCI Results
1
From the Reports menu, select QCI Results Report.
The report is displayed in the QCI Results Report preview screen.
2
To print the report, click
3
Click Close to close the preview screen.
Task 22:Create Stage II sample
Onsite
Primary laptop
For instructions on creating the Stage II sample, see the following section in
the QIS DCT Software User Manual:
☞ “Stage II - Sample Screen”
44
10/6/06
QIS Pilot
Prepare for Stage II
Task 23:Print initial Stage II forms
Onsite
Primary laptop
❑ Start the QIS DCT from ASE.
See Task 8.
Sample Resident List
1
From the Reports menu, select Stage II Sample Resident List.
The report is displayed in the Stage II Sample Resident List preview
screen.
2
To print the report, click
3
Click Close to close the preview screen.
Stage II Care Area List
1
From the Reports menu, select Stage II Care Area List.
The report is displayed in the Stage II Care Area List preview screen.
2
To print the report, click
3
Click Close to close the preview screen.
Stage II Report
1
From the Reports menu, select Stage II Report.
2
Choose the Care Area sort option.
3
Click the Preview Report button to view the report.
4
To print the report, click
5
Click Close to close the Stage II Report preview screen.
Task 24:Assign Stage II tasks
Onsite
Primary laptop
For instructions on assigning surveyors to Stage II tasks, see the following
section in the QIS DCT Software User Manual:
☞ “Stage II - Assignment Screen”
Training Guide
10/6/06
45
Prepare for Stage II
Task 25:Print the Stage II Report
Onsite
Primary laptop
Now you will print the Stage II Report sorted by Surveyor Assignment rather
than by Care Area as you did earlier during the transition from Stage I to Stage
II (Task 23). The report will be printed with each surveyor's assignments on
separate pages for easy distribution to the surveyors.
1
Start the QIS DCT from ASE.
See Task 8.
2
From the Reports menu, select Stage II Report.
3
Choose the Stage II Surveyor sort option.
4
Click the Preview Report button to view the report.
5
To print the report, click
The report will be printed with each surveyor's assignments on separate
pages for ease of distribution to the surveyors.
6
46
Click Close to close the Stage II Report preview screen.
10/6/06
QIS Pilot
Prepare for Stage II
Task 26:Export Stage II sample data to secondary laptops
Onsite
from Primary laptop
1
Start the QIS DCT from ASE.
See Task 8.
2
If you are exporting Stage II sample data to a floppy disk, insert
the disk into the floppy drive.
The floppy should be labelled (4) S2 Sample per the QIS DCT Technical
Support Staff User Manual.
If you have a flash memory disk rather than a floppy, insert it into the
laptop's USB port.
3
From the Utilities menu, select Export Data.
4
On the Export Data screen, click the Export Stage II Survey Data
button.
5
In the Browse for Folder dialog, specify the export transfer
location, e.g., A: if you are using a floppy, and click OK.
The Stage II survey data file will be saved as Sampdata.zip.
6
Training Guide
Click OK in the message that appears when the export is
complete.
10/6/06
47
Prepare for Stage II
Task 27:Import Stage II sample data
Onsite
onto Secondary laptops
1
Start the QIS DCT from ASE.
See Task 8.
2
If you are importing Stage II sample data from a floppy disk,
insert the disk into the floppy drive.
The floppy containing the sample data is labelled (4) S2 Sample per the
QIS DCT Technical Support Staff User Manual.
If the Stage II sample data is on a flash memory disk rather than a floppy,
insert it into the secondary laptop's USB port.
3
From the Utilities menu, select Import Data.
4
On the Import Data screen, click the Import Stage II Sample Data
button.
5
In the Select a location dialog, select the transfer location, e.g., A:
if you are using a floppy, and click OK.
The Stage II sample data file is named Sampdata.zip.
48
6
Click OK in the message that appears when the import is
complete.
7
Repeat this procedure for all secondary laptops to complete the
distribution of Stage II sample data.
10/6/06
QIS Pilot
Complete the Stage II survey process
Exercise 6:Complete the Stage II survey process
Task 28:Collect Stage II data and enter it in the QIS DCT
Onsite
Secondary laptops
For instructions on collecting and entering Stage II data, see the following
sections in the QIS DCT Software User Manual:
☞ “Stage II - Critical Elements Screen”
☞ “Documentation Form”
☞ “Potential Citation Screen”
Task 29:Back up (Export) Stage II survey data
Onsite
from Secondary laptops
At the end of each day of the Stage II survey process (and when the laptops
are left for an extended period), the survey data in the QIS DCT must be backed
up, i.e., exported from all secondary laptops. Then it is merged (imported) on
the primary laptop.
Note: When entry of all Stage II survey data is complete on each secondary
laptop, you will use this same procedure to export all the Stage II data for
merging on the primary laptop.
1
Start the QIS DCT from ASE.
See Task 8.
2
If you are exporting Stage II survey data to a floppy disk, insert
the disk into the floppy drive.
The floppy should be labelled (2) [Surveyor/Laptop Name] S1 & S2
Backup per the QIS DCT Technical Support Staff User Manual.
If you have a flash memory disk rather than a floppy, insert it into the
laptop's USB port.
3
From the Utilities menu, select Export Data.
4
On the Export Data screen, click the Export Stage II Survey Data
button.
Training Guide
10/6/06
49
Complete the Stage II survey process
5
In the Browse for Folder dialog, specify the export transfer
location, e.g., A: if you are using a floppy, and click OK.
The Stage II survey data file will be saved as Stg2data.zip.
6
Click OK in the message that appears when the export is
complete.
7
Repeat this procedure for all secondary laptops to complete the
backup of Stage II survey data.
Task 30:Merge (Import) Stage II survey data
Onsite
onto Primary laptop
After Stage II survey data on each secondary laptop has been backed up
(exported), it is merged (imported) on the primary laptop.
1
Start the QIS DCT from ASE.
See Task 8.
2
If you are importing a secondary laptop's Stage II survey data
from a floppy disk, insert the disk into the floppy drive.
The floppy containing the survey data is labelled (2) [Surveyor/Laptop
Name] S1 & S2 Backup per the QIS DCT Technical Support Staff User
Manual.
If the Stage II survey data is on a flash memory disk rather than a floppy,
insert it into the primary laptop's USB port.
3
From the Utilities menu, select Import Data.
4
On the Import Data screen, click the Import Stage II Survey Data
button.
5
In the Select a location dialog, select the transfer location, e.g., A:
if you are using a floppy, and click OK.
The Stage II survey data file is named Stg2data.zip.
50
6
Click OK in the message that appears when the import is
complete.
7
Repeat this procedure with the data from each secondary laptop
to complete the backup/merging of Stage II survey data.
10/6/06
QIS Pilot
Complete the Stage II survey process
Task 31:Back up merged Stage II survey data
Onsite
Primary laptop
After you import/merge the Stage II survey data from all secondary laptops
and complete the Potential Citation Screen, you need to create a backup of the
merged Stage II survey data on the primary laptop.
1
Start the QIS DCT from ASE.
See Task 8.
2
If you are backing up merged Stage II survey data on a floppy
disk, insert the disk into the floppy drive.
The backup floppy containing the survey data is labelled (5) Merged S2
Data per the QIS DCT Technical Support Staff User Manual.
If you are backing up merged Stage II survey data on a flash memory disk
rather than a floppy, insert it into the primary laptop's USB port.
3
Complete steps 3-6 of Task 29 to back up the merged Stage II
survey data.
Task 32:Print the Potential Citation Report
Onsite
Primary laptop
The survey team reviews this report when determining Severity/Scope for
citations.
1
Start the QIS DCT from ASE.
See Task 8.
2
From the Reports menu, select Potential Citation Report.
3
To print the report, click
4
Click Close to close the Potential Citation Report preview screen.
Training Guide
10/6/06
51
52
10/6/06
QIS Pilot
Post-survey
This exercise will teach you to:
D Transfer citations from the QIS DCT to ASE
D Export a QIS survey and data to ACO
D View a QIS survey summary in ACO
D Export archived QIS data from ACO
D Import and view archived QIS data in the
QIS DCT
Training Guide
10/6/06
53
54
10/6/06
QIS Pilot
Transfer and View QIS Data
Exercise 7:Transfer and View QIS Data
Task 33:Transfer citations from the QIS DCT to ASE
When a QIS survey is complete, you can transfer all citations added in the QIS
DCT to ASE. Or, you may elect to add some citations in the QIS DCT, load them
to ASE, add more citations in the QIS DCT, upload those to ASE, and so on until
the QIS survey is wrapped up.
1
In ASE, locate and right-click a QIS survey on any tab in the Tree
view or in the List view and select Citation Manager.
If the Add Team Member dialog appears, it means that you are not a
member of the survey team. Select the option you want and
click
2
In the Citation Manager dialog, click
This button is available only for QIS surveys.
When the process is finished, a message indicates if the upload was
successful or not. The process will fail if there are no citations associated
with the survey in the QIS database.
If successful, the QIS citations for the survey are added to the Citations
list in Citation Manager and also to the Tree and List views.
Task 34:Archive a QIS survey and data in ACO
Once the QIS survey is wrapped up, you archive it in ASPEN, i.e., export it back
to ACO from ASE. QIS data is exported along with survey and citation
information. The transfer process takes two steps as always: export the QIS
survey from ASE to a transfer file, import it into ACO from the transfer file.
When a QIS survey is archived, i.e., imported back into ACO, the QIS data will
not change. You can still update ASPEN survey details in ACO: add or delete
tags, change Severity/Scope, add or change citation text, etc. without affecting
the QIS portion of the survey. The QIS information in archived QIS surveys is
uploaded to CASPER, where it is available for reporting generation.
Training Guide
10/6/06
55
Transfer and View QIS Data
Export a QIS survey and data from ASE:
1
In ASE, locate and select a QIS survey in Tree or List view, and
drag it to
2
in the toolbar.
In the Export dialog, indicate your transfer location.
•
Select ASPEN Transfer Location and then select the transfer drive,
e.g., A: if you are using a floppy.
-or•
Select Other Location. Enter the transfer location path, or click
Find
to navigate and select the location. ASPENTx.zip is the
default export transfer file name. You can assign another name if you
wish.
3
Click
Messages indicate the progress of the transfer of QIS data. When the
process is finished, a message indicates the export was successful (or
not).
Import a QIS survey and data into ACO:
1
If you are importing data from a floppy disk, insert the disk
containing the export transfer file with the QIS survey(s) you
want to import.
2
On the ACO toolbar, click
3
In the Import dialog, select Surveys as the Import Type.
4
Do one of the following:
•
Select ASPEN Transfer Location and then select the transfer location
from the drop-down list.
•
Select Zip or mdb file and enter the transfer file path, or click
Find
56
to locate and select the file.
10/6/06
QIS Pilot
Transfer and View QIS Data
5
Click
ACO searches for the export transfer file. When the file is located, the
Select Survey(s) to Import dialog appears. It lists the surveys contained
in the transfer file.
6
Select the survey(s) you want to import; choose
import all of the surveys in the export transfer file.
to
Messages indicate the progress of the import process. A message appears
when import is complete.
Task 35:View a QIS survey summary in ACO
ACO provides a high-level, but detailed summary of QIS data collected by DCT.
The QIS Summary option displays only for QIS surveys with QIS data.
1
Locate and right-click a QIS survey on the Alpha, Type, or Cert/
Survey tab in the Tree view.
2
Select QIS Summary to open the Citations dialog.
There are four tabs that provide general and stage-specific summaries.
3
Training Guide
Click the appropriate tab(s) to view the information you want to
review.
10/6/06
57
Transfer and View QIS Data
The QIS Survey Summary tab lists all the citations for the survey with
QIS and ASPEN details for each. You can compare the SS and QIS SS
columns to see changes made to Severity/Scope in ASPEN after the QIS
survey process was completed.
Click
in the Stage 2 column for a tag to go to the Care Area Stage
II tab and view Stage II details for the selected tag.
Click
or
in the Surveyor Initiated column
for a tag to open the QIS Details screen and view information about that
particular surveyor-initiated tag or care area. See step 4 below for more
information about the QIS Details screen.
Tags added in ASPEN after the QIS process was completed appear in the
grid without QIS information, i.e., the QIS SS, Stage 2, and Surveyor
Initiated columns are all blank. See Tag 0176 in the screenshot below.
At the bottom of the screen, the Cited in QIS Only field lists tags cited in
QIS that haven’t been loaded into ASPEN via Load Cites (see Task 33) or
tag citations removed from ASE or ACO but still present in QIS.
58
10/6/06
QIS Pilot
Transfer and View QIS Data
The QIS Overview tab provides a high level view of survey results by Care
Area. It indicates the Care Areas that had tags cited, whether the
threshold for each Care Area was exceeded, and if there was surveyor
intervention.
Training Guide
10/6/06
59
Transfer and View QIS Data
The QCI Stage I tab shows the QCIs that are calculated at the end of
Stage 1. You can display all QCIs; filter them by sample type: MDS,
Admission, Census; or list only those that were triggered. Select the QCIs
individually to see the QCI Calculation for each as well as the Residents
considered in the calculation for resident-specific QCIs. The QCI Category
column indicates whether or not each resident met the threshold criteria
for the selected QCI.
60
10/6/06
QIS Pilot
Transfer and View QIS Data
The Care Area Stage II tab shows the Care Areas that were triggered by
Stage I of the QIS process and investigated in Stage II. For each of these
Care Areas, Stage II details are provided.
Select the Care Areas individually to see the QCIs and Associated Ftags
for each as well as Potential and Cited Ftags for those Care Areas that
were identified as resident-specific and investigated during Stage II. You
can filter Care Areas by Ftag and show all QCIs, or only those that
exceeded the Threshold.
Training Guide
10/6/06
61
Transfer and View QIS Data
4
For a detailed summary of how the QIS process was used to
determine actual citations, click
Citations dialog.
at the bottom of the
For Care Areas listed in the Surveyor Initiated Care Areas section, Stage
I was skipped. For Ftags, both Stage I and Stage II were skipped.
Surveyor Deleted Care Areas overrode DCT’s calculations from Stage I
data that included them in Care Areas to be investigated in Stage II.
The Tags section includes all the tags selected for citation by DCT in Stage
II and indicates whether or not each was actually cited.
5
•
For a survey linked to an enforcement case, click
display the enforcement case.
•
Click Close to return to the Citations dialog.
to
For a survey linked to a complaint or enforcement case,
click
or
at the bottom of the Citations
dialog to display the complaint or enforcement case.
6
62
For all tabs except QIS Survey Summary, click
the data on the tab in report form.
10/6/06
to print
QIS Pilot
Transfer and View QIS Data
Task 36:Export archived QIS data from ACO
Once the QIS survey is complete, it should be removed from the QIS DCT and
stored in ACO before another QIS survey begins. ASPEN and CASPER both
provide high-level summary views of the information collected and entered for
the survey in the QIS DCT. However, there may be occasions when you need to
see full details of the QIS information after removing the survey from the QIS
DCT and archiving it in ACO. In that case, an option is available that lets you
transfer it from ACO for viewing in the QIS DCT.
The transfer process is in two steps as usual: export the QIS survey to a
transfer file, import the QIS survey into the QIS DCT from the transfer file. The
QIS Export option displays only for QIS surveys with QIS data.
Note: You can’t use the regular Export function in ACO for a QIS survey with
QIS data if you are exporting it in order to view it in DCT.
1
On the Alpha, Type, or Cert/Survey tab, locate and right-click an
archived QIS survey.
2
Select Send To/QIS Export.
3
In the Open dialog, click Open to accept the default transfer file
location and name.
The file name is of the form Q-<event ID>.zip. You can change the default
transfer file location but not the default file name.
Messages indicate that QIS export is underway and then complete.
Task 37:Import and view archived QIS data in the QIS
DCT
Once you have exported the archived QIS survey from ACO to a transfer file,
you will open the QIS DCT in stand-alone mode. That is, you will start the QIS
DCT directly instead of using
in ASE. Then you can import the
archived QIS survey and view it in the QIS DCT.
The cross-references here are to the relevant procedures in the QIS DCT
Software User Manual.
1
Start the QIS DCT directly.
2
☞ “Start Stand-Alone QIS DCT”
Import the archived QIS survey and view it in the QIS DCT.
☞ Import and View an Archived QIS Survey
Training Guide
10/6/06
63
64
10/6/06
QIS Pilot
Troubleshooting
This section includes:
D Troubleshooting tips for ASPEN 8.5Q
Training Guide
10/6/06
65
66
10/6/06
QIS Pilot
Troubleshooting ASPEN 8.5Q
Troubleshooting ASPEN 8.5Q
8.5Q/QIS DCT Configuration
Problem/Error Message
Cause
Fix
“Can’t find FF01FTags.mdb,
QIS Data.mde, or QIS Field
Data.mdb.”
QIS DCT (Field Tool) is
not installed to the
default C:\Program
Files\QIS folder.
Click OK and enter the
correct location of the
.mdb/.mde file. Or, run
8.5Q Install again and
select the default
Destination for QIS Field
Tool.
QIS DCT doesn’t start when
called from ASE.
Access 2000 or 2000 RTE
is not installed or path
parameter is invalid or
empty in QIS Settings
(ASE).
Install Access 2000 or
2000 RTE on laptop.
Or, enter correct path
parameter in QIS Settings
(System/System
Configuration).
No message is sent from
DCT indicating Access is
missing.
“The required file
‘aspen.mdb’ could not be
found.”
The ASE database
(aspen.mdb) is not
installed in the default
folder assumed by QIS
(C:\Program
Files\ASE\Data).
Click OK and enter actual
location of aspen.mdb in
the next dialog.
Prompt asks you to enter the
path to aspen.mdb the first
time QIS is run.
The ASE database
(aspen.mdb) is not
installed in the default
folder assumed by QIS
(C:\Program
Files\ASE\Data)
Enter actual location of
aspen.mdb.
Survey team information
entered in ASE doesn’t
appear on QIS DCT logon
screen.
The path to the ASE
database (aspen.mdb)
specified to QIS conflicts
with the ASPEN Workarea
defined through ASE
Config.
If not running ASE 8.5Q is
from the default
C:\Program Files\ASE
folder, but this folder
exists, rename it. Then
start QIS DCT, get prompt
to enter the path to
aspen.mdb, enter actual
location.
Training Guide
10/6/06
67
Troubleshooting ASPEN 8.5Q
QIS Export/Import
Problem/Error Message
Cause
Fix
“Cannot change the name of
the QIS export file.”
QIS Export file must be
named
“Q-<eventID>.zip”.
Do not change default QIS
Export filename, just select
folder to place file in.
“Unable to compress files”
I/O error from WinZip
Delete the transfer file and
try the export again.
SQL Error 3380
“Field ‘<field_name>’
already exists in table
‘survey’”
You selected multiple
surveys in List view and
exported them together.
Click OK and all surveys
will be successfully
exported. Or, export each
survey separately to the
transfer file.
"Cannot find temporary
Windows directory."
Laptop configuration is
not correct, or there is
not enough space on the
machine.
Set up temporary directory
in Windows.
"Cannot open output file."
Laptop configuration is
not correct, or there is
not enough space on the
machine.
Check permissions for the
directory, check space, try
another location.
"Unable to add to zip file."
Laptop configuration is
not correct, or there is
not enough space on the
machine.
Check permissions for the
directory, check space, try
another location.
"Unable to encrypt zip file."
Laptop configuration is
not correct, or there is
not enough space on the
machine.
Check permissions for the
directory, check space, try
another location.
"Unable to run query from
QIS_EXPORT."
Laptop configuration is
not correct, or there is
not enough space on the
machine.
Check permissions for the
directory, check space, try
another location.
"QIS Transfer Error: Cannot
determine location of QIS
database - no
"S2KDataPath" setting in
Alpinesetup table”
QIS Data Path incorrect
or not specified in QIS
Settings (ASE).
Add or correct QIS Data
Path in QIS Settings
(System/System
Configuration).
68
10/6/06
QIS Pilot
Troubleshooting ASPEN 8.5Q
QIS Export/Import
Problem/Error Message
Cause
Fix
SQL Error 3127
“The INSERT INTO
statement contains the
following unknown field
name: ‘<field_name>’.”
You tried to import a QIS
survey into ASE version
8.5, 8.2, or 8.1. Only ASE
8.5Q supports QIS
surveys.
Import QIS surveys to ASE
8.5Q only. If a survey team
is still using ASPEN 8.5,
8.2, or 8.1, surveys should
not be exported from ACO
as QIS.
Problem/Error Message
Cause
Fix
“QIS Tool is open.”
You selected the Change
Event ID option (for any
survey, QIS or not) in
ASE while the QIS Field
Tool (QIS DCT) was open;
or, you selected Load
Cites in Citation Manager.
Close QIS DCT, then select
the desired option.
“Event ID cannot be
changed for a QIS survey.”
You selected the Change
Event ID option in ASE or
ACO for a QIS survey.
Do not attempt to change
the Event ID of a QIS
survey.
"You cannot delete a QIS
survey until the survey has
been uploaded to ACO."
You attempted to delete a
QIS survey from ASE that
hadn’t been uploaded to
ACO.
Upload the survey to ACO,
then delete it in ASE.
Problem/Error Message
Cause
Fix
QIS DCT seemed to hang
after you chose an option on
the Process MDS Data
screen.
You chose Process MDS
Data Now. The
processing takes 15-25
minutes.
Do not select this option
unless you are the Team
Coordinator using the
primary laptop to prepare
data for Stage I.
QIS Survey
QIS Field Tool (QIS DCT)
QIS DCT may hang if other
programs are running on
the laptop during this
processing. Wait long
enough for processing to
finish, then kill the process
(Ctrl+Alt+Del/End Task).
Training Guide
10/6/06
69
Troubleshooting ASPEN 8.5Q
QIS Field Tool (QIS DCT)
Problem/Error Message
Cause
Fix
“Microsoft Access can’t
delete <path>.mdb after
compacting it.”
The Access database QIS
Field Data.mdb did not
compress correctly when
you closed QIS DCT.
To prevent this, keep the
number of programs you
are running simultaneously
with ASPEN 8.5Q/QIS DCT
to a minimum.
To fix, go to the QIS
directory (default is
C:\Program Files\QIS)
and rename db1.mdb to
<path>.mdb.
"QIS Transfer Error: Cannot
determine location of QIS
database - no
"S2KDataPath" setting in
Alpinesetup table.”
Attempted load of QIS
citations failed because
the QIS Data Path is
incorrect or not specified
in QIS Settings (ASE).
Add or correct QIS Data
Path in QIS Settings
(System/System
Configuration).
"S2KToolPath parameter
invalid ..."
QIS Tool or Load Cites
failure because QIS Tool
Path is incorrect or not
specified in QIS Settings
(ASE).
Add or correct QIS Tool
Path in QIS Settings
(System/System
Configuration).
"S2KDataPath parameter
invalid ..."
QIS Tool or Load Cites
failure because QIS Data
Path is incorrect or not
specified in QIS Settings
(ASE).
Add or correct QIS Data
Path in QIS Settings
(System/System
Configuration).
70
10/6/06
QIS Pilot