1
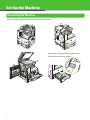
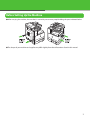
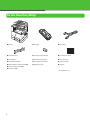
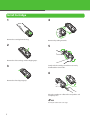
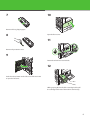
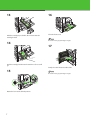
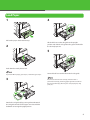
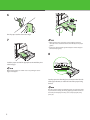
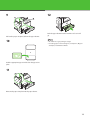
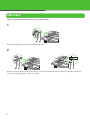
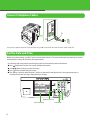
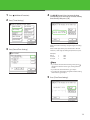
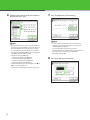
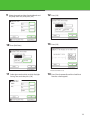
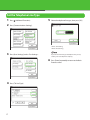
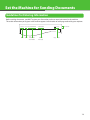
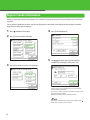
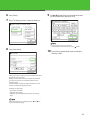
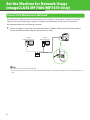
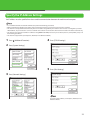
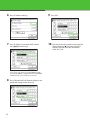
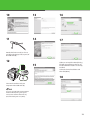
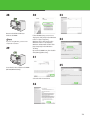
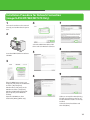
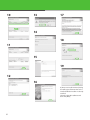
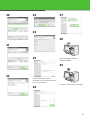
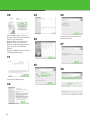
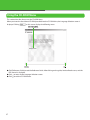
Starter Guide
Please read this guide before operating this product.
After you finish reading this guide, store it in a safe place for future reference.
ENG
Set Up the Machine
Unpacking the Machine
Remove all shipping tape and packing material from the machine.
Remove the vinyl-tie and label attached on the
metal plate in each paper cassette.
Before Setting Up the Machine
● When carrying the machine, be sure that it is carried by two or more people holding the parts indicated below.
● The shapes of your machine and supplies may differ slightly from those illustrations listed in this manual.
Do You Have Everything?
● Machine
● Cartridge
● Power Cord
● Telephone Cable
● Ferrite Core for USB Cable
● Document Size Label
● Starter Guide
● Limited Warranty Notice
● Paper Size Label
● Basic Operation Guide
● Cartridge Warranty Notice
● Stamp Cartridge
● UFRII LT/FAX User Software CD-ROM
● Registration Card
● Tweezers
● PCL User Software CD-ROM*
● Manual CD-ROM
* MF7480/MF7470 only
Manuals for the Machine
● Starter Guide (This Document): Machine set-up and software installation
● Basic Operation Guide: Basic features, maintenance, trouble shooting, and specifications
● Reference Guide (located on the Manual CD-ROM): Total operation features, network and remote user interface,
system settings, reports and lists, and trouble shooting
● Color Network ScanGear User’s Guide (located on the User Software CD-ROM): Color Network ScanGear
installation and instructions
● PCL Driver Guide (MF7480/MF7470 only. Located on the User Software CD-ROM): PCL printer driver installation
and instructions
● UFR II Driver Guide (located on the User Software CD-ROM): UFRII LT printer driver installation and instructions
● Fax Driver Guide (located on the User Software CD-ROM): Fax driver installation and instructions
Assistance:
If you have a problem with your machine and you cannot solve it by referring to the manuals listed above, please
contact our Canon Authorized Service Facilities or the Canon Customer Care Center at 1-800-828-4040 between
the hours of 8:00 A.M. to 8:00 P.M. EST Monday through Friday and 10:00 A.M. to 8:00 P.M. on Saturday.
Install Cartridge
1
Remove the cartridge from the bag.
2
4
Remove the packing materials.
5
Remove the desiccant bag and the shipping tape.
3
Gently rock the cartridge several times to evenly
distributed the toner inside.
6
Remove the short shipping tape.
Place the cartridge on a flat surface and pull the seal
completely out.
Do not pull out the seal at an angle.
7
10
Remove the long shipping tape.
8
Open the front cover.
11
Remove the protective cover.
9
Rotate the unlock lever until it clicks.
12
Push the release button on the left cover of the main unit
to open the left cover.
While grasping the handle of the cartridge holder, pull
the cartridge holder out of the machine until it stops.
13
Hold the cartridge by its handle, then insert it into the
cartridge holder.
14
Push the cartridge holder into the machine as far as it will
go.
15
Rotate the lever to the locked position.
16
Close the front cover.
Be careful not to get your fingers caught.
17
Gently close the left cover until it clicks.
Be careful not to get your fingers caught.
Load Paper
1
Pull out the paper drawer until it stops.
2
4
Lift the lock lever on the side guide to the upright
position and slide the side guide to the groove marked for
the desired paper size.
5
Push down the metal plate to lock.
If you load LTR size paper, go to step 6, or otherwise go to step 3.
3
Lower the lock lever to the left to lock the side guide.
Be sure to set the lock lever correctly. If the lock lever is
positioned incorrectly, the wrong paper type will be shown on
the touch panel display. This may also cause paper jams, dirty
prints, etc.
Detach the end guide (A) by pressing it down. Reattach
the end guide into the desired paper size slots and tilt it
backwards to its original upright position.
6
Fan the paper stack and even the edges.
7
– Make sure the paper stack does not exceed the load limit
–
mark (A) and it is loaded under the small fins (B) on the paper
guides.
Each paper drawer holds approximately 250 sheets of paper
(22 lb bond (80 g/m2)).
8
Load the paper stack of the appropriate size with the print
side facing up.
A4
A3
A5
A4
B5
B4
LGL
B5
11X17
LTR
STMT
LTR
U2
U1
U3
When loading paper, be careful not to cut your fingers at the
edges of the paper.
Set the paper-size detecting lever, located on the left side
of the paper drawer, to match the size of the paper being
loaded.
Be sure to set the paper-size detecting lever correctly. If the lever
is positioned incorrectly, the wrong paper type will be shown on
the touch panel display. This may also cause paper jams, dirty
prints, etc.
9
12
Pull out the paper size plate (A) from the paper drawer.
Push the paper drawer into the machine as far as it will
go.
10
– Be careful not to get your fingers caught.
– For loading paper in the stack bypass, see Chapter 2, “Original
and Paper,” in the Reference Guide.
Stick the appropriate paper size label on the paper size
plate.
11
Reinsert the paper size plate into the paper drawer.
10
Affix Labels
Affix the supplied document size label to the specified location.
1
Align the slide guide (A) to the original size mark “A4/A3” (B).
2
Affix the document size label (A) to the feeder cover so that both indicators (B and C) on the side guide and the document
size label are aligned properly, as shown on the right.
11
Connect the Power Cord and Turn On the Machine
1
Connect the supplied power cord (A) in to the socket and
the wall outlet.
The Basic Features screen is displayed when the machine
is ready to scan.
2
●
<Close the left or front cover.> is displayed:
Make sure that the left or front cover is closed properly.
(See “Install Cartridge,” on p. 5.)
●
<Load paper.> is displayed:
Make sure that paper is loaded in the machine. (See “Load
Paper,” on p. 8.)
●
<Insert the toner.> is displayed:
Make sure that the cartridge is installed properly. (See
“Install Cartridge,” on p. 5.)
Press the main power switch to “I” side.
The Start Up screen is displayed until the machine comes
to the ready mode.
12
Connect Telephone Cables
A
B
Connect the supplied telephone cable (A) to the line jack (B) on the back side of the machine and the wall jack.
Set the Date and Time
Before using the machine, you MUST set the current date and time. The current date and time settings are used as
standard timer settings for functions that require them.
Use the keys both on the touch panel display and the control panel to enter information.
● Press (Additional Functions) to specify additional functions.
● Use - (Numeric Keys) to enter characters.
● Press
(Clear) to delete the entire entry.
● The settings screen for each function is shown on the touch panel display. Press the appropriate keys in
accordance with the messages displayed on this display.
[Additional Functions]
Touch Panel Display
13
[Clear]
Numeric Keys
1 Press
(Additional Functions).
2 Press [Timer Settings].
3 Press [Date & Time Settings].
4 Use
- (Numeric Keys) to enter the date
(month/day/year) and time (in 24-hour/military
time format), then press [OK].
Enter the month and the day using four digits (including
zeros).
Enter all four digits of the year, and the time in 24-hour
notation, as four digits (including zeros) without a space.
Examples:
May 6
9:05 a.m. 4:18 p.m. →
0506
→
0905
→1618
– If you make a mistake when entering values, press
–
–
(Clear) then enter the values again, starting with the
month.
If you want to set the Time Zone, go to step 5.
If you want to set Daylight Saving Time without setting
the Time Zone, go to step 7.
5 Press [Time Zone Settings].
14
6 Select the time zone in which the machine is
located, then press [OK].
– The standard time zones of the world are expressed
–
–
–
–
15
globally in terms of the difference in hours (up to 12
hours) from GMT (0 hours). A time zone is a region
throughout which this time difference is the same.
The time at the Greenwich Observatory in England is
called GMT (Greenwich Mean Time).
The default setting is ‘GMT-5:00’.
– Eastern time (US/Canada): GMT-5:00
– Central time (US/Canada): GMT-6:00
– Mountain time (US/Canada): GMT-7:00
– Pacific time (US/Canada): GMT-8:00
If the desired time zone is not displayed, press [▲] or
[▼] to scroll through the list.
If you want to set Daylight Saving Time, go to step 7.
7 Press [DaylightSaving Time Settings].
– In some countries, time is advanced throughout the
–
–
summer season. The period in which this is applied is
called “Daylight Saving Time.”
If you set Daylight Saving Time, the machine
automatically sets the standard time of the machine one
hour forward at 2:00 am on the specified date.
The default setting is ‘Off’.
8 Press [On], then press [Start Date].
9 Select the month and day from the Month and
Day drop-down lists, then press [OK].
10 Press [End Date].
12 Press [OK].
13 Press [OK].
The selected mode is set.
11 Select the month and day at which Daylight
Saving Time ends then press [OK].
14 Press [Done] repeatedly until the Send Basic
Features screen appears.
16
Set the Telephone Line Type
1 Press
(Additional Functions).
5 Select the telephone line type, then press [OK].
2 Press [Communications Settings].
<Tone>: Tone dialing
<Pulse>: Pulse dialing
3 Press [User Settings] under <Fax Settings>.
If you do not know the type of telephone line you use,
contact your local telephone company.
6 Press [Done] repeatedly to return to the Basic
Features screen.
4 Press [Tel Line Type].
17
Set the Machine for Sending Documents
Guidelines for Entering Information
Before sending documents, you MUST register your fax number, and user name (unit name) in the machine.
The sender information you register in the machine appears in the header of each page received by your recipient.
06/30/2007 15:50 FAX (404)XXX-XXXX
Date
Time
I-Fax Address
or Fax Number
CANON SALES
Sender's
Name (TTI)
0001/0001
Sender Information
Page Number
18
Register Sender Information
You must store your machine’s fax number. This number is printed on the top of every document you send to the
recipient.
Your machine’s telephone number may also be displayed on the touch panel display of the recipient’s machine,
depending on their type of machine.
1 Press
(Additional Functions).
4 Press [Unit Telephone #].
2 Press [Communications Settings].
5 Use
3 Press [User Settings] under <Fax Settings>.
- (Numeric Keys) to enter your fax
number (up to 20 digits), then press [OK].
[Space]: Inserts a space between the area code and the
local fax number (optional).
[+]: Inserts a country code. Press [+] after the country code,
and before the fax number.
[Backspace]: Deletes the last number entered.
If you make a mistake when entering the number, press
(Clear) then enter the correct number.
19
6 Press [Done].
7 Press [TX Settings] under <Common Settings>.
8 Press [Unit Name].
9 Use
- (Numeric Keys) to enter the username
(up to 24 characters), then press [OK].
– You can register only one unit name.
– To delete all the entered characters, press
(Clear).
10 Press [Done] repeatedly to return to the Basic
Features screen.
Enter your name or company name (and department name
if possible) as the unit name.
When you send a document, the recipient’s machine will
print this unit name as the sender information on the
recording paper.
Some fax models also display sender information on the
touch panel display during transmission.
Examples of a unit name:
• Your name: John Smith
• Company name: Canon
• Company name and department: Canon-Accounting
Dept.
If the desired setting is not displayed, press [▼] or [▲] to
scroll to the desired setting.
20
Set the Machine for Network Usage
(imageCLASS MF7480/MF7470 Only)
Connect the Machine to a Network
This machine has a USB connector and LAN connector. If the machine is connected to a network using a LAN
cable, you can print the documents sent from a computer, send documents to a file server, i-fax and send
document attached to an e-mail through a network.
1 Connect a Category 5 twisted pair LAN cable to the 10Base-T/100Base-TXport on the back of the machine.
Connect the other end of the cable to a network router or a hub.
PC with
100Base-TX Connector
PC with
10Base-T Connector
LAN Cable
Hub
– The machine does not come with a LAN cable.
– If you use the machine as a local printer, connect the machine directly to a computer using a USB cable. (See “Installing Software,” on
p. 24.)
21
Specify the IP Address Settings
An IP address must be specified in order to enable communication between the machine and computer.
– It is recommended that the network administrator perform the following procedures.
– Before performing the following procedure, make sure that the machine is turned on and connected to a network.
– This machine is set by default to automatically draw an IP address using DHCP. If your network server or router is configured to provide a
DHCP address, all you need to do is connect a network cable and turn on the machine. The machine will draw an IP address automatically.
– This machine also supports automatic IP addresses using BOOTP and RARP protocols. If you use these protocols, select [DHCP] at step 7 of
the following procedures.
– This machine supports IPv6. (See Chapter 6, “Network,” in the Reference Guide )
1 Press
(Additional Functions).
4 Press [TCP/IP Settings].
2 Press [System Settings].
5 Press [IPv4 Settings].
3 Press [Network Settings].
To set up an IPv6 address, see Chapter 6, “Network,” in the
Reference Guide.
22
6 Press [IP Address Settings].
9 Press [OK].
7 Press [IP Address], then enter the IP address
10 Press the main power switch on the right side
using
-
(Numeric Keys).
If you specify an IP address using DHCP, BOOTP, or RARP,
press [DHCP], [BOOTP], or [RARP]. One of the DHCP, BOOTP,
or RARP settings can be selected at any one time.
8 Press [Subnet Mask] and [Gateway Address] and
specify the settings in the same way.
23
of the machine to “ ” side, wait at least 10
seconds, and then press the main power
switch to “I” side.
Installing Software
Perform the following procedure to install the printer and fax drivers. If you install these drivers, you can print and
fax from your computer. Printer drivers are divided into two types: PCL and UFRII LT.
● PCL: This is the Hewlett-Packard’s PCL printer driver, which includes the PCL5c, PCL5e, and PCL6 drivers. The
PCL5c printer driver is for color printers, while the PCL5e and PCL6 printer drivers are for black-and-white
printers. PCL6 is an advanced version of PCL5e and offers superior printing quality and speed. This machine
supports the PCL5e and PCL6 printer drivers.
● UFRII LT: This is the Canon UFRII LT printer driver. Using this driver, the various data processing tasks
conventionally executed within the printer are appropriately divided between the host PC and the printer to
greatly reduce the overall printing time. The workload can be delegated to match the output data, thus
realizing a significant increase in speed through optimization.
– imageCLASS MF7460 does not come with PCL User Software CD-ROM.
– The following procedures is an example for installing all the drivers for the machine, using the installer on the UFRII LT/FAX User Software
CD-ROM and PCL User Software CD-ROM.
– If you want to install only the PCL Printer Driver with USB connection, select [PCL5e], [PCL6] in [Additional Functions]-[System Settings]–
–
[PDL Selection (PnP)] on the machine before the installation. Next, follow steps 1 through 12 in p. 25, except insert the PCL User Software
CD-ROM instead of the UFRII LT/FAX User Software CD-ROM in step 1.
If you want to install only the PCL Printer Driver with network connection, see Chapter 2, “Getting Started,” in the PCL Driver Guide.
If you want to install only the Fax driver, see Chapter 2, “Getting Started,” in the Fax Driver Guide.
Before Installation:
• Do not connect the USB cable before installing the software. If you connect the USB cable
before installing the software and the Found New Hardware Wizard screen appears, click
[Cancel].
• For Windows 2000/XP/Server 2003/Vista, log on as Administrator to install the software.
• Make sure the machine is turned on before connecting the USB cable.
• On the screen shown at each step, click on the circled button to proceed.
• The machine does not come with a USB cable.
System Requirements
Microsoft Windows 98/98SE
CPU: Intel 80486DX/66MHz or faster
Memory: 24MB or more
Microsoft Windows Me
CPU: Intel Pentium/150MHz or faster
Memory: 32MB or more
Microsoft Windows 2000 Professional/Server
CPU: Intel Pentium/133MHz or faster
Memory: 64MB or more (Server: 128MB or more)
Microsoft Windows XP Professional/Home Edition
CPU: Intel Pentium/233MHz or faster
Memory: 64MB or more
Microsoft Windows Server 2003
CPU: Intel Pentium/133MHz or faster
Memory: 128MB or more
Microsoft Windows Vista
CPU: Intel Pentium/800MHz or faster
Memory: 512MB or more
24
Installation Procedure for USB Connection
1
Insert the UFRII LT/FAX User Software
CD-ROM.
2
If the CD-ROM Setup screen is not
displayed, click [start] on the Windows
task bar → [My Computer].
Windows Vista: click [start] on the
Windows task bar → [Computer].
Windows 98/Me/2000: double-click
[My Computer] on the Windows
desktop.
Open the CD-ROM icon, then doubleclick [MInst] ([MInst.exe]).
3
Select the UFRII Printer Driver, FAX
Driver and Color Network ScanGear.
4
5
6
7
8
9
25
10
13
16
11
14
17
Attach the ferrite core (A) as close as
possible to the B-type side (square) of
the USB cable (B).
12
15
A [Process to Install Fax Driver] dialog
box will appear if drivers that can be
installed with this Installer are already
installed.
Select the desired installation and
then click [Next].
18
Connect the machine and your
computer with a USB cable (A).
If you are using Windows XP, [Found New
Hardware Wizard] dialog box appears.
Select [Install Software Automatically
(Recommended)] then click [Next].
26
19
22
23
20
25
The Color Network ScanGear
installation screen appears. Follow the
on-screen instructions.
If you are using MF7460, skip the Color
Network ScanGear installation.
26
24
Select the USB port you want to use
from [Port]. If you want to add a port,
click [AddPort] and then select the
USB port you want to add.
21
27
27
28
Remove the UFRII LT/FAX User
Software CD-ROM.
If you are using MF7460, you have now
completed installation.
29
30
If the CD-ROM Setup screen is not
displayed, click [start] on the Windows
task bar → [My Computer].
Windows Vista: click [start] on the
Windows task bar → [Computer].
Windows 98/Me/2000: double-click
[My Computer] on the Windows
desktop.
Open the CD-ROM icon, then doubleclick [MInst] ([MInst.exe]).
33
34
31
35
Insert the PCL User Software CD-ROM.
(MF7480/MF7470 Only)
Select the PCL Printer Driver.
32
28
36
Select [Canon MF7400 Series PCL5e]
or [Canon MF7400 Series PCL6] .
39
43
40
44
41
45
37
38
42
Select the USB port you want to use
from [Port]. If you want to add a port,
click [Add Port] and then select the
printer port you want to add.
29
Remove the PCL User Software CDROM. You have now completed
installation.
Installation Procedure for Network Connection
(imageCLASS MF7480/MF7470 Only)
1
Connect the machine to the network
correctly, and confirm that the power
is on.
4
7
2
Select the UFRII Printer Driver, FAX
Driver and Color Network ScanGear.
Insert the UFRII LT/FAX User Software
CD-ROM.
5
8
3
6
If the CD-ROM Setup screen is not
displayed, click [start] on the Windows
task bar → [My Computer].
Windows Vista: click [start] on the
Windows task bar → [Computer].
Windows 98/Me/2000: doubleclick
[My Computer] on the Windows
desktop.
Open the CD-ROM icon, then
doubleclick [MInst] ([MInst.exe]).
9
A [Process to Install Fax Driver] dialog
box will appear if drivers that can be
installed with this Installer are already
installed.
Select the desired installation and
then click [Next].
30
10
13
17
14
18
11
15
19
12
16
A [Process to Install Fax Driver] dialog
box will appear if drivers that can be
installed with this Installer are already
installed.
Select the desired installation and
then click [Next].
31
20
23
27
24
28
21
25
Remove the UFRII LT/FAX User
Software CD-ROM.
29
22
The Color Network ScanGear
installation screen appears. Follow the
on-screen instructions.
26
Insert the PCL User Software CD-ROM.
32
30
If the CD-ROM Setup screen is not
displayed, click [start] on the Windows
task bar → [My Computer].
Windows Vista: click [start] on the
Windows task bar → [Computer].
Windows 98/Me/2000: double-click
[My Computer] on the Windows
desktop.
Open the CD-ROM icon, then doubleclick [MInst] ([MInst.exe]).
33
34
36
Select [PCL5e/5c Printer Driver] or
[PCL Printer Driver].
37
31
35
38
Select the PCL Printer Driver.
32
33
39
43
44
40
45
41
42
Remove the PCL User Software CDROM. You have now completed
installation.
34
Checking the Installation
Check if the drivers are installed successfully and that the machine is selected as the default printer.
If your machine is selected in the [Printer] area when you open the [Print] dialog box from an application, your machine is set as the default
printer.
1 Open the [Printers and Faxes] folder (Windows 98/2000: the [Printers] dialog box).
Windows XP/Server2003: Click [start] on the Windows task bar → select [Printers and Faxes].
Windows Vista: Click [start] on the Windows task bar → select [Control Panel] → [Hardware and Sound] → double-click → [Printer].
Windows 98/Me/2000: [Start] → [Settings] → [Control Panel] → double-click [Printers].
Make sure the corresponding printer driver icon is displayed.
2 Set as default printer.
Click the printer icon of this machine. Click [Set as Default Printer] from [File] menu.
3 Open the [Scanners and Cameras] folder (Windows 98/2000: the [Scanners and Cameras Properties] dialog
box).
Windows XP/Server2003: Click [start] on the Windows task bar → select [Control Panel] → [Printers and Other Hardware] → [Scanners
and Cameras].
Windows Vista: Click [start] on the Windows task bar → select [Control Panel] → [Hardware and Sound] → double-click → [Scanners and
Cameras].
Windows 98/Me/2000: [Start] → [Settings] → [Control Panel] → double-click [Scanners and Cameras].
Make sure the corresponding scanner driver icon is displayed.
4 Check if the [Color Network ScanGear] appears in the program list.
Windows XP/Server2003: Click [start] on the Windows task bar → select [All Programs].
Windows Vista: Click [start] on the Windows task bar → select [All Programs].
Windows 98/Me/2000: [Start] → [Programs].
Make sure the [Color Network ScanGear] is listed in [All Programs] (or [Programs]).
35
Manual CD-ROM Menu
The Manual CD-ROM Menu is software that enables you to select and view PDF Manuals included on the CD-ROM
via your computer screen. Follow the instructions below to use the Manual CD-ROM Menu.
System Requirements
The Manual CD-ROM Menu can be used in the following system environments.
Operation System
Microsoft Windows 98/98SE
Microsoft Windows Me
Microsoft Windows 2000 Professional/Server(Service Pack 4 or later)
Microsoft Windows XP (Service Pack 1a or later)
Microsoft Windows Server 2003
Microsoft Windows Vista
Mac OS 9.x
Mac OS X*
* Only in Classic environment.
Computer
– Any computer that can run the operating system listed above.
– A display with a resolution of 1024 x 768 pixels or higher.
Depending on the configuration of your computer, some functions may not operate correctly. If the PDF manual does not open from the
CD-ROM Menu, open the PDF file directly from the [us english] folder on the Manual CD-ROM.
36
Using the CD-ROM Menu
This section describes how to use the CD-ROM Menu.
When you insert the User Manual CD-ROM provided into the CD-ROM drive, the Language Selection screen is
displayed. Clicking
on this screen displays the following menu.
● Click [Reference Guide] to read the Reference Guide. After clicking on the guide, Acrobat Reader starts, and the
PDF manual is displayed.
● Click to return to the Language Selection screen.
● Click to exit the CD-ROM menu.
37
Trademarks
Canon, the Canon logo and imageCLASS are trademarks of Canon Inc.
Microsoft, Windows, Windows Server and Windows Vista are trademarks or registered trademarks of Microsoft
Corporation in the U.S. and/or other countries.
Adobe and Adobe Acrobat are trademarks of Adobe Systems Incorporated.
Mac OS is a registered trademark of Apple Inc.
Ethernet is a trademark of Xerox Corporation.
All other product and brand names are registered trademarks, trademarks or service marks of their respective
owners.
Specifications subject to change without notice.
Copyright
Copyright © 2007 by Canon Inc. All rights reserved. No part of this publication may be reproduced, transmitted,
transcribed, stored in a retrieval system, or translated into any language or computer language in any form or by
any means, electronic, mechanical, magnetic, optical, chemical, manual, or otherwise, without the prior written
permission of Canon Inc.
Disclaimers
The information in this document is subject to change without notice.
CANON INC. MAKES NO WARRANTY OF ANY KIND WITH REGARD TO THIS MATERIAL, EITHER EXPRESS OR IMPLIED,
EXCEPT AS PROVIDED HEREIN, INCLUDING WITHOUT LIMITATION, THEREOF, WARRANTIES AS TO MARKETABILITY,
MERCHANTABILITY, FITNESS FOR A PARTICULAR PURPOSE OF USE OR NON-INFRINGEMENT. CANON INC. SHALL
NOT BE LIABLE FOR ANY DIRECT, INCIDENTAL, OR CONSEQUENTIAL DAMAGES OF ANY NATURE, OR LOSSES OR
EXPENSES RESULTING FROM THE USE OF THIS MATERIAL.
38
CANON INC.
30-2, Shimomaruko 3-chome, Ohta-ku, Tokyo 146-8501, Japan
CANON U.S.A., INC.
One Canon Plaza, Lake Success, NY 11042, U.S.A.
CANON CANADA INC.
6390 Dixie Road Mississauga, Ontario L5T 1P7, Canada
CANON EUROPA N.V.
Bovenkerkerweg 59-61 1185 XB Amstelveen, The Netherlands
CANON FRANCE S.A.S.
17, quai du Président Paul Doumer 92414 Courbevoie Cedex, France
CANON COMMUNICATION & IMAGE FRANCE S.A.S. (Pour les utilisateurs de l’imprimante laser uniquement)
12, rue de l’Industrie 92414 Courbevoie Cedex, France
CANON (U.K.) LTD.
Woodhatch, Reigate, Surrey, RH2 8BF, United Kingdom
CANON DEUTSCHLAND GmbH
Europark Fichtenhain A10, 47807 Krefeld, Germany
CANON ITALIA S.p.A.
Via Milano, 8 20097 San Donato Milanese (MI) Italy
CANON ESPAÑA, S.A.
c/ Joaquín Costa 41, 28002 Madrid, Spain
CANON LATIN AMERICA, INC.
703 Waterford Way Suite 400 Miami, Florida 33126 U.S.A.
CANON AUSTRALIA PTY. LTD.
1 Thomas Holt Drive, North Ryde, Sydney, N.S.W. 2113, Australia
CANON CHINA CO., LTD.
15F Jinbao Building No.89 Jinbao Street, Dongcheng District, Beijing 100005, China
CANON SINGAPORE PTE. LTD.
1 HarbourFront Avenue #04-01 Keppel Bay Tower, Singapore 098632
CANON HONGKONG CO., LTD.
19/F., The Metropolis Tower, 10 Metropolis Drive, Hunghom, Kowloon, Hong Kong
FT5-1105 (000)
© CANON INC. 2007
PRINTED IN JAPAN OR CHINA