1
ffilffil
Mu'.purp.ses HD
DVR
H F ifi,EI+
USER I,4ANUAL
EFii,EEE / pvxosoacr BoonhsoBaren
c
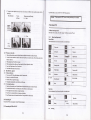
1.3 Multi-Purposes ED DVR rppearance and ferture icons
fmilid with the butuns dd operations according to the lollowing pictues
t Brief Intmduction of Multi-Purposes HD DYR
Be
This is a
endy ed fdhioMble design Multi-Purposes HD DVR. It cm
Mega Pixel digital
cmm drd
b€ used il Cs Black Bo4 SpofDVR ed a 12
suppore 1080p video rccorditrg. It uses latest H.264 compression t€chnology md cm be
di@tly od TV lhrcugh HDMI onnection. With a wide rmge of ecessodes, customers cm Hord HD f 080p
vid€o duing driving, rycliry, skiing, hiking or sorkeling Ir comes with m optional md detrchable GpS module b
keep @k of )ou rcub, speed &d locarion. lt is the snaltest HD DVR with remte conrol available in the mdket.
play€d
l.l PC Syslem Requiremetrts
Tte PC rys@ n€ds b oeet Lbe fouowing requiremenb:
. Windows vishr<P,^ir'in 7 operaring ryst€m
. InEl Pentim 4 2.8cHz CPU or above (recommendd 3GHz)
. Atled512 MBRAMorabove (remmended lcB)
. Shddd USB2.0 pofr or above
. Atledt64MBvideocddorabor€
.
1.2 Ferturcs and functions
HD CtrBIrck Box, auto continuous md semless recording when stding
I
I
the
cil
2 Mega Pixel digital cmera
Outdoor/Extue spot D\R (cycling, skiing, hiking md snorkeling etc)
HDMr HD Audio-Vids outpur
USB Hild disk
1
aom (720p30 cmera mode)
Multi-scile white balece compeffation
Exposre mmp@satiotr
4xdigital
Built-in Micrcphotre md speaker
High capeity Lithim ion bafiery
ofe&h bu@
Name
FuDctiotrs
.
Press
liis butun b pwe! ON/OFF
. Pr6s dom
Mode
Kry
Up
L9
OSD main menu
. Pl6 doM b sribh DY cmsa mdAV mode
' Undq
Ok
b displry
lhe
m@ Plrybek
mode, press
dom to ch€ck a[ the photos.
Press
aubmatically; p;ss again b&k b mmuat operdionDV Plrybak dode. Dress dom to select video files b Dld.
again to plrry a stide
. Under
. Undq
rhe
mmu catalose, press dom to nove up the option.
Pbyb&k mode, press t[e butbn to sbp @ording. Press qain to
the
Under the
20
Power on the DVR. Press M€tru bufion frst. Then press Lcft/ Right buron to selecr Sefling iem. press
UpDom butun to sel*t the highlighting Date/Time. Press OK kry to enter
. Under
Left
the menu cataloguq press
do\m to move lett
Press
the option
P.oss
tught
'
Press Menu bulton
Under the menu catalogue. press do$n to move righr the option
' Under the menu catalogue, press dosn to more dom the option.
Under the cmera mode, press rhe bufion to choose rhe sel_tuimer oprion
Dorm
Up/Dom button to highlight every word.
Leftl Right bubn b adjust value. Press Ok key to
2.5.2 Sding Langilage
I Pouer on th€ DVR
first. Thm press Left/ tught buson to select Sening ibm. press
highlightirg Lmguage. Press OK key to enter
Press Up/Dom bution b select the following lmguqe: English, Simplifred Chinese, Tmditional Chmese. After
the selection, press Ok kq, b cotrfm the setting.
Up,Down buflon to
. Itr DV md cmeramode.
Play brck
1.4
press this bufron to
2.
plry brcl
D\T. LED
LED
Color
Polrer/ Record
Press Menu bufion
sel*t
ltre
2.5.3 SefiingBepTone
1. Pouer on the DVR.
About LEI)
The table below
save the sering.
b quit
Meaning
Bluc
2.
Press Menu butun frst. Then press Left/ tught button to selcct Setting item. Press the
Up/Dom bu$on to seltrt the highlighting B*p Totre. Press OK key to enter
Press Up/Dom buton to ch@se OFF/ ON. Press Ok key to confim the se$ing.
2.6 Record/Playbackavideo
Red
Chtrgins
2.6.1
Looprccordingmode
Press Menu buton. th€n press Up,4)owa b entr Reording Seting, lhen to select loop mod€ or difrerent
Iime Zone for loop l@rdi4. PHs OK kry to mter
2. In toop recordirg mode. @orditrg Eill std when
l.
Red
Yellon
GPS
Getting Started
2-6.2
Read this chapter to
knos how to
operare the
Multfpqoses HD DVR.
1 Plug in
2.1 Inserting a TF card
Insedng a TF cild inro the DVR prorides nore sp&e to store lideos- imqes or other files
Pleasc use high-speed TF ctrd neetiry rhe specillcation of SDHC. ( CLASS 4 or above )
2.2 Charging the
The baftery
ce
be
2.
1
2
a
srddtrd 5V2A barery chqer
2.6.1
D\rR
Press Pouer bufron to
tm
2
ON/ OFF . Or ptug
inb
rhe
cr
chtrging pofr
.
3
4
2.4 Switch Mode
There ae 3 modes inctudhg Record. Cmera md
5
Tape. press
b
the DVR-
wlen cPS sisnal js l@r"4, EI
pic@
s<ib
.ril t"
setrching will be
"r'.*ed
will
itr Cmem mod€, location
on th€
std automatically
dispta
be recorded
aubmatically
Camera mode
battery
chqed septrately by
the GPS module
3. When taking
I
2.3 Turtring on
GPS tracking
fffi, then press Up,Dom key to select Mmual
Up/Do*n to select DV+AV or Recording node (mute recording),
Reording a rideo file
Prcss M€nu buson
Press
press
OKkry to confim
DVR lfte defarlt mode is DV mode.
Select a view wilh tle LED morutof,
Press OK to confm re@rding.
Press OK qain to stop mrding
The video file is au@matically saaed sith the only file nme.
Power on ihe
MODE buron to s\\itch.
Affention:
2.5 Before the operation
Before using the DV& it is necessry to
2.5.1 SettingDatc md Time
l. Milimum l€ngth of
do some basic sefrings such as Da.c
ed
Time, Lmguage md Becp Tone
each @orded
automatically split md saved
tr
rideo file is 3.66c Wlen it reehes the maximm, the rc@rding is
molher fi]e.
2. With higher resolution, the file is bigg€r md recording time length is
21
22
shotu
3.
The
Eevi*.atio captued
on the LCD screen vtries bffause ofdifferent video resolurion
strinss.
See the
table below:
Video
Resolution
I6:9 Ratio
ru
2.6.5 Playitrgyourvideolil6
1. Under the R@ord mod€, press the plryb&k bufion b display
2. use the fou Move butuns b scrorr the vid@ files. p*s ok
3 Whfl pla)ug back. Press Ol, (e1 o pase
4. men wdching lhe video file, move Zoom bufron Up/ Down b adjust the volme.
5 Press Lef, tught button to Slow/ F*t foMtrd
6 PressMode busonb&kbRtrordmode.
2.7 Take /Review a picture
2.7.1 Takinga still pidure
I Poweron the DVR. Press Mode bufion to shift b Cmomode.
2. SeI6t a view wilh the LED monibr
l. Press fie Ok kry to capMe rhe mee.
4. The picm is aubmdica[y saved with tle onty fite nme2.7.2 Reviwing the pidurs
1 .
Under the Cmera mode, press Playbaok buton b disptay lfte l&st pictus on the LCD screen.
2. Use the fou Move bufions to scroll the pichres_ prcss Ok kry b selet th€ picft.
3. Move righ$ild rhe Zoom buhn to @larye the pictu.
4. Press Ok key b automdically play rhe pictues s slideshow.
5 Press Playback bufron to rhe thmbnail interface. press qain bak to omem mode
rhe USB cable included.
1080P video
plry brck.
mm@d b mTY cmer1
tapmg ae not
3 Operating DYR
3.lRecord and tape mode
This mode is for recordiry a
3.1.1
ridm file or bping The titcs de
saved
inb TF cild
Record and tapc mode
Record Mode.
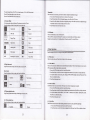
About the hdicatiotr of e&h
ion od
Vid@ mode
rymbo_L
w
&e bble
EI
LED Lishl
Roording
IEH
m
TF card
EI
@
Mebi4
ffi
Wtri&
x
mode
balae
Re@rding
x
MuE
Ba4q
Exposre
Digital Z@E
Scene
E
Color
E
I
efrets
Expotue shifl
2M/O1/01
Reslutiou
72@30
m:28:39
belo*
I
tffi
laoo I
Effi
the latesr files otr the LCD screen.
key to sel*t lhe video. press ok koy again to play
back the r ideohle
2.9 Connecting the DVR ro HD
HDMI cable to comect to HD TV for
Taking
ffia
2.8 Connecting PC
Comect the DVR to you computer with
Use
picms md focusing
16,9Rdio
Pr€vi€w
01:
ti6e
07[
Date md Time
Loop recording
E
GPS
Tape mode:
About the indicatiotr
ffil
@il
ofe&h i@n ed rymbol e the kble below
Tap"
Ef,
Tape mode
2@a/o1/o1
BatEry
0l:
3w
TV
3.1.2
Zooming
23
24
Date md Time
TheopticalmqniflcationoftheDVRis4xdigitatzooming. (1440xl080pRecordmode)"
Move the Zoom bufrotr right b aom in the scMn.
Thumbtrails
Under lhe cmera or record mode, press Play brck buson to display rhe
Move lhe Zoom button lell to zoom out th€ scr€en.
3.2 Camera Mode
Use Cmera mode to take
a
L
2
3.
still pictuc. The pictues
e
saved
hto TF cad
4
About the indication of erch icon md
@I
tffii
1800 I
Cmera mode
H
LED Lieht
Da@
ed
Time
rxlMX
Digital Zoom
@
Metering mode
ffi3
White balmce
1375
Rmaining No. of
brck buson. There is 6 thumbnail images or vid@ files on the LCD scrcen.
buton to s€let the next highlighting inage or vid@ fite. press Ok key to display the image
or playbtrk vids f,les or kpe recording in full-screen mode
kess Playbrck bufion b shii bek Index mode.
Press Play
Press the four Move
Bahery
Exposure
[]
TF Ca.d
E
Color effects
3.5 USB mode
,
cause USB mode to comect $irh the host PC.
Wlen the D\aR is @mected sith the ho$ PC. il appem N a removable disk in rhe WhdoNs explorcr
Remak: the device must b€ set " mrdiry selting" b Mmual b read &e TF cmd tr USB drive.
You
N
U
picms
4 Menu Operations
Exposure shift
3M
Read this chapter
Pictue Pixels
b
knoN ho\r
3.3 Play back mode
Using Plry brck mode b display all th€ vid6 ftles
ll
7201
I
Egefl
rT6'I
lrl
E/8
Resolution
BatEry
Frme Number
Play/
Pilse
D\R.
Pichre playback icon
About the indication of erch icon md
tffil
Itl9{.{l
Resolution
spbol.
see the tablo
25
Mou buton b displa' the vido itms menu.
sct
s
Auto, the
,
,1.1.2.
Video rcolution
Use Resolution item to set
r
Eord rGolutiotr. The lager
screen. the more storage sprce is occupied.
l. Power on the D\aR ad make sre thd it is uder Rmrd mode.
2. Press Menu bufroq u* fou Mo\e bubtr b highlight Inqe Resolution im. press Ok kry to display sub-menu.
3. UseUp,aDowbufionbsel@t1080P30 (1920r1080P), 1080P30-2(t440x1080P),720P30(1280xx720P).
Pr""" Ok keyto confm lhe se8i4.
butun qain to Sit.
Prcss Metru
4.1.3. Color Effect
below
tffil
lAutol
firnctioN
2. PrcssMenubutuqusfouMo\[email protected].
3 Use Up/Dom buflon b ch@* mong Auto, Tmgsbn, D4000, D5000, Daylight, Cloudy md Fluoresmnt. hess
Ok key b confm the sug.
4. Press Menu butuD 4u b qdt
4.
3.4.1
the
con*tion in drfrffit 6loE mder ditrerent light onditions. W}len the white balmce is
DVR compensabs diffeMt light onditioG autoEahcally.
t Poweron the DVRad male src tlat it is md€rRecordDode.
3.4 Picture playback mode
Using Picture playbrck mode to display all the images saved itr rhe
ad fDe-tue
This item is for
DVR
About rhe indication of erch
ffit
the retup
Wtile BalaDce
4,1.1.
saved m the
b conhgre
4.1 Video menu
Under lhe re@rd mode- press
ttl2Sol
fimbnails of images
Power on the D\rR md make sirc that it is in Cmera or Reco.d mode
Shdild Color Brom, FiLn, Bl&k^Vhite md Bight.
thati!is mdq Record mode.
butun b highlight Cotor Etr@t irem. press Ok kry to display sub-menu.
This D\rR cm record sevtral color etrmt including
Exposure
t
2
Power on tho DVR
Press Menu
buton,
ed
make sue
use four Move
26
3
Press
4.
Prcss
Up/Dom bufion b select Otr (Stmdild color), BroM, Film, Bltrk^Vhfte md Brisht.
confm the sefiing.
Menubutonqain to quit.
press Ok
kry to
l.
2.
3
Power on lho DVR
dd
make sure that it is under Cmera mode.
four Move buflon to highlight Wlite Balmce ibm. Press Ok key io display sub-menu.
Up,Dom bufrotr to choose mong Auto, Tungsten, D4000, D5000, Daylight, Cloudy md Fluorescent.
confm the seftirg.
Press Menu bufton, use
Use
Press Ok key to
,[.
4.2 Record/Camem playback menu
mmqe the files saved in TF ctrd.
Press Menu bufron again to
qu(.
Use Playbmk menu to
I.J.2
4.2.1 Deletion
Use this irem lo delete filcs
l.
Imaee Rcsoluriotr
Power on the DVR md malie stre ihat it is mder Record mode. press plryback bufron, rh@ press Metru burbn
Thmbnail Imqe Menu.
1.
2.
to display video Iiles in
2
Press Menu button, use Left,lRight Move bufton to select
If you
del€te one
pictue at one time, thmbnail
pictue to delete, md
screen
will
NO,ryES/ALL irems.
be displayed
qain
Use
fou Move bufion to find
which
L
fmction to lock
the frl€s
Power on tho DVR
to display video fiIes
2.
in
case they
tre accidetrtally deleted.
it is under Record mode. press playbrck bufton, tten
Thmbnail lmqe Menu
ild
Poweron the DVR
sub-nenu.
3.
4.
Use Up,Do\ra bu(on to
Press Metru
*let 3M, 5M, 8M or 16M
Ait.
(some models). Press Ok key to
confm
the seftiag.
buton eain to
buton to delete.
press Mcnu
4.2.2 Protdion
Use this
im€e resolution. The lager screen, ihe more details and the more storqe sprce is occupied.
dd nale sure that it is under Cmeramode.
Press Menu bufion- use fou More buuon to highlight Image Resolution itm. Press Ok key b display
Use Resolution itcm to set
make suo rhat
press Menu bufron
,1.3.3 ColorEffed
This DVR ce rocord sereral olor etrrct including Stmdmd Color Brom- Film, Blacvwhite ild Bnght.
L Power on lhe DVR ild male sre thd it is mder Cmera mode.
2. PressMstrubuttoqu*foEMo\cburcntohighlBhlColorEtrstih PressOkkertodispl4vsub-menu.
3. Press Up/Do\rn buson lo *let Of (Shdild mlor). Brc$a, FiLr- Black Vhite ed Brieht. Press Ok kry
Use four Move bufion to find what files to protect. Prcss Ok kry bulton to swibh ro ptayback mode. press Menu
butson qain, use Up,Down Mo1€ buson to selecl which one to Fo@ot. press Ok key bufion to quit. The filcs
to
4.
confm the ssDg.
Prcss Menu buuon
qah b
quit.
withffi rc protectd.
4.3,4 Self-Timer
Aftention:
3
To
ulock the
fi1es, repeat the steps above.
Afler being ulocked.
no fiIes
1.
2.
3.
,[.
Press Menu button again to quit.
4.2.3 AutoPlay
This DVR cm AutoPlay
l.
ad aubnatically replay all rhe ridms in order
ed make sw rhat ir is uder R@rd mode.
Power on the DVR
a pic@ of ]'omelf
ad ma[e we lhat it is uder Cmera node.
Metru bunon- us four More buflon to highlight Self-Timer item. Press Ok kry to display
Up,/Dosa buen b slet S€lf-Timer fuction. Press Ok key b confim the sermg
Use Sef-Timer fmction to
re wit!ffi
press playb&k buron, then press playback
buton to enter Thumbnail Image Menu. Press Ok kry to seler 6les md then press Menu button to disptay
hle
Power on lhe DVR
Press
Press
Press Menu
sub-menu.
busonagaintosit.
4.4 System menu
Sysrcm Menu is used to set ofier fimctioE ol lhe DVR.
Plryback \4deo m€nu.
2.
Use Up/Down move
3
Under lhe video lile Thumbnail Image menu. Eess Ok kry buson b sel*t the file needed, LCD scrc€n will plry
it in full screen. Press Monu buton to displry Deletion menu, use Up/Doila Move buron to choose Delete Onc,
Proed files or Dclete All
burcn to
ae displayed aubmatically
select the
it;
Play ALL. Thcn press Ok ke). In the playback mode.
aI
the vialeos
4.4.1 Auto Off
This fmction allows the cmera to automatically porver oft afrer some idle time to save enery.
1
2.
Tum on the DVR. Press Menu buton to ent€rsys@m menu.
Use
fou
Use Up/
Move bulon b highli+t Auto Otritem Press Ok key b display sub-nenu.
Dom Move bufton to sld ON/ OFF, I min, 3 min, snins. Press Ok kry to confm
4. PressOkkrytosbpPlrybrck.
,1.3
Camera mode
Under the Cmera mode, press Metru buron to display cmera item menu
4.3.1
White Balmce
This iEm is for corection in different colom mder differenr tisht cotrditions
4.,1.2
TV-Out Fomat
TV option b set
Use the
l.
2.
3.
the
Tv-out fomat ofyow ilea.
Power on the DVR. Press Menu buson lo enter rystem menu.
Use fou Move butbn to highlight TV{ut Fomat option. Press Ok kry to display sub-menu
Use Up/ DoBn Move bufron to select NTSC or
PAl.
28
Press Ok
kry to confm the setting.
the
,t.4.3 tr'omat
Use this
5
fdction to Fomat the slorage medim. Note that all
rhe data stored in lhe medium
I Powtr on the D\.R.. Press Menu butun to mter rystem menu.
2. Use fou Move bufion to highlight Fomat option. press Ok key to enbr sel*tion
3 Use Left/Right bufion to setecr No/Yes. press Ok kry to confim
4. The medim is fomafied.
4.4.4
wiil
be sone
mode.
Restore factory defeults
Tlis fmction will r€store all the s€flings to the facbry defaulb.
l
2.
3
Power on the DVR. Press Metru button to enbr sys@m menu.
fou Move bufrotr to highlight Restore Facrory Defaults. press Ok kry to etrter seletion mode
Use Left,Right bufton to selecr No,/Yes. Press Ok kry to confm.
Use
4.4.5 Flicker Frequency
Use this frrnction to set the
flicker frequ@cy in you eea.
Set Flicker Frequency:
L
2.
3.
Power on the DVR. Press M€nu bufion to enter ryst€m menu.
Use four Move buflon to highlighr Flicker Frequ€ncy option. press Ok
Use Up/DoM butbn to choose 60Hz or 50H2. hess Ok kwburon b
kry to displry
confim
sub_menu.
GPS player
3l
32
'Fomatthe mcmory cild. Before
Mcmo4 ctrd contains non-DCF
fomafiins. make sure to backup files fir$
. Rcmo\c lhe hatteN first ed then reinstall
imaaes from other cmcras.
All
the butlons
dc in\ alid
Shot-circuil $ien connccling thc
DVR \ith other equipments.
Accessories
I
Mounting Clip (optional)
Car charger (optional)
9. CD diver
10. Remote control
l1 HDMI cable (optional)
12 Battery charger (optional)
Carmountingbracket
2 Bicycle
7.
8
mounting bracket
3. User manual
4. USB2 0 cable
5.GPS module (optional)
6 Water proofbracket (optional)
Appendix
The DVR is suddenl]'
lumcd
off
Auto OfT Fuction is
2 Low bafiery
1
3
Otr.
. Install the ballery prcperb
. Chqe the basery
' Tum on qain D\R
Specifications
. Replace/cheee
Imase SeNor
lrl 5 C\IOS i 0xega-pi\el
Eflectire pirels
\{ea-pNel
SD card. SDHC cild ( cl6s 4 or the hish-speed cild abo\
the
bafiea
.when in loop recordine modc,the
devicewillbe po*eroff
aubmaticallv ifit doesn't link
Sensiti\ iN
the car
Color effects
W}len the batory indioatortums rcd, replace
Lcns
thc batery instmtly.
Zoom
usiag the sefaimer
Srndild- ra. filD. black- Nhite brishi
Fi\ed FGus
regc
The DVR tums ofl when
Still imases
Nomal, 3km
or infmite distilce
Close-ur,;ocn
Fomat: JPEG (EXIF22r, DCFDPOF
Image resolution:
Sccnc bryond the focus
rmge
.
Please select the
Nomal or Macro mode
within eflective focus rdge
3 1.2 Macro Function)
Memory cad
cil
sensor
0
( See
Section
\4deos
lM. iM.8M( SoRt!ile Intcryolation),
Resolution,
1920
r
1080
lo&s,1{40 X
not be
33
16M( Softstre Interpolation)
Oualih: Auto
Fomat: H.264 (MOV)
34
1080p
30fps.
1280
x
720 30fps
ZM
Vido:
4X Digital Zoning(1,t40x1080P30 Re@rd mode)
Cedigital vid6 l@rd6. 4x Digibl z@ming
Plo,bact still
Te
IFI
imry:
Digital
Zom
EX
(Maimm)
Ys
t.5' TFT (480x240 pixeli)
Display
whiE B.lme
Aub
Tugsten
Daylight
Cloudy'
Fill lieht
Flurcnt
@Dmdiotr
Selftimq
PC
Ofr, On, 3
smrls,
Fome
Stuffi
wnds, l0 @nds,
NTSC/PAL
Etechonic Shutter
l/16-l/10000
Aub Power
5
USB2.0 (Hirn{oeed)
hbrfe
AV Output
-2.0EV+2.oEV
Of
Smni
On/ Otr,
I
Lithim
ion barery
3
5
minubs
15
sMnds,20 sonds