1
U S E R R EF ER EN C E G U I D E
© Copyright 2005-2015, M iva Inc.
Miva®, M iva Merchant® and Miva Central® are registered trademarks of M iva Inc.
UPS, THE UPS SHIELD TRADEMA RK, THE UPS REA DY MA RK, THE UPS DEVELOPER KIT MARK A ND THE
COLOR BROWN ARE TRADEMARKS OF UNITED PARCEL SERVICE OF AM ERICA, INC. A LL RIGHTS
RESERVED.
Intuit, the Intuit logo, Qu icken, Qu ickBooks, TurboTax, Lacerte, ProSeries and QuickBase, among others, are registered
trademarks and/or registered service marks of Intuit Inc., or one of its subsidiaries, in the United States and other countries.
All rights reserved. The informat ion and intellectual property contained herein is confidential between M iva® Inc and the
client and remains the exclusive property of Miva® Inc. If you find any problems in the documentation, ple ase report them to
us in writing. M iva® Inc. does not guarantee that this document is error free. No part of this publication may be reproduced,
stored in a retrieval system, o r transmitted in any form or by any means, electronic, mechanical, photocopying, recording or
otherwise without the prior written permission of Miva® Inc.
This document, and all materials, products and postings are made available on an "as is" and "as available" basis, without an y
representation or warranty of any kind, express or imp lied, or any guaranty or assurance the document will be available for
use, or that all products, features, functions or operations will be available or perform as described. Without limiting the
foregoing, Miva® Inc is not responsible or liable for any malicious code, delays, inaccuracies, errors, or o missions arising out
of your use of the document. As between you and Miva® Inc, you are assuming the entire risk as to the quality, accuracy,
performance, timeliness, adequacy, completeness, correctness, authenticity, security and validity of any and all features and
functions of the document.
The Miva Merchant® logo, all product names, all custom graphics, page headers, button icons, trademarks, service marks
and logos appearing in this document, unless otherwise noted, are trademarks, service marks, and/or trade dress of Miva® Inc
(the "Marks"). All other trademarks, co mpany names, product names, logos, service marks and/or trade dress displayed,
mentioned or otherwise indicated on the Web Site are the property of their respective owners. These Marks shall not be
displayed or used by you or anyone else, in any manner, without the prior written permission of Miva® Inc. You ag ree not to
display or use trademarks, company names, product names, logos, service marks and/or trade dress of other owners without
the prior written permission of such owners. The use or misuse of the Marks or other trademarks, co mpany names, product
names, logos, service marks and/or trade dress or any other materials contained herein, exce pt as what shall be permitted
herein, is expressly prohibited.
Copyright 2005-2015, Miva Inc. All Rights Reserved. Publication Date: 02/28/2015
User Reference Guide DRAFT
Contents
SECTION 1: ADMIN GUID E REFER ENCE ....................................................................................................................................... 1
ABOUT MIVA MERCHANT .................................................................................................................................................................... 1
CUS TOMER WORKFLOW IN YOUR STORE ................................................................................................................................. 2
ABOUT THIS GUID E ................................................................................................................................................................................. 4
GEN ERAL INFORMATION ABOUT VERS ION 9 ........................................................................................................................... 4
THE ADMIN BAR ......................................................................................................................................................................................... 4
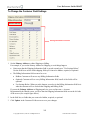
Menu Button ........................................................................................................................................................................................... 5
Version 9 Tabs and Sections ............................................................................................................................................................... 5
History..................................................................................................................................................................................................... 7
Bookmarks.............................................................................................................................................................................................. 8
Store Search and Screen Search....................................................................................................................................................... 10
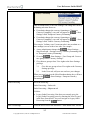
OT HER NEW FEATURES OF T HE VERSION 9 INTERFACE...................................................................................................................... 11
Breadcrumbs ........................................................................................................................................................................................ 11
Ellipsis Dots on Tabs.......................................................................................................................................................................... 12
Edit and Quick Edit............................................................................................................................................................................. 12
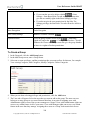
HOME/ MAIN LANDING PAGE ........................................................................................................................................................... 14
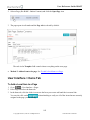
SUPPORT ..................................................................................................................................................................................................... 15
Method 1 - Home Page....................................................................................................................................................................... 15
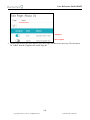
Method 2: Menu Button ..................................................................................................................................................................... 16
CATALOG .................................................................................................................................................................................................... 16
CAT ALOG > PRODUCT S TAB.................................................................................................................................................................... 16
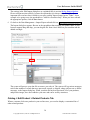
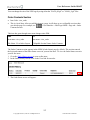
To Delete a Product............................................................................................................................................................................ 17
To Create a New Product .................................................................................................................................................................. 17
Catalog > Edit Product > Images Tab............................................................................................................................................ 29
Catalog > Edit Product > Related Products Tab.......................................................................................................................... 38
Catalog > Edit Product > Attributes Tab....................................................................................................................................... 40
Catalog > Edit Product > Inventory Kit Builder Tab .................................................................................................................. 52
Catalog > Edit Product > Inventory Variants Tab ....................................................................................................................... 58
Catalog > Edit Product > Categories Tab..................................................................................................................................... 65
Catalog > Edit Product > Upsold Products Tab .......................................................................................................................... 65
Catalog > Edit Product > Inventory Tab ....................................................................................................................................... 66
CAT ALOG > CATEGORIES TAB ................................................................................................................................................................ 68
To Create a New Category ................................................................................................................................................................ 69
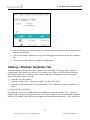
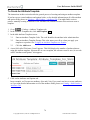
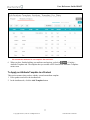
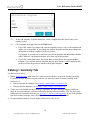
CAT ALOG > ATTRIBUTE TEMPLATES TAB............................................................................................................................................. 75
To Create An Attribute Template ..................................................................................................................................................... 76
To Apply an Attribute Template to a Product ................................................................................................................................ 77
CAT ALOG > INVENT ORY TAB.................................................................................................................................................................. 78
Catalog > Inventory > Inventory Settings Section........................................................................................................................ 79
Catalog > Inventory > Email Notification Tab ............................................................................................................................. 80
CUS TOMERS .............................................................................................................................................................................................. 80
CUST OMERS > CUST OMERS TAB............................................................................................................................................................. 80
To Create a Customer Account......................................................................................................................................................... 81
CUST OMERS > CUST OMER SETTINGS ..................................................................................................................................................... 82
To Set Password Security for Customer Accounts ........................................................................................................................ 82
Customer Lost Password Email........................................................................................................................................................ 83
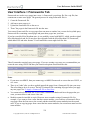
CUST OMERS > A VAILABILITY GROUPS.................................................................................................................................................. 84
Examples............................................................................................................................................................................................... 85
Copyright 2005-2015, Miva Inc. All Rights Reserved.
Publication Date: 02/28/2015
User Reference Guide DRAFT
To Use Availability Groups............................................................................................................................................................... 86
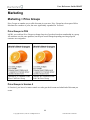
MARKETING .............................................................................................................................................................................................. 88
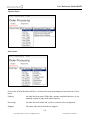
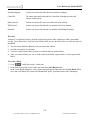
M ARKETING > PRICE GROUPS................................................................................................................................................................. 88
Price Groups in PR8........................................................................................................................................................................... 88
Price Groups in Version 9 ................................................................................................................................................................. 88
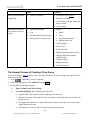
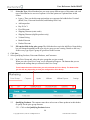
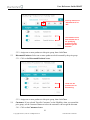
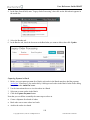
The General Process of Creating a Price Group .......................................................................................................................... 89
Price Groups Can Affect Each Other .............................................................................................................................................. 92
Price Group Types .............................................................................................................................................................................. 92
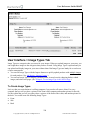
M ARKETING > COUPONS........................................................................................................................................................................121
To Create a Coupon with a Single Code.......................................................................................................................................122
Eligibility in Price Groups and Eligibility in Coupons ..............................................................................................................128
To Create Generated Coupon Codes.............................................................................................................................................129
M ARKETING > UPSALE...........................................................................................................................................................................132
To Create an Upsold Product .........................................................................................................................................................132
Changing the Upsale Options .........................................................................................................................................................136
Pages Related to Upsale Products .................................................................................................................................................138
M ARKETING > A FFILIATES TAB............................................................................................................................................................140
Affiliate Procedures/Content from old Doc ..................................................................................................................................140
To Create an Affiliate Account .......................................................................................................................................................141
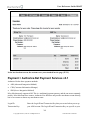
Paying Affiliates ................................................................................................................................................................................142
To Pay an Affiliate ............................................................................................................................................................................142
To Manually Adjust an Affiliates Earnings...................................................................................................................................145
M ARKETING > A FFILIATE PAYOUT S TAB............................................................................................................................................146
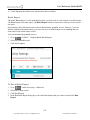
M ARKETING > SETTINGS........................................................................................................................................................................146
Marketing > Settings > Discounting Options ..............................................................................................................................146
Marketing > Settings > Upsale Options .......................................................................................................................................147
Marketing > Settings > Affiliate Options .....................................................................................................................................147
Marketing > Settings > Affiliate Lost Password Email .............................................................................................................149
Marketing > Settings > Affiliate Email Notification...................................................................................................................150
ORDER PROCESSING...........................................................................................................................................................................151
TO PROCESS RET URNS AND REFUNDS .................................................................................................................................................151
ORDER PROCESSING > ORDERS.............................................................................................................................................................153
Working with Orders in the Main Orders Screen........................................................................................................................153
Working with Orders in the Edit Orders Screen..........................................................................................................................163
Order Emails......................................................................................................................................................................................163
Payment ..............................................................................................................................................................................................163
To Void a Shipping Label ................................................................................................................................................................177
ORDER PROCESSING > SHIPMENT S.......................................................................................................................................................179
Filters ..................................................................................................................................................................................................180
Batch Report ......................................................................................................................................................................................180
US ER INTERFACE..................................................................................................................................................................................182
A BOUT PAGES AND IT EMS .....................................................................................................................................................................182
Items call Modules ............................................................................................................................................................................182
GLOBAL ITEMS AND PAGE SPECIFIC (LOCAL) ITEMS ........................................................................................................................183
U SER INTERFACE > PAGES TAB ............................................................................................................................................................184
Adding Content to Your Store Pages .............................................................................................................................................184
U SER INTERFACE > IT EMS TAB .............................................................................................................................................................185
To Add a Local Item to a Page .......................................................................................................................................................185
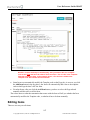
EDITING ITEMS.........................................................................................................................................................................................187
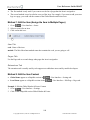
Method 1: Edit the Item (Assign the Item to Multiple Pages) ...................................................................................................188
Method 2: Edit the Item Content ....................................................................................................................................................188
COMMONLY USED IT EMS.......................................................................................................................................................................189
Affiliate Fields ...................................................................................................................................................................................189
Copyright 2005-2015, Miva Inc. All Rights Reserved.
Publication Date: 02/28/2015
User Reference Guide DRAFT
Attribute Machine Section ...............................................................................................................................................................191
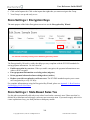
Basket Contents Section ...................................................................................................................................................................200
Category Product List Layout Section...........................................................................................................................................201
Content Section..................................................................................................................................................................................209
Content (inline_css) Section ............................................................................................................................................................214
Customer Information Section ........................................................................................................................................................216
Header & Footer Section.................................................................................................................................................................217
HTTP Headers Section.....................................................................................................................................................................218
Order Contents ..................................................................................................................................................................................219
Order History List Layout Section .................................................................................................................................................220
Product Attribute Template Section ...............................................................................................................................................222
Product Display Layout Section .....................................................................................................................................................222
Product Display Layout Image Machine Section ........................................................................................................................222
Product Display Layout Image Dimensions Section...................................................................................................................224
Related Product List Layout Section..............................................................................................................................................225
Search Results Layout Section ........................................................................................................................................................225
Sitemap Section .................................................................................................................................................................................225
UPS Branding and Disclosures Section ........................................................................................................................................226
Order Contents Section ....................................................................................................................................................................227
U SER INTERFACE > IMAGE TYPES TAB................................................................................................................................................228
To Create Image Types ....................................................................................................................................................................228
U SER INTERFACE > FRAMEWORKS TAB ..............................................................................................................................................231
To Create a Framework File...........................................................................................................................................................232
To Save a Framework File to Your Local Machine ....................................................................................................................233
To Apply a Framework File to Your Store....................................................................................................................................233
U SER INTERFACE > SETTINGS TAB.......................................................................................................................................................237
User Interface > Settings Tab > Misc Color Section .................................................................................................................237
Category Tree Background .............................................................................................................................................................237
List Header Background ..................................................................................................................................................................237
List Alternate Background...............................................................................................................................................................238
User Interface > Settings Tab > Fonts..........................................................................................................................................238
User Interface > Settings Tab > Affiliate Links Section ............................................................................................................238
User Interface > Settings Tab > Buttons ......................................................................................................................................239
User Interface > Settings Tab > Category Tree Template ........................................................................................................240
Category Tree Header / Category Tree Footer ..........................................................................................................................241
User Interface > Settings Tab > Customer Links........................................................................................................................241
User Interface > Settings Tab > Navigation Bar ........................................................................................................................242
User Interface > Settings Tab > Smart Breadcrumbs ................................................................................................................244
User Interface > Settings Tab > Global Header and Footer ....................................................................................................246
User Interface > Settings Tab > HEAD Tag Content.................................................................................................................247
User Interface > Settings Tab > HTML Pro file ..........................................................................................................................248
User Interface > Settings Tab > Shopping Interface Settings ..................................................................................................248
User Interface > Settings Tab > Template Import/Export Settings .........................................................................................249
U SER INTERFACE > ERROR M ESSAGES TAB .......................................................................................................................................251
To Replace an Error Message ........................................................................................................................................................252
U SER INTERFACE > ST YLE RESOURCES TAB ......................................................................................................................................252
To Upload a CSS File.......................................................................................................................................................................252
U SER INTERFACE > M ETA TAG SETTINGS TAB ..................................................................................................................................253
To Use META Tag Settings .............................................................................................................................................................254
DATA MANAGEMENT .........................................................................................................................................................................255
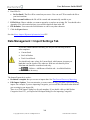
DAT A M ANAGEMENT > IMPORT/EXPORT TAB ...................................................................................................................................255
The General Process of Importing .................................................................................................................................................255
The General Process of Exporting .................................................................................................................................................259
File Locations ....................................................................................................................................................................................259
Export Attributes to XML File ........................................................................................................................................................260
Copyright 2005-2015, Miva Inc. All Rights Reserved.
Publication Date: 02/28/2015
User Reference Guide DRAFT
Export Affiliates To Flat File ..........................................................................................................................................................261
Export Customers to a Flat File .....................................................................................................................................................262
Export Categories To Flat File.......................................................................................................................................................263
Export Orders To Flat File..............................................................................................................................................................264
Export Products To Flat File ..........................................................................................................................................................265
Export Shipment Information to Flat File.....................................................................................................................................267
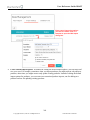
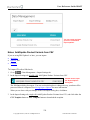
DAT A M ANAGEMENT > IMPORT SETTINGS TAB.................................................................................................................................268
Notes: Add/Update Product Variants from CSV .........................................................................................................................270
Notes: Import Shipment Information from CSV ...........................................................................................................................274
Saving Import Options .....................................................................................................................................................................276
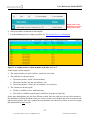
To Create and Save Import Options ..............................................................................................................................................277
Example: Create and Save Two Product Import Settings ..........................................................................................................280
DAT A M ANAGEMENT > DAT ABASE TOOLS TAB ................................................................................................................................282
Data Management > Database Tools Tab > Delete Shopping Baskets ..................................................................................282
To Delete Expired Shopping Baskets.............................................................................................................................................282
Data Management > Database Tools Tab > Pack Data Files .................................................................................................283
STORE S ETTINGS ..................................................................................................................................................................................283
ST ORE SETTINGS > ST ORE DETAILS.....................................................................................................................................................283
Store Settings > Store Details > Identification Section .............................................................................................................283
Store Settings > Store Details > Owner Section .........................................................................................................................284
Store Settings > Store Details > Settings Section .......................................................................................................................284
Store Settings > Store Details > Maintenance Mode Section ...................................................................................................289
Store Settings > Store Details > Order Minimums Section.......................................................................................................291
Store Settings > Store Details > State Tax Options Section......................................................................................................292
ST ORE SETTINGS > ST ATES....................................................................................................................................................................293
ST ORE SETTINGS > COUNT RIES.............................................................................................................................................................293
ST ORE SETTINGS > CUST OMER FIELDS................................................................................................................................................293
To Change the Customer Field Settings........................................................................................................................................295
ST ORE SETTINGS > U SER GROUPS........................................................................................................................................................296
To Create a Group ............................................................................................................................................................................298
ST ORE SETTINGS > ENCRYPTION KEYS ...............................................................................................................................................299
ST ORE SETTINGS > ST ATE BASED SALES TAX ...................................................................................................................................299
To Add State Sales Tax to Orders ..................................................................................................................................................300
REPORTS....................................................................................................................................................................................................300
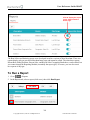
TO RUN A REPORT ..................................................................................................................................................................................301
TO EDIT A REPORT..................................................................................................................................................................................302
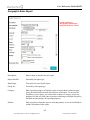
Geographic Sales Report .................................................................................................................................................................303
Product Sales Report ........................................................................................................................................................................305
Sales Report .......................................................................................................................................................................................307
Statistics Display Report..................................................................................................................................................................309
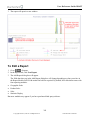
TO DELETE A REPORT.............................................................................................................................................................................310
SHIPPING ...................................................................................................................................................................................................310
SHIPPING > SHIPPING M ETHOD RULES TAB........................................................................................................................................310
Example: Creating a Free Shipping Option.................................................................................................................................314
SHIPPING > BOXES TAB..........................................................................................................................................................................315
SHIPPING > SETTINGS TAB.....................................................................................................................................................................317
Shipping > Settings Tab > Shipping Rules Section.....................................................................................................................317
Shipping > Settings Tab > Handling Charge Section ................................................................................................................319
Shipping > Settings Tab > Packaging Rules Section .................................................................................................................323
Shipping > Settings Tab > Price Table Based Shipping Options Section ..............................................................................327
SHIPPING > PACK BY W EIGHT TAB / PACK BY QUANTITY TAB .......................................................................................................328
SHIPPING > BASE + W EIGHT SHIPPING TAB........................................................................................................................................328
To Enable Base + Weight Shipping ...............................................................................................................................................328
Copyright 2005-2015, Miva Inc. All Rights Reserved.
Publication Date: 02/28/2015
User Reference Guide DRAFT
To Configure Base + Weight Shipping..........................................................................................................................................328
SHIPPING > CANADA POST TAB............................................................................................................................................................330
Your Canada Post Account and Credentials................................................................................................................................330
To Enable the Canada Post Module in Miva Merchant .............................................................................................................332
To Configure the Canada Post Module in Miva Merchant .......................................................................................................332
SHIPPING > FLAT RAT E SHIPPING TAB ................................................................................................................................................334
To Enable Flat Rate Shipping .........................................................................................................................................................334
To Configure Flat Rate Shipping ...................................................................................................................................................334
SHIPPING > M INIMUM OR W EIGHT SHIPPING TAB .............................................................................................................................335
To Enable Minimum or Weight Shipping......................................................................................................................................335
To Configure Minimum or Weight Shipping ................................................................................................................................335
SHIPPING > U.S.P.S. ONLINE RATE CALCULATION (DOMEST IC & INTERNATIONAL ) TAB..........................................................336
Support for the Shipping Settings > Packaging Rules Tab........................................................................................................336
To Create a U.S.P.S. Web Tools Account .....................................................................................................................................336
To Configure U.S.P.S. Online Rate Calculation..........................................................................................................................337
SHIPPING > ENDICIA SHIPPING LABELS TAB.......................................................................................................................................338
To Enable the Endicia Module .......................................................................................................................................................338
To Configure the Endicia Module ..................................................................................................................................................339
SHIPPING > PRICE TABLE BASED SHIPPING TAB................................................................................................................................340
To Enable Price Table Based Shipping.........................................................................................................................................341
To Configure Price Table Based Shipping ...................................................................................................................................342
SHIPPING > QUANTITY BASED SHIPPING.............................................................................................................................................342
To Enable Quantity Based Shipping ..............................................................................................................................................342
To Configure Quantity Based Shipping.........................................................................................................................................342
SHIPPING > UPS® ONLINE TOOLS TAB...............................................................................................................................................344
To Enable UPS® Online Tools.......................................................................................................................................................344
To Register the UPS® Online Tools Module ...............................................................................................................................344
To Configure the UPS® Online Tools Module ............................................................................................................................346
SHIPPING > WEIGHT BASED SHIPPING TAB.........................................................................................................................................348
SHIPPING > FEDEX W EB SERVICES TAB..............................................................................................................................................348
To Enable FedEx Web Services ......................................................................................................................................................348
To Configure FedEx Web Services.................................................................................................................................................348
SHIPPING > A DD / REMOVE M ODULES.................................................................................................................................................351
To Add Shipping Modules................................................................................................................................................................351
To Remove Shipping Modules.........................................................................................................................................................351
PAYMENT ..................................................................................................................................................................................................351
OBSOLETE PAYMENT OPT IONS .............................................................................................................................................................352
Changes in PR8 Update 7................................................................................................................................................................352
Changes in PR8 Update 11 .............................................................................................................................................................353
TYPES OF PAYMENT OPTIONS ...............................................................................................................................................................353
PAYMENT > AMAZON PAYMENT S.........................................................................................................................................................355
To Register for Amazon Payments .................................................................................................................................................355
To Enable Amazon Payments in Miva Merchant.........................................................................................................................356
Amazon Payments In-line Checkout ..............................................................................................................................................357
PAYMENT > AUTHORIZE .NET PAYMENT SERVICES V3.1 ..................................................................................................................361
PAYMENT > CHASE PAYMENTECH ORBIT AL GAT EWAY.................................................................................................................365
PAYMENT > CHECK PAYMENT ..............................................................................................................................................................366
PAYMENT > COD ....................................................................................................................................................................................367
PAYMENT > CREDIT CARD PAYMENT WIT H SIMPLE VALIDATION..................................................................................................368
To Add a Card ...................................................................................................................................................................................368
PAYMENT > CYBERSOURCE ..................................................................................................................................................................369
PAYMENT > FIRST DAT A GLOBAL GAT EWAY ....................................................................................................................................371
PAYMENT > INTUIT MERCHANT SERVICES .........................................................................................................................................372
PAYMENT > PAYPAL EXPRESS CHECKOUT AND/OR PAYMENT S PRO .............................................................................................373
Template Changes for PayPal Express Checkout .......................................................................................................................373
Copyright 2005-2015, Miva Inc. All Rights Reserved.
Publication Date: 02/28/2015
User Reference Guide DRAFT
To Configure PayPal Express Checkout .......................................................................................................................................373
To Configure PayPal Express Checkout with API Credentials ................................................................................................374
To Configure PayPal Payments Pro..............................................................................................................................................375
Payment Settings > PayPal Express Checkout and/or Payments Pro API Credentials Tab ...............................................375
Payment Settings > PayPal Express Checkout Tab....................................................................................................................376
PayPal Express In-context Checkout.............................................................................................................................................379
PayPal Express Credit .....................................................................................................................................................................383
Payment Settings > PayPal Payments Pro Tab...........................................................................................................................390
PAYMENT > PAYPAL PAYMENT S A DVANCED AND/OR PAYFLOW GAT EWAY................................................................................390
PAYMENT > PAYPAL PAYMENT S STANDARD .....................................................................................................................................393
PAYMENT > ADD/REMOVE M ODULES .................................................................................................................................................394
To Add Payment Modules................................................................................................................................................................394
To Remove Payment Modules .........................................................................................................................................................394
ORDER FULFILLMENT .......................................................................................................................................................................394
ORDER FULFILLMENT > TEMPLATE BASED EMAILS..........................................................................................................................394
To Edit a Template Based Email ....................................................................................................................................................395
To Edit Email Properties .................................................................................................................................................................395
To Edit Email Template Code .........................................................................................................................................................398
To Configure Template Based Emails to be Sent Automatically ..............................................................................................399
To Configure Template Based Emails to be Sent Manually ......................................................................................................400
To Send a Template Based Email Manually.................................................................................................................................400
To Create a New Template Based Email ......................................................................................................................................402
ORDER FULFILLMENT > ADD/REMOVE M ODULES.............................................................................................................................402
To Add Order Fulfillment Modules................................................................................................................................................402
To Remove Order Fulfillment Modules .........................................................................................................................................403
LOGGING ...................................................................................................................................................................................................403
E-URCHIN LOG.........................................................................................................................................................................................403
To Enable the e-Urchin Log ............................................................................................................................................................403
M IVA M ERCHANT A CCESS LOG............................................................................................................................................................403
To Enable the Miva Merchant Access Log ...................................................................................................................................404
BUYSAFE 2.0...........................................................................................................................................................................................404
To Enable the buySAFE Log ...........................................................................................................................................................404
SYSTEM EXT ENS ION S ETTINGS ....................................................................................................................................................404
PAYPAL EXPRESS CHECKOUT AND/OR PAYMENT S PRO ...................................................................................................................404
PAYPAL PAYMENT S A DVANCED AND/ OR PAYFLOW GAT EWAY......................................................................................................404
BUYSAFE 2.0...........................................................................................................................................................................................405
To Enable buySAFE 2.0 ...................................................................................................................................................................405
UTILITIES ..................................................................................................................................................................................................405
UT ILITIES > TEMPLAT E BASED BAT CH REPORT S...............................................................................................................................405
To Enable the Default Reports........................................................................................................................................................405
To Run the Default Reports .............................................................................................................................................................406
To Edit a Template Based Batch Report .......................................................................................................................................406
To Create a New Template Based Batch Report .........................................................................................................................407
To Delete a Template Based Batch Report ...................................................................................................................................408
UT ILITIES > CUST OM FIELDS.................................................................................................................................................................408
To Enable Custom Fields.................................................................................................................................................................408
To Create a New Custom Field.......................................................................................................................................................408
To Delete a Custom Field ................................................................................................................................................................411
UT ILITIES > CUST OM FIELD GROUPS ...................................................................................................................................................411
To Create a Custom Field Group ...................................................................................................................................................413
To Assign a Custom Field to a Group ...........................................................................................................................................413
Example: Adding and Using a Custom Category Field .............................................................................................................414
Copyright 2005-2015, Miva Inc. All Rights Reserved.
Publication Date: 02/28/2015
User Reference Guide DRAFT
Example: Adding and Using a Custom Product Field................................................................................................................416
Example: Adding a Custom Field with Image Upload ...............................................................................................................418
Example: Custom Basket Fields .....................................................................................................................................................421
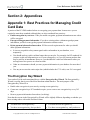
SECTION 2: APPENDICES ..................................................................................................................................................................426
APPENDIX 1: B ES T PRACTICES FOR MANAGING CREDIT CARD DATA ..................................................................426
THE ENCRYPTION KEY W IZARD...........................................................................................................................................................426
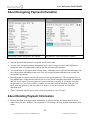
A BOUT ENCRYPTING PAYMENT INFORMATION..................................................................................................................................428
A BOUT DELETING PAYMENT INFORMATION.......................................................................................................................................428
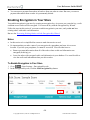
ENABLING ENCRYPT ION IN YOUR ST ORE............................................................................................................................................429
Notes....................................................................................................................................................................................................429
To Enable Encryption in Your Store ..............................................................................................................................................429
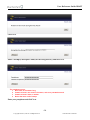
TO DELETE AN ENCRYPTION KEY ........................................................................................................................................................432
PROCESSING EXIST ING ORDERS WITH THE ENCRYPTION KEY WIZARD.........................................................................................432
To Process Existing Orders with the Encryption Key Wizard...................................................................................................433
REGULAR A RCHIVING IN THE MANAGE ORDERS SCREEN................................................................................................................435
To Archive an Order.........................................................................................................................................................................435
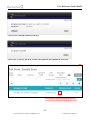
TO VIEW ENCRYPTED CREDIT CARD INFORMATION.........................................................................................................................437
In the Order Encryption Screen......................................................................................................................................................437
In the Orders Screen .........................................................................................................................................................................437
In Legacy Order Processing ...........................................................................................................................................................437
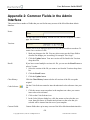
APPENDIX 2: COMMON FIELDS IN THE ADMIN INTERFACE ........................................................................................439
APPENDIX 3: COMPARING WEIGHT BAS ED S HIPP ING MODULES .............................................................................441
APPENDIX 4: HOS TING YOUR STORE.........................................................................................................................................441
GENERAL REQUIREMENT S AND PROCESS FOR HOST ING YOUR ST ORE...........................................................................................442
APPENDIX 5: DEFA ULT HTTP/ HTTPS PAGES ..........................................................................................................................442
Page Code ..........................................................................................................................................................................................442
Page Name .........................................................................................................................................................................................442
APPENDIX 6: ZPL PRINTER CONFIGURATION ......................................................................................................................444
M ACOS CONFIGURAT ION......................................................................................................................................................................444
APPENDIX 7: INVENTORY MANAGEMENT ..............................................................................................................................444
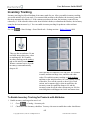
INVENTORY TRACKING ..........................................................................................................................................................................445
To Enable Inventory Tracking for Products with Attributes .....................................................................................................445
To Enable Inventory Tracking for Products with No Attributes ...............................................................................................447
BASKET INVENTORY...............................................................................................................................................................................447
INVENTORY MESSAGE S ..........................................................................................................................................................................447
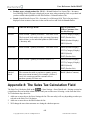
APPENDIX 8: THE SALES TAX CALCULATION FIELD........................................................................................................449
SECTION 3: TEMPLATE CHANGES ...............................................................................................................................................453
TEMPLATE CHANGES FOR MIVA MERCHANT 9 ..................................................................................................................453
CSSUI: Edit Page: PROD > Page > Attribute Machine ...........................................................................................................453
CSSUI: Edit Page: PATR > Page > Attribute Machine ............................................................................................................454
CSSUI: Edit Page: OCST > Page > Customer Fields ...............................................................................................................455
CSSUI: User Interface > Settings > Global Header ..................................................................................................................456
CSSUI: User Interface > Settings > Global Footer ...................................................................................................................456
CSSUI: Edit Page: ORDS > Page > Order Contents ................................................................................................................457
CSSUI: Edit Page: SRCH > Page > Search Results Layout.....................................................................................................460
CSSUI: Edit Page: PROD > Page > Related Product List Layout .........................................................................................461
CSSUI: Edit Page: PROD > Page > Product Display Layout .................................................................................................462
Copyright 2005-2015, Miva Inc. All Rights Reserved.
Publication Date: 02/28/2015
User Reference Guide DRAFT
CSSUI: Edit Page: INVC > Page > Order Contents..................................................................................................................463
CSSUI: Edit Page: CTGY > Page > Category Product List Layout .......................................................................................466
CSSUI: Edit Page: BASK > Page > Basket Contents ................................................................................................................468
CSSUI: Edit Page: OCST > Page > Basket Contents................................................................................................................471
CSSUI: Edit Page: OSEL > Page > Basket Contents ................................................................................................................474
CSSUI: Edit Page: OPAY > Page > Basket Contents................................................................................................................476
CSSUI: Edit Page: PLST > Page > Product List Layout ..........................................................................................................479
CSSUI: Edit Page: BASK > Page -> Details...............................................................................................................................480
CSSUI: Edit Page: NTFD > Page > Details ...............................................................................................................................481
CSSUI: Edit Page: OCST > Page > Details................................................................................................................................482
CSSUI: Edit Page: OPAY > Page > Details................................................................................................................................483
CSSUI: Edit Page: OSEL > Page > Details ................................................................................................................................484
CSSUI: Edit Page: SRCH > Page > Details................................................................................................................................485
cssui.css...............................................................................................................................................................................................486
Edit Page EMAIL_BACKORDER_NOTICE > Page..................................................................................................................487
Edit Page: EMAIL_ORDERC ONF_CUSTOMER > Page ........................................................................................................489
Edit Page: EMAIL_ORDERC ONF_MERC HANT > Page ........................................................................................................491
Edit Page: EMAIL_RETURN_RECEIVED > Page ....................................................................................................................494
Edit Page: EMAIL_RMA_ISSUED > Page..................................................................................................................................496
Edit Page: EMAIL_SHIPMENT_SHIPPED > Page ..................................................................................................................498
Edit Page: Pritable Invoice > Page > Content(inline_css).......................................................................................................500
Edit Page: ORDER_ INVOICE > Page > Details .......................................................................................................................507
Edit Page: Shipment Picklist > Page > Details ..........................................................................................................................509
MMUI: Edit Page: BASK > Page > Details ................................................................................................................................511
Edit Page: NTFD > Page > Details ..............................................................................................................................................511
MMUI: Edit Page: OCST > Page > Details................................................................................................................................512
MMUI: Edit Page: ORDL > Page > Details ...............................................................................................................................515
MMUI: Edit Page: OSEL > Page > Details ................................................................................................................................516
MMUI: Edit Page: POUT > Page > Details ...............................................................................................................................516
MMUI: Edit Page: ACAD > Customer Fields.............................................................................................................................518
Edit Page: ACED > Customer Fields ...........................................................................................................................................523
Edit Page: AFED > Affiliate Fields...............................................................................................................................................528
Edit Page: BASK > Basket Content ...............................................................................................................................................530
Edit Page: CTGY > Product List Layout......................................................................................................................................534
Edit Page: User Interface, Settings > Global Header & Footer..............................................................................................535
Edit Page: INVC > Order Contents...............................................................................................................................................535
Edit Page: OCST > Basket Contents .............................................................................................................................................538
Edit Page: OCST > Customer Fields ............................................................................................................................................541
Edit Page: OPAY > Basket Contents.............................................................................................................................................543
Edit Page: ORDS > Order Contents .............................................................................................................................................546
Edit Page: OSEL > Basket Contents .............................................................................................................................................550
Edit Page: PATR > Attribute Machine .........................................................................................................................................553
Edit Page: PLST > Product List.....................................................................................................................................................554
Edit Page: PROD > Attribute Machine ........................................................................................................................................555
Edit Page: PROD > Product Display Layout ..............................................................................................................................556
Edit Page: PROD > Related Products Layout ............................................................................................................................557
Edit Page: SRCH > Search Results Layout..................................................................................................................................558
Copyright 2005-2015, Miva Inc. All Rights Reserved.
Publication Date: 02/28/2015
User Reference Guide DRAFT
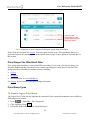
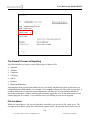
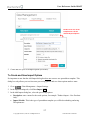
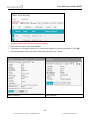
Section 1: Admin Guide Reference
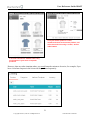
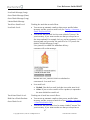
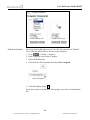
About Miva Merchant
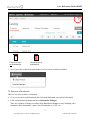
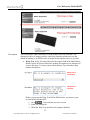
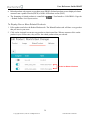
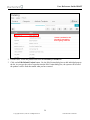
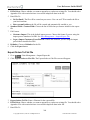
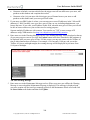
Miva Merchant is a store builder program. It has two main parts:
Software that you use to create an on-line store. The Miva Merchant admin interface includes
everything you need to create and run your business over the internet: manage inventory, describe
your products with text and pictures, checkout, payment processing, shipping and invoices, etc.
A hosting service, which is essentially the computers that your on- line store will live on. It is
possible, although not recommended, to host your store on your own servers. (See Appendix 4:
Hosting Your Store.)
You can use Miva Merchant to create very small or very large on- line stores -- whether you sell dozens
of different products, or thousands. It's also extremely customizable. Almost everything can be modified
so that your on-line store looks and feels exactly as you wish.
The Miva Merchant software also has two main parts:
Use the admin interface to create and maintain your store.
The admin interface automatically generates the web pages of your on- line store where customers
can view and purchase your products. Search engines, like Google, also index these pages, so when
customers use Google to search for products they will see links to your o n- line store.
1
Copyright 2005-2015, Miva Inc. All Rights Reserved.
Publication Date: 02/28/2015
User Reference Guide DRAFT
Use the admin interface to create and maintain your store.
The admin interface automatically generates the web pages for
your on-line store.
Customer Workflow in Your Store
Customers can take many actions in your on- line store, but the general customer workflow looks like
this:
2
Copyright 2005-2015, Miva Inc. All Rights Reserved.
Publication Date: 02/28/2015
User Reference Guide DRAFT
Customers brow se through your store,
add products to their basket,
and then go through checkout
(page OCST)
(page OSEL)
(page OPAY)
(page INVC)
3
Copyright 2005-2015, Miva Inc. All Rights Reserved.
Publication Date: 02/28/2015
User Reference Guide DRAFT
About this Guide
This book is a reference guide to the Miva Merchant admin interface. Although this book is organized as
a reference, it contains topic overviews and lots of examples and step-by-step procedures.
The table of contents in this book has the same order as the Menu button in the admin interface.
Order of topics in thi s book.
The Menu button in the Miva
Merchant admin interface.
General Information About Version 9
Version 9 has a lot of new features that make it much easier to use than previous versions. If you have
used previous versions of Miva Merchant:
All of the features and functions that you know are still in the program. However...
The location of many features have changed.
The good news for people who have used previous versions of Miva Merchant is that finding things is a
lot easier now, thanks to Search, History, and Bookmarks.
The Admin Bar
The Admin Bar is always at the top of your screen, no matter where you are in the admin interface. It
has the most important navigation methods that help you quickly find a specific feature.
4
Copyright 2005-2015, Miva Inc. All Rights Reserved.
Publication Date: 02/28/2015
User Reference Guide DRAFT
Menu Button
The Version 9 Menu Button
The left navigation pane (leftnav)
in PR8 and older releases
The Version 9 Menu button is similar to the left navigation pane used in PR8 and previous releases. The
Version 9 Menu button has top- level "headings" that contain one or more tabs. For example, if you click
on Catalog in the Menu button, you'll go to the Catalog screen, which has a number of tabs.
In PR8 and earlier releases, Products and Categories were shown in the leftnav, but if you can't
remember where something is located in Version 9, there are a number of ways to find out, including
History, Bookmarks, and the Search field (see below).
Version 9 Tabs and Sections
In PR8, almost everything was in a tab at the top of the screen. In Version 9, there are tabs at the top of
the screen, but there are sections on a tab. A lot of features that were in a tab in PR8 are now in a section
on a tab in Version 9.
5
Copyright 2005-2015, Miva Inc. All Rights Reserved.
Publication Date: 02/28/2015
User Reference Guide DRAFT
In PR8, almost everything was in a tab.
In Version 9 there
are tabs...
and collapsible
sections
6
Copyright 2005-2015, Miva Inc. All Rights Reserved.
Publication Date: 02/28/2015
User Reference Guide DRAFT
History
History, new in Version 9, is another fast way to navigate around the admin interface. The History menu
is always available in the Admin bar and keeps track of the pages that you've visited.
Click on any line in the History menu
to go to that screen.
7
Copyright 2005-2015, Miva Inc. All Rights Reserved.
Publication Date: 02/28/2015
User Reference Guide DRAFT
At the bottom of the Hi story menu
there is a link for the History
Manager.
You can use the Hi story Manager
to clear History, export Hi story,
and delete individual items from
the list.
Bookmarks
Bookmarks in the admin interface are similar to bookmarks in your web browser.
To Add a Bookmark
1
2
Go to any screen in the admin interface, for example,
> Catalog > Products.
In the screen that you want to bookmark, click on the bookmark icon so that it drops down.
8
Copyright 2005-2015, Miva Inc. All Rights Reserved.
Publication Date: 02/28/2015
User Reference Guide DRAFT
Current screen is
not bookmarked.
3
Current screen is
bookmarked.
Now if you click on the Bookmarks button, you'll see the screen that you added.
To Remove a Bookmark
There are two ways to delete a bookmark:
Go to a screen that you bookmarked and click on the bookmark icon until it is shortened.
Click on the Bookmarks button and select Bookmarks Manager.
There are a number of things you can do in the Bookmarks Manager screen, including edit a
bookmark, delete bookmarks, export a list of bookmarks as a CSV, etc.
9
Copyright 2005-2015, Miva Inc. All Rights Reserved.
Publication Date: 02/28/2015
User Reference Guide DRAFT
Store Search and Screen Search
Version 9 has two new ways to find things in the admin interface: Store Search and Screen Search.
Store Search
Storewide search is always available in the Admin Bar.
The Miva Merchant admin interface is a huge program and finding the location of a specific feature can
be a challenge. In Version 9, Miva Merchant added a powerful search feature that makes life a lot easier.
The Search function in the admin interface works a lot like a Google search. You can type almost
anything in the Search box, and the software will show you everything in the admin interface that
matches your search.
You can search for features whose name you remember, but whose location you've forgotten:
Where did they hide Attribute Templates?
Click on the underlined words and the software takes you directly to that screen.
You can search for features, even if you can't remember the feature's name. This is essentially a
subject search. How do I change a customer's password? Type "password" in the Search field:
Notice that, for thi s search, the
system created two tabs: "Place s",
which contains all screens that
matched your search string, and
"Pages" which lists only the Miva
Merchant pages that match your
search string.
You can search for product names or parts of product names.
10
Copyright 2005-2015, Miva Inc. All Rights Reserved.
Publication Date: 02/28/2015
User Reference Guide DRAFT
Notice that, for thi s search, the
system created three tabs. The
"Places" tab show s all results. The
"Products" tab shows onl y
matching products, and the
Categories tab show s only
matching categories.
Screen Search
In almost every screen of the admin interface there is a screen search. You can use screen searches, and
advanced screen searches to find specific content on that screen. For example, if you have a large store
with hundreds, or thousands, of products, you can use the screen search to show only products that
match a search string.
Other New Features of the Version 9 Interface
Breadcrumbs
In Version 9, there are two types of Breadcrumbs:
1 Smart Breadcrumbs, introduced in PR8, help your customers navigate your on- line store.
11
Copyright 2005-2015, Miva Inc. All Rights Reserved.
Publication Date: 02/28/2015
User Reference Guide DRAFT
2
Admin Breadcrumbs, introduced in Version 9, help store employees navigate the admin interface.
As you visit different screens in the admin interface, you will always see a breadcrumb trail at the
top of the screen. You can click on a link in a breadcrumb to go directly to that screen.
Smart Breadcrumbs must be enabled. Please see User Interface > Settings Tab > Smart Breadcrumbs.
Admin Breadcrumbs are always on.
Ellipsis Dots on Tabs
If you see ellipsis dots on a tab, it means that the browser window isn't wide enough to show all of the
tabs. Click on the ellipsis dots to see what additional tabs are available.
Edit and Quick Edit
Everything in the admin interface can be considered a "record". A product is a record. A customer
account is a record, etc. There are many types of records in the admin interface, and most of them can be
edited. For example, you can edit a product and change the retail price of that product.
12
Copyright 2005-2015, Miva Inc. All Rights Reserved.
Publication Date: 02/28/2015
User Reference Guide DRAFT
There are two types of editing in the admin interface: "quick edit" and "full edit". Some types of records
only have quick edit. Some types of records have both quick edit and full edit mode.
To Edit a Product
Move the mouse to the left of the gray bar and click on the Edit icon to
open the complete Product record.
13
Copyright 2005-2015, Miva Inc. All Rights Reserved.
Publication Date: 02/28/2015
User Reference Guide DRAFT
To Quick Edit a Product
Double-click anywhere
in the gray bar to quick
edit the product.
Home/Main Landing Page
Selecting Home from the Admin Menu takes you to the main "landing page". This is the same page that
you see when you first login to the admin interface.
14
Copyright 2005-2015, Miva Inc. All Rights Reserved.
Publication Date: 02/28/2015
User Reference Guide DRAFT
Support
In Version 9, there are two ways to create a support ticket.
Method 1 - Home Page
1
2
Click
> Home.
On the Home page, click New Ticket.
15
Copyright 2005-2015, Miva Inc. All Rights Reserved.
Publication Date: 02/28/2015
User Reference Guide DRAFT
3
In the Request Support window, enter your email address and a description of the problem, then
click Submit Ticket.
Method 2: Menu Button
1
2
Select
> Request Support.
In the Request Support window, enter your email address and a description of the problem, then
click Submit Ticket.
Catalog
The Catalog area groups together most of the features related to your inventory.
Catalog > Products Tab
Create, edit, and delete products.
16
Copyright 2005-2015, Miva Inc. All Rights Reserved.
Publication Date: 02/28/2015
User Reference Guide DRAFT
To Delete a Product
1
Click anywhere on the Product line until you see a blue box with a checkmark.
2
Click the Trash icon
.
To Create a New Product
1
Click the Add Product button
.
2
3
The Add Product screen appears.
Fill out the fields in the Add Product screen, then click:
If you want to add the new Product and go back to the Product main screen, or
If you want to add the new Product and stay at the Add Product screen and
create another product.
Reload the page and discards unsaved changes.
Details
Product Code: The product code uniquely identifies the product in the store database.
The product code must be unique. It can be up to 50 characters long, but shorter
codes will make some screens and reports easier to read. Customers may be able to
see the product code, depending on your store settings.
The product code is not case sensitive, so:
CANDY
Candy
cAnDy
candy
would be considered duplicates, and only one would be allowed.
Product codes can contain letters (upper and lowercase), numbers, dashes and
underscores. For example:
RULER-12in or
Pen_Black_3pk
would be allowed.
Product codes cannot contain: spaces, decimal points, quotation marks or slashes.
For example:
RULER-12" or
17
Copyright 2005-2015, Miva Inc. All Rights Reserved.
Publication Date: 02/28/2015
User Reference Guide DRAFT
Pen Black 3pk
would not be allowed.
Product
Name:
You can sort products by code, either ascending or descending, to determine the
order on the product list screen, and within categories. The strategy described
below, under Product Name, can be used with product codes, to determine the
display order when sorted.
The name of the product that customers will see in your store.
The product name is a descriptive label. It appears in many areas of the store,
including the major heading for the product details screen.
The name can be up to 100 characters long, alphanumeric, and can be changed at any
time. Upper — and lower — case letters, along with numbers, spaces, and symbols,
can be used in the product name.
Product display order can be determined by name. This can be either ascending or
descending on the product list screen, and within categories. Some businesses choose
to name products so the ordering naturally clusters certain items or brand names
together. To do this, establish a naming convention in your store where the more
general information comes first, followed by the more specific information. For
example:
Pants, Flared-leg
Pants, Straight- let
Scarf, Silk
Scarf, Wool
Skirt, Blue
Skirt, Red
Compare the order above with:
Blue Skirt
Flared- leg Pants
Red Skirt
Silk Scarf
Straight-leg Pants
Wool Scarf
SKU:
Stock Keeping Unit. An internal identifier you may have for your products.
Canonical
Category
Code:
Canonical Category Code : If you want to assign a product to one or more categories,
see Catalog > Edit Product > Categories Tab. Use the Canonical Category Code for
the following reasons:
Default Breadcrumb category (CSSUI Stores only): Use the Canonical
Category Code field to create a "default" category for products if you are using
18
Copyright 2005-2015, Miva Inc. All Rights Reserved.
Publication Date: 02/28/2015
User Reference Guide DRAFT
Smart Breadcrumbs. Normally, breadcrumbs that appear in your online store are
created as the customer navigates to a product. For example, the customer starts on
your store's home page, clicks on one of your store categories, and then selects a
product in that category. The breadcrumb might look like this:
However, there are cases where the customer can go directly to a product page
without navigating; for example, if your customer reaches a product page from a
Google search, or from search results in your store. In this case, Miva Merchant
software doesn't know how to create a breadcrumb.
Miva Merchant handles this case with the Canonical Category Code. If the
customer jumps directly to a product page, the breadcrumb will show the category
that you entered in this field. If you leave this field empty and the customer jumps
directly to a product page, the software will use the first category in the category
tree to which the product is assigned, as the breadcrumb default.
If:
• The Canonical field is blank, and
• The user jumps directly to a product page, and
• The current product is a ssigned to both of
these categories (for example)
The breadcrumb would use "Cool Gear" as the default
category, since it contains the current product and come s
first in the Category Tree.
Default highlighted category in category tree (CSSUI and MMUI stores): If a
customer jumps to a product page without navigating, the category that you enter
in the canonical field will be highlighted in the category tree:
If you entered "Cool Gear" in the Canonical
field, and the customer jumps directly to a
product page, "Cool Gear" will be highlighted in
the category tree.
Alternate
Display Page:
Allows you to use multiple templates for products. For example, you could use one
product display template for DVDs that you sell and another product display template
for t-shirts.
Example: Creating and using multiple product te mplates
1 Go to
> User Interface. The Pages main screen is selected by default.
2
Create a duplicate PROD (Product Display) page.
19
Copyright 2005-2015, Miva Inc. All Rights Reserved.
Publication Date: 02/28/2015
User Reference Guide DRAFT
2.1.
Edit the original PROD page. In the Page tab, select all of the template
code and paste it temporarily into a text file.
Copy all of thi s code.
2.2.
Select the Items tab. This screen shows you all of the items that can be
added to this page. A gray icon means the item is not currently assigned (in
use by the page). The blue icon means the item is currently assigned to the
page.
Item not assigned
Item assigned
2.3.
Click on the Assigned heading until it has a minus sign next to it
(
). That will sort the item list and put all of the items in use at
the top of the screen.
2.4.
Make a note of all of the items currently in use by the page. You can do
this by making one or more screen caps, or you can select all of the items
in use and then click the
button to export the list as a text file.
2.5.
Go to
button.
2.6.
In our example, we'll use PROD_T-SHIRT as both the new page Code and
Name. Paste the template code that you copied from the original PROD
> User Interface > Pages tab and click the Add Page
20
Copyright 2005-2015, Miva Inc. All Rights Reserved.
Publication Date: 02/28/2015
User Reference Guide DRAFT
page into the Template field of the new page, then click the Add button.
An Items tab will appear. Click on the Items tab.
2.7.
Open the screen capture that you made of the Items tab for the original
PROD page, or your exported CSV list. In the Items tab of the new page,
select the same items, then click the Assign Record(s) button.
Select all of the items that
were used by the original
PROD page, then click
Assign Record(s).
Your new product page now has the same template code and items used by
the original PROD page. Now you can customize the new prod uct page in
any way that you wish.
3
Associate the new template with a product.
In our example we'll edit one of our t-shirt products. In the
> Catalog >
Products > Edit Product (product name) > Product tab > Alternate Display Page
field, enter "PROD_T-SHIRT", or click on the Look Up button; then click the
Update button.
4
When the customer reaches the product page for the t-shirt that we edited, the page
will be displayed with our customized product template, instead the standard
PROD template.
Note that you can use the same process to create multiple templates for your
categories.
1 Create a custom category page, CTGY_T-SHIRTS for example.
2
Edit a category and enter "CTGY_T-SHIRTS" in the
> Catalog
> Categories > Edit Category (category name) > Category tab >
Alternate Display Page field.
Price:
Enter the Price for the product. This is the price that will normally appear in the store.
Discounts may be applied, based on this price, when the product is offered to
customers who are members of a price group, or when the product is offered as an
upsale product
Cost:
Enter the Price for the product. This is the price that will normally appear in the store.
21
Copyright 2005-2015, Miva Inc. All Rights Reserved.
Publication Date: 02/28/2015
User Reference Guide DRAFT
Discounts may be applied, based on this price, when the product is offered to
customers who are members of a price group, or when the product is offered as an
upsale product
Weight:
Shipping charges are usually based on the combined weight of the products ordered.
The Weight you enter here should be the shipping weight of the item, including any
required packaging. For instance, a 40 pound blown-glass art piece might require a
wooden crate and cushioning materials weighing an additional 20 pounds, so the
shipping weight would be 60 pounds for that item.
Weight values are always specified in the Units of Measurement (Weight) field on the
Edit Store / Settings screen. There is one unit of measurement that is used for all
weights throughout the store.
Thumbnail
Image:
Thumbnail images are small images, usually about 150 x 150 pixels, that can appear in
different pages in your store. The example below shows how to add a thumbnail image
to a product, and then have the thumbnail image appear in the Category page.
1 In the edit product screen > Product tab, click on the Upload button.
2
In the Upload File dialog box, click the browse button and browse to the thumbnail
image that you want to associate with the product. If you've uploaded the image
before, check the Overwrite button to upload the image again.
3
After you've browsed to or manually entered the path of the image file that you
want, click the Upload button.
4
In the Edit Product screen, click Update. The thumbnail image is now associated
with a product.
To make the thumbnail appear in a particular page, for example the Category page:
5
5.1.
Select
> User Interface > Pages tab.
5.2.
Edit the Category Display (CTGY) page.
5.3.
Scroll down to the Category Product List Layout area. Click on the Image
drop-down list. Select Thumbnail, then click the Update button.
22
Copyright 2005-2015, Miva Inc. All Rights Reserved.
Publication Date: 02/28/2015
User Reference Guide DRAFT
After you click the Update button, thumbnail images will appear in your
store's category page.
23
Copyright 2005-2015, Miva Inc. All Rights Reserved.
Publication Date: 02/28/2015
User Reference Guide DRAFT
Category page, no thumbnail.
Category page, with thumbnail.
Full-sized
Image:
The process for adding a full-sized image to the product page is the same as for adding
a thumbnail image:
1
Follow the steps in the Thumbnail section to attach a full-sized image to a product.
A good size for a full-sized image is about 300 x 300 pixels.
2
Edit a page so that full-sized images will appear in that page. Many store owners
use a full-size image in their Product Display (PROD) page. Edit the Pages >
PROD page and select the Product Display Layout tab. In the Image drop-down
list, select Full-Sized.
24
Copyright 2005-2015, Miva Inc. All Rights Reserved.
Publication Date: 02/28/2015
User Reference Guide DRAFT
Description:
The Description is what customers see on the product screen in your store. The
description can be as long as you like, and can be entered as plain text to use the
default formatting, or as HTML code, to format the description exactly as you like.
Wrap Text: Wrap Text only affects the Description field in the Edit Product >
Details section. It does not affect how product description text is displayed in
your on- line store. You may want to check this box if you often have long
product descriptions.
Wrap Text is
unchecked.
Wrap Text is
checked.
Before you can use the Wrap Text field in Edit Product, you must set your
account default for this field.
1. Go to
> Users and edit your user account.
2. Select the Settings tab.
3. Check the Wrap Text in Product Description checkbox.
25
Copyright 2005-2015, Miva Inc. All Rights Reserved.
Publication Date: 02/28/2015
User Reference Guide DRAFT
4. Now you can go back to
> Catalog > Edit Product > Product
tab > Details section and check the Wrap Text checkbox.
The Wrap Text checkbox in your user account sets the default for your
admin account. The Wrap Text checkbox in Edit Product turns the setting
on or off for a specific product.
Taxable : Select Taxable if this product is subject to tax. Whether a product is
taxable or not depends on your location and jurisdiction. Some things, such as
services, certain food products, or some books are not taxed. Check with your
accountant or tax attorney for specific, up-to-date information.
Active : Select Active if you want the product to appear in the store. Clear the
Active check box to hide the product. This is convenient for seasonal or
occasional products. Rather than deleting them, and all the information that
goes with them, set them to inactive until you want to make them available in
your store again.
Header & Footer
Add content, such as trust marks, logos, etc, above or below the product content on a product (PROD)
page.
26
Copyright 2005-2015, Miva Inc. All Rights Reserved.
Publication Date: 02/28/2015
User Reference Guide DRAFT
Sample header text.
Sample footer text.
META Tag Settings
Use the META Tag Settings tab to add special content words to your product pages. Search engines, like
Google, index your store pages and adding META words can make it easier for customers to find your
products. For example, if you sell a Hawaiian shirt, you might add keywords to the product page like:
"shirt, Hawaiian, hibiscus, flower, cotton". When a customer does a Google search on "Hawaiian flower
shirt", a link to your product page will appear in the Google result list. For a complete discussion on how
to create and use META tags in Miva Merchant, please see User Interface > Meta Tag Settings Tab.
27
Copyright 2005-2015, Miva Inc. All Rights Reserved.
Publication Date: 02/28/2015
User Reference Guide DRAFT
UPS Options
This section will only appear if you have enabled the UPS(R) Online Tools Module.
Product
Requires
Additional
Handling
Check this box if the product meets the UPS requirements for an additional handling
fee. See:
http://www.ups.com/content/ca/en/shipping/cost/additional. html#Additional+Handlin
g+Fee
Delivery
Confirmation:
Allows you to set the delivery confirmation requirements for this product. What you
select here will override the global Default Delivery Confirmation setting.
Shipping Rules
Shipping rules can be set in two places:
You can set global Shipping Rules for your whole store:
Rules.
You can use the
> Catalog > Edit Product > Product tab > Shipping Rules section to
override some of the global settings. This tab was added in PR8 update 4.
Shipping
Dimensions:
> Shipping > Shipping Method
Use these fields to describe the smallest box that this product can ship in. If you are
using Always Use the Fallback Package Dimensions, and the fallback dimensions are
not the same as the shipping dimensions for this product, the shipping rates that you
get for this product will be also be inaccurate.
To get the most accurate shipping quotes for this product:
1 Enter the shipping dimensions for this product in these fields.
2 Use Pack by Quantity or Pack by Weight.
3
Product
Always Ships
in Separate
Packaging
Make sure you've created at least one box that this product can ship in Packaging
Rules > Boxes Tab.
You might use this field if you have special packaging requirements for a product.
For example, if you sell a hat that ships in a special box, you would enter the
dimensions of the special box in the Shipping Dimensions field, and then create a box
with those same dimension in Packaging Rules > Boxes Tab.
When the system tries to calculate the shipping rate, it sees that this item must be
packaged separately, so even if the whole order could fit in one box, the software will
put the entire order minus this product in one box, and then go looking for a box to
put this product in. If you enter the shipping dimensions for this product as 12" x 12"
x 12", and then create a box the same size, the software will automatically choose
that box since it looks for the smallest box to use.
Limit Shipping
Methods
See Permitted Shipping Methods.
Permitted
Shipping
Methods:
This area lists all of the shipping methods that you have enabled on a system wide
basis. (To enable shipping methods, you first enable a shipping module, then you edit
the module to enable specific shipping methods.
28
Copyright 2005-2015, Miva Inc. All Rights Reserved.
Publication Date: 02/28/2015
User Reference Guide DRAFT
If you want to further restrict the shipping options that are available for the current
product, check the Limit Shipping Methods checkbox, and then check the boxes next
to the shipping methods that you want to offer for this product. Only the options that
you've check will be shown to customers in the "Ship Via" drop-down list in the
Shipping/Payment Selection screen.
Legacy Images
Please see below.
Catalog > Edit Product > Images Tab
Miva Merchant Images - A Brief History
PR7
In older releases of Miva Merchant, before PR8, a product could have two images: one thumbnail
image, and one full-size image. You generally used the thumbnail images in search and Category pages,
and displayed the full-size image when a customer viewed a Product page.
PR8
In PR8, Miva Merchant introduced Additional Images. With Additional Images you could have
multiple images for any product. When the customer viewed a Product page, they could look at multiple
thumbnails, click on any one of them to see an image that fit the product pane, and even click on that
image to see the full-size (or Lightbox) image.
When Additional Images were introduced, we started referring to the old "one thumbnail, one full-size"
as "Legacy" product images.
29
Copyright 2005-2015, Miva Inc. All Rights Reserved.
Publication Date: 02/28/2015
User Reference Guide DRAFT
Version 9
In Version 9, Additional Images are just called "Images". The idea is that, Additional Images are so
much more useful than the old legacy stuff, we hope people will use Additional Images by default.
PR8 - Additional Images
Version 9 - Same feature, just called "Images"
The old PR7 "one thumbnail, one full-size" legacy image features are still available in Version 9:
> Catalog > Products > Edit Product > Product tab > Legacy Images section.
See Thumbnail Image.
Using Images in Version 9
You can add a legacy style thumbnail or full-sized image to a product page in your store by editing the
product and using the "Thumbnail Image" and "Full- sized Image" controls in the edit product page.
30
Copyright 2005-2015, Miva Inc. All Rights Reserved.
Publication Date: 02/28/2015
User Reference Guide DRAFT
This is an older way of uploading product images. It is still supported and is described in the section
Thumbnail Image. However, a better way to add product images to your store is with the Edit Product >
Images tab.
It's a simpler method to upload product images.
You can easily add multiple images for the same product.
When you use the Images feature, the software will automatically create and display thumbnails for
each image (if you have at least 2 additional images).
Images have a "Lightbox" feature. The user can click on a product image and see the largest version
of the image that you have uploaded.
There are several ways to work with Images:
Manually add images to one product at a time. This is slow, but ok if you are only uploading
multiple images for a few products.
Add images by importing. This is the fastest method and is appropriate if you want to add multiple
images for hundreds, or thousands, of products.
Add Images - One Product at a Time
This method is appropriate if you want to add multiple images to a few products, one product at a time.
However, you might want follow these steps to get a simple introduction to using Images and Image
Types.
1
2
Edit a product and select the Images tab.
In the Images tab click Add Images. The Add Images dialog box will open.
31
Copyright 2005-2015, Miva Inc. All Rights Reserved.
Publication Date: 02/28/2015
User Reference Guide DRAFT
Use the Add Images dialog box select an image that you've already uploaded, or upload an image
from your local machine.
Click Clear to unselect the current image.
Select an image and click Delete that's already been uploaded to the server.
Click Upload to find an image on your local machine.
Add Image Type: See Image Types.
Show Selected/Show All: This button will only appear if you select an image in the Image
Uploads area.
The Add Images dialog box.
The Image list i s the list of all images that you've uploaded to your
server. Image Uploads are the images that you've uploaded while the
Add Image dialog box has been open.
3
If you click on an image that you've uploaded, you'll see a blue circle with a checkmark. Next to the
checkmark is a black triangle. If you click on the black triangle, you can assign the image to an
Image Type. This is an optional step, but in our example, we've already created images types of
"Front", "Back", and "Side".
32
Copyright 2005-2015, Miva Inc. All Rights Reserved.
Publication Date: 02/28/2015
User Reference Guide DRAFT
4
In the Add Images dialog box, click the Select 1 Image button.
5
You'll return to the Edit Product > Images tab. You can see that the image you selected is now
assigned to your product. In our example, we selected two images for our shirt; one for the front and
one for the back.
You can use the Edit Di splay Order button to change the order that
the images will appear in your store.
6
Now let's look in the store. When you use the Images feature:
33
Copyright 2005-2015, Miva Inc. All Rights Reserved.
Publication Date: 02/28/2015
User Reference Guide DRAFT
The system automatically scales your image to fit in the product page. This is similar to the old
legacy "full-size" image, but it really means "the biggest image that can fit in the boundary box
on the product page".
Note that you can change the size of this boundary box.
See
> User Interface > Edit PROD > Product Display Layout Image Dimensions
section > Resize to fit within bounding box.
The system automatically creates thumbnails of every additional image that you uploaded,
starting with the second additional image. Thumbnails won't be created if you only have one
additional image.
The end user can click on the image in the product page and see the "Lightbox" image. In our
example, we uploaded a picture of the t-shirt front that was 500 pixels x 500 pixels. But the
product page (by default) is only going to show that at about 200 pixels x 250 pixels. If the
customer clicks on that image in the product page, a pop- up window will appear which displays
the image in its actual dimensions: 500 x 500. When customers click on the Close button at the
bottom of the Lightbox, they return to the regular product page images.
34
Copyright 2005-2015, Miva Inc. All Rights Reserved.
Publication Date: 02/28/2015
User Reference Guide DRAFT
Lightbox image, main image, and thumbnails.
Add Images - Import Feature
This is the most efficient method to add multiple images to hundreds, or thousands, of products.
However, you can only use Images with the Import Feature if you also create Image Types.
35
Copyright 2005-2015, Miva Inc. All Rights Reserved.
Publication Date: 02/28/2015
User Reference Guide DRAFT
1
Create your Image Types. For this example we created Image Types of "Front" and "Back".
2
Give your product images names that will make managing them easy. For example, if we were going
to upload images for hundreds of t-shirts we might call the images: surfer_shirt_white_front.jpg,
surfer_shirt_white_back.jpg, etc.
Use FTP to upload all of the images.
3
Make sure that custom fields will appear in the spreadsheet you are going to download. This step
only has to be done once.
3.1.
4
Go to
> Utilities > Add/Remove Modules tab > Available Modules section.
3.2.
In the box "Product Image Custom Fields", click the Install button.
Download a product spreadsheet template.
4.1.
Select
> Data Management > Import Settings tab.
4.2.
Click on Add/Update Products from CSV.
4.3.
Click on either CSV Template or XLS Te mplate.
4.4.
The file "import.csv" or "import.xml" will download to your local machine, and you can
open it in a spreadsheet program. This file has all of the columns that you need to add new
products to your store, and associate one or more images with each product.
The columns in the spreadsheet will look familiar to you if you've created at least one product in
your store. Each row is a product. You can also see that there is a column in the spreadsheet for
36
Copyright 2005-2015, Miva Inc. All Rights Reserved.
Publication Date: 02/28/2015
User Reference Guide DRAFT
every Image Type that you've created. You can use the Image Type columns to add images for every
product, but there's two things to remember:
5
If you created two Image Types, you can only have (a max of) two images per product. If you
want to import more images per product, you have to create more Image Types, for example,
FRONT_01, FRONT_02, etc.
The file path for images in the spreadsheet is a path to the image on the store server, not your
local machine.
After you've added all your product data to the spreadsheet, go back to the Miva Merchant admin
interface and select
> Data Management > Import Settings, then edit Add/Update Products
from CSV.
37
Copyright 2005-2015, Miva Inc. All Rights Reserved.
Publication Date: 02/28/2015
User Reference Guide DRAFT
The settings in the Edit Import dialog box are explained fully in section Saving Import Options.
Please read that section carefully, because the options that you choose in this dialog box have a
important effect on how data is added to your store, and the Import feature has no "Undo". In our
example we're going to use the spreadsheet to "Add New Products Only". When you have selected
the appropriate options, click the Save button.
6
Go back to the Data Management > Import/Export tab and click on
.
The Import dialog box appears. Browse to the spreadsheet that contains your product data. If your
browser supports drag and drop, you can drag the file from a local folder on your machine into the
dashed rectangle.
The system will process your data file as soon as you select it. The system will log various messages,
such as the number of records that were processed, created, or skipped, along with success or failure
messages, to the Import dialog box. When your data file has been processed, all of your products,
and product images, have been added to your store and can be seen by customers.
Catalog > Edit Product > Related Products Tab
When a customer clicks on a product in your on- line store, you can also display a customized list of
other related products.
38
Copyright 2005-2015, Miva Inc. All Rights Reserved.
Publication Date: 02/28/2015
User Reference Guide DRAFT
Related products only appear on a product page (PROD). Related products are not displayed when a
customer runs a product search (SRCH) or in the All Products screen (PLST).
The formatting of related products is controlled in
> Related Product List Layout section.
> User Interface > Edit PROD > Page tab
To Display One or More Related Products
1
2
Edit a product and select the Related Products tab. The Related Products tab will show every product
that you have in your store.
Click on the Assigned icon next to any product so that it turns blue. When a customer clicks on the
product in your on-line store, they will see the related products that you selected.
Marked as Related Products
39
Copyright 2005-2015, Miva Inc. All Rights Reserved.
Publication Date: 02/28/2015
User Reference Guide DRAFT
Catalog > Edit Product > Attributes Tab
Attributes are features or properties of a product. For example, if you sell t-shirts, you might create
attributes like "Size" and "Color".
Product Name
Size
Color
Zoo T-Shirt
Small
Blue
Zoo T-Shirt
Small
White
Zoo T-Shirt
Medium
Blue
Zoo T-Shirt
Medium
White
40
Copyright 2005-2015, Miva Inc. All Rights Reserved.
Publication Date: 02/28/2015
User Reference Guide DRAFT
Each row in the table above is a Variant (variation) of the same basic product. The purpose of Attributes
and Variants is to make it easier for you to create and maintain your on- line inventory.
You could create each of the above t-shirts as separate product, but an easier way is to:
1
2
Enter the basic t-shirt once (called the master product).
Create Attributes for Size and Color.
3
Let the system generate all of the possible combinations. See Generate Variants button.
You can then edit the list of variants to remove the ones that you don't carry and change other
information, such as pricing.
A variant is just a product that you have on hand and sell. If you sell a "Zoo T-Shirt" in two sizes and
two colors, you stock and sell four variations of the same basic shirt. The "master product/variant" idea
is a way that Miva Merchant helps you organize your on- line store. Your inventory remains the same
either way.
OR
1
Create one master "Zoo Shirt" product.
2
3
Add attributes for size and color.
Use Miva Merchant to generate the
variants.
The customer sees one Zoo Shirt in your
store and selects the size and color that they
want.
If you add each size and color as a separate
product, they'll appear that way in your store.
Options
In Miva Merchant, Attributes are product features such as size and color. Options are individual
selections. For example:
41
Copyright 2005-2015, Miva Inc. All Rights Reserved.
Publication Date: 02/28/2015
User Reference Guide DRAFT
Size
Small
Medium
Color
White
Blue
Attribute
Options
Large
Attribute
Options
Green
To Add an Attribute
1
2
Edit a product and select the Attributes tab.
In the Attributes tab, click Add Attribute.
3
Fill out the fields (see below for more information), then click the Save Product Attribute
button.
To Edit An Attribute
Double-click on the Attribute Code or Prompt.
>
Or select the Attribute,
42
Copyright 2005-2015, Miva Inc. All Rights Reserved.
Publication Date: 02/28/2015
User Reference Guide DRAFT
Then click the Delete Product Attribute(s)
button.
To Add Options to an Attribute
1
Select the Attribute.
2
Click the Add Option button.
3
When you have finished entering data in all of the fields, click
to save the option.
Code : a required field that identifies the attribute or option in the admin interface. You could enter
"Size" or "Color" here.
Prompt: the attribute or option name that customers will see when they visit your store. It can be the
same as the Code. If you charge more for a particular option, you may want to put the extra cost into the
Prompt. This may be less convenient for you, but it makes it easier for the customer to understand that
they are being charged more for that option.
Image: Attributes and options can have an associated image that will show up in the product page.
43
Copyright 2005-2015, Miva Inc. All Rights Reserved.
Publication Date: 02/28/2015
User Reference Guide DRAFT
Type: Select the type of control you want customers to see when they s elect an option. The choices are:
radio buttons, drop-down list, checkbox, text field, text area, and swatches.
Note: In addition to selecting the type of option control your customers will see, the Type drop-down list
can also be used to select an Attribute Template. See Copy? below.
Radio Buttons
Drop-down List
Checkboxe s
Text Field
Text Area
Swatch Drop-Down List
Price: Enter a retail price for this attribute, if any. Note that this will be added to base price of the
product. For example, if you entered $10.00 as the price when you created the t-shirt product, and you
enter $5.00 as the attribute price (monogramming for example) then the price of the t-shirt with this
attribute will be $15.00.
Cost: Enter the wholesale cost of this attribute, if any.
Weight: Enter a weight for the attribute, if any. Note that this weight will be added to the weight that
you entered for the product.
D: Default option. This checkbox only applies to attribute options. This is the option that will be
selected by default when customers view this product in your store.
R: Required. Applies only to the attribute. If you check this box, customers must select one of the
options in this attribute before they can click the Add to Basket button.
I: Enables inventory tracking at the attribute level. If you enable inventory at the attribute level, the
system will automatically check to see if inventory is in stock for the variants that you have created.
44
Copyright 2005-2015, Miva Inc. All Rights Reserved.
Publication Date: 02/28/2015
User Reference Guide DRAFT
You must select this checkbox if you are going to generate Variants. See the section: Add
Variant(s) Button.
To use inventory at the attribute level you do not need to enable inventory tracking at the product
level:
> Catalog > Edit Product > Inventory tab > Track Product checkbox
but you must enable inventory tracking at the store level. See Track Inventory.
You may also want to enable Track Out of Stock Level and Hide Out of Stock Product to prevent
customers from ordering out of stock items. See Appendix 7: Inventory Management.
Enabling
inventory
tracking at the
store level
Adding Swatches to a Product Page
Swatches are small pictures that represent an option. For example, if you sell a t-shirt with color options
of red, blue, and green, you can create pictures of the fabric samples and add them to the t-shirt product
page. Fabric samples are only one example. You can use swatches whenever you would like to have a
visual representation of a product option. You can only use swatches if you have created Attributes for
your product.
The images that you use for swatches should be about 42 x 42 pixels. (Note that 42 x 42 pixels is the
default image size for Swatches. If you want to change this, you must change the CSS.)
If you are using Variants, you only have to add swatches to the master product.
You can use swatches with or without Images.
To Add Swatches to a Product
1
Edit the product and select the Attributes tab. In our example we'll add two attributes to a t-shirt
product: size and color. When we create the color attribute, we'll select Swatch Drop-Down List
from the Type drop-down list.
45
Copyright 2005-2015, Miva Inc. All Rights Reserved.
Publication Date: 02/28/2015
User Reference Guide DRAFT
2
After we create the color attribute, we'll create two color options: Black and Blue. When we create
each color option, we'll also upload a swatch image.
3
When you are done adding swatch images to the color options, click the Update button. The
swatches now appear in the product page.
46
Copyright 2005-2015, Miva Inc. All Rights Reserved.
Publication Date: 02/28/2015
User Reference Guide DRAFT
Generate Variants Button
Use the Generate Variants button to create product variants. Before you use this button you must create
Attributes and options. (See Catalog > Edit Product > Attributes Tab.) Once you have created your
attributes and options, they will appear in the Inventory Variants tab.
Click on the Generate Variants button. In the Generate Product Variants dialog box, select one of the
following pricing options.
Variant Price is set by the Master Product and its Attributes: When you add a product you can set
the price for that product, and when you create an Attribute (such as size), you can set the price for the
Attribute. If you select this option, the system will set the default price for each product variant to be:
variant product price = price of master product + price of Attribute(s).
47
Copyright 2005-2015, Miva Inc. All Rights Reserved.
Publication Date: 02/28/2015
User Reference Guide DRAFT
Let's say we created the following product and attributes:
Basic t-shirt product (master product): $15.00
Medium size: add $2.50
Large size: add $5.00
Color blue: add $5.00
A large t-shirt in blue would cost: $15.00 + $5.00 + $5.00 = $25.00
Note that the total price for the product variant won't show up until it is in a customer basket. If
you wish, you can edit the Prompt column when you create attributes and options, so that
customers understand that the options add to the base price of the product.
Figure 1: Variant Price is set by the Master Product and its Attributes
Variant Price is set by the Inventory Product: Use this option if you want to manually set a price for
each variant. Since the price is not being calculated, it will appear in both the product listing and the
basket. With this option, you don't need to have the price of an option appear in the option Prompt.
48
Copyright 2005-2015, Miva Inc. All Rights Reserved.
Publication Date: 02/28/2015
User Reference Guide DRAFT
Figure 2: Variant Price is set by the Inventory Product
After you select one of the pricing options, go to the Edit Product > Inventory Variants tab. You'll see
that the system will generate all of the possible variants.
You can delete individual variants by selecting a variant and clicking Delete Selected.
You can edit the price and other product fields of a variant.
1. Go to
> Catalog > Products tab.
2. In the Products tab, set Show Products
to All.
3. Edit the variant.
49
Copyright 2005-2015, Miva Inc. All Rights Reserved.
Publication Date: 02/28/2015
User Reference Guide DRAFT
Active vs. Inactive Variants
You can view the variants that you just created:
1
Go to
> Catalog > Products tab.
2
In the Products tab, set Show Products
to All.
Notice that only the master product is marked as Active. When a product is marked as active, it means
that you want Miva Merchant to display the product in your store. If all of the variants were marked as
active, they would show up in your store as separate products:
50
Copyright 2005-2015, Miva Inc. All Rights Reserved.
Publication Date: 02/28/2015
User Reference Guide DRAFT
If only the master product i s active,
customers browse to the master product, and
select size and color using a control, such a s
radio buttons.
If all of the variants are marked active, they
would appear in your store as separate
products.
However, there are other situations where you would want the variants to be active, for example, if you
have a kit where the parts in the kit can also be purchased separately:
51
Copyright 2005-2015, Miva Inc. All Rights Reserved.
Publication Date: 02/28/2015
User Reference Guide DRAFT
In this example we created a fruit basket kit. The basket is the master product and we manually added
variants: apples, pears, and oranges, as the parts. But in this case, we made the variants active, because
we also sell apples, pears, and oranges separately. We want customers to find product pages for those
"parts" as individual products.
Catalog > Edit Product > Inventory Kit Builder Tab
Use the Inventory Kit Builder tab to create a kit if your kit has Attributes and options. If your kit has no
options that the customer can select, use the Catalog > Edit Product > Inventory Variants Tab.
In this section we'll use an example where the customer can purchase a kit of computer parts. The basic
kit consists of:
52
Copyright 2005-2015, Miva Inc. All Rights Reserved.
Publication Date: 02/28/2015
User Reference Guide DRAFT
Mouse
Keyboard
Monitor
Graphics card
Motherboard
Case
But the user has the option of choosing a CPU
CPU 6400
CPU 6800
To build a kit with the Inventory Kit Builder Tab
1
2
Go to
> Catalog > Products.
Create a product for the kit and for every part that will go into the kit.
In this example, we want to track inventory for every part in the kit, so we need a product entry for
each part, and a product entry for the kit itself. If you had an option, such as monogramming or gift
boxing, that didn't need inventory tracking, you would not need to create a product entry for those.
Create a product for the
kit and for everything
that is going in the kit,
including the CPUs.
3
After you create the kit product, and all of the part products, edit the kit product (basic_tower_kit)
and select the Attributes tab.
53
Copyright 2005-2015, Miva Inc. All Rights Reserved.
Publication Date: 02/28/2015
User Reference Guide DRAFT
4
In the Attributes tab we'll create an Attribute called CPU with two options: CPU_6400, and
CPU_6800. This might seem a little weird, because, in the previous step, we created products for
cpu_6400 and cpu_6800, and now we're creating options with the same names, but both steps are
necessary.
Create options for the two CPUs.
5
Select the Inventory Kit Builder tab. You can see the attribute and the two options that we created.
6
Click on the first option (cpu_6400) to open the Edit Parts dialog box. In the Edit Parts dialog box,
enter the product code for the first part that you want to add to the kit, then click Add Part in the
Edit Parts dialog box. In our example, we'll add the mouse to the kit first.
54
Copyright 2005-2015, Miva Inc. All Rights Reserved.
Publication Date: 02/28/2015
User Reference Guide DRAFT
You can use the Quantity column to set how many of that part are included in the kit. For example,
we could set the mouse quantity to 2 so that each kit would include 2 mice.
Add all of the products that you want to include in the kit and click Save in the Edit Parts dialog box.
Our first kit is configured: a group of computer components with a 6400 CPU:
We added all the parts in the kit to the first option. Notice that the
product "CP U 6400" has also been added to the option "CPU 6400".
55
Copyright 2005-2015, Miva Inc. All Rights Reserved.
Publication Date: 02/28/2015
User Reference Guide DRAFT
7
After you have at least 1 kit configured, you can click on the Edit Inventory button. In this dialog
box you can set the inventory for each part in the kit. It's the same as editing each product
individually, but faster.
8
We'll repeat the steps above to create our second kit. Both kits are identical except that one kit comes
with the 6400 CPU and the other comes with the 6800 CPU.
Now click on the Generate Variants button. The Generate Variants button in the Inventory Kit
Builder tab does not create any new products. It just associates the kit product in the database with
all of the parts in the kit. In the Auto Generate Product Variants dialog box, select one o f the
following options:
Variant Price is set by the Master Product and its Attributes: the price of the kit is set by the
kit product and the price that you entered for the attributes (if any). If you choose this option, the
product page will only show the price of the Master Product (the kit product). The customer
won't see the combined price of the kit product with options until they view their basket.
56
Copyright 2005-2015, Miva Inc. All Rights Reserved.
Publication Date: 02/28/2015
User Reference Guide DRAFT
9
Variant Price is the sum of its Parts : the price of the kit product and the price of attributes are
ignored. The prices for all parts in the kit are added together to set the kit price.
After you select one of the pricing options, click Gene rate. The kit is now available in your store.
57
Copyright 2005-2015, Miva Inc. All Rights Reserved.
Publication Date: 02/28/2015
User Reference Guide DRAFT
Catalog > Edit Product > Inventory Variants Tab
Edit Default Variant Button
Use the Edit Default Variant button to create a kit that has no Attributes or options. This means
you have a kit that is "pre-packaged" and the customer can't change or customize it in any way.
Use the Catalog > Edit Product > Inventory Kit Builder Tab if your kit has attributes and options.
If you sell something like computer equipment (keyboard, mouse, graphic s card, etc) you might sell
each item individually, but you can also combine a number of items to sell as a kit or bundle.
1 In our example we are going to sell a desktop computer kit that includes a keyboard, mouse,
monitor, motherboard, and case. We've already entered each product into the system and created a
"Basic Tower Kit" product.
58
Copyright 2005-2015, Miva Inc. All Rights Reserved.
Publication Date: 02/28/2015
User Reference Guide DRAFT
Create a product for the
kit and for everything
that is going in the kit.
2
Edit the Basic Tower Kit product and select the Inventory Variants tab.
3
Click on the Edit Default Variant button. Use the Edit Variant dialog box to add individual parts to
the kit. As you type the code of a product into the Edit Variant dialog box, the system will list all of
the product codes it finds that match what you have entered.
59
Copyright 2005-2015, Miva Inc. All Rights Reserved.
Publication Date: 02/28/2015
User Reference Guide DRAFT
The Quantity text box controls how many of that part are included in the kit. In our example, the
desktop tower kit includes only 1 mouse, but you could change this to 2 and each kit would be sold with
2 mice.
60
Copyright 2005-2015, Miva Inc. All Rights Reserved.
Publication Date: 02/28/2015
User Reference Guide DRAFT
Price/Cost/Weight:
Controlled by Master Product. The price/cost/weight of the entire kit will be whatever you entered as
the price/cost/weight of the kit product
Specific Values: You will be prompted to enter price/cost/weight for the kit.
61
Copyright 2005-2015, Miva Inc. All Rights Reserved.
Publication Date: 02/28/2015
User Reference Guide DRAFT
Sum of Parts: The system will automatically set the price/cost/weight of the kit to be the sum of all the
parts that you add to the kit.
Add Variant(s) Button
There are two ways to add product variants:
Use the Generate Variants Button to generate every possible product variant, and then edit and
delete the variants as needed.
Use the Add Variant(s) button to manually add product variants one at a time.
Using the Add Variant(s) button is slower than using Auto Generate, but there may be two cases where
you would prefer to use it:
You want to control the product code field. If you use the Generate Variants button to create product
variants, the software will automatically generate a product code for each one. If you wanted to
change these product codes, you would have to manually edit each one.
Examples of automatically generated product code s and names.
If you use the Add Variant(s) button to create your product variants, you can set the product code to
be anything that you want.
You already have some product variants in the database and you don't want them to be duplicated by
the Generate Variants button.
To Add Product Variants Manually
1
Create a master product, e.g. a t-shirt.
2
Create products for the variants one at a time or by importing a product file; for example, a small
white t-shirt, medium white t-shirt, large white t-shirt, etc.
62
Copyright 2005-2015, Miva Inc. All Rights Reserved.
Publication Date: 02/28/2015
User Reference Guide DRAFT
3
4
5
Edit the master product and create Attributes, for example, size and color. When you create the
attributes, you must check the "I" column to track inventory.
Edit the master product and select the Inventory Variants tab.
Click on the Add Variant(s) button. In the Edit Variant dialog box, select the attributes that you
want and add the product code of the variant that you manually created.
63
Copyright 2005-2015, Miva Inc. All Rights Reserved.
Publication Date: 02/28/2015
User Reference Guide DRAFT
Delete Selected Button
The Delete Selected Button is used to delete product variants. This button only becomes active after you
have created a kit or generated product variants (See Generate Variants Button).
6 Check the box next to the variant that you want to delete.
7
Click Delete Selected.
Edit Inventory Button
The Edit Inventory button is only available if you have created a kit or if you have generated product
variants (see Generate Variants Button). After you create a kit or product variants, you can click on the
Edit Inve ntory button to set the inventory for that product variant or the parts in the kit.
64
Copyright 2005-2015, Miva Inc. All Rights Reserved.
Publication Date: 02/28/2015
User Reference Guide DRAFT
Catalog > Edit Product > Categories Tab
Use the Edit Product > Categories tab to add your products to existing categories and to create new ones.
You can also do both of these activities from the
> Categories screen.
Use the Show Records menu to
see all categories in your store.
To Add Your Product to an Existing Category
The Categories tab shows all of your current categories. Click the Assigned icon next to a category to
make it turn blue. The product you are editing will be listed in that category in your on- line store.
To Create a New Category
See To Create a New Category.
Catalog > Edit Product > Upsold Products Tab
Everything you would ever want to know about upsold products is in the Marketing > Upsale section.
Upsold products are products that you can offer customers during checkout. The two main ideas of
upsold products are:
The upsold product: this is the product that you want to offer customers during checkout.
The "required" product: this is the product that must be in the customer's basket to trigger the special
offer.
For example, your customer purchases a Hawaiian shirt (the required product). During checkout, you
offer them a matching hat (the upsold product).
65
Copyright 2005-2015, Miva Inc. All Rights Reserved.
Publication Date: 02/28/2015
User Reference Guide DRAFT
The "required product" must be in the customer's ba sket to qualify for the upsale offer(s).
In this example, the Hawaiian Shirt is the required product.
The Upsale Product is what we are going to offer customers during checkout. If the customer buys a
Hawaiian Shirt, we'll offer them a Hawaiian Hat.
Catalog > Edit Product > Inventory Tab
This tab will only appear if you have enabled Track Inventory at the store level. Use the Edit Product >
Inventory tab to:
Enable inventory tracking at the product level if the product does not have Attributes. To enable
inventory tracking for products that do have attributes, see Catalog > Edit Product > Attributes Tab.
Set inventory levels for products that do not have attributes.
Create product specific inventory messages. See Appendix 7: Inventory Management.
Track Product:
Check this box to enable inventory tracking for the current product.
You must also enable inventory tracking at the store level.
Increase Stock By:
Use these fields to tell the system what quantity you have of the current
product. After you enable inventory tracking and you tell the system
what your inventory levels are, the software tracks purchases and
automatically adjusts your inventory levels.
Decrease Stock By:
In Stock Message (Short)
In Stock Message (Long)
Please see Appendix 7: Inventory Management to learn how to use and
control these messages.
Low Stock Message (Short)
66
Copyright 2005-2015, Miva Inc. All Rights Reserved.
Publication Date: 02/28/2015
User Reference Guide DRAFT
Low Stock Message (Long)
Out of Stock Message (Short)
Out of Stock Message (Long)
Limited Stock Message
Track Low Stock Level:
Tracking low stock has several effects:
Low Stock Level:
You can set up automatic emails so that you are notified when
inventory reaches your low stock level (see Catalog > Inventory >
Email Notification Tab).
You can use the low stock level to create a kind of "reserve" for
your inventory, if you want to make sure that you always have a
few items on hand. For example, let's say you have qua ntity 5 of an
item on hand, and you set the low stock level to 3. If you use the
default "In Stock Message (Long)":
%inv_instock% available for immediate delivery
customers will see the message:
Because the %inv_instock% token is calculated as:
current stock - low stock level
Low stock level:
Default: Uses the low stock level that is set at the store level.
Other: If you set a low stock level for a product, it supersedes
the store default low stock level.
Track Out of Stock Level:
Tracking out of stock has several effects:
Hide Out of Stock Products:
You can set up automatic emails so that you are notified when
inventory reaches your out of stock level (see Catalog > Inventory
> Email Notification Tab).
You can use the out of stock level to create a kind of "reserve" for
your inventory, if you want to make sure that you always have a
Out of Stock Level:
67
Copyright 2005-2015, Miva Inc. All Rights Reserved.
Publication Date: 02/28/2015
User Reference Guide DRAFT
few items on hand. For example, let's say you have quantity 5 of an
item on hand, and you set the out of stock level to 3. When your
inventory level reaches quantity 3 on an item, customers will see
the out of stock message. If you have "Hide Out of Stock Products"
enabled, the product will not be displayed in your on- line store.
Available Tokens
If you set "Track Out of Stock Level", "Hide Out of Stock
Products", or "Out of Stock Level" to default, the store level setting
will be used.
The list of tokens that you can use in your store inventory messages.
Catalog > Categories Tab
Use the
> Catalog > Categories screen to create categories that organize your products into
logical groups, and to add products to specific categories. You can also do both of these activities from
the Catalog > Edit Product > Categories Tab.
Technically, you don't have to assign a product to a category. Customers would still be able to find the
product by clicking on "All Products" or by searching for a general term, like "hat". However, putting
your products in categories makes it easier for customers to browse your store and find the products that
they want. Categories in your on- line store are like departments in a brick and mortar store.
You can create as many categories as you wish.
Categories can contain sub-categories, which can contain sub-sub-categories …etc.
The same product can be assigned to as many categories as you wish.
68
Copyright 2005-2015, Miva Inc. All Rights Reserved.
Publication Date: 02/28/2015
User Reference Guide DRAFT
Add a Category.
Sort the Categories as they appear in the admin interface.
Edit the Display Order. Change the way that categories are shown in your on-line
store.
The order that you assign here
control s the order of Categories in
your on-line store.
Refresh the screen.
Show or hide columns in the admin interface.
To Create a New Category
You can create and edit categories in the categories main screen:
> Catalog > Categories
or when you are editing a product:
69
Copyright 2005-2015, Miva Inc. All Rights Reserved.
Publication Date: 02/28/2015
User Reference Guide DRAFT
> Catalog > Edit Product > Categories tab
1
Click on the Add Categories
button.
1.1.
Category Code: The Category Code uniquely identifies the category in the admin interface.
1.2.
Category Name : The Category Name will be displayed in your on-line store.
1.3.
Parent Category: If you enter a parent category in this field, the category that you are
creating will appear as a sub-category in your store. For example, if you had already created
a category called "Hats" and you are now creating a sub-category called "Men's Hats", you
could enter:
70
Copyright 2005-2015, Miva Inc. All Rights Reserved.
Publication Date: 02/28/2015
User Reference Guide DRAFT
1.4.
Alte rnate Display Page : By default, the content and appearance of all category pages in
your on- line store are controlled by the CTGY page in the admin interface (
> User
Interface > Pages > Edit CTGY). However, you can create additional category display pages
and use a different one for each category. For example, if you sell clothing and DVDs, you
might want the clothing category pages to have one format and the DVD category pages to
use another. You can also create multiple product display pages and the steps are nearly
identical.
If you don't want the format of this category to be controlled by the CTGY pa ge, enter the
name of a different page in this field.
1.5.
2
Active : Check the Active checkbox to have the category appear in your on- line store. You
can leave this checkbox unchecked if you want to create the category but not have it appear
in your store.
Category Title section. This section is optional and is only used if you want to have a graphic at
the top of your category page.
71
Copyright 2005-2015, Miva Inc. All Rights Reserved.
Publication Date: 02/28/2015
User Reference Guide DRAFT
Or click Upload to find a file
on your local machine.
Enter a server file path here…
2.1.
2.2.
In the Category Title section you can:
3
Enter the path to an image that is already on your server in the Title Image text box, for
example: graphics/00000001/hat_top.jpg.
Or click on the Upload button and then the Browse button to upload an image from your
local machine to the server.
In the Category Title section, click the Update button. The image that you uploaded will now
appear when the user clicks on the category.
Category Tree section. This section is optional and is only used if you want to have an image in the
category tree instead of text.
72
Copyright 2005-2015, Miva Inc. All Rights Reserved.
Publication Date: 02/28/2015
User Reference Guide DRAFT
3.1.
3.2.
In the Category Tree section you can:
Enter the path to an image that is already on your server in the Title Image text box, for
example: graphics/00000001/hat_top.jpg.
Or click on the Upload button and then the Browse button to upload an image from your
local machine to the server.
In the Category Tree section, click the Update button. The image that you uploaded will now
appear in the Category Tree when the user clicks on the category.
The Category Tree
4
Header/Footer section. This tab is optional. You can use it to add any content you wish: text,
images, JavaScript, HTML/CSS, etc, to the header or footer of the category page.
73
Copyright 2005-2015, Miva Inc. All Rights Reserved.
Publication Date: 02/28/2015
User Reference Guide DRAFT
5
Meta Tag Settings section. Meta tags allow you to embed descriptive words in a page that can be
found by search engines, like Google. This tab is optional and will embed words in the category
page that you are creating. For information about how meta tags work and are used in Miva
Merchant, please see User Interface > Meta Tag Settings Tab.
6
When you have finished filling out the fields in the various Category tabs, click the
Notice that there is a new tab, "Products".
button.
74
Copyright 2005-2015, Miva Inc. All Rights Reserved.
Publication Date: 02/28/2015
User Reference Guide DRAFT
You can assign products to the category by clicking on the Assigned icon next to the product so
that the icon turns blue.
You can also assign a product to a category by editing the product and selecting the Categories
tab.
You can also assign products to categories during import.
Catalog > Attribute Templates Tab
Attribute templates allow you to create an attribute once, and apply it to many products, instead of
recreating the same attribute over and over. For example, let's say that you sell a hundred different tshirts and all of them are available in small, medium, and large. Assuming that you aren't going to
import your product data, you could:
1 Create the first t-shirt product.
2
Create an attribute "Size", with options "small", "medium" and "large".
3
Create the second t-shirt product. Create an attribute "Size" with options "small", "medium" and
"large".
Repeat for all of your shirts.
4
Obviously this is not very efficient, and a faster method is to create the attribute "Size" as part of a
template, and then apply the template to all of your t-shirts. Templates can also contain more than one
attribute. For example, you could create a template that included the attributes Size, Color, and Fabric.
75
Copyright 2005-2015, Miva Inc. All Rights Reserved.
Publication Date: 02/28/2015
User Reference Guide DRAFT
To Create An Attribute Template
The instructions in this section describe the general process of creating and using an attribute template.
If you have never created attributes and options before, or for detailed information on all of the attribute
and option fields, please see Catalog > Edit Product > Attributes Tab. You might find it easier to
practice manually creating an attribute in the Attributes tab, and then return to this section to create a
template.
1
Go to
> Catalog > Attribute Templates tab.
2
3
In the Attribute Templates tab, click Add Te mplate
In the Add Attribute Template screen:
.
3.1.
Enter an Attribute Template Code. The code identifies the attribute in the admin interface.
3.2.
Enter an Attribute Template Prompt: This is the name you will see when you apply your
template to a product. See To Apply an Attribute Template to a Product.
4
3.3.
Click the Add button.
A new field called "Reference Count" appears. This field displays the number of products that are
using this attribute template. (Because this is a new template, the reference count is zero.) A new tab
called "Attributes and Options" also appears.
5
Click on the Attributes and Options tab.
In our example, we'll create two attributes: Size and Color. If you aren't sure how to create attributes,
or if you want detailed information on all of the attribute fields, please see Catalog > Edit Product >
Attributes Tab.
76
Copyright 2005-2015, Miva Inc. All Rights Reserved.
Publication Date: 02/28/2015
User Reference Guide DRAFT
We created two attributes for our template: Size and Color.
6
When you have finished adding your attributes and options, go back to
> Catalog >
Attribute Templates tab. The template that you created will be listed in the Attributes Templates
main screen.
To Apply an Attribute Template to a Product
This section assumes that you have already created an attribute template.
1 Edit a product and select the Attributes tab.
2
In the Attributes tab, click the Add Te mplate button.
77
Copyright 2005-2015, Miva Inc. All Rights Reserved.
Publication Date: 02/28/2015
User Reference Guide DRAFT
2.1.
In the Add Attribute Template dialog box, select a template from the list box that you've
already created.
2.2.
Click on either the Copy button or the Link button.
If you click on the Copy button, the system essentially creates a copy of the template and
applies it to your product. If you change the attribute template later on, those changes are
not applied to attribute template used by the product.
For example, if at some time in the future you edit the template and add another attribute
called "Material", the Material attribute won't show up for this product.
If you click on the Link button, the system links your product to the original attribute
template. If you edit the attribute template later on, those changes will be applied to this
product, because the product is linked to the original template.
Catalog > Inventory Tab
Use the Inventory tab to:
Enable Track Inventory at the store level, which activates the basic system for inventory tracking.
If you want to track inventory on your products, you must also enable inventory tracking at the
product level.
If the product has no attributes, see Catalog > Edit Product > Inventory Tab.
If the product has attributes, see Catalog > Edit Product > Attributes Tab.
Create store wide default inventory messages (optional). Inventory mes sages appear in different
pages in your store and give customers information about product availability. You can also create
product specific inventory messages (see Appendix 7: Inventory Management). If you create product
specific inventory messages, they will take precedence over the storewide defaults.
Set up automated emails so you are notified when stock is low or out.
78
Copyright 2005-2015, Miva Inc. All Rights Reserved.
Publication Date: 02/28/2015
User Reference Guide DRAFT
Catalog > Inventory > Inventory Settings Section
Track Inventory:
Check this box to enable the basic system for inventory tracking in
your store. You must also enable inventory tracking at either the
product level.
If the product has no attributes, see Catalog > Edit Product >
Inventory Tab.
If the product has attributes, see Catalog > Edit Product >
Attributes Tab.
Track Low Stock Level:
Tracking low stock has several effects:
Low Stock Level:
You can set up automatic emails so that you are notified when
inventory reaches your low stock level.
You can use the low stock level to create a kind of "reserve" for
your inventory, if you want to make sure that you always have a
few items on hand. For example, let's say you have quantity 5 of an
item on hand, and you set the low stock level to 3. If you use the
default "In Stock Message (Long)":
%inv_instock% available for immediate delivery
customers will see the message:
Because the %inv_instock% token is calculated as:
current stock - low stock level
Track Out of Stock Level:
Tracking out of stock has several effects:
Hide Out of Stock Products:
You can set up automatic emails so that you are notified when
inventory reaches your out of stock level.
You can use the out of stock level to create a kind of "reserve" for
your inventory, if you want to make sure that you always have a
few items on hand. For example, let's say you have quantity 5 of an
item on hand, and you set the out of stock level to 3. When your
inventory level reaches quantity 3 on an item, customers will see
Out of Stock Level:
79
Copyright 2005-2015, Miva Inc. All Rights Reserved.
Publication Date: 02/28/2015
User Reference Guide DRAFT
the out of stock message. If you have "Hide Out of Stock Products"
enabled, the product will not be displayed in your on- line store.
In Stock Message (Short)
See Inventory Messages.
In Stock Message (Long)
Low Stock Message (Short)
Low Stock Message (Long)
Out of Stock Message (Short)
Out of Stock Message (Long)
Limited Stock Message
Available Tokens
The list of tokens that you can use in your store inventory messages.
Catalog > Inventory > Email Notification Tab
Use the Email Notification tab to send automated emails to you employees when inventory on any item
is low or out of stock. To use email notification you must:
Enable inventory tracking at the store level. See Track Inventory.
Enable inventory tracking at the product level:
See Catalog > Edit Product > Inventory Tab if the product does not have attributes.
See Catalog > Edit Product > Attributes Tab if the product does have attributes.
Automated emails are triggered by out of stock/low stock levels at both the store level and the product
level. For example:
If you set your store-wide default for low stock to be 3, you will receive a low stock email when the
inventory level of any product in your store drops to 3.
If you set a product specific low stock level to 5, you will receive a low stock email for that product
when the inventory for that item drops to 5, even though the store-wide default is 3. See Appendix 7:
Inventory Management.
Customers
Customers > Customers Tab
Use the Customers screen to create accounts for customers in your on- line store. If you want to create
accounts in the admin interface for your employees, see
> Users. Note that customers can also
create their own accounts while visiting your on- line store.
Beginning with PR8 update 7, all customer passwords are encrypted.
80
Copyright 2005-2015, Miva Inc. All Rights Reserved.
Publication Date: 02/28/2015
User Reference Guide DRAFT
If your store was created after the release of PR8 Update 7, new customer accounts are created with
encrypted passwords.
If your store was created before PR8 Update 7, existing customer passwords will be encrypted when
you apply Update 7.
See also:
User Interface > Settings Tab > Customer Links
Store Settings > Customer Fields
To Create a Customer Account
1
2
Go to
> Customers. Click the Add Customer
button.
In the Add Customer screen, enter the following information:
Login:
Email Lost Passwords To:
Password:
Confirm Password:
3
4
Click the
button.
Select the Shipping/Billing Information tab.
5
Enter the customer's information in the Ship To and Bill To columns and click the +Add button.
6
Select the Te mplate Based Emails tab. You can use this tab to manually send a template based
email to a customer. See Order Fulfillment > Template Based Emails.
81
Copyright 2005-2015, Miva Inc. All Rights Reserved.
Publication Date: 02/28/2015
User Reference Guide DRAFT
This email has configured to
be available when you edit a
customer account record.
Customers > Customer Settings
To Set Password Security for Customer Accounts
Follow the steps below to set password security for customer accounts in your on-line store. If you want
to set password security for the admin interface, see
> Domain Settings > Domain Details tab >
Password Settings section.
1
2
3
Go to
> Customers > Customer Settings tab.
Set the Minimum Password Length.
Select an option for Password Complexity.
4
Set a time, in minutes, for the Password Reset Link Expira tion.
Before PR8 Update 7, the Lost Password Email contained the customer's password in clear
(unencrypted) text. As of PR8 Update 7, the Lost Password Email contains a link that customers can
click on. The link takes the customers to a web page where they can reset their password. The reset
link only remains valid for the time that you enter in this field. If the customer clicks on the link after
it has expired, they will see an error message. The customer should go back to your on- line store and
click the Forgot Password link to generate another email.
5
6
Choose whether you want to require customers to reauthenticate (enter their current password) when
they select a new password.
Click the Update button.
82
Copyright 2005-2015, Miva Inc. All Rights Reserved.
Publication Date: 02/28/2015
User Reference Guide DRAFT
Customer Lost Password Email
If a customer forgets their password they can click on a link in your on- line store and receive a lost
password email. In Miva Merchant builds before PR8 Update 7, the customer was sent an email
containing their password in clear (unencrypted) text. Starting with PR8 Update 7, customers receive an
email containing a special hyperlink that they can use to reset their password.
1 The customer goes to your on-line store and clicks on the Sign In link.
2
At the login screen (LOGN), the customer clicks the Forgot Password link.
83
Copyright 2005-2015, Miva Inc. All Rights Reserved.
Publication Date: 02/28/2015
User Reference Guide DRAFT
3
The Forgot Password screen (FPWD) appears.
The customer enters their email address, clicks the Submit button, and will automatically receive the
lost password email, which contains a hyperlink. The customer can click on the link and visit a page
to reset their password.
Customers > Availability Groups
Availability Groups allow you to control what categories and products your customers see in your store,
based on their membership in a group. For example, you could use Availability Groups to offer different
products or packaging to retail and wholesale customers.
84
Copyright 2005-2015, Miva Inc. All Rights Reserved.
Publication Date: 02/28/2015
User Reference Guide DRAFT
Customer A is a member of the
Retail Availability Group.
Customer B is a member of the
Wholesale Availability Group.
The general process is:
1 Create an Availability Group.
2
Add customers, categories, and products to the group.
When customers in that group visit your on- line store and sign in, they will see the categories and
products that you selected.
You can add the same customers, categories and products to multiple groups.
If a category or product is not assigned to a group, it is visible to everyone: all groups and all
customers who are not signed in. Once you assign a category or product to a group, it is only visible
to customers who sign in and are a member of that group. You can assign a product or category to as
many groups as you want.
Examples
Create a store category called "Bulk Produce" and two Availability Groups: "Retail", and "Wholesale".
We'll add one customer to each group, but no categories or products yet. When a customer reaches your
store they will be either:
Not signed in.
Signed in, and a member of the Retail group.
Signed in, and a member of the Wholesale group. (Technically the customer could be a member of
both the Retail and Wholesale groups, but for this example, we'll assume that they are in one or the
other.)
85
Copyright 2005-2015, Miva Inc. All Rights Reserved.
Publication Date: 02/28/2015
User Reference Guide DRAFT
Example 1
If the category "Bulk Produce" is not assigned to any Availability Group it will be visible to everyone:
members of any group, and customers who visit your store and are not signed in.
Example 2
Now we'll add the Bulk Produce category to the Wholesale Availability Group.
The Bulk Produce category is visible to customers who sign in and are a member of the Wholesale
group.
Customers who do not sign in or are not part of the Wholesale Group cannot see the Bulk Produce
category.
Example 3
Add the Bulk Produce category to both the Wholesale Availability Group and the Retail Availability
Group.
The Bulk Produce category is now visible to customers who sign in and are a member of either
group.
Customers who do not sign in or are not part of either group cannot see the Bulk Produce category.
To Use Availability Groups
1
2
Create a new Availability Group.
1.1.
Go to
> Customers > Availability Groups tab.
1.2.
In the Availability Groups screen, click Add Group
1.3.
Enter a name for the new group, such as "Wholesale".
1.4.
Click Save
.
.
Add a category to the group.
2.1.
In the Availability Groups tab, click to the left of your new group so that you see a blue icon.
2.2.
Click Categories.
2.3.
In the Categories Assigned dialog box, click on the Assigned icon next to a category until it
turns blue, then click Close. The category that you selected is now part of your Availability
Group.
86
Copyright 2005-2015, Miva Inc. All Rights Reserved.
Publication Date: 02/28/2015
User Reference Guide DRAFT
3
4
Add a customer to the group.
3.1.
In the Availability Groups tab, click to the left of your new group so that you see a blue icon.
3.2.
Click Customers.
3.3.
In the Customers Assigned dialog box, click on the Assigned icon next to a customer until it
turns blue, then click Close. The customer that you selected is now part of your Availability
Group.
Add a product to the group.
4.1.
In the Availability Groups tab, click to the left of your new group so that you see a blue icon.
4.2.
Click Products.
4.3.
In the Products Assigned dialog box, click on the Assigned icon next to a product until it
turns blue, then click Close. The product that you selected is now part of your Availability
Group.
87
Copyright 2005-2015, Miva Inc. All Rights Reserved.
Publication Date: 02/28/2015
User Reference Guide DRAFT
Marketing
Marketing > Price Groups
Price Groups are another way to offer discounts in your store. Price Groups have been part of Miva
Merchant for a number of years, but were significantly expanded for Version 9.
Price Groups in PR8
In PR8, you could use Price Groups to change the price of products based on membership in a group.
All customers saw the same products, but the price would change depending on what group the
customer was assigned to.
Customer A is a member of the
Silver Club Price Group.
Customer B is a member of the
Gold Club Price Group.
Price Groups in Version 9
In Version 9, you have a lot more control over who gets the discount and what kind of discount you
create.
88
Copyright 2005-2015, Miva Inc. All Rights Reserved.
Publication Date: 02/28/2015
User Reference Guide DRAFT
Who gets the discount?
(Eligibility)
What kind of discount
do you want to create?
(Type)
PR8
Version 9
Customers with a coupon.
Specific Customers
All customers who are signed into
their accounts.
All customers
Legacy
Retail
Specific Customers
Retail (no discount)
Cost
Discount from Retail (percent)
Cost
Markup from Cost (percent)
Discount from Retail
Markup from Cost
Add-on product
Buy X Get Y
Fixed Discount
Shipping Discount (entire order)
Shipping Discount (eligible
products only)
Volume Pricing
Basket Discount
Product Discount
The General Process of Creating a Price Group
If you are creating a coupon, there's a few extra steps, but if you are only creating a price group, this is
what you have to do:
1
Go to
> Marketing > Price Groups tab.
2
In the Price Groups tab, click Add Price Group
3
In the Add Price Group dialog box:
.
3.1.
Enter a name for the Price Group.
3.2.
Select the Eligibility: Who should get the discount?
Coupon Only: only customers with a coupon get the discount.
Specific Customers: Only a specific list of customers will get the discount. You'll create
this list later on.
All Logged In Customers: To get the discount a customer must have an account and be
signed into their account.
All Customers: Everyone who visits your store gets the discount.
89
Copyright 2005-2015, Miva Inc. All Rights Reserved.
Publication Date: 02/28/2015
User Reference Guide DRAFT
3.3.
Select the Type: Miva Merchant lets you create many different types of discounts, and each
type of discount has its own set of options. All of the options are explained later in this
section.
3.4.
4
5
Legacy. These are the discount options that were supported in builds before Version 9
(Retail, Cost, Discount from Retail, and Markup from Cost).
Add-on product
Buy X Get Y
Fixed Discount
Shipping Discount (entire order)
Shipping Discount (eligible products only)
Volume Pricing
Basket Discount
Product Discount
Fill out the fields in the price group. The fields that show up in the Add Price Group dialog
box will change depending on the type of price group you are creating. Details on the every
field in every type of price group are given later in this section.
Click Save.
Select Qualifying Products, Discounted Products, and Customers.
5.1.
In the Price Groups tab, select the price group that you just created.
When you select your Price Group, a row of buttons will appear. The buttons that you see
depend on the settings that you selected in the Price Group.
These buttons become vi sible when you select at least one P rice Group. The buttons that
you see will vary depending on how you configured the Price Group.
5.2.
Qualifying Products : The customer must have at least one of these products in their basket
to qualify for the price group discount.
5.2.1. Click on the Qualifying Products button.
90
Copyright 2005-2015, Miva Inc. All Rights Reserved.
Publication Date: 02/28/2015
User Reference Guide DRAFT
You may want to set
"Show Records" to
"All".
The customer must
have at least one of
the qualifying
products in their
basket to get the
discount.
5.2.2. Assign one or more products to this price group, then click Close.
5.3.
Discounted Products: Select one or more products to be discounted by the price group.
5.3.1. Click on the Discounted Products button.
These are the
products we are
discounting.
5.3.2. Assign one or more products to this price group, then click Close.
5.4.
Custome rs: If you selected "Specific Customers" as the Eligibility when you created the
price group, use the Customers button to select the customers who can get the discount.
5.4.1. Click on the Customers button.
91
Copyright 2005-2015, Miva Inc. All Rights Reserved.
Publication Date: 02/28/2015
User Reference Guide DRAFT
These are the
customers who will
get the discount from
thi s price group.
5.4.2. Assign one or more customers to this price group, then click Close.
Done! With the exception of a coupon, your price group is ready to go. The steps shown above are a
general description for creating a price group. Details on every type of price group are included later in
this section.
Price Groups Can Affect Each Other
Price groups have the ability to interact and affect each other. If you create a lot of price groups, you
may have trouble figuring out exactly how a customer got charged a certain price for an item. Price
groups can affect each other in a number of ways, including:
Priority
Exclusions
Activation dates. See Not Valid Before.
See Priority for an example of how price groups can interact.
Price Group Types
To Create a Legacy Price Group
The Legacy Price Group lets you duplicate the same kind of price group discounts that were available in
PR8 and previous releases.
1
Go to
> Marketing > Price Groups tab.
2
3
Click Add Price Group
.
Fill out the fields in the Add Price Group dialog bo x.
92
Copyright 2005-2015, Miva Inc. All Rights Reserved.
Publication Date: 02/28/2015
User Reference Guide DRAFT
Name
The name of the Price Group as it appears in the admin interface.
Eligibility
Coupon Only: only customers with a coupon get the discount.
Specific Customers: Only a specific list of customers will get
the discount. You'll create this list later on.
All Logged In Customers: To get the discount a customer must
have an account and be signed into their account.
All Customers: Everyone who visits your store gets the
discount.
Type
Select Legacy.
Pricing
Retail: Customers in this group will see the normal retail price.
This is the price that you set in the
> Catalog >
Products tab > (Edit Product) > Product tab > Price field.
Cost: Customers in this group will see whatever you entered in
the
> Catalog > Products tab > (Edit Product) >
Product tab > Cost field.
Discount From Retail: Use this field to give customers a
discount percent from the
> Catalog > Products tab >
(Edit Product) > Product tab > Price field. For example, if you
set the Price field of a product to $30.00 and you enter 50% in
the Discount from Retail field, customers in this group will
only pay $15.00 for that product.
Markup From Cost: Use this field to give customers a
discount percent from the
> Catalog > Products tab >
(Edit Product) > Product tab > Cost field. For example, if you
set the Cost field of a product to $10.00 and you enter 50% in
the Markup from Cost field, customers in this group will pay
$15.00 for that product.
Not Valid Before:
See Not Valid Before.
Not Valid After:
Priority
If multiple discounts are being applied to the order, the higher
priority discount is applied first. A priority 100 discount is applied
before a priority 97 discount. If you set the Priority to "0" it means
"apply this discount last". If you set the Priority of every price
group to "0", the price groups will be applied in the order in which
they were created.
You might use the Priority field if you think multiple discounts
will be applied to the same basket.
Example: Priority affects the price of an item
We'll create two price groups:
93
Copyright 2005-2015, Miva Inc. All Rights Reserved.
Publication Date: 02/28/2015
User Reference Guide DRAFT
The first price group is of type "Product Discount".
We'll set the price group to give the customer $5 off for a
men's golf shirt.
The Maximum Discount Quantity is set to "1", which means
the customer can only get a discount on one item, no matter
how many they buy.
We'll set the Exclusions to "Exclude for Same Item", which
means the customer can't combine multiple discounts on the
same item.
Priority is to 100.
The second price group is of type "Fixed Discount".
We'll set up the price group to give the customer $20 off for
a men's golf shirt.
The Maximum Discount Quantity is set to 1.
The Exclusion is set to "Exclude for Same Item".
The Priority is set to 0.
1
The customer adds a man's golf shirt to their basket. That
triggers our first price group "Product Discount", because we
set the Priority to 100, and the customer gets $5 off the normal
price. This shirt doesn't trigger our second price group because
we set Exclusions to "Exclude for Same Item", so they can't get
multiple discounts on the same shirt.
2
The customer adds a second men's golf shirt to their basket.
This shirt doesn't get the discount from our first price group,
because we set Max Discount Quantity to "1", which means
that discount can only be used once per basket. The 2nd shirt
does qualify for a discount from our second price group.
The customer adds a third men's golf shirt to their basket. This
shirt gets no discount. Both of our price groups had the Max
Discount Quantity set to "1", which means that the discount
from each price group can only be used once per basket. The
customer already got two discounts on their basket, one from
each price group.
Our customer bought quantity 3 of our men's golf shirt.
3
4
They received a $5 discount on the first shirt.
They received a $20 discount on the second shirt.
They will pay full price for the third shirt.
94
Copyright 2005-2015, Miva Inc. All Rights Reserved.
Publication Date: 02/28/2015
User Reference Guide DRAFT
It's important to remember that price groups have variables, such as
Priority, Exclusions, Max Discount Quantity, and others, that can
change the way that the price groups are applied and combined.
Exclusions:
Exclusions let you decide if the price group discount you are
creating can be combined with other existing price groups. When
you create a new price group, every other price group that you've
created will show up in the Add/Edit Price Group dialog box:
You should think carefully when you allow discounts to be
combined. There are many variables that can affect discounts:
Priority, Maximum Discounts Allowed, restrictions, etc. If you
allow too many discounts to be combined, it may be difficult to
predict what the final price of a product will be in every case.
Allow Combination: You will allow the discount of this price
group to be combined with the discount of another price group.
Exclude for Same Basket: The discount created by this price
group cannot be combined with the discount from another price
group.
Exclude for Same Item Group: An Item Group isn't
something that you can select yourself. It's basically one or
more items in a customer's basket that the Miva Merchant
software temporarily groups together as it tries to apply price
group discounts.
Let's say you have two price groups:
Price Group 1: If the customer buys 5 hats they'll receive a
10% discount on each hat. Set the Priority to 100 (apply
this price group first).
Price Group 2: If the customer buys 1 hat, they get the 2nd
hat free. Set the Priority to 0 (apply this price group last.).
Our customer buys 5 hats. Miva Merchant looks at the
customer's basket, takes 5 hats and puts them in a group. The
item group of 5 hats meets the conditions to get a discount from
Price Group 1.
Now Miva Merchant tries to apply a discount for Price Group
2. But all 5 hats are part of an "item group" that was already
95
Copyright 2005-2015, Miva Inc. All Rights Reserved.
Publication Date: 02/28/2015
User Reference Guide DRAFT
used to get a discount from Price Group 1.
Since we set the exclusion to "Exclude for Same Item Group"
none of those hats can get another discount. The 5 hats were
placed in a group to qualify for a discount. As part of that item
group they are "disqualified" from getting a discount from any
other Price Group.
If the customer buys 5 hats, the hats get a discount from
Price Group 1, but not Price Group 2.
If the customer buys 7 hats, the first 5 hats are put in an
item group and get a discount from Price Group 1. Hats 6
and 7 are put into a different item group and get the
discount from Price Group 2.
If the customer buys 8 hats:
5
6
Hats 1-5 get the discount from Price Group 1.
Hats 6-7 get the discount from Price Group 2.
Hat 8 gets no discount. It's in an item group by itself
that doesn't qualify for any discount.
Exclude for Same Item: Multiple discounts can be applied to
the same basket, but not for the same item.
When you've filled out all of the fields in the Add Price Group dialog box, click Save.
Select Qualifying Products, Discounted Products, and Customers.
To Create an Add-on Product Price Group
In the Add-on Product Price Group, the "add-on" product is automatically added to the customer's basket
if they put a qualifying product in their basket. For example, if the customer adds a Hawaiian shirt to
their basket (the qualifying product), you can automatically put a Hawaiian hat in their basket (the addon). You can control the price of the add-on product (free, discounted, normal retail, etc.) The customer
can remove the add-on item from their basket whenever they view their basket, or during checkout.
1
Go to
> Marketing > Price Groups tab.
2
Click Add Price Group
3
Fill out the fields in the Add Price Group dialog box.
.
Name
The name of the Price Group as it appears in the admin interface.
Eligibility
Coupon Only: only customers with a coupon get the
discount.
Specific Customers: Only a specific list of customers will get
the discount. You'll create this list later on.
All Logged In Customers: To get the discount a customer
96
Copyright 2005-2015, Miva Inc. All Rights Reserved.
Publication Date: 02/28/2015
User Reference Guide DRAFT
must have an account and be signed into their account.
All Customers: Everyone who visits your store gets the
discount.
Type
Select Add-on Product.
Add-on Product
This is the product that you want to be automatically added to
the customer's basket.
Quantity to Add
The quantity for the add-on product. For example, if you enter
"3" here, then 3 Hawaiian hats will be added to the customer's
basket when they add a Hawaiian shirt to their basket.
Price/Each
The price you want to charge for each add-on item.
Restrict to Qualifying Subtotal:
The customer will receive the discount if the total value of
qualifying products in their basket falls within a certain
range. You select the list of qualifying products after you
create the price group.
For example, the customer might have 10 items in their
basket with a total value of $100. But if only 3 of those items
were on your list of qualifying products, and the value of
those 3 items is $25, it might not be enough to qualify for the
discount.
This field also uses the basket subtotal, which is the value of
merchandise in the basket, but without tax, shipping, or other
order related charges.
Example 1:
The customer will receive the discount if the total value of
qualifying products in their basket is at least $50. Note that, in
our sample store, we are using US dollars as the currency. The
currency setting in your store might be different and is set in:
> Store Settings > Store Details tab > Settings Section >
Currency Formatting field.
Example 2:
The customer will receive the discount if the value of qualifying
products in their basket is $50 or less.
Restrict to Qualifying Quantity:
The customer must have a certain number of qualifying
products in their basket to get the discount. You select the
list of qualifying products after you create the price group.
For example, the customer might have 10 items in their
97
Copyright 2005-2015, Miva Inc. All Rights Reserved.
Publication Date: 02/28/2015
User Reference Guide DRAFT
basket, but if only 3 of those items are on your list of
qualifying products, it might not be enough for the customer
to receive the discount.
The customer can have any combination of your qualifying
items in their basket, including multiples of the same item.
For example, if you want the customer to have 5 qualifying
items in their basket, and the customer has 5 of the same
item, they would still get the discount.
Example 1:
The customer will receive the discount if they have 5 or more
qualifying products in their basket.
Example 2:
The customer will receive the discount if they have 5 or fewer
qualifying products in their basket.
Restrict to Qualifying Weight
The customer will receive the discount if the total weight of
qualifying products in their basket falls within a certain range.
You select the qualifying products after you create the price
group. Only the weight of qualifying products is considered by
this field.
For example, the customer may have 10 items in their basket
with a total weight of 25 pounds. However, only 2 of those items
are on your list of qualifying products, and those 2 items weigh a
total of 10 pounds, which may not be enough to qualify for the
discount.
Note that, in our sample store, we are using pounds as the unit of
weight. The unit of weight in your store might be different and is
set in:
> Store Settings > Store Details tab > Settings
Section > Weight Units field.
Example 1:
The customer will receive the discount if the total weight of
qualifying products in their basket is 10 pounds or more.
Example 2:
The customer will receive the discount if the total weight of
qualifying products in their basket is 10 pounds or less.
98
Copyright 2005-2015, Miva Inc. All Rights Reserved.
Publication Date: 02/28/2015
User Reference Guide DRAFT
Restrict to Basket Subtotal
The basket subtotal is the value of all merchandise in the
basket, but without tax, shipping, or other order related
charges. This option looks at everything in the customer's
basket, not just items in the qualifying products list.
The Restrict To Basket Subtotal fields let you decide what
merchandise value has to be in the customer's basket to
qualify for the discount
Value in basket must be at least thi s:
But not more than this:
Example 1:
The customer will receive the discount if their basket total is at
least $100. Note that, in our sample store, we are using US
dollars as the currency. The currency setting in your store might
be different and is set in:
> Store Settings > Store
Details tab > Settings Section > Currency Formatting field.
Example 2:
The customer will receive the discount as long as their basket
total is less than $100.
Restrict to Basket Quantity:
The basket quantity is the total number of items in the
customer's basket.
The Restrict to Basket Quantity fields let you decide how
many items must be in the customer's basket in order to
qualify for the discount.
Example 1:
The customer will receive the discount if they have at least 5
items in their basket.
Example 2:
The customer will receive the discount if they have 5 or less
items in their basket.
Restrict to Basket Weight:
The basket weight is the combined weight of all items in the
customer's basket.
99
Copyright 2005-2015, Miva Inc. All Rights Reserved.
Publication Date: 02/28/2015
User Reference Guide DRAFT
The Restrict to Basket Weight fields let you offer a discount
based on the total weight of items in the customer's basket.
Example 1:
The customer will receive the discount if their basket items add
up to at least 50 pounds. Note that, in our sample store, we are
using pounds as the unit of weight. The unit of weight in your
store might be different and is set in:
> Store Settings >
Store Details tab > Settings Section > Weight Units field.
Example 2:
The customer will receive the discount if the weight of items in
their basket is 50 pounds or less.
Basket Description
See examples below.
Display Discount in Basket
These two fields work together so that you can give customers
more information about the discounts they are getting.
These fields affect the Shopping Basket, and all of the checkout
screens (Order Details, Shipping/Payment Selection, Payment
Information, and Invoice).
Even if you don't use these fields, the discount will still show up
in the Total Price column of the Shopping Basket and the
checkout screens:
100
Copyright 2005-2015, Miva Inc. All Rights Reserved.
Publication Date: 02/28/2015
User Reference Guide DRAFT
Example 1: Both fields unused.
Example 2: Basket Description only.
We added a Basket De scription, but
without checking "Di splay Di scount in
Basket" it won't show up.
Example 3: Both fields used.
If you use both fields, the text that you
entered in the Basket De scription field
show s up, along with the discount.
101
Copyright 2005-2015, Miva Inc. All Rights Reserved.
Publication Date: 02/28/2015
User Reference Guide DRAFT
Example 4: Display Discount in Basket only.
If you only use the "Di splay Di scount in
Basket" field, the Price Group name shows
up by default, along with the discount.
Not Valid Before
Not Valid After
These two fields let you control how long your price group will
be active.
Example 1: Neither field is used.
The price group will become active as soon as you create it. It
will never expire.
Example 2: Use Not Valid Before only.
The price group becomes active on the Not Valid Before date.
This price group will never expire.
Example 3: Use Not Valid After only.
The price group becomes active as soon as you create it. The
price group expires on the Not Valid After date.
Example 4: Use both fields.
102
Copyright 2005-2015, Miva Inc. All Rights Reserved.
Publication Date: 02/28/2015
User Reference Guide DRAFT
The price group will become active on the Not Valid Before
date. The price group will expire on the Not Valid After date.
Priority
See Priority.
Exclusions
See Exclusions.
4
5
When you've filled out all of the fields in the Add Price Group dialog box, click Save.
Select Qualifying Products, Discounted Products, and Customers.
To Create a Buy X Get Y Price Group
1
Go to
> Marketing > Price Groups tab.
2
3
Click Add Price Group
.
Fill out the fields in the Add Price Group dialog box.
Name
The name of the Price Group as it appears in the admin interface.
Eligibility
Coupon Only: only customers with a coupon get the discount.
Specific Customers: Only a specific list of customers will get
the discount. You'll create this list later on.
All Logged In Customers: To get the discount a customer must
have an account and be signed into their account.
All Customers: Everyone who visits your store gets the
discount.
Type
Select Buy X Get Y.
Apply To:
All Eligible Products : An eligible product, in this instance,
means:
A product in the customer's basket
Which also appears in the discounted product list for this
price group (See Qualifying Products, Discounted Products,
and Customers.)
and which is "eligible" for a discount.
In many cases, this option means: apply the discount to an item
in the customer's basket that is also on the list of Discounted
Products. However, there are cases where a product in the
customer's basket is on the Discounted Products list, but
103
Copyright 2005-2015, Miva Inc. All Rights Reserved.
Publication Date: 02/28/2015
User Reference Guide DRAFT
wouldn't be eligible for a discount. See Priority for an example.
Same Product: The customer gets the discount if the item is on
the Discounted Products list and the customer purchases
multiples of the same product. Let's say our Price Group is set
up for "Buy 1, Get 1 Free". We have 2 items on our Discounted
Products list - a Hawaiian hat and a Hawaiian shirt. We've set
this field to "Same Product":
Example 1: Different products. These products don't have
variants.
The customer buys 1 hat and 1 shirt. The customer bought 2
products from the Discounted Products list, but the 2nd item
isn't the same as the 1st, so there is no discount.
Example 2: Same master product, different variants:
The customer buys 1 Hawaiian shirt in color red and a 2nd
Hawaiian shirt in color blue. The customer gets the 2nd
shirt for free because both shirts are variants of the same
master product.
Same Product Variant: The customer gets the discount if the
item is on the Discounted Products list and they buy more than
1 of the same variant. For example:
There is a Hawaiian shirt on the discounted products list.
The shirt has 2 variants: color = red and color = blue.
If the Price Group is set up for "Buy 1 Get 1 Free", and the
customer buys 1 red Hawaiian shirt and 1 blue Hawaiian
shirt, they would not get the discount, since they haven't
purchased 2 of the same variant.
Buy
The Buy field determines how many products on the Discounted
Product list the customer has to purchase before they qualify for the
discount. If you set Buy to "0", the customer will get a discount on
the 1st product that they buy. If you set Buy to "1", the customer
pays full price for the 1st product and gets the discount on the 2nd
product.
Get
The Get field determines how many items will be discounted.
Example 1:
104
Copyright 2005-2015, Miva Inc. All Rights Reserved.
Publication Date: 02/28/2015
User Reference Guide DRAFT
There's a Hawaiian hat on our Discounted Products list. The
customer will pay:
Full price for the 1st hat.
1/2 price for the 2nd hat.
Full price for the 3rd hat.
Example 2:
There's a Hawaiian hat on our Discounted Products list. The
customer will pay:
Full price for the 1st hat.
1/2 price for the 2nd hat.
1/2 price for the 3rd hat.
Full price for the 4th hat.
Discount
The amount you want to discount the items.
Apply Discount To:
If the customer has more than one item in their basket that
could qualify for a discount, you can use this field to apply the
discount to the higher priced item or the lower priced item.
Example 1 (Simple):
Our Price Group is set up for "Buy 1, Get 1 Free". The discount
applies to all eligible products.
We'll put 2 items on our Discounted Products list: a Hawaiian
Hat ($10 retail) and a Hawaiian shirt ($20 retail).
The customer buys 2 hats:
The 1st hat is full price.
The 2nd hat is free.
The customer buys 1 hat and 1 shirt.
The shirt is full price.
The hat is free because it was the lower priced item.
Example 2 (More complicated):
105
Copyright 2005-2015, Miva Inc. All Rights Reserved.
Publication Date: 02/28/2015
User Reference Guide DRAFT
Our Price Group is set up for "Buy 1, Get 1 Free". The discount
applies to Same Product.
We'll put 1 item on the Discounted Products list for this price
group: a Hawaiian shirt ($20 retail).
In many cases, if you set "Apply To" to "Same Product", it
doesn't matter what value you select for "Apply Discount To".
If the customer buys 2 of the same shirt, they get a discount on
the 2nd shirt. Both shirts have the same retail price, so there is
no lower or higher priced item in the basket.
However... let's say we allowed our price group to be combined
with some other price group. The other price group gave the
customer a 20% discount on a Hawaiian shirt, and the customer
bought a 2nd Hawaiian shirt to qualify for the "Buy 1 Get 1
Free" offer.
The customer now has 2 identical shirts in their basket, but one
of the shirts has already been discounted 20% down to $18. In a
case like this, it does matter what you choose for "Apply
Discount To".
Maximum Discount Quantity
Higher: The customer gets the $20 shirt for free and pays
$18 for both shirts.
Lower: The customer gets the $18 shirt for free and pays
$20 for both shirts.
This is the maximum number of items that you will allow to be
discounted by this price group, per order. Let's use a "Buy 1, Get 1
Free" price group. If the customer buys one item on the Discounted
Products list, they will get the 2nd item free. Lets say the customer
buys 4 of the same item from the Discounted Product list.
Set the Max. Discount Quantity to 1:
Item 1: Full price.
Item 2: Free
Item 3: Full price.
106
Copyright 2005-2015, Miva Inc. All Rights Reserved.
Publication Date: 02/28/2015
User Reference Guide DRAFT
Item 4: Full price.
This item, and any other items the customer buys from the
Discounted Product list, are full price because we set Max.
Discount Quantity to "1", so the discount can only be
applied once.
Set the Max. Discount Quantity to 2:
Item 1: Full price.
Item 2: Free
Item 3: Full price.
Item 4: Free.
The 2nd and 4th items are free because we are allowing a
max of two items to receive the discount. The customer will
pay full price if they buy any more of this item.
If you set the Max Discount Quantity to "0", the "Buy 1,
Get 1 Free" offer would be applied an unlimited number of
times to the same basket.
Restrict to Qualifying Subtotal:
See Restrict to Qualifying Subtotal.
Restrict to Qualifying Quantity:
Restrict to Qualifying Weight
Restrict to Basket Subtotal
Restrict to Basket Quantity:
Restrict to Basket Weight:
Basket Description
See Basket Description.
Display Discount in Basket
Not Valid Before
See Not Valid Before.
Not Valid After
Priority
See Priority.
Exclusions
See Exclusions.
4
5
When you've filled out all of the fields in the Add Price Group dialog box, click Save.
Select Qualifying Products, Discounted Products, and Customers.
To Create a Fixed Discount Price Group
1
Go to
> Marketing > Price Groups tab.
2
Click Add Price Group
.
107
Copyright 2005-2015, Miva Inc. All Rights Reserved.
Publication Date: 02/28/2015
User Reference Guide DRAFT
3
Fill out the fields in the Add Price Group dialog box.
Name
The name of the Price Group as it appears in the admin interface.
Eligibility
Coupon Only: only customers with a coupon get the discount.
Specific Customers: Only a specific list of customers will get
the discount. You'll create this list later on.
All Logged In Customers: To get the discount a customer must
have an account and be signed into their account.
All Customers: Everyone who visits your store gets the
discount.
Type
Select Fixed Discount.
Discount
Always a dollar value. You apply this discount to either a line item
or the entire basket.
Apply Discount To
Applies the discount to the lowest or highest priced item in the
basket. See Apply Discount To under Buy X Get Y Price Group.
Maximum Item Discount
Quantity
See Maximum Discount Quantity.
Restrict to Qualifying Subtotal:
See Restrict to Qualifying Subtotal.
Restrict to Qualifying Quantity:
Restrict to Qualifying Weight
Restrict to Basket Subtotal
Restrict to Basket Quantity:
Restrict to Basket Weight:
Basket Description
See Basket Description.
Display Discount in Basket
Not Valid Before
See Not Valid Before.
Not Valid After
Priority
See Priority.
Exclusions
See Exclusions.
4
5
When you've filled out all of the fields in the Add Price Group dialog box, click Save.
Select Qualifying Products, Discounted Products, and Customers.
108
Copyright 2005-2015, Miva Inc. All Rights Reserved.
Publication Date: 02/28/2015
User Reference Guide DRAFT
To Create a Shipping Discount (Entire Order) Price Group
1
Go to
> Marketing > Price Groups tab.
2
3
Click Add Price Group
.
Fill out the fields in the Add Price Group dialog box.
Name
The name of the Price Group as it appears in the admin interface.
Eligibility
Coupon Only: only customers with a coupon get the discount.
Specific Customers: Only a specific list of customers will get the discount.
You'll create this list later on.
All Logged In Customers: To get the discount a customer must have an
account and be signed into their account.
All Customers: Everyone who visits your store gets the discount.
Type
Select Shipping Discount (Entire Order).
Method Selection
Reflect Discount in Shipping Method List
If you leave this box unchecked, the shipping discount that you created in
the price group is not displayed in the Shipping/Payment Selection
checkout screen.
Example 1: Reflect Discount is unchecked.
In our price group we set a 5% discount on UPS Next Day Air, and we left
"Reflect Discount" unchecked. The Shipping/Payment Selection checkout
screen does not show the shipping discount (in our example, $30.25 is the
full price).
But the discount will show up in the next checkout screen, Payment
Information ($30.25 - 5% = $28.74).
Example 2: Reflect Discount is checked.
In our price group we set a 5% discount on UPS Next Day Air, and we
checked "Reflect Discount". The discount on shipping now shows up in the
Shipping/Payment Selection checkout screen:
109
Copyright 2005-2015, Miva Inc. All Rights Reserved.
Publication Date: 02/28/2015
User Reference Guide DRAFT
and the Payment Information checkout screen:
Do Not Modify Shipping Method Name: Make no changes to the
shipping method name in the Shipping/Payment Selection screen > Ship
Via list box.
Append < > to Shipping Method Name: If you set a discount on a
shipping method in the price group, the text that you enter here will be
appended to the shipping method name in the Payment/Selection checkout
screen > Ship Via list box.
Example :
We set a discount in the price group on UPS Next Day Air and UPS
2nd Day Air.
We checked the "Reflect Discount" option.
We put some text in the "Append" field.
When the customer chooses a shipping method in the Shipping/Payment
Selection screen, the text that we entered in the Append field shows up for
those two shipping methods.
Replace Shipping Method Name with < >: Use this field with caution!
The text that you enter in this field will replace EVERY shipping method
that you discounted in the price group.
Example :
We set a discount in the price group on UPS Ground only.
We checked the "Reflect Discount" option.
110
Copyright 2005-2015, Miva Inc. All Rights Reserved.
Publication Date: 02/28/2015
User Reference Guide DRAFT
We put some text in the "Replace Shipping Method Name" field.
When the customer chooses a shipping method in the Shipping/Payment
Selection screen, the text that we entered in the Replace field shows up for
UPS Ground:
You should only use this field when you are discounting one shipping
method at a time in the price group. The text that you enter in this field will
replace every shipping method that you discounted in the price group.
Here we accidentally discounted two shipping methods in the price group:
Display in Basket
Modify Applied Charge to Reflect Discount
Do Not Modify Description: Text in the checkout screens will not be
modified to reflect the shipping discount.
Append < > to Description: The text that you enter in this field will be
appended to the shipping information in the Payment Information (OPAY)
and Invoice (INVC) screens.
111
Copyright 2005-2015, Miva Inc. All Rights Reserved.
Publication Date: 02/28/2015
User Reference Guide DRAFT
Replace Description with < >: The text that you enter in this field will
replace the default shipping information in the Payment Information
(OPAY) and Invoice (INVC) screens.
112
Copyright 2005-2015, Miva Inc. All Rights Reserved.
Publication Date: 02/28/2015
User Reference Guide DRAFT
Add a Charge Showing the Discount Amount: If you enable this option,
the text that you enter shows up as a separate line in OPAY and INVC to
describe the shipping discount.
113
Copyright 2005-2015, Miva Inc. All Rights Reserved.
Publication Date: 02/28/2015
User Reference Guide DRAFT
Method Discounts
For every shipping method that you have enabled in your store, you will see
two Method Discounts fields, one for the value of the discount and one for the
type (fixed or percent).
Example 1:
Give $5.00 off UPS Ground shipping.
Note that, in our sample store, we are using US dollars as the currency. The
currency setting in your store might be different and is set in:
> Store
Settings > Store Details tab > Settings Section > Currency Formatting field.
Example 2:
Give 5% off UPS Ground shipping.
Restrict to Qualifying
See Restrict to Qualifying Subtotal.
114
Copyright 2005-2015, Miva Inc. All Rights Reserved.
Publication Date: 02/28/2015
User Reference Guide DRAFT
Subtotal:
Restrict to Qualifying
Quantity:
Restrict to Qualifying
Weight
Restrict to Basket
Subtotal
Restrict to Basket
Quantity:
Restrict to Basket
Weight:
Basket Description
See Basket Description.
Display Discount in
Basket
Not Valid Before
See Not Valid Before.
Not Valid After
Priority
See Priority.
Exclusions
See Exclusions.
4
5
When you've filled out all of the fields in the Add Price Group dialog box, click Save.
Select Qualifying Products, Discounted Products, and Customers.
To Create a Shipping Discount (Eligible Products Only) Price Group
The fields for this price group are identical to those for Shipping Discount (Entire Order). The only
difference is that, instead of giving the customer a shipping discount on everything in their basket, you
only give them a discount on "eligible" items in their basket.
Basket items are eligible for a shipping discount if they meet the following conditions:
The item must be on your list of discounted items. After you create this price group, you select a list
of discounted items. Only these items are eligible for the discount.
The discounted item can't be "disqualified" by another price group. See Priority for an example of
how price groups can affect each other.
1
Go to
2
Click Add Price Group
3
Fill out the fields in the Add Price Group dialog box. See To Create a Shipping Discount (Entire
Order) Price Group.
> Marketing > Price Groups tab.
.
115
Copyright 2005-2015, Miva Inc. All Rights Reserved.
Publication Date: 02/28/2015
User Reference Guide DRAFT
4
Select Qualifying Products, Discounted Products, and Customers.
To Create a Volume Pricing Price Group
1
Go to
> Marketing > Price Groups tab.
2
Click Add Price Group
3
Fill out the fields in the Add Price Group dialog box.
.
Name
The name of the Price Group as it appears in the admin interface.
Eligibility
Coupon Only: only customers with a coupon get the discount.
Specific Customers: Only a specific list of customers will get
the discount. You'll create this list later on.
All Logged In Customers: To get the discount a customer must
have an account and be signed into their account.
All Customers: Everyone who visits your store gets the
discount.
Type
Select Volume Pricing.
Grouping
See Apply To.
Pricing Method
This field only has an effect if you are using more than one row in
the pricing table. Lets' say you have three rows in your pricing
table:
Apply pricing table progressively
If you select progressive and the customer purchases 15 items, the
customer will receive:
A 5% discount on the first 5 items.
A 10% discount on items 6-10.
A 15% discount on items 11-15.
Apply pricing table Using Total Quantity:
If you select Total Quantity and the customer purchases 15 items,
the customer will get a 15% discount off every item.
116
Copyright 2005-2015, Miva Inc. All Rights Reserved.
Publication Date: 02/28/2015
User Reference Guide DRAFT
Progressive Mode
This field only applies if you set the Pricing Method field to
"Progressive".
Look at the pricing table that we used for the Pricing Method field:
We set the Pricing Method field to "Progressive", so if the customer
buys 15 items:
Items 1-5 get a 5% discount.
Items 6-10 get a 10% discount
Items 11-15 get a 15% discount
Let's say in your discounted products list (the products that will
receive a discount) you have a $10 t-shirt, a $50 jacket, and a $300
briefcase. Which item do you want to get the 5% discount, and
which item should get the 15% discount? That's what the
Progressive Mode field lets you control.
If you set this field to "Higher Priced Items", then the $300
briefcase will get the 5% discount. The $50 jacket will get a 10%
discount, and the $10 t-shirt will get the 15% discount. If you set
this field to "Lower Priced Items" the order of discounts will be
reversed, and the $300 briefcase will get the 15% discount.
Pricing Table
The Pricing Table lets you set one or more volume discounts. The
Quantity column refers to items on your discounted products list
that are in the customer's basket. For example, after you create the
price group, you click on the Discounted Products button in the
Price Groups tab and select the items that you want to discount.
117
Copyright 2005-2015, Miva Inc. All Rights Reserved.
Publication Date: 02/28/2015
User Reference Guide DRAFT
In our example, we set our pricing table to give volume discounts
on quantity 5, 10, and 15. In the Discounted Products dialog box,
we added a Hawaiian Hat. We'll set the Pricing Method to "Total
Quantity".
Restrict to Qualifying Subtotal:
If the customer buys 5 Hawaiian hats, each hat is 5% off.
If the customer buys 10 Hawaiian hats, each hat is 10% off.
If the customer buys 15 Hawaiian hats, each hat is 15% off.
See Restrict to Qualifying Subtotal.
Restrict to Qualifying Quantity:
Restrict to Qualifying Weight
Restrict to Basket Subtotal
Restrict to Basket Quantity:
Restrict to Basket Weight:
Basket Description
See Basket Description.
Display Discount in Basket
Not Valid Before
See Not Valid Before.
Not Valid After
Priority
See Priority.
Exclusions
See Exclusions.
4
5
When you've filled out all of the fields in the Add Price Group dialog box, click Save.
Select Qualifying Products, Discounted Products, and Customers.
118
Copyright 2005-2015, Miva Inc. All Rights Reserved.
Publication Date: 02/28/2015
User Reference Guide DRAFT
To Create a Basket Discount Price Group
Basket Discount is a simple price group, similar to a store-wide sale. After you create the price group,
you can select Qualifying Products, products that the customer must purchase to trigger the discount, but
the discount is applied to everything in the customer's basket.
1
Go to
> Marketing > Price Groups tab.
2
Click Add Price Group
3
Fill out the fields in the Add Price Group dialog box.
.
Name
The name of the Price Group as it appears in the admin interface.
Eligibility
Coupon Only: only customers with a coupon get the discount.
Specific Customers: Only a specific list of customers will get
the discount. You'll create this list later on.
All Logged In Customers: To get the discount a customer must
have an account and be signed into their account.
All Customers: Everyone who visits your store gets the
discount.
Type
Select Basket Discount.
Discount
Enter a discount amount and then select either Fixed (dollar)
amount or Percent discount.
Maximum Discount Amount
Enter the maximum discount value the customer can receive. For
example, if you enter $10 in this field, the customer's discount can't
exceed $10, no matter how many products they purchase.
Restrict to Qualifying Subtotal:
See Restrict to Qualifying Subtotal.
Restrict to Qualifying Quantity:
Restrict to Qualifying Weight
Restrict to Basket Subtotal
Restrict to Basket Quantity:
Restrict to Basket Weight:
Basket Description
See Basket Description.
Display Discount in Basket
Not Valid Before
See Not Valid Before.
Not Valid After
Priority
See Priority.
119
Copyright 2005-2015, Miva Inc. All Rights Reserved.
Publication Date: 02/28/2015
User Reference Guide DRAFT
Exclusions
See Exclusions.
4
When you've filled out all of the fields in the Add Price Group dialog box, click Save.
5
Select Qualifying Products, Discounted Products, and Customers.
To Create a Product Discount Price Group
1
Go to
> Marketing > Price Groups tab.
2
Click Add Price Group
3
Fill out the fields in the Add Price Group dialog box.
.
Name
The name of the Price Group as it appears in the admin interface.
Eligibility
Coupon Only: only customers with a coupon get the discount.
Specific Customers: Only a specific list of customers will get
the discount. You'll create this list later on.
All Logged In Customers: To get the discount a customer must
have an account and be signed into their account.
All Customers: Everyone who visits your store gets the
discount.
Type
Select Product Discount.
Discount
Enter a discount amount and then select either Fixed (dollar)
amount or Percent discount.
Apply Discount To
After you create this price group you:
Select Qualifying Products. These are products that the
customer must purchase to trigger the discount. Selecting
Qualifying Products is optional for this type of price group.
Select Discounted Products. These are the products that will
receive the discount. You must select at least one product to
receive the discount from this price group.
Let's say that you selected two products to receive a discount; a $10
hat and a $20 shirt. The customer buys one of each:
If you set this field to "Lowest", the customer gets a discount on
the $10 hat.
If you set this field to "Highest", the customer gets a discount
on the $20 shirt.
120
Copyright 2005-2015, Miva Inc. All Rights Reserved.
Publication Date: 02/28/2015
User Reference Guide DRAFT
Maximum Item Discount
Quantity
See Maximum Discount Quantity.
Maximum Cumulative
Discount:
Enter the maximum discount value the customer can receive. For
example, if you enter $10 in this field, the customer's discount can't
exceed $10, no matter how many products they purchase.
Restrict to Qualifying Subtotal:
See Restrict to Qualifying Subtotal.
Restrict to Qualifying Quantity:
Restrict to Qualifying Weight
Restrict to Basket Subtotal
Restrict to Basket Quantity:
Restrict to Basket Weight:
Basket Description
See Basket Description.
Display Discount in Basket
Not Valid Before
See Not Valid Before.
Not Valid After
Priority
See Priority.
Exclusions
See Exclusions.
4
5
When you've filled out all of the fields in the Add Price Group dialog box, c lick Save.
Select Qualifying Products, Discounted Products, and Customers.
Marketing > Coupons
In Miva Merchant, a coupon always has to be associated with a price group. The price group determines
the discount. The coupon is just a way for customers to receive the discount.
For example, you could create a price group that is a 2- for-1 sale. If the customer buys quantity 1 of a
product, you'll give them another of the same item for free. When you use a coupon, your customers are
offered a 2- for-1 sale, and the way they get the discount is by entering a coupon code during checkout.
Price Group Only:
The customer gets the discount as soon as they add selected items to their basket.
Coupon + Price Group:
The customer gets the discount when they enter a coupon code during checkout.
121
Copyright 2005-2015, Miva Inc. All Rights Reserved.
Publication Date: 02/28/2015
User Reference Guide DRAFT
Miva Merchant lets you create two types of coupon codes:
Generated coupon codes: You tell the system how many coupon codes you want to create. The
system generates that number of codes, and each code is unique. You can control the total number of
times each coupon code can be used, and the number of times it can be used by the same customer.
Everyone gets the same discount, but everyone enters a unique coupon code.
Single coupon codes: You create one coupon code. You can control the total number of times the
coupon code can be used, and the number of times it can be used by the same customer.
Everyone gets the same discount and everyone enters the same coupon code.
Depending on how you distribute and track coupon use, there may not be much difference in whether
you generate a set of unique coupon codes for a discount, or give all of your customers the same coupon
code. If you were selling coupons as gift certificates, though, you might want to generate unique coupon
codes.
To Create a Coupon with a Single Code
1
Make the coupon code field visible on one or more store pages.
When you create a coupon, you also create a coupon code. Customers redeem the coupon (and get
their discount) by entering the coupon code in a special field during checkout. You can add the
Coupon field to one or more of the following pages:
BASK - Basket Contents
OCST - Checkout: Customer Information
OSEL - Checkout Shipping/Payment Selection
OPAY - Checkout: Payment Information.
122
Copyright 2005-2015, Miva Inc. All Rights Reserved.
Publication Date: 02/28/2015
User Reference Guide DRAFT
Customers redeem the coupon by entering your coupon code
in a special field, and clicking the Redeem button.
1.1.
Go to
> User Interface > Pages tab.
1.2.
Edit the page where you want to add the Coupon field. In our example, we'll add the coupon
field to the Order Details screen. Note that in the admin interface, the Order Details screen is
called "OCST - Checkout: Customer Information".
1.3.
In the Edit Page screen, select the Page tab.
1.4.
Scroll down to the Basket Contents section.
1.5.
Click Allow Coupons to be Applied.
1.6.
Click Update.
123
Copyright 2005-2015, Miva Inc. All Rights Reserved.
Publication Date: 02/28/2015
User Reference Guide DRAFT
2
Create the Price Group.
2.1.
Go to
> Marketing > Price Groups tab.
2.2.
Click Add Price Group
2.3.
Set the Eligibility to Coupon Only.
But see also Eligibility in Price Groups and Eligibility in Coupons.
2.4.
When you are creating a coupon, you can create a Price Group of any type. In our example,
we'll create a Price Group of Type Legacy, since that's the simplest.
2.5.
In our example, we'll set the Exclusions to Exclude for Same Basket, to prevent our coupon
discount from being combined with any other discount.
.
124
Copyright 2005-2015, Miva Inc. All Rights Reserved.
Publication Date: 02/28/2015
User Reference Guide DRAFT
2.6.
3
Click Save.
Create the Coupon.
3.1.
Go to
> Marketing > Coupons tab.
3.2.
Click Add Coupon
.
125
Copyright 2005-2015, Miva Inc. All Rights Reserved.
Publication Date: 02/28/2015
User Reference Guide DRAFT
3.3.
Fill out the fields in the Add Coupon dialog box:
Code
Enter an alphanumeric string. This is the code that your customers
will enter in the Coupon field to get their discount.
Description
Enter a description for the coupon as it will appear in the admin
interface.
Eligibility
Select the group of customers that you want to receive the
discount.
All of your customers will see the Coupon field during checkout,
even if you aren't permitting them to get the discount. However, a
customer who isn't allowed to use the coupon code will always see
the message:
no matter what they enter in the Coupon field.
See also Eligibility in Price Groups and Eligibility in Coupons.
Specific Customers : You must select a list of customers after
you create the coupon. Only these customers will receive the
discount.
All logged in customers : The customer must have a store
126
Copyright 2005-2015, Miva Inc. All Rights Reserved.
Publication Date: 02/28/2015
User Reference Guide DRAFT
3.4.
4
account and be signed into their store account to get the
discount.
All Shoppers : everyone gets the discount.
Discount to Apply
Select the Price Group that you want to use with this coupon.
Max Use (Total)
Enter the total number of times the coupon code can be used. For
example, if you enter "100" in this field, the coupon code can only
be entered a total of 100 times.
Max Use (Per
Shopper)
Enter the number of times each customer is allowed to use the
same coupon code. For example, if you enter a "1" in this field,
customers can only use the coupon code one time.
When you are done filling out the field in the Add Coupon dialog box, click the Save button.
If you selected "Specific Customers" from the Add Coupon > Eligibility field:
then you must select a list of customers who are allowed to use your coupon.
4.1.
In the Coupons tab, select the coupon that you just created. You'll see a Customers button at
the top of the record list.
127
Copyright 2005-2015, Miva Inc. All Rights Reserved.
Publication Date: 02/28/2015
User Reference Guide DRAFT
5
4.2.
Click on the Customers button.
4.3.
In the Customers Assigned to <coupon> dialog box, assign one or more customers, then click
Close.
You can also click on the Price Groups button to associate your coupon with more than one Price
Group.
Your coupon is ready to use.
Eligibility in Price Groups and Eligibility in Coupons
Eligibility lets you control whether everyone gets a discount, or whether only some customers get a
discount. You set the eligibility when you create a price group (Add Price Group d ialog box), but there
is also an eligibility field in the Add Coupon dialog box.
128
Copyright 2005-2015, Miva Inc. All Rights Reserved.
Publication Date: 02/28/2015
User Reference Guide DRAFT
In the Add Price Group dialog box
In the Add Coupon dialog box
This can be a little confusing, because, when you associate a coupon with a Price Group, you use both
fields.
Price Group Eligibility: Keep in mind that the discount from a Price Group is applied to a
customer's basket. As soon as the customer's basket qualifies for the discount from a Price Group,
the discount is automatically applied. Price Group eligibility lets you control which customers
qualify for the basket discount. For example, if you set the Price Group eligibility to Specific
Customers, a customer who is not on the list doesn't get the discount, regardless of what is in their
basket.
Coupon Eligibility: The discount from a coupon is applied when the customer enters a coupon code
during checkout. Coupon eligibility lets you control who is allowed to enter the coupon code. For
example, if you set the coupon eligibility to Specific Customers, a customer who is not on the list
doesn't get the discount, even if they enter a valid coupon code.
We'll go through a few examples so you can see how you can combine these fields to achieve different
effects:
Example 1: You can only get the discount from the price group by using a coupon. The coupon code is
available to everyone.
In the Add Price Group dialog box
In the Add Coupon dialog box
Example 2: A specific list of customers will get the discount automatically, based on the contents of
their baskets. Another list of customers can get the same discount, but only by entering a coupo n code
during checkout.
In the Add Price Group dialog box
In the Add Coupon dialog box
To Create Generated Coupon Codes
1
2
Create a Price Group.
See The General Process of Creating a Price Group.
Enable the coupon code field in your store.
See Make the coupon code field visible on one or more store pages.
129
Copyright 2005-2015, Miva Inc. All Rights Reserved.
Publication Date: 02/28/2015
User Reference Guide DRAFT
3
Go to
4
5
In the Coupons tab, click +Generate.
Complete the fields in the Generate Coupons dialog box:
> Marketing > Coupons tab.
Code : This is the "base" code that you want your customers to enter when they redeem the
coupon. For example, if you enter "t_shirt_promo" in this field, and set the "# of Coupons" field
to "10", the system will create 10 coupons like this:
t_shirt_promoN43XBM2J
t_shirt_promoC4G0U5JX
t_shirt_promoBC12EC9W
etc.
Description: The description you enter in this field will only appear in the admin interface.
Eligibility: Who should get the discount?
Specific Customers: Only a specific list of customers will get the discount. You'll create this
list later on.
All Logged In Customers: To get the discount a customer must have an account and be
signed into their account.
All Shoppers: Everyone who visits your store gets the discount.
# of Coupons: Enter the number of coupon codes that you want the system to generate.
Not Valid Before / Not Valid After: These two fields let you decide how long the coupon code
will be active. Please see Not Valid Before for examples.
Max Use (Total): The total number of times you will allow this coupon code to be entered. If
you enter "1" in this field. The coupon code can only be used once.
6
Max Use (Per Shopper): The total number of times you will allow any customer to use this
coupon code. If you enter "1" in this field, each customer can only use this coupon code one
time.
Select Custome rs. If you selected "Specific Customers" in the Eligibility field, the Select Customers
button will be active. Click on this button to open the Select Customers dialog box and select the
customer accounts that you want to offer the coupon to.
130
Copyright 2005-2015, Miva Inc. All Rights Reserved.
Publication Date: 02/28/2015
User Reference Guide DRAFT
7
In the Generate Coupon dialog box, click Generate.
8
In the Coupons tab, you'll see that the system has generated the number of coupon codes that you
requested.
131
Copyright 2005-2015, Miva Inc. All Rights Reserved.
Publication Date: 02/28/2015
User Reference Guide DRAFT
Marketing > Upsale
Upsale refers to products and discounts that you can offer customers during checkout. Customers can
add the offered product(s) to their order, or decline and continue with their original order. The basic
process of upselling is:
1
Add an upsale product. This is a bit misleading since you are not creating a product. All you are
doing is taking one of your existing products and creating an entry that says: "I want to be able to
offer this product to customers during checkout." Creating this kind of entry does not alter the
product in any way. You can also control when customers are offered an item during checkout by
selecting Display and Upsale Options.
2
Link the upsale product to one or more products. For example, let's say that you have a shirt product.
If a customer buys that shirt, during checkout you want to offer them the chance to order a matching
hat. You would
2.1.
Create an upsale entry for the hat.
2.2.
Link the upsale hat entry to the shirt. When a customer buys the shirt, they will be offered the
hat during checkout.
The customer adds
items to their basket and
then clicks the checkout
button.
If the order meets your criteria,
the customer i s offered the
upsale product(s). They accept
or decline and then go to
shipping/payment selection.
If the order does not meet any upsale criteria, the customer
goes directly to shipping/payment selection.
To Create an Upsold Product
1
Go to
> Marketing > Upsale tab.
2
Click Add Upsale
. The Add Upsold Product screen appears.
132
Copyright 2005-2015, Miva Inc. All Rights Reserved.
Publication Date: 02/28/2015
User Reference Guide DRAFT
3
In the Add Upsold Product screen:
Enter a product code or click the Look Up button to find one. This is the product that you want
to offer customers during checkout.
Display: these options control when your upsale product will be offered.
Pricing: these options control the price of your upsale product.
Most of the pricing options are obvious. For example, if you select the Product Price radio
button, the upsale product will be offered to your customers at the price you entered in
Catalog > Edit Product > Product tab > Details section > Price field.
>
Absolute Price lets you offer the upsale product to customers at any price that you want,
unrelated to Price field or the Cost field. For example, let's say that you have a hat product. You
set the product price to $20, and the cost to $10. If you want to offer the upsale product to your
customers for $18, you could select the Absolute Price radio button and enter $18.
4
When you are done, click the Add button. A new tab will appear: Required Products.
5
Select the "Required Products" tab and click the assigned icon next to one or more products until the
icon turns blue.
Our upsold product (Hawaiian hat)
will be offered to customers who buy
the Hawaiian shirt.
If a customer has the required product in their basket, they may be offered the upsale product during
checkout (depending on what Display and Upsale Options you selected). In our example:
We created an upsale product entry for "hat_Hawaiian".
The required product is "shirt_Hawaiian".
133
Copyright 2005-2015, Miva Inc. All Rights Reserved.
Publication Date: 02/28/2015
User Reference Guide DRAFT
6
If the customer adds the Hawaiian shirt to their basket, they will be offered the Hawaiian hat during
checkout.
The upsale item has now been created and linked to a required product. However, there's another
way you can verify this.
6.1.
Go to
> Catalog > Products.
6.2.
Edit the required product. In our example, the required product is "shirt_Hawaiian".
6.3.
Select Edit Product: Hawaiian Shirt, Red > Upsold Products tab. You can see that the
Hawaiian shirt is now associated with the upsale hat.
134
Copyright 2005-2015, Miva Inc. All Rights Reserved.
Publication Date: 02/28/2015
User Reference Guide DRAFT
When the customer purchases "Hawaiian Shirt Red", they will be offered the Hawaiian hat during
checkout. If the customer is only being offered one upsale product, the screen looks like this by
default (see
> User Interface > Pages > OUS1):
135
Copyright 2005-2015, Miva Inc. All Rights Reserved.
Publication Date: 02/28/2015
User Reference Guide DRAFT
If the customer is being offered multiple upsale items, the screen looks like this (see
Interface > Pages > OUSM):
> User
Changing the Upsale Options
Go to
> Marketing > Settings tab > Upsale Options section.
There are several variables that limit upsale offers to customers during checkout:
The Display criteria let you decide when a customer qualifies for an upsale offering. For example,
when you create an upsale product you can set the Display setting so that the customer only qualifies
for the upsale product if their order total is over $100.00.
In the Upsale Options section, the "Upsold Products to Show" variable lets you control how many
upsale products you want to display on the customer's checko ut screen. For example, the customer
may meet your Display criteria for 10 upsale products, but you can set the "Show" variable so that
they never see more than 3 upsale products during checkout.
In the Upsale Options section, the "Max Number of Upsold Products to Select" variable lets you
control how many of the upsale products the customer is allowed to purchase. For example, as a
"thank you" during checkout you might show customers three deeply discounted products, but only
allow the customer to purchase one of them.
136
Copyright 2005-2015, Miva Inc. All Rights Reserved.
Publication Date: 02/28/2015
User Reference Guide DRAFT
Example 1: Based on the Display criteria, the customer qualifies for three upsale products. We'll set
both of the Upsale options: "show" and "select" to unlimited.
Show the customer all of the
upsale products that they've
qualified for.
Allow the customer to
purcha se any/all of them.
137
Copyright 2005-2015, Miva Inc. All Rights Reserved.
Publication Date: 02/28/2015
User Reference Guide DRAFT
Example 2: Based on the Display criteria, the customer qualifies for three upsale products. We'll set
"show" to unlimited and "select" to 1.
Show the customer all
of the upsale products
that they've qualified
for.
Allow the customer to
purcha se only one.
Pages Related to Upsale Products
Upsale products are controlled by four pages in the admin interface: OUS1, OUSM, UATR, and UATM.
Page OUS1 controls the screen where a customer is being offered a single Upsale product. The content
of this page is controlled by the template code on OUS1 > Page tab > Details section. If the upsale
product has Attributes , they are controlled by the OUS1 > Page tab > Product Attribute Template
section.
138
Copyright 2005-2015, Miva Inc. All Rights Reserved.
Publication Date: 02/28/2015
User Reference Guide DRAFT
Page OUS1. Attribute s (i f any) on thi s page
are controlled by the OUS1 > Page tab >
Product Attribute Template section. The rest
of the screen is controlled by the template
code on OUS1 > Page tab > Details section.
If:
The customer clicks on one of the buttons (Add to Order, or Do Not Add to Order) at the bottom
of OUS1, AND
The attributes of the upsale product are required, the customer will be taken to page UATR.
Page UATR. The attributes on thi s page are
controlled in UATR > Page tab > Product
Attribute Template section. The rest of the page
is controlled with the template code on UATR >
Page tab > Details section.
139
Copyright 2005-2015, Miva Inc. All Rights Reserved.
Publication Date: 02/28/2015
User Reference Guide DRAFT
Page OUSM controls the screen where a customer is being offered multiple products. All of the content
on this screen is controlled by the template code on OUSM > Page tab > Details section.
Page OUSM
Notice that on OUSM, the user can't select attributes for the upsale products, even if they are
required. The user clicks on the Continue button and goes to the next screen, UATM.
Page UATM controls the screen where a customer has been offered multiple products and needs to
select attributes for those products. All of the content on this screen is controlled by the template code
on UATM > Page tab > Details section.
Marketing > Affiliates Tab
Affiliate Procedures/Content from old Doc
An affiliate is someone that you pay for referring customers to your on- line store. The general process of
working with affiliates is:
1 Create an affiliate account which includes:
2
A special html link to your store. It can be a link to any page in your store: your store's home
page, a specific product page, etc.
A policy of how much you want to pay the affiliate for a referral. For example, you can pay
affiliates a flat rate for each referral, or a percentage of the order total.
Your affiliate adds the link that you created to one of their web pages; their blog, personal website,
or on- line store. When a customer visits your affiliate's webpage and clicks on the link, Miva
Merchant can track:
That the customer reached your store from a specific affiliate.
What the customer purchased from your store.
140
Copyright 2005-2015, Miva Inc. All Rights Reserved.
Publication Date: 02/28/2015
User Reference Guide DRAFT
3
Create the payouts. Miva Merchant calculates how much you owe each affiliate.
4
Send money to your affiliates using any method that is convenient for you.
5
Mark the debt as paid.
When a customer reaches your store by clicking on an affiliate link, the
affiliate information is added to the customer's session cookie. It's the session
cookie that lets Miva Merchant know that the customer made a certain
purchase in your store after clicking on an affiliate's link. If the customer's
basket expires, or if the customer deletes their cookies, and then buys
something from your store, your affiliate does not get credit for the purchase.
To Create an Affiliate Account
You can create affiliate accounts in the admin interface, but you can also allow potential affiliates to
create their own accounts in your on- line store.
To Create an Affiliate Account in the Admin Interface
1
Go to
> Marketing > Affiliates tab.
2
3
In the Affiliates tab, click Add Affiliate
In the Identification tab:
.
Login. This is the affiliate's user name that they will enter to login to their affiliate account in
your on- line store. See Marketing > Settings > Affiliate Lost Password Email for an example of
how affiliates log in.
Lost Password Email: This is the email address that the affiliate's password will be mailed to if
they click the Forgot Password link in your on- line store.
Password/Confirm Password: The affiliate's password.
Application Status: The status that you set here will over-ride the store wide value you set in
Marketing > Settings > Affiliate Options.
Pending: No referral commissions are tracked.
Approved: Affiliate referrals are enabled and are being tracked by the software.
Disabled: Affiliate referrals are not enabled or tracked.
4
Click
.
5
6
In the Info tab, enter contact information for the affiliate.
In the Commission tab, describe how much the affiliate should be paid for each referral.
The values that you set here for a specific affiliate will override the default settings in
Marketing > Settings tab > Affiliate Options section.
7
>
The Earnings tab will show a record for every commission that this affiliate has earned. However,
you can also use the Earnings tab to manually adjust their earnings.
141
Copyright 2005-2015, Miva Inc. All Rights Reserved.
Publication Date: 02/28/2015
User Reference Guide DRAFT
7.1.
In the earnings tab, click Add Adjustment.
7.2.
In the Transaction screen:
7.3.
Enter an order id to associate the earnings with an order.
Enter the order amount.
Enter a value for Earned. This is what you want to pay your affiliate for the transaction.
Void:
Void Reason:
Adjusted Reason:
When you are done, click
.
To Create an Affiliate Account in Your On-line Store
Usually your potential affiliates will follow these steps to create their own accounts.
1 Open a browser and connect to your on- line store.
2
3
Click on the Affiliate Login link.
In the Affiliate Login page (AFCL), click the Create Account button.
4
5
In the Affiliate Create page (AFAD), choose a login, password, and enter your contact information.
Click the Save button.
After you click the Save button, the "Commission" column will appear, showing the affiliate's account,
current commission, and referral links.
Paying Affiliates
Paying your affiliates is a three step process:
Add payouts. Miva Merchant will calculate how much you owe each affiliate. Miva Merchant
creates a "payout record" for each of these affiliates which means that they are "ready to be paid".
Mark the affiliate payout record as paid.
Send payment to each affiliate : You send payment to your affiliates outside of Miva Merchant
using check, PayPal, or any other method.
To Pay an Affiliate
1
Go to
> Marketing > Affiliate Payouts tab.
2
In the Affiliates Payouts tab, click Add Payout
. The Add Payout screen appears.
142
Copyright 2005-2015, Miva Inc. All Rights Reserved.
Publication Date: 02/28/2015
User Reference Guide DRAFT
Payout Threshold: This is a dollar value that you set in the Payout Threshold field. The
threshold tells the system that you don't want to have to pay affiliates until they've earned at least
a certain amount of money. In our example above, we set the threshold to $20.00. When we click
on the Add Payouts button, the system will ignore any affiliate who has earned less than that.
Payee Count: The number of affiliates who have earned more than the threshold amount.
Payee Amount: The total amount that you currently owe all affiliates at the payout threshold.
3
Click the Continue button. The Payout Details screen displays.
In the Payout Details screen you can:
Mark a payment as paid:
1. Click the Processed checkbox, then click Update.
Mark a payment as void:
2. Click the Void checkbox.
3. Enter a Reason for voiding the payment, if you wish. Your login will automatically be
entered in the Voided By field.
4. Click Update.
143
Copyright 2005-2015, Miva Inc. All Rights Reserved.
Publication Date: 02/28/2015
User Reference Guide DRAFT
4
In our example, we'll click the Processed checkbox and then click Update. This affiliate is now
marked as paid.
5
Confirm that the affiliates are marked as paid.
5.1.
Go to
> Marketing > Affiliate tab.
5.2.
Edit the Affiliate that you just created a payout for.
5.3.
Select the Earnings tab. The payout that we just created now shows up.
144
Copyright 2005-2015, Miva Inc. All Rights Reserved.
Publication Date: 02/28/2015
User Reference Guide DRAFT
5.4.
6
Your affiliate can also see a record of the payment by logging into your on- line store:
Manually send payment to the affiliate using any means that is convenient, check, PayPal, etc.
To Manually Adjust an Affiliates Earnings
See To Create an Affiliate Account in the Admin Interface.
145
Copyright 2005-2015, Miva Inc. All Rights Reserved.
Publication Date: 02/28/2015
User Reference Guide DRAFT
Marketing > Affiliate Payouts Tab
The Payouts tab keeps a record of payments you have made to affiliates. Records will only show up in
this tab if you have created payouts and then marked them as either paid or void. See To Pay an
Affiliate.
Marketing > Settings
Marketing > Settings > Discounting Options
These settings let you control what happens when a customer's order becomes disqualified for a discount
because of a return. For example, let's say you create a Price Group that offers free shipping for orders
of $100 or more. A customer buys $100 of merchandise and gets free shipping. A few days later, the
customer returns one of the items. Technically, the order total is now under $100, which means they no
longer qualify for free shipping.
Generally, when a customer wants to return an item, they would call you. While the customer is on the
phone, you edit the order and issue an RMA for the item(s). See To Process Returns and Refunds for
more details. Adjustments to the discount, based on the settings in this tab, will show up in the Edit
Order screen.
Recalculate Discounts For
Returns
Order Total Handling
These fields let you control when discounts are adjusted as the result of
a return.
Never: the discount is never revoked or recalculated, regardless of
changes to the order by RMA.
When Authorized: Adjustments to the discount will be recalculated
as soon as you click the Authorize button in the Edit Order screen.
When Received: Adjustments to the discount will be recalculated as
soon as you click Received in the Edit Order screen.
These fields let you control how discounts are adjusted as the result of a
return.
Allow Recalculation of Discounts to Increase Order Total: If you
select this option it will be possible for the customer to owe you
money because a discount was disqualified as the result of a return.
Prevent Increase in Order Total with Adjustment Item: If you select
this option the customer's order total will never increase, even if a
returned item disqualifies them for the discount.
Adjustment Item Code / Adjustment Item Name: The text that
you enter in these fields will appear as explanations for the
discounting adjustments in the Edit Order screen.
146
Copyright 2005-2015, Miva Inc. All Rights Reserved.
Publication Date: 02/28/2015
User Reference Guide DRAFT
Marketing > Settings > Upsale Options
See Changing the Upsale Options.
Marketing > Settings > Affiliate Options
Activate Affiliate Program
Enables Miva Merchant to begin tracking affiliates referrals, and adds
the Affiliate Login link to your on- line store.
Default Application Status:
There are two ways to create affiliate accounts:
With the Add Affiliate button in the Affiliates tab. When you
manually create an affiliate account this way you can set the
account status.
A potential affiliate goes to your on- line store, clicks on the
Affiliate Login link, and then clicks the Create Account button.
Use the Default Application Status field to set the default status of
affiliate accounts that are created in your on- line store.
Pending: No commissions are tracked.
Approved: Affiliate referrals are enabled and are being tracked by
the software.
Disabled: Affiliate referrals are not enabled or tracked.
Default Commission Per
Referral (hit):
The affiliate gets a commission when a customer clicks on the link to
your store. No purchase is necessary.
Default Commission Percent
of Order:
The affiliates commission is a percentage of the customer's order total.
Default Commission Flat Fee
Per Order:
The affiliates receives a flat fee for every customer referral that results
in a purchase. The size of the order doesn't matter.
Payout Threshold:
The payout threshold is a way of telling the system that you don't want
to pay your affiliates until they've earned a certain amount of money.
See Paying Affiliates.
Link Image:
The referring link that your affiliates add to their website can either
appear as a text hyperlink or as an image that customers can click on to
reach your store.
Free Shirt
147
Copyright 2005-2015, Miva Inc. All Rights Reserved.
Publication Date: 02/28/2015
User Reference Guide DRAFT
If you want the referring link to appear as text:
1
Enter some text, such as "Free Shirt", in the Link Text field (see
below). Miva Merchant will automatically generate an html HREF
similar to this:
<a
href="http://test_store.coolcommerce.net/mm5/merchant.mvc?Scre
en=SFNT&Affiliate=affiliate1"> alt="Free Shirt" border="0"></a>
If you want the referring link to appear as an image:
1
In the Link Image text box, enter the path to an image that is
already on your server, or use the Upload button to copy an image
from your local machine to your server. Miva Merchant will
automatically generate an html HREF similar to this:
<a
href="http://test.coolcommerce.net/mm5/merchant.mvc?Screen=SF
NT&Affiliate=affiliate1"><img
src="http://test.coolcommerce.net/mm5/graphics/00000001/free_shi
rt.jpg"
alt="http://test.coolcommerce.net/mm5/merchant.mvc?Screen=AF
AD&Affiliate=affiliate1" border="0"></a>
2
Your affiliate can now go to your on- line store and log into their
affiliate account. As the figure on page 145 shows, the html
reference to your link image appears in the "Commissions > Image
Link HTML" section. Your affiliate copies the html into the source
code of their web page and your image now appears as a button.
When someone clicks on that image, they will be taken to your online store and your affiliate gets credit for the referral.
Link Text:
See Link Image field above.
Terms:
Use the Terms text box to document how your affiliate program works.
Affiliates can see your terms when they create an affiliate account or
log into an existing affiliate account.
148
Copyright 2005-2015, Miva Inc. All Rights Reserved.
Publication Date: 02/28/2015
User Reference Guide DRAFT
Marketing > Settings > Affiliate Lost Password Email
Your affiliates can log into their accounts through your on- line store, mainly to check their commission
status. If an affiliate forgets their login, they can:
1
2
3
4
Click on the Affiliate Login link. Note that this link does not appear in your store unless you have
checked the Activate Affiliate Program checkbox.
In the Affiliate Login screen (AFCL), the affiliate enters their login name and clicks the "Forgot
Password" link.
Miva Merchant will automatically send an email containing the affiliate's password.
Use the Lost Password Email tab to create the email that your affiliate receives. The affiliate's
password is appended to the body of the message.
149
Copyright 2005-2015, Miva Inc. All Rights Reserved.
Publication Date: 02/28/2015
User Reference Guide DRAFT
The Affiliate Login page
(AFCL).
Marketing > Settings > Affiliate Email Notification
Potential affiliates can create affiliates accounts through your on- line store (see To Create an Affiliate
Account.) The account is usually created with a status of Pending. When the account is created the
potential affiliate receives an email. Use the Affiliate Email Notification Tab to create the email that
they receive.
150
Copyright 2005-2015, Miva Inc. All Rights Reserved.
Publication Date: 02/28/2015
User Reference Guide DRAFT
Note that you must check the Activate New Affiliates Email checkbox to enable the email.
Order Processing
There are a lot of things you can do with orders, such as cancel items, split, and mark items as being on
back order, but the main steps are:
1
Create an order. Normally the customer creates an order while they are shopping in your store, but
you can manually create orders in the admin interface (ideal for phone orders or other manually
placed orders).
2
Authorize payme nt. Authorizing a payment means that the customer has enough purchasing power
on their credit or debit card for the order. The money isn't transferred yet, but a hold is placed on the
authorized amount for anywhere from 3 to 30 days depending on your merchant account provider.
3
Capture Payment. Capturing payment triggers a "settlement" at your merchant bank. Essentially, it
means that the money is transferred from the customer's account to your account.
4
Create the Shipment. Creating a shipment generates a picking number. This is the step when you
put the order items in one or more boxes.
5
Enter tracking numbers. In this step you mark the item as shipped, and optionally, enter a tracking
number. This step is done for you automatically if you use Miva Merchant’s built in UPS, FedEx,
USPS, Endicia or Canada Post shipping modules to generate the shipping label.
Generate a shipping label and ship.
6
To Process Returns and Refunds
Returns are a special workflow in order processing. All storeowners have slightly differ ent return
policies and procedures, but in Miva Merchant the general process looks like this:
1 The customer contacts you and asks to return something.
2
Edit the order, select the item(s) and click the Create Return button.
The Create Return button creates an RMA number for the item(s) that you selected.
3
You can configure an email that will automatically be sent to the customer with your return
instructions and the RMA number.
The customer returns the item(s).
When you receive a returned item, you can find the order by searching on the customer's name, but
you can also create a filter for orders that have RMA items.
151
Copyright 2005-2015, Miva Inc. All Rights Reserved.
Publication Date: 02/28/2015
User Reference Guide DRAFT
4
Edit the order. Select the returned item(s) and click the Manage Return(s) button. In the Manage
Return(s) dialog box, check the Received checkbox, then click Save.
5
Issue a refund.
If the customer paid with a credit card and you are using a payment gateway that supports
refunds, you can edit the order and click the Refund button.
If the customer paid by check, or you are using a payment gateway that does not support refunds,
you can manually send the customer a refund, with a check, credit slip, PayPal account, etc.
152
Copyright 2005-2015, Miva Inc. All Rights Reserved.
Publication Date: 02/28/2015
User Reference Guide DRAFT
Order Processing > Orders
Standard and Advanced Search
Filter dropdown list box
Select at least
one order to
make these
buttons vi sible.
There are quite a few actions you can take on orders. Some things you can do only in the main Orders
tab; some you can do when you edit an order, and some you can do in both places. For example:
You can only run a Batch Report in the main Orders screen.
You can only Authorize funds when you edit an order.
You can use Back Order in both the main Orders screen and when you edit an order. If you run
Back Order in the main Orders screen, all items in the order are marked as back ordered. If you edit
the order, you can choose which items should be marked as back ordered. This is usually true for any
command that is available in both the Orders screen and when you edit the order. If you run the
command from the main Orders screen, it affects every item in the order. If you run the same
command when you edit the order, you can select the items that you want to be affected.
Working with Orders in the Main Orders Screen
Filters
In addition to the standard search and advanced search features, you can also select orders with the Filter
drop-down list box.
153
Copyright 2005-2015, Miva Inc. All Rights Reserved.
Publication Date: 02/28/2015
User Reference Guide DRAFT
Date Range
Or select "Exact Date s" and then enter your ow n date range.
Select one of the pre-defined
date ranges.
Batch
You can place a group of orders into a batch, and then view only the orders in that batch. See below for
more information about using Batches.
154
Copyright 2005-2015, Miva Inc. All Rights Reserved.
Publication Date: 02/28/2015
User Reference Guide DRAFT
Payment Status
Order Status
Every order in Miva Merchant will have a certain order status, depending on what actions have been
taken.
Pending:
An order has been created. Either the customer completed checkout, or you
manually created an order in the admin interface.
Processing:
An order has been created and you have created at least one shipment.
Shipped:
The entire order has been marked as shipped.
155
Copyright 2005-2015, Miva Inc. All Rights Reserved.
Publication Date: 02/28/2015
User Reference Guide DRAFT
Partially Shipped:
At least one item in the order has been marked as shipped.
Cancelled:
The entire order has been marked as Cancelled, although the order still
remains in the system.
Back Ordered:
At least one item in the order was marked as back ordered.
RMA Issued:
At least one item in the ordered was marked with Create Return.
Returned:
At least one item in the ordered was marked with Manage Return(s).
Batches
A Batch is a collection of orders, grouped together and given a name. Batches are really just another
way for you to filter orders. First you create a Batch, then you use the filter list box to view the orders in
that Batch.
You can create and delete Batches, but you cannot edit a Batch.
An order can only be in one Batch.
To remove orders from a Batch, you have to transfer them to another Batch.
After you create a Batch, you can view the orders in the batch, capture funds, or run a report on the
Batch.
To Create a Batch
1
2
Go to
> Order Processing > Orders tab.
In the Orders tab, select several orders and click the Create Batch button.
3
In the Create Batch dialog box, enter a name (optional) for the batch and click Create Batch. When
you create your Batch, the system will automatically prefix your Batch name with a timestamp.
156
Copyright 2005-2015, Miva Inc. All Rights Reserved.
Publication Date: 02/28/2015
User Reference Guide DRAFT
To View the Orders in a Batch
1
2
3
In the Orders tab, select Batch in the filter drop-down list box.
Select a Batch.
All of the orders in that Batch will display.
1
2
To Transfer Orders from One Batch to Another
1
2
View the orders in a batch (see above).
Select one or more orders and click the Create Batch button.
3
The orders will be removed from the old batch and placed in the new batch.
To Delete a Batch
Please note that deleting a Batch also deletes the orders in that Batch! If this
is not what you intend, you must transfer the orders to a new Batch, then delete
the old Batch.
157
Copyright 2005-2015, Miva Inc. All Rights Reserved.
Publication Date: 02/28/2015
User Reference Guide DRAFT
4
In the Store Search field, enter "Legacy Order Processing", then click on the link when it appears in
the results list.
5
Select the Batches tab.
6
In the Batches tab, check the box next to the Batch that you want to delete, then click Update.
Capturing Payment in Batch
1
2
3
Before you can capture payment for a Batch, each order in the Batch must have had the payment
Authorized. If necessary, you can do this by clicking on each order in the Batch. In the Order dialog
box, click on the Authorize button.
Use the instructions above to view the orders in a Batch.
Select one or more orders in the Batch.
4
Click the Capture Payment button.
Note that you can follow essentially the same steps as above to
Create a shipment for a batch of orders.
Back order one or more orders in a batch.
Archive the orders in a batch.
158
Copyright 2005-2015, Miva Inc. All Rights Reserved.
Publication Date: 02/28/2015
User Reference Guide DRAFT
Create Shipment for a Batch or to Archive the orders in a Batch.
Batch Report
The name "Batch Report" is a bit misleading because you don't need to create a batch to use this feature.
The Batch Report is an order report. The Batch Report button becomes active when you select at least
one order.
Out of the box, Miva Merchant comes with one Batch Report: printable invoice. However, if you are
familiar with Miva Merchant coding, you can create your own Batch Report to do anything that you
want, and run it from the Orders screen.
You can customize the printable invoice.
1
2
Go to
> Utilities > Template Based Batch Reports.
Select the Printable Invoice.
3
Click Edit Template.
To Run a Batch Report
1
2
Go to
> Order Processing > Orders tab.
Select one or more orders.
3
Click Batch Report.
4
In the Run Batch Report dialog box, select the Batch Report that you want to run and click Run
Report.
159
Copyright 2005-2015, Miva Inc. All Rights Reserved.
Publication Date: 02/28/2015
User Reference Guide DRAFT
The Miva Merchant printable invoice.
Create Shipment
The Create Shipme nt button is used to generate a picking number and place all or part of an order in
one or more boxes.
To place an entire order in one box (with a single pick number for the entire order), select the order
in the Manage Orders screen and click Create Shipment.
160
Copyright 2005-2015, Miva Inc. All Rights Reserved.
Publication Date: 02/28/2015
User Reference Guide DRAFT
To create separate pick numbers for different items in the order:
1
2
Edit the order.
Select one item and click Create Shipment
3
Repeat with the other items that you are ready to ship. Note that after you use Create Shipment to
assign a pick number to an item, you can no longer edit that item.
Back Order
You can mark an entire order, or individual items in an order, as back ordered as soon as the order has
been created. If you mark an item in an order as back ordered, the pick number for that item will no
longer appear in the Enter Tracking Number(s) dialog box.
161
Copyright 2005-2015, Miva Inc. All Rights Reserved.
Publication Date: 02/28/2015
User Reference Guide DRAFT
To Mark an Entire Order as Back Ordered:
1
2
Go to
> Order Processing > Orders tab.
Select an order and click the Back Order button.
3
In the Back Order dialog box you can optionally enter a date when you expect the order items to be
in stock.
Click the Back Orde r button.
4
Note that you cannot mark an order as back ordered if you have already created a pick number for the
entire order.
To Mark Part of an Order as Back Ordered:
1
2
Go to
> Order Processing > Orders tab.
Edit an order.
3
In the edit order screen, click the checkbox next to the item you want to back order and click the
Back Order button.
In the Back Order dialog box you can optionally enter a date when you expect the order items to be
in stock.
Click the Back Orde r button.
4
5
Archive
Use the archiving feature to delete the payment information associated with one or more orders.
Archiving is most commonly used with credit card orders, so that you can comply with PCI-DSS
regulations that limit how long you can store customer credit card information. When you archive an
order, the order details remain in the database, but the payment information, such as the credit card
number, is deleted.
To learn more about the PCI-DSS standards for credit card security, please see:
Appendix 1: Best Practices for Managing Credit Card Data
To learn more about the Archive button, see:
Regular Archiving in the Manage Orders Screen.
162
Copyright 2005-2015, Miva Inc. All Rights Reserved.
Publication Date: 02/28/2015
User Reference Guide DRAFT
Working with Orders in the Edit Orders Screen
Order Emails
Use the Order Emails link and dialog box to manually send emails to customers while you are editing an
order. For complete details, please see Order Fulfillment > Template Based Emails.
Payment
The Payment drop-down list displays a history of all payment related activities for the order, such as
authorization, capture, voiding and refunding. Selecting an entry in the Payment drop-down list does not
change the order, but it refreshes the information that is displayed in the Authorized, Captured,
Refunded, Net Captured, and Payment Type fields.
163
Copyright 2005-2015, Miva Inc. All Rights Reserved.
Publication Date: 02/28/2015
User Reference Guide DRAFT
To Add Items to an Order
1
2
Go to
> Order Processing > Orders tab.
Edit an order.
3
In the edit order screen, click Add Item(s).
4
In the Add Items dialog box, start typing the code of a product and the system will list all of the
product codes that match what you have entered.
5
Add an attribute to the item (optional).
The Add Attribute button in the Add Item(s) dialog box is a bit confusing because there is also an
Add Attribute button in the Catalog > Edit Product > Attributes Tab. These two buttons, although
they have the same name, do completely different things:
The Add Attribute button in the Edit Product > Attributes Tab is used to create product
Attributes.
The Add Attribute button in the Add Item(s) dialog box can be used to add miscellaneous items
and charges to the order. For example, you could use the Add Attribute button to add a one-off
charge to an order, such as a customer's special request.
164
Copyright 2005-2015, Miva Inc. All Rights Reserved.
Publication Date: 02/28/2015
User Reference Guide DRAFT
5.1.
Add text to the descriptive fields. The first two fields on the Add Attribute line are for
descriptions. You can enter any text in these fields that you want. In our example we show
that this is a custom charge in the first field and give details about the charge in the second
field.
Descripti ve fields
6
5.2.
Enter a weight and price for the special charges.
5.3.
Click Add Attribute, then click Add.
Back in the edit Order screen, our new item and the custom order charge have been added.
To Delete Items from an Order
1
2
Go to
> Order Processing > Orders tab.
Edit an order.
3
In the edit Orders screen, click the checkbox next to an item, then click Delete or Cancel.
The Delete button removes the item from the order. The item is no longer displayed.
The Cancel button removes the item from the order, but the item is still shown in the order so
that you can see what was removed.
To Split an Order
The Split button only becomes active when you select an item in the order, and when the customer has
ordered quantity 2 or more of that same item. Splitting allows you to break a single item in the order into
two separate items. You might want to split an item if it is too large to fit in a single box, or if you
wanted to ship some of the items right away and mark others as back ordered.
4 Go to
> Order Processing > Orders tab.
165
Copyright 2005-2015, Miva Inc. All Rights Reserved.
Publication Date: 02/28/2015
User Reference Guide DRAFT
5
Edit an order.
6
Select an item that has quantity 2 or more.
7
Click Split.
8
In the Split Line Item dialog box, enter the quantity that you want to be in the new item, then click
Split. In our example, the customer ordered quantity 5 of the same shirt. We are breaking that item
into two items. The first item will have quantity 2 shirts. The second item will contain 3 shirts.
166
Copyright 2005-2015, Miva Inc. All Rights Reserved.
Publication Date: 02/28/2015
User Reference Guide DRAFT
To Enter Tracking Number(s)
After you have used the Create Shipment button to generate at least one pick number, you can use the
Enter Tracking Number(s) button to associate a tracking number with all or part of the order.
To use a single tracking number for the entire order:
1 Create a single picking number for the entire order. To do this, select the order in the Orders screen
and click Create Shipment.
2
3
Edit the order and click the Enter Tracking Number(s) button. Since there is only one pick number
for the whole order, you can only enter one tracking number.
You can mark each shipment number (pick number) as shipped.
Enter a tracking number.
Select a carrier for the tracking number (optional).
You can optionally enter a shipping cost for each tracking number.
In the Enter Tracking Number(s) dialog box, click Save.
167
Copyright 2005-2015, Miva Inc. All Rights Reserved.
Publication Date: 02/28/2015
User Reference Guide DRAFT
The tracking number now appears as a clickable link in several places:
In the
In your on-line store, in the Order Details screen, while the customer is going through checkout.
When the customer looks at the Order History screen:
> Order Processing > Shipments tab.
4. The customer goes to your on-line store. At the Storefront screen (SFNT), the customer clicks on
the Sign In link and enters their username and password.
5. In the Customer Account screen (ACLN), the customer clicks on the Customer Order History
link.
6. The Order History screen displays (ORDH). The customer can click on the tracking number
(Shipments column) and be taken automatically to the carrier website.
To assign different tracking numbers to different items in the order:
1
2
3
4
Edit an order.
Select one item in the order and click Create Shipment. There is now a pick number for that
individual item.
Select the same item again and click Enter Tracking Number(s).
In the Enter Tracking Number(s) dialog box, enter a tracking number. See above for more details.
5
In the Enter Tracking Number(s) dialog box, click Save.
6
Repeat these steps for other items in the order.
To Authorize Payment
Authorize means that you, or someone else, has approved that the customer's payment method is valid
for the purchase amount, and that a hold has been placed on that amount. In the case of a credit card, the
approval might come from a credit card gateway. If a customer pays by check, you might manually use
168
Copyright 2005-2015, Miva Inc. All Rights Reserved.
Publication Date: 02/28/2015
User Reference Guide DRAFT
the Authorize button after the customer's check has cleared. A payment must be marked as Authorized
before the payment can be captured.
1 Edit an order.
2
In the edit order screen, click Authorize.
3
In the Authorize dialog box:
3.1.
Select a Payment Method from the Payment Method dropdown list box.
3.2.
Enter an Amount. You can authorize payment for all or part of an order.
3.3.
Click Authorize.
To Capture Payment
After payment has been marked as authorized, you can capture the payment. Captured means that
payment has been withdrawn from the customer's account and is en-route to you.
1 Edit an order.
2 In the edit order screen, click Capture.
3
In the Capture dialog box, enter the amount that you want to capture.
4
Click Capture.
169
Copyright 2005-2015, Miva Inc. All Rights Reserved.
Publication Date: 02/28/2015
User Reference Guide DRAFT
To Create a Return
Use the Create Return button to generate an RMA number for all or part of an order. Before you can
create a return, at least one item in the order must have payment authorized, captured, and the status set
to "shipped". See Enter Tracking Number(s).
1 Edit an order.
2
Select an item with a status of "shipped" and click the Create Return button.
3
The status of the item (or the order, if you select all items) will change to RMA Issue <auto
generated RMA number>.
170
Copyright 2005-2015, Miva Inc. All Rights Reserved.
Publication Date: 02/28/2015
User Reference Guide DRAFT
To Manage Return(s)
After you have used the Create Return button to generate an RMA number for an item, you can select
that item and use the Manage Return(s) button to:
Cancel an RMA, or
Mark an RMA as received
1
2
3
Edit an order.
Select an item with an RMA number and click Manage Return(s).
In the Manage Return(s) dialog box:
To mark the item as received, click the Received checkbox, then click Save.
To cancel the RMA:
5. Click the Cancel link.
6. A message box will appear asking you to confirm. Click OK.
7. The RMA number will be deleted from the order. The status of the order will go back to
Shipped and the original tracking information will remain.
Click the Close button in the Manage Return(s) dialog box to close the dialog box without
making any changes.
171
Copyright 2005-2015, Miva Inc. All Rights Reserved.
Publication Date: 02/28/2015
User Reference Guide DRAFT
To Refund or Void an Item
Use the Void button after the order has been Authorized, but before the funds have been Captured.
Use the Refund button if the funds have already been captured.
You may see that these buttons are greyed out:
These buttons will not be visible if the order is encrypted. Se e To Decrypt an Order.
Because the Void button is used to cancel the transaction before the funds are captured, the Void
button is usually only active the day that the order comes in.
The Refund button will be greyed out if the customer paid by check, or if you are using a credit card
payment gateway that does not support refunds.
To Use the Refund/Void Buttons
1 Edit an order.
2 Click on the Refund or Void button.
3
In the dialog box, click the Refund (or Void) button.
Edit Shipping/Tax/Other Charges
Any time after an order comes in you can use the Edit Shipping/Tax/Other Charges button. When a
customer makes a purchase from your on- line store, shipping, taxes, and any other charges that you have
configured are calculated automatically. If a customer phones in their order, however, you must use this
button to add those charges and calculate the order total. Before you can use this feature, you must have
configured at least one shipping carrier. (See
> Shipping > Shipping Method Rules.)
172
Copyright 2005-2015, Miva Inc. All Rights Reserved.
Publication Date: 02/28/2015
User Reference Guide DRAFT
To Use the Shipping/Tax/Other Charges Button
1
2
Edit an order.
Click Edit Shipping/Tax/Other Charges.
3
Select a Shipping Method.
4
The entries in this list box will vary depending on what carriers you have configured in the
> Shipping > Shipping Method Rules screen. The other fields in this dialog box will also change
depending on what shipping method that you select.
Click the Recalculate button.
5
Enter an amount for the sales tax, if any.
6
If you are finished editing charges, click Save.
7
If you want to enter an additional charge, for example, special handling, click the Add Charge
button.
Generate Shipping Label
You can create shipping labels when:
At least one item in the order has a picking number.
173
Copyright 2005-2015, Miva Inc. All Rights Reserved.
Publication Date: 02/28/2015
User Reference Guide DRAFT
You have configured at least one shipping module which supports label generation.
To Generate a Shipping Label
1
Edit an order. If you've met all of the criteria listed above, you will see a Gene rate Shipping Label
link. Click on that link to open the Generate Shipping Label dialog box.
2
In the Generate Shipping Label dialog box, select a Shipping Method. In most cases the shipping
method will be set to whatever the customer selected during the checkout process, although you can
change it here.
3
After you select a Shipping Method, a number of other fields will appear that are specific to the
carrier. Fill out these fields and click the Generate button.
Note that fields in the Generate Shipping Label dialog box can change, depending on what
shipping method you select.
174
Copyright 2005-2015, Miva Inc. All Rights Reserved.
Publication Date: 02/28/2015
User Reference Guide DRAFT
175
Copyright 2005-2015, Miva Inc. All Rights Reserved.
Publication Date: 02/28/2015
User Reference Guide DRAFT
Shipping
Method:
Usually this field will default to the shipping method that the customer selected in
your on- line store. However, if you are offering an option that isn't tied to a specific
method, such as free shipping, this field will default to "Select one". You can change
this field to anything that you want.
Package 1 of X:
This fields in this section display the box data that was sent to the carrier for rate
information. For example, if you are using Pack by Weight, you might have a box
that can hold 10 pounds. If the order weighs 20 pounds, Miva Merchant knows to
send weight and dimensions for two boxes to the carrier to get the shipping charges.
If they are not already correct, you should always set the weight and dimension fields
in the Generate Shipping Label dialog box to the weight and dimensions of the box
that is actually being used.
Action:
4
Remove: Use the Remove command if you aren't sure how to package all or part
of the order, or for example, if one item is backordered and you want to ship the
rest of the order. You can leave an item out of any box and still create a label. The
label will reflect only those items that are in boxes.
Move to New Package: Use this command to place selected items in the order
into separate boxes.
After you click the Generate button in the Generate Shipping Label dialog box, you'll return to the
edit order screen. The "Generate Shipping Label" link now says "View/Print Shipping Label". If you
click on this link a browser window will open with instructions on how to print your label and ship
your package using the carrier that you selected.
176
Copyright 2005-2015, Miva Inc. All Rights Reserved.
Publication Date: 02/28/2015
User Reference Guide DRAFT
If you are printing multiple labels, use the Label/Package
drop-down list to view and print each one.
If you enabled a Zebra printer in the UPS, FedEx, or Endicia modules (see Shipping Settings), please
note:
The label you view in this screen is not WYSIWYG (What you see is what you get) and may not
look exactly the same when you print it. When Miva Merchant receives label information for a
Zebra compatible printer, it's in the form of raw data. In this screen we show a representation of that
data, but it may not be perfect. Even if the label has some on-screen errors, you should still try
printing it, because those errors may not show up in the printed version.
Zebra labels can only be printed on Zebra compatible printers. Any other printer will only print
random characters, because it won't be able to print the .zpl formatted data.
To Void a Shipping Label
After you have followed the steps to generate a shipping label you can void that label. Voiding a label
has the following effect:
Your account will not be charged for the postage.
The label is invalidated and cannot be used.
177
Copyright 2005-2015, Miva Inc. All Rights Reserved.
Publication Date: 02/28/2015
User Reference Guide DRAFT
The status of the order will be set to Unshipped.
Any tracking information associated with order will be lost.
You must void all the labels in a shipment, but if an order contains multiple shipments, you can void the
labels in one shipment, but not the other. (One order can contain multiple shipments. One shipment can
consist of multiple packages.)
This order has two separate shipments, so we could void the label(s) in the first shipment
without changing the labels in the second shipment. However, if shipment 1 (Keyboard,
basic) contained two packages, you would have to void the labels for both packages.
1
2
Edit an Order and click on the View/Print Shipping Label link.
In the View/Print Label screen, click the Void All button.
3
In the confirmation message box, click the OK button.
Decrypt an Order
If you have set up your store to use Order Encryption, all orders will be encrypted. If you are editing an
order, you will not be able to perform certain tasks unless you decrypt the order.
178
Copyright 2005-2015, Miva Inc. All Rights Reserved.
Publication Date: 02/28/2015
User Reference Guide DRAFT
To Decrypt an Order
1 Edit the order. If the order is encrypted, you will see a lock icon next to the Payment drop-down list.
2
Click on the lock icon. The Passphrase Required dialog box will appear. Enter the Passphrase that
you created when you configured Order Encryption and click the Continue button.
3
When you are back in the edit order screen, you'll see that the lock icon is now open and information
from the order is now displayed.
Order Emails Tab
Order Processing > Shipments
The Shipments screen is very similar to the Orders screen. Orders do not show up in the Shipments
screen until at least one item in the order has a picking number (see Create Shipment).
179
Copyright 2005-2015, Miva Inc. All Rights Reserved.
Publication Date: 02/28/2015
User Reference Guide DRAFT
Select at least one order to make the buttons vi sible.
Most of the features of the Manage Shipments screen are described in the Manage Orders section:
Enter Tracking Number(s)
Generate Shipping Labels
Batches
Filters
Filter menu
Filters in Order Processing work the same as they do in the Orders screen. Please see
Processing > Orders tab > Filters.
> Order
Batch Report
The Batch Report button becomes active when you select at least one order or when you are viewing a
Batch of orders that you have created. Miva Merchant comes with one shipment batch report: Shipment
Picklist.
180
Copyright 2005-2015, Miva Inc. All Rights Reserved.
Publication Date: 02/28/2015
User Reference Guide DRAFT
To Run a Shipments Batch Report
1
2
Go to
> Order Processing > Shipments.
Select one or more orders and click Batch Report.
The Miva Merchant Shipment Picklist
To Customize the Shipment Picklist Report
1
Go to
> Utilities > Template Based Batch Reports.
2
Select the Shipment Picklist report and click Edit Template. You can also create your own Batch
Reports.
181
Copyright 2005-2015, Miva Inc. All Rights Reserved.
Publication Date: 02/28/2015
User Reference Guide DRAFT
Select Shipment Picklist and click
Edit Template.
User Interface
About Pages and Items
In most cases, pages in the admin interface correspond to pages in your on-line store.
Page "ABUS" in the admin interface corresponds to the About Us page in your on- line store.
But page "ORDER_INVOICE" in the admin interface controls a hard-copy invoice that you can
print for customers, and there's no equivalent page in your on- line store.
Items are a way for you to add content or features to your store pages.
A page in your store contains multiple Items. Each Item adds a certain type of content to the page.
Some Items add content to a specific location in the page. For example, there may be a CSSUI
Headers and Footers Item so you can add content to a page's header and footer area.
Some Items add specific content to a page. For example, you can add customer information fields to
a page with the CSSUI Customer Fields Item.
Most Items have a Template field. You can add or change template code in the Item to change the
way that the Item works.
Items call Modules
If you are familiar with programming concepts, Modules are like library files that contain code. Items
are like function calls into a module. You can create multiple items that call into the same module, but
with different parameters. See To Add a Local Item to a Page.
182
Copyright 2005-2015, Miva Inc. All Rights Reserved.
Publication Date: 02/28/2015
User Reference Guide DRAFT
These are two different items, but
they call into the same module.
Global Items and Page Specific (Local) Items
Global items are used by default on almost every page in your on- line store. Global Items appear as
collapsible sections in
> User Interface > Settings tab.
When you change a global item, the change is made on every page that uses the global item. For
example, if you add your store logo to the Global Header & Footer, that logo will show up on almost
every screen in your on- line store.
When you edit a local item, it only affects one page at a time. For example, both ABUS (About Us)
and BASK (Basket) have a "local" header and footer item. If you add your store logo to the Header
& Footer item on page ABUS, your logo doesn't show up on the Basket page in your on- line store.
183
Copyright 2005-2015, Miva Inc. All Rights Reserved.
Publication Date: 02/28/2015
User Reference Guide DRAFT
Global Items show up as collapsible sections in the Settings tab.
Local Items are added to specific pages. After you add an item to a page, the item will show up as a
collapsible section in the
> User Interface > Edit Page > Pages tab.
Local Items show up as collapsible sections in
Page tab of the Page that uses the item.
User Interface > Pages Tab
Adding Content to Your Store Pages
There are two ways to add content to your store pages:
Method 1: Edit the template code.
1
Go to
> User Interface > Pages.
184
Copyright 2005-2015, Miva Inc. All Rights Reserved.
Publication Date: 02/28/2015
User Reference Guide DRAFT
2
Select a Page (like BASK - Basket Contents) and click the Open Page icon.
3
The page opens in edit mode and the Page tab is selected by default:
The code in the Template field controls almost everything on the store page.
Method 2: Add an Item to the page. See To Add a Local Item to a Page.
User Interface > Items Tab
To Add a Local Item to a Page
1
2
Go to
> User Interface > Pages.
Edit a Page and select the Items tab.
3
In the Items tab, click the slider icon next to the Item you want to add until the icon turns blue.
You can also click on the
assigned to the page you are editing.
column heading to easily see all of the items that are currently
185
Copyright 2005-2015, Miva Inc. All Rights Reserved.
Publication Date: 02/28/2015
User Reference Guide DRAFT
Assigned
Not a ssigned
4
At this point the Item has been added to your store page, but there's one more step. The Item has to
be "called" from the Template code on the Page tab.
186
Copyright 2005-2015, Miva Inc. All Rights Reserved.
Publication Date: 02/28/2015
User Reference Guide DRAFT
Whether it's done manually or automatically, after you add an Item, the Template
code on the Page tab has to be edited. There has to be a line of code in the Template
field that invokes the Item. In the example above, a line has been added to the
Template code that invokes the Content Item.
Some Items can automatically modify the Template code on the Page tab. As soon as you click
the Add Ite m button in the step above, the Item will automatically add a line to the template
code on the Page tab that "calls" the Item.
For other Items, after you click the Add Item button, you have to select the Page tab and
manually add the code to call the Item.
The release notes or other documentation that comes with the Item will tell you whether the Item
automatically modifies the Template code, or whether it has to be done manually.
Editing Items
There are two ways to edit items.
187
Copyright 2005-2015, Miva Inc. All Rights Reserved.
Publication Date: 02/28/2015
User Reference Guide DRAFT
The first method is only used if you want to see the list of pages that the Item is assigned to.
The second method is used to edit the content of the item. For example, if you want to add your store
logo to a page, you could edit the content of the Global Header and Footer item.
Method 1: Edit the Item (Assign the Item to Multiple Pages)
1
2
Go to
> User Interface > Items.
Select or search for an item.
3
Click on the edit icon:
Item Tab
code : Name of the item
module: The Miva Merchant module name that contains the code you are going to call
Pages Tab
Use the Pages tab to see and change what pages the item is assigned to.
Extensions Tab
The extensions tab is usually used by tech support to troubleshoot stores and by module developers.
Method 2: Edit the Item Content
Global items appear as collapsible sections in
Local Items appear as collapsible sections in the
> User Interface > Settings tab.
> User Interface > Edit Page > Pages tab.
Example 1: Edit the Global Header & Footer Content
1
2
Go to
> User Interface > Settings.
Click on the collapsible section Global Header & Footer.
188
Copyright 2005-2015, Miva Inc. All Rights Reserved.
Publication Date: 02/28/2015
User Reference Guide DRAFT
Example 2: Edit the header and footer for a specific page.
1
2
Go to
> User Interface > Pages. Edit a Page, for example ABUS.
In the Pages tab, click on the collapsible section: Header & Footer.
Commonly Used Items
Affiliate Fields
Item Code: affiliatelink
This is a local Item. After you add this item to a page, it will show up as a collapsible section when
you edit the page. For example, see
> User Interface > Edit Page AFAD > Page tab >
Affiliate Fields section.
189
Copyright 2005-2015, Miva Inc. All Rights Reserved.
Publication Date: 02/28/2015
User Reference Guide DRAFT
The Affiliate Fields tab appears in the AFAD (Affiliate Create) page by default.
The template code in this tab controls the fields in the Affiliate Account Registration screen in your online store. To view the Affiliate Account Registration screen in your on- line store:
1
2
Go to your on- line store and click on the Affiliate Login Link (see User Interface > Settings Tab >
Affiliate Links Section).
In the Affiliate Login screen, click the Create Account button. The Affiliate Account Registration
screen (AFAD) will appear.
190
Copyright 2005-2015, Miva Inc. All Rights Reserved.
Publication Date: 02/28/2015
User Reference Guide DRAFT
Attribute Machine Section
Item Code: attributemachine
This is a local Item. After you add this item to a page, it will show up as a collapsible section when
you edit the page. For example, see
> User Interface > Edit Page PROD > Page tab >
Attribute Machine section.
191
Copyright 2005-2015, Miva Inc. All Rights Reserved.
Publication Date: 02/28/2015
User Reference Guide DRAFT
The Attribute Machine section appears in the PROD page by default. It uses JavaScript code to tie a
master product to product Variants:
Track inventory and update the prices on variants
Hide out of stock products
For example, let's say you have a t-shirt product with an attributes for Size.
Variant
Price
Inventory
Size: XSmall
$10.00
20
Size: Small
$15.00
4
Size: Medium
$20.00
0
When a customer is looking at the product page for the t-shirt, they can select different sizes. The
attribute machine makes it possible to update the product page in real time with the price and inventory
message that matches the variant they've selected.
The attribute machine can update the product page in real time with accurate
price and inventory information, based on the customer's selections.
192
Copyright 2005-2015, Miva Inc. All Rights Reserved.
Publication Date: 02/28/2015
User Reference Guide DRAFT
Pricing Elements and Pricing Displays
The attribute machine can display several real time prices. For example, let's say you have a t-shirt
variant, Size = XSmall. The regular price for this particular t-shirt is $10.00. There is a price group
which gives customers 30% off the regular price. The product page can display three price values:
Price: $10.00
Additional Price Element / Additional Price Display. In our example,
we set the Additional Price Display to the sale price.
$7.00
Price Element / Displaye d Price. In our example, we set the Displayed
Price to the sale price.
Savings of: $3.00
Discount Element / Display Predicted Discounts. In our example, we
checked the Display Predicted Discounts checkbox.
The "Element" fields are like containers. The "Display" fields give you control over what is displayed in
that container.
This i s sort of an invi sible container that was set
up when we configured the Price Element field.
The Displayed Price field lets us control what we
want to show in this container. In our example,
we'll set the Di splayed Price field to "Sale Price";
the price of the product after di scounts are
applied.
NOTE - the words “Savings of” shows on the product page because the price group that is triggering this
savings has been configured with the text: “Savings of” in its Basket Description field. If the price group
was not configured this way, the price group’s name would be displayed instead.
193
Copyright 2005-2015, Miva Inc. All Rights Reserved.
Publication Date: 02/28/2015
User Reference Guide DRAFT
Attribute Machine Fields
Enabled:
Turns the attribute machine on or off. The attribute machine must be enabled if
you want to track inventory of product variants.
Initial Attribute State:
This field mostly determines if attribute related data (like a price change when
the customer selects an option) is loaded when the product page is loaded.
Loading the attribute related data with the page (preloading) means it may take
longer for the page to appear in the customer's browser. If you don't preload
the attribute related data, the page will load faster, but if the customer selects
an attribute that requires a price change (for example) another call has to be
194
Copyright 2005-2015, Miva Inc. All Rights Reserved.
Publication Date: 02/28/2015
User Reference Guide DRAFT
made to get that information.
Do Not Preload: Choose this option if you want the page to load faster in
the customer's browser. Information required by attribute selection will be
retrieved in another call.
Preload Drop Down Lists Do Not Contain Select One : Choose this
option if you want to load page and attribute related data at the same time.
If you are using drop-down lists and you've modified the Page tab
template code to include a "Select One" option, your "Select One" option
will not be displayed.
Preload Drop Down Lists Contains Select One: You only need to select
this option if:
You want to preload page and attribute related data.
You are using drop-down lists.
You've modified the Page tab template code to include a "Select One"
option.
You want your "Select One" option to appear as the default choice.
Dependency
Resolution:
Dependency Resolution controls how attribute drop-down lists are populated
based on the current selection or a preset selection.. To use this field you must
be tracking inventory at both the store level (see Track Inventory).
This field doesn't have much effect unless you are using drop-down lists as
your option display type. For drop-down lists, Dependency Resolution changes
the contents of one list depending on what you selected in another list. For
example, if you select medium in the Size list, you might only see "Black" and
"White" in the Color list, because those are the only colors available in
medium. If you are using radio buttons to display options, the behavior will be
the same no matter what you select for Dependency Resolution. Every product
option will be displayed, but products that you don't carry or which are out of
stock will be greyed out.
Dependency Re solution
changes the contents of dropdown lists.
For radio buttons, all options
are displayed, but invalid
selections are greyed out.
Select one of the following values for Dependency Resolution:
195
Copyright 2005-2015, Miva Inc. All Rights Reserved.
Publication Date: 02/28/2015
User Reference Guide DRAFT
Inventory Element:
First selected attribute shows all options : The option you select in the
first drop-down list determines the contents of all other drop-down lists. If
the first drop-down list is size and you select Medium, and the second
drop-down list is color, only the color choices you have for medium shirts
will be displayed.
Cascade: The contents of a list is modified by selections above, but not
below. Let's say you had three attributes: size, color, and fabric. The
contents of the second drop-down list would be modified by what you
selected in the first drop-down list, but the contents of the second list
would not be affected by what was selected in the third list.
Most recently selected attribute shows all options : Whatever attribute
option you select first changes the contents of all other attributes. For
example, if Color is the second attribute and you chose "Blue", the
contents of the first attribute Size would only show sizes that are available
in blue.
The Inventory Element allows the attribute machine to update the product page
with real time inventory information.
If you go to:
> User Interface > Pages > Edit Page PROD > Product Display
Layout section > Advanced Mode
There is a HTML div element in the default template code which controls the
display of your inventory information:
<div id="inventory- message">
The contents of the Inventory Element field must match that div id.
Inventory Message:
Choose whether you want to display short inventory messages or long
inventory messages for products that have Attributes. To set the message
length for products that do not have attributes, see Inventory Level Message in
the Product Display Layout section.
There are three inventory messages that can show up in a product page: "in
stock", "low stock", and "out of stock". For each message, you can create a
long version and a short version, depending on how much information you
want to give the customer.
You can create default versions of these messages:
See Catalog > Inventory > Inventory Settings Section.
And you can customize the inventory messages at a product level:
See Catalog > Edit Product > Inventory Tab.
If you set this field to "short", the short version of your inventory message will
be displayed, and "long" will display the long version of your inventory
messages.
196
Copyright 2005-2015, Miva Inc. All Rights Reserved.
Publication Date: 02/28/2015
User Reference Guide DRAFT
Price Element:
The Price Element field allows the attribute machine to update the product
page with real time pricing information.
If you go to:
> User Interface > Pages > Edit Page PROD > Product Display
Layout section > Advanced Mode
There is an HTML element in the default template:
<span id ="price- value">
If you want the attribute machine to update the product price based on the
attributes that the customer selects, the Price Element field must match that
div.
Additional Price
Element:
See Pricing Elements and Pricing Displays. If the product is receiving some
kind of discount, the attribute machine can display prices like this:
$10.00 $7.00
The $10.00 is the Additional Price Element. It's the original price of the
product before any discounts are applied. You might want to show this
price to customers so that they can see in the product page that they are
getting a discount.
The $7.00 is the Price Element. It's the price of the product after discounts
are applied.
If you go to:
> User Interface > Pages > Edit Page PROD > Product Display
Layout section > Advanced Mode
There is an HTML element in the default template:
<span id ="price- value-additional">
If you want the attribute machine to update the Additional Price Element based
on the attributes that the customer selects, the Additional Price Element field
must match that element.
Discount Element:
See Pricing Elements and Pricing Displays. If the product is receiving some
kind of discount, the attribute machine can display prices like this:
$10.00 $7.00 $3.00
The $10.00 is the Additional Price Element. It's the original price of the
product before any discounts are applied. You might want to show this
price to customers so that they can see in the product page that they are
getting a discount.
The $7.00 is the Price Element. It's the price of the product after discounts
are applied.
197
Copyright 2005-2015, Miva Inc. All Rights Reserved.
Publication Date: 02/28/2015
User Reference Guide DRAFT
The $3.00 is the Discount Element. It's the dollar value of the savings.
If you go to:
> User Interface > Pages > Edit Page PROD > Product Display
Layout section > Advanced Mode
There is an HTML tag in the default template:
<div id = "product-discount">
If you want the attribute machine to update the Discount Element based on the
attributes that the customer selects, the Discount Element field must match that
element.
Displayed Price:
See Pricing Elements and Pricing Displays. The Price Element field as a kind
of container. Generally, it is used to show the customer how much a product
will cost after discounts have been applied. But you can use the Displayed
Price field to have some additional control over what price customers see in a
product page.
Retail Price : If you select Retail Price, the Price Element field will display
whatever you put in the Cost field when you created the product.
Base Price (includes any legacy price group discounts but does not reflect
sales, coupons or discounts applied in the basket): If you select Base Price,
the Price Element field will reflect discounts from legacy price groups, but
not discounts from the new "non- legacy" price groups that were introduced
in Version 9. (See Price Groups in Version 9.)
Sale Price (includes legacy price groups and predicted discounts): If you
select Sale Price, the Price Element field will reflect discounts from any
price group, legacy or non- legacy.
In general you should use the "Sale Price" option because it will reflect
discounts from both legacy and non- legacy price groups.
Additional Price
Display:
See Pricing Elements and Pricing Displays. The Additional Price Element
field as a kind of container. Generally, it is used to show the customer how
much the product cost before discounts were applied. But you can use the
Additional Price Display field to have greater control over what price is
shown.
None: No value will be displayed by the Additional Price Element field.
198
Copyright 2005-2015, Miva Inc. All Rights Reserved.
Publication Date: 02/28/2015
User Reference Guide DRAFT
Choose None. The Displayed Price is
shown ($7.00, price after discount), but
not the Additional Price (price before
discount).
Retail Price : If you select Retail Price, the Additional Price Element field
will display whatever you put in the Cost field when you created the
product.
Choose Retail Price. Both the Displayed
Price ($7.00, after discount) and
Additional Price ($10.00, before discount)
are shown. The Additional Price shows
the product Cost.
Base Price (includes any legacy price group discounts but does not reflect
sales, coupons or discounts applied in the basket): If you select Base Price,
the Additional Price Element field will reflect discounts from legacy price
groups, but not discounts from the new "non- legacy" price groups that
were introduced in Version 9. (See Price Groups in Version 9.)
Choose Ba se Price. Both the Di splayed
Price ($7.00, after discount) and
Additional Price ($8.00, before discount)
are shown. The Additional Price reflects
discounts from legacy price groups, but
not from "non-legacy" price groups.
Display Predicted
Discounts:
Let's say you have a t-shirt that normally sells for $10.00. There is a price
group that gives customers 30% off. If you check this box, the system will
show customers the dollar value of what they've saved. But please see Pricing
Elements and Pricing Displays.
Swatch Element:
If you go to:
> User Interface > Pages > Edit Page PROD > Product Display
Layout section > Advanced Mode
199
Copyright 2005-2015, Miva Inc. All Rights Reserved.
Publication Date: 02/28/2015
User Reference Guide DRAFT
There is a HTML div element in the default template:
<div id="swatches">
If you want swatches to change attributes based on the swatch selection, the
Swatch Element field must match that div.
Invalid Attribute
The customer will see this message if they select an invalid combination of
Combination Message: attributes and try to submit the page.
Missing Text Field
Value Message:
Missing Radio
Selection Message:
The customer will see this message if:
You configured Attributes to use a text field and
The attribute is required, and
The customer left the attribute text field blank when they submitted the
page.
The customer will see this message if:
You configured Attributes to use radio buttons, and
The attribute is required, and
The customer did not select a radio button option when they submitted the
page.
Head Template:
This field can be used to modify the attribute machine performance and
behavior. It should only be changed by advanced users.
Notes /
Versions /
Recall /
Clear History /
Please see Appendix 2: Common Fields in the Admin Interface.
Basket Contents Section
Item Code: basket
This is a local Item. After you add this item to a page, it will show up as a collapsible section when
you edit the page. For example, see
> User Interface > Edit Page OPAY > Page tab > Basket
Contents section.
The Basket Contents is a grid- like structure that shows up by default on the following pages: BASK,
OCST, OSEL, OPAY, and INVC. The template code in this section controls the display and logic of the
Basket Contents grid.
200
Copyright 2005-2015, Miva Inc. All Rights Reserved.
Publication Date: 02/28/2015
User Reference Guide DRAFT
The Basket Contents "grid" i s shown here on the Shopping Ba sket page
(BASK), but thi s grid appears by default on several other store pages.
Category Product List Layout Section
Item Code: category_listing
This is a local Item. After you add this item to a page, it will show up as a collapsible section when
you edit the page. For example, see
> User Interface > Edit Page CTGY > Page tab >
Category Product List Layout Section.
Product Links:
Do Not Include Category Code / Include Category Code
If:
You set this field to "Include Category Code", and
A customer in your on- line store is viewing a category page and then clicks
on an individual product.
The URL of the product page will be modified so that it includes the category
that the customer clicked on. If you were modifying the template code of your
product pages, and you wanted to know what category the customer had
clicked on to reach the product page, you would be able to extract the category
from the product page URL.
201
Copyright 2005-2015, Miva Inc. All Rights Reserved.
Publication Date: 02/28/2015
User Reference Guide DRAFT
The customer is
viewing a category
page in your store and
clicks on a product.
Examples
Do Not Include Category Code (Short Links not enabled)
Category Page URL
http://mivamerchantdev.com/mm5/merchant.mvc?St
ore_Code=001&Screen=CTGY&Category_Code=Sh
irts
Product Page URL
http://mivamerchantdev.com/mm5/merchant.mvc?St
ore_Code=001&Screen=PROD&Product_Code=cyb
ershirt
Include Category Code (Short Links not enabled)
Category Page URL
http://mivamerchantdev.com/mm5/merchant.mvc?St
ore_Code=001&Screen=CTGY&Category_Code=Sh
irts
202
Copyright 2005-2015, Miva Inc. All Rights Reserved.
Publication Date: 02/28/2015
User Reference Guide DRAFT
Product Page URL
Format:
http://mivamerchantdev.com/mm5/merchant.mvc?St
ore_Code=001&Screen=PROD&Category_Code=Sh
irts&Product_Code=cybershirt
Controls the formatting of products in the category page.
Expanded means that the entire image box is displayed:
Line Item formatting looks like this:
Product Fields:
Select the fields that you want to display on the page.
203
Copyright 2005-2015, Miva Inc. All Rights Reserved.
Publication Date: 02/28/2015
User Reference Guide DRAFT
Custom Fields:
If you have created Custom Fields and you would like to reference a custom
field in the template code:
1 Check the box next to a custom field.
2
Displayed Price:
Additional Price
Display:
Click the Update button. Click on the Advanced Mode link at the bottom
of the page. You can now reference the custom field in the product layout
list template code.
By default, discounts from price groups show up in pages that use the Basket
Contents item, but not in product or category pages. The Displayed Price field
give you control over what prices are shown in category pages.
Retail Price : in any category page, show the price that you entered for the
product when you created the product. This option won't show any options
from any price groups.
Base Price (includes any legacy price group discounts but does not reflect
sales, coupons or discounts applied in the basket): this option will show, in
category pages, only those discounts that come from legacy price groups.
This option is mainly kept around for grandfathering, since this option was
added in PR8.)
Sale Price (includes legacy price groups and predicted discounts): this
item will display discounts from any type of price group, legacy or
otherwise.
In a category page, this page can be used to show the original price and the
discounted price.
None:
Retail Price: see above.
Base Price (includes any legacy price group discounts but does not reflect
sales, coupons or discounts applied in the basket): see above.
204
Copyright 2005-2015, Miva Inc. All Rights Reserved.
Publication Date: 02/28/2015
User Reference Guide DRAFT
Display Predicted Discounts
Buttons:
Use these checkboxes to display or remove the "Add To Basket" and "Buy
Now" buttons from the category display page.
Image:
This list box shows all of the Image Types that you've created, and the option
"None". For example, if you've created Image Types of Front, Back, and Side,
the list box will look like this:
If you choose "None", no image is displayed. If you choose one of the Image
Types, images that you assigned to that Image Type will be displayed.
Inventory Level
Message:
Controls what inventory messages (if any) you want to display on category
pages in your on- line store.
You can create default versions of these messages:
See Catalog > Inventory > Inventory Settings Section.
And you can customize the inventory messages at a product level:
Sorting Options:
See Catalog > Edit Product > Inventory Tab.
In some pages of your on- line store you can show a drop-down list that allows
your customers to sort the products that are being displayed. The pages where
you can enable sorting are:
CTGY (Category Display) > Category Product List Layout section >
Sorting Options control
PLST (Product List) > Product List Layout section > Sorting Options
control
SRCH (Search) > Search Results Layout section > Sorting Options control
Use the On and Off radio buttons to display or hide the sorting drop-down list.
Use the checkboxes to select what options will appear in the sorting dropdown list.
205
Copyright 2005-2015, Miva Inc. All Rights Reserved.
Publication Date: 02/28/2015
User Reference Guide DRAFT
Default Sort Method:
One of the options that appears in the "Sort By" drop-down list is "Default".
To see what the default order is for one of your categories:
1
2
3
Go to
> Catalog > Categories.
In the Categories screen, edit a Category.
Select the Products tab.
4
Click the Show Records button and select Show Assigned.
5
Click Edit Display Order
.
If you have at least two products in that category, you will see something like
this:
206
Copyright 2005-2015, Miva Inc. All Rights Reserved.
Publication Date: 02/28/2015
User Reference Guide DRAFT
Whatever order the products have in the Products tab is how they will appear
in your store, if the sort order is set to default. Note that selecting a sort order
other than default can slow the display of pages in your on- line store.
Product Columns:
Set the number of product columns to display when the customer is viewing a
category page. A two column display looks like this:
Pagination:
If you select "Do not paginate products", all products in the category that the
customer has selected will appear on the same page. This can be a
disadvantage if the category has a lot of products in it and the customer has a
slow internet connection.
If you enable pagination, you can select the initial number of products that will
appear on the page. If the category has more than one page of products, "Next"
and "Previous" buttons will appear at the bottom of the screen so that
customers can scroll through the pages.
Note that, if you also enable the "Items Per Page Filter" (see below) a dropdown list will appear at the top of the screen that allows your customer to
207
Copyright 2005-2015, Miva Inc. All Rights Reserved.
Publication Date: 02/28/2015
User Reference Guide DRAFT
choose how many products appear on each page. The customer setting
overrides what you select here.
Page Numbers:
If you select "Do not show page count", no page numbers will appear on a
category page, just the "Next" and "Previous" buttons.
If you enable page numbers, clickable page numbers will appear at the top of
the screen. In the sample figure below, display of page numbers was set to 2.
Items Per Page Filter:
If you enable the Items Per Page filter, a "View" drop-down list will appear at
the top of the category page. Customers can select from this drop-down list the
number of products that they want to appear on each page. The setting that
customers select in this drop-down list overrides what you select in
Pagination.
208
Copyright 2005-2015, Miva Inc. All Rights Reserved.
Publication Date: 02/28/2015
User Reference Guide DRAFT
Notes:
Versions:
Recall:
Clear History:
Please see Appendix 2: Common Fields in the Admin Interface.
Advanced Mode:
Click on this link to display the product list layout template code. This code
controls things like the head tag, global header and footer, html p rofile,
JavaScript, CSS references, leftnav, etc.
Content Section
Item Code: content
This is a local Item. After you add this item to a page, it will show up as a collapsible section when
you edit the page. For example, if you add this item to page SFNT (Storefront) the item will show up
in
> User Interface > Edit Page SFNT > Page tab > Content Section.
Content is essentially a region or block that you can place on a page in your on- line store. The Content
region can hold anything that you want, text, images, JavaScript, HTML/CSS, etc. You can create
multiple Content regions, and you can control where they appear on a particular page.
To Use the Default Content Region
1
Go to
> User Interface > Edit Page SFNT > Page tab, and look at the Details section >
Template field.
209
Copyright 2005-2015, Miva Inc. All Rights Reserved.
Publication Date: 02/28/2015
User Reference Guide DRAFT
Use the Details section template code to control where the content region appears in the page.
Wherever you place the line "<mvt:item name="content" />" is where that region will appear in
the store page.
2
The item name must match the collapsible section name. If you have a content section called
"Content", the mvt item name must also be "content".
Now go to the Content section. In this tab you can control what will go into the content region.
210
Copyright 2005-2015, Miva Inc. All Rights Reserved.
Publication Date: 02/28/2015
User Reference Guide DRAFT
To Create Custom Content Items
1
Go to
> User Interface > Items tab.
2
In the Items tab, click Add Ite m
3
In the Add Item screen:
.
3.1.
Give the new item any code name that you want.
3.2.
In the Module field, enter: cmp- mv-content
3.3.
Click the +Add button.
211
Copyright 2005-2015, Miva Inc. All Rights Reserved.
Publication Date: 02/28/2015
User Reference Guide DRAFT
The item code name is
important. We'll use it in a
few steps when we modify
the template code.
4
Notice that there are now two new tabs: Pages and Extensions. Click on the Pages tab.
5
In the Pages tab, select the page(s) where you want the custom content to appear, then click Update.
In our example, we'll select page ABUS (About Us).
6
Now edit the page where you added the item. In our example we added the item to the ABUS page,
so we'll go to
> User Interface > Pages > Edit Page ABUS > Page tab. (You can also just
click on the Edit Page icon.)
7
In the Details collapsible section, we'll add a call to the item, then click Update.
212
Copyright 2005-2015, Miva Inc. All Rights Reserved.
Publication Date: 02/28/2015
User Reference Guide DRAFT
<mvt:item name="my_content" />
8
9
Note that where you place the Miva code in the template field will determine where the content
ultimately shows up in your on- line store page. In our example, we put the Miva code just under
the <h1> tag.
Notice that page ABUS now has a collapsible section called "Content (my_content)". In the Content
(my_content) section we'll add some sample text and then click Update.
The text that you added now shows up in your ABUS on- line store page.
213
Copyright 2005-2015, Miva Inc. All Rights Reserved.
Publication Date: 02/28/2015
User Reference Guide DRAFT
Content (inline_css) Section
Item Code: inline_css
This is a local Item. After you add this item to a page, it will show up as a collapsible section when
you edit the page. For example, see
> User Interface > Edit Page SFNT > Page tab >
Content (inline_css) Section.
The inline_css section appears by default in the SHIPMENT_PICKLIST, ORDER_INVOICE, AND
SFNT pages. In the ORDER_INVOICE page it is used to control content and formatting of your
printable invoice.
To see what your printable invoice currently looks like:
1 Go to
> Order Processing > Orders Tab.
2 Select an order and click the Batch Report button.
3
In the Run Batch Report dialog box, select Printable Invoice and click Run Report.
214
Copyright 2005-2015, Miva Inc. All Rights Reserved.
Publication Date: 02/28/2015
User Reference Guide DRAFT
4
The printable invoice will open in a new window.
215
Copyright 2005-2015, Miva Inc. All Rights Reserved.
Publication Date: 02/28/2015
User Reference Guide DRAFT
Customer Information Section
Item Code: order_customer
This is a local Item. After you add this item to a page, it will show up as a collapsible section when
you edit the page. For example, see
> User Interface > Edit Page INVC > Page tab >
Customer Information Section.
By default, customers can enter their Ship To/Bill To information in two screens :
When the customer creates a new account in your on- line store (page ACAD, Customer Create).
216
Copyright 2005-2015, Miva Inc. All Rights Reserved.
Publication Date: 02/28/2015
User Reference Guide DRAFT
When the customer doesn't have an account, and enters their Ship To/Bill To information during
checkout (page OCST, Checkout: Customer Information)
You can control the display and format of the Ship To/Bill To fields on pages where it is being entered
(such as ACAD and OCST) with the
> Store Settings > Customer Fields Tab.
But after the customer's shipping information has been entered, the customer information can be
displayed on other screens, such as the Invoice page (INVC). You can use the template code on the
Customer Information tab to control the appearance of customer information fields on pages like INVC.
Header & Footer Section
Item Code: hdft
This is a local Item. After you add this item to a page, it will show up as a collapsible section when
you edit the page. For example, see
> User Interface > Edit Page ABUS > Page tab >
Header & Footer Section.
Use this section to add content, such as images, html, and JavaScript, to a page's header and footer. Note
that this is a "local" header & footer item. Changes that you make to a local header or footer on one
page, don't affect the local header or footer on some other page.
For example, hdft is used on pages ABUS (About Us) and ACAD (Customer Create).
1
2
Go to
> User Interface > Edit Page ABUS > Page tab > Header & Footer Section.
Add your store logo to the header section.
3
Go to your on- line store. You'll see that your logo shows up on the About Us page, but doesn't show
up on the Customer Create screen. If you wanted your store logo to show up on every page in your
on- line store, you could use the
> User Interface > Settings tab > Global Header & Footer
section.
217
Copyright 2005-2015, Miva Inc. All Rights Reserved.
Publication Date: 02/28/2015
User Reference Guide DRAFT
Page header region
Page footer region
HTTP Headers Section
Item Code: http_headers
This is a local Item. After you add this item to a page, it will show up as a tab when you edit the
page. For example, see
> User Interface > Edit Page ABUS > Page tab > HTTP Headers tab.
218
Copyright 2005-2015, Miva Inc. All Rights Reserved.
Publication Date: 02/28/2015
User Reference Guide DRAFT
The HTTP Header tab lets you control the HTTP header and header content that accompanies a web
page sent from a web server to a web browser. This feature can be used for many purposes, but a
common use is to control the HTTP status code for a page.
Every page that is sent from a web server to a browser also gets a status code for that page (see
http://en.wikipedia.org/wiki/List_of_HTTP_status_codes ). For example, if a web page cannot be found
the server sends a status code of 404, and the status code is shown in the browser window.
In older Miva Merchant builds, if a customer bookmarked a product page and then that product was
deleted, when the customer went back to the page they would see a Miva Merchant database error
instead of a web server status code. To correct this problem, later builds of Miva Merchant included a
"Not Found" page (NTFD). If a store page cannot be found, the user is automatically redirected to the
Not Found page.
However, search engines like Google were indexing the Not Found page. Some Miva Merchant
customers didn't want that, because the Not Found page doesn't really contain content that should end up
in a search result list. One way that you can use the HTTP Headers tab is to control the HTTP status that
is sent with the page from the web server to the web browser. For example, if you wanted search engines
to continue indexing the Not Found page:
1 Go to
> User Interface > Edit Page NTFD > Page tab > HTTP Headers tab.
2
Click on the Add button
. Enter "Status" as the Header and 200 as the Value. When the
webserver sends the Not Found page to the customer's browser, the page will be sent with a status of
200 ("OK"). Search engines like Google will index the Not Found page because they will assume
that it is a valid page.
If you set the value of the HTTP Status to "404" (which it is by default), search engines will not
index the page.
By default the HTTP Headers tab only appears in the NTFD (Not Found) page, but you can add the
http_headers item to any page.
Order Contents
Item Code: order_contents
This is a local Item. After you add this item to a page, it will show up as a collapsible section when
you edit the page. For example, see
> User Interface > Edit Page INVC > Page tab > Order
Contents Section.
Controls the format of order items on pages like INVC.
219
Copyright 2005-2015, Miva Inc. All Rights Reserved.
Publication Date: 02/28/2015
User Reference Guide DRAFT
Order History List Layout Section
Item Code: orderhistory_list
This is a local Item. After you add this item to a page, it will show up as a collapsible section when
you edit the page. For example, see
> User Interface > Edit Page ORDH > Page tab > Order
Contents Section.
The fields and template code in the Order History List Layout section control the logic and content in
the Order History screen in your on-line store. To view the Order History screen in your on-line store:
1 At the top of the screen in your on-line store, click on the Order History link.
220
Copyright 2005-2015, Miva Inc. All Rights Reserved.
Publication Date: 02/28/2015
User Reference Guide DRAFT
2
In the Lookup Order History screen (ORHL) enter a customer's billing email and zip code, then click
the Lookup button.
3
The order history screen for that customer will appear.
Order Hi story fields that you select
in the admin interface.
Order Hi story fields that show up in
your on-line store.
Product Fields:
Works essentially the same way as Product Fields in the Basket Contents tab.
Pagination:
Works essentially the same way as Pagination in the Basket Contents tab.
221
Copyright 2005-2015, Miva Inc. All Rights Reserved.
Publication Date: 02/28/2015
User Reference Guide DRAFT
Notes:
Versions:
Recall:
Clear History:
See Appendix 2: Common Fields in the Admin Interface.
Product Attribute Template Section
Please see Pages Related to Upsale Products.
Product Display Layout Section
Item Code: product_display
This is a local Item. After you add this item to a page, it will show up as a collapsible section when
you edit the page. For example, see
> User Interface > Edit Page PROD > Page tab >
Product Display Layout Section.
This tab appears in the PROD page by default. It controls everything in the product display page, except
for attributes. You can access the template code by clicking on the Advanced Mode link at the bottom.
Product Fields /
Custom Fields
Check the boxes next to the fields that you would like customers to see on
product pages.
Displayed Price:
See Displayed Price.
Additional Price
Display:
See Additional Price Display.
Inventory Level
Message:
Choose whether you want to display short inventory messages or long
inventory messages for products that do not have Attributes.
To set the message length for products that have attributes, see Inventory
Message in the Attribute Machine section.
Notes:
Versions:
Recall:
Clear History:
See Appendix 2: Common Fields in the Admin Interface.
Product Display Layout Image Machine Section
Item Code: product_display_imagemachine
222
Copyright 2005-2015, Miva Inc. All Rights Reserved.
Publication Date: 02/28/2015
User Reference Guide DRAFT
This is a local Item. After you add this item to a page, it will show up as a collapsible section when
you edit the page. For example, see
> User Interface > Edit Page PROD > Page tab >
Product Display Layout Image Machine Section.
The Image Machine is JavaScript code that helps to implement features such as Images, and associated
features such as automatically generated thumbnails and close-ups (Lightbox image).
Enabled:
In order for the Image Machine to provide the features associated with
Additional Images:
This checkbox must be enabled.
Preload Images:
The Image Machine must be assigned to a page, for example Edit Page:
Product Display > Items tab > product_display_imagemachine checkbox.
If you select this option then all of the Additional Images associated with a
product: thumbnails, scaled images, and lightbox images, are loaded when the
page loads. This means the page takes longer to load, but there is a faster
response time when the customer clicks on one of the Additional Images.
If you don't enable this option, only the first additional image and the
thumbnails will load when the page loads. This makes the page load faster, but
the customer will have to wait if they click on one of the other Additional
Images.
Available Tokens:
The list of tokens you can use in the element fields (Image Element,
Thumbnail Container, etc.)
Image Element:
This is in the template code for product display layout. It's a placeholder for
the main product image on a product page.
img id="main_image"
Thumbnail Container:
A placeholder for the thumbnail image(s) on the product page:
ul id="thumbnails"
Closeup Container:
A placeholder for the lightbox window:
div id="closeup_div"
Closeup Image
Element:
A placeholder for the lightbox image:
Closeup Close
Element:
A placeholder for the "close" button in the lightbox window
Head Template:
Code used by the image machine. It contains JavaScript that displays
img id="closeup_image"
id="closeup_close"
223
Copyright 2005-2015, Miva Inc. All Rights Reserved.
Publication Date: 02/28/2015
User Reference Guide DRAFT
additional images.
Notes:
Versions:
Recall:
Clear History:
See Appendix 2: Common Fields in the Admin Interface.
Product Display Layout Image Dimensions Section
Item Code: product_display_imagemachine
This is a local Item. After you add this item to a page, it will show up as a collapsible section when
you edit the page. For example, see
> User Interface > Edit Page PROD > Page tab >
Product Display Layout Image Dimensions Section.
Main Image
No Constraints : The image will be displayed in the main image bounding box
at whatever size was uploaded.
Resize to fit within bounding box: An invisible bounding box is drawn in the
product Main Image page. Images larger than the bounding box are scaled
down. Images smaller than the bounding box are untouched.
Main Image
bounding box
Closeup
Enable click to closeup: If you enable this option, when the user clicks on the
product image, a pop-up window will appear on screen containing a larger
bounding box (you can set the dimensions of this larger bounding box below).
See Lightbox image for an example. Images larger than the bounding box are
scaled down. Images smaller than the bounding box are untouched.
No constraints : The image will be displayed in the closeup bounding box at
whatever size was uploaded.
224
Copyright 2005-2015, Miva Inc. All Rights Reserved.
Publication Date: 02/28/2015
User Reference Guide DRAFT
Resize to fit within bounding box: An invisible bounding box is drawn in the
Closeup page. Images larger than the bounding box are scaled down. Images
smaller than the bounding box are untouched.
Thumbnails
Enable additional thumbnails: If you are using the Catalog > Edit Product >
Images Tab, this option will automatically display thumbnails for the images
you have attached to the product. If this option is not checked, the thumbnails
for your additional images will not appear, and customers will have no way of
viewing the additional images.
Related Product List Layout Section
Item Code: related_products
This is a local Item. After you add this item to a page, it will show up as a collapsible section when
you edit the page. For example, see
> User Interface > Edit Page PROD > Page tab >
Related Product List Layout Section.
This tab appears in the PROD page by default. The fields on this tab are identical those in the Category
Product List Layout . The basic idea of "related products" is that, when a customer clicks on a product in
your store, you show the customer one or more other products that they might be interested in
purchasing. You can add related products in the Catalog > Edit Product > Related Products Tab.
Search Results Layout Section
Item Code: search_results
This is a local Item. After you add this item to a page, it will show up as a collapsible section when
you edit the page. For example, see
> User Interface > Edit Page SRCH > Page tab > Search
Results Layout Section.
The Search Results Layout tab appears in the SRCH page by default. This tab controls all content and
formatting of the search results page in your on- line store, except for image dimensions.
For information about the fields in this section, please see Category Product List Layout Section.
Sitemap Section
Item Code: sitemap
This is a local Item. After you add this item to a page, it will show up as a collapsible section when
you edit the page. For example, see
> User Interface > Edit Page SMAP > Page tab >
Sitemap Section.
225
Copyright 2005-2015, Miva Inc. All Rights Reserved.
Publication Date: 02/28/2015
User Reference Guide DRAFT
The Sitemap section is used by the SMAP page. The template code in this section controls the sitemap
screen in your on-line store. However, a Sitemap link does not appear in your on-line store by default,
and the SMAP page does not appear in the admin interface by default.
To enable the Sitemap link in your on- line store and add the SMAP page in the admin interface:
1
2
Go to
> Domain Settings > SEO Settings.
In the SEO Settings tab, check the "Enable Sitemap" checkbox, then click Update.
The page SMAP will now be visible in the admin interface, and a Sitemap link will appear in your
on- line store.
Sitemap link in your on-line store.
UPS Branding and Disclosures Section
Item Code: ups
This is a local Item. After you add this item to a page, it will show up as a collapsible section when
you edit the page. For example, see
> User Interface > Edit Page INVC > Page tab > UPS
Branding and Disclosures Section.
The ups item only appears if you have
> Shipping > UPS® Online Tools installed. By default
the UPS logo and trademark text will appear on the Checkout: Shipping/Payment Selection (OSEL) and
Invoice (INVC) pages, but you can add the UPS Item to any other page. You can modify or remove the
UPS content, although that could violate your contract with UPS. Please contact UPS support for more
information.
Note that you can easily change the size of the UPS icon. The file name of the UPS icon is in the third
line of the (default) template code:
<img style="float: right; margin: 0 31px 0 31px;" src="&mvt:ups:logo_dir;LOGO_L.gif">
226
Copyright 2005-2015, Miva Inc. All Rights Reserved.
Publication Date: 02/28/2015
User Reference Guide DRAFT
You can change the size of the UPS logo by using either the "LOGO_M.gif" or "LOGO_S.gif" files.
Order Contents Section
Item Code: view_order
This is a local Item. After you add this item to a page, it will show up as a collapsible section when
you edit the page. For example, see
> User Interface > Edit Page ORDS > Page tab > Order
Contents Section.
This item has gone through some name changes since PR8:
PR8
V9
Item name: view_order
Item name: view_order
Tab Name: View Order Layout
Collapsible Section Name: Order Contents
The Order Contents section appears in the ORDS (Order Status) page by default. This section controls
the logic and content of the Order Status screen in your on- line store. To view the Order Status screen in
your on- line store:
1 Go to the Order History screen in your on- line store.
2
In the Order History screen, click on the View link for an order.
3
The Order Status screen will appear:
227
Copyright 2005-2015, Miva Inc. All Rights Reserved.
Publication Date: 02/28/2015
User Reference Guide DRAFT
User Interface > Image Types Tab
Image Types are categories that you create for your images. When you upload images to your store, you
can assign those images to the categories that you have created. Using Image Types is optional and you
can upload and display images in your store without them. But Image Types are handy for several areas
of store management:
You can use Image Types with the Import features to quickly upload products with multiple images
for each product. (See Add Images - Import Feature.)
You can use Image Types to display a product picture in search results, shopping basket, related
images, and other store pages. (See Example: Use an Image Type in the Search Page.)
To Create Image Types
Let's say that your main business is selling computers, but you also sell some t-shirts. For every
computer that you sell you have a picture of the front of the computer and another picture for the side.
For the t-shirts that you sell you always have a picture of the front of the t-shirt, and another picture for
the back. You could create the following Image Types:
Front
Side
Back
228
Copyright 2005-2015, Miva Inc. All Rights Reserved.
Publication Date: 02/28/2015
User Reference Guide DRAFT
When you upload your images, you assign each image to one of the Image Types that you created: front,
side, or back.
There are two places where you can create Image Types: at the product main screen or when you are
editing a product in the Catalog > Edit Product > Images Tab. It doesn't matter which one you use.
1 In the Products main page, select the Image Type tab.
2 In the Image Type tab, click on the Add Type(s) button. The Add Image Type dialog box appears.
2.1.
Enter a short code to uniquely identify the Image Type and a longer Description. In our
example we'll enter "Front" as both the code and the description. You may want to keep your
categories fairly generic so that you can use them for a wide variety of different products.
2.2.
Click the Add button.
You can now use your Image Types in several ways:
When you manually upload product images you can assign those images to an Image Type.
When you import product information your Image Types will appear as columns in the spreadsheet.
You can now import multiple images for each product.
If you assign an image to an Image Type, you can have that image show up in the following pages:
BASK (Basket Contents) > Basket Contents tab > Product Images checkboxes
CTGY (Category Display) > Category Product List Layout tab > Image drop-down list
PROD (Product Display) > Product Display Layout tab > Image drop-down list
PROD (Product Display) > Related Product List Layout tab > Image drop-down list
PLST (Product List) > Product List Layout tab > Image drop-down list
SRCH (Search) > Search Results Layout tab > Image drop-down list
Example: Use an Image Type in the Search Page
1
2
3
In our example, we'll create an Image Type called "Front".
Next, we'll edit a t-shirt product and upload a picture of the front of the t-shirt. When we upload the
picture, we'll assign it to the image type of "Front".
Now we'll edit the Search page, so that images of type "Front" show up during a search.
Select
> User Interface > Pages > (Edit) SRCH > Search Results Layout > Image drop-down
list. Select "Front" from the Image drop-down list and click Update.
229
Copyright 2005-2015, Miva Inc. All Rights Reserved.
Publication Date: 02/28/2015
User Reference Guide DRAFT
4
In our store we'll run a search for shirts. The product image that we uploaded appears in the Search
page:
230
Copyright 2005-2015, Miva Inc. All Rights Reserved.
Publication Date: 02/28/2015
User Reference Guide DRAFT
User Interface > Frameworks Tab
Frameworks are used to copy pages into a store. A Framework is a package file, like a zip file, that
contains one or more store pages. The general process for using Framework files is:
1 Create the Framework file.
2
3
4
Add one or more pages to it
Upload the Framework file to the server.
"Paste" the pages in the Framework file into the store.
You can use Framework files to copy pages from one store to another, but you can also buy third-party
Framework files containing custom pages and paste those pages into your store.
If you have an older Miva Merchant store, it was probably created with MMUI , which was the original
Miva Merchant look and feel. It may have been upgraded with the Miva Merchant CSS Framework,
which added CSS and other features. Your Frameworks screen might look like this:
These Frameworks contain legacy store pages. If you are creating a new store we recommend that you
create the store using CSSUI and then your Framework options would look like this:
Notes:
If your store uses MMUI, then you cannot copy an MMUI Framework to a store that uses CSSUI, or
vice versa.
There is no "undo" after you have applied (pasted) the pages from a Framework file into your store.
The safest thing to do is to create a "backup" Framework file containing all pages before you apply
any new pages. See To Apply a Framework File to Your Store.
You cannot edit a Framework file. If you create a Framework that doesn't have the pages that you
want, you must delete it and create a new one.
Modules cannot be installed or copied from one store to another using a Framework file. For
example, if you want to clone a store that has custom modules, you would use a Framework file to
copy pages from the first store to the second, and then install the custom modules into the second
store. If you are copying pages from a store that has custom modules, the second store must have the
same modules.
231
Copyright 2005-2015, Miva Inc. All Rights Reserved.
Publication Date: 02/28/2015
User Reference Guide DRAFT
Once you copy a Framework file to another store and apply those pages to the second store, the
Framework file is no longer needed. You may delete it or keep it, but it is not actively used for
anything.
To Create a Framework File
1
In the Frameworks tab, click on Save Frame work
2
In the Save Framework screen:
2.1.
.
Enter a Framework code. The code is used to create the Framework filename. For example, if
you enter "test" as the code, the Framework file path on the server will be something like:
/mm5/frameworks/00000003/test.pkg
Note that the "00000003" is the store number. If you only have one store this will always be
"00000001", but if you are in doubt as to your store number, you can sftp/ftp to the server
and search for the filename "test.pkg".
2.2.
Enter a Framework name. The name is used to identify the Framework file in the Miva
Merchant admin interface.
2.3.
If you wish you can upload your own Preview Image. This image will be displayed in the
main Frameworks screen.
2.4.
Click the checkboxes next to the pages that you want to include in the Framework file.
2.5.
Click Save Frame work. The Framework file has now been saved to your store server.
232
Copyright 2005-2015, Miva Inc. All Rights Reserved.
Publication Date: 02/28/2015
User Reference Guide DRAFT
To Save a Framework File to Your Local Machine
1
Follow the instructions in the previous section to create the Framework file. It will always be created
in a directory path on the server that looks like: /<root_directory>/Frameworks/subdir/package.pkg
For example: /mm5/frameworks/00000001/test.pkg
2
Use FTP or SFTP to connect to the server and transfer the file to your local machine.
To Apply a Framework File to Your Store
Applying a Framework file is a two step process: first you upload the Framework file to your store
server, and then you "apply" the Framework. Applying the Framework copies the files from the
Framework file into your store.
1
2
Follow the instructions in the previous sections to create the Framework file and save it to your local
machine.
Log into the store where you want to "paste" the pages from the Framework file, and go to :
> User Interface > Frameworks tab
Please keep in mind that, once you apply ("paste") the pages from the Framework file into your
store, there is no rollback. As a safety precaution you may want to create a backup of all your store
pages before you apply the Framework file.
You can create a backup of your store pages by creating another Framework file at this point and by
making sure that you select all store pages. See To Create a Framework File. You might want to
name this Framework file something like "store_backup_<date>".
Before you apply new pages to your store, you may want to create a backup of the current pages.
3
To copy the Framework file from your local machine to the server, click Upload Frame work
4
In the Upload File dialog box, click on the Choose File button. Browse to the Framework file on
your local machine and click Open, then click Upload in the Upload File dialog box.
233
Copyright 2005-2015, Miva Inc. All Rights Reserved.
Publication Date: 02/28/2015
.
User Reference Guide DRAFT
5
After you've uploaded the Frameworks file, the screen will look something like this:
6
When you are ready to apply the pages in the Framework file that you uploaded, select the
Framework file and click Open
.
234
Copyright 2005-2015, Miva Inc. All Rights Reserved.
Publication Date: 02/28/2015
User Reference Guide DRAFT
235
Copyright 2005-2015, Miva Inc. All Rights Reserved.
Publication Date: 02/28/2015
User Reference Guide DRAFT
7
The Apply Framework screen appears. At the bottom of the Apply Framework screen you may see
two checkboxes: "Overwrite Images" and "Overwrite CSS Files". You will only see these
checkboxes if the Framework you are applying contains images or CSS files.
If you check the Overwrite Images checkbox, images in your existing pages with the same names
will be overwritten. For example, if you have an image in your existing pages named
"black_front.jpg" and the same image name exists in your Framework pages, the Framework
image will overwrite the image in your existing pages. The same thing will happen to CSS files
if you check the Overwrite CSS Files checkbox.
If you do not check the Overwrite Image checkbox, pages and images from the Framework will
be copied to your store, but images with the same name will be ignored. For example, if you
have an image in your existing pages named "black_front.jpg" and the same ima ge name exists
236
Copyright 2005-2015, Miva Inc. All Rights Reserved.
Publication Date: 02/28/2015
User Reference Guide DRAFT
8
in your Framework pages, the Framework image will be ignored and the one in your store will be
kept.
Click Apply. The pages that were in the Framework file have now been copied to your store.
User Interface > Settings Tab
User Interface > Settings Tab > Misc Color Section
Specify the colors to be used in selected areas of your store. You can enter the color in each field as a
hexadecimal value (such as #ffffff for white), or by clicking on the color picker icon
. Note that the
fields in this tab do not work with CSSUI, only with the older MMUI. Similar changes to a CSSUI store
are made in the cssui.css file.
When you make a change to a color, it's a good idea to view your on-line store and verify that the results
are what you expected. You might also want to view your on- line store with a few different browsers or
browser versions.
Category Tree Background
By default this area is the vertical band along the left-hand side of the store screen. (For a CSSUI store,
see also User Interface > Settings Tab > Category Tree Template.)
Category Tree Color
Category Tree
List Header Background
The List Header Background appears on any page in your MMUI on-line store that displays a list, such
as a product list, search result list, etc. Similar changes to a CSSUI store are made in the cssui.css file.
237
Copyright 2005-2015, Miva Inc. All Rights Reserved.
Publication Date: 02/28/2015
User Reference Guide DRAFT
A Li st Header
Background in a
product list page.
List Alternate
Background
List Alternate Background
See figure above. Pages in your on-line store that display lists have rows in white and another alternating
color. You can specify that color here.
User Interface > Settings Tab > Fonts
Use the font settings to change the typeface, size, and color of fonts throughout your store. Note that the
fields in this tab do not work with CSSUI only with the older MMUI. Similar changes to a CSSUI store
are made in the cssui.css file.
User Interface > Settings Tab > Affiliate Links Section
If you have enabled the Affiliate Links Program (Activate Affiliate Program checkbox) a new link will
appear at the top of your on- line store.
This i s the Affiliate Login Link. It will
only appear in your on-line store if
you've enabled the Affiliate Program
checkbox.
238
Copyright 2005-2015, Miva Inc. All Rights Reserved.
Publication Date: 02/28/2015
User Reference Guide DRAFT
The Affiliate Login link in your on- line store allows affiliates to login to their account, or to create a
new account. Note that, after an affiliate creates an account in your on- line store, you can edit that
account in the admin interface (
> Marketing > Settings > Affiliates).
After an affiliate logs in, the Edit
Affiliate link appears at the top of the
screen.
Use the User Interface > Settings Tab > Affiliate Links section to edit the HTML of both links. You can
change the text of the link, the background color, add an image, etc.
Use the se fields to edit
the appearance of the
affiliate links in your
on-line store.
User Interface > Settings Tab > Buttons
Customize the wording or look of buttons in your store, such as the Add One To Basket or Search
buttons. When you finish making changes, click the Update at the bottom of the screen.
239
Copyright 2005-2015, Miva Inc. All Rights Reserved.
Publication Date: 02/28/2015
User Reference Guide DRAFT
Text
You can change the wording of each button in the store. The button size will be adjusted to correctly
display the text that you enter.
Show Code
Click on the Show Code button to view the HTML for each button. You can change the text, image, alt
text or action of the button directly.
User Interface > Settings Tab > Category Tree Template
View and edit the code that controls the category tree in your on-line store.
The Category Tree
Template Code
Note that the category tree template code can be edited in different places in the Miva Merchant admin
interface, for example:
> User Interface > Pages tab > Edit SFNT (Storefront). It doesn't matter
which screen you use in the admin interface to edit the category template code. Editing the category tree
template code in one location, changes it in all locations.
Custom Fields
If you have created Custom Fields and you would like to reference a custom field in the category tree
template code:
1 Check the box next to a custom field.
2 Click the Update button. You can now reference the custom field in the category tree template code.
240
Copyright 2005-2015, Miva Inc. All Rights Reserved.
Publication Date: 02/28/2015
User Reference Guide DRAFT
Notes / Versions / Recall / Clear History
Please see Appendix 2: Common Fields in the Admin Interface.
Category Tree Header / Category Tree Footer
Use the Category Tree Header/Footer to add content, such as trust marks, logos, etc, above or below the
category tree.
Content that you add to the header appears above the category tree.
Content that you add to the footer appears below the category tree.
User Interface > Settings Tab > Customer Links
Use this screen to modify the HTML for the Customer Login Link and Customer Account Links.
When customers visit your on- line store, they can click on the Customer Login Link to sign into their
account, or to create an account if they don't already have one. When customers are logged in, Miva
Merchant can display any special pricing (based on Price Groups) or products (based on Availability
Groups) you have created. Note that you can also edit and create customer accounts in the admin
interface. See Customers.
241
Copyright 2005-2015, Miva Inc. All Rights Reserved.
Publication Date: 02/28/2015
User Reference Guide DRAFT
Customer Login Link. Customers can click on thi s link
to login to their account, or to create an account.
After customers login, the link changes to the Customer Account Link. Customers can click on this link
to go to their account info or order history.
Customer Account Link
User Interface > Settings Tab > Navigation Bar
Allows you to customize the navigation bar in your on- line store.
242
Copyright 2005-2015, Miva Inc. All Rights Reserved.
Publication Date: 02/28/2015
User Reference Guide DRAFT
The Navigation Bar
When you first click on the Navigation Bar tab you will see the "point-and-click" mode. In this screen
you can only change the names of the buttons.
Point and click mode in the Navigation
Bar section. Click on the Advanced
Mode link to edit the template code.
But if you click on the Advanced Mode link at the bottom of the screen, you can directly edit the HTML
of the Navigation Bar.
243
Copyright 2005-2015, Miva Inc. All Rights Reserved.
Publication Date: 02/28/2015
User Reference Guide DRAFT
Advanced mode in the Navigation Bar tab.
In advanced mode you can change the background color, add logos and links, and replace the default
button images, such as Product List, or Basket Contents, with your own images. The height of the bar
will expand to accommodate the size of the images you upload. For best results, the logo and button
images should usually be the same height. Images of varying heights will be aligned by the bottom
edges.
Remember that file names for images cannot include spaces. So prod list.gif, would be accepted, but no
image would be displayed. If your file names contain spaces, rename the files before uploading them in
Miva Merchant.
It is a good habit to check your results by looking at the store screen to be sure the images are appearing
as you intended. Remember to click Update after uploading new images, and refresh the store browser
window.
Notes / Versions / Recall / Clear History
Please see Appendix 2: Common Fields in the Admin Interface.
User Interface > Settings Tab > Smart Breadcrumbs
Smart Breadcrumbs appear in your on- line store, not in the Miva Merchant admin interface. For
information about breadcrumbs in the admin interface, please see Breadcrumbs.
244
Copyright 2005-2015, Miva Inc. All Rights Reserved.
Publication Date: 02/28/2015
User Reference Guide DRAFT
Smart Breadcrumbs show customers how they navigated to the current store page, and have clickable
links so that customers can easily go back to previous pages along that path. Smart Breadcrumbs are
only supported for CSSUI stores.
Smart Breadcrumbs
in your on-line store.
Smart Breadcrumbs:
In this section you can directly edit the code that will affect how breadcrumbs
are displayed throughout your store.
Max Category Name
Length:
The default is 0 which means that the category name will be fully displayed no
matter how long it is. If you set the max category name limit to 10 and you
have a category name that is 15 letters, the category name will be truncated to
10 letters.
Max Product Name
Length:
The default is 0 which means that the product name will be fully displayed no
matter how long it is. If you set the max product name limit to 10 and you
have a product name that is 15 letters, the product name will be truncated to 10
letters.
Max Number of Link
Levels to Display:
This setting only affects you if your store has sub-categories, sub-subcategories, etc. The default is 0 which means that entire breadcrumb path will
be displayed, no matter how long it is. However, if you set the max link levels
to 3 and the breadcrumb has 5 levels, only the first level and the last 2 levels
will be shown to the customer.
Breadcrumb contains 5 levels, max levels to display is set to 0.
245
Copyright 2005-2015, Miva Inc. All Rights Reserved.
Publication Date: 02/28/2015
User Reference Guide DRAFT
Breadcrumb contains 5 levels, max levels to display is set to 3.
Notes:
Versions:
Recall:
Clear History:
Please see Appendix 2: Common Fields in the Admin Interface.
User Interface > Settings Tab > Global Header and Footer
Content that you add (such as images, links and text) to the global header appears at the top of every
screen in your on-line store. Content that you add to the global footer appears at the bottom of every
screen.
The notes and versions (See Appendix 2: Common Fields in the Admin Interface) for the global header
and global footer are separate. You can save and recall each one independently. If you make changes to
both, and then click Update, each is saved as a new version.
246
Copyright 2005-2015, Miva Inc. All Rights Reserved.
Publication Date: 02/28/2015
User Reference Guide DRAFT
User Interface > Settings Tab > HEAD Tag Content
This tab is used for two purposes: modifying the HEAD tag for your store.
Editing the HEAD Tag for Your On-line Store
You can customize the contents of the <head> tag in your store html code (using different meta tags,
keywords, title, description, tracking code, script declarations, etc.), by making changes to the HEAD
Tag Content field. Do not include the <head> and </head> tags in this field, just the information that
goes between them. If you leave this field blank, a simple HEAD tag is automatically created.
Note that the HEAD tag is not the same as the global header. See User Interface > Settings Tab >
Global Header and Footer.
247
Copyright 2005-2015, Miva Inc. All Rights Reserved.
Publication Date: 02/28/2015
User Reference Guide DRAFT
If you are using the MMUI Framework and you upload a CSS file, you must manually reference that file
in your HEAD tag. For other Frameworks the CSS file call will be placed automa tically into your page
templates.
Notes / Versions / Recall / Clear History
Please see Appendix 2: Common Fields in the Admin Interface.
User Interface > Settings Tab > HTML Profile
Define the doctype for your on- line store. The doctype declaration ends up being included in the page
source code for every page in your on- line store. The doctype tells the browser what kind of markup
language the page uses, so that the browser can correctly display the page.
Please note that this is the only place in your store where you should declare a doctype. Including a
doctype declaration in any other page will cause conflicts and errors.
User Interface > Settings Tab > Shopping Interface Settings
If this checkbox is checked, when a customer clicks the checkout button, they will be prompted to either
sign in or to create an account. If this checkbox is not checked and the customer clicks the checkout
button, they go right to the checkout screen.
248
Copyright 2005-2015, Miva Inc. All Rights Reserved.
Publication Date: 02/28/2015
User Reference Guide DRAFT
Enable the feature in
the admin interface
A customer clicks the
Checkout button in
your store
The customer is
prompted to sign in or
create an account.
Checking this box can be useful if you offer special pricing to selected customers using Price Groups. It
can also encourage shoppers to create an account, which can make their future visits to your store more
convenient.
User Interface > Settings Tab > Template Import/Export Settings
Using the admin interface, you can export your store pages to an external HTML editor, such as
Dreamweaver. You can use your external HTML editor to change the look and feel of your store pages,
and then re- import them back into the admin interface. Use the fields in this tab to select the folder on
your server where your store pages will be exported to, and imported from.
Note that importing pages back into your store will overwrite the existing
page. For example, if you import an ABUS (About Us) page, it will overwrite
the existing ABUS page currently used in your store. However, if you
accidentally overwrite one of your store pages, you can restore a previous
version. Please see Versions and Recall.
249
Copyright 2005-2015, Miva Inc. All Rights Reserved.
Publication Date: 02/28/2015
User Reference Guide DRAFT
To Set the Import/Export Folder
1
2
In the Import/Export Settings tab:
1.1.
Select either Data or Webroot from the Import/Export folder.
1.2.
Enter the name of a subfolder that you want to use for importing and exporting. This folder
will be created if it doesn't already exist.
Click Update.
To Export Store Pages
1
Use the fields in the
import/export folder.
> User Interface > Settings > Import/Export Settings tab to select your
2
3
Go to
> User Interface > Pages tab.
In the Pages tab, select the pages that you want to export, then click Export Pages.
A copy of the store pages you selected will be placed in your import/export folder. For each store
page there will be one more .htm files.
Select one or more pages,
then click Export Pages.
4
Some HTML editors have a built- in FTP that will allow you to connect to your store server and edit
the exported pages where they are. If your HTML editor does not have built- in FTP, you can use a
stand-alone FTP package to download your store pages from the import/export directory on the
server to your local machine, and then edit them.
250
Copyright 2005-2015, Miva Inc. All Rights Reserved.
Publication Date: 02/28/2015
User Reference Guide DRAFT
To Import Store Pages
1
Use the fields in the
import/export folder.
> User Interface > Settings > Import/Export Settings tab to select your
2
3
Using FTP, copy the store pages that you edited from your local machine to your import/export
folder on the server. Remember to copy both the .html file and the .css file.
Go to
> User Interface > Pages tab.
4
In the Pages tab, select the pages that you want to import, then click Import Pages.
Select one or more pages,
then click Import Pages.
The store page(s) will be copied from the import/export folder and will overwrite your current store
page. If you accidentally overwrite one of your store pages, you can restore a previous version of the
page. Please see Versions and Recall.
User Interface > Error Messages Tab
The error message tab was introduced in Version 9.
The list contains all error messages used by the Miva Merchant software. You can customize all of
these messages.
The Miva Merchant software will automatically add to this list error messages from any third party
module. You can also customize these error message. For example, you may notice that the
Authorize.Net module occasionally generates and displays a message like "Error 12". If you know
251
Copyright 2005-2015, Miva Inc. All Rights Reserved.
Publication Date: 02/28/2015
User Reference Guide DRAFT
that "Error 12" actually means "card number rejected due to insufficient funds", you can replace the
"Error 12" message in this list with something that is more meaningful.
To Replace an Error Message
1
Double-click on an error message.
2
Add your new message text to the replacement field.
User Interface > Style Resources Tab
Use this tab to upload CSS files to your store. After you've uploaded a CSS file, you can modify page
template code to reference the file. You can use CSS files with both the MMUI and CSSUI frameworks.
To Upload a CSS File
1
2
Click Add Style Resource
.
In the CSS File column, enter a name for your file.
3
Use the Media field to set the CSS media type. See
http://www.w3schools.com/css/css_mediatypes.asp
4
Click the Upload button
5
Find the CSS file on your local machine.
.
252
Copyright 2005-2015, Miva Inc. All Rights Reserved.
Publication Date: 02/28/2015
User Reference Guide DRAFT
User Interface > Meta Tag Settings Tab
Use the Meta Tag Settings to embed descriptive words in your store pages. Search engines, like Google,
scan web pages for words that end users search on. For example, if you have a product page in your online store with the word "hat" in it, and a Google user searches for the word "hat", a link to your store
page can be displayed in the Google result list.
To use Meta Tags, you have to create:
The name of the Meta Tag list: "keywords", "description", etc.
The content of the list: "hat, cool, engineer", etc.
253
Copyright 2005-2015, Miva Inc. All Rights Reserved.
Publication Date: 02/28/2015
User Reference Guide DRAFT
For example:
keywords: test1, test2
List name
List content
By default Miva Merchant is configured with two META tags: "keywords" and "descriptions". In the
META Tag Settings tab, you can edit or delete these, and create your own META tags.
To Use META Tag Settings
This section shows how to create a META tag and then add a word list to it by editing a product. You
can also use meta tags in category pages.
1
Go to
> User Interface > Meta Tag Settings tab.
2
In the META Tag tab, click Add
.
The META name field is the exact name that will show up in the HTML of your product pages.
The name can be anything that you want, but in general you sho uld make this one word or
several words connected with the underscore character: "keywords", or "product_keywords".
The Prompt field is what will show up in the Miva Merchant admin interface (see example
below).
3
4
The Type field allows you to enter your word list in either a text box or text field. In current
versions of Miva Merchant, there's not much difference between them. You can enter an
unlimited number of words in each type of field.
Add the word list. If you edit a product (or a category) and click on the Meta Tag Settings tab,
you'll see that the META tag you just created shows up. In our example we created a META name
called "Keywords". We can now add a list of words to the META tag. Enter as many words as you
want, separated by commas.
Vie w the results. Now go to your on- line store and look at the product or category page that you just
edited. In most browsers you can right-click on the page and choose "View Source". You can see
that the your Meta Tag and the list contents are now embedded in the HTML of the product page.
254
Copyright 2005-2015, Miva Inc. All Rights Reserved.
Publication Date: 02/28/2015
User Reference Guide DRAFT
The META tag and keywords that
you created now appear in the
product page source.
What you entered in the "META name"
field in the META Tag Settings screen.
What you entered in the Prompt field in the
META Tag Settings screen.
Data Management
Data Management > Import/Export Tab
The General Process of Importing
You can import different types of data into your store, but the general process is always the same:
1 Download a data file template. The template file contains column headings for the data you are
going to import (see below).
1.1.
Go to
> Data Management > Import Settings tab.
255
Copyright 2005-2015, Miva Inc. All Rights Reserved.
Publication Date: 02/28/2015
User Reference Guide DRAFT
1.2.
Select a template (single-click). For example, if you want to import a group of categories into
your Miva Merchant store, select Add/Update Categories from CSV, then click on the
CSV Template or XLS Te mplate button
Select a template, then
click one of the template
download buttons.
Both files are essentially the same. The CSV template is a text file. The XLS template is an
XML file. Both files are designed to be opened in a spreadsheet program.
When you download a template it will be saved to your computer as "import.csv" or
"import.xls". You may want to change the name to something more meaningful like
"add_update_products.csv" to avoid confusion.
2
Add your data to the template.
3
NOTE: regardless of which file format that you downloaded (CSV or XLS), after you add your data
to the spreadsheet, you must save it as a CSV, or as a text file with your delimiter of choice.
Select your Import options.
3.1.
Go to
> Data Management > Import Settings tab.
3.2.
Double-click the template for the type of data you are going to import.
For example, if you are uploading categories to your store, double-click on the Add/Update
Categories from CSV.
The Edit Import dialog box will open. This dialog box controls the way that your data will be
processed during import. To learn more about the Edit Import dialog box, see To Create and
Save Import Options.
3.3.
Make any changes, then click Save.
256
Copyright 2005-2015, Miva Inc. All Rights Reserved.
Publication Date: 02/28/2015
User Reference Guide DRAFT
Double-click one
of the templates.
4
Upload your data file.
4.1.
Go to
> Data Management > Import/Export tab.
4.2.
If you downloaded the "Add/Update Categories From CSV" template and now you want to
upload your populated data file, click on the Add/Update Categories from CSV button.
257
Copyright 2005-2015, Miva Inc. All Rights Reserved.
Publication Date: 02/28/2015
User Reference Guide DRAFT
Double-click on the data type
that matches the template you
downloaded.
If your browser does not support drag and drop, you will see a slightly different dialog
box:
The Import dialog box does not have Begin Upload button.
As soon as you browse to the file that you want to upload, the system will process
the data in that file, so be careful to select the correct file .
258
Copyright 2005-2015, Miva Inc. All Rights Reserved.
Publication Date: 02/28/2015
User Reference Guide DRAFT
The General Process of Exporting
Miva Merchant lets you export several different types of data to a file:
Attributes
Affiliates
Customers
Categories
Orders
Products
Shipment Information
Exporting data from your Miva Merchant store lets you modify that data much more quickly than you
could through the admin interface. For example, if you wanted to change all of the prices in your store, it
would be much faster to export the Product information, edit the prices in a spreadsheet, and then reimport the product data. Another reason people commonly export data is to use the information in some
external program, for example, if you needed to enter your affiliate payouts in a tax program.
File Locations
When you export data to a file you can either have it mailed to you or leave the file on the server. The
exception is the affiliates export file, which doesn't support ema il. The exported files will always be in
259
Copyright 2005-2015, Miva Inc. All Rights Reserved.
Publication Date: 02/28/2015
User Reference Guide DRAFT
the data directory on your server. If you aren't sure what the name and location of your data directory is,
the easiest thing to do is:
1 Export a data file, such as the attributes file. The default name of the attrib utes file is "provide.xml".
2
FTP to your server and search for the filename "provide.xml".
Export Attributes to XML File
1
2
Go to
> Data Management > Import/Export tab.
Click Export Attributes to XML File. The Export Attributes to XML File screen will appear:
3
Export Product Attributes to File:
4
Enter a filename for the exported file. The default filename is "provide.xml".
Email File To:
Do Not Email: The file will be created on your server. You can use FTP to transfer the file to
your local machine.
5
Enter an email address: the file will be created and automatically emailed to you.
If File Exists:
6
Choose whether you want to append or replace an existing file. You should select Append to File
with caution because it can result in duplicate data in the file.
Export Product Attributes In:
Add Mode : if you select this option, a flag is written to the export file. When you re- import the
attribute data, new attribute will be added to your store, but existing attributes will not be overwritten by the file.
7
Replace All Mode: if you select this option, a flag is written to the export file. When you reimport the attribute data, all existing attributes in your store will be over-written by the file.
Click the Export button.
260
Copyright 2005-2015, Miva Inc. All Rights Reserved.
Publication Date: 02/28/2015
User Reference Guide DRAFT
Example :
If we create a product called "t-shirt" with an attribute called "Size", the XML would look like
this:
<ProductAttribute_Add_Template product_code="t-shirt">
<AttributeTemplateCode>Size</AttributeTemplateCode>
</ProductAttribute_Add_Template>
If we opened the XML file in Excel, it would look like this:
Please note that the Inventory flag was not exported in releases before PR7
Update 10.
Export Affiliates To Flat File
1
2
Go to
> Data Management > Import/Export tab.
Click Export Affiliates to Flat File. The Export Affiliates to Flat File screen will appear:
3
Export Affiliates to File : Enter a filename for the exported file. The default filename is
"affiliates.dat"
4
If File Exists : Choose whether you want to append or replace an existing file. You should select
Append to File with caution because it can result in duplicate data in the file.
Fields to Export: Select the affiliate fields that you want to export.
Delimiter: You can set the field delimiter to a tab or any other character.
5
6
261
Copyright 2005-2015, Miva Inc. All Rights Reserved.
Publication Date: 02/28/2015
User Reference Guide DRAFT
7
Click the Export button.
Export Customers to a Flat File
In builds before PR8, the customer password field was exported in clear text.
In builds after PR8, the customer password field is encrypted in the exported
file.
1
2
Go to
> Data Management > Import/Export tab.
Click Export Customers to Flat File. The Export Customers to Flat File screen will appear:
3
Export Custome rs to File: Enter a filename for the exported file. The default filename is
"customers.csv"
If File Exists : Choose whether you want to append or replace an existing file. You should select
Append to File with caution because it can result in duplicate data in the file.
Email File To:
4
5
Do Not Email: The file will be created on your server. You can use FTP to transfer the file to
your local machine.
262
Copyright 2005-2015, Miva Inc. All Rights Reserved.
Publication Date: 02/28/2015
User Reference Guide DRAFT
Enter an email address: the file will be created and automatically emailed to you.
6
Standard Fields: Select the customer fields that you want to export.
7
File Format:
Custome r Import: This is the default import process. Choose this format if you are using the
import process introduced in PR8. See Data Management > Import/Export Tab.
8
9
Legacy Import Customers From Flat File : Choose this format if you are using the import
process that existed before PR8.
Delimiter: Choose a Delimiter for the file.
Click the Export button.
Export Categories To Flat File
1
2
Go to
> Data Management > Import/Export tab.
Click Export Categories to Flat File. The Export Categories to Flat File screen will appear:
3
Export Categories To File: Enter a filename for the exported file.
263
Copyright 2005-2015, Miva Inc. All Rights Reserved.
Publication Date: 02/28/2015
User Reference Guide DRAFT
4
5
If File Exists: Choose whether you want to append to or replace an existing file. You should select
Append to File with caution because it can result in duplicate data in the file.
Email File To:
6
7
Do Not Email: The file will be created on your server. You can use FTP to transfer the file to
your local machine.
Enter an email address: the file will be created and automatically emailed to you.
Standard Fields / Custom Fields : Choose the list of fields that you want to include in the export
file.
File Format:
Custome r Import: This is the default import process. Choose this format if you are using the
import process introduced in PR8. See Data Management > Import/Export Tab.
8
9
Legacy Import Customers From Flat File : Choose this format if you are using the import
process that existed before PR8.
Delimiter: Choose a Delimiter for the file.
Click the Export button.
Export Orders To Flat File
1
2
Go to
> Data Management > Import/Export tab.
Click Export Orders to Flat File. The Export Orders to Flat File screen will appear:
3
4
Export Orde rs To File: Enter a filename for the exported file.
If File Exists: Choose whether you want to append to or replace an existing file. You should select
Append to File with caution because it can result in duplicate data in the file.
Email File To:
5
264
Copyright 2005-2015, Miva Inc. All Rights Reserved.
Publication Date: 02/28/2015
User Reference Guide DRAFT
6
Do Not Email: The file will be created on your server. You can use FTP to transfer the file to
your local machine.
Enter an email address: the file will be created and automatically emailed to you.
Batch to Export:
All Orders
7
All Unbatched Orders: only export those orders that are not part of a Batch.
Delimiter: Choose a Delimiter for the file.
8
Click the Export button.
Export Products To Flat File
1
2
Go to
> Data Management > Import/Export tab.
Click Export Products to Flat File. The Export Products to Flat File screen will appear:
265
Copyright 2005-2015, Miva Inc. All Rights Reserved.
Publication Date: 02/28/2015
User Reference Guide DRAFT
3
Export Products To File: Enter a filename for the exported file.
4
If File Exists: Choose whether you want to append to or replace an existing file. You should select
Append to File with caution because it can result in duplicate data in the file.
Email File To:
5
6
Do Not Email: The file will be created on your server. You can use FTP to transfer the file to
your local machine.
Enter an email address: the file will be created and automatically emailed to you.
Products to Export: You can choose to export information about all of the products in your store or
a range of products. The range fields let you break your product list into sections, if you think you
have too many products to fit comfortably into a single flat file.
To find out how many products you have:
266
Copyright 2005-2015, Miva Inc. All Rights Reserved.
Publication Date: 02/28/2015
User Reference Guide DRAFT
6.1.
Go to
> Catalog > Products.
6.2.
Click the Show button
and select All.
6.3.
7
8
Click Select Multiple Records
, then click CSV. This downloads a simple CSV
containing all of your products. You can quickly see how many you have in your store.
Export Fields: Select the fields to include in the export file.
File Format:
Product Import: This is the default import process. Choose this format if you are using the
import process introduced in PR8.
Legacy Import Products From Flat File: Choose this format if you are using the import
process that existed before PR8.
Miva Merchant XML Provisioning: This is an XML file.
9 File Delimite r: You can set the field delimiter to a tab or any other character.
10 Category Settings:
Export Only Products In Category: Select this option if you only want to export products in a
single Category.
Include /Ignore Category List: Choose whether you want the categories names to appear in the
exported file.
11 Click the Export button.
Export Shipment Information to Flat File
1
Go to
> Data Management > Import/Export tab.
2
Click Export Shipment Information to Flat File. The Export Shipment Information to Flat File
screen will appear:
3
Export Shipme nts To File: Enter a filename for the exported file.
267
Copyright 2005-2015, Miva Inc. All Rights Reserved.
Publication Date: 02/28/2015
User Reference Guide DRAFT
4
5
Email File To:
Do Not Email: The file will be created on your server. You can use FTP to transfer the file to
your local machine.
Enter an email address: the file will be created and automatically emailed to you.
6
If File Exists: Choose whether you want to append to or replace an existing file. You should select
Append to File with caution because it can result in duplicate data in the file.
File Delimite r: You can set the field delimiter to a tab or any other character.
7
Click the Export button.
See also Notes: Import Shipment Information from CSV.
Data Management > Import Settings Tab
If you have enabled Basket Inventory you may see the following fields in
some templates:
Current Stock
Stock in Baskets
Total Overall Stock.
You should only enter values for Current Stock, which means: inventory on
hand that is not in a basket. The other two fields are calculated by Miva
Merchant and should be considered read-only.
See
> Utilities > Add/Remove Modules tab > Available Modules
section > Basket Inventory.
The Import/Export tab is used to:
Download a template that you can use to import data. See The General Process of Importing.
Edit Import Options. You can customize, to some extent, the way your data is processed during
import. For example, if you are importing Categories, you can tell Miva Merchant what delimiter
you are using in your import file.
There is an "Edit Import" dialog box for each template. If you double-click on Add/Update
Categories from CSV, you'll open the Edit Import dialog box for importing Categories.
268
Copyright 2005-2015, Miva Inc. All Rights Reserved.
Publication Date: 02/28/2015
User Reference Guide DRAFT
Every type of import ha s options
you can set. Double-click on a
template to open the Edit Import
dialog box.
Create custom import options. In addition to editing the default import options, you can create and
save your own. For example, sometimes when you import products you might want to only add new
products; other times you might want to only update existing products. Instead of editing the default
import options for products, you can create two customized product imports, one for add ing new
products and one for updating existing products.
269
Copyright 2005-2015, Miva Inc. All Rights Reserved.
Publication Date: 02/28/2015
User Reference Guide DRAFT
You can create and save
your own customized
import options.
Notes: Add/Update Product Variants from CSV
If you are using PR8 Update 9 or later, you can import:
Attributes
Options, and
Variants
To Import Product Variants
1
2
Go to
> Data Management > Import Settings tab.
In the Import Settings tab, double-click Add/Update Product Variants from CSV.
Double-click to open
the Import Options
dialog box.
The Edit Import dialog box opens. You can use this dialog box to c hange the way your data will be
processed when it is imported. See Saving Import Options for more information.
When you are done with your changes to the Edit Import dialog box, click Save.
3
In the Import Settings tab, single-click Add/Update Product Variants from CSV, and click either the
CSV Template button or XLS Template button to download the template.
270
Copyright 2005-2015, Miva Inc. All Rights Reserved.
Publication Date: 02/28/2015
User Reference Guide DRAFT
Single-click on the
template, then select
either CSV or XLS.
4
5
Add your product variant data to the template.
Use the standard process to import your data. See The General Process of Importing.
Figure 3: A sample product variant template with data, rows A-J
In this sample variant template:
The master products are shown in blue: watch, hat, and t-shirt.
The attributes are shown in green.
The master product "watch" has no attributes.
The master product "hat" has one attribute: size.
The master product "t-shirt" has two attributes: size and color.
The variants are shown in gold:
The hat is available in sizes small and large.
The t-shirt is available in small- green, small-blue, large- green, large-blue.
Notice that, although there are only four different t-shirts, there are eight rows for the t-shirt variants in
the spreadsheet. In Miva Merchant, when you create a variant, every attribute has to have an option code
and an option prompt. Since our example has two attributes (size and color), it takes two rows to capture
this information for each variant:
271
Copyright 2005-2015, Miva Inc. All Rights Reserved.
Publication Date: 02/28/2015
User Reference Guide DRAFT
Master Product
Part Product Code
Attribute Code
Option Code
Option Prompt
t-shirt
t-shirt small green
Size
Small
Small
t-shirt
t-shirt small green
Color
Green
Green
Figure 4: A sample product variant template with data, rows K-P
Figure 5: A sample product variant template with data, rows Q-W
Let's say our t-shirt had three attributes, and two options for each attribute:
Size: Small, Large
272
Copyright 2005-2015, Miva Inc. All Rights Reserved.
Publication Date: 02/28/2015
User Reference Guide DRAFT
Color: Blue, Green
Fabric: Cotton, Synthetic
We would stock six different t-shirts (3 attributes x 2 options). We would need three rows in the
spreadsheet for each variant. Our spreadsheet would have a total of eighteen rows for the t-shirt variants:
3 attributes x 2 options each x 3 rows per variant. Here's the data we would need in our spreadsheet for 1
shirt:
Master Product
Part Product Code
Attribute Code
Option Code
Option Prompt
t-shirt
t-shirt small green cotton
Size
Small
Small
t-shirt
t-shirt small green cotton
Color
Green
Green
t-shirt
t-shirt small green cotton
Fabric
Cotton
Cotton
Notes on Using the Product Variant Template
You cannot import Attribute template information in your product variant template.
If the master product already exists in your store and you list the master product in your import file,
the import process will update the master product in yo ur store with the attribute, option and variant
data in your file. If there's a master product in your spreadsheet, but not in your store, the master
product will be created in your store.
You can get a copy of the sample spreadsheet used in the example above at:
http://www.mivamerchant.com/assets/DND/Create_Variants.zip
Importing Variants with Specific Prices
You may have master products where you want to set a customized or "specific" price for each variant.
For example, you might have a t-shirt master product with two attributes:
Size: Small, Medium, Large
Color: Green
and each variant has its own price:
Master Product
Variant
Variant Price
t-shirt
t-shirt small green
$4.00
t-shirt
t-shirt medium green
$4.50
t-shirt
t-shirt large green
$5.00
If you want to import variants with specific prices, your spreadsheet must have data in these columns:
273
Copyright 2005-2015, Miva Inc. All Rights Reserved.
Publication Date: 02/28/2015
User Reference Guide DRAFT
MASTER_PRODUCT_CODE
VARIANT_PRICE
VARIANT_COST
VARIANT_WEIGHT
Your spreadsheet would look like this (note that we've hidden some columns that don't have required
data):
Notes: Import Shipment Information from CSV
The Shipment Information template has the following fields:
Orde r: the order number.
Shipment_Code : uniquely identifies a shipment. If you enter a value in this field, the shipment will
be marked as shipped in the database.
See
codes.
> Order Processing > Shipments tab > Shipment column for examples of shipment
274
Copyright 2005-2015, Miva Inc. All Rights Reserved.
Publication Date: 02/28/2015
User Reference Guide DRAFT
Tracktype : uniquely identifies a carrier. The tracktype in Miva Merchant is a string associated with
an URL. See
> Domain Settings > Shipment Tracking Links tab.
When Miva Merchant sends a tracking number to one of these URLs, the website (such as USPS)
will return tracking information that is displayed in the admin interface. In your shipment
information spreadsheet you should enter the "Type" that you have configured in Miva Merchant. By
default your store comes with four tracktypes.
Tracknum: the tracking number assigned by the carrier.
Cost: the shipping cost quoted by the carrier.
Every row in the template is a shipment record. When you import your data, Miva Merchant processes
the records in the following way:
275
Copyright 2005-2015, Miva Inc. All Rights Reserved.
Publication Date: 02/28/2015
User Reference Guide DRAFT
Does the
record have a
shipment
code?
Does the order
have pending
items?
No
No
Yes
Mark this
shipment as
shipped.
Does the order
have shipments
that are in a
picking state?
Yes
Do nothing.
No
Yes
Put all
unshipped
items in the
order in single
shipment and
mark the order
as shipped.
Mark all
shipments in
the order that
are in a picking
state as
shipped.
Saving Import Options
When you import your data file you should select the import options that will affect how the data is
processed. There are two ways to do this:
1 Edit the default Import Options.
1.1.
Go to
> Data Management > Import Settings.
1.2.
Double-click on a template.
1.3.
In the Import Options dialog box, make any changes that you want, then click Save.
276
Copyright 2005-2015, Miva Inc. All Rights Reserved.
Publication Date: 02/28/2015
User Reference Guide DRAFT
Double-click one of the
templates to edit the
default Import Options.
2
Create and save your own import options (see below).
To Create and Save Import Options
It's important to note that the Add Import dialog box does not create a new spreadsheet template. This
dialog box only allows you to select some processing options and save those options under a name.
1
Go to
> Data Management > Import Settings.
2
In the Import Settings tab, click New Import
3
In the Add Import dialog box, select the processing options:
.
Description: enter a name for the saved options, for example: "Product Import - New Products
Only"
Import Module : This is the type of spreadsheet template you will be downloading and using.
The options are:
277
Copyright 2005-2015, Miva Inc. All Rights Reserved.
Publication Date: 02/28/2015
User Reference Guide DRAFT
Categories/Customers/Products:
Add Ne w <categories/customers/products> Only : Any categories/customers/products in
your spreadsheet that already exist in the database will be ignored during import.
Update Existing <categories/customers/products> Only: Any
categories/customers/products in your spreadsheet that do not already exist in the database
will be ignored during import. Update will ignore empty columns in your spreadsheet. If you
have a blank column in your spreadsheet, Update will leave the existing value for that
column in your store database alone.
Add Ne w and Update Existing <categories/customers/products> : All new and existing
data in your spreadsheet will be imported. Update will ignore empty columns in your
spreadsheet. If you have a blank column in your spreadsheet, Update will leave the existing
value for that column in your store database alone.
Replace Existing <categories/customers/products> Only : Any new
categories/customers/products in your spreadsheet will be ignored during import. Replace
pays attention to blank columns in your spreadsheet. If you have a blank column in your
spreadsheet, Replace will delete that value from your store database.
Add Ne w and Replace Existing <categories/customers/products> : All new and existing
data in your spreadsheet will be imported. Replace pays attention to blank columns in your
spreadsheet. If you have a blank column in your spreadsheet, Replace will delete that value
from your store database.
Custom Fields : The options, "Retain Existing Data When Imported Data is Empty" and "Delete
Existing Data When Imported Data is Empty" only apply to custom fields that you have:
Created in your database (
and
Added to your spreadsheet.
> Utilities > Custom Fields tab,
Attribute Templates (Product import only): If you are using a Product spreadsheet, it will
contain a column called "attribute_template_code". If you have already created an Attribute
template, you can add the template to a product in your spreadsheet by filling out the Attribute
Template Code column.
Use Attribute Template Codes: This has the same effect as selecting an Attribute Template
from the
> Catalog > Edit Product > Attributes tab > Add Attribute button > Type
drop-down list. The attribute will be assigned to the product, but to modify the attribute you
must change the Attribute Template.
278
Copyright 2005-2015, Miva Inc. All Rights Reserved.
Publication Date: 02/28/2015
User Reference Guide DRAFT
Copy Attribute Te mplate Values: This has the same effect as selecting the Edit Product >
Attributes tab > Add Attribute button > Copy? checkbox. The attribute will be copied from
the Attribute Template and applied to the product. Changing the Attribute Template will not
affect the product. The attribute can only be changed by editing it in the Edit Product >
Attributes tab.
Delimiter: The field delimiter that you are going to use in your spreadsheet.
File Contains a Header Row: Check this box to have the import process ignore the first row in
your spreadsheet.
Fields:
Determine Automatically Using Header Row: If you select this field the import process
will examine the column headings in your spreadsheet and figure out what fields in the
database they represent. This is the appropriate option for most users if you have not changed
the column names in the spreadsheet that you downloaded. Note that the order of columns
doesn't matter, so if you have changed the column order, but not the column names, you can
still use this option.
Manually Assign: Use this option if you have changed the column names in your
spreadsheet.
1. Click on the Choose File button to load your spreadsheet from your local machine.
2. Use the Import Field drop-down list to select a field from the database.
If you have enabled Basket Inventory, you will see the following fields in
the import fields drop-down list: Current Stock, Stock in Baskets, Total
Overall Stock. You should only enter values for Current Stock, which
means: inventory on hand that is not in a basket. The other two fields are
calculated by Miva Merchant and should be considered read-only.
See
> Utilities > Add/Remove Modules tab > Available Modules
section > Basket Inventory.
You can manually assign columns
in your spreadsheet to fields in
your store database.
Database field
Spreadsheet column
279
Copyright 2005-2015, Miva Inc. All Rights Reserved.
Publication Date: 02/28/2015
User Reference Guide DRAFT
Example: Create and Save Two Product Import Settings
Let's say you have a very busy store and you would like to routinely upload two spreadsheets:
New products only.
Changes to existing products only.
1
Go to
2
3
Click Add Import
.
Use the Add Import dialog box to create and save the following two settings:
> Data Management > Import Settings.
280
Copyright 2005-2015, Miva Inc. All Rights Reserved.
Publication Date: 02/28/2015
User Reference Guide DRAFT
4
After you create and save them both, you'll see them in the Import Settings tab:
Both of the se will download the same Product template. But when you import your
data, the import options will be different, depending on the one that you select.
281
Copyright 2005-2015, Miva Inc. All Rights Reserved.
Publication Date: 02/28/2015
User Reference Guide DRAFT
Data Management > Database Tools Tab
Data Management > Database Tools Tab > Delete Shopping Baskets
Just like in a brick–and–mortar store, items that are in shopping baskets are removed from your
inventory. It's fairly common, however, for customers to add products to their baskets but never
complete the purchase. For example: a customer visits your store, adds products to their basket, then
changes their minds and closes their browser. The products in that basket can't be purchased by anyone
else. If enough products accumulate in abandoned baskets it can appear that your store has run out of
those items.
You can prevent this from happening by:
Setting the
> Store Settings > Edit Store > Store Details tab > Settings section > Basket
Timeout (Minutes) field.
The Basket Timeout sets an "idle time". When a customer hasn't purchased or changed the contents
of their basket for that time, the basket is automatically expired. The items in their basket are still
removed from your inventory, but an expired basket can't be used by a customer and is ready to be
deleted.
Deleting the shopping baskets. When you delete expired shopping baskets, the items in those baskets
go back to your inventory and are available to be purchased by other customers.
But see also
> Utilities > Add/Remove Modules tab > Available Modules section > Basket
Inventory. Miva Merchant can report how many items are currently in baskets.
To Delete Expired Shopping Baskets
1
2
3
Go to
> Data Management > Database Tools Tab.
Click Delete Shopping Baskets.
In the Delete Shopping Baskets screen, select:
Perform Module Cleanup Tasks: Some third party modules install and use their own tables in
your store's database. If a third party module has been configured with some kind of table
cleanup code, and you check this box and click the Delete button, it will cause the table cleanup
code in that module to run.
4
Expired Shopping Baskets Only or All Shopping Baskets. In general you should only delete
expired shopping baskets. An exception might be when you are certain the baskets aren't being
used. For example, if your store is off- line, you might want to delete all baskets.
Click the Delete button.
282
Copyright 2005-2015, Miva Inc. All Rights Reserved.
Publication Date: 02/28/2015
User Reference Guide DRAFT
Data Management > Database Tools Tab > Pack Data Files
Clicking this link, or clicking the Launchpad button "Pack Data", automatically starts a script which
optimizes the database tables and improves performance. In general it should be done once a week, but
if you have a very active store, you may want to click on this link more often. If you encounter any kind
of server or database error while packing data files, please contact support.
Store Settings
Store Settings > Store Details
Store Settings > Store Details > Identification Section
Manager
Miva Merchant has three types of admin users: Administrators,
Managers, and ordinary users. Please note that these users exist in the
admin interface and are not related to customer accounts in your on-line
store.
Administrators have access to all admin features in all stores.
Managers have access to all admin features in the store where they
are the manager.
"Ordinary" users have privileges that you can limit by creating a
Group and then assigning the user to that group.
Store Code
The store code uniquely identifies a store in the database. It will also
show up in the URL bar as a parameter when customers visit your online store (&Store_Code=<whatever you entered>).
Store Name
The store name appears in the Miva Merchant administration interface
to indicate which store you are currently editing. If you have more than
one store, your customers can also see the store name in the store
selection screen.
To Assign a Manager to the New Store
You can only assign an existing user to be a manager. If you have already created a user that you want to
assign as the manager, you can enter the user name in the Manager field, or you can click the Look Up
button. Note that if you assign an administrator as the store manager, that p erson will still have access to
all of your stores.
283
Copyright 2005-2015, Miva Inc. All Rights Reserved.
Publication Date: 02/28/2015
User Reference Guide DRAFT
If you haven't already created your manager account, and you only want this person to have admin rights
in one store:
1 Go to
> Users > Users tab.
2
Create a new user. Make sure that you do not check the "Administrator" checkbox in the Add User
screen.
Leave unchecked
3
Go back to
> Store Settings > Store Details > Identification section and enter the user name
that you just created.
Store Settings > Store Details > Owner Section
This tab contains contact information that Miva Merchant uses for the store manager, as default shipping
information, and as registration information for certain payment options. Some of the fields in this tab
are turned into tokens that are used throughout the admin interface. The fields in this tab are
prepopulated with whatever was entered when the initial store setup is done.
Store Settings > Store Details > Settings Section
Weight Unit Display Suffix
Enter the label to use throughout the store where weight is displayed.
The default is pounds. This is only a label for the convenience of your
customers. You can use any term you like such as ounces, kilos, or
tons. You could also describe your products in some non-weight units
such as cartons, bags, or pallets.
Weight Units
Enter the type of weight units that you would like to use in your store
for calculation and for submission to shipping carriers. You can only
use one unit of measurement throughout the store. All your product
weights will be measured by the same term.
284
Copyright 2005-2015, Miva Inc. All Rights Reserved.
Publication Date: 02/28/2015
User Reference Guide DRAFT
Dimension Units
Enter the type of dimension units that you would like to use in your
store for calculation and for submission to shipping carriers. You can
only use one unit of measurement throughout the store. All your
product dimensions will be measured by the same term.
Basket Timeout (Minutes)
Defines the time a shopper's basket can be left without any action (store
browsing, additions, removals, changes of quantity) before it expires.
The default is 60 minutes. In builds before PR8 update 4, the max
Basket Timeout was 1440 minutes (24 hours). In builds after PR8
update 4, there is no limit on the length of the timeout.
Just like in a brick–and–mortar store, items that are in shopping baskets
are removed from your inventory. Sometimes customers may leave
their baskets without checking out. If enough products accumulate in
abandoned baskets, it can appear that your store has run out of them.
When the basket expires, you can return the items to inventory by
deleting the basket (see To Delete Expired Shopping Baskets).
To determine the right time limit for your store, consider the impact on
your inventory levels of having items left in abandoned baskets and the
potential for your customers to be interrupted (by a phone call, for
instance). You want to avoid appearing to be out of items that are
simply tied up in forgotten baskets and avoid frustrating shoppers by
deleting their baskets while they are still browsing in your store.
Expired baskets should be deleted regularly. Note that order numbers
are never reused, even from expired baskets.
Legacy Price Group Overlap
Resolution
When you offer special discounts to certain groups of customers using
price groups, and a customer belongs to more than one price group,
there can be a conflict between prices. Specify whether you want the
customer to be offered the highest of the two prices or the lowest.
Store User Interface
Static field that shows which css user interface you are using. In most
cases, this will be CSSUI.
Sales Tax Calculation
Specify the sales tax method to use in the store.
Please use this feature with caution. Typically, you will make a
selection when initially setting up your store and then never change it.
If you select a different way of calculating sales taxes later, any
changes you have made, including customized tax rates, or tax settings
that vary by product, will be lost.
The standard options are:
Canadian VAT
The Canadian Value Added Tax module enables you to configure the
Canadian VAT module to calculate Goods and Services Tax (GST) and
285
Copyright 2005-2015, Miva Inc. All Rights Reserved.
Publication Date: 02/28/2015
User Reference Guide DRAFT
Harmonized Sales Tax (HST) on shipments from a Canadian store to a
Canadian Customer.
Note: the Canadian VAT module does not calculate Provincial Sales
Tax (PST).
European VAT
The European Value Added Tax module lets you specify the ship-to
countries where VAT should be charged, to specify one or more VAT
rates, and to assign rates to each product in your store.
Shopper Selected Sales Tax
The Shopper Selected Sales Tax module lets you configure sales tax
options that shoppers can select from a drop-down list during the
checkout process.
State Based Sales Tax
State Based Sales Tax enables you to assign tax rates for one or more
states. If an order is being shipped to one of these states then the
assigned rate will be applied to the order, otherwise no tax will be
charged.
Generic VAT
The Generic Value Added Tax (VAT) module gives you the ability to
configure tax rates on a per-product basis. You can add a tax rate to as
many products as you wish. You can also specify tax rates at any time
from the product screen.
Third-party modules supporting other tax methods may be available. If
one of these is installed in your store, that option will be available along
with those above.
After you have selected a tax module, that module name will appear as
a link in the top section of the Edit Store screen.
Currency Formatting
Select the appropriate currency formatting option from the drop-down
list. The choices are European, generic, and U.S. currency formatting.
European Currency Formatting
Select this option to use one country's currency, and also to display the
converted value in Euros.
When you select this option, a new tab, European Currency Formatting,
286
Copyright 2005-2015, Miva Inc. All Rights Reserved.
Publication Date: 02/28/2015
User Reference Guide DRAFT
is added at the top section of the Edit Store screen. Click that link, and
configure the following settings there:
Currency Symbol
Enter the symbol or abbreviation to use for the country's currency. For
instance: DEM, FRF, Before Amount, or After Amount.
Specify where the currency symbol should be located, relative to the
value.
Thousands Separator
Enter the symbol that will appear between groups of digits in large
numbers. For instance, the digit grouping symbol here is a comma:
$2,646,200.00
Decimal Symbol
Enter a symbol to go between the whole and decimal parts of the
currency value. For example: 178.00
Conversion Rate to Euros
Enter a multiplier to convert the currency to Euros. Remember to
update this conversion rate regularly, so your pricing will remain
accurate as currencies fluctuate.
Before Amount, or After Amount
Specify where the currency symbol should be located, relative to the
value in Euros.
Primary Currency
Either the country's currency, or Euros, will be displayed in the store as
the primary unit of currency, with the other being secondary. Select
which to use at the primary currency in your store.
Enclose the Secondary Currency with
Select or specify the symbols to surround the value of the secondary
currency.
Generic Currency Formatting
Use this option to customize all aspects of displaying your currency.
When you select this option, a new tab, Generic Currency Formatting,
is added at the top section of the Edit Store screen. Click that link, and
287
Copyright 2005-2015, Miva Inc. All Rights Reserved.
Publication Date: 02/28/2015
User Reference Guide DRAFT
configure the following settings there:
Currency Symbol
Select the list option, and choose one of the symbols from the list, or
select Other, and specify any symbol.
Positive Currency Format
Specify where the currency symbol should be located, relative to the
value. The position of the currency symbol, indicated in the listed
choices by a square placeholder symbol, can go before or after the
number, with or without a space between the symbol and the number.
Negative Currency Format
Specify the appearance of negative currency values. The position of the
currency symbol is represented by a square placeholder symbol.
Formats are similar to those for positive values, but with the addition of
parentheses and/or a negative symbol.
Digit Grouping Symbol
Enter the symbol that will appear between groups of digits in large
numbers. For instance, the digit grouping symbol here is a comma:
$4,356,500.00
Number of Digits in Group
Select the number of digits to go between each grouping symbol. In the
example above there are 3 digits between each comma.
Decimal Symbol
Enter a symbol to go between the whole and decimal parts of the
currency value. A period is used in this example: $99.95
Number of Digits after Decimal
Select the number of digits to be displayed after the decimal symbol. In
both of the above examples, the number of digits after the decimal is 2.
US Currency Formatting
Formats the currency as standard US currency with a dollar sign,
commas at thousands, and two decimal places for cents. No currency
link is displayed at the top of the form.
288
Copyright 2005-2015, Miva Inc. All Rights Reserved.
Publication Date: 02/28/2015
User Reference Guide DRAFT
Character Set
Set this to match the character set that you want to use in your store.
Require Tax
Select Require Tax to specify that tax must be calculated for all orders
placed in the store. The resulting amount can be zero but the calculation
must be performed.
Allow Modules Used by Store
Morph Items to be Uninstalled
(Not Recommended)
When you install a module, the module may add references to itself in
template code. You can also manually edit template code to reference
installed modules. When you uninstall a module, some modules can
remove both types of references: the references that were added when
the module was installed, and other references to the module that were
added manually.
If you enable this feature and then uninstall a module, you are giving
the module "permission" to automatically remove all references to itself
in template code. There are two problems with this:
Not all modules have the ability to perform this "automated
reference removal". All Miva Merchant modules can do this, and
some, but not all, third party modules can.
When the module deletes references that were added manually,
there may be unintended consequences for your page layout code.
For these reasons this feature is not enabled by default. If you remove a
module, it is recommended that you manually inspect any template
code that might have referenced that module and manually remove the
references.
Store Settings > Store Details > Maintenance Mode Section
Take your store off- line to perform maintenance.
To Take Your Store Offline
1
2
Click the Offline At radio button and enter a time when you want your store to go off- line. If a
customer has some items in their basket when your store goes off- line:
If the customer has submitted payment for the order before your store goes off- line, the order
will be processed.
If the customer has not submitted payment for the order before your store goes off- line, the order
will be cancelled and the customer's basket will be emptied.
Enter a time value in the "No New Customers" text box. For example, if you enter 30 minutes in this
text box, a "trigger" will go off 30 minutes before your store goes offline.
289
Copyright 2005-2015, Miva Inc. All Rights Reserved.
Publication Date: 02/28/2015
User Reference Guide DRAFT
3
4
Customers who had a session cookie before the trigger went off can still browse your store, add
products to their baskets and complete their orders.
Customers who visit your store after this trigger goes off cannot browse your store or add
products to their basket until your store goes back online.
If your store uses PR8 Update 4 or later, you can enter one or more IP addresses in the "Allowed IP
address(es)" field. Normally, once your store goes off- line, no one, including administrators, can
browse the store. If you enter your IP address in this field, when the store goes off- line you will still
be able to browse and access your on- line store for testing purposes.
Separate multiple IP addresses with commas. You can also use "/XX" to enter a range of IP
addresses using CIDR notation. See http://en.wikipedia.org/wiki/CIDR_notation.
Enter some text in the Warning Message text box. The Warning Message will be displayed at the top
of your store pages as soon as you click the Update button in the Store Details tab, and continues to
be displayed until your store goes off- line. For this reason, you may not want to set the "Offline At"
time to more than one hour in advance. For example, if it's currently 11:00 pm, and you set the
"Offline At" time to midnight tonight, the warning message will be displayed in your store from
11:00 pm to Midnight.
The store warning message.
5
Enter some text in the Maintenance Message text box. When your store goes offline, the Warning
Message is removed and the Maintenance Message is displayed. This message is displayed (and
your store remains off- line) until you manually go back to the Maintenance Mode screen and click
the Store Online radio button and then click Update.
290
Copyright 2005-2015, Miva Inc. All Rights Reserved.
Publication Date: 02/28/2015
User Reference Guide DRAFT
The store maintenance message.
6
7
The Available Tokens show the list of tokens that you can add to your Warning Message or
Maintenance Message.
Click the Update button to apply your changes.
To Bring Your Store Back Online
1
2
Go to
> Store Settings > Store Details tab > Maintenance Mode section.
In the Maintenance Mode section, click the Store Online radio button, then click Update.
Store Settings > Store Details > Order Minimums Section
It is sometimes not worthwhile to sell small quantities or items, or to process low-value orders. You can
set a minimum on orders in your store. If a shopper attempts to check out when their order has not met
the minimum, they will see a message that you've created.
You might want to mention your policy in your store, especially if the minimums are relatively high, so
shoppers can plan their purchases accordingly, rather than being surprised when they are ready to
checkout.
Specifying Required M inimums
Specify the Minimum Quantity and/or Minimum Price that will be accepted as an order. You can use
only one, either one, or both.
Minimum Quantity Only
If you specify only a Minimum Quantity of 3 items, then any order with 3 or more items will be
accepted.
291
Copyright 2005-2015, Miva Inc. All Rights Reserved.
Publication Date: 02/28/2015
User Reference Guide DRAFT
Minimum Price Only
If you specify only a Minimum Price of $5.00, then any order where the items total $5.00 or more,
before shipping and tax, will be accepted.
Minimum Quantity or Price
If you specify a Minimum Quantity of 3 items, and a Minimum Price of $5.00, but do not select Must
Meet Both Minimums, then any order with 3 or more items, or where the items total $5.00 or more,
before shipping and tax, will be accepted.
Minimum Quantity and Price
If you specify:
A Minimum Quantity of 3 items
A Minimum Price of $5,00
Must Meet Both Minimums
then any order having 3 or more items, where the items total $5,00 or more, before shipping and tax,
will be accepted. If the order total was $100,00, but only included 2 items, it would not be accepted.
Minimum Not Met Message
Enter a message here, either in plain text, or with HTML formatting, that explains your store policy on
order minimums, and advises the shopper on how to proceed. They will see the message when they click
Checkout. You may want to reassure them that they can return to shopping, and can continue to add
items to their existing basket.
Store Settings > Store Details > State Tax Options Section
Use this tab to automatically add sales tax to orders based on the customer's state. Please note that, by
default, Miva Merchant can only apply a sales tax rate to an entire state. If you need to apply sales tax in
a more sophisticated way, you can purchase a third party module.
To Add State Sales Tax to Orders
1
2
3
4
In the Tax Based On drop down list, you can choose to apply the sales tax for the customer's
shipping state or the customer's billing state. In many cases, the customer's shipping and billing state
will be the same.
Click the Add Rate button.
In the State drop down list, select a state, such as California.
Enter the sales tax you want to charge for that state.
292
Copyright 2005-2015, Miva Inc. All Rights Reserved.
Publication Date: 02/28/2015
User Reference Guide DRAFT
5
6
Check the Tax Shipping checkbox if you want sales tax to be calculated based on (Order Total +
Shipping Costs). If you only want to apply sales tax to the order total, leave the Tax Shipping
checkbox unchecked.
Click the Update button.
When a customer places an order from California, the sales tax you created for that state will
automatically be applied to the order and will appear in the Payment Informa tion screen and on the
invoice.
Store Settings > States
Use this screen to select the list of states that are available in your on- line store. The list of states affects
any screen in your store where you are displaying an address: account creation, checkout, etc. Note that,
unlike countries, there is no "master" list of states under
> Domain Settings > Countries tab that
affects all of your stores. The list of states that you present to customers must be configured on a storeby-store basis.
Store Settings > Countries
Use this screen to select the list of countries that are available in your on- line store. The list of countries
affects any screen in your store where you are displaying an address: account creation, checkout, etc.
There are two places where you can select the list of countries that are displayed in your on-line store.
Use:
> Domain Settings > Countries tab
To set the country list for all of your stores. You can add additional countries in this tab.
Use:
> Store Settings > Countries tab
To set the country list for the store you are currently editing. You cannot add countries in this tab.
Store Settings > Customer Fields
Use the Customer Fields tab to select the Ship To/Bill To fields that you want your customers to see and
fill out in your on- line store:
In the Account Registration screen (ACAD - Customer Create), if the customer is creating a new
account.
In the Order Details screen (OCST - Checkout Customer Information), if the customer does not have
an account and is going through Express Checkout.
293
Copyright 2005-2015, Miva Inc. All Rights Reserved.
Publication Date: 02/28/2015
User Reference Guide DRAFT
When the customer doesn't have an account, and enters their Ship To/Bill To information during
checkout (OCST, Checkout: Customer Information)
294
Copyright 2005-2015, Miva Inc. All Rights Reserved.
Publication Date: 02/28/2015
User Reference Guide DRAFT
To Change the Customer Field Settings
Billing Information Field list
1
Set the Primary Address to either Shipping or Billing.
For example, if you set the Primary Address to Shipping, several things happen:
Notice now that the Shipping Information field is grayed out and set to "Use Settings Below".
Use the field list to select which shipping fields you want to be hidden, required, or optional.
The Billing Information field can now be set to
Hidden: Customer will not see any Billing Information fields.
Optional: Customer will see every Billing Information field, but all of the fields will be
optional.
Use Settings Below: Whatever radio buttons you select in the Billing Information field list is
what the customer will see for both the Shipping and Billing fields.
If you set the Primary Address to Shipping and view your on-line store > Account
Registration/Order Details screen, you'll see that the Shipping Information fields are on the left side
of the screen. (See sample figure above.)
2
In the field list, set fields that you want to be hidden, required, or optional.
3
Click Update in the Customer Fields screen to save your changes.
295
Copyright 2005-2015, Miva Inc. All Rights Reserved.
Publication Date: 02/28/2015
User Reference Guide DRAFT
Store Settings > User Groups
Use groups to limit the access that your employees have to the Miva Merchant admin interface. The
Groups feature does not affect your customers or your on- line store. First you create a group and assign
functional areas of the admin interface to that group; then you assign users (usually your employees) to
the group. When an employee logs into the admin interface, they only have access to those features.
In most cases there is a simple correspondence between the Privileges listed in the Add Group screen
and a feature in the
button. For example, if you enable the "Attributes Templates" privilege in
the Add Group screen, users in that group will have access to the
> Catalog > Attributes
Templates tab. There are a few less obvious privileges that are listed in the table below.
Less Obvious Privilege Name
Gives Access To
Affiliate Money
> Marketing > Affiliate Payout tab. Note that you must
also give the user at least view rights to the Affiliates privilege.
Currency Settings
In the
> Store Settings > Store Details tab > Settings
section, there is a drop-down list called "Currency Formatting".
296
Copyright 2005-2015, Miva Inc. All Rights Reserved.
Publication Date: 02/28/2015
User Reference Guide DRAFT
Only an administrator or the store manager can change the currency
formatting selection. However:
If an admin changes the currency formatting to "European
Currency Formatting" a new tab will appear in
> Store
Settings called "European Currency Formatting".
If an admin changes the currency formatting to "Generic
Currency Formatting" a new tab will appear in
> Store
Settings called "Generic Currency Formatting".
You can give "ordinary users" (someone who is not an admin or a
store manager) access to these new tabs. For example:
1
2
3
A store administrator changes the
> Store Settings >
Store Details tab > Settings section > Currency Formatting field
to "European Currency Formatting".
Go to the
> Store Settings > User Groups tab. Create a
new group called "Currency Settings".
Give this new group at least View rights to the Store Settings
privilege.
3.1.
Give this new group at least View rights to the Currency
Settings privilege.
3.2.
In the Users tab, add your user and save your changes.
When your user logs in to the Miva Merchant admin, they will have
access to the
> Store Settings > European Currency
Formatting tab.
Order Processing
All of the following:
Order Processing > Orders tab
Order Processing > Shipments tab
-Utilities
Sales Tax Settings
Legacy Order Processing. Note that you can only get to the
Legacy Order Processing screen by entering the word "Legacy"
in the Store Search field. You can't navigate to Legacy Order
Processing from the
button.
Gives the user access to the Edit Store > State Based Sales Tax tab.
297
Copyright 2005-2015, Miva Inc. All Rights Reserved.
Publication Date: 02/28/2015
User Reference Guide DRAFT
Please note:
If you want the user to be able to edit the
> Store
Settings > State Based Sales Tax tab settings, you must also
give the user modify rights in the Store Settings privilege.
If you do not give the user permissions for the Sales Tax
Settings privilege, the State Sales Tax tab will not be visible to
them.
Store Encryption
Order Encryption
Store Utility Settings
Removes "Utilities" from the
Upsold Products
Gives the group member access to the
> Marketing >
Upsale tab, and to the
> Catalog > Edit Product > Upsold
Products tab. Please note that you must also give the group member
at least view rights to Product permissions.
.
To Create a Group
1
2
In the Group tab, click the Add Group button.
In the Add Group screen, enter a Group Name.
3
Select one or more privileges, and the permissions that you want to allow for that area, for example:
View existing Categories, Add Categories, Modify Categories, Delete Categories.
4
When you are done selecting privileges and permissions, click the Add button.
5
The Users tab will appear. Select the users that you want to add to this group. The same user can
belong to as many groups as you want. But note that there is no point to assigning users with
Administrator rights or users who are store managers to Gro ups. Users with Administrator rights can
access every admin feature in all of your stores. Users with Manager rights can access every admin
feature in the store that they manage. Assigning these users to a Group won't restrict their access.
298
Copyright 2005-2015, Miva Inc. All Rights Reserved.
Publication Date: 02/28/2015
User Reference Guide DRAFT
6
Click on the Imports tab. Click on the import data rights that you want to assign to the Group.
7
Your Group is set up and ready to use.
Store Settings > Encryption Keys
The main purpose of the Order Encryption screen is to use the Encryption Key Wizard.
You start the wizard by clicking on the Add Encryption Key button.
The Encryption Key Wizard is a utility that helps you stay compliant with the PCI-DSS standards for
storing payment information. Use the wizard to:
Enable encryption in your store. When you enable encryption, the payment information on new
orders will be encrypted.
Encrypt payment information on existing orders (migrate).
Delete payment information from existing orde rs (archive).
Replace your old encryption keys with new ones. The PCI-DSS standards require you to create
new encryption keys every 365 days.
For complete information on using the Encryption Key Wizard, please see Appendix 1: Best Practices
for Managing Credit Card Data.
Store Settings > State Based Sales Tax
Use this tab to automatically add sales tax to orders based on the customer's state. Please note that, by
default, Miva Merchant can only apply a sales tax rate to an entire state. If you need to apply sales tax in
a more sophisticated way, you must purchase a third party module.
299
Copyright 2005-2015, Miva Inc. All Rights Reserved.
Publication Date: 02/28/2015
User Reference Guide DRAFT
To Add State Sales Tax to Orders
1
Click the Add State Tax Rate button
.
2
3
In the State drop down list, select a state, such as California.
Enter the sales tax rate you want to charge for that state.
4
Select Tax Shipping if you want sales tax to be calculated based on (Order Total + Shipping Costs).
If you only want to apply sales tax to the order total, leave Tax Shipping unassigned.
5
Click Save Record
.
When a customer places an order from California, the sales tax you created for that state will
automatically be applied to the order. The sales tax will appear in the Payment Information screen and
on the invoice.
Reports
Miva Merchant ships with five default reports:
Best Sellers
Recent Best Selling Products
Recent Sales
Recent Sales Geographic Breakdown
Statistics
300
Copyright 2005-2015, Miva Inc. All Rights Reserved.
Publication Date: 02/28/2015
User Reference Guide DRAFT
Click to di splay the report
on the admin interface
Home page.
The Best Sellers and Statistics reports were developed in earlier versions of Miva Merchant. These two
reports display only on your Miva Merchant home page and cannot be edited. The other three reports:
Recent Best Selling Products, Recent Sales, and Recent Sales Geographic Breakdown, can be edited, but
you cannot change the Reporting Module (essentially the report type). Of course, you can also create
new reports of any type.
To Run a Report
1
2
Go to
> Reports.
In the Reports tab, select a report (click once), then click Run Report.
301
Copyright 2005-2015, Miva Inc. All Rights Reserved.
Publication Date: 02/28/2015
User Reference Guide DRAFT
3
The report will open in a new window.
To Edit a Report
1
Go to
> Reports.
2
3
In the Reports tab, click Ne w Report.
The Add Report dialog box will appear.
The fields that show up in the Add Report dialog box will change depending on what you select in
the Report Module field. Fields marked in bold are required. By default, Miva Merchant comes with
four reporting modules:
Geographic Sales
Product Sales
Sales
Statistics Display
But more modules may appear if you have purchased third-party software.
302
Copyright 2005-2015, Miva Inc. All Rights Reserved.
Publication Date: 02/28/2015
User Reference Guide DRAFT
Geographic Sales Report
Fields used by the
Geographic Sales Report.
Required fields are in bold.
Description:
Enter a name to describe the new report.
Report Module:
Essentially the report type.
Date Range:
Time period covered by the report.
Group By:
Not used by this report type.
Category:
Enter a product category to limit the report to only products in that category.
Leave the field blank to include all categories in the report. To increase the
flexibility of your reports, you could create an inactive category, assign any
products to it that you wish (since a product can belong to multiple categories)
and then use that category for reporting purposes.
Product:
Enter a product to limit the report to only that product. Leave the field blank to
include all products in the report.
303
Copyright 2005-2015, Miva Inc. All Rights Reserved.
Publication Date: 02/28/2015
User Reference Guide DRAFT
Metric:
Select to have the report display gross revenue or units sold.
Address:
Choose to base the report on the customer billing address or shipping address.
Country:
Choose to have the report display data from all countries or from a single
country.
State:
Choose to have the report display data from all states or from a single state.
Group By:
Collate the report data by Country, State, City, or Zip Code. See below for an
example.
Display:
Item(s) on the main screen / Item(s) on the expanded chart.
This field works in conjunction with the Group By field. For example:
Recalculate After:
1
2
3
Set "Group By" to "State".
Set "Main Screen" to "5".
Set "Expanded Chart" to "10".
4
The pie chart on the home page will show the top 5 states where you've
received orders. If you click on the pie chart on the home page, you'll see
an expanded version of the pie chart which will show you the top 10 states
you've sold to.
Automatically refresh the report data if it is being displayed in your admin
home page.
304
Copyright 2005-2015, Miva Inc. All Rights Reserved.
Publication Date: 02/28/2015
User Reference Guide DRAFT
Product Sales Report
Description:
Enter a name to describe the new report.
Report Module:
Essentially the report type.
Date Range:
Time period covered by the report.
Group By:
Choose a group by increment of hour, day, week, month or year. You can then
scroll through the data in the report by that increment. See the Sales Report for
an example.
Compare Using:
Collate report data by gross revenue or units sold. See example below.
Customers In/Not In
Price Group:
Price groups enable you to offer special pricing to select customers. If you
have created a Price Group, you can choose to show report data for only those
customers in or not in that group.
Category:
Enter a product category to limit the report to only products in that category.
Leave the field blank to include all categories in the report. To increase the
flexibility of your reports, you could create an inactive category, assign any
products to it that you wish (since a product can belong to multiple categories)
and then use that category for reporting purposes.
305
Copyright 2005-2015, Miva Inc. All Rights Reserved.
Publication Date: 02/28/2015
User Reference Guide DRAFT
Display:
Products on the main screen: Number of products that are displayed on your
admin home page.
Products on the expanded chart: Number of products that are displayed
when you click on the name of the report (for example,
) in the Reports main screen.
Products in exported data: Number of products that will be in the
spreadsheet that you download by clicking on the CSV or XLS link in the
Reports main screen.
Recalculate After:
Automatically refresh the report data if it is being displayed in your admin
main page.
306
Copyright 2005-2015, Miva Inc. All Rights Reserved.
Publication Date: 02/28/2015
User Reference Guide DRAFT
Sales Report
Description:
Enter a name to describe the new report.
Report Module:
Essentially the report type.
Date Range:
Time period covered by the report.
Group By:
Choose a group by increment of hour, day, week, month or year. You can then
scroll through the data in the report by that increment. See below for a n
example.
Customers In/Not In
Price Group:
Price groups enable you to offer special pricing to select customers. If you
have created a Price Group, you can choose to show report data for only those
customers in or not in that group.
307
Copyright 2005-2015, Miva Inc. All Rights Reserved.
Publication Date: 02/28/2015
User Reference Guide DRAFT
Category:
Enter a product category to limit the report to only products in that category.
Leave the field blank to include all categories in the report. To increase the
flexibility of your reports, you could create an inactive category, assign any
products to it that you wish (since a product can belong to multiple categories)
and then use that category for reporting purposes.
Product:
Enter a product to limit the report to only that product. Leave the field blank to
include all products in the report.
Display:
Check the box next to the data that you want to see in the report.
Recalculate After:
Automatically refresh the report data if it is being displayed in your admin
main page.
308
Copyright 2005-2015, Miva Inc. All Rights Reserved.
Publication Date: 02/28/2015
User Reference Guide DRAFT
Statistics Display Report
Description:
Enter a string to describe the new report.
Report Module:
Essentially the report type.
Date Range:
Note used by this report.
Group By:
Not used in this report.
Display:
By default your admin site comes with both a Statistics report, and a Best
Sellers report. Both of these reports use the Statistics Display module, and
both reports only show up in the admin main page. Because these reports only
show up on the admin main page, you cannot have more than 1 Statistics and 1
Best Seller report at a time.
Recalculate After:
Automatically refresh the report data if it is being displayed in your admin
main page.
309
Copyright 2005-2015, Miva Inc. All Rights Reserved.
Publication Date: 02/28/2015
User Reference Guide DRAFT
The Statistics Display report in your admin main page.
To Delete a Report
1
Go to
2
In the Reports tab, double-click on the report that you want to delete. The Edit Report dialog box
will open.
Click the Delete button.
3
> Reports.
Shipping
Shipping > Shipping Method Rules Tab
This tab lists all of the shipping methods that you have enabled. You can click on a method to set
various options for that method.
310
Copyright 2005-2015, Miva Inc. All Rights Reserved.
Publication Date: 02/28/2015
User Reference Guide DRAFT
Module:
The shipping module that contains the current method.
Shipping
Method:
The name of the shipping method.
Priority:
Sets the order that the shipping methods will appear in the "Ship Via" drop-down list
in the Shipping/Payment Selection screen. (
> User Interface > Edit Page
OSEL). Initially, all of the shipping methods that you have enabled will show up in
311
Copyright 2005-2015, Miva Inc. All Rights Reserved.
Publication Date: 02/28/2015
User Reference Guide DRAFT
this screen with priority 0. You can use any integer as the priority, but shipping
methods with higher numbers will appear first in the drop-down list. Many
companies set the priority so that the shipping methods are listed from least
expensive to most expensive.
The priority that you
set for the shipping
methods
determines their order
in the "Ship Via" dropdown list in the
Shipping/Payment
Selection screen
(OS EL).
Display As:
Set the text that will appear in the "Ship Via" drop-down list in the Shipping/Payment
Selection screen for the shipping method (see figure above). If you leave this field
empty, the system will show the default shipping method name. For example, the
default Shipping Method name might "UPS Ground", but you could set the Displa y
As text to "Standard Shipping".
Rate
Adjustment
Allows you to adjust the shipping rate, after it is returned from the carrier's estimating
software, but before it is shown to your customer. For example, you could take the
quoted rate from the carrier and add to it to cover your packaging or handling costs.
You could adjust the carrier shipping quote down if you wanted to offer your
customers a discount on shipping. The customer won't see or know about any
adjustment that you make.
None: The customer will be shown the rate that came back from the carrier.
Fixed: Select Fixed and enter a dollar value in the next field. The rate that comes
back from the carrier will be increased or reduced by the amount that you enter.
For example, if you enter "1.00" in this field and the rate quote from the carrier
312
Copyright 2005-2015, Miva Inc. All Rights Reserved.
Publication Date: 02/28/2015
User Reference Guide DRAFT
was $5.00, the customer will see a shipping charge of $6.00 for this shipping
method. You can adjust the rate downward by entering a negative number in the
field "-1.00".
Percent: Select Percent and enter a percentage in the next field. The rate that
comes back from the carrier will be increased or reduced by the percent that you
enter.
For example, if you enter "5.00" in this field and the rate quote from the carrier
was $10.00, the customer will see a shipping charge of $10.50 for this shipping
method. You can adjust the rate downward by entering a negative percentage in
the field "-5.00".
Restrictions
The Shipping Method Rules dialog box has five types of "restrictions".
Restrict to Order Subtotal
Restrict to Item Quantity
Restrict to Total Weight
Geographic Restrictions
Restrict to Zip Codes
These restrictions let you control when a particular shipping method will appear or be
removed from the "Ship Via" drop-down list in the Shipping/Payment Selection
screen. For example, you could make sure that UPS Standard shipping only appears
as a choice in the Shipping/Payment Selection screen when the order total is $10.00
or less:
Or you could remove UPS Standard shipping for orders that weigh more tha n 500
pounds:
But see also Example: Creating a Free Shipping Option.
Exclusions:
The exclusions feature has two purposes:
UPS, as a business rule, does not allow their shipping methods and rates to be
displayed in the same screen with shipping methods from other carriers. This is a
UPS requirement that Miva Merchant must comply with. For example, if you
have both the UPS® Online Tools module and the USPS shipping module
enabled, when you edit the UPS shipping method "UPS Standard", you might see
an exclusions list like this:
313
Copyright 2005-2015, Miva Inc. All Rights Reserved.
Publication Date: 02/28/2015
User Reference Guide DRAFT
The grayed out boxes mean that UPS is not going to allow (in this example) rates
for UPS Standard service to be displayed in the same screen with shipping
methods from USPS. When the customer reaches the Shipping/Payment Selection
screen, they would see a "Ship Via" drop-down list that looks like this:
Notice that UPS Standard does not appear as a shipping option.
You can also use the exclusions drop-down list to deliberately remove a shipping
method based on the presence of another method. For example, if you want only
one type of UPS air method to be present at a time, you can set it to exclude other
UPS air methods.
Allow: Do not set any exclusions.
Excludes: if the current shipping method is available, do not allow the
specified shipping method to be offered. For example, if you are editing the
UPS Ground shipping method, and you set:
Then whenever UPS Ground is a valid shipping method, UPS Next Day Air
will not be offered as a shipping method.
Excluded By: If another selected shipping method is available, the current
shipping method will not be offered. For example, if you are editing the UPS
Ground shipping method, and you set:
Then whenever UPS Next Day Air is a valid shipping method, UPS Ground
would not be offered as a shipping method.
Example: Creating a Free Shipping Option
1
Make sure that you see a
> Shipping > Flat Rate Shipping tab. If you don't see this tab, go to
> Shipping > Add/Remove Modules, and install Flat Rate Shipping.
2
In the Flat Rate Shipping tab, click Add Method
Shipping", then click Save Shipping Method
.
. In the Shipping Method field, enter "Free
314
Copyright 2005-2015, Miva Inc. All Rights Reserved.
Publication Date: 02/28/2015
User Reference Guide DRAFT
3
Go to
> Shipping > Shipping Method Rules tab. The free shipping method that you created
now appears in this screen. Double-click on the Free Shipping method to open the Shipping Method
Rules dialog box and edit the options for free shipping.
Set the Priority for free shipping to be higher than any other shipping method. That will cause
the Free Shipping option to be displayed first in the "Ship Via" drop-down list in the
Shipping/Payment Selection screen.
Set "Restrict to Order Subtotal" to "50 - 0" and save your changes. When a customer's order total
is $50.00 or above, free shipping will appear as an option in the Shipping/Payment Selection
screen.
Shipping > Boxes Tab
Use this tab to let Miva Merchant know what size boxes you use. Click on the New Box button and
enter a description and box dimensions.
315
Copyright 2005-2015, Miva Inc. All Rights Reserved.
Publication Date: 02/28/2015
User Reference Guide DRAFT
If you selected Pack by Quantity in the
> Shipping > Settings tab > Packaging Rules section,
you will be prompted to enter the max number of items that the box can hold.
If you selected Pack by Weight in the
> Shipping > Settings tab > Packaging Rules section,
you will be prompted to enter the max weight that the box can hold.
Checking the Enabled box makes your box available to the system. If you uncheck this box, your
box settings can be saved, but the box won't be used by Miva Merchant when a customer places an
order.
If you chose "Pack by Quantity"
in the Packaging Rules tab, you
are prompted to enter the max
number of items that can fit in
the box.
If you chose "Pack by Weight" in
the Packaging Rules tab, you are
prompted to enter the max
weight that the box can hold.
You can lose some of your box settings by initially setting "Box Packing" to
"Pack by Quantity" and then later changing the setting to "Pack by Weight"
(or the reverse). For example:
1 In the
> Shipping > Settings tab > Packaging Rules section, set
"Box Packing" to "Pack by Quantity" and click the Update button.
2 Select the Boxes tab and click Ne w Box.
3
In the Add Box dialog box, create a new box. Along with the other fields,
you will be prompted to enter the max number of items that can fit in the
box. Save your changes.
4
Go back to the Packaging Rules section and change "Box Packing" to
"Pack by Weight" and click the Update button. You will see a warning
316
Copyright 2005-2015, Miva Inc. All Rights Reserved.
Publication Date: 02/28/2015
User Reference Guide DRAFT
message:
5
Click Ok and go back to the Boxes tab. The box that you created is still
there, but if you edit the box, the "Max. # of Items" field has now changed
to "Max. Weight" and the value that you entered for max items is
permanently deleted.
Shipping > Settings Tab
Shipping > Settings Tab > Shipping Rules Section
If shipping rates can't be retrieved from a carrier (for whatever reason), the Shipping Rules:
Prevent some shipping errors from occurring, and
Allow you to continue to taking orders
When no Shipping
Methods are
Available:
Use Fallback Shipping Method: In Miva Merchant builds before PR8 update
4, certain shipping conditions could generate an error. For example, if
shipping for an item was required, and no shipping options had been
configured or were available for the order, the customer would see a system
error during checkout.
317
Copyright 2005-2015, Miva Inc. All Rights Reserved.
Publication Date: 02/28/2015
User Reference Guide DRAFT
There are several reason why shipping for an order cannot be calculated :
Carrier servers are unavailable.
No shipping modules or methods have been enabled.
Some shipping methods have been enabled, but none are valid for the
current order.
Starting with PR8 update 4, if there is any reason that shipping cannot be
calculated, you can still take the order without causing a system generated
error.
Select the Use Fallback Shipping Method radio button.
Enter some text in the "Fallback Shipping Method Description" text box.
For example, if you can't calculate a shipping rate, you could enter
"Standard Shipping" in this field. If shipping cannot be calculated, your
text will appear in the "Shipping Selections" screen.
1
2
3
1: The text that you entered in the
"Fallback Shipping Method Description" field.
2: The price that you entered in the
"Fallback Shipping Method Price" field.
3: The default error message.
If you are able to estimate what the shipping charges should be, e nter a
value in the "Fallback Shipping Method Price" field. If you have no way
of determining the shipping charges, it's better to leave "Fallback Shipping
Method Price" blank. You can enter a fixed price for shipping, or you can
have shipping calculated as a percentage of the order subtotal.
You can modify the error message that appears in the Shipping Selections
screen (above). The message is in:
> User Interface > Edit Page OSEL (Checkout: Shipping/Payment
318
Copyright 2005-2015, Miva Inc. All Rights Reserved.
Publication Date: 02/28/2015
User Reference Guide DRAFT
Selection) > Page tab > Details Section > Template field.
You can easily review the orders for which shipping charges could not be
calculated. By default, a Miva Merchant administrator receives an email
about each order. You can search your order emails for the text that you
entered in the "Fallback Shipping Method Description" text box, and then
contact the customer to find the shipping method that they prefer.
Display Error Message and Redirect Shopper to Page:
If you choose this option and shipping cannot be calculated, the customer will
be automatically redirected to the page that you select in the drop-down list.
You can even create a custom page and re-direct the customer to it. (If you
create a custom page to handle this situation, it will show up in this dropdown list.) An error message will appear on the page that you selected. This
error message cannot be modified.
Skip
Shipping/Payment
Selection for Free
Orders:
If you check this box, all orders where the order total is $0.00 will receive free
shipping. This field cannot be over-ridden at the product level. In Miva Merchant
builds before PR8 update 4, this feature was handled through the Edit Store >
Settings tab > Require Shipping for Free Orders checkbox.
Fallback Shipping
Method
Description:
If shipping cannot be calculated, this is the text that will appear in the "Ship Via"
drop-down list of the Shipping Selections screen. See Use Fallback Shipping
Method.
Fallback Shipping
Method Price:
If shipping cannot be calculated, this is the price that will appear in the "Ship
Via" drop-down list of the Shipping Selections screen. See Use Fallback
Shipping Method.
Shipping > Settings Tab > Handling Charge Section
Use this section to control when handling charges are applied to orders. Note that these settings are
global to all products in your store and cannot be over-ridden at the product level.
Apply Handling
Charge:
Never: No order in your store will ever have a handling charge.
Always: Handling charges will be applied to every order.
When Orde r Subtotal Within Range: Apply a handling charge when the order
319
Copyright 2005-2015, Miva Inc. All Rights Reserved.
Publication Date: 02/28/2015
User Reference Guide DRAFT
subtotal is within a certain dollar range. After you select this option, enter dollar
values in the "Range (Inclusive)" field. For example, if you want handling
charges applied to orders under $25.00:
When Quantity of Ite ms in Order Within Range : Apply handling charges to
orders that contain a certain number of items. After you select this option, enter a
range of items in the "Range (Inclusive)" field. For example, if you want handling
charges applied to orders that contain more than 10 items:
When Shipping Weight of Order Within Range: Apply handling charges when
the total weight of an order falls in a certain range. After you select this option,
enter a weight range in the "Range (Inclusive)" field. The weight unit will be
whatever you have set in Edit Store > Settings tab > Weight Units. For example,
if you have your weight units set to "pounds" and you enter a range of "0 - 10",
the system understands that as "0 - 10 pounds".
Range
(Inclusive):
See Apply Handling Charge.
Handling
Charge
Amount:
Use Apply Handling Charge to decide when handling charges will apply. Use the
"Handling Charge Amount" field to determine how much the handling charge will be.
You can enter a handling charge as a fixed amount, percent of shipping amount, or
percent of order total.
Display:
Include in Shipping Rate : Any handling charge that is applied is automatically
added to the shipping rate. The customer is not notified that a handling charge has
been added.
Separate Line Ite m: Any handling charge that is applied appears as a separate
line item in the Payment Information screen.
320
Copyright 2005-2015, Miva Inc. All Rights Reserved.
Publication Date: 02/28/2015
User Reference Guide DRAFT
Include handling in the shipping rate
Show handing as a separate line item
Please note that, regardless of what option you choose for Display,
if you are using Google Wallet (formerly Google Checkout), or
Checkout by Amazon, the handling charge will always be included
in the shipping amount.
Separate Line
Item
Description:
The text that will appear if you are applying a handling charge and you have
"Display" set to "Separate Line Item". In the sample screen capture above, the
"Separate Line Item Description" text was set to "Handling".
Separate Line
Item is Tax
Exempt:
Miva Merchant allows you to control how state sales tax is applied to orders:
No state sales tax.
Sales tax just on order.
Sales tax on order and shipping:
Go to the
> Store Settings > State Based Sales Tax tab. In this screen you can
control what states sales taxes should apply, and whether the state sales tax should
only be applied to the order, or to the order and to shipping.
If you want state sales tax to be applied to the handling charge, you can do one of two
things:
Tax shipping and handling togethe r:
1
Go to the
> Store Settings > State Based Sales Tax tab. Make sure that
you have states that apply sales tax and that "Tax Shipping" is selected.
321
Copyright 2005-2015, Miva Inc. All Rights Reserved.
Publication Date: 02/28/2015
User Reference Guide DRAFT
2
Go back to the
> Shipping > Settings tab > Handling Charge section.
3
Set "Display" to "Include in Shipping Rate". The handling charge is now included
with the shipping charge, and the total shipping charge will be taxed.
Tax handling separately:
1
Go to the
2
3
4
Make sure that you have states that apply sales tax. You may or may not want to
tax shipping.
Go back to the
> Shipping > Settings tab > Handling Charge section.
Set "Display" to "Separate Line Item".
5
Make sure that "Separate Line Item is Tax Exempt" is unchecked.
6
The handling charge now appears as a separate line item and will be subject to
state sales tax.
> Store Settings > State Based Sales Tax tab.
If you do not want state sales tax to be applied to the handling charge, you can do one
of two things:
Combine shipping and handling, but do not tax either:
1
2
Go to the
> Store Settings > State Based Sales Tax tab.
You can make sure that no states are applying sales tax, or you can apply sales
tax, but make sure that "Tax Shipping" is not selected.
3
4
Go back to the
> Shipping > Settings tab > Handling Charge section.
Set "Display" to "Include in Shipping Rate".
5
The handling charge is now included with the shipping charge, but state sales tax
won't be applied to either one.
Separate shipping and handling. Do not tax handling:
1
Go to the
2
Make sure that you have states that apply sales tax. You may or may not want to
tax shipping.
3
4
Go back to the
> Shipping > Settings tab > Handling Charge section.
Set "Display" to "Separate Line Item".
5
Make sure that "Separate Line Item is Tax Exempt" is checked.
6
The handling charge now appears as a separate line item and will not be subject
to state sales tax.
> Store Settings > State Based Sales Tax tab.
322
Copyright 2005-2015, Miva Inc. All Rights Reserved.
Publication Date: 02/28/2015
User Reference Guide DRAFT
Shipping > Settings Tab > Packaging Rules Section
The Packaging Rules tab tries to predict how many boxes you will need for a given order, so that you
can estimate the shipping charges. It's mainly useful for companies that sell a lot of products that are the
same size or the same weight. For example, if you only sell DVDs, you might know that you can put ten
DVDs in your smallest box. You could set "Box Packing" to "Pack by Quantity", and in the Box tab
create a box that holds ten DVDs. When your customer places an order, Miva Merchant software figures
out how many boxes are needed for the order, along with the total weight, and total cubic inches of
boxes in the order. If you are using the UPS® Online Tools Module, this information is submitted to the
carrier and affects the rate quote for the order.
Although the settings in this tab create global defaults for your entire store, the settings can be overridden at the product level:
> Catalog > Products tab > Edit Product > Product tab > Shipping
Rules section.
Box Packing:
Always Use the Fallback Package Dimensions : This option assumes that every
order you ship will fit into one box of the same size. The box size and the weight
of the order are sent to the carrier to get real time rate information. This is the
least accurate method of getting real time rate information because it is unlikely
that all of your orders will fit in one box of the same size.
If you select this option you should enter the size of the box that you are always
going to use (or the size of the box that you are going to use to estimate shipping
charges) in the "Fallback Package Dimensions" fields.
Pack by Quantity: most commonly used by companies that sell a lot of products
that are the same size. For example, if you sell mostly DVDs, you could create a
set of boxes that will hold 1-5 DVDs, 6-10 DVDs, etc. When your customer
323
Copyright 2005-2015, Miva Inc. All Rights Reserved.
Publication Date: 02/28/2015
User Reference Guide DRAFT
places an order, the system will select the least number of boxes and the smallest
size boxes automatically.
If you select "Pack by Quantity", when you create boxes you will set the max
number of items that can fit in each box. However, it's still a good idea to enter
values in the Fallback Package Dimensions fields. If you forget to create boxes,
or if you set the max items in your boxes to zero, having Fallback Package
Dimensions guarantees that the system will always have a backup box size.
Pack by Weight: If you select this option, you create boxes (below) that will
hold a certain max weight. When your customer places an order, the system will
select the least number of boxes and the smallest size boxes automatically.
If you select "Pack by Weight" it's still a good idea to enter values in the Fallback
Package Dimensions fields. If you forget to create boxes, or if you set the max
weight in your boxes to zero, having Fallback Package Dimensions guarantees
that the system will always have a backup box size.
Fallback
Package
Dimensions:
It's a good idea to always enter values in the "Fallback Package Dimensions" fields.
Even if you are using Pack by Quantity or Pack by Weight, an error condition can
occur if you forget to create boxes or if you accidentally set the max quantity/max
weight in the boxes to zero. By entering values in these fields you guarantee that a
box dimension is always available to the system.
Inventory Variant Handling
The settings in this section give you some control over how Miva Merchant calculates the weight of a kit
with parts, or the weight of a master product that has Variants. This can be particularly important when
the weight of the master product doesn't match the weight of the parts or variants. For example:
The weight of a kit master product might be set to 20 pounds, but all of the parts in the kit add up to
30 pounds.
The weight of a t-shirt master product might be set to 2 pounds, but a variant of the shirt (say, size
small, color blue) was set to 1 pound.
Pack master product (Uses variant weight)
Select this option to always use the master product weight. Always ignore the part/attribute weight.
Example : If you have a master t-shirt product that weighs 2 pounds regardless of the size or co lor that
the customer orders, select this option.
Pack variant parts using part weights as-is (Ignores variant weight)
Select this option to always use the part/attribute weight. Always ignore the weight of the master
product:
324
Copyright 2005-2015, Miva Inc. All Rights Reserved.
Publication Date: 02/28/2015
User Reference Guide DRAFT
Kit: The weight is calculated as the weight of all of the parts in the kit. If the kit has three parts, and
each part weighs 5 pounds, the weight of the kit is calculated as 15 pounds. It doesn't matter what the
weight of the kit master product was set to.
Master product with variants : if you had a master t-shirt product with variants, you would set the
weight of each variant. The weight of the master product is ignored. The product weight depends on
which variant the customer orders. For example:
Pack variant parts and adjust part weights to equal variant weight by spreading weight evenly across
all parts
This option adjusts the weight of the parts or variants if they don't match the weight of the master part.
Let's say there was a data entry error that caused the following situation.
You have a kit where the kit master product weight is set to 50 pounds.
The kit has two parts. One part weighs 99 pounds. The other part weighs 1 pound. The parts in the
kit weigh a total of 100 pounds, but the master product weight is only 50 pounds.
The Miva Merchant software knows that the parts weigh 50 pounds more than the master product. That
is the discrepancy weight: (weight of all parts) - (weight of master product).
The software will adjust the weight of each part using this formula:
Adjusted part weight = Original weight of part - (Discrepancy weight / number of parts)
Part #1: Adjusted part weight = 99 pounds - (50 pounds / 2 ) = 74 pounds.
Part #2: Adjusted part weight = 1 pound - (50 pounds / 2 ) = -24 pounds.
Notes:
From the above example, you can see that using this option can result in a part weight being adjusted
down to a "negative weight". When this weight is sent to a carrier for a rate quote, the carrier will
send back an error. However, the part weight can also be adjusted up (if the master product weight
was lower than the part weights). If a part weight is adjusted up over 150 pounds, that can also cause
the carrier to return an error.
325
Copyright 2005-2015, Miva Inc. All Rights Reserved.
Publication Date: 02/28/2015
User Reference Guide DRAFT
This is the default setting if you’ve updated your store from PR8 Update 8 or older.
If you want to duplicate the way that older versions of Miva Merchant behaved, select this option
and check all 3 checkboxes at the bottom of the Packaging Rules screen.
Figure 6: These settings will duplicate the way versions before PR8 Update 8 behaved.
Pack variant parts and adjust part weights to equal variant weight by spreading weight proportionally
across all parts
Like the option above, this option also adjusts the weight of parts or variants if they don't match the
weight of the master part, but it uses a different formula. Let's use the same example as above:
You have a kit where the kit master product weight is set to 50 pounds.
The kit has two parts. One part weighs 99 pounds. The other part weighs 1 pound. The parts in the
kit weigh a total of 100 pounds, but the master product weight is only 50 pounds.
Adjusted part weight =
Original part weight - [(Discrepancy weight) x (Part weight as a percent of total weight)]
Part #1:
Original part weight = 99 pounds
Discrepancy weight =
(weight of all parts in the kit: 100 pounds - weight of master part: 50 pounds) = 50 pounds
Part weight as a percent of total weight: The combined weight of all parts in this kit is 99 + 1 =
100 pounds. Part1 weighs 99 pounds, so Part1 is 99% of the total weight.
Adjusted weight of Part1 = 99 pounds - [(50 pounds) x (.99)] = 99 - 49.5 = 49.5 pounds.
Part #2:
Original part weight = 1 pound
Discrepancy weight =
(weight of all parts in the kit: 100 pounds - weight of master part: 50 pounds) = 50 pounds
Part weight as a percent of total weight: The combined weight of all parts in this kit is 99 + 1 =
100 pounds. Part2 weighs 1 pound, so Part2 is 1% of the total weight.
326
Copyright 2005-2015, Miva Inc. All Rights Reserved.
Publication Date: 02/28/2015
User Reference Guide DRAFT
Adjusted weight of Part2 = 1 pound - [(50 pounds) x (.01)] = 1 - .5 = .5 pounds.
The Inventory Variant Handling Checkboxes
These checkboxe s are only
used if you select the third or
fourth radio buttons:
Allow adjustments up:
If the kit master part weight is heavier than the sum of the part weights, the weight of the parts is
adjusted up.
If the kit master part is lighter than the sum of the part weights, the system assumes that the part
weight total is correct and uses that weight to get a shipping quote.
Allow adjustments down:
If the kit master part weight is heavier than the sum of the part weights, the system assumes that
the part weight total is correct and uses that weight to get a shipping quote
If the kit master part weight is lighter than the parts, the software will adjust the part weights
down.
Allow negative adjusted weights : We don't recommend that you select this checkbox because it's
possible that you can end up with a negative part weight. This option is only included for backward
compatibility with previous releases of Miva Merchant.
If you check this box, you will allow the system to send a negative part weight to a carrier.
Unless you have a specific reason for wanting to allow negative weights to be sent to the carrier
for a shipping quote, you should leave this option unchecked.
If you leave this box unchecked, negative part weights will be adjusted up to 0.
Shipping > Settings Tab > Price Table Based Shipping Options Section
See Priced Based Table Shipping.
327
Copyright 2005-2015, Miva Inc. All Rights Reserved.
Publication Date: 02/28/2015
User Reference Guide DRAFT
Shipping > Pack by Weight Tab / Pack by Quantity Tab
The Shipping > Pack by Weight tab will show up if you choose "Pack by Weight" in:
> Shipping > Settings tab > Packaging Rules section > Box Packing list box.
The Shipping > Pack by Quantity tab will show up if you choose "Pack by Quantity" in:
> Shipping > Settings tab > Packaging Rules section > Box Packing list box.
You can only have one of these tabs active at a time. They both contain one option:
Exclude Boxes Smaller
than Product Dimensions:
The packaging rules allow the software to make its best guess about the
box size(s) needed for an order. This checkbox is a final test to make sure
that the estimated box is always larger than the largest product that will
ship in that box.
Shipping > Base + Weight Shipping Tab
Use Base + Weight Shipping to generate simple shipping charges based on the weight of the order.
See also:
> Store Settings > Store Details tab > Settings section > Weight Units drop-down list, to set
the unit of weight used in your store.
To Enable Base + Weight Shipping
1
2
Go to
> Shipping > Add / Remove Modules.
In the Available Modules section, click on the Install button under Base + Weight Shipping.
To Configure Base + Weight Shipping
1
2
In the Base + Weight Shipping tab, click on Add Method
.
1.1.
Enter a name for the shipping method. This name will appear in your on- line store.
1.2.
Enter a Base Charge. The base charge is like a flat rate that you are always going to charge
for this type of shipping. The base charge is added to the calculated weight charge.
1.3.
Enter an Amount/Weight Unit. This is the price that you want to charge pe r weight unit
(usually pounds or kilograms) of the order. You can set the weight unit in the
> Store
Settings > Store Details tab > Settings section > Weight Units drop-down list.
Click Save Method
.
328
Copyright 2005-2015, Miva Inc. All Rights Reserved.
Publication Date: 02/28/2015
User Reference Guide DRAFT
In our example we created two shipping methods: Economy and Overnight. Let's say our customer
selects Economy shipping, which has a base charge of $5.00 and a shipping charge of $1.00 per pound.
If our customer buys a bag of oranges that weighs 12 pounds, the shipping charge is:
Base Charge:
$5.00
Amount/Weight Unit x
Weight of Order:
($1.00 per pound x 12 pounds) $12.00
Shipping:
$17.00
329
Copyright 2005-2015, Miva Inc. All Rights Reserved.
Publication Date: 02/28/2015
User Reference Guide DRAFT
Shipping > Canada Post Tab
Use the Canada Post shipping module to ship products:
From Canada to locations inside Canada.
From Canada to any location in the world.
When you use this module, the address that you ship from must be inside Canada.
You can use this module to get shipping rates and to print labels with postage.
Canada Post has two API's: Sell On- line and a SOAP API. Miva Merchant communicates with
Canada Post using the SOAP API.
Unlike some of the other shipping modules, the Canada Post module does not have any settings at
the product level.
Your Canada Post Account and Credentials
1
Before you can use the Canada Post module in your Miva Merchant store, you must set up a Canada
Post account at:
www.canadapost.ca
2
Select English.
3
In the upper right corner of the screen, click Business.
4
In the upper right corner of the screen, click Sign In | Sign Up.
330
Copyright 2005-2015, Miva Inc. All Rights Reserved.
Publication Date: 02/28/2015
User Reference Guide DRAFT
5
In the My Business Profile screen, you will be asked to select a "site". Make sure you select Canada
Post, then click Sign Up.
6
After you create your account, you will have several important Canada Post credentials. You can
view these credentials by selecting the Support link.
331
Copyright 2005-2015, Miva Inc. All Rights Reserved.
Publication Date: 02/28/2015
User Reference Guide DRAFT
1
2
3
The three credentials you should make a note of are your:
Canada Post customer number
Username
Password
At Canada Post your username and password are alphanumeric strings, which they also call "keys".
Note that Canada Post gives you a separate username and password for development and production.
Use the development keys to test Canada Post in your Miva Merchant store. Use the production keys
in your Miva Merchant store when you are ready to start shipping with Canada Post.
To Enable the Canada Post Module in Miva Merchant
1
2
Go to
> Shipping > Add / Remove Modules.
In the Available Modules section, click on the Install button under Canada Post.
To Configure the Canada Post Module in Miva Merchant
Select the Canada Post tab. Note that the settings in this section are global and will apply to all packages
that you ship by Canada Post.
Environment:
Select Development if you want to test Canada Post in your Miva Merchant store
without generating real postage and postal charges to your account. If you select
332
Copyright 2005-2015, Miva Inc. All Rights Reserved.
Publication Date: 02/28/2015
User Reference Guide DRAFT
Development here, make sure that you enter your Canada Post development
username and password.
Username:
Password:
Confirm
Password:
Select Production when you are ready to start using Canada Post in your Miva
Merchant store. You will be able to generate real postage labels that will be billed
to your Canada Post account.. If you select Production here, make sure that you
enter your Canada Post production username and password.
Enter your:
Development username and password, or your
Production username and password.
See Your Canada Post Account and Credentials
Account Type:
Select "Contract" if you have a rate contract with Canada Post. If you are using
standard Canadian postal rates, choose "Non-contract". If you have a contract you
will also need to print manifests.
Customer
Number:
This is another credential you get when you set up your account with Canada Post.
Payment
Method:
Select the payment method you are using in your Canada Post account.
Source Postal
Code for
Calculations:
This is your Canadian "ship from" postal code. It must be in Canada. Canada Post
uses your postal code to calculate shipping charges.
Label Size:
Select the label size that you want to use on your packages. The 4"x6" size will work
with the Zebra and Zebra compatible printers that Miva Merchant supports.
Label
Preferences:
Show Packing Instructions
Show Postage Rate
Show Insured Value
See Your Canada Post Account and Credentials
All three of these are information that comes back from Canada Post with your
shipping charges. If you check the box next to one of the items, that information will
be printed on your label.
Error Messages
Language:
Select a language for error messages that are returned by the Canada Post API. These
messages only show up in the admin interface if something goes wrong when you are
generating Canada Post labels. They are not displayed to your customers.
333
Copyright 2005-2015, Miva Inc. All Rights Reserved.
Publication Date: 02/28/2015
User Reference Guide DRAFT
An example of a
Canada Post error
message that can
show up in the Miva
Merchant admin
interface.
Currency:
Use this field to select the currency for declared value on international shipments. If
you set this field to anything other than "Canadian dollar", another field will appear
asking you to enter a currency conversion rate between Canadian dollars and the
currency that you selected.
Available
Services:
Whatever shipping methods that you select here will be offered to your customers
during checkout, and will appear in the admin interface when you are printing
Canada Post labels.
Shipping > Flat Rate Shipping Tab
To Enable Flat Rate Shipping
1
2
Go to
> Shipping > Add / Remove Modules > Available Modules section.
Click Install under Flat Rate Shipping.
To Configure Flat Rate Shipping
1
In the Flat Rate Shipping tab, click on the Add Method button.
Enter a name for this shipping method. This name will appear in your on- line store.
334
Copyright 2005-2015, Miva Inc. All Rights Reserved.
Publication Date: 02/28/2015
User Reference Guide DRAFT
2
Enter an Amount that you want to charge for this shipping method. This is the total shipping
charge that will be applied to the order, regardless of the order size or weight.
Click Update.
Shipping > Minimum or Weight Shipping Tab
Minimum or Weight Shipping is similar to Base + Weight shipping.
In Base + Weight shipping you calculate shipping based on the weight, then add a base charge.
In Minimum or Weight shipping, you set the minimum that you want to charge for shipping, then
you calculate shipping based on weight. The customer pays whichever amount is larger.
See the example below, but see also:
Edit Store > Settings tab > Weight Unit drop-down list, to set the unit of weight.
To Enable Minimum or Weight Shipping
1
2
Go to
> Shipping > Add / Remove Modules > Available Modules section.
Click Install under Minimum or Weight Shipping.
To Configure Minimum or Weight Shipping
1
2
In the Minimum or Weight Shipping tab, click Add Method
.
Enter a name for this shipping method. This name will appear in your on- line store.
Enter an Amount/Weight Unit. This is the price that you want to charge per weight unit, for
example, the shipping charge per pound.
Enter a Minimum Charge. This is the least amount that you always want to charge for this
shipping method.
Click Save Method
.
Example
We'll create a Minimum or Weight Shipping rule called "Economy". We'll charge $1.00 per pound of
weight, but the minimum that we ever want to charge for shipping is $10.00.
If our customer buys a bag of oranges that weighs 12 pounds, the syste m calculates the shipping charge
like this:
335
Copyright 2005-2015, Miva Inc. All Rights Reserved.
Publication Date: 02/28/2015
User Reference Guide DRAFT
1
The shipping charge by weight is 12 pounds x $1.00 per pound = $12.00.
2
The minimum shipping charge for "Economy" is $10.00.
3
$12.00 is the larger of the two, so the customer is charged $12.00 shipping.
Shipping > U.S.P.S. Online Rate Calculation (Domestic &
International) Tab
You can use this module to get rates for U.S.P.S. shipping and to print address labels, but you cannot use
this module to print U.S.P.S. postage. If you want to print address labels with U.S.P.S. postage, you
have two choices:
Use the U.S.P.S. Online Rate Calculation module to get shipping rates. Use the Endicia module to
print address labels with U.S.P.S. postage. This is the easiest method and the one that most
merchants choose.
Use the U.S.P.S. Online Rate Calculation module to get shipping rates and to print address labels.
Use an external method, such as a postage meter or stamps, to add U.S.P.S. postage.
Support for the Shipping Settings > Packaging Rules Tab
In Miva Merchant releases before PR8 Update 9, the U.S.P.S. Online Rate Calculation module did
not use any information from the Shipping > Settings Tab > Packaging Rules Section; pack by
weight or quantity preference, box dimensions, etc. In these releases, Miva Merchant gets the
shipping rate by sending U.S.P.S. the source zip code, destination zip code, order weight, and
shipping method.
In release PR8 Update 9 and later, the U.S.P.S. Online Rate Calculation module can use all of the
features from the Shipping > Settings Tab > Packaging Rules Section.
Before you can use the U.S.P.S. Online Rate Calculation Module, you have to create a U.S.P.S. Web
Tools account.
To Create a U.S.P.S. Web Tools Account
1
2
Go to: https://secure.shippingapis.com/registration/
and complete the U.S.P.S. Web Tools registration form.
After you complete the registration form, you should see a confirmation screen like this:
336
Copyright 2005-2015, Miva Inc. All Rights Reserved.
Publication Date: 02/28/2015
User Reference Guide DRAFT
You will also receive a confirmation email from U.S.P.S. with:
A username and password.
Contact information for the Internet Contact Care Center.
[email protected]
1-800-344-7779
This contact information could change, so please check the confirmation email that you receive.
3
Contact U.S.P.S to modify your account.
3.1.
U.S.P.S. production server. When you first register with U.S.P.S. your account is linked to
a test server. Ask the U.S.P.S. representative to switch your account to a production server. If
they ask what application you are using, say "Miva Merchant". Miva Merchant is already an
approved U.S.P.S. rate application.
3.2.
U.S.P.S. shipping labels. If you want to print U.S.P.S. shipping labels without U.S.P.S.
postage, ask the representative to enable your account for the "delivery confirmation API".
You don't have to do this step if you are going to use Endicia to print U.S.P.S. shipping
labels with postage.
To Configure U.S.P.S. Online Rate Calculation
1
Follow the steps above to create a U.S.P.S. web tools account.
2
Go to
3
4
Click Install under U.S.P.S. Online Rate Calculation (Domestic & International).
Click on the U.S.P.S. Online Rate Calculation (Domestic & International) tab.
> Shipping > Add / Remove Modules > Available Modules section.
USPS User ID:
Enter your U.S.P.S. username.
URL to USPS WebTools
Server:
Miva Merchant uses both this URL and the secure URL below to get
rate information. Both fields are populated automatically and almost
337
Copyright 2005-2015, Miva Inc. All Rights Reserved.
Publication Date: 02/28/2015
User Reference Guide DRAFT
never need to be changed.
Secure URL to USPS
WebTools Server:
See above.
Source Zip Code for
Calculations:
The zip code where rate calculation assumes you are shipping from.
Label Option (Default):
This field assumes you are printing U.S.P.S. address labels without
postage. If you want to print U.S.P.S. address labels with postage,
please use the Endicia module.
Delivery Confirmation + Mailing Address: The label contains
address information plus a U.S.P.S. barcode that is scanned to prove
delivery confirmation.
Delivery Confirmation Only: The label contains only the U.S.P.S.
barcode that is used to prove delivery confirmation.
Label Image Type (Default):
The file type of the label that is retrieved from U.S.P.S.
Display Online Rates to
Customers When Available
U.S.P.S. has a "standard" shipping rate that you would be quoted if you
physically went to a post office, and a slightly discounted rate that you
can get if you buy postage online.
See https://www.usps.com/ship/service-chart.htm
If you check this box, your customers will see the discounted online
rate if it's available. If the online rate isn't available, or if you don't
check this box, your customers will see the standard U.S.P.S. rate.
Enable Label Generation
Check this box if you want to print U.S.P.S. labels with address
information but no postage.
Leave this box unchecked if you are using Endicia to print labels with
both address information and postage.
Available Shipping Methods:
The U.S.P.S. shipping methods that you want to offer customers in the
checkout screens.
Shipping > Endicia Shipping Labels Tab
Enable the Endicia module if you want to print labels with USPS postage. Without the Endicia module,
your USPS labels will essentially just be address labels and will not have postage on them.
To Enable the Endicia Module
1
2
Go to
> Shipping > Add / Remove Modules > Available Modules section.
Click Install under Endicia Shipping Labels.
338
Copyright 2005-2015, Miva Inc. All Rights Reserved.
Publication Date: 02/28/2015
User Reference Guide DRAFT
To Configure the Endicia Module
1
Select the Endicia Shipping Label Settings tab.
2
3
Configure the options shown below.
Click Update.
Create Account
This link will only appear if you haven't created your account. Clicking on the
"Sign Up" link will take you to the Endicia website.
Mode:
Test: Use this option to print sample labels.
Production: Use this option to print real labels that will be billed to your
Endicia account.
Endicia Account ID:
Enter your Endicia account number.
Endicia
PassPhrase/Change
Passphrase:
Enter the passphrase that you created during account creation. After you've
entered your account information a "change passphrase" link will appear.
Non-ZPL Label Image
Type:
PR8 Update 8 added the ability to print adhesive backed labels using a Zebra
or Zebra compatible printer. A Zebra compatible printer can be used with
Endicia, FedEx, UPS, and Canada Post, but currently not with the USPS
module.
Use Zebra Thermal
Printing When
Possible.
Requirements:
Your browser must have Java enabled. See
http://java.com/en/download/help/enable_browser.xml.
You must have a Zebra or Zebra compatible printer that can print .zpl.
Your store must be running PR8 Update 8 or later.
For some shipping destinations Endicia is not able to create a label that is
compatible with a Zebra printer. If you enable the Use Zebra Thermal
Printing checkbox, you also should select a value from the Non-ZPL Label
Image Type, usually PDF. The Miva Merchant software automatically
examines the label from Endicia. If the label we receive from Endicia is .zpl
compatible, it will print on your Zebra printer. If it isn't .zpl compatible, it will
print to the backup method you select in the Non-ZPL Label Image Type
dropdown.
Available services:
Use this field to select the type of USPS labels that you want to print with
Endicia. For example, if you uncheck "USPS Domestic: First-Class Mail",
you will not be able to print USPS domestic first class labels.
This field does not change the U.S.P.S. shipping methods that you offer to
customers during checkout. To choose the USPS shipping methods that are
offered to your customers during checkout, please see the U.S.P.S. Online
339
Copyright 2005-2015, Miva Inc. All Rights Reserved.
Publication Date: 02/28/2015
User Reference Guide DRAFT
Rate Calculation module.
Account Postage:
Shows your Endicia account status.
Recredit Account:
Click on the link and enter a dollar amount. That amount is added to your
Endicia account and charged to the credit card that Endicia has on file for
you. Miva Merchant has no record of your credit card information.
Shipping > Price Table Based Shipping Tab
Use this module to generate shipping charges based on the order total.
In the example below we created two price based shipping methods: Economy and Overnight. Both
methods will be shown to customers during checkout. For each method we can add:
A handling charge: this is a flat fee that will be added to every order which uses this method.
A ceiling: The ceiling is a way of dividing the method into price ranges. In our example we created
four price ranges in the Overnight shipping method: $25.00, $50.00, $100.00, and over $100.00. We
created the "Over $100.00" price range by entering a "+" in the Ceiling field. Each price range has a
different shipping charge.
If the order total is less than or equal to $25.00, the shipping charge is 10% of the order total.
If the order total is between $25.00 and $50.00, the shipping charge is 15% of the order total.
If the order total is between $50.00 and $100.00, the shipping charge is 20% of the order total.
If the order total is over $100.00, the shipping charge is 25% of the order total.
A charge: This is the shipping charge we are going to apply to the order. In our example we set the
shipping charge as a percent of the order total, but it can also be a flat fee.
1
Our sample customer has an order total of $25.00. They selected Overnight shipping which has a
$5.00 handling fee.
2
The software looks at the customer's order total. It's less than or equal to $25.00, so it applies a
shipping charge of 10%, which comes out to $2.50.
The total shipping is $7.50.
3
340
Copyright 2005-2015, Miva Inc. All Rights Reserved.
Publication Date: 02/28/2015
User Reference Guide DRAFT
To Enable Price Table Based Shipping
1
2
Go to
> Shipping > Add / Remove Modules > Available Modules section.
Click Install under Price Table Based Shipping .
341
Copyright 2005-2015, Miva Inc. All Rights Reserved.
Publication Date: 02/28/2015
User Reference Guide DRAFT
To Configure Price Table Based Shipping
1
2
In the Price Table Based Shipping tab, click on the Add Shipping Method button.
Enter a Shipping Method name.
Enter a Handling charge, then click Update.
Enter a Ceiling for this price range.
Use a "+" to indicate "and up" from the previous ceiling.
Enter a Charge. If you check the checkbox, the value you enter is applied as a percent of the
order total. If you don't check the checkbox, the value you enter is applied as a flat rate.
Click Update.
Shipping > Quantity Based Shipping
Use this module to generate shipping charges based on the number of items in the customer's basket.
Quantity based shipping has two modes: standard and progressive. In both modes you create a set of
ranges for the number of items in the customer's basket, and each range has a shipping charge. For
example:
Range 1: 1 - 3 items, charge $3.00 shipping per item.
Range 2: 4 - 6 items, charge $2.00 shipping per item.
Range 3: 7 - 10 items, charge $1.00 shipping per item.
In standard mode, the software looks at the total number of items in the customer's basket, figures out
what range it is in, and charges that amount for every item in the basket. For example, using the ranges
above, if you had 5 items in your basket, the shipping charge in standard mode would be:
5 items falls into "range 2", so we'll charge $2.00 shipping for every item in the basket.
5 items x $2.00 shipping each = $10.00 total shipping.
In progressive mode, the software looks at the total number of items in the customer's basket and applies
the shipping charges from one or more ranges. If you had 5 items in your basket, the shipping charge in
progressive mode would be:
The first 3 items fall into "range 1": $3.00 per item x 3 items = $9.00
Items 4 and 5 fall into "range 2": $2.00 per item x 2 items = $4.00
The total shipping is $9.00 + $4.00 = $13.00.
To Enable Quantity Based Shipping
1
2
Go to
> Shipping > Add / Remove Modules > Available Modules section.
Click Install under Quantity Based Shipping .
To Configure Quantity Based Shipping
1
In the Quantity Based Shipping tab, click on the Add Shipping Method button.
342
Copyright 2005-2015, Miva Inc. All Rights Reserved.
Publication Date: 02/28/2015
User Reference Guide DRAFT
2
3
Enter a name for this shipping method. This name will appear in your on- line store.
Check the Progressive checkbox to use progressive mode. Leave the box unchecked to use
standard mode.
Click Save Shipping Method.
Enter a Floor. This is the minimum number of items in this range.
Enter a Ceiling. This is the maximum number of items in this range. In the example below we
created 4 ranges:
1 - 3 Items
4 - 6 Items
7 - 10 Items
Over 10 Items. To create this last range we put a "+" in the Ceiling field.
Enter an Amount/Unit. This the shipping charge per item in this range.
Click Save Shipping Method. You can continue to add as many ranges as you wish.
343
Copyright 2005-2015, Miva Inc. All Rights Reserved.
Publication Date: 02/28/2015
User Reference Guide DRAFT
Shipping > UPS® Online Tools Tab
Please note that real time rates from carriers, such as UPS, are approximate
based on the information that is available when the customer places the order.
The actual amount to ship an order can change based on box size, shipping
options, number of boxes, etc, that could change after the order is placed (for
example, if the order was later edited).
To Enable UPS® Online Tools
1
2
Go to
> Shipping > Add / Remove Modules > Available Modules section.
Click Install under UPS® Online Tools.
To Register the UPS® Online Tools Module
You must register the UPS® Online Tools module after you enable it. Normally you only do this once,
but if you remove the module in the Add/Remove Modules tab, and then re- install it, you'll have to go
through registration again.
1 Enable the UPS® Online Tools.
2 Register the UPS® Online Tools Module. Click on the UPS® Online Tools tab.
2.1.
In the first install screen you can choose to install the UPS® Online Tools Module in
Production or Test modes. In Production mode you can get real- time shipping rates and print
real shipping labels that will be billed to your UPS account. In Test mode you can get realtime rates and print free test labels that cannot be used for shipping.
2.2.
Select the installation mode, then click on "Click here" to start the wizard.
2.3.
The first screen of the registration wizard will appear. Click Next.
344
Copyright 2005-2015, Miva Inc. All Rights Reserved.
Publication Date: 02/28/2015
User Reference Guide DRAFT
2.4.
The end user license (EULA) screen will appear. Scroll to the bottom of the agreement,
check the agreement box, and click Next.
2.5.
The contact information screen will appear. Enter information in at least the bold (required)
fields and click Next. If you have a UPS account number you can enter it in this screen, but
you can complete the registration process without it and enter it later. The phone number that
you enter here should not have spaces or dashes.
345
Copyright 2005-2015, Miva Inc. All Rights Reserved.
Publication Date: 02/28/2015
User Reference Guide DRAFT
2.6.
In the next screen, click Finish to complete the registration.
To Configure the UPS® Online Tools Module
After you register the UPS® Online Tools Module, you can click on the UPS® Online Tools tab and
select the UPS services that you want.
Before PR8 Update 7 you could only print UPS shipping labels if you had a credit card and an account
with UPS. In the current UPS® Online Tools Module, you can create shipping labels with just a credit
card. It is no longer necessary to have a UPS account.
Mode:
You can use the UPS® Online Tools Module in Production or Test mode. In
Production mode you can get real-time shipping rates and print real shipping labels
that will be billed to your UPS account. In Test mode you can get real-time rates and
print free test labels that cannot be used for shipping.
Rating API
Status:
This is a read only field. It will display "Active" if you have successfully registered
the UPS® Online Tools Module, with or without your UPS account number. If this
field is set to active, you will be able to get real-time UPS shipping rates.
Shipping API
Status:
This is a read only field.. It will display "Active" if you have entered a valid UPS
account number. If you have not yet entered your UPS account number, this field will
show "Inactive". If this field is set to active, you will be able to create valid UPS
labels that are billed to your account.
Default UPS
Account:
You must have a valid UPS account number in order to print shipping labels. If you
don't have a UPS account number, you can still use this module to get real-time
shipping rates.
UPS Account
Type:
Select the type of account that you created with UPS.
Billing Method:
Select "Bill configured UPS account" or "credit card". If you select credit card, Miva
Merchant will prompt you to enter a credit card number every time that you print a
346
Copyright 2005-2015, Miva Inc. All Rights Reserved.
Publication Date: 02/28/2015
User Reference Guide DRAFT
label. Your credit card information is not retained by Miva Merchant.
UPS Rate Code:
This is a read only field. It displays a proprietary code, created by UPS, that
corresponds to the type of account that you have. The rate code will change if you reregister the module.
Use Negotiated
Rates:
UPS has three "standard" rates depending on how frequently you ship: Daily Pickup,
Occasional Pickup, and Suggested Retail Rate. See "Billing Method" above.
However, you can also contact UPS and get a better rate if you are an even more
frequent shipper. This is called a "negotiated rate". If you check this box, your on- line
store will display your negotiated rate. If you don't check this box, your on- line store
will display the rate associated with whatever you selected in the UPS Account Type
field.
Re-registering the module also unchecks the Use Negotiated Rates checkbox.
Use Zebra
Thermal
Printing
PR8 Update 8 added the ability to print adhesive backed address labels using a Zebra
or Zebra compatible printer. A Zebra compatible printer can be used with Endicia,
FedEx, UPS, and Canada Post, but currently not with the USPS module.
Requirements:
Your browser must have Java enabled. See
http://java.com/en/download/help/enable_browser.xml.
You must have a Zebra or Zebra compatible printer that can print .zpl.
Your store must be running PR8 Update 8 or later.
Ship From:
This address, and the customer's ship to address, are used to calculate shipping
charges. This address will appear on your shipping labels.
Default
Delivery
Confirmation:
The value you select here for delivery confirmation will be the default for every
product that you ship using UPS. However, you can over-ride the store wide default
setting at the product level.
Please note that the most restrictive delivery confirmation setting for any item in the
order gets precedence for the entire order. For example, if one item in the order
requires an adult signature, and the other items in the order only require delivery
confirmation, the order as a whole will be marked as requiring adult signature.
Specify
Declared Value
Equal To
Basket Subtotal:
"Declared value" is the order total. If you check this box, the order total will be sent
to UPS and UPS will automatically insure the order based on its value. The shipping
charge will go up because it includes the insurance. If you don't check this box, the
order total is not sent to UPS and insurance is not automatically added. This field
cannot be over-ridden at the product level.
See also:
http://www.ups.com/content/us/en/shipping/time/service/value_added/declared_value
.html
347
Copyright 2005-2015, Miva Inc. All Rights Reserved.
Publication Date: 02/28/2015
User Reference Guide DRAFT
Declared Value
Currency:
Select the currency that you use to describe the order total.
Available
Services:
Select the UPS shipping options that customers will see during checkout. Note that
shipping methods can also be restricted at the product level.
Shipping > Weight Based Shipping Tab
In Weight Table Based Shipping you create a set of ranges based on the weight of the customer's total
order. Each weight range can have a different shipping charge. For example:
Range 1: 0 - 5 pounds, charge $4.00 to ship the order.
Range 2: 6 - 10 pounds, charge $6.00 to ship the order.
Range 3: 11 - 15 pounds, charge $8.00 to ship the order.
See also:
Appendix 3: Comparing Weight Based Shipping Modules
Weight Units, to set the unit of weight used in your store.
Shipping > FedEx Web Services Tab
To Enable FedEx Web Services
1
2
Go to
> Shipping > Add / Remove Modules > Available Modules section.
Click Install under FedEx Web Services .
To Configure FedEx Web Services
Select the
> Shipping > FedEx Web Services tab. Note that the settings in this section are global
and will apply to all FedEx packages that you ship. You can over-ride some of these settings:
At the product level:
At the order level when you want to Generate a Shipping Label.
FedEx Server:
> Catalog > Products > Edit Product > FedEx Web Services.
Enter the address of a:
Test server: A FedEx test server that allows you to get rates and print sample
labels.
Production Se rver: A FedEx production server that allows you to get rates and
print real labels that are billed to your account.
348
Copyright 2005-2015, Miva Inc. All Rights Reserved.
Publication Date: 02/28/2015
User Reference Guide DRAFT
FedEx Account
Number:
Enter the number you were given when you created your FedEx account.
Meter Number:
If you enter a FedEx account number and click Update, the screen will be updated
with a meter number. But if FedEx has given you a meter number, you can enter it
here.
Generate New
Meter Number:
This link only appears after you have entered a valid FedEx account number and
clicked the Update button. In general, you would never need to use this link unless
instructed by Miva Merchant or FedEx.
Rate Type:
Affects the rates that are displayed to customers. Note that this is not necessarily the
rate that you (the shipper) will pay. For example, you could display FedEx list rates
to customers, but your account rates might be lower.
Account: Customers will see the rates that are associated with your FedEx
account.
List: Customers will see the FedEx standard retail shipping rates.
Currency Type:
The currency that you are using for the declared value (usually the order total).
Delivery
Signature
Option:
This is a global setting, but it can be over-ridden:
At the product level:
Services.
When you are printing a label:
> Order Processing > Edit Order >
Generate Shipping Label > Signature drop-down list.
> Catalog > Products > Edit Product > FedEx Web
Some signature options are more expensive than others and the option that you select
will change the shipping cost that is shown to the customer. Note that the most
restrictive signature requirement for any product in an order becomes the signature
requirement for the entire order. For example, if the customer orders a package of
cheese, which requires no signature, and a bottle of wine, which requires an adult
signature, then the shipping rate for the entire order will be priced at "requires adult
signature".
Adult: the package can be signed for by anyone over 21.
Direct: the package must be signed for by the person it is addressed to.
Indirect: the package can be signed for by anyone at the receiving address.
No signature required:
Service default: Businesses that ship an enormous number of packages using
FedEx may have a kind of "account default" for the signature option. For
example, a company might want every package to have at least Indirect signature.
If an employee forgets to set the signature option on a package, the signature
option will automatically be set to Indirect. However, this kind of account default
is very rare. For the vast majority of companies that ship with FedEx, setting the
signature option to Service Default means that no signature will be required.
349
Copyright 2005-2015, Miva Inc. All Rights Reserved.
Publication Date: 02/28/2015
User Reference Guide DRAFT
Drop Off Type:
Describes how you are going to get your package to FedEx. The option that you
select will change the shipping cost that is shown to the customer. This is a global
setting, but you can over-ride it when you print a label (
> Order Processing >
Edit Order > Generate Shipping Label > Signature drop-down list.)
Drop at BSC means you will leave the package at a Business Shipping Center, like a
Kinko's/FedEx. Drop at station means that you will leave the package at a FedEx
world-wide service center.
SmartPost Hub
ID:
A SmartPost hub is a processing center for SmartPost mail (see
http://en.wikipedia.org/wiki/FedEx_SmartPost). If you are using SmartPost, FedEx
will give you a hub id to enter here.
Use Zebra
Thermal
Printing
PR8 Update 8 added the ability to print adhesive backed address labels using a Zebra
or Zebra compatible printer. A Zebra compatible printer can be used with Endicia,
FedEx, UPS, and Canada Post, but currently not with the USPS module.
Requirements:
Your browser must have Java enabled. See
http://java.com/en/download/help/enable_browser.xml.
You must have a Zebra or Zebra compatible printer that can print .zpl.
Your store must be running PR8 Update 8 or later.
Ship From:
This address, and the customer's ship to address, are used to calculate shipping
charges. This address will appear on your shipping labels.
Shipment
Defaults:
Alcohol Flag: The alcohol flag must be checked if the order contains alcohol. If
you check this box, the rate you get from FedEx will include "adult signature
required". Because this is a global setting, you should only check this here if
every product that you sell includes alcohol. If only some of your products
include alcohol, you should set this flag on a product level (
> Catalog >
Products > Edit Product > FedEx Web Services Options tab).
Inside pickup: You should check this box if you at least occasionally ship
packages that are over 150 pounds. If a shipment is over 150 pounds (151 plus) a
FedEx employee must enter your building to get the package. This is a global
setting and cannot be overridden at the product level, but it will only be triggered
if the shipping weight is over 150 pounds. If triggered it will affect the rate.
Inside Delivery: You should check this box if you want packages weighing more
than 150 pounds to be brought into the recipient's building. This is a global
setting that cannot be overridden at the product level, but it will only be triggered
if the shipping weight is over 150 pounds. If triggered it will affect the rate.
Non-standard Containe r: Select this option to indicate that your FedEx
shipment is packaged in a non-traditional or irregularly-shaped container (e.g. a
pail). A surcharge may apply. Only check this box if all the products that you ship
350
Copyright 2005-2015, Miva Inc. All Rights Reserved.
Publication Date: 02/28/2015
User Reference Guide DRAFT
meet this description, otherwise you should enable this at the product level
(
> Catalog > Products > Edit Product > FedEx Web Services Options
tab).
Available
Services:
Dry Ice Flag: This flag must be checked if every product that you ship includes
dry ice. If only some of your products contain dry ice, you should enable this
option at the product level (
> Catalog > Products > Edit Product > FedEx
Web Services Options tab). The rate that you get from FedEx will automatically
include the "dry ice surcharge". Some FedEx services will not be available if you
are shipping with dry ice. For more information, see:
http://www.fedex.com/us/service- guide/our-services/dangerous- goodshazmat/index.html?qgroup=toggle-c1&qid=Ship_Dangerous_Goods
Dry Ice Weight: The amount of dry ice included in the order at packing time.
Must be in kilograms.
Select the FedEx shipping options that customers will see during checkout. Note that
shipping methods can also be selected at the product level. See
> Catalog >
Products > Edit Product > FedEx Web Services Options tab and when you Generate
a Shipping Label.
Shipping > Add / Remove Modules
To Add Shipping Modules
1
2
3
Go to the
> Shipping > Add/Remove Modules tab.
Select the Available Modules section.
Click on the Install button for the shipping module that you want to add.
To Remove Shipping Modules
1
2
3
Go to the
> Shipping > Add/Remove Modules tab.
Select the Installed Modules section.
Click on the Remove button for the shipping module that you want to remove.
Payment
Use the Payment Settings section to configure the payment options that you want to offer customers
during checkout. You must enable at least one payment option or there will be no way for customers to
purchase items in your store. Free items that you offer are an exception. See Skip Shipping/Payment
Selection for Free Orders.
To see all of the payment methods that you have access to in your store:
351
Copyright 2005-2015, Miva Inc. All Rights Reserved.
Publication Date: 02/28/2015
User Reference Guide DRAFT
Go to
> Payment > Add/Remove Modules tab > Available Modules section.
Obsolete Payment Options
Over time, some payment options are dropped from Miva Merchant.
If the vendor (such as Amazon) still has the payment option, but Miva Merchant has a new interface
to it, the old payment option is marked as "Legacy". You can continue to use legacy payment
options, but they won't be maintained in future releases of Miva Merc hant.
If the vendor has discontinued the payment option, it is marked as "Discontinued" in Miva
Merchant. Vendors usually discontinue a payment option when they replace it with something else
and there's usually a grace period to give you time to switch over. You can continue to use
discontinued payment options for as long as the vendor allows, but they won't be maintained in
future releases of Miva Merchant.
Changes in PR8 Update 7
Beginning in PR8 Update 7 the following payment options have been removed a nd are no longer
supported:
352
Copyright 2005-2015, Miva Inc. All Rights Reserved.
Publication Date: 02/28/2015
User Reference Guide DRAFT
Amazon Simple Pay
Innovative Gateway Solutions
Payflow Link (Legacy)
Payflow Pro (Legacy)
If you are already using one of these options you can continue to use it after you install PR8 Update 7.
But if you create a new store with PR8 Update 7, the options will not appear in the admin interface.
Changes in PR8 Update 11
Checkout by Amazon was discontinued in PR8 Update 11 and replaced with Amazon Payments. You
can continue to use Checkout by Amazon if your store is at PR8 or earlier, but Checkout by Amazon is
not supported in Miva Merchant Version 9.
Types of Payment Options
Payment options fall into three general categories:
Real-time payment gateway: During checkout, Miva Merchant will send the payment information
to a gateway company which can verify a transaction for any of the major credit cards and return a
pass or fail. Most of the Miva Merchant payment modules are real time gateways.
You must use a real-time payment gateway to use the 3 digit Card Verification Code (CVV2) on
the back of the customer's credit card.
You must have a merchant account with a bank or ISO (Independent Sales Organization) to use a
real-time gateway. A merchant account is like a bank account, but it doesn't contain any funds. It
is used as a holding location for the transfer of funds. There are additional fees associated with
having a merchant account.
Unlike third-party checkout modules, with a real-time gateway the customer completes the entire
checkout in your on-line store. If you are running analytic software, like Google Analytics, it can
track the entire checkout process.
All real-time payment gateways support authorization, capture, refunds, and voiding.
Off-line payme nt: Payment information is collected during checkout but the payment is not
processed in real-time. Checks, COD, and credit card with simple validation are examples of off- line
payments.
Third-party checkout:
8. The customer starts the checkout process in your on-line store.
9. When the customer submits the Payment Information page (OPAY), they are taken to the
third-party website to make their payment.
10. When the customer finishes paying, they return to your on- line store, usually at your
invoice screen (INVC).
Google Wallet, Checkout by Amazon, and PayPal Payments Standard are examples of third-party
checkout systems.
353
Copyright 2005-2015, Miva Inc. All Rights Reserved.
Publication Date: 02/28/2015
User Reference Guide DRAFT
When the customer is redirected to the third-party site, analytic software running in your store,
such as Google Analytics, cannot track the customer. In some cases the customer will cancel the
transaction while at the third-party site and not return to your store immediately.
Third-party checkout systems don't require a merchant account, but you usually need a seller's
account with that company.
Payment Module
Real-time
Gateway
Off-line
Payment
Third-party
Checkout
Amazon Payments
Amazon Simple Pay (Discontinued)
Authorize.Net Payment Services v3.1
CHASE Paymentech Orbital Gateway
Check Payment
Checkout by Amazon (Discontinued)
COD
Credit Card Payment with Simple
Validation
CyberSource
First Data Global Gateway
Google Wallet (Discontinued)
Intuit Merchant Services
PayPal Express Checkout and/or
Payments Pro
PayPal Payments Advanced and/or
Payflow Gateway
PayPal Payments Standard
354
Copyright 2005-2015, Miva Inc. All Rights Reserved.
Publication Date: 02/28/2015
User Reference Guide DRAFT
Payment > Amazon Payments
Checkout by Amazon was discontinued in PR8 Update 11 and replaced with Amazon Payments. You
can continue to use Checkout by Amazon if you wish, but it will not be maintained in new releases of
Miva Merchant.
Amazon Payments is a third party checkout, similar to PayPal Express Checkout. There are a few
differences between Amazon Payments and the old module, Checkout by Amazon:
Amazon Payments
Checkout by Amazon
In-line verification. During checkout the
customer uses a popup window to log into their
Amazon account and does not leave your store.
Standard verification. During checkout
customers are redirected to an Amazon web page
to log into their Amazon account.
In-line authorization. During checkout the
customer uses a JavaScript widget to select
payment and shipping options from their Amazon
account and does not leave your store.
Standard authorization. After logging into their
Amazon account, the customer uses Amazon web
pages to select payment and shipping options.
After the customer selects their payment and
shipping options, they are redirected back to
normal checkout in your store. Analytic tools,
like Google Analytics, can't track the user while
they are not on your store pages.
Supports your store Coupons
Did not support your store coupons.
Shipping method is always selected from your
Miva Merchant store.
Checkout by Amazon maintained its own list of
shipping methods which did not always match the
list of shipping methods supported in your Miva
Merchant store.
Supports use of Miva Merchant shipping rules.
Did not allow Miva Merchant shipping rules to be
used.
But see also Enable In Context Checkout for the way that PayPal implements the same feature in a
slightly different way.
To Register for Amazon Payments
You must register for the Amazon Payment service before you can use it in your Miva Merchant store.
1 Go to:
https://sellercentral.amazon.com
2
Use your existing Checkout by Amazon account, and the Amazon Payments service will be added.
Your Checkout by Amazon account and the Amazon Payments service use the same Access Key and
Secret Key.
355
Copyright 2005-2015, Miva Inc. All Rights Reserved.
Publication Date: 02/28/2015
User Reference Guide DRAFT
To Enable Amazon Payments in Miva Merchant
After you register for the Amazon Payments service you can enable the feature in your Miva Merchant
store.
1 Go to
> Payments > Add/Remove Modules tab > Available Modules section.
2 Click Install under Amazon Payments.
Merchant Id:
Access Key:
Secret Key:
Confirm Secret Key:
Each of these fields is a credential that is created when you set up your
Amazon Seller Account.
Currency Code:
Select the currency code that you want to pass to Amazon. Usually this
matches the currency you have set for your store (see Currency Formatting).
Transaction Timeout:
After your customer completes checkout using Amazon Payments, Amazon
gives you a certain amount of time to change the order. For example, after
completing checkout in your store, the customer might call you and want to
drop an item, add an item, or change the shipping or payment information.
As a store manager or admin, you can log into the Miva Merchant admin
interface, edit the customer's order, and make any necessary changes.
The transaction timeout is a the amount of time, after checkout, that you will
allow an order placed using Amazon payments to be edited. If you set the
transaction timeout to 30 minutes, and the customer calls you 1 hour after
they complete checkout to change the order, you won't be able to resubmit
the order to Amazon. In that case you would have to cancel the order and ask
the customer to start over.
The max timeout you can enter in this field is 1,440 minutes (24 hours),
which is the max allowed by Amazon.
Polling Interval:
Instantly Capture
Payment (requires prior
approval from Amazon)
Amazon does some fraud processing before they authorize a transaction. The
Polling Interval determines how often you want Miva Merchant software to
contact Amazon to check on the transaction status. For example, if you set
the Polling Interval to 30 minutes, Miva Merchant will contact Amazon
every 30 minutes to get a status update on the order. For example:
1 The customer completes checkout in real time, but the transaction is not
yet authorized.
2
If you edit the order in the Miva Merchant admin interface, the order
status will be pending.
3
The Miva Merchant software checks with Amazon every 30 minutes (or
whatever you set the Polling Interval to) for an order status update.
If you select this option, the funds will be captured as soo n as Amazon marks
the transaction as Authorized. If you do not select this option, you must:
1 Wait until the order status is updated to Open.
356
Copyright 2005-2015, Miva Inc. All Rights Reserved.
Publication Date: 02/28/2015
User Reference Guide DRAFT
2
Edit the order in the Miva Merchant admin interface and click the
Capture button.
Before you can use this feature in your Miva Merchant store you must
contact Amazon and ask for it to be enabled in your Amazon seller account.
Server:
If you select "Production", Amazon Payments will be enabled in your on-line
store. Select "Sandbox" if you want to experiment with Amazon Payments in
an isolated environment. Before you can select the sandbox option here you
must have a sandbox setup with your Amazon seller account. Your Amazon
sandbox will have separate credentials for Merchant ID, Access Key, and
Secret Key, which you must also enter in this tab.
Amazon Payments In-line Checkout
If you enable Amazon Payments in-context checkout, the customer can do verification and authorization
without leaving your store. But see also Enable In Context Checkout for the way that PayPal implements
the same feature in a slightly different way.
In the Basket Contents screen (BASK), the customer clicks the "Pay with Amazon" button.
357
Copyright 2005-2015, Miva Inc. All Rights Reserved.
Publication Date: 02/28/2015
User Reference Guide DRAFT
A popup window appears on top of the Basket Contents screen. The custome r enters their
Amazon account credentials and clicks the sign in button.
The customer is now on a Miva Merchant page only used for Amazon Payments (Amazon
Payments - OCST ). The address book shows all of the addresses in the customer's Amazon
account. The customer selects a shipping address and clicks the Continue button.
358
Copyright 2005-2015, Miva Inc. All Rights Reserved.
Publication Date: 02/28/2015
User Reference Guide DRAFT
This is the second custom Amazon Payments screen (Amazon Payments - OSEL). The custome r
selects a shipping method and clicks the Continue button.
359
Copyright 2005-2015, Miva Inc. All Rights Reserved.
Publication Date: 02/28/2015
User Reference Guide DRAFT
This is the next custom Amazon Payme nts screen (Amazon Payments - OPAY). The screen shows
the customer all of the payment methods that are enabled in their Amazon account. The customer
selects a payment method and clicks the Continue button. The orde r is now complete. The status
of the order will show up as "Pending" in the Miva Merchant admin inte rface until Amazon
authorizes the transaction.
360
Copyright 2005-2015, Miva Inc. All Rights Reserved.
Publication Date: 02/28/2015
User Reference Guide DRAFT
In the last checkout screen, the customer sees your standard invoice page (INVC).
Payment > Authorize.Net Payment Services v3.1
Authorize.Net has three payment methods:
AIM (Advanced Integration Method)
CIM (Customer Information Manager)
SIM (Server Integration Method)
Miva Merchant only supports AIM. This is a traditional payment gateway and the one most commonly
used by Miva Merchant store owners. Authorize.Net AIM does not provide merchant accounts directly,
but it can connect to almost any merchant account.
Login ID:
Transaction Key:
Enter the Login ID and Transaction Key that you created when yo u set up
your AIM account. The Login ID and Transaction Key are specific to your
361
Copyright 2005-2015, Miva Inc. All Rights Reserved.
Publication Date: 02/28/2015
User Reference Guide DRAFT
Miva Merchant store and are different from the credentials that you use to
login to Authorize.Net.
To find your Authorize.Net Login ID and Transaction Key:
1
2
Log into your Merchant Interface at https://account.authorize.net.
Click Settings in the main left side menu.
3
4
Click API Login ID and Transaction Key.
Under Create New Transaction Key, enter your Secret Answer.
5
Note: When you get a new Transaction Key, you can choose to disable
the old Transaction Key by clicking on the Disable Old Transaction
Key(s) box. You may want to do this if you suspect your old Transaction
Key is being used fraudulently.
If you check this box, the old Transaction Key expires immediately. If
you do not check this box, the old Transaction Key will automatically
expire in 24 hours.
Click Submit.
Authorize.Net URL:
The URL that Miva Merchant uses to submit requests. This field is autopopulated. You should only change it if you are given a new URL by Miva
Merchant or Authorize.Net.
MD5 Hash Security
Code:
The hash is an additional security feature from Authorize.Net. Enable the
hash feature in your Authorize.Net account and enter the hash string they
give you here. When a customer begins a credit card transaction, the hash
string is set from your on- line store to Authorize.Net as an extra credential.
See https://support.authorize.net/authkb/index?page=content&id=A588
Duplicate Window
Duration:
Measured in seconds.
CVV2 Message:
The text that you enter in this field will appear in your on- line store during
checkout when your customer enters their credit card information. Merchants
usually use this field to describe the purpose of the CVV2 field.
Charge Method:
Online (Automatic Capture): Authorize and Capture happen right away.
When your on-line store sends a request (authorize/void/capture/refund) to
Authorize.Net, Miva Merchant starts a timer. If an identical request (same
credit card number, order number, and order total) is sent to Authorize.Net in
the duration you set in this field, the first request is kept a nd the other
requests are considered duplicates and are ignored.
Offline (Authorize Only, Capture Later): Authorization occurs when the
user clicks the Submit button in the Payments page in your on- line store. To
capture funds you must edit the order in Miva Merchant admin and click on
the Capture button.
Note that these settings also affect you when you manually create an order.
For example:
362
Copyright 2005-2015, Miva Inc. All Rights Reserved.
Publication Date: 02/28/2015
User Reference Guide DRAFT
1
Set the Charge Method to Sale (Automatic Capture).
2
Manually create an order.
3
Edit the order and click the Authorize button. In the Authorize dialog
box, select a payment type associated with PayPal Payments Advanced
and click OK.
In the Edit Order screen, you can see that the Capture button is greyed out
and the funds were automatically captured after authorization.
Use Secure Source
Validation:
This feature is available to you if you have a merchant account with Wells
Fargo, and they sell you an Authorize.Net account. Please contact Wells
Fargo customer support to see if this option is the right choice for your
account. If you enable this option, when your on- line store sends a request to
Authorize.Net, your Login ID from Authorize.Net is replace with a credential
from Wells Fargo.
Store Entire CC
Number:
If you select this option, the customer's entire credit card number is attached
to the order. If you do not select this option, only the last four digits of the
customer's credit card are attached to the order.
Test Mode:
Enable this option if you want to run test credit card transactions.
1 Check this box to enable test mode in Miva Merchant.
2 Login to your Authorize.Net account and set your account to test mode.
Discard Failed Order ID: This feature has been superseded by the Duplicate Window Duration setting.
If you are using Discard Failed Order ID, it will still work, but it is no longer
needed.
If you enable this option and the customer's credit card fails to authorize:
The customer stays at the Payment Information screen (OPAY). Any
failure message that was generated by the gateway is displayed on
this screen.
A new number is created for the order.
The customer must wait two minutes to resubmit the order. The delay
is needed to force Authorize.Net to discard their order number, so that
the new Miva Merchant order number is matched with a new
Authorize.Net order number.
Please note that this option can cause errors if you are using a third-party
module that takes any action with the order number. A third-party
module has no way of knowing that the order number has changed and
can take actions using an order number that Miva Merchant has deleted.
This is not a problem for modules created by Miva Merchant, since those
modules will be "aware" that the order number has changed.
If you do not enable this option and the customer's credit card fails to
authorize:
The customer stays at the Payment Information screen (OPAY). Any
363
Copyright 2005-2015, Miva Inc. All Rights Reserved.
Publication Date: 02/28/2015
User Reference Guide DRAFT
failure message that was generated by the gateway is displayed on
this screen.
The order number remains the same.
The customer can re-submit their order immediately.
Available Payment
Methods:
Electronic Debit: This is an eCheck product from Authorize.Net that allows
your customer to pay by entering their checking account information in your
on- line store.
As the merchant you pay a monthly fee to Authorize.Net for the eCheck
service and a flat fee per transaction. There is no "discount fee" (a transaction
fee that is a percent of the order total) for an eCheck. When the customer
reaches the Shipping/Payment Selection screen (OSEL), they choose
Electronic Debit from the Pay With drop-down list. You can change this text
by editing the code in OPAY > Page tab > Template field.
In the Payment Information screen (OPAY), the customer enters their
checking account information:
Require CVV2 in
Administrative Interface
This option only affects you when you are manually creating an order
through the Miva Merchant admin interface. If you enable this option, you
must enter a CVV2 number in the Authorize dialog box when you create or
edit the order. If you do not enable this option, the Authorize dialog box will
still have a CVV2 field, but you can ignore it.
364
Copyright 2005-2015, Miva Inc. All Rights Reserved.
Publication Date: 02/28/2015
User Reference Guide DRAFT
Payment > CHASE Paymentech Orbital Gateway
Chase Paymentech is a gateway product, but they require you to have a merchant account with them.
Server:
The URL that Miva Merchant uses to submit requests. This field is autopopulated. You should only change it if you are given a new URL by Miva
Merchant or Chase.
Industry Type:
The value that you select here should match the industry type of your Chase
merchant account.
Platform:
Select Sale m or PNS (also called Tampa).
When you sign up for a Chase account you are assigned to a "platform",
which is like a data center. Enter the platform that your Chase account is
configured for.
Group Number:
A unique ID from Chase. Enter the group number that was created when you
set up your account.
Terminal ID:
Enter the Terminal ID that was created when you set up your Chase account.
A Terminal ID is subordinate to your Group ID and identifies a way of
interacting with customers. For example, your Chase Group ID could
identify your company. If you have a brick and mortar store you might have
three point-of-purchase card scanners, each of which would have its own
Terminal ID. In this case the Terminal ID is for your Miva Merchant store.
Currency:
Select the currency for payments that you receive. Usually this matches the
currency you have set for your store (see Edit Store > Settings > Currency
Formatting drop-down list.)
CVV2 Message:
The text that you enter in this field will appear in your on- line store during
checkout when your customer enters their credit card information. Merchants
usually use this field to describe the purpose of the CVV2 field.
Transaction Type:
Automatic Capture: If you select this option, authorize and capture will
occur when the user clicks the Submit button in the Payments page in your
on- line store.
Authorize Only, Capture Later: Authorization occurs when the user clicks
the Submit button in the Payments page in your on- line store. To capture
funds you must edit the order in Miva Merchant admin and click on the
Capture button.
Note that these settings also affect you when you manually create an order.
For example:
1 Set the Transaction Type to Automatic Capture.
2
Manually create an order.
3
Edit the order and click the Authorize button. In the Authorize dialog
365
Copyright 2005-2015, Miva Inc. All Rights Reserved.
Publication Date: 02/28/2015
User Reference Guide DRAFT
box, select a payment type associated with PayPal Payments Advanced
and click OK.
In the Edit Order screen, you can see that the Capture button is greyed out
and the funds were automatically captured after authorization.
Store Entire CC Number
If you select this option the customer's entire credit card number is attached
to the order. If you do not select this option, only the last four digits of the
customer's credit card number are attached to the order. (You can view the
credit card information by editing the order).
Available Payment
Methods:
The payment methods that you choose here will show up in the payments
drop-down list during checkout.
Require CVV2 in
Administrative Interface
This option only affects you when you are manually creating an order
through the Miva Merchant admin interface. If you enable this option, you
must enter a CVV2 number in the Authorize dialog box when you create or
edit the order. If you do not enable this option, the Authorize dialog box will
still have a CVV2 field, but you can ignore it.
Payment > Check Payment
The Check Payment module has no settings and enabling it does not create a tab. Many merchants use it
for testing purposes or for select business to business customers from whom they will accept checks or
purchase orders.
Check Payment is an off- line module, which means that payment is received well after the order is
created. The workflow typically looks like this:
1 Enable Check Payment as a payment module. You can alter the template code in OPAY and OSEL
so that the "Pay With" drop-down list shows "Purchase Order" instead of "Check".
2
3
The customer purchases something in your store and selects "Check" in the Shipping/Payment
Selection screen (OSEL) > "Pay With" drop-down list. The order is created with a status of
Authorized.
When you receive payment you manually edit the order and mark the funds as Captured.
There is a simple method you can use to track payments that were made by check:
1
Go to
> Order Processing > Orders tab.
366
Copyright 2005-2015, Miva Inc. All Rights Reserved.
Publication Date: 02/28/2015
User Reference Guide DRAFT
2
Set the filter fields to "Payment Status" and "Authorized with $0 captured".
With this filter you can see check/purchase orders that were created but which have not been marked as
Captured. Filtering orders this way is also useful for any other payment method that uses automatic
authorization and manual capture.
Payment > COD
Like a check, COD payments are received some time after the order is created. If you enable this module
the string "COD" appears in the Pay With drop-down list in the Shipping/Payment Selection (OSEL)
screen. When a customer selects COD as the payment method the order status is set to authorized, but
you have to manually capture funds by editing the order and clicking on the Capture button.
Charge
The COD charge that you want added to the order. The value you enter here
will show up as a line item in the Payment Information (OPAY) screen.
Message
The text that you enter in this field appears in the Payment Information
screen. You can use this field to give the customer any special instructions
for COD orders.
367
Copyright 2005-2015, Miva Inc. All Rights Reserved.
Publication Date: 02/28/2015
User Reference Guide DRAFT
Payment > Credit Card Payment with Simple Validation
Like a check or COD, this module is an off- line payment method. It allows you to capture the customer's
credit card information so that you can process it later. For example, if you have a brick-and- mortar
store, you might already have a method for manually processing credit cards.
This module performs a very limited set of validations on a credit card number:
When your customer enters their credit card number it is checked against the "mod-10" algorithm
(see http://en.wikipedia.org/wiki/Luhn_algorithm). The mod-10 algorithm only verifies that the
credit card has a valid possible number. It cannot determine if the card was stolen or if the number
was illegally generated by a criminal using widely available software.
For each credit card that you accept with this module, you can set one or more prefixes and one or
more allowable lengths. For example, by default, every American Express card must begin with the
numbers "34", or "37", and must be exactly 15 characters long.
To Add a Card
1
In the Credit Card Payment With Simple Validation tab, click Add Credit Card
.
368
Copyright 2005-2015, Miva Inc. All Rights Reserved.
Publication Date: 02/28/2015
User Reference Guide DRAFT
2
Enter the credit card name.
3
Enter one or more Allowable Prefixes.
4
The prefix describes how a valid card must begin. For example, if you enter "34" in this field,
then all cards of this type must begin with the number "34" or they will be rejec ted during
checkout. You can enter as many prefixes as you want for each card, separated by commas. For
example, "34, 35, 36, 37" would allow credit card numbers that begin with the numbers 34, 35,
36, or 37.
Enter one or more Allowable Lengths.
5
The allowable lengths determine the number of characters the credit card can have. For example,
if you enter "15" in this field, all credit cards of this type must have exactly 15 characters or they
will be rejected during checkout. You can enter as many allowable lengths as you want for each
card, separated by commas. For example, "15, 16, 17, 18" would allow credit card numbers that
have a total of 15, 16, 17 or 18 characters.
Click Save Credit Card
.
Payment > CyberSource
CyberSource is another gateway product, similar to Authorize.Net. (Visa owns CyberSource and
CyberSource owns Authorize.Net.) In general, merchants that do less than 5 million a year in sales use
Authorize.Net. CyberSource is a more expensive gateway and may have more advanced fraud detection
features than you would need in a smaller store.
API Endpoint URL:
The URL that Miva Merchant uses to submit requests. This field is autopopulated. You should only change it if you are given a new URL by Miva
Merchant or CyberSource.
CyberSource ID:
Transaction Key:
These fields are credentials that are created when you set up your account
with CyberSource. They are used to securely identify your store during
payment transactions.
Currency:
Select the currency for payments that you receive. Usually this matches the
currency you have set for your store (see Edit Store > Settings > Currency
Formatting drop-down list.)
CVV2 Message:
The text that you enter in this field will appear in your on- line store during
checkout when your customer enters their credit card information. Merchants
usually use this field to describe the purpose of the CVV2 field.
Transaction Type:
Authorize Only, Capture Later: Authorization occurs when the user clicks
the Submit button in the Payments page in your on- line store. To capture
funds you must edit the order in Miva Merchant admin and click on the
Capture button.
Automatic Capture: If you select this option, Authorize and Capture occur
when the user clicks the Submit button in the Payments page in your on- line
369
Copyright 2005-2015, Miva Inc. All Rights Reserved.
Publication Date: 02/28/2015
User Reference Guide DRAFT
store.
Note that these settings also affect you when you manually create an order.
For example:
1 Set the Transaction Type to Automatic Capture.
2 Manually create an order.
3
Edit the order and click the Authorize button. In the Authorize dialog
box, select a payment type associated with PayPal Payments Advanced
and click OK.
In the Edit Order screen, you can see that the Capture button is greyed out
and the funds were automatically captured after authorization.
Perform Automatic
Capture on AVS Soft
Decline:
CyberSource has a product called Decision Manager. It examines payment
transactions and makes a decision as to whether the transaction is legitima te
or fraudulent. If the software determines that the transaction is fraudulent, it
can mark the transaction with a "soft decline". The order is created in Miva
Merchant, and the customer's card is charged, but the order has a pending
status at CyberSource. This setting affects soft declines that occurred because
the shipping address on the order did not match the registered address of the
card.
If you enable this option, and CyberSource generates a soft decline
because of an address mismatch, the status of the order in Miva Merchant
is set to "Captured".
If you do not enable this option, and CyberSource generates a soft decline
because of an address mismatch, the order is created and the status in
Miva Merchant is set to Authorized. You can manually Capture funds
using the Miva Merchant admin interface or by logging into your
CyberSource account.
Perform Automatic
Capture on CVV2 Soft
Decline:
Same as above, but for soft declines that occurred because the customer did
not enter a CVV2 number, or the CVV2 number that they entered did not
match the recorded CVV2 number for the card.
Store Entire Credit Card
Number
If you select this option the customer's entire credit card number is attached
to the order. If you do not select this option, only the last four digits of the
customer's credit card number are attached to the order. (You can view the
credit card information by editing the order).
Available Payment
Methods:
The payment methods that you choose here will show up in the payments
drop-down list during checkout.
Require CVV2 in
This option only affects you when you are manually creating an order
Administrative Interface: through the Miva Merchant admin interface. If you enable this option, yo u
must enter a CVV2 number in the Authorize dialog box when you create or
edit the order. If you do not enable this option, the Authorize dialog box will
still have a CVV2 field, but you can ignore it.
370
Copyright 2005-2015, Miva Inc. All Rights Reserved.
Publication Date: 02/28/2015
User Reference Guide DRAFT
Payment > First Data Global Gateway
First Data is a gateway product, similar to Authorize.Net. In general, to use the First Data Global
Gateway you must also have a merchant account with them.
API Endpoint URL:
The URL that Miva Merchant uses to submit requests. This field is autopopulated. You should only change it if you are given a new URL by Miva
Merchant or First Data.
API Username:
API Password:
API Certificate:
API Private Key:
API Private Key
Password:
All of these fields are credentials that are created when you set up your
account with First Data. They are used to securely identify your store during
payment transactions.
CVV2 Message:
The text that you enter in this field will appear in your on- line store during
checkout when your customer enters their credit card information. Merchants
usually use this field to describe the purpose of the CVV2 field.
Transaction Type:
Automatic Capture: If you select this option, Authorize and Capture occur
when the user clicks the Submit button in the Payments page in your on- line
store.
Authorize Only, Capture Later: Authorization occurs when the user clicks
the Submit button in the Payments page in your on- line store. To capture
funds you must edit the order in Miva Merchant admin and click on the
Capture button.
Note that these settings also affect you when you manually create an order.
For example:
1 Set the Transaction Type to Automatic Capture.
2
Manually create an order.
3
Edit the order and click the Authorize button. In the Authorize dialog
box, select a payment type associated with PayPal Payments Advanced
and click OK.
In the Edit Order screen, you can see that the Capture button is greyed out
and the funds were automatically captured after authorization.
Store Entire CC Number
If you select this option the customer's entire credit card number is attached
to the order. If you do not select this option, only the last four digits o f the
customer's credit card number are attached to the order. (You can view the
credit card information by editing the order).
Available Payment
Methods:
The payment methods that you choose here will show up in the payments
drop-down list during checkout.
Require CVV2 in
This option only affects you when you are manually creating an order
371
Copyright 2005-2015, Miva Inc. All Rights Reserved.
Publication Date: 02/28/2015
User Reference Guide DRAFT
Administrative Interface
through the Miva Merchant admin interface. If you enable this option, you
must enter a CVV2 number in the Authorize dialog box when you crea te or
edit the order. If you do not enable this option, the Authorize dialog box will
still have a CVV2 field, but you can ignore it.
Payment > Intuit Merchant Services
Intuit Merchant Services (previously known as Q uickBook Merchant Services) is a real-time gateway,
similar to Authorize.Net. You must have a merchant account set up with Intuit before you can use Intuit
Merchant Services in your store.
Intuit API Endpoint
URL:
This field is pre-set with the path to the Intuit API. You will probably never
need to change it.
Connection Ticket:
The Connection Ticked is a credential that you get when you set up your
Intuit merchant account. It looks something like this:
SGM-FUR-26-f6LzmXod3wdT_5MSeFCShH
Apply for an IPS
merchant account or
generate a connection
ticket
If you do not already have an Intuit merchant account, you can click on this
link to visit the page to apply for one. You must have a merchant account set
up with Intuit before you can use Intuit Merchant Services in your store.
CVV2 Message:
The text that you enter in this field will appear in your on- line store during
checkout when your customer enters their credit card information. Merchants
usually use this field to describe the purpose of the CVV2 field.
Transaction Type:
Authorize Only, Capture Later: Authorization occurs when the user clicks
the Submit button in the Payments page in your on- line store. To capture
funds you must edit the order in Miva Merchant admin and click on the
Capture button.
Automatic Capture: Authorization and Capture happen right away.
Note that these settings also affect you when you manually create an order.
For example:
1 Set the Charge Method to Sale (Automatic Capture).
2
Manually create an order.
3
Edit the order and click the Authorize button. In the Authorize dialog
box, select a payment type associated with PayPal Payments Advanced
and click OK.
In the Edit Order screen, you can see that the Capture button is greyed out
and the funds were automatically captured after authorization.
Store Entire CC
Number:
If you select this option, the customer's entire credit card number is attached
to the order. If you do not select this option, only the last four digits of the
customer's credit card are attached to the order.
372
Copyright 2005-2015, Miva Inc. All Rights Reserved.
Publication Date: 02/28/2015
User Reference Guide DRAFT
Available Payment
Methods:
Select the payment options you want to offer your customers in the OPAY
screen.
Require CVV2 in
Administrative Interface
This option only affects you when you are manually creating an order
through the Miva Merchant admin interface. If you enable this option, you
must enter a CVV2 number in the Authorize dialog box when you create or
edit the order. If you do not enable this option, the Authorize dialog box will
still have a CVV2 field, but you can ignore it.
Payment > PayPal Express Checkout and/or Payments Pro
Use this module to enable any of the following PayPal services:
PayPal Express Checkout: This is the simplest PayPal payment method. You only need to have a
standard PayPal account. Orders are Authorized and Captured immediately. You cannot do refunds
or voids. PayPal Express supports in-context checkout.
Express Checkout with API Cre dentials: Also requires only a standard PayPal account. This
option permits refunds and voids, and can be configured for immediate or delayed capture. With
delayed capture the funds are authorized when the customer completes the order, but you have to
manually capture the funds when you edit an order.
PayPal Payments Pro: To use this option you must set up a PayPal Payments Pro account (a
merchant account) with PayPal, which requires an additional monthly fee.
Includes PayPal Express Checkout.
Supports refunds and voids.
Can be configured for immediate or delayed capture.
Gives your on-line store direct access to credit card transactions. When your customers go
through checkout, they will see the PayPal Express Checkout option, but will also see options for
Visa, MasterCard, Discover, and American Express.
Template Changes for PayPal Express Checkout
PayPal Express Checkout in Miva Merchant changed in PR8 Update 11.
If you did not use PayPal Express Checkout before PR8 Update 11, you don't have to do anything.
All the changes that you need are included in PR8 Update 11.
If you were using PayPal Express Checkout in your store before PR8 Update 11, you have to make
the template changes in the PR8 Update 11 Template Changes.
To Configure PayPal Express Checkout
Before you can complete the instructions in this section, you must have a "standard" free account with
PayPal.
1
Go to
> Payment > Add/Remove Modules > Available Modules tab.
373
Copyright 2005-2015, Miva Inc. All Rights Reserved.
Publication Date: 02/28/2015
User Reference Guide DRAFT
2
Click the Install button under PayPal Express Checkout and/or Payments Pro.
3
In the PayPal Express Checkout and/or Payments Pro API Credentials tab:
3.1.
Set the Operation Mode to Production.
3.2.
Select your Currency.
3.3.
4
5
Select the E-mail address to receive PayPal Payment radio button. Enter the email address
associated with your PayPal account.
Click Update.
Select the Payment Settings > PayPal Express Checkout Tab and make any required changes.
6
Click Update.
To Configure PayPal Express Checkout with API Credentials
Before you can complete the instructions in this section, you must:
Have a "standard" free account with PayPal.
Your PayPal account must be upgraded to use API access.
1
2
Go to
> Payment > Add/Remove Modules > Available Modules tab.
Click the Install button under PayPal Express Checkout and/or Payments Pro.
3
In the PayPal Express Checkout and/or Payments Pro API Credentials tab:
374
Copyright 2005-2015, Miva Inc. All Rights Reserved.
Publication Date: 02/28/2015
User Reference Guide DRAFT
4
5
6
3.1.
Set the Operation Mode to Production.
3.2.
Select your Currency.
3.3.
Select the API Credentials for payments and post-checkout operations radio button.
3.4.
Set the Account Type to Express Checkout.
3.5.
Set the API Username, API Password, API Authentication Method, and API Signature /
Certificate. Please see Payment Settings > PayPal Express Checkout and/or Payments Pro
API Credentials Tab.
Click Update.
Select the Payment Settings > PayPal Express Checkout Tab and make any required changes.
Click Update.
To Configure PayPal Payments Pro
Before you can complete the instructions in this section, you must go to PayPal.com and setup a
Payments Pro account. This is a merchant account that requires an additional monthly fee.
1
2
3
Go to
> Payment > Add/Remove Modules > Available Modules tab.
Click the Install button under PayPal Express Checkout and/or Payments Pro.
In the PayPal Express Checkout and/or Payments Pro API Credentials tab:
3.1.
Set the Operation Mode to Production.
3.2.
Select your Currency.
3.3.
Select the API Credentials for payments and post-checkout operations radio button.
3.4.
Set the Account Type to PayPal Payme nts Pro .
3.5.
Set the API Username, API Password, API Authentication Method, and API Signature /
Certificate. Please see Payment Settings > PayPal Express Checkout and/or Payments Pro
API Credentials Tab.
4
5
Click Update.
Select the Payment Settings > PayPal Express Checkout Tab and make any required changes.
6
Click Update.
7
8
Select the Payment Settings > PayPal Payments Pro Tab and make any required changes.
Click Update.
Payment Settings > PayPal Express Checkout and/or Payments Pro API
Credentials Tab
Operation Mode:
Production: Select this mode if you are ready to use one of the PayPal
methods in your store.
375
Copyright 2005-2015, Miva Inc. All Rights Reserved.
Publication Date: 02/28/2015
User Reference Guide DRAFT
Sandbox: Generally you would only select this mode if you are a developer
and you want to test one or more of the PayPal payment methods. Before
you can use sandbox mode, you must go to developer.paypal.com and sign
up for a Sandbox account.
Currency
Select the currency for payments that you receive. Usually this matches the
currency you have set for your store (see Edit Store > Settings > Currency
Formatting drop-down list.)
E- mail address to
Select this option if you want to enable only PayPal Express Checkout. Enter
receive PayPal Payment: the email address associated with your PayPal account.
Account Type:
Express Checkout: Select this option if you want to use Express Checkout
with API Credentials.
PayPal Payments Pro: Select this option if you want to use PayPal
Payments Pro.
API Username:
The API credentials, username, password, authentication method, and
signature/certificate are used by PayPal to authenticate your online store and
your shopping carts. You create these credentials when you either:
Update your standard PayPal account for API Access.
Create a PayPal Payments Pro account.
API Password:
See API Username.
API Authentication
Method:
Select Signature unless PayPal has specifically instructed you otherwise.
This is the method that PayPal uses to authenticate your store's shopping cart
to prevent someone spoofing or otherwise tampering with a cart or payment.
API Signature /
Certificate:
See API Username.
Payment Settings > PayPal Express Checkout Tab
Transaction Mode:
Immediate Sale: Select this option to have capture occur immediately. Note
that this field is greyed out and selected by default if you selected "E- mail
address to receive PayPal Payment radio button" in the "PayPal Express
Checkout and/or Payments Pro API Credentials" tab.
Authorization with Delayed Capture : If you select this option,
authorization will happen immediately, but the funds will not be captured
until you manually edit the order in the Miva Merchant admin and click the
Capture button.
Note that these settings also affect you when you manually create an order.
376
Copyright 2005-2015, Miva Inc. All Rights Reserved.
Publication Date: 02/28/2015
User Reference Guide DRAFT
For example:
1 Set the Transaction Mode to Immediate Sale.
2
3
Manually create an order.
Edit the order and click the Authorize button. In the Authorize dialog
box, select a payment type associated with PayPal Payments Advanced
and click OK.
In the Edit Order screen, you can see that the Capture button is greyed out
and the funds were automatically captured after authorization.
Enable In Context
Checkout
PayPal's in-context checkout is similar to the in- line checkout used by
Amazon Payments. If you enable this feature, customers can log into their
PayPal accounts and make shipping and payment selections without leaving
your store. If you do not enable this feature, the customer is redirected to a
PayPal web page to login and select shipping and payment. Tracking tools,
such as Google Analytics, cannot track your customers when they are on a
PayPal page.
PayPal's in-context checkout is a little different from Amazon's.
When you use the PayPal in-context feature:
The customer does not leave your store during
authorization or checkout.
The customer logs into their PayPal account
with a popup window that appears on top your
store page.
Information is taken from the customer's
PayPal account, placed into a standard Miva
Merchant page (OCST, in the example above)
When you use the Amazon Payments in- line
feature:
The customer does not leave your store during
authorization or checkout.
Your store page has a "widget" (a type of
control) built into it. These page widgets let
your customer log into their Amazon account
and select shipping and payment information.
Information is taken from the customer's
377
Copyright 2005-2015, Miva Inc. All Rights Reserved.
Publication Date: 02/28/2015
User Reference Guide DRAFT
and can be edited.
Amazon account, placed in a custom Miva
Merchant page (Amazon Payments - OCST, in
this example) and cannot be edited.
Display PayPal Credit
Button
PayPal Credit is a credit product from PayPal. If you enable this feature, a
PayPal Credit Button will appear in the Basket Contents screen (BASK) as a
payment option.
The PayPal Credit feature currently does not support in-context verification
or in-context authorization. If the customer selects PayPal Credit, they:
1 Are redirected to a PayPal page where they login to their PayPal account.
2
Make their shipping and payment selections.
3
Return to your store to complete checkout.
Use Customer's PayPal
Shipping Address for
Miva Merchant Orders
Select this option if you want to use the customer's PayPal shipping address
as the destination address.
Send Order Details
If you select this option, all items, quantities and prices in the order are sent
to PayPal. If you do not select this option, only the order total is sent to
PayPal.
Order Description:
Whatever you enter in this field will show up in the customer's PayPal
account as a note for the transaction.
Order Review Message:
When the customer returns to your on-line store after paying with PayPal,
they see a confirmation page right before the invoice page, which will show
whatever text you enter in this field.
Until the customer clicks the OK button in the confirmation page in your online store, they haven't authorized payment. The "authorization" in the
customer's PayPal account just authorizes your on- line store to complete a
transaction with the customers PayPal account. It doesn't authorize the fund
transfer.
Locale:
Select the country where your account with PayPal was created. If you were
in the United States when you created your PayPal account, select "United
States".
Page Style:
This field and the fields below give you some minor control over the PayPal
login screen that the customer will first see if they select PayPal Express as
the payment method. Whatever page style template you selected in your
merchant's PayPal account, you should enter here.
Header Image URL:
Enter a server path to an image, or use the upload button to upload an image
to your store server. The image that you reference here will show up at the
378
Copyright 2005-2015, Miva Inc. All Rights Reserved.
Publication Date: 02/28/2015
User Reference Guide DRAFT
top of the PayPal login screen when your customer chooses to pay with
PayPal. The max image size is 750x90 pixels.
Header Border Color:
Enter a 6 digit hex number. That color will be used as the header border color
in the PayPal login screen when your customer chooses to pay with PayPal.
Header Background
Color:
Enter a 6 digit hex number. That color will be used as the header background
color in the PayPal login screen when your customer chooses to pay with
PayPal.
Page Background Color:
Enter a 6 digit hex number. That color will be used as the page background
color in the PayPal login screen when your customer chooses to pay with
PayPal.
PayPal Express In-context Checkout
If you enable the PayPal Express in-context checkout, the checkout screens in your store will look
slightly different to the customer.
In the Basket Contents screen (BASK), the customer clicks the "Checkout with PayPal" button.
379
Copyright 2005-2015, Miva Inc. All Rights Reserved.
Publication Date: 02/28/2015
User Reference Guide DRAFT
While they are still in the Basket Contents screen (BASK), the customer ente rs their PayPal
credentials in a popup window and clicks the Log In button.
Another popup window opens in front of the Basket Contents screen. The customer makes their
"ship to" and "pay with" selections and clicks the Continue button.
380
Copyright 2005-2015, Miva Inc. All Rights Reserved.
Publication Date: 02/28/2015
User Reference Guide DRAFT
The customer returns to the Order Details screen (OCST) in your store. The Ship To information
that the customer selected from their PayPal account is populated into this screen an can be
edited. The custome r clicks the Continue button when they are done.
381
Copyright 2005-2015, Miva Inc. All Rights Reserved.
Publication Date: 02/28/2015
User Reference Guide DRAFT
The payment information that the customer selected from their PayPal account is populated into
the Shipping/Payment screen (OSEL). The customer can edit the information and clicks the
Continue button when they are done.
The customer sees the standard Payment Information confirmation screen (OPAY). The custome r
clicks the Continue button to confirm that the order is correct.
382
Copyright 2005-2015, Miva Inc. All Rights Reserved.
Publication Date: 02/28/2015
User Reference Guide DRAFT
The customer sees your invoice screen (INVC).
PayPal Express Credit
PayPal Credit in Miva Merchant currently does not support in-context checkout.
383
Copyright 2005-2015, Miva Inc. All Rights Reserved.
Publication Date: 02/28/2015
User Reference Guide DRAFT
The customer goes to the Basket Contents page (BASK) and clicks the PayPal Credit Button.
384
Copyright 2005-2015, Miva Inc. All Rights Reserved.
Publication Date: 02/28/2015
User Reference Guide DRAFT
The customer leaves your store and goes to a PayPal page. If the customer already has PayPal
Credit set up in their PayPal account (as in this case) they are asked to enter their credentials. If
the customer does not have a PayPal Credit account, they are taken to a page to apply for one.
385
Copyright 2005-2015, Miva Inc. All Rights Reserved.
Publication Date: 02/28/2015
User Reference Guide DRAFT
At a PayPal page, the customer selects their billing and payme nt options and clicks the Continue
button.
386
Copyright 2005-2015, Miva Inc. All Rights Reserved.
Publication Date: 02/28/2015
User Reference Guide DRAFT
The customer returns to the Order Details screen (OCST) in your store. The Ship To information
that the customer selected from their PayPal account is populated into this screen an can be
edited. The custome r clicks the Continue button when they are done.
387
Copyright 2005-2015, Miva Inc. All Rights Reserved.
Publication Date: 02/28/2015
User Reference Guide DRAFT
The payment information that the customer selected from their PayPal account is populated into
the Shipping/Payment screen (OSEL). The customer can edit the information and clicks the
Continue button when they are done.
388
Copyright 2005-2015, Miva Inc. All Rights Reserved.
Publication Date: 02/28/2015
User Reference Guide DRAFT
The customer sees the standard Payment Information confirmation screen (OPAY). The custome r
clicks the Continue button to confirm that the order is correct.
The customer sees your invoice screen (INVC).
389
Copyright 2005-2015, Miva Inc. All Rights Reserved.
Publication Date: 02/28/2015
User Reference Guide DRAFT
Payment Settings > PayPal Payments Pro Tab
Send Order Details:
If you select this option, all items, quantities and item prices in the order are
sent to PayPal. If you do not select this option, only the order total is sent to
PayPal.
Transaction Mode:
Immediate Sale: Select this option to have authorization and capture occur
immediately. Note that this field is greyed out and selected by default if you
selected "E- mail address to receive PayPal Payment radio button" in the
"PayPal Express Checkout and/or Payments Pro API Credentials" tab.
Authorization with Delayed Capture : If you select this option,
authorization will happen immediately, but the funds will not be captured
until you manually edit the order in the Miva Merchant admin and click the
Capture button.
Note that these settings also affect you when you manually create an order.
For example:
1 Set the Transaction Mode to Immediate Sale.
2
Manually create an order.
3
Edit the order and click the Authorize button. In the Authorize dialog
box, select a payment type associated with PayPal Payments Advanced
and click OK.
In the Edit Order screen, you can see that the Capture button is greyed out
and the funds were automatically captured after authorization.
Available Payment
Methods:
Select the payment methods that you want to offer your customers during
checkout.
Require CVV2 in
This option only affects you when you are manually creating an order
Administrative Interface: through the Miva Merchant admin interface. If you enable this option, you
must enter a CVV2 number in the Authorize dialog box when you create or
edit the order. If you do not enable this option, the Authorize dialog box will
still have a CVV2 field, but you can ignore it.
Order Description:
Whatever you enter in this field will show up in the customer's PayPal
account as a note for the transaction.
Payment > PayPal Payments Advanced and/or Payflow
Gateway
Use this module to configure one of three PayPal products:
390
Copyright 2005-2015, Miva Inc. All Rights Reserved.
Publication Date: 02/28/2015
User Reference Guide DRAFT
PayPal Payments Advanced: PayPal Payments Advanced combines a merchant account (with a
monthly fee) and a gateway in one product. Unlike PayPal Payments Pro, with this method you
cannot store the customer's credit card information along with their order.
This product uses a "hosted checkout" which places an iFrame in your checkout pages. From the
customer's perspective they are entering their credit card information in your on- line store, however,
the information is being sent directly to PayPal. As of this writing (08/01/12), this method makes
PayPal responsible for compliance with the Payment Card Industry standards for secure transactions.
Please note that this is subject to change.
Payflow Link: Payflow Link is a payment gateway that does not include a merchant account. Like
PayPal Payments Advanced, with this method PayPal is currently responsible for PCI compliance
with transaction security.
Payflow Pro: Like Payflow Link, this method is a gateway only. Unlike the other two methods it
does not add an iFrame to your checkout pages for credit card transactions. The credit card
transaction takes place within your on- line store.
Product Name
Includes a
Merchant Account
(with Monthly Fee)
Adds an iFrame to
Your Checkout Pages
Includes a
Gateway
PayPal Payments Advanced
Payflow Link
Payflow Pro
Payment Solution:
Select the PayPal product you are using. If you haven't already signed up for
one of the products, you can click on a Sign Up link to go to PayPal's
website.
Host:
The URL that Miva Merchant uses to make transactio n requests. This field is
auto-populated and you should never need to change it.
Partner:
The partner is the seller or reseller that gives you access to the payment
gateway. When you create your PayPal account you will be told the partner
information. It will generally be either PayPal or Miva Merchant.
Merchant Login:
When you sign up for a PayPal product you get a single merchant login and
one or more user logins. The merchant login is like the "master" login for
your account. There is only one merchant login and password. However, you
can also create as many user logins as you wish. For example, you might use
your company name as your merchant login and then create user logins for
different employees in your company.
User:
The user account name that you want to use.
391
Copyright 2005-2015, Miva Inc. All Rights Reserved.
Publication Date: 02/28/2015
User Reference Guide DRAFT
Password:
The password for your merchant login.
Transaction Timeout:
Defaults to 30 seconds. When your on- line store sends a request to a gateway
(authorize/refund/void/capture), Miva Merchant starts a timer. If Miva
Merchant doesn't get a response from the gateway before the transaction
timeout, both Miva Merchant and the gateway cancel the request.
CVV2 Message:
Only applies if you are using Payflow Pro. The text that you enter in this
field will appear in your on-line store during checkout when your customer
enters their credit card information. Merchants usually use this field to
describe the purpose of the CVV2 field.
Charge Method:
Sale (Automatic Capture): If you select this option, authorize and capture
will occur when the user clicks the Submit button in the Payments page in
your on- line store.
PreAuth (Authorize Only, Capture Later): Authorization occurs when the
user clicks the Submit button in the Payments page in your on- line store. To
capture funds you must either:
Edit the order in Miva Merchant admin and click on the Capture
button.
Log into your PayPal account and manually capture the funds.
Note that these settings also affect you when you manually create an orde r.
For example:
1 Set the Charge Method to Sale (Automatic Capture).
Store Entire Credit Card
Number:
Available Payment
Methods:
2
Manually create an order.
3
Edit the order and click the Authorize button. In the Authorize dialog
box, select a payment type associated with PayPal Payments Advanced
and click OK.
4
In the Edit Order screen, you can see that the Capture button is greyed
out and the funds were automatically captured after authorization.
If you are using Payflow Pro, and you select this option, the customer's
entire credit card number is attached to the order. (You can view the
credit card information by editing the order).
If you are using Payflow Pro and you don't select this option, only the
last four digits of the customer's credit card are attached to the order.
If you are using Payflow Link or Payflow Pro, the last four digits of the
customer's credit card are always attached to the order, regardless of
whether you check this box or not.
If you are using Payflow Pro, the payment methods that you choose here will
show up in the payments drop-down list during checkout. If you are using
Payflow Link or Payflow Pro, the drop down list will show whatever you
select here, but the iFrame will only accept American Express, Discover,
392
Copyright 2005-2015, Miva Inc. All Rights Reserved.
Publication Date: 02/28/2015
User Reference Guide DRAFT
MasterCard and Visa.
Require CVV2 in
This option only affects you when you are manually creating an order
Administrative Interface: through the Miva Merchant admin interface. If you enable this option, you
must enter a CVV2 number in the Authorize dialog box when you create or
edit the order. If you do not enable this option, the Authorize dialog box will
still have a CVV2 field, but you can ignore it.
Payment > PayPal Payments Standard
PayPal Payments Standard, also called PayPal Instant Payment Notification, is PayPa l's oldest product.
Setup is easy and requires only an email address.
Does not support voids, refunds, or delayed capture.
No monthly fees.
Does not require a merchant account.
If the customer selects this payment method in your store, they are taken to the PayPal site and can pay
with any method they have configured in their account. Please note that you should not enable both
Payments Standard and PayPal Express Checkout. There's very little difference between the two
products, and if you enable both, the text "PayPal" will appear twice in the Pay With drop-down list.
Business Email:
Your PayPal email address.
PayPal URL:
The URL that Miva Merchant uses to make transaction requests. This field is
auto-populated and you should never need to change it.
Currency:
Select the currency for payments that you receive. Usually this matches the
currency you have set for your store (see Edit Store > Settings > Currency
Formatting drop-down list.)
Prompt Shoppers for
Shipping Address (on
PayPal side):
If you enable this option, when the customer reaches the PayPal website they
will be prompted to confirm the shipping address that they have on file with
PayPal. The most secure method you can use to guarantee the customer's
shipping address is to enable this option and the next option "Use Customer's
PayPal Shipping Address". You've asked the customer to confirm their
shipping address, and you are guaranteeing that your on- line store will ship
to that address.
Use Customer's PayPal
Shipping Address for
Miva Merchant Orders
If you enable this option, the address that the customer has on file with
PayPal will be used as their shipping address. See above.
Message:
The message that you enter in this field will appear in the OPAY (Payment
Information) page in your on- line store. Merchants usually use this field to
explain to the customer that, when the customer clicks the Submit button in
the Payment Information page, they will be taken to the PayPal website to
393
Copyright 2005-2015, Miva Inc. All Rights Reserved.
Publication Date: 02/28/2015
User Reference Guide DRAFT
complete payment. When they've finished paying, they will automatically
return to the INVC (Invoice) page in your on- line store.
Instructions
These instructions describe how to configure your PayPal Payments Standard
account so that an order is correctly created in your Miva Merchant store. If
you don't configure your PayPal account correctly, you will receive payment
from your customer, but the order might not be created in your on- line store,
or it might not be created correctly. You will receive payment, but you might
not have enough information to fulfill the order.
Payment > Add/Remove Modules
To Add Payment Modules
1
2
Go to the
> Payment > Add/Remove Modules tab.
Select the Available Modules section.
3
Click on the Install button for the payment module that you want to add.
To Remove Payment Modules
1
2
3
Go to the
> Payment > Add/Remove Modules tab.
Select the Installed Modules section.
Click on the Remove button for the payment module that you want to remove.
Order Fulfillment
Order Fulfillment > Template Based Emails
Template based emails are emails that you can send automatically or manually to a customer.
Automatically: You can configure template based emails so that a customer receives the email when
some event occurs. For example, when you mark an order as shipped in the admin interface, you can
automatically have an email sent to the customer letting them know that their order has shipped. See
To Configure Template Based Emails to be Sent Automatically.
Manually: You can also configure template based emails so that you can send them manually. This
has tremendous utility for areas of your business, such as customer service. For example, let's say
that you sell a lot of products that come with instruction manuals. You could make all of your
assembly documents into email templates. If a customer contacts you and asks for a copy of a certain
set of instructions, you could email the instructions at the click of a button. See To Configure
Template Based Emails to be Sent Manually.
394
Copyright 2005-2015, Miva Inc. All Rights Reserved.
Publication Date: 02/28/2015
User Reference Guide DRAFT
You can create your own template based emails from scratch, but Miva Merchant includes several that
you can use right away. You can also edit the existing template based emails.
To Edit a Template Based Email
There are two kinds of editing you can perform on a template email:
You can edit the email "properties". The email properties are a set of fields that let you control the
From, To, and Subject fields of the email, and other things like what event(s) will trigger the email
to be sent.
You can edit the email te mplate code. When you edit the email template code you can change the
text of the email, add custom logo's, etc.
To Edit Email Properties
1
2
Go to
> Order Fulfillment > Template Based Emails tab.
Double-click on one of the email templates.
3
Edit the fields in the Edit Email dialog box.
395
Copyright 2005-2015, Miva Inc. All Rights Reserved.
Publication Date: 02/28/2015
User Reference Guide DRAFT
Code:
Uniquely identifies an email template in the database.
Name:
Descriptive name for the email template. The Name of the email template is
displayed in the admin interface.
Mime Type
Most customers will never need to edit this field. You could change the Mime
Type to configure the email that is sent, for example to:
Visible For:
Allow only text in the email.
Force the email to be formatted in HTML.
Change the character set used in the email.
In many cases, customer emails are sent automatically when triggered by an
event. For example, if you check the Send When Order > Placed checkbox in
the Add Email dialog box, your customer automatically receives an email
when their order is placed.
However, you can also use the Visible For feature to configure your email so
396
Copyright 2005-2015, Miva Inc. All Rights Reserved.
Publication Date: 02/28/2015
User Reference Guide DRAFT
that it can be sent manually.
Sending
Custome rs: If you check this box, you will be able to send this email
manually when you edit a customer account. See To Create a Customer
Account.
Orde rs: If you check this box, you will be able to send this email manually
when you edit an order. See
> Order Processing > edit an order >
Order Emails link.
Automatic: Select Automatic and one or more of the trigger conditions to
have this email automatically sent when that event occurs. For example, if
you want this email to be automatically sent when an item is on backorder:
Select Sending > Automatic.
Click the Backordered checkbox.
Manual: If you select this option you must also select one of the Visible
For options above. In this case, you don't want the email to be sent
automatically when some event occurs. By selecting one of the Visible For
options, you'll be able to send this email manually when you edit a
customer record, and/or edit an order.
Manual emails are a very powerful feature and can be used in different
ways. For example, let's say that you sell a number of products that require
assembly: bookcases, display shelves, bed frames, etc. You include
assembly instructions in every order, but if a customer loses their
instructions, you want to be able to send them a replacement document
quickly. In this case you could put each set of assembly instructions into a
separate email template. If a customer loses the assembly instructions, your
service rep can edit the order (or the customer's record), find the email
template that has the assembly instructions, and manually send that email
template to the customer.
But see also Example: Different Combinations of the Sending and Visible For
Fields.
Send Base64 Encoded
This is not an event trigger. If you check this box, this email will be sent using
Base64 encoding.
397
Copyright 2005-2015, Miva Inc. All Rights Reserved.
Publication Date: 02/28/2015
User Reference Guide DRAFT
Example: Different Combinations of the Sending and Visible For Fields
You can use the Sending and Visible For fields in the Add/Edit Email dialog box to create different send
options:
Manual Only
Manual and Automatic
I never want to send this
email automatically. I will
only send it manually.
I want to send this email
automatically and be able
to send it manually.
Automatic Only
I only want this email to
be sent automatically. I
will never send it
manually.
Note that checking "Placed" here is only an example.
The same would be true if you check any event trigger.
To Edit Email Template Code
1
2
Go to
> Order Fulfillment > Template Based Emails tab.
Select a template based email, then click Edit Template.
3
Every template based email has its own Page. In our example, we edited the template for Backorder
Notice, so the system took us to "Edit Page: Backorder Notice". If you know the Page name that is
associated with a template based email, you could also edit the template code by going to:
> User Interface > Pages tab > Edit a page (Backorder Notice) > Page tab.
398
Copyright 2005-2015, Miva Inc. All Rights Reserved.
Publication Date: 02/28/2015
User Reference Guide DRAFT
Either way, you'll now be able to edit the template code for the email.
To Configure Template Based Emails to be Sent Automatically
1
2
Go to
> Order Fulfillment > Template Based Emails tab.
Click on the slider icon to enable the template based email.
3
Now double-click on the template based email to open the Edit Email dialog box.
4
In the Sending field, select Automatic, then click on one or more of the event trigger checkboxes.
In this example, the customer will receive an
email when an item is marked as back
ordered in the admin interface (edit order).
5
Save your changes in the Edit Email dialog box.
See also Example: Different Combinations of the Sending and Visible For Fields.
399
Copyright 2005-2015, Miva Inc. All Rights Reserved.
Publication Date: 02/28/2015
User Reference Guide DRAFT
To Configure Template Based Emails to be Sent Manually
1
2
Go to
> Order Fulfillment > Template Based Emails tab.
Click on the slider icon to enable the template based email.
3
Now double-click on the template based email to open the Edit Email dialog box.
4
In the Visible For field, check the Customers and/or the Orders checkbox.
If you check the Customers checkbox, you'll be able to send this email to customers while you
edit a customer account record. See below.
5
If you check the Orders checkbox, you'll be able to send this email to customers while you edit
an order. See below.
Save your changes in the Edit Email dialog box.
See also Example: Different Combinations of the Sending and Visible For Fields.
To Send a Template Based Email Manually
While Editing a Customer Account Record
1
Make sure that you've followed the steps to configure the email to be sent manually.
2
3
Go to
> Customers > Edit a customer account record > Template Based Emails tab.
In the Template Based Emails tab
3.1.
Click the checkbox next to the email(s) that you want to send to the customer. In our
example, we're going to send the Backorder Notice.
3.2.
Fill out at least the "Override To" field
3.3.
Click Update.
400
Copyright 2005-2015, Miva Inc. All Rights Reserved.
Publication Date: 02/28/2015
User Reference Guide DRAFT
Fill out at least thi s field,
then click Update.
While Editing an Order
1
Make sure that you've followed the steps to configure the email to be sent manually.
2
3
4
Go to
> Order Processing > Orders tab.
Edit an order.
In the Edit Order screen, click on the Order Emails link.
5
In the Order Emails dialog box, click the checkbox next to the email that you want to send and click
Send.
401
Copyright 2005-2015, Miva Inc. All Rights Reserved.
Publication Date: 02/28/2015
User Reference Guide DRAFT
To Create a New Template Based Email
1
Go to
> Order Fulfillment > Template Based Emails tab.
2
3
Click New Template Based Email
.
Fill out the fields in the Add Email dialog box. See To Edit Email Properties.
4
When you are done, click Add.
5
To edit the body of your new template based email, see To Edit Email Template Code.
Order Fulfillment > Add/Remove Modules
To Add Order Fulfillment Modules
1
2
Go to the
> Order Fulfillment > Add/Remove Modules tab.
Select the Available Modules section.
402
Copyright 2005-2015, Miva Inc. All Rights Reserved.
Publication Date: 02/28/2015
User Reference Guide DRAFT
3
Click on the Install button for the Order Fulfillment module that you want to add.
To Remove Order Fulfillment Modules
1
2
3
Go to the
> Order Fulfillment > Add/Remove Modules tab.
Select the Installed Modules section.
Click on the Remove button for the Order Fulfillment module that you want to remove.
Logging
Some modules have the ability to create their own log files, usually for troubleshooting. Use the
Logging Settings screen to turn log file creation on or off for any module.
By default there are three modules in your Miva Merchant store that can create log files. However, if
you purchase a third-party module it may also have a log file feature, and will show up in the Logging
Settings screen.
Log files have the potential to use up a lot of space on your server. If you enable a log file, you might
want to keep an eye on how much disk space it uses over time.
e-Urchin Log
Urchin was purchased by Google and became Google Analytics. Urchin is no longer a supported
product, although it still works. If you use Urchin, you have to enable the e-urchin log.
To Enable the e-Urchin Log
1
2
Go to the
> Logging > Add/Remove Modules tab.
Select the Available Modules tab section.
3
4
Under e-Urchin, click Install. A new "e-Urchin Log" tab will appear.
Fill out the fields in the e-Urchin Log tab:
5
Log File : the name of the log file you want to create.
Log Remote Hostnames: Enable this option if you want the log file to contain hostnames
instead of IP addresses. This feature will generate a DNS query for every IP address seen by eUrchin, and will consume more machine resources.
Log Format: select one of the Urchin log file formats, either elf or elf2.
Click Update when you are done with your changes.
Miva Merchant Access Log
This is a general purpose log file to help troubleshoot your store. It can quickly capture a large amount
of data and you should keep an eye on the size of the log file.
403
Copyright 2005-2015, Miva Inc. All Rights Reserved.
Publication Date: 02/28/2015
User Reference Guide DRAFT
To Enable the Miva Merchant Access Log
1
2
Go to the
> Logging > Add/Remove Modules tab.
Select the Available Modules tab section.
3
Under Miva Merchant Access Log, click Install. A new "Miva Merchant Access Log" tab will
appear.
Fill out the field in the Miva Merchant Access Log tab:
4
5
Log File : the name of the log file you want to create.
Click Update when you are done with your changes.
buySAFE 2.0
buySAFE is a product that allows your customers to add insurance to their orders. You should only
enable the buySAFE log if you are asked to do so by their support staff. Enabling the buySAFE log does
not create a new tab and their log file does not have any options.
To Enable the buySAFE Log
1
2
Go to the
> Logging > Add/Remove Modules tab.
Select the Available Modules tab section.
3
Under buySAFE 2.0, click Install.
System Extension Settings
Modules are "blocks" of code that perform specific functions in the Miva Merchant admin interface. If
you write a module you can have it show up almost anywhere in the admin interface so that it can be
enabled and configured. For example, logging modules control the creatio n of log files and show up in
the Logging Settings screen.
The System Extension Settings screen is kind of a catch-all for modules that don't belong anywhere else.
There are three modules that show up in this screen by default, but if you install third-party modules
they may also show up here.
PayPal Express Checkout and/or Payments Pro
Please see Payment > PayPal Express Checkout and/or Payments Pro for instructions on configuring
this module.
PayPal Payments Advanced and/or Payflow Gateway
Please see Payment > PayPal Payments Advanced and/or Payflow Gateway for instructions on
configuring this module.
404
Copyright 2005-2015, Miva Inc. All Rights Reserved.
Publication Date: 02/28/2015
User Reference Guide DRAFT
buySAFE 2.0
buySAFE allows your customers to add insurance to their orders during checkout.
To Enable buySAFE 2.0
1
2
Go to the
> System Extensions > Add/Remove Modules tab.
Select the Available Modules tab section.
3
Under buySAFE 2.0, click Install.
4
Select the buySAFE tab.
4.1.
Check the "I accept the buySAFE End User License Agreement" checkbox.
4.2.
Click the register now button to go to the buySAFE website and create an account.
4.3.
Enable buySAFE Bonding. Adding buySAFE to your store requires changes to some
template code.
If you have modified your store's template code, click on the documentation link to
follow the instructions for manually adding the buySAFE template code.
If you have not made any changes to your store's template code, you can check the
Enable the automatic te mplate changes checkbox.
5
Enter the authentication data provided by buySAFE. You are given these credentials when you
create your buySAFE account.
6
Generate and place buySAFE Seal / Specify store terms of sale: More information about these items
is shown on-screen after you create your buySAFE account.
Click Update.
7
Utilities
Utilities > Template Based Batch Reports
By default, Miva Merchant has two template based batch reports:
The Printable Invoice appears in the:
> Order Processing > Orders tab > Run Batch Report dialog box
The Shipment Picklist appears in the:
> Order Processing > Shipments > Run Batch Report dialog box
You can also create your own batch reports for either managing orders or shipments.
To Enable the Default Reports
1
Go to
> Utilities > Add/Remove Modules tab.
405
Copyright 2005-2015, Miva Inc. All Rights Reserved.
Publication Date: 02/28/2015
User Reference Guide DRAFT
2
Select the Available Modules section.
3
Under Template Based Batch Reports, click Install.
4
You can now run the default reports.
To Run the Default Reports
Printable Invoice:
1
2
Go to
> Order Processing > Orders tab.
Select a batch, or select one or more orders.
3
Click the Batch Report button.
Shipment Picklist:
1
2
3
Go to
> Order Processing > Shipments tab.
Select a batch, or select one or more shipments.
Click the Batch Report button.
To Edit a Template Based Batch Report
You should already have followed the steps to enable the default reports. There are two ways to edit the
default reports (Shipment Picklist and Printable Invoice):
Method 1 - Utilities Screen
1
2
Go to
> Utilities > Template Based Batch Reports tab.
Select one of the template based batch reports.
3
Click the Edit Te mplate button.
406
Copyright 2005-2015, Miva Inc. All Rights Reserved.
Publication Date: 02/28/2015
User Reference Guide DRAFT
Method 2 - Pages Screen
1
2
Go to
> User Interface > Pages tab.
Edit one of the pages that is associated with a default report:
ORDER_INVOICE (Printable Invoice)
SHIPMENT_PICKLIST
To Create a New Template Based Batch Report
You should already have followed the steps to enable the default reports.
Creating a new template based batch report is a two-step process. First you create an empty report,
which is easy; then you add the template code that will cause the report to gather and process the
information that you want. This may require a significant knowledge of Miva Merchant template code.
1 Go to
> Utilities > Template Based Batch Reports tab.
2
3
In the Template Based Batch Reports tab, click the Add Report button
In the Add Batch Report dialog box, enter a:
.
Type: Select either Order or Shipping.
If you select Order, your report will appear under:
> Order Processing > Orders tab > (Select an order) > (click Batch Report button)
If you select Shipping, your report will show up in the batch report dialog box under :
> Order Processing > Shipments tab > (Select an order) > (click Batch Report
button)
4
Code : The code uniquely identifies the report in the database.
Name: The name of the report will appear in the admin interface.
Click the Add button.
407
Copyright 2005-2015, Miva Inc. All Rights Reserved.
Publication Date: 02/28/2015
User Reference Guide DRAFT
To Delete a Template Based Batch Report
1
2
Go to
> Utilities > Template Based Batch Reports tab.
Select the report that you want to delete.
3
Click the Delete button
to permanently delete the report.
Utilities > Custom Fields
Custom fields let you add your own fields to categories, products, customer records, etc. For example,
you can add a custom product field, such as MSRP, and display that field on a product page. See page
414 for several examples.
To Enable Custom Fields
1
2
Go to
> Utilities > Add/Remove Modules tab.
Select the Available Modules section.
3
Under Custom Fields, click Install.
4
A new tab will appear:
> Utilities > Custom Fields.
To Create a New Custom Field
1
Go to
> Utilities > Custom Fields tab.
2
Click New Custom Field
3
4
Fill out the fields in the Add Custom Field dialog box.
Click Add.
.
408
Copyright 2005-2015, Miva Inc. All Rights Reserved.
Publication Date: 02/28/2015
User Reference Guide DRAFT
Type
Select the type of custom field that you want to create.
Product: Add custom fields to Product pages in your online store.
Category: Add custom fields to Category pages in your online store.
Customer: Add custom fields to the
Fields tab.
Order: Add custom fields to the
screen.
> Store Settings > Customer
> Order Processing > edit order
Code
The code uniquely identifies your custom field in the database.
Name
The field name is displayed in the admin interface.
Field Type
Use the field type to select a control or interface for the custom field. Most of
these types are familiar and self- explanatory. You can create custom fields
with text areas, radio buttons, checkboxes, etc. The one exception is a field
type of "Image Upload", which is a bit different from the others. See
Example: Adding a Custom Field with Image Upload.
Text Field
Text Area
Radio Button
Drop Down List
Checkbox
409
Copyright 2005-2015, Miva Inc. All Rights Reserved.
Publication Date: 02/28/2015
User Reference Guide DRAFT
Image Upload
Group
Custom field groups let you organize your custom fields. See Utilities >
Custom Field Groups. The Group drop down list will show all of the custom
field groups that you have created.
Additional
Information
Add "hover text" to custom fields that appear in the admin interface. You
might use Additional Information to tell admin users what kind of information
they should put in the custom field or how the custom field is used.
Example :
1
2
Create a custom field of type Order.
Go to
> Order Processing > Orders tab.
3
Edit an order.
4
In the edit order screen, there will be a new link at the top: "Custom
Fields".
This link won't show up
until you've created at
least one custom field.
5
6
Click on the Custom Fields link. A Custom Fields dialog box will open
and show all of your "Order" type custom fields.
Move the mouse over a custom field name. The text that you entered in
the Additional Information field will appear as hover text.
410
Copyright 2005-2015, Miva Inc. All Rights Reserved.
Publication Date: 02/28/2015
User Reference Guide DRAFT
To Delete a Custom Field
1
2
Go to
> Utilities > Custom Fields tab.
In the Custom Fields tab, select a custom field.
3
Click Delete Custom Field(s)
.
Utilities > Custom Field Groups
Custom Field Groups make it easier to organize and view your custom fields.
We've created a number of custom fields, but without groups, there's no
easy way to sort or organize them.
411
Copyright 2005-2015, Miva Inc. All Rights Reserved.
Publication Date: 02/28/2015
User Reference Guide DRAFT
We created two custom field groups: "Motherboard Spec Fields" and "Tower Case s",
and assigned each field to a group. Now we can sort the custom fields by clicking on
the Group column title.
412
Copyright 2005-2015, Miva Inc. All Rights Reserved.
Publication Date: 02/28/2015
User Reference Guide DRAFT
But since we assigned each custom field to a group, we can enter the name of a
group in the search field and view only the fields in that group.
To Create a Custom Field Group
1
Go to
2
Click Add Group
3
> Utilities > Custom Field Groups tab.
.
Enter a Code: the code uniquely identified the group in your store.
Enter a Name: the name is a more user friendly description of the group.
Click Save Group
.
To Assign a Custom Field to a Group
1
2
Go to
> Utilities > Custom Fields tab.
Edit a custom field.
3
In the Edit Custom Field dialog box, select your group from the Group list box, and click Save.
413
Copyright 2005-2015, Miva Inc. All Rights Reserved.
Publication Date: 02/28/2015
User Reference Guide DRAFT
Example: Adding and Using a Custom Category Field
In this example we'll create a custom category field that allows us to display or hide categories in the
Category Tree.
1
2
Go to
> Utilities > Custom Fields tab.
Create a custom field of type Category.
3
Edit the value of the custom field.
3.1.
4
Go to
> Catalog > Categories tab > (edit a Category) > Custom Fields tab.
When you edit a category now, you'll see that there is a new tab called "Custom Fields". In this new
tab is the custom category field that you created.
414
Copyright 2005-2015, Miva Inc. All Rights Reserved.
Publication Date: 02/28/2015
User Reference Guide DRAFT
After you create a custom field of type
"Category", you'll see a new tab
"Custom Fields" when you edit a
category. The new tab shows the custom
field that you created.
For our example, we'll set the value of
thi s field to "False".
5
Add category tree template code. In our example we'll use the custom field to control whether a
category is displayed in the category tree. If the value of the custom field is "true", the category will
be displayed in the on- line store.
5.1.
Go to
> User Interface > Settings tab > Category Tree Template tab.
5.2.
Add the field. In the Custom Fields section, click on the field named "Display", then click the
Select button. (To reduce overhead in the admin interface, only custom fields that have been
selected can be referenced in the template code.)
5.3.
Edit the template code. In the category tree template code we'll add code to scan the value of
the "Display" field for each category. Categories where the Display field contains the string
"true" will be shown in the category tree.
[Place new code here.]
5.4.
The new code we'll add to the template field is:
<mvt:if expr="NOT
ISNULL(l.settings:cattree_category:customfield_values:customfields:msrp)">
415
Copyright 2005-2015, Miva Inc. All Rights Reserved.
Publication Date: 02/28/2015
User Reference Guide DRAFT
Custom Field Name:
&mvte:cattree_category:customfield_names:customfields:msrp; <br/>
Custom Field Value:
&mvte:cattree_category:customfield_values:customfields:msrp;
</mvt:if>
6
When you've finished making your changes to the Category Tree Template tab, click the Update
button.
Example: Adding and Using a Custom Product Field
This example shows how to create a custom product field and one example of how such a field can be
used.
1
2
Go to
> Utilities > Custom Fields tab.
Create a custom field of type Product. We'll call ours "MSRP".
3
Edit the value of the custom field.
3.1.
Go to
> Catalog > Products tab > (edit a product) > Custom Fields tab.
When you edit a product now, you'll see that there is a new tab called "Custom Fields". In this new
tab is the custom product field that you created.
416
Copyright 2005-2015, Miva Inc. All Rights Reserved.
Publication Date: 02/28/2015
User Reference Guide DRAFT
The custom field that we
created, "MSRP", now
show s up when we edit a
product. We'll set the value
of thi s field to "$25.00".
4
5
Add the custom field to the product page. There are many different things you could do with a
custom product field. As a simple example, we'll have our custom field show up in product pages in
our on- line store.
4.1.
Go to
> User Interface > Pages tab > (edit page PROD) > Page tab > Product
Display Layout section.
4.2.
Click on the custom field ("MSRP" in our example), then click the Select button. (To reduce
overhead in the admin interface, only custom fields that have been selected can be referenced
in the template code.)
4.3.
In the Page tab, click Update.
Now let's look at a product page in our on- line store:
417
Copyright 2005-2015, Miva Inc. All Rights Reserved.
Publication Date: 02/28/2015
User Reference Guide DRAFT
Our custom field now show s up in produc t pages in our on-line store.
In our example the custom product field automatically showed up in our on- line store
because we had not modified our product page template code. If you have modified your
product page template code, you must:
6
Select the custom field in the
> User Interface > Pages tab > (edit page
PROD) > Page tab > Product Display Layout section.
7
In the Product Display Layout section, click on the
Product Display Template code.
Manually add the code that will display the custom field.
8
link to view the
Example: Adding a Custom Field with Image Upload
In this example we'll show how to use the Image Upload field type to add content to your store pages
that customers can download.
1
Make sure that the file type that you want to use is supported by the admin interface. For example, if
you want to add a PDF to a store page that your customers can download:
1.1.
Go to
> Domain Settings > Domain Details tab > Upload Settings section.
1.2.
In the Upload Settings section, add "PDF" to the Image Extension Types field:
418
Copyright 2005-2015, Miva Inc. All Rights Reserved.
Publication Date: 02/28/2015
User Reference Guide DRAFT
2
3
Create a custom field group called "Manuals".
Create a custom field called "User Manual 01" with a Field Type of "Upload Image".
4
Edit a product.
4.1.
There is now a tab called "Manuals", created by our custom field group.
4.2.
The Manuals tab contains our custom field: "User Manual 01"
419
Copyright 2005-2015, Miva Inc. All Rights Reserved.
Publication Date: 02/28/2015
User Reference Guide DRAFT
5
In the Manuals tab, click on the Upload button to upload your document to your server.
If you wanted to attach a PDF to a large number of products, you could upload the PDF once, and
then add the server file path of the PDF to a product import spreadsheet (see Data Management >
Import/Export Tab).
6
7
Go to
> User Interface > Pages tab > (edit page PROD) > Page tab > Product Display
Layout section.
Add the custom field to the page.
7.1.
Click on the custom field.
7.2.
Click Select.
7.3.
Click Update.
420
Copyright 2005-2015, Miva Inc. All Rights Reserved.
Publication Date: 02/28/2015
User Reference Guide DRAFT
8
9
Modify the template code to reference the custom field.
8.1.
If you haven't already, click on the
link so that you can see the template code.
8.2.
Look for the template code:
&mvt:product:customfield_values:customfields:user_manual_01;
and change it to:
<a href="&mvt:product:customfield_values:customfields:user_manual_01;">User
Manual</a>
Click Update.
10 If we go to our online store and select the product page for the Basic Tower Kit, we'll see that our
user manual shows up as a hyperlink. If the customer clicks on the link, their browser will either
open the PDF in a new browser window, or ask the user to save the PDF, depending on how their
browser is configured.
Example: Custom Basket Fields
There are times when you might want to capture information while a customer is shopping in your store
and save that information to your store database. For example, you might want to capture the customer's
IP address and save it with the order record. In releases before PR8 Update 9, you could capture the
information, but to save it to the database you had to use a third party module.
PR8 Update 9 added 16 new read/write template functions that let you attach information that you've
captured to different types of records. You can use these functions to save and display a wide variety of
data:
Agent string fields
The customer's IP address
The referrer page
Any information about the customer's basket, items, costs, etc.
421
Copyright 2005-2015, Miva Inc. All Rights Reserved.
Publication Date: 02/28/2015
User Reference Guide DRAFT
In this example, we'll show how to put a drop-down list on the OSEL page (Checkout:
Shipping/Payment Selection) and save the customer's selection to the basket record.
Write_Basket: creates a custom basket field and writes a value to it.
Read_Basket: reads the value from a custom basket field.
Normally, the custom fields that you attach to a basket record are lost when the basket is deleted.
However, there is a way to "convert" the information and permanently save it in the database with the
customer's order. Baskets are deleted when:
They expire. See Basket Timeout.
The customer completes the checkout process.
1
Make sure that you have enabled custom fields. See To Enable Custom Fields.
Custom fields are added to a page with the "customfields" item. The customfields item is already
enabled on every default page in your store (every page in an "out of the box" store). If you want to
use custom fields on a new page that you've created, you have to add the custo mfields item
manually. See Editing Items.
2
Go to
> User Interface > Pages tab > (edit page OSEL) > Page tab > Details section.
We'll add some code to create a drop-down list box on the OSEL. Our code goes right above the
"</form>" tag.
<strong>How did you hear about us?</strong>
<select id="add1" name="add1">
<option value="" selected="">Choose an option</option>
<option value="Google">Google</option>
<option value="Bing">Bing</option>
<option value="Online Ad">Online Ad</option>
<option value="Referral">Referral</option>
</select>
3
Click Update to save your changes.
422
Copyright 2005-2015, Miva Inc. All Rights Reserved.
Publication Date: 02/28/2015
User Reference Guide DRAFT
4
Here's how the template code looks in our store:
(OS EL)
5
The template code that we added displays a drop-down list on the OSEL page. Now we'll capture the
customer's selection from the drop-down list, and display it on the next checkout page, OPAY
(Checkout: Payment Information).
5.1.
Go to
> User Interface > Pages tab > (edit page OPAY) > Page tab > Header and
Footer section.
5.2.
Add the code shown in the figure below.
423
Copyright 2005-2015, Miva Inc. All Rights Reserved.
Publication Date: 02/28/2015
User Reference Guide DRAFT
<mvt:item name="customfields" param="Write_Basket('hear-about-us',
g.add1)" />
<mvt:item name="customfields" param="Read_Basket('hear-about-us')" />
Where Did you Hear About Us: &mvt:customfields;
The call to Write_Basket creates a new custom basket field called "hear-about-us" and gives it the
value of "g.add1". We used the "add1" variable to store the customer's selection from the drop-down
list box in the previous step. The call to Write_Basket saves the value of g.add1 for as long as the
basket persists.
The call to Read_Basket reads the value in the variable in 'hear-about-us' and prints it to the screen
using &mvt:customfields
When the customer gets to the Invoice screen (INVC), the basket record is converted to an order record.
The basket record, along with any custom basket fields, are deleted. However, if you create custom
order fields that have the same names as your custom basket fields, the values in the custom basket
fields are written to the custom order fields with the same name, and will be saved with the order record.
You can then view the custom fields by editing the record.
424
Copyright 2005-2015, Miva Inc. All Rights Reserved.
Publication Date: 02/28/2015
User Reference Guide DRAFT
425
Copyright 2005-2015, Miva Inc. All Rights Reserved.
Publication Date: 02/28/2015
User Reference Guide DRAFT
Section 2: Appendices
Appendix 1: Best Practices for Managing Credit
Card Data
A portion of the PCI-DSS standard relates to encrypting your payment data. In most cases you are
required to meet these standards, although they are also considered best practices:
Enable encryption in your store. After you enable encryption, payment information on new orders
will be encrypted.
Encrypt existing payme nt information. If you have existing orders with unencrypted payment
information, you have to encrypt the payment information on those orders.
Delete payment information from orders. PCI has several requirements for when you should
delete payment information:
It is never acceptable to keep unencrypted credit card numbers in your database, even
temporarily.
You should not keep credit card data longer than you need to. For example, the PCI standards let
you store credit card information to cover your return policy, or if you sell custom products that
may be paid for in installments. However, you should delete credit card information when you
no longer need it to process or refund an order.
Under no circumstances should you store payment information in your database for more than 1
year.
You may never store the entire stripe data (which includes the CVV code) even if it’s encrypted.
The Encryption Key Wizard
You can do all of the tasks mentioned above with the Encryption Key Wizard. The Encryption Key
Wizard is a utility that is part of the Miva Merchant admin interface. The main purpose of the
Encryption Key Wizard is to
Enable order encryption in your store by creating an encryption key.
Create new encryption keys. PCI standards require you to create a new encryption key every 365
days.
Remove payment information from orders (Archiving).
Note that the screens in the Encryption Key Wizard will be slightly different, depending on whether you
have existing orders with credit card data in them.
You don't have an encryption key.
You don't have an encryption key.
You have an encryption key, but you don't
You have an encryption key, and you have at
426
Copyright 2005-2015, Miva Inc. All Rights Reserved.
Publication Date: 02/28/2015
User Reference Guide DRAFT
have any orders with credit card data.
The wizard will only prompt you to create a new
encryption key.
least one order with credit card data.
The wizard will prompt you to create a new
encryption key and then allow you to:
Migrate orders (encrypt them), and/or
Archive orders (strip payment info)
427
Copyright 2005-2015, Miva Inc. All Rights Reserved.
Publication Date: 02/28/2015
User Reference Guide DRAFT
About Encrypting Payment Information
Edit an order. Order encryption is not enabled.
Edit an order. Order encryption is enabled.
Only the payment information is encrypted, not the entire order.
You can view encrypted payment information in the clear as long as you have the Passphrase to
decrypt the order. It is impossible to decrypt the data without your Passphrase.
You cannot remove encryption from existing orders. Although you can edit an order and temporarily
view the payment information in the clear, once you encrypt payment information in an order, the
encryption is permanent.
Miva Merchant encryption works by having you create an encryption key. The encryption key is a
long alphanumeric string that the software uses as a seed for the encryption algorithm. It's important
that you have a copy of your encryption key stored somewhere securely. If you forget what your
encryption key is, you won't be able to complete several tasks in Miva Merchant. Only you will
know your encryption key and if you lose it or forget it, it can't be recovered, even by Miva
Merchant staff.
The PCI standards require you to create a new encryption key every 365 days.
About Deleting Payment Information
In Miva Merchant, deleting payment information is called Archiving. Archiving doesn't remove
orders from your store database. The only purpose of archiving is to strip payment information from
orders.
428
Copyright 2005-2015, Miva Inc. All Rights Reserved.
Publication Date: 02/28/2015
User Reference Guide DRAFT
You can remove payment from orders in batch or from one order at a time. But once you remove
payment information from an order it is permanently deleted.
Enabling Encryption in Your Store
You enable encryption in your store by creating an encryption key. As soon as you create the key, credit
card data on new orders will be encrypted. You create the key with the Encryption Key Wizard.
Follow the steps in this section if you want to enable encryption in your store, and you do not have
existing orders with credit card information.
But see also Processing Existing Orders with the Encryption Key Wizard.
Notes
In this section we've simplified the screens to make them easier to read.
It's important that you make a note of your encryption key passphrase and store it in a secure
location. If you lose your passphrase, it cannot be recovered. You will either have to:
Remove payment information from all of the orders whose credit card information was
encrypted (archiving), or
Leave the orders with encrypted credit card information in your database. You wo n't be able to
view the credit card information when you edit an order.
To Enable Encryption in Your Store
1
2
Go to
> Store Settings > Encryption Keys tab.
In the Encryption Keys tab, click the Add Encryption Key button.
429
Copyright 2005-2015, Miva Inc. All Rights Reserved.
Publication Date: 02/28/2015
User Reference Guide DRAFT
Click Next.
Enter a Prompt (a descriptive name) for the encryption key and click Next.
The passphra se must:
1 Be at least 16 characters long.
2 Contain at least 1 non-numeric character, such a s a punctuation mark.
3 Contain at least 1 letter or number.
4 Not be the same as the Prompt.
Enter your passphrase and click Next.
430
Copyright 2005-2015, Miva Inc. All Rights Reserved.
Publication Date: 02/28/2015
User Reference Guide DRAFT
Click Next to confirm creation of the key.
Click Close. Your key has been created. Encryption is now enabled in your store.
The Reference Count column te lls you how
many orders have been encrypted with a key.
431
Copyright 2005-2015, Miva Inc. All Rights Reserved.
Publication Date: 02/28/2015
User Reference Guide DRAFT
To Delete an Encryption Key
You cannot delete an encryption key if it there are any orders with credit card information that were
encrypted with that key. It's easy to find out if any orders are encrypted with the current key:
1 Go to
> Store Settings > Encryption Keys tab.
2
3
In the Encryption Keys tab, look at the Reference Count column. This is the number of orders that
have been encrypted with the current key.
Click on the encryption key to edit it.
4
In the Edit Encryption Key screen, select the Orders tab. This tab will show you the order number of
all the orders whose credit card information was encrypted with the current key. Before you can
delete an encryption key, you must either delete these orders, or archive them, which removes the
credit card information. There are several ways to do this, but you can archive and delete orders
from the
> Order Processing > Orders tab.
5
After you have deleted all of the orders that were encrypted with the current key, go back to the
> Store Settings > Encryption Keys tab. You'll see that the Reference Count for the
encryption key is now 0.
6
To delete the encryption key, select it and click the Trash button.
7
Encryption is now turned off in your store. Credit card information on ne w orders will not be
encrypted.
Processing Existing Orders with the Encryption Key
Wizard
Follow the steps in this section if you want to enable encryption in your store, and you have existing
orders with credit card information. You'll be able to:
1 Create a new encryption key. Creating an encryption key enables order encryption in your store.
432
Copyright 2005-2015, Miva Inc. All Rights Reserved.
Publication Date: 02/28/2015
User Reference Guide DRAFT
2
Migrate orders. Migrating means encrypting the payment information in existing orders with the
newly created encryption key. Only the payment information is encrypted. The rest of the order is
unchanged.
and/or
3
Archive orders. Archiving means deleting payment information from existing orders. The order
stays in your database. Only the payment information is deleted.
To Process Existing Orders with the Encryption Key Wizard
1
Go to
> Store Settings > Encryption Keys tab.
2
In the Encryption Keys tab, click the Add Encryption Key button
Wizard will start.
. The Encryption Key
Click Next.
Enter a Prompt (a descriptive name) for the encryption key and click Next.
433
Copyright 2005-2015, Miva Inc. All Rights Reserved.
Publication Date: 02/28/2015
User Reference Guide DRAFT
The passphra se must:
Be at least 16 characters long.
Contain at least 1 non-numeric character, such a s a punctuation mark.
Contain at least 1 letter or number.
Not be the same as the Prompt.
Enter your passphrase and click Next.
In this screen you can migrate orders, archive orders, or both:
Migrate All: Encrypt all payment information in all existing orders.
Archi ve Shipped:
Remove payment information from orders marked as shipped.
Encrypt payment information in all other orders.
Archi ve All: Remove payment information from all existing orders.
Archi ve Older Than:
Remove payment information in orders placed before the date that you select.
Encrypt payment information in all other orders.
Select an option and click Next.
434
Copyright 2005-2015, Miva Inc. All Rights Reserved.
Publication Date: 02/28/2015
User Reference Guide DRAFT
Click Next to confirm.
Click Close. Your encryption key has been created. The migrate/archive options that
you selected have been made.
Regular Archiving in the Manage Orders Screen
The Encryption Key Wizard is usually used only once annually to enable encryption or update the
encryption key in your store. If you’d like to archive payment data more often than when you change
your encryption key, you should use Order Processing.
To Archive an Order
In this section we'll show you how to search for orders that are older than a given date and archive all of
them.
1 Go to
> Order Processing > Orders tab.
2
In the Orders tab select Date Range, Exact Dates, and enter From and To dates covering one year.
435
Copyright 2005-2015, Miva Inc. All Rights Reserved.
Publication Date: 02/28/2015
User Reference Guide DRAFT
Select all of the orders, then click the Archive button.
3
Select all of the orders, then click Archive.
4
5
A message box will appear asking you to confirm the deletion of payment information. Click OK.
Payment information has been removed from the orders that you selected.
Before archiving.
After archiving.
436
Copyright 2005-2015, Miva Inc. All Rights Reserved.
Publication Date: 02/28/2015
User Reference Guide DRAFT
To View Encrypted Credit Card Information
If the credit card information on an order has been encrypted, you can't view the credit card data unless
you know the encryption key passphrase. There are several ways to view encrypted credit card
information.
In the Order Encryption Screen
1
2
Go to
> Store Settings > Encryption Keys tab.
In the Encryption Keys tab, edit an encryption key.
3
In the Edit Encryption Key screen, select the Orders tab.
4
5
In the Orders tab, edit an order.
In the Edit Order screen, click on the padlock icon at the top of the Payment display.
6
A dialog box will open and ask you to enter the passphrase.
After you enter the passphrase that was used to create the encryption key and click Continue, you'll
be able to view the credit card data.
In the Orders Screen
1
Go to
> Order Processing > Orders tab.
2
In the Orders tab, edit an order that has credit card information that was encrypted with the current
key.
3
In the Edit Order screen, click on the padlock icon. Enter the passphrase and click the Continue
button. The Edit Order screen will refresh and will openly display the credit card information.
In Legacy Order Processing
1
In the Store Search field, enter "legacy", then select Legacy Order Processing from the results. Note
that Legacy Order Processing can only be reached from the Store Search field. You can't find it in
the
button.
2
3
In the Order Processing main screen, edit an order that has encrypted credit card information.
In the Edit Order screen, enter the passphrase and click Update.
437
Copyright 2005-2015, Miva Inc. All Rights Reserved.
Publication Date: 02/28/2015
User Reference Guide DRAFT
4
After you enter the passphrase that was used to create the encryption key, you'll be able to select any
of the order tabs.
438
Copyright 2005-2015, Miva Inc. All Rights Reserved.
Publication Date: 02/28/2015
User Reference Guide DRAFT
Appendix 2: Common Fields in the Admin
Interface
This section lists a number of fields that you can find in many screens of the Miva Merchant Admin
Interface.
Notes:
Use the Notes field to identify versions of a file, such as a template or a store
page. See Versions.
Versions:
Allows you to create multiple copies of a file, and to switch between them. To
create a new version of a file:
Recall:
1
Make any change to the file. You may also want to use the Notes field to
describe the changes you are making, for example "New Logo".
2
Click the Update button. Your new version will be listed in the Versions
drop-down list.
If you have created multiple versions of a file, you can use the Recall button to
select a Version.
1
2
3
Select the version of the file you want to use from the Versions drop-down
list.
Click the Recall button.
Click the Update button.
Clear History:
Click the Clear History button to delete all versions of the file except the
original.
Color Selector:
Use the Color Selector control to insert hexadecimal color references into your
file.
1 Click the mouse cursor anywhere in the template text where you want to
insert a hex color reference.
2 Click on the Color Selector icon.
3
Custom Fields:
In the Color Selector dialog box, click the mouse on the color that you
want, then click Insert. A hexadecimal reference to the color that you
selected will be inserted into the text of your template.
Custom fields show up in many screens of the Miva Merchant admin interface.
439
Copyright 2005-2015, Miva Inc. All Rights Reserved.
Publication Date: 02/28/2015
User Reference Guide DRAFT
You can see custom fields, usually on template pages, when you edit your
store, edit pages, products, categories, etc. Custom fields include:
META Tags
Category Headers and Category Footers
Image Types
Shipping options that you enable
The different types of custom fields are used for different purposes, for
example, META Tags can be used to help search engines like Google find
products in your store. When you see a list of custom fields next to a field
containing template code, for example in the Edit Store > Category Tree
Template tab, checking the box next to a custom field makes that custom field
"available" to the template code. If you wanted to reference a custom field in
the template code, you check the box next to the custom field, click the
Update button, and then you can add code to the template to refer to the
custom field. This is done to improve speed and efficiency. Only the custom
fields that you enable are loaded into memory and made available to the
template code.
440
Copyright 2005-2015, Miva Inc. All Rights Reserved.
Publication Date: 02/28/2015
User Reference Guide DRAFT
Appendix 3: Comparing Weight Based Shipping
Modules
Miva Merchant has three shipping modules based on weight. See Shipping.
Base + Weight Shipping
Minimum or Weight Shipping
Create as many shipping methods as you want, "Economy under
5 pounds", "Economy 6-10 pounds", etc.
Each shipping method has 1 weight range.
The total shipping charge is
(weight of order x shipping charge per unit weight) + base charge
Create as many shipping methods as you want, "Economy under
5 pounds", "Economy 6-10 pounds", etc.
Each shipping method has 1 weight range.
The total shipping charge is
(weight of order x shipping charge per unit weight) or base
charge, whichever is greater.
Weight Table Shipping
In Weight Table Based Shipping you create a set of ranges based on
the weight of the customer's total order. Each weight range can have
a different shipping charge. For example:
Range 1: 0 - 5 pounds, charge $4.00 to ship the entire order.
Range 2: 6 - 10 pounds, charge $6.00 to ship the entire order.
Appendix 4: Hosting Your Store
In most cases it is easier and more reliable to have your store hosted by Miva Merchant.
We have in- house expertise on installing, configuring and maintaining stores.
We know exactly what hardware and software works best for Miva Merchant stores and we already
have those resources available and ready to go.
It's been our experience that customers experience MANY fewer problems when they let us host and
install their store. However, for the intrepid spirit, there are two other options:
You can host your store on your own server, but hire us to install and configure your store. See:
http://www.mivamerchant.com/products/MIVA-SUPPT_VM_INSTALL
http://www.mivamerchant.com/products/MIVA-SUPPT_MERC_INSTALL
You can host your store on your own server, and do the installation and configuration yourself.
441
Copyright 2005-2015, Miva Inc. All Rights Reserved.
Publication Date: 02/28/2015
User Reference Guide DRAFT
General Requirements and Process for Hosting Your Store
If you are going to host your own store you should contact Miva Merchant support for detailed
instructions, but here's a overview of what is involved:
Hardware : You need at least one server where you have root access. The hardware specs of the
server and speed of the internet connection must be appropriate for the amount of traffic that you
expect your store to receive.
Ope rating system: We strongly recommended Linux or FreeBSD. Windows is supported but not
recommended. If you use Windows you must have a server version that will support IIS 6 or older.
Database: We strongly recommended MySQL, which is required for PCI compliance. In the past,
other databases have been supported, but beginning in PR9, MySQL will be required for new stores.
Application Server: For Linux and FreeBSD you must have Apache/OpenSSL. On a Windows
server you must use IIS 6 and OpenSSL.
Install and configure Empresa: Empresa is a virtual environment from Miva Merchant. Empresa
also installs CGI on top of Apache.
Verify your environment: Miva Merchant has a script called diag6 that will examine your server
for readiness.
Install Miva Merchant: Download the Miva Merchant store package. Run the setup script to install
and add your license key.
Appendix 5: Default HTTP/HTTPS Pages
The table below shows the way that pages in your store use SSL by default. You can change any page in
your store to use or not use SSL, but this is way your pages are configured when Miva Merchant is
initially installed.
Page names shown in bold use SSL by default.
Page names shown in italics do not use SSL by default.
Page names shown in bold and italic use SSL only if the referring page uses SSL.
For example, if a customer is on a secure page in your on- line store (such as INVC) and goes a page
shown in bold/italic pages (such as NTFD), the Not Found page would use HTTPS. If the customer
was on a non-secure page in your on- line store and went to NTFD, the Not Found page would use
HTTP. The referrer page must be in your on- line store. If the referrer page was outside of your store,
say a Google result list, it would have no effect on the security of your store pages.
Page Code
Page Name
ABUS
ACAD
ACED
ACLN
About Us
Custome r Create
Custome r Edit
Custome r Account
442
Copyright 2005-2015, Miva Inc. All Rights Reserved.
Publication Date: 02/28/2015
User Reference Guide DRAFT
ACRT
AFAD
AFCL
AFED
BASK
BSKE
CEML
CPWD
CTGY
CTUS
FAQS
FPWD
INVC
LOGN
MNTN
NTFD
OCST
OMIN
OPAY
OPRC
ORDH
ORDL
ORDS
ORHL
OSEL
OUS1
OUSM
PATR
PLMT
PLST
POUT
PROD
PRPO
SARP
SFNT
SRCH
UATM
UATR
Custome r Password Reset
Affiliate Create
Affiliate Login
Affiliate Edit
Basket Contents
Checkout: Basket Empty
Change Email Address
Change Password
Category Display
Contact Us
FAQs
Forgot Password
Invoice
Custome r Login
Maintenance Mode
Not Found
Checkout: Customer Information
Checkout: Minimum Purchase Required
Checkout: Payment Information
Orde r Already Processed
Orde r History List
Orde r: Custome r Login
Orde r Status
Lookup Order History
Checkout: Shipping/Payment Selection
Checkout: Upsell Product (Single)
Checkout: Upsell Product (Multiple)
Missing Product Attributes
Product Limited Stock
Product List
Product Sold Out
Product Display
Privacy Policy
Shipping and Return Policy
Storefront
Search
Upsell: Missing Product Attributes (Multiple)
Upsell: Missing Product Attributes (Single)
443
Copyright 2005-2015, Miva Inc. All Rights Reserved.
Publication Date: 02/28/2015
User Reference Guide DRAFT
Appendix 6: ZPL Printer Configuration
MacOS Configuration
If you are using a MacOS with the ZPL printer, you must setup a raw printer queue before you can print.
1 Make sure that the ZPL printer is connected to your computer and is powered on.
2 Open a terminal window and run:
lpinfo -v
You will see the port that is being used by your ZPL printer. Please make a note of this port.
3
Open a browser window on your Macintosh and go to this address:
http://localhost:631
4
5
If you are prompted to enable the CUPS Web Portal, enter the same username and password that you
use to logon to your Macintosh.
Select the Administration tab and click Add Printe r.
6
7
8
Enter any name for the ZPL printer and the port that you found by running the lpinfo command.
Press the Continue button.
Select Raw for Make and press Continue.
9
Make sure that Raw Queue is selected for Model and click the Add Printer button.
Your ZPL printer is now configured and will appear in the Miva Merchant printer drop-down list. More
detailed instructions with screenshots may be found in the JZebra Raw Printer setup instructions.
Appendix 7: Inventory Management
In Miva Merchant, inventory management refers to a set of tasks that are completed in different parts of
the admin interface. This section gives you a bird's-eye view of these tasks:
Inventory Tracking
Basket Inventory
Inventory Messages
Each of these tasks is optional. You don't have to use the Miva Merchant inventory management
features at all. You can use inventory management without the basket inventory feature. You can use the
basket inventory without customizing your inventory messages.
444
Copyright 2005-2015, Miva Inc. All Rights Reserved.
Publication Date: 02/28/2015
User Reference Guide DRAFT
Inventory Tracking
Inventory tracking lets Miva Merchant do inventory math for you. After you enable inventory tracking,
you set the initial level of your stock. If a customer adds an item to their basket, the inventory count for
that item automatically drops by 1. If the customer purchases the item, the inventory count will stay
reduced by 1. If the customer removes the item from their basket, or abandons their basket, the inventory
count for the item increases by 1. You can enable inventory tracking for products with or without
Attributes.
See also
> Store Settings > Store Details tab > Settings section > Basket Timeout field.
This vase has no attributes. It's not
available in any other sizes, colors
or anything else. We'll enable
inventory tracking on the product,
and set the initial inventory to 100.
When a customer buys a vase, the
inventory count automatically
drops to 99.
Our t-shirt has two attributes: size and color. It's available
in small, medium and large sizes, and blue and white
colors. We enable inventory tracking on both attributes
and then set the initial inventory for each variant (version)
of the shirt. If we tell the system we have 100 of each
variant, and a customer buys a shirt in small/blue, the
inventory count for small/blue drops to 99, and the
inventory count for all the other variants stays at 100; the
same thing that would happen in a brick and mortar store.
To Enable Inventory Tracking for Products with Attributes
1
Enable inventory tracking at the store level.
1.1.
Go to
> Catalog > Inventory tab.
1.2.
Check the Track Inventory checkbox. You may also want to enable these other checkboxes:
445
Copyright 2005-2015, Miva Inc. All Rights Reserved.
Publication Date: 02/28/2015
User Reference Guide DRAFT
2
Track Low Stock Level
Track Out of Stock Level
Hide Out of Stock Products
Enable inventory tracking at the attribute level.
2.1.
Go to
> Catalog > Products.
2.2.
Edit a product and select the Attributes tab. If the "I" column for the attribute has a
checkmark, inventory tracking is enabled.
If the attribute was added as an Attribute Template, you have to edit the attribute template
and check the Inventory checkbox.
3
Generate Variants if you haven't already done so.
4
Set the inventory level for each variant. A variant (t-shirt in size small and color blue) is a product,
so you have to tell the system how many you have on hand.
4.1.
Go to
> Catalog > Products > Edit Product > Inventory Variants tab.
4.2.
Click on the Edit Inventory button. In the Edit Inventory dialog box, tell the system what
inventory you have for each variant.
446
Copyright 2005-2015, Miva Inc. All Rights Reserved.
Publication Date: 02/28/2015
User Reference Guide DRAFT
To Enable Inventory Tracking for Products with No Attributes
1
2
Enable inventory tracking at the store level.
1.1.
Go to
> Catalog > Products > Edit Product > Inventory Settings tab
1.2.
Check the Track Inventory checkbox. You may also want to enable these other checkboxes:
Track Low Stock Level
Track Out of Stock Level
Hide Out of Stock Products
Enable inventory tracking at the product level and set the inventory level.
2.1.
Go to
2.2.
Edit a product and select the Inventory tab.
Check the Track Product checkbox.
> Catalog > Products.
Enter the initial inventory you have in the "Increase Stock By" field. For example, if you
currently have 100 vases on-hand, set this field to 100.
Basket Inventory
Basket Inventory keeps track of how many products your customers currently have in baskets. See
> Utilities > Add/Remove Modules tab > Available Modules section > Basket Inventory.
Inventory Messages
Inventory messages appear next to products on different pages in your store and give customers
information about product availability. For example, you can have the text "In Stock" or "Out of Stock"
appear next to a product.
447
Copyright 2005-2015, Miva Inc. All Rights Reserved.
Publication Date: 02/28/2015
User Reference Guide DRAFT
For every inventory message you can have a short and long version of the message.
You can create default inventory messages at the store level or product specific inventory messages
at the product level.
In Stock Me ssage (Short)
The general process of using inventory messages is:
1
Enable inventory tracking at both the store and product level, or the store and attribute level for
products with attributes. See above. You must use inventory tracking to use inventory messages.
2
Set inventory levels on your products (tell the software how many you have of each product on
hand). See above.
Create default inventory messages (Optional). These are store-wide default inventory messages
that will apply to all of your products. You can create store-wide default inventory messages. See
Catalog > Edit Product > Inventory Tab > Inventory Settings section.
3
4
Create product s pecific inve ntory messages (Optional). If you create inventory messages for a
specific product, they will take precedence over the default inventory messages. To create product
specific inventory messages, see
> Catalog > Products > Edit Product > Inventory tab.
5
Set the inventory message to be Long or Short on various store pages. Each of the tabs below has
a drop-down list control that allows you to choose a long or short inventory message for that page.
Category pages: CTGY > Category Product List Layout > Inventory Level Message field.
Customers see this page in your store when they click on a Category.
Product List: PLST > Product List Layout Tab > Inventory Level Message field. This is the
page that is displayed in your store when customers click on the All Products button.
Product pages, product has attributes: PROD > Attribute Machine > Inventory Message field.
This page is displayed in your store when customers click on a product.
Product pages, product does not have attributes: PROD > Product Display Layout >
Inventory Level Message field. This page is displayed in your store when customers click on a
product.
448
Copyright 2005-2015, Miva Inc. All Rights Reserved.
Publication Date: 02/28/2015
User Reference Guide DRAFT
Product pages, related product list: PROD > Related Product List Layout Tab > Inventory
Level Message field. This page is displayed in your store when customers click on a product and
you have added related products in the Edit Product > Related Products Tab.
Search: Search Results Layout Tab > Inventory Level Message field. This is the page that is
displayed when customers enter text in the search text box and click the Search button.
Message
What the Message Means
Page in Your Store
Where Customers Can
See this Message
In Stock
Stock on hand - quantity in baskets > Low Stock Level.
CTGY (Category Display)
The low stock level can be set for your store (Inventory
link in leftnav) or for individual products (Edit Product
> Inventory tab).
PLST (Product List)
PROD (Product Display)
SRCH (Search)
Low Stock
Stock on hand - quantity in baskets < Low Stock Level.
PROD (Product Display)
CTGY (Category Display)
SRCH (Search)
PLST (Product List)
Out of Stock
Stock on hand - quantity in customer baskets = 0
PROD (Product Display)
CTGY (Category Display)
SRCH (Search)
PLST (Product List)
Limited
Stock
The customer has tried to purchase a quantity greater
than your current inventory. For example, you have 5
vases of a certain type and the customer tries to
purchase quantity 6 of that vase.
BASK (Basket Contents)
Appendix 8: The Sales Tax Calculation Field
The Sales Tax Calculation field in the
> Store Settings > Store Details tab > Settings section has
a significant effect on both the admin interface and your on-line store. Selecting a value from the Sales
Tax Calculation drop-down list:
1
2
3
Adds one or more tabs to the Store Settings tab list. The new tab(s) will vary depending on what you
selected as the Sales Tax Calculation.
Adds one or more tabs to the Edit Product tab list.
Will change the taxes that customers see during the checkout process.
449
Copyright 2005-2015, Miva Inc. All Rights Reserved.
Publication Date: 02/28/2015
User Reference Guide DRAFT
450
Copyright 2005-2015, Miva Inc. All Rights Reserved.
Publication Date: 02/28/2015
User Reference Guide DRAFT
Your selection in the Sales Tax Calculation drop-down list
generates taxes that appear in the Payment Information
screen during customer checkout.
The table below shows the changes that occur depend ing on what value you select in the Sales Tax
Calculation Selection drop-down list.
Creates a New Tab or
Sales Tax Calculation Section in Store Settings
Selection
Called:
Creates a New
Section Under
Edit Product >
Product Tab
Called:
Canadian VAT
Store Settings > Store
Details tab > Canadian
VAT GST
Canadian VAT
European VAT
Store Settings > VAT
Rates tab
VAT
Example of What the
Customer Sees in the
Payment Information Screen
Store Settings > VAT
Countries tab
Store Settings > Store
Details tab > VAT
Options section
451
Copyright 2005-2015, Miva Inc. All Rights Reserved.
Publication Date: 02/28/2015
User Reference Guide DRAFT
Shopper Selected
Sales Tax
Store Settings > Store
Details tab > Shopper
Selected Sales Tax
Prompt
N/A
State Based Sales
Tax
Store Settings > Store
Details tab > State Based
Sales Tax
N/A
Generic VAT
Store Settings > Store
Details tab > VAT
Options
VAT
Customers select one of the
tax rates that you create when
they are at the Order Details
screen:
452
Copyright 2005-2015, Miva Inc. All Rights Reserved.
Publication Date: 02/28/2015
User Reference Guide DRAFT
Section 3: Template Changes
Template Changes for Miva Merchant 9
The following is a list of all changes from PR8 Update 12 to Miva Merchant 9 with regards to the
template code/css files. Please note, some template code changed drastically and as such, only the new
template code has been included. In these cases, if you have not made any custom changes to your
template, you should be able to just put the template into point and click mode, set the preferences to
your liking, and click update to generate the new template code. If you have made alterations specific to
your store, you should compare the differences between your template code and the provided template
code in the "New" section and make the changes based on that.
CSSUI: Edit Page: PROD > Page > Attribute Machine
Original File
<script>
AttributeMachine.prototype.Generate_Swatch = function( product_code, attribute,
option )
{
var swatch = document.createElement( 'li' );
var span
= document.createElement( 'span' ); // to vertically center the
swatch images
var img
= document.createElement( 'img' );
img.src
= option.image;
swatch.appendChild( span );
swatch.appendChild( img );
return swatch;
}
</script>
New File
<script>
AttributeMachine.prototype.Generate_Discount = function( discount )
{
var discount_div;
discount_div
discount_div.innerHTML
discount.formatted_discount;
= document.createElement( 'div' );
= discount.descrip + ': ' +
453
Copyright 2005-2015, Miva Inc. All Rights Reserved.
Publication Date: 02/28/2015
User Reference Guide DRAFT
return discount_div;
}
AttributeMachine.prototype.Generate_Swatch = function( product_code, attribute,
option )
{
var swatch = document.createElement( 'li' );
var span
= document.createElement( 'span' ); // to vertically center the
swatch images
var img
= document.createElement( 'img' );
img.src
= option.image;
swatch.appendChild( span );
swatch.appendChild( img );
return swatch;
}
</script>
CSSUI: Edit Page: PATR > Page > Attribute Machine
Original File
<script>
AttributeMachine.prototype.Generate_Swatch = function( product_code, attribute,
option )
{
var swatch = document.createElement( 'li' );
var span
= document.createElement( 'span' ); // to vertically center the
swatch images
var img
= document.createElement( 'img' );
img.src
= option.image;
swatch.appendChild( span );
swatch.appendChild( img );
return swatch;
}
</script>
New File
<script>
AttributeMachine.prototype.Generate_Discount = function( discount )
{
454
Copyright 2005-2015, Miva Inc. All Rights Reserved.
Publication Date: 02/28/2015
User Reference Guide DRAFT
var discount_div;
discount_div
discount_div.innerHTML
discount.formatted_discount;
= document.createElement( 'div' );
= discount.descrip + ': ' +
return discount_div;
}
AttributeMachine.prototype.Generate_Swatch = function( product_code, attribute,
option )
{
var swatch = document.createElement( 'li' );
var span
= document.createElement( 'span' ); // to vertically center the
swatch images
var img
= document.createElement( 'img' );
img.src
= option.image;
swatch.appendChild( span );
swatch.appendChild( img );
return swatch;
}
</script>
CSSUI: Edit Page: OCST > Page > Customer Fields
Original File
...
</script>
</mvt:if>
<script
src="&mvt:global:clientside_url;Store_Code=&mvta:store:code;&Filename=ToggleDetails
.js&Primaddr=shipping&Shipping=D&Billing=O"></script>
New File
...
</script>
</mvt:if>
<script
src="&mvte:global:clientside_url;Store_Code=&mvta:store:code;&Filename=ToggleDetail
s.js&Primaddr=shipping&Shipping=D&Billing=O"></script>
455
Copyright 2005-2015, Miva Inc. All Rights Reserved.
Publication Date: 02/28/2015
User Reference Guide DRAFT
CSSUI: User Interface > Settings > Global Header
Original File
...
<div id="search">
<form method="post" action="&mvt:global:sessionurl;Screen=SRCH">
<input type="hidden" name="Store_Code" value="&mvte:store:code;" />
<input type="text" name="Search" id="searchfield"
value="&mvte:global:Search;" class="textfield" />
<mvt:item name="buttons" param="Search" />
</form>
</div>
...
New File
...
<div id="search">
<form method="post" action="&mvte:global:sessionurl;Screen=SRCH">
<input type="hidden" name="Store_Code" value="&mvte:store:code;" />
<input type="text" name="Search" id="searchfield"
value="&mvte:global:Search;" class="textfield" />
<mvt:item name="buttons" param="Search" />
</form>
</div>
...
CSSUI: User Interface > Settings > Global Footer
Original File
...
<mvt:if expr="l.settings:seo_settings:sm_active"><li id="footersitemap-link"><mvt:item name="cssui_links"
param="sitemap">Sitemap</mvt:item></li></mvt:if>
</ul>
</div>
<div id="miva-link">Ecommerce Shopping Cart Software by <a target="_blank"
href="http://www.mivamerchant.com/">Miva Merchant</a></div>
456
Copyright 2005-2015, Miva Inc. All Rights Reserved.
Publication Date: 02/28/2015
User Reference Guide DRAFT
New File
...
<mvt:if expr="l.settings:seo_settings:sm_active"><li id="footersitemap-link"><mvt:item name="cssui_links"
param="sitemap">Sitemap</mvt:item></li></mvt:if>
</ul>
</div>
<div id="miva-link">Ecommerce Shopping Cart Software by <a target="_blank"
rel="nofollow" href="http://www.miva.com/">Miva</a></div>
CSSUI: Edit Page: ORDS > Page > Order Contents
There are numerous changes sprinkled throughout this file. If you have not made custom changes to this
template, you should regenerate the template code by clicking update while in point and click mode,
otherwise, compare the differences between the "new" version and the version you have in your store.
New File
<script language="JavaScript">
<!-function ReloadForm( form_field )
{
document.location.reload();
document.getElementsByName( "OrderDetails_Format" ).value = form_field;
}
//-->
</script>
<table>
<tr class="heading">
<td class="order-reorder"> </td>
<td class="order-description">Product Description</td>
<td class="order-status">Status</td>
<td class="order-quantity">Quantity</td>
<td class="order-price">Price/Ea.</td>
<td class="order-total">Total</td>
</tr>
<mvt:foreach iterator="item" array="order:groups">
<tr>
<mvt:if expr="l.settings:item:option_count">
<mvt:assign name="l.settings:rowspan"
value="l.settings:item:option_count + 1" />
<mvt:else>
<mvt:assign name="l.settings:rowspan" value="1" />
</mvt:if>
457
Copyright 2005-2015, Miva Inc. All Rights Reserved.
Publication Date: 02/28/2015
User Reference Guide DRAFT
<td class="order-reorder" rowspan="&mvt:rowspan;">
<mvt:if expr="l.settings:item:reorder EQ 1">
<a target="_blank"
href="&mvt:global:sessionurl;&Store_Code=&mvta:store:code;&Screen=BASK&Action=ADPR&
Product_Code=&mvta:item:code;&Quantity=1">reorder</a>
<mvt:else>
</mvt:if>
</td>
<td class="order-description">
&mvt:item:name; <mvt:if expr="l.settings:item:upsold">(Special
Offer)</mvt:if>
<mvt:foreach iterator="discount" array="item:discounts">
<mvt:if expr="l.settings:discount:display">
<div class="order-discount">&mvt:discount:descrip;:
&mvt:discount:formatted_discount;</div>
</mvt:if>
</mvt:foreach>
</td>
<td class="order-status">&mvt:item:order_status;</td>
<td class="order-quantity">&mvt:item:quantity;</td>
<td class="order-price">
&mvt:item:formatted_base_price;
</td>
<td class="order-total">
<mvt:if expr="l.settings:item:subtotal_base_price NE
l.settings:item:subtotal">
<span style="text-decoration: linethrough;">&mvt:item:formatted_subtotal_base_price;</span>
</mvt:if>
&mvt:item:formatted_subtotal;
</td>
</tr>
<mvt:foreach iterator="option" array="item:options">
<tr class="item-options">
<td colspan="2">
<mvt:if expr="l.settings:option:option_id">
&mvt:option:attr_code;: &mvt:option:opt_code;
<mvt:elseif expr="NOT ISNULL l.settings:option:data">
&mvt:option:attr_code;: &mvt:option:data;
<mvt:elseif expr="NOT ISNULL l.settings:option:data_long">
&mvt:option:attr_code;: &mvt:option:data_long;
<mvt:else>
&mvt:option:attr_code;
</mvt:if>
<mvt:foreach iterator="discount" array="option:discounts">
<mvt:if expr="l.settings:discount:display">
458
Copyright 2005-2015, Miva Inc. All Rights Reserved.
Publication Date: 02/28/2015
User Reference Guide DRAFT
<div class="order-discount">&mvt:discount:descrip;:
&mvt:discount:formatted_discount;</div>
</mvt:if>
</mvt:foreach>
</td>
<td> </td>
<td class="order-price">
<mvt:if expr="l.settings:option:base_price">
&mvt:option:formatted_base_price;
<mvt:else>
</mvt:if>
</td>
<td class="order-total">
<mvt:if expr="l.settings:option:subtotal_base_price OR
l.settings:option:subtotal">
<mvt:if expr="l.settings:option:subtotal_base_price NE
l.settings:option:subtotal">
<span style="text-decoration: linethrough;">&mvt:option:formatted_subtotal_base_price;</span>
</mvt:if>
&mvt:option:formatted_subtotal;
<mvt:else>
</mvt:if>
</td>
</tr>
</mvt:foreach>
</mvt:foreach>
<mvt:foreach iterator="charge" array="order:charges">
<tr class="order-charges">
<td colspan="4"> </td>
<td class="charge-description">&mvt:charge:descrip;:</td>
<td class="charge-fee">&mvt:charge:formatted_disp_amt;</td>
</tr>
</mvt:foreach>
<tr class="totals">
<td colspan="4"> </td>
<td class="total-prompt">Total:</td>
<td class="formatted-total">&mvt:order:formatted_total;</td>
</tr>
</table>
459
Copyright 2005-2015, Miva Inc. All Rights Reserved.
Publication Date: 02/28/2015
User Reference Guide DRAFT
CSSUI: Edit Page: SRCH > Page > Search Results Layout
Original File
...
<input type="hidden" name="Per_Page"
value="&mvte:global:Per_Page;" />
<label for="Sort_By">Sort By:</label>
<select name="Sort_By" onchange="this.form.submit();">
<mvt:if expr="ISNULL g.Sort_By">
<option value="disp_order"
selected="selected">Default</option>
<mvt:else>
...
<label for="Per_Page">View:</label>
<select name="Per_Page" onchange="this.form.submit();">
<mvt:if expr="g.Per_Page EQ 10">
<option value="10" selected="selected">10</option>
<mvt:else>
...
<div class="product-name"><a
href="&mvte:product:link;">&mvt:product:name;</a></div>
<div class="product-code">Code: <span
class="bold">&mvt:product:code;</span></div>
<div class="product-price">Price: <span
class="bold">&mvt:product:formatted_price;</span></div>
<mvt:if
expr="l.settings:product:inv_active">&mvt:product:inv_long;<br></mvt:if>
<div class="product-quantity">Quantity in Basket:
...
New File
...
<input type="hidden" name="Per_Page"
value="&mvte:global:Per_Page;" />
<label for="Sort_By">Sort By:</label>
<select name="Sort_By" id="Sort_By"
onchange="this.form.submit();">
<mvt:if expr="ISNULL g.Sort_By">
<option value="disp_order"
selected="selected">Default</option>
<mvt:else>
...
<label for="Per_Page">View:</label>
<select name="Per_Page" id="Per_Page"
onchange="this.form.submit();">
<mvt:if expr="g.Per_Page EQ 10">
460
Copyright 2005-2015, Miva Inc. All Rights Reserved.
Publication Date: 02/28/2015
User Reference Guide DRAFT
<option value="10" selected="selected">10</option>
<mvt:else>
...
<div class="product-name"><a
href="&mvte:product:link;">&mvt:product:name;</a></div>
<div class="product-code">Code: <span
class="bold">&mvt:product:code;</span></div>
<div class="product-price">
Price: <span
class="bold">&mvt:product:formatted_base_price;</span>
</div>
<mvt:if
expr="l.settings:product:inv_active">&mvt:product:inv_long;<br></mvt:if>
<div class="product-quantity">Quantity in Basket:
...
CSSUI: Edit Page: PROD > Page > Related Product List Layout
Original File
...
<label for="Sort_By">Sort By:</label>
<select name="Sort_By" onchange="this.form.submit();">
<mvt:if expr="ISNULL g.Sort_By">
<option value="disp_order"
selected="selected">Default</option>
<mvt:else>
...
<label for="Per_Page">View:</label>
<select name="Per_Page" onchange="this.form.submit();">
<mvt:if expr="g.Per_Page EQ 10">
<option value="10" selected="selected">10</option>
<mvt:else>
...
<div class="product-name"><a
href="&mvte:product:link;">&mvt:product:name;</a></div>
<div class="product-code">Code: <span
class="bold">&mvt:product:code;</span></div>
<div class="product-price">Price: <span
class="bold">&mvt:product:formatted_price;</span></div>
<mvt:if
expr="l.settings:product:inv_active">&mvt:product:inv_long;<br></mvt:if>
<div class="product-quantity">Quantity in Basket:
...
461
Copyright 2005-2015, Miva Inc. All Rights Reserved.
Publication Date: 02/28/2015
User Reference Guide DRAFT
New File
...
<label for="Sort_By">Sort By:</label>
<select name="Sort_By" id="Sort_By"
onchange="this.form.submit();">
<mvt:if expr="ISNULL g.Sort_By">
<option value="disp_order"
selected="selected">Default</option>
<mvt:else>
...
<label for="Per_Page">View:</label>
<select name="Per_Page" id="Per_Page"
onchange="this.form.submit();">
<mvt:if expr="g.Per_Page EQ 10">
<option value="10" selected="selected">10</option>
<mvt:else>
...
<div class="product-name"><a
href="&mvte:product:link;">&mvt:product:name;</a></div>
<div class="product-code">Code: <span
class="bold">&mvt:product:code;</span></div>
<div class="product-price">
Price: <span
class="bold">&mvt:product:formatted_base_price;</span>
</div>
<mvt:if
expr="l.settings:product:inv_active">&mvt:product:inv_long;<br></mvt:if>
<div class="product-quantity">Quantity in Basket:
...
CSSUI: Edit Page: PROD > Page > Product Display Layout
Original File
...
<mvt:item name="product_display_imagemachine" param="body:product:id" />
<div class="clear product-image-margin"></div>
<div class="product-code">Code: <span
class="bold">&mvt:product:code;</span></div>
<div class="product-price">Price: <span id="price-value"
class="bold">&mvt:product:formatted_price;</span></div>
<mvt:if expr="l.settings:product:weight NE 0">
<div class="product-weight">Shipping Weight: <span
class="bold">&mvt:product:weight;</span> &mvt:store:wtunits;</div>
</mvt:if>
...
<div class="product-details-2">
462
Copyright 2005-2015, Miva Inc. All Rights Reserved.
Publication Date: 02/28/2015
User Reference Guide DRAFT
<form method="post" action="&mvt:global:sessionurl;Screen=BASK">
<div class="product-description">&mvt:product:descrip;</div>
<div id="swatches" class="swatches"></div>
<div class="clear"></div>
...
New File
...
<mvt:item name="product_display_imagemachine" param="body:product:id" />
<div class="clear product-image-margin"></div>
<div class="product-code">Code: <span
class="bold">&mvt:product:code;</span></div>
<div class="product-price">
Price:
<span id="price-value-additional" style="text-decoration: linethrough"></span>
<span id="price-value" class="bold">&mvt:product:formatted_base_price;</span>
<div id="product-discounts">
</div>
</div>
<mvt:if expr="l.settings:product:weight NE 0">
<div class="product-weight">Shipping Weight: <span
class="bold">&mvt:product:weight;</span> &mvt:store:wtunits;</div>
</mvt:if>
...
<div class="product-details-2">
<div class="product-description">&mvt:product:descrip;</div>
<form method="post" action="&mvt:global:sessionurl;Screen=BASK">
<div id="swatches" class="swatches"></div>
<div class="clear"></div>
...
CSSUI: Edit Page: INVC > Page > Order Contents
There are numerous changes sprinkled throughout this file. If you have not made custom changes to this
template, you should regenerate the template code by clicking update while in point and click mode,
otherwise, compare the differences between the "new" version and the version you have in your store.
New File
<table>
<tr class="basket-heading">
463
Copyright 2005-2015, Miva Inc. All Rights Reserved.
Publication Date: 02/28/2015
User Reference Guide DRAFT
<td
<td
<td
<td
class="item-name">Item</td>
class="item-quantity">Qty.</td>
class="item-price">Item Price</td>
class="item-total">Total Price</td>
</tr>
<mvt:foreach iterator="item" array="order:groups">
<tr>
<mvt:if expr="l.settings:item:option_count">
<mvt:assign name="l.settings:rowspan"
value="l.settings:item:option_count + 1" />
<mvt:else>
<mvt:assign name="l.settings:rowspan" value="1" />
</mvt:if>
<td class="item-name">
<div class="special-offer"><mvt:if
expr="l.settings:item:upsold">(Special Offer)</mvt:if></div>
<div class="item-name">&mvt:item:name; <span class="item-code">
&mvt:item:code;
<mvt:foreach iterator="discount" array="item:discounts">
<mvt:if expr="l.settings:discount:display">
<div class="item-discount">&mvt:discount:descrip;:
&mvt:discount:formatted_discount;</div>
</mvt:if>
</mvt:foreach>
</span>
</div>
</td>
<td class="item-quantity">
&mvt:item:quantity;
</td>
<td class="item-price">
&mvt:item:formatted_base_price;
</td>
<td class="item-total">
<mvt:if expr="l.settings:item:subtotal_base_price NE
l.settings:item:subtotal">
<span style="text-decoration: linethrough;">&mvt:item:formatted_subtotal_base_price;</span>
</mvt:if>
&mvt:item:formatted_subtotal;
</td>
</tr>
<mvt:foreach iterator="option" array="item:options">
<tr class="item-options">
<td class="item-name">
<mvt:if expr="l.settings:option:option_id">
464
Copyright 2005-2015, Miva Inc. All Rights Reserved.
Publication Date: 02/28/2015
User Reference Guide DRAFT
&mvt:option:attr_code;: &mvt:option:opt_code;
<mvt:elseif expr="NOT ISNULL l.settings:option:data">
&mvt:option:attr_code;: &mvt:option:data;
<mvt:elseif expr="NOT ISNULL l.settings:option:data_long">
&mvt:option:attr_code;: &mvt:option:data_long;
<mvt:else>
&mvt:option:attr_code;
</mvt:if>
<mvt:foreach iterator="discount" array="option:discounts">
<mvt:if expr="l.settings:discount:display">
<div class="item-discount">&mvt:discount:descrip;:
&mvt:discount:formatted_discount;</div>
</mvt:if>
</mvt:foreach>
</td>
<td class="item-quantity"> </td>
<td class="item-price">
<mvt:if expr="l.settings:option:base_price">
&mvt:option:formatted_base_price;
<mvt:else>
</mvt:if>
</td>
<td class="item-total">
<mvt:if expr="l.settings:option:subtotal_base_price OR
l.settings:option:subtotal">
<mvt:if expr="l.settings:option:subtotal_base_price NE
l.settings:option:subtotal">
<span style="text-decoration: linethrough;">&mvt:option:formatted_subtotal_base_price;</span>
</mvt:if>
&mvt:option:formatted_subtotal;
<mvt:else>
</mvt:if>
</td>
</tr>
</mvt:foreach>
</mvt:foreach>
<mvt:foreach iterator="coupon" array="order:coupons">
<tr>
<td class="item-name">
<div class="item-name">Coupon <span class="item-code">
&mvt:coupon:code;
</span>
<mvt:if expr="NOT ISNULL l.settings:coupon:descrip">
<div class="item-discount">&mvt:coupon:descrip;</div>
</mvt:if>
465
Copyright 2005-2015, Miva Inc. All Rights Reserved.
Publication Date: 02/28/2015
User Reference Guide DRAFT
</div>
</td>
<td class="item-quantity">
</td>
<td class="item-price">
</td>
<td class="item-total">
</td>
</tr>
</mvt:foreach>
<mvt:foreach iterator="charge" array="order:charges">
<tr class="basket-charges">
<td colspan="2"> </td>
<td class="charge-description">&mvt:charge:descrip;:</td>
<td class="formatted-charge">&mvt:charge:formatted_disp_amt;</td>
</tr>
</mvt:foreach>
<tr id="basket-totals">
<td colspan="2"> </td>
<td class="total-prompt">Total:</td>
<td class="formatted-total">&mvt:order:formatted_total;</td>
</tr>
</table>
<div class="clear"></div>
CSSUI: Edit Page: CTGY > Page > Category Product List Layout
Original File
...
<label for="Sort_By">Sort By:</label>
<select name="Sort_By" onchange="this.form.submit();">
<mvt:if expr="ISNULL g.Sort_By">
<option value="disp_order"
selected="selected">Default</option>
<mvt:else>
...
<label for="Per_Page">View:</label>
<select name="Per_Page" onchange="this.form.submit();">
<mvt:if expr="g.Per_Page EQ 10">
<option value="10" selected="selected">10</option>
466
Copyright 2005-2015, Miva Inc. All Rights Reserved.
Publication Date: 02/28/2015
User Reference Guide DRAFT
<mvt:else>
...
<div class="product-name"><a
href="&mvte:product:link;">&mvt:product:name;</a></div>
<div class="product-code">Code: <span
class="bold">&mvt:product:code;</span></div>
<div class="product-price">Price: <span
class="bold">&mvt:product:formatted_price;</span></div>
<mvt:if
expr="l.settings:product:inv_active">&mvt:product:inv_long;<br></mvt:if>
<div class="product-quantity">Quantity in Basket:
...
New File
...
<label for="Sort_By">Sort By:</label>
<select name="Sort_By" id="Sort_By"
onchange="this.form.submit();">
<mvt:if expr="ISNULL g.Sort_By">
<option value="disp_order"
selected="selected">Default</option>
<mvt:else>
...
<label for="Per_Page">View:</label>
<select name="Per_Page" id="Per_Page"
onchange="this.form.submit();">
<mvt:if expr="g.Per_Page EQ 10">
<option value="10" selected="selected">10</option>
<mvt:else>
...
<div class="product-name"><a
href="&mvte:product:link;">&mvt:product:name;</a></div>
<div class="product-code">Code: <span
class="bold">&mvt:product:code;</span></div>
<div class="product-price">
Price: <span
class="bold">&mvt:product:formatted_base_price;</span>
</div>
<mvt:if
expr="l.settings:product:inv_active">&mvt:product:inv_long;<br></mvt:if>
<div class="product-quantity">Quantity in Basket:
...
467
Copyright 2005-2015, Miva Inc. All Rights Reserved.
Publication Date: 02/28/2015
User Reference Guide DRAFT
CSSUI: Edit Page: BASK > Page > Basket Contents
There are numerous changes sprinkled throughout this file. If you have not made custom changes to this
template, you should regenerate the template code by clicking update while in point and click mode,
otherwise, compare the differences between the "new" version and the version you have in your store.
New File
<mvt:if expr="l.settings:basket:empty">
Your shopping basket is currently empty.
<p><mvt:item name="cssui_links" param="storefront">Home</mvt:item></p>
<mvt:exit />
</mvt:if>
<table>
<tr class="basket-heading">
<td class="item-remove"> </td>
<td class="item-name">Item</td>
<td class="item-quantity">Qty.</td>
<td class="item-price">Item Price</td>
<td class="item-total">Total Price</td>
</tr>
<mvt:foreach iterator="group" array="basket:groups">
<tr>
<mvt:if expr="l.settings:group:option_count">
<mvt:assign name="l.settings:rowspan"
value="l.settings:group:option_count + 1" />
<mvt:else>
<mvt:assign name="l.settings:rowspan" value="1" />
</mvt:if>
<td class="item-remove" rowspan="&mvt:rowspan;">
<form method="post" action="&mvt:global:sessionurl;Screen=BASK">
<input type="hidden" name="Action" value="RGRP" />
<input type="hidden" name="Store_Code"
value="&mvte:global:Store_Code;" />
<input type="hidden" name="Basket_Group"
value="&mvte:group:group_id;" />
<input type="hidden" name="Offset" value="&mvte:global:Offset;"
/>
<input type="hidden" name="AllOffset"
value="&mvte:global:AllOffset;" />
<input type="hidden" name="CatListingOffset"
value="&mvte:global:CatListingOffset;" />
<input type="hidden" name="RelatedOffset"
value="&mvte:global:RelatedOffset;" />
<input type="hidden" name="SearchOffset"
value="&mvte:global:SearchOffset;" />
<mvt:item name="buttons" param="Remove" />
468
Copyright 2005-2015, Miva Inc. All Rights Reserved.
Publication Date: 02/28/2015
User Reference Guide DRAFT
</form>
</td>
<td class="item-name">
<div class="special-offer"><mvt:if
expr="l.settings:group:upsold">(Special Offer)</mvt:if></div>
<div class="item-name">&mvt:group:name; <span class="item-code">
<a
href="&mvt:global:sessionurl;Screen=PROD&Store_Code=&mvta:global:Store_Code;&Produc
t_Code=&mvta:group:code;">&mvt:group:code;</a>
<mvt:foreach iterator="discount" array="group:discounts">
<mvt:if expr="l.settings:discount:display">
<div class="itemdiscount">&mvt:discount:descrip;: &mvt:discount:formatted_discount;</div>
</mvt:if>
</mvt:foreach>
</span>
</div>
</td>
<td class="item-quantity">
<mvt:if expr="l.settings:group:upsold">
&mvt:group:quantity;
<mvt:else>
<form method="post" action="&mvt:global:sessionurl;Screen=BASK">
<input type="hidden" name="Action" value="QTYG" />
<input type="hidden" name="Store_Code"
value="&mvte:global:Store_Code;" />
<input type="hidden" name="Basket_Group"
value="&mvte:group:group_id;" />
<input type="hidden" name="Old_Screen" value="BASK" />
<input type="hidden" name="Offset" value="&mvte:global:Offset;"
/>
<input type="hidden" name="AllOffset"
value="&mvte:global:AllOffset;" />
<input type="hidden" name="CatListingOffset"
value="&mvte:global:CatListingOffset;" />
<input type="hidden" name="RelatedOffset"
value="&mvte:global:RelatedOffset;" />
<input type="hidden" name="SearchOffset"
value="&mvte:global:SearchOffset;" />
<input type="text" name="Quantity" class="textfield basket-qtyinput small" value="&mvt:group:quantity;" />
<mvt:item name="buttons" param="Update" />
</form>
</mvt:if>
</td>
<td class="item-price">
&mvt:group:formatted_base_price;
</td>
<td class="item-total">
469
Copyright 2005-2015, Miva Inc. All Rights Reserved.
Publication Date: 02/28/2015
User Reference Guide DRAFT
<mvt:if expr="l.settings:group:subtotal_base_price NE
l.settings:group:subtotal">
<span style="text-decoration: linethrough;">&mvt:group:formatted_subtotal_base_price;</span>
</mvt:if>
&mvt:group:formatted_subtotal;
</td>
</tr>
<mvt:foreach iterator="option" array="group:options">
<tr class="item-options">
<td class="item-name">
<mvt:if expr="l.settings:option:option_id">
&mvt:option:attr_code;: &mvt:option:opt_code;
<mvt:elseif expr="NOT ISNULL l.settings:option:data">
&mvt:option:attr_code;: &mvt:option:data;
<mvt:elseif expr="NOT ISNULL l.settings:option:data_long">
&mvt:option:attr_code;: &mvt:option:data_long;
<mvt:else>
&mvt:option:attr_code;
</mvt:if>
<mvt:foreach iterator="discount" array="option:discounts">
<mvt:if expr="l.settings:discount:display">
<div class="item-discount">&mvt:discount:descrip;:
&mvt:discount:formatted_discount;</div>
</mvt:if>
</mvt:foreach>
</td>
<td class="item-quantity"> </td>
<td class="item-price">
<mvt:if expr="l.settings:option:base_price">
&mvt:option:formatted_base_price;
<mvt:else>
</mvt:if>
</td>
<td class="item-total">
<mvt:if expr="l.settings:option:subtotal_base_price OR
l.settings:option:subtotal">
<mvt:if expr="l.settings:option:subtotal_base_price NE
l.settings:option:subtotal">
<span style="text-decoration: linethrough;">&mvt:option:formatted_subtotal_base_price;</span>
</mvt:if>
&mvt:option:formatted_subtotal;
<mvt:else>
</mvt:if>
</td>
</tr>
470
Copyright 2005-2015, Miva Inc. All Rights Reserved.
Publication Date: 02/28/2015
User Reference Guide DRAFT
</mvt:foreach>
</mvt:foreach>
<mvt:foreach iterator="charge" array="basket:charges">
<tr class="basket-charges">
<td colspan="3"> </td>
<td class="charge-description">&mvt:charge:descrip;:</td>
<td class="formatted-charge">&mvt:charge:formatted_disp_amt;</td>
</tr>
</mvt:foreach>
<tr id="basket-totals">
<td colspan="3">
</td>
<td class="total-prompt">Total:</td>
<td class="formatted-total">&mvt:basket:formatted_total;</td>
</tr>
</table>
<div class="clear"></div>
CSSUI: Edit Page: OCST > Page > Basket Contents
There are numerous changes sprinkled throughout this file. If you have not made custom changes to this
template, you should regenerate the template code by clicking update while in point and click mode,
otherwise, compare the differences between the "new" version and the version you have in your store.
New File
<mvt:if expr="l.settings:basket:empty">
Your shopping basket is currently empty.
<p><mvt:item name="cssui_links" param="storefront">Home</mvt:item></p>
<mvt:exit />
</mvt:if>
<table>
<tr class="basket-heading">
<td class="item-name">Item</td>
<td class="item-quantity">Qty.</td>
<td class="item-price">Item Price</td>
<td class="item-total">Total Price</td>
</tr>
<mvt:foreach iterator="group" array="basket:groups">
<tr>
<mvt:if expr="l.settings:group:option_count">
<mvt:assign name="l.settings:rowspan"
value="l.settings:group:option_count + 1" />
<mvt:else>
471
Copyright 2005-2015, Miva Inc. All Rights Reserved.
Publication Date: 02/28/2015
User Reference Guide DRAFT
<mvt:assign name="l.settings:rowspan" value="1" />
</mvt:if>
<td class="item-name">
<div class="special-offer"><mvt:if
expr="l.settings:group:upsold">(Special Offer)</mvt:if></div>
<div class="item-name">&mvt:group:name; <span class="item-code">
&mvt:group:code;
<mvt:foreach iterator="discount" array="group:discounts">
<mvt:if expr="l.settings:discount:display">
<div class="itemdiscount">&mvt:discount:descrip;: &mvt:discount:formatted_discount;</div>
</mvt:if>
</mvt:foreach>
</span>
</div>
</td>
<td class="item-quantity">
&mvt:group:quantity;
</td>
<td class="item-price">
&mvt:group:formatted_base_price;
</td>
<td class="item-total">
<mvt:if expr="l.settings:group:subtotal_base_price NE
l.settings:group:subtotal">
<span style="text-decoration: linethrough;">&mvt:group:formatted_subtotal_base_price;</span>
</mvt:if>
&mvt:group:formatted_subtotal;
</td>
</tr>
<mvt:foreach iterator="option" array="group:options">
<tr class="item-options">
<td class="item-name">
<mvt:if expr="l.settings:option:option_id">
&mvt:option:attr_code;: &mvt:option:opt_code;
<mvt:elseif expr="NOT ISNULL l.settings:option:data">
&mvt:option:attr_code;: &mvt:option:data;
<mvt:elseif expr="NOT ISNULL l.settings:option:data_long">
&mvt:option:attr_code;: &mvt:option:data_long;
<mvt:else>
&mvt:option:attr_code;
</mvt:if>
<mvt:foreach iterator="discount" array="option:discounts">
<mvt:if expr="l.settings:discount:display">
<div class="item-discount">&mvt:discount:descrip;:
&mvt:discount:formatted_discount;</div>
472
Copyright 2005-2015, Miva Inc. All Rights Reserved.
Publication Date: 02/28/2015
User Reference Guide DRAFT
</mvt:if>
</mvt:foreach>
</td>
<td class="item-quantity"> </td>
<td class="item-price">
<mvt:if expr="l.settings:option:base_price">
&mvt:option:formatted_base_price;
<mvt:else>
</mvt:if>
</td>
<td class="item-total">
<mvt:if expr="l.settings:option:subtotal_base_price OR
l.settings:option:subtotal">
<mvt:if expr="l.settings:option:subtotal_base_price NE
l.settings:option:subtotal">
<span style="text-decoration: linethrough;">&mvt:option:formatted_subtotal_base_price;</span>
</mvt:if>
&mvt:option:formatted_subtotal;
<mvt:else>
</mvt:if>
</td>
</tr>
</mvt:foreach>
</mvt:foreach>
<mvt:foreach iterator="charge" array="basket:charges">
<tr class="basket-charges">
<td colspan="2"> </td>
<td class="charge-description">&mvt:charge:descrip;:</td>
<td class="formatted-charge">&mvt:charge:formatted_disp_amt;</td>
</tr>
</mvt:foreach>
<tr id="basket-totals">
<td colspan="2">
</td>
<td class="total-prompt">Total:</td>
<td class="formatted-total">&mvt:basket:formatted_total;</td>
</tr>
</table>
<div class="clear"></div>
473
Copyright 2005-2015, Miva Inc. All Rights Reserved.
Publication Date: 02/28/2015
User Reference Guide DRAFT
CSSUI: Edit Page: OSEL > Page > Basket Contents
There are numerous changes sprinkled throughout this file. If you have not made custom changes to this
template, you should regenerate the template code by clicking update while in point and click mode,
otherwise, compare the differences between the "new" version and the version you have in your store.
New File
<mvt:if expr="l.settings:basket:empty">
Your shopping basket is currently empty.
<p><mvt:item name="cssui_links" param="storefront">Home</mvt:item></p>
<mvt:exit />
</mvt:if>
<table>
<tr class="basket-heading">
<td class="item-name">Item</td>
<td class="item-quantity">Qty.</td>
<td class="item-price">Item Price</td>
<td class="item-total">Total Price</td>
</tr>
<mvt:foreach iterator="group" array="basket:groups">
<tr>
<mvt:if expr="l.settings:group:option_count">
<mvt:assign name="l.settings:rowspan"
value="l.settings:group:option_count + 1" />
<mvt:else>
<mvt:assign name="l.settings:rowspan" value="1" />
</mvt:if>
<td class="item-name">
<div class="special-offer"><mvt:if
expr="l.settings:group:upsold">(Special Offer)</mvt:if></div>
<div class="item-name">&mvt:group:name; <span class="item-code">
&mvt:group:code;
<mvt:foreach iterator="discount" array="group:discounts">
<mvt:if expr="l.settings:discount:display">
<div class="itemdiscount">&mvt:discount:descrip;: &mvt:discount:formatted_discount;</div>
</mvt:if>
</mvt:foreach>
</span>
</div>
</td>
<td class="item-quantity">
&mvt:group:quantity;
</td>
<td class="item-price">
474
Copyright 2005-2015, Miva Inc. All Rights Reserved.
Publication Date: 02/28/2015
User Reference Guide DRAFT
&mvt:group:formatted_base_price;
</td>
<td class="item-total">
<mvt:if expr="l.settings:group:subtotal_base_price NE
l.settings:group:subtotal">
<span style="text-decoration: linethrough;">&mvt:group:formatted_subtotal_base_price;</span>
</mvt:if>
&mvt:group:formatted_subtotal;
</td>
</tr>
<mvt:foreach iterator="option" array="group:options">
<tr class="item-options">
<td class="item-name">
<mvt:if expr="l.settings:option:option_id">
&mvt:option:attr_code;: &mvt:option:opt_code;
<mvt:elseif expr="NOT ISNULL l.settings:option:data">
&mvt:option:attr_code;: &mvt:option:data;
<mvt:elseif expr="NOT ISNULL l.settings:option:data_long">
&mvt:option:attr_code;: &mvt:option:data_long;
<mvt:else>
&mvt:option:attr_code;
</mvt:if>
<mvt:foreach iterator="discount" array="option:discounts">
<mvt:if expr="l.settings:discount:display">
<div class="item-discount">&mvt:discount:descrip;:
&mvt:discount:formatted_discount;</div>
</mvt:if>
</mvt:foreach>
</td>
<td class="item-quantity"> </td>
<td class="item-price">
<mvt:if expr="l.settings:option:base_price">
&mvt:option:formatted_base_price;
<mvt:else>
</mvt:if>
</td>
<td class="item-total">
<mvt:if expr="l.settings:option:subtotal_base_price OR
l.settings:option:subtotal">
<mvt:if expr="l.settings:option:subtotal_base_price NE
l.settings:option:subtotal">
<span style="text-decoration: linethrough;">&mvt:option:formatted_subtotal_base_price;</span>
</mvt:if>
&mvt:option:formatted_subtotal;
<mvt:else>
475
Copyright 2005-2015, Miva Inc. All Rights Reserved.
Publication Date: 02/28/2015
User Reference Guide DRAFT
</mvt:if>
</td>
</tr>
</mvt:foreach>
</mvt:foreach>
<mvt:foreach iterator="charge" array="basket:charges">
<tr class="basket-charges">
<td colspan="2"> </td>
<td class="charge-description">&mvt:charge:descrip;:</td>
<td class="formatted-charge">&mvt:charge:formatted_disp_amt;</td>
</tr>
</mvt:foreach>
<tr id="basket-totals">
<td colspan="2">
</td>
<td class="total-prompt">Total:</td>
<td class="formatted-total">&mvt:basket:formatted_total;</td>
</tr>
</table>
<div class="clear"></div>
CSSUI: Edit Page: OPAY > Page > Basket Contents
There are numerous changes sprinkled throughout this file. If you have not made custom changes to this
template, you should regenerate the template code by clicking update while in point and click mode,
otherwise, compare the differences between the "new" version and the version you have in your store.
New File
<mvt:if expr="l.settings:basket:empty">
Your shopping basket is currently empty.
<p><mvt:item name="cssui_links" param="storefront">Home</mvt:item></p>
<mvt:exit />
</mvt:if>
<table>
<tr class="basket-heading">
<td class="item-name">Item</td>
<td class="item-quantity">Qty.</td>
<td class="item-price">Item Price</td>
<td class="item-total">Total Price</td>
</tr>
<mvt:foreach iterator="group" array="basket:groups">
<tr>
<mvt:if expr="l.settings:group:option_count">
476
Copyright 2005-2015, Miva Inc. All Rights Reserved.
Publication Date: 02/28/2015
User Reference Guide DRAFT
<mvt:assign name="l.settings:rowspan"
value="l.settings:group:option_count + 1" />
<mvt:else>
<mvt:assign name="l.settings:rowspan" value="1" />
</mvt:if>
<td class="item-name">
<div class="special-offer"><mvt:if
expr="l.settings:group:upsold">(Special Offer)</mvt:if></div>
<div class="item-name">&mvt:group:name; <span class="item-code">
&mvt:group:code;
<mvt:foreach iterator="discount" array="group:discounts">
<mvt:if expr="l.settings:discount:display">
<div class="itemdiscount">&mvt:discount:descrip;: &mvt:discount:formatted_discount;</div>
</mvt:if>
</mvt:foreach>
</span>
</div>
</td>
<td class="item-quantity">
&mvt:group:quantity;
</td>
<td class="item-price">
&mvt:group:formatted_base_price;
</td>
<td class="item-total">
<mvt:if expr="l.settings:group:subtotal_base_price NE
l.settings:group:subtotal">
<span style="text-decoration: linethrough;">&mvt:group:formatted_subtotal_base_price;</span>
</mvt:if>
&mvt:group:formatted_subtotal;
</td>
</tr>
<mvt:foreach iterator="option" array="group:options">
<tr class="item-options">
<td class="item-name">
<mvt:if expr="l.settings:option:option_id">
&mvt:option:attr_code;: &mvt:option:opt_code;
<mvt:elseif expr="NOT ISNULL l.settings:option:data">
&mvt:option:attr_code;: &mvt:option:data;
<mvt:elseif expr="NOT ISNULL l.settings:option:data_long">
&mvt:option:attr_code;: &mvt:option:data_long;
<mvt:else>
&mvt:option:attr_code;
</mvt:if>
<mvt:foreach iterator="discount" array="option:discounts">
477
Copyright 2005-2015, Miva Inc. All Rights Reserved.
Publication Date: 02/28/2015
User Reference Guide DRAFT
<mvt:if expr="l.settings:discount:display">
<div class="item-discount">&mvt:discount:descrip;:
&mvt:discount:formatted_discount;</div>
</mvt:if>
</mvt:foreach>
</td>
<td class="item-quantity"> </td>
<td class="item-price">
<mvt:if expr="l.settings:option:base_price">
&mvt:option:formatted_base_price;
<mvt:else>
</mvt:if>
</td>
<td class="item-total">
<mvt:if expr="l.settings:option:subtotal_base_price OR
l.settings:option:subtotal">
<mvt:if expr="l.settings:option:subtotal_base_price NE
l.settings:option:subtotal">
<span style="text-decoration: linethrough;">&mvt:option:formatted_subtotal_base_price;</span>
</mvt:if>
&mvt:option:formatted_subtotal;
<mvt:else>
</mvt:if>
</td>
</tr>
</mvt:foreach>
</mvt:foreach>
<mvt:foreach iterator="charge" array="basket:charges">
<tr class="basket-charges">
<td colspan="2"> </td>
<td class="charge-description">&mvt:charge:descrip;:</td>
<td class="formatted-charge">&mvt:charge:formatted_disp_amt;</td>
</tr>
</mvt:foreach>
<tr id="basket-totals">
<td colspan="2">
</td>
<td class="total-prompt">Total:</td>
<td class="formatted-total">&mvt:basket:formatted_total;</td>
</tr>
</table>
<div class="clear"></div>
478
Copyright 2005-2015, Miva Inc. All Rights Reserved.
Publication Date: 02/28/2015
User Reference Guide DRAFT
CSSUI: Edit Page: PLST > Page > Product List Layout
Original File
...
<label for="Sort_By">Sort By:</label>
<select name="Sort_By" onchange="this.form.submit();">
<mvt:if expr="ISNULL g.Sort_By">
<option value="disp_order"
selected="selected">Default</option>
<mvt:else>
...
<label for="Per_Page">View:</label>
<select name="Per_Page" onchange="this.form.submit();">
<mvt:if expr="g.Per_Page EQ 10">
<option value="10" selected="selected">10</option>
<mvt:else>
...
<div class="product-name"><a
href="&mvte:product:link;">&mvt:product:name;</a></div>
<div class="product-code">Code: <span
class="bold">&mvt:product:code;</span></div>
<div class="product-price">Price: <span
class="bold">&mvt:product:formatted_price;</span></div>
<mvt:if
expr="l.settings:product:inv_active">&mvt:product:inv_long;<br></mvt:if>
<div class="product-quantity">Quantity in Basket:
...
New File
...
<label for="Sort_By">Sort By:</label>
<select name="Sort_By" id="Sort_By"
onchange="this.form.submit();">
<mvt:if expr="ISNULL g.Sort_By">
<option value="disp_order"
selected="selected">Default</option>
<mvt:else>
...
<label for="Per_Page">View:</label>
<select name="Per_Page" id="Per_Page"
onchange="this.form.submit();">
<mvt:if expr="g.Per_Page EQ 10">
<option value="10" selected="selected">10</option>
<mvt:else>
...
479
Copyright 2005-2015, Miva Inc. All Rights Reserved.
Publication Date: 02/28/2015
User Reference Guide DRAFT
<div class="product-name"><a
href="&mvte:product:link;">&mvt:product:name;</a></div>
<div class="product-code">Code: <span
class="bold">&mvt:product:code;</span></div>
<div class="product-price">
Price: <span
class="bold">&mvt:product:formatted_base_price;</span>
</div>
<mvt:if
expr="l.settings:product:inv_active">&mvt:product:inv_long;<br></mvt:if>
<div class="product-quantity">Quantity in Basket:
...
CSSUI: Edit Page: BASK > Page -> Details
Original File
...
<h1>Shopping Basket</h1>
<div id="basket-contents" class="editable"><mvt:item name="basket" /></div>
<div class="checkout-button"><input type="button" value="Checkout"
onclick="window.location =
'&mvte:global:secure_sessionurl;Screen=OINF&Store_Code=&mvta:store:code;';"
class="button" /></div>
...
New File
...
<h1>Shopping Basket</h1>
<mvt:if expr="l.settings:messages:error_message_count">
<div class="error-message">
<mvt:foreach iterator="error" array="messages:error_messages">
&mvt:error;
</mvt:foreach>
</div>
</mvt:if>
<mvt:if expr="l.settings:messages:information_message_count">
<div class="information-message">
<mvt:foreach iterator="message" array="messages:information_messages">
&mvt:message;
</mvt:foreach>
</div>
</mvt:if>
480
Copyright 2005-2015, Miva Inc. All Rights Reserved.
Publication Date: 02/28/2015
User Reference Guide DRAFT
<div id="basket-contents" class="editable"><mvt:item name="basket" /></div>
<div class="checkout-button"><input type="button" value="Checkout"
onclick="window.location =
'&mvte:global:secure_sessionurl;Screen=OINF&Store_Code=&mvta:store:code;';"
class="button" /></div>
...
CSSUI: Edit Page: NTFD > Page > Details
Original File
...
<h1>Not Found</h1>
<mvt:if expr = "ISNULL g.Error_Messages">
The item you requested is not available at this time.
<mvt:else>
&mvte:global:Error_Messages;
</mvt:if>
<p><a
href="&mvt:global:sessionurl;Screen=SFNT&Store_Code=&mvta:store:code;">Home</a></p>
...
New File
...
<h1>Not Found</h1>
<mvt:if expr = "l.settings:messages:error_message_count EQ 0">
The item you requested is not available at this time.
<mvt:else>
<mvt:foreach iterator="error" array="messages:error_messages">
&mvt:error;
</mvt:foreach>
</mvt:if>
<p><a
href="&mvt:global:sessionurl;Screen=SFNT&Store_Code=&mvta:store:code;">Home</a></p>
...
481
Copyright 2005-2015, Miva Inc. All Rights Reserved.
Publication Date: 02/28/2015
User Reference Guide DRAFT
CSSUI: Edit Page: OCST > Page > Details
Original File
...
<h1>Order Details</h1>
<form id="ocst_form" method="post" action="&mvt:global:secure_sessionurl;">
<mvt:if expr="l.settings:basket:total GT 0">
<input type="hidden" name="Action" value="ORDR" />
<input type="hidden" name="Screen" value="OUSL" />
<mvt:elseif expr="g.Store:req_frship">
<input type="hidden" name="Action" value="ORDR" />
<input type="hidden" name="Screen" value="OSEL" />
<mvt:else>
<input type="hidden" name="Action" value="ORDR,SHIP,CTAX,AUTH" />
<input type="hidden" name="Screen" value="INVC" />
</mvt:if>
<input type="hidden" name="Store_Code" value="&mvte:store:code;" />
<div id="basket-contents" class="non-editable"><mvt:item name="basket"
/></div>
<mvt:if expr="l.settings:messages:error_message_count">
<div class="error-message">
<mvt:foreach iterator="error" array="messages:error_messages">
&mvt:error;
</mvt:foreach>
</div>
</mvt:if>
<mvt:if expr="l.settings:messages:information_message_count">
<div class="information-message">
<mvt:foreach iterator="message" array="messages:information_messages">
&mvt:message;
</mvt:foreach>
</div>
</mvt:if>
<div id="customer-fields" class="editable"><mvt:item name="customer" /></div>
<div class="continue-button"><mvt:item name="buttons" param="Continue"
/></div>
</form>
...
New File
...
<h1>Order Details</h1>
482
Copyright 2005-2015, Miva Inc. All Rights Reserved.
Publication Date: 02/28/2015
User Reference Guide DRAFT
<div id="basket-contents" class="non-editable"><mvt:item name="basket"
/></div>
<mvt:if expr="l.settings:messages:error_message_count">
<div class="error-message">
<mvt:foreach iterator="error" array="messages:error_messages">
&mvt:error;
</mvt:foreach>
</div>
</mvt:if>
<mvt:if expr="l.settings:messages:information_message_count">
<div class="information-message">
<mvt:foreach iterator="message" array="messages:information_messages">
&mvt:message;
</mvt:foreach>
</div>
</mvt:if>
<form id="ocst_form" method="post" action="&mvt:global:secure_sessionurl;">
<mvt:if expr="l.settings:basket:total GT 0">
<input type="hidden" name="Action" value="ORDR" />
<input type="hidden" name="Screen" value="OUSL" />
<mvt:elseif expr="g.Store:req_frship">
<input type="hidden" name="Action" value="ORDR" />
<input type="hidden" name="Screen" value="OSEL" />
<mvt:else>
<input type="hidden" name="Action" value="ORDR,SHIP,CTAX,AUTH" />
<input type="hidden" name="Screen" value="INVC" />
</mvt:if>
<input type="hidden" name="Store_Code" value="&mvte:store:code;" />
<div id="customer-fields" class="editable"><mvt:item name="customer" /></div>
<div class="continue-button"><mvt:item name="buttons" param="Continue"
/></div>
</form>
...
CSSUI: Edit Page: OPAY > Page > Details
Original File
...
483
Copyright 2005-2015, Miva Inc. All Rights Reserved.
Publication Date: 02/28/2015
User Reference Guide DRAFT
<mvt:if expr="l.settings:messages:error_message_count">
<div class="error-message">
<mvt:foreach iterator="error" array="messages:error_messages">
&mvt:error;
</mvt:foreach>
</div>
</mvt:if>
<mvt:if expr="l.settings:messages:information_message_count">
<div class="information-message">
<mvt:foreach iterator="message" array="messages:information_messages">
&mvt:message;
</mvt:foreach>
</div>
</mvt:if>
...
New File
...
<mvt:if expr="l.settings:messages:error_message_count">
<div class="error-message">
<mvt:foreach iterator="error" array="messages:error_messages">
&mvt:error;
</mvt:foreach>
</div>
</mvt:if>
<mvt:if expr="l.settings:messages:information_message_count">
<div class="information-message">
<mvt:foreach iterator="message" array="messages:information_messages">
&mvt:message;
</mvt:foreach>
</div>
</mvt:if>
...
CSSUI: Edit Page: OSEL > Page > Details
Original File
...
<h1>Shipping/Payment Selection</h1>
<form method="post" action="&mvt:global:secure_sessionurl;">
<mvt:item name="tax" />
484
Copyright 2005-2015, Miva Inc. All Rights Reserved.
Publication Date: 02/28/2015
User Reference Guide DRAFT
<div id="customer-fields" class="non-editable"><mvt:item name="customer"
/></div>
<div id="basket-contents" class="non-editable"><mvt:item name="basket"
/></div>
<input type="hidden" name="Screen" value="OPAY" />
<input type="hidden" name="Action" value="SHIP,PSHP,CTAX" />
<input type="hidden" name="Store_Code" value="&mvte:global:Store_Code;" />
...
New File
...
<h1>Shipping/Payment Selection</h1>
<div id="customer-fields" class="non-editable"><mvt:item name="customer"
/></div>
<div id="basket-contents" class="non-editable"><mvt:item name="basket"
/></div>
<form method="post" action="&mvt:global:secure_sessionurl;">
<mvt:item name="tax" />
<input type="hidden" name="Screen" value="OPAY" />
<input type="hidden" name="Action" value="SHIP,PSHP,CTAX" />
<input type="hidden" name="Store_Code" value="&mvte:global:Store_Code;" />
...
CSSUI: Edit Page: SRCH > Page > Details
Original File
...
<h1>Search Results</h1>
<div class="search-again alignright">
<form method="post" action="&mvt:global:sessionurl;Screen=SRCH">
<input type="hidden" name="Store_Code" value="&mvte:store:code;" />
<label for="Search" class="bold">Search Again:</label>
<input type="text" name="Search" id="Search" class="textfield"
value="&mvte:global:Search;" />
<mvt:item name="buttons" param="Search" />
</form>
</div>
...
485
Copyright 2005-2015, Miva Inc. All Rights Reserved.
Publication Date: 02/28/2015
User Reference Guide DRAFT
New File
...
<h1>Search Results</h1>
<div class="search-again alignright">
<form method="post" action="&mvte:global:sessionurl;Screen=SRCH">
<input type="hidden" name="Store_Code" value="&mvte:store:code;" />
<label for="Search" class="bold">Search Again:</label>
<input type="text" name="Search" id="Search" class="textfield"
value="&mvte:global:Search;" />
<mvt:item name="buttons" param="Search" />
</form>
</div>
...
cssui.css
Original File
...
#basket-contents .item-total{
width:10%;
text-align:right;
}
#basket-contents .basket-charges .charge-description,
#basket-contents .basket-charges .formatted-charge{
font-style:italic;
text-align:right;
white-space:nowrap;
}
...
New File
...
#basket-contents .item-total{
width:10%;
text-align:right;
}
#basket-contents .custom-field{
486
Copyright 2005-2015, Miva Inc. All Rights Reserved.
Publication Date: 02/28/2015
User Reference Guide DRAFT
font-size:x-small;
}
#basket-contents .basket-charges .charge-description,
#basket-contents .basket-charges .formatted-charge{
font-style:italic;
text-align:right;
white-space:nowrap;
}
...
Edit Page EMAIL_BACKORDER_NOTICE > Page
Original File
...
<table style="border-collapse: collapse; border-spacing: 0; font-size: 100%;
color: #676767; border: 1px solid #c7c8d7; width: 690px;">
<tr>
<th style="font-size: 16px; color: #5b639c; padding: 5px 20px 5px
20px; vertical-align: top; width: 60px; text-align: left;">Code</th>
<th style="font-size: 16px; color: #5b639c; padding: 5px 20px 5px
20px; vertical-align: top; text-align: left;">Product</th>
<th style="font-size: 16px; color: #5b639c; padding: 5px 20px 5px
20px; vertical-align: top; width: 60px; text-align: right;">Quantity</th>
<th style="font-size: 16px; color: #5b639c; padding: 5px 20px 5px
20px; vertical-align: top; text-align: center;">Expected In-Stock Date</th>
</tr>
<mvt:foreach iterator="item" array="backorder:items">
<tr style="background-color: #f7f7f7; font-weight: bold;">
<td style="padding: 5px 20px 5px 20px; vertical-align: top;
width: 60px; text-align: left;">&mvt:item:code;</td>
<td style="padding: 5px 20px 5px 20px; vertical-align: top;
text-align: left;">&mvt:item:name;</td>
<td style="padding: 5px 20px 5px 20px; vertical-align: top;
width: 60px; text-align: right;">&mvt:item:quantity;</td>
<td style="padding: 5px 20px 5px 20px; vertical-align: top;
text-align: center;">
<mvt:if expr="ISNULL l.settings:item:dt_instock">
Not Specified
<mvt:else>
&mvt:item:formatted_dt_instock;
</mvt:if>
</td>
</tr>
487
Copyright 2005-2015, Miva Inc. All Rights Reserved.
Publication Date: 02/28/2015
User Reference Guide DRAFT
<mvt:foreach iterator="option" array="item:options">
<tr>
<td></td>
<td style="padding: 5px 20px 5px 20px; verticalalign: top; text-align: left;">
<mvt:if expr="l.settings:option:option_id">
&mvt:option:attr_code;:
&mvt:option:opt_code;
<mvt:elseif expr="NOT ISNULL
l.settings:option:data">
&mvt:option:attr_code;: &mvt:option:data;
<mvt:elseif expr="NOT ISNULL
l.settings:option:data_long">
&mvt:option:attr_code;:
&mvt:option:data_long;
<mvt:else>
&mvt:option:attr_code;
</mvt:if>
</td>
<td colspan="2"></td>
</tr>
</mvt:foreach>
</mvt:foreach>
</table>
...
New File
...
<table style="border-collapse: collapse; border-spacing: 0; font-size: 100%;
color: #676767; border: 1px solid #c7c8d7; width: 690px;">
<tr>
<th style="font-size: 16px; color: #5b639c; padding: 5px 20px 5px
20px; vertical-align: top; width: 60px; text-align: left;">Code</th>
<th style="font-size: 16px; color: #5b639c; padding: 5px 20px 5px
20px; vertical-align: top; text-align: left;">Product</th>
<th style="font-size: 16px; color: #5b639c; padding: 5px 20px 5px
20px; vertical-align: top; width: 60px; text-align: right;">Quantity</th>
<th style="font-size: 16px; color: #5b639c; padding: 5px 20px 5px
20px; vertical-align: top; text-align: center;">Expected In-Stock Date</th>
</tr>
<mvt:foreach iterator="group" array="backorder:groups">
<tr style="background-color: #f7f7f7; font-weight: bold;">
<td style="padding: 5px 20px 5px 20px; vertical-align: top;
width: 60px; text-align: left;">&mvt:group:code;</td>
<td style="padding: 5px 20px 5px 20px; vertical-align: top;
text-align: left;">&mvt:group:name;</td>
488
Copyright 2005-2015, Miva Inc. All Rights Reserved.
Publication Date: 02/28/2015
User Reference Guide DRAFT
<td style="padding: 5px 20px 5px 20px; vertical-align: top;
width: 60px; text-align: right;">&mvt:group:quantity;</td>
<td style="padding: 5px 20px 5px 20px; vertical-align: top;
text-align: center;">
<mvt:if expr="ISNULL l.settings:group:dt_instock">
Not Specified
<mvt:else>
&mvt:group:formatted_dt_instock;
</mvt:if>
</td>
</tr>
<mvt:foreach iterator="option" array="group:options">
<tr>
<td></td>
<td style="padding: 5px 20px 5px 20px; verticalalign: top; text-align: left;">
<mvt:if expr="l.settings:option:option_id">
&mvt:option:attr_code;:
&mvt:option:opt_code;
<mvt:elseif expr="NOT ISNULL
l.settings:option:data">
&mvt:option:attr_code;: &mvt:option:data;
<mvt:elseif expr="NOT ISNULL
l.settings:option:data_long">
&mvt:option:attr_code;:
&mvt:option:data_long;
<mvt:else>
&mvt:option:attr_code;
</mvt:if>
</td>
<td colspan="2"></td>
</tr>
</mvt:foreach>
</mvt:foreach>
</table>
...
Edit Page: EMAIL_ORDERCONF_CUSTOMER > Page
Original File
...
<div style="clear: both;"></div>
</div>
489
Copyright 2005-2015, Miva Inc. All Rights Reserved.
Publication Date: 02/28/2015
User Reference Guide DRAFT
<table style="border-collapse: collapse; border-spacing: 0; font-size:
100%; color: #676767; border: 1px solid #c7c8d7; width: 690px;">
<tr>
<th style="font-size: 16px; color: #5b639c; padding: 5px
20px 5px 20px; vertical-align: top; width: 60px; text-align: left;">Code</th>
<th style="font-size: 16px; color: #5b639c; padding: 5px
20px 5px 20px; vertical-align: top; text-align: left;">Product</th>
<th style="font-size: 16px; color: #5b639c; padding: 5px
20px 5px 20px; vertical-align: top; width: 60px; text-align: right;">Quantity</th>
<th style="font-size: 16px; color: #5b639c; padding: 5px
20px 5px 20px; vertical-align: top; width: 60px; text-align: right;">Total</th>
</tr>
align: top;
align: top;
align: top;
align: top;
<mvt:foreach iterator="item" array="order:items">
<tr style="background-color: #f7f7f7; font-weight: bold;">
<td style="padding: 5px 20px 5px 20px; verticalwidth: 60px; text-align: left;">&mvt:item:code;</td>
<td style="padding: 5px 20px 5px 20px; verticaltext-align: left;">&mvt:item:name;</td>
<td style="padding: 5px 20px 5px 20px; verticalwidth: 60px; text-align: right;">&mvt:item:quantity;</td>
<td style="padding: 5px 20px 5px 20px; verticalwidth: 60px; text-align: right;">&mvt:item:formatted_subtotal;</td>
</tr>
<mvt:foreach iterator="option" array="item:options">
<tr>
<td></td>
<td style="padding: 5px 20px 5px 20px;
vertical-align: top; text-align: left;">
<mvt:if
expr="l.settings:option:option_id">
&mvt:option:attr_code;:
&mvt:option:opt_code;
<mvt:elseif expr="NOT ISNULL
l.settings:option:data">
&mvt:option:attr_code;:
&mvt:option:data;
<mvt:elseif expr="NOT ISNULL
l.settings:option:data_long">
&mvt:option:attr_code;:
&mvt:option:data_long;
<mvt:else>
&mvt:option:attr_code;
</mvt:if>
</td>
<td></td>
<td style="padding: 5px 20px 5px 20px;
vertical-align: top; width: 60px; text-align: right;">
<mvt:if
expr="l.settings:option:subtotal">
&mvt:option:formatted_subtotal;
</mvt:if>
</td>
</tr>
</mvt:foreach>
</mvt:foreach>
490
Copyright 2005-2015, Miva Inc. All Rights Reserved.
Publication Date: 02/28/2015
User Reference Guide DRAFT
<tr style="background-color: #f7f7f7;">
<td colspan="3" style="padding: 5px 20px 5px 20px;
vertical-align: bottom; text-align: right;">
<mvt:foreach iterator="charge" array="order:charges">
&mvt:charge:descrip;:<br />
</mvt:foreach>
<h2 style="font-size: 16px; color: #5b639c; margin:
0;">Total:</h2>
</td>
<td style="padding: 5px 20px 5px 20px; vertical-align:
bottom; text-align: right;">
<mvt:foreach iterator="charge" array="order:charges">
&mvt:charge:formatted_disp_amt;<br />
</mvt:foreach>
<h2 style="font-size: 16px; color: #5b639c; margin:
0;">&mvt:order:formatted_total;</h2>
</td>
</tr>
</table>
</div>
</div>
</body>
</html>
...
New File
...
<div style="clear: both;"></div>
</div>
<mvt:item name="toe_order_contents" />
</div>
</div>
</body>
</html>
...
Edit Page: EMAIL_ORDERCONF_MERCHANT > Page
Original File
...
<div style="clear: both;"></div>
491
Copyright 2005-2015, Miva Inc. All Rights Reserved.
Publication Date: 02/28/2015
User Reference Guide DRAFT
</div>
<table style="border-collapse: collapse; border-spacing: 0; font-size:
100%; color: #676767; border: 1px solid #c7c8d7; width: 690px;">
<tr>
<th style="font-size: 16px; color: #5b639c; padding: 5px
20px 5px 20px; vertical-align: top; width: 60px; text-align: left;">Code</th>
<th style="font-size: 16px; color: #5b639c; padding: 5px
20px 5px 20px; vertical-align: top; text-align: left;">Product</th>
<th style="font-size: 16px; color: #5b639c; padding: 5px
20px 5px 20px; vertical-align: top; width: 60px; text-align: right;">Quantity</th>
<th style="font-size: 16px; color: #5b639c; padding: 5px
20px 5px 20px; vertical-align: top; width: 60px; text-align: right;">Total</th>
</tr>
align: top;
align: top;
align: top;
align: top;
<mvt:foreach iterator="item" array="order:items">
<tr style="background-color: #f7f7f7; font-weight: bold;">
<td style="padding: 5px 20px 5px 20px; verticalwidth: 60px; text-align: left;">&mvt:item:code;</td>
<td style="padding: 5px 20px 5px 20px; verticaltext-align: left;">&mvt:item:name;</td>
<td style="padding: 5px 20px 5px 20px; verticalwidth: 60px; text-align: right;">&mvt:item:quantity;</td>
<td style="padding: 5px 20px 5px 20px; verticalwidth: 60px; text-align: right;">&mvt:item:formatted_subtotal;</td>
</tr>
<mvt:foreach iterator="option" array="item:options">
<tr>
<td></td>
<td style="padding: 5px 20px 5px 20px;
vertical-align: top; text-align: left;">
<mvt:if
expr="l.settings:option:option_id">
&mvt:option:attr_code;:
&mvt:option:opt_code;
<mvt:elseif expr="NOT ISNULL
l.settings:option:data">
&mvt:option:attr_code;:
&mvt:option:data;
<mvt:elseif expr="NOT ISNULL
l.settings:option:data_long">
&mvt:option:attr_code;:
&mvt:option:data_long;
<mvt:else>
&mvt:option:attr_code;
</mvt:if>
</td>
<td></td>
<td style="padding: 5px 20px 5px 20px;
vertical-align: top; width: 60px; text-align: right;">
492
Copyright 2005-2015, Miva Inc. All Rights Reserved.
Publication Date: 02/28/2015
User Reference Guide DRAFT
<mvt:if
expr="l.settings:option:subtotal">
&mvt:option:formatted_subtotal;
</mvt:if>
</td>
</tr>
</mvt:foreach>
</mvt:foreach>
<tr style="background-color: #f7f7f7;">
<td colspan="3" style="padding: 5px 20px 5px 20px;
vertical-align: bottom; text-align: right;">
<mvt:foreach iterator="charge" array="order:charges">
&mvt:charge:descrip;:<br />
</mvt:foreach>
<h2 style="font-size: 16px; color: #5b639c; margin:
0;">Total:</h2>
</td>
<td style="padding: 5px 20px 5px 20px; vertical-align:
bottom; text-align: right;">
<mvt:foreach iterator="charge" array="order:charges">
&mvt:charge:formatted_disp_amt;<br />
</mvt:foreach>
<h2 style="font-size: 16px; color: #5b639c; margin:
0;">&mvt:order:formatted_total;</h2>
</td>
</tr>
</table>
</div>
</div>
</body>
</html>
...
New File
...
<div style="clear: both;"></div>
</div>
<mvt:item name="toe_order_contents" />
</div>
</div>
</body>
493
Copyright 2005-2015, Miva Inc. All Rights Reserved.
Publication Date: 02/28/2015
User Reference Guide DRAFT
</html>
...
Edit Page: EMAIL_RETURN_RECEIVED > Page
Original File
...
<table style="border-collapse: collapse; border-spacing: 0; font-size: 100%;
color: #676767; border: 1px solid #c7c8d7; width: 690px;">
<tr>
<th style="font-size: 16px; color: #5b639c; padding: 5px 20px 5px
20px; vertical-align: top; width: 60px; text-align: left;">Code</th>
<th style="font-size: 16px; color: #5b639c; padding: 5px 20px 5px
20px; vertical-align: top; text-align: left;">Product</th>
<th style="font-size: 16px; color: #5b639c; padding: 5px 20px 5px
20px; vertical-align: top; width: 60px; text-align: right;">Quantity</th>
</tr>
<mvt:foreach iterator="item" array="return:items">
<tr style="background-color: #f7f7f7; font-weight: bold;">
<td style="padding: 5px 20px 5px 20px; vertical-align: top;
width: 60px; text-align: left;">&mvt:item:code;</td>
<td style="padding: 5px 20px 5px 20px; vertical-align: top;
text-align: left;">&mvt:item:name;</td>
<td style="padding: 5px 20px 5px 20px; vertical-align: top;
width: 60px; text-align: right;">&mvt:item:quantity;</td>
</tr>
<mvt:foreach iterator="option" array="item:options">
<tr>
<td></td>
<td style="padding: 5px 20px 5px 20px; verticalalign: top; text-align: left;">
<mvt:if expr="l.settings:option:option_id">
&mvt:option:attr_code;:
&mvt:option:opt_code;
<mvt:elseif expr="NOT ISNULL
l.settings:option:data">
&mvt:option:attr_code;: &mvt:option:data;
<mvt:elseif expr="NOT ISNULL
l.settings:option:data_long">
&mvt:option:attr_code;:
&mvt:option:data_long;
<mvt:else>
&mvt:option:attr_code;
</mvt:if>
494
Copyright 2005-2015, Miva Inc. All Rights Reserved.
Publication Date: 02/28/2015
User Reference Guide DRAFT
</td>
<td></td>
</tr>
</mvt:foreach>
</mvt:foreach>
</table>
...
New File
...
<table style="border-collapse: collapse; border-spacing: 0; font-size: 100%;
color: #676767; border: 1px solid #c7c8d7; width: 690px;">
<tr>
<th style="font-size: 16px; color: #5b639c; padding: 5px 20px 5px
20px; vertical-align: top; width: 60px; text-align: left;">Code</th>
<th style="font-size: 16px; color: #5b639c; padding: 5px 20px 5px
20px; vertical-align: top; text-align: left;">Product</th>
<th style="font-size: 16px; color: #5b639c; padding: 5px 20px 5px
20px; vertical-align: top; width: 60px; text-align: right;">Quantity</th>
</tr>
<mvt:foreach iterator="item" array="return:items">
<tr style="background-color: #f7f7f7; font-weight: bold;">
<td style="padding: 5px 20px 5px 20px; vertical-align: top;
width: 60px; text-align: left;">&mvt:item:code;</td>
<td style="padding: 5px 20px 5px 20px; vertical-align: top;
text-align: left;">&mvt:item:name;</td>
<td style="padding: 5px 20px 5px 20px; vertical-align: top;
width: 60px; text-align: right;">&mvt:item:quantity;</td>
</tr>
<mvt:foreach iterator="option" array="item:options">
<tr>
<td></td>
<td style="padding: 5px 20px 5px 20px; verticalalign: top; text-align: left;">
<mvt:if expr="l.settings:option:option_id">
&mvt:option:attr_code;:
&mvt:option:opt_code;
<mvt:elseif expr="NOT ISNULL
l.settings:option:data">
&mvt:option:attr_code;: &mvt:option:data;
<mvt:elseif expr="NOT ISNULL
l.settings:option:data_long">
&mvt:option:attr_code;:
&mvt:option:data_long;
<mvt:else>
495
Copyright 2005-2015, Miva Inc. All Rights Reserved.
Publication Date: 02/28/2015
User Reference Guide DRAFT
&mvt:option:attr_code;
</mvt:if>
</td>
<td></td>
</tr>
</mvt:foreach>
</mvt:foreach>
</table>
...
Edit Page: EMAIL_RMA_ISSUED > Page
Original File
...
<table style="border-collapse: collapse; border-spacing: 0; font-size: 100%;
color: #676767; border: 1px solid #c7c8d7; width: 690px;">
<tr>
<th style="font-size: 16px; color: #5b639c; padding: 5px 20px 5px
20px; vertical-align: top; width: 60px; text-align: left;">Code</th>
<th style="font-size: 16px; color: #5b639c; padding: 5px 20px 5px
20px; vertical-align: top; text-align: left;">Product</th>
<th style="font-size: 16px; color: #5b639c; padding: 5px 20px 5px
20px; vertical-align: top; width: 60px; text-align: right;">Quantity</th>
</tr>
<mvt:foreach iterator="group" array="return:groups">
<tr style="background-color: #f7f7f7; font-weight: bold;">
<td style="padding: 5px 20px 5px 20px; vertical-align: top;
width: 60px; text-align: left;">&mvt:group:code;</td>
<td style="padding: 5px 20px 5px 20px; vertical-align: top;
text-align: left;">&mvt:group:name;</td>
<td style="padding: 5px 20px 5px 20px; vertical-align: top;
width: 60px; text-align: right;">&mvt:group:quantity;</td>
</tr>
<mvt:foreach iterator="option" array="group:options">
<tr>
<td></td>
<td style="padding: 5px 20px 5px 20px; verticalalign: top; text-align: left;">
<mvt:if expr="l.settings:option:option_id">
&mvt:option:attr_code;:
&mvt:option:opt_code;
<mvt:elseif expr="NOT ISNULL
l.settings:option:data">
496
Copyright 2005-2015, Miva Inc. All Rights Reserved.
Publication Date: 02/28/2015
User Reference Guide DRAFT
&mvt:option:attr_code;: &mvt:option:data;
<mvt:elseif expr="NOT ISNULL
l.settings:option:data_long">
&mvt:option:attr_code;:
&mvt:option:data_long;
<mvt:else>
&mvt:option:attr_code;
</mvt:if>
</td>
<td></td>
</tr>
</mvt:foreach>
</mvt:foreach>
</table>
...
New File
...
<table style="border-collapse: collapse; border-spacing: 0; font-size: 100%;
color: #676767; border: 1px solid #c7c8d7; width: 690px;">
<tr>
<th style="font-size: 16px; color: #5b639c; padding: 5px 20px 5px
20px; vertical-align: top; width: 60px; text-align: left;">Code</th>
<th style="font-size: 16px; color: #5b639c; padding: 5px 20px 5px
20px; vertical-align: top; text-align: left;">Product</th>
<th style="font-size: 16px; color: #5b639c; padding: 5px 20px 5px
20px; vertical-align: top; width: 60px; text-align: right;">Quantity</th>
</tr>
<mvt:foreach iterator="group" array="return:groups">
<tr style="background-color: #f7f7f7; font-weight: bold;">
<td style="padding: 5px 20px 5px 20px; vertical-align: top;
width: 60px; text-align: left;">&mvt:group:code;</td>
<td style="padding: 5px 20px 5px 20px; vertical-align: top;
text-align: left;">&mvt:group:name;</td>
<td style="padding: 5px 20px 5px 20px; vertical-align: top;
width: 60px; text-align: right;">&mvt:group:quantity;</td>
</tr>
<mvt:foreach iterator="option" array="group:options">
<tr>
<td></td>
<td style="padding: 5px 20px 5px 20px; verticalalign: top; text-align: left;">
<mvt:if expr="l.settings:option:option_id">
&mvt:option:attr_code;:
&mvt:option:opt_code;
497
Copyright 2005-2015, Miva Inc. All Rights Reserved.
Publication Date: 02/28/2015
User Reference Guide DRAFT
<mvt:elseif expr="NOT ISNULL
l.settings:option:data">
&mvt:option:attr_code;: &mvt:option:data;
<mvt:elseif expr="NOT ISNULL
l.settings:option:data_long">
&mvt:option:attr_code;:
&mvt:option:data_long;
<mvt:else>
&mvt:option:attr_code;
</mvt:if>
</td>
<td></td>
</tr>
</mvt:foreach>
</mvt:foreach>
</table>
...
Edit Page: EMAIL_SHIPMENT_SHIPPED > Page
Original File
...
<table style="border-collapse: collapse; border-spacing: 0; font-size: 100%;
color: #676767; border: 1px solid #c7c8d7; width: 690px;">
<tr>
<th style="font-size: 16px; color: #5b639c; padding: 5px 20px 5px
20px; vertical-align: top; width: 60px; text-align: left;">Code</th>
<th style="font-size: 16px; color: #5b639c; padding: 5px 20px 5px
20px; vertical-align: top; text-align: left;">Product</th>
<th style="font-size: 16px; color: #5b639c; padding: 5px 20px 5px
20px; vertical-align: top; width: 60px; text-align: right;">Quantity</th>
</tr>
<mvt:foreach iterator="item" array="shipment_info:items">
<tr style="background-color: #f7f7f7; font-weight: bold;">
<td style="padding: 5px 20px 5px 20px; vertical-align: top;
width: 60px; text-align: left;">&mvt:item:code;</td>
<td style="padding: 5px 20px 5px 20px; vertical-align: top;
text-align: left;">&mvt:item:name;</td>
<td style="padding: 5px 20px 5px 20px; vertical-align: top;
width: 60px; text-align: right;">&mvt:item:quantity;</td>
</tr>
<mvt:foreach iterator="option" array="item:options">
<tr>
498
Copyright 2005-2015, Miva Inc. All Rights Reserved.
Publication Date: 02/28/2015
User Reference Guide DRAFT
<td></td>
<td style="padding: 5px 20px 5px 20px; verticalalign: top; text-align: left;">
<mvt:if expr="l.settings:option:option_id">
&mvt:option:attr_code;:
&mvt:option:opt_code;
<mvt:elseif expr="NOT ISNULL
l.settings:option:data">
&mvt:option:attr_code;: &mvt:option:data;
<mvt:elseif expr="NOT ISNULL
l.settings:option:data_long">
&mvt:option:attr_code;:
&mvt:option:data_long;
<mvt:else>
&mvt:option:attr_code;
</mvt:if>
</td>
<td></td>
</tr>
</mvt:foreach>
</mvt:foreach>
</table>
...
New File
...
<table style="border-collapse: collapse; border-spacing: 0; font-size: 100%;
color: #676767; border: 1px solid #c7c8d7; width: 690px;">
<tr>
<th style="font-size: 16px; color: #5b639c; padding: 5px 20px 5px
20px; vertical-align: top; width: 60px; text-align: left;">Code</th>
<th style="font-size: 16px; color: #5b639c; padding: 5px 20px 5px
20px; vertical-align: top; text-align: left;">Product</th>
<th style="font-size: 16px; color: #5b639c; padding: 5px 20px 5px
20px; vertical-align: top; width: 60px; text-align: right;">Quantity</th>
</tr>
<mvt:foreach iterator="group" array="shipment_info:groups">
<tr style="background-color: #f7f7f7; font-weight: bold;">
<td style="padding: 5px 20px 5px 20px; vertical-align: top;
width: 60px; text-align: left;">&mvt:group:code;</td>
<td style="padding: 5px 20px 5px 20px; vertical-align: top;
text-align: left;">&mvt:group:name;</td>
<td style="padding: 5px 20px 5px 20px; vertical-align: top;
width: 60px; text-align: right;">&mvt:group:quantity;</td>
</tr>
<mvt:foreach iterator="option" array="group:options">
499
Copyright 2005-2015, Miva Inc. All Rights Reserved.
Publication Date: 02/28/2015
User Reference Guide DRAFT
<tr>
<td></td>
<td style="padding: 5px 20px 5px 20px; verticalalign: top; text-align: left;">
<mvt:if expr="l.settings:option:option_id">
&mvt:option:attr_code;:
&mvt:option:opt_code;
<mvt:elseif expr="NOT ISNULL
l.settings:option:data">
&mvt:option:attr_code;: &mvt:option:data;
<mvt:elseif expr="NOT ISNULL
l.settings:option:data_long">
&mvt:option:attr_code;:
&mvt:option:data_long;
<mvt:else>
&mvt:option:attr_code;
</mvt:if>
</td>
<td></td>
</tr>
</mvt:foreach>
</mvt:foreach>
</table>
...
Edit Page: Pritable Invoice > Page > Content(inline_css)
Original File
body
{
line-height: 1;
margin: 0;
padding: 0;
border: 0;
outline: 0;
font-size: 100%;
vertical-align: baseline;
background:#fff url("") top center repeat-x;
text-align:center;
font:12px/1.46
Helvetica, "Trebuchet MS", Arial, sans-serif;
color:#676767;
}
table
{
500
Copyright 2005-2015, Miva Inc. All Rights Reserved.
Publication Date: 02/28/2015
User Reference Guide DRAFT
border-collapse: collapse;
border-spacing: 0;
}
h1
h2
h3
{ font-size:24px; color:#695ba3;
margin:0; }
{ font-size:16px; color:#5b639c;
margin:0; }
{ font-size:1.1em;
font-weight:bold; margin:0; }
.clear
{ clear:both; }
hr
{
background-color:#c7c8d7;
color:#c7c8d7;
height:1px;
border:0px;
display:block;
position:relative;
}
th
{
font-weight: bold;
}
.order
{
text-align:left;
width:690px;
padding:20px;
page-break-after:always;
}
.title-box-left
{
width:300px;
float:left;
display:block;
}
.title-box-right
{
width:300px;
float:right;
text-align:right;
display:block;
}
501
Copyright 2005-2015, Miva Inc. All Rights Reserved.
Publication Date: 02/28/2015
User Reference Guide DRAFT
.purple-box
{
background-color:#f7f7f7;
width:650px;
float:left;
margin:20px 0 20px 0;
padding:20px;
clear:both;
}
.sub-box-left
{
width:300px;
float:left;
text-align:left;
display:block;
}
.sub-box-right
{
width:300px;
float:right;
text-align:left;
display:block;
}
.sub-box-left th, .sub-box-right th
{
padding-right: 5px;
vertical-align: top;
}
table.product-info
{
border:1px solid #c7c8d7;
width:690px;
}
table.product-info th, table.product-info td
{
padding:5px 20px 5px 20px;
vertical-align: top;
}
table.product-info th
{
font-size:16px;
color:#5b639c;
502
Copyright 2005-2015, Miva Inc. All Rights Reserved.
Publication Date: 02/28/2015
User Reference Guide DRAFT
}
td.totalFinal, td.shippingTax
{
padding:5px 20px 5px 20px;
vertical-align:bottom;
font-weight:normal;
}
td.shippingTax, th.quantity, td.quantity, th.total, td.total
{
text-align:right;
width:60px;
}
th.code, td.code
{
width:60px;
}
td.totalFinal
{
text-align:right;
}
.highlighted
{
background-color:#f7f7f7;
font-weight:bold;
}
New File
body
{
line-height: 1;
margin: 0;
padding: 0;
border: 0;
outline: 0;
font-size: 100%;
vertical-align: baseline;
background: #fff url("") top center repeat-x;
text-align: center;
font: 12px/1.46
Helvetica, "Trebuchet MS", Arial, sans-serif;
color: #676767;
}
503
Copyright 2005-2015, Miva Inc. All Rights Reserved.
Publication Date: 02/28/2015
User Reference Guide DRAFT
table
{
border-collapse: collapse;
border-spacing: 0;
}
h1
h2
h3
{ font-size: 24px;
{ font-size: 16px;
{ font-size: 1.1em;
.clear
{ clear: both; }
color: #695ba3;
color: #5b639c;
font-weight: bold;
margin: 0; }
margin: 0; }
margin: 0; }
hr
{
background-color: #c7c8d7;
color: #c7c8d7;
height: 1px;
border: 0px;
display: block;
position: relative;
}
th
{
font-weight: bold;
}
.order
{
text-align: left;
width: 690px;
padding: 20px;
page-break-after: always;
}
.title-box-left
{
width: 300px;
float: left;
display: block;
}
.title-box-right
{
width: 300px;
float: right;
text-align: right;
504
Copyright 2005-2015, Miva Inc. All Rights Reserved.
Publication Date: 02/28/2015
User Reference Guide DRAFT
display: block;
}
.purple-box
{
background-color: #f7f7f7;
width: 650px;
float: left;
margin: 20px 0 20px 0;
padding: 20px;
clear: both;
}
.sub-box-left
{
width: 300px;
float: left;
text-align: left;
display: block;
}
.sub-box-right
{
width: 300px;
float: right;
text-align: left;
display: block;
}
.sub-box-left th, .sub-box-right th
{
padding-right: 5px;
vertical-align: top;
}
table.product-info
{
border: 1px solid #c7c8d7;
width: 690px;
}
table.product-info th, table.product-info td
{
padding: 5px 20px 5px 20px;
vertical-align: top;
}
table.product-info th
505
Copyright 2005-2015, Miva Inc. All Rights Reserved.
Publication Date: 02/28/2015
User Reference Guide DRAFT
{
font-size: 16px;
color: #5b639c;
}
td.totalFinal, td.shippingTax
{
padding: 5px 20px 5px 20px;
vertical-align: bottom;
font-weight: normal;
}
td.shippingTax, th.quantity, td.quantity, th.total, td.total
{
text-align: right;
width: 60px;
}
th.image, td.image
{
width: 1px;
padding: 5px 10px 5px 10px;
}
th.code_with_image, td.code_with_image
{
width: 60px;
padding: 5px 20px 5px 5px;
}
th.code, td.code
{
width: 60px;
}
td .custom-field
{
font-weight: normal;
font-size: x-small;
}
td .discount
{
font-weight: normal;
font-size: x-small;
font-style: italic;
}
506
Copyright 2005-2015, Miva Inc. All Rights Reserved.
Publication Date: 02/28/2015
User Reference Guide DRAFT
td.totalFinal
{
text-align: right;
}
.highlighted
{
background-color: #f7f7f7;
font-weight: bold;
}
Edit Page: ORDER_INVOICE > Page > Details
Original File
...
<head>
<title>&mvte:page:name;</title>
<style type="text/css"><mvt:item name="inline_css" /></style>
</head>
...
</div>
</div>
<table class="product-info">
<tr>
<th class="code">Code</th>
<th class="product">Product</th>
<th class="quantity">Quantity</th>
<th class="total">Total</th>
</tr>
<mvt:foreach iterator="item" array="order:items">
<tr class="highlighted">
<td class="code">&mvt:item:code;</td>
<td class="product">&mvt:item:name;</td>
<td class="quantity">&mvt:item:quantity;</td>
<td class="total">&mvt:item:formatted_subtotal;</td>
</tr>
<mvt:foreach iterator="option" array="item:options">
<tr>
<td class="code"></td>
<td class="product">
<mvt:if
expr="l.settings:option:option_id">
507
Copyright 2005-2015, Miva Inc. All Rights Reserved.
Publication Date: 02/28/2015
User Reference Guide DRAFT
&mvt:option:attr_code;:
&mvt:option:opt_code;
<mvt:elseif expr="NOT ISNULL
l.settings:option:data">
&mvt:option:attr_code;:
&mvt:option:data;
<mvt:elseif expr="NOT ISNULL
l.settings:option:data_long">
&mvt:option:attr_code;:
&mvt:option:data_long;
<mvt:else>
&mvt:option:attr_code;
</mvt:if>
</td>
<td class="quantity"></td>
<td class="total">
<mvt:if
expr="l.settings:option:subtotal">
&mvt:option:formatted_subtotal;
</mvt:if>
</td>
</tr>
</mvt:foreach>
</mvt:foreach>
<tr class="highlighted">
<td colspan="3" class="shippingTax">
<mvt:foreach iterator="charge" array="order:charges">
&mvt:charge:descrip;:<br />
</mvt:foreach>
<h2>Total:</h2>
</td>
<td class="totalFinal">
<mvt:foreach iterator="charge" array="order:charges">
&mvt:charge:formatted_disp_amt;<br />
</mvt:foreach>
<h2>&mvt:order:formatted_total;</h2>
</td>
</tr>
</table>
<div class="purple-box">
<div class="sub-box-left">
...
508
Copyright 2005-2015, Miva Inc. All Rights Reserved.
Publication Date: 02/28/2015
User Reference Guide DRAFT
New File
...
<head>
<title>&mvte:page:name;</title>
<base href="&mvt:global:basehref;" />
<style type="text/css"><mvt:item name="inline_css" /></style>
</head>
...
</div>
</div>
<mvt:item name="tbr_order_contents" />
<div class="purple-box">
<div class="sub-box-left">
...
Edit Page: Shipment Picklist > Page > Details
Original File
...
<mvt:foreach iterator="item" array="ordershipment:items">
<tr class="highlighted">
<td class="code">&mvt:item:code;</td>
<td class="product">&mvt:item:name;</td>
<td class="each"></td>
<td class="total">&mvt:item:quantity;</td>
</tr>
<mvt:foreach iterator="option" array="item:options">
<tr>
<td class="code"></td>
<td class="product">
<mvt:if
expr="l.settings:option:option_id">
&mvt:option:attr_code;:
&mvt:option:opt_code;
<mvt:elseif expr="NOT ISNULL
l.settings:option:data">
&mvt:option:attr_code;:
&mvt:option:data;
<mvt:elseif expr="NOT ISNULL
l.settings:option:data_long">
&mvt:option:attr_code;:
&mvt:option:data_long;
509
Copyright 2005-2015, Miva Inc. All Rights Reserved.
Publication Date: 02/28/2015
User Reference Guide DRAFT
<mvt:else>
&mvt:option:attr_code;
</mvt:if>
</td>
<td class="each"></td>
<td class="total"></td>
</tr>
</mvt:foreach>
<mvt:foreach iterator="part" array="item:parts">
<tr>
<td class="code">Part: &mvt:part:code;</td>
<td class="product">&mvt:part:name;</td>
<td class="each">&mvt:part:quantity;</td>
<td
class="total">&mvt:part:total_quantity;</td>
</tr>
...
New File
...
<mvt:foreach iterator="group" array="ordershipment:groups">
<tr class="highlighted">
<td class="code">&mvt:group:code;</td>
<td class="product">&mvt:group:name;</td>
<td class="each"></td>
<td class="total">&mvt:group:quantity;</td>
</tr>
<mvt:foreach iterator="option" array="group:options">
<tr>
<td class="code"></td>
<td class="product">
<mvt:if
expr="l.settings:option:option_id">
&mvt:option:attr_code;:
&mvt:option:opt_code;
<mvt:elseif expr="NOT ISNULL
l.settings:option:data">
&mvt:option:attr_code;:
&mvt:option:data;
<mvt:elseif expr="NOT ISNULL
l.settings:option:data_long">
&mvt:option:attr_code;:
&mvt:option:data_long;
<mvt:else>
&mvt:option:attr_code;
510
Copyright 2005-2015, Miva Inc. All Rights Reserved.
Publication Date: 02/28/2015
User Reference Guide DRAFT
</mvt:if>
</td>
<td class="each"></td>
<td class="total"></td>
</tr>
</mvt:foreach>
<mvt:foreach iterator="part" array="group:parts">
<tr>
<td class="code">Part: &mvt:part:code;</td>
<td class="product">&mvt:part:name;</td>
<td class="each">&mvt:part:quantity;</td>
<td
class="total">&mvt:part:total_quantity;</td>
</tr>
...
MMUI: Edit Page: BASK > Page > Details
Original File
...
<tr><td align="left" valign="top" width="100%">
<br>
<mvt:item name="basket" />
</td></tr>
...
New File
...
<tr><td align="left" valign="top" width="100%">
<br>
<mvt:item name="messages" />
<mvt:item name="basket" />
</td></tr>
...
Edit Page: NTFD > Page > Details
Original File
...
511
Copyright 2005-2015, Miva Inc. All Rights Reserved.
Publication Date: 02/28/2015
User Reference Guide DRAFT
<mvt:if expr = "ISNULL g.Error_Messages">
The item you requested is not available at this time.
<mvt:else>
&mvt:global:Error_Messages;
</mvt:if>
...
New File
...
<mvt:if expr = "ISNULL g.Error_Messages">
The item you requested is not available at this time.
<mvt:else>
&mvte:global:Error_Messages;
</mvt:if>
...
MMUI: Edit Page: OCST > Page > Details
Original File
<mvt:item name="html_profile" />
<head>
<title>&mvt:store:name;: Checkout: Customer Information</title>
<base href="&mvt:global:basehref;">
<mvt:item name="head" param="head_tag" />
</head>
<mvt:item name="body">
<mvt:item name="hdft" param="global_header" />
<table border="0" cellpadding="0" cellspacing="0" width="100%">
<tr><td align="left" valign="bottom">
<mvt:item name="navbar" />
</td></tr>
<tr><td align="left" valign="bottom">
<mvt:item name="hdft" param="header" />
</td></tr>
<form method="POST" action="&mvt:global:secure_sessionurl;">
<mvt:if expr="l.settings:basket:total GT 0">
<input type="hidden" name="Action" value="ORDR">
<input type="hidden" name="Screen" value="OUSL">
512
Copyright 2005-2015, Miva Inc. All Rights Reserved.
Publication Date: 02/28/2015
User Reference Guide DRAFT
<mvt:elseif expr="g.Store:req_frship">
<input type="hidden" name="Action"
<input type="hidden" name="Screen"
<mvt:else>
<input type="hidden" name="Action"
<input type="hidden" name="Screen"
</mvt:if>
value="ORDR">
value="OSEL">
value="ORDR,SHIP,CTAX,AUTH">
value="INVC">
<input type="hidden" name="Store_Code"
value="&mvte:store:code;">
<tr><td align="left" valign="top" width="100%">
<br>
<mvt:item name="fonts" param="body_font">
<mvt:item name="messages" />
</mvt:item>
<mvt:item name="basket" />
<br>
<br>
<mvt:item name="fonts" param="body_font">
<mvt:item name="customer" />
</mvt:item>
</td></tr>
<tr><td align="right">
<mvt:item name="fonts" param="body_font">
<mvt:item name="buttons" param="Continue" />
</mvt:item>
</td></tr>
</form>
<tr><td align="left" valign="bottom">
<mvt:item name="hdft" param="footer" />
</td></tr>
</table>
<mvt:item name="hdft" param="global_footer" />
</mvt:item>
</html>
New File
<mvt:item name="html_profile" />
513
Copyright 2005-2015, Miva Inc. All Rights Reserved.
Publication Date: 02/28/2015
User Reference Guide DRAFT
<head>
<title>&mvt:store:name;: Checkout: Customer Information</title>
<base href="&mvt:global:basehref;">
<mvt:item name="head" param="head_tag" />
</head>
<mvt:item name="body">
<mvt:item name="hdft" param="global_header" />
<table border="0" cellpadding="0" cellspacing="0" width="100%">
<tr><td align="left" valign="bottom">
<mvt:item name="navbar" />
</td></tr>
<tr><td align="left" valign="bottom">
<mvt:item name="hdft" param="header" />
</td></tr>
<tr><td align="left" valign="top" width="100%">
<br>
<mvt:item name="fonts" param="body_font">
<mvt:item name="messages" />
</mvt:item>
<mvt:item name="basket" />
<br>
<br>
</td></tr>
<form method="POST" action="&mvt:global:secure_sessionurl;">
<mvt:if expr="l.settings:basket:total GT 0">
<input type="hidden" name="Action" value="ORDR">
<input type="hidden" name="Screen" value="OUSL">
<mvt:elseif expr="g.Store:req_frship">
<input type="hidden" name="Action" value="ORDR">
<input type="hidden" name="Screen" value="OSEL">
<mvt:else>
<input type="hidden" name="Action" value="ORDR,SHIP,CTAX,AUTH">
<input type="hidden" name="Screen" value="INVC">
</mvt:if>
<input type="hidden" name="Store_Code"
value="&mvte:store:code;">
<tr><td align="left" valign="top" width="100%">
<mvt:item name="fonts" param="body_font">
<mvt:item name="customer" />
514
Copyright 2005-2015, Miva Inc. All Rights Reserved.
Publication Date: 02/28/2015
User Reference Guide DRAFT
</mvt:item>
</td></tr>
<tr><td align="right">
<mvt:item name="fonts" param="body_font">
<mvt:item name="buttons" param="Continue" />
</mvt:item>
</td></tr>
</form>
<tr><td align="left" valign="bottom">
<mvt:item name="hdft" param="footer" />
</td></tr>
</table>
<mvt:item name="hdft" param="global_footer" />
</mvt:item>
</html>
MMUI: Edit Page: ORDL > Page > Details
Original File
...
<tr><td colspan="2">
<form method="post" action="&mvt:global:secure_sessionurl;"
autocomplete="off">
<input type="hidden" name="Store_Code" value="&mvt:store:code;">
<input type="hidden" name="Screen" value="OCST">
<input type="hidden" name="Action" value="LOGN">
...
New File
...
<tr><td colspan="2">
<form method="post" action="&mvt:global:secure_sessionurl;"
autocomplete="off">
<input type="hidden" name="Store_Code" value="&mvte:store:code;">
<input type="hidden" name="Screen" value="OCST">
<input type="hidden" name="Action" value="LOGN">
...
515
Copyright 2005-2015, Miva Inc. All Rights Reserved.
Publication Date: 02/28/2015
User Reference Guide DRAFT
MMUI: Edit Page: OSEL > Page > Details
Original File
...
<tr><td align="left" valign="top" width="100%">
<form method="post" action="&mvt:global:secure_sessionurl;">
<mvt:item name="tax" />
<br>
<mvt:item name="customer" />
<br>
<mvt:item name="basket" />
<br>
<input type="hidden" name="Screen" value="OPAY">
<input type="hidden" name="Action" value="SHIP,PSHP,CTAX">
<input type="hidden" name="Store_Code"
value="&mvte:global:Store_Code;">
...
New File
...
<tr><td align="left" valign="top" width="100%">
<br>
<mvt:item name="customer" />
<br>
<mvt:item name="basket" />
<br>
<form method="post" action="&mvt:global:secure_sessionurl;">
<mvt:item name="tax" />
<input type="hidden" name="Screen" value="OPAY">
<input type="hidden" name="Action" value="SHIP,PSHP,CTAX">
<input type="hidden" name="Store_Code"
value="&mvte:global:Store_Code;">
...
MMUI: Edit Page: POUT > Page > Details
Original File
...
<mvt:item name="fonts" param="body_font">
&mvte:global:Error_Messages;
<form method="post" action="&mvt:global:sessionurl;">
516
Copyright 2005-2015, Miva Inc. All Rights Reserved.
Publication Date: 02/28/2015
User Reference Guide DRAFT
<input type="hidden" name="Screen"
value="&mvte:global:Screen;">
<input type="hidden" name="Store_Code"
value="&mvte:store:code;">
<input type="hidden" name="Product_Code"
value="&mvte:global:Product_Code;">
<input type="hidden" name="Current_Product_Code"
value="&mvte:global:Current_Product_Code;">
<input type="hidden" name="Category_Code"
value="&mvte:global:Category_Code;">
<input type="hidden" name="Offset"
value="&mvte:global:Offset;">
<input type="hidden" name="Search"
value="&mvte:global:Search;">
<mvt:item name="buttons" param="Back" />
</form>
</mvt:item>
...
New File
...
<mvt:item name="fonts" param="body_font">
&mvt:global:Error_Messages;
<form method="post" action="&mvt:global:sessionurl;">
<input type="hidden" name="Screen"
value="&mvte:global:Screen;">
<input type="hidden" name="Store_Code"
value="&mvte:store:code;">
<input type="hidden" name="Product_Code"
value="&mvte:global:Product_Code;">
<input type="hidden" name="Current_Product_Code"
value="&mvte:global:Current_Product_Code;">
<input type="hidden" name="Category_Code"
value="&mvte:global:Category_Code;">
<input type="hidden" name="Offset"
value="&mvte:global:Offset;">
<input type="hidden" name="Search"
value="&mvte:global:Search;">
<mvt:item name="buttons" param="Back" />
</form>
</mvt:item>
...
517
Copyright 2005-2015, Miva Inc. All Rights Reserved.
Publication Date: 02/28/2015
User Reference Guide DRAFT
MMUI: Edit Page: ACAD > Customer Fields
New File
<div id="fields-key">
<div><span class="required">Bold</span> = Required</div>
<div><span class="italic">Italic</span> = Optional</div>
<mvt:if expr="g.Error_Message_Count">
<div><span class="red">Red</span> = Invalid</div>
</mvt:if>
</div>
<div id="login-details">
<div class="&mvte:global:LoginEmail_Row;">
<label for="Customer_LoginEmail" class="required">Email
Address:</label>
<mvt:if expr="l.settings:customer:primaddr EQ 'shipping'">
<input type="text" name="Customer_LoginEmail"
id="Customer_LoginEmail" value="&mvte:global:Customer_LoginEmail;"
class="textfield" autocomplete="off" onblur="if ( document.getElementById(
'Customer_ShipEmail' ) && ( document.getElementById( 'Customer_ShipEmail' ).value
== '' ) ) document.getElementById( 'Customer_ShipEmail' ).value = this.value;" />
<mvt:elseif expr="l.settings:customer:primaddr EQ 'billing'">
<input type="text" name="Customer_LoginEmail"
id="Customer_LoginEmail" value="&mvte:global:Customer_LoginEmail;"
class="textfield" autocomplete="off" onblur="if ( document.getElementById(
'Customer_BillEmail' ) && ( document.getElementById( 'Customer_BillEmail' ).value
== '' ) ) document.getElementById( 'Customer_BillEmail' ).value = this.value;" />
</mvt:if>
</div>
<div class="&mvte:global:Password_Row;">
<label for="Customer_Password" class="required">Password:</label><input
type="password" name="Customer_Password" id="Customer_Password" class="textfield"
autocomplete="off" />
</div>
<div class="&mvte:global:VerifyPassword_Row;">
<label for="Customer_VerifyPassword" class="required">Confirm
Password:</label><input type="password" name="Customer_VerifyPassword"
id="Customer_VerifyPassword" class="textfield" autocomplete="off" />
</div>
</div>
<div id="ship-to">
<h2 class="fields-heading">
Ship To:
<span id="shipping_controls" class="controls">
<mvt:if expr="g.Action AND g.shipping_to_show">
518
Copyright 2005-2015, Miva Inc. All Rights Reserved.
Publication Date: 02/28/2015
User Reference Guide DRAFT
<input name="shipping_to_show" id="shipping_to_show"
type="checkbox" value="1" class="checkbox" checked />
<mvt:else>
<input name="shipping_to_show" id="shipping_to_show"
type="checkbox" value="1" class="checkbox" />
</mvt:if>
<label for="shipping_to_show">same as billing</label>
</span>
</h2>
<div id="shipping_fields">
<div class="&mvte:global:ShipFirstName_Row;">
<label class="required" for="Customer_ShipFirstName">First
Name:</label>
<input type="text" name="Customer_ShipFirstName"
id="Customer_ShipFirstName" value="&mvte:global:Customer_ShipFirstName;"
class="textfield" />
</div>
<div class="&mvte:global:ShipLastName_Row;">
<label class="required" for="Customer_ShipLastName">Last
Name:</label>
<input type="text" name="Customer_ShipLastName"
id="Customer_ShipLastName" value="&mvte:global:Customer_ShipLastName;"
class="textfield" />
</div>
<div class="&mvte:global:ShipEmail_Row;">
<label class="required" for="Customer_ShipEmail">Email
Address:</label>
<input type="text" name="Customer_ShipEmail"
id="Customer_ShipEmail" value="&mvte:global:Customer_ShipEmail;" class="textfield"
/>
</div>
<div class="&mvte:global:ShipPhone_Row;">
<label class="required" for="Customer_ShipPhone">Phone
Number:</label>
<input type="text" name="Customer_ShipPhone"
id="Customer_ShipPhone" value="&mvte:global:Customer_ShipPhone;" class="textfield"
/>
</div>
<div class="&mvte:global:ShipFax_Row;">
<label class="italic" for="Customer_ShipFax">Fax Number:</label>
<input type="text" name="Customer_ShipFax" id="Customer_ShipFax"
value="&mvte:global:Customer_ShipFax;" class="textfield" />
</div>
<div class="&mvte:global:ShipCompany_Row;">
<label class="italic" for="Customer_ShipCompany">Company:</label>
<input type="text" name="Customer_ShipCompany"
id="Customer_ShipCompany" value="&mvte:global:Customer_ShipCompany;"
class="textfield" />
</div>
<div class="&mvte:global:ShipAddress1_Row;">
519
Copyright 2005-2015, Miva Inc. All Rights Reserved.
Publication Date: 02/28/2015
User Reference Guide DRAFT
<label class="required"
for="Customer_ShipAddress1">Address:</label>
<input type="text" name="Customer_ShipAddress1"
id="Customer_ShipAddress1" value="&mvte:global:Customer_ShipAddress1;"
class="textfield" />
</div>
<div class="&mvte:global:ShipAddress2_Row;">
<label class="italic" for="Customer_ShipAddress2">Address
2:</label>
<input type="text" name="Customer_ShipAddress2"
id="Customer_ShipAddress2" value="&mvte:global:Customer_ShipAddress2;"
class="textfield" />
</div>
<div class="&mvte:global:ShipCity_Row;">
<label class="required" for="Customer_ShipCity">City:</label>
<input type="text" name="Customer_ShipCity"
id="Customer_ShipCity" value="&mvte:global:Customer_ShipCity;" class="textfield" />
</div>
<mvt:if expr="g.States_Empty">
<div class="&mvte:global:ShipState_Row;">
<label class="required"
for="Customer_ShipState">State/Province:</label>
<input type="text" name="Customer_ShipState"
id="Customer_ShipState" value="&mvte:global:Customer_ShipState;" class="textfield"
/>
</div>
<mvt:else>
<div class="&mvte:global:ShipState_Row;">
<label class="required"
for="Customer_ShipStateSelect">State/Province:</label>
<mvt:item name="states" param="Customer_ShipStateSelect" />
</div>
<div class="&mvte:global:ShipState_Row;">
<label class="italic" for="Customer_ShipState">Other
State/Province:</label>
<input type="text" name="Customer_ShipState"
id="Customer_ShipState" value="&mvte:global:Customer_ShipState;" class="textfield">
</div>
</mvt:if>
<div class="&mvte:global:ShipZip_Row;">
<label class="required" for="Customer_ShipZip">Zip/Postal
Code:</label>
<input type="text" name="Customer_ShipZip" id="Customer_ShipZip"
value="&mvte:global:Customer_ShipZip;" class="textfield" />
</div>
<div class="&mvte:global:ShipCountry_Row;">
<label class="required"
for="Customer_ShipCountry">Country:</label>
<mvt:item name="countries" param="Customer_ShipCountry" />
</div>
520
Copyright 2005-2015, Miva Inc. All Rights Reserved.
Publication Date: 02/28/2015
User Reference Guide DRAFT
</div>
</div>
<div id="bill-to">
<h2 class="fields-heading">
Bill To:
<span id="billing_controls" class="controls">
<mvt:if expr="g.Action AND g.billing_to_show">
<input name="billing_to_show" id="billing_to_show"
type="checkbox" value="1" class="checkbox" checked />
<mvt:else>
<input name="billing_to_show" id="billing_to_show"
type="checkbox" value="1" class="checkbox" />
</mvt:if>
<label for="billing_to_show">same as shipping</label>
</span>
</h2>
<div id="billing_fields">
<div class="&mvte:global:BillFirstName_Row;">
<label class="required" for="Customer_BillFirstName">First
Name:</label>
<input type="text" name="Customer_BillFirstName"
id="Customer_BillFirstName" value="&mvte:global:Customer_BillFirstName;"
class="textfield" />
</div>
<div class="&mvte:global:BillLastName_Row;">
<label class="required" for="Customer_BillLastName">Last
Name:</label>
<input type="text" name="Customer_BillLastName"
id="Customer_BillLastName" value="&mvte:global:Customer_BillLastName;"
class="textfield" />
</div>
<div class="&mvte:global:BillEmail_Row;">
<label class="required" for="Customer_BillEmail">Email
Address:</label>
<input type="text" name="Customer_BillEmail"
id="Customer_BillEmail" value="&mvte:global:Customer_BillEmail;" class="textfield"
/>
</div>
<div class="&mvte:global:BillPhone_Row;">
<label class="required" for="Customer_BillPhone">Phone
Number:</label>
<input type="text" name="Customer_BillPhone"
id="Customer_BillPhone" value="&mvte:global:Customer_BillPhone;" class="textfield"
/>
</div>
<div class="&mvte:global:BillFax_Row;">
<label class="italic" for="Customer_BillFax">Fax Number:</label>
<input type="text" name="Customer_BillFax" id="Customer_BillFax"
value="&mvte:global:Customer_BillFax;" class="textfield" />
</div>
521
Copyright 2005-2015, Miva Inc. All Rights Reserved.
Publication Date: 02/28/2015
User Reference Guide DRAFT
<div class="&mvte:global:BillCompany_Row;">
<label class="italic" for="Customer_BillCompany">Company:</label>
<input type="text" name="Customer_BillCompany"
id="Customer_BillCompany" value="&mvte:global:Customer_BillCompany;"
class="textfield" />
</div>
<div class="&mvte:global:BillAddress1_Row;">
<label class="required"
for="Customer_BillAddress1">Address:</label>
<input type="text" name="Customer_BillAddress1"
id="Customer_BillAddress1" value="&mvte:global:Customer_BillAddress1;"
class="textfield" />
</div>
<div class="&mvte:global:BillAddress2_Row;">
<label class="italic" for="Customer_BillAddress2">Address
2:</label>
<input type="text" name="Customer_BillAddress2"
id="Customer_BillAddress2" value="&mvte:global:Customer_BillAddress2;"
class="textfield" />
</div>
<div class="&mvte:global:BillCity_Row;">
<label class="required" for="Customer_BillCity">City:</label>
<input type="text" name="Customer_BillCity"
id="Customer_BillCity" value="&mvte:global:Customer_BillCity;" class="textfield" />
</div>
<mvt:if expr="g.States_Empty">
<div class="&mvte:global:BillState_Row;">
<label class="required"
for="Customer_BillState">State/Province:</label>
<input type="text" name="Customer_BillState"
id="Customer_BillState" value="&mvte:global:Customer_BillState;" class="textfield"
/>
</div>
<mvt:else>
<div class="&mvte:global:BillState_Row;">
<label class="required"
for="Customer_BillStateSelect">State/Province:</label>
<mvt:item name="states" param="Customer_BillStateSelect" />
</div>
<div class="&mvte:global:BillState_Row;">
<label class="italic" for="Customer_BillState">Other
State/Province:</label>
<input type="text" name="Customer_BillState"
id="Customer_BillState" value="&mvte:global:Customer_BillState;" class="textfield"
/>
</div>
</mvt:if>
<div class="&mvte:global:BillZip_Row;">
<label class="required" for="Customer_BillZip">Zip/Postal
Code:</label>
522
Copyright 2005-2015, Miva Inc. All Rights Reserved.
Publication Date: 02/28/2015
User Reference Guide DRAFT
<input type="text" name="Customer_BillZip" id="Customer_BillZip"
value="&mvte:global:Customer_BillZip;" class="textfield" />
</div>
<div class="&mvt:global:BillCountry_Row;">
<label class="required"
for="Customer_BillCountry">Country:</label>
<mvt:item name="countries" param="Customer_BillCountry" />
</div>
</div>
</div>
<mvt:if expr="l.settings:customer:match">
<script>
<mvt:if expr="l.settings:customer:primaddr EQ 'shipping'">
document.getElementById( 'billing_to_show' ).checked = true;
<mvt:elseif expr="l.settings:customer:primaddr EQ 'billing'">
document.getElementById( 'shipping_to_show' ).checked = true;
</mvt:if>
</script>
</mvt:if>
<script
src="&mvte:global:clientside_url;Store_Code=&mvta:store:code;&Filename=ToggleDetail
s.js&Primaddr=shipping&Shipping=D&Billing=O"></script>
Edit Page: ACED > Customer Fields
New File
<div id="fields-key">
<div><span class="required">Bold</span> = Required</div>
<div><span class="italic">Italic</span> = Optional</div>
<mvt:if expr="g.Error_Message_Count">
<div><span class="red">Red</span> = Invalid</div>
</mvt:if>
</div>
<input type="hidden" name="Customer_Login" value="&mvte:global:Customer:login;" />
<input type="hidden" name="Customer_PasswordEmail"
value="&mvte:global:Customer:pw_email;" />
<div id="ship-to">
<h2 class="fields-heading">
Ship To:
<span id="shipping_controls" class="controls">
<mvt:if expr="g.Action AND g.shipping_to_show">
<input name="shipping_to_show" id="shipping_to_show"
type="checkbox" value="1" class="checkbox" checked />
<mvt:else>
523
Copyright 2005-2015, Miva Inc. All Rights Reserved.
Publication Date: 02/28/2015
User Reference Guide DRAFT
<input name="shipping_to_show" id="shipping_to_show"
type="checkbox" value="1" class="checkbox" />
</mvt:if>
<label for="shipping_to_show">same as billing</label>
</span>
</h2>
<div id="shipping_fields">
<div class="&mvte:global:ShipFirstName_Row;">
<label class="required" for="Customer_ShipFirstName">First
Name:</label>
<input type="text" name="Customer_ShipFirstName"
id="Customer_ShipFirstName" value="&mvte:global:Customer_ShipFirstName;"
class="textfield" />
</div>
<div class="&mvte:global:ShipLastName_Row;">
<label class="required" for="Customer_ShipLastName">Last
Name:</label>
<input type="text" name="Customer_ShipLastName"
id="Customer_ShipLastName" value="&mvte:global:Customer_ShipLastName;"
class="textfield" />
</div>
<div class="&mvte:global:ShipEmail_Row;">
<label class="required" for="Customer_ShipEmail">Email
Address:</label>
<input type="text" name="Customer_ShipEmail"
id="Customer_ShipEmail" value="&mvte:global:Customer_ShipEmail;" class="textfield"
/>
</div>
<div class="&mvte:global:ShipPhone_Row;">
<label class="required" for="Customer_ShipPhone">Phone
Number:</label>
<input type="text" name="Customer_ShipPhone"
id="Customer_ShipPhone" value="&mvte:global:Customer_ShipPhone;" class="textfield"
/>
</div>
<div class="&mvte:global:ShipFax_Row;">
<label class="italic" for="Customer_ShipFax">Fax Number:</label>
<input type="text" name="Customer_ShipFax" id="Customer_ShipFax"
value="&mvte:global:Customer_ShipFax;" class="textfield" />
</div>
<div class="&mvte:global:ShipCompany_Row;">
<label class="italic" for="Customer_ShipCompany">Company:</label>
<input type="text" name="Customer_ShipCompany"
id="Customer_ShipCompany" value="&mvte:global:Customer_ShipCompany;"
class="textfield" />
</div>
<div class="&mvte:global:ShipAddress1_Row;">
<label class="required"
for="Customer_ShipAddress1">Address:</label>
524
Copyright 2005-2015, Miva Inc. All Rights Reserved.
Publication Date: 02/28/2015
User Reference Guide DRAFT
<input type="text" name="Customer_ShipAddress1"
id="Customer_ShipAddress1" value="&mvte:global:Customer_ShipAddress1;"
class="textfield" />
</div>
<div class="&mvte:global:ShipAddress2_Row;">
<label class="italic" for="Customer_ShipAddress2">Address
2:</label>
<input type="text" name="Customer_ShipAddress2"
id="Customer_ShipAddress2" value="&mvte:global:Customer_ShipAddress2;"
class="textfield" />
</div>
<div class="&mvte:global:ShipCity_Row;">
<label class="required" for="Customer_ShipCity">City:</label>
<input type="text" name="Customer_ShipCity"
id="Customer_ShipCity" value="&mvte:global:Customer_ShipCity;" class="textfield" />
</div>
<mvt:if expr="g.States_Empty">
<div class="&mvte:global:ShipState_Row;">
<label class="required"
for="Customer_ShipState">State/Province:</label>
<input type="text" name="Customer_ShipState"
id="Customer_ShipState" value="&mvte:global:Customer_ShipState;" class="textfield"
/>
</div>
<mvt:else>
<div class="&mvte:global:ShipState_Row;">
<label class="required"
for="Customer_ShipStateSelect">State/Province:</label>
<mvt:item name="states" param="Customer_ShipStateSelect" />
</div>
<div class="&mvte:global:ShipState_Row;">
<label class="italic" for="Customer_ShipState">Other
State/Province:</label>
<input type="text" name="Customer_ShipState"
id="Customer_ShipState" value="&mvte:global:Customer_ShipState;" class="textfield">
</div>
</mvt:if>
<div class="&mvte:global:ShipZip_Row;">
<label class="required" for="Customer_ShipZip">Zip/Postal
Code:</label>
<input type="text" name="Customer_ShipZip" id="Customer_ShipZip"
value="&mvte:global:Customer_ShipZip;" class="textfield" />
</div>
<div class="&mvte:global:ShipCountry_Row;">
<label class="required"
for="Customer_ShipCountry">Country:</label>
<mvt:item name="countries" param="Customer_ShipCountry" />
</div>
</div>
525
Copyright 2005-2015, Miva Inc. All Rights Reserved.
Publication Date: 02/28/2015
User Reference Guide DRAFT
</div>
<div id="bill-to">
<h2 class="fields-heading">
Bill To:
<span id="billing_controls" class="controls">
<mvt:if expr="g.Action AND g.billing_to_show">
<input name="billing_to_show" id="billing_to_show"
type="checkbox" value="1" class="checkbox" checked />
<mvt:else>
<input name="billing_to_show" id="billing_to_show"
type="checkbox" value="1" class="checkbox" />
</mvt:if>
<label for="billing_to_show">same as shipping</label>
</span>
</h2>
<div id="billing_fields">
<div class="&mvte:global:BillFirstName_Row;">
<label class="required" for="Customer_BillFirstName">First
Name:</label>
<input type="text" name="Customer_BillFirstName"
id="Customer_BillFirstName" value="&mvte:global:Customer_BillFirstName;"
class="textfield" />
</div>
<div class="&mvte:global:BillLastName_Row;">
<label class="required" for="Customer_BillLastName">Last
Name:</label>
<input type="text" name="Customer_BillLastName"
id="Customer_BillLastName" value="&mvte:global:Customer_BillLastName;"
class="textfield" />
</div>
<div class="&mvte:global:BillEmail_Row;">
<label class="required" for="Customer_BillEmail">Email
Address:</label>
<input type="text" name="Customer_BillEmail"
id="Customer_BillEmail" value="&mvte:global:Customer_BillEmail;" class="textfield"
/>
</div>
<div class="&mvte:global:BillPhone_Row;">
<label class="required" for="Customer_BillPhone">Phone
Number:</label>
<input type="text" name="Customer_BillPhone"
id="Customer_BillPhone" value="&mvte:global:Customer_BillPhone;" class="textfield"
/>
</div>
<div class="&mvte:global:BillFax_Row;">
<label class="italic" for="Customer_BillFax">Fax Number:</label>
<input type="text" name="Customer_BillFax" id="Customer_BillFax"
value="&mvte:global:Customer_BillFax;" class="textfield" />
</div>
<div class="&mvte:global:BillCompany_Row;">
526
Copyright 2005-2015, Miva Inc. All Rights Reserved.
Publication Date: 02/28/2015
User Reference Guide DRAFT
<label class="italic" for="Customer_BillCompany">Company:</label>
<input type="text" name="Customer_BillCompany"
id="Customer_BillCompany" value="&mvte:global:Customer_BillCompany;"
class="textfield" />
</div>
<div class="&mvte:global:BillAddress1_Row;">
<label class="required"
for="Customer_BillAddress1">Address:</label>
<input type="text" name="Customer_BillAddress1"
id="Customer_BillAddress1" value="&mvte:global:Customer_BillAddress1;"
class="textfield" />
</div>
<div class="&mvte:global:BillAddress2_Row;">
<label class="italic" for="Customer_BillAddress2">Address
2:</label>
<input type="text" name="Customer_BillAddress2"
id="Customer_BillAddress2" value="&mvte:global:Customer_BillAddress2;"
class="textfield" />
</div>
<div class="&mvte:global:BillCity_Row;">
<label class="required" for="Customer_BillCity">City:</label>
<input type="text" name="Customer_BillCity"
id="Customer_BillCity" value="&mvte:global:Customer_BillCity;" class="textfield" />
</div>
<mvt:if expr="g.States_Empty">
<div class="&mvte:global:BillState_Row;">
<label class="required"
for="Customer_BillState">State/Province:</label>
<input type="text" name="Customer_BillState"
id="Customer_BillState" value="&mvte:global:Customer_BillState;" class="textfield"
/>
</div>
<mvt:else>
<div class="&mvte:global:BillState_Row;">
<label class="required"
for="Customer_BillStateSelect">State/Province:</label>
<mvt:item name="states" param="Customer_BillStateSelect" />
</div>
<div class="&mvte:global:BillState_Row;">
<label class="italic" for="Customer_BillState">Other
State/Province:</label>
<input type="text" name="Customer_BillState"
id="Customer_BillState" value="&mvte:global:Customer_BillState;" class="textfield"
/>
</div>
</mvt:if>
<div class="&mvte:global:BillZip_Row;">
<label class="required" for="Customer_BillZip">Zip/Postal
Code:</label>
527
Copyright 2005-2015, Miva Inc. All Rights Reserved.
Publication Date: 02/28/2015
User Reference Guide DRAFT
<input type="text" name="Customer_BillZip" id="Customer_BillZip"
value="&mvte:global:Customer_BillZip;" class="textfield" />
</div>
<div class="&mvt:global:BillCountry_Row;">
<label class="required"
for="Customer_BillCountry">Country:</label>
<mvt:item name="countries" param="Customer_BillCountry" />
</div>
</div>
</div>
<mvt:if expr="l.settings:customer:match">
<script>
<mvt:if expr="l.settings:customer:primaddr EQ 'shipping'">
document.getElementById( 'billing_to_show' ).checked = true;
<mvt:elseif expr="l.settings:customer:primaddr EQ 'billing'">
document.getElementById( 'shipping_to_show' ).checked = true;
</mvt:if>
</script>
</mvt:if>
<script
src="&mvte:global:clientside_url;Store_Code=&mvta:store:code;&Filename=ToggleDetail
s.js&Primaddr=shipping&Shipping=D&Billing=O"></script>
Edit Page: AFED > Affiliate Fields
Original File
...
<b>Link URL:</b>
</mvt:item>
</td><td align="left" valign="top">
<mvt:item name="fonts" param="body_font">
&mvte:global:Domain:mm_url;Screen=SFNT&Affiliate=&mvta:global:Affiliate:code;
</mvt:item>
</td></tr>
<mvt:if expr="g.AffiliateOptions:link_image">
<tr><td align="left" valign="top" nowrap> <mvt:item name="fonts" param="body_font">
<b>Image Link HTML:</b>
</mvt:item>
</td><td align="left" valign="top">
<mvt:item name="fonts" param="body_font">
<a
href="&mvte:global:Domain:mm_url;Screen=SFNT&Affiliate=&mvta:global:Affiliate:code;
528
Copyright 2005-2015, Miva Inc. All Rights Reserved.
Publication Date: 02/28/2015
User Reference Guide DRAFT
"><img src="&mvte:global:Affiliate_Full_Image_Path;"
alt="&mvte:global:AffiliateOptions:link_text;" border="0"></a><br>
<img src="&mvte:global:AffiliateOptions:link_image;"
alt="&mvte:global:AffiliateOptions:link_text;" border="0">
</mvt:item>
</td></tr>
<mvt:elseif expr="g.AffiliateOptions:link_text">
<tr><td align="left" valign="top" nowrap> <mvt:item name="fonts" param="body_font">
<b>Link Text:</b>
</mvt:item>
</td><td align="left" valign="top">
<mvt:item name="fonts" param="body_font">
<a
href="&mvte:global:Domain:mm_url;Screen=SFNT&Affiliate=&mvta:global:Affiliate:code;
">&mvte:global:AffiliateOptions:link_text;</a><br>
</mvt:item>
</td></tr>
...
New File
...
<b>Link URL:</b>
</mvt:item>
</td><td align="left" valign="top">
<mvt:item name="fonts" param="body_font">
<input type="text" size="40" readonly
value="&mvte:global:Domain:mm_url;Screen=SFNT&Affiliate=&mvta:global:Affiliate:code
;">
</mvt:item>
</td></tr>
<mvt:if expr="g.AffiliateOptions:link_image">
<tr><td align="left" valign="top" nowrap>
<mvt:item name="fonts" param="body_font">
<b>Image Link HTML:</b>
</mvt:item>
</td><td align="left" valign="top">
<mvt:item name="fonts" param="body_font">
<input type="text" size="40" readonly value="<a
href="&mvte:global:Domain:mm_url;Screen=SFNT&Affiliate=&mvta:global:Affiliate:code;
"><img src="&mvte:global:Affiliate_Full_Image_Path;"
alt="&mvte:global:AffiliateOptions:link_text;" border="0"></a>"><br>
529
Copyright 2005-2015, Miva Inc. All Rights Reserved.
Publication Date: 02/28/2015
User Reference Guide DRAFT
<img src="&mvte:global:AffiliateOptions:link_image;"
alt="&mvte:global:AffiliateOptions:link_text;" border="0">
</mvt:item>
</td></tr>
<mvt:elseif expr="g.AffiliateOptions:link_text">
<tr><td align="left" valign="top" nowrap> <mvt:item name="fonts" param="body_font">
<b>Link Text:</b>
</mvt:item>
</td><td align="left" valign="top">
<mvt:item name="fonts" param="body_font">
<input type="text" size="40" readonly value="<a
href="&mvte:global:Domain:mm_url;Screen=SFNT&Affiliate=&mvta:global:Affiliate:code;
">&mvte:global:AffiliateOptions:link_text;</a>">
</mvt:item>
</td></tr>
...
Edit Page: BASK > Basket Content
New File
<mvt:if expr="l.settings:basket:empty">
<mvt:item name="fonts" param="body_font">
Your shopping basket is currently empty.<br>
</mvt:item>
<mvt:exit />
</mvt:if>
<table border="0" cellpadding="2" cellspacing="0" width="100%">
<tr>
<td align="left" valign="middle" bgcolor="&mvt:colors:lhdr_bg;">
</td>
<td align="left" valign="middle" bgcolor="&mvt:colors:lhdr_bg;">
<mvt:item name="fonts" param="lhdr_font">
<b>Code</b>
</mvt:item>
</td>
<td align="left" valign="middle" bgcolor="&mvt:colors:lhdr_bg;">
<mvt:item name="fonts" param="lhdr_font">
<b>Product</b>
</mvt:item>
</td><td align="left" valign="middle" bgcolor="&mvt:colors:lhdr_bg;">
530
Copyright 2005-2015, Miva Inc. All Rights Reserved.
Publication Date: 02/28/2015
User Reference Guide DRAFT
<mvt:item name="fonts" param="lhdr_font">
<b>Quantity</b>
</mvt:item>
</td><td align="right" valign="middle" bgcolor="&mvt:colors:lhdr_bg;">
<mvt:item name="fonts" param="lhdr_font">
<b>Price/Ea.</b>
</mvt:item>
</td><td align="right" valign="middle" bgcolor="&mvt:colors:lhdr_bg;">
<mvt:item name="fonts" param="lhdr_font">
<b>Total</b>
</mvt:item>
</td></tr>
<mvt:foreach iterator="item" array="basket:items">
<tr>
<form method="post" action="&mvt:global:sessionurl;">
<input type="hidden" name="Screen" value="BASK">
<input type="hidden" name="Action" value="RPRD">
<input type="hidden" name="Store_Code" value="&mvte:global:Store_Code;">
<input type="hidden" name="Basket_Line" value="&mvte:item:line_id;">
<td align="left" valign="middle">
<mvt:item name="fonts" param="body_font">
<mvt:item name="buttons" param="Remove" />
</mvt:item>
</td>
</form>
<td align="left" valign="middle" nowrap>
<mvt:item name="fonts" param="body_font">
<a
href="&mvt:global:sessionurl;Screen=PROD&Store_Code=&mvta:global:Store_Code;&Produc
t_Code=&mvta:item:code;">&mvt:item:code;</a>
</mvt:item>
</td><td valign="top" align="left" valign="middle" width="100%">
<mvt:item name="fonts" param="body_font">
&mvt:item:name;
<mvt:if expr="l.settings:item:upsold">
(Special Offer)
</mvt:if>
</mvt:item>
</td>
<mvt:if expr="l.settings:item:upsold">
<td align="right" valign="middle" nowrap>
<mvt:item name="fonts" param="body_font">
&mvt:item:quantity;
</mvt:item>
</td>
<mvt:else>
<form method="post" action="&mvt:global:sessionurl;">
<input type="hidden" name="Screen" value="BASK">
531
Copyright 2005-2015, Miva Inc. All Rights Reserved.
Publication Date: 02/28/2015
User Reference Guide DRAFT
<input type="hidden" name="Action" value="QNTY">
<input type="hidden" name="Store_Code" value="&mvte:global:Store_Code;">
<input type="hidden" name="Basket_Line" value="&mvte:item:line_id;">
<td align="left" valign="middle" nowrap>
<mvt:item name="fonts" param="body_font">
<input type="text" name="Quantity" value="&mvte:item:quantity;" size=4>
<mvt:item name="buttons" param="Update" />
</mvt:item>
</td>
</form>
</mvt:if>
<td align="right" valign="middle" nowrap>
<mvt:item name="fonts" param="body_font">
&mvt:item:formatted_price;
</mvt:item>
</td><td align="right" valign="middle" nowrap>
<mvt:item name="fonts" param="body_font">
&mvt:item:formatted_subtotal;
</mvt:item>
</td></tr>
<mvt:foreach iterator="option" array="item:options">
<tr>
<td align="left">
</td>
<td align="left">
</td><td align="left">
<mvt:item name="fonts" param="body_font">
<mvt:if expr="l.settings:option:option_id">
&mvt:option:attr_code;: &mvt:option:opt_code;
<mvt:elseif expr="NOT ISNULL l.settings:option:data">
&mvt:option:attr_code;: &mvt:option:data;
<mvt:elseif expr="NOT ISNULL l.settings:option:data_long">
&mvt:option:attr_code;: &mvt:option:data_long;
<mvt:else>
&mvt:option:attr_code;
</mvt:if>
</mvt:item>
</td><td align="left">
</td><td align="right" nowrap>
<mvt:item name="fonts" param="body_font">
<mvt:if expr="l.settings:option:price">
&mvt:option:formatted_price;
<mvt:else>
</mvt:if>
532
Copyright 2005-2015, Miva Inc. All Rights Reserved.
Publication Date: 02/28/2015
User Reference Guide DRAFT
</mvt:item>
</td><td align="right" nowrap>
<mvt:item name="fonts" param="body_font">
<mvt:if expr="l.settings:option:price">
&mvt:option:formatted_subtotal;
<mvt:else>
</mvt:if>
</mvt:item>
</td></tr>
</mvt:foreach>
</mvt:foreach>
<mvt:foreach iterator="charge" array="basket:charges">
<tr>
<td align="right" valign="middle" colspan="3">
</td><td align="right" valign="middle" nowrap>
<mvt:item name="fonts" param="body_font">
<i>&mvt:charge:descrip;:</i>
</mvt:item>
</td><td align="right" valign="middle" nowrap>
<mvt:item name="fonts" param="body_font">
&mvt:charge:formatted_disp_amt;
</mvt:item>
</td></tr>
</mvt:foreach>
<tr>
<td>
</td>
<td align="right" valign="middle" colspan="3">
</td><td align="right" valign="middle" bgcolor="&mvt:colors:lhdr_bg;">
<mvt:item name="fonts" param="lhdr_font">
<b>Total:</b>
</mvt:item>
</td><td align="right" valign="middle" bgcolor="&mvt:colors:lhdr_bg;" nowrap>
<mvt:item name="fonts" param="lhdr_font">
<b>&mvt:basket:formatted_total;</b>
</mvt:item>
</td></tr>
</table>
533
Copyright 2005-2015, Miva Inc. All Rights Reserved.
Publication Date: 02/28/2015
User Reference Guide DRAFT
Edit Page: CTGY > Product List Layout
Original File
...
<mvt:if expr="NOT ISNULL l.settings:product:thumbnail">
<a
href="&mvt:global:sessionurl;Screen=PROD&Store_Code=&mvta:store:code;&Product_Code=
&mvta:product:code;&Category_Code=&mvta:category:code;"><img
src="&mvte:product:thumbnail;" alt="&mvte:product:name;" border=0></a>
<mvt:else>
</mvt:if>
</td><td align="left" valign="top" colspan=2>
<mvt:item name="fonts" param="body_font">
<a
href="&mvt:global:sessionurl;Screen=PROD&Store_Code=&mvta:store:code;&Product_Code=
&mvta:product:code;&Category_Code=&mvta:category:code;">&mvt:product:name;</a><br>
Code: <b>&mvt:product:code;</b><br>
Price: <b>&mvt:product:formatted_price;</b><br>
<mvt:if expr="l.settings:product:inv_active">
&mvt:product:inv_long;<br>
...
New File
...
<mvt:if expr="NOT ISNULL l.settings:product:thumbnail">
<a
href="&mvt:global:sessionurl;Screen=PROD&Store_Code=&mvta:store:code;&Product_Code=
&mvta:product:code;&Category_Code=&mvta:category:code;"><img
src="&mvte:product:thumbnail;" alt="&mvte:product:name;" border=0></a>
<mvt:else>
</mvt:if>
</td><td align="left" valign="top" colspan="2">
<mvt:item name="fonts" param="body_font">
<a
href="&mvt:global:sessionurl;Screen=PROD&Store_Code=&mvta:store:code;&Product_Code=
&mvta:product:code;&Category_Code=&mvta:category:code;">&mvt:product:name;</a><br>
Code: <b>&mvt:product:code;</b><br>
534
Copyright 2005-2015, Miva Inc. All Rights Reserved.
Publication Date: 02/28/2015
User Reference Guide DRAFT
Price:
<b>&mvt:product:formatted_base_price;</b><br>
<mvt:if expr="l.settings:product:inv_active">
&mvt:product:inv_long;<br>
...
Edit Page: User Interface, Settings > Global Header & Footer
Original File
...
</Header_Update>
<Footer_Update>
<Template><![CDATA[<br><br><center><small>Ecommerce Shopping Cart Software by
<a target="_blank" href="http://www.mivamerchant.com">Miva
Merchant</a></small></center>]]></Template>
<Notes>#Set_Current_Time#</Notes>
</Footer_Update></Module>
New File
...
</Header_Update>
<Footer_Update>
<Template><![CDATA[<br><br><center><small>Ecommerce Shopping Cart Software by
<a target="_blank" rel="nofollow"
href="http://www.miva.com">Miva</a></small></center>]]></Template>
<Notes>#Set_Current_Time#</Notes>
</Footer_Update></Module>
Edit Page: INVC > Order Contents
New File
<table border="0" cellpadding="2" cellspacing="0" width="100%">
<tr>
<td align="left" valign="middle" bgcolor="&mvt:colors:lhdr_bg;">
535
Copyright 2005-2015, Miva Inc. All Rights Reserved.
Publication Date: 02/28/2015
User Reference Guide DRAFT
<mvt:item name="fonts" param="lhdr_font">
<b>Code</b>
</mvt:item>
</td><td align="left" valign="middle" bgcolor="&mvt:colors:lhdr_bg;">
<mvt:item name="fonts" param="lhdr_font">
<b>Product</b>
</mvt:item>
</td><td align="left" valign="middle" bgcolor="&mvt:colors:lhdr_bg;">
<mvt:item name="fonts" param="lhdr_font">
<b>Quantity</b>
</mvt:item>
</td><td align="right" valign="middle" bgcolor="&mvt:colors:lhdr_bg;">
<mvt:item name="fonts" param="lhdr_font">
<b>Price/Ea.</b>
</mvt:item>
</td><td align="right" valign="middle" bgcolor="&mvt:colors:lhdr_bg;">
<mvt:item name="fonts" param="lhdr_font">
<b>Total</b>
</mvt:item>
</td></tr>
<mvt:foreach iterator="item" array="order:groups">
<tr>
<td align="left" valign="top" nowrap>
<mvt:item name="fonts" param="body_font">
&mvt:item:code;
</mvt:item>
</td><td align="left" valign="top" width="100%">
<mvt:item name="fonts" param="body_font">
&mvt:item:name;
<mvt:if expr="l.settings:item:upsold">
(Special Offer)
</mvt:if>
<mvt:foreach iterator="discount" array="item:discounts">
<mvt:if expr="l.settings:discount:display">
<br><i>&mvt:discount:descrip;: &mvt:discount:formatted_discount;</i>
</mvt:if>
</mvt:foreach>
</mvt:item>
</td><td align="right" valign="top" nowrap>
<mvt:item name="fonts" param="body_font">
&mvt:item:quantity;
</mvt:item>
</td><td align="right" valign="top" nowrap>
<mvt:item name="fonts" param="body_font">
&mvt:item:formatted_base_price;
</mvt:item>
</td><td align="right" valign="top" nowrap>
<mvt:item name="fonts" param="body_font">
536
Copyright 2005-2015, Miva Inc. All Rights Reserved.
Publication Date: 02/28/2015
User Reference Guide DRAFT
<mvt:if expr="l.settings:item:subtotal_base_price NE l.settings:item:subtotal">
<strike>&mvt:item:formatted_subtotal_base_price;</strike>
</mvt:if>
&mvt:item:formatted_subtotal;
</mvt:item>
</td></tr>
<mvt:foreach iterator="option" array="item:options">
<tr><td align="left">
</td><td align="left">
<mvt:item name="fonts" param="body_font">
<mvt:if expr="l.settings:option:option_id">
&mvt:option:attr_code;: &mvt:option:opt_code;
<mvt:elseif expr="NOT ISNULL l.settings:option:data">
&mvt:option:attr_code;: &mvt:option:data;
<mvt:elseif expr="NOT ISNULL l.settings:option:data_long">
&mvt:option:attr_code;: &mvt:option:data_long;
<mvt:else>
&mvt:option:attr_code;
</mvt:if>
<mvt:foreach iterator="discount" array="option:discounts">
<mvt:if expr="l.settings:discount:display">
<br><i>&mvt:discount:descrip;: &mvt:discount:formatted_discount;</i>
</mvt:if>
</mvt:foreach>
</mvt:item>
</td><td align="left">
</td><td align="right" nowrap>
<mvt:item name="fonts" param="body_font">
<mvt:if expr="l.settings:option:base_price">
&mvt:option:formatted_base_price;
<mvt:else>
</mvt:if>
</mvt:item>
</td><td align="right" nowrap>
<mvt:item name="fonts" param="body_font">
<mvt:if expr="l.settings:option:subtotal_base_price OR l.settings:option:subtotal">
<mvt:if expr="l.settings:option:subtotal_base_price NE l.settings:option:subtotal">
<strike>&mvt:option:formatted_subtotal_base_price;</strike>
</mvt:if>
&mvt:option:formatted_subtotal;
<mvt:else>
</mvt:if>
</mvt:item>
</td></tr>
537
Copyright 2005-2015, Miva Inc. All Rights Reserved.
Publication Date: 02/28/2015
User Reference Guide DRAFT
</mvt:foreach>
</mvt:foreach>
<mvt:foreach iterator="charge" array="order:charges">
<tr><td align="right" valign="top" colspan="3">
</td><td align="right" valign="top" nowrap>
<mvt:item name="fonts" param="body_font">
<i>&mvt:charge:descrip;:</i>
</mvt:item>
</td><td align="right" valign="top" nowrap>
<mvt:item name="fonts" param="body_font">
&mvt:charge:formatted_disp_amt;
</mvt:item>
</td></tr>
</mvt:foreach>
<tr><td align="right" valign="top" colspan="3">
</td><td align="right" valign="top" bgcolor="&mvt:colors:lhdr_bg;">
<mvt:item name="fonts" param="lhdr_font">
<b>Total:</b>
</mvt:item>
</td><td align="right" valign="top" bgcolor="&mvt:colors:lhdr_bg;" nowrap>
<mvt:item name="fonts" param="lhdr_font">
<b>&mvt:order:formatted_total;</b>
</mvt:item>
</td></tr>
</table>
Edit Page: OCST > Basket Contents
New File
<mvt:if expr="l.settings:basket:empty">
<mvt:item name="fonts" param="body_font">
Your shopping basket is currently empty.<br>
</mvt:item>
<mvt:exit />
</mvt:if>
<table border="0" cellpadding="2" cellspacing="0" width="100%">
<tr>
<td align="left" valign="middle" bgcolor="&mvt:colors:lhdr_bg;">
<mvt:item name="fonts" param="lhdr_font">
<b>Code</b>
</mvt:item>
</td>
538
Copyright 2005-2015, Miva Inc. All Rights Reserved.
Publication Date: 02/28/2015
User Reference Guide DRAFT
<td align="left" valign="middle" bgcolor="&mvt:colors:lhdr_bg;">
<mvt:item name="fonts" param="lhdr_font">
<b>Product</b>
</mvt:item>
</td><td align="left" valign="middle" bgcolor="&mvt:colors:lhdr_bg;">
<mvt:item name="fonts" param="lhdr_font">
<b>Quantity</b>
</mvt:item>
</td><td align="right" valign="middle" bgcolor="&mvt:colors:lhdr_bg;">
<mvt:item name="fonts" param="lhdr_font">
<b>Price/Ea.</b>
</mvt:item>
</td><td align="right" valign="middle" bgcolor="&mvt:colors:lhdr_bg;">
<mvt:item name="fonts" param="lhdr_font">
<b>Total</b>
</mvt:item>
</td></tr>
<mvt:foreach iterator="group" array="basket:groups">
<tr>
<td align="left" valign="top" nowrap>
<mvt:item name="fonts" param="body_font">
&mvt:group:code;
</mvt:item>
</td><td valign="top" align="left" valign="top" width="100%">
<mvt:item name="fonts" param="body_font">
&mvt:group:name;
<mvt:if expr="l.settings:group:upsold">
(Special Offer)
</mvt:if>
<mvt:foreach iterator="discount" array="group:discounts">
<mvt:if expr="l.settings:discount:display">
<br><i>&mvt:discount:descrip;: &mvt:discount:formatted_discount;</i>
</mvt:if>
</mvt:foreach>
</mvt:item>
</td>
<td align="right" valign="top" nowrap>
<mvt:item name="fonts" param="body_font">
&mvt:group:quantity;
</mvt:item>
</td>
<td align="right" valign="top" nowrap>
<mvt:item name="fonts" param="body_font">
&mvt:group:formatted_base_price;
</mvt:item>
</td><td align="right" valign="top" nowrap>
<mvt:item name="fonts" param="body_font">
<mvt:if expr="l.settings:group:subtotal_base_price NE l.settings:group:subtotal">
539
Copyright 2005-2015, Miva Inc. All Rights Reserved.
Publication Date: 02/28/2015
User Reference Guide DRAFT
<strike>&mvt:group:formatted_subtotal_base_price;</strike>
</mvt:if>
&mvt:group:formatted_subtotal;
</mvt:item>
</td></tr>
<mvt:foreach iterator="option" array="group:options">
<tr><td align="left">
</td><td align="left">
<mvt:item name="fonts" param="body_font">
<mvt:if expr="l.settings:option:option_id">
&mvt:option:attr_code;: &mvt:option:opt_code;
<mvt:elseif expr="NOT ISNULL l.settings:option:data">
&mvt:option:attr_code;: &mvt:option:data;
<mvt:elseif expr="NOT ISNULL l.settings:option:data_long">
&mvt:option:attr_code;: &mvt:option:data_long;
<mvt:else>
&mvt:option:attr_code;
</mvt:if>
<mvt:foreach iterator="discount" array="option:discounts">
<mvt:if expr="l.settings:discount:display">
<br><i>&mvt:discount:descrip;: &mvt:discount:formatted_discount;</i>
</mvt:if>
</mvt:foreach>
</mvt:item>
</td><td align="left">
</td><td align="right" nowrap>
<mvt:item name="fonts" param="body_font">
<mvt:if expr="l.settings:option:base_price">
&mvt:option:formatted_base_price;
<mvt:else>
</mvt:if>
</mvt:item>
</td><td align="right" nowrap>
<mvt:item name="fonts" param="body_font">
<mvt:if expr="l.settings:option:subtotal_base_price OR l.settings:option:subtotal">
<mvt:if expr="l.settings:option:subtotal_base_price NE l.settings:option:subtotal">
<strike>&mvt:option:formatted_subtotal_base_price;</strike>
</mvt:if>
&mvt:option:formatted_subtotal;
<mvt:else>
</mvt:if>
</mvt:item>
</td></tr>
</mvt:foreach>
540
Copyright 2005-2015, Miva Inc. All Rights Reserved.
Publication Date: 02/28/2015
User Reference Guide DRAFT
</mvt:foreach>
<mvt:foreach iterator="charge" array="basket:charges">
<tr><td align="right" valign="top" colspan="3">
</td><td align="right" valign="top" nowrap>
<mvt:item name="fonts" param="body_font">
<i>&mvt:charge:descrip;:</i>
</mvt:item>
</td><td align="right" valign="top" nowrap>
<mvt:item name="fonts" param="body_font">
&mvt:charge:formatted_disp_amt;
</mvt:item>
</td></tr>
</mvt:foreach>
<tr><td align="right" valign="top" colspan="3">
</td><td align="right" valign="top" bgcolor="&mvt:colors:lhdr_bg;">
<mvt:item name="fonts" param="lhdr_font">
<b>Total:</b>
</mvt:item>
</td><td align="right" valign="top" bgcolor="&mvt:colors:lhdr_bg;" nowrap>
<mvt:item name="fonts" param="lhdr_font">
<b>&mvt:basket:formatted_total;</b>
</mvt:item>
</td></tr>
</table>
Edit Page: OCST > Customer Fields
Original File
<b>Email Address:</b>
<mvt:else>
<font color="red">
<b>Email Address:</b>
</font>
</mvt:if>
</mvt:item>
</td><td align="left" valign="middle">
<mvt:item name="fonts" param="body_font">
<input type="text" name="ShipEmail" size=25 value="&mvte:global:ShipEmail;">
</mvt:item>
</td></tr>
...
541
Copyright 2005-2015, Miva Inc. All Rights Reserved.
Publication Date: 02/28/2015
User Reference Guide DRAFT
<b>Email Address:</b>
</font>
</mvt:if>
</mvt:item>
</td><td align="left" valign="middle">
<mvt:item name="fonts" param="body_font">
<input type="text" name="BillEmail" size=25 value="&mvte:global:BillEmail;">
</mvt:item>
</td></tr>
...
New File
...
...
<b>Email Address:</b>
</font>
</mvt:if>
</mvt:item>
</td><td align="left" valign="middle">
<mvt:item name="fonts" param="body_font">
<input type="text" name="ShipEmail" id="ShipEmail" size=25
value="&mvte:global:ShipEmail;">
</mvt:item>
</td></tr>
...
<b>Email Address:</b>
</font>
</mvt:if>
</mvt:item>
</td><td align="left" valign="middle">
<mvt:item name="fonts" param="body_font">
<input type="text" name="BillEmail" id="BillEmail" size=25
value="&mvte:global:BillEmail;">
</mvt:item>
</td></tr>
...
542
Copyright 2005-2015, Miva Inc. All Rights Reserved.
Publication Date: 02/28/2015
User Reference Guide DRAFT
Edit Page: OPAY > Basket Contents
New File
<mvt:if expr="l.settings:basket:empty">
<mvt:item name="fonts" param="body_font">
Your shopping basket is currently empty.<br>
</mvt:item>
<mvt:exit />
</mvt:if>
<table border="0" cellpadding="2" cellspacing="0" width="100%">
<tr>
<td align="left" valign="middle" bgcolor="&mvt:colors:lhdr_bg;">
<mvt:item name="fonts" param="lhdr_font">
<b>Code</b>
</mvt:item>
</td>
<td align="left" valign="middle" bgcolor="&mvt:colors:lhdr_bg;">
<mvt:item name="fonts" param="lhdr_font">
<b>Product</b>
</mvt:item>
</td><td align="left" valign="middle" bgcolor="&mvt:colors:lhdr_bg;">
<mvt:item name="fonts" param="lhdr_font">
<b>Quantity</b>
</mvt:item>
</td><td align="right" valign="middle" bgcolor="&mvt:colors:lhdr_bg;">
<mvt:item name="fonts" param="lhdr_font">
<b>Price/Ea.</b>
</mvt:item>
</td><td align="right" valign="middle" bgcolor="&mvt:colors:lhdr_bg;">
<mvt:item name="fonts" param="lhdr_font">
<b>Total</b>
</mvt:item>
</td></tr>
<mvt:foreach iterator="group" array="basket:groups">
<tr>
<td align="left" valign="top" nowrap>
<mvt:item name="fonts" param="body_font">
&mvt:group:code;
</mvt:item>
</td><td valign="top" align="left" valign="top" width="100%">
<mvt:item name="fonts" param="body_font">
&mvt:group:name;
<mvt:if expr="l.settings:group:upsold">
(Special Offer)
</mvt:if>
<mvt:foreach iterator="discount" array="group:discounts">
543
Copyright 2005-2015, Miva Inc. All Rights Reserved.
Publication Date: 02/28/2015
User Reference Guide DRAFT
<mvt:if expr="l.settings:discount:display">
<br><i>&mvt:discount:descrip;: &mvt:discount:formatted_discount;</i>
</mvt:if>
</mvt:foreach>
</mvt:item>
</td>
<td align="right" valign="top" nowrap>
<mvt:item name="fonts" param="body_font">
&mvt:group:quantity;
</mvt:item>
</td>
<td align="right" valign="top" nowrap>
<mvt:item name="fonts" param="body_font">
&mvt:group:formatted_base_price;
</mvt:item>
</td><td align="right" valign="top" nowrap>
<mvt:item name="fonts" param="body_font">
<mvt:if expr="l.settings:group:subtotal_base_price NE l.settings:group:subtotal">
<strike>&mvt:group:formatted_subtotal_base_price;</strike>
</mvt:if>
&mvt:group:formatted_subtotal;
</mvt:item>
</td></tr>
<mvt:foreach iterator="option" array="group:options">
<tr><td align="left">
</td><td align="left">
<mvt:item name="fonts" param="body_font">
<mvt:if expr="l.settings:option:option_id">
&mvt:option:attr_code;: &mvt:option:opt_code;
<mvt:elseif expr="NOT ISNULL l.settings:option:data">
&mvt:option:attr_code;: &mvt:option:data;
<mvt:elseif expr="NOT ISNULL l.settings:option:data_long">
&mvt:option:attr_code;: &mvt:option:data_long;
<mvt:else>
&mvt:option:attr_code;
</mvt:if>
<mvt:foreach iterator="discount" array="option:discounts">
<mvt:if expr="l.settings:discount:display">
<br><i>&mvt:discount:descrip;: &mvt:discount:formatted_discount;</i>
</mvt:if>
</mvt:foreach>
</mvt:item>
</td><td align="left">
</td><td align="right" nowrap>
<mvt:item name="fonts" param="body_font">
<mvt:if expr="l.settings:option:base_price">
544
Copyright 2005-2015, Miva Inc. All Rights Reserved.
Publication Date: 02/28/2015
User Reference Guide DRAFT
&mvt:option:formatted_base_price;
<mvt:else>
</mvt:if>
</mvt:item>
</td><td align="right" nowrap>
<mvt:item name="fonts" param="body_font">
<mvt:if expr="l.settings:option:subtotal_base_price OR l.settings:option:subtotal">
<mvt:if expr="l.settings:option:subtotal_base_price NE l.settings:option:subtotal">
<strike>&mvt:option:formatted_subtotal_base_price;</strike>
</mvt:if>
&mvt:option:formatted_subtotal;
<mvt:else>
</mvt:if>
</mvt:item>
</td></tr>
</mvt:foreach>
</mvt:foreach>
<mvt:foreach iterator="charge" array="basket:charges">
<tr><td align="right" valign="top" colspan="3">
</td><td align="right" valign="top" nowrap>
<mvt:item name="fonts" param="body_font">
<i>&mvt:charge:descrip;:</i>
</mvt:item>
</td><td align="right" valign="top" nowrap>
<mvt:item name="fonts" param="body_font">
&mvt:charge:formatted_disp_amt;
</mvt:item>
</td></tr>
</mvt:foreach>
<tr><td align="right" valign="top" colspan="3">
</td><td align="right" valign="top" bgcolor="&mvt:colors:lhdr_bg;">
<mvt:item name="fonts" param="lhdr_font">
<b>Total:</b>
</mvt:item>
</td><td align="right" valign="top" bgcolor="&mvt:colors:lhdr_bg;" nowrap>
<mvt:item name="fonts" param="lhdr_font">
<b>&mvt:basket:formatted_total;</b>
</mvt:item>
</td></tr>
</table>
545
Copyright 2005-2015, Miva Inc. All Rights Reserved.
Publication Date: 02/28/2015
User Reference Guide DRAFT
Edit Page: ORDS > Order Contents
New File
<style type="text/css">
p{
margin-top: 6px;
margin-bottom: 10px;
}
td, div{
font-family: Verdana, Arial, Helvetica, sans-serif;
font-size: 11px;
line-height: 15px;
}
.header{
font-size: 15px;
font-weight: bold;
}
.dashedline{
border-bottom: 1px dashed #999999;
z-index: 0;
margin-top: 20px;
margin-bottom: 20px;
}
.ordercell{ padding-right: 10px; }
.orderhead{
font-weight:bold;
font-size: 13px;
margin-bottom: 5px;
}
.downloadbtn{ margin-top: 4px; }
</style>
<p><b>Order number:</b> &mvt:order:id;<br>
<b>Placed:</b> &mvt:order:date; &mvt:order:time;</p>
<p class="dashedline"></p>
<table width="100%" border="0" cellspacing="0" cellpadding="0">
<tr valign="top">
<td width="50%"><b class="header">Ship to: </b><br>
&mvte:order:ship_fname; &mvte:order:ship_lname;<br>
&mvte:order:ship_email;<br>
&mvte:order:ship_phone;<br>
&mvte:order:ship_fax;<br>
&mvte:order:ship_comp; <p>
&mvte:order:ship_addr1;<br>
&mvte:order:ship_addr2;<br>
<mvt:if expr="( NOT
ISNULL l.settings:order:ship_city ) AND ( NOT ISNULL l.settings:order:ship_state
)">
&mvte:order:ship_city;,
546
Copyright 2005-2015, Miva Inc. All Rights Reserved.
Publication Date: 02/28/2015
User Reference Guide DRAFT
<mvt:else>
&mvte:order:ship_city;
</mvt:if>
&mvte:order:ship_state;
&mvte:order:ship_zip;
<br>
&mvte:order:ship_cntry;</p>
</td>
<td><b class="header">Bill to: </b><br>
&mvte:order:bill_fname;
&mvte:order:bill_lname;<br>
&mvte:order:bill_email;<br>
&mvte:order:bill_phone;<br>
&mvte:order:bill_fax;<br>
&mvte:order:bill_comp;<br>
<p>
&mvte:order:bill_addr1;<br>
&mvte:order:bill_addr2;<br>
<mvt:if expr="( NOT ISNULL l.settings:order:bill_city ) AND ( NOT ISNULL
l.settings:order:bill_state )">
&mvte:order:bill_city;,
<mvt:else>
&mvte:order:bill_city;
</mvt:if>
&mvte:order:bill_state;
&mvte:order:bill_zip;
<br>
&mvte:order:bill_cntry;</p>
</td>
</tr>
</table>
<p class="dashedline"></p>
<table width="100%" border="0" cellspacing="0" cellpadding="0">
<tr valign="top">
<td colspan="2" style="padding: 10px 0px 10px 0px">
<table width="100%" border="0" cellspacing="0" cellpadding="0">
<tr valign="top">
<td class="ordercell"> </td>
<td align="left" class="ordercell"><span class="orderhead">Product
Description</span></td>
<td align="right" class="ordercell"><span class="orderhead">Status</span></td>
<td align="right" class="ordercell"><span class="orderhead">Quantity</span></td>
<td align="right" class="ordercell"><span class="orderhead">Price/Ea.</span></td>
<td align="right" class="ordercell"><span class="orderhead">Total</span></td>
</tr>
<mvt:foreach iterator="item" array="order:groups">
<tr valign="top">
<td valign="top"
class="ordercell" nowrap width="75">
<mvt:if expr="l.settings:item:reorder EQ 1">
<a target="_blank"
href="&mvt:global:sessionurl;Store_Code=&mvta:store:code;&Screen=BASK&Action=ADPR&P
547
Copyright 2005-2015, Miva Inc. All Rights Reserved.
Publication Date: 02/28/2015
User Reference Guide DRAFT
roduct_Code=&mvta:item:code;&Quantity=1"><img src="graphics/en-US/mmui/buymore.gif"
width="64" height="19" class="downloadbtn" border=0></a>
<mvt:else>
</mvt:if>
</td>
<td valign="top" class="ordercell" width="50%" nowrap>
&mvt:item:name;
<mvt:if expr="l.settings:item:upsold">
(Special Offer)
</mvt:if>
<mvt:foreach iterator="discount" array="item:discounts">
<mvt:if expr="l.settings:discount:display">
<br><i>&mvt:discount:descrip;: &mvt:discount:formatted_discount;</i>
</mvt:if>
</mvt:foreach>
</td>
<td valign="top" align="right" class="ordercell"
nowrap>&mvt:item:order_status;</td>
<td valign="top" align="right" class="ordercell">&mvt:item:quantity;</td>
<td valign="top" align="right" class="ordercell">
&mvt:item:formatted_base_price;
</td>
<td valign="top" align="right" class="ordercell">
<mvt:if expr="l.settings:item:subtotal_base_price NE l.settings:item:subtotal">
<strike>&mvt:item:formatted_subtotal_base_price;</strike>
</mvt:if>
&mvt:item:formatted_subtotal;
</td>
</tr>
<mvt:foreach iterator="option" array="item:options">
<tr valign="top">
<td class="ordercell" nowrap> </td>
<td valign="middle" width="50%" class="ordercell" nowrap>
<mvt:if expr="l.settings:option:option_id">
&mvt:option:attr_code;: &mvt:option:opt_code;
<mvt:elseif expr="NOT ISNULL l.settings:option:data">
&mvt:option:attr_code;: &mvt:option:data;
<mvt:elseif expr="NOT ISNULL l.settings:option:data_long">
&mvt:option:attr_code;: &mvt:option:data_long;
<mvt:else>
&mvt:option:attr_code;
</mvt:if>
<mvt:foreach iterator="discount" array="option:discounts">
<mvt:if expr="l.settings:discount:display">
<br><i>&mvt:discount:descrip;: &mvt:discount:formatted_discount;</i>
</mvt:if>
</mvt:foreach>
</td>
548
Copyright 2005-2015, Miva Inc. All Rights Reserved.
Publication Date: 02/28/2015
User Reference Guide DRAFT
<td valign="top" align="right" class="ordercell"> </td>
<td valign="top" align="right" class="ordercell"> </td>
<td valign="top" align="right" class="ordercell">
<mvt:if expr="l.settings:option:base_price">
&mvt:option:formatted_base_price;
<mvt:else>
</mvt:if>
</td>
<td valign="top" align="right" class="ordercell">
<mvt:if expr="l.settings:option:subtotal_base_price OR l.settings:option:subtotal">
<mvt:if expr="l.settings:option:subtotal_base_price NE l.settings:option:subtotal">
<strike>&mvt:option:formatted_subtotal_base_price;</strike>
</mvt:if>
&mvt:option:formatted_subtotal;
<mvt:else>
</mvt:if>
</td>
</tr>
</mvt:foreach>
</mvt:foreach>
<mvt:foreach iterator="charge" array="order:charges">
<tr valign="top">
<td valign="top" align="right" class="ordercell" colspan="4"> </td>
<td valign="top" align="right" class="ordercell"
nowrap><i>&mvt:charge:descrip;:</i></td>
<td valign="top" align="right" class="ordercell"
nowrap>&mvt:charge:formatted_disp_amt;</td>
</tr>
</mvt:foreach>
<tr valign="top">
<td valign="top" align="right" class="ordercell" colspan="4"> </td>
<td valign="top" align="right" class="ordercell"><span
class="orderhead">Total:</span></td>
<td valign="top" align="right" class="ordercell"><span
class="orderhead">&mvt:order:formatted_total;</span></td>
</tr>
</table>
</td>
</tr>
</table>
549
Copyright 2005-2015, Miva Inc. All Rights Reserved.
Publication Date: 02/28/2015
User Reference Guide DRAFT
Edit Page: OSEL > Basket Contents
New File
<mvt:if expr="l.settings:basket:empty">
<mvt:item name="fonts" param="body_font">
Your shopping basket is currently empty.<br>
</mvt:item>
<mvt:exit />
</mvt:if>
<table border="0" cellpadding="2" cellspacing="0" width="100%">
<tr>
<td align="left" valign="middle" bgcolor="&mvt:colors:lhdr_bg;">
<mvt:item name="fonts" param="lhdr_font">
<b>Code</b>
</mvt:item>
</td>
<td align="left" valign="middle" bgcolor="&mvt:colors:lhdr_bg;">
<mvt:item name="fonts" param="lhdr_font">
<b>Product</b>
</mvt:item>
</td><td align="left" valign="middle" bgcolor="&mvt:colors:lhdr_bg;">
<mvt:item name="fonts" param="lhdr_font">
<b>Quantity</b>
</mvt:item>
</td><td align="right" valign="middle" bgcolor="&mvt:colors:lhdr_bg;">
<mvt:item name="fonts" param="lhdr_font">
<b>Price/Ea.</b>
</mvt:item>
</td><td align="right" valign="middle" bgcolor="&mvt:colors:lhdr_bg;">
<mvt:item name="fonts" param="lhdr_font">
<b>Total</b>
</mvt:item>
</td></tr>
<mvt:foreach iterator="group" array="basket:groups">
<tr>
<td align="left" valign="top" nowrap>
<mvt:item name="fonts" param="body_font">
&mvt:group:code;
</mvt:item>
</td><td valign="top" align="left" valign="top" width="100%">
<mvt:item name="fonts" param="body_font">
&mvt:group:name;
<mvt:if expr="l.settings:group:upsold">
(Special Offer)
</mvt:if>
<mvt:foreach iterator="discount" array="group:discounts">
550
Copyright 2005-2015, Miva Inc. All Rights Reserved.
Publication Date: 02/28/2015
User Reference Guide DRAFT
<mvt:if expr="l.settings:discount:display">
<br><i>&mvt:discount:descrip;: &mvt:discount:formatted_discount;</i>
</mvt:if>
</mvt:foreach>
</mvt:item>
</td>
<td align="right" valign="top" nowrap>
<mvt:item name="fonts" param="body_font">
&mvt:group:quantity;
</mvt:item>
</td>
<td align="right" valign="top" nowrap>
<mvt:item name="fonts" param="body_font">
&mvt:group:formatted_base_price;
</mvt:item>
</td><td align="right" valign="top" nowrap>
<mvt:item name="fonts" param="body_font">
<mvt:if expr="l.settings:group:subtotal_base_price NE l.settings:group:subtotal">
<strike>&mvt:group:formatted_subtotal_base_price;</strike>
</mvt:if>
&mvt:group:formatted_subtotal;
</mvt:item>
</td></tr>
<mvt:foreach iterator="option" array="group:options">
<tr><td align="left">
</td><td align="left">
<mvt:item name="fonts" param="body_font">
<mvt:if expr="l.settings:option:option_id">
&mvt:option:attr_code;: &mvt:option:opt_code;
<mvt:elseif expr="NOT ISNULL l.settings:option:data">
&mvt:option:attr_code;: &mvt:option:data;
<mvt:elseif expr="NOT ISNULL l.settings:option:data_long">
&mvt:option:attr_code;: &mvt:option:data_long;
<mvt:else>
&mvt:option:attr_code;
</mvt:if>
<mvt:foreach iterator="discount" array="option:discounts">
<mvt:if expr="l.settings:discount:display">
<br><i>&mvt:discount:descrip;: &mvt:discount:formatted_discount;</i>
</mvt:if>
</mvt:foreach>
</mvt:item>
</td><td align="left">
</td><td align="right" nowrap>
<mvt:item name="fonts" param="body_font">
<mvt:if expr="l.settings:option:base_price">
551
Copyright 2005-2015, Miva Inc. All Rights Reserved.
Publication Date: 02/28/2015
User Reference Guide DRAFT
&mvt:option:formatted_base_price;
<mvt:else>
</mvt:if>
</mvt:item>
</td><td align="right" nowrap>
<mvt:item name="fonts" param="body_font">
<mvt:if expr="l.settings:option:subtotal_base_price OR l.settings:option:subtotal">
<mvt:if expr="l.settings:option:subtotal_base_price NE l.settings:option:subtotal">
<strike>&mvt:option:formatted_subtotal_base_price;</strike>
</mvt:if>
&mvt:option:formatted_subtotal;
<mvt:else>
</mvt:if>
</mvt:item>
</td></tr>
</mvt:foreach>
</mvt:foreach>
<mvt:foreach iterator="charge" array="basket:charges">
<tr><td align="right" valign="top" colspan="3">
</td><td align="right" valign="top" nowrap>
<mvt:item name="fonts" param="body_font">
<i>&mvt:charge:descrip;:</i>
</mvt:item>
</td><td align="right" valign="top" nowrap>
<mvt:item name="fonts" param="body_font">
&mvt:charge:formatted_disp_amt;
</mvt:item>
</td></tr>
</mvt:foreach>
<tr><td align="right" valign="top" colspan="3">
</td><td align="right" valign="top" bgcolor="&mvt:colors:lhdr_bg;">
<mvt:item name="fonts" param="lhdr_font">
<b>Total:</b>
</mvt:item>
</td><td align="right" valign="top" bgcolor="&mvt:colors:lhdr_bg;" nowrap>
<mvt:item name="fonts" param="lhdr_font">
<b>&mvt:basket:formatted_total;</b>
</mvt:item>
</td></tr>
</table>
552
Copyright 2005-2015, Miva Inc. All Rights Reserved.
Publication Date: 02/28/2015
User Reference Guide DRAFT
Edit Page: PATR > Attribute Machine
Original File
<script>
AttributeMachine.prototype.Generate_Swatch = function( product_code, attribute,
option )
{
var swatch = document.createElement( 'li' );
var span
= document.createElement( 'span' ); // to vertically center the
swatch images
var img
= document.createElement( 'img' );
img.src
= option.image;
swatch.appendChild( span );
swatch.appendChild( img );
return swatch;
}
</script>
New File
<script>
AttributeMachine.prototype.Generate_Discount = function( discount )
{
var discount_div;
discount_div
discount_div.innerHTML
discount.formatted_discount;
= document.createElement( 'div' );
= discount.descrip + ': ' +
return discount_div;
}
AttributeMachine.prototype.Generate_Swatch = function( product_code, attribute,
option )
{
var swatch = document.createElement( 'li' );
var span
= document.createElement( 'span' ); // to vertically center the
swatch images
var img
= document.createElement( 'img' );
img.src
= option.image;
swatch.appendChild( span );
553
Copyright 2005-2015, Miva Inc. All Rights Reserved.
Publication Date: 02/28/2015
User Reference Guide DRAFT
swatch.appendChild( img );
return swatch;
}
</script>
...
Edit Page: PLST > Product List
Original File
...
<mvt:if expr="NOT ISNULL l.settings:product:thumbnail">
<a
href="&mvt:global:sessionurl;Screen=PROD&Store_Code=&mvta:global:Store_Code;&Produc
t_Code=&mvta:product:code;&Category_Code=&mvta:global:Category_Code;"><img
src="&mvte:product:thumbnail;" border=0></a>
<mvt:else>
</mvt:if>
</mvt:item>
</td>
<td align="right" valign="middle" bgcolor="&mvt:product:bgcolor;" nowrap>
<mvt:item name="fonts" param="body_font">
&mvt:product:formatted_price;
</mvt:item>
</td>
...
New File
...
<mvt:if expr="NOT ISNULL l.settings:product:thumbnail">
<a
href="&mvt:global:sessionurl;Screen=PROD&Store_Code=&mvta:global:Store_Code;&Produc
t_Code=&mvta:product:code;&Category_Code=&mvta:global:Category_Code;"><img
src="&mvte:product:thumbnail;" border=0></a>
<mvt:else>
</mvt:if>
</mvt:item>
</td>
<td align="right" valign="middle" bgcolor="&mvt:product:bgcolor;" nowrap>
<mvt:item name="fonts" param="body_font">
554
Copyright 2005-2015, Miva Inc. All Rights Reserved.
Publication Date: 02/28/2015
User Reference Guide DRAFT
&mvt:product:formatted_base_price;<br>
</mvt:item>
</td>
...
Edit Page: PROD > Attribute Machine
Original File
<script>
AttributeMachine.prototype.Generate_Swatch = function( product_code, attribute,
option )
{
var swatch = document.createElement( 'li' );
var span
= document.createElement( 'span' ); // to vertically center the
swatch images
var img
= document.createElement( 'img' );
img.src
= option.image;
swatch.appendChild( span );
swatch.appendChild( img );
return swatch;
}
</script>
...
New File
<script>
AttributeMachine.prototype.Generate_Discount = function( discount )
{
var discount_div;
discount_div
discount_div.innerHTML
discount.formatted_discount;
= document.createElement( 'div' );
= discount.descrip + ': ' +
return discount_div;
}
555
Copyright 2005-2015, Miva Inc. All Rights Reserved.
Publication Date: 02/28/2015
User Reference Guide DRAFT
AttributeMachine.prototype.Generate_Swatch = function( product_code, attribute,
option )
{
var swatch = document.createElement( 'li' );
var span
= document.createElement( 'span' ); // to vertically center the
swatch images
var img
= document.createElement( 'img' );
img.src
= option.image;
swatch.appendChild( span );
swatch.appendChild( img );
return swatch;
}
</script>
...
Edit Page: PROD > Product Display Layout
Original File
...
Code: <b>&mvt:product:code;</b><br>
Price: <b><span id="price-value">&mvt:product:formatted_price;</span></b><br>
<mvt:if expr="l.settings:product:weight NE 0">
Shipping Weight: <b>&mvt:product:weight;</b> &mvt:store:wtunits;<br>
...
New File
...
Code: <b>&mvt:product:code;</b><br>
Price:
<strike><span id="price-value-additional">
</span></strike>
<b><span id="price-value">&mvt:product:formatted_base_price;</span></b><br>
<div id="product-discounts">
</div>
<mvt:if expr="l.settings:product:weight NE 0">
Shipping Weight: <b>&mvt:product:weight;</b> &mvt:store:wtunits;<br>
...
556
Copyright 2005-2015, Miva Inc. All Rights Reserved.
Publication Date: 02/28/2015
User Reference Guide DRAFT
Edit Page: PROD > Related Products Layout
Original File
...
<mvt:if expr="NOT ISNULL l.settings:product:thumbnail">
<a
href="&mvt:global:sessionurl;Screen=PROD&Store_Code=&mvta:global:Store_Code;&Produc
t_Code=&mvta:product:code;&Category_Code=&mvta:global:Category_Code;"><img
src="&mvte:product:thumbnail;" border=0></a>
<mvt:else>
</mvt:if>
</mvt:item>
</td>
<td align="right" valign="middle" bgcolor="&mvt:product:bgcolor;" nowrap>
<mvt:item name="fonts" param="body_font">
&mvt:product:formatted_price;
</mvt:item>
</td>
...
New File
...
<mvt:if expr="NOT ISNULL l.settings:product:thumbnail">
<a
href="&mvt:global:sessionurl;Screen=PROD&Store_Code=&mvta:global:Store_Code;&Produc
t_Code=&mvta:product:code;&Category_Code=&mvta:global:Category_Code;"><img
src="&mvte:product:thumbnail;" border=0></a>
<mvt:else>
</mvt:if>
</mvt:item>
</td>
<td align="right" valign="middle" bgcolor="&mvt:product:bgcolor;" nowrap>
<mvt:item name="fonts" param="body_font">
&mvt:product:formatted_base_price;<br>
</mvt:item>
</td>
...
557
Copyright 2005-2015, Miva Inc. All Rights Reserved.
Publication Date: 02/28/2015
User Reference Guide DRAFT
Edit Page: SRCH > Search Results Layout
Original File
...
<label for="Sort_By">Sort By:</label>
<select name="Sort_By" onchange="this.form.submit();">
</select>
<noscript><input type="submit" value="go"></noscript>
...
<mvt:if expr="NOT ISNULL l.settings:product:thumbnail">
<a
href="&mvt:global:sessionurl;Screen=PROD&Store_Code=&mvta:global:Store_Code;&Produc
t_Code=&mvta:product:code;&Category_Code=&mvta:global:Category_Code;"><img
src="&mvte:product:thumbnail;" border=0></a>
<mvt:else>
</mvt:if>
</mvt:item>
</td>
<td align="right" valign="middle" bgcolor="&mvt:product:bgcolor;" nowrap>
<mvt:item name="fonts" param="body_font">
&mvt:product:formatted_price;
</mvt:item>
</td>
New File
...
<label for="Sort_By">Sort By:</label>
<select name="Sort_By" onchange="this.form.submit();">
<mvt:if expr="ISNULL g.Sort_By">
<option value="disp_order"
selected="selected">Default</option>
<mvt:else>
<option value="disp_order">Default</option>
</mvt:if>
<mvt:if expr="g.Sort_By EQ 'bestsellers'">
<option value="bestsellers" selected="selected">Best
Selling</option>
<mvt:else>
558
Copyright 2005-2015, Miva Inc. All Rights Reserved.
Publication Date: 02/28/2015
User Reference Guide DRAFT
<option value="bestsellers">Best Selling</option>
</mvt:if>
<mvt:if expr="g.Sort_By EQ 'price_asc'">
<option value="price_asc" selected="selected">Lowest
Price</option>
<mvt:else>
<option value="price_asc">Lowest Price</option>
</mvt:if>
<mvt:if expr="g.Sort_By EQ 'price_desc'">
<option value="price_desc"
selected="selected">Highest Price</option>
<mvt:else>
<option value="price_desc">Highest Price</option>
</mvt:if>
<mvt:if expr="g.Sort_By EQ 'newest'">
<option value="newest" selected="selected">Newest
Items</option>
<mvt:else>
<option value="newest">Newest Items</option>
</mvt:if>
</select>
<noscript><input type="submit" value="go"></noscript>
...
<mvt:if expr="NOT ISNULL l.settings:product:thumbnail">
<a
href="&mvt:global:sessionurl;Screen=PROD&Store_Code=&mvta:global:Store_Code;&Produc
t_Code=&mvta:product:code;&Category_Code=&mvta:global:Category_Code;"><img
src="&mvte:product:thumbnail;" border=0></a>
<mvt:else>
</mvt:if>
</mvt:item>
</td>
<td align="right" valign="middle" bgcolor="&mvt:product:bgcolor;" nowrap>
<mvt:item name="fonts" param="body_font">
&mvt:product:formatted_base_price;<br>
</mvt:item>
</td>
...
559
Copyright 2005-2015, Miva Inc. All Rights Reserved.
Publication Date: 02/28/2015