1
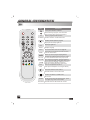
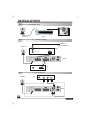
User’s Manual
Digital Terrestrial Receiver
Contents
Contents
GENERAL INFORMATION
P1
P1
P2
P3
P3
P4
P5
P5
Main Features
For your Safety
Unpacking
General Operation
RCU
Front Panel
Rear Panel
INSTALLATION
P6
P6
P7
P6
P7
Connecting to Antenna & TV
Connecting to TV using SCART
Connecting to TV using RCA support
Connecting to another DTR
MENU INFORMATION
P3
USER INSTALLATON
P10
P10
P11
P13
P14
Channel Search
System Setting
Parental Lock
Factory Default
GENERAL VIEWING FUNCTION
P15
P15
P15
P15
P15
P16
P16
P16
Select Program
TV&Radio mode
Program Information
Pause the Frame
Previous Program Recall
Favorite List
Volume&Audio Control
P17
PROGRAM MANAGER
P17
P17
P18
Program Manager
Favorite Channel
Move Channel
Contents
Contents
Contents
P19
P19
P20
P20
Lock Channel
Rename Channel
Delete Channel
Sort Channel
EPG (Electronic Program Guide)
P21
TIMER
P23
FRONT PANEL DISPLAY
P24
TROUBLE SHOOTING
P25
Contents
GENERAL INFORMATION
INFORMATION
GENERAL
This Digital Terrestrial Receiver (DTR) will take you to the new and exciting world of
Digital Television. A world of crystal clear widescreen pictures, digital sound, more
information and new services. All this and more on "Free to Air" Digital Television.
To make full use of your new DTR please take the time to familiarize yourself with the
extensive features of the unit detailed in this User's Guide.
If you need help in setting up please call your dealer or a customer service adviser.
Main Features
High quality Video & Digital Audio
Fully MPEG-2, DVB compliant
User friendly and easy-to-use menu system
Various program editing functions (Favorite, moving, locking, renaming, deleting
and sorting)
Automatic search for newly added channels
Stores up to 4000 programs
Easy and speedy software upgrade through RS-232 port
Plug-and-play data transfer system (DTR to DTR)
Timer function, automatically turns On/Off by setting function (daily, monthly, yearly)
Electronic Program Guide (EPG)
Supports Teletext
Selectable Video output CVBS, RGB
256 colors On-Screen-Display
Automatically saves the last program
1
Main Features
GENERAL INFORMATION
INFORMATION
GENERAL
For Your Safety
To avoid electric-shock hazards, do not
open the cabinet, refer servicing to qualified
personnel only.
Keep the receiver away from flower vases,
tubs, sinks, etc., in order to avoid damaging
the equipment.
Do not expose the receiver to direct
sunlight. Keep it away from the heat source.
Do not block ventilation holes of the
Receiver so that air can circulate freely.
Turn the power off at the mains and unplug
the unit if an abnormal event occurs.
Do not touch the receiver during an
electrical storm as it may create an electrical
shock hazard.
Switch the receiver off whenever it remains
out of service for an extended period.
Be sure to turn the Receiver off and
disconnect the AC power cord before
cleaning the Receiver surface. If the
surface is dirty, wipe clean with a cloth
which has been dipped in a weak soap-andwater solution and wrung out thoroughly,
and then wipe again with a dry cloth.
2
For Your Safety
GENERAL INFORMATION
INFORMATION
GENERAL
Unpacking
Us
Remote Control
e
r ’s
Ma
nu
al
Batteries
D
t
igi
al
Te
r re
st
l
ria
Re
ce
ive
r
User's Guide
Audio / Video Cable
General Operation
Throughout this manual you will notice that the everyday operation of the receiver is
based on a series of user friendly on screen displays and menus. These menus will
help you get the most from your receiver, guiding you through installation, program
organizing, viewing and many other functions.
All function can be carried out using the buttons on the RCU, and some of the function
can also be carried out using the buttons on the front panel.
If at any time when you are using the menus you want to return to the normal TV mode,
press the TV/AV button.
The receiver is easy to use, always at your command and adaptable for future
advances.
Please be aware that new software may change the functionality of the receiver.
Should you experience any difficulties with the operation of your receiver, please
consult the relevant section of this manual, including the Trouble Shooting, or
alternatively call your dealer or a customer service adviser.
Unpacking
General Operation
3
GENERAL INFORMATION
INFORMATION
GENERAL
RCU
Key
Function
Turns power ON/OFF of the DTR
When watching a program, mute the sound
0~9
TV/RADIO
PR
FAV
LIST
AUDIO
Enter number of the required menu item or
select a program number to watch
Switches between TV and Radio mode
Switches back to previous program
Display the favorite program list
Display program list
Multiple language
INFO
Shows information of the current program
MENU
Press this key one time to run menu onscreen,
and call command box
Moves up / down a page in the program list
OK, LIST
PR+, PR-
Executes the selected item in the menu screen
or enters the desired value in any input mode
When watching a program , change program s or
move to the next higher or lower item in the menu
When watching a program , adjust the volume or
move to the left or right item in the menu
EXIT
Returns to the previous menu on the menu
screen or escape from the menu
EPG
Calls up the EPG (Electronic Program Guide)
L
R
TV/AV
Selects the different audio modes
Switches between TV and AV modes
Switches to teletext or subtitle mode
UHF
PAUSE
PAL/NTSC
4
No function
Press once to pause the screen picture, press
once again to go to the normal mode
Switches between PAL and NTSC modes
RCU
GENERAL INFORMATION
INFORMATION
GENERAL
Front Panel
Key
Function
Turns the power of the receiver on and off.
(CH+)
In live mode, changes to the next channel.
(CH-)
In live mode, changes to the previous channel.
(VOL+)
In live mode, increases the volume.
(VOL-)
In live mode, decreases the volume.
Rear Panel
ANT IN: CONNECT TO ANTENNA
LOOP(RF OUT): CONNECT TO ANOTHER RECEIVER
CONNECT TO A PC FOR S/W UPGRADE
POWER ON/OFF
CONNECT TO TV AND VCR
USING A SCART CABLE
CONNECT TO A DIGITAL AMPLIFIER
CONNECT VIDEO TO TV USING RCA JACK
CONNECT TO AUDIO R/L TO TV OR AUDIO TUNER
5
Front Panel
Rear Panel
INSTALLATION
INSTALLATION
Connecting to ANTENNA & TV
DTR
Antenna
Connecting to TV using SCART support
Cable or
OFF-Air Antenna
Antenna
VCR
IN FROM ANT
SCART
OUT TO ANT
DTR
IN
TV
SCART
Connecting to TV using RCA support
IN
Antenna
VIDEO
AUDIO
TV
R
L
DTR
6
Connecting
INSTALLATION
INSTALLATION
Connecting to another DTR
Antenna
Another
DTR
DTR
IN
TV
SCART
Connecting
7
MENU INFORMATION
INFORMATION
MENU
Make sure that you have properly installed and connected the cables of the receiver
well. If the receiver is the factory status or there is no program, when power on this
receiver, the following message box will be displayed on the screen.
The way to change the OSD language.
The default language can be changed. Use
CH+, CH- keys to select the OSD language
item.
In this item, use VOL+, VOL- keys to select
the desired language directly. Or use CH+,
CH- keys select one in the language list
popped by pressing the OK key, and then
press OK key to confirm.
Automactic searching programs.
In the message box, once OK key is pressed
on the OK button, system will enter into the
Channel Search window and start searching.
After searching, press EXIT key to normal
view mode.
If there is no searched program, you can not return to the normal mode unless you
have searched the programs. The detail way to search the programs, please refer to
Channel Search title.
8
MENU INFORMATION
MENU INFORMATION
INFORMATION
MENU
Main Menu
During the normal TV/RADIO mode, press MENU key on the RCU or on the front
panel to enter into the Main Menu.
This menu consists of the 5 major main menus as
follows:
- Channel Manager
- Program Guide
- Timer
- User Installation
- Receiver Information
During installation, the OK key confirms a selection and may show a Down List Box if
the column has 34 mark. You can also use the numeric keys on the RCU to enter
numeric value.
Use the PR+ or PR- keys to move upwards and downwards from one line to another
and use the VOL+, VOL- keys to move from main menu to submenus and move from
left side to right side or vice sersa.
To escape from the menu system at any time, press the EXIT key on the RCU.
9
MENU INFORMATION
USER INSTALLATION
INSTALLATION
USER
This menu consists of the 4 major submenus listed below:
-Channel Search
-System Setting
-Parental Lock
-Factory Default
Channel Search
Move cursor to Channel Search item in User Installation menu by using VOL+ or VOLkeys on the RCU, and press OK key to enter into the Channel Search menu.
1)Country Code: Select the desired
country code. Use VOL+ or VOL- keys to
select directly. Or use CH+ or CH- key to
select one in the channel list popped by
pressing OK key, and then press OK key to
confirm.
2) Channel : Refer to the same operation
methods as the above.
3)Frequency: The original value is determined by the above selected channel.
Edit Mode: If you want to edit the value in Frequency item, please press the Edit
Mode key (Red color key) on the RCU. Use the numeric keys on the RCU to change
its value directly, or input the desired value in the keypad popped by pressing OK key.
4)FFT,Code Rate, Constellation, Guard interval: The values in these items are
changed automatically and can not be set by hand.
5) Search Channel : Allows you to search for channels using the following options:
- Search All Channel: Search All Channels in the network.
- Search 1 Channel : Search programs in one channel which need to be
selected from the channel column.
- Search Network : Search programs for the network.
10
Channel Search
USER INSTALLATION
INSTALLATION
USER
Channel Search
During searhcing, the searched channels
will be divided into TV and Radio list box
respectively and automatically.
After searching, cursor will be placed on the
COMPLETE automatically, then press OK
key to return to Channel Search window.
If move cursor to VIEW button and press OK
key. A warning message "Please wait for
saving the data" will appear for several
minutes, and then you can view searched
programs in normal mode.
6) Set PID : If you want to set PID (Packet
Identifier) manually, please press SET PID
key (Green colour key) on the RCU, then
Set PID window will be displayed. Enter the
correct value and select OK.
System Setting
System Setting menu provides you with options to adjust your settings to suit your
setup and personal taste. Press OK on the RCU.
1) OSD Language : Select your desired
language.
2) Audio Language :Press OK key to enter
into Select Audio Language window.
First Language, Second Language, Third
Language, Fourth Language: Select the
desired language in order as you want. The
selected language will take effect only when
it was offered by the service provider.
Channel Search
11
USER INSTALLATION
INSTALLATION
USER
System Setting
After setting, select OK button and press OK
key to confirm, otherwise press EXIT key.
3) Video Format : Select your desired video
format.
4) Screen Format : Select your desired
screen format from 4:3 and 16:9 options.
5) Video output : If your SCART supports
RGB control, select RGB. Otherwise select
CVBS.
6) TV type : Select proper TV type among
PAL, NTSC, PAL&NTSC.
7) Start On Channel : To display a selected
channel everytime you turn the unit on,
press OK and select your default channel
from the list displayed.
8) LNB Power: Select between ON and OFF.
9) Logic Channel Number: Select between
ON and OFF. If select OFF, all searched
channels will be sorted by their searching
order. If select ON, all searched channels
will be their logic channel numbers. The
default values is ON.
10) UHF Standard : Select UHF type.
11) UHF Channel : Select your desired UHF
channel.
12
System Setting
USER INSTALLATION
INSTALLATION
USER
Parental Lock
This function allows you to block programs based on Parental Guidance ratings.
You can protect your installed data and information by selecting the Install Lock
function.
How to change Password :
1) Enter the current password.
2) Select ON at Parental Lock item by using
left or right arrow keys.
3) Enter new password.
4) Confirm your new password by
entering new password again.
Note:
1.The default password is 0000.
2.Do not forget your new password in order
not to fail to operate the receiver.
How to use Parental Lock :
1) Set Parent Lock ON and go to the TV
Channel Manager page.
2) Press the Lock key (Blue color key) on the
RCU.
3) Selet the channel that you want to lock.
4) Press OK key, the symbol is marked.
How to use Parental Rating Level
1) Enter the password and press OK.
2) In Parent Guidance item, system has
provided eight levels to prevent children
from watching programs beyond their age.
Parental Rating Value
No Block: Not Classified
Block G: General
Block M: Mature Audience (15+)
Block MA: Mature, Strong Violent
Block AV: Adult, Strong Violent
Block R: Restricted 18+
Block All: Lock all channels.
Use left or right arrow keys to select desired level directly. Or press OK key to pop up
a drop -down box list, then move cursor to select the desired level and press OK key
to confirm.
13
Parental Lock
USER INSTALLATION
INSTALLATION
USER
Parental Lock
3) Press Exit, the STB will save the data and block all programs at selected level or
beyond.
Note:
1.This parental rating function can only take effect when the transmission of the
viewing program includes such rating level information.
2. In viewing mode, if current program is locked, equal to or beyond the set rating
level, a password is needed before you can view this program.
How to use Install Lock :
1) Enter the current password.
2) Select ON from the Install Lock sub-menu.
3) Enter new password.
4) Confirm your new password entering new
password again.
5) Exit this menu.
6) Select any menu and press OK on the
RCU.
7) The Enter Password Box will be displayed.
8) Unless the correct password is entered
menus cannot be operated.
Note :
1.The Install lock password is the same as the Parental Lock password.
2.The default password is 0000.
Factory Default
If you want to bring the receiver back to the
factory default condition, select Factory
Default and press OK key.
A warning message will be displayed, to
continue select and press OK.
Warning : You will lose all of the data and
information which was installed.
14
Parental Lock
Factory Default
GENERAL VIEWING
VIEWING FUNCTION
FUNCTION
GENERAL
The following describes the basic functions of your receiver while watching digital
TV or listening to digital radio.
Select Program
If you want to select a program, use
key
on the front panel, CH+, CH- key on the RCU,
or numeric key on the RCU directly.
While watching digital TV, press the OK key
on the RCU. The program list will be
displayed on the right side of the screen. If
you press the EXIT key, the program list will
be gone.
TV & Radio mode
While viewing TV program, press TV/RADIO key on the RCU to move to radio mode.
Press this key once again to return to TV mode.
Program Information
During viewing, when you select program or
press INFO key, the information bar, which
includes the basic information of the current
program, will be displayed on the screen for
several seconds.
If the service provider has offered the now
and next program guide, before the bar
disappears, press red colour key to know
detail of the now program, or press green
colour key to know the next program.
Pause the frame
Press PAUSE key on the RCU to pause the screen. To bring it back to the normal
mode, press PAUSE key once again.
15
Select Program
TV & Radio mode
Program Information
GENERAL VIEWING
VIEWING FUNCTION
FUNCTION
GENERAL
Previous program recall
Press
PR key on the RCU to move to the previous program you were watching
before.
Favorite List
If you want to create one of the three
Favorites List available, press the FAV key
on the RCU.
You can navigate to the next Favorites List
by pressing the FAV key again.
For more information on organising your
F a v o r i t e L i s t s r e f e r t o t h e "F a v o r i t e
Program" section on page 16.
Volume & Audio Control
1) Volume Control
To increase or decrease volume, use VOL+,
VOL- key on the RCU or VOL+, VOL- on the
front panel.
2) Mute
To mute the sound, press
button on the
RCU. To bring back the normal sound, press
this key once again.
3) Audio Control
L
Press the
R key repeatedly to select one of three possible Audio settings (Left,
Right and Stereo) .
The current audio selection will be displayed in the program information.
4) Language Selection
Press the AUDIO key on the RCU repeatedly to select audio-language. This is
dependent on the transmission of audio signal which supports Multi-language
options.
16
Pause the frame
Previous program recall Favorite List
Volume & Audio Control
PROGRAM MANAGER
MANAGER
PROGRAM
This receiver provides a number of practical options to manage digital television
programs.
Program Manager
Move the cursor to highlight the TV Program
sub menu from the Channel manager menu
and press OK.
The program list will be displayed on the left
side of the screen and a small Picture in
Graphic (PIG) will be displayed on the right.
Information about the highlighted channel is
displayed underneath the PIG screen.
When you navigate the cursor through the
channel list the PIG display will change
accordingly.
You can utilize the color keys on the RCU as below :
1. Delete mode(Red key)
2. Favorite mode(Green key)
3. Move mode(Yellow key)
4. Lock mode(Blue key)
In this mode press the MENU key on the
remote to envoke the following:
1. Rename Favorite group
2. Rename
3. Sort
Favorite Channel
When you select program manager, default
favorite list will be displayed on the screen
as Favorite 1.
Select your favorite channel and then press
OK key. Then
will be displayed at rear of
your selected channel.
To delete a channel from your Favorite List
highlight the channel and press OK.
Program Manager
17
Favorite Channel
PROGRAM MANAGER
MANAGER
PROGRAM
Favorite Channel
After you have completed your Favorites List press the EXIT key twice to save the
data. Then press the FAV key to ensure that your changes have been saved correctly.
How to make favorite group :
1)When you enter program manager, the
default favorite group will be displayed on
the screen as Favorite 1.
2)If you press favorite key (Green color key)
on the RCU, new favorite groups will be
created as Favorite 2 and Favorite 3.
How to edit the name of Favorite group :
1)In favorite mode, press MENU key on the
RCU then the Favorite sub menu will be
displayed on the screen.
2)Select "Rename Favorite group" .
3)Edit the name using the keypad.
Move Channel
In the TV program manager page, press
Move key (Yellow color key) on the RCU.
Select a channel by pressing OK key and
move the cursor to the location in which you
want to move the selected channel press
OK key. Then, you will find the selected
program is moved to the desired location
and channel number.
Check whether the channel number is
changed on the program list.
18
Favorite Channel
Move Channel
PROGRAM MANAGER
MANAGER
PROGRAM
Lock Channel
In the TV program manager page, press
Lock key (blue color key) on the RCU.
This Lock command allows you to lock the
channel. First select the program, which
you want to lock, press OK key and then
will be displayed at rear of your selected
channel name.
Note : To perform this function, you should
set up the Parental Lock in advance.
Rename Channel
In TV program manager Page, press MENU
key on the RCU, then select Rename on the
command menu.
This Rename command allows you to
rename the channel. First select the channel
to be renamed and press OK key, then, the
Keypad dialog box will be displayed. Edit
your desired name entering word or number.
To delete characters or numbers, select from
the keypad dialog.
19
Lock Channel
Rename Channel
PROGRAM MANAGER
MANAGER
PROGRAM
Delete Channel
In the Program manager, you can enter Delete mode, if you press Delete key (Red
color key) on the RCU. Then, if you press Delete key (Red color key) repeately, the
mode will change to Delete CH -> Delete All -> Delete PG.
This Delete command allows you to delete
the channel permanently. First select the
channels which you want to delete, the
selected channel number will be marked as
X. To cancel the selection, press OK again.
If you decide to delete, press EXIT key and
then the Message box will be displayed.
Press OK to delete.
Check whether the channel name is deleted on program list .
Warning : The deleted channel can not be recovered unless you search again.
Please be careful when you decide to delete channels.
Sort Channel
In TV program manager Page, press MENU
key on the RCU, and select Sort on the
command menu.
This Sort menu has a sub command that
allows you to sort the channels.
You can sort the channels by Favorite, Lock,
Scramble, Channel name. Place the cursor
on your desired line, and then press OK.
Check whether the channels are sorted properly on the program listt.
Note : Radio Program Manager has the same operation as TV program Manager.
20
Delete Channel
Sort Channel
EPG(Electronic Program
Program Guide)
Guide)
EPG(Electronic
The receiver provides EPG function for you
to access the TV Guide(or Radio Guide if
you are listening to radio programs) which
will show the titles and other information of
the current and next programs on different
channels. The information is only available
from the network to which the program you
are watching belongs.
Display the EPG.
You can see the program in the PIG screen,
program list on the left side and Program
schedule for selected program will be
displayed on the right side. The time will be
displayed relating to the program schedule.
Select one channel and placing the 6 mark
on the time of Program name which detail
information you want to know. Then you can
see blue button, if there is details
information of the program. And press
Detail(Blue color key) key on the RCU, then
detail information box will be displayed.
If you want to check the former or later information of the channel, please press +6:00
key (Yellow color key) or 6:00 key (Green color key) on the RCU.
Note : A No Information Yet message will be shown if the selected program does
not provide EPG data.
EPG
21
EPG(Electronic Program
Program Guide)
Guide)
EPG(Electronic
Special Channel EPG
During the normal viewing mode, press
INFO key twice to enter into the program
guide window of the current channel.
In this window, system has provided the
current week program guide of the selected
channel. Use VOL+, VOL- keys to select the
day from Sunday to Saturday.
The contents shown in "Duration & Title" box will vary with the selected day. Use
CH+, CH- keys to select the guides up or down, while left detail description will vary
with the selected guide.
22
EPG
TIMER
TIMER
The TIMER function allows you to program the timer in various ways.
To activate the Turn On Time and/or Turn Off Time , select YES and enter your time.
Time Adjust
Summer Time: If you are in summer time,
select ON.
Note : Time Adjust is default for the first time.
Time Reservation
Time Reservation allows you to program the
various timer function.
1) Timer Number: Select your desired timer
number.
2) Turn On Channel: If there are searched
programs, press OK key to pop up the
searched program list. Select desired
channel and press OK key to confirm.
If there is no searched program, this item
turns grey and can not be set.
3) Time Type: Through this item, you can set
the timer one time, daily, weekly and monthly.
4) Event Type: Select between Turn ON and Tune OFF. If select "Turn ON", the
event is that the receiver will turn on the just set Turn ON channel at the defined time.
If select "Turn OFF", the event is that the receiver will turn off or standby at the
defined time.
5) Enable: Select between ON and OFF. If select "ON", the event will take effect. The
default value is "ON".
6) The following time setting items, such as Month, Date and Time, are determined by
the selection in the above Time Type item.
Time Adjust Time Reservation
23
FRONT PANEL
PANEL DISPLAY
DISPLAY
FRONT
24
UP LOAD PROCEDURE
VCR MODE
DOWN LOAD
PROCEDURE
SYSTEM WAITING
ERROR IN DATA
TRANSMITTING
FLASH ROM ERROR
TV MODE
SYSTEM BOOTING
TIME
(STAND BY INDICATOR)
SOFTWARE VERSION
ERROR
FRONT PANEL DISPLAY
TROUBLE SHOOTING
SHOOTING
TROUBLE
Problem
Possible causes
What to do
The display on the front
panel does not light up.
Main cable is not connected.
Check that the main cable is plugged into
the power socket.
No sound or picture, but the
front panel shows red light.
The receiver is in standby mode.
Press the standby button.
No sound or picture.
No signal or weak signal.
Check the cable connections, antenna
and other equipment connected between
the antenna and the receiver.
Signal is too strong.
Connect a signal attenuator to the
antenna input.
Antenna noise factor too high.
Change to an antenna with lower noise
factor.
The antenna is faulty.
Change the antenna.
The system is connected by RF
leads.
Check the UHF channel fixed in your
system and tune the UHF channel
properly.
The system is connected by RF
leads and the output program of the
receiver interferes with an existing
terrestrial programs or Video signal.
Change the receiver output program to
a more suitable program, or connect the
system by SCART leads.
Battery exhausted.
Change the batteries.
RCU is incorrectly aimed.
Aim RCU at the receiver, or check that
nothing blocks the front panel.
Bad picture / blocking
error.
The picture is not
displayed on the screen,
when switching on.
There is interference on
your terrestrial program
or video signal.
The RCU is not working.
Note : If you have tried all of the actions suggested above, without solving the
problem, please contact your dealer or a customer service adviser.
25
TROUBLE SHOOTING