1
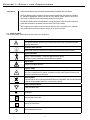
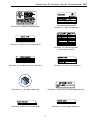
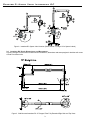
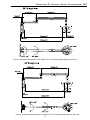
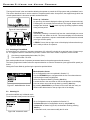
Table of Contents Chapter 1 Safety and Precautions .............................................................................................................7 1.1 General Safety Tips ...................................................................................................................7 1.2 Safety Symbols ..........................................................................................................................8 Chapter 2 Introduction ................................................................................................................................9 2.1 Intraskan DC X-Ray Equipment ...............................................................................................9 2.2 Indication for Use .......................................................................................................................9 2.3 This Manual ................................................................................................................................9 2.4 Included System Components ..................................................................................................10 Chapter 3 Know Your Intraskan DC ........................................................................................................ 11 3.1 Key Components Identification ................................................................................................. 11 3.2 System Labels ..........................................................................................................................12 3.3 Intraskan DC Reach Dimensions and Movements ............................................................ 14 3.4 Intraskan DC Wall mount Configurations ..................................................................................20 3.5 Keypad Console ........................................................................................................................24 3.5.1 Graphical LCD Display ..............................................................................................................24 3.5.2 Keypad ......................................................................................................................................24 Chapter 4 Operating Intraskan DC ............................................................................................................26 4.1 Before You Begin ......................................................................................................................26 4.2 Positioning the Patient ..............................................................................................................26 4.3 Achieving the Best Image Quality .............................................................................................27 4.4 Power Turn-On Procedure.........................................................................................................28 4.5 Intraskan DC Operating Procedure Summary........................................................................... 29 4.6 Exposure Settings and Tables ...................................................................................................29 4.6.1 Default Exposure Program Presets ..........................................................................................29 4.6.2 Default Exposure Values ...........................................................................................................29 4.7 Delivering an Exposure Procedure............................................................................................29 Chapter 5 Using the Keypad Console ......................................................................................................34 5.1 Selecting a Preset Mode ...........................................................................................................34 5.2 Selecting kV ..............................................................................................................................34 5.3 Configuring Defaults .................................................................................................................35 5.4 Console Events .........................................................................................................................36 Chapter 6 Maintenance ..............................................................................................................................37 6.1 Cleaning and Disinfecting .........................................................................................................37 6.2 Caring For Your Equipment .......................................................................................................37 6.3 Shipping, Long Term Storage and Tube Seasoning .................................................................. 38 6.4 Preventive Maintenance ...........................................................................................................38 6.5 Disposal of the Unit ...................................................................................................................38 Chapter 7 Troubleshooting and Error Codes ...........................................................................................40 Chapter 8 Measurement Techniques ........................................................................................................41 Annex A: Annex B: Annex C: Annex D: Technical Specifications ..................................................................................................44 Declaration of Conformity ...............................................................................................48 Guidance and Manufacturer’s Declaration .................................................................... 49 Contact Details .................................................................................................................52 3 List of Illustrations Figure 1 Intraskan DC Key Component Identification....................................................................... 11 Figure 2 Intraskan DC Label Location...............................................................................................14 Figure 3 Wall Mounted Intraskan DC 15" Support Tube Fully Extended Right Side and Top Views...................................................................................................14 Figure 4 Wall Mounted Intraskan DC 24" Support Tube Fully Extended Right Side and Top Views...................................................................................................15 Figure 5 Wall Mounted Intraskan DC 33" Support Tube Fully Extended Right Side and Top Views...................................................................................................15 Figure 6 Wall mounth Intraskan DC Ground Clearance & Horizontally Extended............................16 Figure 7 Wall mounth Intraskan DC Vertically Extended...................................................................16 Figure 8 Floor Mount Intraskan DC Fully Extended Dimensions......................................................17 Figure 9 Floor Mount Intraskan DC Sweep Angle.............................................................................17 Figure 10 Floor Mount Intraskan DC Extended Dimensions...............................................................18 Figure 11 Floor Mount Intraskan DC - Top View................................................................................18 Figure 12 Floor Mount Intraskan DC - Storage Dimensions..............................................................19 Figure 13 Intraskan DC Keypad Console and Wall Mounting Configurations.....................................20 Figure 14 Intraskan DC Keypad Console with LED display................................................................24 Figure 15 Doorbell switch....................................................................................................................24 Figure 16 Remote Keypad Console....................................................................................................24 Figure 17 Horizontal Angulation..........................................................................................................27 Figure 18 Paralleling Technique..........................................................................................................28 Figure 19 Home Screen......................................................................................................................30 Figure 20 Home Screen with S Highlighted........................................................................................30 Figure 21 mA parameter modified and accepted................................................................................30 Figure 22 X-Ray - Preparing...............................................................................................................31 Figure 23 X-Ray - Exposing................................................................................................................31 Figure 24 X-Ray - Results...................................................................................................................31 Figure 25 Start-up Screen...................................................................................................................34 Figure 26 Home Screen......................................................................................................................34 Figure 27 Mode Selection Screen..................................................................................................................................34 Figure 28 Automatic mode...........................................................................................................................................34 Figure 29 Manual mode......................................................................................................................35 Figure 30 Configuration Screen.................................................................................................................................35 Figure 31 Stand-by Screen.................................................................................................................36 Figure 32 Error Display.......................................................................................................................36 Figure 33 kV Feed-back circuit...........................................................................................................36 Figure 34 Test points...........................................................................................................................36 Figure 35 mA Feed-back circuit..........................................................................................................36 Figure 36 Exposure time measurements............................................................................................36 Figure 37 kV measurement using kVp sensor....................................................................................36 Figure A-1 X-Ray Tube Insert Rating Chart..........................................................................................42 Figure A-2 X-Ray Tube Insert Thermal Data........................................................................................42 Figure A-3 Heating and Cooling Curve.................................................................................................43 4 List of Tables Table A Table 1 Table 2 Table 3 Table 4 Table 5 Table 6 Table 7 Table 8 Table A1 Table A2 Table A3 Table A4 Table A5 Table C1 Table C2 Table C3 Key Description...................................................................................................................... Default Exposure Values for Short/Long Cone R1 (Film)...................................................... Default Exposure Values for Short/Long Cone R2................................................................. Default Exposure Values for Short Cone R3 ......................................................................... Default Exposure Values for Long Cone R3 ......................................................................... Attention / Warning Messages............................................................................................... Tube seasoning..................................................................................................................... Error Codes ........................................................................................................................... Troubleshooting Tips ............................................................................................................. Tube-Head Specifications ..................................................................................................... X-Ray Tube Insert Specifications .......................................................................................... Mechanical Dimensions and Weight ..................................................................................... Mains Power Requirements .................................................................................................. Environmental Conditions ..................................................................................................... Guidance and Manufacturer’s Declaration – Electromagnetic Emissions – For all EQUIPMENT and SYSTEMS ..................................... Guidance and Manufacturer’s Declaration – Electromagnetic Immunity – For all EQUIPMENT and SYSTEMS ....................................... Guidance and Manufacturer’s Declaration – Electromagnetic Immunity – for all EQUIPMENT and SYSTEMS that are not LIFE-SUPPORTING.................................. 5 25 32 32 33 33 36 38 39 40 41 41 43 44 44 46 47 48 This Page is left blank Intentionally. 6 Chapter 1: Safety and Precautions • Users must exercise every precaution to ensure personnel safety, and be familiar with the warnings and cautions presented throughout this manual and summarized below. • Make sure to read and understand the safety related instructions. • Make sure not to modify any component of the Intraskan DC system. Any modification may result in violation of compliance to the standards. Imageworks shall not be responsible for any modification causing violation of compliance, compromise on safety, performance deterioration or any other adverse effects. • Warranty of this equipment will be void in the event of any modification done to the equipment, misuse of the equipment and opening or servicing by unauthorized personnel. 1.1 General Safety Tips Radiation Safety This X-Ray equipment may be dangerous to the patient and the operator unless safe exposure parameters and operating instructions are observed. Follow proper X-Ray radiation safety rules. • Do not allow non-prescribed exposures. • The system should be used only by dentists or trained & qualified dental staff. • Always point the X-Ray tube-head at the area to be imaged. • Patients should be provided with lead apron and thyroid collar while being exposed. • The operator should wear proper X-Ray shielding protection. • The operator should be at a distance of at least 2 meters away from the tube-head • while carrying out the procedure. The operator should not be standing in the direction of the X-Ray. The operator • should always stand away from the X-Ray beam and behind the tube-head. Electrical Safety Always switch off the main power when cleaning and disinfecting the unit. The unit contains lethal high voltages. Do not attempt to open covers or repair the unit yourself or with the help of non-certified service personnel. Contact your authorized dealer. This is an ORDINARY MEDICAL EQUIPMENT without protection against ingress of liquids. Water or any other liquid should be prevented from leaking into the equipment, as they may cause short circuit and/or corrosion. Mechanical Safety Where complete safeguarding of the equipment is not possible, due care must be taken to ensure that no part of the user’s or patient’s body or clothing can be trapped or injured by any part of the equipment. In particular, make sure that fingers are not caught or pinched during scissor arm movement. Electromagnetic Interference This equipment complies with EMI regulations. Interference between the unit and other sensitive electronics can occur under extreme conditions. Do not use the X-Ray equipment in close conjunction with other sensitive devices or devices which create high electromagnetic disturbance. Physical Injury Exercise caution when operating the mechanical scissor arm. Since the arm mechanism allows free movement with minimal force, a swinging arm can inadvertently cause injuries. The swinging joints on the arm are potential pinch points. Use caution while operating the arm. Installation and Service Installation and service of Intraskan DC must only be done by an authorized service engineer. Consult the factory or dealer as necessary. Make sure that Intraskan DC is assembled and installed in compliance with all applicable laws and recommendations concerning electrical safety. Explosion Safety This equipment must not be used in the presence of flammable or potentially explosive disinfecting gases or vapors, which could ignite causing personal injury and/or damage to the equipment. If such disinfectants are used, the vapor must be allowed to disperse before using the equipment. This equipment is not suitable for use in presence of anaesthetic gases. 7 Chapter 1: Safety and Precautions Care must be taken for the movement and positioning of Intraskan DC Floor Mount. Floor Mount The Floor Mount system is meant for limited movement inside the clinic and is not suitable for Transport applications. Before moving the Floor Mount system around, the scissor arms must be folded to avoid unnecessary damage to the system. The wheel locks should be unlocked before moving the system. After the system is placed at the desired location, the wheel locks should be put in lock position. This equipment is meant for limited movement within a clinic or hospital room. Adequate care should be taken while moving on ramp or on an uneven surface. 1.2 Safety Symbols The following safety related symbols are found on the equipment. Caution Symbol This symbol indicates the user to be cautious and refer to the user manual for safe operating instructions. Protective Earth Ground Mains Earth Ground is required for continued protection against shock hazards. Type of Insulation Class 1, Type B Insulation. Protection against electric shock (UL60601-1:2003). Requires protective Earth Connection. High Voltage Dangerous voltages present. Caution: X-Ray X-Ray Source Assembly / Tube-head capable of generating X-Rays. This X-Ray unit may be dangerous to patient & operators unless safe exposure factors and operating instructions are observed. WEEE Symbol Indicates that the unit conforms with WEEE Directive 2002/96/EC and must be disposed of only at the appropriate facilities for recovery and recycling. X-Ray Emission Status X-Ray Emission /ON Focal Spot Mains Neutral Connection Mains Line Connection Follow Instructions for use 8 Chapter 2: Introduction 2.1. Intraskan DC X-Ray Equipment The Intraskan DC High Frequency Intraoral X-Ray has been engineered and manufactured to provide many years of reliable service. The system houses two microprocessors, one for control/supervisory functions and another to provide the user/machine interface. The technology incorporates feedback circuits to ensure accuracy and reproducibility of X-Ray output for dental diagnostic radiography. Intraskan DC will create radiographs of excellent quality, performing equally well using any image receptor. The High Frequency Intraoral X-Ray is hereafter referred to as Intraskan DC in this manual. Review and follow the guidelines included in this User's Manual to thoroughly become familiar with the operating and safety procedures. This will ensure that your Intraskan DC gives you the highest level of service. 2.2. Indication for Use The Imageworks High Frequency Intraoral X-Ray is to be used as a source of X-Rays in Dental radiography. Only trained professionals should use this device. Federal law prohibits the sale of this device to individuals other than trained professionals. Use of this device, other than as described in this manual, may result in injury. 2.3. This Manual This manual is not to be used as a replacement for training in radiography. The document contains basic operation instructions, identification of parts, system labels and safety guidelines for the Intraskan DC models listed below. Additionally, troubleshooting tips are provided should the equipment not perform as intended. The following are guidelines for using this manual. Alerts users to important instructions that require caution when operating the unit since they are related to safety. This symbol points to an important detail / tip in the operation of the unit. Read carefully to avoid any problems. This manual describes the user interface of the keypad Console using images as shown to the left. These images are indicative only and the values displayed may differ from the actual values unless specified otherwise. 9 Chapter 2: Introduction 2.4. Included System Components The Wall Mounted Intraskan DC system is available in three model configurations using different Straight Arm assembly. Top Level Variants Intraskan DC Intraoral X-Ray Floor Mount Wall Mounted Intraskan DC High Frequency Intraoral X-Ray with 15" Straight Arm Wall Mounted Intraskan DC High Frequency Intraoral X-Ray with 24" Straight Arm Wall Mounted Intraskan DC High Frequency Intraoral X-Ray with 33" Straight Arm Unpack each component and verify that items listed below are received as appropriate. If any item is missing or damaged, notify your authorized dealer. Description Intraskan DC High Frequency Intraoral X-Ray (one only) Part No. Wall Mounted 15" Straight Arm without remote switch 9992720300 Wall Mounted 24" Straight Arm without remote switch 9992720200 Wall Mounted 33" Straight Arm without remote switch 9992720000 Wall Mounted 15" Straight Arm with remote switch 9992720350 Wall Mounted 24" Straight Arm with remote switch 9992720250 Wall Mounted 33" Straight Arm with remote switch 9992720050 Floor Mount 9992720100 Contents Note: The Tube-head is shipped attached to the Scissor Arm Straight Arm Assembly for Wall Mount (one only) 15" Long SK-309-000422-0 24" Long SK-309-000423-0 33" Long SK-309-000424-0 Scissor Arm Assembly (includes cables) SK-309-000425-0 70kVp 8mA Tube-head Assembly SK-309-000426-0 Base Unit Assembly SK-309-000427-0 Exposure Switch with Cable SK-309-000428-0 Template for Wall Plate (Single Stud Mounting) Installations SK-207-001473-0 Intraskan DC Extension Cone SK-211-000317-0 16" Wall Plate with template (Optional) 9992720002 Remote Keypad Console with template (Optional) 9992720003 Doorbell Switch with template (Optional) 9992720001 10 Chapter 3: Know Your Intraskan DC 3.1 Key Component Identification As shown in Figure 1, Intraskan DC is comprised of the following components: 1. Base Unit (Both Wall mount and Floor Mount Units) The Base Unit provides mounting support for the straight arm and scissor arm with attached tube-head. It provides system power connection and application via the Mains Power Line Cord and the Mains Power ON/OFF Switch. Overall operational control for Intraskan DC is also provided via the Keypad Console. 2. Keypad Console (Both Wall mount and Floor Mount Units) The Keypad Console is the user/machine interface providing all functional operating controls of the Intraskan DC system. Consisting of a LCD display and keypad, the console keypad allows both automatic and manual selections of exposure parameters while the resultant operation status is shown via the LCD display. 3. Straight Arm (Wall mount Units) The Straight Arm provides the horizontal space away from the wall-mounted Base Unit. Available in 15, 24 and 33 - inch lengths to meet the reach requirements of the installation site. 4. Scissor Arm (Both Wall mount and Floor Mount Units) The Scissor Arm consists of a vertical and horizontal arm joined via a double joint. This design enables smooth linear and upward motion transitions while allowing the attached tube-head to remain balanced in all positions. 5. Mobile Support Platform (Floor Mount Units) The Mobile Support Platform provides a stable portable operating base for Intraskan DC Floor Mount 6. Tube-head with Beam Limiting Device (Both Wall mount and Floor Mount Units) Provides 55 kV – 70 kV voltage range (adjustable in 1 kV steps) and 4 mA – 8 mA current range (adjustable in 1 mA steps) to reduce exposure times and the amount of radiation absorbed by the patient. The tubehead is equipped with a beam limiting device with a 220mm source to skin distance and 60mm beam diameter at the output. The tube-head is connected to the arm by means of a rotating contact, allowing 540 degree horizontal rotation and 310 degree vertical rotation. Wall Mounted Intraskan DC Intraskan DC Floor Mount Figure 1. Intraskan DC Key Component Identification 11 Chapter 3: Know Your Intraskan DC 3.2 System Labels This section shows the required system labels that are affixed on the unit. Refer to Figure 2 for the location of each label by the corresponding item number below the label. Illustration 1: Straight Arm Label (#1) Illustration 2: FDA Label (#2) Illustration 3: Angular Tape (#15) Illustration 5: X-Ray Control Console Label (#4) Illustration 7. X-Rays Caution Label (#6) Illustration 4: Warning Label (#3) Illustration 8: Manufacturer Label (#7) Illustration 6: Danger Label (#5) Illustration 9: System Label (#8) 12 Chapter 3: Know Your Intraskan DC Illustration 10: 3rd Ed-UL Mark Label (#9) Illustration 11: Base Unit Label (#11) Illustration 12: Base Unit Sl. No. Label (#10) Illustration 13: Tube Housing label for focal sport 0.5 (#12) Illustration 14: Tube Housing Sl. No. Label (#13) Illustration 15: Scissor Arm Label (#14) Illustration 16: L-Arm Dome Label (#16) Illustration 17: Extension Cone Label (Optional) (#17) Illustration 18: Base Column Label (#18) Illustration 19: Casted Base Label (#19) 13 Chapter 3: Know Your Intraskan DC Figure 2. Intraskan DC System Label Location (Refer section 3.2, Page 12 for System Labels) 3.3 Intraskan DC Reach Dimensions and Movements Figures 3 through 12 show minimum and maximum clearances, dimensions and sweep angles for both the wall mounted and Floor Mount units. Figure 3. Wall Mounted Intraskan DC 15" Support Tube Fully Extended Right Side and Top Views 14 Chapter 3: Know Your Intraskan DC Figure 4. Wall Mounted Intraskan DC 24" Support Tube Fully Extended Right Side and Top Views Figure 5. Wall Mounted Intraskan DC 33" Support Tube Fully Extended Right Side and Top Views 15 Chapter 3: Know Your Intraskan DC Figure 6. Wall Mounted Intraskan DC Ground Clearance & Horizontally Extended Figure 7. Wall Mounted Intraskan DC Vertically Extended 16 Chapter 3: Know Your Intraskan DC Figure 8. Floor Mount Intraskan DC Fully Extended Dimensions Figure 9. Floor Mount Intraskan DC Sweep Angle 17 Chapter 3 Know Your Intraskan DC Figure 10. Floor Mount Intraskan DC Extended Dimensions Figure 11. Floor Mount Intraskan DC - Top view 18 Chapter 3 Know Your Intraskan DC View A. Right Side View View B. Front View Figure 12. Floor Mount Intraskan DC - Storage Dimensions 19 Chapter 3: Know Your Intraskan DC 3.4 Intraskan DC Wall mount Configurations Figure 13: Intraskan DC Keypad Console and Wall mounting Configurations Note: (For Configurations 2 - 7) 1. RJ45-8P8C 35' Cable: CAT-5 24AWG 4-Twisted Pair 1:1 Connection. Similar to BELDEN P/N 1624R 2. RJ11-6P4C 35' Cable: Center 4 Positions Populated 1:1 Connection. Similar to P/N A2521 #B 3. 3Wire, 35' Cable: Shielded or Un-shielded Cable AWG 20-28. P/N LAPP0028503 4. 2 Wire shielded or unshielded cable AWG 20-28 P/N LAPP0028502 Can use Internal Keypad Console and Internal Exposure Switch RJ45 (8P8C) with single door bell switch Can use both Keypad Consoles (internal and remote) with Internal Exposure Switch and single door bell switch. 20 Chapter 3 Know Your Intraskan DC RJ45 (8P8C) with DOUBLE DOORBELL SWITCH Can use both Keypad Consoles (internal and remote) with Internal Exposure Switch and double door bell switch 3 WIRE WITH SINGLE DOORBELL SWITCH Can use Internal Keypad Console with Internal Exposure Switch and single door bell switch 21 Chapter 3: Know Your Intraskan DC 3 WIRE WITH DOUBLE DOORBELL SWITCH Can use Internal Keypad Console with Internal Exposure Switch and double door bell switch RJ11 (6P4C) WITH SINGLE DOORBELL SWITCH Can use Internal Keypad Console with Internal Exposure Switch and single door bell switch 22 Chapter 3 Know Your Intraskan DC RJ11 (6P4C) WITH DOUBLE DOORBELL SWITCH Can use Internal Keypad Console with Internal Exposure Switch and double door bell switch Intraskan DC Floor Mount unit is powered directly through a Hospital-grade Plug. For Intraskan DC Floor Mount unit, exposure is given using Internal Exposure Switch as in Wall Mount Configuration 1. Intraskan DC Wall mounting Configurations 2 Stud Mounting Single Stud Mounting 23 Chapter 3: Know Your Intraskan DC 3.5 Keypad Console All functional operating control of Intraskan DC is provided by the keypad Console located on the base unit, consisting of a LCD display and keypad. Apart from this, Remote Keypad Console (External Console with Doorbell Switch) and Doorbell Switch also is available as an optional accessory. This additional console will be used for different configurations of console as illustrated in Section 3.4. It allows both automatic and manual selections of exposure parameters. The location of the panel controls and indicators are shown by Figure 14, while the function of each is described on the following page. 3.5.1 Graphical LCD Display The LCD display on the keypad Console offers a rich user interface, displaying the selected exposure parameters along with many other user-friendly features. The screen components of the home screen are shown by Figure 14. 3.5.2 Keypad In addition to the LCD display, the keypad Console contains 8 keys and exposure LED indicator. These keys are used to select the exposure parameters. Intraskan DC simplifies the process of selecting exposure parameters using preprogrammed settings for every combination of image receptor, adult/child and tooth anatomy as described by section 4.7, Selecting an Exposure set of this manual. Additionally, an audible signal (beep) sounds to confirm keypad button selection and when certain errors occur. This alert is also heard during any X-ray emission occurrence. Figure 14. Intraskan DC Keypad Console with LCD Display Figure 15. Door Bell switch Figure 16. Remote keypad Console 24 Chapter 3: Know Your Intraskan DC Table A. Key description Exposure Status LED Indicator No Color: Idle / Standby Green: Ready to Deliver X-Ray Orange: Exposure in Progress Red: Operation Fault UP / DOWN Keys Navigate up or down a list menu. Increment or decrement parameter value. Seconds/ milliampere Toggles between Second/mA Top LED: Second Bottom LED: mA Adult / Child Preset Key Toggles between Adult & Child Preset. Top LED : Adult Bottom LED: Child Canine/Incisor Canine/Incisor preset key LED ON - Enable LED OFF - Disable Bitewing Bitewing preset key LED ON - Enable LED OFF - Disable Pre-Molar Pre-Molar preset key LED ON - Enable LED OFF - Disable Molar Molar preset key LED ON - Enable LED OFF - Disable 25 Chapter 4: Operating Intraskan DC 4.1 Before You Begin Make sure that the operator has read and understood this manual regarding operation of the system. Users must exercise every precaution to ensure personal safety, and be familiar with the warnings presented throughout this manual and summarized in Chapter 1 (Page 7). Government regulators may require that only a licensed operator may use this equipment. Check with your dealer regarding regulations. Regulator Approvals Installation and use of radiation generating equipment is regulated by the government or its authorized agencies in most countries. Check with your local dealer regarding site approvals or usage requirements. The operator should be well acquainted with the radiation protection methods for both the operator and patient before using this equipment. Film Development Majority of repeat exposures and inferior X-Ray images are attributed to the storage, handling, use and developing of X-Ray films rather than the equipment itself. Make sure that the image capture films are stored and used per instructions. Let the patient know that he/she is going to be exposed to X-Ray. Avoid X-Rays or take necessary precautions when X-Raying pregnant patients. 4.2 Positioning the Patient Adults Children Position Indicating Device The patient shall be seated and made comfortable so that he/she does not move during the exposure. Make sure to place protective aprons and shields over the patient where necessary. For young patients, it may be required that a guardian be available near the patient. In such cases, instruct the guardian to be on the same side of the X-Ray port; away from the X-Ray beam and behind the tube-head. The guardian shall wear radiation protective clothing. The Position Indicating Device (PID), also referred to as the Cone, should be used to approximate the area of X-Ray exposure. The tube-head has an built-in focus to skin distance of 220mm ± 5mm. This is also referred as short cone distance,which is the safe distance at which the skin can be positioned. Optionally, the operator can use long cone. Long cone will increase the focus to skin position distance from 220mm ± 5mm to 300mm ± 5mm 26 Chapter 4: Operating Intraskan DC 4.3 Achieving the Best Image Quality Intraskan DC is engineered to provide the best platform for dental radiographic imaging. However, the best results are obtained when the equipment is used properly per the manufacturer's specifications. Practicing the following positioning techniques will help the user make the best out of the equipment’s output. Patient's Head Position Patient’s head should be as straight as possible. The patient should not move during the exposure. Cone Position Cone should be positioned in such a way that the central axis of the cone is perpendicular to the teeth and should be as close to the area being imaged as possible. In general, the vertical angulation of the cone should be at +45° for maxilla teeth and -10° for Mandible teeth. The horizontal angulation of the cone should also be maintained to achieve perpendicularity with respect to the teeth as shown by Figure 17 below. The angle of the cone is indicated on the scale located on the vertical joint of the tube-head. M – Molar P – Pre-Molar C – Canine Maxilla Mandible ML Sagittal Plane 0° C 60 - 75° 80 - 90° P M 70 - 80° 80 - 90° 70 - 80° 45° M P C 0° Sagittal Plane ML Figure 17. Horizontal Angulation 27 Chapter 4: Operating Intraskan DC The Image Receptor and holder are not part of supplied accessories. Image Receptor Holder Using an image receptor holder and head positioning device is recommended since it gives precise control over the area to be imaged. Placement of Image Receptor Inside the Patient's Mouth The image receptor should be placed parallel to the long axis of the teeth as shown by Figure 18. CR Central Ray: an imaginary beam of X-Rays in the exact center of the position indicating device. CR CR perpendicular to long axis of tooth & film Long axis of tooth Film parallel to long axis of tooth Figure 18. Paralleling Technique Refer to Chapter 5 for details on navigating the Keypad Console for setup and operation of Intraskan DC 4.4 Power Turn-On Procedure Turn on Intraskan DC by performing the following steps: 1. Place the Main Power Switch located on the bottom of the Base Unit to the ON ( I ) position. See Figure 1.(Page 11) Do not press any keypad keys during self test period. Any input will be considered an error at this time. 2. On power up, observe that the system self check function initiates and the console display's Start-up Screen as shown by Figure 25 (Page 34). 3. Immediately following a successful self test, the console displays a home screen as shown by Figure 19 (page 30). 28 Chapter 4: Operating Intraskan DC 4.5 Intraskan DC Operating Procedure Summary 1. Turn on Intraskan DC by performing the Power Turn-On Procedure provided in section 4.4. 2. Introduce the receptor into the patient’s mouth according to the chosen technique as shown by Figures 17 and 18 (bisecting or parallel - Page 27, 28). 3. Move the tube-head beam limiter near the patient and direct it exactly towards the tooth to be examined. 4. Arrange the tube-head with an angle suitable for the required exposure and positioning. 5. Move as far away as the Exposure switch cable allows, in a direction opposite to the X-ray beam emission while maintaining visual contact with the keypad Console and the patient. Refer to Tables 1 through 4 (Page 32 to 33) for estimated exposure values of minimum patient dose that can be modified per user requirement in Custom mode. 6. 4.6 Create an exposure by performing the Exposure Delivery Procedure provided in section 4.7. Make sure to refer to Chapter 5 for details on navigating the keypad Console for setup and operation of Intraskan DC as necessary. Exposure Settings and Tables 4.6.1 Default Exposure Program Presets By default the keypad console boots into R1, Short cone, Adult, Canine/Incisor Presets. The default or start-up exposure program is the exposure program set to operate Intraskan DC upon power turn-on of the unit. The default exposure program can be changed using the keypad Console by performing the Setting a Preset as the Start-up Mode procedure provided in section 5.2 4.6.2 Default Exposure Values Estimated exposure values (kV,mA & S) listed by Tables 1 through 4 (Page 32 to 33) are for minimum patient dose and can be modified per user requirement later. Refer to the tables below for Default Exposure Values for specific Intraskan DC application modes and options. Table 1. Default Exposure Values for Short/Long Cone R1 (Film) Table 2. Default Exposure Values for Short/Long Cone R2 (Custom) Table 3. Default Exposure Values for Short Cone R3 (Custom) Table 4. Default Exposure Values for Long Cone R3 (Custom) 4.7 Exposure Delivery Procedure The moment the keypad console displays the Home screen, the unit is ready to deliver an exposure. This section describes the preparations that can be done before delivering an exposure and what happens during the procedure 29 Chapter 4: Operating Intraskan DC Bring the console back to home screen as shown in figure 19. Here the user can modify the mA, and S value The defaults (kV, Cone, and Preset mode) can be set during Configuration time (See Section 5.3). Figure 19. Home Screen Selecting an Exposure Set proceed as follows An exposure set is a combination of patient type and tooth anatomy which the console uses as an index to retrieve the exposure parameters. For each mode, there are 8 presets available. To select one from these 8 exposure set, use the patient type key and the tooth anatomy keys. e.g. to take X-Ray image of canine of a child 1. Press the ADULT / CHILD key to select child (bottom LED), 2. Press the CANINE key until the LED is turned on. Modifcation of mA & S values proceed as follows Highlight the parameter By default parameter 'S' is Highlighted (S/mA) If values of mA is Highlighed and to be altered,change the values by using Up & Down keys. If values of S to be altered,select by pressing (S/mA) until the parameter is Highlighed and change using Up & Down keys. Figure 20. Home Screen with S highlighted Modify the parameter Press UP / DOWN keys the required number of times to change the highlighted parameter. The parameter being changed to indicate the operation. Accept the change The set parameters are accepted automatically. Figure 21. mA parameter modified and accepted 30 Chapter 4: Operating Intraskan DC Figure 22. X-Ray - Preparing Now press Exposure Switch or Remote Exposure Button on the Doorbell switch to initiate the exposure. Here the unit prepares itself to deliver the exposure. This stage might take a few seconds. Verify that an audible beep occurs and the X-Ray status indication LED illuminates green. Stop or abort an exposure by simply pressing any key other than the Exposure Switch. The Exposure Switch must be kept depressed throughout the entire exposure. Releasing the Exposure Switch before the end of the exposure terminates the emission with the message displaying "X-RAY ABORTED" . Verify that an audible beep occurs and the screen shows the radiation icon while the exposure is being delivered. The X-Ray status indication LED also illuminates orange. Figure 23. X-Ray - Exposing If you need to abort while delivering an exposure, simply release the Exposure Switch. Once the exposure is completed (or aborted while delivering), the X-Ray results screen displays the actual values of kV, mA and S sensed. The Exposure Switch may be released once the X-Ray Results screen displays. If the Exposure Switch is continued to be held, the next exposure will not be initiated. Results screen would show ABORTED rather than DONE when the exposure procedure was aborted. Figure 24. X-Ray - Results The results screen is shown for 5 seconds if not interrupted by any key press (except the Exposure Switch). The screen returns to Home screen and is ready for the next exposure. The tube-head needs to cool down before proceeding to the next exposure. This waiting period depends on the specific exposure duration selected for the last exposure. If an attempt is made to conduct an exposure during this waiting period, the console displays a message requesting the operator to wait for the remaining amount of time required by the tube-head to cool down. 31 Chapter 4: Operating Intraskan DC Table 1. Default Exposure Values for Short/Long Cone R1 (Film) Validated Exposure Values (kV, mA & S) mentioned below are for minimum patient dose and can be modified as per user requirement. Time (S) Anatomy Adult Child kV Slow mA Fast Cone Short Long Short Long Bitewing 70 8 0.09 0.27 0.07 0.22 Canine 70 8 0.14 0.44 0.11 0.35 Molar 70 8 0.16 0.49 0.13 0.39 Pre-Molar 70 8 0.14 0.44 0.11 0.35 Bitewing 70 8 0.07 0.19 0.05 0.13 Canine 70 8 0.1 0.31 0.08 0.22 Molar 70 8 0.12 0.34 0.09 0.24 Pre-Molar 70 8 0.1 0.31 0.08 0.22 Table 2. Default Exposure Values for Short/Long Cone R2 (Custom) Estimated Exposure Values (kV, mA & S) mentioned below are for minimum patient dose and can be modified as per user requirement. Time (S) Anatomy Adult Child kV mA Cone Short Long Bitewing 70 8 0.07 0.22 Canine 70 8 0.11 0.35 Molar 70 8 0.13 0.39 Pre-Molar 70 8 0.11 0.35 Bitewing 70 8 0.05 0.13 Canine 70 8 0.08 0.22 Molar 70 8 0.09 0.24 Pre-Molar 70 8 0.08 0.22 32 Chapter 4: Operating Intraskan DC Table 3. Default Exposure Values for Short Cone R3 (Custom) Estimated Exposure Values (kV, mA & S) mentioned below are for minimum patient dose and can be modified as per user requirement. Time (S) Anatomy kV mA Cone Short Adult Child Bitewing 70 8 0.15 Canine 70 8 0.13 Molar 70 8 0.15 Pre-Molar 70 8 0.13 Bitewing 70 8 0.11 Canine 70 8 0.11 Molar 70 8 0.12 Pre-Molar 70 8 0.11 Table 4. Default Exposure Values for Long Cone R3 (Custom) Estimated Exposure Values (kV, mA & S) mentioned below are for minimum patient dose and can be modified as per user requirement. Time (S) Anatomy kV mA Cone Long Adult Child Bitewing 70 6 0.33 Canine 70 8 0.25 Molar 70 8 0.25 Pre-Molar 70 8 0.25 Bitewing 70 8 0.18 Canine 70 8 0.18 Molar 70 8 0.18 Pre-Molar 70 8 0.18 33 Chapter 5: Using the Keypad Console The keypad Console is the user interface allowing the operator to control the X-Ray system and get feedback from it. This section describes how to use the console to complete specific tasks. As a preface, the stages through which the console passes before it becomes operable are described first. Power up - Indication On power up, the console displays the Start-up Screen as shown on the left. Following this, the console performs self test. The keypad, beeper and LCD backlight are checked. Do not press any keys (including exposure switch) during self test period. Figure 25: Start-up Screen Home Screen Immediately following a successful self test the console displays a screen similar to the one shown on the left. This screen displays current selection of exposure parameters, exposure mode details and accessories selected (cone type and film speed). Figure 26: Home Screen A 'READY' icon at the top right corner of the display indicates that the system is ready to deliver an exposure. 5.1 Selecting a Preset Mode A Preset Mode is a collection of exposure parameters (kV, mA and S) suitable for a particular type of image receptor. The keypad Console of Intraskan DC provides a total of three user modes of operation, which include: One factory programmed default modes, R1 (Film) Two custom modes : R2 & R3 Each mode provides 8 sets of exposure parameters based on the patient type and tooth anatomy. The factory programmed modes varies the exposure duration to suite the accessories (cone type and film speed) selected. Change the Preset Mode by performing the procedure provided below. Figure 27: Mode Selection Screen 5.2 Mode Selection Screen Go to Configuration menu as explained in Section 5.3. Use the UP/DOWN keys to navigate within the list. Press these buttons until the desired mode is highlighted Select Set Exposure Mode by pressing S/mA key. A screen similar to the one shown on the left side appears on the display. User can select one mode among these by pressing S/mA key. By pressing Adult/Child key to returns home screen with the newly selected mode abbreviated on the top right side of the display. Selecting kV kV can be modified only in Manual mode. To set Automatic mode proceed as follows. Go to Configuration menu as explained in Section 5.3. Set Select kV option in Configuration menu by using S/mA key. In Select kV as shown in figure 28, set Automatic mode by pressing S/mA key In Automatic mode, user cannot modify the kV value. Figure 28 : Automatic mode 34 Chapter 5: Using the Keypad Console Figure 29 : Manual mode To modify kV values in manual mode proceed as follows. Go to Configuration menu as explained in Section 5.3. Set Select kV option in Configuration menu by using S/mA key. In Select kV as shown in figure 28, set manual mode by using S/mA key. Use Up/Down key to select the required kV and set kV value, by pressing S/mA key as shown in figure 29. 5.3 Configuring Defaults To set the parameters like kV, modes and cone as required, proceed as follows. Press Up and Down key simultaneously to access configuration menu (during start up logo) The user can set/access the following options as shown in the Figure 30 Figure 30: Configuration Screen Use Up/Down key to navigate within Configuration menu. Press S/mA key to accept currently highlighted item. Press Adult/Child key to return previous menu. 35 Chapter 5: Using the Keypad Console 5.4 Console Events This section describes the special events displayed in the Keypad console. For Attention / Warning messages, refer Table 5 and for error codes refer Table 7. Inactive Absence of any activity for 10 minutes continuously on the console causes the system to go to a state of inactivity. This is marked by the screen indicating a message as shown on the left side along with the display backlight driven into a ‘breathing’ state. Press any key to bring the console back to the Home screen Figure 31. Stand-by Screen Figure 32. Error Display Error Any error occurring in the system is reported by the console as follows. • Displays an error message with an error code and additional messages (example code shown is CN009). • Display backlight turns RED • An exposure can not be delivered until the issue is resolved. Table 5: Attention / Warning Messages Attention/Warning Messages Screen Condition Tube cooling Please wait <n> seconds Home EXPOSURE key pressed after an exposure and before the cooling period expires. Home After fixing an internal error while exposing. ERROR <error code> Please restart Home After an internal error that requires user / service intervention. System error. <error code> Please retry 36 Chapter 6: Maintenance 6.1 Cleaning and Disinfecting Important: Turn OFF Intraskan DC Wall mount or turn OFF and unplug the Intraskan DC Floor Mount Unit. Wait for 2 minutes before proceeding with service. Active internal circuits remain connected to main voltage even when main power switch is turned off. • Use a soft damp cloth to clean the outside surfaces of the equipment • Do not spray or let the cleaning fluid enter the unit. • Periodic disinfecting of the unit is required for hygiene. Disinfect with a compatible low or intermediate level instrument grade disinfectant after cleaning. • Use a non-acetone based disinfectant liquid. Cleaning Methods. In order to ensure proper hygiene, especially when protective barriers are not used between each patient, clean and disinfect Intraskan DC by thoroughly performing the following procedures: Important: Make sure that the unit is completely dry before plugging in or turning power back on. Exterior Surfaces: Wipe the outside surfaces with a disposable towel moistened with water. Dry the external surface with disposable towels. Parts in Contact with the Patient’s Skin: To ensure proper cleaning of these parts, periodic disinfection with an approved EPA Non Corrosive Surface Disinfectant is recommended. Clean any remaining disinfectant residue from the system with a disposable towel moistened with water. 6.2 Caring For Your Equipment Do not allow the unit to impact with any hard surfaces. Switch off the unit when leaving for the day or when not used for a long time. Ensure that the unit is not subject to direct sunlight. Do not force the arm mechanisms or tube-head into a position it is not designed for. There are movement stoppers provided. Avoid swinging the arms or rotating the tube-head in a sudden jerky manner. Avoid free swinging of the arms or tube-head. Always guide the movements with your hand. Do not hang external loads or weights on the tube-head or Straight Arm. The arm and base units are designed for its own weight and may not hold an additional weight. Schedule and carry out periodic maintenance checks. 37 Chapter 6: Maintenance 6.3 Shipping, Long Term Storage and Tube seasoning Use the original packing box for shipping / transporting the unit. When not using for a long time, cover the unit with dust proof covers and ensure the unit is not exposed to harsh environments. In case of non-usage for long period (>6 months) X-Ray Tube Seasoning is recommended. Cover the X-Ray port with Lead .Using the Keypad Console set the parameters per Table below . Give Exposure and repeat exposure 5 times for each combination of kV, mA and S. After all the exposures are completed, the Unit is ready for use. Table 6: kV 6.4 mA Time(S) 55 4 0.04 55 6 0.04 55 8 0.04 55 4 0.50 55 6 0.50 55 8 0.50 60 4 0.04 60 6 0.04 60 8 0.04 60 4 0.50 60 6 0.50 60 8 0.50 70 4 0.04 70 6 0.04 70 8 0.04 70 4 0.50 70 6 0.50 70 8 0.50 Preventive Maintenance For continued service support, ensure you have entered into an annual maintenance program with your dealer. This will ensure that qualified engineers periodically keep a check on the equipment. It is advised that the unit be subject to a maintenance schedule once every year (after 1st year of usage) . All servicing should be done by qualified personnel. The interior of the Main Assembly is only accessible by removing hardware with tools and should only be opened and serviced by an authorized ImageWorks’ Dealer Service representative. Call your authorized Imageworks’ dealer for service. Since the interior of the unit contains high voltage components, failure to heed this warning may result in equipment damage, personal injury and/or death. 6.5 Disposal of the Unit Some parts of the equipment contain material and fluids which must be disposed of at appropriate recycling centers conforming to all local, state and federal regulations. In particular the equipment contains the following materials and or components: Tube-head: external packages in non-biodegradable plastic, dielectric oil, lead, copper, brass, aluminium, tungsten. Power supply and remote control: external packages in non biodegradable plastic, iron, populated printed circuit boards, copper. Tube-head extension: iron, aluminium, copper & silicon rubber. Important: The Manufacturer and the Distributor do not accept any responsibility for the disposal of equipment or parts discarded by the user and the related costs. 38 Chapter 7: Troubleshooting & Error codes Intraskan DC has been designed with safety features to protect the patient and operator in case of failure of an electrical component. The system automatically checks for errors and will report a malfunction by means of an error code on the Keypad Console display. These error codes are listed in the Table 7 below. The table lists the code and identifies the corresponding equipment operational fault. The corrective action for the error code is provided by Table 8, which also lists observed problems and their potential source. Table 7. Error Codes Error Code Error CN001 Communication error CN002 Console and tube-head are incompatible CN003 X-Ray preparation time-out CN004 Anode arc fault CN005 Cathode arc fault CN006 Over kV fault CN007 Over mA fault CN008 kV regulation fault CN009 Filament open fault CN010 Filament limit fault CN011 CAN fault KB001 Key jam error 39 Chapter 7: Troubleshooting & Error codes Table 8 provides troubleshooting tips to help the user recover from an equipment fault condition. It lists observed problems as well as recommends the corrective actions. Table 8. Troubleshooting Tips Observed Problem 1. Error state with display indicating CNXXX error code Recommended Action Switch off mains power. Wait for 2 minutes and then Switch on mains power. If the problem persists, contact authorized service personnel. 2. Error state with display indicating KB001 error code Ensure none of the console keys are active. Switch off mains power. Wait for 2 minutes. Switch on mains power and make sure that none of the console keys are pressed. If the problem persists, contact authorized service personnel. 3. The unit does not power on when mains is switched on. Check for loose contact at the wall socket end. Or the wall outlet is not receiving power. Check local electrical circuit for trips. Switch off mains power. Wait for 2 minutes. Switch on mains power. If the problem persists, contact authorized service personnel. 4. No X-Ray image even through the unit indicates normal exposure Verify film development and storage method. The films could be damaged or the chemicals could be contaminated. Contact authorized service personnel to validate exposure quality. 5. The mechanical Straight Arm is drifting and does not stay in set position. This can be due to normal wear and tear or using excess force on the arms. Get the spring tension adjusted by an authorized service engineer. Contact authorized service personnel. 6. Poor image quality Please make sure that following points are observed. • Correct exposure values are selected for the anatomy. • When using film as image receptor its storage and processing are as recommended by the manufacturer. • Positioning of tube-head and receptor is proper. • Patient is positioned stably during imaging. If the problem persists, contact authorized service personnel. 40 Chapter 8: Measurement Techniques 8.1 Direct measurement method Instruments used in kV, mA and timer accuracies measurement S/N 01 Description Make Model Remarks DSO, 200Mhz YOKOGAWA DLM2024 Any Equivalent equipment can be used (with valid calibration) Abbreviations used: kV= Tube potential , mA=Tube Current S= Exposure time DSO=Digital storage oscilloscope Tube Potential testing method: Tube potential measurement is direct method by using potential divider and DSO as shown below. Potential divider is inbuilt into the INTRASKAN DC and measurement point TP2 on the control board(refer figure 34) provided for hooking measuring probe. Figure 33. kV Feed back circuit Figure 34. Test Points Test procedure: (Production test will be performed with nominal input voltage 110Vac, 60Hz.) 1. Connect the probe of the DSO to TP2 (kV feedback) with respect to ground (mounting screw) of control board as shown in the Figure 34. 2. Switch ON the AC mains. Indication on Control board: The fault LED D10 on test control board should not glow red. The LED D7 on test control board should glow (green color) and the LED D6 (green color) on test control board should be blinking every 1 sec (approx). Indication on Console board: [Note:Do not press any key when console displays the message SELF TEST] All LED’s should glow during self test & LCD will display all 3 (Red, Green & Blue) colours in sequence. Console should boot into the home screen without displaying any error message. 3. Command exposures through operator console with kV,mA and S settings shown in table below. Press & hold exposure button till exposure done signal comes in the LCD display. Measure and Record the voltage on Oscilloscope . Tube potential signal measured from DSO are multiplied by Design factor 80/6. Each measured tube potential is verified with rejection limit. 41 Chapter 8: Measurement Techniques Tube kV 55, 60, 65, 70. 4mA, 0.04s 4mA, 4s Tube Current, Exposure Time 6mA, 0.04s 6mA, 4s 8mA, 0.04s 8mA, 4s 4. Rejection limit : Design: 3%. To be measured by a DSO having accuracy < ±2%. Difference between kV Command to kV actual shall be <±5% Tube Current testing method : Tube current measurement is direct method by using shunt/Sensing resistor, 750Ohms, +/- 1% and DSO as shown below. Current sensing circuit is inbuilt into the INTRA SKAN DC and measurement point TP5 provided for hooking measuring probe. Figure 35. mA Feed back circuit Test procedure: (Production test will be performed with nominal input voltage 110Vac, 60Hz). 1.Connect the probe of the DSO to TP5 (mA feedback) with respect to ground (mounting screw) of control board as shown in the Figure 34. 2.Switch ON the AC mains. Indication on Control board: The fault LED D10 on test control board should not glow red. The LED D7 on test control board should glow (green colour) and the LED D6 (green colour) on test control board should be blinking every 1 sec (approx). Indication on Console board: [Note: Do not press any key when console displays the message SELF TEST] All LED’s should glow during self test & LCD will display all 3 (Red, Green & Blue) colours in sequence. Console should boot into the home screen without displaying any error message. 3. Command exposures through operator console with kV,mA and S settings shown in table below. Press & hold exposure button till exposure done signal comes in the LCD display. Measure and Record the voltage on Oscilloscope. Tube current calculated from DSO signal multiplied by scaling factor of (8/6). Measured Tube current reading are verified with rejection unit. Tube current loading (mA) 4, 8 kV, S 55, 0.04 55, 4 70, 0.04 70, 4 4. Rejection limit: Design:3% To be measured by a DSO having accuracy < ±2%. Difference between mA Command to mA actual shall be <±5% Exposure time test method: Exposure time measurement is direct method by using DSO as shown below. Exposure time is measured across test points TP2 and Ground (Chassis). The exposure time is the time measured between start of kV waveform and start of falling edge from Final Value. 42 Chapter 8: Measurement Techniques Figure 36. Exposure Time measurement Test procedure: 1.Connect the probe of the DSO to TP2 (kV feedback) with respect to ground (mounting screw) of control board as shown in the Figure 34. 2. Switch ON the AC mains. Indication on Control board: The fault LED D10 on test control board should not glow red. The LED D7 on test control board should glow (green colour) and the LED D6 (green colour) on test control board should be blinking every 1 sec (approx). Indication on Console board: [Note: Do not press any key when console displays the message SELF TEST] All LED’s should glow during self test & LCD will display all 3 (Red, Green & Blue) colours in sequence. Console should boot into the home screen without displaying any error message. 3.Command exposures through operator console with Kv, mA and S settings shown in table below. Press & hold exposure button till exposure done signal comes in the LCD display. Measure and Record the time on Oscilloscope. % of Error is calculated between set time (command) and measured time as %Error=((Measured time- Set Time)/Set time) x 100% Example: % Error with 0.04S exposure time= ((0.0398 - 0.04) / 0.04) x 100 = -0.005 x 100 = -0.5% Each measured value is verified with rejection limit. kV 70 mA 8 S 0.04, 0.40, 2, 4 Rejection limit set +/- 10% of set exposure time 8.2 Indirect Measurement method: S/N 01 02 Description Accu-pro Kvp sensor Make Radcal Radcal Model 9096 40×12-W Remarks Any Equivalent equipment can be used (with valid calibration) Test Procedure: Place the kVp sensor at 25cm from the focal spot. Visually center the kVp probe in the x-ray beam path such that the beam will strike sensor in the probe as shown in the picture below Once aligned, deliver an exposure(protocol:70kV,8mA, 0.04S) and capture the wave form in the oscilloscope. Acceptance criteria: No over shoot in the kV waveform Figure 37. kV measurement using kVp sensor 43 Annex A: Technical Specifications Table A1. Tube-head Specifications Description Specification Generator Type High Frequency, Microprocessor Controlled, Constant Potential (DC) Control of High Voltage Closed Loop High Voltage Range 55kV – 70kV Settable (Step size 1kV) Accuracy of High Voltage < ± 5% High Voltage Ripple Frequency > 200kHz High Voltage Ripple Low Frequency Ripple (≤ 10kHz) shall be less than 2% p to p measured @ 70kV/8mA High Frequency Ripple (≤ 50kHz) shall be less than 10% p to p measured @ 70kV/8mA High Voltage Rise Time < 3ms Control of Tube Current Closed Loop Tube-head current range 4mA – 8mA Settable (Step size 1mA) Accuracy of current < ± 5% Maximum Exposure Time 4 seconds Minimum Exposure Time 0.04 s Exposure Timer Accuracy < ± 10% Maximum Electrical Input 560W at 70kV, 8mA Duty Cycle 1:15 Adaptive & auto limit based on temperature. Additional X-Ray filtration Minimum 2.0 mm Al equivalent @ 70 kV Total X-Ray filtration >2.5 mm AL/70 kV Minimum source to skin distance 220 mm ± 5mm (in-built) 300 mm ± 5mm with optional cone X-Ray field (at collimator tip) Circular, diameter ≤ 60 mm @ SSD of 220 mm and 300 mm Leakage radiation @ 1m < 0.88 mGy/h (100 mR/h) Leakage radiation technique 70 kV, 8 mA, 1 s Tube-head Outer Covers PC ABS Plastic with Glossy Finish PID / Cone Material/Extension Cone Silicone Rubber/Aluminium/ Markrolon - 2407 Table A2. X-Ray Tube Insert Specifications Parameters Specification Tube Insert Model OX/70-5 Focal Spot (IEC60336) 0.5 Anode material Tungsten Anode angle 19° Insert Inherent filtration 0.5 mm Al equivalent @ 70 kV Anode thermal capacity 7 kJ 44 Annex A: Technical Specifications Figure A-1. X-Ray Tube Insert Rating Chart Figure A-2. X-Ray Tube Insert Thermal Data 45 Annex A: Technical Specifications Figure A-3. Heating and Cooling Curve Table A3. Mechanical Dimensions and Weight Description Comment/Value Total Weight of System (including Packing Carton) Wall Mount 15" Straight Arm - 86 lbs 24" Straight Arm - 90 Ibs 33" Straight Arm - 95 lbs Floor Mount - 223 lbs Weight of Tube-head 11.023 lbs (Approx.) Straight Arm Material Aluminum Type of painting Glossy Mounting type Base Unit adapters for Wall mounted or Floor Mount Extended Arm Reach 15" Straight Arm - 61" 24" Straight Arm - 71" 33" Straight Arm - 80" Height of unit with Arms folded (Wall Mount) 49" ± 0.5 Height of unit with Arms folded (Floor Mount) 77" ± 0.5 Straight Arm Rotation about Base 160° ± 10° Scissor Arm Swing (Wall Mount) 205° ± 5° Scissor Arm Swing (Floor Mount) 90° ± 5° Tube-head swivel on horizontal plane 530° ± 10° Tube-head rotation about Vertical Plane 305° ± 5° 46 Annex A: Technical Specifications Table A4. Mains Power Requirements Description Requirement Line voltage range 110 VAC ± 10%, Range of line-voltage regulation for operation at maximum line current ± 1% maximum at 99 VAC, 60Hz Line frequency Nominal: 60 Hz Range: 54Hz to 66Hz Momentary Current (70kV, 8mA) 8A @ 110 VAC Momentary Power (70kV, 8mA) 0.88 kVA @ 110 VAC Standby Current 250mA maximum Line resistance ≤ 0.4 Ohm Current Peak 30 A for 2 ms at mains turn on Input Power Factor >0.9 during any exposure Electrical Classification Class I, Type B Electrical Connection Line, Neutral and Ground, 1-Phase (Ground is Mandatory) Table A5. Environmental Conditions Description Specification Operating conditions Temperature: 50°F to 104°F Humidity: 25% to 75% Altitude: 1500m Conditions for transport and storage Temperature: -22°F to 158°F Humidity: 95% non condensing Altitude: 3500m 47 Annex B: Declaration of Conformity B1: Name and Description of Product Medical device name: ImageWorks High Frequency Intraoral X-Ray Medical device model: ImageWorks High Frequency Intraoral X-Ray Device Variants: 303-000133-X: ImageWorks High Frequency Intraoral X-Ray with Focal Spot Size 0.5 in a Wall Mount configurations using a Straight Arm. Where X = 15", 24" and 33". 303-000133-8: ImageWorks High Frequency Intraoral X-Ray with Focal Spot Size 0.5 in a Floor Mount configuration. Medical device Type: Dental X-Ray System Medical device classification: IIb-Rule 10 -MDD, Class II FDA B2: Standards under which conformity is declared: ANSI/AAMI ES60601-1: 2005 + C1:09 + A2:10 IEC 60601-1: 2005 + CORR. 1: 2006 + CORR. 2:2007 CAN/CSA-C22.2 No. 60601-1: 2008 IEC 60601-1-2:2006 IEC 60601-1-3: 2008 IEC 60601-2-65 :2012 IEC 60601-2-28: 2010 21 CFR, Subchapter J, CMDR SOR/98-282 B3: Marking : The products described herein conform to the UL safety marking. B4: Declaration The products described herein, are designed, manufactured, inspected, tested, and released by Skanray Technologies Pvt Ltd, a contract manufacturer for ImageWorks,Inc., in accordance with FDA's 21CFR, Part 820, ISO 9001:2008 (UL File # A17728) and ISO 13485:2003 (UL File # A17728). B5: Authorized Representative ImageWorks 250 Clearbrook Road, Suite 240 Elmsford, NY 10523 USA 1-914.592.6100 - Voice 1-800.592.6666 - Toll Free 1-914.592.6148 - Fax Web: www.imageworkscorporation.com 48 Annex C: Guidance & Manufacturer's Declaration According to: EN 60601-1-2: 2001 + A1:2006 (Group 1, class A, for use in Hospitals) (Not LIFE-SUPPORTING) ImageWorks High Frequency Intraoral X-Ray is tested per applicable IEC standards, to be used under electromagnetic environment specified below. The customer or the user of ImageWorks High Frequency Intraoral X-Ray should assure that it is used in such an environment. Table C1. Guidance and Manufacturer’s Declaration – Electromagnetic Emissions For all EQUIPMENT and SYSTEMS Emissions Test RF emissions EN 55011 Group 1 RF emissions EN 55011 Class A Harmonic emissions EN 61000-3-2 Class A Voltage fluctuations/flicker EN 61000-3-3 Electromagnetic Environment - Guide Compliance ImageWorks High Frequency Intraoral X-Ray uses RF energy only for its internal function. Therefore, its RF emissions are very low and are not likely to cause any interference in nearby electronic equipment. ImageWorks High Frequency Intraoral X-Ray is suitable for use in all establishments, other than domestic establishments and those directly connected to the public lowvoltage power supply network supplying buildings used for domestic purposes. Complies 49 Annex C: Guidance & Manufacturer's Declaration Table C2. Guidance and Manufacturer’s Declaration – Electromagnetic Immunity For all EQUIPMENT and SYSTEMS Immunity Test Electrostatic discharge (ESD) EN 61000-4-2 EN 60601 Test Level ± (2, 4, 6) kV contact ± (2, 4, 8) kV air Compliance Level ± (2, 4, 6) kV contact ± (2, 4, 8) kV air Electrical fast tran± 2 kV for power sup- ± 2 kV for power supply sient/burst EN 61000- ply lines lines 4-4 ± 1 kV for Signal lines ± 1 kV for Signal lines Surge EN 61000-4-5 Voltage dips, short interruptions & voltage variations on power supply input lines EN 61000-4-11 Power frequency (50/60 Hz) magnetic field EN 61000-4-8 ± 1 kV Differential mode ± 2 kV Common mode ± 1 kV Differential mode ± 2 kV Common mode < 5 % UT (> 95 % dip in UT) for 0,5 cycle < 5 % UT (> 95 % dip in UT) for 0,5 cycle 40 % UT (60 % dip in UT) for 5 cycles 40 % UT (60 % dip in UT) for 5 cycles 70 % UT (30 % dip in UT) for 25 cycles 70 % UT (30 % dip in UT) for 25 cycles < 5 % UT (> 95 % dip in UT) for 5 sec < 5 % UT (> 95 % dip in UT) for 5 sec 3 A/m Electromagnetic Environment - Guidance Floors should be wood, concrete or ceramic tile. If the floor is covered with synthetic material, the relative humidity should be at least 30 %. Mains power quality should be that of a typical commercial or hospital environment. Mains power quality should be that of a typical commercial or hospital environment. Mains power quality should be that of a typical commercial or hospital environment. If the user of the Imageworks High Frequency Intraoral X-Ray requires continued operation during power mains interruptions, it is recommended that this High Frequency Intraoral X-Ray be powered from an uninterruptible power supply or a battery. Power frequency magnetic fields should be at levels characteristic of a typical location in a typical commercial or hospital environment. 3 A/m 50 Annex C: Guidance & Manufacturer's Declaration Table C3. Guidance and Manufacturer’s Declaration - Electromagnetic Immunity for all EQUIPMENT and SYSTEMS that are not LIFE-SUPPORTING Immunity Test Conducted RF EN 61000-4-6 EN 60601 Test Level 3 Vrms 50 kHz to 80 MHz Compliance Level 3 Vrms 150 kHz to 80 MHz Electromagnetic Environment – Guidance Portable/mobile RF communications equipment should be used no closer to any part of the Imageworks High Frequency Intraoral X-Ray, including cables, than the recommended separation distance calculated from the equation applicable to the frequency of the transmitter. Recommended separation distance d=1,2 √P d=1,2 √P 80 MHz to 800 MHz d=2,3 √P 800 MHz to 2,5 GHz Where P is the maximum output power rating of the transmitter in watts (W) according to the transmitter manufacturer and d is the recommended separation distance in meters (m). Radiated RF EN 61000-4-3 3 V/m 80 MHz to 2,5 GHz 3 V/m 80 MHz to 2,5 GHz Field strengths from fixed RF transmitters, as determined by an electromagnetic site survey,a should be less than the compliance level in each frequency range. Interference may occur in the vicinity of equipment marked with the following symbol: At 80 MHz and 800 MHz, the higher frequency range applies. These guidelines may not apply in all situations. Electromagnetic propagation is affected by absorption and reflection from structures, objects and people. a Field strengths from fixed transmitters, such as base stations for radio (cellular/cordless) telephones and land mobile radios, amateur radio, AM and FM radio broadcast and TV broadcast cannot be predicted theoretically with accuracy. To assess the electromagnetic environment due to fixed RF transmitters, an electromagnetic site survey should be considered. If the measured field strength in the location in which Intraskan DC is used exceeds the applicable RF compliance level above, the Imageworks High Frequency Intraoral X-Ray should be observed to verify normal operation. If abnormal performance is observed, additional measures may be necessary, such as reorienting or relocating the Imageworks High Frequency Intraoral X-Ray. b Over the frequency range 150 kHz to 80 MHz, field strengths should be less than 3 V/m. 51 Annex D: Contact Details Corporate Head Quarters/ Factory and Technical Support ImageWorks 250 Clearbrook Road, Suite 240 Elmsford, NY 10523 USA 1-914.592.6100 - Voice 1-800.592.6666 - Toll Free 1-914.592.6148 - Fax Web: www.imageworkscorporation.com 52 © ImageWorks • Copyright 2013 • P/N 515-001597-0 • Rev.B - Sept 2013