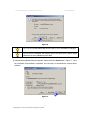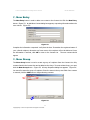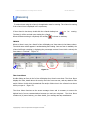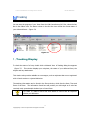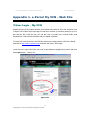
1
Digital Data Delivery Service
e-Parcel Client Software
Installation & Configuration
Users Manual
e-Parcel VCN CommCenter 6.0
June, 2014
e-Parcel Corporation
e-Parcel Installation & Configuration Manual
EP-PM-MN-0265
Contacts Us
e-Parcel Web Site
I will provide latest information on the e-Parcel web site with the content of our service, news
support upgrade information, etc. Moreover, 'e-Parcel VCN login page' that can be used only
for our customers can be accessed from our web site. At the download of your digital
certificate and the e-Parcel client software and the edit user's profile etc. Please register to
"Favorite" of a browser used or "Bookmark", and use it.
URL:
:http://www.e-parcel.co.jp/
e-Parcel Customer Support
If you have any technical question, please contact our e-Parcel customer support by E-mail.
Japanese and English will be acceptable. Also we provide the inquiry form of 'Inquiry' page
on our Web site. Please figure out the inquiry form and submit.
※Please note: When you inquire, inform us of your company name, name and user ID.
Though the inquiry on E-mail and the Web site is acceptable for 24 hours, we are afraid
that our response might be the next business day if receiving your inquiry in out of our
business hours. Moreover, we are afraid of a delay answering depend on the support
receipt situation.
e-Parcel Customer Support
E-mail:
:[email protected]
Business hours:
)
:9:
:00am~
~17:
:00pm(
(Monday - Friday)
1
Copyright© e-Parcel Corporation All rights reserved.
e-Parcel Installation & Configuration Manual
EP-PM-MN-0265
Introduction
As companies embrace the Internet to reduce costs, improve communications and generate
new revenue, they expose core digital assets and intellectual property to an increasingly
unsecured channel.
Breaches in security and control of these assets can cost a company
millions of dollars, and potentially damage its franchise and brand.
Businesses rely on electronic communications to deliver sensitive data quickly, despite
numerous security issues inherent in electronic transmissions.
Items sent to business
partners become cached during their journey across the Internet, leaving copies at e-mail
servers as it travels. Security limitations in standard e-mail, FTP and Web-messaging solutions
can also put confidential information at risk.
The e-Parcel provides outsourced services for secure and controlled Internet communications,
enabling clients to protect, control and manage digital assets more effectively than any other
solution available. Security components and processes, digital rights management, and
network infrastructure have been integrated into a comprehensive set of services that can be
deployed quickly and easily into common applications.
With e-Parcel service, companies now have a way to establish global communications
networks using software instead of traditional hardware-based alternatives. The e-Parcel’s
patent-protected technology allows any-size file to be delivered over any network, across any
platform, creating intra- and extra-enterprise communications and data delivery channels.
The e-Parcel provides an advanced security process that layers strong encryption with
automatic authentication, symmetric key management, certificate authority and digital rights
management. It integrates seamlessly with your existing e-mail system to securely deliver any
size or type of mission-critical file.
2
Copyright© e-Parcel Corporation All rights reserved.
e-Parcel Installation & Configuration Manual
EP-PM-MN-0265
Overview
The e-Parcel Installation and Usage Guide will introduce and assist you with each operation of
the e-Parcel product. Additionally we have provided alerts and tips throughout this document
to aid in assuring successful installation and a positive user experience.
You will find using e-Parcel is no different than your existing e-mail application. Simply create
your message, add attachments, select a recipient from your existing address book or create a
new e-Parcel Contact List and click the Send button to securely deliver messages and
attachments from desktop-to-desktop.
The e-Parcel combines many powerful features with the ease of standard email.
Below, we
have highlighted some of e-Parcel’s exciting features and capabilities.
Provide all-in-one solutions that is satisfied with 『 all-round security
requirements』
』for business use.
・Encryption
The advanced encryption technology for business use of AES256 bits (AES:
Advanced Encryption Standard), rest assured your message and data are delivering safely.
・Authentication
The pretender is prevented strongly using the automatic operation
of mutual recognition for the user by the digital certificate based on X.509.
・Integrity
The completeness of data is delivered securely and certainly according to
the e-Parcel original protocol using the inspection function of the data damage and the
falsification by SHA-1 algorithms (Secure Hush Algorithm-1), and using automatic restart
function (intermission delivery and auto resume function) when the internet line is
intercepted and then recovered.
・Audit
It can be proven the transaction was generated by logging database with the
time stamp of all the transactions.
Enabling large file size delivery Large data can be delivered at once according to
the streaming communication that doesn't put the load even on the streaming
communication terminal and the server in Intranet and doesn't accumulate data in the
route on the way.
Tracking
e-Parcel provides the ability track your sent messages and content beyond
delivery. The e-Parcel lets you have visibility into when your transmission was received,
opened, moved, shredded, updated, or revoked.
Covering globally
In 236 countries including even the region where the line
circumstances are unstable, the secure large data delivery service by using the Internet
can be provided.
3
Copyright© e-Parcel Corporation All rights reserved.
e-Parcel Installation & Configuration Manual
EP-PM-MN-0265
Trademark Acknowledgments
e-Parcel is a trademark of e-Parcel Corporation.
e-Parcel Digital Delivery Service is a trademark of e-Parcel Corporation.
Windows is a trademark of Microsoft Corporation.
Microsoft Word is a trademark of the Microsoft Corporation.
Microsoft PowerPoint is a trademark of the Microsoft Corporation.
Microsoft Excel is a trademark of the Microsoft Corporation.
Adobe Acrobat is a trademark of Adobe Systems.
Other products are trademarks of their respective trademark holders.
4
Copyright© e-Parcel Corporation All rights reserved.
e-Parcel Installation & Configuration Manual
EP-PM-MN-0265
Table of Contents
CONTACTS US .............................................................
............................................................. 1
INTRODUCTION................................
...........................................................
........................................................... 2
OVERVIEW................................
................................................................
................................................................ 3
TRADEMARK ACKNOWLEDGMENTS ........................................
........................................ 4
TABLE OF CONTENTS ......................................................
...................................................... 5
ABOUT VCN COMMCENTER GUI ............................................
............................................ 9
SYSTEM REQUIREMENTS .................................................
................................................. 10
PREPARATIONS FOR THE E-PARCEL SOFTWARE ........................... 11
STEP1.
.REGISTRATION ................................................................
................................................................................................
..................................................................
.................................. 12
STEP2.
.OBTAINING A CERTIFICATE................................................................
..................................................................................
.................................................. 12
STEP3.
.DOWNLOADING THE E-PARCEL SOFTWARE .............................................................
............................................................. 18
STEP4.
.INSTALLING THE E-PARCEL SOFTWARE ................................................................
..................................................................
.................................. 21
STEP5.
.INSTALLING A DIGITAL CERTIFICATE ................................................................
....................................................................
.................................... 23
CONFIGURING VCN COMMCENTER................................
........................................
........................................ 29
1.U
1. SER INFORMATION ................................................................
................................................................................................
..................................................................
.................................. 30
2.C
2. ERTIFICATE ................................................................
................................................................................................
.............................................................................
............................................. 33
3.N
3. ETWORK ................................................................
................................................................................................
.................................................................................
................................................. 34
4.G
4. ENERAL ................................................................
................................................................................................
..................................................................................
.................................................. 38
5.O
5. PTION ................................................................
................................................................................................
....................................................................................
.................................................... 40
6.C
6. USTOMIZE................................................................
................................................................................................
...............................................................................
............................................... 45
VCN COMMCENTER VIEW .................................................
................................................. 46
1.M
1. ENU ................................................................
................................................................................................
......................................................................................
...................................................... 47
1-1. e-Parcel................................
................................................................
................................................................
.............................................
............. 47
................................
................................
................................
1-2.Tools................................
................................................................
................................................................
...................................................
................................
................................
................................
................... 48
1-3.Components................................
................................................................
................................................................
.......................................
................................
................................
................................
....... 49
1-4.View ................................
................................................................
................................................................
...................................................
................................
................................
................... 50
1-5.Help ................................
................................................................
................................................................
....................................................
................................
................................
.................... 50
2.T
2. OOL BAR ................................................................
................................................................................................
.................................................................................
................................................. 53
5
Copyright© e-Parcel Corporation All rights reserved.
e-Parcel Installation & Configuration Manual
EP-PM-MN-0265
2-1.Home ................................
................................................................
................................................................
..................................................
................................
................................
.................. 53
2-2.New ................................
................................................................
................................................................
....................................................
................................
................................
.................... 53
2-3.Contacts ................................
................................................................
................................................................
.............................................
................................
................................
............. 53
2-4.Account ................................
................................................................
................................................................
..............................................
................................
................................
.............. 53
2-5.Cancel ................................
................................................................
................................................................
................................................
................................
................................
................ 54
2-6.Delete................................
................................................................
................................................................
.................................................
................................
................................
................................
................. 54
2-7.Move................................
................................................................
................................................................
...................................................
................................
................................
................................
................... 55
2-8.Check Now ................................
................................................................
................................................................
.........................................
................................
................................
......... 55
3.F
3. OLDERS DISPLAY ................................................................
................................................................................................
......................................................................
...................................... 56
4.C
4. ONTACTS LIST DISPLAY ................................................................
............................................................................................
............................................................ 57
E-PARCEL CONTACTS LIST................................
................................................
................................................ 58
1.T
1. O MANAGE CONTACTS LIST................................................................
........................................................................................
........................................................ 58
2.N
2. EW ENTRY ................................................................
................................................................................................
..............................................................................
.............................................. 59
3.N
3. EW GROUP ................................................................
................................................................................................
.............................................................................
............................................. 59
4.P
4. ROPERTIES ................................................................
................................................................................................
.............................................................................
............................................. 61
4-1.Individual Property ................................
................................................................
...........................................................
................................
........................... 61
4-2.Group Property ................................
................................................................
................................................................
..................................
................................
................................
.. 61
5.D
5. ELETE................................................................
................................................................................................
.....................................................................................
..................................................... 62
6.S
6. ELECT ................................................................
................................................................................................
.....................................................................................
..................................................... 62
7.C
7. LOSE ................................................................
................................................................................................
......................................................................................
...................................................... 62
SENDING ................................................................
................................................................ 63
1.N
1. EW ITEMS CREATION ................................................................
...............................................................................................
............................................................... 63
1-1.Enter the recipients................................
................................................................
...........................................................
................................
................................
........................... 64
1-2.Attach File(s) ................................
................................................................
................................................................
.....................................
................................
................................
..... 65
1-3.Attach Folder(s) ................................
................................................................
................................................................
................................
................................ 67
1-4. Removing Attachments ................................................................
................................................................
...................................................
................... 69
1-5.Cancel Item ................................
................................................................
................................................................
.......................................
................................
................................
....... 69
RECEIVING ..............................................................
.............................................................. 70
1.R
1. ECEIVING ITEM ................................................................
................................................................................................
.......................................................................
....................................... 71
1-1.MOVE................................
................................................................
................................................................
..................................................
................................
................................
................................
.................. 71
1-2.Reply ................................
................................................................
................................................................
..................................................
................................
................................
.................. 72
1-3.Reply All ................................
................................................................
................................................................
.............................................
................................
................................
............. 72
1-4.Forward................................
................................................................
................................................................
..............................................
................................
................................
................................
.............. 72
1-5.Reject ................................
................................................................
................................................................
.................................................
................................
................................
................. 73
6
Copyright© e-Parcel Corporation All rights reserved.
e-Parcel Installation & Configuration Manual
EP-PM-MN-0265
1-6.Print ................................
................................................................
................................................................
...................................................
................................
................................
................... 73
TRACKING ...............................................................
............................................................... 74
1.T
1. RACKING DISPLAY ................................................................
................................................................................................
...................................................................
................................... 74
2.T
2. RACKING FUNCTION BUTTONS ................................................................
...................................................................................
................................................... 75
2-1.Cancel Delivery................................
................................................................
................................................................
..................................
................................
................................
................................
.. 76
2-2.Refresh Tracking ................................
................................................................
...............................................................
................................
............................... 76
2-3.Print ................................
................................................................
................................................................
...................................................
................................
................................
................... 76
2-4.Close................................
................................................................
................................................................
...................................................
................................
................................
................................
................... 76
RECEIVE AUTOMATION COMPONENT .....................................
..................................... 77
1.R
1. ECEIVE AUTOMATION DISPLAY ................................................................
..................................................................................
.................................................. 77
2.R
2. ECEIVE AUTOMATION TOOL BAR AND MENU................................................................
................................................................ 78
2-1.Receive Automation Tool Bar ................................
................................................................
...........................................
................................
........... 78
2-2. Receive Automation Menu................................
................................................................
...............................................
................................
................................
............... 79
3.C
3. REATING RECEIVE AUTOMATION CONDITIONS ............................................................
............................................................ 80
3-1.Conditions................................
................................................................
................................................................
..........................................
................................
................................
................................
.......... 81
3-2.Data Location ................................
................................................................
................................................................
....................................
................................
................................
.... 87
3-3. Execute Files................................
................................................................
................................................................
.....................................
................................
................................
................................
..... 95
3-4. E-mail Forwarding................................
................................................................
............................................................
................................
................................
............................ 99
3-5.Error Notification ................................
................................................................
............................................................
................................
............................ 101
3-6. E-mail Notification ................................
................................................................
.........................................................
................................
......................... 103
4.E
4. XPORTING CONDITIONS ................................................................
.........................................................................................
......................................................... 107
4-1. Export Single or Multiple Conditions ................................
............................................................
............................ 107
4-2.Export All Conditions ................................
................................................................
......................................................
................................
...................... 109
5.I
5. MPORTING CONDITIONS ................................................................
.........................................................................................
......................................................... 111
6. E-MAIL SETTINGS ................................................................
................................................................................................
..................................................................
.................................. 113
6-1. SMTP mail server Settings................................
................................................................
.............................................
............. 113
................................
................................
6-2. Edit SMTP mail server ................................
................................................................
....................................................
................................
.................... 116
6-3. Remove SMTP mail server ................................
................................................................
.............................................
................................
............. 117
6-4.Remove all SMTP mail server ................................
................................................................
.........................................
................................
......... 117
HOT FOLDERS COMPONENT .............................................
............................................. 118
1.H
1. OT FOLDERS DISPLAY ................................................................
............................................................................................
............................................................ 118
2.H
2. OT FOLDERS TOOL BAR AND MENU ................................................................
..........................................................................
.......................................... 119
2-1.Hot Folders Tool Bar ................................
................................................................
.......................................................
................................
....................... 119
2-2. Hot Folders Menu ................................
................................................................
...........................................................
................................
........................... 120
7
Copyright© e-Parcel Corporation All rights reserved.
e-Parcel Installation & Configuration Manual
EP-PM-MN-0265
3.C
3. REATING HOT FOLDERS CONDITION ................................................................
........................................................................
........................................ 120
3-1. Hot Folder identity ................................
................................................................
.........................................................
................................
......................... 121
3-2.Recipients ................................
................................................................
................................................................
........................................
................................
................................
........ 122
3-3.Folders ................................
................................................................
................................................................
.............................................
................................
................................
............. 122
3-4.Subject ................................
................................................................
................................................................
.............................................
................................
................................
............. 124
3-5.Message ................................
................................................................
................................................................
...........................................
................................
................................
........... 124
3-6. Activation................................
................................................................
................................................................
........................................
................................
................................
................................
........ 124
3-7. File Management ................................
................................................................
............................................................
................................
............................ 124
APPENDIX 1. E-PARCEL MY VCN - WEB SITE..............................
.............................. 126
○USER LOGIN – MY VCN ................................................................
..............................................................................................
.............................................................. 126
○MY VCN – VIEW MY PROFILE ................................................................
......................................................................................
...................................................... 127
○MY VCN – EDIT MY PROFILE ................................................................
.......................................................................................
....................................................... 128
○MY VCN - IN BOX ................................................................
................................................................................................
......................................................................
...................................... 130
○VIEW PARCEL COVERSHEET ................................................................
..........................................................................................
.......................................................... 131
○MY VCN - OUT BOX ................................................................
................................................................................................
....................................................................
.................................... 132
○TRACK ................................................................
................................................................................................
.......................................................................................
....................................................... 133
○ITEM TRACKING ................................................................
................................................................................................
..........................................................................
.......................................... 135
○MY VCN – E-PARCEL SOFTWARE ................................................................
..................................................................................
.................................................. 136
APPENDIX 2. FOR FORGETTING "PASSWORD"............................
............................ 137
○FOR FORGETTING E-PARCEL PASSWORD ................................................................
........................................................................
........................................ 137
APPENDIX 3. E-PARCEL SUPPORT INFORMATION ........................ 139
○WEB SITE - E-PARCEL SUPPORT INFORMATION PAGE ......................................................
...................................................... 139
APPENDIX 4. COMMODITIZE DATABASE .................................
................................. 140
○FOR COMMODITIZE THE E-PARCEL USER CERTIFICATE AND THE SENDING & RECEIVING HISTORIES
................................................................
................................................................................................
................................................................................................
....................................................................
.................................... 140
DOCUMENT INFORMATION ...........................................
........................................... 146
8
Copyright© e-Parcel Corporation All rights reserved.
e-Parcel Installation & Configuration Manual
EP-PM-MN-0265
About VCN CommCenter GUI
This guide will help navigate your way through the e-Parcel and available components.
Several references are made to describe the e-parcel features and options. The VCN
CommCenter GUI is displayed.
The term GUI – Graphical User Interface will be used often in this manual to describe the
main e-Parcel application view. Other references are made in respect to the VCN
CommCenter GUI, including:
Menu Bar
Tool Bar
Title Bar
Folders display (P53)
e-Parcel Contact List display (P60)
Main display
Figure 1
9
Copyright© e-Parcel Corporation All rights reserved.
e-Parcel Installation & Configuration Manual
EP-PM-MN-0265
System Requirements
Microsoft Windows 98, ME, NT 4.0 (SP 3 or better), 2000, 2003, XP, Vista, 2008, 7, 8
32bit for Japanese or English
* Windows 8 must be required e-Parcel VCN CommCenter Version 6.0.6022 or better. (Released on
12.01.2012)
* Windows 2008/7 must be required e-Parcel VCN CommCenter Version 6.0.6021 or better.
(Released on 10.01.2009)
* Windows Vista must be required e-Parcel VCN CommCenter Version 6.0.6012 or better. (Released
on 02.05.2007)
*Additionally, Windows installer must be required for Microsoft Windows 98, 98SE, ME, NT4.0(SP3 or
better)
Internet Connection
Web Browser………Internet Explorer4.01 SP1 or better must be required
To access e-Parcel VCN login web site must require to encrypt at over 128bits
16 MB RAM for the client software
15 MB Disk Space for the installation
(plus additional space for attachments and delivered Items.)
※We recommend the Internet Explorer near the latest version, and the memory and the disk
space as much as possible to use it comfortably.
10
Copyright© e-Parcel Corporation All rights reserved.
e-Parcel Installation & Configuration Manual
EP-PM-MN-0265
Preparations for the e-Parcel software
Before using the e-Parcel service, you must download and install your digital certificate and
the e-Parcel software. Please take the STEP1 to STEp5 the following:
《The flow chart of the e-Parcel preparations》
STEP1.Registration(P12)
e-Parcel
representative
Apply your registration form ⇒ Registration by the
e-Parcel
representative
⇒
Notify
registration
completed by e-mail (with instruction and password)
Customers
STEP2.Obtaining a Certificate(P12)
Customers
STEP3.Downloading the e-Parcel software(P 18)
Customers
STEP4.Installing the e-Parcel software (P21)
Customers
STEP5.Installing a Digital Certificate (P23)
Now you completed the preparations for the e-Parcel.
You can start the e-Parcel Service!
Thank you.
11
Copyright© e-Parcel Corporation All rights reserved.
e-Parcel Installation & Configuration Manual
EP-PM-MN-0265
STEP1.Registration
To use the e-Parcel, you must first apply your registration form to register your e-Parcel user
ID. The e-Parcel Registration will normally be done by e-Parcel representative. (Depending on
the contract, registered by your company’s e-Parcel Administrator.) After registration
completed, you will get the notification with credentials which you need to access to the
e-Parcel VCN login page on the web site.
Note: If user credentials have not been supplied, or have been misplaced,
please contact the e-Parcel Customer Support ([email protected]) by
e-mail.
STEP2.Obtaining a Certificate
In the beginning, to obtain a digital certificate from e-Parcel, visit the e-Parcel VCN login web
site. The e-Parcel Digital Certificates are required to install and run e-Parcel.
Caution: In case of OS of Windows NT, 2000, XP, 2003, Vista, 2008, 7 used,
please log in Windows by either the Administrator or the user to whom
Administrator authority is added.
12
Copyright© e-Parcel Corporation All rights reserved.
e-Parcel Installation & Configuration Manual
EP-PM-MN-0265
① Access your default web browser. Visit the e-Parcel web site at http://www.e-parcel.co.jp/
and click the menu “VCN Login”.(Figure 2)
Caution: To access e-Parcel VCN login web site must require encrypting at over
128bits.
Figure 2
13
Copyright© e-Parcel Corporation All rights reserved.
e-Parcel Installation & Configuration Manual
EP-PM-MN-0265
② Locate the “User Login - My VCN” fields. Enter your User ID and password and then click
the Login button.(Figure 3)
Figure 3
14
Copyright© e-Parcel Corporation All rights reserved.
e-Parcel Installation & Configuration Manual
EP-PM-MN-0265
③The “My VCN – View My Profile” page appears. Your e-Parcel Profile is displayed and
includes your User ID, Name, Company, Work Number and e-mail address (Figure 4).
Verify that the information listed is correct. If changes are required, click the Edit My Profile
option in the left navigation menu. Modify necessary information.
To download your certificate, click the Software option in the left navigation menu.
Figure 4
15
Copyright© e-Parcel Corporation All rights reserved.
e-Parcel Installation & Configuration Manual
EP-PM-MN-0265
④The “My VCN – Software” page appears. (Figure 5)
Follow the STEP1 to download your e-Parcel Digital Certificate.
First, click the Download Now! button to the right of “Obtain your e-Parcel Digital
Certificate” in Step1.
Figure 5
⑤A File Download dialog box appears prompting to either “Open the file ” or “Save the file to
your computer”. (Figure 6)
Please select the Save button. The Save As dialog appears. Save your Certificate to your
desktop or another convenient location.(It is not recommended that the file name of your
certificate be changed.)The download of a Digital Certificate starts here. It normally ends in
a few seconds though the speed of download is different depending on your line capacity.
16
Copyright© e-Parcel Corporation All rights reserved.
e-Parcel Installation & Configuration Manual
EP-PM-MN-0265
Figure 6
Tip: It is not recommended that the file name of your certificate be changed.
Tip: Be sure to remember the location where you saved your e-Parcel digital
certificate for the installation process later.
⑥A Download completed dialog box appears. Please select the Close button.(Figure 7) After
the Certificate file download is completed, the next step is to download the e-Parcel Client
software.
Figure 7
17
Copyright© e-Parcel Corporation All rights reserved.
e-Parcel Installation & Configuration Manual
EP-PM-MN-0265
STEP3.Downloading the e-Parcel software
From the “My VCN – Software” page, proceed to STEP 2 for download the e-Parcel software.
① All products available for download are listed. Select the appropriate e-Parcel software for
your OS and language. Click the Download Now! button to begin.(Figure 8)
[ex:Your OS is Windows・and language is English ⇒
Select“VCN CommCenter 6.0 for Windows(English)”]
Figure 8
18
Copyright© e-Parcel Corporation All rights reserved.
e-Parcel Installation & Configuration Manual
EP-PM-MN-0265
②A File Download dialog appears prompting you to either “Open the file” or “Save the file to
your computer”. Please select the Save button.(Figure 9)
Figure 9
② The Save As dialog appears. Save the program to your desktop or another convenient
location.(Figure 10)(It is NOT recommended that the file name of the installation
packaged is changed.)Click the Save button. The download of the program starts here. It
normally ends in a few seconds to a few minutes though the speed of download is different
depending on your line capacity.
Figure 10
Tip: It is not recommended that the file name of the installation packaged be
changed.
19
Copyright© e-Parcel Corporation All rights reserved.
e-Parcel Installation & Configuration Manual
EP-PM-MN-0265
④A Download completed dialog box appears. Please select the Close button.(Figure 11)
After the software file download is completed, the next step is to install the e-Parcel software.
To install the e-Parcel, please proceed to the next section of this manual.
Figure 11
Caution: Before installing the e-Parcel software, it is recommended that all
other applications are closed.
20
Copyright© e-Parcel Corporation All rights reserved.
e-Parcel Installation & Configuration Manual
EP-PM-MN-0265
STEP4.Installing the e-Parcel software
Execute to Install The e-Parcel software.
① Double click the downloaded executable file to begin installation. (In case of Windows
Vista, 2008 and 7, right-click the downloaded executable file and then select Run as
administrator. Then please select permission on UAC window.)
The executable file name
must be “eClient...”. A VCN CommCenter - Install Shield Wizard dialog appears. Proceed to
install to click the Next button.(Figure 12)
Figure 12
② The Software License Agreement appears. Print a copy of the license agreement for your
records. After reviewing it, Select “I accept…” to continue and click the Next.(Figure 13)
Figure 13
21
Copyright© e-Parcel Corporation All rights reserved.
e-Parcel Installation & Configuration Manual
EP-PM-MN-0265
Warning: If the Customer Information dialog box appears. It is displayed the
User Name and Organization which have been entered to your computer. Also
the Customer Information dialog box appears prompting you to Install this
application for either “anyone who uses this computer (all users)” or “only for
me”. Please select “anyone who uses this computer (all users)”.
However in case of Windows98, 98SE, ME, this Customer Information dialog
box dose NOT appears.
③ Destination Folder Location dialog appears. Click the Next button to save program in the
default destination directory provided. (Figure 14)
Figure 14
④ An Install completed dialog box appears. Please select the Finish button.(Figure 15)
Proceed to Installing a Digital Certificate.
Figure 15
22
Copyright© e-Parcel Corporation All rights reserved.
e-Parcel Installation & Configuration Manual
EP-PM-MN-0265
Caution: For users of Windows NT, 2000, XP, 2003, Vista, 2008, 7
If you logon to PC as the administrator right itself only for the installation and
will usually use the e-Parcel as user right, firstly shut down this "Installing
Certificate" window. Then re-logon Windows with user right and proceed to the
Installing a Digital Certificate section and go on. If the "Installing Certificate"
window will not be opened, double click the e-Parcel icon.
STEP5.Installing a Digital Certificate
With the e-Parcel product installed, it must now be configured for use. You should also install
the Digital Certificate which was downloaded during the above process.
① After installing the e-Parcel software completed, The Installing Certificate dialog box
appears. Click the Locate Certificate button. (Figure 16)
Figure 16
② The Select Certificate File dialog box appears. Locate your certificate, which was
downloaded during the above process. The certificate file name must be
“e-ParcelCertificate-Your User ID.ctr”. Click the Open button to load the e-Parcel Digital
Certification file to continue.(Figure 17)
23
Copyright© e-Parcel Corporation All rights reserved.
e-Parcel Installation & Configuration Manual
EP-PM-MN-0265
Figure 17
③ Return to the Installing Certificate dialog box. Click the Next to view your certificate.
④ After reviewing your Certificate information, especially confirming “Issuer” name that
must be “e-Parcel Corporation”, click the Next button to continue with the configuration
process.(Figure 18)
Figure 18
24
Copyright© e-Parcel Corporation All rights reserved.
e-Parcel Installation & Configuration Manual
EP-PM-MN-0265
⑤ The Setup dialog box appears.(Figure 19)The e-Parcel Digital Certificate will
automatically look for your network configuration settings. With the default as your
appropriate networking configuration, select “Continue” and click the Next button to
login to the e-Parcel.
Figure 19
※ If further configuration is needed, select the Advanced setting and click the Next
button. Please refer to the Configuring the e-Parcel delivery service section3.Network
(P34) of this manual for more details regarding Advanced set up features.(Figure 19)
Caution: If your network is set proxy server, you must manually configure your
network, please check the Advanced and click Next in setup view. More details
on setting the proxy server can be found in the section3.Network (P34).
⑥ With your certificate installed, you can now log into the e-Parcel. The User Information
dialog box appears. Type in your password to verify your e-Parcel user identity then click
the Login button to authenticate with e-Parcel.(Figure 20)
25
Copyright© e-Parcel Corporation All rights reserved.
e-Parcel Installation & Configuration Manual
EP-PM-MN-0265
Note: The password field will not display your password in clear text. Instead,
you will simply see asterisks (*).
Figure 20
⑦ The Login Progress field displays the results of authentication. The message, “Login
successful” should normally appear.(Figure 21)
Figure 21
26
Copyright© e-Parcel Corporation All rights reserved.
e-Parcel Installation & Configuration Manual
EP-PM-MN-0265
⑧ Click the Login button again to run the e-Parcel Delivery Service.(Figure 21)The VCN
CommCenter GUI appears on your desktop.(Figure 22)
You completed the all process to prepare the
e-Parcel Service.
Now you can start the e-Parcel! The further each
section will provide you how to configure and use
it. Please refer to the next.
Thank you!
Figure 22
Caution: Caution: For users of Windows NT, 2000, XP, 2003, Vista, 2008, 7
If you logon to PC by another Windows logon user account different from the
Windows logon user account which you installed the e-Parcel and would like to
launch the e-parcel only by the Windows logon user account which you
installed the e-Parcel, you need to move the “VCN CommCenter” shortcut icon
from the default directory: Start Up of All Users to the directory: Start Up of the
Windows logon user account which you installed the e-Parcel. For more detail,
refer to the “Download &Installation Manual” P16.
Ex. For Windows 2000, XP, 2003
Move the “VCN CommCenter” shortcut icon from the following directory① to the following directory②.
① C: ¥Documents and Settings ¥All Users ¥Start Menu ¥Program ¥Start Up
② C: ¥Documents and Settings ¥(Windows User Name)¥Start Menu ¥Program ¥Start Up
Warning: Please carefully note: The e-Parcel Client Software with
authenticating one user ID must be installed into only one computer.
If the e-Parcel client software with authenticating same one user ID is installed
into multiple computers, it might be caused the problem that data cannot be
normally sent and received.
27
Copyright© e-Parcel Corporation All rights reserved.
e-Parcel Installation & Configuration Manual
EP-PM-MN-0265
Failed Login
① If the message “Login failed…” appears after attempting to login, verify your password was
entered correctly.(Figure 23)Type in your password and click the Login button again. The
Login Progress field displays the message, “Login successful”. If not, proceed to the next
② paragraph.
② Also, verify your proxy which requires authentication and your Network settings are
configured correctly. Return the Installing a digital Certificate steps again to be sure
everything is configured correctly.
Especially verify your connection to the Internet is not properly configured with Proxy
server on your network. In that case you will need to contact your network administrator
and determine the following information:
•
•
DNS Name or IP address of the Proxy server and its port number to connect.
Whether the proxy requires authentication and, if so, what User ID and password does
the proxy require.
Once this information is obtained, click the Back button to return to the Setup dialog box.
Select the Advanced setting and complete required information.
③ If still unsuccessful logging in, please contact the e-Parcel Customer Support by e-mail
([email protected] ).
Figure 23
28
Copyright© e-Parcel Corporation All rights reserved.
e-Parcel Installation & Configuration Manual
EP-PM-MN-0265
Configuring VCN CommCenter
Once the e-Parcel is installed and authentication was successful, the application is ready for
use. However, in a network environment, additional configuration may be required. The
following steps will guide you in configuring the VCN CommCenter for optimal use.
To begin configuring the VCN CommCenter, the application must be running. The e-Parcel icon
should be displayed in your system tray. Access the Tools >Setup menu from the VCN
CommCenter menu bar.(Figure 24)
Figure 24
The Setup dialog box appears including six configuration tabs.(Figure 25) when configuring,
click each tab. These configurations are included some significant settings for the use of the
VCN CommCenter. The following section explains each tab in greater detail.
Figure 25
29
Copyright© e-Parcel Corporation All rights reserved.
e-Parcel Installation & Configuration Manual
EP-PM-MN-0265
Setup Tabs
Function
User Information To re-authenticate with the e-Parcel after the password updated.
Certificate
To verify the information listed on your installed digital certificate.
Network
The location where you will be entering your network configurations, if necessary.
General
To set Security Options, Address Book and Dial up user.
Option
To set Data locations, Database location and Font etc.
Customize
To customize the columns which can be displayed in the e-Parcel view.
1.User Information
The purpose of the User Information Tab is to allow you to re-authenticate with the e-Parcel
after your e-Parcel User ID’s password has been updated through the Edit My Profile of
e-Parcel VCN Login Page on Web site.
① To re-authenticate your password, click the Change Logon Password button.
By
doing so, you will be prompted to re-enter your logon password.(Figure 25)
② The Enter new password dialog box appears. The User ID field should be pre-filled. Type
in your password.(Figure 26)
③ Once your credentials are entered, click the OK button. The Login Progress field displays
the results of authentication.
Figure 26
Caution: After successfully updating your e-Parcel User ID’s password though
e-Parcel VCN Login Page on Web site you must require to re-authenticate with
the e-Parcel. Click the Change Logon Password button.
Caution: The User Information tab is not designed to change your password on
the e-Parcel server, but instead it will allow you to re-authenticate with the
e-Parcel without having to re-install the e-Parcel Digital certificate after your
change has been updated.
30
Copyright© e-Parcel Corporation All rights reserved.
e-Parcel Installation & Configuration Manual
EP-PM-MN-0265
Note: The password field will not display the password in clear text. Instead,
you will simply see asterisks (*).
Successful Login
The message, “Login successful” should normally appear. Click the OK button to run the
e-Parcel Delivery Service or the Apply button to continue the configuring. (Figure 27)
Figure 27
31
Copyright© e-Parcel Corporation All rights reserved.
e-Parcel Installation & Configuration Manual
EP-PM-MN-0265
Failed Login
If the message “Login failed…” appears after re-authenticate with the e-Parcel after your
e-Parcel User ID’s password has been updated, verify your new password was entered
correctly.(Figure 28)If still unsuccessful logging in, please contact the e-Parcel Customer
Support by e-mail ( [email protected] ).
Figure 28
32
Copyright© e-Parcel Corporation All rights reserved.
e-Parcel Installation & Configuration Manual
EP-PM-MN-0265
2.Certificate
The purpose of the Certificate Tab is to allow you to verify the information listed on your
installed digital certificate. It also contains Issuer who your certificate issue.(Figure 29)the
Certificate Tab just displays to show your certificate information, not to configure.
Figure 29
33
Copyright© e-Parcel Corporation All rights reserved.
e-Parcel Installation & Configuration Manual
EP-PM-MN-0265
3.Network
The Network tab is the location where you will be entering your network configurations, if
necessary. Typically, e-Parcel attempts to automatically detect your network settings. If
unsuccessful, additional information may be required. You may have to contact your network
administrator if it is determined that you must manually configure your network settings.
(Figure 30)
Caution: To successfully run the e-Parcel, accurate Network settings must be
supplied. It is strongly recommended that you contact your system/firewall
administrator or service provider to obtain the correct information.
Figure 30
34
Copyright© e-Parcel Corporation All rights reserved.
e-Parcel Installation & Configuration Manual
EP-PM-MN-0265
Proxy Settings
Not using Proxy
The default selection is NOT using Proxy. If this option is correct, proceed to Advanced
Options.
Automatic Proxy Detection
If the Proxy configuration uses automatic detection, select the Automatic Proxy Detection
option and then proceed to Advanced Options.
Manual Proxy Configuration
If the proxy configuration must be manually configured, select the Manual Proxy
Configuration. This will allow you to select the proxy type, HTTP or SOCKS. You must
also enter the Host server name and Port number. Once this information is entered,
proceed to the next section, Proxy authentication.
Caution: When selecting the Manual Proxy Configuration, Host field must be
entered just IP address or server name, without “http://”.
Proxy authentication
Entering your proxy information may also require authentication in your environment. This
feature only enable if you have manually configured your network settings.
If not necessary: Proceed to Advanced Options.
If necessary: Enter the appropriate network user name and password if necessary and then
proceed to Advanced Options.
Note: The password field will not display the password in clear text. Instead,
you will simply see asterisks (*).
35
Copyright© e-Parcel Corporation All rights reserved.
e-Parcel Installation & Configuration Manual
EP-PM-MN-0265
Advanced Options
In the Setup >Network tab, please locate the Advanced button. (Figure 30)
If necessary, you have the ability to modify the Polling, Timeout, Block Size and Transfer
Encoding settings. Click the Advanced button to view these options.
If there is no need to set the advanced parameters, click the Apply button to save the other
configuring or click the Next button to proceed to the section 4.General (P38).
If the advanced settings must be configured, click the Advanced button. Four settings appear
with additional dropdown menu options. These settings are usually affiliated with network
traffic management and Firewall configuration.(Figure 31)
Figure 31
36
Copyright© e-Parcel Corporation All rights reserved.
e-Parcel Installation & Configuration Manual
EP-PM-MN-0265
Polling (Minutes)-This setting is in minutes. You must select the interval of the
e-Parcel product for checking external events, such as a parcel delivery. If the network
bandwidth resource is very restricted, set the Polling interval to a high number, such
as every 30 minutes.
Timeout(Seconds)-This setting is in seconds. You must select the duration of a
non-responsive poll before the polling session is terminated. Again, this has network
bandwidth implications.
If a poll that requires a response does not receive a
response, it will continue to poll until a response is returned.
Block Size(BK)-This setting is in Kilobytes (KB). You must select the maximum block
size of any incoming event. If the block size exceeds this threshold, the block is
refused. Bandwidth management may require system administrators to restrict the
size of incoming blocks. This setting should match the system administrator’s.
Transfer Encoding-The choice made is the type of encoding that is acceptable.
There are two choices, Binary and Base64. You must determine if there are any
restrictions in receiving either encoding type.
If changes were made in the Network tab, click the Apply button to save your settings and
then click the OK to exit Setup.
To continue using the additional VCN CommCenter configuration options, please proceed to
the General tab.
37
Copyright© e-Parcel Corporation All rights reserved.
e-Parcel Installation & Configuration Manual
EP-PM-MN-0265
4.General
The General tab will enable you to establish security options, which address book to use when
selecting your recipients and the configuration of your dial-up connection, if necessary.(Figure
32)
Figure 32
Security Options
Placing a check in the security options boxes will prompt a dialog box which requires you to
enter your password before performing a specific function.
Password Protect Sending – Your credentials will be required each time a new
Item is sent.
Password Protect Configuration – Your credentials will be required each time you
attempt to change the configuration of the VCN CommCenter.
Password Protect Login – Your credentials will be required once the e-Parcel
application is opened.
38
Copyright© e-Parcel Corporation All rights reserved.
e-Parcel Installation & Configuration Manual
EP-PM-MN-0265
Note: Any corporate network environment adheres to their own security policy.
You should select the optimal Security Options that best coincide with your
corporate security policy.
Address Book
The address book settings instruct the e-Parcel to open the address book selected in this
location.
Use Custom e-parcel Address Book – Selecting this setting, the e-Parcel will use your
e-Parcel Address Book as your default address book.
Use Windows Address Book – Selecting this setting, the e-Parcel will use the Windows
address book as your default address book.
Ask me each time which to use – Selecting this setting, you are prompted to choose
which address book to use each time when selecting recipients.
Note: The e-Parcel uses addresses that can be resolved. It does not accept
outlook distribution lists.
Note: More details on using the e-Parcel address book can be found in the
section e-Parcel Contacts List (P58).
Dial-up Users
For users sending and receiving Items via e-Parcel with a dial-up connection, this option is
important to consider. By selecting the option to Hang-up any dial-up connections after
sending and receiving, the connection is cancelled the moment all transmissions are
completed.
This option is valuable if you do not wish to keep the phone line busy after
transmissions have completed.
If changes were made in the Network tab, click the Apply button to save your settings and
then click the OK to exit Setup.
To continue using the additional e-Parcel configuration options, please proceed to the Option
tab.
39
Copyright© e-Parcel Corporation All rights reserved.
e-Parcel Installation & Configuration Manual
EP-PM-MN-0265
5.Option
This Option tab provides you with the ability to choose Data Locations, Default Message Fonts
and general viewing customization.(Figure 33)
Figure 33
Data Locations
Data Location displays the locations of the Delivered and In Progress directories. The delivered
directory is where you’re delivered Items and data are stored. The In Progress directory is the
directory in which messages and data are decompressed. Default locations are provided.
(Figure 33)
If you wish to change the location of the Delivered and/or In Progress directories:
① You must first select either Delivered or In Progress from the drop down menu. A
corresponding data location will be listed. To change this location, click the ellipse
button.(Figure 33)
40
Copyright© e-Parcel Corporation All rights reserved.
e-Parcel Installation & Configuration Manual
EP-PM-MN-0265
② A Browser for Folder dialog box appears. Select the location to store your messages
and data and then click OK button. The newly selected location will be listed in the
Data Locations field in your Setup> Options dialog box. Follow the same procedure to
change the In Progress directory location.(Figure 34)
Figure 34
Database Location
Data Location displays the locations of the Database directories. Default locations are provided.
(Figure 33)
If you wish to change the location of the Database directories:
① To change this location, click the ellipse button.(Figure 33)The Client Database
Location dialog box appears.(Figure 35)
② Default location is provided in the Database Location field. Click the ellipse button in
the New Database Location to change.(Figure 35) A Browser for Folder dialog box
appears. Select the location to store your database and then click the OK button. The
newly selected location will be listed in the New Database Location field in the Client
Database Location dialog box.
③ The default selection is “Current user”. If this option is correct, click the OK button.
41
Copyright© e-Parcel Corporation All rights reserved.
e-Parcel Installation & Configuration Manual
EP-PM-MN-0265
Caution: Only in case of multiple users logging into same machine will use the
same e-Parcel identity (same e-Parcel User ID) and have access to the In Box
and Out Box, select “All users”. If you’d like to configure that when you install
the VCN CommCenter on new machine, please refer Download & Installation
Manual for e-Parcel Client software. If you’d like to configure that on the
machine that the particular user is already using the VCN CommCenter, please
refer the Appendix 4 (the page 140).
Figure 35
Caution: If the database location is changed, the e-Parcel may automatically
shutdown to perform the move operation.
Default Message Font
The Default Message Font allows you to select the font for messages sent via the e-Parcel.
The default font is Arial, size 10, black.
If you wish to change the font, click the ellipse button to the right of the Default Message Font
field.(Figure 33) A font dialog box appears.(Figure 36)Select the desired font size, style,
effects, color and script and then click the OK button to return to Setup >Options.
42
Copyright© e-Parcel Corporation All rights reserved.
e-Parcel Installation & Configuration Manual
EP-PM-MN-0265
Figure 36
General
This set of options provides you with tools to control the startup and characteristics of the
e-Parcel.(Figure 37)
Figure 37
Start Client in iconized form – When this option is selected, the e-Parcel icon
appears in the system tray and the e-Parcel can be opened using this icon. If this
option is not selected, the VCN CommCenter GUI is opened during your computer’s
startup.
Use sound – Select this option if you would like a sound to play when a Item is
received by the e-Parcel.
43
Copyright© e-Parcel Corporation All rights reserved.
e-Parcel Installation & Configuration Manual
EP-PM-MN-0265
Show Text on Toolbar – Select this option if you would like the text associated with
each icon on the VCN CommCenter GUI to be displayed. If you choose not to select
this option, each icon appears without the associated text.
Remember dialog size and position – By selecting this option, the last size and
position of the VCN CommCenter GUI prior to shutting down will be saved and used
the next time the VCN CommCenter GUI is opened.
Each item folder view sorts uniquely – Select this option to sort your e-Parcel
folders according to your specifications.
Add sender’s e-Parcel ID to your contact list – If this option is selected, each
new e-Parcel User ID that is sent a Item will be listed automatically in your e-Parcel
Contact List/Address Book.
Maximum number of recent recipients – By selecting this option, the most
recent recipients are listed when clicking your Recent button upon composing a new
Item to be delivered. This will prove useful if the same recipients are routinely sent
Items.
If changes were made in the Option tab, click the Apply button to save. Click OK to exit Setup.
To continue using the additional the e-Parcel configuration options, please proceed to the
Customize tab.
44
Copyright© e-Parcel Corporation All rights reserved.
e-Parcel Installation & Configuration Manual
EP-PM-MN-0265
6.Customize
You can choose the columns displayed in your e-Parcel folders such as the In Box, Out Box,
and deleted items views using the Customize tab. The columns will contain data related to
each Item.(Figure 38)
① To customize the columns in each of the In Box, Out Box and Deleted Items parent
directories, and all associated child directories, you must first choose which parent
directory to customize from the View type drop down menu. The options are In, Out, or
Deleted Items. Once a View type is selected, the current Available Columns and
Columns in Use are listed.
② You can Add any available column by first selecting an Available Column title, and then
clicking the Add button. The column will be transferred to the Columns in Use list.
③ You can Remove any column in use by first selecting a Columns in Use title and then
clicking the Remove button. The column will be transferred to the Available Columns
list.
Figure 38
If changes were made in the Setup, click the Apply button to save. Click OK to exit Setup.
45
Copyright© e-Parcel Corporation All rights reserved.
e-Parcel Installation & Configuration Manual
EP-PM-MN-0265
VCN CommCenter View
After installing the e-Parcel, the main application GUI “VCN CommCenter” should appear on
your desktop.(Figure 39)If not, double click
Menu bar
your new e-Parcel desktop icon.
Tool bar
Folders View
Contact List View
Figure 39
46
Copyright© e-Parcel Corporation All rights reserved.
e-Parcel Installation & Configuration Manual
EP-PM-MN-0265
1.Menu
There are five (5) menu choices available in the menu bar of e-Parcel, including e-Parcel, Tools,
Components, View and Help.(Figure 39)
Menu
Functions
e-Parcel
To direct the e-Parcel to perform various functions.
Tools
To direct the e-Parcel to perform setup and configuration functions.
Components
View
Help
To determine and configure how particle are sent and or received
automatically.
What is displayed on the main VCN CommCenter GUI, such as the current
e-Parcel folders and your Contact List.
Provide you with your session Items, the manual and general information.
1-1. e-Parcel
This menu selection features commands to direct the e-Parcel to perform various
functions. The following commands are available:
Send Item – This command will create a new Item to send.
The shortcut
keystroke for this command is the <ctrl> key plus and <a> key simultaneously.
Check Now – This command will check for any Items pending delivery. The
shortcut keystroke for this command is the <F5> key.
Accept All – This command will accept all pending Items for delivery. The
shortcut keystroke for this command is <ctrl> key and <L> key simultaneously.
Select All – This command will select all Items listed in the current Folder view.
The shortcut keystroke for this command is <ctrl> and <a> simultaneously.
Move Item – This command will open the “Browse for Folder” dialog box,
prompting you to choose a destination for the selected message and any
attachments. The shortcut keystroke for this command is <ctrl> and <m>
simultaneously.
47
Copyright© e-Parcel Corporation All rights reserved.
e-Parcel Installation & Configuration Manual
EP-PM-MN-0265
Open Item– This command will open any attachment(s) in a received Item. If an
attachment(s) does not accompany the Item, this command will be disabled. The
shortcut keystroke for this command is <ctrl> and <o> simultaneously.
Item Details – This command will open the Cover Sheet and display the
message. The shortcut keystroke for this command is <ctrl> and <p>
simultaneously.
Cancel Transmission – This command will be enabled only during the process
of receiving or sending transmissions. While an Item or transmission is being
received or sent, a user can cancel the transmission. There is no shortcut
keystroke for this command.
Delete – This command will only be enabled once an Item(s) is selected in the
current folder view. With an Item(s) selected, a user can delete the Item. The
shortcut keystroke for this command is <Delete>.
Close this Window – This command will close the VCN CommCenter window,
but will not shut down or exit the program. An e-Parcel icon will still appear in the
system tray, representing the availability of e-Parcel. You can still receive Items,
and view them by restoring the VCN CommCenter GUI. There is no shortcut
keystroke for this command.
Exit VCN CommCenter – This command will shut down the e-Parcel. The
e-parcel icon will be removed from the system tray. Once the e-Parcel is shut
down, you will not receive any Items until the next time the e-Parcel is running.
1-2.Tools
This menu selection features commands directing the e-Parcel to perform setup and
configuration functions.(Figure 39) The available options are:
Setup – This command will launch the Setup window, allowing you to configure
settings for the e-Parcel. Refer to the Configuring VCN CommCenter (P30) section for
more details on this command.
48
Copyright© e-Parcel Corporation All rights reserved.
e-Parcel Installation & Configuration Manual
EP-PM-MN-0265
Install Certificate – This command will display prompts to install the certificate
which was downloaded during the registration process. Refer to the Step5. Installing a
Digital Certificate (P23) section for more details on how to install your certificate.
Account Info – This command will display the active accounts to which you belong.
It also displays your sending and receiving rights, along with any file size limitations, if
applicable.(Figure 40)
Figure 40
1-3.Components
The components options allow the user to determine and configure how particle are sent and
or received automatically. There are two options: Hot Folders and Receive Automation.
Hot Folders – The Hot folders component has the ability to automatically send
parcels to any other registered user by simply copying a supported file type into a
predetermined Hot Folder. These features are further explained in the Hot Folders
Components (P118) of this manual.
Receive Automation – The Receive Automation component is designed to
automatically receive and move parcels once it has been delivered. This component
also has the ability to store copies of the attachment(s) and even delete any previous
data before delivering the new material. These features are further explained in the
Receive Automation Components (P77) section of this manual.
49
Copyright© e-Parcel Corporation All rights reserved.
e-Parcel Installation & Configuration Manual
EP-PM-MN-0265
1-4.View
You have options as to what is displayed on the main VCN CommCenter GUI. You can view
the current e-Parcel folders and your Contact List saved in the e-Parcel Address Book.
In the Menu bar, select the View menu. There are two options: Folders and Contact List. If you
wish to view either one or both, simply highlight and click the desired view. Once a view is
selected, a check-mark is placed beside the menu option displayed.(Figure 41)
Contact List – Once a view is selected, a check-mark is placed beside the Contact
List option displayed. You can view your Contact List saved in the e-Parcel Address
Book.
Folders – Once a view is selected, a check-mark is placed beside the Folders option
displayed. You can view the current e-Parcel folders, which includes the In Box, Out
Box, Deleted Items and Components. You can also click the pin which appears to the
right of the In Box dropdown to allow your folder view to remain open.
If you do not wish to view your contact list or folder, simply access the View menu again and
select the checked menu items to remove. You can also click the X in the top corner frame of
each displayed view.
Figure 41
1-5.Help
This set of Help commands will provide you with general information on how to use the VCN
CommCenter.
This menu also provides you with your session messages. (Figure 42)
Figure 42
50
Copyright© e-Parcel Corporation All rights reserved.
e-Parcel Installation & Configuration Manual
EP-PM-MN-0265
View Session Message Log – This command displays the current messages related
to all sessions performed by the e-Parcel (Figure 43). There are two views within the
Session Messages dialog box: Protocol Messages and Application Messages. The
information displayed may provide insight as to why certain issues are occurring.
Figure 43
Help Topics – This command will launch your default Internet browser and display
the e-Parcel Help Section. You are provided with a choice of either “viewing the
e-Parcel manual - the .PDF file”, or “sending an e-mail to the e-Parcel Customer
Support at [email protected]”. (Figure 44)
Figure 44
51
Copyright© e-Parcel Corporation All rights reserved.
e-Parcel Installation & Configuration Manual
EP-PM-MN-0265
About VCN CommCenter – This command opens the About VCN CommCenter
dialog box which displays the version of the application installed, and lists URL of our
web site and e-mail address of e-Parcel Technical Support. (Figure 45)
Figure 45
52
Copyright© e-Parcel Corporation All rights reserved.
e-Parcel Installation & Configuration Manual
EP-PM-MN-0265
2.Tool Bar
The tool bar of VCN CommCenter GUI, displays buttons to execute quick commands. Several
options parallel the menu commands detailed in the1.Menu(P47)section of this manual.
(Figure 39)
2-1.Home
The Home button opens your default Internet browser and displays the e-Parcel web site,
http://www.e-parcel.co.jp/. This provides easy access to the VCN Login page.
2-2.New
To create a new Item to be sent securely simply click the New button and compose your new
Item. More details about the New button and sending Items can be found in the Sending(P63)
section of this manual.
2-3.Contacts
The Contacts button displays your contact list, and allows you to enter new contacts. More
details about the Contacts button can be found in the e-Parcel Conducts List (P58) section of
this manual.
2-4.Account
Your account information displays your User ID, Rights, and Account number(s). You can view
your rights by clicking the Account button.(Figure 46)
53
Copyright© e-Parcel Corporation All rights reserved.
e-Parcel Installation & Configuration Manual
EP-PM-MN-0265
Figure 46
2-5.Cancel
The Cancel button will be enabled only during the process of receiving or sending
transmissions. While a Item or transmission is being received or sent, you can Cancel the
transmission by clicking the Cancel button.
2-6.Delete
The Delete button will only be enabled once an Item(s) is selected. You can delete the
Item(s) in the current e-Parcel folders, which includes the In Box, Out Box, and Deleted Items.
With an Item(s) selected, you can Delete the Item by clicking on the Delete button or
right-click the item to display the pop-up menu and choose “delete selection”. The shortcut
keystroke for this command is <Delete>.
Once an Item(s) in the In Box or Out Box is selected and deleted, an Item(s) is moved to
Deleted Items folder. For deleting an Item(s) selected completely, you can delete the Item(s)
in Deleted Items folder by clicking on the Delete button again.
Tip: You should periodically empty your Deleted Items folder. The more items you
save in this folder, the more space will be used on your drives.
54
Copyright© e-Parcel Corporation All rights reserved.
e-Parcel Installation & Configuration Manual
EP-PM-MN-0265
2-7.Move
The Move button will open the Browse for Folder dialog box, prompting you to choose a
destination for any attachments. The Move button will only be enabled if the file or folder
attached to an Item allows moving. You can Move only once an Item. The shortcut keystroke
for this command is <ctrl> and <m> together.
Caution: Once you moved an Item(s), you cannot move or forward again,
although a Item(s) moved by Receive Automation.
2-8.Check Now
You can set intervals for the e-Parcel to periodically check for Items. If you want to check in
real-time, this command will poll for any pending Items. Simply click the Check Now button.
The shortcut keystroke for this command is the <F5> key.
55
Copyright© e-Parcel Corporation All rights reserved.
e-Parcel Installation & Configuration Manual
EP-PM-MN-0265
3.Folders display
The Folder Display will only appear if you select it by accessing the View menu.(Figure 47)
You can also click the pin which appears to the right of the In Box dropdown to allow your
folder view to remain open. If you do elect to display your folders, the VCN CommCenter view
adds all folders to the left side of the GUI.
The three parental e-Parcel mailboxes are the In Box, Out Box, and Deleted Items.
Note: The Component listing in the Folder display will be explained in more
detail in the Receive Automation Components (P77) and Hot Folders
Components (P118) sections of this manual.
Figure 47
To manage the three (3) e-parcel folders, you must first select the parental folder, either the In
Box, Out Box, and Deleted Items. Right-click the parent folder to display the pop-up menu.
(Figure 48)
Figure 48
56
Copyright© e-Parcel Corporation All rights reserved.
e-Parcel Installation & Configuration Manual
EP-PM-MN-0265
4.Contacts List Display
The Contact List Display will only appear if you select it from the VCN CommCenter View menu.
(Figure 49)
Figure 49
If you do elect to display the Contacts List, the VCN CommCenter view adds all Contacts and
Groups to the left side of the GUI. (Figure 50)
Figure 50
57
Copyright© e-Parcel Corporation All rights reserved.
e-Parcel Installation & Configuration Manual
EP-PM-MN-0265
e-Parcel Contacts List
1.To manage Contacts List
Click the Contacts button on the e-Parcel tool bar to manage the Contact List. (Figure 51)
Figure 51
From this location, you can also create your personal e-Parcel Address Book.(Figure 52)
Figure 52
58
Copyright© e-Parcel Corporation All rights reserved.
e-Parcel Installation & Configuration Manual
EP-PM-MN-0265
2.New Entry
The New Entry button is used to add a new contact to the Contact List. Click the New Entry
button.(Figure 52) An Add New Contact dialog box appears, requesting information about the
new contact. (Figure 53)
Figure 53
Complete the information requested. Verify that the User ID matches the registered name of
your e-Parcel recipient; otherwise any Items sent to this recipient will not be delivered. Once
the information is entered, click OK to return to the Contact List. The new contact should
appear.
3.New Group
The New Group button is used to create a group of recipients from the Contact List. Only
contacts listed in the Contact List can be added to the Group. To create a New Group, you must
click the New Group button.(Figure 52)A Group Properties dialog box appears.(Figure 54)
You must first name the group of recipients. Enter the name in the top text field. Once a name
is entered, click the Add button to begin selecting contacts.
Figure 54
59
Copyright© e-Parcel Corporation All rights reserved.
e-Parcel Installation & Configuration Manual
EP-PM-MN-0265
A list of contacts appears. Select your contacts and then click the OK button to return to the
Group Properties window.(Figure 55)
Figure 55
Note: To select more than one contact at a time, hold down the <ctrl> key
while selecting contacts using your mouse button.
Selected contacts should now be listed in the Group Properties window. Click OK to save
your group.(Figure 56) The new group should be listed in the Contact List.
Figure 56
60
Copyright© e-Parcel Corporation All rights reserved.
e-Parcel Installation & Configuration Manual
EP-PM-MN-0265
4.Properties
The Properties button will only be enabled if a contact in the Contact List is selected. Only
one contact can be selected in order to view the Properties of that contact. To view the
Properties of either an individual contact, or a group, select the contact or the group and then
click the Properties button. (Figure 52)
4-1.Individual Property
If you selected an individual contact, a Properties window appears. The name of the contact
and their User ID appears in the Properties dialog box. This information can be modified if
necessary. Click the OK button to return to the Contact List. (Figure 57)
Figure 57
4-2.Group Property
To review the properties of a group, select the group and then click the Properties button.
The Group Properties box appears.(Figure 58)
Figure 58
61
Copyright© e-Parcel Corporation All rights reserved.
e-Parcel Installation & Configuration Manual
EP-PM-MN-0265
5.Delete
The Delete button can be used if you want to delete individual contacts or groups.(Figure 52)
To delete individual contacts or groups, you must first select the contact or group.
Once you select the contacts or groups to be deleted, simply click the Delete button, to
immediately delete from the Contact List.
Caution: Once contacts or groups are deleted, they cannot be recovered. Use
caution when selecting contacts or groups to delete.
Note: To select more than one contact or group at a time, hold down the <ctrl>
key while selecting contacts with your mouse.
6.Select
The Select button will only be enabled once you have selected single or multiple contacts or
groups. (Figure 52) Once selections have been made, click the Select button to open a new
message window, listing the selected contacts or groups as recipients. For more details on
sending Items, please refer to the Sending (P63) section of this manual.
7.Close
The Close button will close the Contact List window, returning you to the VCN CommCenter
view. (Figure 52)
62
Copyright© e-Parcel Corporation All rights reserved.
e-Parcel Installation & Configuration Manual
EP-PM-MN-0265
Sending
The e-Parcel provides users for sending secure messages to registered e-parcel recipients. The
e-Parcel GUI is similar to any e-mail program which users may be familiar with. However the
e-Parcel provides the abilities of encryption, attached large data, security etc. that any
standard e-mail application doses not have. The steps to create a new Item and to attach files
and folders are explained in this section.
1.New Items Creation
Create a new Item by clicking the New button found on the tool bar(Figure 59) or by
selecting in the e-Parcel > Send Item on the menu bar. The Sending New message dialog box
appears. The shortcut keystroke for this command is the <ctrl> key plus and <a> key
simultaneously.
Figure 59
This window will provide you with all the options necessary to create a new message, select
recipients from your Contact List, attach files or folders, and send your message.(Figure 60)
Add File button
Add Folder button
Figure 60
63
Copyright© e-Parcel Corporation All rights reserved.
e-Parcel Installation & Configuration Manual
EP-PM-MN-0265
1-1.Enter the recipients
Contacts
First, you must enter the recipients of your Item. Recipients can be manually added, by
entering their e-Parcel User ID. You can also select recipients from your Windows Address
Book or your e-Parcel Contact List. (Figure 60) Click the Contacts button in the e-Parcel tool
bar. (Figure 61)
Figure 61
Select a contact, multiple contacts or groups, and then click the Select button. The selected
recipient(s) will appear in the Sending New Message window.
Tip: The Contact List which appears is dependent upon your selection in the
Tools >Setup menu >General tab >Address Book (P39) option of the VCN
CommCenter. Address Book option provides the three (3) choices which
appears, "Use Custom e-parcel Address Book", "Use Windows Address Book" or
"Ask me each time which to use".
Note: If a group were selected as recipient, the group will not be listed.
Instead, all recipients in the chosen group will be listed individually.
Caution: The recipients which are registered such as the e-Parcel User ID can
be selected.
Recent Recipients
Each time you send a Item, the recipients from that Item are temporarily stored in the recent
64
Copyright© e-Parcel Corporation All rights reserved.
e-Parcel Installation & Configuration Manual
EP-PM-MN-0265
recipients list.
① To select the last group of recipients for your next Item, simply click the Recent button
and select from your list of Recent Recipients.(Figure 62)
Figure 62
② You can select recipients from Recent Recipients window. Select a recipient and click the
OK button. (Figure 63)
Figure 63
Tip: The number of Recent recipients which appears is dependent upon your
selection in the Tools >Setup menu >Option tab > General(P 43)
③ Next, the standard e-mail fields must also be entered including CC, BCC, and Subject and
Message fields. With the recipients listed, you should add a Subject pertaining to your
outgoing Item. After completing your message click the Send button to send your Item to
your recipients.
If you wish to attach files or folders to your Item, proceed to the next 1-2.Attach File(s) or
1-3.Attach Folder(s) (P67) section of this chapter.
1-2.Attach File(s)
If single or multiple files must accompany a Item, the e-Parcel provides the ability to attach
65
Copyright© e-Parcel Corporation All rights reserved.
e-Parcel Installation & Configuration Manual
EP-PM-MN-0265
files as well as encrypt these file attachments with your Item.
① To attach a file or multiple files to a new Item, click the Add File
button in
the tool bar. (Figure 64)
Figure 64
② The Select files to deliver dialog box appears.(Figure 65)Select the file you wish to attach
and click the OK button to copy the file to your Item.
Figure 65
Note: To select more than one file at a time, hold down the <ctrl> key while
selecting files with the mouse.
Warning: DO NOT use a comma( , )in the file name attached. If do so, the
attached file to an Item may be divide into multiple Items when you send an
Item.
Caution: 0 byte file(s) can not be attached. 0 byte file(s) can not be sent and
received through VCN CommCenter.
③ The Sending New Message dialog box appears with selected file(s) attached to the
message box. The Item can be sent at this stage. To send the Item and attached file(s),
simply click the Send button in the tool bar.(Figure 66)
66
Copyright© e-Parcel Corporation All rights reserved.
e-Parcel Installation & Configuration Manual
EP-PM-MN-0265
Figure 66
1-3.Attach Folder(s)
If single or multiple folders must accompany an Item, the e-Parcel provides the ability to
attach folders as well as encrypt the attachment with your Item.
① To attach a folder or multiple folders to a new Item, click the Add Folder
button in the tool bar.(Figure 67)
Figure 67
② A Browse for Folder dialog box appears.(Figure 68)Select the folder(s) you wish to attach
and click the OK button to copy the folder and all contents to your Item.
67
Copyright© e-Parcel Corporation All rights reserved.
e-Parcel Installation & Configuration Manual
EP-PM-MN-0265
Figure 68
③ The Sending New Message dialog box appears with selected folder(s) attached to the
message box. The Item can be sent at this stage. To send the Item and attached folder(s),
simply click the Send button in the tool bar.(Figure 69)
Figure 69
68
Copyright© e-Parcel Corporation All rights reserved.
e-Parcel Installation & Configuration Manual
EP-PM-MN-0265
Caution: 0 byte file(s) can not be sent and received through VCN CommCenter.
Also total 0 byte data attached can not be sent.
1-4. Removing Attachments
Attachments can also be removed from an Item, prior to delivery. Click the attachment in the
New message window to be removed. Once the attachment is highlighted, delete it using the
<delete> key on your keyboard.
Note: You can also delete the Attachments by Right-click the attachment in the
New message window to display the pop-up menu. Simply select the Remove
on the pop-up menu to delete. The Attachments will be immediately deleted.
1-5.Cancel Item
In the event you must cancel an Item prior to sending, simply click the Cancel button.
Item will be immediately deleted and the parcel will not be sent.(Figure 70)
Figure 70
69
Copyright© e-Parcel Corporation All rights reserved.
The
e-Parcel Installation & Configuration Manual
EP-PM-MN-0265
Receiving
To receive items using the e-Parcel, the application must be running. The e-Parcel is running
if the e-Parcel icon is displayed in the system tray.
If the e-Parcel is shut down, double click the e-Parcel desktop icon
to
be
running.
The item(s) will be received upon starting the e-Parcel.
When the data receiving is completed, the red flag
is shown on task tray.
IN BOX
When an Item is sent, the e-Parcel In Box will display your Item status in the Status column.
The initial status which appears is authenticating and waiting. Once an Item is available, the
e-Parcel will begin receiving it, displaying the percentage received. Once 100% received, the
Item status is “received”.(Figure 71)
Figure 71
The Cover Sheet
Double clicking an Item in the In Box will display the e-Parcel cover sheet. The Cover Sheet
displays the Item, details about the sender, when the Item was sent, and any attached files
and/or folders. Double click the attached files and/or folders icon in the e-Parcel cover sheet
when you open it.(Figure 72)
The Cover Sheet functions as the secure message viewer and is necessary to ensure the
highest level of secure communications between you and your recipients. The Cover Sheet
contains six (6) menu buttons, your Item details, your message and any attachments.
70
Copyright© e-Parcel Corporation All rights reserved.
e-Parcel Installation & Configuration Manual
EP-PM-MN-0265
Menu buttons
Item details
Massage
Attachment(s)
Figure 72
1.Receiving Item
1-1.MOVE
The Move button will only be enabled if an attachment accompanies the Item. If attachments
accompany the Item, the recipient can save the attachments to a preferred location by clicking
the Move button.
A Browse for Folder dialog box appears, prompting you to select the location to move the
attachments. (Figure 73)Once a location is selected, click the OK button and the attached
file(s) and/or folder(s) is moved your assigned location.
Note: Once you Move the attached file(s) and/or folder(s), it is no longer
attached to the Item. However the Cover Sheet displays the attached files
and/or folders. You also can access the attachment(s) by double click the
attached files and/or folders icon.
71
Copyright© e-Parcel Corporation All rights reserved.
e-Parcel Installation & Configuration Manual
EP-PM-MN-0265
Caution: Once you Move the attached file(s) and/or folder(s), it is no longer
attached to the Item. Therefore the Move and Forward button can not be
enabled. You can no longer move and forward the attachment(s) from the In
Box.
Figure 73
1-2.Reply
The Reply function is similar to the standard e-mail reply. In the event you wish to respond to
your sender, simply click the Reply button and a new message box will open and include the
original message.
1-3.Reply All
The Reply All function is similar to the standard e-mail reply. In the event you wish to respond
to your sender including CC, BCC, simply click the Reply All button and a new message box
will open and include the original message.
1-4.Forward
The Forward function is similar to any e-mail Forward functionality. In the event you wish to
Forward a received Item to another recipient, simply click the Forward button. A new
message window appears.
72
Copyright© e-Parcel Corporation All rights reserved.
e-Parcel Installation & Configuration Manual
EP-PM-MN-0265
Caution: Once you Move the attached file(s) and/or folder(s), it is no longer
forward the attachment(s) from the In Box. Therefore the Forward button can
not be enabled.
1-5.Reject
The Reject button is used to reject or cancel incoming Item you do not wish to receive. For
example, if an Item delivered was significant in size and the transmission was slow, you could
simply click the Reject button to cancel delivery.
Caution: Once you Reject the Item, it no longer receives the Item. Therefore
the Reject button can not be enabled.
1-6.Print
This feature will only be enabled to be printed. You can print the Item by clicking the Print
button. To Print the attachments, the attachment must be opened, and then printed.
73
Copyright© e-Parcel Corporation All rights reserved.
e-Parcel Installation & Configuration Manual
EP-PM-MN-0265
Tracking
You can view the progress of your Items from the VCN CommCenter GUI. First, select the Out
Box in the folders view. The Status column in the Out Box view will list the current status of
your delivered Items.(Figure 74)
OUT BOX
Figure 74
1.Tracking Display
To check the status of a Item, double click a delivered Item. A Tracking dialog box appears
(Figure 75). This window displays your recipients, the status of your delivered Item, the
subject and any attachments.
This window also provides valuable error messages, such as recipients that are not registered
with e-Parcel services or rejected deliveries.
The tracking information can be found in the Event window, which lists the Date, Time and
Event of the Item. The information found here will provide you with insight as to who has
received, read, opened and/or deleted your e-Parcel Item.
Tip: Make it a habit to track sent Item details to ensure that all recipients
receive your deliveries.
74
Copyright© e-Parcel Corporation All rights reserved.
e-Parcel Installation & Configuration Manual
EP-PM-MN-0265
Figure 75
2.Tracking function Buttons
There are four(4) function buttons at the bottom of the Tracking dialog box; Cancel Delivery,
Refresh Tracking, Print and Close. The Tracking function buttons at the bottom of the Tracking
dialog box provide[Cancel Delivery]
[Refresh Tracking]
[Print]
[Close]functions.(Figure
76)
75
Copyright© e-Parcel Corporation All rights reserved.
e-Parcel Installation & Configuration Manual
EP-PM-MN-0265
Figure 76
2-1.Cancel Delivery
The Cancel Delivery button will only be enabled if intended recipients have not opened your
message and contents. If the Cancel Delivery button is enabled, you can cancel the
transmission. After you click the Cancel button, your cancelled Item will be deleted in the
recipient’s In Box. Also the status of the Item in your Tracking windows displays “Cancelled”
after refresh tracking.
Caution: Once you Cancel an Item to send, it is no longer send an Item. If you
send same one, you have to remake it to send.
2-2.Refresh Tracking
The Refresh Tracking button will provide you with real time tracking capabilities. Click
Refresh Tracking to allow the e-Parcel to poll your recipients to obtain the latest status of
your delivered Item.
2-3.Print
The Print button prints the Tracking information details, providing you with a paper trail of
sent messages and attachments.
2-4.Close
The Close button closes the Tracking dialog box.
76
Copyright© e-Parcel Corporation All rights reserved.
e-Parcel Installation & Configuration Manual
EP-PM-MN-0265
Receive Automation Component
VCN CommCenter provides The Receive Automation Component. The Receive Automation
Component is the functions which are enabled to automatically copy, move and forward the
attached file(s) and/or folder(s) in an Item to a specific data location, and to automate the
process of starting tasks for specific file types received.
1.Receive Automation Display
The Receive Automation Component can be access from either the folder tree on the left side
of the GUI below the Components icon, or from the Components menu on the menu bar.
(Figure 77)
Figure 77
“The Receive Automation Component” View
Once displayed the Receive Automation Component View, after selecting the components
menu, a new set of options is available to apply conditions to data received.(Figure 78)The
existing Receive Automation condition (entry) can be listed up on The Receive Automation
View.
Receive Automation Tool Bar
Receive Automation Entry
Receive Automation Menu
Figure 78
77
Copyright© e-Parcel Corporation All rights reserved.
e-Parcel Installation & Configuration Manual
EP-PM-MN-0265
2.Receive Automation Tool Bar and Menu
From this view, a new Receive Automation menu and tool bar appears with various options.
These tool bar and menu are specifically for the setup of rules and conditions for your Receive
Automation Component. These rules allow the component to automate the process of
receiving data and starting tasks.(Figure 78)
2-1.Receive Automation Tool Bar
New —- This button will create a new Receive Automation Condition. For more details,
refer to 3.Creating Receive Automation Conditions (P80).
Edit —- This button will be enabled when an existing Receive Automation
Condition is selected or highlighted. Once the Edit button is clicked, an Edit This
Entry dialog box appears (Figure 79). Details on how to edit the Condition, Data
Location, Execute Files, Processing Error, Email Notification and Email Forwarding
tabs can be found throughout the 3.Creating Receive Automation Conditions
(P80) section.
Note: A Receive Automation Condition created can be disabled temporary by
placing a check in the “Disable this entry” option. Once a check-mark is placed,
you can not edit. Click the Apply button to save. If you wish to enable a Receive
Automation Condition again, remove a check-mark in the “Disable this entry”
option. (Figure 79)
Delete —- This button will be enabled when selecting a single or multiple Receive
Automation Conditions. To delete an entry, select it and click Delete. A confirmation
dialog appears. Click Yes to delete.
Delete All — This button will always be enabled. To delete all Receive Automation
Conditions, click the Delete All button. A confirmation dialog appears. Click Yes to
delete all entries.
Move Up/Move Down —- These two buttons are navigation tools. They perform the
simple function of scrolling up or down step by step among the Receive Automation
Entries in your list. It gives priority from the Receive Automation Entry be located in
the upper side of list.
78
Copyright© e-Parcel Corporation All rights reserved.
e-Parcel Installation & Configuration Manual
EP-PM-MN-0265
Import —- This button allows you to import existing Receive Automation
conditions. Further details about the use of this feature can be found in the 5.
Importing Conditions (P111) section of this manual.
Export — This button is used to export current Receive Automation conditions.
Further details about the use of this feature can be found in the4.Exporting
Conditions (P107) section of this manual.
Figure 79
2-2. Receive Automation Menu
This menu selection features commands to setup of rules and conditions for your Receive
Automation Component same as the menu buttons. The available options, which are not in the
Tool Bar are:
Move To Top/Move To Bottom — These two buttons are navigation tools. They
perform the simple function of scrolling up to top or down to bottom among the
Receive Automation Entries in your list.
Disable-This button allows you to disable an existing Receive Automation
conditions.
79
Copyright© e-Parcel Corporation All rights reserved.
e-Parcel Installation & Configuration Manual
EP-PM-MN-0265
Disable All— This button allows you to disable all existing Receive Automation
conditions.
Enable-This button allows you to enable an existing Receive Automation conditions.
Enable All— This button allows you to enable all existing Receive Automation
conditions.
3.Creating Receive Automation Conditions
Filters must be created to setup rules or conditions for the Receive Automation Component to
follow. These rules allow the component to automate the process of receiving data and
starting tasks. Filters can be set up to move and/or copy data to a specific data location.
You can also create conditions to allow the Receive Automation Component to start a program
or set up a production process, which executes a particular file. Receive Automation can also
be configured to notify individuals of the success or failure of an assigned task, and forward an
automation receiving data.
To set up a new filter, access the e-Parcel Components menu. Select Receive Automation
>View Entries.
Display the Receive Automation Conditions dialog box
A new view is created in VCN CommCenter GUI with another set of buttons found below the
set of e-parcel buttons. This is the Receive Automation tool bar. From the set of Tool buttons,
select New to add a new filter.(Figure 80)or select the Receive Automation > New on the
menu bar.(Figure 81) The Conditions dialog box appears.(Figure 82)
Figure 80
80
Copyright© e-Parcel Corporation All rights reserved.
e-Parcel Installation & Configuration Manual
EP-PM-MN-0265
Figure 81
The next step is to create your new Receive Automation filters or rules, referred to as
Conditions.
3-1.Conditions
Once Conditions are created, they are applied when an incoming Item meets your
pre-determined criteria.
Figure 82
81
Copyright© e-Parcel Corporation All rights reserved.
e-Parcel Installation & Configuration Manual
EP-PM-MN-0265
Condition Name
You must first assign a name for your filter. The filter name serves only as a unique identifier
for your convenience. (Figure 82)
Tip: It is recommended that the Condition name be related to the filter being
created. For example, if you want to route Items from a senior manager to a
specific location, the name of the Condition could be called “Boss” or “Boss
Messages to Important Folder”.
Condition
You will see that Conditions can be created based on three criteria: “…All incoming Item…”,
“…Sender’s e-e-parcel address…” or “…words or phrases from the parcel’s subject”. (Figure 82)
The Receive Automation Component has the ability to apply conditions based upon both
Sender and Subject. For Conditions that require both these options, place a check in both
boxes and enter appropriate criteria.
Caution: If both Sender and Subject conditions are chosen, They are applied
when an incoming Item meets both criteria.
All incoming items
This feature will allow you to apply the Receive Automation Component for all incoming
Items without a filter based on any one.
Condition Based on Sender
This feature will allow you to create a filter based on sender’s e-Parcel User ID.
To apply a filter based on a e-parcel’s sender User ID
① To apply a filter based on a e-parcel’s sender User ID, place a check in the box to “Use
the sender’s e-Parcel address checked below”, and then click the Address Book
button to select the e-Parcel User ID.(Figure 83)
82
Copyright© e-Parcel Corporation All rights reserved.
e-Parcel Installation & Configuration Manual
EP-PM-MN-0265
Figure 83
② The Address Book displayed. Enter the User ID from the e-Parcel Contact list by
selecting the e-parcel User ID to highlight, and then click the Select button.(Figure
84)
Figure 84
Tip: If there are multiple contacts or groups that must be added, they all can be
selected by holding down the <ctrl> key, and then selecting the contacts or
groups using your left mouse button.
83
Copyright© e-Parcel Corporation All rights reserved.
e-Parcel Installation & Configuration Manual
EP-PM-MN-0265
Note: The Address Book displayed (Windows or e-Parcel Contact List) is
determined by your selection in the e-Parcel Tools menu. Select Setup and
Choose the General tab. More information can be found in the Address Book
(P39) section of this manual.
③ The Conditions dialog box appears. The individuals selected appear in the appropriate
field.(Figure 85)
Figure 85
Edit User IDs
Once selected, User IDs can be modified if necessary. To modify, highlight your IDs and
click the Edit button.(Figure 85)
Remove User IDs
Individual or multiple User IDs can be removed. To remove a User IDs, highlight the
ID and then click the Remove button. Confirmation is required. Click Yes to remove, click
No if you do not wish to Remove the specified User ID. (Figure 85)
Note: To choose multiple User IDs, hold down the <ctrl> key while selecting
IDs.
84
Copyright© e-Parcel Corporation All rights reserved.
e-Parcel Installation & Configuration Manual
EP-PM-MN-0265
Condition Based on Subject
This feature allows you to create a filter based on your parcel’s subject.
To apply a filter based on a e-parcel’s your parcel’s subject
① To apply this filter, select the box “Use words or phrases from the parcel’s
subject” and then click Add Words to add applicable words or phrases.(Figure 86)
Figure 86
② The Add Words dialog box appears. (Figure 87) Enter the specific words or phrases
that apply to the condition you wish to create. If the condition is based on multiple
words or phrases, or a combination of both, click the Add button after entering
appropriate words or phrases to your filter.
After entering all appropriate conditions, click the OK button to apply.(Figure 88)
85
Copyright© e-Parcel Corporation All rights reserved.
e-Parcel Installation & Configuration Manual
EP-PM-MN-0265
Figure 87
Figure 88
③ Next to each word or phrase is a checked box. This box indicates that the word or
phrase is enabled and therefore will be included in the action set in the Receive
Automation Condition.(Figure 89)
Figure 89
86
Copyright© e-Parcel Corporation All rights reserved.
e-Parcel Installation & Configuration Manual
EP-PM-MN-0265
Edit Words or Phrases
Once your words or phrases have been selected and entered for a particular condition,
your entries can be modified if necessary.
To Edit words or phrases in your lists, select
the entry you wish to edit and click the Edit button. After making necessary modifications,
click the Enter button to apply the changes.(Figure 89)
Remove Words or Phrases
To remove particular words or phrases, click the checked box or select to highlight the word or
phrase to remove and then click the Remove button. Confirmation is required. Click Yes to
remove, click No if you do not wish to Remove the specified words or phrases.(Figure 89)
Note: To choose multiple words or phrases, hold down the <ctrl> key while
clicking the words or phrases.
Each word or phrase chosen will be highlighted.
Once complete Condition, click Next to configure the Data Locations for this Condition.
3-2.Data Location
The Data Location specifies where the data is to be placed by the Receive Automation
Component. There are several options for establishing where this data can be stored, “Move
to an e-Parcel Folder (a Child Folder on In Box)”, “Copy to a Windows folder” and “Move to a
Windows folder”. The section goes over the Data Location options in grater detail.(Figure 90)
Tip: Multiple Data Locations can be chosen. If this is necessary, it is important
to understand that the hierarchy is top-down. In other words, “Move the Item
to a new e-Parcel folder” will have precedence over the other two choices,
which are below.
87
Copyright© e-Parcel Corporation All rights reserved.
e-Parcel Installation & Configuration Manual
EP-PM-MN-0265
Figure 90
Select Data Location
The Data Location specifies where the data is to be placed by the Receive Automation
Component. There are several options for establishing where this data can be stored, an
e-Parcel Folder (a Child Folder in In Box), both a Windows folder and an e-Parcel Child Folder
or a Windows folder.
Move to a e-Parcel Folder
Placing a check in the first box, to “Move the Item to an e-Parcel Folder (a Child Folder in
In Box)”, will move the received Item to a specified e-Parcel Child Folder, referred to as
e-Parcel folder.
① When selected “Move the Item to a new e-Parcel folder”, the Item Folder button will
be enabled.(Figure 90)
② Click this button to select which folder the received Item is to be moved for this
Condition. The Move to New Folder dialog box appears.(Figure 91) From this location,
the e-Parcel In Box destination folder must be selected. If the folder already exists,
chose the folder, and then click the Select button.
88
Copyright© e-Parcel Corporation All rights reserved.
e-Parcel Installation & Configuration Manual
EP-PM-MN-0265
Tip: You can select only the e-Parcel In Box destination folder as a child folder
which the received Item is to be moved. Besides a new child folder also can be
created into a existed child folder of the e-Parcel In Box.
Figure 91
③ If the Condition requires a new folder, it can be created from the Move to New Folder
dialog box. First, it must be determined where this folder should be created. Because
this is a Child Folder, it must be created as a sub-folder to the In Box. Highlight In Box
as the parent Folder and select the New Folder button.
④ A New Folder dialog box appears.(Figure 92) Name the new folder. If the folder
should exist someplace other than the location listed, click the ellipse button and select
the desired location, and then click the OK button.
Figure 92
⑤ The Move to New Folder dialog box appears. (Figure 91) Chose the New created sub
folder, and then click the Select button. The Data Location dialog box appears. The
selected Folder(s) will be listed up in the first box “Move the Item to a new e-Parcel
folder”.(Figure 93)
89
Copyright© e-Parcel Corporation All rights reserved.
e-Parcel Installation & Configuration Manual
EP-PM-MN-0265
Figure 93
If this is the only destination folder for the Condition being configured, proceed to the File
Management section. Otherwise, continue to the Copy to Windows Folder section.
Caution: You do NOT have the ability to move the received Item to several
different e-Parcel Child Folder. You can select ONLY ONE e-parcel child folder
where received Item for meeting this Condition are to be moved.
Tip: Click the button on the right of the Data Location box and select the new
Data Location when you wish to create a child folder in new Data Location
rather than out of In Box. (Figure 92) However, in that case a child folder is
appeared in the e-Parcel In Box on the VCN CommCenter view.
Tip: There is a check box on the left of the selected e-Parcel child folder which
Item is moved to. If the e-Parcel child folder is necessary, A check must be
placed in the check box to be enabled. Once a check is removed in the check
box, it will not be applied to move when an incoming Item meets your
condition.(Figure 93)
Copy to Windows Folder
Placing a check in the second box, to “Copy the Item to a new Windows folder”, will place
a copy of the received Item in a Windows folder while maintaining the original parcel in
e-Parcel In Box.
90
Copyright© e-Parcel Corporation All rights reserved.
e-Parcel Installation & Configuration Manual
EP-PM-MN-0265
① When selected “Copy the Item to a new Windows folder”, the Browse button to the
right will be enabled. (Figure 94)
Figure 94
② Click the Browse button to select the destination folder to store copies of received
Items. A Choose Directory dialog box appears. Select the destination directory and
click OK .(Figure 95)
Figure 95
91
Copyright© e-Parcel Corporation All rights reserved.
e-Parcel Installation & Configuration Manual
EP-PM-MN-0265
③ The Data Location dialog box appears. The selected Folder(s) will be listed up in the
second box “Copy the Item to a new Windows folder”.
If this is the only destination folder for the Condition being configured, proceed to the File
Management (P94) section. Otherwise, continue to the next Move to Windows Folder section.
Note: You have the ability to copy the received Item to several different
destination directories. If multiple destinations are necessary, repeat the Copy
to Windows Folder instructions until all destination folders are listed.
Tip: There is a check box on the left of the selected windows folder which Item
is copied to. If a windows folder is necessary, A check must be placed in the
check box to be enabled. Once a check is removed, it will not be applied to copy
when an incoming Item meets your condition.
Move to Windows Folder
Placing a check in the last box, to “Moves the Item to a Windows folder”. It does not retain
a copy in the e-Parcel In Box.
① When selected the “Move the Item to a new Windows folder”, The Browse button to
the right will enabled.(Figure 96)
② Choose the Browse button to select the destination folder where received Item for
this Condition is to be moved. A Choose Directory dialog box appears. Locate the
destination folder to move the Item. Highlight and select the destination folder and
click OK.(Figure 95)
③ The Data Location dialog box appears. The selected Folder(s) will be listed up in the
last box “Move the Item to a new Windows folder”.
92
Copyright© e-Parcel Corporation All rights reserved.
e-Parcel Installation & Configuration Manual
EP-PM-MN-0265
Figure 96
Proceed to the next File Management section.
Caution: You do NOT have the ability to move the received Item to several
different destination directories. You can select ONLY ONE windows folder
where received Item for this Condition are to be moved.
Tip: There is a check box on the left of the selected windows folder which Item
is moved to. If a windows folder is necessary, A check must be placed in the
check box to be enabled. Once a check is removed, it will not be applied to
move when an incoming Item meets your condition.
Remove Data Location
To remove particular Data Location in the each box, to “Move to a e-Parcel Folder”, “Copy to a
Windows folder” and “Move to a Windows folder”, click the checked box or select to highlight
the Data Location to remove and then click the Remove button. Confirmation is required.
Click Yes to remove, click No if you do not wish to Remove the specified Data Location.
Note: To choose multiple Data Locations, hold down the <ctrl> key while
selecting Data Locations.
93
Copyright© e-Parcel Corporation All rights reserved.
e-Parcel Installation & Configuration Manual
EP-PM-MN-0265
File Management
After choosing the Condition destination folders, other file management aspects associated
with the data location must be established.
The available selections for file management are:
“Delete Existing Directories”, “Remove All Files and Directories” or “Overwrite Existing Files”.
(Figure 97)
Figure 97
Caution: These options are only enabled if the received parcels are to be stored
in a Windows destination folder. These options are not available for storage
within the e-Parcel folder such as a sub folder in In Box.
Delete Existing Directories
The option to “Delete existing Directories when they are duplicated by directories in the
Item” is demonstrated in the following example:(Figure 97)
If a received a Item contains a directory as an attachment, it will place the new directory in
your specified Data Location. If a directory with the same name is already present in your
specified location, it will be replaced with the new directory attached to your new Item
delivery.
Warning: Selecting this option overwrites any and all destination directories if
they already exist in the assigned location. Any files or sub-directories in the
destination file will be deleted and then overwritten. If there are files that
must be retained, they should either be stored in another directory, or create
backup directories for these files. Although the same directory structure exists,
the files will be deleted and replaced.
Remove All Files and Directories
The option to “Remove all files and directories from the target directory before moving the
Item” is demonstrated in the following example:(Figure 97)
94
Copyright© e-Parcel Corporation All rights reserved.
e-Parcel Installation & Configuration Manual
EP-PM-MN-0265
If a Item received contains a directory, it will place that received directory in the data
location specified. It will delete all existing directories and files within the specified data
location.
Warning: Selecting this option replaces all directories in the specified
destination directories. Any files or sub-directories in the destination directory
will be deleted and replaced with the received directory. If there are any files
that must be retained, they should either be stored in another directory, or
create backup directories for these files.
Overwrite Existing Files
The option to overwrite existing files indicates the existing files will be removed and
replaced with the new file. Use care when using this feature. This option to “Overwrite
existing files when they are duplicated by files in the parcel” is demonstrated in the
following example: (Figure 97)
If a item is received containing files in a directory, the filter will place the new files in the
destination location. If files in the directory are duplicates of files that already exist in the
destination location, the duplicate files contained in the new Item will overwrite the
existing files. Any additional files in the received Item directory that do not already exist
in the destination location are written to the destination directory.
Warning: The files in the directory of a received Item overwrite ONLY the
duplicate files in the destination directory. Files that have no duplicates are
simply written to the specified data location. If there are any files that must be
retained, they should either be stored in another directory, or create backup
directories for these files.
Once a File Management selection is made, click NEXT to proceed to Execute Files.
3-3. Execute Files
The Execute Files dialog box provides the receiver with the ability to launch applications
associated with specific file types, or to create command lines to invoke specific file types.
(Figure 98) At the bottom of the Execute Files dialog box, there are several “Extra command
line parameters” to aid in the development of command lines.
※ If this is not needed for the Condition being configured, proceed to the 3-4. E-mail
Forwarding (P99) section. Otherwise, continue to the Execute File section.
95
Copyright© e-Parcel Corporation All rights reserved.
e-Parcel Installation & Configuration Manual
EP-PM-MN-0265
Figure 98
Single File Recognition
The option, “For single file Items, run the program associated with this file”, will launch the
application associated with that file type.
The system can automatically recognize certain file
types and launch the application or program necessary to display the contents of the parcel
received. To enable this option, place a check in the appropriate box.(Figure 98)
Note: In selecting the box, “For single file Items, run the program associated
with this file”, there is also the option of creating a command line to associate a
specific file type. If a command line is necessary, this option must be checked
to enable. Further details about the configuring a command Line can be found
in the Command Line (P97) section of this manual.
Executable File
The “Select the program or batch file to execute” option is the second choice in the Execute
Files dialog box. (Figure 98)
Select Executable File
① To use this option, check the associated box.
This will enable the Browse button.
② Click Browse to view a Select Executable File dialog box. An application or executable
96
Copyright© e-Parcel Corporation All rights reserved.
e-Parcel Installation & Configuration Manual
EP-PM-MN-0265
file must be selected (.exe extension). This selected executable will automatically
launch to allow you to view the received Item.
Tip: There is a check box on the left of the selected Executable File. If an
Executable File is necessary, this check box must be checked to enable. Once a
check is removed, it will not be applied when an incoming Item meets your
Executable File.
Note: Choosing the box, “Select the program or batch file to execute” there is
also the option of creating a command line to associate a specific file type. If
a command line is necessary, this option must be checked to enable. Further
details about the configuring a command Line can be found in the next
Command Line section of this manual.
Remove Executable File
This can be performed in a Execute File. In the event a Execute File must be removed,
highlight the specific a Execute File. Choosing an Execute File will enable the Remove
button. Click the Remove button. Click Yes if an Execute File is to be removed.
Note: To choose multiple Execute Files, hold down the <ctrl> key while
selecting an Execute Files.
Command Line
In selecting the box, “For single file Items, run the program associated with this file” and
“Select the program or batch file to execute”, there is also the option of creating a command
line to associate a specific file type. If a command line is necessary, this option must be
checked to enable. (Figure 98)
Caution: Constructing command lines require simple background knowledge of
command lines.
To learn how to construct command lines, refer to Microsoft’s
operating system manuals.
Tip: If the command line parameter is not specified, the full path to an
attachment is automatically set as a command line parameter.
Add Command Line
① After placing a check in the appropriate box, a command line must be entered. Click
the Add button, which displays the Add Command Line dialog box.(Figure 99)
97
Copyright© e-Parcel Corporation All rights reserved.
e-Parcel Installation & Configuration Manual
EP-PM-MN-0265
Figure 99
② The command line must then be entered in the top field. Once complete, click the Add
button. Several command lines can be entered. All command lines entered will be
executed. Once all commands are added, click OK to proceed.(Figure 99)
Tip: Multiple command line parameters are added as one parameter delimited
by the comma.
Edit Command Line
This can be performed in either the Execute Files or the Add Command Line dialog boxes.
In the event a command line must be edited, highlight the specific command line. Select
the command line to enable the Edit button. Click the Edit button. Make necessary
modifications and click OK.
Remove Command Line
This can be performed in either the Execute Files or Add Command Line dialog boxes. In the
event a command line must be removed, highlight the specific command line. Choosing the
command line will enable the Remove button. Click the Remove button. Click Yes if the
command line is to be removed, click No if you do not wish to Remove.
Remove All Command Line
This can be performed in Add Command Line dialog box. Simply click Add to open the Add
Command Line dialog box. To remove all command lines, click the Remove All button. Click
Yes to remove all command lines. Click Cancel if you do not wish to Remove All Command
Line. Click OK if the all command line is to be removed, click Cancel if you do not wish to
Remove.
Once Execute Files section is made, click NEXT to proceed to E-mail Forwarding.
98
Copyright© e-Parcel Corporation All rights reserved.
e-Parcel Installation & Configuration Manual
EP-PM-MN-0265
3-4. E-mail Forwarding
The E-mail Forwarding option can be configured send an e-mail you to forward a message or a
message with an attachment(s) if a situation arises with the Receive Automation Component’s
assigned task(s).(Figure 100)
※ If E-mail Forwarding is not necessary, click Next and proceed to the 3-5.Error
(P101)
section.
Caution: To configure this option, you must have a SMTP server. Further details
about the configure a SMTP server can be found in the 6 . E-mail
Settings(P113) section of this manual.
Warning: Please note that neither a message nor an attachment(s) of an item is
encrypted for E-mail forwarding of the Receive automation Component.
Figure 100
E-mail Forwarding Settings
To configure this option, first you must select whether to forward only a message or to forward
a message and an attachment(s) if a situation arises with the Receive Automation
Component’s assigned task(s). Click either check box of "Message only" or "Message and
99
Copyright© e-Parcel Corporation All rights reserved.
e-Parcel Installation & Configuration Manual
EP-PM-MN-0265
attachment". (Figure 100)
E-mail Forwarding Recipient List
① The E-mail Forwarding can be configured for a specific recipient(s). First, check box of
"Message only" or "Message and attachment" to enable this feature. This will enable the
Address Book button. Click the Address Book button to select the email address (s) of
the person to receive an email if a situation arises with the Receive Automation
Component’s assigned task(s). (Figure 100)
② Select the recipients and/or groups from the Windows e-mail address list. Click OK to
add recipients. The recipient(s) should appear in the E-mail Forwarding dialog box.
Caution: With an e-mail function you should be using the Windows E-mail
Address. The Contact List which appears is dependent upon your selection in
the menu Tools >Setup >General tab>Address Book(P39) option of the
e-Parcel menu bar. Address Book option provides the three (3) choices which
appears, "Use Custom e-parcel Address Book", "Use Windows Address Book" or
"Ask me each time which to use".
Edit E-mail Forwarding Recipient List
In the event an E-mail Forwarding recipient email address must be edited, highlight the
address to enable the Edit button. Click the Edit button to make necessary modifications.
Click Enter to apply the changes.
Remove E-mail Forwarding Recipient
In the event an E-mail Forwarding recipient must be removed, highlight or select the
recipient to enable the Remove button. Click the Remove button. Confirmation is required.
Click Yes to remove. Click No, if you do not wish to remove.
Settings
To configure this option, you must have a SMTP server. The next step is to configure your
e-mail server for E-mail Forwarding. Click the Settings button on the E-mail Forwarding
dialog box. Further details about the configure a SMTP server can be found in the 6.
E-mail Settings(P113) section of this manual.
100
Copyright© e-Parcel Corporation All rights reserved.
e-Parcel Installation & Configuration Manual
EP-PM-MN-0265
Test E-mail
After E-mail Forwarding can be configured for a specific condition, you can try to send E-mail.
To send for trial, click the Test Email Button.
Message
In the message field, append the message to the original message of an Item. The recipients
will read prior to opening the message or message with attachments from the Mail Forwarding.
(Figure 100)
Click Next to proceed to Error Notification.
3-5.Error Notification
The Error Notification option can be configured to send an e-mail to notify you in the event
of a problem or if a situation arises with the Receive Automation Component’s assigned task(s).
(Figure 101)
※ If Error Notification is not necessary, click Next and proceed to the 3-6. E-mail Notification
(P103) section.
Figure 101
101
Copyright© e-Parcel Corporation All rights reserved.
e-Parcel Installation & Configuration Manual
Caution:
EP-PM-MN-0265
To configure this option, you must have a SMTP server. Further
details about the configure a SMTP server can be found in the 6. E-mail
Settings(P113) section of this manual.
Error Notification Recipient List
① Error notification can be configured for a specific condition.
First, click the box to the
left of “Send e-mail to the following people when this filter fails” to enable this feature.
This will enable the Address Book button. Click the Address Book button to select
the email address (s) of the person to receive an email in the event an error occurs.
(Figure 101)
② Select the recipients and/or groups from the Windows e-mail address list.
Click OK to
add recipients. The recipient(s) should appear in the Error Notification dialog box.
Caution: With an e-mail function you should be using the Windows E-mail
Address. The Contact List which appears is dependent upon your selection in
the Tools >Setup >General tab >Address Book(P39) option of the e-Parcel
menu bar. Address Book option provides the three (3) choices which appears,
"Use Custom e-parcel Address Book", "Use Windows Address Book" or "Ask me
each time which to use".
Edit Error Notification Recipient List
In the event an Error Notification recipient email address must be edited, highlight the
address to enable the Edit button Click the Edit button to make necessary modifications.
Click Enter to apply the changes.
Remove Error Notification Recipient
In the event an Error Notification recipient must be removed, highlight or select the recipient
to enable the Remove button. Click the Remove button. Confirmation is required. Click
Yes to remove. Click No, if you do not wish to remove.
Settings
To configure this option, you must have a SMTP server. The next step is to configure your
email server for Error Notification. Click the Settings button on the Error Notification dialog
102
Copyright© e-Parcel Corporation All rights reserved.
e-Parcel Installation & Configuration Manual
EP-PM-MN-0265
box. Further details about the configure a SMTP server can be found in the 6. E-mail
Settings(P113) section of this manual.
Test E-mail
After Error notification can be configured for a specific condition, you can try to send E-mail.
To send for trial, click the Test Email Button.
Subject
In the Subject field, enter the Subject of the Items sent to the recipients based upon the Error
Notification. (Figure 101)
Message
In the message field, enter the message that the recipients will read prior to opening the
attached file from the Error Notification. (Figure 101)
Note: The shortcut keystroke for the message when starting a new line is the
<Ctrl> plus the <Enter> key simultaneously.
Click Next to proceed to Success Notification.
3-6. E-mail Notification
The e-Parcel can send an e-mail to notify you once the condition of the filter in the Receive
Automation Component is satisfy assigned tasks. It will also contain information on the result
of any Item processing.(Figure 102)
※ If E-mail Notification is not necessary, click Next and proceed to the 4.Exporting
Conditions (P107).
Caution: To configure this option, you must have a SMTP server. Further details
about the configure a SMTP server can be found in the 6 . E-mail
Settings(P113) section of this manual.
103
Copyright© e-Parcel Corporation All rights reserved.
e-Parcel Installation & Configuration Manual
EP-PM-MN-0265
Figure 102
E-mail Notification Settings
To configure this option, first you must select to send E-mail Notification whether “Always send
this notification” or “Only send this notification if the filter was successfully processed”. Click
either check box. (Figure 102)
E-mail Notification Recipient List
① E-mail Notification can be configured for a specific Condition. First, click the check box to
the “Always send this notification” or “Only send this notification if the filter was
successfully processed” to enable this feature.
This will enable the Address Book
button. Click the Address Book button to select the email address (s) of the person to
receive an email if a situation arises with the Receive Automation Component’s assigned
task(s). (Figure 102)
② Select the recipients and/or groups from the Windows e-mail address list. Click OK to
add recipients. the recipient(s) should appear in the E-mail Notification dialog box.
104
Copyright© e-Parcel Corporation All rights reserved.
e-Parcel Installation & Configuration Manual
EP-PM-MN-0265
Caution: With an e-mail function you should be using the Windows E-mail
Address.
The Contact List which appears is dependent upon your selection in
the Tools >Setup >General tab >Address Book(P39) option of the e-Parcel
menu bar. Address Book option provides the three (3) choices which appears,
"Use Custom e-parcel Address Book", "Use Windows Address Book" or "Ask me
each time which to use".
Edit E-mail Notification Recipient List
In the event a E-mail Notification recipient email address must be edited, highlight the
address to enable the Edit button. Click the Edit button to make necessary modifications.
Click Enter to apply the changes.
Remove E-mail Notification Recipient
In the event a Notification recipient must be removed, highlight or select the recipient to
enable the Remove button. Click the Remove button. Confirmation is required. Click
Yes to remove. Click No, if you do not wish to remove.
Settings
To configure this option, you must have a SMTP server.
The next step is to configure your
email server for E-mail Notification. Click the Settings button on the E-mail Notification
dialog box. Further details about the configure a SMTP server can be found in the 6.
E-mail Settings(P113) section of this manual.
Test E-mail
After E-mail Notification can be configured for a specific condition, you can try to send
E-mail. To send for trial, click the Test Email Button.
Subject
In the Subject field, enter the Subject of the Items sent to the recipients based upon the
E-mail Notification. (Figure 102)
Message
In the message field, enter the message that the recipients will read prior to opening the
attached file from the E-mail Notification. (Figure 102)
105
Copyright© e-Parcel Corporation All rights reserved.
e-Parcel Installation & Configuration Manual
EP-PM-MN-0265
Note: The shortcut keystroke for the message when starting a new line is the
<Ctrl> plus the <Enter> key simultaneously.
You completed the configuration of receive automation condition.
Click the OK button to save the setting. The receive automation condition should
appear in the receive automation view. Once conditions are created, they are
applied when an incoming Item meets your pre-determined criteria.
106
Copyright© e-Parcel Corporation All rights reserved.
e-Parcel Installation & Configuration Manual
EP-PM-MN-0265
4.Exporting Conditions
The following steps describe how to export the receive automation Conditions.
Exporting
conditions limits the need to recreate the same condition for multiple users. (Figure 103)
The Export dialog box appears next. There are two options available for the exporting
Conditions: Export a single or multiple conditions or Export all conditions.(Figure 104)
Figure 103
4-1. Export Single or Multiple Conditions
This option of the Export Condition feature will allow the export of Receive Automation
Conditions listed in the Receive Automation Component.
① To export single or multiple conditions, first, you must select a Receive Automation
Condition(s) in the Receive Automation view. Then, select the Export button in the
Receive Automation tool bar.(Figure 103)
Note: To export multiple conditions, the conditions must be selected or
highlighted in the Receive Automation view. To choose multiple conditions, hold
down the <ctrl> key while selecting conditions.
② The Export dialog box appears. Click the box next to “Export selected entries to the file
listed below”.(Figure 104) Next, a name of the export file must be entered into the text
box. Click the Select File button.
107
Copyright© e-Parcel Corporation All rights reserved.
e-Parcel Installation & Configuration Manual
EP-PM-MN-0265
Figure 104
③ This will display a Select or Create Export File dialog box. Enter a name into the “File
name:” text field. Next, a location for storing the export file must be chosen. Do so by
highlighting the desired directory. Once the name is created and a location is chosen, click
the Open button to return to the Export dialog box.(Figure 105)
Figure 105
Note: When multiple conditions are exported, it is exported as one file with
a .dat extension. Once it is imported, multiple conditions will appear in the
Receive Automation view.
④ In the Export dialog box, the location path and file name will be listed.(Figure 106) To
complete the exporting function, click the Export button. This will export the condition(s)
to the specified location with a .dat extension.
108
Copyright© e-Parcel Corporation All rights reserved.
e-Parcel Installation & Configuration Manual
EP-PM-MN-0265
Figure 106
4-2.Export All Conditions
This option will export all Receive Automation Conditions listed in the Receive Automation
view.
① To export all Receive Automation Conditions, click the Export button in the Receive
Automation tool bar of the view.(Figure 103)
② The Export dialog box appears. Next, the box beside “Export all entries to the file listed
below” must be selected. A name must be entered in the text box. Click the Select File
button.(Figure 107)
Figure 107
③ The Select or Create Export File browse box appears. Enter a name into the “File name:”
text field. A location for storing the export file must be chosen. Do so by highlighting
the desired directory. Once the name is created and a location is chosen, click the Open
button, which will display the Export dialog box.
Note: When all conditions are exported, it is exported as one file with a .dat
extension. Once it is imported, multiple conditions will appear in the Receive
Automation view.
109
Copyright© e-Parcel Corporation All rights reserved.
e-Parcel Installation & Configuration Manual
EP-PM-MN-0265
④ In the Export dialog box, the location path and file name will be listed. To complete the
export, click the Export button. This will export the conditions to the specified location
with a .dat extension.(Figure 108)
Figure 108
110
Copyright© e-Parcel Corporation All rights reserved.
e-Parcel Installation & Configuration Manual
EP-PM-MN-0265
5.Importing Conditions
The e-Parcel is able to import Receive Automation Conditions previously created by others or
stored for backup purposes.
① In the Receive Automation view, select the Import button in the Receive Automation tool
bar.(Figure 109)
Figure 109
② The Import dialog box appears.(Figure 110) Select the appropriate version of the e-Parcel
client software you are importing from. Once a version is selected, the Select File button
becomes enabled. Click the Select File button to view the Select Import File dialog box.
Figure 110
Note: The confirmation of the version of the e-Parcel client software is
displayed to select the help > About VCN CommCenter in the e-Parcel menu
bar.
111
Copyright© e-Parcel Corporation All rights reserved.
e-Parcel Installation & Configuration Manual
EP-PM-MN-0265
③ Locate the file to be imported and highlight file to select. Click the Open button to return
to the Import dialog box. (Figure 111)
Figure 111
④ The Import dialog box appears. The location path and file name will be listed in the Import
dialog box. To complete the import, click the Import button.(Figure 112)This will import
a condition(s). Once it is imported, a condition(s) will appear in the Receive Automation
view.
Figure 112
112
Copyright© e-Parcel Corporation All rights reserved.
e-Parcel Installation & Configuration Manual
EP-PM-MN-0265
6. E-mail Settings
6-1. SMTP mail server Settings
To configure “E-mail Forwarding” “Error Notification” “E-mail Notification” option, you must
have a SMTP server. The next step is to configure your E-mail server for these three (3)
options.
Note: To configure your SMTP mail server, it is available to click any Settings
button on “E-mail Forwarding”, “Error Notification” or “E-mail Notification”
dialog box.
Note: e-Parcel’s Receive Automation Component- “E-mail Forwarding”, “Error
Notification” and “E-mail Notification” option can only function with an SMTP
mail server.
Caution: If you do not know the address of your SMTP e-mail server, please
contact your system administrator, company help desk or service provider for
technical support.
① To configure your SMTP mail server, Click any Settings button on “E-mail Forwarding”,
“Error Notification” or “E-mail Notification” dialog box.(Figure 113)
Figure 113
113
Copyright© e-Parcel Corporation All rights reserved.
e-Parcel Installation & Configuration Manual
EP-PM-MN-0265
② The E-mail Settings dialog box appears. To add new e-mail server, click Add New to enter
your SMTP mail server.(Figure 114)
Figure 114
Note: If multiple SMTP mail servers are entered, you can set only one server
port number.
③ The Add E-mail Servers dialog box appears. Enter new SMTP e-mail server name or IP
Address to “Enter a valid e-mail server” box, click Add to enter your SMTP mail server.
(Figure 115)
Figure 115
114
Copyright© e-Parcel Corporation All rights reserved.
e-Parcel Installation & Configuration Manual
EP-PM-MN-0265
④ Your SMTP mail server name which enter now will move to the Current e-mail servers box.
(Figure 116)Once the e-mail server has been entered, click OK to proceed.
Figure 116
Note: Repeat this process whenever it is necessary different mail server(s)
according to the E-mail address of the recipients.
⑤ The E-mail Settings dialog box appears. Your SMTP mail server name which enters now will
list up to the e-mail server box. See the Check mark in the box to the left of Your SMTP
mail server name which is set up now.(Figure 117)
⑥ To use the each notification service by the receive automation function, next the server
port number and E-mail language are set.
⑦ Furthermore if your E-mail server is required “Login user ID” and “Login password”, you
must enter to set. Locate the check mark in the “My server requires authentication” box to
enable the “Login user ID” and “Login password” field.(Figure 117)Once the “Login user
ID” and “Login password” has been entered, click OK to complete the SMTP mail server
settings.
※ If “Login user ID” and “Login password” on your E-mail server is not necessary to set, click
OK to complete the SMTP mail server settings.
115
Copyright© e-Parcel Corporation All rights reserved.
e-Parcel Installation & Configuration Manual
EP-PM-MN-0265
Figure 117
6-2. Edit SMTP mail server
In the event a SMTP mail server must be edited, highlight the mail server to enable the Edit
button. Click the Edit button to make necessary modifications. Click the Enter button to
apply the changes.(Figure 118)
Figure 118
116
Copyright© e-Parcel Corporation All rights reserved.
e-Parcel Installation & Configuration Manual
EP-PM-MN-0265
6-3. Remove SMTP mail server
In the event a SMTP mail server must be removed, highlight or select the SMTP mail server to
enable the Remove button. Click the Remove button. Confirmation is required. Click Yes to
remove. Click No, if you do not wish to remove. (Figure 119)
Figure 119
6-4.Remove all SMTP mail server
① In the event all SMTP mail server must be removed, first click Add New button in the
E-mail Settings dialog box to open the Add E-mail Servers dialog box.(Figure 119)
② Click the Remove All button in the Add E-mail Servers dialog box. Once all SMTP mail
server are remove in the “Current E-mail servers” field. Click OK to remove. Click Cancel,
if you do not wish to remove all.(Figure 120)The E-mail Settings dialog box returns.
Figure 120
117
Copyright© e-Parcel Corporation All rights reserved.
e-Parcel Installation & Configuration Manual
EP-PM-MN-0265
Hot Folders Component
VCN CommCenter provides the Hot Folders Component. The Hot Folders Component is the
functions which are enabled to automatically send a file(s) or a folder(s) to a e-parcel
recipient(s) specified by copying or moving an attachment(s) to pre determined Hot Folder.
1.Hot Folders Display
The Hot Folders Component can be access from either the folder tree on the left side of the
GUI below the Components icon, or from the Components menu on the menu bar. (Figure
121)
Figure 121
“The Hot Folder Component” View
Once displayed the Hot Folder Component View, after selecting the components menu, a new
set of options is available to apply conditions to data sent.(Figure 122)The existing Hot Folder
condition (entry) can be listed up on The Hot Folder View.
Hot Folders Tool Bar
Hot Folders Tool Entry
Hot Folders Menu
Figure 122
118
Copyright© e-Parcel Corporation All rights reserved.
e-Parcel Installation & Configuration Manual
EP-PM-MN-0265
2.Hot Folders Tool Bar and Menu
From this view, a new Hot Folders menu and tool bar appears with various options. These tool
bar and menu are specifically for the setup of rules and conditions for your Hot Folders
Component. These rules allow the component to automate the process of sending data.
(Figure 122)
The following options are available using the Hot Folders Component:
2-1.Hot Folders Tool Bar
New — This button will create a new Hot Folder Condition. For more details, refer to the
3.Creating Hot Folders Condition (P120).
Edit — This button will only be enabled once a current Hot Folder Condition is highlighted.
Once the Edit button is clicked, an Edit This Entry dialog box appears. (Figure 125)
Details about how to edit the Hot Folder Condition can be found in the 3.Creating Hot
Folders Condition (P120).
Delete —This button will only be enabled once a single, or multiple (but not all)
current Hot Folder Condition(s) is highlighted. Once the Delete button is clicked,
confirmation is required. If the Hot Folder Condition(s) is to be deleted, choose the
Yes button. If the Hot Folder Condition(s) should not be deleted, choose the No
button.
Delete All —This button will always be enabled. If all current Hot Folder Conditions
must be deleted, click the Delete All button. Once the Delete All button is clicked,
confirmation is required. If all of the Hot Folder Condition(s) are to be deleted, choose
the Yes button. If all of the Hot Folder Condition(s) should not be deleted, choose the
No button.
Enable All — This button will always be enabled. By clicking this button, any Hot
Folder Conditions that are currently disabled, will be enabled.
Disable All — This button will always be enabled. By clicking this button, any Hot
Folder Conditions that are currently enabled, will be disabled.
119
Copyright© e-Parcel Corporation All rights reserved.
e-Parcel Installation & Configuration Manual
EP-PM-MN-0265
2-2. Hot Folders Menu
This menu selection features commands to setup of rules and conditions for your Hot Folders
Component same as the menu buttons. The available options, which are not in the Tool Bar
are:
Enable — This button will only be enabled once a single disable Hot Folder Condition
is highlighted. By selecting this menu, a Hot Folder Condition that is currently disabled,
will be enabled.
Disable — This button will only be enabled once a single enable Hot Folder Condition
is highlighted. By selecting this menu, a Hot Folder Conditions that is currently enabled,
will be disabled.
3.Creating Hot Folders Condition
Conditions must be created to setup rules for the Hot Folders Component to follow. These
rules allow the component to automate a sending data. Rules can be set up to sent when a
file(s) and/or a folder(s) copy or move to a specific folder set as Hot Folder.
Note: e-Parcel Client Software provides the 63 Hot Folders condition which can
be configured by default. If the more than 63 Hot Folders Condition are
required to configure, please contact us to get the further functions which are
enabled to create over 64 Hot Folders conditions.
Display the Hot Folders Conditions dialog box
To create a new Hot Folder condition, select the New button(Figure 123)or select Hot Folders
menu > New in the menu bar.(Figure 124)The Hot Folders dialog box appears.(Figure 125)
Figure 123
120
Copyright© e-Parcel Corporation All rights reserved.
e-Parcel Installation & Configuration Manual
EP-PM-MN-0265
Figure 124
Figure 125
3-1. Hot Folder identity
You must first assign a name for your Hot Folder. The Hot Folder name serves only as a unique
identifier for your convenience.(Figure 125)
121
Copyright© e-Parcel Corporation All rights reserved.
e-Parcel Installation & Configuration Manual
EP-PM-MN-0265
3-2.Recipients
Next, the recipients must be added to the Hot Folder condition. (Figure 125)
Add Recipient
This can be done by manually adding recipients. After each user ID is added, click the Add
Recipient button.
Address Book
Recipients can also be added using the Address Book button. Click the Address Book
button, which will display your default address book.
Note: If there are multiple recipients or groups that must be added, they all can
be selected by holding down the <ctrl> key, and then selecting the recipients or
groups using your left mouse button.
Caution: The Address Book displayed (Windows or e-Parcel Contact List) is
determined by your selection in the e-Parcel Tools menu. Select Setup
>General tab >Address Book(P39) option of the e-Parcel menu bar. Address
Book option provides the three (3) choices which appears, "Use Custom
e-parcel Address Book", "Use Windows Address Book" or "Ask me each time
which to use".
Remove Recipient(s)
Individual or multiple recipient(s) can be removed. To remove a single or multiple recipient(s),
highlight the recipient(s) and then click the Remove button. Confirmation is required. Click
Yes to remove, click No if you do not wish to Remove the specified recipient(s).
Note: To choose multiple recipient(s), hold down the <ctrl> key while clicking
on the recipient(s). Each recipient(s) chosen will be highlighted.
Remove All Recipient(s)
If the entire set of recipient(s) must be removed, the Remove All button will accomplish that
task. There is no need to highlight any recipient(s). Simply click the Remove All button.
Confirmation is required. Click Yes to remove all, click No if you do not wish to Remove All
the recipient(s).
3-3.Folders
The next step for creating a Hot Folder is listing the folders. (Figure 125)
122
Copyright© e-Parcel Corporation All rights reserved.
e-Parcel Installation & Configuration Manual
EP-PM-MN-0265
Caution: You can locate and select the folder(s) designated to set as the Hot
Folder within only your local drive, through the Hot Folders function is
developed on the assumption of using it only within the computer in which the
e-Parcel client software that sets the Hot Folder(s) is installed.
The Hot Folders function is NOT guaranteed the result when the network place
folder in your computer is set as a Hot Folder or when a file(s)/folder(s) which
is saved in the other computer is copy/move to a shared folder within your
computer as a Hot Folder.
Caution: There is a report that there is a case where the Hot Folders on the
Network drive designated to set by the VCN CommCenter on Windows 7 and
OS after it stop functioning.
Caution: When multiple Hot folder entries are set a same folder as the Hot
Folder, the setting of the entry located in higher position in the view becomes
effective.
Add Folder
Click the Add Folder button(Figure 125), and then
locate and select the folder(s) designated to serve as
the Hot Folder from your local drive. (Figure 126)
Single and Multiple folder(s) can be selected and listed
as Hot Folders under the same Hot Folder Condition
although only one folder is enabled and therefore will
be included in the action set in the Hot Folder
Condition. Once all folders are selected, click the OK
button. This will transfer the folders and their location
into the Hot Folder Condition window.
Figure 126
Tip: Next to each folder is a checked box. This designates that the folder is
enabled and therefore will be included in the action set in the Hot Folder
Condition.
folder.
If a folder should not be included, select the check box beside the
This will remove the check-mark from the box and the folder is no
longer included in the Hot Folder Condition, although it remains listed.
With the individual folder(s) listed, other functions can be performed in the event changes are
necessary. Once a folder(s) is highlighted (click a folder(s) entry), the folder(s) can be
Removed individually or Removed All at once.
123
Copyright© e-Parcel Corporation All rights reserved.
e-Parcel Installation & Configuration Manual
EP-PM-MN-0265
Remove Folder(s)
Individual or multiple folder(s) can be removed. To remove a single or multiple folder(s),
highlight the folder(s) and then click the Remove button. Confirmation will be required.
Click Yes to remove, click No if you do not wish to Remove the folder(s).
Note: To choose multiple folder(s), hold down the <ctrl> key while clicking on
the folder(s).
Each folder(s) chosen will be highlighted.
Remove All Folder(s)
If the entire set of folder(s) must be removed, the Remove All button will accomplish that
task. There is no need to highlight any folder(s). Simply click the Remove All button.
Confirmation is required. Click Yes to remove all, click No if you do not wish to Remove All
the folder(s).
3-4.Subject
In the Subject field, enter the Subject of the Items sent to the recipients based upon the Hot
Folder Condition.(Figure 125)
3-5.Message
In the message field, enter the message that the recipients will read prior to opening the
attached file from the Hot Folder.(Figure 125)
Note: The shortcut keystroke for the message when starting a new line is the
<Ctrl> plus the <Enter> key simultaneously.
The last configuration for a Hot Folder Condition is enabling the condition and whether the
files transferred must be deleted after distribution.
3-6. Activation
“Enable this entry” is checked by default. By choosing this option, the Hot Folder Condition is
active.
To deactivate, click in the box and the check-mark is removed.(Figure 125)
3-7. File Management
“Delete files after transfer” is disabled by default. By choosing this option, once the files placed
in the Hot Folder are delivered to the recipients, the files are then deleted from the Hot Folder.
To enable this feature, click in the box and the check-mark will appear.(Figure 125)
124
Copyright© e-Parcel Corporation All rights reserved.
e-Parcel Installation & Configuration Manual
EP-PM-MN-0265
Warning: By enabling this option, the files are permanently deleted and cannot
be recovered.
Therefore it is important that an original copy be kept in
another location if the files must be deleted.
Warning: Even though by enabling this option, the files without write privilege
can NOT be deleted after the Hot Folder Condition has been applied.
You completed the configuration of Hot Folders condition.
Click the OK button to save the setting. The Hot Folders condition should appear
in the Hot Folders view. Once conditions are created, they are applied when a
file(s) and/or a folder(s) copy or move to a pre determined Hot Folder.
Tip: If a sending file directly made by other upper application software will send
from a Hot Folder, it is recommended that at first assign a folder to save a
sending file, NOT assign a Hot Folder. Once it’s normally completed to save a
sending file to a folder assigned, copy/move it to a Hot Folder to send.
Tip: If you copy/move multiple files to a Hot Folder, it is highly recommended
that multiple files will be combined together into one file before copy/move to a
Hot Folder. However it might be difficult you to combine together into one file.
In that case, it is recommended that once save multiple files/folders to one
folder before copy/move to a Hot Folder, rather than select and copy/move the
multiple files/folders at a same time.
Caution: If you individually select and continuously copy/move multiple
files/folders to a Hot Folder, it might be starting to send dividing into two or
more items not one Item together, before all the copies and the movements are
completed. In this case, the transmission is starting from a file(s)/folder(s) that
is completed to copy/move one after another. (The number of attachments per
an Item is the different between one file/folder to all files/folders depending on
the file type and size.)
Caution: 0 byte file(s) can not be sent and received through VCN CommCenter.
Also, if total 0 byte data is(are) copied/moved to a Hot Folder, the item can not
be sent.
125
Copyright© e-Parcel Corporation All rights reserved.
e-Parcel Installation & Configuration Manual
EP-PM-MN-0265
Appendix 1. e-Parcel My VCN - Web Site
○User Login – My VCN
Registered users of the e-Parcel services are provided with a User ID. This User ID can be used
to login to the e-Parcel VCN Login Page on web site to monitor your delivery activity in your In
Box and Out Box. From this site, you can also view or modify your e-Parcel profile, and
download the e-Parcel Client Software and your digital certificate.
To login to the e-Parcel User- My VCN site, access your web browser. Visit the e-Parcel
web site at http://www.e-parcel.co.jp/ and click the menu “VCN Login”.
Locate the User Login field. Enter your User ID and Password supplied by e-parcel, and then
click Login button.(Figure 127)
Figure 127
126
Copyright© e-Parcel Corporation All rights reserved.
e-Parcel Installation & Configuration Manual
EP-PM-MN-0265
○My VCN – View My Profile
View your user profile. Verify that the information is correct. If the information must be
edited, click the Edit My Profile option on the left navigation menu.(Figure 128)
Figure 128
127
Copyright© e-Parcel Corporation All rights reserved.
e-Parcel Installation & Configuration Manual
EP-PM-MN-0265
○My VCN – Edit My Profile
The Edit My Profile allows you to modify your e-Parcel VCN User Profile. Make the necessary
changes and then click the Submit button.(Figure 129)
Figure 129
The following fields can be modified:
First Name & Last Name (Must enter) – Your first and last name. If space is necessary
to insert between letters of your first and last name, it is enable to enter only one half
space.)
Company Name – Your company name.
Work Number – Your daytime number. It is important that this information be accurate
as there may be instances where e-Parcel Corporation must contact you directly.
E-mail (Must enter) – Your email address at the location where e-Parcel Items are
received.(Don’t enter any space.)
Password & Confirm Password –In the event a e-Parcel password should be changed,
enter the new password in the Password field, and then confirm the new password by
128
Copyright© e-Parcel Corporation All rights reserved.
e-Parcel Installation & Configuration Manual
EP-PM-MN-0265
re-entering it in the Confirm Password field.(※When a e-Parcel password is changed, you
must re- authenticate the new password on your e-Parcel Client Software such as the
following procedure.)
Caution: The password should be set by alphabet letters and figure mixture,
and the number of letters should be over six characters and within 11
characters. The password of only the alphabet or only the figure is irrelevant.
Warning: When an e-Parcel password is changed on the e-Parcel web site, you
must re-setup the new password on your e-Parcel Client Software. Refer to the
following procedure. The reason is that you need to re-authenticate with the
new e-Parcel password on your e-Parcel Client Software after your e-Parcel
User ID’s password has been updated through the Edit My Profile of My VCN on
Web site. More information can be found in the Configuring 1 . User
Information (P30) section of this manual.
① To re-authenticate your password, the application must be running. The
e-Parcel icon should be displayed in your system tray.
② Access the Tools >Setup menu from the VCN CommCenter menu bar.
③ The User Information tab of Setup dialog box appears including six
configuration tabs.
④ Click the Change Logon Password button. The Enter new password
dialog box appears.
⑤ The User ID field should be pre-filled. Type in your new logon password
which has been updated through the Edit My Profile of My VCN on Web
site.
⑥ Once your credentials are entered, click OK. The Login Progress field
displays the results of authentication. The message, “Login was
successful” should normally appear. Click the OK button to run the
e-parcel.
Time Zone – Your standard time zone is displayed on the page of the In Box and the Out
Box in e-Parcel My VCN.
Summer Time – When the time zone is set at the US time, select Yes to set the summer
time, select No if you do not set to summer time.
Once the appropriate changes can be entered, click the Submit button to apply.
129
Copyright© e-Parcel Corporation All rights reserved.
e-Parcel Installation & Configuration Manual
EP-PM-MN-0265
○My VCN - In Box
To view the items received in the e-Parcel In Box, click the In Box navigation menu option to
the left of the page. (Figure 130)
The In Box view will automatically display all Items received for the current date. To change
the In Box view, or to view specific Items, sort the list by clicking the any of the available
dropdown menu. After selecting the desired search criteria from the In Box-Transmissions
Query list, click the Submit button to view received Items.
Figure 130
130
Copyright© e-Parcel Corporation All rights reserved.
e-Parcel Installation & Configuration Manual
EP-PM-MN-0265
○View Parcel Coversheet
To view more detailed information about the received Item, click the Detail icon [
etc.]
to the left of the Sender User ID.(Figure 131)
Figure 131
Specific details about the Item in your In Box are provided, including:
Name – The name of any attached file(s) or folder(s).
Subject – Subject contents of the Item.
From – Item sender’s User ID.
Size – Exact size of the delivered Item.
Item ID – Unique Item identifier.
Time Zone ‐Your standard time zone to set.
Sent – Date and time the Item was sent.
To return the In Box view, click either the Back to Activity or the Back button on your web
browser.
131
Copyright© e-Parcel Corporation All rights reserved.
e-Parcel Installation & Configuration Manual
EP-PM-MN-0265
○My VCN - Out Box
To view Items delivered using the e-Parcel, access the Out Box option on the left navigation
menu. (Figure 132)
To view a particular selection, choose either the dropdown Time Range or Item Status menus.
You can also sort Items by Item Name, Size and Date using the Sort by menu. Click Submit to
view Out Box query.
Figure 132
132
Copyright© e-Parcel Corporation All rights reserved.
e-Parcel Installation & Configuration Manual
EP-PM-MN-0265
○Track
To view the Item coversheet from your Out Box view, click the Track icon [
of the Recipients user ID. (Figure 133)
Figure 133
Specific details about the Item in your Out Box are provided, including:
Item Cover sheet
Name – The name of any attached file(s) or folder(s).
Subject – Subject contents of the Item.
From – Item sender’s User ID.
Size – Exact size of the delivered Item.
Item ID – Unique Item identifier.
Time Zone ‐Your standard time zone to set.
Sent – Date and time the Item was sent.
133
Copyright© e-Parcel Corporation All rights reserved.
] to the left
e-Parcel Installation & Configuration Manual
EP-PM-MN-0265
Recipient List
View Details – Click icon [
etc.] to view Item history.
User ID – The recipient(s) of your delivered Item. This field also displays details
about the recipient including:
First Name & Last Name – The registered recipient’s name.
Registered – Yes: If the recipient is registered with e-Parcel services. No: If the
recipient is not registered.
Last Login – The date and time a recipient last logged in to e-Parcel services.
Installed – Displays whether or not a recipient has installed the e-Parcel software.
Version, Language, Client – The e-Parcel Client Software which recipient has
installed.
Item Status – Displays the confirmation of the Item, if it has been confirmed,
received, or not received etc.
Recipient Confirmed
Delivery Confirmed
Item Opened
Item Read
Item Moved
Item Shredded
Cancelled by Sender
Cancelled by Recipient
To return the Out Box view, click either the Back to Activity or the Back button on your web
browser.
134
Copyright© e-Parcel Corporation All rights reserved.
e-Parcel Installation & Configuration Manual
EP-PM-MN-0265
○Item Tracking
To view item history, click View Detail icon [
etc.] to view Item history or click the User
ID provided in the Recipient List. (Figure 134)
The Activity-Transmissions page appears. This page displays the Parcel Coversheet, Sender
History and Recipient History.
The history fields detail the up to the minute delivery transmission status when Item sending
and receiving began and completed. The recipient history field also displays the actions taken
by your recipient, whether the Item was opened, moved, or cancelled.
Figure 134
To return the Track view, click either the Back to Activity or the Back button on your web
browser.
135
Copyright© e-Parcel Corporation All rights reserved.
e-Parcel Installation & Configuration Manual
EP-PM-MN-0265
○My VCN – e-Parcel Software
Select the Software menu option to download the e-Parcel Digital Certificate and the e-Parcel
Service Software. (Figure 135)For more information regarding how to download and install
your Certificate and Client Software, please refer to STEP2.Obtaining a Certificate (P12) and
STEP3.Downloading the e-Parcel software (P18) sections of this manual.
Figure 135
To logout the e-Parcel My VCN view, click the blue letter “Logout” on the left of your user ID
on the title of My VCN view.
136
Copyright© e-Parcel Corporation All rights reserved.
e-Parcel Installation & Configuration Manual
EP-PM-MN-0265
Appendix 2. For forgetting "Password"
○For forgetting e-Parcel Password
For the customers who forget the password for login, access your default web browser. Visit
the “VCN Login” page on the e-Parcel web site at http://www.e-parcel.co.jp/ and click the
Password Request button.(Figure 127)
The application form for password request or reset password appears.(Figure 136) After the
customer apply the form, our response will be automatically sent by e-Parcel/VCN service or
E-mail, it depends on the customer’s choice of the “Select how to get your password” field.
Figure 136
137
Copyright© e-Parcel Corporation All rights reserved.
e-Parcel Installation & Configuration Manual
EP-PM-MN-0265
To request password or reset password, refer to the following descriptions and fill the application
form.
① Must enter the fields of
② Must select the field of
“User ID”, “Name”, “Company Name”, “E-mail”
“Select how to get your password.”
Click an appropriate means of them. If you do NOT launch the e-Parcel/VCN service at
present or you do NOT know your registered e-mail address, select to reset password.
「You will request to notify password through the ee-Parcel/VCN service.」
service.」
Your password is automatically sent to your e-Parcel user ID through our
service. Launch the e-Parcel client software and click the check Now button to refresh.
The password notice is received in the In Box.
「You will request to notify password by ee-mail to the registered ee-mail address」
address」
Your password is automatically sent by E-mail. This ee-mail address
address is already
registered in ee-Parcel Corporation when you launch the ee-Parcel/VCN service. (Normally your
registered E-mail address can be shown on the web: “View My Profile” and “Edit My Profile”
menu on “VCN Login” page of the e-Parcel web site.) This e-mail address is NOT the E-mail
address entered in the E-mail field of this application form.
「You will apply to reset password.」
password.」
Our response is automatically sent by E-mail. This e-mail address is the E-mail
address entered in the E-mail field of this application form. When you are sure to reset
password for your user ID, reply to us with your permission by E-mail.
③ Click the Submit button to apply after fill the application form. You will receive our response at
once.
138
Copyright© e-Parcel Corporation All rights reserved.
e-Parcel Installation & Configuration Manual
EP-PM-MN-0265
Appendix 3. e-parcel Support Information
○Web site - e-Parcel Support Information Page
We provide the latest e-Parcel Support Information page on e-Parcel Corporation web site for
our customers such as “Customer Support general Information”, “Notice”, “Software Upgrade
Information” and “Information of the e-Parcel Server Operations”. (Figure 137)
Please access the e-Parcel Corporation Home page at http://www.e-parcel.co.jp/ and visit the
Support page in the menu bar.
Figure 137
139
Copyright© e-Parcel Corporation All rights reserved.
e-Parcel Installation & Configuration Manual
EP-PM-MN-0265
Appendix 4. Commoditize Database
○ For commoditize the e-parcel user certificate
and the sending & receiving histories
If you have administrator right on your computer, you can configure to commoditize the
e-parcel user certificate and the sending & receiving histories for multiple users logging into
your computer by commoditizing the database folder.
To do this configuration in case that only particular user on your computer is already using
the VCN CommCenter, please take the following procedure.
*The procedure differs according to your Windows OS.
In case of Windows NT4.0(SP3 and more), 2000, XP and 2003
1. Select the following menu on the VCN CommCenter.
[Tools] – [Setup] – [Options]tab
And check the database Location path and then make backup copy of its folder.
(Do not erase this folder and all files in it until the end of the configuring operation.)
If you use the VCN CommCenter as a general user right, please follow from number 2. to 16.
If you use the VCN CommCenter as an administrator right, please follow from number 17. to 28.
[If you use the VCN CommCenter as a general user right]
2. Log off from Windows after shutting the VCN CommCenter down and then relogon as a
local administrator right of your computer.
In this time, if the Installing Certificate window appears, shut it down by clicking cancel
button.
3. Make 3 folders (Ex. Folder-A, Folder-B and Folder-C) and give all users of that computer the
change authority for each folder.
4. Start the VCN CommCenter. In this time, if the Installing Certificate window appears, install
your e-parcel certificate as instructed and then start the VCN CommCenter.
140
Copyright© e-Parcel Corporation All rights reserved.
e-Parcel Installation & Configuration Manual
EP-PM-MN-0265
5. Select the following tab on the VCN CommCenter. [Tools] – [Setup] – [Options]tab
6. Select Delivered from the dropdown button on Data Locations and then click the far right
button on that line.
7. Select Folder-A on Browse for Folder window and then click OK button. Folder-A is fixed as
the Delivered folder on Data Locations.
8. Select In Progress from the dropdown button on Data Locations and then click the far right
button on that line.
9. Select Folder-B on Browse for Folder window and then click OK button. Folder-B is fixed as
the In Progress folder on Data Locations. After this, make sure to click Apply button.
10. Click the far right button on Database Location line.
11. Click the far right button on New Database Location on Client Database Location window.
12. Select Folder-C on Browse for Folder window and then click OK button. Folder-C is fixed as
the new database location.
13. Clear the check box for Current User and then check for All Users. After that, click OK
button. VCN CommCenter is automatically shut down. If it is not do so, shut it down
manually. Folder-C is fixed as the common database folder with all users of that computer.
14. Overwrite Folder-C all files in a folder backup copied on 1.
15. Start the VCN CommCenter and then check that the sending & receiving histories are taken
over.
16. Relogon to your windows as other general user and start the VCN CommCenter.
Check that the sending & receiving histories are taken over without problem.
[If you use the VCN CommCenter as an administrator right]
17. Make 3 folders (Ex. Folder-A, Folder-B and Folder-C) and give all users of that computer the
change authority for each folder.
141
Copyright© e-Parcel Corporation All rights reserved.
e-Parcel Installation & Configuration Manual
EP-PM-MN-0265
18. Select the following tab on the VCN CommCenter. [Tools] – [Setup] – [Options]tab
19. Select Delivered from the dropdown button on Data Locations and then click the far right
button on that line.
20. Select Folder-A on Browse for Folder window and then click OK button. Folder-A is fixed as
the Delivered folder on Data Locations.
21. Select In Progress from the dropdown button on Data Locations and then click the far right
button on that line.
22. Select Folder-B on Browse for Folder window and then click OK button. Folder-B is fixed as
the In Progress folder on Data Locations. After this, make sure to click Apply button.
23. Click the far right button on Database Location line.
24. Click the far right button on New Database Location on Client Database Location window.
25. Select Folder-C on Browse for Folder window and then click OK button. Folder-C is fixed as
the new database location.
26. Clear the check box for Current User and then check for All Users. After that, click OK
button. VCN CommCenter is automatically shut down. If it is not do so, shut it down
manually. Folder-C is fixed as the common database folder with all users of that computer.
27. Start the VCN CommCenter and then check that the sending & receiving histories are taken
over.
28. Relogon to your windows as other general user and start the VCN CommCenter.
Check that the sending & receiving histories are taken over without problem
In case of Windows Vista, 2008 and 7
Caution : You must erase some related registry keys in the procedure below. Please be careful
enough not to erase other unrelated registry keys. We are not responsible for any
damages to the computer or other software by erasing unrelated registry keys.
142
Copyright© e-Parcel Corporation All rights reserved.
e-Parcel Installation & Configuration Manual
EP-PM-MN-0265
1. Select the following menu on the VCN CommCenter.
[Tools] – [Setup] – [Options]tab
And check the database Location path and then make backup copy of its folder.
(Do not erase this folder and all files in it until the end of the configuring operation.)
2. If you logon as a general user, log off after shutting the VCN CommCenter down and then
relogon as a local administrator group user of your computer.
In this time, if the Installing Certificate window appears, shut it down by clicking cancel
button. If the VCN CommCenter is automatically started, exit it.
3. Select the following menu with right click and then select Run as administrator.
Windows[Start]button – [Program] – [e-Parcel] – [VCN CommCenter] – [Remove…]
If prompted by UAC, then click on Yes to apply permission. Then, uninstall VCN
CommCenter.
4. Erase the following folder if any.
C:¥Users¥(Username)¥AppData¥Roaming¥e-Parcel
5. Erase the following registry key on registry editor window.
HKEY_LOCAL_MACHINE¥SOFTWARE¥e-Parcel
6. Erase the following registry key surely on registry editor window if any.
HKEY_CLASSES_ROOT¥VirtualStore¥MACHINE¥SOFTWARE¥e-Parcel
HKEY_CURRENT_USER¥Software¥e-Parcel
In this time, if you can not erase them with indication of an error message, try again after
you reboot your computer.
7. Logon to your computer with each user who use the VCN CommCenter and erase the
following folder with respect to each user if any.
C:¥Users¥(Username)¥AppData¥Roaming¥e-Parcel
Also erase the following registry key surely on registry editor window with respect to each
user if any.
HKEY_CLASSES_ROOT¥VirtualStore¥MACHINE¥SOFTWARE¥e-Parcel
HKEY_CURRENT_USER¥Software¥e-Parcel
In this time, if you can not erase them with indication of an error message, try again after
you reboot your computer.
143
Copyright© e-Parcel Corporation All rights reserved.
e-Parcel Installation & Configuration Manual
EP-PM-MN-0265
8. Logon to your computer again as an administrators group user.
9. Make 3 folders (Ex. Folder-A, Folder-B and Folder-C) and give all users of that computer the
change authority for each folder.
10. Right-click eClient60EN…exe (VCN CommCenter installer icon) and then select Run as
administrator to start installing the VCN CommCenter.
If prompted by UAC, then click on Yes to apply permission.
Install your e-parcel certificate with administrator right, too.
11. Right-click e-Parcel icon on the desktop and then select Run as administrator to
start the VCN CommCenter. After that, select the following tab on the VCN CommCenter.
[Tools] – [Setup] – [Options]tab
12. Select Delivered from the dropdown button on Data Locations and then click the far right
button on that line.
13. Select Folder-A on Browse for Folder window and then click OK button. Folder-A is fixed as
the Delivered folder on Data Locations.
14. Select In Progress from the dropdown button on Data Locations and then click the far right
button on that line.
15. Select Folder-B on Browse for Folder window and then click OK button. Folder-B is fixed as
the In Progress folder on Data Locations. After this, make sure to click Apply button.
16. Click the far right button on Database Location line.
17. Click the far right button on New Database Location on Client Database Location window.
18. Select Folder-C on Browse for Folder window and then click OK button. Folder-C is fixed as
the new database location.
19. Clear the check box for Current User and then check for All Users. After that, click OK
button. VCN CommCenter is automatically shut down. If it is not do so, shut it down
manually. Folder-C is fixed as the common database folder with all users of that computer.
144
Copyright© e-Parcel Corporation All rights reserved.
e-Parcel Installation & Configuration Manual
EP-PM-MN-0265
20. Overwrite Folder-C all files in a folder backup copied on 1.
21. Start the VCN CommCenter and then check that the sending & receiving histories are taken
over.
22. Relogon to your windows as other general user and start the VCN CommCenter.
Check that the sending & receiving histories are taken over without problem.
145
Copyright© e-Parcel Corporation All rights reserved.
e-Parcel Installation & Configuration Manual
EP-PM-MN-0265
Document Information
e-Parcel VCN CommCenter 6.0 Installation & Configuration User Manual
11th version printed in June, 2014
e-Parcel and e-Parcel Logo are trademarks of e-Parcel Corporation.
Copyright © 2001-2014
e-Parcel Corporation All rights reserved.
This document is intended for the sole use of e-Parcel and e-Parcel clients only.
Confidential and proprietary information is contained and should not be copied and/or
distributed without the express written consent of e-Parcel Corporation.
146
Copyright© e-Parcel Corporation All rights reserved.