1
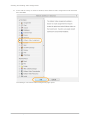
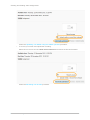
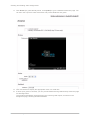
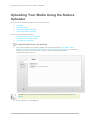
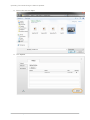
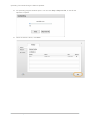
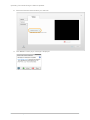
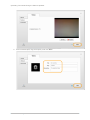
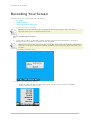
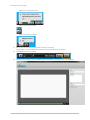
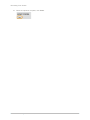
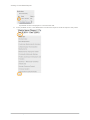
Kaltura Video Package for Moodle
2.x
Quick Start Guide
Version: 3.0 for Moodle 2.x
Kaltura Business Headquarters
5 Union Square West, Suite 602, New York, NY, 10003, USA
Tel.: +1 800 871 5224
Copyright © 2012 Kaltura Inc. All Rights Reserved. Designated trademarks and brands are the property of their respective
owners.
Use of this document constitutes acceptance of the Kaltura Terms of Use and Privacy Policy.
Contents
Preface .................................................................................................................................................... 4
Audience ........................................................................................................................................... 4
About this Guide ............................................................................................................................... 4
Overview of the Kaltura Package for Moodle 2.x .................................................................................... 5
Configuring the Kaltura Package for Moodle 2.x .................................................................................... 6
Setting Up the Kaltura Package for Moodle 2.x ................................................................................ 6
Customizing Players and Uploader Widgets .................................................................................... 7
Customizing General Settings .......................................................................................................... 9
Enabling the Kaltura Repositories .................................................................................................... 9
Kaltura Media Repository: Kaltura Capabilities .............................................................................. 12
Kaltura Capabilities Terminology .............................................................................................. 12
Customizing Roles Capabilities Permissions with Kaltura........................................................ 12
My Media ............................................................................................................................................... 14
Using Media in the Text Editor .............................................................................................................. 18
Creating Video Resources .................................................................................................................... 37
Creating Video Presentation Resources ............................................................................................... 40
Creating and Grading Video Assignments ............................................................................................ 44
Uploading Your Media Using the Kaltura Uploader .............................................................................. 51
Recording Your Screen ......................................................................................................................... 60
Viewing Course Media Reports ............................................................................................................ 63
Reports Dashboard ......................................................................................................................... 64
Media Items Highlights ............................................................................................................. 65
User Engagement and Contribution Highlights ........................................................................ 66
Media Items Full Report .................................................................................................................. 67
Understanding the Media Items Full Report ............................................................................. 68
Understanding the Media Item Full Report Drill-Down Details ................................................. 68
User Engagement Full Report ........................................................................................................ 69
Understanding the User Engagement Full Report .................................................................... 69
Understanding the User Engagement Full Report Drill-Down Details ...................................... 70
User Contribution Full Report ......................................................................................................... 70
Understanding the User Contribution Full Report..................................................................... 71
Understanding the User Contribution Full Report Drill-Down Details ....................................... 71
Exporting a Report to a CSV File and Printing a Report ................................................................ 72
Kaltura Video Package for Moodle 2.x Quick Start Guide
3
Preface
Audience
This guide is primarily intended for Moodle administrators and faculty users. It contains useful
information for the main usage flows and functionality of the Kaltura Video Package for Moodle.
About this Guide
This guide describes how to set up, configure, and use the Kaltura Video Package for Moodle.
Related Documentation
Kaltura Video Package for Moodle Release Notes
Kaltura Video Package for Moodle 2.x Installation and Upgrade Guide
Kaltura Video Package for Moodle 2.x Quick Start Guide
4
Overview of the Kaltura Package for Moodle 2.x
Overview of the Kaltura Package for
Moodle 2.x
Kaltura's Video Package for Moodle 2.x makes it easy to add the robust capabilities of Kaltura's open
source online video platform to any Moodle site. The package was developed specifically for Moodle
and integrates with other features and modules, such as resources and activities, so that users can
upload and embed media easily.
The package supports the following features for all users:
•
My Media: users’ personal media gallery, for uploading, viewing, managing, and sharing
media.
•
Integration as an external repository with the file picker accessible from the text editor: embed
your media or media you have access to, anywhere you can author text.
o
Use the text editor to upload new files to Kaltura and embed the media anywhere you can
author text.
•
Record the user's screen (desktop recording, audio, and optionally web cam) to record
lessons, assignments, classes, meetings, demonstrations, tutorials and more.
•
Compatibility with the latest Moodle Stable Release, including displaying videos when
working with the default Moodle Mobile theme
Teachers and Admins can create:
•
Video Resource: Easily add video content to your course as a specialized resource.
•
Video Presentation resource: Create a synchronized view of a Document and a Video.
•
Video Assignment: Allows students to submit videos as an assignment submission.
Teachers and Admins can view course media reports to see:
•
Which videos are students watching the most?
•
Which students contribute the most videos?
•
Which students watch the most videos?
•
How long are students watching each video?
Kaltura Video Package for Moodle 2.x Quick Start Guide
5
Configuring the Kaltura Package for Moodle 2.x
Configuring the Kaltura Package for
Moodle 2.x
Only site administrators can configure various settings of the Kaltura Package for Moodle 2.x.
Setting Up the Kaltura Package for Moodle 2.x
After you install the Kaltura Package for Moodle 2.x, configure the package settings. For installation,
please refer to the Kaltura Video Package for Moodle 2.x Installation and Upgrade Guide.
To set up the Kaltura package
1. Go to Site administration > Plugins > Local plugins > Kaltura package libraries.
2. Set the connection to Kaltura. Select your Connection Server.
The default is Kaltura Hosted Solution (SaaS).
3. Enter your Kaltura partner login credentials.(Hosted account login and Hosted account
password)
4. Click Save changes to save.
If you do not have a Kaltura account, sign up to obtain one.
Kaltura Video Package for Moodle 2.x Quick Start Guide
6
Configuring the Kaltura Package for Moodle 2.x
Customizing Players and Uploader Widgets
Kaltura's most commonly used widgets include the Kaltura Dynamic Player (KDP) and the Kaltura
Uploader. The Kaltura UIConf ID is the unique identifier for Kaltura widgets. We recommend using the
default widgets for the Kaltura Video Package for Moodle.
Players can be created, designed and configured with specific features and buttons within the Studio
tab, in the Kaltura Management Console. For instructions on how to create, design and configure a
player, refer to the KMC User Manual.
After you create a player, you can select it in the Kaltura Package Configuration page to replace the
default players.
You can also modify the Kaltura Uploader widgets (also known as the Kaltura Contribution Wizard KCW) and Kaltura Presentation Widget using the Kaltura APIs. Please contact Kaltura for more
information on using the Kaltura API or refer to the Kaltura API Documentation.
NOTE: The default widget settings should work out of the box when working with Kaltura
SaaS.
To customize the widgets
1. Go to Site administration > Plugins > Local plugins > Kaltura package libraries and scroll
down to the Kaltura Reports Settings section.
Kaltura Video Package for Moodle 2.x Quick Start Guide
7
Configuring the Kaltura Package for Moodle 2.x
Kaltura Video Package for Moodle 2.x Quick Start Guide
8
Configuring the Kaltura Package for Moodle 2.x
2. Kaltura Reports Settings is the base URL where reports are hosted. For Kaltura SaaS, use
the default setting.
3. For each of the following types – Video Assignment, Video Resource, Video Presentation,
Embedded player used via the File Picker (for video used in the text editor) – you can select a
player used to play back media of this type in the appropriate dropdown.
Advanced Kaltura users may choose to use a custom player and insert the player’s UIConf ID
to use a player that does not appear in the dropdown.
4. For Video Resource, check the “Override video resource player setting” for the selected
player to be used for all video resources. Teachers will not be able to choose different players
for their video resources if this option is selected.
5. For the Kaltura Video Presentation resource, the simple uploader is the widget that is used for
uploading documents. You can select an uploader in the dropdown.
Advanced Kaltura users may use a custom Kaltura Simple Uploader and insert the uploader's
UiConf ID to use an uploader that does not appear in the dropdown.
6. The Screen Recorder is the applet used for screen recording across the application.
Advanced Kaltura users may use a custom KSR (Kaltura Screen Recorder) and insert the
KSR's UiConf ID to use a screen recorder that does not appear in the dropdown.
7. For the Embedded player used via the File Picker (for video used in the text editor), select
embedded player width and height.
Advanced Kaltura users may use a custom embedded player and insert the player's UiConf
ID to use a player that does not appear in the dropdown.
8. For each of the following types – Video Assignment, Video Resource, Video Presentation,
and My Media – you can change the Kaltura Uploader (KCW) to a custom one. We
recommend this option for advanced users only.
9. Click Save changes to save.
Customizing General Settings
To customize the general settings
1. Go to Site administration > Plugins > Local plugins > Kaltura package libraries and scroll
down to the General Settings section.
2. Check the “Enable HTML5 flavour” to enable playback on Mobile devices.
3. If you are using several applications, select the application name to be used for data
aggregation in Kaltura.
4. Click Save changes to save.
Enabling the Kaltura Repositories
Enable the Upload Media to Kaltura Repository and the Kaltura Media Repository.
To enable the Upload Media to Kaltura Repository
1. Go to Site administration > Plugins > Repositories > Manage repositories
Kaltura Video Package for Moodle 2.x Quick Start Guide
9
Configuring the Kaltura Package for Moodle 2.x
2. Find “Upload media to Kaltura” in the list and choose Enabled and visible in the dropdown.
3. In the Kaltura Uploader Plug-in screen, select the repository plugin name (optional) to
determine the name of the repository that is displayed in the File Picker.
4. Click Save.
NOTE: Upload files to Kaltura is the Upload Media to Kaltura Repository name used in
procedures and examples in this document.
To enable the Kaltura Media Repository
1. Go to Site administration > Plugins > Repositories > Manage repositories
2. Find “Kaltura” in the list and choose Enabled and visible in the dropdown.
Kaltura Video Package for Moodle 2.x Quick Start Guide
10
Configuring the Kaltura Package for Moodle 2.x
3. In the Kaltura Configuration screen, select:
a. The repository plugin name (optional), to determine the name of the repository that is
displayed in the File Picker.
b. The number of files to display per page.
c. The name of the root category of the Moodle application in your Kaltura account.
4. Click Save.
NOTE: To enable the Kaltura Media Repository to its full functionality, we recommend that
you enable the Kaltura Media Filter, so that the media is displayed in an embedded fully
functional player.
To enable the Kaltura Media Filter
1. Go to Site administration > Plugins > Filters > Manage filters
Kaltura Video Package for Moodle 2.x Quick Start Guide
11
Configuring the Kaltura Package for Moodle 2.x
2. Find “Kaltura Media” and select On from the dropdown menu.
Kaltura Media Repository: Kaltura Capabilities
The Kaltura media repository comes with a set of capabilities that can be set on Moodle roles.
Kaltura Capabilities Terminology
•
View Kaltura Repository – determines whether users assigned to a role can view the
Kaltura media repository in the File Picker
•
Shared Video Visibility – determines whether users assigned to a role can use media items
that are shared in courses they are enrolled in with an admissible role, via the text editor.
•
Course Video Visibility - determines whether users can use media items that were used in
courses they are enrolled with an admissible role, via the text editor. Used Videos are defined
as media that was embedded in the course and was viewed at least once.
By default users have access to Shared Media of courses they are enrolled in as students, while
users that are enrolled to a course as teachers or managers have access to Shared Media and Used
Media of that course.
Customizing Roles Capabilities Permissions with Kaltura
The default capabilities assignment can be further customized via Moodle permissions to include
additional roles, as well as for creating special use-cases.
To customize roles permissions with Kaltura
1. Go to Site administration > Users > Permissions > Define Roles
2. Select the role you want to customize.
Kaltura Video Package for Moodle 2.x Quick Start Guide
12
Configuring the Kaltura Package for Moodle 2.x
3. Click Edit.
4. Scroll down or search for the string the “Repository: Kaltura” permissions.
5. Select the capabilities for this role.
6. Click Save changes.
Kaltura Video Package for Moodle 2.x Quick Start Guide
13
My Media
My Media
Each user has a personal, searchable My Media gallery for uploading, viewing, managing, and
sharing media.
Users are able to use and reuse any of the videos in this repository in various locations within Moodle
as well as across various Kaltura applications in the institution. Additionally, users can use this gallery
to mark which of their videos will be available for use by authorized users in specific courses.
My Media is accessed from the Navigation block in My home > My Media.
To upload media in My Media
Go to My home > My Media and choose a media type to upload:
•
To upload media or record and upload a webcam video:
a. Click Upload media or record from webcam (on the top left) to launch the Kaltura
Uploader.
b. Follow the Uploading Your Media Using the Kaltura Uploader procedure.
c. When a confirmation message is displayed, click Continue.
The new media is displayed in My Media.
•
To record your screen and upload the recording:
a. Click Record Screen (on the top left) to launch the Screen Recorder.
Kaltura Video Package for Moodle 2.x Quick Start Guide
14
My Media
b. Follow the Recording Your Screen procedure.
The new media is displayed in My Media.
NOTE: Newly uploaded media is converted in Kaltura servers for maximizing user experience
with different devices and network capabilities. This process may take a few minutes. While the
media is being converted, you cannot preview it, but you can change the metadata, share it
and use it.
To search for media in My Media
1.
2.
3.
4.
Go to My home > My Media.
Type the text you want to search for in the text box.
Click Search.
The items shown in My Media display only items matching the search query.
To preview media in My media
1. Go to My home > My Media.
2. Click Preview below the relevant media item
A modal box with the media in a player is displayed.
3. Use the player controls to view the media.
4. When you are finished, close the modal box by clicking the ‘x’ button on the top right.
Kaltura Video Package for Moodle 2.x Quick Start Guide
15
My Media
To edit media metadata in My Media
1. Go to My home > My Media.
2. Click Edit below the relevant media item.
A modal box with the media metadata is displayed
3. Input the metadata and click Save.
4. When a confirmation message is displayed, click Continue.
5. When you are finished, close the modal box by clicking the ‘x’ button on the top right.
To share media
1. Go to My home > My Media
2. Click Share below the relevant media item.
A modal box with list of courses to share the media item with is displayed.
Kaltura Video Package for Moodle 2.x Quick Start Guide
16
My Media
3. Check Share with site to share it with everyone that has access to the Kaltura repository.
4. Check each course you want to share the media item with (for those who have the relevant
permission).
5. Click Save to save your changes.
6. When a confirmation message is displayed, click Continue.
7. When you are finished, close the modal box by clicking the ‘x’ button on the top right.
Kaltura Video Package for Moodle 2.x Quick Start Guide
17
Using Media in the Text Editor
Using Media in the Text Editor
When the Kaltura repository is enabled, you can embed existing and new media everywhere that you
have permission to author content with Moodle’s text editor.
For example, you can embed existing and new media in quizzes, glossary, forum posts, wiki, and
resources.
To embed existing media in the text editor
1. Click the ‘Moodle Media’ button in the text editor.
The ‘insert embedded media’ modal box is displayed.
Kaltura Video Package for Moodle 2.x Quick Start Guide
18
Using Media in the Text Editor
2. Click Find or upload a sound, video or applet.
The File picker (Moodle component) is displayed.
Kaltura Video Package for Moodle 2.x Quick Start Guide
19
Using Media in the Text Editor
Moodle 2.2 and earlier:
Moodle 2.3:
3. Click the name of the Kaltura repository (in this example “Kaltura”).
Kaltura Video Package for Moodle 2.x Quick Start Guide
20
Using Media in the Text Editor
Moodle 2.2 and earlier:
The Kaltura repository tab is displayed. You can View as icons or View as a list.
Moodle 2.3:
The Kaltura repository tab is displayed with icons. To view as a list, click the middle menu
view button
. To view as a tree, click the right menu view button
.
4. Select the media you want to embed. You can browse for media or search for it.
Depending on your permissions in the course you are authoring in, you can use media from
four sources:
1
1
o
Site Shared Videos – Media shared with the site
o
Shared Videos – Media shared with courses you have the Shared Videos permission in
1
In Moodle 2.3, Media replaces Videos.
Kaltura Video Package for Moodle 2.x Quick Start Guide
21
Using Media in the Text Editor
1
o
Used Videos – Media used in courses you have the Course Videos permission in
o
Your own media
The File picker displays the thumbnail of the media selected for approval.
Moodle 2.2 and earlier:
Kaltura Video Package for Moodle 2.x Quick Start Guide
22
Using Media in the Text Editor
Moodle 2.3:
5. Click Select this file.
6. The ‘insert embedded media’ box is displayed with the selected media in the Preview box.
Kaltura Video Package for Moodle 2.x Quick Start Guide
23
Using Media in the Text Editor
NOTE: The player in this box is only a flash player and doesn’t include any advanced features
like playback on mobile devices. Likewise, if your media is session restricted, the media won’t
playback in this location. These limitations are only for this location and are lifted once the
media is displayed as embedded in the context.
7. Click Insert.
The text editor is displayed, where the embedded media is represented as a link.
When displayed outside of the editing mode, the media is displayed as an embedded player.
To browse for media
1. In the File picker on the Kaltura Repository tab, select the source you want to browse, for
Kaltura Video Package for Moodle 2.x Quick Start Guide
24
Using Media in the Text Editor
1
example “Shared Videos” .
1
1
2. If you chose “Shared Videos” or “Used Videos” , a list of all the courses you have admissible
permission to is displayed.
Moodle 2.2 and earlier:
Kaltura Video Package for Moodle 2.x Quick Start Guide
25
Using Media in the Text Editor
Moodle 2.3:
3. Browse to the course you want to select.
A list of videos is displayed.
Kaltura Video Package for Moodle 2.x Quick Start Guide
26
Using Media in the Text Editor
Moodle 2.2 and earlier:
Moodle 2.3:
4. Either select the media you want to use or go back using the breadcrumbs.
Kaltura Video Package for Moodle 2.x Quick Start Guide
27
Using Media in the Text Editor
Moodle 2.2 and earlier:
Moodle 2.3:
To search for media
NOTE: Search results are limited solely to media items in courses that you have the relevant
permission to access.
Moodle 2.2 and earlier:
1. In the File picker on the Kaltura Repository tab, click Search.
A modal box for search is displayed.
Kaltura Video Package for Moodle 2.x Quick Start Guide
28
Using Media in the Text Editor
2. Choose the source of media you are searching for from one of the following options:
a. Shared with courses
b. Shared with site
c. Used in courses
d. Your own
3. (Optional) Enter the media Name and/or Tags as search strings.
NOTE: If you input search criteria in both text fields, the result includes media that matches
either the input keyword in the Name or the input keyword in the Tags.
4. (Optional) For searches over media ‘Used in courses’ or ‘Shared with courses’, you can
further limit the search to specific keywords in the course/s Name.
5. Click Submit to execute the search query.
The file picker is displayed with the search results shown as a flat list.
You can select the media you want to use.
Kaltura Video Package for Moodle 2.x Quick Start Guide
29
Using Media in the Text Editor
Moodle 2.3:
1. In the File Picker on the Kaltura Repository tab, click Search.
2. In the Search for menu, select one of the following sources for the media you are searching
for:
o
Media shared with courses
o
Media shared with site
o
Media used in courses
o
Media you own
Kaltura Video Package for Moodle 2.x Quick Start Guide
30
Using Media in the Text Editor
3. (Optional) In the Media Name field, enter the name of the media to search for.
4. In the Media Name field, press the Enter key.
The search results are displayed as a flat list.
5. In the File Picker on the search results page, do one of the following:
o
Select the media you want to use.
o
Click Search to define a new search.
o
Click the
button to return to the Kaltura Repository tab home page.
To select from your own media
Moodle 2.2 and earlier:
1. In the File picker on the Kaltura Repository tab, click Search.
A modal box for search is displayed.
Kaltura Video Package for Moodle 2.x Quick Start Guide
31
Using Media in the Text Editor
2. Choose You own in the ‘Search for videos’ dropdown.
3. (Optional) Narrow the search results by typing additional search criteria in the other fields.
4. Click Submit.
The File Picker displays the search results for media that you own.
You can select the media you want to use.
Moodle 2.3:
1. In the File Picker on the Kaltura Repository tab, click Search.
2. In the Search for menu, select Media you own.
Kaltura Video Package for Moodle 2.x Quick Start Guide
32
Using Media in the Text Editor
3. (Optional) In the Media Name field, enter the name of the media to search for.
4. In the Media Name field, press the Enter key.
The File Picker displays the search results for media that you own.
You can select the media you want to use.
To embed new media in the text editor
1. Click the Moodle Media button in the text editor.
Kaltura Video Package for Moodle 2.x Quick Start Guide
33
Using Media in the Text Editor
2. In the Insert/Edit Embedded Media window, click Find or upload a sound, video or applet.
3. In the File Picker, click Upload files to Kaltura.
Kaltura Video Package for Moodle 2.x Quick Start Guide
34
Using Media in the Text Editor
4. In the File Picker, click Browse and select a file.
5. In the File Picker, skip the metadata fields and click Upload this file.
6. In the Insert/Edit Embedded Media window, click Insert to embed the new media in the text
editor.
No preview is displayed.
Kaltura Video Package for Moodle 2.x Quick Start Guide
35
Using Media in the Text Editor
In the text editor, the embedded media is represented as a link.
When displayed outside of the editing mode, the media is displayed as an embedded player.
Kaltura Video Package for Moodle 2.x Quick Start Guide
36
Creating Video Resources
Creating Video Resources
Teachers and administrators can create video resources that will be displayed inline within a course.
To create a Video Resource
1. In the relevant part of the course that you want the resource to appear in, click Add an
activity or resource.
2. In the Add an activity or resource window, select Kaltura Video Resource under Resources
and click Add.
Kaltura Video Package for Moodle 2.x Quick Start Guide
37
Creating Video Resources
3. In the General section of the Adding a new Kaltura Video Resource page, enter the Kaltura
Video Resource’s name and summary.
4. In the Video section of the Adding a new Kaltura Video Resource page, choose a media type.
o
To upload media, select My Content media, or record and upload a webcam video:
Select Upload media or record from webcam and click Add Media to launch the Kaltura
Uploader.
Follow the Uploading Your Media Using the Kaltura Uploader procedure.
o
To record your screen and upload the recording:
Select Record screen and click Add Media to launch the Screen Recorder.
Follow the Recording Your Screen procedure.
Kaltura Video Package for Moodle 2.x Quick Start Guide
38
Creating Video Resources
5. After the video is added to the Video section of the Adding a new Kaltura Video Resource
page, click Player properties.
6. In the Player Properties window, enter a name, select the player design (availability depends
on configuration), select the player dimensions, specify the player size, and click Save.
7. In the Video section of the Adding a new Kaltura Video Resource page, click Preview to view
the added video in the selected player.
NOTE: Previewing the video is only available after the video finished the transcoding and
conversion process within the Kaltura system. This may take a few minutes and depends
mostly on the video duration.
8. On the Adding a new Kaltura Video Resource page, click Save and display or Save and
return to course to save the video resource and make it available for course participants.
Kaltura Video Package for Moodle 2.x Quick Start Guide
39
Creating Video Presentation Resources
Creating Video Presentation Resources
The Video Presentation Resource creates a synchronized view of a video aside a document, with key
points that can be edited by the author.
To create a Video Presentation Resource
1. In the relevant part of the course that you want the resource to appear in, click Add an
activity or resource.
2. In the Add an activity or resource window, select Kaltura Video Presentation under Resources
and click Add.
Kaltura Video Package for Moodle 2.x Quick Start Guide
40
Creating Video Presentation Resources
3. In the General section of the Adding a new Kaltura Video Presentation page, enter the Kaltura
Video Presentation’s Name and Summary.
4. In the Video section of the Adding a new Kaltura Video Presentation page, choose a media
type.
o
To upload media, select My Content media, or record and upload a webcam video:
Select Upload media or record from webcam and click Add Media to launch the Kaltura
Uploader.
Follow the Uploading Your Media Using the Kaltura Uploader procedure.
o
To record your screen and upload the recording:
Select Record screen and click Add Media to launch the Screen Recorder.
Follow the Recording Your Screen procedure.
Kaltura Video Package for Moodle 2.x Quick Start Guide
41
Creating Video Presentation Resources
5. In the Video section of the Adding a new Kaltura Video Presentation page, click Upload
document to upload the document to be synchronized with the video. Supported documents
include *.pot; *.doc; *.axles; *.odds; *.odd; *.odd; *.pot; *.docks; *.puff; *.lax; *ppt; *pdf.
6. Wait until both assets have finished converting:
To check the status of the video conversion process, click Preview.
To check the status of the document conversion process, click Check status.
7. When both video and document are ready, click Preview to synchronize the document pages
with the timeline of the video. You can also sync after saving the resource when viewing it as
a teacher.
8. On the presentation widget, you can sync slides to key points in the video using the
Presentation Widget controls. Play the video or drag the video scrubber to the selected place
for the selected slide/page within the document, and click Sync Video/Slide.
9. On the presentation widget, click Save when you are done.
10. On the Adding a new Kaltura Video Presentation page, click Save and display or Save and
return to course to save the video presentation and make it available for course participants.
As students play the presentation, the video plays while the slides automatically rotate in full
Kaltura Video Package for Moodle 2.x Quick Start Guide
42
Creating Video Presentation Resources
synchronization, based on the key points set by the presenter. Students can easily navigate
through the slides with Forward and Back buttons, or by clicking a specific slide thumbnail.
Kaltura Video Package for Moodle 2.x Quick Start Guide
43
Creating and Grading Video Assignments
Creating and Grading Video Assignments
Teachers can create a Kaltura Video Assignment that requires students to submit videos as
assignments. Following submissions, teachers can view the submitted videos, provide feedback and
grade the video assignments.
To create a Video Assignment (Teacher)
1. In the relevant part of the course that you want the activity to appear in, click Add an activity
or resource.
Kaltura Video Package for Moodle 2.x Quick Start Guide
44
Creating and Grading Video Assignments
2. In the Add an activity or resource window, select Kaltura Video Assignment under Activities
and click Add.
The Adding a new Kaltura Video Assignment page opens.
Kaltura Video Package for Moodle 2.x Quick Start Guide
45
Creating and Grading Video Assignments
3. In the General section, enter the Kaltura Video Assignment’s name and description and select
assignment properties:
a. Availability dates
b. Whether to prevent late submissions
c. Whether to allow resubmitting
d. Whether to receive email notification whenever students add or update an assignment
submission
4. In the Grade section, enter the Kaltura Video Assignment’s grading scale.
5. Click Save and display or Save and return to course to save the video assignment and
make it available for course participants.
To submit a video assignment (Student)
1. Click the Assignment link.
2. On the assignment page, choose a media type.
o
To upload media, select My Content media, or record and upload a webcam video:
Select Upload media or record from webcam and click Add media submission to launch
the Kaltura Uploader.
Kaltura Video Package for Moodle 2.x Quick Start Guide
46
Creating and Grading Video Assignments
Follow the Uploading Your Media Using the Kaltura Uploader procedure.
o
To record your screen and upload the recording:
Select Record screen and click Add media submission to launch the Screen Recorder.
Follow the Recording Your Screen procedure.
Kaltura Video Package for Moodle 2.x Quick Start Guide
47
Creating and Grading Video Assignments
3. After the video is uploaded, you can replace your media submission, preview your
submission, or click Submit media to submit the assignment.
4. After submitting your assignment, click Continue to return to the assignment page.
Kaltura Video Package for Moodle 2.x Quick Start Guide
48
Creating and Grading Video Assignments
To grade video assignments (Teacher)
1. Click the Assignment link.
2. Click Grade submissions.
Kaltura Video Package for Moodle 2.x Quick Start Guide
49
Creating and Grading Video Assignments
3. Click Grade (if a grade already exists, click Update) to go to a detailed submission page. You
can then view a specific video submission and provide feedback and grade.
4. Click a thumbnail to display the appropriate video in a modal box.
5. If Allow quick grade is checked, you can provide feedback and grades directly within this page
for all assignments.
The grades and feedback are displayed in the course’s grade reports, as well as in the
assignment page, following Moodle standards.
Kaltura Video Package for Moodle 2.x Quick Start Guide
50
Uploading Your Media Using the Kaltura Uploader
Uploading Your Media Using the Kaltura
Uploader
You can use the Kaltura Uploader when you add video to:
•
My Media
•
Video Resources
•
Video Presentation Resources
•
Video Assignments (Student)
You can use the Kaltura Uploader:
•
To upload media from your desktop
•
To upload your existing content
•
To record from a webcam
To upload media from your desktop
1. Follow the procedure for uploading media (see the relevant section – My Media, Video
Resources, Video Presentation Resources, or Video Assignments (Student)), and select the
Upload media or record from webcam option to launch the Kaltura Uploader.
The Kaltura Uploader opens.
NOTE: The My Content tab is not displayed when you use the Kaltura Uploader in My
Media.
2. On the Upload tab, click Browse.
Kaltura Video Package for Moodle 2.x Quick Start Guide
51
Uploading Your Media Using the Kaltura Uploader
3. Select a file and click Open.
4. Click Upload.
Kaltura Video Package for Moodle 2.x Quick Start Guide
52
Uploading Your Media Using the Kaltura Uploader
5. An Uploading progress window opens. You can click Stop or Skip this file, or wait for the
upload to complete.
6. When the status is Done, click Next.
Kaltura Video Package for Moodle 2.x Quick Start Guide
53
Uploading Your Media Using the Kaltura Uploader
7. Enter metadata (title, tags, description) and click Next.
To upload your existing content
NOTE: Uploading your existing content does not apply to My Media.
1. Follow the procedure for uploading media (see the relevant section – Video Resources, Video
Presentation Resources, or Video Assignments (Student)), and select the Upload media or
record from webcam option to launch the Kaltura Uploader.
2. The Kaltura Uploader opens.
Kaltura Video Package for Moodle 2.x Quick Start Guide
54
Uploading Your Media Using the Kaltura Uploader
3. Select the My Content tab and do one of the following:
o
To find specific videos, enter at least one complete word that is part of a video name, tag,
or description, and click Search.
o
To find all videos on My Content, leave the search field empty and click Search.
4. The My Content tab displays the search results.
a. (Optional) Use the arrows to display more results.
b. (Optional) Hover over a media thumbnail to access a preview player.
c. Select one media. A plus sign is displayed on the selected media.
d. Click Next.
Kaltura Video Package for Moodle 2.x Quick Start Guide
55
Uploading Your Media Using the Kaltura Uploader
5. Enter metadata (title, tags, description) and click Next.
To record from a webcam
1. Follow the procedure for uploading media (see the relevant section – My Media, Video
Resources, Video Presentation Resources, or Video Assignments (Student)), and select the
Upload media or record from webcam option to launch the Kaltura Uploader.
The Kaltura Uploader opens.
NOTE: The My Content tab is not displayed when you use the Kaltura Uploader in My
Media.
Kaltura Video Package for Moodle 2.x Quick Start Guide
56
Uploading Your Media Using the Kaltura Uploader
2. Select the Webcam tab and select your webcam.
3. Click Allow if a flash player message is displayed.
Kaltura Video Package for Moodle 2.x Quick Start Guide
57
Uploading Your Media Using the Kaltura Uploader
4. To start recording your video, click Record.
5. To finish or pause the recording, click Stop.
6. When you stop the recording:
a. (Optional) To view the recording, click Play.
b. (Optional) To record again, click Record.
c. To upload the recording, click Next.
Kaltura Video Package for Moodle 2.x Quick Start Guide
58
Uploading Your Media Using the Kaltura Uploader
7. Enter metadata (title, tags, description) and click Next.
Kaltura Video Package for Moodle 2.x Quick Start Guide
59
Recording Your Screen
Recording Your Screen
You can record your screen when you add video to:
•
My Media
•
Video Resources
•
Video Presentation Resources
•
Video Assignments (Student)
NOTE: The Screen Recorder runs on Windows devices that support Java. The Screen
Recorder does not run on Mobile iOS and Linux.
To record your screen
1. Follow the procedure for uploading media (see the relevant section listed above), and select
the Record Screen option to launch the Screen Recorder.
NOTE: The first time that you record your screen, the Screen Recorder applet is downloaded.
In the Run Java Applet confirmation dialog, click Run. Downloading the applet may take a few
minutes.
The Screen Recorder opens.
2. Select screen recording options:
o
Drag and resize the frame to define the screen area to record or select a predefined
screen resolution from the menu.
Kaltura Video Package for Moodle 2.x Quick Start Guide
60
Recording Your Screen
o
Select the microphone input.
o
Select the volume control.
o
Select the webcam options.
3. Enter Alt-P or click the Record button to begin recording.
Toggle Alt-P or the Record/Pause button to pause and continue recording.
4. Click Done to finish recording.
5. Review your recording, enter metadata (title, description, and tags), and click Upload.
Kaltura Video Package for Moodle 2.x Quick Start Guide
61
Recording Your Screen
6. When the upload is complete, click Close.
Kaltura Video Package for Moodle 2.x Quick Start Guide
62
Viewing Course Media Reports
Viewing Course Media Reports
For each course, a teacher can view reports that show:
•
Are students watching the videos?
•
Which students watch the videos?
•
Which videos are students watching?
•
Are students watching the videos to the end?
A teacher can view:
•
Media Items reports
o
On the reports dashboard:
-
o
•
Media Items Highlights
Top 5 Media Items
Media Items Full Report
User Engagement and Contribution reports
o
On the reports dashboard:
-
User Engagement and Contribution Highlights
Top 5 Engaged Users
Top 5 Contributing Users
o
User Engagement Full Report
o
User Contribution Full Report
To display reports for a course
1. On the Navigation block under My home, click Kaltura Course Media Reports.
2. On the Navigation block under My home>Kaltura Course Media Reports, click a course name
to open the reports dashboard for the selected course.
Kaltura Video Package for Moodle 2.x Quick Start Guide
63
Viewing Course Media Reports
Reports Dashboard
The reports dashboard displays:
•
Media Items Highlights
•
User Engagement and Contribution Highlights
On the dashboard:
•
To define a time range for the reports: In the Date Range menu, select a date range and click
Submit.
NOTE: If no data is displayed, select a larger date range.
Note that data availability may be delayed by up to 24 hours.
Kaltura Video Package for Moodle 2.x Quick Start Guide
64
Viewing Course Media Reports
•
To expand a report, click the plus sign.
•
To minimize an expanded report, click the minus sign.
Media Items Highlights
The highlights show:
•
Media items in course – The total number of media items assigned to the course when the
report runs
•
Media items played – The total number of media items in the course played during the
defined time range
•
Plays – The total number of times that a user clicked Play in the course during the defined
time range
•
(Expandable) Most popular media – The name of the media played the most times in the
course and the number of times it was played during the defined time range
Expand Most popular media to view the Top 5 Media Items.
Top 5 Media Items
For the five most played media items in the course, the report shows:
•
Media Item – The name of the media
Kaltura Video Package for Moodle 2.x Quick Start Guide
65
Viewing Course Media Reports
•
Contributed by – The name of the user who contributed the media
•
Plays –The total number of times that a user clicked Play in the course during the defined
time range
o
The table is sorted in descending order of plays.
o
The number of plays is displayed in a bar chart.
•
Minutes viewed – The total number of minutes that a media was viewed in the course during
the defined time range
•
Avg. view time – The average time that a media was viewed in the course during the defined
time range
•
Avg. view drop-off – The average percentage of viewing drop-off of a media in the course
during the defined time range
Click See Full Report>> at the bottom of the report to display the Media Items Full Report.
User Engagement and Contribution Highlights
The highlights show:
•
Users in course – The total number of users enrolled in the course when the report runs
•
Users who watched course media – The total number of users who viewed media in the
course during the defined time range. In parentheses: the percentage of course users who
viewed media.
•
Users who contributed media to course – The total number of users who contributed media to
the course. In parentheses: the percentage of course users who contributed media.
•
(Expandable) Most Engaged User – The name of the user who viewed the most media items
during the defined time range and the total number of minutes that the user viewed media
Expand Most Engaged User to view the Top 5 Engaged Users.
•
(Expandable) Most Contributing User – The name of the user who contributed the most
media items
Expand Most Contributing User to view the Top 5 Contributing Users.
Top 5 Engaged Users
Kaltura Video Package for Moodle 2.x Quick Start Guide
66
Viewing Course Media Reports
For the five most engaged users in the course, the report shows:
•
User – The name of the user
•
Watched – The total number of media items that the user loaded in a player in the course
during the defined time range. In parentheses: the total number of times that the user clicked
Play in the course during the defined time range.
o
The table is sorted in descending order of media items watched.
o
The number of media items watched is displayed in a bar chart.
•
Minutes viewed – The total number of minutes that the user viewed course media during the
defined time range
•
Avg. view time – The average time that the user viewed course media during the defined time
range
•
Avg. drop-off – The average percentage of viewing drop-off by the user during the defined
time range
Click See Full Report>> at the bottom of the report to display the User Engagement Full Report.
Top 5 Contributing Users
For the five users who contributed the most media items used in the course, the report shows:
•
User – The name of the user
•
Contributed – Total number of items assigned to the course that the user owns when the
report runs
o
The table is sorted in descending order of contributed items.
o
The number of contributed items is displayed in a bar chart.
Click See Full Report>> at the bottom of the report to display the User Contribution Full Report.
Media Items Full Report
This section covers:
•
Understanding the Media Items Full Report
•
Understanding the Media Item Full Report Drill-Down Details
To display the Media Items full report
•
When the Top 5 Media Items report is displayed, click See Full Report>> at the bottom of
the report.
•
When the Top 5 Media Items report is not displayed:
a. Display the reports dashboard.
b. On the reports dashboard under Media items, expand Most popular media to view the
Top 5 Media Items and then click See Full Report>> at the bottom of the report.
Kaltura Video Package for Moodle 2.x Quick Start Guide
67
Viewing Course Media Reports
Understanding the Media Items Full Report
All course data for the report is displayed. When there is a lot of data, it will be displayed in a
scrollable window.
See the Top 5 Media Items report for a description of the data displayed.
In the full report you can:
•
Click <<Back at the top of the report to return to the reports dashboard.
•
Modify the time range: In the Date Range menu, select a new date range.
•
Search for specific media items: In the Search Media field above a report, enter at least one
complete word that is part of a media name and press the Enter key or click
The report displays the rows that contain media items that match your search.
.
•
Export the report to a CSV file.
•
Print the report.
•
Drill down to the details of a report row: Click the plus sign at the beginning of the row.
Understanding the Media Item Full Report Drill-Down Details
The media item row's drill-down details show:
•
All users who viewed the specified media item in the course during the defined time range
•
For each user:
Kaltura Video Package for Moodle 2.x Quick Start Guide
68
Viewing Course Media Reports
o
User – The name of the user
o
View drop-off – The maximum percentage of viewing drop-off by the user for the media
item during the defined time range. For example, if a student viewed a media item that
lasts one minute at three different times – one time for four seconds, one time for 24
seconds and one time for the entire minute – the drop-off percentage is 100%. This
percentage indicates that the media was viewed to the end.
When a report row's drill-down details are displayed, you can:
•
Export the report row's drill-down details to a CSV file.
•
Print the report row's drill-down details.
User Engagement Full Report
This section covers:
•
Understanding the User Engagement Full Report
•
Understanding the User Contribution Full Report Drill-Down Details
To display the User Engagement full report
•
When the Top 5 Engaged Users report is displayed, click See Full Report>> at the bottom of
the report.
•
When the Top 5 Engaged Users report is not displayed:
a. Display the reports dashboard.
b. On the reports dashboard under User Engagement and Contribution, expand Most
engaged user to view the Top 5 Engaged Users and then click See Full Report>> at the
bottom of the report.
Understanding the User Engagement Full Report
All course data for the report is displayed. When there is a lot of data, it will be displayed in a
scrollable window.
See the Top 5 Engaged Users report for a description of the data displayed.
In the full report you can:
•
Click <<Back at the top of the report to return to the reports dashboard.
•
Modify the time range: In the Date Range menu, select a new date range.
•
Search for specific users: In the Search Media field above a report, enter at least one
complete word that is part of a user name or ID and press the Enter key or click
Kaltura Video Package for Moodle 2.x Quick Start Guide
.
69
Viewing Course Media Reports
The report displays the rows that contain users that match your search.
•
Export the report to a CSV file.
•
Print the report.
•
Drill down to the details of a report row: Click the plus sign at the beginning of the row.
•
Select the User Contribution tab to display the User Contribution Full Report.
Understanding the User Engagement Full Report Drill-Down
Details
The user row's drill-down details show:
•
All media items that the user viewed in the course during the defined time range
•
For each media item:
o
Media Item – The name of the media item
o
View drop-off – The maximum percentage of viewing drop-off by the user for the media
item during the defined time range. For example, if a student viewed a media item that
lasts one minute at three different times – one time for four seconds, one time for 24
seconds and one time for the entire minute – the drop-off percentage is 100%. This
percentage indicates that the media was viewed to the end.
When a report row's drill-down details are displayed, you can:
•
Export the report row's drill-down details to a CSV file.
•
Print the report row's drill-down details.
User Contribution Full Report
This section covers:
•
Understanding the User Contribution Full Report
•
Understanding the User Contribution Full Report Drill-Down Details
To display the User Contribution full report
•
When the Top 5 Contributing Users report is displayed, click See Full Report>> at the
bottom of the report.
•
When the Top 5 Contributing Users report is not displayed:
a. Display the reports dashboard.
b. On the reports dashboard under User Engagement and Contribution, expand Most
contributing user to view the Top 5 Contributing Users and then click See Full Report>>
at the bottom of the report.
Kaltura Video Package for Moodle 2.x Quick Start Guide
70
Viewing Course Media Reports
Understanding the User Contribution Full Report
All course data for the report is displayed. When there is a lot of data, it will be displayed in a
scrollable window.
See the Top 5 Contributing Users report for a description of the data displayed.
In the full report you can:
•
Click <<Back at the top of the report to return to the reports dashboard.
•
Modify the time range: In the Date Range menu, select a new date range.
•
Search for specific users: In the Search Media field above a report, enter at least one
complete word that is part of a user name or ID and press the Enter key or click
The report displays the rows that contain users that match your search.
.
•
Export the report to a CSV file.
•
Print the report.
•
Drill down to the details of a report row: Click the plus sign at the beginning of the row.
•
Select the User Engagement tab to display the User Engagement Full Report.
Understanding the User Contribution Full Report Drill-Down
Details
The user row's drill-down details show:
•
All media items assigned to the course that the user owns when the report runs
Kaltura Video Package for Moodle 2.x Quick Start Guide
71
Viewing Course Media Reports
•
For each media item:
o
Plays – The total number of times that the media item was played in the course during the
defined time range
o
View drop-off – The maximum percentage of viewing drop-off for the media item during
the defined time range.
When a report row's drill-down details are displayed, you can:
•
Export the report row's drill-down details to a CSV file.
•
Print the report row's drill-down details.
Exporting a Report to a CSV File and Printing a
Report
NOTE: Only full reports and their drill-down row details can be exported to a CSV file or
printed.
To export a report to a CSV file
•
To export an entire report, click Export to CSV above the report.
•
To export a report row's drill-down details, click the Export to CSV icon at the beginning of the
row.
A CSV file is generated that you can download and save.
To print a report
1. Create a printable version:
o
For an entire report, click Printable Version above the report.
A printable version is displayed in a new browser tab.
o
For a report row's drill-down details, click the Printable Version icon at the beginning of
the row.
Kaltura Video Package for Moodle 2.x Quick Start Guide
72
Viewing Course Media Reports
A printable version is displayed in a new browser tab.
2. In the printable version, click Print above or below the report to send the report to the printer.
Kaltura Video Package for Moodle 2.x Quick Start Guide
73