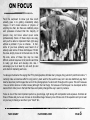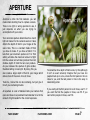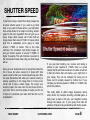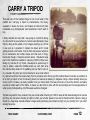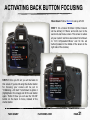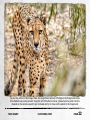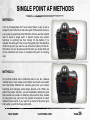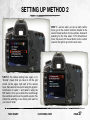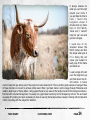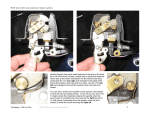
1
flatbooks
A STUCK IN CUSTOMS PRODUCT
Clever
eBooks
For
Curious
TACK SHARP:
a step by step guide to nailing focus
flatbooks.com
[email protected]
COPYRIGHT © 2011 JAMES BRANDON
AUTHOR :
James Brandon
CONTENT SUPERVISOR :
The DragonLady
EDITOR AND PUBLISHER :
Trey Ratcli!
PRODUCTION & MANAGER :
Will Kelly
FLATBOOKS WEB DESIGNER
Gri"n Stewart
COPY EDITOR :
Luke Lakatosh
ALL RIGHTS RESERVED
No part of this book may be reproduced or transmitted in any
form by any means without the prior written permission of the
publisher.
M O R E
E B O O K S
YOU MAY
E N J O Y
CHECK OUT THE LAST PAGE FOR A GREAT
DISCOUNT ON YOUR NEXT EBOOK!
Minds.
ABOUT ME AND THIS EBOOK
I LOVE ICED TEA, CHIPOTLE AND MY WIFE KRISTIN (BUT NOT IN THAT ORDER).
ABOUT ME
My name is James Brandon and I’m a photographer and writer living in Fort Worth, Texas. I give full credit for any
talents or abilities I may have to Jesus Christ. Without Him I’d be nothing! As far as photography goes, I specialize in
both travel and portrait imagery and I have an insatiable desire to
travel the world and see new things (I really want to visit
Antarctica one day!). I have a blog that I update just about every
day and you can always find me on Twitter, so be sure to follow
me and say hi! I’m also an author for Digital Photography School,
and an editor for Trey’s site, HDR Spotting.
ABOUT THIS EBOOK
This eBook is a step by step guide for any photographer who has
ever struggled with getting sharp images. While the first part of
the book is geared towards beginners, things get somewhat
advanced toward the end and will cover topics that some of you
may not know about. The secret to a sharp image isn’t just one
thing, it’s an entire process and every situation is different.
I should also point out that I’m a Canonista. Therefore, when I
give examples or settings, it will be from a Canon point of view.
Most of this stuff is easily interchangeable but it may require you
to open up your user manual and decode what I’m saying if you’re a Nikonian or if you simply have a different
camera model. Don’t be scared to open your manual, everything I discuss in the book can be found inside it!
All content © James Brandon Photography 2011. All Rights Reserved
TABLE OF CONTENTS
Foundations In Focus
5
Aperture
6
Shutter Speed
7
ISO
8
Do Lenses Really Matter?
9
Tips For Buying A New Tripod
10
Advanced Techniques
14
Using A Self-Timer Or Remote
15
Live View And Manual Focus
16
Back Button (AF-ON) Focus
18
Servo Focusing
22
Single Point AF
24
The Focus Trifecta
28
Infinite Focus
29
Depth of Field Preview
31
Bonus Examples
More Content To Help You Excel
Discounts
TACK SHARP
32
39
40
FLATBOOKS.COM
PAGE
4
ON FOCUS
You’d be surprised to know just how much
actually goes in to getting consistently sharp
images. It isn’t rocket science or physics or
anything like that, but there are definitely steps
and processes involved that the majority of
people may not know about (even some
professionals). Some of these steps are easy,
and you’ll be able to implement them right away
without a problem if you so choose. In fact,
some of you have probably even heard of or
already used some of these techniques. If that’s
the case, simply move on to the next one. On the
flip side, some of these tips may be more
difficult, and will require a bit of practice and time
to really get down and develop into rote. I
encourage you to at least try out each tip and
work hard at mastering each one.
I’ve always chuckled at the saying that “Pro photographers still take blurry images, they just don’t post them online.” I
certainly make a conscious effort to only post my best work for the world to see, but I can also definitively say that I
take far less blurry/soft images than a lot of the photographers I’ve shot with throughout the years. This isn’t because
I have a better camera or better lenses (although that can help), it’s because of techniques I’ve developed and/or
learned from other pros in the field that have completely changed the way I used my camera.
Focus is one of the most important parts to a good image, right along with composition and exposure. Combine all
three of these and you’re sure to have an incredible image. Take any one of these out of the equation and you’re well
on your way to having a new file in your “trash” bin.
TACK SHARP
FLATBOOKS.COM
PAGE
5
FOUNDATIONS IN FOCUS
e
becom
o
t
g
n
i
e go
rp
If you’r
ing sha
t
t
e
g
t
er
er a
d bett
a mast
a
h
u
s, yo
how
image
ter at
s
a
m
st .
e a
rks fir
becom
o
w
a
r
ny
ame
your c
re on a
u
s
n
u
si c
are
ese ba
I f yo u
h
t
w
o
t h
ow
ine h
level a
m
r
e
t
e
s d
ure
setting
s, be s
k
o
o
l
age
an im
n!
ttentio
a
y
a
p
to
TACK SHARP
FLATBOOKS.COM
PAGE
6
APERTURE
Aperture is often the first decision you will
make when deciding how to capture a scene.
There is no right or wrong aperture to use, it
just depends on what you are trying to
accomplish with your vision.
Your camera’s aperture determines how much
light will make it to the camera’s sensor. It also
affects the depth of field in your image at the
same time. This is a constant trade off that
you have to make. If you have a 50mm f/1.4
lens then your maximum aperture is f/1.4. That
setting will allow the maximum amount of light
into the sensor and will also produce the most
shallow depth of field the lens can produce.
As you increase the aperture it gets smaller,
therefore letting in less light. By doing this you
also create a larger depth of field in your image which
allows more of the scene to be in focus.
Trust me, I know this can be confusing, but just give it
time if you are having trouble.
An aperture is a set of blades inside your camera that
open and close to a predetermined diameter to let in the
amount of light needed for the correct exposure.
TACK SHARP
To remember how depth of field works, try this (although
it isn’t an exact science): Imagine that you have ten
people lined up in a row, where the first person in line is
close to you, and the last person in line is far away in
descending order.
If you want just the first person to be in focus, use f/1. If
you want the first five people in focus, use f/5. If you
want all ten people in focus, use f/10.
FLATBOOKS.COM
PAGE
7
SHUTTER SPEED
If you’re not using a tripod then sharp images are
all about shutter speed. If you want to go hand
held, or you want to freeze action, you had better
have a fast shutter. If an object is moving, shutter
speed is the main ingredient that will give you a
sharp image. Most people can’t hand hold an
image slower than around 1/50th. To freeze action
(and this is debatable) you’re going to need
around 1/150th or better. This is the bare
minimum. For consistent, tack sharp images, try
and get shutter speeds of around 1/1000th or
higher if possible. This will minimize movement in
the frame and increase how crisp your final image
will be.
Have you ever looked back on an image that looks like
it’s in focus, but when zoomed in it looks soft? One
reason could be that your shutter speed was just a little
too slow. Remember that while your camera is taking a
picture, everything in the image that is in focus must
remain still to have a sharp image. The longer your
shutter is open, the more room for error there will be in
your shot. This is common sense of course, but for me
it helps to sometimes just read stuff like this out to
understand it.
TACK SHARP
If you are hand holding your camera and taking a
picture of your nephew at 1/100th, there is a good
chance that he will make some sort of subtle movement
in that time frame that will create a very slight blur in
your image. This can be mistaken for being out of
focus, but it’s actually caused by motion blur. If you
increase your shutter speed to 1/800th or 1/1000th, this
will fix the problem.
This really starts to affect image sharpness during
action shots. For example; shooting a football game, a
track meet, a plane in the sky, your daughter running
through the leaves, etc. If your going hand held do
whatever it takes to have a blistering fast shutter speed.
FLATBOOKS.COM
PAGE
8
ISO SETTING
ISO determines how sensitive your cameras sensor is to
light. ISO can be used to overcome the limitations of
aperture and shutter speed. If you’re at ISO 400 and
looking to get shot of a football player running down the
field, but your shutter speed is only 1/500th, simply
increase your ISO to 800 and your shutter speed
doubles to 1/1000th.
much light as possible and bring it back to your camera
in 1/100th of a second. If they can’t bring in enough
light in that amount of time, just send 200 workers
instead which will double the amount of light. Every time
you double the amount of worker bees, you get to use a
shutter speed twice as fast as the previous one.”
The downside to ISO is that when you
increase it you lose image quality. While
cameras are becoming more and more
capable of reaching ridiculously high
ISO ranges (like ISO 120,000+), these
images still aren’t going to be useable
quality. Most cameras stop producing
useable quality images somewhere
between ISO 1600 and ISO 6400.
Ideally, you want to keep ISO between
100 and 800, but this isn’t always
possible.
To better understand what ISO is, here’s
a great analogy I came across from the
book Understanding Exposure by Bryan
Peterson: “Imagine your camera’s ISO
as little worker bees that go out and
gather light for your camera. At ISO 100
and a shutter speed of 1/100th, you
have 100 worker bees to gather as
TACK SHARP
FLATBOOKS.COM
PAGE
9
DO LENSES
REALLY MATTER?
Well, in most cases the answer is yes, but not always!
Lenses are a significant factor in getting tack sharp images.
However, just because a lens is $2000 that doesn’t mean it
will be sharper than a lens that is $400. The trick is knowing
which lenses are sharp by nature and which aren’t. For
example, a 50mm f/1.4 sells for around $400 and is one of
the sharpest lenses on the market. It’s a simple lens to build
so it comes with a simple price tag. A 14mm f/2.8 prime
sells for around $2000 and is considerably softer in focus.
It’s a much more complicated lens to build hence the much
more complicated price tag.
Prime lenses (fixed focal lengths) like the 50mm, 85mm,
100mm, etc are going to be noticeably sharper than a zoom
lens, but even this rule of thumb is changing as technology
increases. Now, when you compare a cheap zoom lens to
an expensive similar zoom lens the more expensive lens will
almost always be sharper. Canon’s “L” series lenses
(pictured above) are built with superior glass and build
materials over the cheaper lenses that come in camera kits
(pictured below). The glass inside an “L” series lens is built
with special fluoride elements and most of them are
assembled by hand instead of mass produced. These high
end lenses are also sealed from the elements to prevent
dust from getting inside, which would further effect image
sharpness and clarity.
TACK SHARP
FLATBOOKS.COM
PAGE
10
HAND-HOLDING
YOUR CAMERA
I think it’s safe to say that hand-held is the most
common way for taking pictures these days.
Cameras are getting better ever day and shooting
without a tripod is getting easier and easier to do.
Even with these advances in technology there are
still some basic foundational skills that every
photographer should posses. The first of these is
holding your camera properly.
The first step to holding your camera properly is
proper weight distribution. I like to place one foot
slightly forward, with 70% of my weight on my front foot and the other 30% on the back. This gives the feeling of
leaning into the shot to improve stability. In addition to stance, be sure that you’re holding your camera underneath the
lens as if you’re cradling it in the palm of your hand. A sure sign of an amateur is someone holding the lens from the
top and zooming in and out with their finger tips. The hand that your lens is resting in should support nearly the entire
weight of the camera. The more weight you support with your other hand (the one you use to squeeze the shutter), the
more chance you have at jerking the camera during the shot. Be sure to tuck your elbows in as much as possible, to
the point that your elbows are almost pointed at the ground (this is how the military, special forces, etc are trained to
hold their rifles to ensure as much stability and consistency as possible). Finally, be sure to use proper technique when
pressing the shutter down. This may seem like a no brainer but there is definitely a wrong and right way of doing this.
Instead of jabbing, poking or stabbing at the shutter, be sure to squeeze it slowly until it releases. You can even roll
your finger over it slowly, applying even pressure the entire way. Whatever you do, however you do it, just make sure
you develop a consistent method of doing it.
TACK SHARP
FLATBOOKS.COM
PAGE
11
CARRY A TRIPOD
This was one of the hardest things for me to do when I first
started out. Carrying a tripod is cumbersome. It’s heavy,
awkward, it slows me down, and makes me that much more
noticeable as a photographer (and sometimes I don’t want to
be).
I finally decided one day that I was going to commit to taking
my tripod with me everywhere my camera went because I knew
that by doing so the quality of my images would go up. At first
it was just as I expected; it slowed me down and it made
getting around a bit harder. I had to think twice about where to
sit at restaurants and coffee shops and that sort of thing.
Eventually though, it became second nature. I traveled a large
part of the California coastline in January of 2010 without ever
taking my camera off my tripod. I developed a special way to
carry it, where I extend the middle section up a bit, then wrap
the camera strap around it for padding and use that to rest on
my shoulder. My pistol grip tripod head acts as a hook behind
my right arm and lets the camera hang from my shoulder a bit. Once I got this method down it became no problem at
all to carry a tripod. In fact, the slowing down part became a blessing in disguise. Using a tripod actually slows you
down a LOT. It makes you really consider how you frame shots. You take more time to level the horizon and place
objects at certain parts of the frame. It makes you feel more in tune with the surroundings and more appreciative of
what you’re photographing. All of these are welcome changes!
Tripods are great for many reasons; they are crucial when shooting for HDR to keep all the brackets aligned in camera
and they are vital when shooting at night or when your shutter speed is too slow to hand-hold the camera. Using a
tripod is a huge leap towards sharper images and purchasing one should be high on your priority list if you don’t
already have one.
TACK SHARP
FLATBOOKS.COM
PAGE
12
TIPS FOR BUYING A NEW TRIPOD
Buying a tripod can be just as
much fun as using one. Like
anything these days there are
seemingly endless choices on the
market. One thing I would never
suggest is ordering a tripod online,
no matter how good the deal is
(this is true with quite a few areas
of photography). Tripods come in
all different shapes and sizes; from
aluminum to plastic to carbon fiber,
from 6 pound support to 100+
pound support, from $50 to $3000.
On top of that, you have tripod
legs and tripod heads to choose
from, and each one serves a
different purpose for different
s t y l e s o f p h o t o g r a p h y. C a n
someone say “Paralysis by
Analysis?”
I strongly suggest driving over to
your local camera store and
spending a good amount of time
testing out all your different
options. Not only do you support a
local business, but you walk away
TACK SHARP
knowing you made the right
choice. My first tripod was cheap,
only about $60. It lasted about 3
months before it broke because
the whole thing was made of
plastic and the tripod could no
longer support the weight of my
new camera. If you can, try and
budget a minimum of between
$200-$300 to get you started. You
can easily spend more than that,
but that price range will get you a
solid set of legs and a good
functional tripod head. You need to
know what you will be using the
tripod for as well. Will it stay in a
studio or do you want to be able to
travel around with it? If you travel a
lot, will it be easy to carry around?
Find out how much your camera
and heaviest lens weighs so you
can be sure to get a head and legs
that can support it. Play around
with the different heads to figure
out if you prefer knobs, a ball head,
or a pistol grip style. There are so
many choices, and you want to
FLATBOOKS.COM
make sure to pick something you’ll
be happy with.
For me personally, I chose the
Manfrotto 055XPPROB Legs and
the Manfrotto 322RC2 Grip-Action
ball head. I spent a good 45
minutes at my local camera store
testing out the different options
before settling on these. I decided
that I needed legs that were solid,
somewhat lightweight, and easily
transportable. The 055XPROB’s
are aluminum and don’t weigh a
ton. I would have preferred carbon
fiber but didn’t want to shell out an
extra few hundred dollars for it.
The legs also go up to 70 inches in
height, which is taller than I am,
and can even go down to 10cm
with some creativity. The grip
action ball head is great because I
can quickly switch from landscape
to portrait, as well as make acute
adjustments for leveling the
horizon or adjusting camera tilt.
PAGE
13
This image was taken at Disney World’s Epcot park and would not have been possible without a
tripod. It was about 45 minutes after sunset and I was losing light quickly. By the time I got to this
spot I needed a 6 second exposure to capture the light in this scene.
TACK SHARP
FLATBOOKS.COM
PAGE
14
ADVANCED TECHNIQUES
ill
, we w
n
o
i
t
c
s se
uilt
In thi
ues b
q
i
n
h
a
tec
camer
cover
r
u
o
y
into
sibly
right
te pos
i
u
q
ou
o f.
heard
that y
n
e
v
e
r
eve
t i ps
have n
anced
v
d
a
e
or
ntrol
These m
ake co
t
u
o
y
lp
start
will he
a and
r
e
m
a
c
ently
of your
onsist
c
g
n
ci
produ
.
mages
i
p
r
a
h
s
TACK SHARP
FLATBOOKS.COM
PAGE
15
USING A SELF-TIMER OR REMOTE
A self-timer on your camera is just one more way
to get your hands off the camera for those long
exposures. This technique is great for
landscapes, night shots, group portraits, long
exposures and this sort of thing. Obviously, you
wouldn’t want to use a self-timer if your subject is
moving around a lot, or timing your shutter
release is important. When shooting HDR or long
shutter speeds, any movement of the camera can
cause problems in the final image, or later in
post-processing. Even the slight movement of
pulling your hand away from the camera after a
lengthy shutter has started can cause noticeable
blur in an image.
Most cameras have the ability to use a self-timer
and the setting should be easily found in your
manual. Some cameras will even have the option
for 10 second, 2 second, etc. I usually opt for the
2 second because 10 is far too long to be waiting
around for your shot to go off. A remote shutter release may be a great option for you
if: your camera doesn’t have a self-timer, you want the
ability to take more than 30 second exposures, or you
want to look cool by having more contraptions hanging
TACK SHARP
off your camera. On some cameras, like my 5DMII, I can
even use a remote shutter to start a self-timer. This is
great if I’m taking group shots with friends or family that
I’m in. That way I don’t have to keep walking back to
the camera to take multiple shots.
FLATBOOKS.COM
PAGE
16
LIVE VIEW AND
MANUAL FOCUS
When shooting landscapes, architecture, travel
or any type of photography where you have
time to really think and compose your scenes,
using Live View and manual focus is a great
way to gain complete control over your focus.
Not all cameras have a Live View function but
just about all newer models do. I think it’s safe
to say that this will now be a standard feature
on future DSLR cameras.
Instead of looking through your viewfinder you
can use your Live View screen to actually frame
your shot and make sure it is sharp. While this
will eat up battery life a bit, it also provides less strain on your eyes from looking through a viewfinder and less strain
on your back if you normally have to bend over when using a tripod.
You can also use the zoom button on the back of your camera along with Live View turned on to hone in on your
subject (both of my cameras will zoom in to 10X the actual size of the subject).
Once you are zoomed in, set your lens to manual focus and adjust the focus ring until the subject is perfectly sharp.
TACK SHARP
FLATBOOKS.COM
PAGE
17
This shot of the Dallas skyline was taken from the roof of the Renaissance Hotel. I used Live View to
manually focus out to infinity so the entire shot would be sharp. The image was shot with a
70-200mm lens at f/4.5 for 2 seconds.
TACK SHARP
FLATBOOKS.COM
PAGE
18
BACK BUTTON
(AF-ON) FOCUS
I discovered back button focus the same day I
discovered AI-Servo. Both settings completely
rocked my world and I still use them everyday.
The default setting for focus on any camera works
like this: You see your subject, you press your
shutter button half way down, your camera
focuses on the subject, you press the shutter
button all the way down, the camera takes the
pictures. Well, this is crap. Let me explain why...
Your shutter button should serve one purpose and
one purpose alone; releasing the shutter and taking a picture. It should not double as a focus button or anything else.
The advantages of back button focus really become apparent when you start using it in concert with other advanced
functions in your camera. Here are some reasons why back button focus is far superior than the “normal” method:
• Set focus, and done
• With stationary subjects you can hit the back button to focus on your subject, get the focus just the way you want
it, then take as many pictures as you want. With the old method you’d have to refocus your subject each time you
take a picture. What if you want your subject far off center, away from any focus point in your grid?
TACK SHARP
FLATBOOKS.COM
PAGE
19
BACK BUTTON FOCUS (continued...)
• Timing
• With just about any form of photography, timing is everything. Key moments happen in the blink of an eye and you
need to be ready at a moments notice to capture the image. With the old method you have to refocus your subject
every time you take a picture, no matter what. With back button focus, again, you can set focus on your subject
and have the shutter ready when the moment happens.
• Full Time Servo Focusing (No more switching between AI-Servo (AF-C) and One Shot (AF-S))
• With focusing set to the AF-ON button you no longer need ‘One Shot’ focusing. You can now set your focus
method to servo and still have access to the benefits of one shot. In servo mode, simply hold down the AF-ON
button to track focus on a moving subject, or press and release the AF-ON button for a stationary subject. The
only time you would still need One Shot is in low light with a flash to activate the flashes built in focus grid.
• Never take your lens off Auto Focus
• That’s right, with BBF you never have to take your camera off auto focus again! With BBF, the only time your
camera will focus automatically is when you tell it to by hitting the AF-ON focus button. While I can’t speak for
Nikon, Canon has a built in feature with almost all their cameras that allows you to make manual focus
adjustments to your image even while the camera is in auto focus mode. All you have to do is adjust the focus ring
on your lens. The problem is, with the old way of focusing as soon as you press the shutter half way down you
undo whatever change was made. With that system of focusing you’d have to switch your lens over to manual
focus, disabling your ability to focus automatically.
• Objects moving between you and your subject
• Let’s say you’re at a baseball game and you’re photographing the first baseman, and you are behind home plate.
You want to catch the reaction on the first baseman’s face as the runner try’s to make it to first. Because of your
angle, the runner actually gets between you and the first baseman while running down the line. With BBF you can
set focus on first base beforehand, then shoot away while the runner is on the way. With the normal way of
focusing this would be a nightmare.
TACK SHARP
FLATBOOKS.COM
PAGE
20
ACTIVATING BACK BUTTON FOCUSING
Nikon Users: Follow this link to set up AF-ON
STEP 1: On a Canon 5D Mark II (Other Canon’s
will be similar), hit ‘Menu’ and scroll over to the
second-to-last menu screen. This screen is where
all your custom functions are located. Scroll down
to ‘C.Fn IV:Operation/Others’ and hit the set
button (located in the middle of the wheel on the
right side of the camera).
STEP 2: Once you hit set you will be taken to
this screen. If you’re still using the shutter button
for focusing your camera will be set to
“O:Metering + AF start.” Scroll down to option 2
(highlighted in the image) and hit the set button
again. That’s it! Now you will use the ‘AF-ON’
button on the back to focus, instead of the
shutter button.
TACK SHARP
FLATBOOKS.COM
PAGE
21
As you may notice in this image, there was a significant amount of foliage in the foreground where
this cheetah was pacing around. Using the AF-ON button to focus, I placed a focus point over the
cheetah so the camera wouldn’t get confused and try to focus on the plants in the foreground.
TACK SHARP
FLATBOOKS.COM
PAGE
22
SERVO FOCUSING
AI-Servo (AF-C on Nikon) is simply incredible for
moving subjects. Under normal conditions (basic
camera settings) if a subject is moving towards
you and you focus your camera on it, that subject
will only be in focus at the instant the camera
achieves focus. Once the subject moves you have
to re-focus. Whether or not you can capture the
subject in focus during that split second depends
on a few things: How quick you are, how deep
your depth of field is, and how fast your shutter
speed is.
So let’s introduce a potentially terrible problem that
wedding photographers face every day: The aisle.
With a wedding you only have one chance to get
the shot. One chance to get the bride walking down
the aisle seeing her groom for the first time. One chance to capture the bridal party making their exits or entrances.
One chance.
If you’re in a dimly lit room and you can’t use flash, you had better crank up your ISO and open your aperture wide
open. The side effect of opening your aperture is that you now have an extremely shallow depth of field, sometimes
only 1 or 2 inches. If the bride is walking toward you and she is 20 feet away, and your depth of field is only two inches
once you lock focus, imagine how fast she is going to exit that field of focus during her walk down the aisle.
With servo focusing everything changes, and it’s awesome. Servo focus is focus tracking. In other words, as the bride
walks down the aisle your lens will adjust and keep focus as she moves towards you. This setting is widely used for
wildlife photography, sports photography and any type or style of photography with moving subjects.
TACK SHARP
FLATBOOKS.COM
PAGE
23
Using back button focus and AI Servo, I was able to single out this White Ibis in flight at Disney
World’s Animal Kingdom. A shot like this would be next to impossible without Servo (save for luck),
as this bird was quickly and frantically flying in circles searching for food. I simply held down the AFON button over the bird and Servo kept focus as he flew around the entire time.
TACK SHARP
FLATBOOKS.COM
PAGE
24
SINGLE POINT AF
Single point auto-focus is the final piece of the
puzzle to the last two topics covered. When AIServo, Back Button Focus, and Single Point AF
are working in concert, things really start clicking
(pun totally intended).
By default, your camera focuses by using the
entire focus grid and trying to choose the correct
point(s) in the grid to achieve focus on the subject.
The camera is guessing in essence. It’s looking for
the largest or most prominent object in the frame,
or the closest thing to the camera. So, what if you
want to focus on a small object that is far away
and off center? Well, that’s where single point AF
comes in.
Any digital camera purchased in the last decade will
more than likely have the functionality to choose a
singular focus point and override using the entire grid.
This means that you now have complete control over
what the camera focuses on. In other words, instead of
the camera guessing what to focus on, you are now
telling the camera what to focus on!
This becomes a life saver when shooting with shallow
depth of field and fast, wide open lenses. If you’re
shooting a close up portrait of a person at f/1.4 your
depth of field is going to be incredibly minuscule
(sometimes less than an inch). With grid focusing the
TACK SHARP
camera is going to be guessing where to focus. It could
choose the eyes (which is the only thing that matters), it
could choose the nose, it could choose that huge zit on
some poor girl’s chin, you just never know. If your
camera focuses on your subjects nose at f/1.4, your
subjects eyes will be noticeably and considerably out of
focus, and if you don’t have focused eyes you don’t
have a portrait, you have a file taking up space on your
hard drive.
With a single AF point chosen you simply place a
predetermined focus point over the subjects eye, hit the
focus button, and take the picture. As long as that focus
point is over the eye it will be in focus.
FLATBOOKS.COM
PAGE
25
SINGLE POINT AF METHODS
METHOD 1:
A lot of photographers don’t even know there’s a way to use a
single AF point rather than the entire grid. Of those that do know,
I am going to guess that about 80-90% of them use this method
here to select a single point. It doesn’t involve any custom
functions or anything like that. Simply hit the button (1) to
activate the entire grid, then move the joystick (2) in the direction
of the focus point you want to use. Once this is done, hit the AFON button and you should see the AF point you chose flash red
in the viewfinder and focus on whatever the point is hovering
over.
METHOD 2:
It’s not that method one is inherently bad or evil, but I believe
method two is much easier, much faster, and much more useful
than the former. Method two involves going into your custom
functions and changing some things around a bit. When you
select the proper function, you will essentially disable the grid
focus button as a means to selecting focus points. Now, instead
of using step one, just move the joystick at anytime to select
different focus points. If you want to go back to the entire grid,
that’s when you hit the focus grid button.
TACK SHARP
FLATBOOKS.COM
PAGE
26
SETTING UP METHOD 2
STEP 1: Just as when we set up back button
focus, go to the custom functions located in the
second to last section of menu options. Instead of
selecting IV, this time select ‘C.Fn III:Autofocus/
Drive.’ Be sure to hit the set button on the control
wheel to the right to go into the next menu.
STEP 2: The default setting here, again, is 0.
‘Normal’ means that you have to hit the grid
button on the upper right part of the camera
back, then select a focus point using the joystick.
Scroll down to option 1 and select it using the
SET button. Once you’ve done this, look through
the viewfinder and move the joystick around. You
should be selecting a new focus point each to
you move it. Voila!
TACK SHARP
FLATBOOKS.COM
PAGE
27
Air Shows are incredibly fun (and challenging) to photograph. Planes are constantly flying around,
changing directions, and traveling at incredibly fast speeds. Using the second method I was able to
quickly and effortlessly change my focus point to the bottom right and get a shot of these twin P-51
Mustangs as they flew in formation over the crowd below.
TACK SHARP
FLATBOOKS.COM
PAGE
28
THE FOCUS TRIFECTA
When Servo, back button focus, and single point AF points are all used in harmony, you can be sure that the amount
of sharp images you get will increase dramatically. This process eventually becomes second nature and won’t even
require much thought at all. You simply view a subject through your viewfinder, decide which focus point to use, select
the appropriate focus point, tap or hold down the back focus button and fire off the shutter. Those five steps happen in
a fraction of a second and the result will almost always be a better framed, better focused image. This stuff isn’t
rocket science, it’s just not well known by most photographers because camera manuals aren’t very fun to read!
I’ve taught these techniques to countless photographers, and while some embrace it immediately and never look
back, there are always a few here and there who aren’t sure about it because it’s so different. I admit, it’s a bit
uncomfortable at first trying to completely change your thought process before a shot, but I promise it becomes a nonissue after just a day or so of putting these techniques through the ropes.
Don’t fall into the trap of laziness that so many fall victim to. Just because it’s different and takes some getting used to
doesn’t mean you should just abandon the whole process and stick with what you know.
I meet so many photographers through meet-ups and photo walks who struggle with getting sharp images, or get
frustrated because they can’t place the subject in a certain part of the frame. It’s always the same thing, they are
always still using the factory settings on their camera.
I realize that you can press the shutter half way down, hold it there while you recompose the image, and then press it
all the way down to take the shot, but why bother with have to do that every single time? With back button focus, as
long as your subject isn’t moving and you aren’t moving, you can simply set focus and take as many pictures as you’d
like. There is simply no other way of achieving this without these settings.
TACK SHARP
FLATBOOKS.COM
PAGE
29
INFINITE FOCUS - SMALL APERTURE
Most of the time when shooting landscapes it’s good to have everything in focus from foreground to background. This
rule is in no way set in stone and can easily be (successfully) broken, but this is certainly the most common way to
photograph a landscape. The challenge becomes creating a composition that the viewer can take in without getting
overwhelmed by everything that is going on. Landscapes are often shot with wide angle lenses, and if the composition
isn’t well thought out the viewer can quickly become lost. So, apart from everything being in focus, it’s usually a best
practice to have some kind of foreground subject as well as an interesting background.
There are a few ways to keep everything in
focus on an image, but a small aperture is
probably the most common. In most cases,
using a large aperture, such as f/2.8, will
cause the subject to be in focus, but
everything in front of or behind it will
become soft or blurred. The smaller you
make the aperture (or the larger your
aperture number), the more depth of field
you attain.
Using any aperture at or above f/13 will all
but guarantee that everything in your image
will be in focus. Using an aperture like f/18
or f/22 will further your ability to achieve
infinite focus even more. The possibilities of
using these apertures will largely depend
on how much light you have available, as
small apertures create very slow shutter
speeds. Another reason why landscape
photographers always have tripods!
TACK SHARP
FLATBOOKS.COM
PAGE
30
INFINITE FOCUS - WIDE ANGLE LENSES
Despite common knowledge, small apertures aren’t the only way to achieve
infinite focus from foreground to background. The outcome of a photograph
is never caused by a single setting. Rather, it is a collaboration of all the
settings available to achieve the desired final product. One thing that will
greatly effect your depth of field in your images is focal length. The longer
your lens, the greater depth of field you will have. So on the flip side, the
wider your lens, the less depth of field you will have. But wait, that’s not all!
Depth of field is effected by distance to your subject. The further away you
are from the subject, the less depth of field you will have. So the closer you
are, the more blur you will you have.
As you can see from this screen grab from my iPhone, if I have a subject
that is 25 feet away from my lens, and I have my 24-70 lens zoomed all the
way out at 24mm, I can achieve infinite focus in my frame with an aperture
of f/2.8! This goes against all common sense I know, but it is true. If you
look even closer you’ll notice that not only do I have infinite focus under
these settings, but my focus doesn’t just start at the subject, it starts at 11.8
feet from my lens. What this means is that as long as there are no objects in
my frame from 0 to 11.8 feet, I will infinite focus in the entire image.
If you’ve got a 14mm lens on a full frame camera you can achieve infinite
focus at f2.8 with a subject only 8 feet away! Under those conditions focus
will begin at 3.9 feet from your camera lens. Crazy!
iPhone App used in this example: Depth of Field Calculator
TACK SHARP
FLATBOOKS.COM
PAGE
31
DEPTH OF FIELD PREVIEW
This feature exists on just about any DSLR on the
market today and it is also one of the least known
features! Maybe you’ve seen the button there
before but didn’t really know what it was for. Or
maybe you’ve even pressed it down before but
didn’t really understand it’s purpose.
The Depth of Field Preview button is, well, a
preview of your depth of field. Pretty selfexplanatory once you realize what it is for! When
you press this button down your camera will close
the aperture down to whatever your had it set at.
This of course always happens when you take a
picture anyways. If you have your aperture set at
f/11, when your camera takes a picture the
aperture closes to the set aperture and stays there
for the duration of the shot (the shutter speed).
The Depth of Field Preview button does this before
the shot to let you know exactly what the depth of field will look like. The resulting preview can be viewed through the
viewfinder, but will also show up in live view on most models. What you may also notice is that on certain apertures the
screen gets really dark and it can sometimes be hard to see what’s in the viewfinder. Well, if you think about it this
makes perfect sense. The aperture is closing on the camera to give you a preview of the depth of field, so the higher
(smaller) your aperture is, the less light there will be to give a preview.
The point of using this feature is to simply get a 100% accurate preview of your depth of field. The viewfinder alone
isn’t always completely accurate, which can be frustrating sometimes. If I’m ever unsure as to whether or not my
foreground as well as my background is in focus I’ll always turn to this feature to double check everything.
TACK SHARP
FLATBOOKS.COM
PAGE
32
BONUS EXAMPLES
o
we’ll g
,
n
o
i
t
es
s sec
xampl
In thi
e
s
u
o
ari
and
over v
folio,
t
r
o
p
on
my
from
etail
d
o
t
in
ing
I’ll go
to gett
n
i
t
en
ck
and ta
what w
s
u
c
o
f
t in
the sho
sharp.
TACK SHARP
FLATBOOKS.COM
PAGE
33
It always amazes me
what you can find right
around your home if
you just take the time to
look. I found this
longhorn about 2
minutes from my home
here in Fort Worth,
Texas and I couldn’t
help but pull over and
get some images.
I used one of my
sharpest lenses (the
50mm prime) and shot
this image wide open at
f/1.4. Doing this will
cause your subject to
really pop off the frame
and stand out.
I used a single AF point
over the longhorns eye
and held down the AFON button in Servo
mode to keep the eye sharp even if the longhorn moved around a bit. This is another great example of using all three
of these functions in concert to achieve a final result. When I got back home I ran the image through Photoshop and
added a slight layer of Topaz Adjust. I only applied Topaz to key areas of the longhorn and left the background alone. I
find that with a blurred background, it’s usually not a good idea to add any kind of sharpening to them. The end result
is usually dirty looking and quite unpleasing to look at. Leaving the background as is keeps it looking soft and prevents
it from competing with the subject for attention.
TACK SHARP
FLATBOOKS.COM
PAGE
34
This image was
taken during a recent
snow storm in my
home town in North
Texas at the Fort
Wo r t h B o t a n i c a l
G a rd e n s . Tr i p o d s
aren’t allowed here
so I had to go
handheld the entire
day, but don’t get me
started on that...
Again, I chose a
shallow depth of field
here to draw
attention to the front
of the bench and
create a nice bokeh
in the back. I placed
a single focus point
over the wood on the
bench and hit the
s h u t t e r. I s i m p l y
loved the way the
snow had built up on
the bench with the stark contrast to the wood and greenery in the background.
For processing, I used HDR Express from Unified Color to create a natural and subtle HDR image. This image is
actually made up of 7 different exposures, which was necessary in this case because of the harsh sunlight reflecting
off the snow. I also applied a soft and selective layer of Topaz Adjust to the front part of the bench, gradually taking
down the opacity as I moved towards the back. I also added a bit to the greenery in the foreground.
TACK SHARP
FLATBOOKS.COM
PAGE
35
This is one of my favorite images from a trip I took to Miami, Florida. I got up really early one day to catch the
sunrise and fortunately I had a friend who lives there to show me some great spots to photograph. What caught my
eye in this scene was the warm morning light reflecting off the boat and I wanted to do my best get everything
sharp. Because I had so much light to work with I was able to shoot the scene at f/18 and get everything from
foreground to background in sharp focus. The priority however was the boat, and since I had my tripod, I turned to
Live View to manually dial in the backside of this boat.
TACK SHARP
FLATBOOKS.COM
PAGE
36
I grabbed this shot of a beautiful pelican off the coast of Galveston one morning. It’s incredible how close they fly
to the water. It looks like the birds wings are actually just touching the surface in this image. To get the shot I had
my camera in Servo focus mode and held a single AF point over the bird as it flew across the surface of the water. I
used a 70-200mm lens zoomed in all the way at f/2.8 to get the fastest possible shutter speed. This image in
particular was shot at 1/4000th of a second.
TACK SHARP
FLATBOOKS.COM
PAGE
37
Oh how I miss Hawaii. The Big Island is by far my favorite place I’ve traveled to so far. The island is so diverse and
contains every climate zone on Earth except for the Arctic. This image was taken at the Akaka Falls Rainforest on
the east side of the island. I really wanted to smooth out the water so I used a shutter speed of 4 seconds on one
exposure. I then took another quick exposure at 1/250th for the vegetation to remove any ghosting from the wind.
After blending the exposures together in Photoshop, this is the final result.
TACK SHARP
FLATBOOKS.COM
PAGE
38
When I saw the backend of this Ferrari at a local car show I immediately knew what I wanted to capture in my
image. I set my tripod up and set my camera in Av mode with an aperture of 2.8. I then turned on Live View so I
could really dial in the focus on the rear tail light. There were also a lot of people walking around during my shot.
Using a shallow depth of field will turn the reflections in the cars paint job to mush, which really draws the viewers
attention to the intended subject.
TACK SHARP
FLATBOOKS.COM
PAGE
39
MORE CONTENT TO HELP YOU EXCEL
As you may already be aware, I am quite passionate
about teaching others the joys of photography. I write
article and tutorials on the regular, so I thought you
might like some links to a few articles that I really think
will help you become a better photographer. Some of
these articles are on my own personal blog, others are
located at Digital Photography School, just click the
links if you’re interested!
Your Best Lines To Make Clients Laugh and Act
Natural
• This is a really fun article I put together designed
around reader engagement. I jotted down a few of
my favorite lines to use around clients and told the
readers to chip in with their own lines. The article
currently has 100+ comments so be sure to check it
out if you shoot portraits!
Minimalism: Using Negative Space In Your
Photographs
• A great article to read through if you ever need a
quick boost of creativity. Minimalism is a great way
to break away from your ordinary style and try
something new.
How To Apply Textures To Your Photographs
• Yep, this one is pretty self-explanatory :-)
TACK SHARP
Beyond Sunset: The Different Phases of Twilight
• I see a lot of photographers pack up their gear right
when the sun hits the horizon. They came to shoot
the sunset and it’s time for dinner. A lot of people
have no idea about twilight and the different phases
therein. It’s a whole new world of possibilities!
12 Ways To Improve Your Photography Today
• I think I can speak for all us when I say that
sometimes, we hit walls in our creativity. It happens
to everyone, from first time shooters to veterans in
the field. This article is a collection of tips that you
can read through and implement immediately into
your everyday life of photography.
11 Tips For Those Starting Out With Photography
• I get emails and messages all the time from
budding photographers wanting to get better. Some
are looking to start their own business and others
just want advice. This article will seek to answer
questions on what to do if you’re starting out in
photography and how to get better.
Digital Camera Recommendations
• Trey Ratcliff has a great list of recommendations for
Nikon users, so here is my list for the other (smarter)
half of the world :-)
FLATBOOKS.COM
PAGE
40
DISCOUNTS
The images shown throughout this eBook were
processed using a variety of different programs and
plug-ins. I like to have as many at my disposal as I can
afford, so I can change things up as much as possible
and keep my creative vision fresh. I have coupon codes
for most of the programs I use and I’m more than happy
to share them with you so you can save a bit of money
should you decide to purchase any of them. Here they
are!
Topaz Labs (Try it | Buy it)
Topaz is my go-to product for adding detail and pop to
my images. Topaz Adjust has tons of great options and
different effects to make your images stand out. If you
purchase the Photoshop bundle you’ll also have access
to incredible noise reduction software, masking
software, and more.
onOne Perfect Photo Suite (Try it | Buy it)
HDR Express (Try it | Buy it)
This has been my go-to program for HDR for some time
now. I’ve settled on more of a natural approach to my
HDR work and this program really helps with that.
Express is also extremely good at preserving white
balance from start to finish.
This is an absolutely incredible suite for any type of
photographer. The tools included are very powerful and
really allow you to achieve greatness with your images.
This suite is a little more pricey than the others, but it’s
worth it.
Lynda.com (24 Hour Free Pass)
Photomatix Pro (Try it | Buy it)
I use this program for some of my HDR work as well.
Photomatix is sort of the industry standard right now for
HDR processing, as it’s strengths really shine through in
different areas.
TACK SHARP
I can’t speak highly enough for Lynda.com. This website
is basically an endless source of knowledge for just
about any computer based creative platform. I’ve
learned a TON about photography and photography
programs using this website, and the videos are
incredibly well done and easy to follow. At only $25 a
month this should be a no-brainer for most.
FLATBOOKS.COM
PAGE
41
A BIG THANK YOU FROM THE RATCLIFF FAMILY!
I hope you enjoyed this eBook! There
are many moving parts that go into the
production and distribution of these, and
we certainly appreciate you as a
customer. If you had a good time here,
we invite you to come see our other
eBooks as well!
Many Bothans died to bring you this
information.
Visit flatbooks.com to see the latest
o!erings, and I would LOVE to hear
your feedback!
MORE EBOOKS
Y OU M AY ENJOY
THANKS SO MUCH FOR YOUR PURCHASE. PLEASE ENJOY
10% OFF ANY OF OUR OTHER EBOOKS BY USING THIS CODE
HAPPYCUSTOMER