1
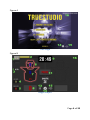
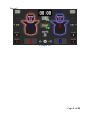
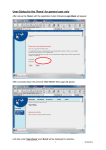
TRUESCORE
TrueStudio
Manual
Game Box
Date modified
6/15/2015
A user manual for operating TrueStudio GameBox.
Manual Table of Contents:
1.) Quickstart TrueStudio GameBox………………..2
2.) Connecting electronic devices…………………….2
3.) Setting Game Defaults………………………………..2
4.) Understanding the GUI……………………………….3
5.) Against the Clock Set up……………………………..
6.) Marathon Set up…………………………………………
7.) Sparring Set up……………………………………………
8.) Last Fighter Standing Set up………………………..
9.) Practice Set up…………………………………………….
10.) Combat Set up…………………………………………….
11.) Remote Access……………………………………………
12.) Charts for Threshold settings………………………
13.) Device Maintenance……………………………………
14.) Troubleshooting………………………………………….
15.) Contacting Support……………………………………..
16.) Figures A, B, C ……………………………………………..4-5
17.) Figures and diagrams…………………………………..
Page 1 of 20
QuickStart: Using the TrueStudio GameBox
1.
2.
3.
4.
5.
6.
7.
Insert the TrueStudio receiver into the USB port
below the wifi port (under the Raspberry image).
Plug in the power supply (micro USB end) into the
Game Server.
Plug the other side of the power supply into a wall
socket.
Wait for the light to turn green (next to the
Raspberry image). This can take up to a minute.
On a laptop, connect to the TrueStudio wifi network.
Password for Wifi is defaulted to: TrueStudio10987.
Open a browser and input the following into the URL
browser:
a. 192.168.222.1
b. This will be the same IP address for all
browsers including mobile devices.
DO NOT:
All the following will void warranty
-DO NOT OPEN GAME BOX
-DO NOT REMOVE SD CARD
-DO NOT REMOVE USB WIFI
-HDMI and AV connections on box are not active at this time
Turn on devices
1. Turn on “transmitter(s)” using the power switch.
2. Plug “transmitter” into electronic equipment (Chestgear or
paddle or etc) via RJ45 connector.
3. Select a game, fill out game settings, and play.
Setting Game Defaults
The Game Defaults are settings that stay constant
throughout all games. They can be set from the Title
Page. It is here that you may change default sound
settings and point values for body kicks and head
kicks.
Page 2 of 20
Understanding the GUI
1. Threshold Level………………………………………...Fig B
2. Status bar……………………………………………….…Fig B
3. Sync Light: Green, Empty………………………..…Fig B
4. Hit Level Feedback…………………………………… Fig B
5. Failed Hits Count……………………………………….Fig B
6. Head kick cumulative hits……………………….…Fig B
7. Body kick cumulative hits……………………….…Fig B
8. Total points……………………………………………….Fig B
9. Timer…………………………………………………….....Fig B
10. Round number…………………………………….….Fig C
11. Start Button/Pause/Resume……………….….Fig C
12. Re Start…………………………………………………..Fig B
13. Home button …………………………………………Fig B
14. Game setting button……………………………...Fig A
15. Sound Toggle………………………………………….Fig A
16. Additional setting…………………………………..Fig A
*Figures A, B, C on pages 4-5
Page 3 of 20
Figure A
Title Page
Figure B
Single Player
Page 4 of 20
Figure C
2 Player VS
Page 5 of 20
Against the Clock
In this 1-Player training game, the player rushes to add health to a steadily
depleting health meter in an allotted time frame for up to 10 levels of
increasing difficulty. The objective is to finish all the levels without running
out of meter.
Recommended set up options:
1 E-Shield set up:
What you’ll need
1 E-Paddle/Shield
1 Body Transmitter
1 Receiver
1 Electronic Foot Protector
1 GameBox
1 E-Chestgear set up:
What you’ll need
1 E-Chestgear
1 Body Transmitter
1 Receiver
1 Electronic Foot Protector
1 GameBox
1 E-Chestgear + 1 E-Headgear set up:
What you’ll need
1 E-Chestgear
1 Body Transmitter
1 E-Headgear
1 Head Transmitter
1 Receiver
1 Electronic Foot Protector
1 GameBox
Getting started:
After Game Defaults have been set, select the game from the Main Menu.
The description box will pop up – press the continue button to go to user
settings.
Page 6 of 20
How to use the game setting box:
“Against the Clock” has the following setting options and can be filled in as
recommended:
-Player Name: Here is where you insert the player’s name.
-Threshold: This is where the desired body and head hit level is set.
-Number of Rounds: The player can type in a number from 1-10 to
indicate the desired number of rounds.
-Time per round: This is where each round length is input in
seconds.
-Time of rest: This is where the rest time duration is set.
-Start Level Speed: Input a speed/difficulty level from 1-10.
-Body Transmitter: Fill in the ID # on your body transmitter in use.
This transmitter must be filled in to continue.
-Head Transmitter: Fill in the ID # of your head transmitter in use.
This can be left blank if no head transmitter will be in use.
Once settings are complete, press the continue button and the game will
sync the electronic devices.
Press the start button to start the game.
Page 7 of 20
Marathon
In this 1-Player training game, the player rushes to add more time to a
depleting time meter that depletes more rapidly as time progresses. The
objective is to play as long as possible and improve endurance.
Recommended set up options:
1 E-Shield set up:
What you’ll need
1 E-Paddle/Shield
1 Body Transmitter
1 Receiver
1 Electronic Foot Protector
1 GameBox
1 E-Chestgear set up:
What you’ll need
1 E-Chestgear
1 Body Transmitter
1 Receiver
1 Electronic Foot Protector
1 GameBox
1 E-Chestgear + 1 E-Headgear set up:
What you’ll need
1 E-Chestgear
1 Body Transmitter
1 E-Headgear
1 Head Transmitter
1 Receiver
1 Electronic Foot Protector
1 GameBox
Getting started:
After Game Defaults have been set, select the game from the Main Menu.
The description box will pop up – press the continue button to go to user
settings.
Page 8 of 20
How to use the game setting box:
“Marathon” has the following setting options and can be filled in as
recommended:
-Player Name: Here is where you insert the player’s name.
-Threshold: This is where the desired body and head hit levels are
set.
-Start Level Speed: Input a speed/difficulty level from 1-10.
-Body Transmitter: Fill in the ID # on your body transmitter in use.
This transmitter number must be filled in to continue.
-Head Transmitter: Fill in the ID # of your head transmitter in use. -This can be left blank if no head transmitter will be in use.
Once settings are complete, press the continue button and the game will
sync the electronic devices.
Press the start button to start the game.
Page 9 of 20
Sparring
In this 2-Player training game, the fighter with the most amount of points at
the end of the rounds, wins.
Recommended set up options:
2 E-Shield set up:
What you’ll need
2 E-Paddle/Shield
2 Body Transmitter
1 Receiver
2 Electronic Foot Protector
1 GameBox
2 E-Chestgear set up:
What you’ll need
2 E-Chestgear
2 Body Transmitter
1 Receiver
2 Electronic Foot Protector
1 GameBox
2 E-Chestgear + 2 E-Headgear set up:
What you’ll need
2 E-Chestgear
2 Body Transmitter
2 E-Headgear
2 Head Transmitter
1 Receiver
2 Electronic Foot Protector
1 GameBox
Getting started:
After Game Defaults have been set, select the game from the Main Menu
The description box will pop up – press the continue button to go to user
settings.
Page 10 of 20
How to use the game setting box:
“Sparring” has the following setting options and can be filled in as
recommended:
-Player Name 1 & 2: Here is where you insert the players’ name
-Number of Rounds: Here is where you set the number of rounds.
Recommended 2-3 rounds per match
-Time Per Round: Here is where you set the time duration of each
round.
-Time Per Rest: Here is where you insert the time duration of
breaks in between each round.
-Threshold: This is where the desired body and head hit levels are
set.
-Body Transmitter: Fill in the ID # on your body transmitter in use
for each player. The transmitters for both players must be filled in
to continue.
-Head Transmitter: Fill in the ID # of your head transmitter in use.
This can be left blank if no head transmitter will be in use
Once settings are complete, press the continue button and the game will
sync the electronic devices.
Press the start button to start the game.
Page 11 of 20
Last Fighter Standing
In this multi-player game of knockout, the lowest scoring fighter(s) is
knocked out of each round until there is only one winner out of all the
fighters.
Game requirements:
NOTE: The multiplayer game requires a TrueStudio receiver. Upgrading a
normal receiver to TrueStudio comes with a fixed cost and can be done
through Truescore HQ, whose contact information can be found in this
manual.
Recommended set up options:
1 E-Shield per Player
What you’ll need per player
1 E-Shield
1 Body Transmitter
1 TrueStudio Receiver
1 Electronic Foot Protector per player
Getting started
After Game Defaults have been set, select the game from the Main Menu
The description box will pop up – press the continue button to go to user
settings.
How to use the game setting box:
“Last Fighter Standing” has the following setting options and can be filled in
as recommended:
-Number of Players: Set the number of players that are in the
game from 3-8.
-Player Names: Here is where you insert the players’ names.
-Time Per Round: Here is where you set the time duration of each
round.
-Time Per Rest: Here is where you set the time duration of breaks
in between each round.
-Threshold: This is where the body and head hit levels are set.
Page 12 of 20
-Body Transmitter: Fill in the ID # on your body transmitter in use
in corresponding order with player names. These transmitters
must be filled in to continue and must match.
-Head Transmitter: Fill in the ID # of your head transmitters in
corresponding order with player names. This can be left blank if no
head transmitters will be in use.
Once settings are complete, press the continue button and the game will
sync the electronic devices.
Press the start button to start the game.
Page 13 of 20
Practice
In this 1-multiplayer training mode, the player(s) go through their own
training regimen and assess their training session at the end in graphs with
the session statistics. Time is unlimited and there is no designated
objective.
Recommended set up options:
1 E-Shield set up (per player):
What you’ll need
1 E-Paddle/Shield
1 Body Transmitter
1 Receiver
1 Electronic Foot Protector
1 GameBox
1 E-Chestgear set up (per player):
What you’ll need
1 E-Chestgear
1 Body Transmitter
1 Receiver
1 Electronic Foot Protector
1 GameBox
1 E-Chestgear + 1 E-Headgear set up (per player):
What you’ll need
1 E-Chestgear
1 Body Transmitter
1 E-Headgear
1 Head Transmitter
1 Receiver
1 Electronic Foot Protector
1 GameBox
Getting started:
After Game Defaults have been set, select the game from the Main Menu
The description box will pop up – press the continue button to go to user
settings.
Page 14 of 20
How to use the game setting box:
“Practice” has the following setting options and can be filled in as
recommended:
-Player Name: Here is where you insert the player’s name
-Threshold: This is where the desired body and head hit level is
inserted.
-Body Transmitter: Fill in the ID # on your body transmitter in use.
This transmitter must be filled in to continue
-Head Transmitter: Fill in the ID # of your head transmitter in use.
This can be left blank if no head transmitter will be in use
Once settings are complete, press the continue button and the game will
sync the electronic devices.
Press the start button to start the game.
Page 15 of 20
Combat
In this 2-Player training game, the player with the most health at the end of
the round wins. Hit levels of each strike translate to the damage done to
the opponent’s health bar. This game has the ability to run 4 simultaneous
matches with one “Start/Pause” button to control them all at once.
Game requirements for multiplayer (not necessary for 2 player versus):
NOTE: The multiplayer game requires a TrueStudio receiver. Upgrading a
normal receiver to TrueStudio comes with a fixed cost and can be done
through Truescore HQ, whose contact information can be found in this
manual.
Recommended set up options:
2 E-Paddle/Shield set up:
What you’ll need
2 E-Paddle/Shield
2 Body Transmitter
1 Receiver
2 Electronic Foot Protector
1 GameBox
2 E-Chestgear set up:
What you’ll need
2 E-Chestgear
2 Body Transmitter
1 Receiver
2 Electronic Foot Protector
1 GameBox
2 E-Chestgear + 2 E-Headgear set up:
What you’ll need
2 E-Chestgear
2 Body Transmitter
2 E-Headgear
2 Head Transmitter
1 Receiver
2 Electronic Foot Protector
1 GameBox
Page 16 of 20
Getting started:
After Game Defaults have been set, select the game from the Main Menu
The description box will pop up – press the continue button to go to user
settings.
How to use the user input box:
“C0ombat” has the following input options and can be filled in as
recommended:
-Number of Players: 2, 4, 6, or 8.
-Player Names: Here is where you write in the players’ name
-Number of Rounds: Here is where you select the number of
rounds for best out of 1 or best out of 3.
-Time Per Round: Here is where you set the time duration of each
round. Unlimited is an option if you want the match to be
determined by total health depletion only.
-Health/damage bar amount: Here is where you set the health
meter size. Default is 100, but depending on how long you want
the match to be and how high the hit levels are for your students,
numbers between 300-1000 can lengthen or shorten the match.
There is no minimum number if “first touch” is the object of the
game.
-Time Per Rest: Here is where you insert the time duration of
breaks in between each round.
-Threshold: This is where the desired body and head hit levels are
inserted.
-Body Transmitter: Fill in the ID # on your body transmitter in use.
This transmitter must be filled in to continue.
-Head Transmitter: Fill in the ID # of your head transmitter in use.
This can be left blank if no head transmitter will be in use.
Once settings are complete, press the continue button and the game will
sync the electronic devices.
Press the start button to start the game.
Page 17 of 20
Remote Access
This feature allows a user to connect to the GameBox via any device with a
browser such as:
iOS Mobile Device
iOS Tablet
Android Mobile Device
Android Tablet
PC/Mac Computer
Steps:
1.
2.
3.
4.
Connect device to wifi network “TrueStudio”.
Insert Password: TrueStudio10987.
Open a browser.
Input IP address 192.168.222.1 into the URL of the browser.
Page 18 of 20
Device Maintenance
Charging
Transmitters have a built in battery and require charging
between sessions. To charge, plug a charger into an outlet
and plug the other end of the charger into the
transmitter. From fully depleted, a transmitter normally
takes 2-3 hours to charge fully. Take note of the light on
the charger as it will turn from RED to GREEN when the
transmitter fully charged.
Warranty Repair
TrueScore warranties electronic items for 1 year from
manufacturing defects that impair function. Contact
Truescore HQ for warranty information and inquiries.
Page 19 of 20
Contacting Customer Support
Email: [email protected]
Phone: 510-270-2995
510-270-4155
Technical Support
Email: [email protected]
Phone: 510-279-4137
Websites
www.TrueScore.com
www.facebook.com/TruescoreHQ
www.youtube.com/TruescoreHQ
Page 20 of 20