1
INTREPID User Manual
Library | Help | Top
Importing to INTREPID datasets (T05)
1
| Back |
Importing to INTREPID datasets (T05)
Top
This tool enables you to convert data from a variety of formats to INTREPID dataset
files.
You can import data into vector and grid datasets. The sections following on vector
dataset import and grid dataset import contain lists of the data formats from which
INTREPID can import.
You can also specify the geographic registration of an existing dataset using this tool.
Note: You can identify the current datum and projection if, for some reason,
INTREPID does not have them correctly recorded. For example, the import data may
not explicitly identify its datum and projection. This tool will not perform datum or
projection conversion in a dataset. See Datum and Projection Utility (T13) for
information about that process.
Generally, at the end of this process, your data should have geographic registration
(be 'geolocated'). INTREPID does, however, support unlocated and local grids. See
"Data that is not geolocated (RAW)" in INTREPID’s supported datums and projections
(R09) and "Local projections (local grids)" in INTREPID’s supported datums and
projections (R09) for details.
Recent updates—please note
The Import tool can now import
•
ARCVIEW Shape files into vector datasets. The procedure is similar to the one
for Picodas Line and Moss Exchange data.
•
LCT Grids.
•
USGS Images into grid datasets. The procedure is similar to that for importing
ASCII Images.
Using the Import tool
>> To use the Import Data tool
Library | Help | Top
1
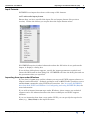
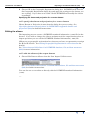
Choose Import from the File menu of the Project Manager or use the command
import.exe. INTREPID displays the Import window.
2
If you are only editing the geographic registration of an existing dataset, perform
steps 3, 4 (specify output dataset only), 9, 10, 11.
© 2012 Intrepid Geophysics
| Back |
INTREPID User Manual
Library | Help | Top
Importing to INTREPID datasets (T05)
2
| Back |
3
If you have previously prepared file specifications and parameter settings for
Import, load the corresponding task specification file using Load Options from the
File menu. (See Specifying input files and output datasets for information about
specifying files). If all of the specifications are correct in this file, go to step 7. If
you wish to modify any settings, carry out the following steps as required.
4
Specify the input file (or device name for an AGSO Argus tape) and the output
dataset into which you wish to import the data. Use the corresponding options
from the File menu. (See Specifying input files and output datasets for
information about specifying files).
5
Select the input format to be used from the Input Format menu (See Input
Formats for details).
6
If INTREPID displays a dialog box for the input format you have chosen, specify
the parameters required.
7
When you have made specifications according to your requirements, choose Apply
in the Import window. INTREPID will to carry out the import process.
8
Edit the INTREPID standard information (.isi) file if necessary (vector datasets
only). (See Editing the aliases.)
9
Edit the geographic registration for the dataset if necessary. (See Setting
Geographic Registration for vector datasets or Setting Geographic Registration
for a grid dataset.)
10 If you wish to record the specifications for this process in a task specification
(.job) file in order to repeat a similar task later or for some other reason, use
Save Options from the File menu. (See Specifying input files and output datasets
for information about specifying files).
11 If you wish to repeat the process, repeat steps 2–10, varying the specifications as
required.
12 To exit from Import, choose Quit from the File menu.
___
As you specify the filenames and parameters for the import process, INTREPID
displays them in the Import window. See Displaying options and using task
specification files for details and an example of a set of specifications.
You can view Help information by choosing options from the Help menu (See Help).
You can execute Import as a batch task using a task specification (.job) file that you
have previously prepared. See Displaying options and using task specification files
for details.
Library | Help | Top
© 2012 Intrepid Geophysics
| Back |
INTREPID User Manual
Library | Help | Top
Importing to INTREPID datasets (T05)
3
| Back |
Specifying input files and output datasets
To import data you must specify the input data file and the output dataset. Choose
the corresponding options from the File menu to specify these files.
In each case INTREPID displays an Open dialog box. Use the directory and file
selector to locate the file you require. (See "Specifying input and output files" in
Introduction to INTREPID (R02) for information about specifying files).
Open Input File Use this to specify the file or device containing the data to be
imported.
If you are importing data from a tape under UNIX, you can specify the tape device
name (e.g., /dev/rst4) as the input file name.
If you are importing data into a multiband grid dataset, INTREPID will prompt
you to specify the band in which to store the data.
If you are only editing geographic registration, do not specify an input file.
Editing geographic registration operates only on the output dataset
Specify Output Dataset Use this to specify the INTREPID dataset that you are
creating and to which you are importing data in this process.
Load Options If you wish to use an existing task specification file to specify the
Import process, use this menu option to specify the task specification file required.
INTREPID will load the file and use its contents to set all of the parameters for
the Import process. (See Displaying options and using task specification files for
information about task specification files).
Save Options If you wish to save the current Import file specifications and
parameter settings as a task specification file, use this menu option to specify the
file name and save the file. (See Displaying options and using task specification
files for more information).
Library | Help | Top
© 2012 Intrepid Geophysics
| Back |
INTREPID User Manual
Library | Help | Top
Importing to INTREPID datasets (T05)
4
| Back |
Input Formats
INTREPID can import data from a wide range of file formats.
>> To select the input format
Ensure that you have specified the input file and output dataset (See previous
section). Choose the format you require from the Input Format menu.
If INTREPID requires further information about the file before it can perform the
import, it displays a dialog box.
If one of these dialog boxes appears, specify the import parameters required and
choose the OK button in that dialog box. INTREPID will close the dialog box and use
the parameters that you specified.
Importing from tape under Windows
If your data is in tar (tape archive) format you may need UNIX support software to
import it under Windows. Software packages such as MKS Toolkit provide access to
standard tar commands using UNIX device notation. See "Accessing INTREPID
data from both UNIX and Windows" in Configuring and using INTREPID (R04) for
more information.
If you wish to import from tar tape under Windows, please contact our technical
support service for information about the latest techniques and UNIX support
software.
If you are importing data from a tape under UNIX, you can specify the tape device
name (e.g., /dev/rst4) as the input file name.
Library | Help | Top
© 2012 Intrepid Geophysics
| Back |
INTREPID User Manual
Library | Help | Top
Importing to INTREPID datasets (T05)
5
| Back |
Apply
When you choose Apply INTREPID will carry out the processing that you have
specified. Before you choose Apply, you must have specified the input file and output
dataset names and the parameters that you wish INTREPID to use.
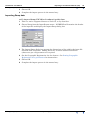
Help
You can use the Help menu to display help text on the topics shown in the menu
illustration below.
Exit
To exit from Import, choose Quit from the file menu.
Displaying options and using task specification files
Displaying options
INTREPID displays the current file specifications and parameter settings in the
Import window.
Using task specification files
You can store sets of file specifications and parameter settings for Import in task
specification (.job) files.
>> To create a task specification file with the Import tool
1
Specify all files and parameters.
2
If possible, execute the task (choose Apply) to ensure that it will work.
3
Choose Save Options from the File menu. Specify a task specification file
(INTREPID will add the extension .job) INTREPID will create the file with the
settings current at the time of the Save Options operation.
For full instructions on creating and editing task specification files see INTREPID
task specification (.job) files (R06) files.
>> To use a task specification file in an interactive Import session
Load the task specification (.job) file (File menu, Load Options), modify any settings
as required, then choose Apply.
>> To use a task specification file for a batch mode Import task
Type the command import.exe with the switch -batch followed by the name of the
task specification file.
For example, if you had a task specification file called surv329.job in the current
directory you would use the command
import.exe -batch surv329.job
Library | Help | Top
© 2012 Intrepid Geophysics
| Back |
INTREPID User Manual
Library | Help | Top
Importing to INTREPID datasets (T05)
6
| Back |
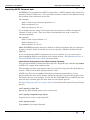
Task specification file example
Here is an example of an Import task specification file.
Process Begin
Name = Import
Input = eba_Ascii
Output = ebagoola
Parameters Begin
Format = AsciiColumns
AsciiColumns Begin
FixedLength = No
RecordLength = 80
SkipRecords = 0
ReportDiagnostics=yes
DDF = "eba.ddf"
AsciiColumns End
Parameters End
Process End
___
Importing to vector datasets
You can import to INTREPID vector datasets from a range of data formats. The
formats that INTREPID supports include
Library | Help | Top
•
ASCII column files described by Data Definition Files (DDF)
•
AGSO Argus, BASOS and RAF files
•
Geosoft XYZ files
•
Moss files
•
NetCDF XYZ files
•
Picodas files
•
Geosolutions Line files
© 2012 Intrepid Geophysics
| Back |
INTREPID User Manual
Library | Help | Top
Importing to INTREPID datasets (T05)
7
| Back |
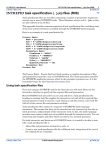
'Group by' fields and field aliases
During the import process for a vector dataset, INTREPID can automatically:
•
Identify 'group by' fields and
•
Create and assign aliases to fields. INTREPID creates an INTREPID standard
information (.isi) file with aliases appropriate to the output dataset type.
See "'Group by' fields" in INTREPID database, file and data structures (R05) and
"Vector dataset field aliases" in INTREPID database, file and data structures (R05)
for full details about these topics.
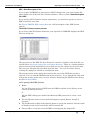
The table in this section indicates automatic or programmable 'group by' and alias
assignments for each input format.
INTREPID imports data from all formats listed into line datasets unless otherwise
indicated in the table.
The table contains the following codes:
Code
Meaning
A
INTREPID automatically assigns a field without your intervention.
P
You specify the assignment of a field before the import process.
Blank
INTREPID lists the alias in the INTREPID standard information (.isi) file, but does not
assign it during the import process. You must edit the INTREPID standard information
(.isi) file after import to assign the alias.
X
INTREPID does not list this alias in the INTREPID standard information (.isi) file
(usually because the alias is not appropriate to the dataset type).
Library | Help | Top
© 2012 Intrepid Geophysics
| Back |
Importing to INTREPID datasets (T05)
8
| Back |
Y
Fiducial
LineNumber
PointType
PointGroup
A
A
A
A
A
X
X
AGSO Binary Argus
A
A
A
A
A
X
X
AGSO Binary BASOS
A
A
A
A
A
X
X
AGSO RAF
A
A
A
A
A
X
X
ASCII Columns (line)
P
P
P
X
X
ASCII Columns (point)
P
P
P
X
X
X
X
X
P
P
X
X
X
X
X
X
X
ASCII Columns
(polygon)
Clearance
X
AGSO ASCII Argus
LineType
'Group by'
Automatic selection of
'group by' fields and
assigning of fields to
aliases for each
import formats
FlightNumber
INTREPID User Manual
Library | Help | Top
Geosoft XYZ
A
A
A
A
X
X
Geosolutions (line)
P
A
A
P
X
X
Geosolutions (point)
A
A
A
GR_820
A
A
A
X
X
Moss
A
A
A
X
X
NetCDF XYZ (line)
A
A
A
X
X
NetCDF XYZ (point)
A
A
A
A
A
X
X
X
A
A
A
X
X
NetCDF XYZ (polygon)
Picodas
A
A
A
X
X
A
A
X
X
X
X
X
X
X
X
A
A
A
Traverse line type codes
Several INTREPID tools require a line type field containing a type code for each
traverse line. If your imported dataset does not contain such a field you may need to
create one. See "Traverse line numbers and types" in INTREPID database, file and
data structures (R05) for further information.
Viewing imported line datasets as point datasets
INTREPID imports some formats to line datasets automatically. You can view these
datasets as point datasets if required. See "Viewing line datasets as point datasets"
in INTREPID database, file and data structures (R05) for instructions.
Library | Help | Top
© 2012 Intrepid Geophysics
| Back |
INTREPID User Manual
Library | Help | Top
Importing to INTREPID datasets (T05)
9
| Back |
Importing ASCII Columns data
INTREPID can interpret most ASCII columns data. ASCII columns files consist of a
number of lines of characters. You can divide each line of the file into fields based on
the position of the characters in the line.
For example,
field 1 could occupy character positions 1–5,
field 2 positions 6–14,
field 3 positions 15–24, etc..
If you display the file using a fixed space font, the characters will be arranged in
columns as well as rows. Thus you could also substitute the word 'column' for
'character position'.
For example,
field 1 could occupy columns 1–5,
field 2 columns 6–14,
field 3 columns 15–24, etc..
Note: INTREPID assumes that the columns of data in the import file are separated
by spaces or tabs. If this is not the case you can specify a different delimiter in the
DDF file.
If you are importing ASCII column data to a vector dataset you can create one or
more multiband fields or one field for each column of data. See"Multiband fields" in
The INTREPID DDF format (R08) for instructions.
Input file and device options for ASCII columns importing
You can import ASCII columns data from disc file, magnetic tape and through stdin
(UNIX only—output from another task).
The advantage of direct tape input is that you can select only part of the data that you
require. This is faster than copying all data to disc.
(UNIX only) You can use stdin in batch processing situations where you are
preprocessing the data before import, piping the data directly from the preprocess to
the import process. For example, you can use the UNIX dd utility to unblock the data
from the tape and then pipe the data from it to the import process.
See Specifying input files and output datasets for details of the input file specification
process.
>> To specify a disc file
Specify the path and file name in the normal way.
>> To specify magnetic tape input
Type the device name as the input file.
>> To specify stdin
Type stdin as the input filename.
Library | Help | Top
© 2012 Intrepid Geophysics
| Back |
INTREPID User Manual
Library | Help | Top
Importing to INTREPID datasets (T05)
10
| Back |
DDF—Data Description Files
If you require INTREPID to interpret an ASCII columns file, you need another file
which defines the fields and their column numbers. This is called a Data Description
File (DDF).
If you specify ASCII Columns format import data, you must also specify or create a
DDF to describe your data.
See The INTREPID DDF format (R08) for a full description of the DDF format
options.
The ASCII Columns import process
If you choose ASCII Columns format for your input file, INTREPID displays the DDF
Preview dialog box.
The top section of the DDF Preview dialog box contains a display of the data file you
specified (See Specifying input files and output datasets). There is a column number
ruler across top of the text display area to help you see the column layout of the data.
The text area will probably not show all of the data. You can view more data by
resizing the dialog box window or scrolling the data.
The bottom section of the dialog box contains the text of the DDF that you have
selected. You can edit the DDF directly in this text area. If you edit the file and wish
to keep the results, make sure you save it before dismissing the DDF Preview dialog
box (See Saving DDFs).
>> To specify the DDF format,
1
Either
Use the File menu to load a DDF from the DDFs available in the library or the
current (working) directory
or
Use the DDF editing area and/or the Skeleton DDF generator to create a new
DDF.
Library | Help | Top
2
Use the Options menu to turn on Fixed Length or specify Record Length if
required.
3
Use Set Records to Skip in the Options menu to specify the number of header and/
or blank records at the start of the ASCII columns file.
4
Choose OK to accept the selected DDF for interpreting the import file.
© 2012 Intrepid Geophysics
| Back |
INTREPID User Manual
Library | Help | Top
Importing to INTREPID datasets (T05)
11
| Back |
Loading existing DDFs
>> To load an existing DDF,
1
Choose Load DDF from the File menu. INTREPID displays the From Library/
From Current Directory cascade menu.
Choose From Library or From Current Directory depending on where the required
DDF resides. The Library is the directory install_path/ddf. (See The
INTREPID DDF format (R08) for more information.) INTREPID displays a file
selection dialog box.
If you choose Library INTREPID displays the DDFs from the library in the Load
Library DDF dialog box.
If you choose Current Directory INTREPID displays the DDFs from your current
working directory in the Load Local DDF dialog box.
2
Choose the file you require (See "Specifying input and output files" in Introduction
to INTREPID (R02) for information about specifying files).
ASCII Columns import options
You can use options from the Options menu to specify
•
Whether the import records are of fixed length.
•
If there is an error in the input data, whether to assign the value null or stop the
process and report the error.
•
Whether to produce a diagnostic report of the process.
•
The record length of the input data if it is fixed length.
•
Number of records containing header information, etc., at the start of the input
file (Records to skip)
Fixed Length Records Turn on this option if the file to be imported has fixed length
records. This option is useful if there are no carriage returns or line feeds
delimiting records in the data.
Library | Help | Top
© 2012 Intrepid Geophysics
| Back |
INTREPID User Manual
Library | Help | Top
Importing to INTREPID datasets (T05)
12
| Back |
Null Field on Error This option specifies INTREPID's behaviour if it encounters an
error or data that it cannot interpret in the import file. If you turn this option on,
INTREPID will insert the value null in the data whenever it cannot evaluate an
item. If you turn this option off, INTREPID will halt the import process if it
cannot evaluate an item and report the problem to you.
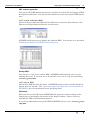
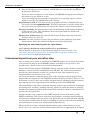
Here is an example of an error report which INTREPID displays when this option
is turned off.
Diagnostic Report If you turn on this option INTREPID can produce a report of the
import process. The report will be an ASCII (text) file in the working directory
with the same name as the output dataset and the extension .rpt. For example,
if your dataset is called mag567, then the report file will be mag567.rpt. You can
also view diagnostic reporting of the process in a background window (UNIX) or a
Windows ntout report file. See "Diagnostic reporting options" in Configuring and
using INTREPID (R04) for more information.
Set Record Length If the import file has fixed length records, use option to specify
the number of characters in each record. When you choose it INTREPID displays
the Record Length input dialog box. Type the record length in the text box and
choose OK.
Set Records to Skip Use this to specify the number of records (rows) occupied by
any header or other file description data at the start of the input file. INTREPID
will skip the number of records (rows) that you specify. When you choose it
INTREPID displays the Records to Skip input dialog box. Type the records to
skip in the text box and choose OK.
Editing the DDF in the DDF Preview dialog box
You can directly edit the DDF in the editing area in the lower half of the dialog box.
To see more of the DDF use the scroll bar.
Library | Help | Top
© 2012 Intrepid Geophysics
| Back |
INTREPID User Manual
Library | Help | Top
Importing to INTREPID datasets (T05)
13
| Back |
DDF skeleton generator
You can use the DDF skeleton generator to examine your data file and suggest a DDF
description for the data. You can edit this skeleton to create the required DDF for the
data.
>> To create a skeleton DDF
Choose Generate Skeleton DDF from the File menu, and select Point Dataset, Line
Dataset or Polygon Dataset from the cascade menu.
INTREPID will generate and display the skeleton DDF. You can edit it as described
in Editing the DDF in the DDF Preview dialog box.
Saving DDFs
You can save a copy of the current DDF. INTREPID will normally save it in the
working directory. If you wish to use it regularly, save it in or copy it to the library
(install_path/ddf).
>> To save a DDF
Choose Save DDF from the file menu. INTREPID displays a file selection dialog box.
Specify and save the file. (See "Specifying input and output files" in Introduction to
INTREPID (R02) for information about specifying files).
OK/Cancel
When you choose the OK button INTREPID will apply the current settings to the
import process and display the results in the Import window. Choose Cancel to
abandon the DDF selection/editing process.
If you choose OK without saving the DDF INTREPID will save it as install_path/
tmp/ddf.
Library | Help | Top
© 2012 Intrepid Geophysics
| Back |
INTREPID User Manual
Library | Help | Top
Importing to INTREPID datasets (T05)
14
| Back |
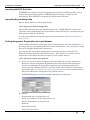
Help
You can use the Help menu to display help text on the topics shown in the menu
illustration below.
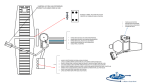
Importing AGSO vector data
With the deployment of GADDS by Geosciense Australia, the need for this function
becomes obsolete. INTREPID
INTREPID can import AGSO standard tapes in
•
Argus format (currently used),
•
BASOS format (an old format not currently used),
RAF format (AGSO internal archive storage and retrieval format—not generally
available).
>> To import AGSO data
1
Choose AGSO Argus, AGSO BASOS or AGSO RAF from the Input Format menu.
INTREPID displays an AGSO Import dialog box.
2
If you wish to have INTREPID only report on the file contents, turn on the Report
Contents Only check box.
3
Choose OK.
4
Complete the import process in the normal way.
Geographic registration for AGSO vector data
AGSO vector data has two possible datums. The change occurred in 1992.
Before 1992: AGD66
After 1992: WGS84
The import data does not specify the datum. After importing the data you must check
and change the datum if necessary. You can use GeoReference Output from the
Utilities menu for this operation. See Modifying geographic registration for an
existing dataset for instructions.
Library | Help | Top
© 2012 Intrepid Geophysics
| Back |
INTREPID User Manual
Library | Help | Top
Importing to INTREPID datasets (T05)
15
| Back |
The AGSO configuration file
INTREPID keeps a configuration file for the AGSO formats called
BMRStandardChannels in the directory install_path/config. This ASCII file
contains the field names for each variety of tape including
•
radiometrics only,
•
radiometrics and magnetics,
•
VLF,
•
Doppler navigational data,
•
Pressure,
•
temperature and upward radiometrics,
•
Navigation,
•
Magnetics (new and old).
The file contains the default field names followed by a standard divisor to convert
from integer to real. The divisor will normally convert the data to Real*4. You can
add an optional 3rd argument to force a conversion to Real*8. All location
information should be converted to Real*8.
The dataset creation process
The header of an AGSO tape contains the channel and data type information.
INTREPID uses this to select the dataset field names and structure from
BMRStandardChannels.
INTREPID automatically derives the location, line number and fiducial fields from
the AGSO data and assigns the corresponding aliases.
You may wish to create a line type field for the dataset. AGSO has a line number
convention which enables you to derive a line type field from the line numbers. See
"Traverse line numbers and types" in INTREPID database, file and data structures
(R05) for further information.
Importing AGSO Argus data from tape or disc—notes
AGSO Argus traverse line data format stores each traverse line as a separate file.
You can specify that INTREPID read the data directly from tape. This is especially
useful if you have a very large multivolume ASCII dataset and only wish to extract
part of it.
To read data from tape, enter the input file name containing the name of the tape
device.
Examples:
Silicon Graphics:
/dev/rmt/tps0d5nrnsv.6250
Sun:
/dev/rst0a
a. For 6250 bpi Sun with Kennedy drive at SCSI address 5,
the device name is /dev/rst16
As there are multiple files on the tape, you must specify no rewind after read.
INTREPID will import all files on the tape.
Library | Help | Top
© 2012 Intrepid Geophysics
| Back |
INTREPID User Manual
Library | Help | Top
Importing to INTREPID datasets (T05)
16
| Back |
You can also specify that INTREPID read the data from disc. The procedure for
reading Argus data from disc requires you to have read the data from tape into
multiple files via a tape utility such as dd. We can supply you with a shell script to
assist in creating these files. If you are importing from disc you must have created a
file containing a list of all of the file names, one per line. The file name must have the
extension .lst In this case, specify the .lst file as the File To Import text box in the
Import dialog box. From this file name list file INTREPID can determine the names
of all of the files it must import.
If you are importing the data from disc and specify a file name with an extension
other than .lst, INTREPID will assume that the data is in an AGSO Archive format
file.
Importing BASOS data—notes
You can load BASOS data from disc or tape. This older format is not commonly
found. The blocking factor is 3840 for tapes. If you read a tape to disc make sure you
pad out the blocks so that they remain a constant size.
The BASOS null value is 1010
Importing ASCII XYZ data
ASCII XYZ files consist of a number of 'columns' of data, where a column represents a
field (e.g., X or Y or Z) and a row represents a data point.
INTREPID imports ASCII XYZ files to line datasets. You can view these datasets as
point datasets if required. See "Viewing line datasets as point datasets" in
INTREPID database, file and data structures (R05) for instructions.
>> To import ASCII XYZ data
1
Choose ASCII XYZ from the Input Format menu. INTREPID will examine the
input file and may display the Import ASCII XYZ dialog box.
Set the Geographic Registration for the dataset by specifying its Datum and
Projection. Choose the corresponding buttons and select the datum and projection
accordingly from the dialog boxes that INTREPID displays. See Setting
Geographic Registration for vector datasets for details of this process.
2
Library | Help | Top
INTREPID will normally import the first column of data as the X field, the second
as Y and the third as Z. If there are exactly three columns of data go to step 6.
© 2012 Intrepid Geophysics
| Back |
INTREPID User Manual
Library | Help | Top
3
Importing to INTREPID datasets (T05)
17
| Back |
If there are more than three columns of data in the Geosoft XYZ file, you need to
decide whether the third and subsequent columns will be single fields or bands of
one multiband field.
To import the additional columns of data as a single multiband Z field, turn on the
Save as Multiband Channel Z check box.
To import the additional columns of data as separate Z fields, turn off the Save as
Multiband Channel Z check box. INTREPID will import the third and subsequent
columns as fields Z1, Z2,...
4
Choose OK.
5
Complete the import process in the normal way.
6
Depending on the particular format of the XYZ file, the import process may create
2 extra fields, called AS_FLIGHT and AS_DATE. These fields occur in the
comment line of the XYZ file, and are created within INTREPID as ‘Group By’
fields. The ‘AS’ prefix distinguishes them from ‘GS’ fields (eg: GS_Line), which
originate within the Geosoft program.
Importing Geosolutions line/point data
Geosolutions line or point files consist of a number of fields which may be labelled.
>> To import Geosolutions line or line data
1
Choose Geosolutions Line/Point from the Input format menu. INTREPID will
examine the input file and display the Import Geosolutions Line/Point Data dialog
box.
The dialog box will report the number of fields and their labels if present.
Library | Help | Top
2
Specify whether to import the data to a line or point dataset using the
corresponding option buttons.
3
If one of the fields is the line number field for the dataset, specify it by choosing
Line Number and selecting the line number field from the file selection dialog box
displayed.
4
Set the Geographic Registration for the dataset by specifying its Datum and
Projection. Choose the corresponding buttons and select the datum and projection
accordingly from the dialog boxes that INTREPID displays. See Setting
Geographic Registration for vector datasets for more details of this process.
5
Choose OK.
6
Complete the import process in the normal way.
© 2012 Intrepid Geophysics
| Back |
INTREPID User Manual
Library | Help | Top
Importing to INTREPID datasets (T05)
18
| Back |
Importing Picodas Line data
>> To import from Picodas Line formats
1
Choose Picodas Line from the Input format menu. You should choose the list file,
which contains a list of the binary files supplied in this format. INTREPID will
examine the input file and display the corresponding dialog box.
2
Choose which fields you wish to import and create an Intrepid database from.
3
Set the Geographic Registration for the dataset by specifying its Datum and
Projection. Choose the corresponding buttons and select the datum and projection
accordingly from the dialog boxes that INTREPID displays. See Setting
Geographic Registration for vector datasets for more details of this process.
4
Choose OK.
5
Complete the import process in the normal way.
Importing NetCDF XYZ data
INTREPID can obtain all required information from the NetCDF XYZ files. If you
choose this input format option, INTREPID will not display a dialog box for
parameters. At V4.5/5.0, the GMT variant for GRIDS of this format is supported
natively.
Importing Exploranium GR 820 data
Exploranium GR 820 data files have a binary format. INTREPID can import GR 820
binary data blocks into a predetermined vector dataset format. The binary data
blocks can be alone in a file or embedded in an ASCII columns file.
You can import Exploranium GR 820 data using
•
The GR_820 option from the InputFormat menu (for standard Exploranium GR
820 binary files)
•
ASCII columns import (for Exploranium GR 820 binary data embedded in an
ASCII columns file). See "Exploranium GR820 import" in The INTREPID DDF
format (R08) for instructions.
Setting Geographic Registration for vector datasets
When you import to a vector dataset, part of the process is to nominate the datum and
Library | Help | Top
© 2012 Intrepid Geophysics
| Back |
INTREPID User Manual
Library | Help | Top
Importing to INTREPID datasets (T05)
19
| Back |
projection for the dataset. This is called geographic registration. This should
alswyas be done, prior to trying to use other tools within INTREPID. The
ProjectManager also lets you review and set this information.
ASCII columns data
If you are importing ASCII columns data, you should incorporate geographic
registration information in the DDF (See Importing ASCII Columns data).
NetCDF XYZ data
If you are importing NetCDF XYZ data (see Importing NetCDF XYZ data), the import
data should include its own geographic registration information.
ASCII XYZ, Geosolutions line/point, Picodas, Exchange data
If you are importing Geosoft XYZ, Geosolutions line/point data, Picodas and Moss
Exchange data (see corresponding sections above), you need to specify the datum and
projection using the buttons provided in the corresponding import format dialog box.
Modifying geographic registration for an existing dataset
You can edit the geographic registration of an existing dataset using the Geo
Reference Output option in the Utilities menu. This dataset can be the one just
imported or some other one that you specify as the output dataset.
You can identify the datum and projection. You may wish to do this, for example, if
the current datum or projection is not the correct one for the dataset, or if no datum or
projection is currently recorded for the dataset.
You can also nominate the location X ,Y fields for the dataset (i.e., assign the X and Y
aliases). See Editing the aliases in this chapter and "Vector dataset field aliases" in
INTREPID database, file and data structures (R05) for more information.
Note: The Import tool will not perform datum or projection conversion in a dataset.
See Old Datum and Projection Conversion (T12) for information about that process.
>> To specify location information for an existing vector dataset
1
Ensure that the existing dataset is specified as the output dataset in the Import
tool window (See Specifying input files and output datasets for more information).
2
Choose Geo Reference Output from the Utilities menu of the Import window.
INTREPID displays the Set Geographic Registration dialog box.
Library | Help | Top
© 2012 Intrepid Geophysics
| Back |
INTREPID User Manual
Library | Help | Top
Library | Help | Top
Importing to INTREPID datasets (T05)
20
| Back |
3
Specify the Datum and the Projection by choosing the corresponding buttons.
INTREPID displays a datum or projection selection dialog box accordingly. Select
the datum/projection you require, then choose OK. See Specifying the datum and
projection for a vector dataset for full instructions.
4
If you wish to nominate different fields as the X and Y location fields, choose X.
INTREPID displays a file selection dialog box. Select the new X field. Repeat the
process for the Y field. (See "Specifying input and output files" in Introduction to
INTREPID (R02) for information about specifying files)
© 2012 Intrepid Geophysics
| Back |
INTREPID User Manual
Library | Help | Top
5
Importing to INTREPID datasets (T05)
21
| Back |
Choose OK in the Geographic Registration dialog box. INTREPID will close the
Set Geographic Registration dialog box and apply the settings to the dataset you
are creating. If you chose new X and Y fields INTREPID will modify the aliases
accordingly.
Specifying the datum and projection for a vector dataset
>> To specify the datum and projection for a vector dataset
Choose Datum or Projection in turn from the dialog box you are using. See
"Specifying datums and projections" in INTREPID’s supported datums and
projections (R09) for detailed instructions.
Editing the aliases
The importing process creates a INTREPID standard information (.isi) file for the
dataset. If you wish to change the aliases assignment of the output dataset after an
import operation you can edit its INTREPID standard information (.isi) file.
(When you set geographic registration for a dataset you have an opportunity to assign
the X and Y aliasese. See Setting Geographic Registration for vector datasets for
details.)
See "Vector dataset field aliases" in INTREPID database, file and data structures
(R05) for more information.
>> To edit the aliases of the output dataset
1
Choose Edit Dataset Aliases from the Post Import Utilities menu.
See "Vector dataset field aliases" in INTREPID database, file and data structures
(R05) for further instructions.
You can also use a text editor to directly edit the INTREPID standard information
(.isi).
___
Library | Help | Top
© 2012 Intrepid Geophysics
| Back |
INTREPID User Manual
Library | Help | Top
Importing to INTREPID datasets (T05)
22
| Back |
Importing to grid datasets
INTREPID can import data from the following grid formats
•
ASCII image files
•
Binary image files (including ERMapper1, ARC/INFO and ERDAS IMAGINE)
•
AGSO ASCII and Binary image files
•
ASEG GXF files
•
Encom Image
•
Zmap grid
•
ECS gridfile and GRDUTE files
•
GEOPAK files
•
Geosoft grid files
•
NetCDF Grid files
•
Geosolutions (previously Newcrest) Grid files
Examining input grid dimensions (UNIX)
The octal dump UNIX command is sometimes useful for determining the size of a
header or the dimensions of a grid.
od
-b
filename (Binary grids)
od
-c
filename (ASCII (character) grids)
1.There is generally no need to import ERMapper files. ERMapper files are 100%
INTREPID compatible and can just be loaded as datasets without any importing process.
If you wish to import ERMapper files, treat them as binary image files.
Library | Help | Top
© 2012 Intrepid Geophysics
| Back |
INTREPID User Manual
Library | Help | Top
Importing to INTREPID datasets (T05)
23
| Back |
Importing ASCII Image data
An ASCII image file consists of a sequence of numbers in ASCII text format separated
by spaces. Each number represents the value of a cell of the image.
>> To import ASCII image data
1
Choose ASCII Image from the InputFormat menu. INTREPID displays the
Import ASCII Image dialog box.
2
Set the parameters and options according to your requirements.
Notes:
•
There are no end of row markers in the data, so you need to specify the number of
columns and rows of cells there are in the image.
•
The file may have some header data at the beginning. If so, you need to specify
the number of rows of data to skip in order to find the start of the image. Each
row may also have some unwanted data at the start or end. If this exists you need
to specify the number of bytes at the beginning and end.
•
If the numbers in the ASCII file are not separated by spaces you will need to
specify this and say how many characters represent one cell.
•
You need to specify the precision of the data (byte, integer, floating point).
•
If there are nulls in the data, you will need to specify the notation used for them
in the import file.
An explanation of each parameter or set of options appears below.
Library | Help | Top
3
Set the Geographic Registration for the dataset. See Setting Geographic
Registration for a grid dataset for instructions.
4
Choose OK and complete the import process in the normal way.
© 2012 Intrepid Geophysics
| Back |
INTREPID User Manual
Library | Help | Top
Importing to INTREPID datasets (T05)
24
| Back |
Rows and Columns Use these text boxes to specify the dimensions of the grid
dataset. Enter the number of rows of data values and the number of values in
each row (i.e., the number of columns).
Characters to skip at start Use this text box to specify the size in characters of any
header or other file description data occurring at the start of the image file.
INTREPID will skip the number of rows that you specify.
Leading/Trailing Bytes to Skip Each Row Use these text boxes to specify the
number of bytes of unwanted data occurring at the start and/or end of each row.
INTREPID will skip the data that you specify.
Nulls Flagged as Use this text box to specify the notation in the import file that
INTREPID should interpret as null.
Fixed Width and Chars/Pixel If your ASCII file has no spaces between cell values
there must be a fixed number of characters to be interpreted as the data for each
cell. If your data is of this type turn on the Fixed Width text box and specify the
number of characters that represent each cell's value.
Precision of the data to be processed Use these option buttons to specify the
precision of the saved dataset.
Option button
Precision
Unsigned8bitInteger
byte
Signed16BitInteger
integer (2 byte)
Signed32BitInteger
integer (4 byte)
IEEE4ByteReal
real (4 byte)
IEEE8ByteReal
real (8 byte)
Geographic Registration Use this button to set the geographic registration of the
data (datum, projection, cell size and location of the top left corner cell) See
Setting Geographic Registration for a grid dataset for details of this operation.
Library | Help | Top
© 2012 Intrepid Geophysics
| Back |
INTREPID User Manual
Library | Help | Top
Importing to INTREPID datasets (T05)
25
| Back |
Importing Binary Image data
A Binary image file consists of a sequence of binary encoded numbers. Each number
represents the value of a cell of the image and occupies 1–8 bytes, depending on the
precision of the data.
>> To import binary image data
1
Choose Binary Image from the InputFormat menu. INTREPID displays the
Import Binary Image dialog box.
2
Set the parameters and options according to your requirements.
Notes:
•
If you are importing ERMapper data you normally do not need to alter any of the
parameters in this dialog box (See Importing ERMapper files).
•
There are no end of row markers in the data, so you need to specify the number of
columns and rows of cells there are in the image.
•
The file may have some header data at the beginning. If so, you need to specify
the number of bytes of data to skip in order to find the start of the image.
•
Each row may have some unwanted data at the beginning and the end. If so, you
need to specify the number of bytes of data to skip in order to find the beginning
and end of the image data in each row.
•
Each row may also have some unwanted data at the start or end. If this exists
you need to specify the number of bytes at the beginning and end.
•
You need to specify the precision of the data (byte, integer, floating point).
•
If there are nulls in the data, you will need to specify the value used for them in
the import file.
An explanation of each parameter or set of options appears below.
Library | Help | Top
3
Set the Geographic Registration for the dataset. See Setting Geographic
Registration for a grid dataset for instructions.
4
Choose OK.
5
Complete the import process in the normal way.
© 2012 Intrepid Geophysics
| Back |
INTREPID User Manual
Library | Help | Top
Importing to INTREPID datasets (T05)
26
| Back |
Rows and Columns Use these text boxes to specify the dimensions of the grid
dataset. Enter the number of rows of data values and the number of values in
each row (i.e., the number of columns).
Bytes to skip at start Use this text box to specify the size in bytes of any header or
other file description data occurring at the start of the image file. INTREPID will
skip the number of rows that you specify.
Leading/Trailing Bytes to Skip Each Row Use these text boxes to specify the
number of bytes of unwanted data occurring at the start and/or end of each row.
INTREPID will skip the data that you specify.
Nulls Flagged as Use this text box to specify the value in the import file that
INTREPID should interpret as null.
Binary generated on Opposite Endian machine Have this check box turned on if
the binary image data was generated on a computer that uses 'least significant
byte first' (LSB) format Have it turned off if the binary image data was
generated on a computer that uses 'most significant byte first' (MSB) format. In
general PCS (e.g., Intel, Windows, DOS,LINUX ) use LSB and UNIX computers
(e.g., Sun) use MSB. An exception to this rule is the DEC UNIX, which uses LSB.
INTREPID will automatically convert the image data as necessary.
Precision of the data to be processed Use these option buttons to specify the
precision of the saved dataset.
Option button
Precision
Unsigned8bitInteger
byte
Signed16BitInteger
integer (2 bytes)
Signed32BitInteger
integer (4 bytes)
IEEE4ByteReal
real (4 bytes)
IEEE8ByteReal
real (8 bytes)
Geographic Registration Use this button to set the geographic registration of the
data (projection, datum, cell size and location of the top left corner cell) See
Setting Geographic Registration for a grid dataset for details of this operation.
Importing ERMapper files
If you are importing ERMapper grid data, INTREPID automatically sets all
parameters from information stored in the ERMapper grid header file.
Library | Help | Top
© 2012 Intrepid Geophysics
| Back |
INTREPID User Manual
Library | Help | Top
Importing to INTREPID datasets (T05)
27
| Back |
Importing ECS gridfile data
>> To import ECS gridfile data
1
Choose ECS gridfile from the InputFormat menu. INTREPID will examine the
import file and identify the individual grids within the ECS database.
2
INTREPID displays the ECS Grid Selection dialog box.
3
Set the Geographic Registration for the dataset. See Setting Geographic
Registration for a grid dataset for instructions.
4
Choose the grid you wish to import, then choose OK.
5
Complete the import process in the normal way.
Importing ASEG GXF data
INTREPID Import supports the following GXF (Grid Exchange File) formats:
•
The standard ASCII GXF format
•
The base 90 compressed ASCII GXF format
INTREPID automatically recognises all specifications in GXF, such as 'by row or by
column'.
There is no need to import this format, as it is also a native supported format.
To import GXF data
Library | Help | Top
1
Choose ASEG GXF from the InputFormat menu. INTREPID displays the Import
ASEG GXF dialog box.
2
Set the Geographic Registration for the dataset. See Setting Geographic
Registration for a grid dataset for instructions.
© 2012 Intrepid Geophysics
| Back |
INTREPID User Manual
Library | Help | Top
Importing to INTREPID datasets (T05)
28
| Back |
3
Choose OK.
4
Complete the import process in the normal way.
Importing Zmap data
>> To import Zmap (ZYCOR or Landmark grids) data
Library | Help | Top
1
This is a native supported format at V4.5/5.0, so try that first.
2
Choose Zmap from the InputFormat menu. INTREPID will examine the header
of the input file and display the Import Zmap dialog box.
3
The Import Zmap dialog box reports the dimensions of the grid in the input file
obtained from its header. Modify the Rows, Columns and/or Chars/Pixel
(characters per cell) parameters if required.
4
Set the Geographic Registration for the dataset. See Setting Geographic
Registration for a grid dataset for instructions.
5
Choose OK.
6
Complete the import process in the normal way.
© 2012 Intrepid Geophysics
| Back |
INTREPID User Manual
Library | Help | Top
Importing to INTREPID datasets (T05)
29
| Back |
Importing other grid formats
INTREPID can import GEOPAK, ECS GRDUTE grid, Geosoft Image (GIPSI),
Geosolutions Image and AGSO ASCII grid data
>> To import data with a grid format listed above:
1
Choose the format as required from the InputFormat menu. INTREPID displays
the corresponding Import dialog box.
Notes:
Library | Help | Top
•
If you are importing Geosoft (GIPSI) INTREPID will automatically detect
whether the grid is in GIPSI (UNIX) format or Geosoft (DOS) format.
•
If you are importing AGSO ASCII Image data you can use the Report Contents
Only check box to choose whether to
•
View a report of the input file contents only (Turn on the check box) or
•
Perform the import. (Turn off the check box).
•
Geosolutions image data already has coordinates for the registration cell ('origin')
and cell size. You only need to specify the datum and projection.
•
AGSO Binary Image data already has geographic registration which INTREPID
can interpret. Omit step 2 for this input format.
2
Set the Geographic Registration for the dataset. See Setting Geographic
Registration for a grid dataset for instructions.
3
Choose OK.
4
Complete the import process in the normal way.
© 2012 Intrepid Geophysics
| Back |
INTREPID User Manual
Library | Help | Top
Importing to INTREPID datasets (T05)
30
| Back |
Importing NetCDF Grid data
INTREPID can obtain all required information from the NetCDF grid files. If you
choose this input format option, INTREPID will not display a dialog box for
parameters. Note GMT files automatically OK in most tools now.
Importing Encom Image data
Encom Image files have binary grid format.
>> To import an Encom Image file
Choose Encom Image from the InputFormat menu. INTREPID will examine the
input file header and display the Import Binary Image dialog box, reporting the grid
dimensions it finds in the header.
Use the Import Binary Image procedure as described above (see Importing Binary
Image data).
Setting Geographic Registration for a grid dataset
Image import files often contain only values without proper location information. If
the image file you are importing has no location information, you can specify it using
the Set Geographic Registration dialog box.
You can edit the geographic registration of an existing dataset using the Geo
Reference Output option in the Utilities menu. This dataset can be the one just
imported or some other one that you specify as the output dataset.
>> To specify location information.
1
If you are about to import an image and have displayed an input parameters
dialog box, choose Geographic Registration from the input format dialog box.
If you are modifying the geographic registration of an existing grid dataset,
ensure that the existing dataset is specified as the output dataset in the Import
tool window (See Specifying input files and output datasets for more information).
Choose Geo Reference Output from the Utilities menu.
INTREPIDdisplays the Set Geographic Registration dialog box.
Library | Help | Top
2
Specify
•
Column and row of registration cell
•
X and Y coordinates of the registration cell
•
X and Y dimensions of the grid cells
•
Rotation
•
Datum (See below)
•
Projection (See below)
© 2012 Intrepid Geophysics
| Back |
INTREPID User Manual
Library | Help | Top
3
Importing to INTREPID datasets (T05)
31
| Back |
Choose OK when you have finished. INTREPID will close the Set Geographic
Registration dialog box.
If you are about to import to a new dataset, INTREPID will apply the settings to
the dataset you are about to create.
If you are modifying the geographic registration of an existing dataset, choose
Apply to save the new information to the dataset.
Registration Cell X, Y You must specify geographic reference coordinates for one
cell in the grid (the registration cell). Use these text boxes to specify which cell in
the grid is to be the registration cell. Enter the cell's row and column numbers.
Easting, Northing Use this text box to specify the Easting and Northing coordinates
of the reference cell. The coordinates must correspond with the datum and
projection you are choosing.
Xdimension, Ydimension Use this text box to specify dimensions (in projection
distance units) of a grid cell.
Rotation Use this text box to specify the orientation of the grid lines away from
North–South. Enter the rotation in degrees clockwise from North.
Specifying the datum and projection for a grid dataset
>> To specify the datum and projection for a grid dataset
Choose Datum or Projection in turn from the dialog box you are using. See
"Specifying datums and projections" in INTREPID’s supported datums and
projections (R09) for detailed instructions.
Customised import from your aircraft or ship
We can assist you to create a customised INTREPID import tool to import data from
your aircraft (or ship) to an INTREPID dataset according to your practices and
specifications. Please contact us for further information.
As described in this manual, INTREPID directly supports many common acquisition
hardware, such as Picodas and Exploranium GR 820. We invite instrumentation
providers to share formats, so that we can then in-turn, offer support for your
equipment that you can feel at ease with.
We are in the process of sharing many more of the languages and Geophysical file
formats that we support, via the GOOGLE protobuf language facilities. This is a V5.0
deliverable. So far we have successfully integrated many standard airborne systems,
plus special one-off or experimental acquisition systems with INTREPID.
The extensibility of the object-orienteed database and also the abstraction of primary
processing tools, levelling, gridding, filtering, allows for rapid extensions to existing
workflows incorporting aspects of measured fields that have alluded “conventional” or
one size fits all approaches.
A good example is the support for the IPHT magnetic tensor instrument, using
SQUID technology. This system measures 22 quantities, including mixed gradients,
accelerations, temperatures, pressures, roll, pitch and yaw. Decimation from 1000 Hz
to a required, sensible value is easily accomplished, as well as the task of establishing
a located dataset, by time sync all the various input devices.
The point about an object oriented database framework, is that tensors, vectors,
decay curves etc, can have all their observations stored in an appropriately designed
Library | Help | Top
© 2012 Intrepid Geophysics
| Back |
INTREPID User Manual
Library | Help | Top
Importing to INTREPID datasets (T05)
32
| Back |
“field” type within the database, preserving the unique physical nature of the
measurements, and ensuring the correct mathenmatics and error analysis can be
properly appplied at all stages of the processing.
For those who wish to claim that EXCELL or ACCESS among the possible tools, can
do all that is required to provide an excellent and optimum solution - think again!
Library | Help | Top
© 2012 Intrepid Geophysics
| Back |