1
INTREPID User Manual
Library | Help | Top
INTREPID task specification (.job) files (R06)
1
| Back |
INTREPID task specification (.job) files (R06)
Top
Task specification files are text files containing a number of parameters required to
execute one or many INTREPID tasks. These filenames always end in .job, so they
are also referred to as job files.
This appendix describes common properties of task specification files, including some
of the more advanced features available through the INTREPID batch language.
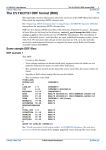
Here is an example of a task specification file.
Process Begin
Name = projconv
XIN = F:\DATA\ebagoola\easting
YIN = F:\DATA\ebagoola\northing
XOUT = F:\DATA\ebagoola\longitude
YOUT = F:\DATA\ebagoola\latitude
Parameters Begin
FromDatum = "AGD84"
FromProj = "TMAMG55"
ToDatum = "AGD84"
ToProj = "GEODETIC"
UpdateSurveyInfo = Yes
Parameters End
Process End
The Process Begin - Process End text block contains a complete description of files
and parameters required to run an INTREPID task. The Name parameter specifies
the INTREPID application process, which in this example is projconv.exe. It is the
executable binary for the Projection Conversion Tool.
Using task specification files
If you are using an INTREPID tool for the first time you will most likely use the
interactive interface to specify all the required files and parameters.
Most INTREPID tools also allow you to Load and Save a task specification file.
Loading an existing task file supplies the interactive tool with all the required files
and parameters it needs to execute a task. Saving a task file creates a new task file
with all of the current file and parameter settings.
Task specification files consist of a sequence of INTREPID batch language
statements. This means that they can be executed not only interactively but also as
batch processes, independently of the interactive tools. In fact, the batch language
provides many options which are not available through the interactive tools. You can
create long and complex task files which can only be run as batch processes.
For both interactive and batch use of INTREPID tools, it is useful to be able to textedit a task specification file to
Library | Help | Top
•
Adjust file and parameter settings for a task, or
•
Create a new task specification file for a different task, using some of the text of
the original file as a template.
© 2012 Intrepid Geophysics
| Back |
INTREPID User Manual
Library | Help | Top
INTREPID task specification (.job) files (R06)
2
| Back |
Running task specification files from command line
In addition to Loading task files through the interactive tools, you can use a command
line to launch task files. This can be done in either of two modes - batch or interactive.
For batch mode, type the command followed by the switch -batch, followed by the
name of the task specification file. If the task file involves only one application, eg;
gridding, then the command can be the name of the executable program. Example:
gridding.exe -batch eba1.job
However if the task file contains calls to more than one application, or if it contains
some of the more advanced features of the batch language, then the command must
be fmanager.exe. Example:
fmanager.exe -batch eba1.job
For this reason we recommend that you always use the command fmanager.exe to
execute an INTREPID task file in batch mode. (Note: on Windows platform the .exe
is not required).
For interactive mode use the switch -input with the command. Example:
gridding.exe -input eba1.job
This command launches the interactive tool (eg, gridding) and loads the parameters
specified in the task file. It is the same as launching the tool from the Project
Manager and using Load Options.
See "How to start INTREPID—Overview" in Introduction to INTREPID (R02) for
complete instructions.
HISTORY files
Whenever you use INTREPID, it records your activities in a history file. This is an
ASCII text file with the name HISTORY. It can act as an audit trail for your
processing. HISTORY consists of a series of task specification files. You can extract
sections from it to use in task specification files or even use a whole history file for a
batch task.
See:
Library | Help | Top
•
"Task and hard copy specification and HISTORY files" in Introduction to
INTREPID (R02)
•
"The HISTORY file location, project directory, working directory" in Introduction to
INTREPID (R02)
•
Using HISTORY to reprocess a dataset
© 2012 Intrepid Geophysics
| Back |
INTREPID User Manual
Library | Help | Top
INTREPID task specification (.job) files (R06)
3
| Back |
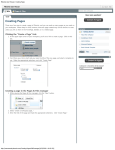
Creating task specification files
Creating task specification files in an interactive session
You can create a task specification file using Save Options from the File menu in most
INTREPID tools.
>> To create a task specification file with an INTREPID tool
1
Specify all files and parameters.
2
If possible, execute the task (choose Apply) to ensure that it will work.
3
Choose Save Options from the File menu. Specify a task specification file
(INTREPID will add the extension .job) INTREPID will create the file with the
settings current at the time of the Save Options operation.
Creating task specification files with a text editor
If you know the correct syntax you can create a task specification file using a text
editor, either from scratch or by editing an existing task specification file.
Ensure that it has the extension .job when you save it.
Extracting task specification files from HISTORY
If you have recently executed a task similar to the one for which you are creating the
task specification file, you can use a text editor to extract the text for the task from
HISTORY, then edit it to fit your new requirements.
See Using HISTORY to reprocess a dataset.
Task specification file syntax
Task specification files are ASCII text files with the standard INTREPID Begin –
End block syntax (See "INTREPID Auxiliary files" in INTREPID database, file and
data structures (R05) for a description of the syntax). They consist of statements
from the INTREPID batch language.
For a discussion and example of task specification file format for a particular tool, see
the section usually entitled ‘Displaying options and using task specification files’
usually placed at the end of the chapter describing the tool.
Because new features are regularly added to INTREPID, the task specification file
language also changes regularly. To make sure you are using the most up-to-date
syntax, run the INTREPID tool you require interactively and save a new task
specification file or examine HISTORY.
Syntax tables
Each tool manual will eventually contain a syntax table, describing the possible
contents of a task specification file for that tool.
The syntax table has describes keywords, data types, units and default values. The
following sections explain data types, headings and abbreviations in syntax tables.
Library | Help | Top
© 2012 Intrepid Geophysics
| Back |
INTREPID User Manual
Library | Help | Top
INTREPID task specification (.job) files (R06)
4
| Back |
Data types
A task specification file contains statements that assign values to keywords. This
section describes the data types of these values and their syntax table notation:
Data type
Description
<path>
Filename with or without directory specification.
Directory specification can be relative or absolute.
<...|...>
Listed options, such as <COSINE|LINEAR|NONE>
<a..b>
Whole numbers between a and b (inclusive)
For example <1..5> means <1|2|3|4|5>
<ord>
Whole number, such as the band number of a grid
<number>
Number
<datatype>
Numeric data type. See "Data Types in INTREPID datasets" in
INTREPID database, file and data structures (R05) for the
available numeric data types.
<string>
(characters enclosed in " ")
<char>
(single character)
<deg:min:sec>
(latitude/longitude notation)
Headings and abbreviations in the syntax table
The INTREPID syntax table uses the following headings and abbreviations:
Abbreviation
or Heading
Meaning and use
Unit
INTREPID assumes a certain unit for each value that you assign in a statement.
This column shows the assumed unit for each statement (where appropriate).
Default
If you leave out a statement, this column shows the default value that INTREPID
automatically uses for the omitted keyword.
oblig
Obligatory—no default value. You must include the statement with an assigned
value.
cyc/m
cycles per metre (for projected grids)
cyc/°
cycles per degree (for geodetic grids—latitude longitude)
calc
Calculated—INTREPID automatically calculates a value
<YES|NO>
and <1|0>
You can use YES or 1 to mean ‘yes’ and NO or 0 to mean ‘no’ interchangeably in these
task files.
Library | Help | Top
© 2012 Intrepid Geophysics
| Back |
INTREPID User Manual
Library | Help | Top
INTREPID task specification (.job) files (R06)
5
| Back |
Compatibility with earlier INTREPID versions
In some cases recent changes to the task specification file language may prevent
INTREPID from successfully executing older task specification files. We cannot
guarantee backwards compatibility for existing task specification files when we
release a new version of INTREPID. We recommend that you check your existing
task specification files against entries in HISTORY or new task files created
interactively. Do not rely upon older task files to execute properly in later versions of
INTREPID.
Case sensitivity
Task specification files are case insensitive (except within " "). The files can contain
any mixture of upper or lower case. We recommend that you use upper and lower
case combinations to enhance readability.
Compatibility between Windows and UNIX
If you are executing a task specification file created under the other operating system,
please note the following:
•
INTREPID automatically interchanges / and \ characters as required in path
specifications.
•
You will need to use a text editor or system parameter reference to respecify drive
letters or drive names in path specifications.
Full path examples:
UNIX full path:
/disk1/data/Projects/gridarea
Windows full path:
d:\data\Projects\gridarea
See Relative paths and the working directory below for an example showing the use of
a variable.
Library | Help | Top
© 2012 Intrepid Geophysics
| Back |
INTREPID User Manual
Library | Help | Top
INTREPID task specification (.job) files (R06)
6
| Back |
Relative paths and the working directory
When you create a task specification (.job) using Save Options from the File menu
in a tool, INTREPID inserts full directory paths for file and dataset specifications.
You can edit the full directory paths and change them to relative paths. If you do
this, INTREPID will use the file and directory references relative to the working
directory at the time you execute the task specification file.
Note: If there are relative paths in a task specification (.job) file you must ensure
that you set the correct working directory before executing the task.
If you move a task specification file with relative paths you must do one of the
following:
•
Move it as part of the project with the associated directory structure so that the
relative paths can remain unchanged;
•
Edit it to modify the relative paths;
•
Edit it to include full paths.
•
Edit it to use a variable to define the path.
For example, use a system parameter or environment variable MYDIR to contain the
path and use $MYDIR to refer to it in the task specification files. A typical statement
could be
ZOUT = $MYDIR/ebagoola_ST/mlevel_mag1
See Command line replaceable parameters below for instructions about using
variables.
Relative / full path examples
Example of statement with relative path
ZOUT = ebagoola_ST/mlevel_mag1
Example of statement with full path
ZOUT = F:/DATA/disk1/surveys/ebagoola_ST/mlevel_mag1
Library | Help | Top
© 2012 Intrepid Geophysics
| Back |
INTREPID User Manual
Library | Help | Top
INTREPID task specification (.job) files (R06)
7
| Back |
Special Project Manager batch task operations
In an interactive sense the Project Manager refers to the main INTREPID graphical
user interface. However the Project Manager also encompasses the batch language
interpreter. When we type the command ‘fmanager -batch eba1.job’ we are
invoking the Project Manager to execute the batch language statements contained
within the task file eba1.job.
The Project Manager has some special batch mode capabilities which are not
available interactively. These features are as follows:
•
Support specifications for all INTREPID tools
•
Execute multiple tasks sequentially
•
Fixed parameter substitution within the task file
•
Variable parameter substitution within the task file
•
Repeat one or more tasks a number of times using variable parameters
•
Command line replaceable parameters
•
System parameter references
•
References to parameter values in auxiliary files
•
Specific Action commands—Echo, Command and Spawn
Some examples of task specification files showing the correct syntax for these
features can be located in the install_path/sample_data/examples/jobs
folder.
You can use the HISTORY file to produce a task specification file for the Project
Manager. See Using HISTORY to reprocess a dataset
Support specifications for all INTREPID tools
You can execute any batch task using the Project Manager.
See "How to start INTREPID—Batch mode" in Introduction to INTREPID (R02) for
instructions.
Library | Help | Top
© 2012 Intrepid Geophysics
| Back |
INTREPID User Manual
Library | Help | Top
INTREPID task specification (.job) files (R06)
8
| Back |
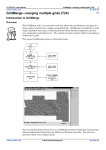
Execute multiple tasks sequentially
The Project Manager can execute a number of task specifications placed one after
another in a task specification file. Here is an example, showing a decorrugation
process followed by a microlevelling process.
Example:
Process Begin
Name = decorrugate
InputGrid = smooth_grid_t.ers
OutputGrid = corr_grid.ers
Parameters Begin
...
Parameters End
Process End
Process Begin
Name = microLevel
InputGrid = corr_grid.ers
ZIN = ebagoola_ST..DIR/smooth_mag
LineType = ebagoola_ST..DIR/linetype
ZOUT = ebagoola_ST..DIR/mlevel_mag1
Parameters Begin
...
Parameters End
Process End
Library | Help | Top
© 2012 Intrepid Geophysics
| Back |
INTREPID User Manual
Library | Help | Top
INTREPID task specification (.job) files (R06)
9
| Back |
Fixed parameter substitution within the task file
You can declare parameters and assign values to them within a task specification file.
Normally these parameters appear at the beginning of the file. You can then use the
parameters to assign values in the file. The assigned values can be numeric or
character strings. You need to place a $ before the name of a parameter when you use
it to supply a value. This is mainly useful when you have a number of tasks to
perform in the same task file. In the following example a fixed parameter called
Corrections is declared and given a value of corr_grid1.
Example:
Corrections = corr_grid1.ers
Process Begin
Name = decorrugate
InputGrid = smooth_grid_t.ers
OutputGrid = $Corrections
Parameters Begin
...
Parameters End
Process End
Process Begin
Name = microLevel
InputGrid = $corrections
ZIN = ebagoola_ST..DIR/smooth_mag
LineType = ebagoola_ST..DIR/linetype
ZOUT = ebagoola_ST..DIR/mlevel_mag1
Parameters Begin
...
Parameters End
Process End
Library | Help | Top
© 2012 Intrepid Geophysics
| Back |
INTREPID User Manual
Library | Help | Top
INTREPID task specification (.job) files (R06)
10
| Back |
Variable parameter substitution within the task file
Variable parameters can also be declared. These are used in combination with a
Repeat loop (see below). For each repeat cycle the parameter takes a different value,
assigned from a list which must be enclosed within curly brackets. Parameter values
in the list must be separated by one or more spaces.
You must follow a variable name reference with a character that is not a letter or
number.
For example, if you are referencing the variable $MYDIR, You can use the notation
TempDir=$MYDIR/temp, but not TempDir=$MYDIRtemp.
The following example shows a combination of fixed and variable parameters
declared at the start of the task file, and used to provide values within the Process
block.
A variable name can also be constructed from other declared variable names. In the
example, ‘OutputImage’ is created using a combination of declared variables and a
text string. If the underscores are omitted the strings will be concatenated.
Example:
Repeat Begin
dataset = Ebagoola..DIR
proj = mga53
band={lev_mag v_deriv}
element={TMI 1VD}
Process Begin
Name = newgridding
XIN = $dataset/$(proj)"E"
YIN = $dataset/$(proj)"N"
ZIN = $dataset/$band
OutputImage = $(dataset)_$(element)_gda94_$(proj)
Parameters Begin
...
Parameters End
Process End
Repeat End
Library | Help | Top
© 2012 Intrepid Geophysics
| Back |
INTREPID User Manual
Library | Help | Top
INTREPID task specification (.job) files (R06)
11
| Back |
Repeat one or more tasks a number of times using variable parameters
The Project Manager can repeat a batch task, using different parameters each time
according to a list of parameter values you provide. INTREPID determines the
number of repeat cycles by the maximum number of entries in any parameter list. If
there are several lists, INTREPID uses the first value in each list for the first cycle,
then the second items for the second cycle, etc..
In the following example, INTREPID will import three files dat1, dat2 and dat3
into three separate vector datasets eba_1, eba_2 and eba_3.
Example:
Repeat Begin
SurveyPart = {dat1 dat2 dat3}
OutData = {eba_1 eba_2 eba_3}
Process Begin
Name = Import
Input = /disk1/import/i55data/$SurveyPart
Output = /disk1/surveys/$Outdata
Parameters Begin
Format = AsciiColumns
AsciiColumns Begin
FixedLength = No
SkipRecords = 0
DDF = "/disk1/import/gravity_database.ddf"
NoError = No
ReportDiagnostics = No
AsciiColumns End
Parameters End
Process End
Repeat End
It is also possible to use nested Repeat Begin-End loops.
Library | Help | Top
© 2012 Intrepid Geophysics
| Back |
INTREPID User Manual
Library | Help | Top
INTREPID task specification (.job) files (R06)
12
| Back |
Command line replaceable parameters
When you launch a task from a command line, you can add parameters to the
command line (separated by spaces) which correspond to parameter number
references in the body of the task specification file. For example the third, fourth and
fifth parameters on the command line correspond to the notations $3, $4, $5 in the
task specification file. These notations are called replaceable parameters.
INTREPID will substitute values of replaceable parameters from the command line.
Note that switches (e.g., -batch) count as parameters in the numbering system.
For example, command lines could be:
(Batch mode)
gridding.exe -batch eba1.job raw_mag raw_grid
fmanager.exe -batch eba1.job raw_mag raw_grid
(Interactive mode)
gridding.exe -input eba1.job raw_mag raw_grid
The task specification file (eba1.job) appears below.
Gridding will use
•
The third parameter raw_mag as the value for the file name of ZIN ($3) and
•
The fourth parameter raw_grid as the value for the file name of OutputImage
($4).
Process Begin
Name = Gridding
Parameters Begin
...
Parameters End
XIN = ebagoola_S..DIR/x
YIN = ebagoola_S..DIR/y
ZIN = ebagoola_S..DIR/$3
LineType = ebagoola_S..DIR/linetype
OutputImage = $4
Process End
Library | Help | Top
© 2012 Intrepid Geophysics
| Back |
INTREPID User Manual
Library | Help | Top
INTREPID task specification (.job) files (R06)
13
| Back |
System parameter references
INTREPID can insert values of system parameters and environment variables in
task specification file statements. Use the notation $system_parameter to specify a
system parameter value (where system_parameter is the name of a system
parameter). If you are appending some text to the value of the system parameter, put
its name in parentheses
Example: If you have the following statement
TempDir=$(INTREPID)/temp
INTREPID will recognise $INTREPID as a system parameter, look up its value and
use it for the string to be combined with /temp and assigned to TempDir.
For full instructions on using system parameters and environment variables, see
"About INTREPID system parameters" in INTREPID system parameters and
install.cfg (R07).
References to parameter values in auxiliary files
INTREPID will look up values assigned to keywords in auxiliary files for use in task
specification files. Use the following notation in your task specification file:
$[auxfile]blockname.keyword or
$[auxfile]blockname.sub_blockname.keyword
auxfile is the INTREPID auxiliary file
blockname is the name of a begin – end block
sub_blockname is the name of a begin – end block within the blockname block
keyword is the name of a keyword within the Begin – End block.
Example
The file ebagoola352.ers includes the following lines:
DatasetHeader Begin
...
CoordinateSpace Begin
Projection = "TMAMG54"
CoordinateType = EN
Units = "METERS"
Datum = "AGD66"
CoordinateSpace End
...
DatasetHeader End
If you have the following line in your task specification file:
Projection=$[ebagoola352.ers]DatasetHeader.CoordinateSpace.Projec
tion
INTREPID will look up the auxiliary file and insert the value TMAMG54 for the
parameter Projection.
Library | Help | Top
© 2012 Intrepid Geophysics
| Back |
INTREPID User Manual
Library | Help | Top
INTREPID task specification (.job) files (R06)
14
| Back |
Specific Action commands—Echo, Command and Spawn
Special Action commands can be used for specific purposes.
In a large complex task specification file it may be necessary to output a text string
into the log file for easier monitoring of job progress. This can be achieved using the
Echo Action command.
Example:
Process Begin
Name = filemanager
Parameters Begin
Action = Echo
Text = And tomorrow will be like today, only more so.
Parameters End
Process End
The Command Action command allows access to Operating System commands from
within a task specification file.
Example:
Process Begin
Name = filemanager
Parameters Begin
Action = Command
Script = ls
Args = "-al"
Pause = yes
Parameters End
Process End
The ‘Args’ parameter can even be a korn-shell script, or its equivalent. The following
example calls a korn shell window which calls a korn shell script called ‘importscript’.
This script performs a complicated extraction and formatting of data and then calls
another Intrepid job file which import the reformatted data to an Intrepid dataset.
Control is then returned to the following job file.
Example:
Process Begin
Name = filemanager
Parameters Begin
Action = Command
Script = sh -c
Args = "./importscript"
Pause = no
Parameters End
Process End
Library | Help | Top
© 2012 Intrepid Geophysics
| Back |
INTREPID User Manual
Library | Help | Top
INTREPID task specification (.job) files (R06)
15
| Back |
The Spawn Action command enables a separate task specification file to be launched
and executed midway through execution of the parent task.
Example:
Process Begin
Name = filemanager
Parameters Begin
Action = Spawn
Job = echo.job
Parameters End
Process End
Using HISTORY to reprocess a dataset
You can specify HISTORY as the task specification file for a batch mode Project
Manager task. In doing this you can use the HISTORY file's audit trail to 'replay' an
entire set of processes on a dataset.
This can be a complex process. If you wish to do it, you must note the following:
•
Ensure that you do not overwrite the raw data (e.g., make sure that you create
new vector dataset fields for intermediate results as you proceed on the first
occasion).
•
Avoid or keep good records of direct editing using the Spreadsheet tool. The
current version of INTREPID does not record Spreadsheet tool operations in
HISTORY.
•
Only use standard INTREPID tools for the process. If you do this, all of the steps
of the process will be recorded in HISTORY.
•
If you wish to make some changes to the process before the batch mode operation,
you can, of course, edit HISTORY using a text editor. If you do this:
•
•
You can extract sections of it and save them as task specification (.job) files if
you do not wish to repeat all steps;
•
You must be careful not to accidentally corrupt HISTORY. If you edit it using a
word processor, be sure to save the results as a text file, not a word processor
document.
•
You should note that editing HISTORY compromises the concept of HISTORY
being an 'audit trail'.
If you wish to build a new HISTORY file starting with a certain processing step,
simply delete the existing HISTORY before you commence this process.
INTREPID will create a new HISTORY starting with the current process.
For an introduction to the HISTORY file see:
Library | Help | Top
•
"Task and hard copy specification and HISTORY files" in Introduction to
INTREPID (R02)
•
"The HISTORY file location, project directory, working directory" in Introduction to
INTREPID (R02)
© 2012 Intrepid Geophysics
| Back |