1
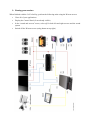
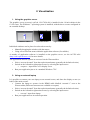
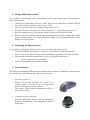
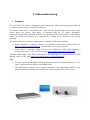
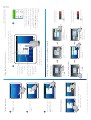
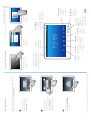
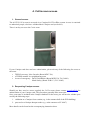
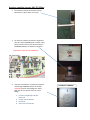
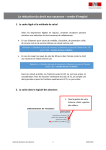
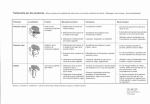
ACCES
Application-Centred Computational Engineering Science
__________________________________________________________________________
SCHOOL OF ENGINEERING
SCHOOL OF ARCHITECTURE, CIVIL & ENVIRON. ENGINEERING
ACCES CoViz Facility
USER MANUAL
(03 August 2015 – work in progress)
Contents
1. Quick Start User Guide
2. Visualization
3. Videoconferencing
4. CoViz room access
5. Contact details
1. Quick Start User Guide
1. Preamble
The ACCES CoViz facility should be accessible with a minimum of knowledge of how to
operate the hardware and software.
This guide is designed to provide users with the basic knowledge required to use the CoViz
facility for both visualization and videoconferencing. Please contact [email protected] if additional
information is required.
Information regarding the goals of the CoViz facility and the installed hardware and software
can be found on the ACCES wiki (http://wiki.epfl.ch/acces.viz).
2. Starting your session
The CoViz facility is managed by a web-based control system. This is generally accessed from
the Wacom tablet, but is also available e.g. on the mobile Samsung tablet. Both tablets have a
touch screen.
• Switch on the Wacom tablet (using button at top right)
• Logon with username “user” (there is no password required)
• Select the CoViz Control Panel (generally the default selection, but if not click on
“control panel” icon at bottom left)
• Select “screens & sound” from the top horizontal menu (generally the default selection)
• Switch on the left and/or right main screens, by selecting the input source:
o off: switch the screen off (at the end of your session)
o computer: input from CoViz display server
o blueray: input from OPPO Blu-ray player
o external: input from e.g. laptop, Wacom tablet
o videoconf: input from videoconferencing system
You should hear an audible click from each screen when switched on, before a visual
image appears a short time later.
• The sound can be similarly controlled using the “sound system” menu.
• If appropriate, from the top horizontal menu select:
o apps: run application software via the control panel interface
o videoconference: web control interface for videoconferencing
o media & demos: general and lab-specific examples of presentations, images,
movies and demos
o help: useful information to assist operation
3. Closing your session
When finished with the CoViz facility, perform the following tasks using the Wacom screen:
•
Close all of your applications
•
Display the Control Panel (if not already visible)
•
In the “sound and screens” menu, select off for both left and right screens and the sound
system
•
Switch off the Wacom screen (using button at top right)
2. Visualization
1. Using the graphics server
The graphics server (accessrv1.epfl.ch; 128.178.24.48) is installed in the 19-inch cabinet in the
CoViz room. The Windows 7 operating system is installed, with the three screens configured in
an extended desktop:
Wacom tablet
Left main screen
Right main screen
Individual windows can be placed on selected screens by:
• Manually dragging the window with the mouse,
• Using screen selection menu within the application software (if available).
A number of application software is installed on the graphics server; see the ACCES wiki
(http://wiki.epfl.ch/acces.viz) for more details.
The applications and file system are accessed via the Wacom tablet:
• Select “screens & sound” from the top horizontal menu (generally the default selection)
• Switch on the left and/or right main screens, by selecting the input source:
o computer: input from CoViz display server
• Run your application just as in a standard Windows 7 PC.
2. Using an external laptop
It is possible to connect your own laptop as an external source, and show the display on one (or
both) of the main screens:
• Connect the laptop to system via the HDMI cable labelled “external 1” next to the
Wacom tablet (different connectors are available on request)
• Select “screens & sound” from the top horizontal menu (generally the default selection)
• Switch on the left and/or right main screens, by selecting the input source:
o external: input from laptop
• Run your application as in normal operation.
3. Using a USB memory stick
It is possible to transfer data from a USB memory stick to the display server, for example, to
show a presentation:
• Connect the USB memory stick to a “Data” input on one of the three available USB 3.0
ports (black half golf balls located on the 19” rack)
• Copy your presentation files to desktop of the display server
• Set up the Wacom control panel as indicated above in “1. Using the graphics server”
• Run your application (e.g. PowerPoint, Adobe Acrobat) as in normal operation
• Remove your files from the desktop when no longer required. (Note: desktop files will be
removed without notice. For more permanent storage, use the Scratch directory on the
display server file system.)
4. Displaying the Wacom screen
It is possible to display the Wacom screen on one (or both) of the main screens:
• Connect the HDMI cable labelled “external 1” to the left side of the Wacom tablet
• Select “screens & sound” from the top horizontal menu (generally the default selection)
• Switch on the left and/or right main screens, by selecting the input source:
o external: input from Wacom tablet
• Use the Wacom tablet as in normal operation.
5. Control devices
The Wacom and Samsung tablets both have touch screens. However, in addition, various devices
are available for controlling the information on the screens.
•
Gyration gyromouse
Wireless device that functions on a table as an
ordinary mouse, or in the air as a 3D gyroscopic
mouse (click button on lower surface).
This device allows content manipulation while in
front of the screens.
•
3Dconnexion SpaceNavigator
Wireless, table-based mouse with 3D capabilities.
Requires compatibility with application software
being used.
•
Smartphone / Tablet
ParaView can be controlled wirelessly on either iOS
or Android devices using the Mobile Remote Control
plugin.
6. Using the render server
The rendering and remote visualization server (accessrv2.epfl.ch; 128.178.131.196) is installed
in the 19-inch cabinet in the server room INJ 019. The Debian Linux operating system is
installed.
The main supported software packages are ParaView for remote visualization and Blender cycles
for GPU rendering.
See the ACCES wiki (http://wiki.epfl.ch/acces.viz/renderserver) for general guidelines on using
this server.
3. Videoconferencing
1. Preamble
The ACCES CoViz facility is equipment with a high-quality videoconferencing system that can
be used to connect to up to 4 external participants.
The system is based on a Cisco SX80 codec, which includes SpeakerTrack cameras and a touch
control panel (see below). This choice is consistent with the UC system (telephones,
videoconferencing) being installed at EPFL. The SpeakerTrack system includes a microphone
matrix that allows the cameras to be automatically oriented in the direction of the person
speaking.
The Jabber software is used for communication, with three different possibilities:
•
Jabber Softphone – complete software to be installed on Windows or Mac OSX (see:
http://uc.epfl.ch/jeveuxmonjabber); uses the EPFL server uc-pres.epfl.ch
•
Jabber Guest – provides a light web access on Windows or Mac OSX requiring a
browser plug-in (e.g. call CoViz room using https://jabberguest.epfl.ch/call/35560)
The basic functionality of the SX80 is described on the following Cisco Quick Reference Guide
and also in the ACCES wiki (http://wiki.epfl.ch/acces.viz/videoconference).
Tips:
•
To share content, the machine with the presentation must be connected directly to a “PC
input” connection of the SX80 via an HDMI cable.
•
The SpeakerTrack cameras can be operated manually in an independent manner via the
menu obtained by clicking on the camera icon at the top right of the control screen.
To locate an entry, you may also scroll
through a list as you would do on a
smartphone. Tap to select an entry.
In a call
tap Add.
Method B (MultiWay/CUCM):
In a call
tap Add.
Method A (Multisite):
Place a new call in the
usual way.
Search or dial in the usual
way.
Initiating a video conference (optional feature)
Any matches will
appear here. Tap to
select an entry. The
selected entry will
appear on a blue
background.
If you are going to
look in a specific
list only, tap the
corresponding
tab first.
Quick Reference Guide
Tap Merge to
turn the current
call into a conference.
Tap Add to turn
the current call into a
conference.
Tap END to terminate the
conference.
Repeat the procedure to
add more participants.
Tap END to terminate the
conference.
Repeat the procedure to
add more participants.
Tap Call to place the call. There are
some options available. These are always
context sensitive, which means that
meaningless options are not shown. For
example Add to Favorites is not available
for entries already residing in the list of
Favorites.
When an entry has been located and
selected the Call menu will appear.
Cisco TelePresence MX200 G2/MX300 G2/MX700/MX800/SX80
To search for someone, tap here to invoke the virtual keyboard
and then key in the name or number. Matches will appear as you
type. All three lists will be examined for possible matches.
Using the list of contacts to call
D1507703 Quick Reference Guide MX200 G2/MX300 G2/MX700/MX800/SX80 TC7.2 English, July 2014
Tap as outlined to go betwen dialpad and
alphanumerical keyboard.
Keyboard layout
When the number has
been keyed in, tap the
Call key to place the
call.
Key in the number, as
outlined.
Tap Dial, as outlined.
Calling someone
TC7.2
D1507703 Quick Reference Guide MX200 G2/MX300 G2/MX700/MX800/SX80 TC7.2 English, July 2014
When the presentation is
over, tap Stop Presenting,
as outlined.
Scroll horizontally (a), if
needed, to locate the
required source, as outlined.
Then tap Present (b).
You should now see the
presentation on the screen.
Make sure your source is
connected and on. Tap
Presentation, as outlined.
Make sure your presentation source is switched on and connected to
the video system before you tap Presentation.
Sharing content
Tap Dial to
invoke the
dial pad.
Quick Reference Guide
Tap
Messages
to invoke the
voice mail
system, if
applicable.
Press the
Microphone
button to
mute / unmute
microphone.
Tap
Presentation
to start sharing
content and
to conduct
presentations.
Time of day is
indicated in the
upper right corner.
Press and hold
the left side of the
Volume button
to decrease the
loudspeaker volume
and the right side to
increase the volume.
Tap the Camera
icon to activate
self-view and
camera settings.
Scroll in lists
as on a smart
phone.
Cisco TelePresence MX200 G2/MX300 G2/MX700/MX800/SX80
Tap Meetings
to invoke a list
of upcoming
scheduled
meetings.
Tap the ? to
contact or
access the Help
desk, if available.
Tap a button
to activate its
function.
Tap Contacts to
invoke the list of
contacts including
Favorites,
Directory and
History.
Tap the upper left corner to
activate /deactivate the Do not
disturb feature, to activate /
deactivate the Standby feature, and
to access the Settings.
Tap the touch screen
to wake up the system,
if needed.
A tour of the Touch pad
TC7.2
4. CoViz room access
1. General access
The ACCES CoViz room is accessed via a Camipro SALTO offline system. Access is restricted
to authorized people, who have validated their Camipro card (see below).
There is no key access to the Coviz room.
If your Camipro card does not have authorization, please ask any of the following for access to
the room:
• THEOS secretary, Irène Laroche (Room MXC 336)
• a THEOS member in a neighbouring room
• in case of emergency: David Geissbühler (Room MXD 334, Tel: 36881)
Mark Sawley (Room ELB 113, Tel: 36965)
2. Requesting Camipro access
Should you have need to access regularly the CoViz room, please contact [email protected] for
authorization of your Camipro card. This procedure generally takes some time
Once your name is included in the Camipro database for the room, you will need to validate your
card by the following steps:
1. validation at a Camipro Oscar station (e.g. in the entrance hall of the ELB building)
2. pass card at a Camipro hotspot reader (e.g. at the entrance to SV 094.7)
More details can be found on the accompanying instruction sheet.
Système contrôle d’accès SALTO Offline
1. Le nouveau système de contrôle d’accès
SALTO mis en place dans vos locaux
2. Ce nouveau système nécessite la segmenta‐
tion des cartes CAMIPRO pour ce faire il faut
passer une fois votre carte dans une borne
CAMIPRO (OSCAR ) et valider les données :
Emplacement des bornes CAMIPRO :
Voir Plans EPFL :
3. Une fois ceci effectué, vous devez présenter
votre badge CAMIPRO devant un lecteur
HOTSPOT (laisser votre badge env.10sec.
Afin d’écrire vos droit d’accès sur votre
Badge
1. Lecteurs périphérique du bâ‐
timent BI
2. Lecteur entrée BS 94.7
3. SV 094.17
4. STCC sous‐commission
HOTSPOT CAMIPRO
5. Contact details
For general information
•
Mark Sawley, ACCES-STI, ELB 113 (Tel: 36965)
For technical information
•
David Geissbühler, LTP-IMX-STI, MXD 334 (Tel: 36881)
•
Mark Sawley, ACCES-STI, ELB 113 (Tel: 36965)
For administrative information (e.g. room reservation and access)
•
Irène Laroche, THEOS-IMX, MXC 320 (Tel: 31128)
•
Sylvie Moreau, STI-GE, ELB 113 (Tel: 36868)
•
Lysiane Bourquin, IMT-GE, MC A4 304 (Tel: 54343)
•
Carole Burget, ENAC-GE, GC A2 445 (Tel: 36302)
•
Géraldine Michau, LSMS-IIC, GC A2 485 (Tel: 32452)