1
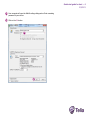
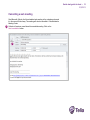
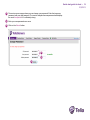
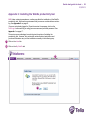
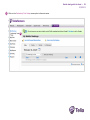
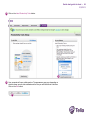
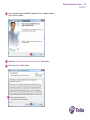
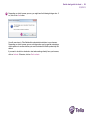
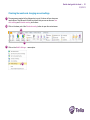
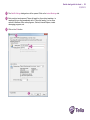
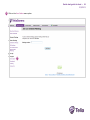
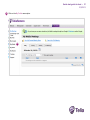
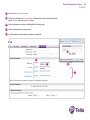
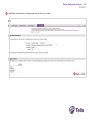
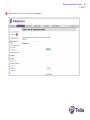
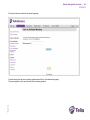
Quick-start guide for host • 1
21/3/2013
Rev 1.0
Quick-start guide
for host
Managing web meetings
Contents
Read this before you start _____________________________________________ 2
Support for operating systems and browsers __________________________ 2
Support for mobile operating systems ________________________________ 2
Technical platform for this guide _____________________________________ 2
Changing your password enhances security _____________________________ 3
The WebEx productivity tool simplifies your everyday life ___________________ 3
Easier web meeting administration ___________________________________ 3
Practical installation management ___________________________________ 3
If you use an operating system other than Windows ____________________ 4
Bilingual communication with meeting participants ________________________ 4
Scheduling a web meeting in Microsoft Outlook __________________________ 5
Starting a scheduled web meeting ______________________________________ 9
Starting a one-click meeting __________________________________________ 14
Cancelling a web meeting ____________________________________________ 15
Appendix 1: Changing your password __________________________________ 17
Appendix 2: Removing cookies ________________________________________ 21
Appendix 3: Installing the WebEx productivity tool _______________________ 22
Appendix 4: Finding support for Telia Webbmöte ________________________ 33
Appendix 5: Adding telephone numbers to My Profile ____________________ 36
Appendix 6: Setting the language version for Meeting Center ______________ 41
Quick-start guide for host • 2
21/3/2013
Read this before you start
Support for operating systems and browsers
Telia Webbmöte Meeting Center is a cloud service that you can use on the following
platforms:
Windows
Mac OS
Operating system
2000, XP SP3,
2003 Server, Vista,
Windows 7, 2008 Server
10.5, 10.6, 10.7
JavaScript
Activated
Activated
Cookies
Allowed
Allowed
Other
ActivX activated
Apple Java 5
Browser
Internet Explorer 6, 7, 8, 9
Firefox 3, 4, 5
Chrome 11, 12, 13
Firefox 3, 4, 5
Safari 4, 5
The service also works on Linux, Solaris, HP-UX and AIX using the Mozilla and Firefox browsers.
Support for mobile operating systems
Apps for Telia Webbmöte Meeting Center are available for the following mobile
operating systems:
• iOS
• Android
Technical platform for this guide
The actions and illustrations detailed in this guide apply for a technical platform with
the following software in the Swedish-language version:
• Microsoft Windows 7
• Microsoft Internet Explorer 9
• Microsoft Outlook 2010
Telia Webbmöte Meeting Center can also be used with earlier versions of Windows,
Internet Explorer and Outlook. However, behaviour and appearance may differ from
the descriptions contained in this guide.
Quick-start guide for host • 3
21/3/2013
Changing your password enhances security
For security reasons, the first time you log in to Telia Webbmöte Meeting Center the
service requires you to change the password we e-mailed you. This one-off action is
described in further detail in Appendix 1: Changing your password on page 17.
The WebEx productivity tool simplifies your
everyday life
Easier web meeting administration
We strongly recommend that you install the WebEx productivity tool, since this
enables you to manage your web meetings more effectively. The WebEx productivity
tool integrates elements of the Telia Webbmöte Meeting Center cloud service with
some of the most frequently used utility programs in Windows.
Once you have installed the WebEx productivity tool, you can for example quickly
start web meetings direct from:
• programs in the Microsoft Office suite
• your browser
• Microsoft Outlook
• IBM Lotus Notes
• your chat program
You can also use Microsoft Outlook or IBM Lotus Notes for administrative management of your web meetings, i.e. scheduling, invitations, cancellations and similar
tasks. Using the same well-known calendar environment for your web meetings as
your physical meetings makes it easier to get an overview of the situation and to use
your work time effectively.
Practical installation management
If your company’s IT function transfers full responsibility for Telia Webbmöte Meeting
Center to individual users, you can install the WebEx productivity tool yourself on
your computer. Follow the instructions in Appendix 3: Installing the WebEx
productivity tool on page 22 of this guide.
If your company’s IT policy requires all software installation to be coordinated, your
IT department will provide you with an installation file and anything else you need in
order to use the WebEx productivity tool on your computer.
Quick-start guide for host • 4
21/3/2013
If you use an operating system other than Windows
The WebEx productivity tool can only be installed on computers running Windows.
(Support for different versions is detailed in the table on page 2.) If you use a different operating system, you cannot therefore use the productivity tool, even if you
have Microsoft Office and Microsoft Outlook on your computer.
Instead, you should use the meeting administration functions included in Telia
Webbmöte Meeting Center. The administration of these functions is described in a
user manual available from Cisco Systems. To find out how to obtain this manual,
see Appendix 4: on page 33 of this guide.
If you do not use the WebEx productivity tool, you cannot obtain the e-mail addresses of meeting participants from your Outlook contacts. Instead, you should address
your invitations in one of the following ways:
• enter the addresses manually
• use the “My contacts” (“Mina kontakter”) function in Telia Webbmöte Meeting
Center
You can either add your contacts manually or import them. See the Importera kontaktinformation i en fil till adressboken (“Importing a contact details file into your
address book”) section in the Meeting Center manual. To find out how to obtain this
manual, see Appendix 4: on page 33 of this guide.
If you have imported contacts from some kind of list on your own computer and then
make changes to this list, you must re-import it into Telia Webbmöte to update the
“My contacts” (“Mina kontakter”) function.
Bilingual communication with meeting participants
Telia Webbmöte Meeting Center is available in two language versions: Swedish and
English. You can choose either of these via a simple setting in the service’s administrative web interface.
The default language setting is Swedish. This means that all e-mails sent to participants will be in Swedish. Similarly, the user interface in the meeting window will be in
Swedish.
Similarly, if you use the English-language version, all e-mails and the user interface
will be in English. You can use this setting to hold effective meetings if one or more
of the participants does not speak Swedish.
To find out how to set the language, see Appendix 6: Setting the language version
for Meeting Center on page 41 of this guide.
Quick-start guide for host • 5
21/3/2013
Scheduling a web meeting in Microsoft Outlook
1
Start Microsoft Outlook. Click on the Schedule meeting tool button in the WebEx
group. (If you cannot find this button in Outlook, it may be because you have not
installed the WebEx productivity tool. For more information, see Appendix 3 on
page 21.)
1
2
Outlook opens a meeting invitation window. Fill in the text boxes and specify the
times in the normal Outlook way.
3
Click on the Add WebEx meeting tool button.
3
2
Quick-start guide for host • 6
21/3/2013
4
Your computer will open the WebEx settings dialogue box. Enter a meeting
password of your choice.
5
Click on the OK button.
4
5
Quick-start guide for host • 7
21/3/2013
6
You will return to the Outlook window for the meeting invitation. Click on the Send button.
6
Quick-start guide for host • 8
21/3/2013
The meeting participants will now receive an e-mail inviting them to your web
meeting. The invitation includes complete information about the meeting.
Quick-start guide for host • 9
21/3/2013
Starting a scheduled web meeting
Just before the specified starting time, you should open the web meeting using the
details saved by Outlook. You can show this information in two different ways:
• Option 1: If you have set a reminder for the meeting, Outlook will open a dialogue
box with this reminder. Click on the Open (“Öppna”) button.
• Option 2: Open the calendar, go to Today (”I dag”) and double-click on the
scheduled web meeting.
1
Outlook will present the web meeting details. Scroll down a little way and click on
the start link:
1
Quick-start guide for host • 10
21/3/2013
2
Your browser will open the following page in the web meeting service. Click on the
start your meeting link.
2
3
The service opens the log-in page. Enter your user name and password.
4
Click on the Log in button.
3
4
Quick-start guide for host • 11
21/3/2013
At the very first meeting, the following page will be opened. Via this page, you will
install a browser add-on. The add-on is required in order for your computer to be
able to deal with web meetings.
The next time you open a web meeting from the same computer, you will go straight
to the meeting interface (see next page).
5a
If you have Internet Explorer version 8, this is how it will appear in your browser
window. Follow the description in accordance with steps 1, 2 and 3.
5b
If you have Internet Explorer version 9 or later, this is how it will appear at the bottom
of the window. Click on the Installera (“Install”) button.
5c
If you use a different browser, we recommend that you click on the Klicka här
(“Click here”) button.
5a
5c
5b
Quick-start guide for host • 12
21/3/2013
Once installation is complete, the meeting window will be shown in full-screen mode.
Quick-start guide for host • 13
21/3/2013
6
On top of the window is the telephone conference dialogue box. Enter the phone
number that you want to be called on.
7
Click on the Call Me button.
Tip: You can save one or more telephone numbers that you
want to be called on via the service’s web interface. For more
information, see Appendix 5: Adding telephone numbers
to My profile on page 38 of this guide.
6
7
8
Once the call has been connected and you have answered it, the service will confirm
that you have opened the telephone conference.
8
The dialogue box will then close automatically and the meeting can begin. Find out
more in the User guide for host and meeting participants.
Quick-start guide for host • 14
21/3/2013
Starting a one-click meeting
1
Start Microsoft Outlook. Click on the One-click meeting tool button.
1
The service creates a meeting and opens the quick-start page in full-screen mode. The
service also opens the telephone conference dialogue boxes shown on the previous page.
2
You will immediately receive an e-mail in your Outlook inbox. This e-mail contains all
the administrative details relating to your one-click meeting. Switch to Outlook and
forward this e-mail to the meeting participants.
2
Find out more about managing the meeting in the User guide for host and meeting
participants.
Quick-start guide for host • 15
21/3/2013
Cancelling a web meeting
Start Microsoft Outlook, find the scheduled web meeting in the calendar and cancel
it in the normal Outlook way. The meeting will also be cancelled in Telia Webbmöte
Meeting Center.
1
Outlook will create an e-mail about the cancelled meeting. Click on the
Send cancellation button.
1
Quick-start guide for host • 16
21/3/2013
The invitees will now receive an e-mail to say that the meeting has been cancelled,
and they can remove it from their calendars in the normal Outlook way.
Quick-start guide for host • 17
21/3/2013
Appendix 1: Changing your password
You will have received an e-mail from Telia with the subject line Welcome to Telia
Webbmöte. In this e-mail, you will find:
• Your company’s own URL for the service’s homepage
• Your user name
• A temporary password that you will use only for your first login
For security reasons, once you have logged in using the temporary password the
service will require you to change it to a personal password of your choice. Do the
following:
1
Open the e-mail and click on the link labelled Address to webmeeting.
1
Quick-start guide for host • 18
21/3/2013
2
Your browser will open the service’s homepage. Click on the HOST Log In button.
2
3
Enter your user name and the temporary password from the e-mail entitled
Welcome to Telia Webbmöte.
3
Quick-start guide for host • 19
21/3/2013
4
The service opens a page where you can change your password. Enter the temporary
password and your new password. The service analyses the new password and displays
the word Acceptable if it is sufficiently strong.
5
Enter your new password once more.
6
Click on the Submit button.
4
5
6
Quick-start guide for host • 20
21/3/2013
Your browser will show the service’s welcome page. If you want to install the WebEx
productivity tool, continue on the next page.
Quick-start guide for host • 21
21/3/2013
Appendix 2: Removing cookies
In certain cases, cookies (small data files saved on your computer when you visit
various websites) can affect the use and adaptation of Telia Webbmöte. We
therefore recommend that you remove cookies from time to time. How you do this
depends on which browser you use. The following description applies to Internet
Explorer 9. If you use a different browser, consult the help function.
1
Press Ctrl-Shift-Del. Internet Explorer will open the Delete Browsing History dialogue
box.
2
Uncheck the Preserve Favorites website data check box.
3
Check the Cookies check box. (You can choose any settings for the remaining
check boxes.)
4
Click on the Delete button.
1
2
3
4
Your browser will confirm the action via a message at the bottom of the program window.
Quick-start guide for host • 22
21/3/2013
Appendix 3: Installing the WebEx productivity tool
N.B. Under certain circumstances, cookies may affect the installation of the WebEx
productivity tool. We therefore recommend that you remove cookies before continuing. See Appendix 2 on page 21.
(If you are not already logged in:) Open the service’s homepage, click on the
Host Log in button and log in using your user name and personal password. See
Appendix 1 on page 17.
The service opens a dialogue box which gives the option of installing the
productivity tool. However, this routine has certain technical restrictions and
you should therefore carry out the installation manually in the following way.
1
Click on the Later link.
2
Click on the My WebEx tab.
2
1
Quick-start guide for host • 23
21/3/2013
3
Click on the Productivity Tool Setup menu option in the main menu.
3
Quick-start guide for host • 24
21/3/2013
4
Click on the Install Productivity Tools button.
4
5
Your computer will open a dialogue box. The appearance may vary depending on
which browser you use, but somewhere in the box you will find this set of buttons.
Click on the Run button.
5
Quick-start guide for host • 25
21/3/2013
6
Your computer will open the WebEx Productivity Tools – Installation Wizard.
Click on the Next button.
6
7
Select the I accept the terms of the licence agreement radio button.
8
Click on the Nästa (“Next”) button.
7
8
Quick-start guide for host • 26
21/3/2013
9
Accept the wizard’s choice of installation folder by clicking on the Next button.
9
10
Once the installation wizard is completed, this is confirmed by the following dialogue
box. Click on the Finish button.
10
Quick-start guide for host • 27
21/3/2013
11
The WebEx Productivity Tools dialogue box will be opened. Enter your login details.
You can find the URL and your user name in the e‑mail entitled Welcome to Telia
Webbmöte (see Appendix 1 on page 17). The password should be the new password that you chose when logging in for the first time.
12
Check that the Remember my password check box has been checked.
13
Click on the Login button.
11
12
13
Quick-start guide for host • 28
21/3/2013
14
The installation is now complete. Your browser will display the following dialogue
box, which confirms that you can schedule and open meetings from various
programs on your computer and from the task bar on your desktop. Click on the OK
button.
14
15
As well as the preceding dialogue box, the following box will also be opened. Close
it by clicking on the cross in the top right-hand corner.
15
Quick-start guide for host • 29
21/3/2013
16
Depending on which browser you use, you might see the following dialogue box. If
so, click on the Yes button.
16
You will now return to Telia Webbmöte’s administrative interface in your browser.
Depending on which browser you use, a dialogue box may be opened containing a
check question to confirm whether you want to activate the WebEx productivity tool
add-on.
If you want to be able to schedule or start web meetings directly from your browser,
click on Activate. Otherwise, click on Don’t activate.
Quick-start guide for host • 30
21/3/2013
18
Log out from the service by clicking on the Log out button.
18
Quick-start guide for host • 31
21/3/2013
Checking the results and changing account settings
1
The programs presented in the dialogue box in point 14 above will now have new
menu options. Start Microsoft Outlook and check that you can see the new Oneclick meeting and Schedule meeting tool buttons.
2
Click on the lower part of the Schedule meeting button to open the context menu.
1
2
3
Click on the WebEx Settings… menu option.
3
Quick-start guide for host • 32
21/3/2013
4
The WebEx-Settings dialogue box will be opened. Click on the Instant Meetings tab.
5
Enter a subject and password. These will apply for all your direct meetings, i.e.
meetings that you start immediately via the “One-click meeting” tool or menu
options in Windows, Office suite programs, Outlook, Internet Explorer, instant
messaging programs, etc.
6
Click on the OK button.
4
5
6
Quick-start guide for host • 33
21/3/2013
Appendix 4: Finding support for Telia Webbmöte
Open the service’s homepage, click on the HOST Log in button and log in using
your user name and personal password. See Appendix 1 on page 17.
1
Click on the Meeting Center tab.
1
Quick-start guide for host • 34
21/3/2013
2
Click on the User Guides menu option.
2
Quick-start guide for host • 35
21/3/2013
A new Internet Explorer window will open, showing Telia’s support page for
Webbmöte (the address is http://www.telia.se/foretag/support/teliawebbmote). Use
the navigation tabs and links to find adequate information.
Quick-start guide for host • 36
21/3/2013
Appendix 5: Adding telephone numbers to My Profile
N.B. Depending on which operating system your computer uses, the telephone
numbers that you add to My profile may be deleted if you remove cookies on your
computer. These details will also be unavailable to you if you log in to Telia
Webbmöte from a different computer to the one on which you saved the numbers. In
this case, however, the details will still be saved on your computer. You can find out
more about cookies in Appendix 2 on page 21.
Open the service’s homepage, click on the Host Log in button and log in using your
user name and personal password. See Appendix 1 on page 17.
1
Click on the My WebEx tab.
1
Quick-start guide for host • 37
21/3/2013
2
Click on the My Profile menu option.
2
Quick-start guide for host • 38
21/3/2013
3
Click on the Country/region link.
4
The service will show the Country/Region dialogue box. Open the drop-down list,
select Sweden and click on the OK button.
5
Enter the telephone number, including the full dialling code.
6
Check the check box for this number.
7
Continue adding more telephone numbers if required.
4
3
5
6
7
Quick-start guide for host • 39
21/3/2013
8
Scroll down to the bottom of the page and click on the Update button.
8
Quick-start guide for host • 40
21/3/2013
When you start a web meeting and the telephone conference dialogue box opens,
you can choose to be called on one of your pre-set telephone numbers.
9
Open the Ring mig på ett nytt nummer (“Call me on a new number”) drop-down list
and select the desired number.
9
Quick-start guide for host • 41
21/3/2013
Appendix 6: Setting the language version for Meeting Center
The user interface of Telia Webbmöte comes in two varieties; Swedish and English.
During the process of ordering the service, your company has specified which of
these languages should be the default setting when a user logs in.
If the default setting is unsuitable for a specific group of participants, you can easily
change the language before the meeting. The screen shots below show the shift
from Swedish to English. Between brackets, you find the interface terminology for
the opposite direction.
Open the service’s homepage, click on the Värd Logga in (HOST Log in) button and
log in using your user name and personal password. See Appendix 1 on page 17.
1
Click on the Meeting Center tab.
1
Quick-start guide for host • 42
21/3/2013
2
Click on the Välj språk (Select language) menu option.
2
.
Quick-start guide for host • 43
21/3/2013
3
Open the Språk (Language) drop-down list and select Engelska (Swedish).
4
Click on the OK button.
3
4
Quick-start guide for host • 44
21/3/2013
The service will now switch to the other language.
TSP-3360_1-1303
E-mails sent by the service to meeting participants will be in the selected language.
The same applies to the user interface in the meeting window.