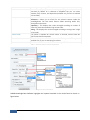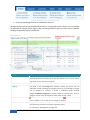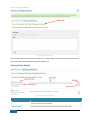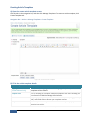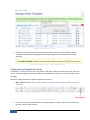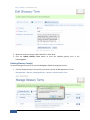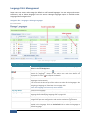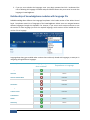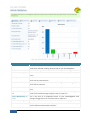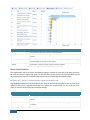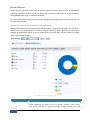
1
Chadha Software Technologies PHPKB Knowledge Base Software User Manual Author: Rinky Batra 2012 PHPKB User's Manual 1 PHPKB User’s Manual Table of Contents About The User’s Manual ................................................................................ 8 How to use this Guide ..................................................................................................... 8 A Few Key Concepts ........................................................................................................ 8 Customer Support .......................................................................................................... 9 Welcome to PHPKB Knowledge Base Software .............................................................. 10 PHPKB Features ............................................................................................................ 10 Requirements for PHPKB Software................................................................................ 12 End User Interface ........................................................................................................ 13 Logging into PHPKB Admin Control Panel ...................................................................... 20 Admin Control Panel Interface at Glance ....................................................................... 21 Admin Dashboard ......................................................................................................... 27 Management of Knowledge Base ................................................................. 28 CATEGORIES .............................................................................................................. 30 Category Types ............................................................................................................. 31 Creating Categories....................................................................................................... 31 Categories’ Management .............................................................................................. 33 Modifying Categories ............................................................................................................ 35 Deleting Categories ............................................................................................................... 35 ARTICLES .................................................................................................................. 38 Article Interface on Front End ....................................................................................... 38 Article Types ................................................................................................................. 39 Creating Article(s) ......................................................................................................... 39 Saved Drafts ................................................................................................................. 43 Creating an Article Draft ........................................................................................................ 43 Saved Draft’s Management ................................................................................................... 43 Modifying the Saved Draft .................................................................................................................. 44 Publishing the Saved Draft .................................................................................................................. 44 Deleting the Saved Draft ..................................................................................................................... 44 Articles’ Management................................................................................................... 44 2 PHPKB User’s Manual Modifying Article(s) .............................................................................................................. 47 Article Versions..................................................................................................................... 49 Previewing Article Version .................................................................................................................. 50 How to Restore the Article Version ..................................................................................................... 50 How to Delete the Article Version ....................................................................................................... 51 Deleting Article(s) ................................................................................................................. 52 Permanent Removal of Article(s) ........................................................................................... 53 Restoring Articles from Trash Box .......................................................................................... 54 Article Attachments .............................................................................................................. 54 Adding Attachment(s) ......................................................................................................................... 55 Deleting Attachment(s) ....................................................................................................................... 56 Common Operations on Articles ............................................................................................ 56 Approve an Article .............................................................................................................................. 56 Disapprove an Article .......................................................................................................................... 57 Making an Article Featured ................................................................................................................. 58 Search Articles .............................................................................................................. 59 Custom Fields ............................................................................................................... 61 Creating Custom Field(s) ....................................................................................................... 61 Custom Fields’ Management ................................................................................................. 63 Modifying Custom Field(s) .................................................................................................................. 64 Deleting Custom Field(s) ..................................................................................................................... 64 End User view of Custom Fields .......................................................................................................... 65 Article Collaboration ..................................................................................................... 66 How to collaborate on an article............................................................................................ 66 Viewing Article Note(s) ......................................................................................................... 67 Modifying Article Note(s) ...................................................................................................... 68 Deleting Article Note(s) ......................................................................................................... 68 Article Subscribers ........................................................................................................ 69 How to subscribe .................................................................................................................. 69 Subscribers’ Management ..................................................................................................... 70 Modifying Subscriber(s) ...................................................................................................................... 72 Deleting Subscriber(s) ......................................................................................................................... 72 Importing an article from CSV file ................................................................................. 73 Article Templates.......................................................................................................... 76 3 PHPKB User’s Manual Creating Article Templates .................................................................................................... 77 Article Templates’ Management............................................................................................ 78 Previewing Article Template ............................................................................................................... 80 Modifying Article Template(s) ............................................................................................................. 81 Deleting Article Template(s) ................................................................................................................ 81 Using Templates in Articles ................................................................................................... 82 USERS ...................................................................................................................... 85 Types of Users .............................................................................................................. 85 Admin Users ......................................................................................................................... 85 KB Users ............................................................................................................................... 87 Privileges Assigned to each User Level .......................................................................... 88 Creating User Account(s) .............................................................................................. 91 Users’ Management...................................................................................................... 93 Previewing User .................................................................................................................... 95 Modifying User(s) ................................................................................................................. 97 Deleting User(s) .................................................................................................................... 98 Search Users ................................................................................................................. 99 USER GROUPS ......................................................................................................... 102 Creating User Group(s) ............................................................................................... 102 User Groups’ Management ......................................................................................... 103 Previewing Group Details .................................................................................................... 104 Modifying Group(s) ............................................................................................................. 104 Deleting Group(s)................................................................................................................ 105 TICKETS .................................................................................................................. 107 Viewing Tickets........................................................................................................... 108 Replying Back to Tickets.............................................................................................. 110 Publishing Ticket as Article.......................................................................................... 112 Tickets’ Management ................................................................................................. 113 Close Ticket(s) ..................................................................................................................... 113 Reopen Ticket(s) ................................................................................................................. 113 Delete Ticket(s) ................................................................................................................... 114 NEWS .................................................................................................................... 116 4 PHPKB User’s Manual Creating News ............................................................................................................ 117 News’ Management.................................................................................................... 119 Previewing News ................................................................................................................ 119 Modifying News .................................................................................................................. 120 Deleting News .................................................................................................................... 121 GLOSSARY .............................................................................................................. 123 Create Glossary Term(s) .............................................................................................. 124 Glossary Terms’ Management ..................................................................................... 126 Modifying Glossary Term(s) ................................................................................................. 126 Deleting Glossary Term(s) ................................................................................................... 127 COMMENTS ............................................................................................................ 130 Comments’ Management ........................................................................................... 131 Modifying Comment(s) ....................................................................................................... 133 Approve Comment(s) .......................................................................................................... 134 Disapprove Comment(s) ...................................................................................................... 134 Delete Comment(s) ............................................................................................................. 135 LANGUAGES ............................................................................................................ 138 Creating Language File(s) ............................................................................................ 138 Creating Language Translator...................................................................................... 139 Language Assignments to Translators ......................................................................... 140 Assigning a Language to Translator User .............................................................................. 140 Revoke a Language from Translator User ............................................................................. 141 Language File’s Management ...................................................................................... 142 Modifying Language File...................................................................................................... 143 Deleting Language File ........................................................................................................ 146 Relationship of knowledgebase modules with language file ........................................ 147 STATISTICS .............................................................................................................. 150 Knowledgebase Statistics Overview ............................................................................ 150 Article Statistics .......................................................................................................... 151 Articles’ Summary ............................................................................................................... 151 Popular Articles .................................................................................................................. 153 Top Rated Articles ............................................................................................................... 153 5 PHPKB User’s Manual Most Discussed Articles....................................................................................................... 154 Most Mailed Articles ........................................................................................................... 155 Most Printed Articles .......................................................................................................... 156 Monthly Report .................................................................................................................. 157 Articles’ Traffic Statistics ............................................................................................. 158 Traffic Statistics .................................................................................................................. 158 Article Referrers.................................................................................................................. 160 Category Statistics ...................................................................................................... 161 Categories’ Summary .......................................................................................................... 161 Popular Categories .............................................................................................................. 163 Empty Categories ................................................................................................................ 163 User Statistics ............................................................................................................. 164 User’s Summary .................................................................................................................. 164 Most Popular Authors ......................................................................................................... 166 Article Contributors ............................................................................................................ 167 Recently Active Users .......................................................................................................... 168 Search Statistics.......................................................................................................... 169 Search Summary ................................................................................................................. 169 Successful Searches............................................................................................................. 170 Failed Searches ................................................................................................................... 171 Failed Login Statistics .................................................................................................. 171 Tools.............................................................................................................. 174 MANAGE SETTINGS .................................................................................................. 175 PHPKB Settings ........................................................................................................... 175 General Settings ................................................................................................................. 175 Product Details ................................................................................................................... 176 Knowledgebase Settings ..................................................................................................... 177 Mail Server Settings ............................................................................................................ 177 Database Settings ............................................................................................................... 178 Feature Settings.......................................................................................................... 178 Home Page Settings ............................................................................................................ 179 Subscribe to Knowledgebase ............................................................................................... 180 6 PHPKB User’s Manual Category Page Settings ........................................................................................................ 181 News Page Settings ............................................................................................................. 181 Login Page Settings ............................................................................................................. 182 Comment Settings............................................................................................................... 182 Glossary Settings................................................................................................................. 183 Contact Page Settings.......................................................................................................... 183 Article’s Settings ......................................................................................................... 184 Article Options .................................................................................................................... 184 Article Features................................................................................................................... 186 Meta Description ................................................................................................................ 187 RSS Feed Settings ................................................................................................................ 188 Miscellaneous Settings ............................................................................................... 188 Login Attempts ................................................................................................................... 189 Search Settings ................................................................................................................... 189 File Upload Settings ............................................................................................................ 190 Miscellaneous Settings ........................................................................................................ 190 SEO Friendly URL’s Settings ................................................................................................. 191 PHPKB Meta Tag Settings .................................................................................................... 191 Admin Section Settings ....................................................................................................... 192 AdSense Integration ................................................................................................... 192 OPTIMIZE DATABASE ................................................................................................ 195 KNOWLEDGE BASE BACKUP ....................................................................................... 196 SITEMAP GENERATOR ............................................................................................... 197 7 PHPKB User’s Manual About The User’s Manual How to use this Guide The User’s Manual describes PHPKB Knowledge Base Software’s Graphical User Interface (end user and admin control panel). It explains you the functioning of each of knowledgebase screen. User Manual is divided into following sections. 1. Introduction – This gives you the basic overview and features of the PHPKB Knowledge Base Software; system requirements, end user interface, admin control panel interface. 2. Management of Modules – This gives detail description of each of knowledgebase feature; categories, users, articles, news, comments, user groups, tickets glossary, languages. 3. Tools – Use this to configure the settings of knowledgebase, optimize database, KB Backup etc. Moreover, Table of Contents, List of Figures and List of tables are given. You can use them to find information about a particular screen in the GUI. A Few Key Concepts End Users - your knowledge base readers. They may be customers, partners, affiliates, staff members or general public users. Admin Users – your organization's team, the people who write and manage the FAQs. End User Section (Interface) / Front End / Public Section – This is the public-facing part of your knowledgebase; the knowledgebase home for your users. Admin Control Panel / Administrator Control Panel / Backend - This is the place where all the magic happens. Admin users use this to manage articles, categories, news, tickets, users, reports, etc. The entire configuration happens here. Your knowledgebase administrators use this control panel to change settings and configure elements such as staff users, user groups etc. 8 PHPKB User’s Manual Customer Support We are here to help! If you hit a bump let us know. We're a young company and eager to please. (We hope to stay that way.) We'll do what it takes to make PHPKB the best, hassle-free knowledge management software. Our offices are open from 9 AM - 6 PM Monday to Saturday (Indian Time GMT+5:30). You can get in touch with our agents and engineers by live chat, email, telephone, contact us form. Live Chat – Live chat is available at http://www.knowledgebase-script.com/contact.php Email – You can email us at [email protected] Telephone/Fax – You can contact us telephonically on the numbers given below in weekdays. Telephone: Mobile: +91 (0) 181-4613940 +91 (0) 98158-43940 Contact Us Form - You can send your questions/comments/suggestions using the contact form at http://www.knowledgebase-script.com/contact.php. Our Postal Address Chadha Software Technologies 232, Green Model Town Near Vinay Mandir Jalandhar City – 144003 Punjab (INDIA) Written By: Ms. Rinky Batra for Chadha Software Technologies. Copyright © 2012 Chadha Software Technologies. All rights reserved. No part of this documentation can be copied or reproduced without written permission from Chadha Software Technologies. All trademarks and registered trademarks used are the properties of their respective owners. DISCLAIMER: The information in this User’s Manual is accurate at the time of writing. This user’s Manual is provided “as is” without express or implied warranty of any kind. Neither Chadha Software Technologies nor its employees/affiliates/agents assume any liability for inaccuracies in the user’s manual, or losses incurred by use or misuse of the information in this User’s Guide. 9 PHPKB User’s Manual Introduction Welcome to PHPKB Knowledge Base Software Thank you for purchasing PHPKB Knowledge Base Software - The best, quick and smartest way to start and manage your own knowledge base system. PHPKB Knowledge Base Software allows you to create an unlimited, searchable library of FAQs, articles, how-to documents, resolutions, announcements, product manuals and more. PHPKB make it easy for your customers to find the information they need & reduce your support workload by offering selfservice based online support to your users. PHPKB Features PHPKB knowledge management software provides a range of advanced features that enable your business to handle customer support more efficiently. Multi-Language Support PHPKB offers the capability to localize every aspect of your Knowledgebase by creating the language content file from administrator control panel. Document Lifecycle An expiry date can be set for knowledgebase articles to control their lifecycle. This feature is particularly useful in situations where an article has temporary life say 1 week or 1 month. The article automatically stops appearing in the list of published articles when the expiry date is over. You can use this feature to show time-sensitive knowledge items. LDAP Integration PHPKB Enterprise Edition combines LDAP (Lightweight Directory Access Protocol) which helps in easy integration of Knowledge Base into organizational structure to manage authentication of your existing users. Document Version Control Versions of your articles will automatically be saved as you edit articles. This allows you to view past versions and revert to older versions if needed. If an article is edited it is automatically saved as a new version. The version control contributes to collaborative editing so many people can work together to create and refine a knowledge base entry. Knowledge Base Dashboard PHPKB Knowledge Base Software’s Multifunctional dashboard is a place for every action. In addition, it provides the graphical representation of statistics like user traffic statistics, article status and open tickets that need your attention. 10 PHPKB User’s Manual Advanced Knowledgebase Search PHPKB lets your users to search articles, news by keyword and/or category. Additionally, it allows the search for exact match/ any word match/ all word matches for the specified criteria. Full Source Code Have access to the full source code! No encrypted files means that you can modify all PHP files and customize the knowledge base software as needed. User-Groups & Private Categories Private Categories can be created to restrict access to content. User-groups can be associated with private categories so that members of a particular user-group can access the content under those private categories. Optimize Database Feature Reclaim the unused space and defragment the data file with database optimization feature of PHPKB Knowledgebase. Sitemap Builder PHPKB Knowledge Base creates not only an XML sitemap but also a sitemap in text format and HTML format to easily get you recognized in search engine crawlers. File Attachments Enhance your knowledge base by adding file attachments to articles. Saved Search You can create saved drafts of incomplete articles so that you can complete and publish them at a later date. Cross Browser Compatibility PHPKB knowledge base software is fully cross browser compatible, which means your users can access the knowledgebase from any web browser of their choice. SEO Tools Use of Meta Tags and SEO friendly URLs for knowledgebase items improve Search Engine Ranking of Knowledge Base pages. Except of the above mentioned other features of our knowledge base software include Browse Categories (browse titles and descriptions), Search Articles, View articles by Most Popular, Most Viewed, Featured Articles, Print Article and Options like Email Article To Friend, Save Article, Export Article to PDF and MS Word Formats, Talk about article by adding user comments, Rate Articles etc. With Hundreds of options like RSS Feed Export, Advanced Search, Powerful WYSIWYG Editor, AJAX Powered IQS Technology (Instant Question Suggestions), Complete Knowledge Base Statistics, PHPKB knowledge base software is a complete web based knowledge base management system as well as an Article Directory System that is easy to install and customize. 11 PHPKB User’s Manual Requirements for PHPKB Software PHPKB has minimal requirements and should work on any modern web server. Please read and verify that your server meets the following requirements in order to install PHPKB knowledgebase script. You can confirm these settings from your web hosting service provider. Operating System: Linux, UNIX, Mac or Windows. Web Server: Apache Web Server 1.3 or above/ Microsoft IIS. Scripting Language: PHP 4.3 or above. Database: MySQL 3.23 or above. PHPKB software comes with its own installer that checks for all required components prior to the installation process. Follow the Installation Tutorial. You may also wish to refer to the ‘System Requirements’ page on our website at the URL below. http://www.knowledgebase-script.com/requirements.php Recommended Hardware Requirements PHPKB knowledge base software works well on any web-server that meets its requirements specified above. This is definitely not a processor-hungry or memory-hungry application. Numerous instances of PHPKB knowledge base software are running on shared web hosting (virtual hosting) systems and are working perfectly fine. It means you can install it on a shared hosting server too. If you would like to use a dedicated hosting or host it on a local server, you can have a look at the hardware requirements and example configurations for a reference. http://www.knowledgebase-script.com/hardware-requirements.php 12 PHPKB User’s Manual End User Interface The end-user interface/front end in PHPKB Knowledge Base Software is what your knowledge base readers, who are reading the articles, see. 13 PHPKB User’s Manual Figure 1: Front End Home Page The PHPKB Knowledge Base Software has very interactive and user friendly front-end. The PHPKB knowledge base script has been designed and organized in such a manner to provide maximum ease of use to visitors without any learning. PHPKB end user interface can be configured easily from admin control panel’s settings. Super users can control the display (On/Off) of every possible feature of knowledgebase. PHPKB front end interface header is available on every page which gives the users swift navigation experience. Home Page of PHPKB has links to every knowledgebase features. Different sections of home page are explained in detail below. Header Links Figure 2: Front End Header Links Header contains links to KB home, advanced search, news, glossary, ask question, member login area and language drop down to change the language of knowledgebase. KB Home When you first enter the screen the KB Home page is displayed. You can click on this link to come back to home page, if you are viewing or using any other feature of Knowledgebase. Search The knowledgebase has both quick search and advanced search. This is a link to advanced search page, where KB users can refine the search using various search options. Advanced Search Interface Explanation (Refer Figure 3 for screen view) Show Choose what you are looking for. By default article is selected, but you can also find news and categories. That Contain Enter the keywords or term for which to search. But Not Enter the keywords or term that should not be part of article/news/category. In This field is available only when you select the article from show drop down. By default all categories option is selected, choose the category, if you are looking for articles under specific category. Search For Use this to search for any word, all words or exact match of keywords you have specified. Any Word- Display results that match with any of the words from the keyword entered by you. All Words – Display the results that have all the words entered by you, but not necessarily consecutively. Exact Match – Displays the results that have exact keywords in 14 PHPKB User’s Manual Search In Sort By Custom Fields File Attachments Advanced Search them as you specified. You can filter (narrow) the search more by specifying where keywords are searched. By default all is selected in dropdown but you can select between Title, Content, and Keywords (available only if article is selected in show field). You can sort the results found by Relevance – allows you to search for the relevant content inside the knowledgebase. Full text search feature allows searching within title, description and content. Popularity – This displays the results arranged according to number of times they have been viewed in high to low order. Rating - This displays the results arranged according to voting score in high to low order. This option is available for articles search. If checked, custom fields will also be searched for keywords. If checked, Attachments will also be searched for keywords. This option is available only if, you are searching for articles. Click this to search the results for the criteria specified above. Table 1: Advanced Search Interface Explanation Figure 3: Advanced Search PHPKB Knowledge Base Software highlights the keyword searched in the results found as shown in figure below. 15 PHPKB User’s Manual Figure 4: Advanced Search’s Results Ask Question Ask Question is a link to contact page, which allows the reader to contact the knowledgebase administrators. Reader might do this if, say, he couldn't find the information he was looking for, had problems using the system. See Tickets on page 107 for details. Login This is a link for KB member’s login page. KB members have accounts with knowledgebase and can access the private categories and their articles for groups whom they are member of. KB members can login with the login credentials provided to them by administrators. Refer KB Members on page 87 for details. Language Drop Down Language drop down contains the list of languages of the knowledgebase that KB users can use for changing the current language. The current language will be the one your browser is using or the language which was selected by the administrator of the knowledgebase. If you change the language you'll see the categories and records of your chosen language. If you're switching to languages with right to left text direction (for example Arabic, Hebrew or Farsi) the whole layout will be switching according to the text direction. Quick Search Box PHPKB Knowledge Base has Quick Search in header, available on every page to easily search for articles. Just type the text into the search field for a quick search, or you can search on other options from Advanced Search. Figure 5: Quick Search Box 16 PHPKB User’s Manual Knowledgebase Details Figure 6: Knowledgebase Details Below the header links Knowledge Base Name is displayed. Name can be configured through Knowledgebase Name setting available under PHPKB Settings of Manage Settings. News & Announcements Below the header section, news headlines are displayed on home page if Display Home Page news setting is enabled under Feature Settings of Manage Settings. The number of news headlines displayed can also be configured from manage settings. Figure 7: News & Announcements Browse Categories Browse categories contain all the parent categories/root categories of knowledgebase with category search option. For viewing the category page, users can select the category and click on go button. Figure 8: Browse Categories Group Categories Group Categories are private categories of knowledge base and are visible to KB users with accounts (KB Members). All those private categories are shown to a user, which are associated with the groups assigned to him. Figure 9: Group Categories 17 PHPKB User’s Manual Featured Articles Featured articles are vital articles in the knowledgebase. Super users can control the display and number of featured articles; from manage settings. Users can also subscribe to RSS feeds of Featured Articles. Figure 10: Featured Articles Recently Added Articles This displays the list of latest articles. Super users can control the display and number of latest articles from; manage settings. Users can also subscribe to RSS feeds. Figure 11: Recently Added Articles Most Popular Articles PHPKB Knowledge Base Script will dynamically create and display the list of your most popular (maximum number of times viewed) articles on home page allowing your knowledgebase (FAQ) to become more valuable with each interaction. Super users can control the display and number of popular articles; from manage setting. Users can also subscribe to RSS feeds of popular articles. 18 PHPKB User’s Manual Figure 12: Most Popular Articles Top Rated Articles PHPKB Knowledge Base Script will dynamically create and display the list of your top rated (highest voted) articles on home page allowing your knowledgebase (FAQ) to become more valuable with each interaction. Super users can control the display and number of top rated articles; from manage setting. Users can also subscribe to RSS feeds of top rated articles. Figure 13: Top Rated Articles Subscribe to Knowledgebase Subscribers are users who get emails when knowledgebase articles are published or updated. Click on the Subscribe button to get the articles’ updates. Figure 14: Subscribe to Knowledgebase 19 PHPKB User’s Manual Logging into PHPKB Admin Control Panel 1. Open the Internet Browser and type the path to your knowledgebase in address bar and hit enter or click on go button. 2. Login screen will be displayed. Figure 15: Login Screen 3. Enter your username and password to log in. 4. Click the Login button. If your details are correct you will be shifted to dashboard. Cases when u can’t log in to PHPKB Knowledge Base Software: a) Your account is inactive. You should contact the administrator regarding the issue. b) Your username and/or password are incorrect. Click Forgot Password button to reset your password or contact administrator for assitance. Note: You’ll be unable to login for 15 minutes in case you try wrong login attempt for 5 times. 20 PHPKB User’s Manual Admin Control Panel Interface at Glance PHPKB Knowledgebase has easy to use, highly interactive Graphical User Interface with demotic and innate interface elements. User does not require retraining to start using PHPKB Knowledge Base Software. The use of AJAX makes the application to be faster or more responsive as sections of pages can also be reloaded individually which reduces the bandwidth usage and load time. The interface of PHPKB is divided into two parts Header Section and Workspace Area. PHPKB Header PHPKB Workspace Header Section PHPKB Header section includes admin user details, shortcut links and navigation bar. Header section is displayed on every screen. Workspace Area PHPKB Workspace is the area where you can manage PHPKB features. Navigation Bar With Navigation Bar you can create, configure and manage your knowledgebase. Description for each sub option of navigation bar is added to express its functionality. 21 PHPKB User’s Manual Figure 16: Navigation Bar Navigation bar contain links to: Articles These are the content base of knowledgebase. Articles can contain your frequently asked questions, white papers, user manuals, or troubleshooting information. You can create articles; manage articles, saved drafts, trash box, subscribers or custom fields from this section. Refer Articles on page 38 for details. Categories Categories are used to structure your knowledgebase into easily manageable portions. In PHPKB knowledgebase categories are represented in tree based structure. You can perform various actions like add, edit and delete categories in this section. Refer Categories on page Error! Bookmark not defined. for details. Comments Click here to and manage user submitted comments on articles in your knowledgebase. Refer Comments on page 130 for details. Tickets Questions submitted by the users from the front-end are displayed in PHPKB in the form of tickets. You can reply or publish them as article in your Knowledgebase. Refer Tickets on page 107 for details. News You can add and manage news of your enterprise in this section. News is displayed in front end but you can also hide the visibility for the news. Refer News on page for 116 details. Glossary Click here to create and manage glossary of frequently used terms. Glossary terms are highlighted where they appear in the article content in front-end and appropriate description is shown on mouse over. Refer Glossary on page 123 for details. Languages You can manage the language customization of your front end here. You can add, edit or delete the language files in this section. Refer Languages Error! Bookmark not defined. on page for details. Users You can manage users in this section. Different level of users can be added or searched here. Refer Users on page 85 for details. 22 PHPKB User’s Manual User Groups User-groups can be associated with protected categories only so that front end members of a particular user-group can access the content under those categories. User groups can be created edited or deleted under this navigation tab. Refer User Groups on page 102 for details. Statistics You can view the graphical reports of knowledgebase components such as articles, categories, users, search keywords, article traffic & failed login attempts in this tab. Refer Statistics on page 150 for details. Tools Under tools navigation tab you can configure your knowledgebase settings, generate sitemaps, optimize and backup your database and can integrate AdSense ads to your knowledgebase. Refer Tools on page 174 for details. Shortcut Links Shortcut Links button is on right bottom corner of header section. Shortcut links menu is collection of commonly used items so that you don’t have to go through navigation bar to work on them. To view shortcut menu just position your mouse over the shortcut button. Figure 17: Shortcut Links 23 Figure 18: Dashboard Shortcuts PHPKB User’s Manual Dashboard Shortcuts Every feature that would be probably used by you every day is in front of your eyes when you log in, here on your dashboard as I would like to…. You do not need to look through the navigation bar to find a desired feature – it is already here, on the Home Page. Required Image In PHPKB Knowledge Base Software some fields are marked mandatory when you configure any of knowledgebase features. The required fields are represented with icon. Paging When the list of records is greater than value specified in Records per Page setting under manage settings then the records are displayed in pages. You can check page number and number of records you are viewing at any time from the Paging Navigation. Figure 19: Paging Navigation Paging Click this First Page icon to go to first page. , When you are already on first page the First Page and Previous Page icons are disabled. Click this Last Page icon to go to last page. , When you are already on last page the Last Page and Next Page icons are disabled. Click on it to go to next page from the current page. Click on it to go to previous page from the current page. Click here to reload the page again with the number of items specified in items per page text box. Table 2: Paging Navigation – Explanation of Symbols Sorting In PHPKB knowledgebase sort icons are added to fields that you can use to sort records. Click to sort in descending order and to sort in ascending order. Toggle Button To make effective use of browser space some options and details are hidden by default. You can this to see hidden details and to hide them again. use Success Notifications Figure 20: Success Notifications 24 PHPKB User’s Manual After successful completion of any operation PHPKB Knowledge Base Software show confirmation notices. Error Notifications When you try to perform some operation that is not allowed by PHPKB Knowledge Base Software you get error message. Example: If you will try to remove Editor user account who has contributions in knowledgebase PHPKB will throw an exception message. Figure 21: Error Notifications Tooltip The tooltip or info tip appears with information about the item being hovered over that has tooltip icon next to it. Figure 22: Tooltip Navigation Breadcrumbs Figure 23: Navigation Breadcrumbs 25 PHPKB User’s Manual PHPKB software has Breadcrumbs below the headers section. They provide the hierarchical site structures—links to the parent pages of the current one. Top links Figure 24: Top Links Knowledgebase Software has five top links to Dashboard – reload home page, My Profile - change your account settings, Manage Setting – configure your knowledgebase, View KB – view front end KB, Logout – sign out of the knowledgebase. Language Dropdown In Multi Language Edition of PHPKB Knowledgebase Software Language Dropdown is displayed that let the admin users work in language of their choice. Admin user can enter the articles, news, glossary in the language selected. It gets disabled in sections, where it has no significance –Comments, Languages, Users, User groups, Statistics, Tools Tab. Editor WYSIWYG Editor used in PHPKB knowledge Base Software is the most unique online HTML Editor which provides advanced editing facilities designed to create stylish content. "Advanced" doesn't mean complicated. All dialogs provide you with an easy to use interface. Have a look at the screenshot. Figure 25: WYSIWYG Editor WYSIWYG editor is fully compatible with all the majorly used browsers including Internet Explorer, Netscape Navigator, Mozilla Firefox, Chrome, Opera etc. WYSIWYG Editor of PHPKB Knowledge Base Software is full of features and provides essential HTML editing functionalities with total control of the styles. 26 PHPKB User’s Manual Admin Dashboard The home screen or the dashboard is shown when you log in or click the dashboard link on the top links. PHPKB dashboard presents and organizes your daily usage information in a way that is easy to read. It contains header section to reach out to every possible operation of PHPKB Knowledge Base Software. Figure 26: Dashboard Dashboard gives overview of your knowledgebase content in the form of charts. Language Dropdown will be visible in case of Multilanguage Edition of Knowledgebase. Navigation Breadcrumbs shows the position of your dashboard in Knowledgebase. On the top left side of the workspace is a graphical representation of last 15 day traffic (total hits of all articles for last 15 days). You can view the details of graph by clicking on Shortcut to Traffic Statistics. This information helps you analyze your visitors. Below is a pie chart representation of articles of different status with their total count in knowledgebase. Next to this are notifications for pending, approved comments, open tickets, expired articles, subscribers, public and private categories and admin users. You can click on the notification to see the details. I would like to… Most frequently used sections are displayed under 'I would like to' text on the right side for you to get started. 27 PHPKB User’s Manual Management of Knowledge Base This chapter includes the details of all the components of PHPKB Knowledge Base Software. Categories (Page 29) Articles (Page 37) Users (Page 84) User Groups (Page 101) Tickets (Page 106) News (Page 115) Glossary (Page 122) Comments (Page 129) Languages (Page 137) Statistics (Page 149) 28 PHPKB User’s Manual Categories 29 PHPKB User’s Manual CATEGORIES Category is the one of the highest classes to which the objects of knowledge or thought can be reduced, and by which they can be arranged in a system. Categories are used to structure your knowledgebase articles into easily manageable portions. When there is large number of articles they can be categorized to ease the users in locating the relevant information. Suppose a company deals with electronic gadgets then it can divide its FAQ in different categories of mobile phones, televisions, laptops etc. An unlimited amount of categories and sub-categories can be created in PHPKB software. Root categories (who do not have any parent category) are displayed at home page with their description and article count of category itself and all subcategories under browse categories. User can traverse through any of category by selecting category from Select Category drop down menu. Figure 27: Categories Display at Front End By clicking on any category, a page with subcategories and articles for selected category will get displayed. For instance, by clicking the automobiles category user can view its articles and two subcategories as shown in Figure 28. User can go through any of these sub categories to see their details. A navigation bar is shown at top to tell the hierarchy of category displayed. 30 PHPKB User’s Manual Figure 28: Category Page Category Types In PHPKB knowledge base categories are divided as: Public Categories Public categories are visible to all end users. Any user from public accessing your knowledgebase can see the public categories and all its sub categories and articles. Private Categories Private categories are visible only to KB members (Refer KB member on page 87), when they logged in from member's area (Refer Figure 27 for screen details). KB members can see those private categories, which are associated with user groups of whom he/she is member of. Private categories are used to maintains the of information authentication. Creating Categories A) Open the create category screen The new category screen can be opened in different ways as mentioned below: 1. Shortcut Links: The swift way to open a create category page is to use the Shortcuts Links at the top right corner of admin control panel header. Click on the shortcut links, a drop down menu get displayed. Click on Create Category option. 2. Navigation Bar: Create category page can also be opened from Create Category option of Category tab under navigation bar. Refer Figure 30 for screen details. 31 PHPKB User’s Manual Navigation Bar > Category > Create Category 3. Dashboard Shortcuts: You can also create category via a Create Category option of Dashboard Shortcuts. Refer Figure 31 for screen details. After selecting the option create category page will be displayed as shown below. Figure 29: Create New Category B) Fill New Category Details New Category Interface Explanation Language Displays the language for which category will be created. You can change the language from the language drop down on header. Category Name Enter the name for new category. Remember that category name cannot be shorter than 2 characters. Note: Required Field. It is mandatory to fill this field otherwise PHPKB Knowledge Base Software wouldn’t let you create category and throws an error. Category Type Choose between category type – Private or Public. If you choose Private option, Private Categories drop down will be displayed and vice versa for Public option. Parent Category Select the category from drop down if you want this new category to be sub category of any other category else select No Parent option to make it Root Category. Category Description Write the description of up to 250 chars. Description is displayed below the category name in end user section. 32 PHPKB User’s Manual Create Category Cancel Click on this to save the category to knowledgebase. Click this to go back to Manage Categories without saving your changes. Table 3: Create Category Interface Explanation C) Save Category Click on Save Category button to save the category into knowledgebase. Categories’ Management In admin section categories can be viewed by two ways: 1. By clicking the Categories tab from Navigation bar. 2. By clicking the Manage categories from dashboard shortcuts. Figure 30: Viewing Categories from Navigation Bar Figure 31: Viewing Categories from Dashboard Shortcuts After selecting the appropriate option the Manage Categories page will be displayed as shown below. Figure 32: Manage Categories You can view the public or private categories by clicking the respective tab on manage categories page. 33 PHPKB User’s Manual Manage Categories Interface Explanation ID ID is the serial number of category in your KB database. Category Name Name assigned to Knowledge base article category. Root category is displayed on left and sub categories are shown in hierarchical form under root category. Priority Priority defines the order of precedence for categories. Lower priority shows category of higher importance. Visible Tick image icon shows that category is visible in end user section and vice-aversa for cross image. Click on the image to change its status. Hits Depicts the total of views of all the articles under this category and its subcategories. Subcats Total count of sub-categories depth. Articles Articles column shows the Published articles and total articles under this category. Category Description The Description is an explanation of what this category is about. Actions Action column comprises the operations that can be performed on category. Click this to add new article to this category. By 1. Add Article default article will be published under this category but you can change the category. Refer Creating Article(s) on page 39 for details. Click this to add new sub category under this 2. Add Subcategory category. Refer Creating Categories on page 31 for details. Click this to modify the category. Refer Modifying 3. Edit Category Categories on page 35 for details. Click this to delete the selected category. Refer 4. Delete Category Deleting Categories on page 35 for screen details. Table 4: Manage Categories Interface Explanation You can also arrange the categories in ascending or descending order under Manage Categories screen. By default latest categories are shown at top i.e. categories are sorted is by ID in descending order, but they can be sorted by category name, priority, visibility or hits, just by clicking the sorting icons on respective column. For user section sorting can be done in alphabetic order or according to priority as it is defined by you in Manage Settings. 34 PHPKB User’s Manual Modifying Categories PHPKB provides you the option to edit the existing categories. Steps for editing the category are mentioned below: 1. Click the Edit Category operation from Actions column of Manage Categories for the category you want to edit. Refer Figure 32 for screen details. Navigation Bar > Categories > Actions > Edit Category Icon Edit Category page for selected category will be displayed as presented in figure below. Figure 33: Edit Category 2. Make the necessary changes. See Table 5 for details of edit form fields. 3. Click on Update Category button to make the changes permanent. NOTE: Parent Category of category can’t be category itself or any of its sub categories. Deleting Categories You can remove the existing categories if you think they are of no use in your knowledgebase by following the steps mentioned below: 1. Click the Delete Category operation from Actions column of Manage Categories for the category you want to delete. Refer Figure 32 for screen details. Navigation Bar > Categories > Actions > Delete Category Icon 35 PHPKB User’s Manual Figure 34: Delete Category 2. Click OK on confirmation box if you want to permanently delete this category. NOTE: Category can only be deleted if it is empty (doesn’t contain any sub-category or article) else system will generate warning message as shown in following figure. 36 PHPKB User’s Manual Articles 37 PHPKB User’s Manual ARTICLES Articles, answers to frequently asked questions, white papers, user manuals, or troubleshooting information are grounds of your knowledge base. The knowledgebase is a database of categorized articles that act as an information repository for your clients. Adding articles in PHPKB Knowledgebase is much easier with "what you see is what you get" editor. You can quickly create stunning HTML documents without any HTML and coding experience. Moreover, with PHPKB Multi Language edition you can create articles in different language just by choosing the requisite language from the language dropdown on admin control panel header. An unlimited number of articles, FAQ, question-answer combinations can be created. Article Interface on Front End Articles are published under categories on front end. End users can view article page by clicking on the article title from the list of articles displayed under category page. Article page contains the article details like title/question, its content/answers, article author, rating, views, user comments, attachments, custom fields, categories under which it is filed etc.; article options on right side – specify the various actions that can be done with/on article. Article page also contain the related articles, articles that are alike the article. Figure 35: Article Page 38 PHPKB User’s Manual Article Types PHPKB articles can be categorized as: Pending Approved Featured Disapproved Expired Saved Draft Articles engraved by writer are in pending state by default; to be approved by super user or editor. Pending articles are not published to KB Users (end users). Articles written by super user, editor or accepted articles of writer. If an article is "Featured" it is a very important article and will always be shown on knowledgebase front end home page under featured articles. You should make articles as Featured if they are very important for your whole knowledgebase. Featured Articles also appear at the top positions of the lists of articles. Articles that have been disapproved by editor or super user. An expiry date can be set for knowledgebase articles to control their lifecycle. You can set the time limit for article up to when it will be accessible by KB users (end users). The article automatically stops appearing in the list of published articles when the expiry date is over. List of incomplete articles that you can complete and publish at a later date. Creating Article(s) A) Open the Create Article Page To create a new article, click Articles in the Navigation Bar and select Create Article. Navigation Bar > Articles > Create Article If you are on dashboard speediest way is to click on Create New Article from dashboard shortcuts. You can also use Create Article option on shortcut menu on right side of header. 39 PHPKB User’s Manual Figure 36: Create an Article 40 PHPKB User’s Manual B) Fill in the necessary details Create an Article Interface Explanation Article Title Title can be question, caption or headline of your article. Note: Multiple articles with same title under one category are not allowed. Article Type Choose Private to change the categories field to display private categories and to make article visible only to KB Member Users. With Public type article will be published under public categories and be accessible by all end users. Categories The place in the knowledgebase hierarchy where this entry will be published depends on this field. You can assign an article to multiple categories by checking the checkboxes in front of category names. Article Content The content is an answer to the question or a solution for a problem i.e. body of your article. The content can be edited with the included WYSIWYG (What You See Is What You Get) editor when JavaScript is enabled and miscellaneous settings Use WYSIWYG Editor? Is also enabled. Article Keywords Article Summary Make Featured Article Expiry Custom Fields Show Article? 41 Editor provides you features- text, image, table, audio and video insertion; number of readymade templates; internal linking; linking to network files along with uncountable formatting features. Keywords are relevant for searching through the database. Keywords are the important words that classify your article. In case you didn't include a specific word in the entry itself, but it is closely related to the content you can include it as a keyword, so the entry will come up as a search result. It is compact view of your article for meta description attribute. Indexing search engines may present the content of your meta description tag as the result of a search query. Note: It is suggested not to write summary of more than 160 words. Check this and mark this as a featured article if you want the article to appear in the “Featured articles” section of your knowledge base’s front Page and get priority in published articles. Check this to set the time limit for article up to when it will be accessible by KB users (end users). You can set expiry days in between 365 days from current date. This displays the custom fields you created for your knowledgebase article s, either a text field or a list of options (in form of checkbox or dropdown). You can leave a custom field blank if it is not specified mandatory and marked with required icon. Refer Custom Fields on page 61 for detail description. Uncheck this if you don’t want the article to get displayed to KB users after publishing. PHPKB User’s Manual Preview Article Save as Draft Save Article Cancel Shows preview of the article with the latest (even unsaved) changes as it will be published to the front-end users. See Figure 37 for Previewing Article’s screen details on page 42. Saves changes as your personal draft. You can continue to edit this draft later and save it as an article or delete eventually. Refer Saved Draft’s Management on page 43. Click this to save your changes and store the article in knowledgebase. Click this to return to Manage Articles page without saving your changes. Table 5: Create an Article Interface Explanation C) Save Article To save the article in knowledgebase and to publish, click on Save Article button. You can click on Preview Article option to see its appearance in front end; and can publish or make changes from there. Figure 37: Previewing an Article 42 PHPKB User’s Manual Saved Drafts Saved drafts are incomplete articles that are not ready to publish yet. Saved drafts allow multiple users to edit the article without publishing the article in knowledgebase. Creating an Article Draft You can create saved drafts of incomplete articles so that you can complete and publish them at a later date. Saved drafts are created from create article page by clicking the Saved Draft button. Refer Create Article(s) on page 39 for details. Saved Draft’s Management In PHPKB Software editor and super users can view all the drafts of knowledgebase but writers can see their own saved drafts. You can view the saved drafts from Saved Drafts option under articles tab of navigation bar. Navigation Bar > Articles > Saved Drafts Figure 38: Manage Saved Drafts Manage Saved Draft Interface Explanation ID Serial number assigned to draft in database. Article Title Click on this to preview the article. Preview display article details to ease you in deciding what action you want to take on this article. Category Category is place where you have chosen to publish this article. Visible Click this to set the visibility of saved draft after it gets published. Created Month, date and year; when draft was last updated. Actions Attachments: Click this to add or delete attachments to draft. Edit-Publish Draft: Click this to edit or publish the draft. Discard Draft: Click here to remove the draft. Table 6: Manage Saved Draft Interface Explanation 43 PHPKB User’s Manual Modifying the Saved Draft Click on the Edit-Publish Draft option from actions row of saved drafts. Navigation Bar > Articles > Saved Drafts > Actions > Edit-Publish Draft An edit article screen will be displayed. See Figure 48 for screen details. Make the necessary changes in the article and click on update article option to make the changes permanent. Remember, article will not get published, only be updated. Publishing the Saved Draft Click on the Edit-Publish Draft option from actions row of saved drafts. Navigation Bar > Articles > Saved Drafts > Actions > Edit-Publish Draft An edit article screen will be displayed. See Figure 48 for screen details. Make the necessary changes in the article and click on Preview Article. From the Preview Article screen click on the Publish Article button to make the changes permanent and publish it in knowledgebase. Deleting the Saved Draft Click on the Discard Draft from actions row of saved drafts. Navigation Bar > Articles > Saved Drafts > Actions > Discard Draft Figure 39: Delete Saved Draft Confirm the dialog box to remove the saved draft from knowledgebase. Articles’ Management Viewing Articles 1. By clicking the Articles tab from Navigation bar. 44 PHPKB User’s Manual Figure 40: Viewing Articles from Navigation Bar 2. By clicking the Manage Articles from dashboard shortcuts. Manage articles screen will get displayed. By default, list of approved articles is shown. You can navigate through tabs on manage articles page to view and manage different types of articles such as featured, pending, disapproved, expired, saved drafts. Figure 41: Manage Articles Manage Articles Interface Explanation ID Every article generates automatically an ID in database. Articles can be accessed directly by putting this ID into the search box on article search page. Refer Search Articles on page 59. Article Title This is the question or headline of your article. Category The place in the Knowledgebase hierarchy where this article will be published. Tooltip unfolding the category hierarchy is presented on mouse over of category. In instance, if article is published under multiple categories Multiple Categories is written under the column entry. Click on category to view name of categories under which article is filed. Visible Shows that article is visible to front end users. In the column value makes it hidden. Click on the icon to change its visibility. Comments Displays the number of users comments on the article. Click the number to view the article comments if number is greater than 0. See Comments’ Management on page 131. 45 PHPKB User’s Manual Ratings Hits Updated Versions Options It displays the average rating (total of article rating score divided by number of votes since the counter reset). Note: When no votes have been casted for an article, Unrated displays. Number of times this article has been viewed by your KB users (end users). Last month, date and year on which admin user made a change to the article. Versions of your articles will automatically be saved as you edit articles. The numeric figure displays number of versions for this article. Refer Article Versions on page 49 for details. Click on toggle to view the actions associated with article. Table 7: Manage Articles Interface Explanation Actions allied with different type of articles Tabs of Manage Articles represent articles of different status (type). Each type of article has few different set of operation that can be performed on it. By clicking the toggle button you can see the available actions for the article. Below different actions for different status articles has been displayed. 1. Approved Figure 42: Approved Articles' Actions 2. Featured Figure 43: Featured Articles' Actions 3. Pending Figure 44: Pending Articles' Actions 4. Disapproved Figure 45: Disapproved Articles’ Actions Expired Article Expiry date Figure 46: Expired Articles’ Actions 46 PHPKB User’s Manual 5. Saved Draft Figure 47: Actions for Saved Drafts Every possible action for all type of articles is explained in table given below. Article Actions’ Explanation Attachments Click this option to add or delete attachments to article. Refer Article Attachments on page 54 for details. Disapprove Click this to disapprove an already approved article. See Disapprove an Article on page 57 for details. Make Featured Click this to make the article featured. See Making an Article Featured on page 58. Subscribers To view and manage details about the people who have signed up to receive email notifications when article is updated. See Article Subscribers on page 69 for details. Reset Rating To set the rating of an article to 0 click on this link. Edit To update an existing article click on this action. Refer to Modifying Article(s) for details on page 47. Delete To send the article to trash folder click here. See Deleting Article(s) on page knowledgebase article on page 52 for details. Non Featured Click here to make the article as non-featured. By making it to nonfeatured, articles will no more be listed in top positions of published articles. Approve Pending articles must be approved by an administrator before they become visible to the public. You can also edit a pending article before approving it. Remove Expiry Click here to remove the expiry of expired articles. After expiry date removal article will be moved to status from which it had expired. Edit Publish draft To edit the draft and publish it in knowledgebase click here. See Modifying the Saved Draft and Publishing the saved draft on page 44. Discard Draft To delete the draft permanently click here. Refer Deleting the Saved Draft on page 44. Table 8: Article Actions’ Explanation Modifying Article(s) With PHPKB Knowledge Base Software you can edit article of any status. Editors and super users have privilege to update any article of knowledgebase. However, writers can edit their own articles, and articles edited are again sent to pending state to be approved by editor or super user. Steps for editing an article are as mentioned below. Whenever articles are updated, previous version of article is stored in version history. Refer Article Versions on page 49 for details. 1. Click the Edit option from Actions row in manage articles. An edit article screen gets displayed. Navigation Bar > Articles Tab > Manage Articles > Actions > Edit 47 PHPKB User’s Manual 2. On the edit article page make the required changes. Refer to Table 5 for details of fields. Figure 48: Edit an Article 3. Click on Update Article button to make the changes permanent in knowledgebase. If you want to see the preview before updating the article click on the Preview Article button. 48 PHPKB User’s Manual On preview article page (See Figure 37 for Preview Article screen details) you have two options either to publish the updated article or to edit the article again. If you are satisfied with the article content press Publish Article button to publish it in knowledge base else you can make the changes in article by pressing the Edit Article option. Article Versions PHPKB Knowledge Base Software allows you to automatically save versions of documents as you edit them if you enable the Enable Version History setting under Miscellaneous Settings of Manage Settings. With article history/versions you can go back, look at changes, and even revert to an earlier version of an article. The version control contributes to collaborative editing so many people can work together to create and refine a knowledge base entry. To view, manage the article versions, click on Versions column in the Manage Articles. Refer Figure 41 for screen details. Navigation Bar > Articles Tab > Manage Articles > Version Column Figure 49: Article Versions Article Versions Interface Explanation S. No. The Serial number assigned to article version in database. Title Title of the article when article history (version) was created. Click on this to preview the article version. Refer Previewing Article Version on page 50 for details. Version The version numbers are assigned in increasing order and correspond to updates made on the article. Article versions are displayed in descending order, latest at top place. User The Admin user who is responsible for the creation of the version (i.e. the one who has edited the article). Saved On Date and time details, when version was created. Actions Delete: Click this if you think that version is no longer required and to 49 PHPKB User’s Manual remove it from the article version list. See How to Delete Article Version on page 51. Restore: Click this to rollback to previous version. See How to restore Article Version on page 50. Table 9: Article Versions Interface Explanation Previewing Article Version You can preview the version by clicking on the article title column of the version on Article Versions screen. Navigation Bar > Articles Tab > Manage Articles > Versions > Article Title Preview shows the title, content, keywords, and description of article at the time version was created. Figure 50: Article Version's Preview How to Restore the Article Version Restore will return the article to its previous version and store the current article state in version history. 1. Click the Restore link from Actions column under Article Versions to roll back the article. Navigation Bar > Articles Tab > Manage Articles > Versions > Article Versions > Actions > Restore 50 PHPKB User’s Manual 2. You will be shifted to Edit Article screen. Refer 48 for screen details. Make the changes if you want to and update or publish it after seeing its preview. 3. A new version will be created under Article Versions. Figure 51: Article Versions Screen after Version Restore How to Delete the Article Version Delete will remove the article version from article history. 1. Click the remove link from Actions column under Article Versions to delete the article permanently. Navigation Bar > Articles Tab > Manage Articles > Versions > Article Versions > Actions > Delete Figure 52: Delete Article Version 2. Press OK in the confirmation dialog to remove the version or cancel to keep the version in the history. 51 PHPKB User’s Manual Deleting Article(s) In PHPKB Knowledge Base Software, when an article is deleted it is sent to trash folder instead of permanently deleting it from knowledge base Trash box is useful if someone suddenly delete wrong article or simply you want to restore accidentally deleted article. PHPKB Software doesn’t provide the delete article privilege to writers; only editors or super users have the authority to delete the articles. To delete the article follow the steps mentioned below: 1. Click the delete link from Actions row of Manage Articles Navigation Bar > Articles Tab > Manage Articles > Actions > Delete Figure 53: Delete an Article 2. Confirm the dialog to send the article to trash box. After deletion article is moved to trash folder. Trash box (folder) is accessible by super user only. Super user can delete the article permanently or restore the article from trash box. To view the trash box click the trash box icon from the articles tab of navigation bar. Navigation Bar > Articles > Trash box Figure 54: Manage Trash Box Trash Box Interface Explanation 52 PHPKB User’s Manual ID Article Title Category Comments Rating Hits Deleted On Actions Serial number of deleted article in database. Title of the article when article was deleted. Click on this to preview the article. Category under which article has been filed. No of comments added to article. Rating at the time it has been deleted. Number of times article has been viewed. Month, date and year when article was sent to trash. Purge: Click this delete the article permanently from the knowledgebase. See Permanent Removal of Article(s) on page 53. Restore: To add the article again into knowledgebase articles. Refer Restoring Articles from Trash Box on page 54. Table 10: Trash Box Interface Explanation Permanent Removal of Article(s) You can delete the article permanently from the database by clicking on Purge link from Actions of trash box. Once article is purged it can be retrieved back. Navigation Bar > Articles > Trash Box > Actions > Purge Figure 55: Purge Article Confirm the dialog to delete the article for forever or cancel to keep it in trash. Delete message notification is displayed on successful deletion of article. Figure 56: Success Notification – Article Purged 53 PHPKB User’s Manual Restoring Articles from Trash Box Super users can restore the article back to its original status even after they have been deleted. To restore the article, click on restore link from actions column of trash box. Navigation Bar > Articles > Trash Box > Actions > Restore Figure 57: Restore Deleted Article After restore article will be moved to the article list where it belonged before deletion. For instance, if you have deleted the featured article and restoring it from trash now it will be shifted to featured articles after restore. Figure 58: Success Notification - Article Restored Article Attachments Attachments are the documents/files that are attached with Articles. Attachments are displayed in end user section on article’s page with their views (number of times seen/downloaded) and attachment size. Figure 59: Attachments’ Display in Front End Attachments are used in Advanced search if Search File Attachments? Setting is enabled in Manage Settings. You can enable the setting from: 54 PHPKB User’s Manual Navigation Bar > Tools > Manage Settings > Miscellaneous Settings > Search Settings > Search File Attachments Figure 60: Search File Attachments Setting In admin section you can add or delete the attachment from Attachments action on manage articles page. Refer Figure 41 for screen details. Figure 61: Attach Files Screen Attachment screen is divided into two fragments for easy management of attachments. On left side you can add attachments; on right side you can delete already attached attachments. Article title with which files are to be attached is displayed at the top. Click on it to preview the article. Adding Attachment(s) 1. Click on Choose File/ Browse to select the local file for upload. 2. Click on Add another to browse more attachments and repeat the step 1. If some file has been accidently, you can remove if by clicking on Remove link. 3. After browsing through the files you can upload them by clicking the Attach Files button. After upload, attachments are shown in right panel/fragment under Attachment Files heading with details of their views and size. Note: You can configure the File Upload Settings under Miscellaneous Settings of Manage Settings. 55 PHPKB User’s Manual Figure 62: Attach Files Screen after File Upload Deleting Attachment(s) 1. Click on the delete icon next to attachment, in right panel to delete the attachment. Figure 63: Delete Attachment File 2. Confirm the dialog to delete the attachment permanently. Attachment is deleted from server database as well as from assets folder. Common Operations on Articles Common operations that can be performed on articles are: Approve an Article Pending or disapproved articles should be approved before they get visible to end users. In PHPKB writers don’t have privilege to publish the articles. So, whenever writer composes or modify the article it is send to pending state. Editors or super user has to approve pending articles before they get published. To approve the article follow the path: Manage Articles->Pending/ Disapproved tab->Actions->Approve 56 PHPKB User’s Manual Figure 64: Approve an Article Click on approve link for the article you want to approve. On successful approval of article success message is displayed. Figure 65: Success Notification - Article Approved Disapprove an Article Editor or super user can disapprove the approved or featured articles. Disapproved articles are not published to KB users. Manage Articles->Approved/ Featured tab->Actions->Disapprove Figure 66: Disapprove an Article To disapprove an article, confirm the dialog. Figure 67: Success Notification - Article Disapproved Disapproved articles will not be displayed in the list of published articles until you again approve them. 57 PHPKB User’s Manual Making an Article Featured With this operation you can feature your favorite articles on the knowledgebase homepage. Featured articles are vital articles in your knowledgebase and get priority (displayed before non-featured articles) list of published articles and article search results. Besides, PHPKB knowledgebase software use different icon to present featured articles as to ease the users in identifying important articles in your knowledgebase. Figure 68: Featured Articles in Front End 1. To make an article featured click the Make Featured link from Actions of approved article. Figure 69: Make an Article Featured 2. Click the ok button on make featured article confirmation box. Figure 70: Success Notification - Featured Article 3. Article is successfully moved to feature articles. 58 PHPKB User’s Manual Search Articles You can filter the articles on search articles page. PHPKB Knowledge Base Software allows you to make variety of search selections- article status, number of views, article last updated, rating etc. You can search your knowledge base’s article list in admin section from search tab of manage articles. Navigation Bar > Articles > Manage Articles > Search Figure 71: Search Articles Search Articles Interface Explanation Article ID If you know the article ID (Serial number of article in database) you can directly enter it in Article ID text box. Click Edit button next to Article ID text box to make changes the changes in the article. You will be moved to Edit Article Page by clicking on edit button. Search For Enter the keywords or term for which to search. You can filter (narrow) the search more by specifying where these keywords are to be searched. By default all is selected in IN dropdown but you can select Article Title/ Article Content/Article Keywords/Article Summary or Custom Fields. Status Search results can be sieved by defining, status of article. Any status will ignore the article status and search in all types of articles. Article Hits Use this to search for articles viewed by KB users (end users) by certain number of times. Enter the numeric figure in the field on the right and choose an option from the field on left: Select Less than to search for articles viewed fewer times than the number you specify. 59 PHPKB User’s Manual Rated Article Last Updated Show Reset Select Greater than to search for articles viewed more than the number you specify. Select Equal to for searching articles that have been viewed exactly the number of times as specified by you. Select Less than or equal to to search for articles viewed as many times as you specify, or fewer. Select Greater than or equal to to search for articles viewed as many times as you specify, or more. Search articles by ratings given by KB users to articles. Select a rating figure from the list on the right and select the option from the list on the left: Select Less than to search for articles with a lower rating than the number you specify. Select Greater than to search for articles with a higher rating than the number you specify. Select Equal to for searching articles that have exactly the same rating as you specify. Select Less than or equal to to search for articles with the rating you specify or lower. Select Greater than or equal to to search for articles with the rating you specify or more. Use this to search for articles that were modified before, after or on the date you specify. Specify the date by choosing the Month, Date and Year from the respective dropdowns and choose the option from the dropdown at the left most place: Select Before to search the articles that were modified before the date you specify. Select On to search the articles modified on the same date as you specify. Select After to search the articles that are modified after the date you specify. Click on this to perform the search. Click this to reset all the field values to default values. Table 11: Search Articles Interface Explanation When you click on the Show button search screen is displayed with search filter and article results. List of articles with their details and actions are shown. You can see the status of article from location column. Moreover, you can refine the search again with the search filter. 60 PHPKB User’s Manual Figure 72: Results - Search Articles Custom Fields Custom fields are helpful to add additional classification or specific searchable information to your articles. Custom fields in particular, which let users create variables and add custom values to them. Information that is common for certain set of articles can be added in form of custom fields so that article author should enter text or select choices while editing an article. For example, you might want to display the additional details of writers like phone no, job title, experience etc. with article besides the writer information displayed by PHPKB Software. Once you have created custom fields, each subsequent article create or edit offers the opportunity to include the custom fields. Either enter the information (type text or select values from a list), or leave the custom field blank to not include the custom field in your article if it is created as not required. Creating Custom Field(s) A) Open the new custom field screen Click Articles in the navigation bar, and then click Custom fields. To create the custom field for your articles Click create custom field tab. Navigation Bar > Articles > Custom Fields > Create custom field tab 61 PHPKB User’s Manual Figure 73: Create Custom Field B) Fill in the new custom field details Create Custom Fields Interface Explanation Language Custom field will be created for the articles of language shown here. You can change the language from the Language drop down on header. Field Name Enter the name for this field, as it should be displayed to public. Field Required Tick this checkbox if you want to make this field as mandatory. Field Type Text: A text field features a simple, single-line text field into which text can be typed. Checkbox: A checkbox list is made up of a series of options, each with a checkbox. To select an option, the user “checks” (ticks) the box. Dropdown: A drop down is a form field intended for listing many options in one condensed area of page space. Clicking on the menu will expand a scrollable list of all field selections. The user is able to select just one selection. Note: For checkbox and dropdown type you can provide multiple options separated by comma. Table 12: Create Custom Fields Interface Explanation C) Save the custom field Click the create button to save the details of custom field in database. 62 PHPKB User’s Manual Custom Fields’ Management Super users can manage the custom fields in admin section from sub-option Custom Fields in Articles Tab of Navigation Bar or from shortcut links. Navigation Bar > Articles > Custom Fields Custom Field screen has two tabs – Manage Custom Fields to edit or delete your knowledgebase custom fields and Create Custom Field to add new custom field for your articles. Edit Custom Field Delete Custom Fields Figure 74: Manage Custom Fields Manage Custom Fields Interface Explanation ID ID depicts the index value of custom field in knowledgebase database. Custom Field Name Name of the custom field as assigned by you. The name is displayed along with custom field value on article page. Type This displays type of custom field. PHPKB knowledgebase software gives you the facility to create text-field, checkbox and dropdown menu. Required Tick in column value represents that this field is mandatory and article creator has to fill value for this field while article editing. Cross icon represents optional fields. Actions Edit Custom Field Click on this to update the custom field particulars. See Modifying Custom Field(s) on page 64. Delete Custom Field Click this to delete the custom field then it will no longer be displayed with published articles and to admin users while creation or editing of documents/articles. Refer Deleting Custom Field(s) on page 64. Table 13: Manage Custom Fields Interface Explanation 63 PHPKB User’s Manual Modifying Custom Field(s) You would be able to edit the custom fields of your knowledgebase by going through the steps given below. 1. Click the Edit Custom Field icon from Actions column of Manage Custom Fields for the custom field you want to edit. Navigation Bar > Articles > Custom Fields > Manage Custom Fields > Actions > Edit Custom Field icon Edit Custom field page is be displayed as presented below in screenshot. Figure 75: Edit Custom Field 2. Make the necessary changes. 3. Click on Update button to make the changes permanent. Deleting Custom Field(s) You can remove the existing custom field if you think it is of no use in your knowledgebase by following the steps mentioned below: 1. Click the Delete Custom Field icon from Actions column of Manage Custom Fields. Navigation Bar > Articles > Custom Fields > Manage Custom Fields > Actions > Delete Custom Field icon 64 PHPKB User’s Manual Figure 76: Delete Custom Field 2. Click OK on confirmation box if you want to permanently delete the custom field. Delete message is shown on successful deletion of custom field. Figure 77: Success Notification – Custom Field Deleted End User view of Custom Fields Front end users can see the custom fields below article content if Enable Custom Fields Display setting under article features is enabled. Navigation Bar >Tools > Manage Settings > Article’s Settings > Article Features > Enable Custom Fields Display Figure 78: Enable Custom Fields Display Setting Furthermore, PHPKB Knowledgebase Software facilitates the knowledge organization and filtration with searchable custom fields. Custom fields are used in Advanced Search if Search Custom Fields setting is enabled in Manage Settings. Navigation Bar > Tools > Manage Settings > Miscellaneous Settings > Search Settings > Search Custom Fields You can see in following figure custom fields field set contain field name on left side and value on right side. 65 PHPKB User’s Manual Figure 79: Custom Fields from KB Users’ Perspective Article Collaboration Article collaboration allows the admin users to share their views, opinions & comments with other admin users in the form of notes for an article in order to improve it and achieve their goals. The intent of this collaboration is to polish the articles, to bring them up to the highest standards. How to collaborate on an article To give your views/suggestions/opinion click the collaborate icon under Manage Articles. Move your mouse over the blue colored collaboration icon, to view the number of notes on this article. Gray color collaboration icon depicts, article has no notes. Figure 80: Article Collaboration Navigation Bar > Articles Tab > Manage Articles > Collaboration Icon 66 PHPKB User’s Manual Article Title Figure 81: Add Article Note Enter the note contents in the text area and click on submit button to share it with other admin users. Your article notes can be viewed by any other admin users. Viewing Article Note(s) Figure 82: Viewing Article Notes Viewing Article Notes Interface Explanation Admin User Name Name of the admin user who have added this comment/note. Click on name to preview the user details. Note Posted On Date and time details when note was added by the admin user. 67 PHPKB User’s Manual Level Note Content Edit Note Level represents the role of admin user in knowledgebase. Message/Comment/Opinion added by admin user. Click here to Edit the note content. See Modifying Article Note(s) on page 68. Click here to delete the note. See Deleting Article Note(s) on page 68. Delete Note Table 14: Viewing Article Notes Interface Explanation Modifying Article Note(s) 1. To edit the article note, click on the edit note icon for the note you want to edit. Figure 83: Edit Article Note 2. Make the changes in the text area containing your existing contents. 3. Click Save button to make the save the changes made. Note: Privilege to edit article note is with super user only. Deleting Article Note(s) 1. To delete the article note, click on the delete note icon for the note you want to delete. Figure 84: Delete Article Note 2. Click the OK button to delete the note, Cancel to keep it in knowledge base. Note: Privilege to delete article note is to super user only. 68 PHPKB User’s Manual Article Subscribers Subscribers are persons who get emails when knowledgebase articles are published or updated. PHPKB provides two types of subscribers. 1. KB (knowledgebase) Subscribers Individuals who have subscribed to entire knowledgebase receive email notifications when a new article is published or existing article is updated in knowledgebase. 2. Article Subscribers Persons who have signed up to receive email notifications when knowledgebase articles are updated for which they have subscribed. How to subscribe 1. To become a KB subscriber go to Subscribe to knowledgebase in footer section of Front end knowledgebase pages. This bar will be displayed if Enable Subscribe to KB setting is enabled in Manage Setting’s feature tab. Enter your email id and click on subscribe button. Figure 85: Subscribe to Knowledgebase Or To become an article subscriber click on the Subscribe to Article link in the right panel on article page; option highlighted in following figure. This option will be available only if Enable Subscribe to Article is checked in Article’s setting tab of Manage settings. Figure 86: Subscribe to an Article 2. Fill in your details in Subscribe Me form. 69 PHPKB User’s Manual Figure 87: Subscription Form 3. Click on Subscribe Me button to become knowledgebase subscriber. 4. Go to your mailbox and click the activation link received in Activate Email Subscription mail from PHPKB knowledgebase software. Note: Subscribers can unsubscribe from the unsubscribe link available in article notification emails sent. Subscribers’ Management Super users can view, edit or delete the subscribers from option Subscribers available under Articles Tab of Navigation Bar. Navigation Bar > Articles Tab > Subscribers Figure 88: Viewing Subscribers from Navigation Bar Manage Subscriber’s page encompass tabs for article subscribers and KB subscribers. Click the KB subscriber tab to view and manage knowledgebase subscribers, by default Article Subscribers are displayed. You can edit, delete or change subscriber status to active or inactive from this section. 70 PHPKB User’s Manual Figure 89: Manage Subscribers Manage Subscribers Interface Explanation ID ID is the serial number of subscriber in your Knowledge base’s database table. Select the checkboxes individually or Check All checkbox in the title bar to delete the inactive users in bulk. Note: Checkboxes are enabled for users who are inactive. Subscriber Name Name of the subscriber used to address subscriber in notifications. Email Displays the email address of the subscriber, to which article publication or update notifications are sent. Click the address to send an email to the sub scriber. Article Title/Subscribed Article Title column is displayed in article subscribers tab expressing the for article on which user has subscribed. Click on article title to preview the article. Subscribed For column is displayed under KB subscribers tab in place of Article Title to tell subscription is valid for entire knowledgebase. Status Inactive members (subscribers who have not confirmed that they want to receive updates in the confirmation mail sent to them) are represented with cross icon and active subscribers with tick icon . You can change the status by clicking on the status of subscriber. Subscription Date Month, date, year and time on which subscriber signed up for receiving updates. Actions Edit Subscriber Click on this to change the subscriber’s details. See Modifying Subscriber(s) on page 72. 71 PHPKB User’s Manual Delete Subscriber Click this to delete the subscriber from the knowledgebase. Deleting subscriber is equivalent to unsubscribing. Refer Deleting Subscriber(s) on page 72. Table 15: Manage Subscribers Interface Explanation Modifying Subscriber(s) Click the Edit Subscriber icon from Actions column of Subscribers for the subscriber whom details you want to edit. Edit Subscriber page will be displayed as presented in figure below. Figure 90: Edit Subscriber You can change the name, email address and subscription status here. After editing details click on Update button to save the changes permanently. Deleting Subscriber(s) Removing single subscriber: 1. Click the Delete Subscriber icon from Actions column of Subscribers for the subscriber whom you want to remove from subscribers list. Figure 91: Delete Subscriber 2. Confirm the dialog to delete the subscriber forever. Removing subscribers in bulk: You can remove the multiple inactive subscribers simultaneously. 72 PHPKB User’s Manual 1. Check the checkboxes for subscribers whom you want to delete. Figure 92: Removing Subscribers in Bulk 2. Then, click the Delete Selected button at bottom. 3. Confirm the multiple delete dialog box to remove them. Importing an article from CSV file PHPKB Knowledge Base Software expedites in importing articles in bulk from CSV file. You might want to do this, say, if you are changing over to PHPKB from another system. CSV stands for Comma Separated Values, sometimes also called Comma Delimited. A CSV file is a specially formatted plain text file which stores spreadsheet or basic database style information in a very simple format, with one record on each line, and each field within that record separated by a comma. The steps of importing CSV file are: 1. Upload the CSV file Open the CSV Import screen from the Import from CSV option under Tools tab of Navigation bar. Navigation Bar > Tools Tab > Import from CSV The Importing through CSV file feature is two staged process. You can move to second stage after successful completion of first stage. At first stage specify the import options and import source, and second allows you to map your CSV file fields with database fields. Importing Source PHPKB Knowledge Base Software allows you to specify the source in two ways: 73 PHPKB User’s Manual Figure 93: Import Articles’ Screen A) Import from a file For large scale imports you can use CSV file stored on your computer. You can use the exported CSV files from a variety of applications, or you can create one manually as a plain text. The CSV file that you use should contain the following information: Each record should have two mandatory fields- Title and Content Title: Title/Question for the article. Note: Title must be unique and should not be empty. Content: Body/Answer of the article. If your content contain commas it is recommended, use | (pipe symbol) or \t (tab) as delimiter. Keywords: It is an optional field. Keywords are specified in the article’s HTML header with Meta tag. Description: This is also optional field. Description is summary of your article specified in HTML header, used by search engines as the result of a search query. Fields do not have to be in the same order as specified above, but each line in the import file must contain the same fields in the same order. If your CSV file contains field headers, they should occupy the first line of the file. 74 PHPKB User’s Manual Only text/plain or text/CSV or text/comma-separated-values or application/csv or application/excel or application/vnd.ms-excel or application/vnd.msexcel files may be uploaded. If your text/plain or text/csv file field contains double quotes then you must preface these interior quotes with a black slash (\) in order to differentiate them from quotes defining the start and end of field contents. B) Import using copy and paste If you choose the option import using copy and paste, you can write the comma separated contents directly into the text box area below the option (appears when you select the option). Import Options Language: Imported articles will belong to this language. You can change language from language drop down on header. Article Type: Choose Public option to file the imported articles into Public Category or choose private to import them into private category. Refer Category Types on page 31. Import Into: Select one or more categories into which articles will be hierarchically placed after import. Import As: Select the status location for the import articles. Delimiter: PHPKB Knowledge Base Software allows you to separate the fields by options; comma (,), Pipe Symbol (|) or by tab (\t). Choose the option by which contents are separated in your CSV file. First Line Contains Fields: If CSV file or contents have first line of field headers check this option. 2. Mapping of file fields with database fields Click the NEXT button to synchronize your fields. The screen will display that allow you to select which fields in your CSV file you want to map to the fields in PHPKB Knowledge Base product list. CSV Fields contain the field headers if you have checked the First Line contains Fields checkbox Figure 94: Import Articles - Map Fields Screen 75 PHPKB User’s Manual Or first record fields otherwise. Map into Field Contains the PHPKB Knowledge Base field names. In each dropdown, select the field that match with the specified field of your CSV file. Note: a) With Do not Synchronize this option field value is ignored and not stored in database. b) One to one mapping is allowed. 3. Generate the Report Click Import Now button to import the articles. Article Imported Status screen will be displayed. Screen displays total records imported, successfully imported and failed. If any errors have occurred in importing process, errors with full details are shown. You can check the imported articles from Manage Articles. Figure 95: Import Articles - Report Article Templates Article templates are reusable pieces of content, including text, tables, images, videos, or any other preformatted snippets you create. You can use the article templates to add a signature, custom formatting block, logo, notice, warning, preformatted text, recurring paragraph, boilerplate text etc. for quick insertion to your articles. Template(s) can be inserted to an article using special button at WYSIWYG toolbar. With the use of article templates you don’t have a need to retype or copy-paste the recurring contents instead contents can be inserted with few clicks where you need it. Suppose you need to add the footer at the bottom of every article and you don't want the bother of recreating it every time then create the template of your footer and you can use it while creating/editing an article. Templates save your time, provide consistency and removes the errors of retyping and copy-pasting. 76 PHPKB User’s Manual Creating Article Templates A) Open the create article template screen Click Articles in the navigation bar, and then click Manage Templates. To create an article template, click Create Template tab. Navigation Bar > Articles > Manage Templates > Create Template Figure 96: Create Article Template B) Fill in the article template details Create Template Interface Explanation Language This shows the language selected in language drop down, under which (For ML Editions Only) templates will be created. Template Title Title or heading for template. Multiple templates with same heading are not allowed in PHPKB Knowledge Base Software. Content Body of your template. You can add formatted text, tables, images, videos, flash, and HTML code to format your template content. Template Status If checked, article template will be visible on templates pop-up box for insertion into article. Table 16: Create Article Template Interface Explanation 77 PHPKB User’s Manual C) Save the article template To save the article template in knowledgebase, click on Save button. You can click on Preview button to see its appearance. Figure 97: Previewing an Article Template If you are satisfied with the preview and want to save it into database then click on Save button or you may click on Edit button to go back and make changes in the template design/content. Cancel button will discard the template and takes you to Manage Article Templates screen. Article Templates Management Super users and Editors can manage the article templates from sub-option Manage Templates of Articles Tab in Navigation Bar. Navigation Bar > Articles > Manage Templates Manage Templates screen can be used to activate, deactivate, edit and/or delete the article templates for the selected language in language drop down. 78 PHPKB User’s Manual Figure 98: Manage Article Templates Manage Article Templates Interface Explanation ID ID depicts the index value of Article Template in database. Template Title Name of the article template as assigned by you. Click on title to preview the template. Refer Previewing News on page 80 for details. Author Author is person who created the template. Status Tick in column value represents that template will be visible on templates pop-up box for insertion into an article. Cross icon represents inactive templates that are not available for insertion into template. Click on the icon to set its status to active or inactive. Default Field shows the template item that is set as default by you. A default template allows you to preload article contents field on create article page with the contents of template that has been set as default. One default template per language is allowed in knowledgebase. Set Default: Click this to set the template as default. Remove Default Status: Click on default as shown in figure below to remove the default status. Last Updated This displays the date, last time template was modified. Actions Edit Template: Click this to modify the template. Refer Modifying News on page 81 for details. Delete Template: Click this to delete the template from the knowledgebase. Refer Deleting News on page 81 for details. 79 PHPKB User’s Manual Bulk Actions Select one or more template items’ checkboxes to perform bulk action from the Bulk actions list. Check/Uncheck the checkbox at the top of the column to select/deselect all the template items. Select one or more template checkboxes, select the required action from Bulk Actions drop down, and then click on Go button to perform the selected action. Templates can be activated/deactivated or deleted in bulk. Table 17: Manage Article Templates Interface Explanation Previewing Article Template You can preview the article template details by clicking on template title from the manage article templates page. Navigation Bar > Articles > Manage Templates Preview Templates page shows the template language, title, content, author and date of creation. Figure 99: Article Template Preview 80 PHPKB User’s Manual Modifying Article Templates To make changes in your knowledgebase templates follow the steps mentioned below. 1. Click the Edit Template icon from Actions column of Manage Article Templates page for the template you want to edit. Navigation Bar > Articles > Manage Templates > Actions > Edit Template Icon Edit Article Template page will be displayed as presented below in screenshot. Figure 100: Edit Article Template 4. Make the necessary changes. 5. Click on Preview button to view the preview of template and Save button to make the changes permanent. Deleting Article Templates You can remove the existing article template if you think it is of no use in your knowledgebase by following the steps mentioned below: 1. Click the Delete Article Template Icon from Actions column of Manage Article Templates page. Navigation Bar > Articles > Manage Templates > Manage Article Templates > Actions > Delete Article template Icon 81 PHPKB User’s Manual Figure 101: Delete Article Template 2. Click OK on confirmation box if you want to permanently delete the article template. Delete notification get displayed on Manage Article Templates page on successful deletion of article template. Figure 102: Success Notification – Article Template Deleted Using/Inserting Templates in Articles A template is a piece of content (text and pictures and other media) that admin users can place into articles. Templates speed up the article creation and modification process as no need to write the same text again. Follow the steps given below to add the template to an article: 1. Add or Edit the article. Refer Creating Article(s) on page 39 and Modifying Article(s) on page 47 for details. Figure 103: Article Templates Icon 2. Click on the Article Templates button on WYSIWYG editor’s toolbar to open the templates popup box as shown in figure below. 82 PHPKB User’s Manual Figure 104: Article Templates Page The Article Templates pop-up box displays the titles of active templates for the selected language in language dropdown. 3. Click on Preview button next to template title to preview the template. Click on title to view the template insert options. Append at Cursor Location: This pastes the text of the template where the cursor is currently positioned. It does not affect any of the text above or below it. Clear Contents & Insert: If you wish to replace the contents of the article, click on this option. This deletes any text currently in the article content field and replaces it with the contents in the template. 4. The contents of template are now part of article. You can insert multiple templates into an article by repeating the steps from 1 to 3. 83 PHPKB User’s Manual Users 84 PHPKB User’s Manual USERS Users are those persons who can access the knowledgebase. Separate section for users has been created in PHPKB so that you can easily manage and restrict the knowledge for the people working with you on knowledgebase. Types of Users Users in PHPKB Knowledge Base can be categorized as Admin Users and KB Users. PHPKB USERS Admin Users Super user Editor KB Users Writer End User Member User Figure 105: Types of Users Admin Users Admin Users are members of admin section. PHPKB Knowledge Base divide Admin Users into three levels according to the privileges assigned to them. 1. Super user has full control over the knowledgebase. Every possible operation in PHPKB Knowledge Base Software can be executed by users of this level. Figure 106: PHPKB Knowledgebase from Super user’s Perspective 85 PHPKB User’s Manual Note: Super user can’t edit or delete any other super user’s account. 2. Editors are governor of all knowledgebase articles. They can manage articles, categories, comments, tickets, news and Glossary but can’t perform administrative work like creating users, user groups, reviewing statistics and manage settings of knowledgebase. Figure 107: PHPKB Knowledgebase from Editor’s Perspective 3. Writers are producers of their own articles, literary content, documents. They can write articles but can’t publish them. Whenever new article is created or edited by writer it is send to pending state to be approved by Editor or Super user. Figure 108: PHPKB Knowledgebase from Writer’s Perspective Except for the above users Translators account can also be created in PHPKB Multi Language edition. Translators are responsible for conversion of PHPKB front end into your custom language. 86 PHPKB User’s Manual Figure 109: PHPKB Knowledgebase from Translator’s Perspective You can refer Table 18 on page 90 for viewing the privileges assigned to different level of users. KB Users KB Users are knowledgebase front end users. KB users can further be categorized as: 1. Member Users have accounts with knowledgebase and can access the private categories and their articles for groups whom they are member of as well as publically published articles. In addition, they can store the links of their favorite articles. This allows the enterprise to restrict content view ability to certain users. Figure 110: PHPKB Knowledgebase from KB Member User’s Perspective Member users can add articles to favorites from Add to Favorite link available on right side of Article Page under article options. To view the favorite articles, members can click on the My 87 PHPKB User’s Manual Favorites link available at header section. From here, member users can even remove the articles from their favorite articles’ list just by clicking on the Remove from Favorites icon. Figure 111: Favorite Articles Note: Member users can login from front end login link. 2. End Users can view the all the published articles except private articles. Privileges Assigned to each User Level Privileges Super User Editor Writer User Group Privileges Manage User Groups Create User Group User Privileges Manage Admin Users Create Admin User Manage Member Users Create Member User Category Privileges Manage Categories Create Categories Article Privileges View Own Articles View All Articles Add Article Edit Own Articles 88 PHPKB User’s Manual Edit All Articles Delete Own Articles Delete All Articles Add Attachment To Own Articles Add Attachment To All Articles Search Articles Approve Articles Disapprove Articles Make Featured Article Make Non Featured Article Reset Rating of Article Remove Expiry of Article Edit Own Saved Drafts Edit All Saved Drafts Publish Own Saved Draft Publish All Saved Draft Discard Saved Draft Create Custom Fields Manage Custom Fields Access Trash Box Purge Articles Restore Articles Manage Subscribers Participate in collaboration Edit Collaboration Notes Delete Collaboration Notes Comment Privileges Approve Comments Disapprove Comments Edit Comments 89 PHPKB User’s Manual Delete Comments News Privileges Manage News Create News Glossary Privileges Manage Glossary Create Glossary Ticket Privileges Access Tickets Send Reply on Ticket Publish Ticket to Knowledgebase Close Ticket Delete Ticket Reopen Ticket Setting Privileges Manage Settings Access Statistics Optimize Database KB Backup Import from CSV Generate Sitemap Enable AdSense Ads Table 18: Privileges assigned to different level of users. 90 PHPKB User’s Manual Creating User Account(s) A) Open the create new user window To create a new user, click Users option from navigation bar, and then click Create User option (Refer Figure 115 ). Or you can open it from dashboard shortcuts by clicking on Create New User option (Refer Figure 116) or by clicking on Create User link under shortcut links straightaway (Refer Figure 117). Figure 112: Create a New User Figure 113: Create User - Group Assignments 91 PHPKB User’s Manual Create New User Interface Explanation Username Password Full Name Email Address User Level Status Default Language Group Assignments Send Email The Username is the name the user uses to log in. Username is unique in knowledgebase; you can check availability of desired username by clicking the Check Availability button next to username text field. Note: Username must be within 5 to 20 characters. The password will be asked from the user at the time of log in to check user authentication. Note: Password must be within 5 to 20 characters. Enter the full name of user. Enter the Email address on which all the PHPKB communications with user will be done. Select the User Level. Choose between Super user, Editor, Writer or Translator (in ML edition only) for Admin User account and Member option for Front End user creation. Note: If you don’t have unlimited admin user license and your limit to create admin users has exceeded the maximum available then admin user options (Super user, Editor, Writer or Translator) will not be available in user level dropdown. You have to upgrade the license in order to create more admin user accounts. If you don’t want this user to be able to log in to PHPKB Knowledgebase select Inactive and vice a versa. This option will get enabled only in ML edition when you choose any of admin user level among Super user, Editor or Writer. When the user will log into admin control panel, it will be loaded with modules of the language selected. Group Assignments field displays only when you choose member option from the user Level dropdown. Check the Group Assignment checkbox, if you want to make user member of groups, else user can’t access any private categories. You can assign multiple groups to user using Ctrl + Click combination of multiple selections. Refer User Groups on page 102 for detailed description. If Yes option is selected, the user will receive account creation notification email once their account has been set up. Table 19: Create a New User Interface Explanation B) Fill New User Details In the screen below we are creating editor with username Editor and status as active. 92 PHPKB User’s Manual Figure 114: Create New User Example Screen C) Save User Click on Save User button to save the user into knowledgebase. Users’ Management In admin section KB and Admin users can be viewed from: 1. Click the Users option from Navigation Bar and then click the Admin Users option to view and manage the admin users or the KB Users option to view and manage front end member users. Figure 115: View User Accounts from Navigation Bar Navigation Bar > Users > Admin Users/KB Users 2. You can also view users from Shortcut Links of PHPKB Knowledge Base Software. Click on either Manage Admin Users or Manage KB Users link. 93 PHPKB User’s Manual Figure 116: Viewing User Accounts from Dashboard Shortcuts Figure 117: Viewing User Accounts from Shortcuts Links 3. Dashboard Shortcuts can also be used to view user accounts. Click on Manage User Accounts option. After selecting the appropriate option the Manage User page will be displayed as shown below. Figure 118: Manage Users 94 PHPKB User’s Manual Manage Users Interface Explanation ID User ID is the serial number of user account in database. Full Name Full Name field displays the actual name of user as last name after first name. Email This is the email address for the user to which all PHPKB communications will be sent. Click on email address to send email to user. Username Username is the name with which user logs in to knowledgebase. User Level Level of the user in Knowledgebase. It can be Super user, Editor, Writer, Translator (in ML version) for admin users and Member in case of KB Users. Status Cross Icon shows the inactive status of user. Inactive users cannot log in to the knowledgebase. Tick icon shows the active users, who can log in and participate in knowledgebase operations. User Since Shows the date details from which the user is part of Knowledgebase. Actions Action column comprises the operations that can be performed on user account. NA (Not Applicable) text in action column defines that action is not possible for user. Click this to Edit the account details of user. Refer 1. Edit User Modifying User(s) on page 97 for details. 2. Delete User Click this to delete the user account from the knowledgebase. Refer Deleting User(s) on page 98 for details. Table 20: Manage Users Interface Explanation Previewing User PHPKB Software provides you the facility to view the user details of KB users and admin users. Previewing Admin User You can view the preview of user account by clicking on the Full Name of user on Manage Admin Users screen. Refer Figure 118 for screen details. Navigation Bar > Users > Admin Users > Full name Column Preview admin user screen shows the details like Username, Full Name, Email address, Level, Status, Signup Date, Last Login with contributions made by user. Contributions are details of articles or news posted by the admin user (editor, writer or super user) in the knowledgebase. 95 PHPKB User’s Manual Figure 119: Admin User’s Preview Previewing KB User Likewise you can view the preview of KB user account by clicking on the Full Name column from Manage KB User. Navigation Bar > Users > KB Users > Full name Column Preview user has basic user details with information of groups assigned to user and favorite articles list. You can delete the favorite articles of user by clicking on Delete option under Action column. Furthermore, Group Preview can be seen just by clicking on the group name (See Figure 127 for screen details). 96 PHPKB User’s Manual Figure 120: KB User’s Preview Modifying User(s) You can edit the details of user accounts by following the steps mentioned below: 1. To edit an existing user’s information, click Users in the navigation bar, and then either click on KB Users option to edit knowledgebase members or Admin Users option to edit the accounts of Knowledgebase admin users. Click the Edit user operation icon from Actions column. Navigation Bar > Users > Admin Users/KB Users > Actions > Edit User icon Edit user page for selected user will be displayed as shown in Figure 121. By default Edit Password is not bloated; you can click on it to expand it. 97 PHPKB User’s Manual Figure 121: Edit User 2. Make the necessary changes. Refer Table 19 for details of form fields. 3. Click on Update User button to make the changes permanent. Deleting User(s) 1. Click the Delete User operation from Actions column of Manage User. Navigation Bar > Users > Admin Users/KB Users > Actions > Delete User icon Figure 122: Delete User 2. Confirm if you want to permanently delete the user account. Notes: 1. Admin users can’t be deleted if they have contributions (articles and news) in knowledgebase. 2. When KB User is deleted, its entire favorite links also get deleted. 98 PHPKB User’s Manual Search Users PHPKB has feature to filter the users by specifying parameters in search form. Click the Search Users option under Users tab of navigation bar. Navigation Bar > Users > Search Users Figure 123: Search Users Screen Search Users Interface Explanation Search Keyword Enter the keyword you want to search. Search In Select option from where you want the keyword to be searched of. Name - If name option selected, users whose name match with the keyword specified will be returned. Email Address – This will search the keywords from email addresses of users. Username – This option will search the keywords from the username field. All - This will look for keyword in name, email address and username. Search Type Any Word will show user results that contain any of the keywords entered. All Words will show user results that contain all the keywords entered. Exact Match will show user results that exactly match with the keywords entered. Status Select Active to search for active knowledgebase users. Select Inactive to search the inactive users. By default Any Status is selected; will look users for both active as well as inactive status. Level Choose the user level (Super user, Editor, Writer, Translator, member) to 99 PHPKB User’s Manual Show Reset search for specific type of users. By default All is selected. Click show to search the results. Click Reset to reset the search form. Table 21: Search Users Interface Explanation The results of search will be shown below the search filter as shown in figure below. Figure 124: Search Users - Results 100 PHPKB User’s Manual User Groups 101 PHPKB User’s Manual USER GROUPS Users Groups allows you to create the group of KB members (registered users) and outline the parts of knowledgebase they can access. User-groups are associated with protected categories so that KB members of a particular user-group can access the content of those categories. If you would like to restrict some users so that they can access the articles of a few selected protected categories then you can create a user group for them and assign only those protected categories to the user-group. Unregistered users cannot access the private categories (See Private categories on page Private Categories 31) and contents associated with them. You can associate members with groups either while creating or editing user accounts. Refer Creating User Account(s) on page 91. Note: Only Super users can create and manage the user groups. Refer Table 18 on page 90 for privileges assigned to each level of user. Creating User Group(s) You can create user groups to provide KB members access to private categories and their articles. 1. To create a user group either, click the Create User Group option from the dashboard links or Create Group option from User Groups tab of navigation bar. Navigation Bar > User Groups > Create Group Figure 125: Create a User Group 102 PHPKB User’s Manual Create Group Group Name Select Categories Enter a name for this user group. Select the private categories to control which articles, member of this user group can access. In Multi Language edition Private categories of all the languages are displayed. Tick the checkbox at front of category to associate it with group. Table 22: Create a User Group Interface Explanation 2. Fill in the form details. 3. Click the Create Group button to add this user group to knowledgebase. User Groups’ Management You can manage user groups either from the dashboard shortcuts (Refer for Figure 18 screen view) or From User Groups tab of navigation bar. Navigation Bar > User Groups > Manage Groups Figure 126: Manage User Groups Manage Groups Screen Explained ID Auto generated Group ID in the database. Group Name This displays the name of the user group. Members Number of registered KB users associated with this group. Click on this to see member list and group preview. Refer Previewing Group Details on page 104. Created On Date when this user group was created. Actions Edit Group: Click this to modify the details of user group. See Modifying Group(s) on page 104 for details. Delete Group: Click this to remove group from the knowledgebase. See Deleting Group(s) on page 105 for details. Table 23: Manage Groups Interface Explanation 103 PHPKB User’s Manual Previewing Group Details To see the group details click on the name of group from Manage Groups page. Navigation Bar > User Groups > Manage Groups > Group Name Preview displays the name of group, creation date and group categories assigned to this group. You can view the category hierarchy by placing the mouse over the category name. Language of protected category is also displayed next to category name. Group members with their name and email address details are also shown. Figure 127: Previewing a User Group Modifying Group(s) You can edit the group details like remove any private category or add private category to group by following the steps given below. 1. Click the Edit Group action from the Manage User Groups. Navigation Bar > User Groups > Manage Groups > Actions > Edit Group icon 104 PHPKB User’s Manual Figure 128: Edit a User Group 2. Make the changes in the Edit User Group form. Refer Table 22 for form details. 3. Click the Update Group button to make the changes permanent. Deleting Group(s) Super users can remove the user groups from the knowledgebase. With this action group will be permanently deleted as well as its assignments to various categories and users will also be deleted. 1. Click the Delete Group action from the Manage User Groups. Navigation Bar > User Groups > Manage Groups > Actions > Delete Group icon Figure 129: Deleting a User Group 2. When you click Delete Group option, you get a confirmation dialog box. Click OK to remove this user group. 105 PHPKB User’s Manual Tickets 106 PHPKB User’s Manual TICKETS Questions submitted by end users from the front-end are referred to as tickets in PHPKB Knowledge Base Software. Number of open tickets is shown on dashboard with blinking icon to catch your attention. You can click on it to view the details of tickets. You can either reply back to them with an answer to their question or publish that question as an article to the knowledgebase so that users need not to ask the same question in future. When you reply back with an answer, an email is sent to the user who asked that question. Once you've replied back, you can mark that ticket as closed. End Users can submit tickets from Ask a question page on the front end with details of the problem/question. Question(s) are submitted in the language, selected from language dropdown on the front end. PHPKB Knowledge Base Software provides the instant question suggestions facility to users. When user types the content for the question, software checks the words for the question and does a full text search on the database with the existing knowledge base articles. If found some matches the user get some recommendations in form of suggested articles next to ask a question form. Figure 130: Ask a Question Page The users have to add their name, email address, question subject, and question contents in order to submit the question. They should also choose the priority (importance of question) from the drop down list of priorities. If the spam protection is enabled they have to enter the correct CAPTCHA code, too. 107 PHPKB User’s Manual Viewing Tickets Editors and super users can view and manage tickets either from dashboard shortcuts or from tickets tab of navigation bar. Tickets for the language selected in the language drop down will be displayed. PHPKB Knowledge Base software has tickets with two statuses – open and close. Opened Tickets Opened Tickets shows the tickets in work queue, tickets that need attention of admin user. When users submit/ask questions by default they are send to opened tickets. These tickets can be replied or published to knowledgebase. Navigation Bar > Tickets > Opened Tickets Tab Figure 131: Opened Tickets Screen Closed Tickets Submitted questions are referred to as closed tickets when they don’t need admin user’s attention and are transferred by admin users (superuser and/or editor) as closed. This is done generally when a ticket has been replied. Navigation Bar > Tickets > Closed Tickets tab Figure 132: Closed Tickets Screen 108 PHPKB User’s Manual Manage Tickets Interface Explanation ID Auto generated database serial number for user submitted question. This column shows the different color flag showing the priority of the ticket. Ticket Subject Green flag represents the tickets with low priority. Yellow flag represents tickets of medium priority. Orange flag shows high priority tickets . Red flag is used for tickets with urgent priority. This represents the subject of question submitted by the user. Click on the subject to view its preview in pop up window as shown below. Figure 133:Preview Ticket Screen From Priority Opened On/Closed On Actions Name of the user who posted this question. Click on the name to send email to user. Priority column represents the importance of ticket defined by KB users. PHPKB Software allows the KB users to choose between different types of priorities from low to urgent stating lower importance tickets to urgent attention seekers. Opened On shows the date and time when the question was submitted by user. In case of closed tickets Closed On column is displayed showing the time details when ticket was closed by Admin user. •Reply Back – Click this to send the reply to the user. Refer Replying Back to Tickets on page 110 for details. • Publish to Knowledgebase- Click this to publish the ticket as article in knowledgebase. Refer Publishing Ticket as Article on page 112 for details. • Reopen Ticket – Click this to put the ticket under work queue again. See Reopen Ticket(s) on page 113 for details. • Close Ticket – Click here to close the ticket. See Close Ticket(s) on page 113 for details. • Delete Ticket- To delete the ticket permanently from the knowledge base click on this option. Refer Delete Ticket(s) on page 114 for details. Table 24: View Tickets Interface Explanation 109 PHPKB User’s Manual Replying Back to Tickets You can answer to the KB user’s Question by sending the reply to ticket. 1. For sending reply, click on the Reply Back option action from Manage Tickets page. Navigation Bar > Tickets > Opened Tickets > Actions > Reply Back Figure 134: Send Reply to Ticket Screen You can also publish the ticket as knowledgebase article by checking the Publish this Question Answer as Article in Knowledgebase checkbox. It will allow you to add the article category, keywords and summary. In Addition, you can also remove the article permanently after publishing from the same window. The expanded view of Publish this Question Answer in Knowledgebase is shown in the figure given below. 110 PHPKB User’s Manual Figure 135: Expanded view of publishing a ticket reply (Question-Answer) as an Article in Knowledgebase Send Reply to Ticket Interface Explanation Language This shows the language in which question was submitted. Note: Questions can be replied back in the same languages in which they were asked. Title Fill in the title that will be the subject of email notification send to user. By default subject of question submitted by KB user (end user) is displayed in this field. Answer Write the answer which you want to send to user. For your convenience contents of user submitted question are shown in the editor/text area. You can customize your answer by using the features of WYSIWYG editor if use WYSIWYG editor option is enabled under manage settings. Close this Ticket After Reply Click this to close the ticket after sending reply. Note: This option is available only if Publish this Question Answer as Article in Knowledgebase option is unchecked. Publish this Question Answer Check this if you want to send the reply as well as publish the article in as Article in Knowledgebase knowledgebase. Select Article Categories The place in the knowledgebase hierarchy where this entry will be published. You can choose one or more categories where to store the article. Article Keywords Keywords are the important words that classify your article and are relevant for searching through the database. Article Summary It is summarized view of your article for meta description attribute. Remove this ticket after Click this if you want to remove the ticket from the knowledgebase publishing after publishing and sending reply. Table 25: Send reply to Ticket Interface Explanation 111 PHPKB User’s Manual 2. Fill the Send Reply form. 3. Click the Send Reply/Send Reply and Publish Article to send the reply. Publishing Ticket as Article To publish the question as an article to the knowledgebase so that users need not to ask the same question in future follow the steps mentioned below. 1. For publishing article, click on the Publish to Knowledgebase action on Manage Tickets page. Navigation Bar > Tickets > Opened Tickets > Actions > Publish To Knowledgebase Figure 136: Publish Ticket to KB 2. Fill the form and click Publish to Knowledgebase to post it in KB. Refer Table 25for field details. 112 PHPKB User’s Manual Tickets’ Management Close Ticket(s) You can make the tickets of closed status, if they are no longer required in the work queue. Closed tickets remains in the database but can’t be replied or published. 1. Click the Close Ticket action from Manage Tickets page for the ticket you want to close. Navigation Bar > Tickets > Opened Tickets > Actions > Close Ticket Figure 137: Close Ticket 2. Click OK in the Close Ticket confirmation box to change its status; cancel to keep its status unchanged i.e. open. Reopen Ticket(s) In PHPKB Software tickets with open status can only be replied or published. May be sometimes, you have a need to perform these operation on a ticket closed earlier. So, you can use the Reopen ticket action to make its status open again. 1. Click the Reopen Ticket action for the ticket you want to open again. Navigation Bar > Tickets > Closed Tickets > Actions > Reopen Ticket Figure 138: Reopen a Ticket 2. Click OK in the confirmation box to reopen the ticket and put it in work queue. 113 PHPKB User’s Manual Delete Ticket(s) Editors or super users can remove the tickets which are not required in the knowledgebase may be because they have been answered, published or not valid/spam etc. You can remove both open as well as closed status tickets. Removing single ticket 1. Click the Delete Ticket action from Manage Tickets page for the ticket you want to remove from ticket list. Navigation Bar > Tickets > Closed Tickets/Closed Tickets > Actions > Delete Ticket Figure 139: Delete Single Ticket 2. Confirm the dialog to delete the ticket permanently from database. Removing tickets in bulk You can also remove multiple tickets simultaneously. 1. Check checkboxes for the tickets you want to delete. Figure 140: Deleting Tickets in bulk 2. Then, click the Delete Selected button at bottom. 3. Confirm the multiple delete dialog box to remove them. 114 PHPKB User’s Manual News 115 PHPKB User’s Manual NEWS News represents information about recent and important events of your company. KB users (end users) can see the news if their corresponding display setting is enabled in Manage Settings Page. Home > Manage Settings > Feature Settings > News Page Figure 141: News Page Settings Enable News Page setting when checked will display News link under knowledgebase header links and corresponding news page in the knowledgebase. Moreover, you can also control the display and count of the recent news on knowledgebase home page through Display Home Page News and Number of News settings. Since the user sees only the title of news on home page, it is important that when you write news, make sure that the title contains all the salient points of the news item, encouraging users to click the link. Refer Figure 7 for screen details of news display on end users’ home page. KB users can see list of all the news of your knowledgebase from the NEWS link on header. News List item represents news title, published date and number of views along with first 325 characters of news content. Super user can regulate the items per news page from Search Results per Page setting under Miscellaneous Settings of Manage Settings. Manage Settings > Miscellaneous Settings > Search Settings > Search Results per Page News Title Figure 142: News Items on News Page 116 PHPKB User’s Manual User can read the full news either by clicking on the news title or on Read Full News link. News Page displays the news heading at the top, news content below that, and posted date and number of views at the bottom. Figure 143: News Display at Front End Creating News You (Super user/Editor) can create a news item to be published in the knowledgebase in this segment. 1. Open the Create News page PHPKB Knowledge base software facilitates you to create the new news post in three ways: a) Click the Create News Post option from the dashboard shortcuts. b) Click the Create News option from shortcut links. c) Click the Create News option under news tab of navigation bar. Navigation Bar > News > Create News 117 PHPKB User’s Manual Figure 144: Create News Create News Interface Explanation Language This shows the language selected in language drop down, under which news will be published. News Title Title or heading for news. Multiple news with same heading, are not allowed in PHPKB Knowledge Base Software. Content Body of your news. You can use HTML, images, videos, tables and flash to customize your news content if Use WYSIWYG Editor? Setting is enabled under Manage Settings. Show News Check this, if you want to publish the news to KB users (end users). Preview Click this to view the preview the news. From Preview you can san save it or can make changes again. Save Click this to save the news in knowledgebase. Cancel By clicking on this, all your changes will not be saved, and you will be 118 PHPKB User’s Manual returned to manage news page. Table 26: Create News Interface Explanation 2. Fill the form Fill up the fields of form. News’ Management Super users and editors can manage the list of news items published in your knowledgebase from news tab of navigation bar or dashboard shortcuts. Figure 145: Manage News Manage News Interface Explanation ID Database auto generated serial Id assigned to news item. News Title Heading for the news item. Click on this to view the Preview of news item. Refer Previewing News on page 119 for details. Author Author is person who created the news item. Visible Tick icon represents that news item is visible to knowledgebase end users. Cross icon depicts, news item is not visible to KB users (end users). Click on this to change the visibility of the news item. Last Updated This displays the date, last time news item was modified. Actions Edit News: Click this to modify the news. Refer Modifying News on page 120 for details. Delete News: Click this to delete the news from the knowledgebase. Refer Deleting News on page121 for details. Table 27: Manage News Interface Explanation Previewing News You can preview the news details by clicking on news title from the manage news page. Navigation Bar > News > Manage News Preview News page shows the news language, title, content, author and date of creation. 119 PHPKB User’s Manual In PHPKB ML edition, this represents language in which news is created. Figure 146: News Preview Modifying News To make changes in your knowledgebase news items follow the steps mentioned below. 1. Click the Edit News action icon from Manage News page. Refer Figure 118 for screen details. Navigation Bar > News > Manage News > Edit News icon Figure 147: Edit News 120 PHPKB User’s Manual 2. Make the changes. 3. Click Save button to update the changes or click Preview, to see how changes will look after publishing before saving the news. Deleting News 1. Click the Delete News Icon from Actions Column of Manage News. Navigation Bar > News > Manage News > Actions > Delete News Figure 148: Delete News 2. Click the OK button to delete the news from your knowledgebase, Cancel to retain it in knowledgebase. 121 PHPKB User’s Manual Glossary 122 PHPKB User’s Manual GLOSSARY A glossary, also known as vocabulary is an alphabetical list of terms defined by you in with the definitions for those terms. Glossary helps your knowledgebase users learn technical jargon, uncommon or specialized words. Glossary Items Terms are auto linked with articles’ content if Auto link Glossary Terms option is checked in manage settings. Home > Manage Settings > Feature Settings > Glossary Settings The Glossary term is highlighted in green any time it appears in your knowledgebase articles’ body text. When a user place the mouse cursor over the term, question mark appears showing that help is available, when user click the term the definition displays. Click the definition to hide it. Figure 149: Glossary Term Display at Front End 123 PHPKB User’s Manual User can also view the glossary items of your knowledgebase by clicking the Glossary option from header links on end user home page. Note: Glossary link will appear on header if Enable Glossary Page option is checked in Manage settings. Figure 150: Glossary Page Glossary page contains the list of Glossary terms with their definitions and related articles (articles that contain the Glossary term) link. Click on the Related Articles link to view the details of articles. Users can quickly jump to a specific term(s) by searching for it from the search box on glossary page. Moreover, users can view the list of glossary terms starting with specific alphabet by clicking on the corresponding alphabet link from alphabet list displayed on page. Create Glossary Term(s) Super users and editors can create unlimited number of Glossary terms by following the steps given below. 1. To create a new glossary term, click Glossary in the Navigation Bar and then select Create Glossary option. Navigation Bar > Glossary > Create Glossary 124 PHPKB User’s Manual Figure 151: Create Glossary Term Create Glossary Term Interface Explanation Language Language in which Glossary Term will be created. To change the language, click the language dropdown in header bar. Note: Language field is available only in ML edition. Glossary Term The word or phrase that you want to define. Note: This field is case-insensitive and contains unique values. Glossary Term Description Explanation/definition of the glossary term. Active If checked, will display the glossary term on glossary page in end users interface and also auto link the glossary term with article contents. Save Glossary Term Cancel Click this to save the glossary term to knowledgebase. By clicking on this, all your changes will not be saved, and you will be returned to manage glossary page. Table 28: Create Glossary Term Interface Explanation 2. Fill the glossary details. 3. Click the Save Glossary Term button to add the glossary item in the knowledgebase. 125 PHPKB User’s Manual Glossary Terms’ Management Editors and super users can manage the glossary of frequently used items of your knowledgebase from glossary tab of Navigation bar. Navigation Bar > Glossary > Manage Glossary Figure 152: Manage Glossary Terms Manage Glossary Terms Interface Explanation ID Auto generated serial number of glossary term in database. Glossary Term The word or phrase defined in your glossary. This word or phrase is highlighted in all your knowledgebase article text. Definition Explanation of the Glossary Term that you want to display when the KB user clicks on the glossary term. Active Cross in column value represents, Glossary term neither be displayed on glossary page nor auto linked with article and vice a versa for tick value. Click on icon to change its visibility. Actions Edit Glossary - Click this to edit the glossary item. Refer Modifying Glossary Term(s) on page 126. Delete Glossary - Click this to delete the glossary term from your knowledgebase. Refer Deleting Glossary Term(s) on page 127. Table 29: Manage Glossary Terms Interface Explanation Modifying Glossary Term(s) PHPKB provides you the facility to edit the existing glossary terms. Steps for editing the glossary term are mentioned below: 1. Click the Edit Glossary action from Manage Glossary page. Navigation Bar > Glossary > Manage Glossary > Actions > Edit Glossary Term 126 PHPKB User’s Manual Figure 153: Edit Glossary Term 2. Make the necessary changes. Refer Table 28 for form detail. 3. Click the Update Glossary Term button to store the updated glossary term in the knowledgebase. Deleting Glossary Term(s) To remove the glossary terms from your knowledgebase follow the steps given below: 1. Click the Delete Glossary Term icon from the Actions column of Manage Glossary Terms. Navigation Bar > Glossary > Manage Glossary > Actions > Delete Glossary Term Figure 154: Delete Glossary Term 127 PHPKB User’s Manual Confirmation dialog box will prompt to make sure, you have not clicked delete icon accidently. 2. Click OK in the confirmation dialog box to remove the term from knowledgebase, Cancel to retain the item in the knowledgebase. 128 PHPKB User’s Manual Comments 129 PHPKB User’s Manual COMMENTS Comments allow readers to give feedback on articles. Comments are users’ opinion, remarks, observation or criticism on your articles. Comments let users interact with you and bring the system to life. Super user can configure the comments settings from the admin control panel, under the features settings section. Manage Settings > Feature Settings > Comments Settings Enable article comments if checked will allow the users to post the comment on articles of your knowledgebase. Auto Approve Comments if enabled will approve the comment automatically and make it visible to user immediately. But as all comments are not desirable so by default this option is not enabled, to let you approve the comments manually. Send Approval Notification if enabled sends the email notification to the users when their comments are approved. You can make your system more secure by enabling Email Privacy Protection. With it user comments are published with user names but mailto option on user names is not enabled. In addition, you can set the Enable CAPTCHA setting, in order to avoid automatically submitted comments and to ensure that only real people post comments. In the public view comments are displayed beneath the article. Total Comments on the article Date, when comment posted User Name Figure 155: User Submitted Comments at Front End End users can post their comments from comment form displayed below the user comments on article page. 130 PHPKB User’s Manual CAPTCHA Code Figure 156: Comment Form Comments’ Management Super users and editors can view the comments users have submitted on knowledge base’s articles, and can approve, disapprove, or delete the comments, by clicking the comments tab in the navigation bar. Comment Notifications are also shown on dashboard in blinking form as shown below. Comments tab has two sub options: Pending Click Pending option to view and manage the comments, pending for approval. Navigation Bar > Comments > Pending Figure 157: Pending Comments 131 PHPKB User’s Manual You can view the actions associated with the comment by clicking on the toggle/down arrow button. Approved Click Approved option to view and manage the comments, approved for publishing either by you or by the PHPKB knowledgebase software. Navigation Bar > Comments > Approved Figure 158: Approved Comments Manage Comments Interface Explanation ID Auto generated database serial number for comment. Comment This displays the user remarks, opinion on article. The first 250 characters of the comment are displayed initially. If there are more than 200 characters, this will be shown by ‘... ‘At the end. You can click on it to see the full comment. Posted on Article The article title on which the comment has been posted is listed in this column. Click on the article title to preview article. Posted By Name of the user who posted the comment. Click on the name to send email to user. Comment Date Date and time details, when comment was posted. Check one or more comment’s checkboxes to delete them simultaneously. You can check the box at top of the column to select all the comments. Actions • Preview - Click this to view the full comment with details as shown in the figure below. Figure 159: Preview Comment 132 PHPKB User’s Manual • Edit- Click this to edit the content details. Refer Modifying Comment(s)on page 133. • Approve – Click this to approve the pending comments manually. Refer Approve Comment(s) on page 134. • Disapprove - Click this to disapprove the comment and transfer it to pending comment list. Refer Disapprove Comment(s) on page 134. • Delete - To delete the comment permanently from the knowledge base click this option. Refer Delete Comment(s) on page 135. Select this to remove the selected comments from your knowledge base Deleted comments can’t be retrieved. Refer Delete Comment(s) on page 135. Delete Selected Table 30: Manage Comments Interface Explanation Modifying Comment(s) Public users generally commit typing mistakes (spelling or grammatical). So, to edit their comments follow the steps specified below: 1. Click the Edit option from Actions column. Navigation Bar > Comments > Pending/Approved > Actions > Edit Figure 160: Edit Comment 2. Make the changes. 3. Click on Update button to make the changes permanent. Notes: 1. Editors or Super users can edit the comments only. 2. Pending or approved both types of comments can be edited. 133 PHPKB User’s Manual Approve Comment(s) PHPKB Knowledge Base Software offers you (editors or super users) two ways of approving comments. Either you can approve comments manually or let the software itself approve all the comments, by enabling the option Auto Approve Comments from Manage settings. Auto Approve feature saves your time as it works on your behalf and approve every new comment when it is posted by user. However, Approving Manually will ensure the quality of comments in your knowledgebase as you can review the comments before approving. To approve the comments manually follow the steps mentioned below. 1. Click the Approve option from actions corresponding to comment you want to approve. Navigation Bar > Comments > Pending > Actions > Approve Figure 161: Approve Comment 2. Click the OK button to approve the comment. After approval, comment can be seen under Approved Comments tab. Disapprove Comment(s) Editors and super users can disapprove the approved comments. After disapprove, comment becomes pending again, and it should be manually approved again to be part of approved comments. This feature lets you disapprove the spam comments that have been automatically approved by the software. To disapprove the comments follow the steps given below. 1. Click the Disapprove action for the comment you want to disapprove on Manage Approved Comments page. Navigation Bar > Comments > Approved > Actions > Disapprove 134 PHPKB User’s Manual Figure 162: Disapprove Comment 2. Click the OK button to disapprove the comment. Delete Comment(s) Not all comments posted by KB users are appropriate; they can be offensive, irrelevant, or contain automatically-submitted advertising material. Editors or super users can remove these comments from knowledgebase. Removing single comment: 1. Click the Delete option from Actions row for the comment you want to remove from comment list on Manage Comments page. Navigation Bar > Comments > Approved > Actions > Delete Figure 163: Delete Single Comment 2. Confirm the dialog to delete the comment permanently. Removing comments in bulk: You can even remove the multiple comments simultaneously. 1. Check checkboxes for the comments you want to delete. 135 PHPKB User’s Manual Figure 164: Delete Multiple Comments 2. Then, click the Delete Selected button at bottom. 3. Confirm the multiple delete dialog box to remove them permanently. 136 PHPKB User’s Manual Languages 137 PHPKB User’s Manual LANGUAGES PHPKB Software’s user interface is fully translatable (only in the Multi-Language Editions). You can translate or alter labels, helps messages, front-end messages etc. PHPKB supports multiple languages including the ability to create and edit language files, create language translators, assign language translators etc. Multilanguage version has the support for creation of language files and detection of user’s browser language so that the knowledgebase content can be displayed in the auto-detected language. Apart from this, you also have the facility to set a default language for the front-end so that it can be displayed by default in case there is no auto-detection match. Initially, knowledge base’s end user interface is loaded in the default language specified in manage language section but KB users (end users) can change the language according to their preferences from the language drop down on front end to load the KB in the language chosen. Language drop down contain languages created by you. Multilanguage version comes with the default English language file that can’t be deleted. However, you have the facility to edit the default language file or create new language files for the languages of your choice and translate the content yourself using admin control panel of our knowledge base software. Note: Only super-users can access, create and manage knowledgebase languages. Creating Language File(s) PHPKB knowledgebase provides you the capability to create categories, articles, news, glossary items in languages of your choice. For creating all these features in your language, you should create the language file first. PHPKB software provides you with one default language file i.e. English. However, you can create your own language files. When a language file is created, it is blank by default. You have to provide translations for the language. To create the language file follow the steps mentioned below. 1. Open the Create Language form from the Create Language option under Languages tab. Navigation Bar > Languages > Create Language 138 PHPKB User’s Manual Figure 165: Create a Language Manage Languages Language Name Select the name of your language from the available list of languages in drop down. Language Text Direction Specify the display order of text for language selected. Some languages like Arabic are written in a form known as right-to-left (RTL), in which writing begins at the right-hand side of a page and concludes at the left-hand side. Text - Left to Right: Select this if text runs from left to right in your language. Text - The right side: Select this if text runs from right to left in your language. Visible Check this, if you don’t want to show the knowledgebase details for the language. Table 31: Create Language Interface Explanation 2. Fill the Create Language form. 3. Click on Create Language button to add the language file to knowledgebase. Creating Language Translator Translators are admin users who are responsible for conversion of PHPKB front end into your custom language. Translators can access the admin section for the language file translation jobs. Translators are not allowed to do any other action except the modification of language files in the admin control panel of PHPKB knowledge base software. Follow the steps given below to create the translator account. 1. Click the Users option from the Navigation Bar and then click the Create User option. Navigation Bar > Users > Create User 139 PHPKB User’s Manual Figure 166: Create Translator 2. Fill the form details. Refer Table 19 for details of form fields. 3. Click the Save User button to save the translator account into knowledgebase. Language Assignments to Translators Superuser can assign the language files to translators so that they can access the admin control panel to complete the translation job of language files assigned to them. Moreover, super-users can revoke the translation right back from translator if required. This section will help you learn how to assign a language to translator and revoking it back. Assigning a Language to Translator User PHPKB Knowledge Base software allows you the facility to assign translator (who renders pretext for public section into another language). Superuser can assign a language file translation job to any translator. Superuser can assign one translator per language. To assign a language to translator follow the steps given below. 1. Open the Manage Languages Screen from Language tab of Navigation Bar. Navigation Bar > Languages > Manage Languages 140 PHPKB User’s Manual Translator Dropdown Figure 167: Assigning Language to Translator 2. Select the translator from the translator dropdown. Dropdown list has name and email addresses of all translators of your knowledgebase. 3. Check the checkboxes for the language(s) you wish to assign to translator. Checkboxes are disabled for languages that are already assigned to some translator. 4. Click Assign Selected Languages button to assign the language(s) to selected translator. Revoke a Language from Translator User In case you have assigned a wrong language to translator, you can withdraw it and assign it to some other translator. To revoke the language translation right from the translator, follow the steps given below. 1. Click the Revoke Translation Right icon next to translator name on manage languages screen. Refer Figure 169 for screen details. Navigation Bar > Languages > Manage Languages > Revoke Translation Right Icon Figure 168: Revoking Translation Right from Translator 2. Confirm the dialog box to revoke the translation right. 141 PHPKB User’s Manual Language File’s Management Super users can access and manage the default or self-created languages. You can assign and remove translators, edit or delete language from this section. Manage Languages option is available under Language tab of navigation bar. Navigation Bar > Languages > Manage Languages Figure 169: Manage Languages Manage Languages ID Language Name Language Configuration Translator Status 142 Automatically generated serial number in database, when language is added in the knowledgebase. Click the expand/toggle button to view the details of latest updating details for language. Name of the admin user and time details are displayed. Click this to collapse the details. Check one or more comment’s checkboxes to add translator to selected languages simultaneously. You can check the box at top of the column to select all the languages. See Assigning a Language to Translator User on page 140. Note: One language can have only one translator. Name of the Language. Click this to edit the preset text for the public area of the website for the language. Refer Modifying Language File on page 143. This displays the name of the translator to whom language has been assigned for pre text configuration and revoke translation right button. Default in the column value depicts that initially knowledgebase will be loaded in this language. Click on Set Default link to make the language as default language. PHPKB User’s Manual Text Direction Visible Actions This displays the display order of the text in language. Displays that this language is available in front end language drop down and knowledgebase can be loaded for this language. It is advised, to configure language before making it visible to KB users. Shows language exists in knowledgebase but, not visible to KB users. Delete Language: Click here to delete the language permanently from the knowledgebase. Refer Deleting Language File on page 146. --NA-- is displayed for English language, which can’t be deleted. Table 32: Manage Languages Interface Explanation Modifying Language File Edit language feature allows to translate the content of language file (either default or created by super user). Language file contains all the text used within the applications users interface. Super users and translators can translate the pretext for public section for a language from the admin control panel. Supers users can go to edit language page from the Manage Languages. Refer Figure 169 for screen details. Navigation Bar > Languages > Manage Languages > Language Configuration > Edit Language Translators can click Edit Language link from My Languages. My Languages page contains details of languages assigned to translator. Figure 170: Translator's My Languages Screen A language configuration page will be displayed as shown in figure below. Language configuration page contains the name of language file at the top whose variables you want to translate or modify. 143 PHPKB User’s Manual Figure 171: Edit Language/Language Configuration Screen 144 PHPKB User’s Manual Variables are divided into different sections. Each section has it’s expand button, name, file name where these variables will be used. Figure 172: Edit Language- News Section Click expand button to see the variables available for translation under the section. Figure 173: Edit Language- Expanded view of News Page Section You got the original string on the left (Text to translate), and the field for its translation on the right (translation). For instance, suppose for English language you want to display the Knowledge Base News as News only then you can write News in the text field provided in front of Knowledge Base News. Similarly, you can write the translations of other languages in the text field specified in front of text to translate fields. While translating, you may see some special words/symbols in between % %. You are not supposed to change or translate these words/symbols as they have predefined meaning. Refer Table 33 for their meaning. For example, to translate published on: %cd% text, you should translate only published to and keep the %cd% (created date) as unchanged. Meaning of Special Symbols %st% %end% %total% %cp% %tp% %vd% %cd% %rt% %vt% 145 Start End Total Current Page Total Pages Viewed (Number of times Viewed) Creation Date Rating Score Voting (Number of votes) PHPKB User’s Manual %ad% %sk% Added to Favorites on date Search Keywords Table 33: Language Configuration: Meaning of Special Symbols After making the changes either click on the Save Changes button of section or Save Language Changes button to save the changes permanently in the language file. Deleting Language File Super user can delete any language except the language (English) provided with the software. Deletion of language results into deletion of all the associated items with it. 1. Click on Delete Language action under Manage Languages corresponding to language you want to delete. Delete Language Figure 174: Deleting a Language 2. Press OK to confirm the Delete Selected Language dialog box. If Language has no items under it, language will be deleted else a warning window displaying the details of all the associated items with language appears. Figure 175: Delete Language- Warning Message 146 PHPKB User’s Manual 3. If you are sure to delete the language, enter your admin password and tick I understand the risks of deleting this language checkbox and press DELETE button else press cancel to retain the language in knowledgebase. Relationship of knowledgebase modules with language file PHPKB Knowledge Base Software has Language Drop Down in the header section of the Admin Control Panel. Drop down contain list of languages of the knowledgebase. Admin users can navigate between different languages through this dropdown. For instance, if you are on article section and want to see the articles of other language just click the required language, article section will be loaded with the articles of that language. Language drop down gets enabled under sections that are directly related with languages, to ease you in navigating through different languages. Sections/Modules Language drop down enabled? Dependence on Language Categories Direct Articles Direct Article Subscribers Indirect Attachments Indirect Favorites Indirect Ratings Indirect Traffic Visits Indirect Comments Indirect News Direct Glossary Direct Tickets Direct 147 PHPKB User’s Manual User Groups Indirect Users No Dependence Table 34: Relationship of knowledgebase modules with language file Represents that Language drop down is enabled for that section and you can traverse in different languages and view the language related items of that section through it. Relationship shows the effect of language (creation and deletion) on module. Direct shows module items have straight dependence. Indirect means they have dependence because they are related with modules with direct dependence. No dependence means language does not affect the module e.g. users can access any language so they are independent of language creation and deletion. Deletion of language will lead to: 1. All categories (public & private) associated with that language would be permanently deleted. 2. All articles associated with that language would be permanently deleted along with the following items related to those articles. a. Attachments, Comments, Favorites, Ratings, Article Subscribers, Traffic Visits 3. All news items associated with that language would be permanently deleted. 4. All glossary terms associated with that language would be permanently deleted. 5. All submitted tickets associated with that language would be permanently deleted. 148 PHPKB User’s Manual Statistics 149 PHPKB User’s Manual STATISTICS Statistics section of PHPKB Knowledge Base Software represents those facts of your knowledgebase which can be stated in numbers or any tabular or classified arrangement. PHPKB will enable your company to monitor quality and review metrics for all of the content you produce. PHPKB yields higher quality results and reduce risk to your business. Statistics section is categorized into several sub-sections to provide in-depth statistics of various knowledgebase components such as articles, categories, users, search keywords, article traffic & failed login attempts. Reports are available in the form of interactive charts (for graphical analysis) as well as tabular (print-friendly) format. Super users can view the statistics from statistics tab under navigation bar. Navigation Bar > Statistics Figure 176: Statistics Tab Note: In ML edition, Statistics will be shown for the language, selected in the language drop down. To view the statistics for other language, select the required language from the drop down. Knowledgebase Statistics Overview Click on the statistics tab from navigation bar to view the Knowledgebase reports page that is a shortcut to variety of statistics about your knowledge base’s articles, users, categories, searched terms, failed logins, traffic statistics etc. Directly click on the links view their statistics. Figure 177: Knowledge Base Reports 150 PHPKB User’s Manual Defining a Date Range You can use the Date drop down under different statistics screen to specify the period for which you want to see the statistics. Select the option from the list and click on Show button next to it to show the statistics for the range you have selected. Figure 178: Statistics - Date Dropdown Menu When you select Custom(Specify Range) you can define a range of your own choice. Select the start and date from the day, month and year dropdows respectively, and click on Show button to see the statistics results for your custom range. Figure 179: Custom Date Options Article Statistics You can view the statistics/reports related to articles of your knowledgebase from the Article Statistics option of statistics tab or by clicking Articles link from Knowledge Base Reports page. Navigation Bar > Statistics > Article Statistics When you click on the Article Statistics option, PHPKB Knowledge Base Software displays the summary of your knowledgebase articles. Articles’ Summary You can use this screen to see the overview of your articles. Either click on Summary tab from articles statistics or click on Articles Summary link from Knowledge Base Reports page. Navigation Bar > Statistics > Articles Statistics > Summary Tab Summary screen is divided into two parts. Left side is a tabular representation of various article facts explained in Table 35 and right side is a pictorial representation in form of bar graph showing different types of articles on X-axis and their count in knowledgebase on Y-axis. Move the mouse pointer on any bar to view number of articles of that type in knowledgebase. 151 PHPKB User’s Manual Figure 180: Article Statistics – Summary Report Article Statistics – Summary Report Explanation Total number of articles This is sum of all articles of different status (approved, featured, expired, saved drafts, deleted, pending, disapproved) of your knowledgebase. Published Articles Total of all the approved and featured articles of your knowledgebase. Articles with Ratings Total of all published articles which have been rated by KB users (end users). Most Popular Article Published article that has been viewed maximum number of times. Click on article title to preview article. Most Rated Article Displays published article that has received highest user rating. Click on article title to preview it. Most Popular Author An Admin user whose articles have been viewed maximum number of times. Articles With Ratings This displays the total of all the published articles of your knowledgebase <=2 which have received average rating less than or equal to 2. Articles With Ratings >2 This is the total of all published articles of your knowledgebase with & <=4 average rating greater than 2 and less than or equal to 4. Articles with Rating > 4 This displays the total of all the published articles with rating higher than 4. Article Subscribers This displays the total number of people who have subscribed to your articles and also activated their accounts. 152 PHPKB User’s Manual Table 35: Article Statistics – Summary Report Explanation Popular Articles This page displays the list of published articles arranged in high to low order according to number of times they have been viewed by KB users (end users). To view the popular articles click on either Popular Articles tab from Articles Statistics or Most Popular Articles link from Knowledge Base Reports page. Navigation Bar > Statistics > Articles Statistics > Popular Articles Tab Screen uses the tabular representation for showing details of articles with maximum number of views and pie chart to graphically exemplify the propotion of each article hits. The number of popular articles displayed, depends upon Record per Page setting under Manage Settings. Move the mouse pointer on any of the pie chart sector to view the Article ID and hits for that article. Moreover, you can find the popular articles for specific time period by using the date drop down menu. Article ID Figure 181: Article Statistics – Popular Articles Article Statistics – Popular Articles Explanation ID This represents the ID of article in knowledgebase. Title This displays the article heading/name. Click on the article title to see its preview. Views This displays the number of times the article has been viewed by KB users. Table 36: Article Statistics – Popular Articles Explanation Top Rated Articles Screen has list of published articles arranged in descending order according to average ratings they have received from KB users. To view the top rated articles click on either Top Rated Articles tab under Articles Statistics or Most Rated Articles link from Knowledge Base Reports page. Navigation Bar > Statistics > Articles Statistics > Top Rated Tab 153 PHPKB User’s Manual Screen contains details of highest rated articles and their graphical representation in form of bar graph. Horizontal side of graph represents the rating score and vertical side displays the ID of articles. Bar color is different for each article to ease you in interpretation of graph. Move your cursor on bar to view the id and rating of an article. Figure 182: Article Statistics – Top Rated Articles Article Statistics – Top Rated Articles Explanation ID This represents the ID of article in knowledgebase. Title This displays the article heading/name. Click on the article title to see its preview. Rating This represents the average score (total rating score/number of votes) of the article. Table 37: Article Statistics – Top Rated Articles Explanation Most Discussed Articles This report displays the published articles of your knowledgebase arranged in descending order according to the number of user submitted comments. The number of articles dispalyed, depends upon the Records per Page setting . Click the Most Discussed Articles tab from Articles Statistics or click the Most Discussed Articles Link from Knowledgebase Reports page, to view the most discussed articles. Navigation Bar > Statistics > Articles Statistics > Most Discussed Tab Screen contains details of articles with maximum number of comments and their graphical representation in form of bar graph. Horizontal side of graph represents the Article Id and vertical side displays the comment count.The number of most discussed articles displayed on page, depends upon Record per Page setting under Manage Settings. Move the mouse pointer on any of the bar to view the 154 PHPKB User’s Manual Article ID and comments for that article as shown in figure below. You can also find the most discussed articles for specific date range using the date drop down menu. Figure 183: Article Statistics – Most Discussed Articles Article Statistics – Most Discussed Articles Explanation ID This represents the ID of article in knowledgebase. Title This displays the article heading/name. Click on the article title to see its preview. Comments This displays the number of user‐submitted comments for that article. Table 38: Article Statistics – Most Discussed Articles Explanation Most Mailed Articles You can use this screen to see the list of articles arranged by the number of times they have reffered to friend through email. To view the most mailed articles either click on Most Mailed tab under Articles Statistics or Most Mailed Articles link from Knowledge Base Reports page. Navigation Bar > Statistics > Articles Statistics > Most Mailed Tab Screen contains details of most mailed articles and their graphical representation in form of bar graph. Vertical side (Y-axis) represents the article Id and horizontal side represents number of times article mailed. Move the mouse pointer on any bar to view the article id and count(number of times article mailed to friend). 155 PHPKB User’s Manual Figure 184: Article Statistics – Most Mailed Articles Article Statistics – Most Mailed Articles Explanation ID This represents the ID of article in knowledgebase. Title This displays the article heading/name. Click on the article title to see its preview. Status This represents the article status. Click on it to go to Manage Articles page and to manage the articles of this status. Mailed This displays number of times article has been mailed. Table 39: Article Statistics – Most Mailed Articles Explanation Most Printed Articles This page displays the list of articles arranged according to number of times they have been printed by KB users (end users) in high to low order. To view the most printed articles click on either Most Printed tab under Articles Statistics or Most Printed Articles link from Knowledge Base Reports page. Navigation Bar > Statistics > Articles Statistics > Most Printed Articles Tab Page displays the details of articles in tabular form and use pictorial representaion in form of pie chart to represent each article’s printed percentage share. Move the mouse pointer on any of the pie chart sector to view the Article ID and its printed percentage. Article Statistics – Most Printed Articles Explanation ID This represents the ID of article in knowledgebase. Title This displays the article heading/name. Click on the article title to see its preview. Status This represents the article status. Click on it to view/ manage the article of this status. Printed This displays number of times article has been printed by KB users. 156 PHPKB User’s Manual Table 40: Article Statistics – Most Printed Articles’ Interface Explanation Figure 185: Article Statistics – Most Printed Articles Monthly Report You can use this screen to see the details of newly created or updated articles. Click on Monthly Report tab from articles statistics to view this report. Navigation Bar > Statistics > Articles Statistics > Monthly Report Tab You can also view the monthly report from Monthly Report link under Article Statistics from Knowledge Base Reports page. By default articles for the current month are shown but you can view the articles for month of your choice by selecting the month and year from the month and year drop down respectively and then click on Show button to view the articles (newly created and updated) for the month and year selected. Figure 186: Article Statistics – Monthly Report 157 PHPKB User’s Manual Article Statistics – Monthly Report Id This represents the ID of article in knowledgebase. Article Title This displays the article heading/name. Click on the article title to see its preview. Hits This represents the number of times article viewed by KB users (end users). Status This represents the article status. Click on it to go to Manage Articles page to manage the article of this status. Created By Name of the admin user who wrote this article. Created On This column is displayed in case of newly created article representing the date and time details when article created. Saved By This represents the name of the admin user who has last updated the article. Updated On This column is displayed in case of updated articles representing the date and time details when article updated. Table 41: Article Statistics – Monthly Report Articles’ Traffic Statistics PHPKB knowledge base software comes loaded with traffic statistics for your knowledge base so that you can know which of the knowedge base articles are receiving maximum traffic (hits). You can drilldown the statistics for a given time period to see which articles are being viewed the most for the given time period. These traffic statistics are offered in both tabular as well as graphical format. Apart from the statistics, you also have the facility to know how much traffic your knowledge base is receiving from 3 major search engines (Google, Yahoo and Bing) and using what search keywords on the search engines. Traffic Statistics The report provides you a snap shot of visitor traffic, and lets you discover what is happening over your knowledge base. Traffic statistics provides details of who came, when is the most hits happening and how they (end users) searched your KB on the internet, which articles are mostly viewed. These numbers indicate how many visitors view the site each day, audience growth, and how the site has progressed since its formation. Using the information gathered here you could reconstruct the way visitors use your knowledge base and make necessary adjustments to your categories, content or keywords. To see the traffic statistics click on Statistics tab of navigation bar, and then click on the Traffic Statistics. Navigation Bar > Statistics > Traffic Statistics Or You can click the Traffic Statistics link on Knowledge Base Reports page. 158 PHPKB User’s Manual Figure 187: Traffic Statistics The traffic statistics screen uses line graph to shows the hits (views) of articles. X-axis (horizontal) plots the time and Y-axis (vertical) shows the articles hits. You can use the date and time drop down to view traffic for your knowledgebase in different periods of time. It helps you in determining progress rate of your knowledge base. Table below the graph provides the average visits per day and per day percentage share of article hits. Show details link provides you the list of articles viewed in the time period with their views as shown in figure below. Figure 188: Traffic Statistics - Details Record filter feature allows you to filter records that have article hits less than the number specified by you in text box. 159 PHPKB User’s Manual Article Referrers Article referrer’s statistics shows from where the request for article pages of your knowledgebase originated. The report provides you stats of where your visitors are coming from, how they found you, through which search engines and which keywords. To see the article referrers click on Statistics tab of Navigation bar, and then click on article referrers tab from the traffic Statistics. Navigation Bar > Statistics > Traffic Statistics > Article Referrers Referrers are divided into five groups Google, Google (images), Yahoo, Bing and Others. You can see the referrers for the time period of your choice by using the date drop down. Referrers for the duration selected are displayed in tabular as well as graphical form using pie chart. Pie chart shows percentage share of each of referrer group. Figure 189: Article Referrers Statistics Article Referrers Referrer 160 Referrer is site/search engine that sent someone to your site through a link. PHPKB categorizes the referrers into five groups. Generally, visitors come from widely used search engines like Google, Google (images), Bing, and PHPKB User’s Manual Hits Percent Yahoo; so PHPKB software gives you details of articles referred through them separately. Referrers except these are put into others group. This displays the number of articles referred by the referrer. Click the toggle button to view the details of articles referred by referrer. This is the referrer’s percentage share. Table 42: Article Referrers Report Explanation Figure 190: Referrers Details Figure 191: Referrers Details - 1 Article Referrers Details Referrer Host The HTTP referrer host or search engine which redirected the user to an article in your knowledge base. Keywords The keywords used on search engine or Referrer Host to land at the article page in your knowledge base. Title Title of the article on which the user landed. Date-Time The date and time of user’s arrival on that article. Table 43: Details of Article Referrers Statistics Category Statistics You can view the statistics/reports related to your knowledgebase’s article categories from the Category Statistics option of statistics tab or by clicking Categoies links from Knowledge Base Reports page. Navigation Bar > Statistics > Category Statistics When you click on the Category Statistics option, PHPKB Knowledge Base Software displays the summary of your knowledgebase categories. Categories’ Summary You can use this screen to see the overview of your knowledge base categories. Either Click on Summary tab from Category Statistics or click on Categories Summary link from Knowledge Base Reports page. Navigation Bar > Statistics > Articles Statistics > Summary Tab Summary screen contain statistics related to various aspects of categories, and pictorial representaion of those in form of pie charts. Different pie charts presented on page are explained below. Private/Public Catgeories: This pie chart represents the percentage share of each type (Private/ Public) of category in knowledge base. Place your mouse over the pie chart sector to see its percentage share. 161 PHPKB User’s Manual Visible/Hidden Categories: PHPKB Knowledge Base Software allows the admin users to change the status of category to hidden i.e.to hide it from your KB users(end users). This pie chart represents the ratio of visible and hidden categories in knowledge base. Like the Private/Public Categories, you can place your mouse over the sector to view its percentage share. Parent/Sub-Categories: This pie chart represents the relationship of parent categories and subcategories in the knowledge base. Categories at root level are called Parent Categories, and are visible on knowledge base’s home page. Sub categories are those whoes level (depth) is greater than zero in hierarchy. Figure 192: Category Statistics – Summary Report Category Statistics – Summary Report Total Number of This represents the total of all the knowledgebase categories. Categories Public Categories This is total of all public categories including both visible and hidden of your knowledge base. Private Categories This is total of all private categories including both visible and hidden of your knowledge base. Visible Categories This represents the total of private and public categories which are visible to knowledge base users. Hidden Categories This displays the total of private and public categories which exists in knowledgebase, but categories are not visible to knowledgebase users. Sub Categories This displays all the categories which have some parent category. Most Popular Category This represents category which has maximum number of views from all its articles. 162 PHPKB User’s Manual Least Popular Category This represents category which has minimum number of views from all its articles. Table 44: Category Statistics – Summary Report Popular Categories Use this screen to see information about your knowledge base’s most‐viewed article categories. Either Click on Popular Categories tab from Category Statistics or click on Popular Categories link from Knowledge Base Reports page. Navigation Bar > Statistics > Category Statistics > Popular Categories Screen represents tabular as well as graphical representation of categories. Pie chart represents the number of times articles in each category have been viewed. The number of popular categories displayed, depends upon Record per Page setting under Manage Settings. Move the mouse pointer on any of the pie chart sector to view the Category ID and its percentage share. Figure 193: Category Statistics – Popular Categories Popular Categories ID Category Name Views This is ID of category in knowledge base. This displays the name of each category. Click the category name to view and manage this category under Manage Categories section. This is total of views/hits of all articles of this category. Table 45: Category Statistics – Popular Categories Empty Categories This section represents the categories (Private and Public) that have no article under them. Empty category report reminds you about categories that need your attention. Either Click on Empty categories tab from Category Statistics or click on Empty Categories link from Knowledge Base Reports page. Navigation Bar > Statistics > Articles Statistics > Popular Categories 163 PHPKB User’s Manual Figure 194: Category Statistics – Empty Categories Empty Categories ID Category Name Category Type Articles Created On This is the ID of category in knowledge base. This displays the name of each category. Click the category name to view and manage this category under Manage Categories section. Lock Icon next to category name represents categories of private status. This displays the type of category. Parent Category means category is root category and Sub Category means category has depth more than 0 in the hierarchy. Since the category is empty, it does not contain any articles so this displays 0 articles in the category. Date and time details, when category was created in knowledgebase. Table 46: Category Statistics – Empty Categories User Statistics To view the reports related to your knowledgebase’s users, click the Statistics in the navigation bar, then click User Statistics. Navigation Bar > Statistics > User Statistics Or you can view user statistics from the User Statistics link of the Knowledge Base Reports page. User’s Summary You can use this screen to see the overview of your knowledge base users. Either Click on Summary tab from User Statistics or click on Users Summary link from Knowledge Base Reports page. Navigation Bar > Statistics > Users Statistics > Summary Tab Summary screen shows details of different level of active and inactive users of your knowledgebase. Pie charts are used to graphically show their propotion in knoweledgebase. Admin Users: This pie chart represents the ratio of different Admin users. Note: S represents Super users, E represents Editor, W represents Writers, T represents Translators (Translator level for admin users is available only in Multi-Language edition). 164 PHPKB User’s Manual Active/Inactive Editors: This pie chart displays the ratio of active and inactive editor users. Active editors can log in to PHPKB Knowledge base’s Control Panel, whereas inactive editors can’t. Active/Inactive Writers: This pie chart displays the ratio of active and inactive writers. Active writers can log in to PHPKB Knowledge base’s Control Panel, whereas inactive writers can’t. Active/Inactive Members: This pie chart displays the ratio of active and inactive members. Members are KB users with accounts to view private categories and their articles. Active members can log in to knowledge base, whereas inactive members can’t. Figure 195: User Statistics – Summary Report User Summary Total Admin Users Super users Editors Writers 165 Total of all the admin users (super users, editors, writers, translators) of your knowledgebase. This is the number of super user account in your knowledgebase. Super user has full control over the knowledgebase. This is the number of editor accounts (active + inactive) in the knowledgebase. Editors are governor of all knowledgebase articles. Active Editors – This represents the number of editors who can access the admin control panel. Inactive Editors - This represents the number of editors who can’t access the admin control panel. This is the total of writer accounts (active + inactive) in your knowledgebase. Writers are producers of their own articles, literary content, documents. They can write articles but can’t publish them. Active Writers– This is total of all writers who can log into the admin PHPKB User’s Manual Translators Total Front-End Users Members Most Popular Author control panel. Inactive Writers– This is the total of all writers who can’t log into the admin control panel. This is the total of translators (active + inactive) users, who are responsible for conversion of PHPKB front end into your custom language. Active Translators – Number of translators who can log into the admin control panel and can customize languages. Inactive Translators – Number of translators who can’t log into the admin control panel. Total of all the front end user accounts in the knowledgebase. Total of member users accounts with knowledgebase. Member users can access the private categories and their articles for groups whom they are member of besides publically published articles. Active Members - Number of members who can log in and can access private articles. Inactive Members – Number of members who can’t login. This represents the admin user (Super user/editor/writer) whose articles are most popular among KB users. Table 47: User Statistics – Summary Report Explanation Most Popular Authors This page displays the list of users arranged in descending order according to their articles’ popularity. Popularity is calculated on the basis of average views (total views of all articles of author/number of articles of author) of authors’ articles. To view the most popular authors click on either Most Popular Authors tab under Users Statistics or Most Popular Authors link from Knowledge Base Reports page. Navigation Bar > Statistics > User Statistics > Most Popular AuthorsTab Pie chart on the screen represents the article posted by popular authors. Place your mouse over the sector to see the admin user’s username and percentage share of articles. 166 PHPKB User’s Manual Figure 196: User Statistics – Most Popular Authors Most Popular Authors ID Author Name Articles Views This is ID of user in knowledge base. This displays the user’s full name and user’s username in square brackets. Click on it see the user details and contributions made by him. Number of articles posted by the user. Sum of views of all the articles of the knowledgebase. Table 48: User Statistics – Most Popular Authors Article Contributors You can use this screen to see the arranged list of active admin users who have posted articles in knowledgebase. To view the article contributors either click on Article Contributors tab from User Statistics under statistics tab of navigation bar or click on Article Contributors link from Knowledge Base Reports page. Navigation Bar > Statistics > User Statistics > Article Contributors Tab This piechart displays the number of articles posted by each user. Move the mouse pointer on any sector to view the username of admin user and article posted percentage. 167 PHPKB User’s Manual Figure 197: User Statistics – Article Contributors Article Contributors ID Author Name Author Level Articles This is ID of user in knowledge base. This displays the user’s full name and user’s username in square brackets. Click on it see the user details and contributions made by him. This represents the level of admin user in knowledgebase. Shows the number of articles posted by the user. Click the toggle button to view the detail list of articles posted by user. List contains the article title and type of article in the knowledgebase. Click the article title to see its preview. Table 49: User Statistics – Article Contributors Recently Active Users You can view the details of recently active members of your knowledgebase from this report. This will help you to keep track of knowledgebase users. To view the users login details Either Click on Recently Active Users tab from User Statistics or click on Recently Active Users link from Knowledge Base Reports page. Navigation Bar > Statistics > User Statistics > Recently Active Users Figure 198: User Statistics – Recently Active Users Recently Active Users ID Author Name 168 This is ID of user in knowledge base. This displays the user’s full name. Click on it see the user details and PHPKB User’s Manual Username Level Last Login contributions made by him. This represents the name admin user use to login into admin control panel. This represents the level (user privileges) of admin user in knowledgebase. Time and date details, user logged into the admin control panel last time. Table 50: User Statistics – Recently Active Users Search Statistics On the search statistics page you'll get a report about which keywords or terms your KB users (end users) are search often. This represents the keywords searched and the details of successful and unsuccessful searched made for them. To view statistics about the terms for which users of your knowledge base have searched, either click on Search Statistics tab from Navigation Bar or click on Search Statistics link from Knowledge Base Reports page. Navigation Bar > Statistics > Search Statistics Search Summary Use this screen to see an overview of the terms for which users have searched in your knowledge base. You can view the search summary in two ways – Click on Statistics tab in the navigation bar, and then click the Search Statistics. Click the summary tab. Navigation Bar > Statistics > Search Statistics > Summary Tab Or you can click the Statistics tab from navigation bar, and then click the Searches Summary link on the knowledge base reports page. Figure 199: Search Statistics – Summary Report Search Summary Total Searches 169 This is number of unique searches (Successful as well as unsuccessful) made PHPKB User’s Manual Successful Searches Most Popular Search Failed Searches Most Failed Search Recently Successful Search Recently Failed Search Delete by the KB users. This represents the unique successful searches made by the KB users. This displays the term for which users of your knowledge base have searched most often and found result. This represents the unique searches made by the KB users for which no results were provided to users. This displays the term for which users of your knowledge base have searched most often, that has not returned any search results. This represents the most recent term that users have searched in knowledge base and found the results. This represents the most recent term that users have searched in knowledge base, which has not returned any search results. Click this if you want to delete the search details from the knowledgebase. You can delete successful or unsuccessful searches of specific time period. Table 51: Search Statistics – Summary Report Explanation Successful Searches You can view the list of the terms for which users have searched in your knowledgebase, arranged in descending order of number of times they were searched. To view the successful searches, click on Statistics tab in the Navigation Bar, and then click the Search Statistics. Click the Successful Searches tab. Navigation Bar > Statistics > Search Statistics > Successful Searches Tab Or click the successful searches link on the Knowledge Base Reports page. Figure 200: Search Statistics – Successful Searches Successful Searches ID Search 170 This is ID of search term in the database. This displays the term for which KB user(s) have searched. This is as typed by user(s). PHPKB User’s Manual Times Searched Results Percentage Share This displays the number of times term have been searched by KB users. Represents the number of results (articles/news/categories) returned for the searched term. Graphical representation of percentage share of number of times each term searched. Table 52: Search Statistics – Successful Searches Failed Searches You can view the list of the terms for which users have searched in your knowledgebase but that have not returned any search result, arranged in descending order of number of times they were searched. To view the unsuccessful searches either click Unsuccessful Searches link under Statistics tab or click the Unsuccessful searches link on the Knowledge Base Reports page. Navigation Bar > Statistics > Search Statistics > Unsuccessful Searches Tab Figure 201: Search Statistics – Failed Searches Failed Searches ID Search Times Searched Results Percentage Share This is ID of search term in the database. This displays the term for which KB user(s) have searched. This is as typed by user(s). This displays the number of times term have been searched by KB users. Represents the number of results returned for the searched term. Graphical representation of percentage share of number of times each term searched. Table 53: Search Statistics – Failed Searches Failed Login Statistics You can see the list of unsuccessful login attempts, arranged in descending order of date and time on which attempt made. You can avoid intrusion into your system, if you regularly monitor this statistics. To see the failed login statistics click on Statistics tab of navigation bar, and then click on the Failed Login Statistics. 171 PHPKB User’s Manual Navigation Bar > Statistics > Failed Login Statistics Or you can click the Failed Login Statistics link on knowledge base reports page. Figure 202: Failed Login Statistics Failed Login Statistics Explanation Attempted Username Name used as username for login. IP Address This represents the IP address of the user who attempted to login. Attempted On Time and Date details when the attempt to login made. Attempts Number of times, the person with same IP address tried to log in. Table 54: Failed Login Statistics Explanation You can also delete the failed login attempts unwanted data from the database by using delete options provided at the bottom. Choose the period you want to delete data and then click the delete button. 172 PHPKB User’s Manual Tools 173 PHPKB User’s Manual Tools This section contains: Manage Settings (175) Optimize Database (195) KB Backup (196) Sitemap Generator (197) 174 PHPKB User’s Manual MANAGE SETTINGS Manage Settings area of the admin control panel is a centralized location where all major components and modules that make up PHPKB Knowledge Base Software can be configured. Here, many of the PHPKB's advanced features can be fully configured or even turned on/off. Settings are divided into 5 sub-sections to categorize them properly. To access the settings and configuration area, click on the Manage Settings option under tools tab. Navigation Bar > Tools > Manage Settings You can also access the Manage Settings section from the Shortcut Links or directly from Admin control panel’s top links. PHPKB Settings This section allows you to configure general settings relevant to the PHPKB such as knowledgebase name, knowledgebase URL, license up gradation etc. You can access the PHPKB Settings by clicking on PHPKB settings tab under Manage Settings. Navigation Bar > Tools > Manage Settings > PHPKB Settings The PHPKB settings page is categorized into five parts. General Settings Product Details Knowledgebase Settings Mail Server Settings Database Settings General Settings Figure 203: PHPKB Settings - General Settings PHPKB Settings General Settings Down for Maintenance? 175 If checked will display down for maintenance page to KB users (end PHPKB User’s Manual users) instead of knowledgebase details. During system enhancements, you can check this option and uncheck it later on to let KB users’ access knowledgebase. Table 55: PHPKB Settings - General Settings Explanation Product Details Figure 204: PHPKB Settings - Product Details PHPKB Settings Product Details Software Version This displays the version of PHPKB knowledgebase installed on your server. Admin Users This displays the admin user license you have. You can click on Enter Upgrade License Key if you don’t have Unlimited user license and you want to upgrade admin users license. Upgrade License Key Enter the Upgrade License Key you have received from the vendor and click the Upgrade License button. Support and Period Till This displays the days after which support and maintenance period will expire. PHPKB Knowledge Base comes with one year free full maintenance and support. Click on Extend Support Subscription link to send the mail to sales department for extending the support period. Maintenance Extend Support Period Click on Enter Extended Support License toggle link to see this field and enter the license key you received from vendor for increasing support period. Show Dashboard Notifications If checked will remind you about Support Period Validation in form of dashboard notification as shown in figure. 176 PHPKB User’s Manual Table 56: PHPKB Settings - Product Details Knowledgebase Settings Figure 205: PHPKB Settings - Knowledgebase Settings PHPKB Settings Knowledgebase Settings Knowledgebase Name Enter the name of your knowledge base. This name displays at the top of each of your knowledge base’s page. This name is used as the From Name e-mail field for outgoing e-mails. Knowledgebase URL This is the installation URL of the PHPKB. Enter the new knowledgebase URL in case you have changed your server. Note: The product will not work properly if the product URL value is incorrect. Table 57: PHPKB Settings - Knowledgebase Settings Explanation Mail Server Settings Figure 206: PHPKB Settings - Mail Server Settings PHPKB Settings Mail Server Settings Outgoing Mail Server(SMTP) This field controls the email server used for PHPKB knowledge base’s mail functions. With Default option PHPKB Software will use the internal PHP mail function to send emails. Select Advanced option to specify the own SMTP (Simple Mail Transfer Protocol) server details. Enter the SMTP settings in the fields that display. SMTP Hostname Enter either the Fully Qualified Domain name (e.g. mail.domain.com) or the IP address (e.g. 192.168.0.1) of your SMTP server. SMTP Username If your SMTP server requires authentication, then you need to provide 177 PHPKB User’s Manual the login username in order to connect to the SMTP server and send the emails. SMTP Password If your SMTP server requires authentication, then you need to provide the login password in order to connect to the SMTP server and send the emails. SMTP Port You need to specify the Port number on which your SMTP server is listening. The default Port number is 25. Table 58: PHPKB Settings - Mail Server Settings Explanation Database Settings Figure 207: PHPKB Settings - Database Settings PHPKB Settings Database Settings MySQL Details Detected This displays the information about your database server. MySQL Hostname Enter the name of the server where your MySQL database is located. Note: Hostname is usually localhost. MySQL Username Enter the username you use to log into the database. MySQL Password Enter the password you use to log into the database. MySQL Database Name This is the name of your MySQL database. Table 59: PHPKB Settings - Database Settings Explanationgs Feature Settings This section allows you to configure feature settings relevant to the PHPKB. You can control the display and functioning of public section pages (home page, news page, articles page, category page, contact page etc.) through these settings. You can access these settings by clicking on Feature Settings tab under Manage Settings. Navigation Bar > Tools > Manage Settings > Feature Settings The Feature settings page is categorized into eight parts. 178 PHPKB User’s Manual Home Page Settings Subscribe to Knowledgebase Category Page News Page Login Page Comment Settings Glossary Settings Contact Page Settings Home Page Settings Figure 208: Feature Settings - Home Page Settings Feature Settings Home Page Settings Show Categories Columns This is the number of columns you wish to arrange the knowledgebase categories of home page into. Sort Categories By Alphabetic Order - This option sorts the categories of knowledgebase by their names. Priority Order - With this option, categories are sorted according to priorities assigned to them. Category Articles Count Show option will display the count of all the articles under it and 179 PHPKB User’s Manual its subcategories next to category name , vice A versa for hide option. Note: Deeply nested knowledgebase structures can be very resource intensive. Display Featured Articles Check this if you want to display “Featured Articles” section on your Knowledge base’s home page. Number of Featured Articles Display Most Popular Articles Enter the number of articles you want to display in the “Featured Articles” section of your knowledge base’s home page. Check this if you want to display “Popular Articles” section on your Knowledge base’s home page. Number of Popular Articles Enter the number of articles you want to display in the “Popular Ar ticles” section of your knowledge base’s home page. Display Recently Added Articles Check this if you want to display “Recently Added Articles” section on your Knowledge base’s home page. Number of Recent Articles Enter the number of recently published articles, you want to display in the “Recently Added Articles” section of your knowledgebase. Display Top Rated Articles Number of Rated Articles Check this if you want to display “Top Rated Articles” section on your Knowledge base’s home page. Enter the number of highest voted articles, you want to display in the “Top Rated Articles” section of your knowledge base’s home page. Table 60: Feature Settings - Home Page Settings Explanation Subscribe to Knowledgebase Figure 209: Feature Settings - Subscribe to Knowledgebase Settings Feature Settings Subscribe to Knowledgebase Enable Subscribe to KB If checked, Subscribe to Knowledgebase section is visible to KB users (end user) for subscribing to knowledgebase and get notified when knowledge base articles are published or edited. Table 61: Feature Settings - Subscribe to Knowledgebase Settings Explanation 180 PHPKB User’s Manual Category Page Settings Figure 210: Feature Settings - Category Page Settings Feature Settings Category Page Sort Articles By Popularity - Choose this option, if you want articles of category are sorted by the number of times they have been viewed. Alphabetic Order - With this option articles are sorted by article titles. Update Date Time - With this option, articles of category will be sorted by the dates they are updated on. Sort Order Ascending – This displays the sorted articles in ascending order. Descending - This displays the sorted articles in descending order. For instance, if you have chosen Popularity in Sort Articles By and Descending in Sort Order then articles are displayed in decreasing order of their hits. Table 62: Feature Settings - Category Page Settings Explanation News Page Settings Figure 211: Feature Settings - News Page Settings Feature Settings News Page Enable News Page If checked will display News link in knowledgebase header and corresponding news page in the knowledgebase. Display Home Page News If checked, displays the recent news headlines on knowledge base’s home page. 181 PHPKB User’s Manual Number of News Enter the number of news headlines you want to display in the “News & Announcements” section of your knowledge base’s home page. Table 63: Feature Settings - News Page Settings Explanation Login Page Settings Figure 212: Feature Settings - Login Page Settings Feature Settings Login Page Enable Login Page If enabled will display Login link in knowledgebase header and KB Member users will be able to login to knowledgebase and access private categories. Table 64: Feature Settings - Login Page Settings Explanation Comment Settings Figure 213: Feature Settings - Comment Settings Feature Settings Comments Settings Enable Article Comments If checked, will allow the KB users (end users) to post comments on articles of your knowledgebase. Auto Approve Comments If enabled, PHPKB Knowledge Base Software approves the every incoming comment automatically and makes it visible to user immediately. But as all comments are not desirable, by default this option is not enabled to let you approve the comments manually. Send Approval Notification If enabled, PHPKB Knowledge Base Software sends the email notification to the users when their comments are approved. Email Privacy Protection If enabled, user comments will be published with user names, but 182 PHPKB User’s Manual mailto option on user names is not enabled. Table 65: Feature Settings - Comment Settings Glossary Settings Figure 214: Feature Settings - Glossary Settings Feature Settings Glossary Settings Enable Glossary Page If enabled will display Glossary link in knowledgebase header and allow the KB users to view the Glossary page of your knowledgebase. Auto link Glossary Terms Glossary Terms are auto linked with articles’ content if this option is checked. Refer Glossary on page 123 for details. Table 66: Feature Settings - Glossary Settings Explanation Contact Page Settings Figure 215: Feature Settings - Contact Page Settings Feature Settings Contact Page Settings Enable Contact Page If enabled will display Ask Question link in knowledgebase header and allow the KB users to post their questions. Send Contact Email If enabled, email will be sent on email address specified in Contact Email Address field when KB user asks a question; else only ticket will be created. Contact Email Address Enter the Email address on which contact page notification will be sent and which will be used as the default “From” address in the 183 PHPKB User’s Manual outgoing emails. Enable Instant Suggestions If enabled, instant suggestions of articles will be displayed to KB users when they type the content for the question. Refer Tickets on page 107 for details. Table 67: Feature Settings - Contact Page Settings Explanation Article’s Settings You can manage settings related to article in this section. Article options and features can be controlled through these settings. You can access these settings by clicking on Article Settings tab under Manage Settings. Navigation Bar > Tools > Manage Settings > Article’s Settings The article settings page is categorized into four parts. Article Options Article Features Meta Description RSS Feed Settings Article Options Figure 216: Article’s Settings - Article Options Settings 184 PHPKB User’s Manual Article Settings Article Options Enable Add Favorite Select this, if you want the logged in KB users to mark articles as favorite. When you select this option Add to Favorites link displays in each article page as shown below. When KB member clicks on the link article is added to their favorites and link changes to Remove from favorites. Enable Print Article If checked, Print Article Link will be visible on each article page and KB users will be able to print the article. Enable Email Article Select this if you want users to be able to email articles to others. When you select this option, Email Article to Friend link displays on article page. Enable Export to MS Word If selected, Export to MS Word link will be displayed and KB users (end users) will be able to able to export article as word document. Enable Export to PDF If selected, Export to MS Word link will be displayed and KB users (end users) will be able to able to export article as PDF document. Enable Subscribe to Article If selected, Subscribe to Article link will be displayed and KB users will be able to subscribe to article. Enable Bookmark Article If enabled, Bookmark Article link will be displayed and KB users (end users) will be able to store address of article in browser’s bookmark list so that the user can easily return to the article page. Enable Digg Bookmark If enabled, Digg It link will be displayed and KB users will be able to share article with other users of social networking site Digg. 185 PHPKB User’s Manual Enable Stumble Upon If enabled, Stumble Upon link will be displayed and KB users will be able to share article with other users of social networking site Stumble Upon. Enable Twitter If enabled, Tweet this Article link will be displayed and KB users will be able to tweet the article and share with other twitter users. Enable Del.icio.us Bookmark If enabled, KB users will be able to share article on del.icio.us. Enable Facebook Share If enabled, KB users will be able to share article on Facebook. Table 68: Article’s Settings - Article Options Settings Explanation Article Features Figure 217: Article’s Settings - Article Features’ Settings Article Settings Article Features Enable Custom Fields Display If enabled, custom fields’ data will be displayed with articles. See Custom Fields on page61 for details. Enable Article Rating If enabled, KB users will be able give feedback (votes) on articles. 186 PHPKB User’s Manual When you select this, Article Rating box displays on each article page. Enable Hits Display If enabled, article views (hits) will be displayed for each article in article list and on article page. Enable Article Author Display If enabled, name of the article author will be displayed on article page. Show Author Email as Link If enabled, KB users will be able to send mails to author of article. Enable Related Articles Select this, if you want to display articles related to article on article page. Number of Related Articles Enter the number of related articles you want to display under Related Articles section on article page. Show Related Articles Randomly If not selected, related articles will be displayed according to their status; featured then approved; else selected articles are displayed arbitrarily. Table 69: Article’s Settings - Article Features’ Settings Explanation Meta Description Figure 218: Article’s Settings - Meta Description Settings Article Settings Meta Description Meta Description Source Enter the source of Meta Description tag’s content for articles with empty article description field. Select Article Title, if you want to display title of article as content of Meta Description tag. Select Article Description, if you want to display first 150 characters of article content as contents of Meta Description tag. Table 70: Article’s Settings - Meta Description Settings Explanation 187 PHPKB User’s Manual RSS Feed Settings Figure 219: Article’s Settings - RSS Feed Settings Article Settings RSS Feed Settings Enable Category Feed If enabled, RSS feeds of articles of category will be available via the end user interface. Enable Featured Articles Feed If enabled, RSS feeds of featured articles will be available via the end user interface. Enable Popular Articles Feed If enabled, RSS feeds of popular articles will be available via the end user interface. Enable Recent Articles Feed If enabled, RSS feeds of recent articles will be available via the end user interface. Enable Rated Articles Feed If enabled, RSS feeds of voted articles will be available via the end user interface. Enable Related Articles Feed If enabled, RSS feeds of related articles will be available via the end user interface. Table 71: Article’s Settings - RSS Feed Settings Explanation Miscellaneous Settings Miscellaneous Settings allows you to manage Security settings such as login attempts allowed to admin users, search settings, file upload settings, Meta tags settings, SEO friendly URLs Settings and paging related settings. You can access these settings by clicking on Miscellaneous Settings tab under Manage Settings. Navigation Bar > Tools > Manage Settings > Miscellaneous Settings The article settings page is categorized into seven parts. 188 PHPKB User’s Manual Login Attempts Search Settings File Upload Settings Miscellaneous Settings SEO Friendly URLs Setting PHPKB Meta Tag Settings Admin Section Settings Login Attempts Figure 220: Miscellaneous Settings - Login Attempts Settings Miscellaneous Settings Login Attempts Wrong Login Attempts Enter the number of times user can try to login before they are locked out in case of wrong login credentials. Prevent Login for Enter the period of time for which users remain locked out once they are blocked. After the time period elapsed, user may attempt to log in again. Table 72: Miscellaneous Settings - Login Attempts Settings Explanation Search Settings Figure 221: Miscellaneous Settings - Search Settings Miscellaneous Settings Search Settings Results Per-Page Enter the number of records you want to display per page for news, favorites and search results. Search Custom Fields If enabled, KB users (end users) will be able to search keywords in 189 PHPKB User’s Manual custom fields of articles under advanced search. Search File Attachments? If enabled, KB users will be able to search keywords in file attachments of articles under advanced search. Table 73: Miscellaneous Settings - Search Settings Explanation File Upload Settings Figure 222: Miscellaneous Settings - File Upload Settings Miscellaneous Settings File Upload Settings Upload File Size Limit This specifies the maximum size of file(s) your server allows you to upload at one time. Upload file size limit is controlled by upload_max_filesize variable in php.ini file. Maximum File Size Allowed Admin users are not able to upload files larger than the size selected. In case unlimited option is selected, maximum file size will be equivalent to Upload File Size limit. Table 74: Miscellaneous Settings - File Upload Settings Explanation Miscellaneous Settings Figure 223: Miscellaneous Settings Miscellaneous Settings Miscellaneous Settings Enable Version History If enabled, PHPKB Software will create versions of articles when they will be updated. Refer Article Versions on page 49. Use WYSIWYG Editor? If enabled, admin users will be able to use What You See Is What You Get editor when creating articles or news. 190 PHPKB User’s Manual Enable CAPTCHA If enabled CAPTCHA field will be displayed to KB users where they can submit information to PHPKB Knowledge Base Software. Enable Article Select-Copy If enabled, then would enable any KB user to select and copy article content. By default, no one has privilege to select and copy the article content. Table 75: Miscellaneous Settings Explanation SEO Friendly URL’s Settings Figure 224: Miscellaneous Settings - SEO Friendly URL’s Settings Miscellaneous Settings SEO Friendly URL's Settings If enabled, PHPKB knowledgebase creates the HTML pages for each article/category/news and article/news/category page URL will be based on their title. These URLs are searched by search engines, and can increase your page ranking. SEO Friendly URL's PHPKB Knowledge Base Software allows you to choose between three types of SEO URLs. Professional SEO URL's – If you choose this URL will be displayed with title and id e.g. http://www.articlediary.com/article/articletitle-is-here-1.html Simple SEO URL's - If you choose this URL will be displayed with title only as e.g. http://www.articlediary.com/article/article-titleis-here.html Classic SEO URL's If you choose this URL will be displayed with article/category/news keyword and id e.g. http://www.articlediary.com/article-1.html Table 76: Miscellaneous Settings - SEO Friendly URL’s Settings Explanation PHPKB Meta Tag Settings Figure 225: Miscellaneous Settings - PHPKB Meta Tag Settings 191 PHPKB User’s Manual Miscellaneous Settings PHPKB Meta Tags Settings Meta Keywords Enter the keywords for Meta Keyword tag’s content that will be displayed on every KB page of front end section. Meta Keyword tag on article page will take the keywords of article as its content. Meta Description Enter the description for Meta Description tag’s content that will be displayed on every KB page of front end section. Meta Description tag on article page will take the description of article as its content if article has description else article’s title/content based on Meta Description Source setting. Table 77: Miscellaneous Settings - PHPKB Meta Tag Settings Explanation Admin Section Settings Figure 226: Miscellaneous Settings - Admin Section Settings Miscellaneous Settings Admin Section Settings Records Per Page Enter the number of records per page you want to display under admin section. Table 78: Miscellaneous Settings - Admin Section Settings Explanation AdSense Integration PHPKB provides seamless integration of AdSense codes into your Knowledge Base Article System. Its Auto Insert feature inserts AdSense codes into each article automatically so that you can profit from visitors clicking on your ads. All you need to do is to simply specify your AdSense ID in the manage settings screen of Admin control panel. PHPKB automatically inserts the AdSense units color blended with rest of website into your knowledge base articles to get maximum click through rate. You can access these AdSense integration settings from AdSense Integration tab of Manage Settings. Navigation Bar > Tools > Manage Settings > AdSense Integration 192 PHPKB User’s Manual Figure 227: AdSense Integration Settings AdSense Integration Google AdSense Settings Turn on Google AdSense? This setting will turn On/Off the display of Google Ads in every article of the knowledge base with your AdSense Publisher-ID. AdSense Publisher's ID Enter the Publisher’s ID (unique identification (ID) string) provided to you by Google. AdSense Channel ID Enter Google Channel Id. Ad Format Select the type of Ads that you want to display on article page. Suggested Ad Positions Chart PHPKB Knowledge Base suggest you the various combinations of Ad location and Ad Size to choose from for Ad display. Choose 193 PHPKB User’s Manual between these combinations for better results. Ad Border Color Code Enter the border color for the Ad unit. Ad Title Color Code Enter the color of Title for text ad unit. Ad URL Color Code Enter the color of URL code. Ad Background Color Code Enter the background color of Ad unit. Ad Text Color Code Enter the color in which contents (text) will be displayed. Table 79: AdSense Integration Settings Explanation 194 PHPKB User’s Manual OPTIMIZE DATABASE PHPKB Knowledge Base Software allows you to optimize the database tables of your knowledgebase to defragment the table and reduce the size of the table on disk which leads to improved query performance and reduced select query response time. Table structure optimization reclaims unused space after deletions and basically cleans up the table after structural modifications have been made. Optimization should be used if you have deleted a large part of a table or if you have made many changes to a table with variable-length rows (tables that have VARCHAR, BLOB, or TEXT columns). Deleted records are maintained in a linked list and subsequent INSERT operations reuse old record positions. Super users can optimize the database from Optimize Database option from Tools tab. Navigation Bar > Tools > Optimize Database Click on Optimize Database Now button to optimize the tables of your database. During optimization, database tables are locked and front end users will not be able to access the knowledgebase for the optimization duration. Figure 228: Optimize Database Screen Results of optimization for the table optimized with the status are displayed after optimization process completes. Figure 229: Optimize Database Table Results 195 PHPKB User’s Manual KNOWLEDGE BASE BACKUP Backup is the activity of copying files or databases so that they will be preserved in case of data loss or disk failure. PHPKB Knowledge Base Software allows super users to take the backup of your whole database data as well as configuration details (knowledgebase Settings) . Database backup create a copy of the database to a single file. This makes it possible to restore your knowledgebase after a possible crash or to move the knowledgebase from one server to another. The dump file contains SQL statements to create the table and populate it. You can take the backup of all your knowledgebase data by clicking the Generate Database Backup button from Knowledge Base Backup section. Navigation Bar > Tools > KB Backup > Generate Database Backup button You can save the SQL file generated from backup process. Tables are locked during back up so you should optimize it when little traffic is flowing to your system. Figure 230: Knowledge Base Backup Screen To take the backup of your knowledgebase configurations, click on the Generate Configuration Backup button under Knowledge Base Backup section. Navigation Bar > Tools > KB Backup > Generate Configuration Backup button This file contains all the information of your knowledgebase settings. 196 PHPKB User’s Manual SITEMAP GENERATOR A sitemap is a list of pages of a web site accessible to crawlers or users. It can be a web page that lists the pages on a web site, typically organized in hierarchical fashion. This helps visitors and search engine bots find pages on the site. Site maps can improve search engine optimization of a site by making sure that all the pages can be found. PHPKB Knowledge Base Software creates not only an XML sitemap (that can be submitted to Google), but also a sitemap in text format. You can use the text sitemap to submit it to Yahoo. By placing a formatted xml file with site map on your webserver, you enable Search Engine crawlers (like Google) to find out what pages are present and which have been recently changed, and to guide them to crawl your site accordingly. Follow the steps given below to create the sitemap. 1. Click the Sitemap Generator option under Tools tab to view the sitemap generator screen. Navigation Bar > Tools > Sitemap Generator Figure 231: Sitemap Generator Sitemap Creation Sitemap Format 197 You can create sitemap in three formats – XML, Text, and HTML. XML: These sitemaps are created for search engines to inform them about URLs that are available on a website to be crawled. Large sites can make it difficult for search engines to index all of its pages. By submitting a XML sitemap, it will help search engines find all of those pages that can be nested a few directories deep. Text: These sitemaps contain one website URL per line. Search engines like Yahoo can scan text sitemaps. PHPKB User’s Manual Change Frequency Date of Last Modification Priority HTML: A HTML sitemap is simply a hierarchical list of links on a web page that helps web visitor’s review in a quick glance a site’s index of pages, which helps promote site usability. This value indicates how frequently the content at a particular URL is likely to change. The time the URL was last modified. This information allows crawlers to avoid re crawling documents that haven't changed. You can either use the current date which is displayed by default or specify your own date and time. Please make sure to enter the last modification date in "YYYY-MM-DD" format only. The priority of a particular URL relative to other pages on the same site. The value for this tag is a number between 0.0 and 1.0, where 0.0 identifies the lowest priority page(s) on your site and 1.0 identifies the highest priority page(s) on your site. The default priority of a page is 0.5. Table 80: Sitemap Generator Interface Explanation 2. Select the sitemap format & enter some optional parameters in the form. 3. Press Create Sitemap button and wait until the sitemap is generated and sitemap URL is provided to you. 4. Go to your Google Webmaster account and submit your sitemap URL. 198 PHPKB User’s Manual List of Figures FIGURE 1: FRONT END HOME PAGE .....................................................................................................................................14 FIGURE 2: FRONT END HEADER LINKS ..................................................................................................................................14 FIGURE 3: ADVANCED SEARCH ............................................................................................................................................15 FIGURE 4: ADVANCED SEARCH’S RESULTS .............................................................................................................................16 FIGURE 5: QUICK SEARCH BOX ............................................................................................................................................16 FIGURE 6: KNOWLEDGEBASE DETAILS ...................................................................................................................................17 FIGURE 7: NEWS & ANNOUNCEMENTS .................................................................................................................................17 FIGURE 8: BROWSE CATEGORIES .........................................................................................................................................17 FIGURE 9: GROUP CATEGORIES ...........................................................................................................................................17 FIGURE 10: FEATURED ARTICLES .........................................................................................................................................18 FIGURE 11: RECENTLY ADDED ARTICLES................................................................................................................................18 FIGURE 12: MOST POPULAR ARTICLES .................................................................................................................................19 FIGURE 13: TOP RATED ARTICLES ........................................................................................................................................19 FIGURE 14: SUBSCRIBE TO KNOWLEDGEBASE .........................................................................................................................19 FIGURE 15: LOGIN SCREEN .................................................................................................................................................20 FIGURE 16: NAVIGATION BAR .............................................................................................................................................22 FIGURE 17: SHORTCUT LINKS ..............................................................................................................................................23 FIGURE 18: DASHBOARD SHORTCUTS ...................................................................................................................................23 FIGURE 19: PAGING NAVIGATION ........................................................................................................................................24 FIGURE 20: SUCCESS NOTIFICATIONS ...................................................................................................................................24 FIGURE 21: ERROR NOTIFICATIONS ......................................................................................................................................25 FIGURE 22: TOOLTIP .........................................................................................................................................................25 FIGURE 23: NAVIGATION BREADCRUMBS ..............................................................................................................................25 FIGURE 24: TOP LINKS ......................................................................................................................................................26 FIGURE 25: WYSIWYG EDITOR .........................................................................................................................................26 FIGURE 26: DASHBOARD ...................................................................................................................................................27 FIGURE 27: CATEGORIES DISPLAY AT FRONT END ...................................................................................................................30 FIGURE 28: CATEGORY PAGE ..............................................................................................................................................31 FIGURE 29: CREATE NEW CATEGORY ...................................................................................................................................32 FIGURE 30: VIEWING CATEGORIES FROM NAVIGATION BAR......................................................................................................33 FIGURE 31: VIEWING CATEGORIES FROM DASHBOARD SHORTCUTS............................................................................................33 FIGURE 32: MANAGE CATEGORIES ......................................................................................................................................33 FIGURE 33: EDIT CATEGORY ...............................................................................................................................................35 FIGURE 34: DELETE CATEGORY ...........................................................................................................................................36 FIGURE 35: ARTICLE PAGE .................................................................................................................................................38 FIGURE 36: CREATE AN ARTICLE ..........................................................................................................................................40 FIGURE 37: PREVIEWING AN ARTICLE ...................................................................................................................................42 FIGURE 38: MANAGE SAVED DRAFTS ...................................................................................................................................43 FIGURE 39: DELETE SAVED DRAFT .......................................................................................................................................44 FIGURE 40: VIEWING ARTICLES FROM NAVIGATION BAR ..........................................................................................................45 FIGURE 41: MANAGE ARTICLES ...........................................................................................................................................45 FIGURE 42: APPROVED ARTICLES' ACTIONS ...........................................................................................................................46 FIGURE 43: FEATURED ARTICLES' ACTIONS ............................................................................................................................46 FIGURE 44: PENDING ARTICLES' ACTIONS .............................................................................................................................46 199 PHPKB User’s Manual FIGURE 45: DISAPPROVED ARTICLES’ ACTIONS .......................................................................................................................46 FIGURE 46: EXPIRED ARTICLES’ ACTIONS ..............................................................................................................................46 FIGURE 47: ACTIONS FOR SAVED DRAFTS ..............................................................................................................................47 FIGURE 48: EDIT AN ARTICLE ..............................................................................................................................................48 FIGURE 49: ARTICLE VERSIONS ...........................................................................................................................................49 FIGURE 50: ARTICLE VERSION'S PREVIEW..............................................................................................................................50 FIGURE 51: ARTICLE VERSIONS SCREEN AFTER VERSION RESTORE ..............................................................................................51 FIGURE 52: DELETE ARTICLE VERSION ..................................................................................................................................51 FIGURE 53: DELETE AN ARTICLE ..........................................................................................................................................52 FIGURE 54: MANAGE TRASH BOX........................................................................................................................................52 FIGURE 55: PURGE ARTICLE ...............................................................................................................................................53 FIGURE 56: SUCCESS NOTIFICATION – ARTICLE PURGED ..........................................................................................................53 FIGURE 57: RESTORE DELETED ARTICLE ................................................................................................................................54 FIGURE 58: SUCCESS NOTIFICATION - ARTICLE RESTORED ........................................................................................................54 FIGURE 59: ATTACHMENTS’ DISPLAY IN FRONT END ...............................................................................................................54 FIGURE 60: SEARCH FILE ATTACHMENTS SETTING ...................................................................................................................55 FIGURE 61: ATTACH FILES SCREEN .......................................................................................................................................55 FIGURE 62: ATTACH FILES SCREEN AFTER FILE UPLOAD............................................................................................................56 FIGURE 63: DELETE ATTACHMENT FILE .................................................................................................................................56 FIGURE 64: APPROVE AN ARTICLE .......................................................................................................................................57 FIGURE 65: SUCCESS NOTIFICATION - ARTICLE APPROVED ........................................................................................................57 FIGURE 66: DISAPPROVE AN ARTICLE ...................................................................................................................................57 FIGURE 67: SUCCESS NOTIFICATION - ARTICLE DISAPPROVED....................................................................................................57 FIGURE 68: FEATURED ARTICLES IN FRONT END .....................................................................................................................58 FIGURE 69: MAKE AN ARTICLE FEATURED .............................................................................................................................58 FIGURE 70: SUCCESS NOTIFICATION - FEATURED ARTICLE ........................................................................................................58 FIGURE 71: SEARCH ARTICLES .............................................................................................................................................59 FIGURE 72: RESULTS - SEARCH ARTICLES...............................................................................................................................61 FIGURE 73: CREATE CUSTOM FIELD .....................................................................................................................................62 FIGURE 74: MANAGE CUSTOM FIELDS .................................................................................................................................63 FIGURE 75: EDIT CUSTOM FIELD .........................................................................................................................................64 FIGURE 76: DELETE CUSTOM FIELD......................................................................................................................................65 FIGURE 77: SUCCESS NOTIFICATION – CUSTOM FIELD DELETED.................................................................................................65 FIGURE 78: ENABLE CUSTOM FIELDS DISPLAY SETTING ............................................................................................................65 FIGURE 79: CUSTOM FIELDS FROM KB USERS’ PERSPECTIVE .....................................................................................................66 FIGURE 80: ARTICLE COLLABORATION ..................................................................................................................................66 FIGURE 81: ADD ARTICLE NOTE ..........................................................................................................................................67 FIGURE 82: VIEWING ARTICLE NOTES...................................................................................................................................67 FIGURE 83: EDIT ARTICLE NOTE ..........................................................................................................................................68 FIGURE 84: DELETE ARTICLE NOTE ......................................................................................................................................68 FIGURE 85: SUBSCRIBE TO KNOWLEDGEBASE .........................................................................................................................69 FIGURE 86: SUBSCRIBE TO AN ARTICLE .................................................................................................................................69 FIGURE 87: SUBSCRIPTION FORM ........................................................................................................................................70 FIGURE 88: VIEWING SUBSCRIBERS FROM NAVIGATION BAR.....................................................................................................70 FIGURE 89: MANAGE SUBSCRIBERS .....................................................................................................................................71 FIGURE 90: EDIT SUBSCRIBER .............................................................................................................................................72 FIGURE 91: DELETE SUBSCRIBER..........................................................................................................................................72 FIGURE 92: REMOVING SUBSCRIBERS IN BULK .......................................................................................................................73 200 PHPKB User’s Manual FIGURE 93: IMPORT ARTICLES’ SCREEN.................................................................................................................................74 FIGURE 94: IMPORT ARTICLES - MAP FIELDS SCREEN ..............................................................................................................75 FIGURE 95: IMPORT ARTICLES - REPORT ...............................................................................................................................76 FIGURE 96: CREATE ARTICLE TEMPLATE ................................................................................................................................77 FIGURE 97: PREVIEWING AN ARTICLE TEMPLATE ....................................................................................................................78 FIGURE 98: MANAGE ARTICLE TEMPLATES ............................................................................................................................79 FIGURE 99: ARTICLE TEMPLATE PREVIEW ..............................................................................................................................80 FIGURE 100: EDIT ARTICLE TEMPLATE ..................................................................................................................................81 FIGURE 101: DELETE ARTICLE TEMPLATE ..............................................................................................................................82 FIGURE 102: SUCCESS NOTIFICATION – ARTICLE TEMPLATE DELETED .........................................................................................82 FIGURE 103: ARTICLE TEMPLATES ICON ................................................................................................................................82 FIGURE 104: ARTICLE TEMPLATES PAGE ..............................................................................................................................83 FIGURE 105: TYPES OF USERS.............................................................................................................................................85 FIGURE 106: PHPKB KNOWLEDGEBASE FROM SUPER USER’S PERSPECTIVE .................................................................................85 FIGURE 107: PHPKB KNOWLEDGEBASE FROM EDITOR’S PERSPECTIVE .......................................................................................86 FIGURE 108: PHPKB KNOWLEDGEBASE FROM WRITER’S PERSPECTIVE ......................................................................................86 FIGURE 109: PHPKB KNOWLEDGEBASE FROM TRANSLATOR’S PERSPECTIVE ...............................................................................87 FIGURE 110: PHPKB KNOWLEDGEBASE FROM KB MEMBER USER’S PERSPECTIVE .......................................................................87 FIGURE 111: FAVORITE ARTICLES ........................................................................................................................................88 FIGURE 112: CREATE A NEW USER ......................................................................................................................................91 FIGURE 113: CREATE USER - GROUP ASSIGNMENTS ...............................................................................................................91 FIGURE 114: CREATE NEW USER EXAMPLE SCREEN ................................................................................................................93 FIGURE 115: VIEW USER ACCOUNTS FROM NAVIGATION BAR ..................................................................................................93 FIGURE 116: VIEWING USER ACCOUNTS FROM DASHBOARD SHORTCUTS....................................................................................94 FIGURE 117: VIEWING USER ACCOUNTS FROM SHORTCUTS LINKS .............................................................................................94 FIGURE 118: MANAGE USERS ............................................................................................................................................94 FIGURE 119: ADMIN USER’S PREVIEW .................................................................................................................................96 FIGURE 120: KB USER’S PREVIEW .......................................................................................................................................97 FIGURE 121: EDIT USER ....................................................................................................................................................98 FIGURE 122: DELETE USER.................................................................................................................................................98 FIGURE 123: SEARCH USERS SCREEN ...................................................................................................................................99 FIGURE 124: SEARCH USERS - RESULTS ..............................................................................................................................100 FIGURE 125: CREATE A USER GROUP .................................................................................................................................102 FIGURE 126: MANAGE USER GROUPS................................................................................................................................103 FIGURE 127: PREVIEWING A USER GROUP ..........................................................................................................................104 FIGURE 128: EDIT A USER GROUP .....................................................................................................................................105 FIGURE 129: DELETING A USER GROUP ..............................................................................................................................105 FIGURE 130: ASK A QUESTION PAGE .................................................................................................................................107 FIGURE 131: OPENED TICKETS SCREEN...............................................................................................................................108 FIGURE 132: CLOSED TICKETS SCREEN ...............................................................................................................................108 FIGURE 133:PREVIEW TICKET SCREEN ................................................................................................................................109 FIGURE 134: SEND REPLY TO TICKET SCREEN .......................................................................................................................110 FIGURE 135: EXPANDED VIEW OF PUBLISHING A TICKET REPLY (QUESTION-ANSWER) AS AN ARTICLE IN KNOWLEDGEBASE ..................111 FIGURE 136: PUBLISH TICKET TO KB ..................................................................................................................................112 FIGURE 137: CLOSE TICKET ..............................................................................................................................................113 FIGURE 138: REOPEN A TICKET .........................................................................................................................................113 FIGURE 139: DELETE SINGLE TICKET ..................................................................................................................................114 FIGURE 140: DELETING TICKETS IN BULK .............................................................................................................................114 201 PHPKB User’s Manual FIGURE 141: NEWS PAGE SETTINGS ..................................................................................................................................116 FIGURE 142: NEWS ITEMS ON NEWS PAGE .........................................................................................................................116 FIGURE 143: NEWS DISPLAY AT FRONT END........................................................................................................................117 FIGURE 144: CREATE NEWS .............................................................................................................................................118 FIGURE 145: MANAGE NEWS ...........................................................................................................................................119 FIGURE 146: NEWS PREVIEW ...........................................................................................................................................120 FIGURE 147: EDIT NEWS .................................................................................................................................................120 FIGURE 148: DELETE NEWS .............................................................................................................................................121 FIGURE 149: GLOSSARY TERM DISPLAY AT FRONT END .........................................................................................................123 FIGURE 150: GLOSSARY PAGE ..........................................................................................................................................124 FIGURE 151: CREATE GLOSSARY TERM ...............................................................................................................................125 FIGURE 152: MANAGE GLOSSARY TERMS ...........................................................................................................................126 FIGURE 153: EDIT GLOSSARY TERM ...................................................................................................................................127 FIGURE 154: DELETE GLOSSARY TERM ...............................................................................................................................127 FIGURE 155: USER SUBMITTED COMMENTS AT FRONT END ...................................................................................................130 FIGURE 156: COMMENT FORM .........................................................................................................................................131 FIGURE 157: PENDING COMMENTS ...................................................................................................................................131 FIGURE 158: APPROVED COMMENTS .................................................................................................................................132 FIGURE 159: PREVIEW COMMENT.....................................................................................................................................132 FIGURE 160: EDIT COMMENT ...........................................................................................................................................133 FIGURE 161: APPROVE COMMENT ....................................................................................................................................134 FIGURE 162: DISAPPROVE COMMENT ................................................................................................................................135 FIGURE 163: DELETE SINGLE COMMENT .............................................................................................................................135 FIGURE 164: DELETE MULTIPLE COMMENTS .......................................................................................................................136 FIGURE 165: CREATE A LANGUAGE ....................................................................................................................................139 FIGURE 166: CREATE TRANSLATOR ....................................................................................................................................140 FIGURE 167: ASSIGNING LANGUAGE TO TRANSLATOR ...........................................................................................................141 FIGURE 168: REVOKING TRANSLATION RIGHT FROM TRANSLATOR ...........................................................................................141 FIGURE 169: MANAGE LANGUAGES...................................................................................................................................142 FIGURE 170: TRANSLATOR'S MY LANGUAGES SCREEN...........................................................................................................143 FIGURE 171: EDIT LANGUAGE/LANGUAGE CONFIGURATION SCREEN........................................................................................144 FIGURE 172: EDIT LANGUAGE- NEWS SECTION ....................................................................................................................145 FIGURE 173: EDIT LANGUAGE- EXPANDED VIEW OF NEWS PAGE SECTION.................................................................................145 FIGURE 174: DELETING A LANGUAGE .................................................................................................................................146 FIGURE 175: DELETE LANGUAGE- WARNING MESSAGE .........................................................................................................146 FIGURE 176: STATISTICS TAB ............................................................................................................................................150 FIGURE 177: KNOWLEDGE BASE REPORTS ..........................................................................................................................150 FIGURE 178: STATISTICS - DATE DROPDOWN MENU.............................................................................................................151 FIGURE 179: CUSTOM DATE OPTIONS ...............................................................................................................................151 FIGURE 180: ARTICLE STATISTICS – SUMMARY REPORT .........................................................................................................152 FIGURE 181: ARTICLE STATISTICS – POPULAR ARTICLES .........................................................................................................153 FIGURE 182: ARTICLE STATISTICS – TOP RATED ARTICLES ......................................................................................................154 FIGURE 183: ARTICLE STATISTICS – MOST DISCUSSED ARTICLES ..............................................................................................155 FIGURE 184: ARTICLE STATISTICS – MOST MAILED ARTICLES ..................................................................................................156 FIGURE 185: ARTICLE STATISTICS – MOST PRINTED ARTICLES .................................................................................................157 FIGURE 186: ARTICLE STATISTICS – MONTHLY REPORT..........................................................................................................157 FIGURE 187: TRAFFIC STATISTICS ......................................................................................................................................159 FIGURE 188: TRAFFIC STATISTICS - DETAILS .........................................................................................................................159 202 PHPKB User’s Manual FIGURE 189: ARTICLE REFERRERS STATISTICS .......................................................................................................................160 FIGURE 190: REFERRERS DETAILS ......................................................................................................................................161 FIGURE 191: REFERRERS DETAILS - 1 .................................................................................................................................161 FIGURE 192: CATEGORY STATISTICS – SUMMARY REPORT......................................................................................................162 FIGURE 193: CATEGORY STATISTICS – POPULAR CATEGORIES .................................................................................................163 FIGURE 194: CATEGORY STATISTICS – EMPTY CATEGORIES.....................................................................................................164 FIGURE 195: USER STATISTICS – SUMMARY REPORT .............................................................................................................165 FIGURE 196: USER STATISTICS – MOST POPULAR AUTHORS ...................................................................................................167 FIGURE 197: USER STATISTICS – ARTICLE CONTRIBUTORS ......................................................................................................168 FIGURE 198: USER STATISTICS – RECENTLY ACTIVE USERS .....................................................................................................168 FIGURE 199: SEARCH STATISTICS – SUMMARY REPORT .........................................................................................................169 FIGURE 200: SEARCH STATISTICS – SUCCESSFUL SEARCHES ....................................................................................................170 FIGURE 201: SEARCH STATISTICS – FAILED SEARCHES............................................................................................................171 FIGURE 202: FAILED LOGIN STATISTICS...............................................................................................................................172 FIGURE 203: PHPKB SETTINGS - GENERAL SETTINGS............................................................................................................175 FIGURE 204: PHPKB SETTINGS - PRODUCT DETAILS .............................................................................................................176 FIGURE 205: PHPKB SETTINGS - KNOWLEDGEBASE SETTINGS ................................................................................................177 FIGURE 206: PHPKB SETTINGS - MAIL SERVER SETTINGS ......................................................................................................177 FIGURE 207: PHPKB SETTINGS - DATABASE SETTINGS ..........................................................................................................178 FIGURE 208: FEATURE SETTINGS - HOME PAGE SETTINGS ......................................................................................................179 FIGURE 209: FEATURE SETTINGS - SUBSCRIBE TO KNOWLEDGEBASE SETTINGS ...........................................................................180 FIGURE 210: FEATURE SETTINGS - CATEGORY PAGE SETTINGS ................................................................................................181 FIGURE 211: FEATURE SETTINGS - NEWS PAGE SETTINGS ......................................................................................................181 FIGURE 212: FEATURE SETTINGS - LOGIN PAGE SETTINGS ......................................................................................................182 FIGURE 213: FEATURE SETTINGS - COMMENT SETTINGS ........................................................................................................182 FIGURE 214: FEATURE SETTINGS - GLOSSARY SETTINGS .........................................................................................................183 FIGURE 215: FEATURE SETTINGS - CONTACT PAGE SETTINGS .................................................................................................183 FIGURE 216: ARTICLE’S SETTINGS - ARTICLE OPTIONS SETTINGS..............................................................................................184 FIGURE 217: ARTICLE’S SETTINGS - ARTICLE FEATURES’ SETTINGS ...........................................................................................186 FIGURE 218: ARTICLE’S SETTINGS - META DESCRIPTION SETTINGS ..........................................................................................187 FIGURE 219: ARTICLE’S SETTINGS - RSS FEED SETTINGS ........................................................................................................188 FIGURE 220: MISCELLANEOUS SETTINGS - LOGIN ATTEMPTS SETTINGS.....................................................................................189 FIGURE 221: MISCELLANEOUS SETTINGS - SEARCH SETTINGS..................................................................................................189 FIGURE 222: MISCELLANEOUS SETTINGS - FILE UPLOAD SETTINGS...........................................................................................190 FIGURE 223: MISCELLANEOUS SETTINGS ............................................................................................................................190 FIGURE 224: MISCELLANEOUS SETTINGS - SEO FRIENDLY URL’S SETTINGS ...............................................................................191 FIGURE 225: MISCELLANEOUS SETTINGS - PHPKB META TAG SETTINGS ..................................................................................191 FIGURE 226: MISCELLANEOUS SETTINGS - ADMIN SECTION SETTINGS ......................................................................................192 FIGURE 227: ADSENSE INTEGRATION SETTINGS ...................................................................................................................193 FIGURE 228: OPTIMIZE DATABASE SCREEN .........................................................................................................................195 FIGURE 229: OPTIMIZE DATABASE TABLE RESULTS ...............................................................................................................195 FIGURE 230: KNOWLEDGE BASE BACKUP SCREEN ................................................................................................................196 FIGURE 231: SITEMAP GENERATOR ...................................................................................................................................197 203 PHPKB User’s Manual List of Tables TABLE 1: ADVANCED SEARCH INTERFACE EXPLANATION ...........................................................................................................15 TABLE 2: PAGING NAVIGATION – EXPLANATION OF SYMBOLS ...................................................................................................24 TABLE 3: CREATE CATEGORY INTERFACE EXPLANATION ............................................................................................................33 TABLE 4: MANAGE CATEGORIES INTERFACE EXPLANATION .......................................................................................................34 TABLE 5: CREATE AN ARTICLE INTERFACE EXPLANATION ...........................................................................................................42 TABLE 6: MANAGE SAVED DRAFT INTERFACE EXPLANATION .....................................................................................................43 TABLE 7: MANAGE ARTICLES INTERFACE EXPLANATION............................................................................................................46 TABLE 8: ARTICLE ACTIONS’ EXPLANATION ............................................................................................................................47 TABLE 9: ARTICLE VERSIONS INTERFACE EXPLANATION ............................................................................................................50 TABLE 10: TRASH BOX INTERFACE EXPLANATION ....................................................................................................................53 TABLE 11: SEARCH ARTICLES INTERFACE EXPLANATION ............................................................................................................60 TABLE 12: CREATE CUSTOM FIELDS INTERFACE EXPLANATION ...................................................................................................62 TABLE 13: MANAGE CUSTOM FIELDS INTERFACE EXPLANATION ................................................................................................63 TABLE 14: VIEWING ARTICLE NOTES INTERFACE EXPLANATION..................................................................................................68 TABLE 15: MANAGE SUBSCRIBERS INTERFACE EXPLANATION ....................................................................................................72 TABLE 16: CREATE ARTICLE TEMPLATE INTERFACE EXPLANATION...............................................................................................77 TABLE 17: MANAGE ARTICLE TEMPLATES INTERFACE EXPLANATION ...........................................................................................80 TABLE 18: PRIVILEGES ASSIGNED TO DIFFERENT LEVEL OF USERS. ...............................................................................................90 TABLE 19: CREATE A NEW USER INTERFACE EXPLANATION .......................................................................................................92 TABLE 20: MANAGE USERS INTERFACE EXPLANATION .............................................................................................................95 TABLE 21: SEARCH USERS INTERFACE EXPLANATION .............................................................................................................100 TABLE 22: CREATE A USER GROUP INTERFACE EXPLANATION ..................................................................................................103 TABLE 23: MANAGE GROUPS INTERFACE EXPLANATION.........................................................................................................103 TABLE 24: VIEW TICKETS INTERFACE EXPLANATION...............................................................................................................109 TABLE 25: SEND REPLY TO TICKET INTERFACE EXPLANATION ...................................................................................................111 TABLE 26: CREATE NEWS INTERFACE EXPLANATION ..............................................................................................................119 TABLE 27: MANAGE NEWS INTERFACE EXPLANATION............................................................................................................119 TABLE 28: CREATE GLOSSARY TERM INTERFACE EXPLANATION ................................................................................................125 TABLE 29: MANAGE GLOSSARY TERMS INTERFACE EXPLANATION ............................................................................................126 TABLE 30: MANAGE COMMENTS INTERFACE EXPLANATION ....................................................................................................133 TABLE 31: CREATE LANGUAGE INTERFACE EXPLANATION .......................................................................................................139 TABLE 32: MANAGE LANGUAGES INTERFACE EXPLANATION....................................................................................................143 TABLE 33: LANGUAGE CONFIGURATION: MEANING OF SPECIAL SYMBOLS .................................................................................146 TABLE 34: RELATIONSHIP OF KNOWLEDGEBASE MODULES WITH LANGUAGE FILE .........................................................................148 TABLE 35: ARTICLE STATISTICS – SUMMARY REPORT EXPLANATION .........................................................................................153 TABLE 36: ARTICLE STATISTICS – POPULAR ARTICLES EXPLANATION .........................................................................................153 TABLE 37: ARTICLE STATISTICS – TOP RATED ARTICLES EXPLANATION ......................................................................................154 TABLE 38: ARTICLE STATISTICS – MOST DISCUSSED ARTICLES EXPLANATION ..............................................................................155 TABLE 39: ARTICLE STATISTICS – MOST MAILED ARTICLES EXPLANATION ..................................................................................156 TABLE 40: ARTICLE STATISTICS – MOST PRINTED ARTICLES’ INTERFACE EXPLANATION .................................................................157 TABLE 41: ARTICLE STATISTICS – MONTHLY REPORT .............................................................................................................158 TABLE 42: ARTICLE REFERRERS REPORT EXPLANATION...........................................................................................................161 TABLE 43: DETAILS OF ARTICLE REFERRERS STATISTICS ..........................................................................................................161 TABLE 44: CATEGORY STATISTICS – SUMMARY REPORT .........................................................................................................163 204 PHPKB User’s Manual TABLE 45: CATEGORY STATISTICS – POPULAR CATEGORIES .....................................................................................................163 TABLE 46: CATEGORY STATISTICS – EMPTY CATEGORIES ........................................................................................................164 TABLE 47: USER STATISTICS – SUMMARY REPORT EXPLANATION .............................................................................................166 TABLE 48: USER STATISTICS – MOST POPULAR AUTHORS ......................................................................................................167 TABLE 49: USER STATISTICS – ARTICLE CONTRIBUTORS..........................................................................................................168 TABLE 50: USER STATISTICS – RECENTLY ACTIVE USERS .........................................................................................................169 TABLE 51: SEARCH STATISTICS – SUMMARY REPORT EXPLANATION .........................................................................................170 TABLE 52: SEARCH STATISTICS – SUCCESSFUL SEARCHES ........................................................................................................171 TABLE 53: SEARCH STATISTICS – FAILED SEARCHES ...............................................................................................................171 TABLE 54: FAILED LOGIN STATISTICS EXPLANATION...............................................................................................................172 TABLE 55: PHPKB SETTINGS - GENERAL SETTINGS EXPLANATION............................................................................................176 TABLE 56: PHPKB SETTINGS - PRODUCT DETAILS ................................................................................................................177 TABLE 57: PHPKB SETTINGS - KNOWLEDGEBASE SETTINGS EXPLANATION ................................................................................177 TABLE 58: PHPKB SETTINGS - MAIL SERVER SETTINGS EXPLANATION ......................................................................................178 TABLE 59: PHPKB SETTINGS - DATABASE SETTINGS EXPLANATIONGS ......................................................................................178 TABLE 60: FEATURE SETTINGS - HOME PAGE SETTINGS EXPLANATION ......................................................................................180 TABLE 61: FEATURE SETTINGS - SUBSCRIBE TO KNOWLEDGEBASE SETTINGS EXPLANATION ...........................................................180 TABLE 62: FEATURE SETTINGS - CATEGORY PAGE SETTINGS EXPLANATION ................................................................................181 TABLE 63: FEATURE SETTINGS - NEWS PAGE SETTINGS EXPLANATION ......................................................................................182 TABLE 64: FEATURE SETTINGS - LOGIN PAGE SETTINGS EXPLANATION ......................................................................................182 TABLE 65: FEATURE SETTINGS - COMMENT SETTINGS............................................................................................................183 TABLE 66: FEATURE SETTINGS - GLOSSARY SETTINGS EXPLANATION .........................................................................................183 TABLE 67: FEATURE SETTINGS - CONTACT PAGE SETTINGS EXPLANATION ..................................................................................184 TABLE 68: ARTICLE’S SETTINGS - ARTICLE OPTIONS SETTINGS EXPLANATION..............................................................................186 TABLE 69: ARTICLE’S SETTINGS - ARTICLE FEATURES’ SETTINGS EXPLANATION ...........................................................................187 TABLE 70: ARTICLE’S SETTINGS - META DESCRIPTION SETTINGS EXPLANATION...........................................................................187 TABLE 71: ARTICLE’S SETTINGS - RSS FEED SETTINGS EXPLANATION ........................................................................................188 TABLE 72: MISCELLANEOUS SETTINGS - LOGIN ATTEMPTS SETTINGS EXPLANATION.....................................................................189 TABLE 73: MISCELLANEOUS SETTINGS - SEARCH SETTINGS EXPLANATION ..................................................................................190 TABLE 74: MISCELLANEOUS SETTINGS - FILE UPLOAD SETTINGS EXPLANATION...........................................................................190 TABLE 75: MISCELLANEOUS SETTINGS EXPLANATION ............................................................................................................191 TABLE 76: MISCELLANEOUS SETTINGS - SEO FRIENDLY URL’S SETTINGS EXPLANATION ...............................................................191 TABLE 77: MISCELLANEOUS SETTINGS - PHPKB META TAG SETTINGS EXPLANATION ..................................................................192 TABLE 78: MISCELLANEOUS SETTINGS - ADMIN SECTION SETTINGS EXPLANATION ......................................................................192 TABLE 79: ADSENSE INTEGRATION SETTINGS EXPLANATION ...................................................................................................194 TABLE 80: SITEMAP GENERATOR INTERFACE EXPLANATION ....................................................................................................198 205 PHPKB User’s Manual