1
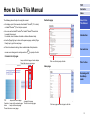
P2WW-2862-01ENZ0
TOP
Contents
Index
How to Use
This Manual
ScandAll PRO ScanSnap mode Add-in
V1.0 User's Guide
Introduction
Conventions
Explains about ScanSnap mode.
Prior to Use
Explains how to scan documents using
ScanSnap mode.
Scanning with
ScanSnap
mode
TOP
How to Use This Manual
Contents
Index
Contents page
The following shows the tips for using this manual.
● To display or print this manual, either Adobe® Acrobat® (7.0 or later)
or Adobe® Reader® (7.0 or later) is required.
● You can use the Adobe® Acrobat® or Adobe® Reader® Search tool
to search this manual.
For details, refer to Adobe® Acrobat® or Adobe® Reader® Help.
How to Use
This Manual
Introduction
● Use the [Page Up] key to return to the previous page, and the [Page
Down] key to go to the next page.
● Click a blue character string, tab or contents/index title (where the
mouse cursor changes into a shape such as
Conventions
) to jump to the link.
Common for all pages
Jumps to the first page of each chapter.
These tabs are on every page.
Click on a title to jump to the link.
Prior to Use
Index page
Scanning with
ScanSnap
mode
TOP
Jumps to the cover page.
Jumps to this page.
Contents :Jumps to the contents page. This tab is on every page.
Index
: Jumps to the index page.
These tabs are on every page.
Click on a page number to jump to the link.
2
TOP
Introduction
Thank you for using ScandAll PRO ScanSnap mode Add-in
(hereinafter referred to as "ScanSnap mode").
The contents of this manual may be changed following updates of
ScanSnap mode.
The latest version of the ScanSnap mode User's Guide is available
from the Web site below. An Internet connection is required for
downloading.
http://www.fujitsu.com/global/support/computing/peripheral/scanners/
manual/scandall.html
About This Product
ScandAll PRO is an application that enables you to display and edit
images scanned with an Image Scanner fi Series scanner. ScanSnap
mode, an application for additional functions, can be installed when
ScandAll PRO is installed.
This manual describes how to use ScanSnap mode for scanning with
an Image Scanner fi Series scanner.
For details about ScandAll PRO, refer to the ScandAll PRO V2.0
User's Guide. For details about the functions of ScanSnap mode, refer
to the ScanSnap mode Help.
Trademarks
Microsoft, Windows, Windows Server, Windows Vista, Excel,
PowerPoint and SharePoint are either registered trademarks or
trademarks of Microsoft Corporation in the United States and/or other
countries.
Word is the product of Microsoft Corporation in the United States.
ISIS is a registered trademark of EMC Corporation in the United
States.
Adobe, the Adobe logo, Acrobat, and Adobe Reader are either
registered trademarks or trade names of Adobe Systems Incorporated
in the United States and/or other countries.
Contents
Index
Intel and Intel Core are trademarks or registered trademarks of Intel
Corporation in the United States and other countries.
ABBYY™ FineReader™ Engine ©2011 ABBYY. OCR by ABBYY
ABBYY and FineReader are trademarks of ABBYY.
Other company names and product names are the registered
trademarks or trademarks of the respective companies.
How to Use
This Manual
Introduction
Manufacturer
PFU LIMITED
International Sales Dept., Imaging Business Division, Products Group
Solid Square East Tower, 580 Horikawa-cho, Saiwai-ku, Kawasaki-shi
Kanagawa 212-8563, JAPAN.
Phone: (81-44) 540-4538
© PFU LIMITED 2011
Conventions
Prior to Use
Scanning with
ScanSnap
mode
3
Use in High-Safety Applications
This product has been designed and manufactured on the assumption
that it will be used in office, personal, domestic, regular industrial, and
general purpose applications. It has not been designed and
manufactured for use in applications (simply called "high-safety
applications" from here on) that directly involve danger to life and
health when a high degree of safety is required, for example, in the
control of nuclear reactions at nuclear power facilities, automatic flight
control of aircraft, air traffic control, operation control in mass-transport
systems, medical equipment for sustaining life, and missile firing
control in weapons systems, and when provisionally the safety in
question is not ensured. The user should use this product with
adopting measures for ensuring safety in such high-safety applications.
PFU LIMITED assumes no liability whatsoever for damages arising
from use of this product by the user in high-safety applications, and for
any claims or compensation for damages by the user or a third party.
TOP
Contents
Index
How to Use
This Manual
Introduction
Conventions
Prior to Use
Scanning with
ScanSnap
mode
4
TOP
Conventions
Contents
Index
Symbols Used in This Manual
Product
In this manual, the following symbols are used to describe operations.
!
This symbol alerts operators to particularly important
information.
Be sure to read this information.
This symbol alerts operators to helpful advice regarding
operation.
Abbreviations Used in This Manual
Indication
● Windows Vista® Home Basic (32/64-bit)
Windows Vista
● Windows Vista® Home Premium (32/64-bit) (*1)
● Windows Vista® Business (32/64-bit)
Indication
● Windows® XP Home Edition
Windows XP
(*1)
● Windows® XP Professional
●
Windows®
XP Professional x64 Edition
● Windows Server® 2003 R2,
Standard Edition
● Windows Vista® Ultimate (32/64-bit)
Windows Server® 2008 Standard (32/64-bit)
Windows Server® 2008 R2 Standard (64-bit)
Server®
● Windows
2003 R2,
Standard x64 Edition
Windows Server
2008
(*1)
Windows Server
2008
(*1)
Windows Server
2008 R2 Standard
(*1)
●
Windows®
7 Home Premium (32/64-bit)
● Windows® 7 Professional (32/64-bit)
Windows Server
2003
(*1)
Introduction
● Windows Vista® Enterprise (32/64-bit)
The following abbreviations are used in this manual:
Product
How to Use
This Manual
Windows 7
(*1)
Conventions
Prior to Use
Scanning with
ScanSnap
mode
● Windows® 7 Enterprise (32/64-bit)
● Windows® 7 Ultimate (32/64-bit)
5
TOP
Product
Indication
● Microsoft® Office SharePoint® Portal
Server 2003
SharePoint
*1 :
Where there is no distinction between the different versions of
the above operating system, the general term "Windows" is
used.
● Microsoft® Office SharePoint® Server
2007
Arrow Symbols in This Manual
● Microsoft® SharePoint® Server 2010
Right-arrow symbols (→) are used to separate icons or menu options
you should select in succession.
Example: Click the [Start] menu → [All Programs].
● Microsoft® Windows® SharePoint®
Services 2.0 / 3.0
Screen Examples in This Manual
● Microsoft® SharePoint® Foundation
2010
● Microsoft® Office Word 2002
Word
● Microsoft® Office Word 2003
●
Microsoft®
Office Word 2007
● Microsoft® Word 2010
● Microsoft® Office Excel® 2002
Excel
● Microsoft® Office Excel® 2003
● Microsoft® Office Excel® 2007
● Microsoft Excel® 2010
● Microsoft® Office PowerPoint® 2002
PowerPoint
● Microsoft® Office PowerPoint® 2003
The screen examples in this manual are subject to change without
notice in the interest of product improvement.
If the actual displayed screen differs from the screen examples in this
manual, operate by following the actual displayed screen while
referring to the user's manual of the scanner application you are using.
The screen examples used in this manual are of ScanSnap mode.
This manual uses screenshots from Windows Vista. The windows that
appear and the operations differ by the operating system that you are
using.
Contents
Index
How to Use
This Manual
Introduction
Conventions
Prior to Use
Scanning with
ScanSnap
mode
● Microsoft® Office PowerPoint® 2007
● Microsoft® PowerPoint® 2010
Adobe® Acrobat®
Adobe Acrobat
Adobe® Reader®
Adobe Reader
ABBYY FineReader for ScanSnap™
ABBYY FineReader for
ScanSnap
ScandAll PRO ScanSnap mode Add-in
ScanSnap mode
6
TOP
Contents
Contents
Index
How to Use This Manual ................................................................................................................................. 2
How to Use
This Manual
Introduction ..................................................................................................................................................... 3
About This Product ........................................................................................................................................ 3
Trademarks .................................................................................................................................................. 3
Manufacturer ................................................................................................................................................ 3
Use in High-Safety Applications ........................................................................................................................ 4
Conventions .................................................................................................................................................... 5
Symbols Used in This Manual ..........................................................................................................................
Abbreviations Used in This Manual ...................................................................................................................
Arrow Symbols in This Manual .........................................................................................................................
Screen Examples in This Manual ......................................................................................................................
5
5
6
6
Chapter 1 Prior to Use ..................................................................................................................................... 9
1.1 Overview ..............................................................................................................................................
What is ScanSnap mode? ....................................................................................................................
1.2 Features ...............................................................................................................................................
1.3 System Requirements .............................................................................................................................
System Requirements .........................................................................................................................
Supported Models ..............................................................................................................................
1.4 Launching .............................................................................................................................................
10
10
11
12
12
12
13
Introduction
Conventions
Prior to Use
Scanning with
ScanSnap
mode
Chapter 2 Scanning with ScanSnap mode .................................................................................................. 16
2.1 ScanSnap mode Icon and Menu ................................................................................................................ 17
7
ScanSnap mode Icon ..........................................................................................................................
Right-Click Menu ................................................................................................................................
Left-Click Menu ..................................................................................................................................
Quick Menu .......................................................................................................................................
2.2 Scanning Methods ..................................................................................................................................
Selecting an Application After Scanning (Quick Menu) ...............................................................................
Specifying an Application Before Scanning (Left-Click Menu) ......................................................................
2.3 Scanning with the Quick Menu ..................................................................................................................
2.4 Scanning with the Left-Click Menu .............................................................................................................
2.5 Changing Scan Settings ..........................................................................................................................
2.6 Saving Scan Settings ..............................................................................................................................
Registering Scan Settings ....................................................................................................................
Scanning with a Registered Profile .........................................................................................................
2.7 Updating Firmware/Drivers .......................................................................................................................
Updating Firmware .............................................................................................................................
Updating Drivers ................................................................................................................................
2.8 Functional Difference for Each Scanner Model .............................................................................................
Carrier Sheet Compatibility ...................................................................................................................
17
17
18
19
20
20
20
21
24
27
29
29
31
33
33
33
35
35
Index .............................................................................................................................................................. 36
TOP
Contents
Index
How to Use
This Manual
Introduction
Conventions
Prior to Use
Scanning with
ScanSnap
mode
8
TOP
Chapter 1 Prior to Use
Contents
Index
This chapter describes the overview, features and starting procedures of ScandAll PRO.
1.1 Overview .......................................................................................................................................................
1.2 Features ........................................................................................................................................................
1.3 System Requirements ......................................................................................................................................
1.4 Launching ......................................................................................................................................................
10
11
12
13
How to Use
This Manual
Introduction
Conventions
Prior to Use
Scanning with
ScanSnap
mode
TOP
1.1 Overview
What is ScanSnap mode?
ScanSnap mode, an application for additional functions, can be
installed when ScandAll PRO is installed.
Configured for a scanner driver, ScanSnap mode allows you to scan a
document to make image data. A TWAIN driver is required for
scanning.
You can save the scanned images as PDF or JPEG files with a single
press of the [Scan] button on the scanner, without configuring any
particular settings.
It provides a post-scan choice where you select an application from the
"Quick Menu" which appears after scanning, and then perform tasks
such as creating image data, or sending/printing the scanned images.
Contents
Index
How to Use
This Manual
Introduction
Conventions
● For details about ScandAll PRO, refer to the ScandAll
PRO V2.0 User's Guide.
● For details about the functions of ScanSnap mode, refer
to the ScanSnap mode Help.
● ScanSnap mode outputs image data for document filing
with an Image Scanner fi Series scanner. The image
quality cannot be adjusted. When you need to adjust
the image quality, use ScandAll PRO for scanning
documents.
Prior to Use
Scanning with
ScanSnap
mode
10
TOP
1.2 Features
ScanSnap mode has the following features:
● Outputs the scanned images as PDF or JPEG files with a single
press of the [Scan] button on the scanner. You can scan long pages
by pressing the [Send to] button on the scanner.
Contents
Index
How to Use
This Manual
● Sends the scanned image and the save directory information by
sending an e-mail or printing.
● Monitors the scanner status and indicates whether the scanner can
be used with the icon on the taskbar.
● Converts the scanned images into the following types of files by
using ABBYY FineReader for ScanSnap. ABBYY FineReader for
ScanSnap can be installed at the same time as ScanSnap mode.
Introduction
Conventions
– Word
– Excel
– PowerPoint
● Automatically saves the scanned images in the specified server by
linking with SharePoint.
● Allows editing scanned images (PDF files). You can overwrite the
data, or save the edited data under a different file name.
Prior to Use
Scanning with
ScanSnap
mode
11
TOP
1.3 System Requirements
Contents
Index
System Requirements
Memory
2 GB or more recommended
ScanSnap mode including ScandAll PRO has the following system
requirements:
Display
resoultion
(*2)
1024 × 768 pixels or more, and 65536 colors or more
Disk space
1.3 GB or more of free space (*3)
Operating
system (*1)
CPU
Windows® XP Home Edition
(Service Pack 3 or later)
Windows® XP Professional
(Service Pack 3 or later)
Windows® XP Professional x64 Edition
(Service Pack 2 or later)
Windows Server® 2003 R2, Standard Edition
(Service Pack 2 or later)
Windows Server® 2003 R2, Standard x64 Edition
(Service Pack 2 or later)
Windows Vista® Home Basic (32/64-bit)
(Service Pack 1 or later)
Windows Vista® Home Premium (32/64-bit)
(Service Pack 1 or later)
Windows Vista® Business (32/64-bit)
(Service Pack 1 or later)
Windows Vista® Enterprise (32/64-bit)
(Service Pack 1 or later)
Windows Vista® Ultimate (32/64-bit)
(Service Pack 1 or later)
Windows Server® 2008 Standard (32/64-bit)
Windows Server® 2008 R2 Standard (64-bit)
Windows® 7 Home Premium (32/64-bit)
Windows® 7 Professional (32/64-bit)
Windows® 7 Enterprise (32/64-bit)
Windows® 7 Ultimate (32/64-bit)
Intel® Core™ 2 Duo 2.2 GHz or higher
recommended
*1 :
ScandAll PRO is supported as a 32-bit application which can
operate on a 64-bit operating system.
*2 :
When the font size is too large, some screens may not be
shown correctly. In this case, decrease the font size.
*3 :
Required disk space varies according to the file size of the
scanned images.
Supported Models
How to Use
This Manual
Introduction
Conventions
Prior to Use
ScanSnap mode supports the following models:
● fi-6670 / fi-6670A / fi-6750S / fi-6770 / fi-6770A
● fi-5530C2
● fi-6130Z / fi-6230Z / fi-6140Z / fi-6240Z
Scanning with
ScanSnap
mode
● fi-6130 / fi-6230 / fi-6140 / fi-6240
● fi-6110
Depending on the model, updating firmware or drivers might be
required for operation. For details, refer to "2.7 Updating Firmware/
Drivers" (page 33).
!
In the following cases, ScanSnap mode cannot be used :
● When the scanner is connected to a fi-5000N
● When the scanner is connected using a SCSI cable
12
TOP
1.4 Launching
1.
Contents
Index
Select the [Start] menu → [All Programs] → [Fujitsu
ScandAll PRO] → [ScanSnap mode].
aA dialog box to confirm whether to continue with the startup
process appears.
How to Use
This Manual
Introduction
Conventions
Prior to Use
When the [Do not show this message again] check box is
selected, this dialog box will not appear from next time.
2.
Click the [Continue] button.
aScanSnap mode starts up, and the icon appears on the
taskbar.
Scanning with
ScanSnap
mode
13
!
● To use ScanSnap mode, TWAIN driver must be
installed.
– When updating a driver is required
How to Use
This Manual
● If you start another application which uses the scanner
when ScanSnap mode is running, take note of the
following:
– To start ScandAll PRO
If you start ScandAll PRO when ScanSnap mode is
running, ScanSnap mode is suspended, and you can
use the scanner with ScandAll PRO.
For details about the updating method, refer to "2.7
Updating Firmware/Drivers" (page 33).
– To start an application other than ScandAll PRO
You need to exit the ScanSnap mode. Right-click the
ScanSnap mode icon and select [Exit].
● In Windows Server 2008 R2 Standard or Windows 7,
the ScanSnap mode icon is displayed in the menu that
– When updating firmware is required
Contents
Index
● To start ScanSnap mode, exit other applications that
use the scanner.
● When one of the following dialog boxes is shown,
updating scanner firmware or drivers is required.
TOP
Introduction
Conventions
appears when you click
on the taskbar.
To always show the ScanSnap mode icon on the
taskbar, drag the icon and drop it onto the taskbar.
Prior to Use
Scanning with
ScanSnap
mode
● To start automatically when you login, select the [Start]
menu → [All Programs] → [Fujitsu ScandAll PRO] →
[Tools] → [Add ScanSnap mode to Startup].
To NOT start automatically when you login, select the
[Start] menu → [All Programs] → [Fujitsu ScandAll
PRO] → [Tools] → [Remove ScanSnap mode from
Startup].
14
● When you press the [Scan] button on the scanner just
after power on, the event selection screen of the
scanner may be displayed. When you disable the event
selection screen, configures settings with the following
procedures.
The windows that appear and the operations differ by
the operating system that you are using.
TOP
Contents
Index
How to Use
This Manual
1. Select the [Start] menu → [Control Panel].
aThe [Control Panel] window appears.
2. Select the [Hardware and Sound] icon.
Introduction
aThe [Hardware and Sound] window appears.
3. Select the [Scanners and Cameras] icon.
aThe [Scanners and Cameras] window appears.
Conventions
4. Double-click the scanner icon.
aThe scanner properties dialog box appears.
5. Select the [Events] tab, and then select [Take no
action] on [Actions].
Prior to Use
Scanning with
ScanSnap
mode
15
TOP
Chapter 2 Scanning with ScanSnap mode
Contents
Index
This chapter describes how to scan documents with the scanner using ScanSnap mode.
ScanSnap mode outputs image data for document filing with an Image Scanner fi Series scanner. The image quality cannot be adjusted. When you
need to adjust the image quality, use ScandAll PRO for scanning documents.
For details about scanning documents with the scanner using ScandAll PRO, refer to ScandAll PRO V2.0 User's Guide.
2.1 ScanSnap mode Icon and Menu .........................................................................................................................
2.2 Scanning Methods ...........................................................................................................................................
2.3 Scanning with the Quick Menu ...........................................................................................................................
2.4 Scanning with the Left-Click Menu ......................................................................................................................
2.5 Changing Scan Settings ...................................................................................................................................
2.6 Saving Scan Settings .......................................................................................................................................
2.7 Updating Firmware/Drivers ................................................................................................................................
2.8 Functional Difference for Each Scanner Model ......................................................................................................
How to Use
This Manual
17
20
21
24
27
29
33
35
Introduction
Conventions
Prior to Use
Scanning with
ScanSnap
mode
TOP
2.1 ScanSnap mode Icon and Menu
ScanSnap mode Icon
Index
Right-Click Menu
When ScanSnap mode is running, the ScanSnap mode icon
appears on the taskbar.
The ScanSnap mode icon also indicates whether or not ScanSnap
mode is successfully communicating with the scanner. The
appearance of the icon changes according to the communication
status as shown below.
Status
Contents
This menu appears when you right-click the ScanSnap mode icon
.
How to Use
This Manual
Introduction
Icon on the Taskbar
Communicating
Conventions
Not communicating
Clicking this icon shows menus for which you can configure the
settings to start scanning and change scan settings.
Right-click
Menu option
Used to...
In Windows Server 2008 R2 Standard or Windows 7, the
ScanSnap mode icon is displayed in the menu that
Duplex scan
appears when you click
on the taskbar.
To always show the ScanSnap mode icon on the taskbar,
drag the icon and drop it onto the taskbar.
Scan both sides of the document.
Follows [Scan Button Settings] for
other settings.
Simplex scan
Scan only one side of the document.
Follows [Scan Button Settings] for
other settings.
Flatbed scan
Scan the document with the flatbed.
Follows [Scan Button Settings] for
other settings.
This option is available when the
connected scanner is equipped with a
flatbed.
Prior to Use
Scanning with
ScanSnap
mode
17
Menu option
Used to...
Scan Button Settings
Display the ScandAll PRO (ScanSnap
mode) setup dialog box.
You can configure the scan settings in
this dialog box when performing a
scan.
You can also configure whether or not
to use the Quick Menu.
For details, refer to "2.2 Scanning
Methods" (page 20).
Profile Management
Show scanning results
TOP
Left-Click Menu
Contents
This menu appears when you left-click the ScanSnap mode icon
.
Index
How to Use
This Manual
Introduction
Display the [Profile Management]
dialog box.
You cannot select [Profile
Management] when the [Use Quick
Menu] check box is selected in the
ScandAll PRO (ScanSnap mode)
setup dialog box.
Conventions
After scanning is completed, a
message appears to inform you of
scan results, whether blank pages are
removed or the orientation is changed.
Prior to Use
Left-click
Scanning with
ScanSnap
mode
If you are not using the Quick Menu, you can select a profile from the
Left-Click Menu.
For details about how to save and manage profiles, refer to "2.6 Saving
Scan Settings" (page 29).
Help
Exit
Display the Help topics, the version
information, and the setup dialog box.
Exit ScanSnap mode.
Clear the [Use Quick Menu] check box in the ScandAll
PRO (ScanSnap mode) setup dialog box to display the
Left- Click Menu. The Left-Click Menu does not appear
when this check box is selected.
18
TOP
Quick Menu
To display the Quick Menu, perform a scan after selecting the [Use
Quick Menu] check box in the ScandAll PRO (ScanSnap mode) setup
dialog box.
Menu option
Used to...
Contents
Scan to
PowerPoint(R) (*1)
Create a PowerPoint file by converting
the scanned image data into text data.
Index
Scan to SharePoint Save the scanned image data in the
(*2)
SharePoint site.
Scan to Picture
Folder
Create JPEG files from the scanned
image data, and save them in the
pictures folder.
Edit in ScandAll
PRO (PDF Edit)
Edit scanned image data (PDF files).
Action list
Description of
selected action
Item List
*1 :
Displayed when ABBYY FineReader for ScanSnap is installed.
*2 :
Displayed when Scan to Microsoft SharePoint is installed.
The application of the selected item starts up and performs the
selected action.
Menu option
Used to...
Scan to Folder
Create PDF or JPEG files from the
scanned image data, and save them in
a specified folder (shared folder).
Scan to E-mail
Create PDF or JPEG files from the
scanned image data, and start an e-mail
program with the PDF or JPEG files
attached to an e-mail message.
Scan to Print
Print the scanned image data with a
printer.
Scan to Word (*1)
Create a Word file by converting the
scanned image data into text data.
Scan to Excel (*1)
Create an Excel file by converting the
scanned image data into text data.
For details about the functions of ScandAll PRO (PDF
Edit), refer to the ScandAll PRO (PDF Edit) Help.
How to Use
This Manual
Introduction
Conventions
Prior to Use
Scanning with
ScanSnap
mode
19
TOP
2.2 Scanning Methods
There are two ways to scan documents by using ScanSnap mode.
Selecting an Application After Scanning (Quick
Menu)
This is an easy way to perform scanning even if you are using the
scanner for the first time.
It provides a post-scan choice where you select an application from the
"Quick Menu" which appears after scanning, and then perform tasks
such as creating image data, or sending/printing the scanned images.
Note that this is the default scanning method.
For details, refer to "2.3 Scanning with the Quick Menu" (page 21).
Contents
Index
How to Use
This Manual
Introduction
Conventions
Specifying an Application Before Scanning (LeftClick Menu)
This is a pre-scan choice where you specify the application and scan
settings beforehand.
From the "Left-Click Menu" which appears when you click the
ScanSnap mode icon on the taskbar with the left mouse button, you
can perform scanning by simply selecting an application (predefined
scan settings) and pressing the [Scan] button on the scanner.
This method is convenient when you want to scan documents without
having to configure the scan settings each time.
For details, refer to "2.4 Scanning with the Left-Click Menu"
(page 24).
Prior to Use
Scanning with
ScanSnap
mode
20
TOP
2.3 Scanning with the Quick Menu
1.
Check for the ScanSnap mode icon on the taskbar.
Contents
4.
5.
● If the ScanSnap mode icon
is not displayed, start
ScanSnap mode. For details on how to start ScanSnap
mode, refer to "1.4 Launching" (page 13).
● In Windows Server 2008 R2 Standard or Windows 7,
the ScanSnap mode icon is displayed in the menu that
appears when you click
on the taskbar.
For information on how to display the ScanSnap mode
icon on the taskbar, refer to "2.1 ScanSnap mode Icon
and Menu" (page 17).
● To start automatically when you login, select the [Start]
menu → [All Programs] → [Fujitsu ScandAll PRO] →
[Tools] → [Add ScanSnap mode to Startup].
2.
Select [Scan Button Settings] from the Right-Click
Menu.
For details about Right-Click Menu, refer to "Right-Click Menu"
(page 17).
Index
Click the [OK] button to close the ScandAll PRO
(ScanSnap mode) setup dialog box.
Load the document in the scanner.
How to Use
This Manual
For how to load the document in the scanner, refer to the
Operator's Guide for the scanner you are using.
6.
Press the [Scan] button on the scanner.
Introduction
aScanning starts.
!
● Do not connect and disconnect the scanner and other
USB devices during scanning.
Conventions
● Do not switch users during scanning. Doing so will
cancel scanning.
Prior to Use
Scanning with
ScanSnap
mode
aThe ScandAll PRO (ScanSnap mode) setup dialog box
appears.
3.
Select the [Use Quick Menu] check box.
If [Use Quick Menu] is not selected, the Quick Menu is not
used for scanning. For details about scanning documents
without using the Quick Menu, refer to "2.4 Scanning with
the Left-Click Menu" (page 24).
21
● The default scanning mode (scanning side) when
pressing the [Scan] button differs depending on the
connected scanners such as the following:
– When the connected scanner is equipped with a
flatbed
[Auto Scan]
– When the connected scanner is not equipped with a
flatbed
[Duplex Scan (Double-sided)]
You can change the setting of the [Scan] button by
selecting from the [Scanning side] drop-down list on the
[Scanning] tab in the ScandAll PRO (ScanSnap mode)
setup dialog box.
● You can scan long pages (up to 863 mm / 33.98 in.) by
pressing the [Send to] button on the scanner.
● You can also start scanning from the ScanSnap mode
icon
on the taskbar. For details, refer to "Right-Click
Menu" (page 17).
status (recommended)] check box on the [Status
Display] tab in the [ScandAll PRO (ScanSnap mode) Preferences] dialog box, which appears when you click
[Help] → [Preferences] from the Right-Click Menu.
For more information, refer to the ScanSnap mode
Help.
● When you press the [Scan] button on the scanner while
scanning a document, the event selection window of the
scanner may appear. When you disable the event
selection screen, configures settings with the following
procedures.
The windows that appear and the operations differ by
the operating system that you are using.
1. Select the [Start] menu → [Control Panel].
aThe [Control Panel] window appears.
TOP
Contents
Index
How to Use
This Manual
Introduction
Conventions
2. Select the [Hardware and Sound] icon.
aThe [Hardware and Sound] window appears.
3. Select the [Scanners and Cameras] icon.
Prior to Use
aThe [Scanners and Cameras] window appears.
4. Double-click the scanner icon.
aA window appears during scanning to show the scanning
process.
aThe scanner properties dialog box appears.
5. Select the [Events] tab, and then select [Take no
action] on [Actions].
Scanning with
ScanSnap
mode
aThe Quick Menu appears when scanning is completed.
● If you do not want to display a window to show the
scanning process, clear the [Show the scan progress
22
7.
TOP
From the application list of the Quick Menu, click an
icon for the item to be performed.
Pointing an item with the mouse pointer displays an explanation
of its action. For details about items, refer to "Quick Menu"
(page 19).
!
● You cannot start scanning when the Quick Menu is
displayed. Either select an icon from the Quick Menu
and finish the process, or close the Quick Menu before
you perform the next scan.
Contents
Index
How to Use
This Manual
Introduction
● Do not move, delete, or rename the scanned image in
other applications when the Quick Menu is displayed.
● By default, documents are scanned with [Image quality]
set to [Auto] and [Color mode] set to [Auto Color
Detection].
● ScanSnap mode outputs image data for document filing
with an Image Scanner fi Series scanner. The image
quality cannot be adjusted. When you need to adjust
the image quality, use ScandAll PRO for scanning
documents. For details about scanning documents with
the scanner using ScandAll PRO, refer to ScandAll
PRO V2.0 User's Guide.
● Before scanning documents of printed or handwritten
text, select the [Scanning] tab → [Option] button →
[Setting for text only document] check box from the
ScandAll PRO (ScanSnap mode) setup dialog box.
Conventions
Prior to Use
Scanning with
ScanSnap
mode
23
TOP
2.4 Scanning with the Left-Click Menu
1.
Check for the ScanSnap mode icon on the taskbar.
Contents
4.
Index
Select a profile by using one of the following methods.
● Select a profile from the [Profile] drop-down list on the
ScandAll PRO (ScanSnap mode) setup dialog box.
● If the ScanSnap mode icon
is not displayed, start
ScanSnap mode. For details on how to start ScanSnap
mode, refer to "1.4 Launching" (page 13).
● Select a profile from the Left-Click Menu.
Before selecting a profile from the Left-Click Menu, close the
ScandAll PRO (ScanSnap mode) setup dialog box.
5.
● In Windows Server 2008 R2 Standard or Windows 7,
the ScanSnap mode icon is displayed in the menu that
appears when you click
on the taskbar.
For information on how to display the ScanSnap mode
icon on the taskbar, refer to "2.1 ScanSnap mode Icon
and Menu" (page 17).
● To start automatically when you login, select the [Start]
menu → [All Programs] → [Fujitsu ScandAll PRO] →
[Tools] → [Add ScanSnap mode to Startup].
2.
Select [Scan Button Settings] from the Right-Click
Menu.
For details about Right-Click Menu, refer to "Right-Click Menu"
(page 17).
How to Use
This Manual
Introduction
Load the document in the scanner.
For how to load the document in the scanner, refer to the
Operator's Guide for the scanner you are using.
6.
Press the [Scan] button on the scanner.
Conventions
aScanning starts.
!
● Do not connect and disconnect the scanner and other
USB devices during scanning.
Prior to Use
● Do not switch users during scanning. Doing so will
cancel scanning.
Scanning with
ScanSnap
mode
aThe ScandAll PRO (ScanSnap mode) setup dialog box
appears.
3.
Clear the [Use Quick Menu] check box.
If [Use Quick Menu] is selected, the Quick Menu is used
for scanning. For details about scanning documents with
Quick Menu Mode, refer to "2.3 Scanning with the Quick
Menu" (page 21).
24
● The default scanning mode (scanning side) when
pressing the [Scan] button differs depending on the
connected scanners such as the following:
– When the connected scanner is equipped with a
flatbed
[Auto Scan]
– When the connected scanner is not equipped with a
flatbed
[Duplex Scan (Double-sided)]
You can change the setting of the [Scan] button by
selecting from the [Scanning side] drop-down list on the
[Scanning] tab in the ScandAll PRO (ScanSnap mode)
setup dialog box.
● You can scan long pages (up to 863 mm / 33.98 in.) by
pressing the [Send to] button on the scanner.
● You can also start scanning from the ScanSnap mode
icon
on the taskbar. For details, refer to "Right-Click
Menu" (page 17).
status (recommended)] check box on the [Status
Display] tab in the [ScandAll PRO (ScanSnap mode) Preferences] dialog box, which appears when you click
[Help] → [Preferences] from the Right-Click Menu.
For more information, refer to the ScanSnap mode
Help.
● When you press the [Scan] button on the scanner while
scanning a document, the event selection window of the
scanner may appear. When you disable the event
selection screen, configures settings with the following
procedures.
The windows that appear and the operations differ by
the operating system that you are using.
1. Select the [Start] menu → [Control Panel].
aThe [Control Panel] window appears.
TOP
Contents
Index
How to Use
This Manual
Introduction
Conventions
2. Select the [Hardware and Sound] icon.
aThe [Hardware and Sound] window appears.
3. Select the [Scanners and Cameras] icon.
Prior to Use
aThe [Scanners and Cameras] window appears.
4. Double-click the scanner icon.
aA window appears during scanning to show the scanning
process.
aThe scanner properties dialog box appears.
5. Select the [Events] tab, and then select [Take no
action] on [Actions].
Scanning with
ScanSnap
mode
● By default, documents are scanned with [Image quality]
set to [Auto] and [Color mode] set to [Auto Color
Detection].
aThe previously specified application starts up.
● If you do not want to display a window to show the
scanning process, clear the [Show the scan progress
● ScanSnap mode outputs image data for document filing
with an Image Scanner fi Series scanner. The image
quality cannot be adjusted. When you need to adjust
the image quality, use ScandAll PRO for scanning
documents. For details about scanning documents with
25
the scanner using ScandAll PRO, refer to ScandAll
PRO V2.0 User's Guide.
● Before scanning documents of printed or handwritten
text, select the [Scanning] tab → [Option] button →
[Setting for text only document] check box from the
ScandAll PRO (ScanSnap mode) setup dialog box.
● The application that starts after scanning varies
depending on what is selected in the [Application] tab in
the ScandAll PRO (ScanSnap mode) setup dialog box.
For more information, refer to the ScanSnap mode
Help.
TOP
Contents
Index
How to Use
This Manual
Introduction
Conventions
Prior to Use
Scanning with
ScanSnap
mode
26
TOP
2.5 Changing Scan Settings
Use the Right-Click Menu to change scan settings for ScanSnap mode.
The following explains how to change scan settings.
The scan button settings vary depending on whether you
are using the Quick Menu.
This section describes the ScandAll PRO (ScanSnap
mode) setup dialog box when the Quick Menu is not used.
Contents
2.
Index
Click the [Detail] button to switch to the detail view
mode.
Outline view
Detail view
How to Use
This Manual
Introduction
1.
Select [Scan Button Settings] from the Right-Click
Menu.
For details about Right-Click Menu, refer to "Right-Click Menu"
(page 17).
aThe ScandAll PRO (ScanSnap mode) setup dialog box
appears.
You can open the ScandAll PRO (ScanSnap mode) setup
dialog box by the following ways:
● Double-click the ScanSnap mode icon
The ScandAll PRO (ScanSnap mode) setup dialog box
retains the display status from the last time the scanner
was used. For example, if it was closed in detail view
mode, the dialog box is displayed in detail mode next time
you open it.
Conventions
Prior to Use
.
● Press [Ctrl], [Shift], and [Space] keys simultaneously.
● Select the [Start] menu → [All Programs] → [Fujitsu
ScandAll PRO] → [Tools] → [Setup].
Scanning with
ScanSnap
mode
27
3.
TOP
Change the scan settings in each tab in the ScandAll
PRO (ScanSnap mode) setup dialog box.
For details, refer to the ScanSnap mode Help.
Setting example:
Contents
● Scan quickly
Index
● Scan in high quality
● Scan in color
● Scan in black and white
How to Use
This Manual
● Enable or disable [Setting for text only
document]
● Enable or disable [Allow automatic blank page
removal]
Introduction
● Enable or disable [Correct skewed character
strings automatically]
● Enable or disable [Set the document with its
face up]
Conventions
● Enable or disable [Continue scanning after
current scan is finished]
The following items can be configured in each tab:
● File format of the scanned images a [File option] tab
● Applications that start after scanning
a [Application] tab
Prior to Use
Setting example:
● Saving destination of the scanned images a [Save] tab
● File format
● Scanning mode a [Scanning] tab
● Set a marked character string as a keyword
(Marker Index)
Scanning with
ScanSnap
mode
● Text-recognition
● Specify the number of PDF file pages
● Set a password for PDF file
● Document size to be scanned a [Paper size] tab
● File size of the scanned images a [Compression] tab
4.
Click the [OK] or [Apply] button.
aScan settings are changed.
28
TOP
2.6 Saving Scan Settings
Contents
You can save up to 20 sets of pre-defined settings called profiles in the
Left-Click Menu.
You can easily retrieve and use the saved profiles by simply leftclicking the ScanSnap mode icon
The following describes the operational methods.
Registering Scan Settings
.
1.
Index
How to Use
This Manual
Select [Scan Button Settings] from the Right-Click
Menu.
For details about Right-Click Menu, refer to "Right-Click Menu"
(page 17).
Introduction
aThe ScandAll PRO (ScanSnap mode) setup dialog box
appears.
2.
Clear the [Use Quick Menu] check box.
3.
Change the scan settings in each tab in the ScandAll
PRO (ScanSnap mode) setup dialog box.
For details, refer to the ScanSnap mode Help.
Conventions
Prior to Use
Scanning with
ScanSnap
mode
Left-click
Once the frequently used scan settings are saved as profiles, you do
not have to open the setup dialog box to change settings every time
you perform scanning. You can easily switch to an appropriate profile
you want by just clicking on it.
The description here applies only when the Quick Menu is
not used.
29
4.
TOP
Select [Add Profile] from the [Profile] drop-down list.
Contents
Index
How to Use
This Manual
Introduction
6.
aThe [Add new profile] dialog box appears.
5.
Type in a new profile name and click the [OK] button.
Click the [OK] button to close the ScandAll PRO
(ScanSnap mode) setup dialog box.
Conventions
aThe new profile is saved.
Prior to Use
Scanning with
ScanSnap
mode
aThe new profile name appears in the [Profile] drop-down list.
30
● You can save up to 20 profiles, including the [Standard]
profile. Note that the [Standard] profile cannot be
deleted.
● You can change the display order of profiles except for
the [Standard] profile.
TOP
Scanning with a Registered Profile
Contents
Index
1.
Left-click the ScanSnap mode icon
.
How to Use
This Manual
1. Right-click the ScanSnap mode icon
and select
[Profile Management] to display the [Profile
Management] dialog box.
Introduction
2. Select a profile from the list to arrange profiles in a
different order.
3. Click the [Up] or [Down] button to move the profile.
Conventions
Prior to Use
Scanning with
ScanSnap
mode
4. Click the [Close] button.
aThe Left-Click Menu appears. The icon for the application that
starts after scanning is displayed on the left side of the profile
name.
31
2.
TOP
Select a profile to be used for scanning.
Contents
aThe selected profile is checked, and the menu is closed.
Index
How to Use
This Manual
3.
Load the document in the scanner.
Introduction
For how to load the document in the scanner, refer to the
Operator's Guide for the scanner you are using.
4.
Press the [Scan] button on the scanner.
Conventions
aThe document is scanned with the selected profile.
Prior to Use
Scanning with
ScanSnap
mode
32
TOP
2.7 Updating Firmware/Drivers
Contents
When you try to use ScanSnap mode, a dialog box prompting you to
update the firmware or drivers may appear.
● Do not run other applications
● Dialog box prompting you to update the firmware
When the following dialog box is shown, refer to "Updating
Firmware" (page 33) and update the firmware.
Even if the firmware or driver update is canceled, when
the scanner is powered on again or ScanSnap mode is
restarted, a dialog box prompting you to update the
firmware or drivers will appear.
Updating Firmware
1.
Click the [OK] button in the following dialog box.
● Dialog box prompting you to update drivers
When the following dialog box is shown, refer to "Updating Drivers"
(page 33) and update drivers.
Index
How to Use
This Manual
Introduction
Conventions
Prior to Use
aA firmware update tool starts up.
Follow the instructions on the window to update the firmware.
Scanning with
ScanSnap
mode
Updating Drivers
!
When the firmware update tool or driver installer is
running, take note of the following:
1.
Load the Setup DVD-ROM that was used during the
installation of ScanSnap mode in the computer.
● Do not connect or disconnect other USB devices
● Do not power off the computer
● Do not log off the computer
33
2.
TOP
Click the [OK] button in the following dialog box.
Contents
Index
How to Use
This Manual
Introduction
aThe driver's installer starts up.
Follow the instructions on the window to continue with the
installation.
!
● If driver installation is canceled halfway, and the
scanner is no longer detected, restart the computer.
Conventions
● After the driver is installed, restarting the computer may
be required.
Prior to Use
Scanning with
ScanSnap
mode
34
TOP
2.8 Functional Difference for Each Scanner Model
Carrier Sheet Compatibility
When the Carrier Sheet is scanned using a scanner model for which
the Carrier Sheet cannot be used, a multifeed occurs.
The following table shows the Carrier Sheet compatibility for each
scanner model.
Scanner model
Carrier Sheet
fi-6670
fi-6670A
fi-6750S
fi-6770
fi-6770A
NA
fi-5530C2
NA
fi-6130Z
fi-6230Z
fi-6140Z
fi-6240Z
OK
Contents
Index
How to Use
This Manual
Introduction
Conventions
fi-6130
fi-6230
fi-6140
fi-6240
OK
fi-6110
OK
Prior to Use
Scanning with
ScanSnap
mode
OK: Available
NA: Not available
35
Index
C
changing scan settings .............................................. 27
conventions ............................................................... 5
TOP
Contents
Index
How to Use
This Manual
F
features .................................................................. 11
H
Introduction
how to use this manual ................................................ 2
I
icon and menu ......................................................... 17
introduction ............................................................... 3
Conventions
L
launching ................................................................ 13
Left-Click Menu ........................................................ 18
Prior to Use
Q
Quick Menu ............................................................. 19
R
Right-Click Menu ...................................................... 17
Scanning with
ScanSnap
mode
S
saving scan settings .................................................. 29
scanning methods .................................................... 16
Left-Click Menu ................................................ 20, 24
Quick Menu ..................................................... 20, 21
system requirements ................................................. 12
36
TOP
Contents
Index
How to Use
This Manual
Introduction
Conventions
ScandAll PRO ScanSnap mode Add-in V1.0 User's Guide
P2WW-2862-01ENZ0
Issue date: October 2011
Issued by: PFU LIMITED
● The contents of this manual are subject to change without notice.
Prior to Use
Scanning with
ScanSnap
mode
● PFU LIMITED assumes no liability for incidental or consequential damages arising from the use of this Product, and any claims by a third party.
● Copying of the contents of this manual, in whole or in part, as well as the scanner applications is prohibited under the copyright law.
37