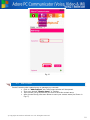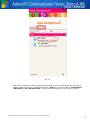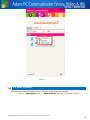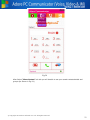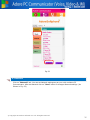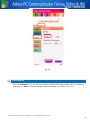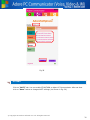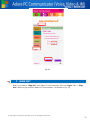
1
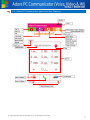
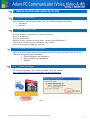
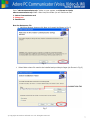
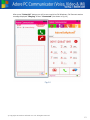
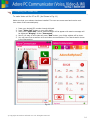
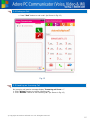
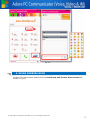
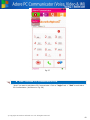
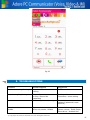
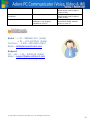
Adore Softphone is a registered trademark. No part of this User’s Manual Guide may be copied, altered, or transferred to, any other media without written explicit concern from Adore Infotech Pvt. Ltd. All brand or product names appearing herein are trademarks or registered trademarks of their respective holders. Adore Infotech has developed this user manual guide to the best of its knowledge, but does not guarantee that the program will meet all requirements of the user. No warranty is made in regard to specifications or features. Adore InfoTech retains the right to make alterations to the contents of this user manual guide without the obligation to inform third parties. 1. Welcome to Adore PC Communicator 1.1 ‐ About Adore PC Communicator 1.1.1 What’s New 1.2 – Adore PC Communicator Features 1.3 ‐ Adore PC Communicator panel and User Features 2. Installations and Uninstallation 2.1 ‐ Account Information 2.2 ‐ System Requirements 2.3 ‐ Multimedia Device Requirements 2.4 ‐ Install Application 2.5 ‐ Uninstall Adore PC Communicator 2.6 ‐ Start Adore PC Communicator 3. Configuring Adore PC Communicator 3.1 ‐ Register PC Communicator 3.2 ‐ Placing a Audio Call 3.3 – Placing A Video Call 3.4 ‐ Ending a Call 3.5 ‐ Handling an Incoming Call 3.6 – Using IM (Instant Messaging) 4. Using Address Book 4.1 – Add Group 4.2 – Add Contact 4.3 – Show Contacts 5. History 5.1 – Show History 5.2 – Call History 5.3 – Clear History 6. Settings 6.1 ‐ General 6.2 ‐ Media 6.3 ‐ Network 6.4 ‐ Presence 6.5 – Messages 6.6 – NATT 7. Sign out Adore PC Communicator 8. EXIT 9. Troubleshooting © Copyright 2014 Adore Infotech Pvt. Ltd. All Rights Reserved 3 1. WELCOME TO ADORE PC COMMUNICATOR 1.1 – About Adore PC Communicator Turn Your Windows Based PC into an Video & VoIP Phone Adore PC Communicator is a softphone application which is developed specially for the PC based on the Windows operating system. It can allow you to use your PC, Laptop or Notebook to make voice and video calls along with the newly integrated Instant Messaging and Data transfer functionality. Armed with the latest technology of VoIP Communication, it is just the fun to install and use. Note:- After download the Adore Communicator You will need to get testing Accounts for Sip to Sip Voice, Video and IM testing.Please fill the form to get testing Account from URL: http://adoresoftphone.com/get-account.html 1.1.1 What’s New User Friendly, Advanced and Smoother GUI 1.2 – PC Communicator Features Audio Call Video Call Instant Messaging (IM) Smileys Rich text Format File Transfer Hold / Unhold Address Book History NAT/Firewall support STUN/TURN server Support Codec Supported :Audio Codec(G711,GSM,iLBC,Speex) Video Codec (H264, H.263) Codecs Selection DTMF (RFC 2833) Registration Timeout Acoustic Echo Cancellation Packet concealing Packet Lost Concealment (PLC) Comfort Noise Generator (CNG) Resampling Customized with company logo/name Unlimited user license © Copyright 2014 Adore Infotech Pvt. Ltd. All Rights Reserved 4 1.3 - Adore PC Communicator panel and User Features © Copyright 2014 Adore Infotech Pvt. Ltd. All Rights Reserved 5 2. INSTALLATION AND UNISTALLATION 2.1 Account Information After choosing a VoIP service provider, you will need the following information: User Name Password 2.2 System Requirements Processor Minimum: Intel Pentium 4, 2.4 GHz or equivalent Memory 512 MB RAM Hard Disk Space 50 MB Operating System: Windows XP Service Pack2 , Windows Vista ®,Windows 7 Connection IP network connection (broadband, LAN, wireless) Sound Card Full-duplex, Headphone , Webcam 2.3 Multimedia Device Requirements Adore PC Communicator requires both speakers and a microphone to make calls. Any of the following configurations are acceptable: External speakers and Headphone Built-in speakers and Headphone Webcam 2.4 Install Application For installing application you need to download it from our website http://adoresoftphone.com/communicator-windows.html#tabs-3 Download the application Setup. (As Shown in Fig-1) Fig-1 © Copyright 2014 Adore Infotech Pvt. Ltd. All Rights Reserved 6 Save “adorecommunicator.zip” folder on your system, and Extract or Unzip adorecommunicator.zip folder. After Unzip the folder you will find three files: 1. Adore Communicator.msi 2. Setup.exe 3. ReadMe.txt Run the Setup.exe file Welcome Window Appears click Next to Proceed.(As Shown in Fig-2) Fig-2 Select folder where file need to be installed and provide privileges.(As Shown in Fig-3) Fig-3 © Copyright 2014 Adore Infotech Pvt. Ltd. All Rights Reserved 7 Installer Ready to Install Adore PC Communicator, Select Next to continue.(As Shown in Fig-4) Fig-4 Click Close to complete installation.(As Shown in Fig-5) Fig-5 © Copyright 2014 Adore Infotech Pvt. Ltd. All Rights Reserved 8 2.5 - Uninstall Adore PC Communicator To uninstall Adore PC Communicator, go to Control Panel->Add/Remove Programs->Adore Communicator>Uninstall. 2.6 – Start Adore PC Communicator Go to Start->Programs-> Adore Communicator. (As Shown in Fig-6) Fig-67 Using Adore PC Communicator Or Double Click on Icon Adore Communicator on desktop. (As Shown in Fig-6.1) Fig-6.1 © Copyright 2014 Adore Infotech Pvt. Ltd. All Rights Reserved 9 3. CONFIGURING ADORE PC COMMUNICATOR 3.1 Register PC Communicator 1. Click on “Login” tab -> “Sign In” tab. Login Window appear. (As Shown in Fig-7) Enter SIP, Username and Password. Press Login Button Fig-7 © Copyright 2014 Adore Infotech Pvt. Ltd. All Rights Reserved 10 If Username and Password are correct, Adore PC Communicator Dialer will open. (With status message “Registered”). (As Shown in Fig-8) Fig-8 © Copyright 2014 Adore Infotech Pvt. Ltd. All Rights Reserved 11 3.2 Placing an Audio Call To make call 1. Press desired number through Dial Pad 2. Press Voice Call Button. (As Shown in Fig-9) Fig-9 © Copyright 2014 Adore Infotech Pvt. Ltd. All Rights Reserved 12 After press “Voice Call” button you will be see new Voice Call Windows. Call Connect session message displayed “Ringing” & then “Connected”.(As shown in fig-10) Fig-10 © Copyright 2014 Adore Infotech Pvt. Ltd. All Rights Reserved 13 3.3 Placing an Video Call To make Video call for PC-to-PC. (As Shown in Fig-11) Make sure that your webcam has been installed. The user can access send and receive realtime video of the connected party. 1. Press your desired SIP number through dial pad. 2. Press “Video Call” button on your main dialer. 3. After press “Video Call” button Video Windows will be appear with session message will be displayed “Ringing” & then “Connected” 4. Now if you want to end video call press “End” button, your Video window will be close. 5. You can have Chat as well as voice and video communications. The Chat thread is shown in the Chat section. Fig-11 © Copyright 2014 Adore Infotech Pvt. Ltd. All Rights Reserved 14 3.4 Ending an Call 1. Press “End” button to end a call. (As Shown in Fig-12) Fig-12 3.5 Handling an Incoming Call On incoming call session message display “Incoming call from…..” 1. Click “Accept” button to receive incoming call 2. Click “Decline” button to end incoming call. (As Shown in Fig-13) © Copyright 2014 Adore Infotech Pvt. Ltd. All Rights Reserved 15 Fig-13 3.6 Using Instant Messaging Instant messages can be made using Adore PC Communicator. Therefore, you can send or receive an instant message. (As Shown In Fig-14) 1. Press your desired SIP number through dial pad. 2. Press “Chat” button on your main dialer. 3. After press “Chat” button IM Windows will be open. Now user will be able to chat (Text Message) and Smiley with the remote party. © Copyright 2014 Adore Infotech Pvt. Ltd. All Rights Reserved 16 Fig-14 4. USING ADDRESS BOOK In Adore PC Communicator Address book has Add Group, Add Contact, Show Contact (As Shown in Fig-15) © Copyright 2014 Adore Infotech Pvt. Ltd. All Rights Reserved 17 Fig 15 4.1 Add Group Create Groups easily to manage your groups like (Business, Office, Friends, and Family etc.) Click on “Add Group” tab , Add group window will be opened. Type your desired group name on “DisplayName” box and press “Save” button to save your group name. (As Shown in Fig-16) © Copyright 2014 Adore Infotech Pvt. Ltd. All Rights Reserved 18 Fig-16 4.2 Add Contact Create Contacts under created group to manage your contacts. Click on “AddressBook” tab, Add Contact window will be opened. Type your desired “Display name” in Textbox. Then choose your group as like you wish to save this contact name. After choose Group press save button to save your contact name.(As Shown in Fig-17) © Copyright 2014 Adore Infotech Pvt. Ltd. All Rights Reserved 19 Fig 17 After save your contact name it will display below screen on your main dialer with full contact details to the particular selected group. (As Shown in Fig-18) © Copyright 2014 Adore Infotech Pvt. Ltd. All Rights Reserved 20 Fig-18 Now you will be able to create multiple contact detail on your created group as in the below screen. Right click on your created Group name “Office”. You will be able to “Add Contact”, “Edit Group”, and “Delete Group”. Choose the desired options. (As Shown in Fig-19) © Copyright 2014 Adore Infotech Pvt. Ltd. All Rights Reserved 21 Fig-19 4.3 Show Contacts After Create Group and Contacts you can see your saved group and contacts. Click on “AddressBook” tab -> “Show Contacts” sub tab. (As Shown in fig-20) © Copyright 2014 Adore Infotech Pvt. Ltd. All Rights Reserved 22 Fig-20 After Select “Show Contact” sub tab you will be able to see your saved contacts details and groups (As Shown in Fig-21) © Copyright 2014 Adore Infotech Pvt. Ltd. All Rights Reserved 23 Fig-21 Now you will be able to Edit, Delete your created contacts. Also you can have Voice Call, Video Call, Transfer File, Chat with your desired contacts. (As Shown in Fig-22) © Copyright 2014 Adore Infotech Pvt. Ltd. All Rights Reserved 24 Fig-22 You can also see all groups and choose desired group list and contact. (As Shown in Fig -23) © Copyright 2014 Adore Infotech Pvt. Ltd. All Rights Reserved 25 Fig-23 You can also search your saved contact. Type your contact name in the search box, now it will display full contact detail. (As Shown in Fig -24) © Copyright 2014 Adore Infotech Pvt. Ltd. All Rights Reserved 26 Fig-24 5. HISTORY Adore PC Communicator has the following History options: Show History Call History Clear History © Copyright 2014 Adore Infotech Pvt. Ltd. All Rights Reserved 27 5.1 Show History Click on “History” tab -> “Show History” sub tab. (As Shown in Fig -25) Fig-25 After choose “Show History” you will see below screen which has details history. (As Shown in Fig 26) © Copyright 2014 Adore Infotech Pvt. Ltd. All Rights Reserved 28 Fig-26 Now right click on any contacts name as in the below screen. You will also able to perform the given below operations. (As Shown in Fig -27) Make Voice Call Make Video Call Send File Start Chat Delete History Events © Copyright 2014 Adore Infotech Pvt. Ltd. All Rights Reserved 29 Fig-27 5.2 Call History Click on “History” tab ->“Call History” sub tab. (As Shown in Fig -28) © Copyright 2014 Adore Infotech Pvt. Ltd. All Rights Reserved 30 Fig-28 After Choose “Call History” you will be see below screen. Now right click on any contacts name. You will also able to perform the given below operations. (As Shown in Fig -29) Make Voice Call Make Video Call Send File Start Chat Delete History Events © Copyright 2014 Adore Infotech Pvt. Ltd. All Rights Reserved 31 Fig-29 5.3 Clear History Click on “History” tab -> “Delete All Events” sub tab. After Choosing Delete All Events your all events will be deleted. (As Shown in Fig -30) © Copyright 2014 Adore Infotech Pvt. Ltd. All Rights Reserved 32 Fig-30 6. SETTINGS Adore PC Communicator Settings has following settings options: General Media Network Presence Message NATT 6.1 General Click on your Main Dialer “Settings” tab ->”General” at the top. You can set to Adore PC Communicator to launch automatically when your PC starts. After set than click on “Save” button to changes setting. (As Shown in Fig -31) © Copyright 2014 Adore Infotech Pvt. Ltd. All Rights Reserved 33 Fig-31 6.2 Media Click on “Media” tab. You can set the Audio & Video Codecs on Adore PC Communicator as per your Sip server setting. After set codecs than click on “Save” button to changes Codecs settings. (As Shown in Fig -32) © Copyright 2014 Adore Infotech Pvt. Ltd. All Rights Reserved 34 Fig-32 6.3 Network Click on “Network” tab. You can set Network settings as per your wish on Adore PC Communicator. After set Network click on “Save” button to changes Network settings. (As Shown in Fig -33) © Copyright 2014 Adore Infotech Pvt. Ltd. All Rights Reserved 35 Fig-33 6.4 Presence Click on “Presence” tab. You can set Presence on Adore PC Communicator. After set Presence than click on “Save” button to changes presence settings. (As Shown in Fig -34) © Copyright 2014 Adore Infotech Pvt. Ltd. All Rights Reserved 36 Fig-34 6.5 Messages Click on “Messages” tab. You can set your Messages settings as you wish on Adore PC Communicator. After set Messages than click on “Save” button to changes messages settings. (As Shown in Fig -35) © Copyright 2014 Adore Infotech Pvt. Ltd. All Rights Reserved 37 Fig-35 6.6 NATT Click on “NATT” tab. You can enable STUN/TURN on Adore PC Communicator. After set than click on “Save” button to changes NATT settings. (As Shown in Fig -36) © Copyright 2014 Adore Infotech Pvt. Ltd. All Rights Reserved 38 Fig-36 7. SIGN OUT Now if you want to “Sign Out” from Adore PC Communicator. Click on “Login” tab -> “Sign Out” option to sign out from Adore PC Communicator. (As Shown in Fig -37) © Copyright 2014 Adore Infotech Pvt. Ltd. All Rights Reserved 39 Fig-37 8. EXIT ADORE PC COMMUNICATOR Now if you want to exit Adore PC Communicator. Click on “Login” tab -> “Exit” to exit Adore PC Communicator. (As Shown in Fig -38) © Copyright 2014 Adore Infotech Pvt. Ltd. All Rights Reserved 40 Fig-38 9. TROUBLESHOOTING Problem Possible Reason Suggestion Problem in starting after Login Any other SIP software is running Close that software Keep showing Registering… Internet Connection is too slow or Drop / Server Not responding User and password is wrong Check your Internet Connection / server setting Voice is too slow / voice is not audible System volume is Low / sound driver not present / disable Cross check username and password (password is case sensitive) Increase Volume by using system volume / Install proper Sound driver / enable driver © Copyright 2014 Adore Infotech Pvt. Ltd. All Rights Reserved 41 Voice is not Clear Call get disconnected before connected Problem in Video Call Codec is not properly set. Codec is not properly set. Internet Connection is too slow /Webcam is not properly installed on your PC Contact to your server administrator And Configure Codec priority Contact to your server administrator And Configure Codec priority Check your Internet Connection/Install webcam driver on your PC Sales : + 91 - 9958611014 (India) + 91 – 120-6471891 (India) Toll Free : -1-800- 498-6429 (USA) Email : [email protected] Support Tel : +91 – 120 – 6450129 (India) Email : [email protected] © Copyright 2014 Adore Infotech Pvt. Ltd. All Rights Reserved 42