1
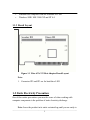
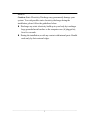
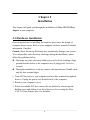
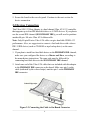
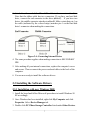
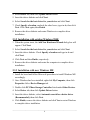
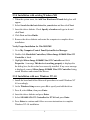
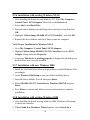
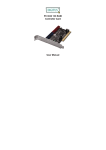
Ultra ATA/133 Host Adapter
User's Manual
Table of Contents
Chapter 1 Introducing
1-1 Introducing the Ultra ATA/133 Host Adapter…….……...…….
1-1.1 Key Features and Benefits ……………………….…………
1-1.2 System Requirements ………………………………………
1-1.3 Board Layout……………………………………….……….
1-2 1-2 Static Electricity Precaution ………………………………...
1
1
1
2
2
Chapter 2 Installation
2-1 Hardware Installation ………………………………………...….
2-2 Device Connection ………………………………………………..
2-3 Installing the Software Drivers ……...…………………………..
2-3.1 Installation with new Windows 98SE …………..…….....….
2-3.2 Installation with existing Windows 98SE …………..…...….
2-3.3 Installation with new Windows Me …………….……..……
2-3.4 Installation with existing Windows Me ………...……..……
Verify Proper Installation for Win 98SE/Me ……...…….….
2-3.5 Installation with new Windows NT 4.0 …………………….
2-3.6 Installation with existing Windows NT 4.0 …………..…….
Verify Proper Installation for NT 4.0 ……………….….…...
2-3.7 Installation with new Windows 2000 ……………....…...….
2-3.8 Installation with existing Windows 2000 …………….…….
2-3.9 Installation with new Windows XP …………………..…….
2-3.10 Installation with existing Windows XP …………..……….
Verify Proper Installation for Windows 2000/XP ….….
4
6
7
7
8
8
9
9
9
10
10
10
10
11
11
12
Chapter 1
Introduction
1-1 Introducing the Ultra ATA/133 Host Adapter
This adapter is an ultra high-speed dual channel Ultra ATA/133 PCI Host
Adapter for use in Pentium-class computers. It achieves burst data transfer
rates up to 133MB/sec and supports drive capacities greater than 137 GB. It’s
enhanced BIOS auto-detect device types and fine tunes to the best
performance for each connected hard drive.
1-1.1 Key Features and Benefits
•
Compliant with UltraDMA6 ATA/133 specification
•
Compliant with PCI v2.2 Plug-n-play
•
Provides two independent Ultra ATA channels (built-in 256-byte FIFOs
per channel) for faster data transfer
•
Supports Ultra DMA 0-6 and Multi-word DMA 0-2
•
Breaks the 137GB barrier! Supports hard drives larger than 137GB
•
Co-exists with on-board IDE controller
•
CRC (Cyclical Redundancy Check) error-checking provides data
verification and achieves flawless data transfer
•
Flash BIOS for easy upgrade
•
Full ACPI power management support
•
Works with various brands of Ultra ATA 133/100/66/33 hard disk
drivers and ATAPI devices including CD-ROM, CD-R/RW,
DVD-ROM, and zip drives
1-1.2 System Requirements
________________________________________________________________________________________
1
•
Pentium-class computer with one available PCI slot
•
Windows 98SE/ ME/ 2000/ XP and NT 4.0
1-1.3 Board Layout
Figure 1-1 Ultra ATA/133 Host Adapter Board Layout
Note:
1. Connector JP2 and JP3 are for hard drive LED
1-2 Static Electricity Precaution
One of the routine precautions you must be aware of when working with
computer components is the problem of static electricity discharge.
Note: Leave the product in its static-resistant bag until you are ready to
________________________________________________________________________________________
2
install it.
Caution: Static Electricity Discharge may permanently damage your
system. To avoid possible static electricity discharge during the
installation, please follow the guidelines below:
Discharge any static electricity build up in your body by touching a
large grounded metal surface or the computer case (if plugged in),
for a few seconds.
During the installation, avoid any contact with internal parts. Handle
cards only by their external edges.
________________________________________________________________________________________
3
Chapter 2
Installation
This chapter will guide you through the installation of Ultra ATA/133 Host
Adapter in your computer.
2-1 Hardware Installation
General instructions for installing the board are given since the design of
computer chassis varies. Refer to your computer reference manual for further
information, if needed.
Caution: Static Electricity Discharge may permanently damage your system.
To avoid possible static electricity discharge during the installation, please
follow the guidelines below:
Discharge any static electricity build up in your body by touching a large
grounded metal surface or the computer case (if plugged in), for a few
seconds.
During the installation, avoid any contact with internal parts. Handle cards
only by their external edges.
1. Turn OFF the power to your computer and any other connected peripheral
devices. Unplug the power cord from the back of the computer.
2. Remove your computer's cover.
3. Select an available PCI slot; remove the slot bracket by unscrewing the
holding screw and sliding it out. Save this screw for securing the Ultra
ATA/133 Host Adapter after it is installed.
________________________________________________________________________________________
4
4. To install Ultra ATA/133 Host Adapter, carefully align the board's bus
connector to the PCI slot on the motherboard. Push the board down
firmly, but gently, until it is well seated.
Note: Hold the card by its external edges only. Try to avoid touching the
components, connectors or pins.
________________________________________________________________________________________
5
5. Secure the board to the rear slot panel. Continue to the next section for
device connection.
2-2 Devices Connection
This Ultra ATA/133 Host Adapter is a dual channel Ultra ATA/133 controller
that supports up to four IDE hard disk drives or ATAPI devices. If you plan to
use the second IDE channel (SECONDARY IDE), you will need to purchase
another 40-pin / 80-wire Ultra ATA ribbon cable.
Note: Only 40-pin/80-wire Ultra ATA cable can give hard disk UDMA 133
performance. Also, we suggest not to connect a fast hard drive with a slower
IDE / EIDE device (such as CD-ROM or tape backup drive) on the same
channel.
1. If you plan to install two hard disk drives on the PRIMARY IDE channel,
make sure you configured the drives as a Master and Slave, according to
the manufacture instructions. The same rule must be followed for
connecting hard disk drives to the SECONDARY IDE channel.
2. Attach one end of the Ultra ATA cable that was included with this adapter
to the PRIMARY IDE connector on the board. Make sure pin 1 on the
cable (indicated by the colored stripe) matches pin 1 on the PRIMARY
IDE connector.
Figure 2-3 Connecting the Cable to On-Board Connector
________________________________________________________________________________________
6
3. Attach the other end of the Ultra ATA cable to the connector of a drive.
Note that the ribbon cable has two connectors. If you have one hard disk
drive, connect the end connector to the drive (drive C). If you have two
drives, the middle connector attaches to drive D. Make certain that pin 1 on
the cable (indicated by the colored stripe) matches pin 1 on the hard disk
drive's connector when making the connections.
Figure 2-4: Connecting Internal Drives
4. The same procedure applies when making connection to SECONDARY
IDE.
5. After making all your internal connections, replace the computer's cover
and screws. Then reconnect the power cord and cables to the back of the
computer.
6. You are now ready to install the software drivers.
2-3 Installing the Software Drivers
2-3.1 Installation with new Windows 98SE
1. Install the board and follow Microsoft procedures to install Windows 98
SE accordingly.
2. Once Windows has been installed, right click My Computer and click
Properties. Select Device Manager tab.
3. Double click PCI Mass Storage Controller listed under Other Devices.
________________________________________________________________________________________
7
4. Select Driver tab, then click Update Driver button.
5. Insert the driver diskette and click Next.
6. Select Search for the best driver for your device and click Next.
7. Check Specify a location, uncheck the other boxes, type in A:, then click
Next. Click Next again, then Finish.
8. Remove the driver diskette and restart Windows to complete driver
installation.
2-3.2 Installation with existing Windows 98SE
1. When the system starts, the Add New Hardware Wizard dialog box will
appear. Click Next.
2. Select Search for the best driver for your device and click Next.
3. Insert the driver diskette. Check Specify a location and type in A: and
click Next.
4. Click Next and then Finish, respectively.
5. Remove the driver diskette and restart the computer to complete driver
installation.
2-3.3 Installation with new Windows ME
1. Install the board and follow Microsoft procedures to install Windows ME
accordingly.
2. Once Windows has been installed, right click My Computer, then click
Properties. Select Device Manager tab.
3. Double click PCI Mass Storage Controller listed under Other Devices.
4. Select Driver tab, then click Update Driver button.
5. Insert the driver diskette, select Automatic search for a better driver
(Recommended), then click Next.
6. Click Finish, remove the driver diskette and click Yes to restart Windows
to complete driver installation.
________________________________________________________________________________________
8
2-3.4 Installation with existing Windows ME
1. When the system starts, the Add New Hardware Wizard dialog box will
appear.
2. Select Search for the best driver for your device and then click Next.
3. Insert the driver diskette. Check Specify a location and type in A: and
click Next.
4. Click Next and then Finish.
5. Remove the driver diskette and restart the computer to complete driver
installation.
Verify Proper Installation for Win 98SE/ME
1. Go to My Computer/Control Panel/System/Device Manager.
2. Double click Hard disk Controllers, Silicon Image SiI 0680 Ultra/133
Controller is listed.
3. Highlight Silicon Image SiI 0680 Ultra/133 Controller and click
Properties. A message This device is working properly is displayed in
the dialog box, the driver has been correctly installed. If any error message
is displayed, remove Silicon Image SiI 0680 Ultra/133 Controller listing,
restart Windows and reinstall the drivers.
2-3.5 Installation with new Windows NT 4.0
1. Install the board and follow Microsoft procedures to install Windows NT
4.0 accordingly.
2. At the Windows Setup screen, press F6 to specify and add the driver.
3. Press S, select Other, then press Enter.
4. Insert the driver diskette and press Enter.
5. Select SiI 0680 ATA/133 Controller for NT 4.0 and press Enter.
6. Press Enter to continue and follow on-screen instructions to complete
Windows NT 4.0 installation.
________________________________________________________________________________________
9
2-3.6 Installation with existing Windows NT4.0
1. After installing the board, boot up Windows NT. Select My Computer /
Control Panel / SCSI Adapters, then click on the Drivers tab.
2. Select Add... then Have Disk...
3. Insert the driver diskette into the floppy driver and type in A:, then click
OK.
4. Highlight “Silicon Image SiI 0680 ATA/133 Controller” and click OK.
5. Remove the driver diskette and select Yes to restart the computer.
Verify Proper Installation for Windows NT4.0
1. Go to My Computer / Control Panel / SCSI Adapters
2. Highlight Silicon Image SiI0680 ATA/133 Controller from the SCSI
Adapter listing and select Properties.
3. A message This device is working properly is displayed in the dialog box,
the driver has been correctly installed.
2-3.7 Installation with new Windows 2000
1. Install the board and follow Microsoft procedures to install Windows 2000
accordingly.
2. At the Windows 2000 Setup screen, press F6 to install the driver.
3. Insert the driver diskette. Press S, then press Enter.
4. Select SiI 0680 ATA/133 Controller for Windows 2000/XP and press
Enter.
5. Press Enter to continue and follow on-screen instructions to complete
installation.
2-3.8 Installation with existing Windows 2000
1. After installing the board, boot up Windows 2000. Windows will attempt
to detect the controller.
2. When Found New Hardware Wizard appears, select Search for a
________________________________________________________________________________________
10
suitable driver for my device (recommended) and click Next.
3. Insert the driver diskette into the floppy drive, check Floppy disk drive
and click Next. Click Next again to continue.
4. If the Digital Signature Not Found message appears, click Yes.
Note: If prompted for Windows 2000 CD-ROM, insert the CD into your
CD-ROM drive and click OK. Type in D:\I386 (assuming D: is your
CD-ROM drive) and click OK and then Finish.
5. Click Finish and restart Windows to complete driver installation.
2-3.9 Installation with new Windows XP
1. Install the board and follow Microsoft procedures to install Windows XP
accordingly.
2. At the Windows Setup screen, press F6 to install the driver.
3. Insert the driver diskette. Press S then press Enter.
4. Select SiI 0680 ATA/133 Controller for Windows 2000/XP and press
Enter.
5. Press Enter to continue and follow on-screen instructions to complete
Windows XP installation.
Note: When the Software Installation warning pops up, click Yes. And
when the Hardware Installation warning pops up, click Yes again.
2-3.10 Installation with existing Windows XP
Important: If the hard disk drive connected to your controller has a boot
partition, do not connect this drive until the driver for the controller has been
completely installed in Windows XP. Follow the instructions below to install
the driver for the controller first, shut down your system and connect the hard
disk drive. The controller is now ready for operation.
1. After installing the board, boot up Windows XP. Windows will attempt to
detect the controller.
2. When Found New Hardware Wizard appears, Insert the driver diskette
into the floppy drive, select Install the software automatically
________________________________________________________________________________________
11
(Recommended), and click Next.
3. At the next window, choose the entry with A:\si680.inf under heading
location.
4. When a warning message pops up, click Continue Anyway.
5. Click Finish to complete installation.
Verify Proper Installation for Windows 2000/XP
1. Go to My Computer / Control Panel / System.
2. Click Hardware then click Device Manager.
3. Double click IDE ATA / ATAPI Controllers, then double click Silicon
Image SiI0680 ATA/133 Controller to display driver properties.
4. A message This device is working properly is displayed in the dialog box,
the driver has been correctly installed.
5303-0169-1
________________________________________________________________________________________
12