1
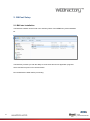
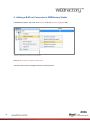
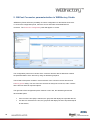
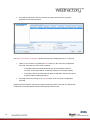
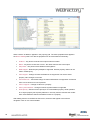
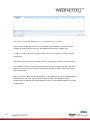
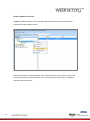
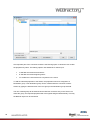
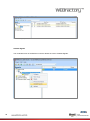
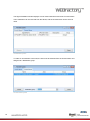
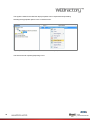
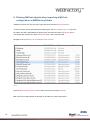
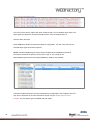
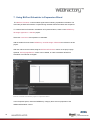
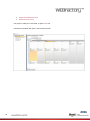
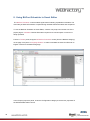
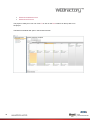
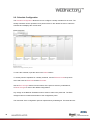
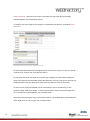
WEBfactory 2010 BACnet WhitePaper Version 1.0 February 2012 www.webfactory-world.de 2 This whitepaper is a product of the company WEBfactory GmbH. WEBfactory GmbH Hollergasse 15 74722 Buchen Germany Tel: (+49) 6281 5233 0 Fax: (+49) 6281 5233 333 http://www.webfactory-world.de © Copyright 2012, WEBfactory GmbH. All rights reserved. No part of this user manual may be copied or forwarded in any other way without the explicit written approval of WEBfactory GmbH. All information and descriptions were selected with special care, following careful investigations. However, application errors or changes leading to a series of changed commands or other results may not be entirely excluded. WEBfactory GmbH cannot undertake any legal or other liability for such changes or any errors deriving from them. Microsoft® and MS -Internet Explorer® are registered trademarks, property of the Microsoft Corporation. All other logos and product names are registered logos or trademarks of their respective owners. WEBfactory GmbH denies any liability for increased costs of phone calls as a consequence of using the respective communications modules, even in the case of accidental connections. WEBfactory GmbH has drawn up this user manual according to the most advanced knowledge but it does not undetake any responsibility for the programs / systems generating the results expected by the user. WEBfactory GmbH reserves the right to make changes to the user manual without undertaking the responsibility of informing third parties as to such changes. We reserve the right to make technical changes! 3 1. Introduction ......................................................................................................................... 5 2. BACnet Setup ..................................................................................................................... 6 3. 4 2.1. BACstac Installation................................................................................................... 6 2.2. Starting BACnet Service ............................................................................................ 7 BACnet Overview ............................................................................................................... 8 3.1. WF2010WebService .................................................................................................. 9 3.2. WFBacNetService ..................................................................................................... 9 3.3. BACnetToolbox ........................................................................................................ 10 3.4. BACnetDiscovery..................................................................................................... 10 3.5. Cimetrics BACstac ................................................................................................... 11 3.6. BACnet connector operation ................................................................................... 11 3.6.1. Device, object, property ....................................................................................... 11 3.6.2. Retrieving the values of the properties ................................................................ 12 3.6.3. Setting value of the properties ............................................................................. 13 3.6.4. Device disconnect, reconnect .............................................................................. 14 3.6.5. Supported objects and properties ........................................................................ 14 4. Adding a BACnet Connector to WEBfactory Studio ......................................................... 19 5. BACnet Connector parameterization in WEBfactory Studio ............................................ 20 6. Filtering BACnet objects when importing a BACnet configuration in WEBfactory Studio 29 7. Using BACnet Scheduler in Expression Blend................................................................. 31 8. Using BACnet Scheduler in Smart Editor ......................................................................... 33 9. The BACnet Scheduler control at runtime........................................................................ 35 9.1. BACnet Scheduler workflow .................................................................................... 35 9.2. Schedule Configuration ........................................................................................... 36 9.3. Calendar Configuration ............................................................................................ 41 1. Introduction This whitepaper is intended for all the users of WEBfactory 2010 software and is designed to facilitate the understanding of WEBfactory 2010’s approach on BACnet. The document will present a WEBfactory BACnet toolkit overview as well as a guide through the processes of installing, configuring and using the WEBfactory BACnet toolkit. For a correct understanding of the following information, WEBfactory 2010 software and additional modules must be installed on the operating machine. For more information about installing WEBfactory 2010, system requirements, licensing and release notes, please visit the WEBfactory Knowledge Base at: http://webfactory-support.de/assets/documentation/Default.htm . 5 2. BACnet Setup 2.1. BACstac Installation The BACstac installer can be found in the 3rd Party folder of the WEBfactory 2010 installation kit. BACstac setup The BACstac provides you with the ability to create client and server application programs which use BACnet protocol for communication. Run the BACstac installer before proceeding. 6 2.2. Starting BACnet Service The BACnet Service needs to be started before proceeding with further setup or work. WEBfactory Service Manager lists the WEBfactory services including the WEBfactory 2010 BACnet Service. WEBfactory 2010 Service Manager WEBfactory 2010 Service Manager is located in WEBfactory 2010\Tools\Service Manager. Make sure that the WEBfactory 2010 BACnet Service is started, 7 3. BACnet Overview HTTP Named Pipes BACnet diagram 8 3.1. WF2010WebService This is the standard WEBfactory web service interface. Its role is to provide a standardized API that can be used for communicating with lower level components in an easier manner. Basically this is the component that is used by the scheduler control for all its functionality. The methods exposed by this API cover the following functionalities: o Discovering BACnet devices o Reading device object properties o Writing device object properties The WF2010WebService component resides on the server side and is hosted in IIS. 3.2. WFBacNetService This is a windows service that offers lower level BACnet functionality. It basically acts as a wrapper on top of several COM components and is used by the WF2010WebService component for executing low level commands. The windows service offers on one side functionality for executing BACnet commands (read/write operations). The read/write functionality offered by this service is in the form of a low level XML–based API that covers actions such as writing the value of a property or of a set of properties and querying the value of a property. The other functionality exposed by the service is discovering BACnet devices. The windows service acts as a caching system for minimizing the time required for discovering devices. When started, it will try to discover all BACnet devices in the network, along with their objects and the object names. When the WF2010WebServices query the available devices, they will always get a cached list. The discovery and caching is affected by two parameters (configurable from WEBfactory Studio): o SearchDeviceMinimumTime – the minimum time that the discovery will wait for a new device to send an “I AM” response before the discovery is ended. The default value here is 6000ms, but depending on the speed of the devices and network conditions, this value can be increased to allow for more time for the devices to send an answer. 9 o DeviceScanInterval – this is the time interval between two subsequent discoveries. After the service runs its first discovery process and places the devices in the cache, it will wait for a period of time equal to the value of this setting and then it will start another discovery process. This flow is repeated after each discovery is completed. The default value is 10 minutes. When configuring the network, this value can be decreased to a smaller value. When the network is configured and the chances that the topology changes are smaller, the value can be increased in order to decrease network traffic. In order to prevent stale data, the service also schedules a new discovery as soon as a write operation is performed. A secondary role for the Windows Service is to provide the correct apartment and threading context for the BACnet Toolbox and BACnet Discovery COM components and a stable lifetime for the device cache. 3.3. BACnetToolbox BACnetToolbox executes any command built into it. It is assumed that range of supported data types and operations would be extended over time. BACnetToolbox exposes single method which takes as input xml string containing command specification and outputs, in addition to the return code, xml string containing result of the operation plus optional data. Current range of supported operations involves reading and writing complex property data, in addition to inserting and deleting list elements. 3.4. BACnetDiscovery BACnetDiscovery detects devices on network using “WhoIs”/”IAm” broadcast messages. Discovery process always involves listing of devices, with optional information about device objects and optional information about object properties. Discovery process is complete when no previously known device is detected for the specified timespan. 10 3.5. Cimetrics BACstac BACnet communication layer from Cimetrics, current version is 6.2. 3.6. BACnet connector operation 3.6.1.Device, object, property The BACnet Device is used in 2 different contexts: as piece of electronic equipment and as part of BACnet networking model. Each device has several objects; each object is of certain type (like analog input or binary output) and because certain type of object can be present multiple times in a device, each object has got its instance number. This instance number must be unique for given object type inside the device. There is one special object type - device object. Each device has exactly one object of type device object. Though a device object must exist only once inside device, it still has an instance number. The instance number of the device object becomes instance number of the whole device. On a BACnet network, each device must have unique instance number, which is the instance number of its single instance object. Each object in a device has several properties. A property is of certain type (like presentvalue or status-flags). Each object type/property type combination determines what data type the property will contain. These data types might be simple like floating point values or very complex ones. BACnet connector’s goal is to facilitate the retrieving of values from the properties and setting values for the properties. 11 3.6.2.Retrieving the values of the properties There are two basic ways how to retrieve values of the properties Reading value of the properties - sending request to the device asking for a property value and receiving answer from device containing that value; Setting device to send a value of the property whenever property value changes. 3.6.2.1. Property value reading This process must be executed periodically, with period of “PollPeriod” parameter inside “Device” section inside XML configuration. There are two types of reading requests: requesting value of single property or requesting value of multiple properties. If reading request type asking value of several properties should be used than “RPM” parameter inside “Device” section should be 1, in opposite case that parameter should be 0. There are some properties that typically do not change their value. If it is the case than “ReadRepeat” parameter inside “Property” section should be 0, otherwise that parameter should be 1. 3.6.2.2. Setting device to send value of properties in case of change There are 2 types of BACnet protocol services that facilitate sending property values whenever value changes: object COV and property COV (COV-P). Object COV makes device send changes of value of most important properties for given object type. Changes of values of some of the remaining properties can be sent via COV-P service. Connector starts COV/COV-P by making order for COV/COV-P operation to the device. Than processing of value sent by device during normal operation follows. Such order for COV/COV-P operation is not generally valid forever: after some period of time COV/COV-P expires and connector must reissue order for COV to the device. Such new order is issued before existing order for COV/COV-P expires. 12 If object COV should be used than “COV” parameter in “Object” section should be 1, otherwise it should be 0. If property COV should be used that “COV” parameter in “Property” section should be 1, otherwise it should be 0. Both COV and COV-P device generated messages with new property values could be of a type that requires (or not) confirmation from the connector - hence confirmed or not confirmed COV. Confirmed COV is more immune to loss of packets. If confirmed COV/COV-P is used, the “COVConfirmed” parameter in “Object” section should be 1, otherwise it should be 0. When a COV/COV-P operation is ordered from the device, some devices immediately send current value of relevant properties at the moment the order was made. However, other devices don’t send property value until later when it changes. If device does not send property value in the time when COV/COV-P was ordered, this value must be read - though just once. In the configuration file, parameter ” COV1Read” inside “Device” section should be 1 if such reading of property value is necessary, otherwise it should be 0. “COVPeriod” parameter inside “Device” section specifies period in milliseconds after which COV/COV-P operation order would be considered to be expired by the device. The connector will use this time period information to renew COV/COV-P orders before expiry could occur. 3.6.3.Setting value of the properties The connector always uses single property write service to set new value of the property in the device. Some of the properties are commendable. Commendable properties make use of priority of writing operation to resolve conflict when multiple BACnet clients write values into the very same property. Implicit priority used for writing is BACSTAC_PRI_MANUAL_OPERATOR. This value can be overridden by the ”WritePriorityLevel“ parameter in “Device” section. Resetting value of commendable property is accomplished when VT_EMPY variant value is being requested by the connector client to be written to the property. 13 3.6.4.Device disconnect, reconnect Device (re)discovery process is invoked by connector using “WhoIs” broadcast on network with network number specified by parameter “Network” in “Devices” section. If -1 is used for network number than global broadcast is used, in case of 0 local broadcast is used. In case of value of “Network” parameter other than 0 or -1, remote broadcast is utilized. At the connector startup device, (re)discovery process happens immediate, afterwards it is repeated with period specified by “WhoIsPeriod” parameter in “Devices” section. This (re)discovery process than waits for period specified in “WhoIsReplyWait” for “IAm” broadcast from connected devices. Both “WhoIsPeriod” and “WhoIsReplyWait” parameters are in milliseconds. Any device listed in connector configuration that did not respond with “IAm” message is consider to be disconnected for the time being At the beginning or when device is reconnected list of objects is retrieved from device and existence of each object in the configuration is verified. Polling for property values in one device is independent of polling for property values of any other device. Offline device will not cause delays in communication with other devices 3.6.5.Supported objects and properties Following objects and properties are supported OBJ_ACCUMULATOR PROP_PRESENT_VALUE PROP_MAX_PRES_VALUE PROP_VALUE_BEFORE_CHANGE PROP_VALUE_SET PROP_PULSE_RATE PROP_HIGH_LIMIT PROP_LOW_LIMIT PROP_LIMIT_MONITORING_INTERVAL PROP_NOTIFICATION_CLASS PROP_TIME_DELAY PROP_OUT_OF_SERVICE 14 OBJ_ANALOG_INPUT PROP_PRESENT_VALUE PROP_MIN_PRES_VALUE PROP_MAX_PRES_VALUE PROP_RESOLUTION PROP_COV_INCREMENT PROP_HIGH_LIMIT PROP_LOW_LIMIT PROP_DEADBAND PROP_UPDATE_INTERVAL PROP_TIME_DELAY PROP_NOTIFICATION_CLASS PROP_OUT_OF_SERVICE (COV) OBJ_ANALOG_OUTPUT PROP_PRESENT_VALUE PROP_MIN_PRES_VALUE PROP_MAX_PRES_VALUE PROP_RESOLUTION PROP_RELINQUISH_DEFAULT PROP_COV_INCREMENT PROP_HIGH_LIMIT PROP_LOW_LIMIT PROP_DEADBAND PROP_TIME_DELAY PROP_NOTIFICATION_CLASS PROP_OUT_OF_SERVICE (COV) OBJ_ANALOG_VALUE PROP_PRESENT_VALUE PROP_RELINQUISH_DEFAULT PROP_COV_INCREMENT PROP_HIGH_LIMIT PROP_LOW_LIMIT PROP_DEADBAND PROP_TIME_DELAY PROP_NOTIFICATION_CLASS PROP_OUT_OF_SERVICE (COV) OBJ_AVERAGING PROP_MINIMUM_VALUE PROP_AVERAGE_VALUE PROP_VARIANCE_VALUE PROP_MAXIMUM_VALUE PROP_ATTEMPTED_SAMPLES PROP_VALID_SAMPLES PROP_WINDOW_INTERVAL PROP_WINDOW_SAMPLES OBJ_BINARY_INPUT PROP_CHANGE_OF_STATE_COUNT PROP_TIME_DELAY PROP_NOTIFICATION_CLASS PROP_OUT_OF_SERVICE PROP_PRESENT_VALUE PROP_ALARM_VALUE PROP_ELAPSED_ACTIVE_TIME 15 (COV) OBJ_BINARY_OUTPUT PROP_CHANGE_OF_STATE_COUNT PROP_TIME_DELAY PROP_NOTIFICATION_CLASS PROP_OUT_OF_SERVICE PROP_PRESENT_VALUE PROP_RELINQUISH_DEFAULT PROP_FEEDBACK_VALUE PROP_ELAPSED_ACTIVE_TIME PROP_MINIMUM_OFF_TIME PROP_MINIMUM_ON_TIME (COV) OBJ_BINARY_VALUE PROP_TIME_DELAY PROP_NOTIFICATION_CLASS PROP_OUT_OF_SERVICE PROP_PRESENT_VALUE PROP_RELINQUISH_DEFAULT PROP_ALARM_VALUE PROP_CHANGE_OF_STATE_COUNT PROP_ELAPSED_ACTIVE_TIME PROP_MINIMUM_OFF_TIME PROP_MINIMUM_ON_TIME OBJ_CALENDAR PROP_PRESENT_VALUE OBJ_COMMAND PROP_PRESENT_VALUE PROP_IN_PROCESS PROP_ALL_WRITES_SUCCESSFUL OBJ_DEVICE PROP_PROT_VERSION PROP_PROTOCOL_REVISION PROP_MAX_APDU_LENGTH_ACCEPTED PROP_MAX_SEGMENTS_ACCEPTED PROP_APDU_SEGMENT_TIMEOUT PROP_APDU_TIMEOUT PROP_NUMBER_OF_APDU_RETRIES PROP_MAX_INFO_FRAMES PROP_DATABASE_REVISION PROP_DAYLIGHT_SAVINGS_STATUS OBJ_EVENT_ENROLLMENT PROP_NOTIFICATION_CLASS OBJ_FILE PROP_FILE_SIZE PROP_RECORD_COUNT PROP_ARCHIVE PROP_READ_ONLY OBJ_LIFE_SAFETY_POINT 16 (COV) PROP_DIRECT_READING PROP_TIME_DELAY PROP_NOTIFICATION_CLASS PROP_OUT_OF_SERVICE OBJ_LIFE_SAFETY_ZONE PROP_TIME_DELAY PROP_NOTIFICATION_CLASS PROP_OUT_OF_SERVICE PROP_MAINTENANCE_REQUIRED OBJ_LOOP PROP_PRESENT_VALUE PROP_CONTROLLED_VAR_VALUE PROP_SETPOINT PROP_PROPORTIONAL_CONST PROP_INTEGRAL_CONSTANT PROP_DERIVATIVE_CONSTANT PROP_BIAS PROP_MAXIMUM_OUTPUT PROP_MINIMUM_OUTPUT PROP_COV_INCREMENT PROP_ERROR_LIMIT PROP_UPDATE_INTERVAL PROP_PRIORITY_FOR_WRITING PROP_TIME_DELAY PROP_NOTIFICATION_CLASS PROP_OUT_OF_SERVICE (COV) (COV) (COV) OBJ_MULTISTATE_INPUT PROP_PRESENT_VALUE PROP_NUMBER_OF_STATES PROP_TIME_DELAY PROP_NOTIFICATION_CLASS PROP_OUT_OF_SERVICE (COV) OBJ_MULTISTATE_OUTPUT PROP_PRESENT_VALUE PROP_NUMBER_OF_STATES PROP_RELINQUISH_DEFAULT PROP_TIME_DELAY PROP_NOTIFICATION_CLASS PROP_FEEDBACK_VALUE PROP_OUT_OF_SERVICE (COV) OBJ_MULTISTATE_VALUE PROP_PRESENT_VALUE PROP_NUMBER_OF_STATES PROP_RELINQUISH_DEFAULT PROP_TIME_DELAY PROP_NOTIFICATION_CLASS PROP_OUT_OF_SERVICE OBJ_NOTIFICATION_CLASS PROP_NOTIFICATION_CLASS 17 (COV) OBJ_PROGRAM PROP_OUT_OF_SERVICE OBJ_PULSE_CONVERTER PROP_PRESENT_VALUE PROP_SCALE_FACTOR PROP_ADJUST_VALUE PROP_COV_INCREMENT PROP_HIGH_LIMIT PROP_LOW_LIMIT PROP_DEADBAND PROP_COUNT PROP_COUNT_BEFORE_CHANGE PROP_COV_PERIOD PROP_NOTIFICATION_CLASS PROP_TIME_DELAY PROP_OUT_OF_SERVICE OBJ_SCHEDULE PROP_OUT_OF_SERVICE OBJ_TRENDLOG PROP_LOG_INTERVAL PROP_COV_RESUBSCRIBE_INTERVAL PROP_NOTIFICATION_CLASS PROP_LOG_ENABLE PROP_STOP_WHEN_FULL PROP_BUFFER_SIZE PROP_RECORD_COUNT PROP_TOTAL_RECORD_COUNT PROP_NOTIFICATION_THRESHOLD PROP_RECORDS_SINCE_NOTIFY PROP_LAST_NOTIFY_RECORD 18 4. Adding a BACnet Connector to WEBfactory Studio In WEBfactory Studio, right-click on the server under the Server List (Signals tab). Adding a BACnet connector to the Studio Select New Connector > BACnet Connector. The BACnet Connector will appear under the selected server. 19 5. BACnet Connector parameterization in WEBfactory Studio WEBfactory Studio offers the possibility of custom configuration for the BACnet Connector. To access the configuration panel, select the server and select the desired BACnet connector. The Connector Configuration panel will appear on screen. The BACnet Connector inside WEBfactory Studio The configuration panel is an overview of the connector and the devices attached. It allows the parameterization of the devices by using an attributes grid panel. The left side of the panel consists in a tree structure of the connector and its devices and a filtering option dialog. The root of the tree structure is always the connector, and it contains all the devices and their imported objects. The right side of the configuration panel contains a menu bar, the attributes grid and the device details panel. If the root of the tree (left) is selected, the grid panel will display the imported devices; If a device is selected in the tree, the grid panel will display the list of imported objects for that device; 20 If an object is selected in the tree structure, the grid panel will list the imported properties for the selected object. BACnet Connector Configuration The BACnet Connector Configuration allows two methods of adding devices to a connector: create a new connector by pressing the New button on the connector configuration menu bar, while the root of the tree is selected. o If the New button is pressed while having a device selected in the tree structure, a new object will be created (by default an accumulator object); o If the New button is pressed while an object is selected in the tree structure, a property selection dialog will pop up. importing devices by clicking on the Import button on the connector configuration menu bar Importing a BACnet device will open the import properties window. Here the user will be able to select the connected BACnet devices and import the desired ones. 21 Import BACnet device properties When a device is added, it appears in the property grid. The same properties also appear in the Device details panel. The devices properties can be customized as necessary: Instance - Any device must have an unique instance number Name - Any device must have a name - the name doesn't have to be unique Poll period - The period of time between interrogations RPM support - Read Property Multiple is supported. Several property values can be read in a RPM query. COV support - Change Of Value notifications are supported. The device sends property value changes on its own. Confirmed COV - Confirmed change of values notifications are supported. Confirmed COV is more immune to loss of packets. COV-P support – Change of value for a property COV synchronization - Change of Values synchronization is supported Write priority - Sets the level of priority for a commendable property. Write operation to an object property has a priority attribute: in this way a device resolves the conflict when several BACnet clients write different value to a property. After adding a device to the BACnet Connector, the device will appear in the left tree navigation. Click on it to view its details. 22 BACnet device The Device details panel contains a main view and the detail view panel. When a device is selected, the main view will list the objects defined for the device. When selecting an object from the main view, the details will be listed in the details view. To add a new object, the user can either create a new one and define it, or import it via the import menu. The desired object type can be selected from the Type drop-down menu in the property grid. Like the BACnet devices, BACnet objects must have an unique instance number. Then name does not have to be unique. The same properties for the BACnet object can be found in the Object details panel. When an object is selected in the tree structure, on the right panel, the list of properties will be displayed in the main view, and the details of the properties in the details view. New properties can be added for this selected objects (if they are not available already) by clicking the New button. 23 Browsing BACnet Connector WEBfactory Studio allows the user browse the BACnet connector and select the desired properties to assign signals to them. Browsing the BACnet connector The Browse Connector option (available in the contextual menu of the connector entry in the Server List) will open a browser window. The user has the options to browse for properties and select the desired ones. 24 Connector Browser window One important part of the connector browser is the Filtering option. It allows the user to filter the properties by name. The filtering options uses wildcards for easier input: *X will filter the names that end with X X* will filter the names beginning with X *X* will filter the names that have X anywhere in the name. To add the selected properties to the Studio, the properties need to be assigned to a Destination group. This destination group can be created inside the connector browser window by typing the desired name of the new group in the Destination group text field. The new created group will be listed under the BACnet connector entry in the Server List. Inside the group, the imported properties will have signals assigned automatically. This way the BACnet object can be monitored. 25 Destination group view Validate Signals The contextual menu of the BACnet connector allows the user to Validate Signals. Signal validation 26 The Signal Validation window displays a list of used invalid items and a list of unused items. The invalid items can be removed from the Studio, and the unused items can be set to be used. Invalid items panel To make an unused item to be used, the item must be selected from the Unused Items and assigned to a Destination group. Unused Items panel 27 The signals created for the BACnet object properties can be exported and imported by selecting the appropriate options in the contextual menu. Importing and exporting signals from the BACnet destination group The format used for importing/exporting is xml. 28 6. Filtering BACnet objects when importing a BACnet configuration in WEBfactory Studio WEBfactory Studio only imports object types that have the value of "Required" as 1. In order to import only the desired BACnet object types, the BACnetObjectTypes.xml file must be edited, and all the desired BACnet object types must have the value of Required set to 1. The objects that will have the value of Required set to 0 will not be imported. Navigate to the WEBfactory 2010 installation folder > Studio. The BACnetObjectTypes.xml is located in the Studio folder inside the WEBfactory installation folder Open the BACnetObjectTypes.xml in an editor and search the string Required. TIP: Use the Find and Replace functionality of the editor for easier replacement. 29 Replacing the value of Require with 1 for the desired object types Like in the picture above, replace the value of Require with 1 for the desired object types. The object types not desired for importing should have the value of Required set to 0. Save the XML document. Open WEBfactory Studio and import the BACnet configuration. You will notice that only the selected object types have been imported. NOTE: The BACnetObjectTypes.xml file will be loaded when the WEBfactory Studio is launched. If the Studio is opened, close it and re-open it. Any change in the BACnetObjectTypes.xml file will require WEBfactory Studio to be restarted. Only the selected object type has been imported The BACnet objects that have not been selected may be displayed in the navigation tree, but they are not imported. As we have selected for import only the analog-output > objectidentifier, only this object type is available after the import. 30 7. Using BACnet Scheduler in Expression Blend The BACnet Scheduler control handles signal values following a predefined schedule. The main utility of BACnet Scheduler is implementing calendar based schedules and exceptions. To create a BACnet Scheduler visualization in Expression Blend, create a new WEBfactory Silverlight Application + Website project. Select the UserControl and expand it to 1600x800. Add the dll files from the folder WEBfactory 2010/Silverlight 4/Standard as references to this project. After the references are loaded, drag the WFBacnetScheduler control on the project page. Optional, WFLanguageSelector control can be added, in order to translate de BACnet Scheduler from German to English. BACnet Scheduler visualization project in Expression Blend In the Properties panel, under the WEBfactory category there are two properties of the WFBacnetScheduler control: 31 SearchDeviceMinimumTime SearchDeviceTimeout The project is ready to be executed, so press F5 to run. The BACnet scheduler will open in the browser window: BACnet Scheduler control in web browser 32 8. Using BACnet Scheduler in Smart Editor The BACnet Scheduler control handles signal values following a predefined schedule. The main utility of BACnet Scheduler is implementing calendar based schedules and exceptions. To use the BACnet Scheduler in Smart Editor, create a new project and set the size of the project page to 1600x900. BACnet Scheduler requires more canvas space in order to be easily operated. From the Toolbox panel, drag the WFBACnet Scheduler control (from the BACnet category) on the page. Also place a Language Selector in order to translate the texts from German to English. German is the default language. BACnet Scheduler in Smart Editor In the Property Inspector panel, under the Configuration category there are two properties of the WFBacnetScheduler control: 33 SearchDeviceMinimumTime SearchDeviceTimeout The project is ready to be run now. Pres F5 or click on the Run button from the top bar to run the project. The BACnet scheduler will open in the browser window: BACnet Scheduler control in web browser 34 9. The BACnet Scheduler control at runtime The BACnet Scheduler control is divided in two panels Discovered Devices panel - left side - lists the BACnet devices and all the objects (schedules and calendars) Configuration panel - right side - the configuration options for the BACnet objects When an object (schedule or calendar) is selected in the left panel, the configuration options are displayed in the configuration panel. The Discovered devices panel features a Refresh button that allows the user to manually reload the devices and objects if any configuration had changed. 9.1. BACnet Scheduler workflow A get devices query is executed when the control starts or on any click of the refresh button. The get devices query has a configurable timeout (-1 means wait indefinitely). This will in turn query the devices from the WF2010WebService and subsequently from WFBacNetService. If the cache is populated with devices, or gets populated until the timeout expires, the control will get them. Otherwise, it will get an empty list and a new refresh should be executed. After the first initialization of the cache, the control should always get a list. The get devices query will return the list of devices and the list of scheduler and calendar objects for each device) When the user accesses any of the device objects, one or more queries (depending on the object type) are made for reading each of the object properties or property groups. When writing values, the scheduler tries to write each property one by one. As noted above, this will trigger a rescheduling of the discovery so that the objects are updated (useful for example when the name of an object is changed). 35 9.2. Schedule Configuration The Schedule Configuration allows the user to configure a weekly schedule for an event. The weekly scheduler can be repeated over a period of time. It also allows the user to name the schedule and it displays the current value. BACnet Configuration panel To name the schedule, input the name in the Name textbox. To set the period of repetition for a weekly schedule, use the Effective Period drop down menu and enter the Start Date and the End Date. Use the Save changes button from the bottom of the panel to save any modifications, or Reset changes to reset to the default configurations. Any change in the BACnet Scheduler must be saved in order to be preserved. The Save changes button is located at the bottom of the configuration panel The main area of the configuration panel is represented by a tabbed grid. The three tabs are: 36 Weekly Schedule - allows the user to plan a schedule over the week days (the weekly schedule repeats over the Effective Period). To create a new event, right-click in the grid, on the desired day and hour, and select Insert new event. ... Inserting a new event in the weekly schedule An event will expand itself from the beginning hour to the end of the day. To stop an event at a specific hour, insert a new event with the value 0. An event sets the value of a signal on a specific time. Stopping an event means setting the value of the signal to the initial state, before the first event occurred. This can be done only by creating another event and altering the value of the one which is currently executing. An event can be copied and pasted over an entire week or just on specific days. It also supports cutting, deleting or editing. To access this functions, select an event and right-click on it. The options will be available in the contextual menu. Not only the events support copy, cut and paste options. The calendar days can be edited the same. Right-click on a day to open the contextual menu. 37 Editing entire days These options allow the user to duplicate days in the schedule, cut days or even delete days from the schedule. The Weekly Schedule tab has a Zoom option at the bottom. This is useful when working with detailed time units. Exception Schedule - allows the user to create exceptions from the Weekly Schedule. Exception Schedule 38 The Exception Schedule can be used to create exceptions in the predefined weekly schedule. Using the Add button from the bottom of the panel, the user can add Single Date exceptions, Date Range exceptions, Week and Day exceptions or Calendar References. The user can also import exception entries from other calendar applications, using the file format .ics. Adding and importing exceptions To delete exceptions, mark the checkbox corresponding with the desired exception and use the Delete checked entries button. Single Date exceptions - specify a day in which the schedule will be altered, the value of the signal being different for that day. Single Date exception Date Range exceptions - specify range of time over which the value of the signal will be altered. 39 Date Range exception Week and Day - specifies a certain month/week/day when the value of the signal will be altered Week and Day exception Calendar Reference exception - specify exception dates imported from an existing calendar object. Calendar Reference exception Device Object Property References - displays a grid of property for the discovered devices. 40 9.3. Calendar Configuration The Calendar Configuration view allows the customization of a calendar object. Calendar objects can be used in Exception Schedules under Schedules Configuration. Calendar Configuration view The Calendar Configuration features: Name text field - where the calendar can be named Description field - where description of the calendar can be entered Present Value - displays the present value Date List - the list of dates that the calendar holds By using the Add button from the bottom of the Date List, new entries can be added to the calendar: 41 Single Date Date Range Week and Day Using these calendar entries, the Scheduler can execute exceptions when programmed to. The Calendar also features an Import calendar entries button, which allows the user to import .ics calendar files. 42