1
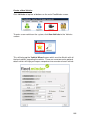
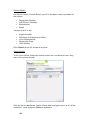
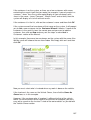
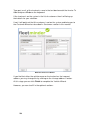
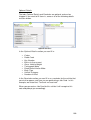
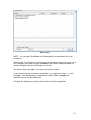
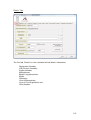
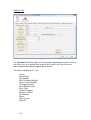
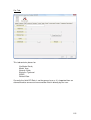
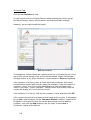
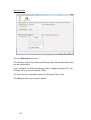
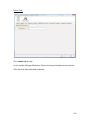
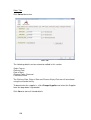
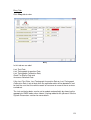
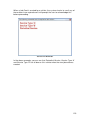
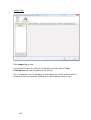
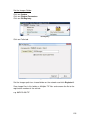
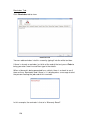
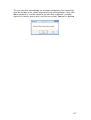
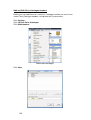
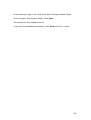
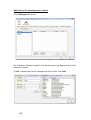
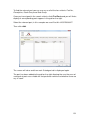
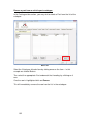
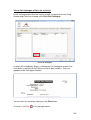
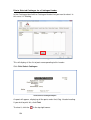
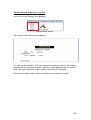
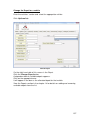
Chapter 5
Vehicles
103
104
Create a New Vehicle:
Click Vehicles at top bar of buttons on the main FleetMinder screen.
Vehicles Section
To enter a new vehicle on the system, click New Vehicles in the Vehicles
section.
New Vehicle
This will bring up the Vehicle Wizard screen which must be filled in with all
the basic details regarding the vehicle. There are numerous extra optional
details which will help you keep a comprehensive overview of each vehicle.
Vehicle Details
105
Vehicle Details
On the first screen, Vehicle Details, you fill in the basic necessary details of
the vehicle:
•
•
•
•
Registration Number
VIN (Chassis Number)
Manufacturer
Model
You can also fill in the:
•
•
•
•
•
Engine Number
Odometer (in Kilometres or Miles)
Year of Manufacture
Registration Date
Fleet Number
Click Cancel to exit this wizard at anytime.
Owner Details
To fill in the Vehicle Owner we need to search for a customer to see if they
are on the system already.
Vehicle Owner Search
Click on the text box below Vehicle Owner label and type in part, or all, of the
customer’s name and press Enter on keyboard.
106
If the customer is on the system, or there are a few customers with names
containing the search input that you wrote (for example, if you only wrote in a
surname, “Jones” then the system would display all your customers with
Jones in the name, “Jones Transport”, “Martin Jones” and so forth) then the
system will display a list of all relevant results.
If the customer is in the list, click on the customer’s name and then click OK.
If the system cannot find a customer of that name on the system, it will prompt
you to add a new customer via the Customer Wizard. Likewise, if none of the
customers in the result-list was the correct one and you want to add the
customer, then click on New and carry out the steps as described in
Customers section of the Manual.
In this example, there were two customers on the system with the name Alan
McGee so we will choose the one from Ardee. We simply click on it and then
click OK.
Vehicle Owner and Invoicee
Now you must select who is invoiced when any work is done on the vehicle.
If the invoicee is the same as the Vehicle Owner, then click the Same As
Owner box, as in this example.
However, if the customer who is invoiced, is different to that of the vehicle
owner (in circumstances where vehicles are leased, for example) you must
carry out a search on the Invoice To side of the owner details as you did with
the Vehicle Owner section.
107
Type part, or all, of the invoicee’s name in the text box beneath the Invoice To
label and press Enter on the keyboard.
If the invoicee is on the system in the list of customers then it will bring up
their details for your selection.
If not, it will point out that this customer is not on the system and bring you to
the Customer Wizard as described in Customers section in this manual.
Different Invoicee to Owner
If you find that either the vehicle owner or the invoice has the incorrect
address you may change this by clicking on the “change address” button.
At this stage you can click Finish to complete the Vehicle Wizard.
However, you can also fill in the optional sections.
108
Optional Details
The tabs Optional Details and Reminder are optional and can be
skipped. If you want to fill them in, some or all of the following details
must be known.
Optional Sections
In the Optional Details section you can fill in:
•
•
•
•
•
•
•
•
•
•
Colour
Radio Code
Key Number
Basis of Assessment
Gross Vehicle Weight
Tachograph Make
Road Speed Limiter Make
Body Type
Vehicle Category
Number of Axles
In the Reminder section you can fill in any reminder for the vehicle that
you wish to appear next time you are generating a Job Card. In this
example, we noted that “Tax book not received”.
When you generate a Job Card for this vehicle it will recognise this
note and prompt you accordingly.
109
Search for a vehicle
From the vehicle’s section, select the Search Criteria Search Field.
Search Criteria
You have an option between:
Chassis number,
Fleet No,
Make,
Owner,
Reg No.,
Unit No,
VModel,
Hirer ID and
Client ID.
Once you have selected the search field, you then have different options for
input of the search criteria.
For Chassis, Reg No., Unit No., Hirer ID and Client ID you are given a text
box to fill in the search details.
In Make and VModel you are given a drop-down box of all the previously
inputted items.
If you select Owner from the search criteria area, start typing in the name of
the customer for whom you wish to search.
In our example, we are using the first word of the customer’s name to start our
search: mur.
110
Owner Search
NOTE - As you type FleetMinder will automatically narrow down the list of
customers.
Please note, it searches for the text you have typed anywhere the name, so in
this example, we could also type Contract in the search field and expect to
receive Murphy Contract Cleaning in the results.
The more letters you type in, the more refined the search.
If you cannot find the customer immediately, try using fewer letters – in this
example, if we accidentally misspelled our search field as muphy, we
wouldn’t receive the desired result.
The grid will display any vehicles that match the criteria specified.
111
View Details of a Vehicle
Enter the Vehicles section from the main FleetMinder menu.
Vehicles Section
After carrying out a search for the vehicle you wish to view, you will be
presented with the relevant vehicle or some vehicles that match your criteria.
Vehicle Record
Double-click on the vehicle you wish to select and then click Record.
112
Details Tab:
Details Tab
The first tab, Details, has the standard vehicle details information:
Registration Number,
VIN (Chassis Number),
Engine Number,
Manufacturer,
Model Long description,
Model,
Odometer,
Year of Manufacture,
Year of First Registration and
Fleet Number.
113
Optional Tab:
Optional Details
The Optional tab displays pieces of information regarding the vehicle that are
not necessary for a vehicle to be used on the system, but give the user a
more complete description regarding the vehicle.
The fields available to fill in are:
Colour,
Radio Code,
Key Number,
ULW (Unladen Weight),
Gross Vehicle Weight,
Tachograph Make,
Road Speed Limiter,
Body Type,
Vehicle Category,
Number of Axles,
Unit Number,
Depot,
Hirer ID and
Client ID
114
Car Tab:
Car tab details in Vehicle record
This tab contains places for
Car Model Code,
Model Year,
Security Code,
Business Type and
SONO,
Defleet Date.
Currently the field PDI Date is not for general use as it is imported from an
alternative data source and so cannot be filled in directly by the user.
115
Customer Tab:
Click on tab Customer to view.
As you cannot enter the Vehicle Record section without the vehicle set up,
this tab will always have a vehicle owner and invoicee filled in already.
However, you are able to edit the details.
New Vehicle Owner
To change the Vehicle Owner we need to search for a customer to see if they
are on the system already. Click on the text box below Vehicle Owner label
and type in part, or all, of the customer’s name and press Enter on keyboard.
If the customer is on the system, or there are a few customers with names
containing the search input that you wrote (for example, if you only wrote in a
surname, “Jones” then the system would display all your customers with
Jones in the name, “Jones Transport”, “Martin Jones” and so forth) then the
system will display a list of all relevant results.
If the customer is in the list, click on the customer’s name and then click OK.
If the system cannot find a customer of that name on the system, it will prompt
you to add a new customer via the Customer Wizard. Likewise, if none of the
customers in the result-list was the correct one and you want to add the
customer, then click on New and carry out the steps as described in
Customers section of the Manual.
116
In this example, there were two customers on the system with the name Alan
McGee. We simply click on the customer we would like to use and then click
OK.
Update Invoicee
Now you must select who is invoiced when any work is done on the vehicle.
If the invoicee is the same as the Vehicle Owner, then click the ‘Set Invoice
Address to Same as Vehicle Owner’ box.
However, if the customer who is invoiced, is different to that of the vehicle
owner (in circumstances where vehicles are leased, for example) you must
carry out a search on the Invoice To side of the owner details as you did with
the Vehicle Owner section.
Type part, or all, of the invoicee’s name in the text box beneath the Invoice To
label and press Enter on the keyboard.
If the invoicee is on the system in the list of customers then it will bring up
their details for your selection.
If not, it will point out that this customer is not on the system and bring you to
the Customer Wizard as described in Customers section in this manual.
At this stage you can click Save to store the details you have altered.
117
Warranty Tab:
Extended Warranty Date
Click on Warranty tab to view.
The Warranty Expiry Date, Warranty Mileage and Extended Warranty Date
can be entered here.
In this example, the Extended Warranty Date is being changed to 14h July
2010 by the easy-to-use calendar facility.
The same facility is provided to enter the Warranty Expiry Date.
Click Save to store any change in details.
118
Lease Tab:
Lease Details
Click Lease tab to view.
In this section Mileage Allowance Figure and Lease Number can be altered.
Click Save to store alteration to details.
119
Sales Tab:
Click Sales tab to view.
Sales Tab
The following details can be entered or edited in this section:
Sales Person,
Delivery Date,
Date of Sale,
Finance Expiry Date and
Purchased From
The Delivery Date, Date of Sale and Finance Expiry Date can all be entered
using the calendar facility.
To denote who the supplier is, click Change Supplier and select the Supplier
from the drop down list provided.
Click Save to store all altered details.
120
Diary Tab:
Click Diary tab to view.
Diary
In this tab we can add:
Last Test Date,
Last Tachograph Inspection Date,
Last Tachograph Calibration Date,
Road Tax Expiry Date and
Insurance Renewal Date.
If the Last Test Date, Last Tachograph Inspection Date or Last Tachograph
Calibration Date is out of date then the expiration date will be denoted in red
to alert the user that the vehicle needs to have one or more of these services
carried out.
The test and tacho dates can be set to update automatically by choosing the
appropriate VMRS codes when labour is being added to the job card. See the
System Parameters section for more details.
121
Service Diary Tab:
Click Service Diary tab to view.
Service Diary
This is the section that shows the Last Odometer Read Date and the Last
Odometer Reading.
Each section displays the last date and odometer reading at the time of each
of the services, how long an interval should be between each service and then
the next estimated date for that type of service. If the due date for any of the
services has been passed, then the box turns red to alert you.
If you alter the Last Service ‘A’ Date, Last Service ‘A’ Odometer reading, Last
Service ‘B’ Date, Last Service ‘B’ Odometer, Last Periodical Service Date or
Last Periodical Service Odometer then you must click Update All to ensure
that the Next Estimated Service Type ‘A’, Next Estimated Service Type ‘B’
and Next Estimated Periodical Service dates are all updated to correspond to
their criteria. Likewise, if you alter the Service Interval of any of the criteria in
either Weeks or Miles/KMs/Hours then you must click Update All again to
update the criteria.
These dates can be set to update automatically by choosing the appropriate
VMRS codes when labour is being added to the job card. See the System
Parameters section for more details.
Click Save to record any alterations you have made.
122
When a Job Card is created for a vehicle, the system checks to see if any of
these dates have expired and it will prompt the user to acknowledge this
before proceeding.
Service/Test Reminder
In the above example, you can see that Periodical Service, Service Type ‘A’
and Service Type ‘B’ are all due on this vehicle when the new job card was
created.
123
Images Tab:
Images
Click Images tab to view.
If a picture file is present, click on the filename and then click on View
Scanned Docs to view the picture of the vehicle.
This is especially useful if damage has occurred to the vehicle and you wish to
record it or wish to record the condition of a vehicle before rental or sale.
124
Set the Images Folder
Click on System.
Click on System Parameters.
Click on Set Registry.
Set Registry
Click on Paths tab.
Images Folder Path
Set the Images path to a shared folder on the network and click Register It.
Save image files in this folder as Multiple TIF files and rename the file to the
registration number of the vehicle.
e.g. 06D123456.TIF
125
Reminders Tab:
Click Reminders tab to view.
Reminder Tab
You can add reminders into this screen by typing it into the white text box.
If there is already a reminder, just click at the end of the text; press Enter to
bring you onto a new line and then type in the details.
When a job card is being generated for a vehicle, there is a check to see if
there are any Reminders and if there is, it is displayed as a message to alert
the person creating the job card of this reminder.
Reminder Notes
In this example, the reminder is that of a “Warranty Recall”.
126
The user can then acknowledge the reminder and delete it (thus removing it
from the text box in this screen automatically) by clicking Yes or, if they click
No to not delete it, it will be stored for the next time a job card is created
against this vehicle, and so forth, until the user selects Yes and it is deleted.
Reminder Removal
127
Add and Edit Parts Catalogue Headers
Before you can add items to a vehicle’s Catalogue section you must have
some Parts Catalogue headers set up from the System menu.
Click System.
Click Vehicle Parts Catalogue.
Click Maintenance.
Vehicle Parts Catalogue
Click New.
Vehicle Parts Catalogue
128
In the Name box, type in the name of the New Catalogue Header Name.
In this example, Steering was written. Click Save.
The header has been added to the list.
If you are finished adding new headers, click Close to exit this screen.
129
Add Parts to the Catalogue for a Vehicle
Click Catalogue tab to view.
Parts Catalogue
The Catalogue Headers created in the System menu are displayed on the left
side of the screen.
To add a relevant part to the catalogue for that vehicle, click Add.
Part Finder
130
To find the relevant part you can use any or all of the four criteria: Part No.,
Description, Stock Group and Sub Group.
Once you have typed in the search criteria, click Find Parts and you will find a
display of corresponding parts appear in the grid on the right.
Select the relevant part, in this example we used Part No. 815078030027.
Then click Add.
Part Item Added
The screen will close and then main Catalogue tab is displayed again.
The part has been added to the grid on the right allowing the user the ease of
seeing what parts are suitable for that particular vehicle and whether there are
any in stock.
131
Remove a part from a vehicle parts catalogue
In the Catalogue tab section, you may wish to delete a Part from the list of the
catalogue.
Delete Part
Select the Catalogue Header item by clicking once on the item – in this
example we clicked Brakes.
Then select the appropriate Part underneath that heading, by clicking on it
once.
Once the row is highlighted click on Remove.
This will immediately remove the row from the list in the catalogue.
132
View a Full Catalogue of Parts for a Vehicle
In the Catalogue tab within the vehicle record, irrespective of what Catg.
Header and Parts are selected; click Print Full Catalogue.
Print Full Catalogue
A report will immediately display, showing the Full Catalogue of parts that
have been associated to that vehicle and their part numbers. They are
grouped under Catalogue Headers.
Vehicle Parts Catalogue Report
You can print this report by clicking on the Print button.
To close it, click the
in the top right corner.
133
Print a Selected Catalogue for a Catalogue Header
In the Catalogue tab click the Catalogue Header that you want to select. In
this case, it is Braking.
Print Catalogue
This will display all the list of parts corresponding to this header.
Click Print Select Catalogue.
Vehicle Parts Catalogue Report
A report will appear, displaying all the parts under that Catg. Header heading.
If you wish to print this, click Print.
To close it, click the
134
in the top right corner.
View an Activity Report for a Vehicle
From the Vehicle Record, click Activity.
Vehicle History Activity
The Vehicle Activity Report is displayed.
Vehicle Activity Report
It is split into two sections, External Invoices and Internal Invoices. All invoices
pertaining to this vehicle will display, with their corresponding Job No. and the
Date that it was signed off and any Work Detail that was recorded.
Clicking on the job number is blue will display the invoice for that job.
135
Workshop Invoice
In our example, we have an external invoice, 247049 and it was issued from
the work done on Job No. 1373376.
Click
in the top right corner to close the Workshop Invoice or click Print if
you wish to print out a copy of the invoice.
136
Change the Depot for a vehicle
Enter the vehicles’ section and select the appropriate vehicle.
Click Optional tab.
Vehicle Depot
On the right hand side of this screen is the Depot.
Click the Change Depot button.
A drop down box of available depots appears.
Click on the appropriate one.
It will appear in the box as the allocated depot for that vehicle.
View the Depots section in the chapter 14 for details on adding and removing
available depots from the list.
137
138