1
Chapter 3
Customers
57
58
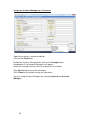
Create a New Customer
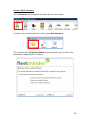
Click Customers on the top bar of buttons on the main screen.
Customers Section
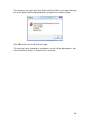
To enter a new customer on the system, click New Customer.
New Customer
This will bring up a Customer Wizard screen into which we must fill in the
basic details regarding this customer.
Customer wizard
59
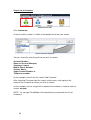
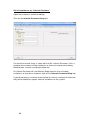
The first screen welcomes you to the Customer Wizard and points out the
main three items that are needed to enter a customer:
•
•
•
Customer’s Name and Unique Reference Number
Customer’s Address Details
Customer’s Contact Information
Click Next to continue to the next screen.
You can click Cancel at any time to exit the wizard.
Customer Name
The next screen requests the Customer’s Full Account Name.
As you enter the name, the system generates the Customer’s Unique
Account No.
This unique Account is used reference number in FleetMinder.
Click Next to continue to the following screen.
Click Back to return to the previous screen if you wish to alter any details.
60
Customer Address
The next screen looks for the Customer’s Address and Contact Details. Fill
in these details as appropriate.
Click Next to move onto the next screen.
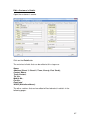
Contact Information
On the final screen there is space for:
•
•
•
•
•
Email address
WWW website address
Contact Name
Trade Contact name
VAT Number.
Note – if an email address is entered then it will be used if you email an
invoice/credit note to this customer.
Click on Finish to complete the creation of a new customer on your system.
61
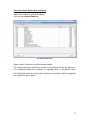
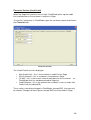
Search for a Customer
Customers Section
Click Customers.
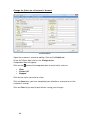
A search criteria section is visible at the bottom left of the new screen.
Search Criteria Categories
You can select the criteria by which you wish to search:
Account Number,
Name of Account Manager,
Customer’s name,
Mobile Phone Number,
Contact Name,
Sage Account Number or
Telephone number.
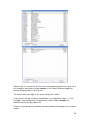
In our example, we will use the search field Customer.
After selecting Customer from the search criteria area, start typing in the
name of the customer for whom you wish to search.
In our example, we are using the first word of the customer’s name to start our
search: murphy.
NOTE - As you type FleetMinder will automatically narrow down the list of
customers.
62
Customer Search
Please note, it searches for the text you have typed anywhere the name, so in
this example, we could also type motors in the search field and expect to
receive Murphy Motors in the results.
The more letters you type in, the more refined the search.
If you cannot find the customer immediately, try using fewer letters – in this
example, if we accidentally misspelled our search field as muphy, we
wouldn’t receive the desired result.
Once we have found the customer we want, double click to open the customer
record.
63
View a Customer’s Details
Click Customers.
Customers Section
Carry out a search for the customer that you wish to edit.
When the grid displays the correct result of the search, highlight the line and
double-click or click on Record button.
Open Customer Record
The customer’s record will then be displayed.
Customer Record
64
If the customer has gone over their Sage credit limit then a message informing
you of the details will be displayed when you open the customer record.
Credit Limit Warning
Click OK to close the credit limit message.
This warning is only intended as a guideline, you will still be able process Job
Cards and Sales Orders as normal for this customer.
65
Set a Customer as an “Internal Customer”
Open the customer’s record for editing.
Click on the Internal Accounts Setup tab.
Internal Customer
On the left hand side, there is a box with the title, Internal Customer. If this is
checked, the customer will be treated as an internal customer when being
billed for jobs, invoices are being created etc.
An Internal Customer will use different Sage accounts than standard
customers, to view these accounts click on the Internal Accounts Setup tab.
If you do not want a customer to be marked as internal, uncheck this box and
they will be treated as regular external customers on the system.
66
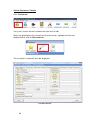
Edit a Customer’s Details
Open the customer’s record.
Edit Customer
Click on the Details tab.
The main basic fields that can be edited at this stage are:
Name,
Address {Street 1, Street 2, Town, County, Post Code},
Contact Name,
Trade Contact,
Tel. No.,
Mobile No.,
Fax No.,
Email and
WWW {Website address}.
The other sections that can be edited will be looked at in details in the
following pages.
67
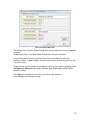
Change the Status on a Customer’s Account
Account Status
Open the customer’s record for editing. Click on the Details tab.
At the A/C Status field, click on the Change button.
A drop down box will appear.
Click on the
arrow at the drop down box to reveal other statuses:
•
•
•
Clear
Contact AC
Stopped
Click on the status you want to select.
Click on Save when you have completed your alterations and want to exit the
customer’s records.
Click on Close if you want to quit without saving your changes.
68
Assign an Accounts Package Account Code to a Customer
Open the customer’s record for editing.
Click on the Details tab.
Accounts package Accounts Code
In the Accounts Package: Accounts Code field you can fill in a reference code
for this customer so that when the information is being synchronized between
FleetMinder and your accounts package, the package knows which customer
you are referencing.
This field is also used by FleetMinder to bring across the customer’s credit
limit and account balance.
69
Assign an Account Manager to a Customer
Account Manager
Open the customer’s record for editing.
Click on the Details tab.
Beside the Account Manager field, click on the Change button.
A drop down list of Account Managers will appear.
Select the manager that you wish to allocate to the customer.
Click Save button to save the alterations.
Click Close to exit without saving any alterations.
You can setup Account Managers by selecting System and Account
Manager.
70
View the Labour Rates for a Customer
Open the customer’s record for editing.
Click on the Labour Rates tab.
Custom Labour Rates
Against each Code you can view the description.
The Default field notes whether or not this is the default rate for this labour or
if it is individualised for this customer. A * highlights that it is the default value.
The Rate field shows the actual rate at which this customer will be charged for
each specific type of labour.
71
Alter a Labour Rate for a Customer
Open the customer’s record for editing.
Click on the Labour Rates tab.
Edit Custom Labour Rate
Select the Labour Rate you wish to alter by double-clicking on the Description
of the Labour Code.
A new frame will open, Edit Customer’s Labour Rate.
The Code field and the Description field cannot be altered; however, you can
change the Rate field so that this customer will be charged at a different value
for that type of labour.
Click Cancel if you do not wish to save the alterations that you have made.
Click Save if you want to store the changes.
If you save the rate and it is different to the default value, you will note that in
the grid, that particular labour rate does not have a * in the Default field.
72
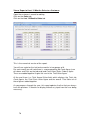
View the Parts Discounts for a Customer
Open the customer’s record for editing.
Click on the Parts Discounts tab.
Parts Discounts
The left grid displays the Stock Groups.
You can view the percentage value Workshop Discount (Job Card) and also
the Parts Sales Discount (Sales Order).
If you click on a stock group within this grid, it will open a second grid, on the
right, displaying all the Sub Stock Groups within that stock group.
Again, this displays the Workshop Discount in percentage value and also the
Parts Sales Discount.
To view other Sub Stock Group items you simply click on a different stock
group on the left.
Click Save or Close to exit.
73
Edit the Parts Discounts for a Customer
Open the customer’s record for editing.
Click on the Parts Discounts tab.
Parts Discounts table for a customer
The left grid displays the Stock Groups.
You can view the percentage value Workshop Discount and also the Parts
Sales Discount.
Click on a stock group within this grid that has a sub stock group item which
you wish to edit.
It will open a second grid, on the right, displaying all the Sub Stock Groups
within that stock group.
Again, this displays the Workshop Discount in percentage value and also the
Parts Sales Discount.
To edit the Workshop Discount or Parts Sales Discount for any of the Sub
Stock Group items, double-click on the item.
74
Sub Stock Group Discount
The display will show the Stock Group item and the discounts that are applied
for them.
Underneath there is the Sub Stock Group item, that you selected.
In the Workshop Discount and Part Sales Discount fields you alter the
discount values, in percentages, that you want to give to this customer on the
sale of this part.
If you want to set the values to the default value for that stock sub group, click
Set Same as Default button and it will alter both Workshop and Part Sales
discount values.
Click Save to record the values that you have input and exit.
Click Close to exit without saving.
75
View a Report of Last 12 Months Sales to a Customer
Open the customer’s record for editing.
Click on the Sales tab.
Click on the Last 12 Months Sales tab.
Customer Sales
This is the numerical version of the report.
You will see a grid on the last twelve months in two groups of 6.
For each month you will note there is a corresponding Job Cards figure (sum
of Labour and Parts on the job card) and Parts Sales (Sales Orders) figure.
These are added together to give the sum in the Total Sales figure.
At the end, there is a Total Annual Sales field, which displays the Total Job
Cards figure, the Total Parts Sales figure and the overall Total Sales of all
these figures added together.
As you progress through the year, this report updates itself so that you always
have the previous 12 months on display without any input from the user being
necessary.
76
View the Chart of Sales to a Customer
Open the customer’s record for editing.
Click on the Sales tab.
Click on the Sales Chart tab.
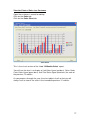
Sales Chart
This is the visual version of the “Last 12 Months Sales” report.
You will see the chart is a display of Job Sales figure (red bars), Sales Order
Parts Sales figure (green bars) and Total Sales figure (blue bars) for each of
the previous 12 months.
As you progress through the year, the chart adjusts itself so that you will
always have a view of the sales in the immediate previous 12 months.
77
Create, Edit or View a Note
Open the customer record.
Click on the Notes tab.
Customer Notes
Any notes that have been previously written here can be viewed irrespective
of who wrote them. Notes can be added or amended once you are an
authorised user of this area on the system.
78
Add Customer Feedback
Open the customer’s record for editing.
Click on the Feedback tab.
Click on the All Feedback Types tab.
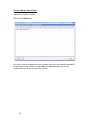
Customer Feedback
Initially, this screen is blank apart from an Add Feedback button.
To add feedback, click on the Add Feedback button.
Select an Account Manager
79
You are prompted to select an Account Manager from the list of Account
Managers. Use the drop down box to view the list and click on the
appropriate name.
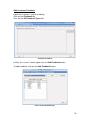
Courtesy Feedback Rating
A grid is displayed showing all the types of feedback.
Click on the Feedback Type for which you wish to record a rating.
In this example, we are using Service.
The Date field cannot be altered – this is taken from today’s date.
In the Rating For … frame, click on the rating.
The ratings are “Excellent”, “Very Good”, “Good”, “Average” and “Poor”.
In the text box below, you can enter any comment that the customer has to
add. Click Save if you want to record the feedback. Click Cancel if you do not
want to store the feedback details.
If you click Save and there is no comment in the text box, a message will
appear asking you “Do you wish to add a comment before saving?”
Add Comment
If you want to return and add a comment, click Yes.
Otherwise, if you wish to continue without storing a comment, click No.
When you are finished, click the Close button to exit this section.
80
View Graph of All Feedback Types
Open the customer’s record for editing.
Click on the Feedback tab.
Click on the All Feedback Types tab.
Bar Graph of Feedback
As the user adds more and more feedback types and feedback results to the
system, it adds to this graph and so is always showing you an accurate
representation of the feedback from this customer.
81
View Graph of Customer’s Last 10 Feedbacks
Open the customer’s record for editing.
Click on the Feedback tab.
Click on the Detailed Type tab.
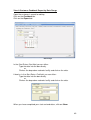
Feedback Type
By using the drop-down box, view the list of Feedback Category types and
click on the one of which you wish to view the detailed graph.
A graph appears showing you, date by date, the values that your company
has received from this customer, under the Feedback Category that you
selected. In this example, we used Feedback type 001-Politeness.
Click Save or Close to exit the customer record.
82
View A Customer Feedback Report by Date Range
Open the customer’s record for editing.
Click on the Feedback tab.
Click on the Report tab.
Date Range
In the Start Dates: Start field you can either:
Type the date into the box directly
or
Click on the drop-down calendar facility and click on the date.
Likewise, in the Start Dates: End field, you can either:
Type the date into the box directly
or
Click on the drop-down calendar facility and click on the date.
Start and End Date
When you have completed your start and end dates, click on Show.
83
Customer Feedback Report
A report will display showing each Feedback Type on a new page.
They are grouped by Account Managers and then under each Account
Manager you can view the Mark Given, the Date the mark was given, the
Rating and any Comments by the customer.
You can print this report by clicking Print and then by selecting the printer.
To exit the report, click
customer record.
in the top right corner to bring you back to the
Click Close to exit the customer record area completely.
84
Financials Section (Credit Limit)
When the SageLink interface runs at night, FleetMinder picks up the credit
limit and balance on the customer’s account in Sage.
To view this information in FleetMinder, open the customer record and click on
the Financials tab.
Financials Section
The Credit Details are then displayed.
•
•
•
•
Max Credit Limit – this is the customer’s credit limit on Sage
Bal On Account – this is customers a/c balance on Sage
On WIP – this is the current value of work done for this customer on
FleetMinder that has not been posted to Sage yet.
Credit Balance – this is the amount the customer is over or under their
Credit Limit (including WIP)
These values cannot be changed in FleetMinder (except WIP), they can only
be viewed. Changes to these figures (except WIP) must be made in Sage.
85
86