1
7W
N
NOTICE
Corvus Systems, Inc. reserves the right to make improvements in the product described in this
manual at any time and without notice.
DISCLAIMER OF ALL WARRANTIES AND LIABILITY
-77777
7W
Corvus Systems, Inc. makes no warranties, either express or implied, with respect to this manual or
with respect to the software described in this manual, its quality, performance, merchantability, or
fitness for any particular purpose. Corvus Systems, Inc. software is sold or licensed "as is." The entire
risk as to its quality and performance is with the buyer. Should the programs prove defective
following their purchase, the buyer (and not Corvus Systems, Inc., its distributor, or its retailer)
assumes the entire cost of all necessary servicing, repair, or correction and any incidental or
consequential damages. In no event will Corvus Systems, Inc. be liable for direct, indirect,
incidental, or consequential damages resulting from any defect in the software, even if Corvus
Systems, Inc. has been advised of the possibility of such damages. Some states do not allow the
exclusion or limitation of implied warranties or liability for incidental or consequential damages, so
the above limitation or exclusion may not apply to you.
This manual is copyrighted and contains proprietary information. All rights are reserved. This
document may not, in whole or part, be copied, photocopied, reproduced, translated or reduced to
any electronic medium or machine readable form without prior consent, in writing, from Corvus
Systems, Inc.
cg5 by Corvus Systems, Inc.
2029 O'Toole Ave.
San Jose, California 95131
(408) 946-7700
k
All rights reserved.
Reorder CORVUS product no. 11APM
Text and photos by Moe Rubenzahl
Printed in U.S.A.
San Jose, California 95131
408/946-7700 TWX: 910-338-0226
Price $20
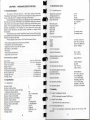
TABLE OF CONTENTS
Chapter 0
THE CORVUS hAP MASS STORAGE SYSTEM
0.1 What It Is and What It Does ...............................................
0.2 How It Does It ....................................................................
Chapter 1
HOW TO USE THIS MANUAL
1.1 Background .......................................................................
1.2 Background For Applesoft and DOS Users.......................
1.3 Background For Pascal Users...........................................
1.4 References (Annotated Bibliography)................................
1.5 Conventions......................................................................
1.6 Some Terms.......................................................................
3
3
3
3
4
5
Chapter 2
CAUTIONS
2.1 Power Off..........................................................................
2.2 Handling Floppy Disks.......................................................
2.3 Disk Drive..........................................................................
6
6
6
Chapter 3
GETTING STARTED-INSTALLATION
3.1 Check Your Parts..............................................................
3.2 Carriage Lock ...................................................................
3.3 Cabling.............................................................................
3.4 Final Check......................................................................
Chapter 4
GETTING STARTED-CONFIGURING THE SYSTEM
4.1 About Slots, Booting, and Configuring.............................
4.2 Selecting the System ........................................................
4.3 Installing the BASICS System..........................................
4.4 Installing the Pascal System.............................................
19
20
21
24
Chapter 5
USING YOUR CORVUS hAP WITH BASICS
5.1 How BASICS Boots..........................................................
5.2 Creating a Turn-Key BASICS System...............................
5.3 About Volumes.................................................................
5.4 Using DOS 3.2 and BASICS .............................................
5.5 Corvus BASICS Utility Programs .....................................
5.6 How the Corvus BASICS/Only Disk is Organized............
32
34
35
36
37
38
Chapter 6
USING YOUR CORVUS hAP WITH PASCAL
6.1 About Volumes...............................................................
6,2 Getting Acquainted With the Corvus
Volume Manager (VMGR) .............................................
6.3 VMGR Commands ............................................................
6.4 VMGR Commands-Quick Reference..............................
6.5 BACKUP and RESTORE Facilities...................................
6.6 Creating and Using DOS 3.2Format Volumes Under Pascal/BASICS........................
6.7 Pascal Cold Boot Facility and Turn-Key Operation ..........
Chapter 7
39
39
42
44
44
6.8 How the Corvus Pascal/BASICS Disk is Organized.........
45
48
49
HARDWARE SPECIFICATION
7.1 General Description ...........................
7.2 Specifications ...................................................................
7.3 Reliability..........................................................................
50
50
51
CHAPTER 0
THE CORVUS hAP MASS STORAGE SYSTEM
0.1 What It Is and What It Does
The Corvus hAP is a microprocessor-controlled intelligent peripheral
that adds high performance mass storage to Apple Computers with DOS or
Pascal operating systems.
The hAP is totally compatible with Apple hardware and software-all
programs and peripherals that work on an Apple will work on an Apple with
an hAP.
The hAP with one disk drive adds over 9.69 million bytes (9.69 MB) of
storage capacity to your Apple system. You can put as many as four drives on
the hAP with Pascal (two with the BASICS/only configuration) for over 38.7
MB storage-the equivalent of 276 floppy disks.
Summary of Features
" The hAP provides 9.69 megabytes of storage and is totally compatible with
Apple's DOS 3.2 and Pascal operating systems.
" The 11 AP is faster than a floppy-based system. The 11 AP transfers information
many times faster than a floppy system.
" The hAP is convenient. Corvus supplies well-engineered, friendly utilities
that allow you to quickly and easily manipulate the data on the disk.
" The hAP is accurate and more reliablethan floppy disks. It features read after
write operation. When you record data on the disk, the hAP automatically
reads it back to make sure it was recorded perfectly. This happens automatically. The result is flawless recording without human attention.
0.2 How It Does It
Your hAP consists of a compact high speed disc drive, a microprocessorbased intelligent controller, and a personality card" that links the controller to
your Apple.
The disk drive can store about eleven megabytes of unformatted data on
two eight-inch magnetic disks. The information is stored on three sides of the
disks. The fourth side contains servo information-magnetic traces that are
used by the closed-loop servo positioning mechanism to guarantee accurate
positioning of the read/write heads under all operating conditions.
While a floppy disk is flexible (hence its name), the disks in your hAP are
rigid ('hard disks"). The disk drive uses proven Winchester Technology that
provides reliable, dependable high density storage. In a Winchester drive, the
read/write heads do not touch the disk's surface. Instead, they are designed
with a wing-like shape that allows them to fly above the surface of the rapidly
spinning disk, riding on a cushion of air that suspends them approximately 18
microinches (0.46 urn) above the disk. That's about a hundredth of the diameter
of a human hair! In a floppy, the heads actually touch the floppy disks's surface.
To prevent dust and other contaminants from interfering with the heads,
the Corvus disk operates in a sealed enclosure with a positive-flow air
filtration system.
The controller uses a Z-80 microprocessor and 16K Bytes of randomaccess-memory to provide high speed, intelligent, and accurate reading
and writing.
The personality card will transfer up to fifty kilobytes per second and
conforms to all Apple interface conventions. This means the hAP works
exactly like a floppy drive, but with greater capacity and speed.
CHAPTER 1
USING THIS MANUAL
1.1 Background
This manual assumes that you have some experience with your Apple.
Although several Apple procedures are described in this manual, these
descriptions are designed to jog your memory. They are not a substitute for
Apple's documentation.
If you have a problem, please refer to your Apple Manuals. If you
encounter an apparent conflict between this manual and Apple's manuals,
remember that Apple's manuals are the final authority on Apple's hardware
and software.
1.2 Background For Applesoft and DOS 3.2 Users
If you are just getting started with computers, please read The Applesoft
Tutorial, an excellent way for new computer users to learn the basics (and the
BASICS) of computers. Computers are complicated instruments and most
computer manuals-including this one-use computer jargon that can be a
barrier at first. The Applesoft Tutorial will get you started smoothly and make you
comfortable with your Apple. The glossary in theApple /I Reference Manualwill
help you with the jargon.
If you already know computers, skim The Applesoft Tutorial, read the
Applesoft II Manual, and finish with the DOS 3.2 Manual.
For information on the Apple's hardware and firmware (programs
recorded in ROM), refer to the Apple II Reference Manual.
1.3 Background For Pascal Users
If computers are new to you, please read Problem Solving With Pascal. It is
a thick book and may seem forbidding, but it's a good way to really learn
computers. Computer manuals (including this one) use a lot of technical
jargon. Refer to the glossaries in Problem Solving With Pascal and in theApple II
Reference Manual for help. If you already know computers, read the Pascal User
Manual and Report.
Once you know Pascal, refer to the Apple Pascal Reference Manual to learn
about Apple-flavored Pascal.
The Apple /1 Reference Manual describes the Apple's hardware
and firmware.
1.4 References
Here is an annotated, partial list of the applicable Apple manuals:
1.4.1 Disk Operating System Instructional and Reference Manual (also known
as DOS 3.2 Manual, The Do's and Don'ts of DOS, and A Manual for Using the
Apple Disk II with DOS Version 3.2), by Phyllis Cole and Brian Howard,
copyright 1979. Apple product number A21_0012. The authority on Apple's DOS.
1.4.2 The Applesoft Tutorial, by Caryl Richardson, copyright 1979. Apple
product number A2L0018. This manual is asuperb way to get started in BASIC.
It provides fruitful hands-on experience right away, virtually guaranteeing a
warm first experience with the computer. More experienced computer people
will benefit from this manual, too, as it provides a swift introduction to the
Apple's unique features (such as graphics).
1.4.3 Applosoft II, by Apple Computer, copyright 1978. Apple product number
A2L0006. The authoritative reference on Applesoft BASIC.
1.4.4 Pascal User Manual and Report, second edition, by Kathleen Jensen and
Niklaus Wirth, copyright 1974. The authoritative reference on Pascal.
1.6 Some Terms
Floppy-
1.4.5 Problem Solving Using Pascal, by Kenneth L. Bowles, copyright 1977. An
introduction to using computers in general, and Pascal in particular.
Disc-
1.4.6 Apple Pascal Reference Manual by Apple Computer, copyright 1979.
Apple product number A2L0019. Describes Apple's version of Pascal.
BlockSectorVolume-
1.4.7 Apple II Reference Manual by Apple Computer, copyright 1979, Apple
product number A2L0001A. Describes the Apple's hardware and firmware in
considerable detail, including full information on all past and present Apples
and a rather extensive glossary.
1.4.8 Apple Language System Installation and Operating Manual by Apple
Computer, copyright 1979, Apple product number A2L0024.
1.5 Conventions
" Angle brackets> indicate certain special keys: <ctrl>, <return>, <esc>, and
<reset>. The Applesoft Tutorial describes these keys in more detail.
" When the computer prompts you for an input, this manual will generally show
both the prompt and the appropriate response. For instance, if the
computer asks
(the screen cursor sits after the?, waiting for your response) and you should
respond with
MYDISK: EXTRA.DATA,SCRATCH:$
the manual will show
TRANSFER ? MYDISK:EXTRA.DATA,SCRATCH:$
" Watch for these symbols:
WA FINING
This reminds you to be extra careful. Failure to follow these
instructions could cause damage to your Apple, your Corvus hAP,
or both, or could cause you to lose data, or could cause you to have
to start over.
This reminds you to turn off your Apple, your Corvus hAP, or both.
It is absolutely essential that they be powered down anytime you
remove or install any circuit card or cable. (If in doubt, turn it
off first!)
UnitMount-
When this manual refers to "floppies" we are using the common
term for what Apple Computer calls "diskettes." And when we say
"floppy drive," we are referring to a "diskette drive" such as the
Apple Disk II.
When werefer to"disk"or"disk drive" or"Corvusdrive,"wealways
mean the disk drive that is the heart of your Corvus hAP
mass-storage system.
A block is 512 bytes (4K bits).
A sector is 256 bytes-or half a block.
When we say "volume" we mean a block-structured Pascal devicespecifically, a set of files with a directory, recorded on a floppy or on
the Corvus disk.
A logical device number. Apple Pascal uses units 4,5,9,10,11, and 12
for floppy drives.
To associate a volume with a unit. Floppies are physically mounted
by placing a floppy (the volume) in a drive (the unit). Corvus Pascal
volumes are mounted by a program (the volume manager).
CHAPTER 2
CAUTIONS
W
of
0
ew
I
f
or
cables
or
circuit
cards.
removing
any
you
forget,
you
may
inserting
permanently damage your Apple or your hAP.
These suggestions will protect your Apple and your Corvus hAP
from damage.
2.1 Always turnoff (or, better still, unplug) both your Apple and your llAPwhen
Here's why: When you remove or replace a card or a cable, one or
two pins may connect before the others. The circuit was not
designed to operate that way and it is possible (though not
extremely likely) that an illegal voltage may be applied to the circuit
or that the circuit may power-up in an unusual state. It is quite
possible that these conditions could destroy portions of your
computer, requiring extensive and expensive repair.
So please remember-always turn off the computer and the hAP
before you start plugging in the cards and cables.
2.2 Handling Floppy Disks
You will use floppy disks to install and configure your llAP. Please referto
the section called Care of the Disk II and Diskettes" in Apple's DOS manual.
Here are the more important cautions:
" Keep away from magnetic fields
and temperature extremes.
" Never, never touch the floppy's magnetic surface.
" If you write on a label that is already
on the floppy, never use a ball point
pen or a pencil. Use only a soft
tipped pen and don't press hard.
" Keep the floppy disk clean.
" Do not bend,
mutilate.
fold,
spindle,
or
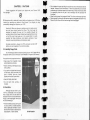
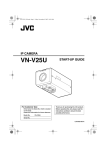
2.3 Disk Drive
Although the disk drive in your
hAP is considerably more durable
than a floppy drive and its sealed-in
hard disk is much more durable than a
floppy, it can be damaged. Here's how
to avoid damaging it:
The drive needs cooling. Don't put it
in a box, drawer, or sealed cabinet,
without adequate ventilation. Don't
let the airflow slots be disturbed by
loose papers, or other objects.
Air slot location
" Do not attempt to open the disk drive and do not remove the stickers that are
labeled, 'Warranty Void If Seal Broken". The drive is sealed shut to avoid dust
problems and the stickers keep the air seals intact. If they are removed, there
is a possibility that dirt will get in and a certainty that the warranty will
be voided!
" Keep the drive away from magnetic fields. The drive can be erased
by them.
" Never operate the drive with the head
carriage lock engaged (see section 3.2).
Never ship the drive with the head carriage lock disengaged.
CHAPTER 3
GETTING STARTED: INSTALLATION
that
Installing your Corvus hAP is not difficult, but it is very important
in-the
to
it
all
Please
resist
the
follow
the
directions!
temptation
just
plug
you
result could be broken hardware and that would spoil your whole day.
need.
First, please read Chapter 1 and be sure you have the background you
WARNING
Then, read Chapter 2 and be sure you understand the cautions.
After you have installed the hardware, you will have an empty disk drive
connected to your Apple. Chapter 4 will tell you how to put special files on the
drive to make the hAP really useful.
Enough background. Let's install your Corvus 11 AP mass storage system.
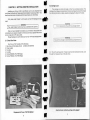
3.1 Check Your Parts
1.
2.
3.
4.
5.
6.
Your Corvus 1 lAP consists of the following:
Disk drive with flat cable and per
sonality card assembly
Power supply
Dc cable
Ac cable
Corvus BASICS UTILITIES floppy
Corvus PASCAL UTILITIES floppy
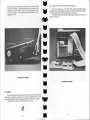
Components of Corvus 1 IA P Disk System
8
W
of
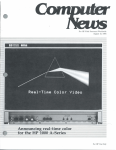
3.2 Carriage Lock
The carriage lock holds the heads in their fully retracted position. The
carriage should always be locked when the disk is shipped to prevent the heads
from striking the disk's surfaces, possibly damaging the heads or the disk.
401W
01
of
W
W
WARNING
Do not operate the drive with the carriage locked!
WARNING
Be sure the carriage is locked before you ship the drive.
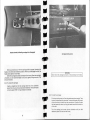
3.2.1 Study the carriage lock. It helps to see how the mechanism works. Look
through the transparent top of the disk drive.
Heads retracted, indicating carriage lock engaged
Heads extended, indicating carriage lock disengaged
When you receive your hAP, the carriage lock is engaged, clamping the
heads in into their fully withdrawn position. When you disengage the lock, the
heads will be able to move freely.
When the carriage is locked, the heads will not move. When the carriage is
unlocked, you can move the heads in and out by gently lifting one end of the
drive or the other.
Carriage locking screw
WARNING
Never force the carriage lock screw. It should always turn easily.
3.2.2 To unlock the carriage:
Insert a screwdriver into the carriage lock hole. Turn clockwise
about 191/2 turns or until you feel some resistance. If the screw does
not turn easily, STOP-it may already be unlocked.
3.2.3 To lock the carriage:
First, be surethe power is off and the cables are disconnected. Then
be sure the heads arefully retracted. To retract the heads, Iiftthe end
of the drive that is furthest from the connections. Gravity will make
the head assembly retract, pulling the heads toward the outside rim
of the disk.
Turn the carriage lock screw counter clockwise until you feel
resistance (about 19 and one-half turns).
Check to be sure the carriage is really locked. Lift one end of the
drive, then the other. If the heads do not stay fully retracted, the
carriage is not really locked. Fully unlock the carriage and then
re-lock it, making sure the heads are retracted before you start
engaging the lock.
3.3.1 Disk Drive, Flat Cable, Personality Card Assembly
When you receive your hAP, these three will be connected together
already and you may go straight to section 3.3.2. If they have been disconnected
or if you would enjoy confirming the assembly, here's how:
The disk drive end of the flat cable is attached to the pins that extend from
one end of the drive.
Checking head position
3.3 Cabling
Be sure the power to both the Apple and to the Corvus power supply are
off anytime you install or remove any circuit cards or cables. Failure to do so
may cause permanent hardware damage to both the hAP and your Apple.
This symbol reminds you when the power must be off:
13
WARNING
It is possible to connect the flat cable to the wrong pins. Be
careful-the wrong connection could permanently damage
the hardware!
Remove the plastic cover that protects the pins. Connect the disk drive
end EXACTLY as shown. The colored stripe on the cable should be closest to
pin 50.
The end of the connector away from the colored stripe should be adjacent
to, but not overlap, the white rectangle marked "IMI BUS" on the disk drive
circuit board.
Replace the plastic cover after the flat cable has been installed.
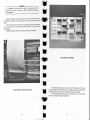
Personality card connection
Proper position of flat cable connector
The personality card goes on the other end of the flat cable. The colored
stripe should be at the end farthest from the "edge connector" that plugs into
the Apple. Be sure all the pins on the personality card are engaged.
Do not install the personality card in your Apple just yet-you will do that
when you configure the system (Chapter 4).
3.3.2 Dc Cable
Connect the square connector at one end of the power supply. Note that
three of the pins are squared off so the connectorwill only go in one way. It will
snap in easily when it's positioned correctly.
No
of
AW
The other end of the Dc cable connects to the ten large pins on the rear of
the disk drive exactly as shown.
3.3.3 Ac Cord
Be sure the switch on the power supply is OFF!
Then connect the Ac cord to the supply and plug it in a liOvoltAc socket.
WARNING
Your hAP has been wired for the type of power used in the country
it was shipped to. If you move your hAP to a country with different
power specifications, contact Corvus for instructions.
Dc cable connection at power supply
Dc cable connection at drive
CHAPTER 4 GETTING STARTED:
CONFIGURING THE SYSTEM
3.4 Final Check
Your system should look like this:
When you received your hAP, it was empty-there was no information on
the disk. To makethesystem useful, you must putsomespecial programs onthe
drive. This is called "configuring" the system.
This section tells you how to configure your new Corvus hAP. (It also
tells you how to re-configure a previously configured system, something you
may want to do someday, for instance, if you add Pascal to a non-Pascal
system.)
You use your Apple to configure the new disk. Here's how: First you bring
up your system normally. Then you run the special Corvus programs (supplied
on one of the floppies that came with your hAP) that put all the correct
information on the Corvus disk.
Once the system is configured, you bring it up using the programs on the
Corvus disk instead of the programs that originally came with the Apple.
Section 4.1 describes "slots" and how they are used in booting and
configuring your system.
Section 4.2 describes the differences between the BASICS/only" configuration and the "Pascal/BASICS" configuration and will help you decide
which applies to your needs.
Section 4.3 tells you how to configure a "BASICS/only" system.
Section 4.4 tells how to configure a "Pascal/BASICS" system.
4.1 Slots, Booting and Configuring
4.1.1 About Booting the System
Properly connected system
When a computer is first turned on, it is particularly stupid. In order to be
useful, the computer must first be booted-in other words, the computer's
'guiding intelligence" (operating system) must be loaded into the machine
and started.
Some computers (such as an Apple with an "Auto-Start PROM") are
smart enough to boot themselves automatically as soon as they're turned on.
Others require human assistance.
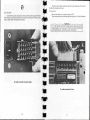
4.1.2 About Slots
Your Apple has eight input/output connectors, called "slots" that it uses to
communicate with disk drives, Apple cards, and the like. Look inside your
Apple-the slots are the eight long, narrow connectors on the rear of the large
main circuit board.
The slots are numbered from Oto 7. (Computer people tend to count from
instead of 1-that's why this manual has a Chapter 0!) The slot numbers are
printed near each connector, at the rear edge of the main keyboard. The
leftmost slot (looking at the computer from the keyboard end) is slot number 0
and probably contains an Apple ROM CARD or an Apple LANGUAGE CARD.
Your floppy drive is probably plugged into slot 6. (Slot 6 is special-the next
section tells why.)
o
4.1.3 What Do Slots Have To Do With Booting?
As you learned in section 4.2.1, booting is the process of loading your
computer with a "guiding intelligence-called an operating system-and
starting it. Where does the operating system come from?
Most of the world's advanced operating systems are stored on disk.
Apple's DOS 3.2 and Pascal are examples, so when you boot your Apple, you
boot it from disk. Right now, the boot-disk drive is the floppy drive but you will
be able to boot from your Corvus drive once it has been configured.
The disks are connected to one of the slots. In general, the disk you boot
from is connected to slot 6.
Although some Apples allow you to boot from a different slot, we
strongly recommend that you use slot 6 as the drive you use for booting.
4.1.4 How To Boot
When you turn your Apple on and press <RESET> it will do one of these
things, depending on how it is equipped:
" Early Apples will come up in the monitor," presentyou with a "*" and wait for
you to type.
" Some Apples will come up in Integer BASIC. You will see a ">" and the
computer will wait for you to type.
" Some Apples will come up with a "i". That indicates Applesoft is running.
" Many Apples (notably all Pascal-equipped Apples and Apples with Auto-Start
PROM's) require a disk to come up. Every time you turn one of these Apples
on, they go straight to the disk to look for an operating system.
To configure your hAP, you will want to boot from disk. Depending on
how your Apple_comes_up, you will use one of these commands:
*6<CTRL >P
>PR#6
IPR#6
(Reminder: <CTRL >P means hold down the <CTRL> key while you press
P. The *, the >, and the J are supplied by the computer-you don't type them.)
All these commands do the same thing-they tell the computer to "boot
from slot 6". (Note that
ll;1
or "I;uu would mean boot from
slot 4.")
Pascal always boots from slot 6-never any other slot. No command is
needed-Pascal boots from slot 6 any time power is turned on or <RESET>
is pressed.
For more information, refer to the section on "Booting DOS" in Apple's
DOS 3.2 Manual and/or thesections on "Starting up an Apple Pascal System" in
the Apple Pascal Reference Manual.
4.2 Selecting the System
Pascal/BASICS system-If your Apple has 48K of RAM and the Apple
Language card, then you will probably want to use the hAP in the Pascal/
BASICS configuration. With this configuration, you can use the Apple Pascal
operating system or you can use the Apple DOS 3.2 system with either of the
Apple BASICs. You can switch back and forth between DOS 3.2 and Pascal and
use both types of files.
BASICS/only system-The BASICS/only system allows you to use Apple
DOS 3.2 with either Integer BASIC or Applesoft BASIC, but does not provide
access to Pascal. This system will work with any size memory (that is, it doesn't
require 48K of RAM as does the Pascal configuration.) (When you use the
Corvus 1 lAP in this configuration, it is identical to the Corvus h A, except that
the hAP MUST be plugged into slot 6 of the Apple.)
If you decide to configure your hAP as a BASICS/only system, then
proceed to section 4.3. If Pascal is your choice, go to section 4.4.
4.3 Bringing Up BASICS/only
WARNING
Configuring the system effectively removes all data from the drive.
If you ever decide to reconfigure the system with data already on
the drive, you must first backup your data.
4.3.1 Turn the Apple and the Corvus hAP off.
WARNING
Never insert or remove cables or cards with the power on. Serious
damage to the Apple and the Corvus hAP may result.
4.3.2 Read about slots, booting, and configuring in section 4.1 if you haven't
already. The key point to understand is that the Apple will be booting from a
disk. In this procedure, you will first boot from the floppy, then use yourAppleto
set up the hAP disk drive with the data you will need to boot from it.
0
4.3.3 Insert the Corvus personality card into slot 6 and the floppy drive
controller into slot 4. (If you have more than one floppy controller, leave the
others out for now.)
4.3.4 Turn on your Apple computer, but not the Corvus 1 lAP. Press <RESET>
on how your Apple is
immediately after you turn your Apple on."*",
Depending
a ">", or a "I", followed by a
equipped, the TV monitor will display a
flashing cursor.
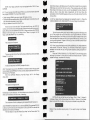
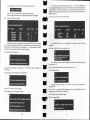
4.3.5 Place the SYSTEM MASTER DOS 3.2 floppy, supplied with Apple DOS
3.2, into the floppy drive.
4.3.6 Boot the Apple from that floppy by entering
*4<CTRL>p
or
>PR#4
or
JPR#4
on
which prompt you received (remember that the *, >, and the are
depending
prompt characters, displayed by the computer-you don't type them-and
remember to press <RETURN>).
After a few seconds the monitor should display something like this:
DISK II MASTER DISKETTE VERSION 3.2
16-FEB-79
followed by the Applesoft prompt () and the cursor. (If you do not have
Applesoft, the message won't appear and the Integer BASIC prompt (>)
will appear.)
If you have trouble, refer to section 4.1.4, "How To Boot," or refer to the
section on "Booting DOS" in Apple's DOS Manual.
NOTE: Your floppy controller must be equipped with a DOS 3.2 control ROM.
with
4.3.7 If you have less than 32K bytes of RAM, you cannot format the disk
the program BFOR MAT. You have three options:
" Obtain enough RAM to give your system 32K bytes or more.
" Format the disk on another system. Borrow a 32K Apple, format the drive, and
then move the drive back to your Apple.
" Ask your dealer to format the drive for you.
Warm Boot Area is a 48K Byte area on the disk that is loaded into your Apple's
RAM when you boot from the Corvus drive. This procedure sets up the Warm
Boot Area so that when you boot, you will have Applesoft running. Chapter 5
tells you how to make other boot arrangements, but for now, follow this
procedure so that if something goes wrong, you will be able to boot from the
Corvus drive.
4.3.10 Your Apple should be displaying the Applesoft prompt (J). Place the
CORVUS BASICS UTILITIES DISKETTE into your floppy drive and enter:
CATALOG,
S6
Here's
how to format the disk. The Apple should be up, with DOS 3.2
seconds for the disk to come up to
JRUN
running. Turn on the Corvus drive and wait 15
3.2 floppy and place the CORVUS
speed. Remove the SYSTEM MASTER DOS
into
the
This will load the APPLESOFT BOOT PREP program from the floppy and
BASICS UTILITIES floppy
floppy drive. There is a program on the
BFORMAT.
Run
it
run
it.
The program will copy all the data in your Apple's RAM into the Warm
called
by
centering:
floppy
Boot Area of the disk. Then when you boot from the disk, the data will be copied
from the Warm Boot Area back into your Apple's RAM and you will be up and
running with Applesoft. Chapter 5 will tell you how to rewrite the Warm Boot
Area to boot other systems.
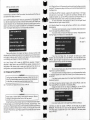
The computer will respond
DOS/ONLY FORMATTER
IS IT OK TO ERASE DISK?
(YIN):
This is a reminder that configuring the disk will effectively remove all data.
Answer Y to continue.
WRITING BOOT TRACKS...
ZEROING DIRECTORIES...
In about 20 seconds, the BASIC prompt will return.
4.3.8 The program you just ran, BFORMAT, formatted the disk. Now you must
run a program called BRINGUP, which connects Apple's standard DOS 3.2 to
the Corvus hAP firmware.
With the CORVUS BASICS UTILITIES floppy still in the floppy
drive, enter:
4.3.11 Next, copy all the files from the CORVUS BASICS UTILITIES DISKETTE
onto volume 1 of the disk. That way, you will have all these handy programs
available on the disk and you will get some practice putting programs on
your disk.
Place the CORVUS BASICS UTILITIES DISKETTE into the floppy drive
and copy it to volume 1 on the disk (You need not initialize volume 1-COPY2
copies the floppy, complete with directory):
]LOAD COPY2,S4
]RUN
COPY 2 - CORVUS SYSTEMS 1979
USE VOLUME 0 FOR FLOPPY DISKS
TO ENTER DEFAULT JUST PRESS RETURN
FROM SLOT (6) :?4
FROM DRIVE (1):?
FROM VOLUME (1) :?0
]RUN BRINGUP
The system will respond with
BRINGUP UTILITY.. DOS/ONLY
Corvus
followed by a volume directory-but since there are no volumes on the
will
not
be
drive yet, the directory
very interesting:
VOL DIRECTORY - CORVUS hA - DRIVE 1
The computer will end up displaying the Applesoft BASIC prompt ().
4.3.9 BFORMAT formatted the Corvus disk and BRINGUP connected DOS 3.2
to the Corvus firmware (it put a3-byte patch in DOS 3.2's RWTS to refer all disk
references to the Corvus firmware).
The next step is to load the Warm Boot Area" on the Corvus disk. The
22
TO SLOT (4) :?6
TO DRIVE (1) :?
TO VOLUME (0) :?1
OK TO COPY ? V
COPY2 will copy all the files on the floppy (Slot 4, Drive 1, Volume 0
indicates a floppy) to the Corvus drive (Slot 6, Drive 1, Volume 1). It will take
about a minute. After it is done, it will give you a chance to copy other files:
Reply N if you are done copying, reply Y if you want to copy more floppies
to disk.
4.4.2 Plug the Corvus h AP personality card into slot 2 and the floppy controller
into slot 6. This temporary setup will allow you to boot the Pascal system from
the floppy drive.
4.4.3 Place the APPLE1: diskette, supplied with Apple Pascal, in the floppy
drive and turn on your Apple. The system will load Pascal. (Normally, with a
single drive system, you use the APPLE3: diskette to boot Pascal. APPLE1: is
for multiple-disk systems, which is what you are about to configure!)
For more information, read sections 6.2 and 6.3 of the Apple Pascal
Reference Manual, Apple number A2L0019.
After you are done, try this:
I CATALOG, Vi, S6
to list the files on volume 1 of the Corvus drive. You should see all the files you
just copied from floppy to volume 1.
4.3.12 COPY2 initialized volume 1 when you copied the UTILITIES DISKETTE
to it. But the remaining 81 volumes on the disk were zeroed by BFORMAT and
must be initialized. You can initialize each one when you want to use it, but it
easier to use the Corvus program VOLUME INIT to initialize all 81 volumes
once: The program takes about four or five seconds per volume.
4.4.4 Use the Pascal Filer to copy all the files on APPLE1: onto a formatted
blank diskette.
If you have never made a back-up copy of a diskette, please read section
6.2.3 in the Apple Pascal Reference Manual.
If you have, these commands will refresh your memory. They assume the
back-up floppy is formatted and is named BLANK:..
I LOAD VOLUME UNIT, S6
I RUN
BULK VOLUME INIT PROGRAM
'
--,
-
CORVUS SYSTEMS - 1979
FILER: G, S N, L, A, C, T, D, 0 [C.2]
ENTER FIRST VOLUME NUMBER: 2
TRANSFER ? APPLEI:
ENTER LAST VOLUME NUMBER: 82
TO WHERE ? BLANK:
Take a coffee break-the program will take six minutes, but then all 82
volumes will be initialized and ready for storing data and you will never have to
run it again (unless you zero the disk for some reason). (For more information
on initializing, see Chapter 2 of the DOS 3.2 Manual.)
(You type F)
(You type T)
TRANSFER 280 BLOCKS ? (YIN) V
-
If you have one floppy drive, the computer will direct you to insert
BLANK:, then remove BLANK: and insert APPLE1:, then insert BLANK:, then
APPLE1:, again and again (actually about 20 times) until the floppy is copied
and the computer tells you so with the message:
4.3.13 Your Corvus hAP is ready for BASICS/only operation. Chapter 5
describes APPLE1:
in detail how to use your BASICS/only system, including how to
BLANK:
manipulate all 82 volumes, how to make your Apple boot from disk in any
configuration, and a technical discussion of how the disk is organized.
You now have a floppy copy. (Say it three times fast. Now you know why
likes to call them diskettes.)
Apple
4.4 Bringing Up Pascal/BASICS
If you have morethan onefloppy disk drive, you will be spared thetrouble
of swapping floppies and in about two minutes, you will have a backup copy
WARNING
of APPLE1:.
Configuring the system effectively removes all data from the disk
If you have trouble, please refer to the Apple Pascal Reference Manual,
with
data
decide
to
the
already
drive. If you ever
reconfigure
system
ections 6.2 and 6.3.
on the drive, you must first be sure to backup your data.
4.5 Now you have two identical floppies, both named APPLE1: (when the
4.4.1 Turn both your Apple and your Corvus hAP off.
er copied APPLE1: onto BLANK:, it renamed BLANK:).
Change the name of the new floppy to BRINGUP:. Use the FILER's
C(HANGE command. From the FILER, type C. The FILER will respond:
WARNING
Never insert or remove cables or cards with the power on. Serious
damage to the Apple and the Corvus hAP may result
CHANGE ?APPLE1:
CHANGE TO WHAT? BRINGUP:
Since the Corvus drive is empty right now, the Apple cannot boot from it.
In the next steps, you will boot Apple Pascal normally, using the floppy. Then
you will run a Pascal program that puts the Apple Pascal system programs plus
some Corvus utilities on the Corvus drive. Finally, you will plug the Corvus hAP
into slot 6. From then on, your Pascal system will automatically boot from the
Corvus drive.
BRINGUP:
LA!PLE1
If you have trouble, refer to the Apple Pascal Reference Manual.
4.4.6 Now you have two copies of APPLE1: and the new one is named
BRINGUP:. The next step is to copy two files from the CORVUS PASCAL
UTILITIES floppy, supplied with your hAP, to BRINGUP:, the newly-made
copy of APPLE1:.
24
25
Place the CORVUS PASCAL UTILITIES floppy into your floppy drive.
Transfer the files CORVUS:BOOT. DATA and CORVUS:PFORMAT.CODE from
the CORVUS PASCAL UTILITIES floppy to BRINGUP:.
Refer to the Apple Pascal Reference Manual if you get stuck. These
commands will jog your memory. (If you have two floppy drives, the dialogue
will be slightly different).
FILER: G, 5, N, L, R, C, T, 0, 0 [C.2J
4.4.8 Turn on the Corvus disk drive. The drive will make a chirping noise, then
that will dissolveto awindy purr. These are the normal sounds of a healthy drive.
4.4.9 Now it's time to write data tothe Corvus drive. Place the BRINGUP: floppy
that you have made into thefloppy drive. If you are in the filer, type 0 (for QUIT).
You should see this:
COMMAND: E(DIT, R(UN, F(ILE, C(OMP, L(IN
(You type T)
TRANSFER ? CORVLJS;BOOT.DATA
You should execute PFORMAT.CODE. Type X.
TO WHERE ? BRINGUP:$
EXECUTE WHAT FILE ? PFORMAT
(The $ just means "Give it the same name-that is, BOOT. DATA.)
PASCAL/BASICS FORMATTER
PUT IN BRINGUP:
TYPE <SPACE> TO CONTINUE
and so on until the transfer is complete as signalled by the message:
If the disk is not ready, the program will say:
'CORVUS:BOOT.DATA
-- >BRINGUP:BOOT.DATA
Repeat the process for the file
you're done.
CORVUS:PFORMAT.CODE and
Be sure the drive is on. The drive takes 15 seconds to come up to speed.
When the disk is ready, the program will continue, taking about a minute:
4.4.7 To be sure BRINGUP: is complete, list its directory:
FILER: G, S, N, L, R, C, T, D, Q [C.21
OPENING FILE BOOT.DATA
WRITING BOOT TRACKS
(You type E)
DIR LISTING OF ? BRINGUP:
F
The system should respond with something like this:
F
BRINGUP:
SYSTEM.APPLE
SYSTEM.PASCAL
SYSTEM.MISCINFO
SYSTEM.EDITOR
(The Information presented
SYSTEM.FILER
here will vary.)
SYSTEM.LIBRARY
SYSTEM.CHARSET
SYSTEM SYNTAX
BOOT.DATA
PFORMAT.CODE
<UNUSED>
10/10 FILES, 73 UNUSED, 73 IN LARGEST
Your BRINGUP: floppy may not look exactly like this but it should be
close; it should contain all the files on APPLE1: plus BOOT.DATA and OOW
PFORMAT.CODE.
If BOOT.DATA or PFORMAT.CODE is missing, repeat section 4.4.6.
If the system files are not correct, check your APPLE1: floppy. All the files
on APPLE1: should be on BRINGUP:. If not, use the FILER to fix the problem or
repeat sections 4.4.3 through 4.4.5.
26
COPYING FLOPPY TO DISK
Here's what's happening. Your Apple is running a Pascal program called
PFORMAT.CODE that prepares the Corvus drive for operation. First, it creates a
boot area" on the disk and fills the area with the information in BOOT.DATA.
The boot data is used to boot your Apple when it is turned on. Then, PFORMAT
copies the entire contents of BRINGUP: onto the drive as volume 1. (The disk
structure is described more completely in section 6.8, How the Corvus disk
is organized.")
4.4.10 After PFORMAT finishes running, the computer will say
COMMAND: E(DIT, R(UN, F(ILE, C(OMP, L(I.
and wait for a response. You have successfully configured your Corvus hAP
Pascal system-go to section 4.4.12.
If, after 70 seconds, the above message has not appeared, something went
wrong. Go to section 4.4.11, "What If It Doesn't Work?"
27
The warning is thereto remind you that unit 4 (the Corvus drive) and unit 9
(the floppy) both are named BRINGUP:. Since this is potentially dangerous,
remove the floppy (after all, you won't need it now that your Corvus drive is up).
Save the BRINGUP: floppy in case you ever have to reformat the drive.
Now, change the name of BRINGUP: to CORVUS1:. Be sure the floppy
has been removed! Use the FILER's C(HANGE command:
4.4.11 What If It Doesn't Work?
If when you try to execute PFORMAT, the system answers:
then check the contents of the BRINGUP: floppy (using the FILER's E
command) to be sure PFORMAT.CODE and BOOT.DATA are present. If not, go 0
CHANGE? BRINGUP:
to section 4.4.6. If they are present, go to 4.4.9 and try again.
If PFORMAT simply doesn't work, double check your cabling, check to
CHANGE TO WHAT ? CORVUS1:
see that the correct files are on BRINGUP: (see section 4.4.7), especially the file
-->
BOOT.
DATA, and carefully repeat the procedures.
CORVUS1:
BRINGUP:
_W11N
4.4.12 After you have successfully configured your hAP disk drive, rearrange
the cards into their final configuration. Here's how:
Use the V command to verify that it worked:
0
VOLS ON LINE:
First, turn off the power to both your Apple and your hAP.
Place the hAP personality card into slot 6, making sure the flat cable exits
gracefully (no kinks in the cable) through one of the slots in the back wall of
your Apple.
Plug in your floppy controller cards. If you have one floppy controller,
plug it into slot 4. If you have two controllers (i.e., more than two floppy drives)
plug the second controller card into slot 5. Arrange all the cables neatly and
close your Apple.
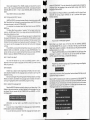
4.4.13 Power on the Apple and the Corvus drive. After the Corvus drive comes
up to speed (about 15 seconds), the computer will respond with something
like this:
WELCOME BRINGUP, TO
U.C.S.D. PASCAL SYSTEM II, 1
CURRENT DATE is 26-JUL-79
Note that the computer booted itself from the Corvus drive, not from
the floppy!
(Don't worry if the system revision number and the date are different.)
4.4.14 Try it. This is a quick exercise to prove that the configuration went well
and to give you a chance to play.
The display should look like this:
COMMAND: E(DIT, R(UN, F(ILE, C(OMP, L(IN
Type F to get into the FILER.
Then type V to see a volume directory:
AR.Ii'.G Iu.ITS 4 & 9 ñA
TfI
SA..L
VOLS ON LINE:
1 CONSOLE:
2 SYSTEM:
4# BRINGUP:
9# BRINGUP:
ROOT VOL IS - BRINGUP:
PREFIX IS - BRINGUP:
28
1 CONSOLE:
2 SYSTEM:
4# CORVUS1:
ROOT VOL IS - CORVUS1:
PREFIX IS - CORVUS1:
Now place any Pascal floppy into the floppy drive.
Type V again. You will get the same volume directory, but now unit 9 will
bear the name of whatever floppy you inserted into the floppy drive.
Now type E to get a file directory.
__-______
You will recognize the resulting directory as the same one you saw when
you listed the directory of the BRINGUP: floppy, but this time the files are on
CORVUS1:, a volume on the Corvus drive.
You can also list the contents of the floppy (type E followed by "#9:" or by
the name of the floppy.)
4.4.16 Your Corvus hAP Pascal/BASICS system is almost ready. The next step
is to transfer some useful files onto CORVUS1:, the first volume on the disk.
But first, a word about transferring from floppy to disk. When you transfer
between floppies, you often use this sort of dialogue:
TRANSFER ? VOL1:
That works, but requires that VOL1: and VOL2: are the same length and
that you don't mind that VOL2:'s name is changed to VOL1:.
When you transfer VOL1: to VOL2:, you are saying, transfer the whole
volume." Sometimes that's convenient-in fact, part of the Pascal/BASICS
installation procedure did that sort of transfer. But in general it is better to
transfer VOL1:= to VOL2:$, which means, "transfer all the files on V01_1: to
VOL2:". The difference is that the directories are updated correctly, volume
lengths are handled properly, and the destination volume name stays the same.
For more information, consult the Apple Pascal Reference Manual.
'VUS PASCAL UTILITIES DISKETTE to
WI
CORVUS1: on the disk. Placethe PASCAL UTILITIES floppy in the floppy drive.
CORVUS1:
Use the Filer's T command:
SVSTEM.APPLE
32 26-Jul -79
6
512
Datafile
SYSTEM.PASCAL
36
38
512
Datafile
4-May -79
TRANSFER ? CORVUS:
SYSTEM.MISCINFO
1
74
512
Datafile
4-May -79
SYSTEM.EDITOR
.45 29-Jan -79
75
512
Codeflie
TO WHERE? CORVUS1:$
SYSTEM.FILER
28 24-May -79
120
512
Codeffle
SYSTEM.LIBRARY
36 22-Jun -79
148
512
Datafile
SYSTEM.CHARSET
2 14-Jun -79
184
512
Datafile
($ means give the copied file the same name it had on the original volume.)
lvir,14
SVSTEM.SVNTAX
14 18-Apr -79
186
512
TextfHe
When the Filer encounters the files PFORMAT.CODE and BOOT.DATA, it
BOOT.DATA
4 27-Sep -79
200
512
Datafile
will notice that those files are already on CORVUS1: and ask whether you want
PFORMAT.CODE
3
5-Oct -79
204
512
Codefile
to remove the old versions. Since both copies are identical, answer N.
BACKUP.CODE
4 13-Sep -79
207
512
Codefile
BASICS.CODE
2 27-Sep -79
211
512
Codeflie
with
4.4.16.2 Transfer all the files on APPLE2: (supplied
Apple Pascal) to
213
Datafile
BASICS.DATA
96 30-Sep -79
512
CORVUS1:. Place APPLE2: in the floppy drive.
4
RESTORE.CODE
5-Oct -79
309
512
Codefile
313
Codetlle
SETBOOT.CODE
3
5-Oct -79
512
316
512
Codefile
VMGR.CODE
27 1-Dec -79
TRANSFER ? APPLE2:
SVSTEM.COMPILER
71 30-May -79
343
512
Codefile
SVSTEM.LINKER
24
-79
414
512
Codefile
3-May
TO WHERE? CORVUS1:$
SYSTEM.ASSMBLER
48 31-May -79
438
512
Codefile
6500.OPCODES
2 20-Dec -78
486
208
Datafile
6500.ERRORS
7 28-Mar -79
488
498
Datafile
4.4.16.3 Transfer the following files from APPLE3: to CORVUS1:.
FORMATTER.CODE
4
495
512
Codefile
4-May -79
FORMATTER.DATA
6 22-Jun -79
499
512
Dataflle
FORMATTER.CODE
LIBRARY.CODE
9 21-Jun -79
505
512
Codefile
FOR MATTER.DATA
LIBMAP.CODE
9 19-Apr -79
514
512
CodefIle
LIBRARY.CODE
SETUP.CODE
33 7-Feb -79
523
512
Codefile
LIBMAP.CODE
BINDER.CODE
5 4-May-79
556
512
Codeflle
SETUP.CODE
CALC.CODE
8 28-Dec -78
561
512
Codefile
--t
BINDER.CODE
455
569
(UNUSED)
CALC.CODE
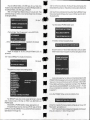
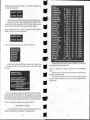
28/28 files (listed/in-dir), 569 blocks used, 455 unused, 455 in largest
Wr
w
These are the files we suggest you have in CORVUS1:. The rest of this
manual assumes that these files are there.
Note that not all the files on APPLE3: will be transferred. The easiest way
is to transfer using the ? wild card which asks for confirmation before
it transfers:
4.4.17 That
TRANSFER ? APPLE3:?
TO WHERE ? CORVUS1:$
TRANSFER SYSTEM.APPLE ? N
TRANSFER FORMATTER.CODE ? Y
APPLE3: FORMATTER.CODE?
-->CORVUS1:FORMATTER.CODE
TRANSFER FORMATTER.DATA? V
APPLE3: FORMATTER.DATA
-- >CORVUS1:FORMATTER.DATA
" and so on, replying V to the files you want transferred and N to the others.
You will reply N to SYSTEM.APPLE, then Y to all requests up to and including
CALC.CODE. None of the files after CALC.CODE should be transferred at this
time. After CALC.CODE has transferred, press <ESC >to terminate the transfer.
4.4.16.4 Use the Filer's E command to see what's on CORVUS1:.
DIR LISTING OF ? CORVUS1:
If you followed the procedures in this section exactly, CORVUS1: will
contain the following files (not necessarily in exactly this order):
W
W
completes the installation procedure for the Pascal/BASICS
system.
Feel free to play for awhile. When you feel comfortable with the system,
relax and congratulate yourself.
Then proceed to Chapter 6 where you will learn to use the full storage
capacity and data transfer speed of your Corvus hAP Pascal/BASICS mass
storage system.
CHAPTER 5
USING YOUR CORVUS hAP WITH BASICS
This chapter assumes you are familiar with how your Apple with BASICS
and the DOS 3.2 operating system works. Please refer to Chapter 1 if you are not
familiar with Apple DOS 3.2.
This chapter describes how data is stored and files are manipulated using
DOS 3.2 and the Corvus extensions. These features can be used from DOS 3.2,
whether it is part of a BASICS/only system (installed as described by section
4.3, Bringing Up BASICS/only") or part of a Pascal/BASICS system (installed
per section 6.4, Bringing Up Pascal/BASICS". However, Pascal/BASICS users
will find that they may have less than 82 DOS 3.2-format volumes and that their
boot procedures are somewhat different. Please refer to Chapter 6, 'Using Your
Corvus hAP with Pascal/BASICS" for boot procedures if you are using
Pascal/BASICS.
WARNING
From BASICS, you can alter any memory location or any byte on
disk, including the operating system or any Pascal files on disk. You
can conceivably lose the ability to boot and may have to re-format
the disk, losing all the data on the disk. Your best insurance is to
back-up your disk.
5.1 describes how your hAP BASICS system boots and how to
Section
change it.
Section
Section
Section
hAP system.
Section
Section
5.2 describes how to create a turn-key system.
5.3 describes volumes.
5.4 tells how to use DOS 3.2 and BASIC commands with your
5.5 describes the utilities programs.
5.6 tells how the BASICS/only disk is organized.
5.1 Booting
This section describes how your hAP BASICS system boots and how
you can tailor the boot procedures to fit your needs.
This section assumes your hAP disk has been set up for BASICS
operation according to the procedures in section 4.3, "Bringing Up BASICS/
Only" or section 6.6, "Creating and Using DOS 3.2 Format Volume Under
Pascal/BASICS".
5.1.1 HowtoBoot
Apple executes the machine code stored in the "Cold Boot Area" at the
beginning of the Corvus disk.
If you have a Pascal/BASICS system, the Cold Boot looks for a Pascal
format file called SYSTEM.BASIC on DOS1:. If it finds the file, it loads it into
your Apple Language Card and enables the card.
Whether you have Pascal/BASICS or BASICS/only, the Cold Boot loads
your Apple's main memory (RAM) with the data it finds in the "Warm Boot Area,"
a 48K Byte area on the disk, and passes control to that data.
It is very important that you understand the Warm Boot. The Warm Boot
Area is a 48K Byte "snapshot" of the Apple's main memory. The snapshot is
taken by either a program called BOOT PREP, a program called APPLESOFT
BOOT PREP, or a user program constructed as described in section 5.2,
"Turn-key Systems". The Warm Boot is copied back into RAM when BASICS is
booted, whether from a BASICS/only system or a Pascal/BASICS system.
WARNING
When you run BOOT PREP, APPLESOFT BOOT PREP, or a
specially constructed user program, all of your Apple's RAM is
copied into the Warm Boot Area on the disk.
When you boot BASICS, the Warm Boot Area is copied back into
RAM and resumes execution.
The reason the Warm Boot is so important is that it contains the entire
state of your Apple. When it is loaded back into RAM, the machine will be in
exactly the same state as it was when Warm Boot was loaded. For instance, if
your Apple was in Applesoft and the slot default was 6 when you ran
APPLESOFT BOOT PREP, then it will be in the Applesoft with slot 6 the default
when the Warm Boot Area is copied back into RAM.
5.1.3 Changing the Boot
When you first configured your BASICS system, the Warm Boot Area was
automatically set up with RAM-based Applesoft. If that's the way you want your
Apple to boot, fine. If you want to boot in some other configuration, all you need
o do is set up the computer the way you want it to boot and run BOOT PREP,
APPLESOFT BOOT PREP, or your own turn-key program (described in
3ection 5.2).
Example: You are now running Applesoft, but you want yourAppleto boot
Integer BASIC. Simply switch to integer BASIC:
If you have a BASICS/only system you boot using the command:
*6<CTRL>p, >PR#6, OR JPR#6,
depending on how your Apple is equipped. If your Apple has an Auto start
ROM, simply powering on the system will boot BASICS and no boot command
is necessary.
If you have a Pascal/BASICS system, you can boot BASICS from Pascal
using X(ECUTE BASICS, or you can set the SETBOOT utility. See section 6.6,
"Creating and Using DOS 3.2 Format Volumes Under Pascal/BASICS" and
section 6.7, "Cold Boot Facility".
5.1.2 How Booting Works
No matter how you boot BASICS, the first thing that happens is that your
and run BOOT PREP:
>RUN BOOT PREP, S6
Note that this will first switch the default slot number to S6, then load and
run BOOT PREP. Since BOOT PREP saves all of RAM, including the location
that stores the default slot number, when you boot, the default slot number will
be S6.
Now, suppose you want to make your system boot in Applesoft again, with
the default slot set to slot 4 (the floppy).
33
(to change to Applesoft)
,,THIS IS SAM'S BOOT PROGRAM
NEW
(to load BOOT PREP from
]LOAD APPLESOFT BOOT PREP, S6 the Corvus disk)
(to set the default slot to S4)
(to run APPLESOFT BOOT PREP).
WARNING
You must run APPLESOFT BOOT PREP if you want the system to
boot Applesoft and you must use BOOT PREP to get the system to
boot Integer BASIC.
5.1.4 What To Do If The Boot Doesn't Work
The boot method used by the Corvus hAP is simple and powerful
because when you boot, it gives your Apple the same exact system memory it
had when you ran BOOT PREP (0rAPPLESOFT BOOT PREP oryour own boot
preparing program). But you can confuse it if you change your hardware
configuration (for instance, if you remove the Applesoft ROM card or you
change memory size). When you boot, the system hardware must match the
hardware it had when you ran BOOT PREP.
If the system boots with a blank screen and won't respond to the
keyboard, it may be because the wrong language is enabled (for instance, if the
switch on the ROM card is in the wrong position or if the wrong language is
loaded into the Apple Language Card). You can usually recover by pressing
<RESET>.
In a BASICS/only system, when the boot doesn't work, you can boot from
diskette and run BRINGUP on the CORVUS BASICS UTILITIES DISKETTE, to
connect the Corvus drive. Then set up the system the way you want it and run
BOOT PREP, APPLESOFT BOOT PREP, or your own boot preparing program
to re-write the Warm Boot Area.
5.2 Turn-key Systems
You can easily make yourApple come up running any BASIC program. (If
you have a Pascal/BASICS system, you can boot using a Pascal program. See
section 6.7,Most
'Cold Boot Facility".)
To boot from a BASIC program, you must understand how the Warm Boot
works. Read section 5.1 "Booting" Then try the program
]NEW
110 REM SAM'S BOOT PROGRAM
120 REM
130 REM COPY MEMORY TO WARM BOOT AREA:
]4OCALL -14707
150 REM
160 PRINT
170 PRINT "THIS IS SAM'S BOOT PROGRAM"
180 PRINT
190 END
]SAVE SAM'S BOOT PROGRAM,S6,V1
]RUN
Continued from
Page 34
Now, turn off your Apple, turn it on again, and boot it from slot 6. Here's
what will happen:
THIS IS SAM'S BOOT PROGRAM
L
Here's what happened: When you ran the program, statement 40 called a
Corvus machine language routine, located in a ROM on the Corvus Personality
Card plugged into slot 6, that copies all of the data in RAM into the Warm Boot
Area on disk. When you booted the system, it copied all that data back into RAM
and continued where the program had left off! Now, every time you boot, your
system will execute lines 50 through 90 of SAM'S BOOT PROGRAM. The
system will come up with SAM'S BOOT PROGRAM in RAM and all the defaults
(slot, volume, etc.) will be exactly as they were when the program first ran.
If all this reminds you of what APPLESOFT BOOT PREP does, that's no
coincidence at all-look at the code:
]LOAD APPLESOFT BOOT PREP, S6
]LIST
Note that line 5 is:
5 CALL -936: CALL -14707
(CALL -936 clears the screen.)
When you understand how APPLESOFT BOOT PREP and SAM'S BOOT
PROGRAM work, you will be able to write your own booting routine.
5.3 About Volumes
Your Corvus hAP has 82 DOS 3.2 format volumes, called Vi through V82.
They are very similar to floppies; each is the same size as a floppy and has a
directory and a number of files.
DOS 3.2 commands allow you to specify a volume number.
For instance,
I LOAD FISH,V8,S4
would load thefile FISH if thefloppy in slot 4 happensto have been initialized as
volume 8. DOS 3.2 uses the volume number simply to check that the correct
volume is in the floppy drive. (Seethe DOS 3.2 manual's section on "Drive, Slot,
and Volume Options" for more information.)
Your Corvus hAP uses the volume number to specify which of the 82
volumes on the disk you want. So, if the Corvus drive were plugged into slot 6,
Continued on
Page 35
would get the file FISH from V8, the eighth volume on the disk.
If the V option is not specified, then the command will refer to the volume
that was referenced by the last command.
]LOAD BURD,V8
]SAVE PORK BELLY
Continued from
Page 36
Now no one may write on volume 3. In fact, the command:
would load the program BURD from volume 8 and save it as PORK BELLY on
volume 8.
5.4
]LOCK EMPLOYEES,V7
WRITE PROTECTED
Using DOS 3.2 and BASICS Commands
With Your hAP BASICS System
Most of the DOS 3.2 commands work exactly as they do for floppy-based
systems except that the V option specifies which volume on the drive the
command should operate on.
5.4.1 Catalog
The CATALOG command is special. Normally, it does what you'd expect:
JCATALOG,V10 1,S61
would list the names, lengths, and types of the files on volume 10.
But there's also a special form of CATALOG:
JCATALOG,V99 1,S61
Volume 99 does not exist. This command lists the name of the first file on
each volume. It is good practice to begin each volume with an explanatory "title"
file so that CATALOG, V99 will tell you what each volume is.
If the first file on a volume is not type A (Applesoft) of I (Integer BASIC),
then the volume will not be listed by the CATALOG V99 command. (Hint: You
can "hide" a volume by making the first file on it type B or T.)
Hidden volumes are useful for storing large amounts of data that span
several volumes.
Hidden volumes may be LOCKed and UNLOCKed (see section 5.4.2).
5.4.2 Write Protect
When the write protect notch on a floppy is covered, no one can write on
that floppy. Each volume on the Corvus drive can be write-protected by
LOCK-ing the first file on the volume. (Remember, good practice dictates that
the first file on each volume is an explanatory title" file.)
Consider the example:
]CATALOG,V99
VOL DIRECTORY - CORVUS hA - DRIVE 1
]UNLOCK EMPLOYEES,V3
will not work because V3 is protected and you cannot alter the EMPLOYEES
file, even to unlock it! To unlock a volume, use these commands:
]POKE 1278,1
]UNLOCK EMPLOYEES, V7
5.4.3 Using Files In Two Volumes
The READ and WRITE commands in DOS 3.2 do not allow you to specify
volume numbers, but the OPEN command does. If your program references
files in separate volumes, it can open the file every time it accesses a
different volume.
Another method is to POKE the desired volume number into 1150 before
performing the READ or WRITE. Location 1150 stores the default volume
number.
WARNING
Even though they are in different volumes, the files must have
different names.
The FILE MOVER program on the CORVUS BASICS UTILITIES DISKETTE is
an example of a program that reads and writes to/from different volumes.
5.5 Utility Programs
These programs are located on the CORVUS BASICS UTILITIES
DISKETTE, (and, if you followed the installation instructions, are also on
volume 1 of the disk).
5.5.1 COPY2
COPY2 can copy a DOS 3.2-format volume between any two disk drives,
whether they are Corvus or floppy drives.
WARNING
COPY2 ignores write-protect on disk volumes and will write over a
protected volume.
01 CORVUS UTILITIES
02 VENDORS
07 EMPLOYEES
COPY2 asks you for the slot, drive, and volume numbers for the FROM
volume and the TO volume. Use 0 for the volume number for floppies. Press
<RETURN> if you wish to enter the default number given.
ICATALOG,V7
5.5.2 COPY3
DISK VOLUME 007
A 028 EMPLOYEES
A 052 ADDRESSES
A 003 SALARIES
Continued on
Page 37
36
COPY3 is an improved version of COPY2. It's faster because it only copies
sectors that have been recorded. It's safer because it will not record over
write-protected volumes. When COPY3 encounters an error, it continues to
copy and reports the error when it is finished.
COPY3 cannot copy non-DOS 3.2-format diskettes. It requires 48K Bytes
of RAM and will not run under RAM-based Applesoft. Use COPY2 if one of these
limitations becomes a barrier.
5.5.3 VOLUM-EINIT
VOLUME INIT initializes volumes on the disk. Initialization of a volume
removes ailfiles and places a binary file called EMPTY at the start of the volume.
Volumes initialized by VOLUME NIT are not listed by the CATALOG, V99
command because the first file is binary. (Seethe discussion of hidden files" in
section 5.4.1.)
VOLUME INIT asks for the numbers of the first and last volumes to be
initialized. It initializes all volumes between the first and last, inclusive.
VOLUME lNlT cannot modify a write-protected volume.
5.5.4 FILE FINDER
Suppose you forgot which volume you used to store a new program. FILE
FINDER will search all 82 volumes. It reports the first instance of the file name
and asks if you want to continue the search. If so, simply press <RETURN>. If
not, enter N.
WARNING
When it finds the file, FILE FINDER unlocks it.
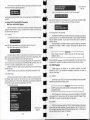
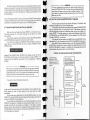
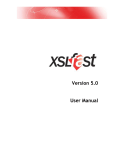
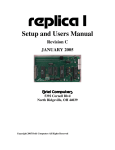
5.6 How The Corvus BASICS/only Disk Is Organized
The Corvus disk consists of eight blocks (4K Bytes) of Cold Boot" data
followed by a 96 block (48K Bytes) "Warm Boot Area" and 82 DOS 3.2 format
volumes, each 2271/2 blocks long.
The Cold Boot data blocks were created by BFORMAT, the program you
ran to format the disk for BASICS/only operation when you installed the
system. These blocks comprise a machine language program that i executed
at power-on/reset. The Cold Boot loads the Warm Boot Area into your Apple's
RAM and causes it to start executing.
The Cold Boot Area is identical to the Cold Boot Area that you'd have if
you configured a Pascal/BASICS system and used SETBOOT to set up for a
BASICS boot. (See section 6.7, 'Pascal Cold Boot Facility.")
In fact, if you set up a Pascal system using SETBOOTt0 set up for BASICS
boot, and VMGR's D(OSVOL command to set up an 82-volume DOSVOLUMES
file, your disk would look exactly like the disk you have with a BASICS/
only system.
For more information, see section 6.8, "How The Pascal/BASICS Disk
Is Organized".
CORVUS hAP BASICS/ONLY DISK CONFIGURATION:
COLD BOOT AREA.
Created when system is
I
configured. Executed at
power/reset or with *6 I
CTRL P or with PR#6.
WARM BOOT AREA.
Loaded into memory by
the cold boot program.
BASICS/ONLY
COLD BOOT AREA
1
8 BLOCKS
VOLUME DIRECTORY
48KB96 BLOCKS
WARM BOOT AREA
82 DOS 3.2 FORMAT
USER VOLUMES.
38
j
J
82 VOLUMES:
EACH 2271/2
BLOCKS
of
or
Aw
N1
of
N1
01
CHAPTER 6
USING YOUR CORVUS hAP PASCAL/BASICS
This chapter assumes you have installed your Corvus hAP as a
Pascal/BASICS system according to the instructions in section 4.4, "Bringing
Up Pascal/BASICS". It also assumes you are familiar with how Apple Pascal
works. Please refer to Chapter 1 if you are not familiar with Apple Pascal.
This chapter describes the Pascal/BASICS system, including how files
and volumes are created, manipulated, backed up, and restored; how BASICS
files are handled; and how booting works.
Section 6.1 describes volumes and how they are set up on the disk.
Section 6.2 is a step-by-step exercise that helps you quickly get
acquainted with the Corvus Volume Manager (VMGR).
Section 6.3 describes the Volume Manager commands in detail.
Section 6.4 is a quick-reference guide to the Volume Manager commands.
Section 6.5 describes the BACKUP and RESTORE utilities.
Section 6.6 tells how to create and use DOS 3.2-format volumes.
Section 6.7 describes the Pascal booting facilities and turn-key operation.
Section 6.8 tells how the Corvus hAP Pascal/BASICS disk is organized.
6.1 About Volumes
Your hAP drive consists of 18,928 blocks of user-accessible data storage
area. (There are 8 blocks on the disk that are not accessible; they are used for
booting the system and for storing the volume directory and related information. See section 6.8.)
The data is divided into up to 63 volumes. A volume is like an imaginary
floppy disk. Like a floppy, it has a name (such as CORVUS1: or APPLE1:) and up
to six of them can be mounted at once (on Pascal I/O units 4,5,9,10,11 or 12).
A Pascal format floppy is 280 blocks long, but a Corvus volume can be any
length in multiples of 8 blocks. You can divide the disk space in many ways; for
instance, you can have one huge volume, 18,928 blocks long or up to 63 volumes
of different lengths.
You can make the last volume on the disk a special DOS volume that
contains DOS 3.2-format volumes. (See section 6.6.)
The volumes are manipulated by the Corvus Volume Manager (VMGR),
described in this chapter, and the files in each volume are handled by the
standard Pascal Filer, described in the Apple Pascal Reference Manual.
6.2 Getting Acquainted With The Corvus Volume Manager (VMGR)
This section helps new users rapidly learn how VMGR works. Sections 6.3
and 6.4 describe the commands in detail.
Turn on your Apple. It should boot from the Corvus disk.
If you have just installed your system using the procedure in section 4.4,
you will have one volume called CORVUS1: on the disk (and you may have
volumes mounted in your floppy drives). Use the Filer's V command to see what
is mounted. CORVUS1: should appear on unit #4.
Type 0 to exit the Filer and start the Corvus Volume Manager by typing X.
(for X(ECUTE) and then VMGR <RETURN>. (Hint: Make a copy of VMGR and
call it V. Then you can use the volume manager by typing XV <RETURN >.) You
will be greeted with:
VMGR 0 M(OUNT L(IST N(EW R(EMOVE
W(PROI
And if you type <CTRL>A you will see the rest of the line:
D(OSVOL U(NMOUNT:
Use <CTRL>A to get back to the left-side of the screen.
Run through this exercise to quickly become familiar with VMGR.
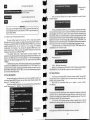
6.2.1 Start by listing the volumes.
Notice that you did not have to type "1024", '1", or "1032". VMGR typed
those suggested responses for you and positioned the cursor at the beginning
of the response. When this happens, you can simply press <RETURN> and
VMGR will use the suggested response. Or you can type another response and
VMGR will use it.
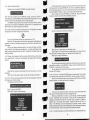
6.2.7 Type L to see your new volume listed.
CORVUS VOLUME DIRECTORY
WP
NAME
LENGTH
CORVUS1:
<UNUSED>
<OFFLINE>
<OFFLINE>
<OFFLINE>
1024
17904
18928
18928
18928
CORVUS VOLUME DIRECTORY
ADDR
1032
8
8
8
8
DRV#
UNIT
1
1
2
3
4
#4
This list tells you that you have a volume named CORVUS1: on drive #1. It
is 1024 blocks long, starts at block #8 on the drive, and it mounted on unit #4.
Drives #2, 3, and 4 are offline (not connected). A "*" would appear in the WP
column next to any volumes that are write-protected.
WP
NAME
LENGTH
ADDR
CORVUS1:
1024
NEW:
1024
<UNUSED>
16880
8
1032
2056
DRV#
1
1
1
UNIT
#4
Note that NEW: has no unit assigned to it because it has not been
mounted.
6.2.8 Mount NEW: on the next available unit.
6.2.2 Write protect CORVUS1:.
H
MOUNT
I
ENTER VOLUME NAME: CORVUS1:
CORVUS1: NOW WRITE PROTECTED
6.2.3 List volumes again. You will see a "*" in the WP column, adjacent to
"CORVUS1 :".
6.2.4 Remove the Write-Protect from CORVUS1:.
H
WHICH VOLUME: NEW:
MOUNT NEW: ONUNIT #12
NEW: MOUNTED
Note that you did not have to supply the UNIT# because VMGR suggested
the response 12".
6.2.9 L to see the result. NEW: is now mounted on unit 12.
6.2.10 Remove NEW:.
ENTER VOLUME NAME: NEW:
ENTER VOLUME NAME: CORVUS1:
CORVUS1: NOW UNPROTECTED
6.2.5 Use L to confirm that it worked.
6.2.6 Create a new volume called 'NEW:".
OK TO DESTROY NEW:? Y
Note that you must type Y to confirm that you really wanted to
destroy NEW:.
6.2.11 Use L to see that NEW: disappeared. Note that R(EMOVE is smart
enough to unmount NEW:, then destroy it.
6.2.12 Create and mount NEW: again.
NEW VOLUME: ENTER VOLUME NAME: NEW:
ENTER LENGTH (BLOCKS): 1024
iI
ENTER CORVUS DRIVE # (1...4) : 1
ENTER ADDRESS (BLOCKS): 1032
40
6.2.13 Unmount NEW:
.I1.LF. I:
LtL.L t
NEW: UNMOUNTED
r.Atht
jri u
if:
6.2.14 Mount a floppy. Place a floppy in the floppy drive. If you mount a Corvus
volume in a unit that is occupied by a floppy, the floppy will no longer be
accessible. If you want to access the floppy again, simply U(NMOUNT the
Corvus volume.
If CORVUS6: were mounted on #9:, the floppy plugged into slot 4, drive 1
would be invisible. U(NMOUNTin9 CORVUS6: or mounting it on another unit
would make the floppy available again.
6.2.15 If you list the volumes, the floppy does not appear because VMGR lists
only the volumes on the disk drive. The Pascal Filer's V command, however, will
show that the floppy is mounted on unit #9:.
6.2.16 List the volumes. The listing should look like this:
!L
CORVUS VOLUME DIRECTORY
WP
NAME
LENGTH
DRV#
ADDR
WP
1024
CORVUS1:
1024
NEW:
16880
<UNUSED>
1032
2056
8
1
1
1
UNIT
#4
6.2.17 Leave VMGR and use the Filer's V command to see the results:
Type 0 to leave VMGR, Ftostartthe Filer, and V forthe V(OLS command:
VOLS ON-LINE:
1
2
4#
9#
CONSOLE:
SYSTERM:
CORVUS1:
(name of floppy in floppy drive)
etc.
Note that the floppy is mounted on #9:. NEW: does not appear because it
is not mounted.
6.2.18 That completes the VMGR exercise. The next sections describe the
commands in detail.
6.3 VMGR Commands
This section consists of a detailed description of the Corvus Volume
Manager commands.
6.3.1 M(OUNT
The mount command assigns a volume to a specific unit (volume number). It is analogous to placing a floppy disk in the appropriate drive. Apple
Pascal restricts volumes to units 4,5,9, 10, 11 and 12; therefore only six volumes
can be mounted at any time.
A Corvus volume may be mounted 'on top" of a floppy volume; for
example, suppose afloppy is plugged into slot 4, drivel. It would be unit #9. If a
Corvus volume were mounted to unit #9, then the floppy would not be
accessible-any references to unit #9 would refer to the Corvus volume.
To access the floppy again, simply U(MOUNT the Corvus volume that is
using the floppy's unit (or move the Corvus volume to a different unit).
42
w
w
w
W
W
N
6.3.2 U(NMOUNT
Unmount disassociates a volume from the unit on which it is mounted. It
is comparable to removing a floppy from a drive.
WARNING
When you turn your Apple on, it boots from the files on the disk. If
you unmount the volume that contains the boot files SYSTEM.
APPLE and SYSTEM.PASCAL, you will be unable to boot from the
disk. You will then have to reconfigure the disk, effectively losing all
the data on it. If you attempt to unmount this volume, VMGR will
warn you of the danger and give you a chance to change your mind.
6.3.3 L(IST
Lists what volumes are on each disk in the system. A typical listing might
look like this:
CORVUS VOLUME DIRECTORY
NAME
CORVUS1:
NEW:
* TUNA:
* ACCT53:
<UNUSED>
DOS1:
<OFFLINE>
<OFFLINE>
<OFFLINE>
LENGTH
1024
1024
72
1024
11104
4680
ADDR
8
1032
2056
2128
3152
14256
8
8
8
DRV#
UNIT
1
1
1
1
1
1
2
3
4
#4
#9
#12
The listing tells us that drive 1 contains 5 volumes: CORVUS1:, NEW:,
TUNA:, ACCTS3:, and DOS1: . TUNA: is 72 blocks long, DOSi: is 4680
blocks long, and the others are each 1024 blocks long. There are 11,104 empty
blocks between ACCTS3: and DOS1:.
*
TUNA: and ACCTS3: are write-protected, as indicated by the in the
"WP" column.
The ADDR column gives the location (block address) at which each
volume begins. Note that the first 8 blocks on each drive are unavailable. They
are reserved for system use.
CORVUS1: is mounted on unit #4, NEW: is on unit #9, and ACCTS3: is
on unit #12. DOSl: and TUNA: were not mounted when the listing was made.
Drives 2, 3, and 4 are offline, that is, not connected. If they were
connected, their volumes would be listed.
6.3.4 N(EW
Creates new volumes. The N(EW command asks for the name you want to
give the new volume (the name must meet Apple Pascal volume name requirements) and for its length, drive number, and address. Default values for the
length, drive, and address are provided-if you press <RETURN> when a
question is asked, the displayed default is used.
6.3.5 R(EMOVE
Removes (and, if necessary, unmounts) and destroys the specified
volume. R(EMOVE gives you a chance to change your mind before it destroys
the volume.
43
6.3.6 W(PROT
Ifavolume is not protected, W(PROT protects it. If it is protected, W(PROT
removes the protection.
6.3.7 D(OSVOL
Creates a volume which can contain DOS 3.2 format volumes. See
section 6.6.
6.4 VMGR Quick Reference Chart
Remember that volumes are similar to floppies. This quick reference chart
describes the VMGR commands and the comparable floppy operation.
CORVUS VMGR QUICK REFERENCE CHART
VMGR Command
Equivalent Floppy Operation
" L
List volumes
Lists all floppies both mounted and
not mounted
" N
Create new volume
Format a new floppy and change
its name
" A
Remove a volume
Dismount and erase a floppy
" M
Mount a volume
Place a floppy in a drive
" U
Unmount a volume
Remove a floppy from a drive
" W
Write protect (or un-protect)
a volume
Place a write protect sticker on a
floppy (or remove a sticker)
" D
Create a DOS 3.2 format
volume
No equivalent
" 0
Quit (exit VMGR)
No equivalent
6.5 BACKUP and RESTORE Facilities
6.5.1 BACKUP is a Corvus utility that allows you to make backup copies of any
Corvus disk volume. The backup copy can be made on a floppy or on disk. The
volume to be backed up is called the source volume and the copy is called
the destination.
To use BACKUP, you must create one or more destination volumes
(depending on how much space is needed). Call the first volume BAKUP1:, the
second BAKUP2:, the third BAKUP3:, and so on.
X(ECUTE BACKUP. It will ask for the source volume name and proceed to
make a back-up copy on BAKUP1:.
BACKUP copies one files at a time from the source volume to BAKUP1:. If
afile is too large forthe space remaining on BAKUP1:, the program will stop and
ask you to mount BAKUP2:. When BAKUP2: is full, the program will ask for
BAKUP3: and so on.
If a file from the source volume is so large that it will not fit on a new
(empty) destination volume, the file must be broken into pieces. This can occur
if you are backing up to floppies and a file of over 280 blocks is encountered.
BACKUP will fragment the file automatically, recording it on as many volumes
44
as necessary. It will append a period (.) to the file name of each fragment so that
you can tell it's been broken up.
6.5.2 RESTORE
The standard Pascal Filer can be used to read the backup copies created
by BACKUP unless large files were fragmented (see BACKUP).
RESTORE is a Corvus utility that reads fragmented backup files and
recreates the originals, automatically merging the fragments created by
BACKUP.
To use, simply X(ECUTE RESTORE.
Hint: If you use the Filer to restore a backup volume, be careful how you
specify the transfer. If, for instance, you want to transfer from unit 9 to unit 5,
don't transfer #9: to #5:. instead, transfer #9:= to #5:= because it will preserve the
iame assigned to the volume on unit #5.
.6 Creating and Using DOS 3.2 Format Volumes Under Pascal/BASICS
One of the main strengths of the Corvus hAP Pascal system is that DOS
3.2 format files can be stored on the disk along with Pascal. This section
describes how to create and use DOS 3.2 format volumes.
WARNING
From BASICS, you can alter any memory location or any byte on
disk, including the operating system or any Pascal files on disk. You
can conceivably lose the ability to boot and may have to re-format
the disk, losing all the data on the disk. Your best insurance is to
back-up your disk.
6.6.1 Creating DOS 3.2 Volumes
The DOS volumes are stored in a single Pascal file called DOS1: at the
end of the disk.
To create DOS1: , simply use the D(OSVOL command in VMGR:
D
CREATE DOS VOLUMES ON DRIVE:1
BLOCKS RESERVED FOR SYSTEM.BASICS:24
ENTER # OF DOS VOLUMES (MAX=78):20
VMGR will then create DOS1:. The process takes about 40 seconds for a
20-volume DOSVOLUMES and tells you what it's doing:
MOUNTING DOS1: ON #9:
OPENING BASICS.DATA
WRITING DOS1:DOSVOLUMES
ZEROING DOS1: DOSVOLUMES
MOUNTING FLOPPY ON #9:
45
Here's what happened: First, VMGR created and mounted the volume
DOS1: on #9:. It copied the file BASICS.DATA to DOS1: and created a file called
DOSVOLUMES on DOS1: . Then it zeroed DOSVOLUMES and dismounted
DOS 1:
Mount DOS1: before you leave VMGR.
6.6.2 Configuring the DOS1: Volume
VMGR's D(OSVOL command creates a Pascal volumethat contains a48K
Byte "Warm Boot Area" followed by a zeroed area that can hold DOS 3.2-format
volumes and space for the file SYSTEM.BASIC.
It is important to understand what the Warm Boot Area and SYSTEM.
BASIC are.
The Warm Boot Area contains a snapshot" of the Apple's entire main
memory-all 48K Bytes of RAM. (If your Apple has less than 48KB of RAM, the
Area stores whatever you have.)
The DOS 3.2-format volumes are followed by space for a Pascal-format
file called SYSTEM.BASIC. When you boot BASICS, SYSTEM.BASIC is loaded
into the Apple Language card and the card is enabled, if thefile is present. Note
that when the card is enabled, your Apple will execute the language in it. There
is no way to load the Language Card and boot with some other language
running.
The D(OSVOL command fills the Warm Boot Area with a copy of the file
BASICS. DATA from CORVUS1: and does not create SYSTEM.BASIC. This
section will tell you how to rewrite the Warm Boot Area and create SYSTEM.
BASIC to make your BASIC SYSTEM come up the way you want.
6.6.2.1 What Do You Want?
You must first decide how you want your BASICS system to boot. It
depends on how your Apple is equipped and which BASIC you want running
when you power on.
Some examples:
Debbie has an Apple II with Integer Basic in ROM on the main board,
wants Applesoft loaded into the Language Card, and wants to come up with
Applesoft running.
Murray has an Apple II Plus with Applesoft in ROM but doesn't use Integer
BASIC and doesn't care whether the Language Card is loaded. He wants to
come up in Applesoft but with his own BASIC program running.
6.6.2.2 Loading The Language Card
Placethe BASICS diskette, supplied by Apple, in your floppy drive. If, like
Debbie in the previous section, you want Applesoft in the Language Card, use
the Pascal Files to transfer the file FPBAS.DATA from BASICS: to DOS1:
SYSTEM. BASIC.
TRANSFER? BASICS:FPBAS.DATA
(Remember, you may need to use VMGR to mount the floppy. See
section 6.3.1.)
If you want to put Integer BASIC in the language card, transfer BASICS:
INTBAS.DATA to DOS1:SYSTEM.BASIC.
If you are like Murray and don't need the Language Card loaded, don't
46
create SYSTEM.BASIC. If you do, then when the system boots and loads the
the
Language Card, the language in the card will start running, rather than
ROM.
in
RAM
or
language
6.6.2.3 Switch from Pascal to BASICS. Leave VMGR or the Filer (type Q) and
X(ECUTE the Corvus program BASICS (not be to confused with Apple's
BASICS diskette).
x
BASICS
><-----------------------------><
><
><
><
><
><
><
><
><
CORVUS hA
You are now in RAM-based Applesoft.
6.6.2.4 Next, you should copy all the files from the CORVUS BASICS
UTILITIES DISKETTE onto volume 1 of the disk. That way, you will have all
these handy programs available on the disk and you will get some practice
putting programs on your disk.
Place the CORVUS BASICS UTILITIES DISKETTE into the floppy drive
and copy it to volume 1 on the disk (You do not have to INIT the volumeCOPY2 copies the whole floppy, complete with directory.)
]LOAD COPY2, S4
Reply N if you are done copying, reply Y if you want to copy more floppies.
After you are done, try this:
to list the file on volume 1 of the Corvus drive. You should see all the files you just
copied from floppy to volume 1.
6.6.2.5 COPY2 initialized volume 1 when you copied the UTILITIES DISKETTE
to it. But the remaining volumes on the disk were zeroed by BFORMAT and must
be initialized. You can initialize each one when you want to use it, but it is easier
to use the Corvus program VOLUME INIT to initialize all the volumes at once.
The program takes four or five seconds per volume.
]LOAD VOLUME INIT, S6
]RUN
BULK VOLUME INIT PROGRAM
CORVUS SYSTEMS - 1979
ENTER FIRST VOLUME NUMBER: 2
ENTER LAST VOLUME NUMBER:
47
Enter the number of the last volume you want initialized. After it is done,
(allow six minutes for 81 volumes) all the volumes will be initialized and ready
br storing data and you will never have to run it again (unless you zero the disk
for some reason). (For more information on initializing, see Chapter 2 of the
DOS 3.2 Manual.)
6.6.2.6 Proceed to Chapter 5, where you will learn how BASICS boots and how
to make it boot the way you want. Then you will learn how to use the DOS 3.2
commands to manipulate the volumes in your hAP BASICS system.
6.7 Pascal Cold Boot Facility and Turn-key Operation
When you turn your Apple on (or press <RESET >), a cold boot" occurs.
The Apple executes the cold boot" program on the disk in slot 6 (the
Corvus drive).
The cold boot program will boot Pascal, using the files SYSTEM.APPLE
and SYSTEM.PASCAL located in the first volume on the disk.
If you want your Apple to boot BASICS instead of Pascal at power-on!
reset, then you should X(ECUTE the Corvus program SETBOOT. When
SETBOOT asks:
P(ASCAL B(ASICS <ESC>
respond B for a BASICS boot. SETBOOT will change a portion of the file
BOOT.DATA and from then on, when you power-on or press <RESET>, the
computer will boot BASICS. (See section 5.1 for a description of BASICS
booting.)
WARNING
Do not set up the system to boot BASICS until you have created
and tested the DOS VOLUMES area using the D(OSVOL command
(see section 6.6). If you do, your system will be unable to boot at all
and you will have to reformat the disk, losing all your files.
WARNING
If is very important that you test your boot program before you
name it SYSTEM.STARTUP. If it bombs, then your Apple will bomb
every time you power-on and you may be unable to recover. Then
you'll have to re-format the disk and lose all your files! The moral:
Back-up your disk.
6.8 How The Corvus Pascal/BASICS Disk Is Organized
The Corvus disk consists of eight blocks (4K Bytes) of "Cold Boot" data
followed by 18,928 blocks of user accessible space.
The Cold Boot data blocks were created by the program PFORMAT.CODE
that you executed when you configured the disk. These blocks comprise a
machine language program that is executed when you turn your Apple on or
press <RESET>. It normally causes your Apple to boot Pascal, using the files
SYSTEM.APPLE and SYSTEM.PASCAL that are located in the first volume
(normally CORVUS 1:) on the disk.
If you set the cold boot area to boot BASICS using the SETBOOT utility
(see section 6.7), then the system will boot DOS 3.2 and BASICS at power-on.
When BASICS boots, whether at power-on or when the program BASICS
is X(ECUTEd, the Warm Boot Area is loaded into Apple RAM and if the file
DOS1:SYSTEM.BASIC is present, it is loaded into the language card and the
card is enabled. See section 6.6 for more information.
CORVUS hAP PASCAL/BASICS DISK CONFIGURATION
COLD BOOT AREA
Created by PFORMAT
when system is configured.
Executed at power-on or
<RESET>. SETBOOT alters
this area.
PASCAL/BASICS
COLD BOOT AREA
MOUNT INFORMATION
VOLUME DIRECTORY
First user volume
(usually CORVUS1:)
(generally must
include files
SYSTEM.APPLE and
SYSTEM. PASCAL
If you wish to return to Pascal booting, enter
to get back to Pascal and then X(ECUTE SETBOOT. When SETBOOT asks
which system you wish to boot, respond P and your Apple will again
boot Pascal.
You can make your Apple power-on running a BASIC program by using
SETBOOT to set for BASICS boot and following the procedure described in
section 5.2, BASICS Turn-key Systems".
You can make your Apple power-on running a Pascal program by leaving
SETBOOT configured for a Pascal boot and setting up Pascal to boot your
program according to the procedure in Chapter 3 of the Apple Language
System manual. The procedure is to change the name of a tested code file to
SYSTEM.STARTUP and include it on the boot volume (CORVUS1 :). When you
boot, the program will execute.
48
Other Pascal-format
user volumes
and/or unused blocks
1-63
PASCAL
USER
VOLUMES
OPTIONAL
DOS1:
VOLUME
Pascalformat
file
DOS
VOLUMES
EACH
VOLUME
ANY
SIZE,
IN
MULTIPLE
OF 8
BLOCKS
18,928
BLOCKS
48K Warm Boot Area
1-82 DOS 32-format
volumes
2271/2
BLOCKS
EACH
Pascal-format file
SYSTEM. BASIC
24
BLOCKS
CHAPTER 7
HARDWARE SPECIFICATIONS
7.2.1 Operational (cont.)
7.1 General Description
The Corvus hAP Disk Drive is a fixed disk, sealed environment,
"Winchester" technology drive. While not much larger than a floppy disk drive
in size, it provides over 11 megabytes of storage (unformatted).
Its advanced technology base accommodates all major subassemblies.
The low load, low mass Winchester" type Read/Write heads are positioned
with a linear voice coil actuator utilizing a closed loop, track following, servo
system. The recirculating filtered air flow system within a sealed enclosure
prevents contamination. The brushless d.c. drive motor with built-in disk
spindle, motor electronics and speed control provides for universal 50/60
Hz operation.
Three printed circuit boards, Read/Write, Servo Control, and Drive Logic
and installed within the base and are interconnected with a back panel where all
interface connections are made.
Primary features of the Corvus hAP Disk Drive are as follows:
"
"
"
"
"
"
"
7.2 Specifications (cont.)
Fixed media (magnetically oriented and lubricated)
"Winchester" type recording features
Sealed environment, clean air filter system
Brushless d.c. Drive Motor
Small size
No scheduled maintenance
Daisy chain up to 4 drives
Recording code
Heads per surface
Data heads
Servo head
Start time
Stop time
5.5 x 8.5 x 19.25 inches
5.5 x 4.5 x 15.5 inches.
250 Watts .
22 lbs..
13 lbs..
9.5 Megabytes.
10 milliseconds.
50 milliseconds.
8.3 milliseconds
Height
Width
Length
Weight
Operating Relative Humidity
(no condensation)
Operating Altitude
Non Operating Temperature
Non Operating Relative Humidity
(no condensation)
Temperature Variation
Operating Vibration
Non Operating Vibration
7.2.1 Operational
50
3
15 seconds (max.)
15 seconds (max.)
7.7.2 Physical Dimensions
Operating Temperature
7.2 Specifications
Number of disks
Number of data surfaces
Number of tracks per surface (354 data,
4 diagnostic, 60 guardband)
Number of data tracks per surface
Bytes per track (unformatted)
Bytes per cylinder (unformatted)
Number of data cylinders
Bytes per surface (unformattedO
Bytes per drive (unformatted)
Track density
Bit density
Rotational Speed
Average Latency
10 ms
50 ms
100 ms
648 Kilobytes/second
(5.1 mega Hz)
MFM
5.5" max. (13.97 cm)
8.57" max. (21.76 cm)
19.25" max (48.89 cm)
22 lbs. (10 Kgm)
7.2.3 Environmental
PERFORMANCE SUMMARY
Size of Drive ...............................................................
Size of Power Supply .................................................
Power Consumption .......................................................
Weight of Drive ...............................................................
Weight of Power Supply ..................................................
Formatted Data Capacity................................................
Minimum Seek Time .......................................................
Average Seek Time .........................................................
Average Latency .............................................................
Single track access time
Average access time
Maximum access time
Data transfer rate
Non Operating Shock
418
350 + 4 Alternatives
10,800
32,400
350
3.78 Megabytes
11.34 Megabytes
300 TPI
5,868 BPI
3,600 RMP ± 1%
8.33 ms
50 F. to 120 F.
(10 C. to 50 C.)
20% to 80% R.H.
-1000 to +6000 ft.
sea level
-40 F. to 140 F.
(-40 C. to 60 C.)
10% to 90% R.H.
18 F. (10 C.) per hour
(no condensation)
0.1 G (5 CPS linear
increase to 100 CPS)
1.0 G (2 CPS linear
increase to 100 CPS)
5.0 G for 5 ms duration
7.3 Reliability
7.3.1 Mean Time Between Failures
MTBF is calculated to exceed 10,000 hours.
7.3.2 Mean Time to Repair
The MTTR will not exceed 0.5 hours.
7.3.3 Preventive Maintenance
There is no preventative maintenance required on the Corvus hAP
disk drive.
ARAZARKI
a A
CORVUS VMGR QUICK REFERENCE CHART
VMGRCommand
"
Equivalent Floppy Operation
L
List volumes
Lists all floppies both mounted and
not mounted
N
Create new volume
Format a new floppy and change
its name
R
Remove a volume
Dismount and erase a floppy
M
Mount a volume
Place a floppy in a drive
U Unmountavolume
Remove a floppy from a drive
W
Write protect (or un-protect)
a volume
Place a write protect sticker on a
floppy (or remove a sticker)
D
Create a DOS 3.2 format
volume
No equivalent
Quit (exit VMGR)
No equivalent