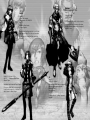
1
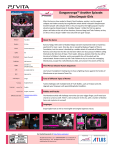
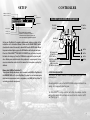
TABLE OF CONTENTS
WARNING: READ BEFORE USING YOUR PLAYSTATION®2 COMPUTER ENTERTAINMENT
SYSTEM.
A very small percentage of individuals may experience epileptic seizures when
exposed to certain light patterns or flashing lights. Exposure to certain patterns or
backgrounds on a television screen or while playing video games, including
games played on the PlayStation 2 console, may induce an epileptic seizure in
these individuals. Certain conditions may induce previously undetected epileptic
symptoms even in persons who have no history of prior seizures or epilepsy. If
you, or anyone in your family, has an epileptic condition, consult your physician
prior to playing. If you experience any of the following symptoms while playing a
video game – dizziness, altered vision, eye or muscle twitches, loss of awareness,
disorientation, any involuntary movement, or convulsions – IMMEDIATELY
discontinue use and consult your physician before resuming play.
WARNING TO OWNERS OF PROJECTION TELEVISIONS:
Do not connect your PlayStation 2 console to a projection TV without first
consulting the user manual for your projection TV, unless it is of the LCD type.
Otherwise, it may permanently damage your TV screen.
USE OF UNAUTHORIZED PRODUCT:
The use of software or peripherials not authorized by Sony Computer
Entertainment America may damage your console and/or invalidate your warranty.
Only official or licensed peripherals should be used in the controller ports or
MEMORY CARD slots.
HANDLING YOUR PLAYSTATION 2 FORMAT DISC:
• This disc is intended for use only with PlayStation 2 consoles with the NTSC U/C
designation.
• Do not bend it, crush it or submerge it in liquids.
• Do not leave it in direct sunlight or near a radiator or other source of heat.
• Be sure to take an occasional rest break during extended play.
• Keep this compact disc clean. Always hold the disc by the edges and keep it in
its protective case when not in use. Clean the disc with a lint-free, soft, dry cloth,
wiping in straight lines from center to outer edge. Never use solvents or abrasive
cleaners.
Prologue...............................................................4
Character Introductions..................................................6
Character Relationships..............................................10
Basic Controls.............................................................12
Game Modes................................................................14
Game Progression........................................................15
World Map....................................................................18
Camp Menu..................................................................22
Status...........................................................................24
Battle System...............................................................25
Credits................................................................36
© 2005 Atlus
1
SETUP
CONTROLLER
MEMORY CARD slot 2
disc tray
MEMORY CARD slot 1
RESET button
®
DUALSHOCK 2 ANALOG CONTROLLER CONFIGURATIONS
OPEN button
USB connector
L2 button
R2 button
L1 button
R1 button
* Note: Illustration may not match all
controller port 1
controller port 2
PlayStation 2 console types. For owners of
SCPH-70000 series PlayStation 2 systems, refer
to the setup instructions supplied with your system.
®
Set up your PlayStation 2 computer entertainment system according to the
instructions in its Instruction Manual. Make sure the MAIN POWER switch
(located on the back of the console) is turned ON. Press the RESET button. When
the power indicator lights up, press the OPEN button and the display will open.
Place the STELLA DEUSTM: THE GATE OF ETERNITY disc on the disc tray with
the label side facing up. Press the OPEN button again and the disc tray will
close. Attach game controllers and other peripherals, as appropriate. Follow
on-screen instructions and refer to this manual for information on using the
software.
Memory Card (8MB)(for PlayStation®2)
To save game settings and progress, insert a memory card (8MB)(for PlayStation®2)
into MEMORY CARD slot 1 of your PlayStation®2 system. You can load saved game
data from the same memory card or any memory card (8MB)(for PlayStation®2)
containing previously saved games.
directional
buttons
button
left analog stick
(L3 button when pushed down)
SELECT button
ANALOG mode button
START button
right analog stick
(R3 button when pushed down)
button
button
button
CONTROLLER NOTES
Stella Deus: The Gate of Eternity is a 1-player game which only utilizes
controller port 1.
An analog controller such as the DUALSHOCK®2 analog controller with an
analog stick is required to play the game.
The DUALSHOCK®2 analog controller will utilize the vibration function
during certain events. For information on how to turn this function On/Off,
see “Config” (pg. 21).
2
3
The land of Solum...
A continent engulfed in a deadly mist called the
Miasma.
Nothing swallowed by the ancient fog ever emerged;
the Miasma turned all to nothingness.
This plague ushered in an age of despair.
Humanity lost all hope, and was driven to the brink
of insanity.
Thieves, traitors, and murderers led Solum to chaos.
The land became a hell on earth.
However, a ray of hope sparkled in Solum's darkest
night.
That hope was the Aeque religion, teaching the
doctrine of “a peaceful end.”
So it is written:
“God’s will for our broken world is
destruction. Those who accept this and
await their fate will be welcomed at His
side.”
The ideology of the Aeque freed people from their
fear, but at the same time, it robbed them of their
will to live.
The chaos subsided. Apathy spread like a blanket as
people awaited their peaceful end.
Then, a man named Dignus stepped forward.
Declaring himself Overlord, Dignus gathered an
army.
He overthrew the kingdom of Fortuna,
slaughtering the apathetic masses.
As quickly as peace had come, fear began to stir the
people of Solum…
Now the source of that fear, the Overlord himself,
is descending on our hero’s village…
4
5
LINEA
Weight: No comment
Height: 5’ 4’’
Measurements:B32/W22/H32
Age: 18
Birthplace: Gula
Weapon: Bow
You’ll meet many different characters over the course of
the game. Here’s a short introduction to some of the
main ones.
The last remaining descendant
of the Anima kingdom’s Royal
lineage. She understands her
position and asserts herself
easily. As all Anima, she
believes humanity can live in
harmony with the spirits, and
she seeks to mediate between
the two.
VISER
Height: 6’ 1’’
Weight: 147 lbs
Age: 24
Birthplace: Near Barrage Castle
Weapon: Alchemic Sword
SPERO
Height: 5’ 8’’ Weight: 139 lbs
Age: 16 Birthplace: Porta
Weapon: Dual Katana
A brilliant alchemist who hopes to
create a world free of the Miasma.
He continues his research, despite
alchemy being forbidden.
A kind and optimistic young man.
He continues to train with the sword
techniques he learned from his late father.
6
7
GALLANT
Height: 6’ 5’’ Weight: 216 lbs
Age: 33
Birthplace: Boreas
Weapon: Axe
ADARA
Height: 5’ 5’’
Weight: No comment
Measurements: B33/W24/H34
Age: 17
Birthplace: Near Evarate
Weapon: Argyrion
A strong warrior who walks softly and carries
a large axe. He lives in harmony with nature,
and can communicate with spirits, though not
as well as Linea.
A cheerful and intelligent girl who is good friends
with Spero and Grey. She’s self conscious about
her arm, which is an artificial limb created by
alchemy.
GREY
Height: 5’ 9’ Weight: 137 lbs
Age: 17
Birthplace: Near Evarate
Weapon: Spear
Good friends with Adara and Spero, despite
his sarcastic barbs. Grey’s cockiness tends
to get him into trouble. He’s overly sensitive
when it comes to Adara, though.
TIA
Height: 4’ 8’’
Weight: No comment
Measurements: What are you, a pervert!?
Age: Don’t ask so many questions.
Birthplace: Silva
Weapon: Gloves
A strange girl who’s stalking Spero and
the party.
8
9
There are two major powers in Solum, the Aeque and the
Imperial Legion. Philosophically, they are at odds with each
other.
The Aeque
This religious group believes that God has ordained a
peaceful end to mankind. They simply accept the
world's current rotting state.
PRIER
Height: 4’ 10’’
Weight: No comment
Measurements:
B30/W20/H30
Age: 11
Birthplace: Barrage
Weapon: Staff
The Imperial Legion
Lead by Overlord Dignus, the Legion believes apathy is grounds
for execution. The Legion's objective is the eradication of the
Aeque's disciples.
DIGNUS
Height: 6’ 6’’ Weight: 240 lbs
Age: 44 Birthplace: Unknown
Weapon: Broad Sword
An Overlord of war and destruction,
he slaughters anyone affected by the
shadow of apathy. If destruction is the
will of God, he intends to destroy God
himself.
Lumena's loyal attendant.
LUMENA
Height: 5’ 6’’ Weight: 115 lbs
Measurements: B35/W23/H35 Age: Unknown
Birthplace: Barrage Weapon: Staff
The high priestess of the Aeque, she believes
God's will for humanity is a peaceful end. She
is very motherly, and has a romantic
relationship with Avis. Lumena is currently a
prisoner of the Legion.
The Kingdom of Fortuna
This land once held to Aeque principles,
but was recently destroyed by the
Imperial Legion.
AVIS
Height: 6’ 2’’ Weight: 159 lbs
Age: 22 Birthplace: Barrage
Weapon: Sword
The former prince of Fortuna. After the Imperial
Legion destroyed his kingdom, Avis's hatred for
Dignus prompted him to take up arms and lead
the Resistance.
10
CROIRE
Height: 6’ 2’’
Weight: 157 lbs
Age: 32
Birthplace: Near Taberna
Weapon: Bow
One of the four generals of
the Imperial Legion. He is
Dignus’s attendant, and
attempts to use his power
for his lord.
ECHIDNA
Height: 5’ 10’’
Weight: 137 lbs
Measurements:
B37/W23/H34
Age: 29
Birthplace: The East
Weapon: Katana
One of the four generals of
the Imperial Legion.
She is a skilled
swordswoman. She has
fought with
Dignus in the past and lost,
but she was permitted
into his army. She is
constantly in search for
strong opponents.
VIPER
Height: 6’ 8’’
Weight: 216 lbs
Age: 34
Birthplace: Near Boreas
Weapon: Axe
One of the four generals of
the Imperial Legion.
He is cruel, sinister, dirty
and mean. He is the
epitome of evil. He is in
charge of the ruffians of
the Legion, massacring
anyone they want.
11
SYSTEM
FIELD
BATTLE
BASIC CONTROLS
Controls differ between the World Map, Camp Menu, and Battle. Take time to learn the
various controls--especially for battle.
Make sure the DUALSHOCK™2 analog controller is inserted into controller port 1.
(This game does not use controller port 2.)
BUTTON
MAP
MENU
BATTLE
directional buttons
move cursor
move cursor
move cursor
left analog stick
move cursor
move cursor
move cursor
right analog stick
Not used
Not used
change angle / zoom
L1 button
Not used
change character
add 1 AP
R1 button
Not used
change character
advance order
L2 button
Not used
change page
subtract 1 AP
R2 button
Not used
change page
reduce order
START button
System Menu
Not used
System Menu
SELECT button
Not used
displays information
Not used
x button
confirm destination
confirm selection
confirm selection /
display details
7 button
reset cursor to current
location
cancel selection
cancel selection
Camp Menu
toggle between
equipment/skills
Not used
Not used
Not used
toggle areas
∆ button
9 button
*The mode indicator is always on (analog mode).
This game can also be played with the DUALSHOCK™ analog controller.
The basic controls are the same as the DUALSHOCK™2 analog controller.
*You can skip event scenes by pressing the START button.
*This game does not use the vibration function.
SYSTEM
FIELD
BATTLE
BASIC CONTROL
System Menu - World Map
Press the START button to display the System Menu while
on the World Map (P16). You can Save and Load from this
menu. Select one and press the x button. You can return
to the World Map by pressing the 7 button.
[ Save ]
This allows you to save your game progress. Before
saving, make sure you have a memory card (8MB) (for
PlayStation®2) inserted into MEMORY CARD slot 1. At
the Save Screen, use the up/down directional buttons to
highlight the slot where you wish to save, and press the
x button. You must have at least 77KB of free space to
save. Saving Suspend Data requires 106KB of free space.
[ Load ]
Select this to load previously saved data. See page 14 for
further details.
You can access the System Menu
from the World Map at any time.
[Saving Between Scenes]
Sometimes, in between long
scenes, the game will ask if you
want to save. Select "Yes" to save
your data.
[ Quit Game ]
Quit the current game and return to the title screen.
System Menu - Battle
By pressing the START button during battle (P26) you can
access the System Menu. This menu is different from that
of the World Map. Here, you can Suspend your game and
toggle options.
[ Suspend ]
Create Suspend Data and return to the title screen. By
selecting "Continue" on the title screen, you can restore
your suspended game. Remember that you can't create
Suspend Data unless your character has 100 AP for that
turn.
[ Options ]
Alter various game settings.
[ Quit Game ]
Quit the current game and return to the title screen.
12
13
GAME MODES
You have five choices at the title screen.
[ NEW GAME ]
Begin a new game, starting from the beginning.
[ LOAD GAME ]
Continue from a previously saved game. Use the up/down
directional buttons to select a file to load. Make sure you
have a memory card (8MB) (for PlayStation®2) inserted
into MEMORY CARD slot 1.
[ CONTINUE ]
Continue from suspended data (P13). Remember that after
continuing, you will not be able to load it again. This
option isn't available unless you have Suspend Data.
[ TUTORIAL ]
Learn the intricacies of playing the game. Select a
category and press the x button to view a tutorial on that
subject. Return to the Title Screen by pressing the 7
button.
[ OPTIONS ]
Alter the settings of the game. This includes things like
message speed and volume. See page 23 for details.
14
SYSTEM
FIELD
BATTLE
GAME PROGRESSION
The game alternates between 2 basic areas: the World
Map, and battle fields.
About the World Map and Battles
Stella Deus is split between the World Map and battles.
Select a destination on the world map and win battles to
progress the story.
World Map
This is where you'll move
around the map and
prepare for battle. Select
a destination with the
cursor and press the x
button to move. Pressing
the ∆ button will display
the Camp Menu, and the
START button will display
the System Menu.
Travel to
destination
Power up
the Party
Camp Menu
Visit the Shop to buy
equipment, or the Guild
to fuse items and accept
quests. You can also
power up your characters
or equip new skills, so
always visit Camp
between battles. Lastly,
you can choose to level
up in the Catacombs of
Trial.
Mission
cleared
Battles
The red mark on the
World Map indicates your
next destination. When
you arrive there, the story
will unfold and a battle
will ensue. If you are
victorious, you'll return to
the World Map and travel
to your next destination. If
you cannot win the battle,
power up your party in the
Camp Menu.
15
WORLD MAP
SYSTEM
FIELD
BATTLE
The World Map's an important screen; it's where you'll shop, open menus, and initiate battles.
Here are the details of the World Map:
SYSTEM
FIELD
BATTLE
WORLD MAP
Moving to the Next Area
Move the cursor to the the desired area and press the
x button to move. If you go to the flashing red area, the
story will progress and a battle will follow. Nothing will
happen if you stop on a white area unless the area is
related to a quest you are currently undertaking.
About the World Map and the Battle Screen
Movement, shopping for items, and entering battle are all
initiated from this screen. As the story progresses, your
movement options will increase...but first, you need to
learn how to read the map.
[ Red Area ]
The next required destination. Moving here
progresses the story and begins a new battle.
[ White Area ]
An area you have not cleared. You may move
to these areas, but cannot enter them.
Viewing the World Map
The Flow of Time
1
Areas are connected by paths
along which the party travels.
2
3
It takes one day to travel between two areas. Keep this in
mind, as certain quests have time constraints. Also,
entering the Catacombs of Trial takes one day.
4
[About the Flow of Time]
Time passes as you move
across the map. Wander too
much, and you'll risk failing
quests. However, certain
events will not occur unless
you move.
5
Using the Menus
You may access two menus from the World Map. The
∆ button displays the Camp Menu (P18) and the
START button displays the System Menu (P13). Learn to
use them both.
1: Date: The current date. Moving to an adjoining area costs one day.
2: Area: Locations you can move to. The flashing red area is your next plot destination. The
destinations are connected by paths which your party travels.
3: Current Area: Your party's present location.
4: Cursor: Use this to select a destination.
5: Area Name: The name of the currently selected area.
16
The Camp Menu is an
invaluable tool in your
adventure.
The Relationship Between Areas and Quests
Entering red areas will advance the story. These
areas remain red until you enter them. After
accepting a quest (p19), events may occur in white
areas as well. This will vary depending on the
quest you've selected. Keep an eye on time and
distance, as both can affect quests.
17
CAMP MENU
SYSTEM
FIELD
BATTLE
Going camping?
Using the Camp Menu, you can visit the Shop and the Guild, as well as customize your party.
It's very important to use the Camp Menu to its fullest.
The Five Commands
Five Essentials
1: Town
Pressing the ∆ button opens the Camp Menu. There are 2: Party
five choices to select from. Town and Party are important, 3: System
as they allow you to strengthen your characters and 4: Tutorial
examine their stats.
5: Options
1: Town
The Guild
CAMP MENU
The Guild
Two selections are available at the Guild: Quest and Fuse.
Quest
Pay for information, then complete quests to earn
rewards. The icon next to a quest's title indicates which
type it is. Use the L1/R1 buttons to switch between lists.
Keep in mind that some quests have time limits.
Requests
This list shows quests that are currently available. Press the X
button to display quest details. If you want to accept the
quest, choose "Yes."
There are three areas you can visit by selecting Town: The
Shop, The Guild, and Catacombs (Catacombs of Trial). You
can purchase or sell weapons, armor, and items at The
Shop. In The Guild, you may accept quests or fuse items.
The Shop
SYSTEM
FIELD
BATTLE
Current Quests
The quests you're currently undertaking are shown here.
[Information]
Some requests may offer
valuable information, such as
how to defeat a particular enemy.
Make sure to look into such
requests.
The Catacombs of Trial
Completed Quests
View the quests you've already completed.
The Shop
A battle will occur at the specified location
Four choices are available at the shop. The items
available to you will vary depending on your
progression through the story.
RED
Occurs when you arrive at a specific location.
BLUE
[TRY ON]
18
Immediately occurs after acceptance. It's possible to
fail, depending on certain conditions.
You may sample equipment before you buy.
At the bottom of the screen you'll see the
amount of money you have to spend
(Current), the price of the equipment (Cost),
and the money remaining if you make the
purchase (Balance).
[BUY]
Purchase items. Use the directional buttons
to select an item, the quantity of your
purchase, and press the X button.
[SELL]
Sell items from your inventory. Use the
directional buttons to select an item, the
quantity of your sale, and press the X button.
[EQUIP]
Equip characters with items from your
inventory. For more details, please see p.20.
YELLOW
Fusion
Pay for information, then complete quests to earn
rewards. The icon next to a quest's title indicates which
type it is. Use the L1/R1 buttons to switch between lists.
Keep in mind that some quests have time limits.
The Catacombs of Trial
[Utilizing the Shop]
By Trying On equipment, you can
view any stat changes before making
a purchase. Use this to your
advantage by sampling everything.
Make sure your characters have the
best equipment before entering the
next battle.
In the Catacombs, you can battle as long as you like to
level up and gain items. In the beginning, you can only
travel down 20 levels. However, as you progress through
the game, you may eventually be able to reach B50...or
lower.
19
CAMP MENU
CAMP MENU
Skills
2: PARTY
Any skills you have learned may be equipped for
battle. Some skills may have automatic effects. Skills
can't be used on the world map. Always remember to
equip skills after learning a new one (p.22).
This is where you organize the party. There are six subchoices in this menu. It's a good idea to check your party
before each battle, as you can equip items and skills or
power up your characters.
Equip
Skill
Power Up
Item
Status
Skill Stats
Rank Up
Damage
Displays a skill's power.
Equip
Range
Displays how far a skill can reach.
Equip weapons, armor, and items. There are four
different equipment slots: Weapon, Armor, Headgear,
and Item. Select a slot and press the X button, then
choose what you wish to equip.
Area
Displays the area of effect.
AP
Indicates AP required for the skill.
Equipment Icons
Weapon
Each character uses a specific type of weapon,
including: Katana, Swords, Bows, Axes,
Spears, Knives, Argyrion, Gloves, and Staffs.
Spero can equip two katana at a time.
MP
Indicates MP cost for using the skill.
Three Types of Skills
There are three types of skills in this game, and you can equip each type in its own slot. Here
are some examples of each type.
Armor
The two different armor types are Mails and
Robes, and anyone can equip either type. Mail
is good for defense but tends to be heavy,
while robes are light but weak.
Action Skills
Skills you perform by selecting them in battle,
including attacks, healing magic, and ailment
abilities. Each skill consumes a certain amount of AP
and MP when used.
Headgear
There are two types of Headgear: Helments
and Hats. Like armor, anybody can equip either
type.
Item
Up to four healing items or accessories may be
equipped. Jewelry, gauntlets, and shoes are all
useful accessories. Note that only one shoe or
gauntlet may be equipped at a time.
[Equip Items Accordingly]
Only four items may be equipped in
the Item slot. Plan carefully--you can
only use items in battle if you've
equipped them.
Equipment Weight
Every item has a certain weight, and the total weight of
your equipment affects how much AP is used during
battle. You have to trade mobility for defense, so be sure
to balance the two factors carefully.
20
Support Skills
These skills take effect as soon as they are equipped.
"Team" type skills allow your character to participate
in Team Attacks, as long as the proper conditions are
met. For more information on Team Attacks, see p.30.
Zone Skills
These skills will affect any character within the
Effect Zone (EZ). To check a character's EZ, select
them in battle and press the 9 button. The yellow
spaces represent the EZ. Positive skills affect allies,
while negative skills affect enemies.
Magic Burst
Combination Slash
HP Recovery
Wolf’s Fang
Jump + 1
HP/MP Damage
21
CAMP MENU
Power Up
Using Skill Points (SP) earned in battle, you can learn
new skills or power up various stats.
CAMP MENU
Rank Up
You can raise a character's rank by using a certain
item after fulfilling certain conditions. Select the
character using the L1/R1 buttons and press the X
button.
Learn Skills
Add new skills to a character's repertoire. Select a
skill you wish to learn and press the X button. The
amount of SP necessary varies from skill to skill.
3: SYSTEM
Opens the System Menu. You can also access this menu by pressing the START button on the
World Map.
[ Increase Stats ]
Highlight the stat you wish to raise and press the
right directional button to increase its value. 50 SP
are necessary to raise a stat by 1 point. Press the
X button when finished to confirm the changes. Stat
details are provided on p.25.
4: TUTORIAL
Learn the basics of gameplay.
5: OPTIONS
Items
Use items from your inventory to increase SP or teach
characters a new skill. After choosing an item, select
the recipient with the L1/R1 buttons and press the
X button.
Change various game settings. The up/down directional buttons will select a setting, and the
left/right buttons will change it.
Message Speed
The speed at which text appears.
Sound Output
Select from Monaural, Stereo, and Dolby Pro Logic II.
BGM/SE/Voice Volume
Adjust the balance between music and sound effects.
Status
You can view a specific character's data. For further
explanation of character statistics, please see p.25.
Battle Controls
Switch the battle control method between Command and
Direct. The default setting is Command, where choices
are selected from a menu. Direct mode assigns an action
to each button so that expert players don't need to rely
on menus.
Display Command Configuration
Select whether or not you wish to confirm actions in
battle.
Display Controls
Display/hide the button guide during battle.
22
Display EXP/SP Gained
Toggle the display of EXP and SP earned in battle on or
off.
Direct Controls
Button
Action
directional
buttons
Move
X button
Attack
9 button
Skill
∆ button
Item
7 button
Scroll Map
R1 button
Finish
R2 button
Team Attack
23
SYSTEM
FIELD
BATTLE
STATUS
FIELD
STATUS
What exactly do the stats mean?
All the character stats are listed below, with their effects.
You can raise stats by leveling up or by manually powering
up with SP.
You can check information about your party on the Status Screen.
Viewing Character Status
Stat Explanation
You'll see a detailed rundown of each character's stats in
the Status Screen. Note that HP and MP are recovered
after battle. Press the ∆ button to view a list of equipped
skills.
Use the L1/R1 buttons to switch
between characters in your
party.
Viewing the Status Screen
1 2 3
4
5
6
8
7
Strength (STR)
Affects Power and Movement.
Stamina (STM)
Affects Defense.
Intelligence (INT)
Affects Magic.
Resistance (RES)
Affects Magic Resistance.
Technique (TEC)
Affects Accuracy and Critical Hit Ratio.
Agility (AGL)
Affects Evasion and Movement AP.
Luck (LCK)
Affects various things.
Power (POW)
Total of Strength, the weapon equipped, and any bonus the character has.
Defense (DEF)
Affects the amount of damage the character receives when hit.
Magic (MAG)
Total of Intelligence, equipment, and any bonus the character has.
Magic Resistance (MGR)
Total of Resistance, equipment, and any bonus the character has.
Accuracy (ACC)
Total of Technique, equipment, and any bonus the character has.
Evasion (EVA)
Total of Agility, equipment, and any bonus the character has.
Weight (WGT)
The total weight of a character's equipment.
Movement (MOV)
The amount of AP necessary to take one step.
Cost (CST)
The amount of AP required to attack with a weapon.
Critical (CRT)
Indicates how often critical hits occur with a weapon.
Rank (RNK)
Indicates the quality of an item's stats.
Viewing Character Status
There are five different status ailments which can be cured
with items or skills. However, there are also support skills
which prevent them in the first place.
1: Lv
Displays a character's current level.
2: EXP
Displays a character's experience points. When the character gains 100 exp,
they will gain one level and the counter will reset.
Poison
3: SP
Displays a character's SP. SP is used to increase stats and abilities.
4: HP
Displays a character's HP. If this drops to 0, the character will be knocked out.
5: MP
Displays a character's MP. Using skills requires SP.
6: Rank
Displays a character's current rank. This changes throughout the game.
[ Preparing for Ailment ]
Lowers a character's Accuracy and Evasion. Will wear
If you're hit with a status
Dark
off over time, or can be cured with Eyewash.
ailment and you don't have the
proper items or skills, you'll be
Sleeping characters will miss their turns in battle, and
in trouble. Change your
Sleep they will be unable to dodge or counter. Hearing a
equipment to account for the
Whistle or getting hit will wake a sleeping character up. enemy's abilities.
7: Stats
Displays a character's complete stats. See p.25 for more details.
8: Equipment
Displays a character's currently equipped items. Press the ∆ button to display
the skills he or she has equipped.
24
The character loses some HP at the end of the turn. Can
be cured with Antidote, or wears off over time.
Equip skills accordingly.
While this ailment is in effect, the character cannot
[ About Stone ]
attack, use Skills, or take part in Team Attacks. It can be Stone, unlike other ailments,
cured over time, or by using a Badge of Courage.
does not have an icon.
However, the status window of
Characters affected by stone cannot perform any
the affected character will be
Stone actions. If every character is turned to stone, the game
greyed out.
will end. Lotion cures this ailment.
Fear
25
BATTLE SYSTEM
SYSTEM
FIELD
BATTLE
BATTLE SYSTEM
Precise decision and a firm grasp of the situation are what is needed in the heat of battle.
First, however, basic battle skills should be mastered.
Use Strategies to Win
In this game battles are decided on AP, so by making full
use of the AP, you can keep one up on the enemy. Take
the time to keep a grasp on the battle order.
Battle Basics
AP plays a crucial role in character order and the actions
taken. AP is used when a character moves or attacks, and
he or she will have another turn once the AP refills. Use
this knowledge to predict turn order, and stay ahead of the
game.
Before making a decision, consider
the turn order of enemies and allies.
[ Calculate Your Moves ]
You have the ability to manipulate turn order, so planning
ahead is essential. For instance, if the first character has
low HP, you can place him/her fifth in the order, and have
the fourth character heal him/her.
Viewing the Battle Screen
1
2
5
3
6
7
4
2: Turn Order
Displays the order in which characters will take action (left to right). It's decided
by each character's AP level.
3: Commands
Displays the battle commands. Each action requires a different amount of AP. For
details, see p.29.
4: Quick Status
Shows a character's Level, EXP, HP (Current/Max), and MP (Current/Max).
5: Height
Indicates the height of the currently selected space.
Order
[ Understand the AP Cost ]
AP starts to refill as soon as you end your turn. This means
you can choose to use all 100 AP (after moving and
attacking several times) or only using a portion of them
(allowing your next turn to come quickly).
AP Example
1: Remaining AP Displays Action Points (AP) remaining for the current character. The character's
turn occurs when his/her AP reaches 100; they may continue to take action until
the counter reaches 0.
AP Meter
AP: 0
AP: 100
Begin Turn
As you can see in the
example to the right, the
character moved a distance
worth 30 AP and attacked
once. There are still 30 AP
remaining, but by ending
his/her turn, the character
ensures a shorter wait
time.
AP Remaining
Movement
Movements
Attack
AP Remaining: 70
AP Remaining 30
End Turn
AP Used: 30
Attack
Movement
AP Used: 40
AP Used: 30
AP Refilling
[ Adjusting the AP and Changing Order ]
6: Cursor
Select characters or spaces.
7: Area
Blue squares indicate an area the character can move to. Yellow squares indicate
Zone Skill Effect Zones (EZ). Red squares indicate the character's attack range.
Press the 7 button to toggle between these areas.
26
After selecting Finish, you can adjust the upcoming turn
order. The R1/R2 buttons switch character order one at a
time. The L1/L2 buttons adjust AP one point at a time. Use
this technique to your advantage.
The enemy can't adjust turn order.
Use this fact to your advantage.
27
BATTLE SYSTEM
The Flow of Battle
Commands Used in Battle
There are a number of intricacies to battle that can spell
the difference between victory and defeat. If your party
is placed improperly, for example, it may put you at a
disadvantage. Below are some suggestions to keep in
mind.
STEP 1
Select/Place Your Characters
Once battle begins, use various attacks and skills to
defeat the enemy. Any character whose HP reaches 0
will be removed from battle. Adjust turn order to your
advantage and make use of Team Attacks.
STEP 3
Select/Place Your Characters
Each battle has its own conditions of victory. Some
stages don't require that you defeat every enemy. You
can confirm a battle's victory condition by pressing
the START button during battle. Keep in mind that
failing to achieve the condition will end the game.
STEP 4
Select/Place Your Characters
After the battle, you'll see the Spoils Screen. This
screen lists any items you gained during the battle,
and how much money you earned. Press the X button
to exit this screen.
Rotating the Screen
Use the right analog stick to rotate the camera
and zoom in or out during battle. Changing
angles is useful when there are buildings (or
other objects) obstructing your current view.
28
During battle, you have five commands to select from:
Move, Attack, Skill, Item and Finish. Each action uses
some AP. Learn how to use them and defeat your
enemies.
These five commands are the
foundation of battle.
Select/Place Your Characters
Once a battle begins, you must select the characters
to participate and their starting positions. Use the
L1/R1 buttons to scroll through your party, and the
directional buttons and the X button to dispatch the
selected character. Up to six characters may take part
in a battle. Once finished placing your characters,
press the START button to begin the battle.
STEP 2
BATTLE SYSTEM
[ Move ]
Move your character to the designated location. Use the
directional buttons to select a space and press the
X button to confirm. You may move anywhere highlighted
in blue, though the amount of AP used depends on the
current character and the distance moved. The red areas
indicate attack range from the destination, but will only be The AP requirements vary
shown if enough AP remains to attack. Also, by placing the depending on the character and
cursor on an enemy, you will move and attack at the same the area's topography.
time (provided you have the required AP).
[ Attack ]
The character will attack with his/her equipped weapon.
Select an enemy in the red area and press the X button to
attack. You may attack allies. Also, you may perform a
Team Attack if you have one equipped.
Each
character's
weapon
determines his/her method of
attack.
Variable Ranges
Normally, attack range is a single space adjacent to the
character in any direction. Bows and spears, however, [ Height and Attacks ]
have greater range--spears can reach two spaces in any Some weapons may not be able to
reach opponents at different heights.
direction, and bow range increases with height.
Close Range
Spear
Bow
[ Attacking Allies ]
If an ally is in range, you can attack
him or her just like an enemy. Be
careful, as you can do it by moving
"onto" allies as well. Also, Grey's
spear hits any targets two spaces in
the direction of his attack, so don't
accidentally kill a comrade.
29
BATTLE SYSTEM
BATTLE SYSTEM
Team Attacks
[ Skill ]
By equipping Team Attack Support Skills like Combo Slash,
you can have two or more allies gang up on opponent! You
can initiate Team Attacks as long as allies have the same
enemy in their Effect Zone (EZ).
Team Attack Conditions
1: Have a Team Attack skill (Combo) equipped.
2: Have remaining Team Attack stock.
3: Target an enemy in the EZ of several allies.
STEP 1
Equip a Team Attack Support Skill
Equip the Team Attack skill (Combo) on the Skill
Screen (p.21). Only allies with a Team Attack skill
equipped may participate in Team Attacks. In this
case, both Spero and Linea have "Combo Slash"
equipped.
STEP 2
Place Target in EZ of Participants
Move Spero and Linea toward the target, so he's in
both of their EZ. During either character's turn,
highlight Attack and press the right directional button
to select Team Attack. Now target the enemy.
STEP 3
Select Participants
When the screen on the right is displayed, select
which characters will participate in the attack (toggle
others OFF). In this case, only Grey and Adara are
participating...but up to six characters can perform a
Team Attack together. The numbers on the right
indicate the character's stock of Team Attacks. A
character with 0 stock cannot participate.
STEP 4
Commence Attack
After choosing the attacking characters, select
"Commence Attack" and press the X button. Any
participant can initiate the Team Attack--but only that
character will receive EXP and SP.
30
Team Attacks are extermely
powerful. Consider using them
against bosses.
Use any of the Action Skills you have equipped. Choose a
skill to use with the up and down directional buttons, then
confirm by pressing the X button. Then, select a target
(within range) with the cursor and press the X button to
perform the skill. Skill effects vary between the different
skills. Note that you can only use skills if the active
character has enough MP and AP.
Make good use of both attack
and recovery skills.
[ Item ]
Use any of the Items you have equipped. Choose an item
to use with the up and down directional buttons, then
confirm by pressing the X button. Then, select a target
(within range) with the cursor and press the X button to
use the item. You can use items on any characters nearby
the active character.
A character can only use items
he/she has equipped.
[ Finish ]
Select this command when the active character is finished
taking action. As the character waits for the next turn,
his/her AP will slowly refill until it reaches 100. You can
also adjust the character's SP after selecting Finish to
manipulate battle order.
Be wary of getting hit from
behind.
Adjusting AP
After selecting Finish, you can decide when the
character's next turn will be using the L1/L2/R1/R2
buttons. The R1/R2 buttons move the character up and
down in the battle order, while the L1/L2 buttons raise and
lower AP one point at a time.
Facing a Direction
After selecting Finish, there will be arrows above the
character. Use the directional buttons to decide which
direction the character should be facing, and confirm with
the X button. Getting hit in the back results in heavy
damage, so always try to face your opponents.
[ Finishing Up ]
The Finish command doesn't just
end your turn--it also allows you
to adjust AP and direction.
31
BATTLE SYSTEM
BATTLE SYSTEM
Before Moving
Level Up and Game Over
It's dangerous to move around without considering a
map's geography. A lot of different things factor into
movement.
As you continue battling, you will level up. Otherwise,
you'll receive a Game Over sooner or later.
[ Gaining EXP/SP ]
You gain Experience Points (EXP) and Skill Points (SP) by
attacking enemies and supporting allies. EXP allows you
to increase experience levels, and SP is for powering up
your characters. The amount of EXP and SP gained
depends on the action taken and the enemy's experience
level.
Stat changes will take place
immediately, in the midst of
battle.
[ Get the Lay of the Land ]
Examine the map before moving.
Press the 7 button to enter Scroll Map mode and press
the X button for information on the currently highlighted
space. You should be able to use the map details to your
advantage.
Geographical Effects
Each type of land has its own special effects. Check the
geography and select squares with high Evasion for
defensive positions and high Accuracy for attacking.
[ Leveling Up ]
When a character's EXP reaches 100, he/she will level up.
By leveling up, you increase a character's stats and
abilities. Act efficiently in battle to make the most of your
actions, as each one increases EXP.
[ Viewing Character Status ]
Placing the cursor on a character and pressing the X button
will display his or her status.
[ Game Over ]
Game Over occurs if any of the three things listed take
place. Also keep in mind that any character other than
Spero will have their Luck reduced when they are
defeated.
Zone Skill Icons
When characters enter the Effect Zone (EZ) of another
character, an icon will show up above his/her head.
Learn about opponents before
engaging them.
EZ Icons
Checking the Area
A Game Over Occurs if...
- Spero is defeated.
- All allies are turned to stone.
- A winning condition cannot be fulfilled.
Developing Characters Wisely
You gain EXP by fighting, but the character who
performs the finishing blow on an enemy will receive
the most. So allowing a strong character to weaken an
opponent, then finishing it off with a weaker character
is a good way to level up your party.
32
Selecting a character and pressing the 7 button will
display that character's movement range. Pressing the
7 button again will toggle between attack range and
EZ.
A helpful Zone Skill
A Harmful Zone Skill
A Zone Skill that
causes ailments.
Finding Items
Stepping on certain spaces in battle may reveal hidden
items. There's no way to know beforehand, so try
moving to suspicious looking areas.
33
BATTLE SYSTEM
POWERING UP
Your party will become stronger as they fight in many battles. Fostering character growth is
the quickest road to victory.
Attacking Basics
Attacking is a very basic offensive action, but it's also the
most versatile. Keep in mind, the enemy can always attack
you, too. It's important to plan ahead.
[ About Direction ]
The damage dealt when attacking depends on which side
of the enemy you attack. Attacking from the side raises
Accuracy and damage. Damage will be raised even higher
if you attack from behind. Move your characters carefully
so the enemy is always right where you want it.
Different Ways of Powering Up
Side
Back
Heavy Damage Moderate Damage
Your opponents will be stronger as the game progresses.
The Catacombs of Trial are an important way of training to
defeat more powerful enemies. There are, however,
several ways to increase your party's effectiveness.
[ Customize Your Character ]
Side
Front
Moderate Damage Low Damage
Leveling up isn't the only way to become stronger. Using
SP gained in battle, you can teach a character new skills
or raise specific stats manually.
[ Utilizing Height ]
Swords and Axes deal heavy damage, but have short
range and are affected by height. Spears and Bows have
longer range, but not as much power. It's important to use
altitude as a factor in attacking.
Bows
Bows have a wide
range, but by climbing
higher, the range will
increase even more.
Try to keep your
archers as high up as
possible.
[ Get Powerful Weapons ]
You can buy weapons at the Shop, but you'll earn even
more powerful ones from Quests. Fusions will also
result in stronger weapons than you can buy from the
Shop.
[ Keep the Party Balanced ]
New members will join the party as you progress
through the story. However, only a certain amount of
people are allowed in battle. If you aren't careful, a gap
will grow between the characters you favor in battle and
the weaker members. Use the Catacombs of Trial to
keep your entire party in fighting shape.
[ Increasing Rank ]
Spears
Spears can attack from above or below, though it's always
better to be on higher ground.
34
After certain conditions are met, you can raise your
character's rank and power him/her up. Not only will the
character's stats increase, but he/she will also learn
new skills and gain additional skill equip slots. Try to
achieve high ranks for all your characters.
35
CREDITS
LIMITED WARRANTY
Published by Atlus USA, Inc.
Executive Producer
Shinichi Suzuki
Product Manager
Sonoko Saito
Project Lead
Akibo Shieh
Project Coordinator
Hiroyuki Tanaka
Marketing Manager
Gail Salamanca
Translator
James Kuroki
Localization Editor
Tomm Hulett
Quality Assurance
Wayne Carter
Erik Chan
Carl Chen
Michael Manzanares
English Voice Production Services Provided by Elastic Media Corporation
Executive Producer
Rod Boaz
Executive Producer
Mike Eckart
Production Supervisor
JP Frid
Casting
Elisa Fiorillo
Voice Directors
Elisa Fiorillo
Marcus Junkin
Featuring the Voice Talents of:
Brett Baughman, Todd Boaz, Tom Darrow, Simone Elliot, Jen Finley, Elisa Fiorillo, Beth Ginett, Ted
Hartsook, Tomm Hulett, Rachel Kemp, Jeff Mitchell, Jeff Morgan, Scotty Myers, Tom Patrick, Jeanette
Phillips, Lee Rose, Akibo Shieh, Roger Craig Smith
Sound Engineer
Jeff Mitchell
Special Thanks
Eloy Productions
36
ATLUS, at its sole option, will refund, repair or replace at no charge any
defective ATLUS products within ninety (90) days of purchase with proof
of purchase date, so long as the defect is not caused by misuse and
neglect of the purchaser. EXCEPT FOR THE FOREGOING LIMITED
WARRANTY, ALL EXPRESS, IMPLIED AND STATUTORY WARRANTIES,
INCLUDING WARRANTIES OF MERCHANTABILITY, FITNESS FOR A
PARTICULAR PURPOSE AND NONINFRINGEMENT OF PROPRIETARY
RIGHTS, ARE EXPRESSLY DISCLAIMED. ATLUS SHALL NOT BE LIABLE
FOR ANY DIRECT, INDIRECT, INCIDENTAL, CONSEQUENTIAL OR OTHER
DAMAGES, EVEN IF DAMAGES RESULT FROM THE USE OF ATLUS
PRODUCTS IN ACCORDANCE WITH ATLUS manual instructions. In some
jurisdictions, some of the foregoing warranty disclaimers or damage
limitations may not apply.
Repair/Service After Expiration of Warranty
If your ATLUS product requires repair after expiration of the 90-day
Limited Warranty Period, you may contact the Customer Service
Department at the number listed below. You will be advised of the
estimated cost of repair and the shipping instructions.
ATLUS Customer Service Department/Technical Support Line:
(949) 788-0353
Call this number for help in operating our products or for general product
questions. Representatives are available Monday - Friday, 9:00 am to
5:30 pm Pacific Time.
GAME HINTS!
Visit our web site at www.atlus.com and click on the “Support” link to
see helpful hints that can help you master Stella Deus: The Gate of
Eternity.


![Zoria RPG System [v0.3.5.65 Amber Release] (4.2MB PDF)](http://vs1.manualzilla.com/store/data/005863942_1-9b91ecb9cab405b7a5ed4ce5145d0e9c-150x150.png)
![[v0.3.5.63 Blue Release] (4.17MB PDF)](http://vs1.manualzilla.com/store/data/005758602_1-69f3b29a9a050ef0b6d8d37fccf12e09-150x150.png)