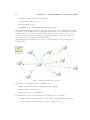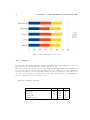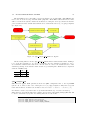
1
Quick deployment network using MANET
Pau Escrich Garcia
January 2012
Acknowledgements
Thanks to:
Leandro Navarro for the global revision of the document
Roger Baig for the technical help
Axel Neumann for the great job done with BMX6 and the technical support
Dario Garcia for the language corrections
Anna Juan for the language correction and moral support
The QMP team for the great job done during this year
The Guifi.net project, just for being so amazing
4
Contents
1 Introduction
1.1 Scope/Objectives . . . . . . . . . . . . . . . . . . . . . . . . . . . . . . . . . . . .
1.2 Organization of this document . . . . . . . . . . . . . . . . . . . . . . . . . . . .
1
1
1
2 State of art
2.1 Centralized and static networks . . . . . . .
2.2 Decentralized and flexible networks . . . . .
2.3 The need of decentralized networks . . . . .
2.3.1 Free Wireless Community Networks
2.3.2 Mesh and MANET networks . . . .
.
.
.
.
.
.
.
.
.
.
.
.
.
.
.
.
.
.
.
.
.
.
.
.
.
.
.
.
.
.
.
.
.
.
.
.
.
.
.
.
.
.
.
.
.
.
.
.
.
.
.
.
.
.
.
.
.
.
.
.
.
.
.
.
.
.
.
.
.
.
.
.
.
.
.
.
.
.
.
.
.
.
.
.
.
.
.
.
.
.
.
.
.
.
.
.
.
.
.
.
.
.
.
.
.
3
3
4
4
5
6
3 Quick Mesh Project
3.1 General overview . . . . . . .
3.1.1 Quick deployments . .
3.1.2 Network communities
3.2 Funding . . . . . . . . . . . .
3.3 Tasks and budget . . . . . . .
3.4 My contribution . . . . . . .
.
.
.
.
.
.
.
.
.
.
.
.
.
.
.
.
.
.
.
.
.
.
.
.
.
.
.
.
.
.
.
.
.
.
.
.
.
.
.
.
.
.
.
.
.
.
.
.
.
.
.
.
.
.
.
.
.
.
.
.
.
.
.
.
.
.
.
.
.
.
.
.
.
.
.
.
.
.
.
.
.
.
.
.
.
.
.
.
.
.
.
.
.
.
.
.
.
.
.
.
.
.
.
.
.
.
.
.
.
.
.
.
.
.
.
.
.
.
.
.
.
.
.
.
.
.
9
9
10
10
11
11
13
.
.
.
.
.
.
.
.
.
15
15
15
17
18
18
18
19
20
21
.
.
.
.
.
.
.
.
.
.
.
.
.
.
.
.
.
.
.
.
.
.
.
.
.
.
.
.
.
.
4 Small research in Battle of Mesh
4.1 The Battle of Mesh . . . . . . . . . . .
4.2 Testbed . . . . . . . . . . . . . . . . .
4.3 Protocols . . . . . . . . . . . . . . . .
4.3.1 Technical details or our testbed
4.4 Results . . . . . . . . . . . . . . . . . .
4.4.1 Nodes seen . . . . . . . . . . .
4.4.2 Successful pings . . . . . . . . .
4.4.3 Latency . . . . . . . . . . . . .
4.5 Conclusions fro the tests . . . . . . . .
i
.
.
.
.
.
.
.
.
.
.
.
.
.
.
.
.
.
.
.
.
.
.
.
.
.
.
.
.
.
.
.
.
.
.
.
.
.
.
.
.
.
.
.
.
.
.
.
.
.
.
.
.
.
.
.
.
.
.
.
.
.
.
.
.
.
.
.
.
.
.
.
.
.
.
.
.
.
.
.
.
.
.
.
.
.
.
.
.
.
.
.
.
.
.
.
.
.
.
.
.
.
.
.
.
.
.
.
.
.
.
.
.
.
.
.
.
.
.
.
.
.
.
.
.
.
.
.
.
.
.
.
.
.
.
.
.
.
.
.
.
.
.
.
.
.
.
.
.
.
.
.
.
.
.
.
.
.
.
.
.
.
.
.
.
.
.
.
.
.
.
.
.
.
.
.
.
.
.
.
.
.
.
.
.
.
.
.
.
.
.
.
.
.
.
.
.
.
.
.
.
.
.
.
.
.
.
.
.
.
.
.
.
.
.
.
.
.
.
.
.
.
.
.
.
.
ii
5 Routing protocol for QMP
5.1 Inside BMX6 . . . . . . . . . .
5.1.1 Originator Messages . .
5.1.2 Protocol data structure
5.1.3 SMS and JSON plug-in
CONTENTS
.
.
.
.
.
.
.
.
.
.
.
.
.
.
.
.
.
.
.
.
.
.
.
.
.
.
.
.
.
.
.
.
.
.
.
.
.
.
.
.
.
.
.
.
.
.
.
.
.
.
.
.
.
.
.
.
.
.
.
.
.
.
.
.
.
.
.
.
.
.
.
.
.
.
.
.
.
.
.
.
.
.
.
.
.
.
.
.
.
.
.
.
.
.
.
.
.
.
.
.
.
.
.
.
.
.
.
.
.
.
.
.
23
24
24
25
26
6 OpenWRT a basis for QMP
6.1 Brief introduction to OpenWRT
6.2 Why OpenWRT? . . . . . . . . .
6.3 QMP as part of OpenWRT . . .
6.4 QMP main packages . . . . . . .
6.4.1 qmp-small-node . . . . . .
6.4.2 qmp-big-node . . . . . . .
.
.
.
.
.
.
.
.
.
.
.
.
.
.
.
.
.
.
.
.
.
.
.
.
.
.
.
.
.
.
.
.
.
.
.
.
.
.
.
.
.
.
.
.
.
.
.
.
.
.
.
.
.
.
.
.
.
.
.
.
.
.
.
.
.
.
.
.
.
.
.
.
.
.
.
.
.
.
.
.
.
.
.
.
.
.
.
.
.
.
.
.
.
.
.
.
.
.
.
.
.
.
.
.
.
.
.
.
.
.
.
.
.
.
.
.
.
.
.
.
.
.
.
.
.
.
.
.
.
.
.
.
.
.
.
.
.
.
.
.
.
.
.
.
.
.
.
.
.
.
.
.
.
.
.
.
.
.
.
.
.
.
27
27
28
28
29
30
30
7 Inside the qMp development
7.1 The IP structure . . . . . . . . .
7.1.1 ULA addresses . . . . . .
7.1.2 IANA addresses . . . . .
7.1.3 IPv4 addresses . . . . . .
7.2 The interfaces structure . . . . .
7.2.1 Mesh interfaces . . . . . .
7.2.2 LAN interfaces . . . . . .
7.2.3 WAN interface . . . . . .
7.2.4 NIIT 4to6/6to4 interfaces
7.2.5 BMX6 tunnel interfaces .
7.2.6 An example of interfaces .
7.3 UCI qmp configuration file . . . .
7.3.1 Node configuration . . . .
7.3.2 Interfaces . . . . . . . . .
7.3.3 Networks . . . . . . . . .
7.3.4 Wireless . . . . . . . . . .
7.3.5 Tunnels . . . . . . . . . .
7.4 Autoconfiguration system . . . .
7.4.1 Wireless . . . . . . . . . .
7.4.2 Network . . . . . . . . . .
7.5 Management tools . . . . . . . .
7.5.1 Web Interface . . . . . . .
7.5.2 Shell tools . . . . . . . . .
.
.
.
.
.
.
.
.
.
.
.
.
.
.
.
.
.
.
.
.
.
.
.
.
.
.
.
.
.
.
.
.
.
.
.
.
.
.
.
.
.
.
.
.
.
.
.
.
.
.
.
.
.
.
.
.
.
.
.
.
.
.
.
.
.
.
.
.
.
.
.
.
.
.
.
.
.
.
.
.
.
.
.
.
.
.
.
.
.
.
.
.
.
.
.
.
.
.
.
.
.
.
.
.
.
.
.
.
.
.
.
.
.
.
.
.
.
.
.
.
.
.
.
.
.
.
.
.
.
.
.
.
.
.
.
.
.
.
.
.
.
.
.
.
.
.
.
.
.
.
.
.
.
.
.
.
.
.
.
.
.
.
.
.
.
.
.
.
.
.
.
.
.
.
.
.
.
.
.
.
.
.
.
.
.
.
.
.
.
.
.
.
.
.
.
.
.
.
.
.
.
.
.
.
.
.
.
.
.
.
.
.
.
.
.
.
.
.
.
.
.
.
.
.
.
.
.
.
.
.
.
.
.
.
.
.
.
.
.
.
.
.
.
.
.
.
.
.
.
.
.
.
.
.
.
.
.
.
.
.
.
.
.
.
.
.
.
.
.
.
.
.
.
.
.
.
.
.
.
.
.
.
.
.
.
.
.
.
.
.
.
.
.
.
.
.
.
.
.
.
.
.
.
.
.
.
.
.
.
.
.
.
.
.
.
.
.
.
.
.
.
.
.
.
.
.
.
.
.
.
.
.
.
.
.
.
.
.
.
.
.
.
.
.
.
.
.
.
.
.
.
.
.
.
.
.
.
.
.
.
.
.
.
.
.
.
.
.
.
.
.
.
.
.
.
.
.
.
.
.
.
.
.
.
.
.
.
.
.
.
.
.
.
.
.
.
.
.
.
.
.
.
.
.
.
.
.
.
.
.
.
.
.
.
.
.
.
.
.
.
.
.
.
.
.
.
.
.
.
.
.
.
.
.
.
.
.
.
.
.
.
.
.
.
.
.
.
.
.
.
.
.
.
.
.
.
.
.
.
.
.
.
.
.
.
.
.
.
.
.
.
.
.
.
.
.
.
.
.
.
.
.
.
.
.
.
.
.
.
.
.
.
.
.
.
.
.
.
.
.
.
.
.
.
.
.
.
.
.
.
.
.
.
.
.
.
.
.
.
.
.
.
.
.
.
.
.
.
.
.
.
.
.
.
.
.
.
.
.
.
.
.
.
.
.
.
.
.
.
.
.
.
.
.
.
.
.
.
.
.
.
.
.
.
.
.
.
.
.
.
.
.
.
.
.
.
.
.
.
.
.
.
.
.
.
.
.
.
.
.
.
.
.
.
.
.
.
.
.
.
.
.
.
.
.
.
.
.
.
.
.
.
.
.
.
.
.
.
.
.
.
31
33
34
35
35
36
36
36
36
37
37
37
39
39
39
39
40
41
42
42
45
46
46
46
8 Getting the QMP firmware
49
8.1 SDK for QMP . . . . . . . . . . . . . . . . . . . . . . . . . . . . . . . . . . . . . 49
9 Experience and conclusions
51
Bibliography
53
Glossary
55
CHAPTER
1
Introduction
1.1
Scope/Objectives
The main purpose of QMP (Quick Mesh Project) is to provide an open and free software
solution for the quick deployment of a WiFi network based on Mesh/MANET technology. For
an accurate explanation,look chapter 3.
The objective of this document is to collect the principal decisions (why and how) taken
during the development of the project QMP. Also it tries to be a starting point for all people
who want to become involved in the technical aspects of it. However these issues are shown from
a general point of view because most of them can be found documented in other places. We
are only detailing some points, which are considered the most important ones, directly related
and owned by QMP. The idea of this document is that if does not end here, but is extended
and improved when system evolves.
1.2
Organization of this document
The chapter 2 (State of art) explains the current state of the related points regarding to this
project and the need of building a system like QMP. It introduces some important concepts
that the reader should know before starts with the next chapters.
Chapter 3 describes the general aspects of QMP: how, why and where was it born. The
tasks/budget specification and the job I did within the project.
The two following chapters, 4 and 5, are focused in the decision of the routing protocol
(listing and testing some of them). There is a detailed view of the selected one.
Chapter 6 is referring to another important decision which drove the direction of the development: the operating system used as a basis. In this chapter are also explained some technical
points regarding the integration between our software and this operating system.
Chapters 7 and 8 are more technical and focused to the people interested in QMP details
that could be used to get involved in the project. Decisions are also explained so it could be
interesting in the research environment as well.
1
2
CHAPTER 1. INTRODUCTION
Finally in 9 I explain my experience and conclusions of the work done during the development
of the project.
CHAPTER
2
State of art
2.1
Centralized and static networks
First of all must be clarified what we understand when speaking about centralized. We are
not specifically referring to the physical infrastructure or routing management. We are talking
about the global structure, viewed from a higher abstraction layer.
Nowadays most of networks are deployed using a centralized topology. It means that it
exists one node which has the special role to organize the rest. Let’s call this kind of node
Master. The other nodes are following his instructions, so let’s call these other nodes Slaves.
An example of this is the standard WiFi network used by most of internet end users in their
houses (figure 2.1(a)).
(a) Centralized network with one master
A centralized network can have multiple Master nodes, each one organizing his own slaves.
Even if master nodes are connected through an horizontal topology the whole network is still
being centralized because it is mainly centralized. A good example is the global network Internet
where the Masters (Autonomous Systems) are connected horizontally speaking BGP. But the
end-clients (Slaves) are in a second (third, fourth or more) layer knowing nothing about the
other layers which ara managed by Masters.
3
4
CHAPTER 2. STATE OF ART
(b) Centralized network with multiple masters
A centralized network normally is also a static network. Static means that nodes, at least
the master ones, are always in the same place doing the same job. Each one has his own specific
configuration, so the deployment of it must be thought in advance. This kind of networks are
a good solution for a long term system in a non changing environment.
2.2
Decentralized and flexible networks
A decentralized (or non-centralized) network is the one where all nodes have the same role.
Neither master nor slaves, just participants. A very explicit example is the neural network of
our brain, where all neurons are in the same level broadcasting information to their neighbours.
However, when speaking about centralized we are referring to structure. In a horizontal network
can also appear a centralized behavior product of, for instance, an internet uplink. If all nodes
from the network want to access internet using the same uplink node, it will operate like a
Master. Anyway the network keeps being decentralized because of the structure and not the
internal operation. But these cases should not be welcome by the network users/administrators,
because they are losing part of the benefits offered by this kind of structure.
Flexible means (as opposed of static) that the network can be frequently physically changed
and the proper functioning is not affected. Existing nodes can move and new ones can be added
without the need of changing anything. This property is normally linked to a decentralized
structure.
2.3
The need of decentralized networks
Decentralized structures can be useful in networks based on IEEE 802.11 standards, commonly
know as WiFi. Unlike most of cabled networks, WiFi networks are continuously changing.
The physical infrastructure is not dedicated to data transmission, consequently any external
agent can change its properties (a building, a tree, the rain or even a bird). If the network
administrator is giving all the control to one or more nodes (Masters), and some external
agent changes the topology affecting one of these nodes, the performance of the network will
be affected. That is why a non-centralized structure could be useful in an outdoor WiFi
environment. See figure 2.1(c).
Another important point to take into account is the freedom. Freedom in networking means
mainly two things. First one, the lack of an artificial restriction to participate in the network.
Second one, the network is content-neutral ergo nobody can prioritize/discriminate traffic according the data content or the user owner of this data. In a Master/Slave structure, even if
2.3. THE NEED OF DECENTRALIZED NETWORKS
5
(c) Centralized VS Decentralized in a outdoor WiFi environment
the network is declared free, the freedom can be easy violated. Since even if it is controlled by
some few nodes which have the power to do so, in this kind of environment it is important to
implement a non-centralized structure.
Two scenarios have been exposed where decentralized networks might be required:
1. In a changing link layer environment like WiFi.
2. In a free network, to ensure the freedom of the network.
Those two scenarios fit perfectly in a environment which, in last years, has experimented a
significant growth in the telecommunications world: the Free Wireless Community Networks,
shown in chapter 2.3.1.
2.3.1
Free Wireless Community Networks
A community network is a network made and maintained by the same participants. Unlike
the model used by the global telecommunication companies (which are business-focused), each
user is owner of his stretch following the philosophy make-it-yourself. Using some agreements
and organizations (e.g web site) they are able to connect with neighbours, neighbours of the
neighbours and so on. These communities are normally open and free, in the sense explained
in section 2.3. Most of them are using WiFi technology because it is the easiest and cheapest
way to deploy an outdoor network.
This model, named Free Wireless Community Network (FWCN), is nowadays being used in
many places and is growing every day. Probably one of the main reasons of this growth is the
governments policy, which day by day tries to control the Internet and the connections within
it. An example of this is the cut of communications made in Egypt during the 2011 revolution,
6
CHAPTER 2. STATE OF ART
or the SOPA1 bill currently being discussed in the USA. A community network is owned by the
users, the government is not able to control it.
One of the biggest FWCN in Europe is Guifi.net2 . It was born on a rural village of Catalonia
in 2004. Currently Guifi.net has more than 15.000 working nodes and 26.000 kilometers of
wireless links. It is mainly operating in Catalonia but the project is open to anybody from any
place around the world.
(d) Guifi.net Catalonia area map of links in January 2012
As described before, decentralized is a structure which fits perfectly in this FWCN environment. However it is hard to find a software/hardware solution for these networks because the
companies are normally not interested in it due to the lack of classic business opportunities.
That is why most part of the development is made by open hacker communities, working in
Mesh protocols and MANET systems.
2.3.2
Mesh and MANET networks
In this section we are going to introduce Mesh/MANET networks, to see them in detail check
the external documents [14] [18]
Strictly speaking, a Mesh network is one where all nodes (participants) are routers, meaning
that all the nodes accept and forward packets from other nodes according to the routing rules.
Thanks to this property the physical topology of the network is only restricted by the need
of all nodes to be connected through at least one link. To be able to use any participant as
router, a coordinating system is needed. This must be flexible and automatic way to ensure
the stability and scalability of the network. Here is where dynamic routing protocols become
important, see chapter 5 for more details.
1 Stop
Online Piracy Act: http://en.wikipedia.org/wiki/Stop Online Piracy Act
2 http://www.guifi.net
2.3. THE NEED OF DECENTRALIZED NETWORKS
7
MANET (Mobile Ad-Hoc Network) is a network with Mesh properties using 802.11 AdHoc mode as link layer. Thanks to that, mobility is allowed, nodes can be in movement and
frequently switched on/off without problems. It is clear that when speaking of decentralized and
flexible networks we are actually referring to MANET networks. It is not the only technology
to do so but it is the most widely used and supported.
8
CHAPTER 2. STATE OF ART
CHAPTER
3
Quick Mesh Project
3.1
General overview
The QMP project was drafted by Guifi.net active members during year 2010. They did not start
from scratch, since the idea of this project was based on another project started in 2003 by some
networking folks from Gracia district, in Barcelona (GSF1 ). GSF people started working with
the first Wifi routers which allowed the installation of some Linux distribution, to build their
own free outdoor wireless network. After a few years, this small network joined to Guifi.net
project, which was expanding quite fast within the Catalonia region. Unlike most Guifi.net
parts, GSF uses Mesh routing protocols and ad-hoc mode as link layer.
In 2009 a new need appeared. An organization asked Guifi.net members to cover a big public
demonstration which took place in Barcelona, it was named ”the first 2.0 demonstration”. In
this scenario the most efficient deployment was a flexible network, so GSF folks adapted their
software to cover it. After that, more people, companies, associations and also some political
parties were asking for the same kind of deployment to cover their events. However GSF
software was not designed to be used in this scenario, but to be used in a wireless community.
So some members of GSF and Guifi.net decided to start a new project thinking in this new
scenario.
The straight answer to the question what is QMP? : an operating system (firmware) for
embedded network devices. But to understand it, maybe it is better to see what it provides:
• an easy way to deploy a Mesh/MANET network.
• a quick and easy way to extend an Internet uplink to end users.
QMP has been developed thinking in two different scenarios. To achieve quick deployments
and to be used in wireless network communities.
1 Gracia
Sense Fils: http://graciasensefils.net
9
10
CHAPTER 3. QUICK MESH PROJECT
Figure 3.1: QMP logo
3.1.1
Quick deployments
A quick deployment means a scenario where a network must be created as fast as possible with
the minimum requirements. Some examples are: concerts, meetings, demonstrations or natural
disasters. There are three requirements that we define mandatory for a quick deployment.
1. the deployment must be performed as fast as possible.
2. it must be able to be done by non-technical people.
3. it must be possible in most situations.
To accomplish these points QMP is using the following technologies:
1. a mobile ad-hoc network (MANET) with dynamic routing protocol.
2. an out-of-the-box system, where each node configures itself automatically.
3. 802.11 (WiFi) technology, so no cables or any other infrastructure is needed.
For instance, to extend an Internet uplink, all what people need to do is to spread the nodes
and connect at least one to the Internet for all the rest to have access as well.
3.1.2
Network communities
One of the most important points for a network community is the freedom, in this case it means
the lack of restrictions. Unfortunately that is not totally possible due to the need, for instance,
of hardware and electricity needs and, in the current societies, people need money to have them.
But network community users are constantly working to have as less restrictions as possible, to
build a system which anybody, with technical knowledge or not, is able to install and use. In
this regard, QMP is providing an out-of-the-box solution, easy and free, for outdoor Wireless
deployments.
Nowadays there are some communities which have developed their own software and which
has been working for several years. But there is an important point that will change the current
scenarios and will leave some of these systems deprecated: the IP protocol version 6 (IPv6).
QMP provides native IPv6 support, as we will see it in the following chapters.
3.2. FUNDING
3.2
11
Funding
Most of this kind of projects are freely contributed, people do it just because they believe in
it and enjoy working on it. However a budget of money is always appreciated because new
hardware can be purchased and developers are able to devote more time to it. The QMP
project draft was sent to a competition organized by puntCat Foundation2 , the .cat top level
domain managers, asking for projects which pushed the social telecommunications. To try to
satisfy some of those economic needs, QMP was presented with the title System to cover quick
deployments and it was one of the seven winners. A budget of fifteen thousand Euros was given
to the project for spend in one year according the project details (see 3.3).
The money obtained from puntCat Foundation covers the development of the software for
quick deployments and the purchase of eight new nodes. To make it self sustainable after the
funded year, the idea is to rent the nodes to anyone who need them. The price depends on who
is asking for it, and they might be free for non-profit entities.
One important point to consider is that QMP is more than what was described in the draft
sent to the puntCat competition. In it the money will only cover the quick deployment, but
QMP is also (as described in 3.1.2) a system for Wireless Communities. Funding is not covering
this part.
Figure 3.2: PuntCat foundation logo
3.3
Tasks and budget
This data has been obtained from the original project presented to puntCat competition. It
details tasks to accomplish and the budget solicited. Note that the only expenses are for hired
people and hardware. Since we are using always free software we do not spent money on this.
Tasks List of tasks to perform during the project duration. They are distributed in four
different roles:
• Director (Dir): Director of the project, his scope is coordinate the group and contact
periodically with puntCat.
• Responsible (Res): Responsible must help the director with his tasks.
• Developer (Dev): In charge of building software and hardware.
• Documentor (Doc): In charge of performing needed documentation.
In each task it is shown the amount of work (percent) assigned to each role.
2 http://domini.cat
12
CHAPTER 3. QUICK MESH PROJECT
Development phase
1. Describe characteristics (Dir 75%, Res 25%)
2. Hardware selection (Dir 25%, Dev 75%)
3.Software development (Dir 10%, Dev 90%)
4.Partial tests (Dir 25%, Dev 75%)
5.Global tests (Dir 25%, Dev 75%)
6.Tests in real environment (Dir 25%, Dev 75%)
1.1
1.2
1.3
2.1
Hardware
Software
Documentation
Choose the hardware to use
3.1 Personalize OpenWRT Linux distribution
3.2 Develop specific functionalities
3.2.1 Auto-configuration system
3.2.2 Network integration (Mesh/MANET)
3.2.3 Tools for node management
3.2.4 Tools for internet uplink management
4.1 For each node
4.2 Fix detected problems
5.1 Build hardware and install software
5.2 Perform stress tests
5.3 Fix detected problems
6.1 Fix detected problems
Documentation phase
1. Project documentation (Dir 75%, Doc 25%)
2. User manual (Dir 10%, Doc 90%)
3. Administrator manual (Dir 10%, Doc 90%)
Broadcasting phase
1. Lecture for interested people (Dir 50%, Res 50%)
2. Mailing lists for users and developers (Dir 10%, Doc 90%)
3. Web site (Dir 50%, Dev 50%)
Budget The budget needed to perform the project. Note that Director and Responsible are
volunteers, so they are not getting any money from this budget.
Reason
Director
Responsible
Developer
Documentor
Hardware
Association
Total:
Description
102h - 0e/h
46h - 0e/h
413h - 15e/h
254h - 12e/h
8 nodes - 423e/node
Taxes (18% VAT)
Amount
0e
0e
6195e
3048e
3384e
2306.34e
14933.34e
3.4. MY CONTRIBUTION
3.4
13
My contribution
In the last three years I have been working as volunteer for the Guifi.net project (Wireless
Community), mainly in my current district Sants from Barcelona. I started, with some other
people, a new project called GuifiSants.net to bring the Guifi.net coverage to the district (nonexistent before). To do it, we decided to use Mesh/MANET structure using the firmware
developed by the GSF folks. That’s how I started to work in this kind of networks.
I have been involved in the project QMP from the beginning (November 2010), but not in
project drafting. I was one of the three developers and I contributed in some documentation
tasks. Specifically I have been focused mainly in the next points:
• auto-configuration system
• web management interface
• shell management tools
• software development kit
• hardware nodes building
• technical documentation
But the most important work (from my point of view) has been the decision making. The
organization of work during the project execution has been totally horizontal, so all involved
people have been able to participate in all decisions taken. We have had several meetings and
mail exchanges discussing about all points related with the project.
Currently the funded project has been finished (we deliver the results to puntCat managers),
but I, and the rest of involved people, are still working on it. Our idea is to use the firmware
in our Wireless Communities and maintain it for anyone who needs it leaving the code and
compiled images available in our web site (http://qmp.cat).
14
CHAPTER 3. QUICK MESH PROJECT
CHAPTER
4
Small research in Battle of Mesh
4.1
The Battle of Mesh
From the official Wireless Battle of Mesh website1
”The Wireless Battle of the Mesh is an event that aims at bringing together
people from across Europe to test the performance of different routing protocols
for ad-hoc networks, like Babel, B.A.T.M.A.N., BMX, OLSR, and Static Routing.
It is a tournament with a social character. If you are a mesh networking
enthusiast, community networking activist, or have an interest in mesh networks
you might want to check this out!
The goal of the WirelessBattleMesh events is to set-up hands-on testbed for each
available mesh routing protocol with a standard test procedure for the different
mesh networks. During the different WBM events, similar hardware and software
configuration will be used based on the OpenWRT BoardSupportPackage and
packages for each protocol implementation. The WBM events are also a great
opportunity to develop testing tools for PHY/MAC radio layers (drivers, scripts
and PHY analyzers).
Is clear that this event has a lot of points related with QMP. In fact one of QMP members
was the organizer of the four edition of it in March 2011. There we met with developers of the
most important mesh routing protocols in Europe. I took the opportunity to perform a small
research about the different protocols.”
4.2
Testbed
In our scenario, there are a total of 33 nodes (routers) distributed randomly inside a big
complex (near 2000 square meters) with the following specifications:
1 http://battlemesh.org
15
16
CHAPTER 4. SMALL RESEARCH IN BATTLE OF MESH
• Hardware: Fonera 2100 and Fonera 2200
• One 2.4Ghz (802.11bg) radio
• One Fast Ethernet port
• OpenWRT as operating system with all needed software
The testbed wireless network is under bad conditions, because we are using the same channel
for all devices, the hardware is not powerful (we are using five protocols in each node so CPU
is always busy), and the radio/antenna is designed for indoor use, then the connection
between nodes placed far away is quite bad. However this is not a bad point because the
protocols are forced to use their best functionalities.
The tests have been performed from one host to all network hosts, as shows the testbed
scenario image.
Figure 4.1: Battle of Mesh testbed scenario
We will use the following notation to identify the nodes
• Main node: The central node (which performs the pings)
• Node: The rest of the nodes
• N: Total of nodes seen by Main node
From the Main node we are performing the following probes for each Node
1. 50 pings with an interval of 0.1ms to get the neighbours ARP (this is not stored).
2. 5 tests of 20 pings with an interval of 0.2ms to destination node.
4.3. PROTOCOLS
17
The average latency of the 20 pings for each probe is stored. If no reply recived, a 0 is stored.
Then the amount of data collected for each test is: 5∆N
We have done a total of 3 tests, identified by the start hour:
1. T519 (05:19)
2. T630 (06:30)
3. T744 (07:44)
As can be seen, every test needs near one hour to finish.
4.3
Protocols
There are a lot of mesh protocols and a lot of different flavors. However in Battle of Mesh are
only participating the most active ones where at least one developer is present in the event.
They are the next with a brief description.
OLSR (Optimized Link State Protocol)
It is based on the RFC 3626 by IETF. We are using the implementation of olsr.org website,
the one used in most Wireless Communities. The protocol is link-state, pro-active and uses
two different packets (HELLO and TC) to discover and disseminate the network topology
information, so it means that each node knows the entire state of the network.
Babel (a loop-avoiding distance-vector routing protocol)
One of the youngest protocols, is recently defined in RFC 6126 by Juliuz Chroboczek who is
nowadays also the main developer. It is mainly designed for mobile networks, solving
problems like routing loops (very present in OLSR). Link quality is got from IEEE 802.11
MAC, so it means a special design also for Wireless networks. It is based on the ideas in
DSDV[3], AODV[1] and Cisco’s EIGRP[6].
BATMAN (Better Approach To Mobile Adhoc Networking)
It was born on Freifunk community as a substitute of OLSR with the objective of being easy,
small and as fast as possible. Unlike OLSR it is, like Babel, a distance-vector protocol instead
of link-state, and is using only one kind of messages (OGM) to discover neighbours. So it
means that BATMAN is not trying to determinate the whole state of the network, each node
only knows the first step (hop) of the entire path to find another node.
Currently the implementation of BATMAN seems to be deprecated.
Batman-adv (a layer 2 protocol)
This is probably the most different protocol because it is operating on MAC layer 2. It can be
imagined like a big smart virtual switch where all nodes are connected together. Nowadays it
is included on kernel as a module, so to use it we just need to load the module and use brctl
userspace tool to control it. Currently the development is managed by Marek Linder, one of
the BATMAN originators.
18
CHAPTER 4. SMALL RESEARCH IN BATTLE OF MESH
BMX6 (BATMAN experimental version 6)
It is based on the code of BATMAN 0.3, but now in the version 6 it is totally rewrote.
Initially it was a branch of BATMAN maintained by Axel Neumann with some improvements
in the routing algorithm. It is probably the most close protocol to the original BATMAN,
using UDP flood to discover neighbours and avoiding link-state idea. Some extra features
have been developed, like a short text message plugin which permits to send any information
to the rest of nodes using the same routing packages (OGM).
4.3.1
Technical details or our testbed
All nodes have installed and configured a total of 5 routing protocols, each of them running in
a different networking range
Batman
10.10.101.0/24
Babel
10.10.102.0/24
OLSR
10.10.103.0/24
Batman-adv
10.10.104.0/24
BMX6
10.10.105.0/24
We classify the protocols in two diferent groups:
• A: Babel, OLSR, BMX6
• B: Batman, Batman-adv
That is because the group B is not using Ethernet interface, then according our scenario, the
total number of nodes that can be seen by group B is 25 (instead of 33 seen by group A).
The command used to perform pings is the next:
ping -c 20 -i 0.2 Host -q -W1 -s64
4.4
4.4.1
Results
Nodes seen
There are 33 nodes for group A and 25 for group B. However not all of them are always
reachable, maybe they appear in the description but the connection is not possible because the
path is impossible or they are not using the best one. To probe that, we are performing 50 pings
for each node, if there are not at least one reply we consider that this nodes is not reachable
from the Main node.
In the next table we can see the total amount of nodes seen for each protocol.
Protocol
Babel (A)
OLSR (A)
BMX6 (A)
Batman (B)
Batman-adv (B)
T519
18
23
26
15
24
T630
22
24
27
19
20
T744
20
28
28
18
23
Remember that there are two different groups (A and B) so to compare all protocols we
should use the relation between available and seen nodes (percent) as shown in the next table:
4.4. RESULTS
Protocol
Babel (A)
OLSR (A)
BMX6 (A)
Batman (B)
Batman-adv (B)
19
Available nodes
33
33
33
25
25
T519
55%
70%
79%
60%
96%
T630
67%
73%
82%
76%
80%
T744
61%
85%
85%
72%
92%
Figure 4.2: Relation between nodes available and seen (more is better)
4.4.2
Successful pings
We are only considering the nodes seen. One successful ping means at least 1 ping reply from 20
(each probe). It could be translated like: To the total amount of nodes seen for each protocol,
how stable is the communication with it
The numbers are percent, the relation between nodes seen and successful pings.
Protocol
Babel (A)
OLSR (A)
BMX6 (A)
Batman (B)
Batman-adv (B)
T519
97.78
96.52
98.46
94.67
100
T630
88.18
97.5
100
89.47
97.04
T744
94.00
94.29
98.57
100
94.57
20
CHAPTER 4. SMALL RESEARCH IN BATTLE OF MESH
Figure 4.3: Successful pings (more is better)
4.4.3
Latency
Latency is the time delay between the packet send and the reply using ICMP protocol. It can
give us an idea about how fast is the connexion between nodes.
We observed that some times the latency is very high, something like 2000 or more milliseconds
for some nodes placed far away from the Main node. So to compare it, we only consider the
nodes seen by all protocols of a group (all of them). Because in general the nodes only seen by
one or two protocols have a very big latency, and consider them would be a disadvantage for
the protocols which are able to see those nodes.
Results are in milliseconds (ms).
Protocol
Babel (A)
OLSR (A)
BMX6 (A)
Batman (B)
Batman-adv (B)
T519
89
221
62
45
39
T630
137
40
131
164
37
T744
110
86
56
81
39
4.5. CONCLUSIONS FRO THE TESTS
21
Figure 4.4: Latency by protocol (less is better)
4.5
Conclusions fro the tests
There is not a clear conclusion about this test and it can just give us a small idea about how
the protocols are working. More kind of probes are needed to have relevant conclusions, for
instance a persistent transport protocol like TCP should operate different, we are using only
ICMP packets.
Also, as can be seen for each test the results are quite different, it means that the environment is
changing very fast and we are performing tests in serial (one after the other) for each protocol.
Another important thing in mesh networks that we are not considering is the mobility, our
testbed is an static testbed, and many of these protocols have implemented interesting features
for a mobile environment.
However some patterns can be shown in the results. In nodes seen is clear that BMX6
and Batman-adv have the best results. The average number of nodes seen (percent) for each
one is 82% and 89% respectively, quite higher than the rest. And also the communication
between nodes seems to be very stable, the average for BMX6 is 99% and for Batman-adv
97% (it is deduced from successful pings probe). We have to consider than the scenario is very
complicated for communication, this good numbers are a proof that these mesh protocols have
a good implementation and they can operate in a very bad conditions.
Also do not forget about OLSR, his numbers are close to BMX6 ones.
22
CHAPTER 4. SMALL RESEARCH IN BATTLE OF MESH
CHAPTER
5
Routing protocol for QMP
The routing protocol is probably the most important component of a Mesh network. When
managing a small number of nodes any kind of routing protocol may work fine (also static), but
as the network grows, the routing becomes key for the final performance of the net. Currently
most production networks use protocols like BGP or OSPF, which is probably a good choice for
static an environments, mainly because they are quite simple and stable. However, as described
in chapter 3, our scenario is completely different, the network we work with is changing very
fast and static protocols are not developed for such cases. It is necessary a more complex
protocol. For instance, other metrics beyond number of hops should be taken into account,
such the packet losses, path saturation, link quality and so on.
In chapter 4 there is a small evaluation about the different routing protocols designed for
Mesh networks, which we will call ”dynamic routing protocols” or DRP. At this point we
should answer the question: which DRP should be used in QMP? it is hard to say as all these
DRP are in constant development changing all the time. Most of them are born in hacker’s
environments where the maintainers are doing it just for fun or for their own network. Currently
one of the most stable DRPs is OLSR, probably because it is based on a RFC from 2003 so the
implementations are quite mature. But it is also a counterpoint, because from 2003 to nowadays
WiFi networks and devices changed a lot. Babel and BATMAN based protocols are newer and
designed for Wireless Communities, they have interesting features based on the experience of
the community people.
The choice of one DRP for the system means that it will be depending always on it. If in
some moment the developers decide to stop development or to implement some new feature
that makes it incompatible with the network, every single node in our system would have
to be modified. Also if this protocol has some issue which, for instance, makes some nodes
unreachable, these nodes would become unreachable and therefore unable to be upgraded by
the network administrators. According to these points, the QMP team decided to use more
than one DRP:
1. BMX6 as the main DRP
2. OLSR6 as a backup DRP
23
24
CHAPTER 5. ROUTING PROTOCOL FOR QMP
3. Babel as a backup DRP but optional
We wanted to have the three flavors in our system: BATMAN based protocol, OLSR and
Babel. BMX6 and Batman-adv have the best results in the Battle of Mesh evaluation, but we
chose BMX6 because it has some features very interesting for us not implemented in Batmanadv. An example is the ”SMS” plugin or the smart gateway selection.
5.1
Inside BMX6
As explained before, we chose BMX6 as main protocol so in this section it will be explained
with more detail. Documentation of BMX6 is very sparse, I got the next information with help
from Axel Neumann (main developer) and Roger Baig (working in a research thesis about mesh
protocols).
As starting point, the two main points which characterize BMX6:
• Pro-active: As opposite of reactive, it maintains an updated routing table by periodically
distributing information through the network. Thus it can be considered loop-free.
• Destination-sequenced, Distance-vector (DSDV): Table-driven routing scheme where the
node does not know the entire network topology, just the best neighbour for a specific
destination. See [3] for more details.
The following sections describe some specific features of BMX6 and how they work.
5.1.1
Originator Messages
As its predecessor BATMAN, BMX6 uses periodic packets named OriGinator Message (OGM).
These are UDP (User Datagram Packet) sent normally every half second to the direct connected
neighbours using a broadcast address as destination. OGM are used to update routes and
metrics over the mesh network. When a node receives this message from other node, it is
forwarded through all interfaces. So thanks to this UDP flooding, a node is able to know the
existence of all mesh participants (see figure 5.1).
Figure 5.1: OGM propagation example
5.1. INSIDE BMX6
5.1.2
25
Protocol data structure
Unlike most of other mesh routing protocols, BMX6 is not using IP addresses as node identifiers.
Instead, global identifiers (SHA2 based), Description Hashes (DHASHs), and very short local
identifiers are used to represent nodes and related interfaces in the mesh. As a result of this
approach the IP address size only has a marginal impact on the total protocol data overhead.
Figure 5.2 shows the low-overhead impact of this implementation.
Figure 5.2: Comparative between BMX6 and OLSRd overhead in a virtual environment with 39 nodes.
Y: bytes. X: seconds. Red: OLSRd-0.6.1. Blue: BMX6
BMX6 organizes packets in the following structure.
• Each Packet is wrapped into an IP/UDP header.
• The UDP header is followed by a BMX6 packet header of 17 bytes.
• The remaining part of a packet is filled with one or multiple frame.
Content
Size (Bytes)
Link Header
-
IPv6
40
UDP
8
BMX6 routing protocol packet
-
A frame consists of a frame header and frame data. The frame header defines the size and
type of the following frame data. A list of currently existing frame types is given in the next
table. The size of the frame header is either 2 or 4 bytes depending on the value of the ”is short”
flag which corresponds to the first byte of the frame header.
Frame name
HELLO ADV
RP ADV
OGM ADV
OGM ACK
Description
Hello advertisement. Used for letting neighbouring nodes detect the link
quality in transmit direction (from sending to receiving node).
Rx probe advertisement. Used for reporting about reception rate of hello
messages from neighbouring nodes.
OGM advertisement. Used for updating periodically route and metric information over the mesh.
OGM acknowledgement. Used for acknowledging the previously reception
of a full OGM ADV frame.
The frame data consists of an optional data header and zero or more messages.
26
CHAPTER 5. ROUTING PROTOCOL FOR QMP
5.1.3
SMS and JSON plug-in
BMX6 can be extended using plug-ins. A plug-in is a set of software components that adds
specific abilities to an application. During the development of QMP, two plug-ins have been
created.
JSON This plug-in exports all available status and topology information in JSON1 notation
using standard file system (regular file). Data is classified as durable and volatile. Files can be
found in directory /var/run/bmx6/json/. It is an interesting feature for QMP, we used it to
get network status information from the Web Interface.
Durable information
options
This file provides a detailed description of all available BMX6 configuration
options and its attributes (like default/min/max values, help, syntax).
parameters
This file provides a detailed summary of the current configuration of the
daemon.
descriptions This directory holds one file for each currently active node in the network,
describing the attributes (like IP addresses, hostname, IDs,...) of each node
respectively.
Volatile information
status
uptime, CPU load, globalID, number of active nodes, version.
interfaces
names, status, bandwidth, IP address, etc.
links
outgoing interface to neighbour links, neighbour IP addresses, link qualities.
originators
list of currently originators in the network, primary ip, metric, etc...
SMS This plug-in uses routing packets to transmit any information from one node to the
whole network. The good point is that propagation works even if there is no continuous datapath. Even though the WiFi network is under bad conditions (because the Wireless noise,
distance between nodes, etc...), the data will be propagated. However in the current implementation, there exist a maximum size limit of 300 Bytes for each file.
The API of the sms plug-in is very simple. It simply clones the content of one or more files
given by one node to all other nodes. All other nodes can do the same. Once started, each
node will have two directories:/var/run/bmx6/sms/rcvd and /var/run/bmx6/sms/rcvd. Files
put into the send folder will be cloned to all other nodes inside rcvd folder.
QMP is using this feature for several things. The positioning Map information is transmitted
using it. There is a chat in web interface which uses it too. And in the future we are planning
to use it for more purposes like statistics, captive portal, MAC filter rules, etc...
1 JavaScript Object Notation, is a lightweight text-based open standard designed for human-readable data
interchange. It is derived from the JavaScript scripting language for representing simple data structures and
associative arrays, called objects.
CHAPTER
6
OpenWRT a basis for QMP
QMP is an operating system (firmware) for embedded network devices, but it is not developed
from scratch. As part of the free software community, QMP is able to benefit from other
projects like OpenWRT.
6.1
Brief introduction to OpenWRT
OpenWRT is a Linux based distribution for embedded devices (mainly routers). The project
started when the Linksys company published the firmware for their WRT54G wireless router
under the GPL license. Using this code as a basis, a community of developers created derivative
versions. Originally the support was limited to WRT54G series, but with the time it was
extended to many other chipsets and architectures. It was a very important point for noncommercial wireless networking because those distributions offers many features no previously
found in consumer-lever routers.
Here a list with some of most important features in OpenWRT operating system (source:
Wikipedia.org[23]):
• A writable root file system, enabling users to add, remove or modify any file
• The package manager opkg, similar to dpkg or pacman, which enables users to install and
remove software [17]
• A package repository containing about 2,000 packages
• Sysupgrade, preserving selected configuration files on firmware upgrade
• UCI (unified configuration interface) intended to unify and simplify the configuration of
the entire system [20]
• Extensible configuration of your network involving VLAN
• Customizable methods to filter, manipulate, delay and rearrange network packets
27
28
CHAPTER 6. OPENWRT A BASIS FOR QMP
• An extensive Ajax-enabled web interface, thanks to the LuCI project [13]
• User-configurable hardware buttons
• Regular bug fixes and updates, even for devices no longer supported by their manufacturers
• USB devices support for 3G, printer, file sharing, audio/video, webcam, etc.
6.2
Why OpenWRT?
We decided to use OpenWRT as a base operating system instead other options for embedded
devices like VoyageLinux 1 or Tomato Firmware2 . We found several pros in favor of OpenWRT.
The first one is that most Wireless Communities are using it. It is the most widespread
operating system most extended in this kind of environment so there exist a huge group of
people maintaining it, reporting bugs and adding new features. In consequence packages are
often ported to the repositories and constantly updated.
Also the powerful SDK (software development kid) provided by OpenWRT, permits to
cross compile the sources for many different architectures like x86, MIPS or ARM (complete
list of supported architectures can be found here 3 ). That is important because most of routers
are using these kind of small architectures (not x86). To be able to run properly in these low
performance computers, the system is very optimized. Binaries are normally very small because
they are compiled using uClibc 4 (much smaller than GNU libc) and stripped from unnecessary
functions. Also the applications are cautiously selected (e.g busybox instead all common shell
tools) and some of them even modified to be smaller. For instance hostapd-mini, which is a
hostapd version with only WPA/PSK support (most common used security protocol in WiFi
networks).
And, as last point, the wireless device support in OpenWRT is probably the best one of all
Linux based distribution, especially in Atheros devices5 where some developers are also involved
directly in the operating system. An example of the last year (2011); OpenWRT was the first
system which supported IBSS (Ad-Hoc Wifi mode) in 802.11n and HT40 (MiMo 2x20MHz
channels) for mac80211 devices (most common).
6.3
QMP as part of OpenWRT
To integrate QMP with OpenWRT we use the feeds system 6 . A feed is a collection of packages
sharing a common location (using a remote server or a local filesystem). A package is a directory
which contains a Makefile (GNU-Make compatible7 ). OpenWRT SDK is providing a set of
GNU-Make functions to facilitate the implementation of this Makefile 8 .
To manage feeds, the SDK provides an utility located on scripts/feeds which permits the
easy install/remove/upgrade of all feed packages. For instance, the next command would install
feeds related with LuCi web interface9 .
1 http://linux.voyage.hk
2 http://www.polarcloud.com/tomato
3 https://dev.openwrt.org/wiki/platforms
4 http://uclibc.org/about.html
5 http://www.qca.qualcomm.com/technology/technology.php?nav1=47
6 http://wiki.openwrt.org/doc/devel/feeds
7 http://www.gnu.org/software/make
8 http://wiki.openwrt.org/doc/devel/packages
9 http://luci.subsignal.org
6.4. QMP MAIN PACKAGES
29
./ scripts / feeds install luci
All feed sources are defined in a file named feeds.conf which contains the type, name and
URL. For instance this is the line used by the LuCi repository:
src - svn luci http :// svn . luci . subsignal . org / luci / branches / luci -0.10/
contrib / package
6.4
QMP main packages
QMP uses a feed system, as described in chapter 6.3, to include his packets in OpenWRT SDK.
It uses a git10 repository located on http://qmp.cat. To use it we should modify feeds.conf file
and add this entry:
src-git qmp packages git://qmp.cat/qmp.git
To install it on OpenWRT package tree directory:
./ scripts / feeds update qmp_packages
./ scripts / feeds install qmp_packages
To build the firmware OpenWRT provides a tool named menuconfig where the user is able
to select the packages which will be compiled and wrapped in the final image ready to install
in the device as shown in figure 6.1.
Figure 6.1: Selecting QMP packages using the menuconfig tool
QMP contains, among others, two main packages described in the next sections.
10 http://git-scm.com/
30
6.4.1
CHAPTER 6. OPENWRT A BASIS FOR QMP
qmp-small-node
This package contains a Makefile which includes all mandatory dependencies by QMP and all
specific files (mainly scripts). An example of dependencies could be bmx6, luci, ip, kmod-ath9k.
So when qmp-small-node is enabled, the rest of needed packages are enabled too. It is named
”small-node” because it is designed to be used in low performance devices with at least 4MB
of internal memory.
6.4.2
qmp-big-node
This package is like a ”meta-package”, just containing dependences. It includes qmp-small-node
and a set of packages not mandatory for QMP but useful for the final user, an example could
be tcpdump, openvpn, nmap. It is designed for high performance devices with at least 8MB of
internal memory.
CHAPTER
7
Inside the qMp development
In this chapter the main software components provided by QMP are listed and, from a global
point of view, its operation is described. All of them are made using the scripting languages
Shell Scripting1 and Lua2 because both are small, fast, powerful and OpenWRT compatible
such as most OpenWRT tools are also built using these languages.
Figure 7.1 shows the relation between the components of QMP and OpenWRT, and which
ones are provided to be used by the final user. In the next list there is a short description of
each of them, but in next sections they are described with more detail:
Provided by OpenWRT
• UCI: Unified Configuration Interface is mainly a database system intended to centralize
the whole configuration of OpenWRT. The syntax is very simple and most of OpenWRT
components are using it.
• LUCI: Lua UCI Is a the default web interface provided by OpenWRT written in Lua.
• Admin webint: It is a LUCI module (admin mod full) which contains several useful tools
to manage the system.
• WiFi tools: A set of userspace tools to manage WiFi devices. Some ones standard (like
iwconfig or iw) and some others provided by OpenWRT (iwinfo).
• Networking: A set of tools to manage networking devices.
• Bmx6: The routing protocol used by QMP as part of OpenWRT packets.
1 ash: NetBSD /bin/sh ”ash” is a POSIX compliant shell that is much smaller than ”bash”. We take advantage
of that by making it the shell on the installation root floppy, where space is at a premium.
2 Lua combines simple procedural syntax with powerful data description constructs based on associative
arrays and extensible semantics. Lua is dynamically typed, runs by interpreting bytecode for a register-based
virtual machine, and has automatic memory management with incremental garbage collection, making it ideal
for configuration, scripting, and rapid prototyping.
31
32
CHAPTER 7. INSIDE THE QMP DEVELOPMENT
Provided by QMP
• qmpinfo: It is a tool written in Lua to get some information about the QMP system.
• qmpcontrol: It is a tool written as a shell script to manage the QMP system.
• qMp webint: A LUCI (web interface) module to manage and monitor QMP system.
• map: A map tool (named b6m and written in Shell Scripting using OpenStreetMaps
API3 ) to see the position of all network nodes and how are they connected.
• autoconf: A system to auto-configure all settings. So the user does not need to configure
anything.
• internet detect: A tool (named gwck) written in Shell Script which is monitoring if the
node is connected to internet, in this case it modifies all needed things to share it with
the whole network.
Figure 7.1: Relation between QMP and OpenWRT components
3 http://www.openstreetmap.org
7.1. THE IP STRUCTURE
7.1
33
The IP structure
The IP schema is a very important point because it is key for the network scalability and
compatibility with other networks. It has been discussed a lot of times in our team. First
decision is to use IPv6 as backbone and IPv4 tunneled over IPv6. Then when finally IPv4
disappears, removing it will not have big complications for the network administrators. However
it has been a challenge for us because currently IPv6 is an unknown world where nobody
actually knows how is it going to be implemented. We are trying to follow always RIPE
recommendations, but probably some ISP are not going to do the same. This is a small list of
requirements which our schema must accomplish.
• it must support both IPv4 and IPv6
• it must be configured automatically
• multiple IP in the same node must be supported
• multiple routing protocols must be supported
• it must be the most human readable as possible
• it must be the least overlap as possible (to avoid IP conflicts)
• it must permit a good aggregation level (to summarize routes between networks)
QMP is using three different kind of addresses, two IPv6 and one IPv4. They will be seen
in detail on next sections.
• internal Mesh routing is based on IPv6 ULA addresses
• external internet routing is based on IPv6 IANA addresses
• internal and external routing is based on private IPv4 addresses and NAT
Figure 7.2: IP schema for qMp network
34
CHAPTER 7. INSIDE THE QMP DEVELOPMENT
7.1.1
ULA addresses
ULA means Unified Local Addresses. They are a special IPv6 block (fc00::/7) defined in
RFC4193 [21], reserved for use in a private environment so they are not routable in the global
Internet. In a Mesh cloud the Internet connection is a non mandatory option. It means
that we need some system to be able to deploy a network without using global IPs, ULA was
developed for this purpose. These ULA addresses will also be given to the final clients (personal
computers), they cannot be used to access Internet but to surf over the Mesh network.
An IPv6 address has 128 bits, we have chosen the next distribution to calculate the digits
Content
Bits
ULA prefix
8
QMP prefix
32
Cloud
8
X
12
Interface
4
MAC or clients
64
This is the meaning of each IP block
Content
ULA prefix
QMP prefix
Cloud
X
Interface
MAC
Description
The standard ULA prefix fc
We are currently using three prefixes to define the network as QMP network
and to differentiate between the different protocols. They are statically
configured (always the same).
The number of QMP cloud. If several clouds are physically separated but
exist the possibility of joining together, the number should be different for
each one. Using 8 bits we are able to define 256 clouds.
For interfaces used to meshing X=000 (where routing daemon is running).
For the interface where the clients are connected X is randomly calculated
when needed and checked with the whole network to avoid IP collisions.
The index of the interface used inside the node. For instance eth0 will be 0
and wlan0 1. We are able to have 16 interfaces in the same device. For the
clients interface these bits are random, so in fact they are part of the X.
The last 64 bits will be calculated according the MAC address of the device
following EUI-64 standard [10].
For example, this is how the block is split for this IP: fcba:beff:f012:0001:0000:82b1:5981:a1cb
ULA prefix
fd
QMP prefix
b0b0b0b0
Cloud
12
X
000
Interface
1
MAC
000082b15981a1cb
Considering the same node, these four IPs would be assigned to the different interfaces
according to the descriptions. Note that AP interfaces are using /64, this is because we are
going to use IPv6 auto-configuration feature for the clients. In bold the changing parts.
• BMX6 and eth0 used for MESH fcb0:b0b0:b000:0000:MAC/128
• BMX6 and eth1 used for MESH fcb0:b0b0:b000:0001:MAC/128
• OLSR6 and eth0 used for MESH fcb0:b0b0:b100:0000:MAC/128
• br-lan used for clients fcb0:b0b0:b000:9999/64
7.1. THE IP STRUCTURE
7.1.2
35
IANA addresses
We understand IANA addresses as the IP addresses assigned by IANA (in fact by RIPE in
Europe, APNIC in Asia and so on) to our ISP and our ISP to us, so they are routable to
the Internet. These are created when a node connects to Internet and share it with the whole
network. However the addresses got by the Internet node must be at least a /60, because each
node needs at least a /64 to provide access to their clients.
All LAN interfaces inside the same node are bridged, so one /64 address is enough to offer
connectivity to all connected clients. These are the steps to follow in a high abstraction layer.
Gateway node
1 Announces Internet
3 Announces the IP range available
5 Announces the minimum amount of IPs that can give
7 Using unicast AHCP the gateway node gives
Client node
2 Search for Internet
4 Read the available range
6 Ask for the range and the amount of IPs
the desired IP range to the client
After that the node starts offering stateless autoconfiguration addresses to the clients.
7.1.3
IPv4 addresses
IPv4 addresses are needed to connect to the current global Internet normally using private
addresses trough a NAT (address translation). We need one IP for each routing protocol
because then we are able to choose which protocol to use when we are connecting to some
other node (just choosing the right IP). These IPs will be configured in a non-physical interface
because they are used over an IPv6 tunnelled interface.
When defining the IPs we have three options to choose depending on our scenario (if quick
deployment or wireless community).
- Selecting exactly the IPs that we want to use:
BMX6
OLSR6
Babel
10.140.48.1/24 10.140.49.1/24 10.140.50.1/24
- Selecting a /24 range, so the lasts 8 bit will be calculated randomly
BMX6
OLSR6
Babel
10.140.48 10.140.49 10.140.50
- Selecting a /16 range, so the lasts 16 bit will be calculated randomly
BMX6 OLSR6 Babel
10.201 10.202
10.203
36
CHAPTER 7. INSIDE THE QMP DEVELOPMENT
Figure 7.3: Schema about how clients are connecting to internet.
7.2
The interfaces structure
Multiple IPs means multiple network interfaces. QMP is using five different kind of interfaces,
each one with his own function. They are described in next sections, and in the last one an
example can be seen.
7.2.1
Mesh interfaces
For mesh interfaces we use 802.1Q VLAN specified in RFC2815[11]. It is needed because QMP
system has multiple routing protocols, VLAN allow layer 2 isolation, so each protocol is using
his own tag to send the packets.
For instance, if we configure eth0 as mesh device and we use tags 11, 12 and 13. System
network interfaces for routing protocols would be the following:
BMX6
OLSR6
Babel
7.2.2
eth0.11
eth0.12
eth0.13
LAN interfaces
LAN interfaces are used for final client connections. A virtual bridge interface container named
br-lan will be created with all physical interfaces specified as LAN in configuration. A DHCPv4
server and IPv6 stateless auto-configuration[12] will be enabled on it.
7.2.3
WAN interface
WAN interface is used to connect with other networks (for instance Internet). A DHCPv4 client
and IPv6 stateless auto-configuration requests will be enabled on it.
7.2. THE INTERFACES STRUCTURE
7.2.4
37
NIIT 4to6/6to4 interfaces
NIIT[15] is an 4in6 tunneling technique developed by the Freifunk community4 and used in
OLSR to transport IPv4 packets over an IPv6 core network. It is not a standard but has many
similarities to 4in6 standard RFC2473[7]. NIIT is much more simple compared to 4in6 and also
can be easily autoconfigured.
QMP is an IPv6 native network so a tunneling transport layer is needed to use IPv4. The
eigennet project from Pisa has already integrated NIIT in their mesh firmware. We are using
NIIT implementation from their repository5 .
7.2.5
BMX6 tunnel interfaces
When a gateway (gate to another network) is published by some node, the rest might be
interested in it. In this case to use it the interested nodes must request a tunnel between it
and the gateway. This is due to the kind of source address. If this is pointed to some external
address (like a public Internet address), each node in the path between both nodes will process
the packets in different way. So a direct connection from interested node to gateway node is
needed. BMX6 implements his own tunnel system creating virtual interfaces with names like
”bmx6 in0056” or ”bmx6 out0056”. This kind of interfaces are created/destroyed at run time.
7.2.6
An example of interfaces
Figure 7.2.6 an example of QMP interfaces configured in a production node. The text has been
summarized to facilitate the reading. The following table briefly describes the usage of each
one.
eth0
eth1, wlan1
wlan0, wlan2
br-lan
niit4to6
bmx6 in0056
WAN device connected to Internet
LAN devices used to end-user connection
Used as Mesh. The VLAN interfaces (tagged with .11/.12) is where routing
protocols are running
This is the bridge between all LAN devices
Tunneled interface using NIIT. It contains all IPv4 addresses used inside the
Mesh network and IPv6 IANA if present.
This is the tunnel created by BMX6 to share the Internet connection with
the rest of the network
4 http://freifunk.net
5 http://gitorious.org/eigennet
38
CHAPTER 7. INSIDE THE QMP DEVELOPMENT
eth0 :
link / ether 00:15:6 d : c7 :9 a : XX brd ff : ff : ff : ff : ff : ff
inet 1 92 .1 68 . 1. 20 /2 4 brd 192.168.1.255 scope global eth0
inet6 fd02 :0000:0080:78 f9 :215:6 dff /64 scope global
inet6 fe80 ::215:6 dff : fec7 :9 a5d /64 scope link
eth1 :
link / ether 00:15:6 d : c7 :9 a : XX brd ff : ff : ff : ff : ff : ff
wlan1 :
link / ether 00:80:48:72: d6 : XX brd ff : ff : ff : ff : ff : ff
br - lan :
link / ether 00:15:6 d : c7 :9 a : XX brd ff : ff : ff : ff : ff : ff
inet 172.30.2 2.1/16 brd 172 .30.255 .255 scope global br - lan
inet6 fe80 ::215:6 dff : fec7 :9 a5e /64 scope link
niit4to6 :
link / ether 36:78: f c :1 c : a9 : XX brd ff : ff : ff : ff : ff : ff
inet 1 0. 20 1. 0 .1 24 /3 2 brd 10.201.0.124 scope global niit4to6 :1
inet 1 0. 20 2. 0 .1 24 /3 2 brd 10.202.0.124 scope global niit4to6 :2
inet6 2012:0:0:7 c ::1/64 scope global
inet6 2011:0:0:7 c ::1/64 scope global
inet6 fe80 ::3478: fcff : fe1c : a94e /64 scope link
wlan0 :
link / ether 00:80:48:72: d4 : XX brd ff : ff : ff : ff : ff : ff
inet6 fe80 ::280:48 ff : fe72 : d4XX /64 scope link
wlan0 .11:
link / ether 00:80:48:72: d4 : XX brd ff : ff : ff : ff : ff : ff
inet6 fd02 ::80:0:280:48 ff : fe72 : d4XX /128 scope global
inet6 fe80 ::280:48 ff : fe72 : d4XX /64 scope link
wlan0 .12:
link / ether 00:80:48:72: d4 : XX brd ff : ff : ff : ff : ff : ff
inet6 fd02 ::80:1:280:48 ff : fe72 : d4XX /128 scope global
inet6 fe80 ::280:48 ff : fe72 : d4XX /64 scope link
wlan2 :
link / ether 00:80:48:72: e5 : XX brd ff : ff : ff : ff : ff : ff
inet6 fe80 ::280:48 ff : fe72 : e5XX /64 scope link
wlan2 .11:
link / ether 00:80:48:72: e5 : XX brd ff : ff : ff : ff : ff : ff
inet6 fd02 ::80:2:280:48 ff : fe72 : e5XX /128 scope global
inet6 fe80 ::280:48 ff : fe72 : e5XX /64 scope link
wlan2 .12:
link / ether 00:80:48:72: e5 :09 brd ff : ff : ff : ff : ff : ff
inet6 fd02 ::80:3:280:48 ff : fe72 : e5XX /128 scope global
inet6 fe80 ::280:48 ff : fe72 : e5XX /64 scope link
bmx6_in0056 :
link / tunnel6 fd02 ::80:1:280:48 ff : fe72 : d4XX peer fd02 ::80:1:280:48 ff :
fe72 : ffff
inet6 fe80 ::215:6 dff : fec7 :9 aXX /64 scope link
Code 7.1: System interfaces example
7.3. UCI QMP CONFIGURATION FILE
7.3
39
UCI qmp configuration file
This chapter describes how the QMP configuration works. All settings are located in file
/etc/config/qmp, which is managed by the UCI [20] system. The idea is that an end user only
needs to modify these options using the management tools like Web Interface or qmpcontrol
script. According to these values QMP is creating or modifying all needed files and performing
the required actions. The QMP main configuration file has several sections:
7.3.1
Node configuration
This is a small section with some settings related to the node.
config ’qmp ’ ’ node ’
option ’ community_node_id ’ ’901 ’
option ’key ’ ’/ tmp / qmp_key ’
• community node id: An number identifying the node. In this case node name will be:
”qmp901”. If not specified it will be auto-configured based on the last byte of the MAC
address.
• key: Path to file containing the QMP key. It is a hash generated randomly on each boot
used by some QMP applications for security purposes.
7.3.2
Interfaces
Interfaces section is very simple as it consists in three options which indicate the operation
mode for each physical network device as shown in the next example.
config ’qmp ’ ’ interfaces ’
option ’ lan_devices ’ ’ eth0 wlan1 ’
option ’ wan_device ’ ’ eth1 ’
option ’ mesh_devices ’ ’ wlan0 wlan2 ’
• lan devices: Interfaces used for final client connection, a bridge between them will be
created and the DHCP server will be enabled.
• wan device: Interface connection with another network. A DHCP client will be enabled
in this interface to automatically get the network configuration.
• mesh devices: Interfaces used for meshing. Several VLAN will be created and routing
protocols will be enabled.
7.3.3
Networks
In this section all options related with networking are found . Let’s see an example:
config ’qmp ’ ’ networks ’
option ’dns ’
option ’ lan_address ’
option ’ lan_netmask ’
option ’ niit_prefix96 ’
option ’ mesh_protocol_vids ’
option ’ mesh_vid_offset ’
’141.1.1.1 ’
’172.30.22.1 ’
’255.255.255.0 ’
’0:0:0:0:0: ffff ’
’ olsr6 :1 bmx6 :2 ’
’10 ’
40
CHAPTER 7. INSIDE THE QMP DEVELOPMENT
option ’ olsr6_mesh_prefix48 ’ ’ fd01 :0:0 ’
option ’ bmx6_mesh_prefix48 ’ ’ fd02 :0:0 ’
option ’ babel_mesh_prefix48 ’ ’ fd03 :0:0 ’
option ’ netserver ’ ’1 ’
• dns: Nameservers used for the device and final clients
• lan address: IPv4 address used for final client bridge interface (see 7.3.2)
• lan netmask: IPv4 netmask used for final client bridge interface
• niit prefix96: Niit is used for 4in6 tunneling, see 7.2.4
• mesh vid offset: VLAN tag offset used for routing protocol interfaces (e. eth0.10)
• mesh protocol vids: VLAN tag suffix added for routing protocol interfaces (mesh vid offset + mesh protocol vids)
• xxxx mesh prefix48: First 48 bits used for IPv6 calculation, see IP structure chapter
• netserver: Enable/disable netserver, used for bandwidth tests.
7.3.4
Wireless
To configure WiFi devices, QMP offers an abstraction layer which intends to be more easy and
intuitive than the one offered by OpenWRT. The user only needs to fill some fields and QMP
will do the rest. Note that configuration is different for layer 3 (networking saw in section
7.3.3) and layer 2 (this one). Ad-Hoc mode is not strictly related with Mesh routing, user can
choose AP/Client as link mode (and probably WDS in the future) to run routing protocols too
if needed.
Wireless section consists in two different set of options:
General section (affects all WiFi devices), looks like that:
config ’qmp ’ ’ wireless ’
option ’ driver ’ ’ mac80211 ’
option ’ country ’ ’ES ’
option ’ bssid ’
’02: CA : FF : EE : BA : BE ’
• driver: Which driver to use: mac80211 or madwifi
• country: Country code to use for WiFi devices
• bssid: BSSID to use for Ad-Hoc devices
Specific device section looks like that:
config ’ wireless ’
option ’ mode ’ ’ adhoc ’
option ’ name ’ ’ qMp ’
option ’ txpower ’ ’20 ’
option ’ channel ’ ’48+ ’
option ’mac ’ ’00: AA : BB : CC : DD : EE ’
option ’ device ’ ’ wlan0 ’
7.3. UCI QMP CONFIGURATION FILE
41
• mode: WiFi supported modes are ”adhoc”, ”ap” or ”none”6
• name: WiFi SSID to use in this device
• txpower: Transmit power for this device
• channel: Channel for this device. If +/- added, 802.11n in mode HT40 will be used
• mac: MAC identify the device
• device: Interface name used for this device
7.3.5
Tunnels
When a node has connectivity to another network (for instance Internet) and wants to share it
with the rest, it must be specified in the tunnels section and also when a node wants to search
for access to another network. The options might be ”search/offer” and ”ipv4/ipv6”. This
section is modified in at run time depending on the user needs.
config ’qmp ’ ’ tunnels ’
option ’ search_ipv4_tunnel ’
option ’ offer_ipv6_tunnel ’
’0.0.0.0/0 ’
’::/0 ’
6 If none used, QMP is not configuring the device. This is useful if you want to manage it manually or with
another system
42
CHAPTER 7. INSIDE THE QMP DEVELOPMENT
7.4
Autoconfiguration system
This is one of the most important parts of the QMP firmware because the proper working of
it means that user does not need to have technical knowledge. He just needs to install the
firmware in the device, maybe configure some parameters. That is enough to be part of the
network. However each wireless cloud has its own specific options, for instance as seen in the
IP structure section 7.1, the cloud number or QMP prefix for IPv6 configuration. The idea is
that network administrators build an image with the specific parameters and leave it available
for download for the normal users. However if this task is not performed default settings should
work too.
The auto-configuration system is executed only the first time the device boots. There is a
special file placed on /qmp autoconf, lets call it control file, and a init script on /etc/init.d /qmp autoconf. This script is executed at each boot, but it only operates if the control file does not
exist. In the first boot the init script will execute all needed functions to leave the system
ready, and after that it will create the control file. So this functions will not be called anymore
unless the user (or the administrator) decides to do it by removing the control file.
i f [ ! -f " $CONTROL_FILE " ]; then
configure
else
echo " Remove $CONTROL_FILE to force r ec on f ig ur at i on "
fi
Code 7.2: Control file checking
These are the steps followed by qmp autoconf, we will see them in detail in the next sections.
1. Check if control file exist
2. Configure wireless devices
3. Configure networking
4. Restart affected services
5. Create control file
7.4.1
Wireless
All wireless functions can be found in the file /etc/qmp/qmp wireless.sh. Mainly there are two
available functions:
qmp configure wifi initial
Leaves all options from QMP configuration file ready to be applied. One of the most important
points of this function is that all parameters from the configuration file are optional. It means
than you can leave any of them empty and the QMP system will fill it using the right one or
with a default value. For instance, the user can just configure these parameters:
config ’ wireless ’
option ’ mode ’ ’ adhoc ’
option ’ name ’ ’ qMp - MESH ’
config ’ wireless ’
option ’ mode ’ ’ap ’
option ’ name ’ ’ qMp - AP ’
7.4. AUTOCONFIGURATION SYSTEM
43
The first WiFi device found will be used as in Ad-Hoc mode with SSID ”qMp-MESH” and
the second one as an access point with SSID ”qMp-AP”. Then MAC address and device name
will be read from the system, channel is calculated according the device specifications and TXpower is taken from the default values which can be found in the directory /etc/qmp/templates
(see figure 7.4).
Figure 7.4: qmp configure wifi initial flow diagram
An interesting function is also qmp wifi get default which returns default values. Taking a
look on the flow diagram 7.5, we can see for instance how the channel is calculated to try to
avoid channel collisions that cause noise. In next table we can see the default selection of the
channel depending on the interface name and mode (considering three WiFi devices compatible
with the 2.4GHz band).
wlan0
wlan1
wlan2
adhoc
11
9
6
ap
1
3
5
qmp configure wifi
This function applies WiFi parameters from the QMP configuration file to the OpenWRT
system. To do that, it uses a set of files placed on /etc/qmp/templates. They have a special
name that indicates on which case it must be used: wireless. < driver > . < mode > [−n]
For instance wireless.mac80211.adhoc-n (n means 802.11n mode) or wireless.madwifi.ap.
These files are UCI [20] friendly and contain some special words starting with#QMP that will
be used to substitute by specific ones during function execution time.
wireless .# QMP_DEVICE = wifi - device
wireless .# QMP_DEVICE . type = mac80211
wireless .# QMP_DEVICE . macaddr =# QMP_MAC
wireless .# QMP_DEVICE . channel =# QMP_CHANNEL
44
CHAPTER 7. INSIDE THE QMP DEVELOPMENT
Figure 7.5: qmp wifi get default flow diagram
7.4. AUTOCONFIGURATION SYSTEM
45
wireless . @wifi - iface [# QMP_INDEX ]. mode = adhoc
wireless . @wifi - iface [# QMP_INDEX ]. bssid =# QMP_BSSID
Code 7.3: example of wireless template
7.4.2
Network
The networking auto-configuration system gets and applies the values from the network section
of the QMP configuration file (see 7.3). It configures the IP addresses as shown in section 7.1
and creates the interfaces as shown in section 7.2. Finally it configures the routing protocols
(just specifying in which interface have to be enabled) and starts them.
46
CHAPTER 7. INSIDE THE QMP DEVELOPMENT
7.5
Management tools
QMP provides a set of tools to configure, manage and monitor the system and the network.
But they are not going to be explained in detail as the code can be easily read if interested.
7.5.1
Web Interface
The web interface is based on LUCI7 which offers a very powerful API written in Lua. It is
focused to be used by the end user so it tries to be as intuitive and easy as possible. The QMP
web interface provides the following features:
• Networking configuration.
• Wireless configuration.
• Splash screen configuration (for Acess Point clients).
• Some tools like bandwidth test or ping results.
• Nodes position Map based on OpenStreetMaps API.
• Mesh network information (neighbours, originators, etc...) and configuration.
Figure 7.6: Snapshot of the web interface in the Network tab
7.5.2
Shell tools
Shell tools are more focused to be used by the administrator. There are two, one to configure
and another to get information. They are also used by the auto-configuration system and the
web interface.
7 http://luci.subsignal.org
7.5. MANAGEMENT TOOLS
47
qmpcontrol This tool is written in Shell Script. It is located on /etc/qmp/qmp control.sh
and imports most of the files placed on /etc/qmp (qmp wireless.sh, qmp network.sh, etc.).
Usage : / usr / bin / qmpcontrol < function > [ params ]
Available functions :
o f f e r _ d e f a u l t _ gw : Offers default gw to the network
s e a r c h _ d e f a u l t _ g w : Search for a default gw in the network
conf igure_wi fi
: Configure and apply current wifi settings
c o n f i g u r e _ n e t w o r k : Configure and apply current network settings
a pp ly _n e ts er ve r
: Start / stop netserver depending on configuration
enable_ns_ppt
: Enable POE passtrought from NanoStation M2 /5
devices . Be careful with this
qmpinfo This tool is written in Lua. It uses the library provided by OpenWRT libiwinfo
which gives information about WiFi devices.
Usage : qmpinfo < question > [ options ]
Available questions :
modes <dev > : supported modes by the wireless card
channels <dev > : supported channels and supported HT40 type (+/ -)
ipv4 : print all ipv4 from this computer ( excluding localhost )
hostname : print device hostname
bwtest < ipv6 > : perform a bandwidth test
nodes : list all nodes on MESH network
key : print qmp key
48
CHAPTER 7. INSIDE THE QMP DEVELOPMENT
CHAPTER
8
Getting the QMP firmware
As referenced several times in this document, QMP source is available in a git1 repository. The
Master branch is the current stable one and the rest are testing branches used by developers.
Following the OpenWRT policy, we are using alcoholic drink names to identify the stable
releases, with the first one being called Ratafia. Compiled binaries of the current release can
be found here2 .
8.1
SDK for QMP
QMP, which involves OpenWRT too, is a complex system where all needed packets are crosscompiled to be used in embedded devices. As a result a set of special packets, patches, scripts,
etc., are needed. Providing a SDK (Software Development Kit) is an important point to maintain and integrate new features in the system. As explained in chapter 6, OpenWRT provides
a powerful kit. In this regard QMP SDK is an abstraction layer of it, making it more simple
and including new features.
The predecessor firmware GSF (see chapter 3.1) used a shell script as SDK. It was user
tool including options to build/update firmware. For instance, to generate a binary image for
Alix board with name NodeName and IP 10.202.1.1 (see3 for more info), we would run the
command:
fwgen -d -w alix -n NodeName -i 10.202.1.1
For QMP we chose a different method, we decided to use GNU-Make to manage all functions
related with SDK. We are using a single Makefile with all needed functionalities which helps
developers to compile, try new features and upload changes. Also it can be used by a end user
just to generate his own firmware. We decided to use this system instead of the old one because
the code is cleaner thanks to the powerful programming syntax of the GNU-Make tool, and to
1 git://qmp.cat/qmp.git
2 http://qmp.cat/qmk/firm/
3 http://gsf.guifi.net/repository
49
50
CHAPTER 8. GETTING THE QMP FIRMWARE
win compatibility with OpenWRT, since it uses the same method. We named this tool QMP
Firmware Generator qmpfw, and it is available in our git repository.
The needed steps to compile the system from scratch are the following:
1. Download OpenWRT source.
2. Download QMP source.
3. Integrate both (using the feeds system).
4. Configure parameters according to the target hardware and specific options.
5. Compile and leave image ready to be installed.
To perform all these actions we need to execute the following commands:
git clone git :// qmp . cat / qmpfw . git
cd qmpfw
make T = alix build
When done we will find the output images ready to be installed in the directory called
images/. As can be seen in the example, the destination target is specified using variable T,
current available targets are:
• alix: PCengines Alix (x86)
• rspro: Ubiquiti RouterStation Pro (MIPS ar71xx)
• rs: Ubiquiti RouterStation (MIPS ar71xx)
• nsm5: Ubiquiti NanoStation m5/m2 (MIPS ar71xx)
• fonera: FON AP 2X00 (MIPS atheros 231x)
Including a target is quite easy, as they are specified in file targets.mk included in the
repository. Multiple targets can be used in the same SDK. This is an interesting option for
developers because they are able to test all targets using the same Makefile.
Several extra actions can be executed, some of them are listed below (check the README file
in the software repository to know all of them):
• make update: update sources for all targets
• make T=[TARGET] menuconfig: executes Ncurses menu config from OpenWRT SDK
• make T=[TARGET] kernel menuconfig: executes Ncurses menu config from Kernel
• make T=[TARGET] clean: removes all generated files and leaves the SDK clean
• make T=[TARGET] sync config: if a developer makes some change in config files, this
actions synchronize them with the targets
• make config: interactive configuration of some QMP parameters
CHAPTER
9
Experience and conclusions
My professional experience before joining the QMP project was only within private companies.
It has been my first time in a funded project but not business-focused job, and the skills that I
have acquired have already been really rewarding. In this project the organizational structure
is completely horizontal, although there are several different roles. In such structure all the
participants have a voice and the same decision power during the decision making process. The
director only manages if there is no way decides if there is no way in which the rest of the
participants can reach consensus.
With this paradigm I felt totally involved in the project and I put all my enthusiasm in
it. Since the work that we are doing is going to be used in our own Network Communities, I
felt part of it as well. I enjoyed being involved in an open and cooperative project. I find it
a way to enjoy doing what I like and helping other people at the same time. Thanks to that,
I dedicated more hours to the QMP development than the total amount shown in the budget
table in section 3.3. I also developed more features than the listed on our project plan, just
because I found them interesting.
Referring to the total cost of the project, I think it is clear that if it had been developed in a
company-like environment the price would be much higher. In the current study of costs there
are a lot of hours invested ”for free” by volunteers, mainly from the Director and Responsible,
who from the beginning decided to do not get any money. We are not expecting a profit margin
so we are able to sell or rent our hardware for a price close to the original one at a very affordable
rates. Furthermore we only use free software, reducing the expenses considerably too.
The proof of that is the following example: the price of a professional solution like QMP
in the telco world is several times highe. Aruba Networks is selling his AirMesh 1 router (with
similar features than the QMP nodes) for 5000 USD.
Speaking about my future work on the project, I think I will be involved on it for a long time.
It is just the beginning. Two months ago we got the first stable version but there are several
missing features. Now we are going to look for other funding sources to keep the development
1 http://www.securewirelessworks.com/Aruba-MSR4000.asp
51
52
CHAPTER 9. EXPERIENCE AND CONCLUSIONS
active. Actually we are already involved in a FP72 and preparing a new project to present to
the NLnet foundation3 .
Regarding the technical conclusions, there is not much left relevant to say because it does not
fit into the scope of this document. We have made some technical errors during development,
but that is understandable since we are not a business and we can roll back mistakes without
many complications. In addition, we are always doing research and trying to improve the system
because most of the technology we are using is not tested yet or, at times, not even implemented.
In this scenario, making mistakes should be considered as a good way for improvement, as long
as something is learned from them, since the worse part of those mistakes can be easily solved
in our organizational model.
2 http://cordis.europa.eu/fp7/home
3 http://nlnet.nl
en.html
Bibliography
[1] Adhoc On-Demand Distance Vector. http://www.ietf.org/rfc/rfc3561.txt.
[2] Creating OpenWRT packages. http://wiki.openwrt.org/doc/devel/packages.
[3] Destination-Sequenced Distance-Vector.
papers/dsdv-sigcomm94.pdf.
http://www.cs.virginia.edu/
cl7v/cs851-
[4] Draft of BATMAN RFC sent in 2008 to IETF. http://tools.ietf.org/html/draft-wunderlichopenmesh-manet-routing-00.
[5] Eigennet project. http://gitorious.org/eigennet.
[6] Enhanced Interior Gateway Routing Protocol. http://www.cisco.com/en/US/tech/tk365/technologies tech note09186a0080093f07.shtm.
[7] Generic Packet Tunneling in IPv6. http://tools.ietf.org/html/rfc2473.
[8] Getting behind the routing vodoo
mesh.org/wiki/batmand/RoutingVodoo.
of
BATMAN.
http://www.open-
[9] GNU-Make documentation. http://www.gnu.org/software/make/.
[10] IANA Considerations and IETF
http://tools.ietf.org/html/rfc5342.
Protocol
Usage
for
IEEE
802
Parameters.
[11] Integrated Service Mappings on IEEE 802 Networks. http://tools.ietf.org/html/rfc2815.
[12] IPv6 stateless autoconfiguration. ftp://ftp.ripe.net/rfc/rfc2462.txt.
[13] LUCI web interface API documentation. http://luci.subsignal.org.
[14] MANET:
An
essential
technology
for
http://www.mediateam.oulu.fi/publications/pdf/92.p.
pervasive
[15] NIIT IPv4 unicast traffic through an IPv6. http://wiki.freifunk.net/Niit.
[16] OpenWRT feeds system. http://wiki.openwrt.org/doc/devel/feeds.
53
computing.
54
BIBLIOGRAPHY
[17] opkg package manager documentation. http://code.google.com/p/opkg.
[18] Routing Packets into Wireless Mesh Networks. http://www.baumann.info/public/wimob07.pdf.
[19] Tomato firmware. http://www.polarcloud.com/tomato.
[20] UCI database documentation. http://wiki.openwrt.org/doc/uci.
[21] Unique Local IPv6 Unicast Addresses. http://tools.ietf.org/html/rfc4193.
[22] Voyage Linux. http://linux.voyage.hk.
[23] Wikipedia free encyclopedia. http://wikipedia.org.
Glossary
Ad-Hoc
A decentralized type of wireless network
API
An application programming interface is a source code based specification
Cloud
In networking a cloud is a set of nodes connected together
deployment Sparse physically a set of nodes due a certain zone
firmware Fixed, usually rather small, programs and/or data structures that internally control
electronic devices
gateway
A computer or a network that allows or controls access to another computer or
network
Hardware A general term for equipment such as wire, antennas, motherboards, handles, etc.
IANA
The Internet Assigned Numbers Authority, an organisation that oversees IP address,
Top-level domain and Internet protocol code point allocations
ICMP
Internet Control Message Protocol is one of the core protocols of the Internet Protocol Suite
IETF
The Internet Engineering Task Force develops and promotes Internet standards
Internet uplink In a network, the point which nodes can use to connect with the Internet
network
LAN
A local area network (LAN) is a computer network that interconnects computers in
a limited area
Layer (OSI model) It is a prescription of characterizing and standardizing the functions of a
communications system in terms of abstraction layers
Makefile
Main file used to specify the operation that make command must do
meta-package Is a special package that only contains metadata
55
56
NAT
GLOSSARY
Network address translation is the process of modifying IP address information in
IP packet headers
neighbour A node is neighbour of another node if they are directly connected
Network community A set of nodes placed by the people to connect between them
node
An active device attached to a computer network or other telecommunications network
out-of-the-box A property that means: it does not need manual configuration
Ping
Administration utility used to test the reachability of a host on an Internet Protocol
(IP)
RFC
Request for Comments is a memorandum published by the IETF describing methods,
behaviors, research, or innovations
RIPE
Réseaux IP Européens is a forum open to all parties with an interest in the technical
development of the Internet
router
A device that forwards data packets between computer networks
SDK
A software development kit is typically a set of software development tools that
allows for the creation of applications
shell
A piece of software that provides an interface for users of an operating system
Software
A computer program and related data that provides the instructions for telling a
computer what to do and how to do it
SSID
A wireless network identifier
TCP
Transmission Control Protocol, one of the core protocols of the Internet protocol
suite
Testbed
A platform for experimentation
topology Is the layout pattern of interconnections of the various elements (links, nodes, etc.)
of a computer
UDP
User Datagram Protocol, a simple transport protocol used on the Internet
WAN
A wide area network s a telecommunication network that covers a broad area