1
IBM ILOG ODM Enterprise
Optimization Server and Data Server
Installation Guide
Version 3 Release 6
COPYRIGHT NOTICE
Describes general use restrictions and trademarks related to this document and the software described in this
document.
© Copyright IBM Corp. 1987, 2011
US Government Users Restricted Rights - Use, duplication or disclosure restricted by GSA ADP Schedule Contract
with IBM Corp.
Trademarks
IBM, the IBM logo, ibm.com, WebSphere, and ILOG are trademarks or registered trademarks of International
Business Machines Corp., in many jurisdictions worldwide. Other product and service names might be trademarks
of IBM or other companies. A current list of IBM trademarks is available on the Web at Copyright and trademark
information.
Adobe, the Adobe logo, PostScript, and the PostScript logo are either registered trademarks or trademarks of Adobe
Systems Incorporated in the United States, and/or other countries.
Linux is a registered trademark of Linus Torvalds in the United States, other countries, or both.
Microsoft, Windows, Windows NT, and the Windows logo are trademarks of Microsoft Corporation in the United
States, other countries, or both.
Java and all Java-based trademarks and logos are trademarks or registered trademarks of Oracle and/or its
affiliates.
Other company, product, or service names may be trademarks or service marks of others.
© Copyright IBM Corporation 1987, 2011.
US Government Users Restricted Rights – Use, duplication or disclosure restricted by GSA ADP Schedule Contract
with IBM Corp.
Contents
Chapter 1. IBM ILOG ODM Enterprise
Optimization Server and Data Server
Installation Guide . . . . . . . . . . 1
General information . . .
Before you start . . . .
IBM ILOG ODM Enterprise
Optimization Server . . .
. . . .
. . . .
Data Server
. . . .
. .
. .
and
. .
.
.
.
.
. 1
. 1
.
.
. 3
Chapter 2. IBM ILOG ODM Enterprise
Optimization Server and Data Server
Installation Guide for WebSphere
Application Server . . . . . . . . . . 9
Overview of the installation process . . . . . . 9
Automated ODM Enterprise Optimization Server
and Data Server installation for WAS . . . . . . 13
Automated Installation step 1 – running the
installer. . . . . . . . . . . . . . . 14
Automated Installation step 2 – data collection
14
Automated Installation step 3 – data modification 16
Automated Installation step 4 – installation. . . 20
Manual ODM Enterprise Optimization Server and
Data Server installation for WAS . . . . . . . 22
Manual Installation step 1 – running the installer 22
Manual Installation step 2 – configuring the
ODM Enterprise datasource . . . . . . . . 22
Manual Installation step 3 – configuring the
ODM Enterprise messaging . . . . . . . . 26
Manual Installation step 4 – deploying the
common ODM Enterprise Server EAR
(Application Management) . . . . . . . . 29
Manual Installation step 5 – verifying the
common ODM Enterprise Server EAR
(Application Management) . . . . . . . . 29
Manual Installation step 6 – for Data Server
installation, deploy and configure the Data
Management EAR . . . . . . . . . . . 30
Manual Installation step 7 – for Optimization
Server installation, deploy and configure the Job
Management EAR . . . . . . . . . . . 31
Manual Installation step 8 – for Optimization
Server installation, deploy and configure the Job
Processor EAR . . . . . . . . . . . . 32
Manual Installation step 9 – configuring the
Deployment Directory . . . . . . . . . . 34
Optional – Deploying your ODM applications to an
ODM Enterprise Optimization Server and Data
Server . . . . . . . . . . . . . . . . 35
© Copyright IBM Corp. 1987, 2011
Deployment . . . . . . . . . . . .
Changing the 'Clear ended jobs' option . . .
Monitoring job status . . . . . . . . . .
Reuse of solve subprocesses in Optimization Server
JobProcessor parameters for solve subprocess
reuse . . . . . . . . . . . . . .
Setting Optimization Server JobProcessor solve
subprocess reuse parameters. . . . . . .
Setting subprocess reuse parameters for
individual ODM applications . . . . . .
Guidelines on how to determine subprocess
reuse parameters . . . . . . . . . .
Additional information for WebSphere
administrators . . . . . . . . . . . .
. 35
. 36
. 37
38
. 38
. 38
. 40
. 41
. 42
Chapter 3. IBM ILOG ODM Enterprise
Optimization Server and Data Server
Installation Guide for WebSphere
Application Server Community Edition
(WASCE) . . . . . . . . . . . . . . 47
Manually Installing ODM Enterprise Optimization
Server and Data Server on WASCE . . . . . . 47
Using the command tool to install IBM ILOG ODM
Enterprise Optimization Server and Data Server on
WASCE. . . . . . . . . . . . . . . . 49
Installation notes, troubleshooting and references for
installing IBM ILOG ODM Enterprise Optimization
Server and Data Server on WASCE . . . . . . 50
Chapter 4. IBM ILOG ODM Enterprise
Optimization Server and Data Server
Installation Guide for JBoss . . . . . 55
ODM Enterprise Optimization Server and Data
Server for JBoss installation . . . . . . . . .
Installed components for JBoss installation . . .
Downloading the software and running the
configuration script . . . . . . . . . . .
Starting and stopping the JBoss Optimization
Server and Data Server . . . . . . . . .
Optional – Deploying your ODM applications to
a JBoss Optimization Server and Data Server . .
Monitoring job status . . . . . . . . . .
55
55
56
57
57
59
Index . . . . . . . . . . . . . . . 61
iii
iv
Optimization Server and Data Server Installation Guide
Chapter 1. IBM ILOG ODM Enterprise Optimization Server and
Data Server Installation Guide
This installation guide provides installation instructions for IBM® ILOG® ODM
Enterprise Optimization Server and Data Server on either WebSphere® Application
Server (WAS) or JBoss 4.2.1.
General information
This overview provides general information about IBM ILOG ODM Enterprise
Optimization Server and Data Server, their architecture and the benefits they offer
to users of IBM ILOG ODM Enterprise.
IBM ILOG ODM Enterprise Data Server and Optimization Server are components
of IBM ILOG ODM Enterprise that allows remote, concurrent, queued, multi-user
solving and data maintenance for ODM applications. They are exclusively available
for ODM applications that are deployed in multi-user mode, using any database
supported for the ODM Scenario Repository.
Additional information about the architecture and benefits of Data Server and
Optimization Server can be found in the IBM ILOG ODM Enterprise Data Server and
Optimization Server section of this Installation Guide.
Supported databases
The following databases are supported for use as the Data Server and
Optimization Server datasource for ODM Enterprise in a production environment:
v IBM DB2® V9
v Oracle Database 10g
v Oracle Database 11g
v Microsoft SQL Server 2005
v Microsoft SQL Server 2008
Supported platforms
IBM ILOG ODM Enterprise Optimization Server is available on the following
platforms:
v On Microsoft 32–bit or 64–bit Windows: WebSphere Application Server 6.1 or
7.0, WebSphere Application Server Community Edition 2.1.1.5, and JBoss 4.2.
v On 64–bit AIX®: WebSphere Application Server 6.1 or 7.0 and WebSphere
Application Server Community Edition 2.1.1.5.
In both cases, the databases supported as the Optimization Server datasource are
the same as for the ODM Scenario Repository database: Oracle 10g and 11g, IBM
DB2 v9, and Microsoft SQL Server 2005/2008.
Before you start
This section lists assumptions made in this installation guide and tasks that should
be performed before you start the IBM ILOG ODM Enterprise Optimization Server
and Data Server installation.
© Copyright IBM Corp. 1987, 2011
1
This installation guide makes several assumptions. These assumptions are detailed
in the points below. You should read this section over and make sure that any
tasks listed as “assumed” have been performed before installing IBM ILOG ODM
Enterprise Optimization Server and Data Server on your instance of either
WebSphere Application Server (WAS) or JBoss 4.2.1.
v This installation guide contains procedures for installing IBM ILOG ODM
Enterprise Optimization Server and Data Server on either WebSphere
Application Server (WAS) or JBoss 4.2.1. Choose the section of the installation
guide that corresponds to the type of Application Server you are using.
v For the WebSphere installation:
– This guide assumes that an instance of WebSphere Application Server is
installed on the machine where IBM ILOG ODM Enterprise Optimization
Server and Data Server are being installed, and is working properly. This
installation guide does not cover installation procedures for WAS. Consult the
IBM WebSphere documentation if you need to install WAS before proceeding.
– It is assumed that the user performing the installation has sufficient
knowledge of WebSphere, its administrative console, and its normal functions
to be able to follow the instructions. If this is not the case, again refer to the
IBM WebSphere documentation for help.
– Two installation procedures are presented for WebSphere — an Automated
Installation and a Manual Installation. The Automated Installation is
recommended as a starting point, and uses scripts that result in a finished
installation that requires no further configuration. The Manual Installation
procedure is presented as an alternative, and requires the use of the WAS
administration console to configure the Optimization Server and Data Server
components.
– This installation guide assumes a standard installation of a single-server setup
of WebSphere Application Server. Specific recommendations are made about
the naming of certain resource reference names based on that assumption,
and based on providing the easiest “install path” for our users. The
Automated Installation procedure has some provisions to accommodate
alternate resource names that would conform to your IT policy. If you have
made significant modifications to your instance of WAS, take note of the
recommendations appearing in Warning boxes throughout the Manual
Installation procedure and proceed accordingly.
v For the JBoss installation:
– Before you can work with the standalone version of ODM Enterprise
Optimization Server and Data Server, you must download the JBoss
application server software, and then run a script to configure it. Instructions
for how to do this are included in this installation guide.
– For the JBoss installation procedures to work correctly, you should have a
Java Development Kit (JDK) installed. If you do not have one, you can
download it from http://www.ibm.com/developerworks/java/jdk/. You
should also create a JAVA_HOME environment variable pointing to the parent
Java JDK directory.
v The “Optional – Deploying your ODM applications to an ODM Enterprise
Optimization Server and Data Server” on page 35 and “Optional – Deploying
your ODM applications to a JBoss Optimization Server and Data Server” on
page 57 step in this installation guide assume knowledge of and access to IBM
ILOG ODM Enterprise Developer Edition. If this is not the case, you may need
the assistance of an ODM Enterprise developer to complete this optional step.
It assumes that 1) an ODM Enterprise project has been created and is ready for
deployment, and 2) that a database has been created to serve as the ODM
2
Optimization Server and Data Server Installation Guide
Scenario Repository (which is different than the application server datasource
covered in these installation procedures).
Since this step is performed after the IBM ILOG ODM Enterprise Optimization
Server and Data Server installation has been completed, you can also allow
ODM Enterprise developers to perform it from their own machines. They will
need to know the URL of the applcation server instance and have HTTP
network connectivity to it.
Completion of the Optimization Server and Data Server installation is not
dependent on the ODM application having been created or the existence of a
database for the ODM Scenario Repository.
Note:
For customers who wish to distribute IBM ILOG ODM Enterprise Optimization
Server and Data Server to users using a scripted installation, you need to be aware
of the following information.
When running the installer interactively, there is a step in which the user is asked
to verify that they have read and accepted the license agreement. There are
additional steps in which you are expected to indicate your choice of installation
options. If you create a scripted distribution that runs the installers in ‘silent
mode,’ this step will not be performed by default, and the installation will fail.
To correct this, you can use response files to provide the expected input to the
installer. How to create such response files for the IBM ILOG ODM Enterprise
Client installer, Developer installer, and Server installer are contained in the Silent
installation of IBM ILOG ODM Enterprise section of the IBM ILOG ODM
Enterprise Developer Edition documentation.
IBM ILOG ODM Enterprise Data Server and Optimization Server
This overview of IBM ILOG ODM Enterprise Data Server and Optimization Server
provides information about their architecture and the benefits they offer to users of
IBM ILOG ODM Enterprise.
IBM ILOG ODM Enterprise is a robust and scalable execution environment for
ODM Enterprise-based planning applications.
For planners, Data Server and Optimization Server deliver sophisticated decision
support to the rich ODM Studio GUI, without burdening the client with the
computationally intensive work of solving optimization models.
For IT departments and development teams, ODM Enterprise:
v Conforms to standard corporate IT environments and requirements.
v Supports solving optimization models applied to scenario data from the ODM
Scenario Repository.
v Supports remote concurrent and multi-user invocations from ODM Studio as
well as scheduled runs in batch mode.
v Allows solves and intensive computations like Search Goal Bounds operations to
be performed on a fast server rather than on the user's local machine.
Once installed, the configuration, deployment, redeployment, and removal of IBM
ILOG ODM Enterprise applications to and from the ODM Enterprise platform is
simple and effortless, and is performed from the ODM Enterprise IDE.
Chapter 1. IBM ILOG ODM Enterprise Optimization Server and Data Server Installation Guide
3
For information on installing and configuring a Data Server and Optimization
Server for use during development with IBM ILOG ODM Enterprise Developer
Edition, see the ODM Enterprise Optimization Server and Data Server Installation
Guide for Development section in this documentation set.
For information on installing and configuring a Data Server and Optimization
Server for a production environment, see the Chapter 1, “IBM ILOG ODM
Enterprise Optimization Server and Data Server Installation Guide,” on page 1,
which is installed on the target machine when the Data Server and Optimization
Server software is installed.
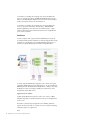
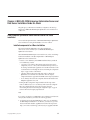
Architecture
To ensure compliance with corporate standards, ODM Enterprise leverages the
Java Enterprise Edition platform architecture to seamlessly integrate within existing
application server deployments such as the IBM WebSphere Application Server
environment. A typical ODM Enterprise installation is diagrammed below:
To manage deployed ODM Enterprise applications, and to interact with ongoing
optimizations, ODM Enterprise provides Web interfaces to any client including the
ODM Enterprise IDE, the ODM Studio, the ODM Planner, or batch processes using
the ODM Service APIs. For maximum portability, the communication is made
through HTTP requests (Web services).
Application and Jobs database
Together with the ODM Scenario Repository used to store scenarios, an ODM
Enterprise setup requires an additional database for Data Server and Optimization
Server to work.
This database contains the deployed applications, the submitted optimization
requests and their current state. It is accessible to all server components (including
management and processor applications).
Note:
4
Optimization Server and Data Server Installation Guide
Although they are conceptually two different databases for two different purposes,
it is possible to use the same database server for both the ODM Scenario
Repository and the Application and Jobs database. If this is done, it is wise to
define different database users or schemas for the two databases to ensure better
isolation.
Application Management application
The Application Manager application provides the entry point to deploy and
undeploy applications.
Data Server Management application
The Data Server Management application provides the entry point to the ODM
Scenario Repository for clients. It handles the connection to the ODM Scenario
Repository for all deployed applications.
In addition, at regular and configurable intervals, it performs maintenance tasks on
the ODM Scenario Repository such as cleaning orphan sessions and data left over
as a result of disconnected clients.
Optimization Server Management application
The Optimization Server Management application provides the entry point to list
submitted jobs and to interact with ongoing optimization jobs.
In addition, it monitors the ongoing jobs to detect jobs that are no longer logging
any activity and makes sure that another available processor takes over, because
this is usually a sign that an error occurred on the server hosting the processor
application.
The management application is the only entry point for clients of the Optimization
Servers. Clients will never directly interact with a job processor application.
Optimization Server Job Processor application
The Optimization Server Job Processor application is responsible for performing
the actual optimization.
Whenever a new job is submitted, it is notified and processes the request if there is
any available slot. Otherwise it waits for a slot to become available before
processing the submitted request. By default, the processor application is able to
process three optimization jobs in parallel. This is a configurable parameter on the
processor application.
The optimization takes place in a sub process where the native optimization code
will be executed. The job processor maintains a pool of sub processes by deployed
application.
The job processor application can be deployed to one or more servers. The more
servers it is deployed to, the more concurrent optimization jobs the platform will
be able to handle.
If the processor application has been deployed on many servers, the first server
with free optimization slots will take the job waiting to be processed.
Chapter 1. IBM ILOG ODM Enterprise Optimization Server and Data Server Installation Guide
5
Scalability and load-balancing
Scalability is achieved by deploying the Job Processor application to more servers.
Although one server can already solve multiple optimization jobs in parallel, when
this limit is reached on one server, configuring additional servers will make it
possible to solve even more jobs.
Load balancing and fail-over are achieved by adhering to Java Enterprise Edition
fail-over protocols (clustering); if one processor application is too busy or fails,
another processor application takes over.
With regard to clustering, the IBM ILOG ODM Enterprise architecture is designed
to allow deployment of several Job Processor Nodes in a cluster of machines, to
provide additional scalability. Note that such deployments can take multiple forms
depending on the J2EE platform, the configuration of database and machines, and
other factors. Support for clustering requires good J2EE expertise. Because of this
variability of cases, no step-by-step deployment guide is provided for those
advanced configurations, although IBM Product Support will help with any
product-related issue in such configurations.
The ODM Enterprise platform can also be deployed on some (but not all) high
availability architectures. This can include high availability databases (Oracle or
DB2 HA versions), high availability of management applications (Application
Management, Data Server Management, Optimization Server Management)
through a HTTP balancer, and active/passive hardware replication. As HA
architectures vary in their capabilities, prices and software requirements, it is
recommended to check with your IBM representative for a service engagement to
help you define and validate any HA architecture you might need.
A document called Building a High Availability ODM Enterprise environment has been
made available on the IBM Product Support network, and can be accessed using
the following link: http://www-01.ibm.com/support/docview.wss?rs=203
&q1=ODME&uid=swg27017270&loc=en_US&cs=utf-8&lang=en .
Interacting with ongoing optimizations
While an optimization is running on one of the servers where the Job Processor
application has been deployed, client applications (like ODM Planner Studio) can
interact with the ongoing optimization process. For an ODM client application,
such interactions include accepting the current solution already found by the
optimization, relaxing more requirements, and stopping the optimization.
Interactions with these ongoing jobs from clients go through the management
application. Then the management application will send a notification to all servers
running the processor application. This notification is sent through a dedicated
Java Messaging Service (JMS) topic configured during the installation of the
Optimization Server (all servers running one of the ODM Enterprise applications
must have been registered to this topic to receive the notification, and must be able
to reply). All running Job Processor applications will receive the notification but
only the Job Processor application currently executing the specific optimization will
handle it and reply to the management application once it has executed the
requested interaction.
6
Optimization Server and Data Server Installation Guide
Monitoring Data Server and Optimization Server
While the planners are working, IT administrators can monitor the performance of
ODM Enterprise using a Web-based console. The console is accessible from the
Optimization Server management application. On a typical setup, its location will
be http://<hostname-of-the-server>/odme/console/.
From the console, IT administrators can monitor ongoing and completed job
processes, abort ongoing jobs, perform maintenance task to clear the completed
jobs and undeploy unused ODM applications.
In the Optimization Server, a job (a processing operation on a scenario) can have
several states:
The state of current and past jobs can be seen in the ODM Enterprise Optimization
Server console.
Chapter 1. IBM ILOG ODM Enterprise Optimization Server and Data Server Installation Guide
7
The names of these job status types are self-explanatory. Transitional states (shown
in white) are less interesting and can be ignored for monitoring purposes. Instead,
the terminal states (shown in red and green) may be useful.
The transitions to the terminal states are straightforward: NOT_STARTED >
RUNNING > PROCESSED / ABORTED / FAILED /
FAILED_AFTER_TOO_MANY_RETRIES.
If an error is recoverable, the solve process will be restarted, up to five times
(using column RETRY_COUNT), then will go into the state
FAILED_AFTER_TOO_MANY_RETRIES.
The transitory states FAILED_AND_TO_CLEAN and
FAILED_AFTER_TOO_MANY_RETRIES_AND_TO_CLEAN are just used
internally to check that the scenario is correctly unlocked after the failure.
8
Optimization Server and Data Server Installation Guide
Chapter 2. IBM ILOG ODM Enterprise Optimization Server and
Data Server Installation Guide for WebSphere Application
Server
This guide gives you background information on and installation, configuration,
and start/stop instructions for the production versions of IBM ILOG ODM
Enterprise Optimization Server and Data Server. These versions support
production deployment of ODM Enterprise applications, and run on WebSphere
Application Server 6.1 or 7.0.
Overview of the installation process
The procedures that follow describe how to install IBM ILOG ODM Enterprise
Optimization Server and Data Server on an instance of WebSphere Application
Server 6.1 or 7.0. Two procedures are provided: an Automated Installation
procedure and a Manual Installation procedure.
Automated Installation vs. Manual Installation
In the sections that follow, two procedures are provided: an Automated Installation
procedure that should work in most cases and is recommended, and a Manual
Installation procedure that can be used in special cases or for troubleshooting of
any installation issues encountered.
The Automated Installation is recommended as a starting point. The Automated
Installation procedure uses a similar properties response file and modification of that
file approach to that used by WAS itself, and results in a finished installation that
requires no further configuration. The automated installation procedure is
applicable when the ODM Enterprise Server Edition is installed on the host where
WebSphere Application Server is installed.
The Manual Installation procedure is presented as an alternative, or as a
supplement for use in special cases (for example, when the WAS instance is not
installed on the same host as ODM Enterprise Server Edition), or to help
troubleshoot issues encountered during the Automated Installation. It requires the
use of the WAS administration console to configure the Optimization Server and
Data Server components.
CAUTION:
Both procedures are intended for a user who is familiar with WebSphere
Application Server, its numerous options, and the terms by which these options
are referred to or named.
Overview of the Automated Installation procedure
The Automated Installation procedure is a four-part process (although for standard
installations the last three phases can be merged into a single step that takes all
safe defaults; see the Note following this list for details).
1. Run the IBM ILOG ODM Enterprise Optimization Server Edition installer.
This installs the files and scripts needed for Optimization Server installation on
the machine that contains an instance of WAS. During this product installation
© Copyright IBM Corp. 1987, 2011
9
phase, you will be asked to select the server components that you want to
install (Data Server, Optimization Server, or both, according to your license
entitlement). Only components that have been selected during installation will
be subsequently available for installation onto the application server.
2. Data collection. In the next step of the procedure, you run the server
installation script in genprop mode against the existing WAS installation to
gather data about that installation. The WAS installation is 'introspected' or
'scanned' for existing definitions and the resulting data is stored in a generated
properties response file that is then used as input for the next step.
3. Data modification. In this step you analyze the properties response file and
modify it, specifying the exact settings you want. Static lines in the properties
response file (those that should not be changed) are preceded by a # comment
indicator. Lines that indicate settings that can be changed are preceded with a !
comment indicator.
Note that this step may be skipped if you opt for a standard default
installation, in which case the response file produced by Step 2 can directly be
used in subsequent Step 4. See the note below about running steps 2 and 4
together using the auto option
4. Installation. In the final stage of the procedure, you run the same script in
install mode, which uses the properties response file as an input and
implements your choices to install and configure the Optimization Server and
Data Server components.
Note:
There is an additional auto mode for the installation, that runs the genprop and
install (steps 2 and 4 above) in one operation, using safe standard default
settings. For example, to run the script in this mode, the syntax would be:
installServer auto was.home=WAS_HOME
[optimserver.install.props=Props_response_file]
[was.profile=WAS_PROFILE]
[components=All]
Syntax of the installServer script
Usage:
installServer genprop|install|auto was.home=<WAS_HOME>
[optimserver.install.props=<Props_response_file>]
[was.profile=<WAS_PROFILE>]
[components=All|DataServer|OptimServer]
[propName=propValue]
The was.home parameter is mandatory; others can be specified or will have
defaults. Additional information on the syntax:
v was.home must point to the WebSphere Application Server home (install)
directory.
v optimserver.install.props can be set to override the default properties file
name. This defaults to
optimserver.install.<profilename>.<hostname>.properties.
v was.profile points to the filename of a WAS profile file, if used. This defaults to
AppSrvODMEnterprise. If the specified (or defaulted) profile does not exist, it will
be created. If it exists, it will set up with the ODM Enterprise server resources
creating or using J2EE resources with the default values.
10
Optimization Server and Data Server Installation Guide
v components can optionally be set to DataServer or OptimServer to install only the
specified component, or to All (the default, and assumed if components is not
specified). All means to install all components that have been selected during
product installation.
v propName=propValue are optional property name-value pairs which can be used:
– When configuring a DB2, Oracle, or Microsoft SQL Server JOBSDB, set the
name-value pairs; for example, was.db.user and was.db.password.
– To use a DB2 JOBSDB in auto mode, the following must be set:
- was.jdbc.provider.type=DB2
- db2.dir or db2.java.dir
- db2.host
- db2.port
- db2.database
– To use an Oracle JOBSDB in auto mode, the following must be set:
- was.jdbc.provider.type=Oracle
- oracle.lib.dir
- oracle.host
- oracle.port
- oracle.database
– To use a Microsoft SQL Server JOBSDB in auto mode, the following must be
set:
- was.jdbc.provider.type=SQL Server
-
sqlserver.lib.dir
sqlserver.host
sqlserver.port
sqlserver.database
Two types of Automated Installation are supported
The Automated Installation procedure works equally well in either of two
scenarios:
v If you run the data collection script in step 2 above against either a WAS
instance that has a WAS profile and existing J2EE resources, you have the option
of using these resources or specifying different ones, which will be created
automatically.
v If you run the data collection script in step 2 above against a ‘blank’ or ‘empty’
instance of WAS (meaning that its WAS profile does not exist), the installation
scripts will:
– Create the WAS profile.
– Create a Derby database for the Optimization Server's JOBS DB.
– Create the optimization tables in this Derby database.
– Create all JMS resources, new bus, topics, etc.
– Installs the Optimization Server EAR files.
Note:
Note that Derby database creation takes place only if Derby is selected as the
database. DB2, Oracle, or Microsoft SQL Server can also be selected, but in this
Chapter 2. IBM ILOG ODM Enterprise Optimization Server and Data Server Installation Guide for WebSphere Application Server
11
case a database administrator will have to setup the database, using the SQL
scripts provided in the <Install_dir>\Server\server\databases directory to
create the tables.
See also the Note in the “Prerequisites” section below for additional information
about the Derby database.
Overview of the Manual Installation procedure
The Manual Installation procedure is a multi-part process:
1. Run the IBM ILOG ODM Enterprise Server installer. This installs the files
and scripts needed for Optimization Server installation on the machine that
contains an instance of WAS. The Data Server and Optimization Server
components will be selected during this product installation.
2. Configure the ODM Enterprise datasource. This and all subsequent
procedures are performed manually using the WAS admin console.
3. Configure the ODM Enterprise messaging.
4. Deploy and configure the common ODM Enterprise Server EAR (Application
Management).
5. Verify the common ODM Enterprise Server EAR (Application Management)
6. For Data Server installation, deploy and configure the Data Server Data
Management EAR.
7. For Optimization Server installation, deploy and configure the Optimization
Sever Job Management EAR.
8. For Optimization Server installation, deploy and configure the Optimization
Server Job Processor EAR.
9. Configure the Deployment Directory.
Prerequisites
Before starting either the Automated Installation procedure or the Manual
Installation procedure, the following things should be checked:
v The WAS 6.1 or 7.0 instance should exist on the target machine. WAS fixpack
levels should match those required by IBM ILOG ODM Enterprise Server.
v WAS Admin security should be turned off. In order to turn off security, the user
should either have WAS administrator privileges, or be assisted by someone
who does. WAS administrative security can be turned back on after the
installation.
v The ODM Enterprise Server database (a JOBS database utilizing DB2, Oracle, or
Microsoft SQL Server) should exist and be accessible, except for Derby
automated installations where the Derby database will be created by the
installation procedure. Again, the user should have administrator privileges on
this database or be assisted by someone who does.
See the Note below for additional information.
v Optional. If you want to complete the “Optional – Deploying your ODM
applications to an ODM Enterprise Optimization Server and Data Server” on
page 35 step listed in this installation guide, the DB2, Oracle, or Microsoft SQL
Server database used as the ODM Scenario Repository should exist, and an
ODM application should exist.
Note:
12
Optimization Server and Data Server Installation Guide
If you are using this procedure to create an instance of Optimization Server on a
new WAS installation that has no DB2, Oracle, or Microsoft SQL Server database
set up as its JOBS database, an option exists in the properties response file to have
the scripts create this datasource for you using the Derby database.
Installed components
The IBM ILOG ODM Enterprise Server installer can be run either on a
Windows-based computer (either 32–bit or 64–bit), or on an AIX-based server.
When it runs, depending on what platform you are installing on, the installer does
several things:
If you are installing on a Windows machine to install the files needed to configure
Optimization Server and Data Server to run on WebSphere Application Server:
v It creates creates a server subdirectory in the ODM Enterprise installation
directory. Under the server subdirectory, it creates:
– A configure-scripts directory that contains scripts to repackage the EARs for
the JBoss application server, if used, and for an Oracle or Microsoft SQL
Server ODM Scenario Repository, if used as the datasource for the application
server. Please refer to the Notes that follow on how to configure for Oracle or
SQL Server.
– A databases directory that contains SQL scripts used to drop and recreate the
Optimization Server database schema for several target databases, if this ever
needs to be done.
– An ears directory that contains the EARs installed on the WebSphere
Application Server. If you installed both Optimization Server and Data Server
during the installation, this directory contains the following EARs:
-
odme-application-mgmt-ear.ear
odme-data-mgmt-ear.ear
optimserver-mgmt-ear-x86_win32.ear
optimserver-processor-ear-x86_win32.ear
If you are installing on a AIX machine to install the files needed to configure
Optimization Server and Data Server to run on WebSphere Application Server:
v It creates a new <Install_dir>/Deployment/server directory. Under the server
directory, it creates:
– A server/configure-scripts/was-resources directory that contains the
specific resources to drive Optimization Server and Data Server installation on
WAS.
– A databases directory that contains SQL scripts SQL scripts used to drop and
recreate the Optimization Server database schema for several target databases,
if this ever needs to be done.
– An ears directory that contains the components to be installed on the
Application Server.
Automated ODM Enterprise Optimization Server and Data Server
installation for WAS
The step-by-step procedures in this section describe the Automated Installation
procedure for IBM ILOG ODM Enterprise Optimization Server and Data Server on
a WAS 6.1 or 7.0 instance. This procedure uses a script to issue the WAS
configuration commands automatically.
Chapter 2. IBM ILOG ODM Enterprise Optimization Server and Data Server Installation Guide for WebSphere Application Server
13
Automated Installation step 1 – running the installer
Rrefer to this procedure for instructions on how to run the IBM ILOG ODM
Enterprise Server installer. The installer should be run on the machine containing
the instance of WAS on which you want to install Optimization Server.
About this task
The first step of the Manual Installation procedure is to run IBM ILOG ODM
Enterprise Server installer on the target machine, the one that contains the WAS
instance you want to install Optimization Server and Data Server on.
Running the installer on Windows
Procedure
Double-click the odme<version>-servers-win-x86-<port>.exe (where <port>
indicates 32 or 64 bits) file, accept the license agreement, and follow the online
instructions.
The ODM Enterprise Optimization Server and Data Server files will be installed in
the <Install_dir>\Server\server directory.
Running the installer on AIX
Procedure
Launch the odme<version>_deployment_aix64.bin installer by typing:
sh ./odme<version > _deployment_aix64.bin
at the prompt.
Follow any online instructions. The ODM Enterprise Optimization Server and Data
Server files will be installed in the <Install_dir>/Deployment/server directory.
Automated Installation step 2 – data collection
This procedure describes how to run the installServer script with the genprop
option to create a properties response file from a named WAS instance.
About this task
The second step of the Automated Installation procedure is to run a script on the
target machine that analyzes the WAS instance and creates a properties response
file as output. To perform this step, you need to know the path of the WAS
installation and a path for the output file.
Overview
The purpose of this step is to detect and gather existing WAS configuration details
and suggest appropriate values in a properties response file. The script will run
either against a ‘blank’ or ‘empty’ instance of WAS (meaning that the specified
WAS profile does not exist), or you can specify an existing WAS profile, in which
case existing J2EE resources that may be used by Optimization Server and Data
Server will be detected and listed.
If you specify a WAS profile that does not exist yet, the script will:
v Add configuration lines (from templates with suggested default J2EE resource
names) to the properties response file to make it easier for you to create new
resources in the new profile.
In addition, if you specify an existing WAS profile, the script will:
14
Optimization Server and Data Server Installation Guide
v Find datasources and list them (commented out and prefixed with use-) in the
properties response file. The script can detect DB2, Oracle, Microsoft SQL Server,
or Derby databases. It will also detect other database artifacts such as JAAS
Authentication Data items and JDBC provider definitions that may be used to
configure Optimization Server and Data Server.
v Find JMS resources and list them (also commented out) in the properties
response file.
Syntax
This step uses the installServer.bat script on Windows or installServer.sh
script on AIX. Both are located in the ...server\configure-scripts\was-resources
directory.
The basic syntax for this command in genprop (data collection) mode is:
installServer genprop was.home=<washome> optimserver.install.props=<config.properties> was.profile=<wasprofile>
where <washome> is the path to your WAS installation, <config.properties> is the
path to the properties response file you want to create (including the filename),
and <wasprofile> is the name of a new or existing WAS profile.
Note:
On AIX, the equal signs (=) in the syntax above are replaced by spaces.
Examples
For Windows:
installServer genprop was.home=c:\IBM\Websphere\AppServer
optimserver.install.props=C:\ILOG\ODME34\Deployment\server\propfilename
was.profile=AppSrvOptim
For AIX:
sh installServer.sh genprop was.home <home>/IBM/Websphere/AppServer
optimserver.install.props <home>/ILOG/<ODME_version>/Deployment/server/propfilename
was.profile AppSrvOptim
Procedure
To perform step 2 of the Automated Installation process:
1. On the target machine, run the installation script (installServer.bat on
Windows, installServer.sh on AIX), using the syntax described above to
launch it in genprop mode, specifying your <washome>, <config.properties>,
and a <wasprofile>.
Running the script with no arguments displays a Help message with
information about syntax and required arguments.
2. If the script runs correctly, a BUILD SUCCESSFUL message should appear.
If there are errors or omissions in your syntax, an error message appears to
help you correct the situation.
3. Open the resulting properties response file (the file you named in the
<config.properties> argument) in a text editor and proceed to the next step.
Chapter 2. IBM ILOG ODM Enterprise Optimization Server and Data Server Installation Guide for WebSphere Application Server
15
Automated Installation step 3 – data modification
This procedure describes how to analyze the properties response file created in
step 2 and modify it to specify your desired options.
About this task
In the third step of the Automated Installation procedure, you analyze the
properties response file created in step 2 and modify it to specify the options and
settings you want. To perform this step, you need to be familiar with the various
WebSphere settings, options, and terminology.
Note that this step may be skipped if you opt for a standard installation with safe
defaults. In this case you would not need to modify the default settings proposed
by the genprop step 2, and may go directly to the install step 4.
Overview
Having generated a properties response file for your WAS installation, in this step
you analyze it and choose the options and settings you want to specify.
The properties response file is a text file containing user information and
instructions, commented out with a # indicator, and actual options to be specified,
commented out with a ! indicator. A partial properties response file is shown
below:
##############################################################################
# WAS instance properties
# Use this property to create a WAS Profile from scratch
!new-was.profile=AppSrvOptim
##############################################################################
# Database authentication JAAS aliases
# The JAAS Authentication Alias will be used or created from the following
# entry to access the JOBS DB database from optimserver
# Authentication alias for user ’system’
!use-was.db.authalias=OptimizationServerAuth
# Default properties to create a JAAS authentication
# Note that the user/password Will also be used to create Derby databases
!new-was.db.authalias=OptimizationServerAuth
!new-was.db.user=system
!new-was.db.password=odm
##############################################################################
. . . [deletions]
##############################################################################
# A new DB2 JDBC provider can be created with the following properties
##############################################################################
!new-was.jdbc.provider.type=DB2
!new-was.jdbc.provider.name="OptimServer DB2 JDBC Provider"
# Directory where DB2 is installed (typically SQLLIB), we expect to find a
# java\ subdirectory with the DB2 JDBC drivers (db2jcc.jar, db2jcc_license_*)
!new-db2.dir=
##############################################################################
# Properties specific to Oracle JDBC Providers
# Select one of the existing Oracle providers to use
##############################################################################
# Setup to create a new Oracle JDBC provider
!new-was.jdbc.provider.type=Oracle
16
Optimization Server and Data Server Installation Guide
!new-was.jdbc.provider.name="OptimServer Oracle JDBC Provider"
# Oracle directory (where ojdbc14.jar is located)
!new-oracle.lib.dir
##############################################################################
. . . [deletions]
In this step, you need to remove the ! comment indicators from in front of the
options you want to specify. The properties file will have some settings
uncommented (those that match the default optimserver values), and you will just
need to review them, and change those that you do not want to have the default
values.
Two types of options are shown in the partial properties response file shown
above:
v !new-<component>=[<argument>] lines, for example:
!new-was.jdbc.provider.type=DB2
or
!new-was.jdbc.provider.name="OptimServer DB2 JDBC Provider"
Removing the ! comment indicator for a line of this type indicates that you want
to create a new resource of this type and identification in your WAS installation.
v !use-<component>=[<argument>] lines, for example:
!use-was.db.authalias=OptimizationServerAuth
Removing the ! comment indicator for a line of this type indicates that you want
to use the existing resource of this type in your WAS installation.
General information about modifying the options
If you have performed a setup using WAS response files, this procedure is similar.
Simply remove the ! comment indicator from in front of the !new- or !use- lines
you want to specify.
Most options require a value after their equal sign, so make sure that the value is
correct or supply it. For !new- resource specifications, a default recommended
value is usually supplied, but you may specify other names to conform to your IT
naming and deployment policies.
Some of the options are “mutually exclusive.” For example, if you use DB2 for
your JOBS database, you would not want to remove the ! comment indicators from
the lines having to do with Derby, Oracle or Microsoft SQL Server. In this case, just
leave the ones that you do not want commented out.
In general:
v if you are working with a ‘blank’ or ‘empty’ instance of WAS (meaning that its
WAS profile did not exist), there will be no !use- lines. So you should remove
the ! comment indicator from almost all of the !new- lines except for the lines
having to do with database setup, which are mutually exclusive. This will create
a WAS profile for you and if Derby is specified will create an instance of Derby
as the JOBS database.
v if you specified an existing WAS profile in step 2, your response file will also
contain lines of the type !use-, meaning that resources exist already for these
options. If you choose to use them, remove the ! comment indicator from the
!use- lines and do not remove the ! comment indicator from the !new- lines in
that section.
Chapter 2. IBM ILOG ODM Enterprise Optimization Server and Data Server Installation Guide for WebSphere Application Server
17
Specific considerations
ODM Enterprise JOBS database considerations:
v By default, optimserver will be set up with a Derby JOBS database with safe
default settings. This default behavior can be overridden by setting additional
properties on the installServer command, either for auto or genprop modes.
v The properties are specified in the installServer command in the form
[property-name property-value]. For example, installServer auto was.home
%WAS_HOME% was.profile profileName propName propValue
Common database properties:
v The property that governs the type of database used is was.jdbc.provider.type,
and it can be set to Derby, DB2, SQL Server, or Oracle.
v The was.jdbc.provider.name property can be changed to set the name of the
JDBC Provider created as a WebSphere resource.
v The database userid and password are set using the was.db.user and
was.db.password properties. Those properties default to system and odm, which
are relevant only when using the embedded Derby database and should be
overridden for DB2, Oracle, and Microsoft SQL Server to match existing
definitions.
Derby JOBS database setup:
v By default, a new Derby database will be created, using the Derby JDBC driver
files provided with ODME, with the database files inside the
was.home/profiles/was.profile/odme directory.
v Two additional property overrides can be set:
– derby.jar.dir points to the directory where the derby.JAR file is located.
– derby.jobsdb.data.dir points to the directory where the Derby JOBSDb will
be created.
v Note that the Derby Database instance and the JOBSDB tables will be created
with the supplied userid and password.
DB2 JOBS database setup:
v When using DB2 for the JOBS database, the database must be created by a DBA,
as well as the tables required by OptimServer. The DDL file to use to create the
DB is <Install_dir>\Deployment\server\database\db2-create-tables.sql.
v The properties that define the DB2 instance characteristics have to be set:
– was.jdbc.provider.type has to be set to DB2.
– db2.dir or db2.java.dir respectively points to the DB2 instance root directory
(typically sqllib), or to the directory where the DB2 JDBC driver files
(db2jcc.jar) can be found.
– db2.host is the IP address or name of the DB2 instance. Defaults to
localhost.
– db2.port the port for the DB2 service. Defaults to 50000.
– db2.database is the name of the database where the tables have been created.
Note that the schema for the tables has to be equal to the DB2 userid.
Defaults to JOBSDB.
v Example:
installServer auto was.home %WAS_HOME% was.profile AppSrvOptimDB2
db2.host 9.123.211.11 db2.port 50000 was.db.user odmserver
was.db.password xxx db2.database ODM db2.dir
E:\\IBM\\SQLLIB was.jdbc.provider.type DB2
18
Optimization Server and Data Server Installation Guide
Oracle JOBS database setup:
v As for DB2, when using Oracle, the tables have to be created first in the Oracle
instance, using <Install_dir>\Deployment\server\database\oracle-createtables.sql.
v The properties that define the Oracle instance characteristics have to be set:
– was.jdbc.provider.type has to be set to Oracle.
– oracle.lib.dir points to the directory where the Oracle JDBC driver files
(ojdbc*.jar) can be found.
– oracle.host is the IP address or name of the Oracle instance. Defaults to
localhost.
– oracle.port the port for the Oracle listener. Defaults to 1521.
– oracle.database is the name of the database where the tables have been
created. Note that the schema for the tables has to be equal to the Oracle
userid. Defaults to ORCL.
v Note regarding the oracle JDBC driver: Oracle 10g uses the ojdbc14.jar driver,
while Oracle 11g uses ojdbc5.jar. Oracle 11g is supported on WAS 6.1 from
fixpack 17 (see http://publib.boulder.ibm.com/infocenter/wasinfo/v6r1/
index.jsp?topic=/com.ibm.websphere.nd.doc/info/ae/ae/
rdat_minreqoracle.html). You can still connect to Oracle 11g databases with the
ojdbc14.jar driver but you may get a warning at runtime.
v Example:
installServer auto was.home %WAS_HOME% was.profile AppSrvOptimOrcl
oracle.host 9.123.211.11 oracle.port 1521 was.db.user odmserver
was.db.password xxx oracle.database ODM oracle.lib.dir
E:\\ORCL was.jdbc.provider.type Oracle
Microsoft SQL Server JOBS database setup:
v When using Microsoft SQL Server, the tables have to be created first in the SQL
Server instance, using <Install_dir>\Deployment\server\database\mssqlcreate-tables.sql.
v The properties that define the SQL Server instance characteristics have to be set:
– was.jdbc.provider.type has to be set to SQL Server.
– sqlserver.lib.dir points to the directory where the SQL Server JDBC driver
files (sqljdbc.jar or sqljdbc4.jar) can be found.
– sqlserver.host is the IP address or name of the SQL Server instance. Defaults
to localhost.
– sqlserver.port the port for the SQL Server listener. Defaults to 1433.
– sqlserver.database is the name of the database where the tables have been
created. Note that the schema for the tables has to be equal to the SQL Server
userid. Defaults to JOBSDB.
The following step-by-step instructions will not cover all possibilities, just the most
important ones. It is assumed that you know best which options you want to
specify for your WAS installation, in accordance with your IT management
policies. Also note that the JDBC and JMS resources required by the Optimization
Server and Data Server components are identical and shared between the two.
Procedure
To perform step 3 of the Automated Installation process:
1. WAS instance properties section — If a !use- line appears, you may want to
remove the comment on this line to preserve the existing WAS profile.
Chapter 2. IBM ILOG ODM Enterprise Optimization Server and Data Server Installation Guide for WebSphere Application Server
19
If there is no !use- line or you want to replace the WAS profile with a new
one, uncomment the !new- line.
2. Database authentication JAAS aliases section — If !use- lines appear in this
section, you may want to remove the comments on these lines to use them to
configure the Optimization Server database access authority.
If there are no !use- lines and you plan to create a database for your WAS
installation with a specific authentication alias, userID, and password,
uncomment the !new- line. Change the system alias, user, and password as
required. The JAAS AuthAlias option is common to all databases, but when
using a new Derby database it is also used to create the Derby database tables.
If you do this, you should also uncomment the appropriate !new- lines in the
Properties specific to Derby JDBC Providers andProperties to create a new
Derby JDBC Provider sections that follow.
3.
4.
5.
6.
Naturally, if you plan to use an existing DB2 or Oracle database, leave all of the
!new- lines in these Derby-specific sections commented. The JAAS AuthAlias
option is common to all databases.
Properties specific to Oracle JDBC Providers section — If you are reusing an
existing Oracle database, remove the comments on the !use- lines to reuse
them. If there are no !use- lines or you plan to use a DB2 or Microsoft SQL
Server database or create a Derby database for your WAS installation, leave all
lines commented.
Properties specific to DB2 JDBC Providers section — If you are reusing an
existing DB2 database, remove the comments on the !use- lines to reuse them.
If there are no !use- lines or you plan to use an Oracle or Microsoft SQL Server
database or create a Derby database for your WAS installation, leave all lines
commented.
JOBS Database specification section — If !use- lines appear in this section,
you may want to remove the comments on the lines that match the database
that you want to use.
If you want to create a new database specification for your WAS installation,
uncomment the !new- lines for that database you specified in earlier steps.
Leave all unused lines commented.
JMS properties section — If !use- lines appear in this section, you may want
to remove the comments on the lines that identify the JMS resources (Queue
Connection Factory, Topic+TCF+ActivationSpec) that you will be using for
Optimization Server and Data Server.
If no !use- lines exist for a certain subsection or you want to change the
option, uncomment the !new- lines for the resources to be created. You may
change the proposed default resources names on the right side of the = sign.
7. Save your changes to the properties response file and proceed to the next step.
Automated Installation step 4 – installation
This procedure describes how to run the installServer script with the install
option to install Optimization Server and Data Server on the WAS instance.
About this task
The fourth and final step of the Automated Installation procedure is to run a script
on the target machine that takes the properties response file modified in step 3 as
input. The script then performs the steps of Optimization Server and Data Server
installation. To perform this step, you need to know the path of the modified
properties response file.
20
Optimization Server and Data Server Installation Guide
Overview
The purpose of this step is to take the properties response file modified in step 3
and use it as input to the installation and configuration process. The script detects
missing or syntactically-incorrect lines and prompts the user if they are present.
Syntax
This step uses the installServer.bat script on Windows or installServer.sh
script on AIX. Both are located in the ...server\configure-scripts\was-resources
directory.
The basic syntax for this command in install (installation) mode is:
installServer install optimserver.install.props=<config.properties>
where <config.properties> is the path to the properties response file modified in
step 2 of this procedure.
Note:
On AIX, the equal signs (=) in the syntax above are replaced by spaces.
Examples
For Windows:
installServer install optimserver.install.props=C:\ILOG\ODME34\Deployment\server\propfilename
For AIX:
sh installServer.sh install optimserver.install.props <home>/ILOG/<ODME_version>/Deployment/server/propfilename
Procedure
To perform step 4 of the Manual Installation process:
1. On the target machine, run the installation script (installServer.bat on
Windows, installServer.sh on AIX), using the syntax described above to
launch it in install mode, specifying your modified <config.properties> file
as input.
2. If the script runs correctly, a BUILD SUCCESSFUL message should appear.
If there are errors or omissions in your syntax or in any of the options specified
in the properties response file (for example, specifying a create line when the
resource already exists), an error message appears to help you correct the
situation.
Results
At this point, IBM ILOG ODM Enterprise Optimization Server and Data Server
should be fully set up and usable on your WAS installation.
If you have access to the IBM ILOG ODM Enterprise Developer Edition, see the
“Optional – Deploying your ODM applications to an ODM Enterprise
Optimization Server and Data Server” on page 35 section of this installation guide,
and refer to the Working with the Deployment Configuration editor section of the IBM
ILOG ODM Enterprise User Manual for information on how to configure and deploy
your ODM applications to use Optimization Server and Data Server.
Chapter 2. IBM ILOG ODM Enterprise Optimization Server and Data Server Installation Guide for WebSphere Application Server
21
Manual ODM Enterprise Optimization Server and Data Server
installation for WAS
The step-by-step procedures in this section describe the Manual Installation
procedure for IBM ILOG ODM Enterprise Optimization Server and Data Server on
a WAS 6.1 or 7.0 instance. This procedure requires the WAS administrator to issue
the WAS configuration commands using the WAS administration console.
Manual Installation step 1 – running the installer
Refer to this procedure for instructions on how to run the IBM ILOG ODM
Enterprise Server Edition installer. The installer should be run on the machine
containing the instance of WAS on which you want to install Optimization Server
and Data Server.
About this task
The first step of the Manual Installation procedure is to run IBM ILOG ODM
Enterprise Server Edition installer on the target machine, the one that contains the
WAS instance you want to install Optimization Server and Data Server on. During
this product installation, you will be asked to select either or both the Data Server
and Optimization Server components.
Running the installer on Windows
Procedure
Double-click the odme<version>-servers-win-x86-<port>.exe (where <port>
indicates 32 or 64 bits) file, accept the license agreement, and follow the online
instructions.
The ODM Enterprise Optimization Server and Data Server files will be installed in
the <Install_dir>\Server\server directory.
Running the installer on AIX
Procedure
Launch the odme<version>_deployment_aix64.bin installer by typing:
sh ./odme<version > _deployment_aix64.bin
at the prompt.
Follow any online instructions. The ODM Enterprise Optimization Server and Data
Server files will be installed in the <home>/ILOG/<ODME_version>/Server/server
directory.
Manual Installation step 2 – configuring the ODM Enterprise
datasource
This procedure shows how to install and configure the datasource used by ODM
Enterprise Optimization Server and Data Server.
About this task
The ODM Enterprise Server requires an XA datasource to store information about
deployed applications and submitted jobs.
The database to support this XA datasource — DB2, Oracle 10g or 11g, or
Microsoft SQL Server 2005 or 2008 — should be installed and a database created
22
Optimization Server and Data Server Installation Guide
on it for ODM Enterprise Server before you start. Also, you will need to know the
administration user name and password for the database.
Attention:
In order to simplify your EAR installation, we recommend that you use the
Resource reference names defined in bold type in this document. You are free to
use any other name but then you will have to review name bindings during
installation to match the names you selected.
Procedure
1. Using your database administration tool, create a new database user and
schema on one of the datasources accessible by your WebSphere servers. Once
created, initialize the environment by executing the right SQL script for your
database (using the scripts found in the databases folder of your IBM ILOG
ODM Enterprise Optimization Server Edition installation).
All servers on which ODM Enterprise Server components will be deployed
must be able to access this datasource.
Note:
For DB2 Users
If you are using DB2 as your datasource, you may need to create a JDBC
provider for it. The required db2jcc.jar can be found in the IBM ILOG ODM
Enterprise Server Edition distribution in the <Install_dir>\Server\lib
directory.
Note:
For Oracle Users
For licensing reasons, the Oracle JDBC Driver (ojdbc5.jar) is not included in
the ODM Enterprise distribution. To use Oracle as your datasource, you must
first download Oracle Database 11g JDBC driver from the following location:
http://www.oracle.com/technology/software/tech/java/sqlj_jdbc/index.html
Next, the ojdbc5.jar must be integrated into the ODM Enterprise distribution
as follows:
v Modify the installation instructions below as follows:
– Before deploying EARs to Application Server, you must repackage the
optimserver-processor EAR and the odme-data-mgmt EAR to incorporate
ojdbc5.jar file in the oplodm/lib folder of the runtime.zip file. This is
located in optimserver-processor-runtimes.jar.
– You can do this manually or use script RepackageEARWithOracle.bat,
located in the server/configure-scripts directory. NOTE: On AIX64 this
script is named RepackageEARWithOracle.sh.
– Using the script, you should put the downloaded ojdbc5.jar file in the
server/configure-scripts directory and then launch
RepackageEARWithOracle.bat. The resulting EARs are copied to the
server/ears directory, and the old EARs are backed up with a .BAK
extension.
Chapter 2. IBM ILOG ODM Enterprise Optimization Server and Data Server Installation Guide for WebSphere Application Server
23
It is also possible, when working with Oracle as your datasource, to see in the
WAS logs indications of XAException errors due to WAS having insufficient
permissions to rollback a XA transaction on Oracle. See the “Troubleshooting”
on page 44 section in this manual for more information.
Note:
For Microsoft SQL Server users
If you want to use Microsoft SQL Server as the ODM Scenario Repository for
your development Optimization Server / WebSphere Application Server
installation (for example, to solve an ODM application that uses a SQL Server
database to store scenarios in its ODM Scenario Repository), you must use the
following procedures.
a. For licensing reasons, the Microsoft SQL Server JDBC Driver file is not
included in the ODM Enterprise distribution. To use SQL Server as your
ODM Scenario Repository, you must first download the appropriate driver
from the fMicrosoft SQL Server JDBC Driver 3.0 driver from the following
location: http://www.microsoft.com/downloads/en/
details.aspx?FamilyID=a737000d-68d0-4531-b65d-da0f2a735707
&displaylang=en.
The driver distribution contains two different JAR files:
v sqljdbc.jar requires a Java Runtime Environment (JRE) of version 5.0.
(The JDBC Driver does not support JRE 1.4. Using sqljdbc.jar on JRE
6.0 will throw an exception when connecting to a database.)
v sqljdbc4.jar requires a Java Runtime Environment (JRE) of version 6.0
or later. (Using sqljdbc4.jar on JRE 1.4 or 5.0 will throw an exception.)
b. Next, the appropriate sqljdbc.jar or sqljdbc4.jar file must be integrated
into the ODM Enterprise distribution. You can do this manually or use
script RepackageEARWithMSSQL.bat, located in the <Install_dir>\Developer\
server\configure-scripts directory.
c. Put the downloaded sqljdbc.jar or sqljdbc4.jar file in the
server\configure-scripts directory and then launch
RepackageEARWithMSSQL.bat. The resulting processor EARs are updated and
copied to the server\ears directory, and the old EARs are backed up with a
.BAK extension.
d. Open the WebSphere Server console, log in, and go to Applications >
Application Types > WebSphere enterprise applications to update your
processor EARs with the updated one.
2. Create the datasource in the WebSphere environment.
24
Optimization Server and Data Server Installation Guide
Name it OptimizationServerDB. Do this even if you also intend to use IBM
ILOG ODM Enterprise Data Server.
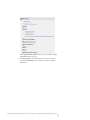
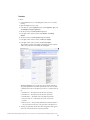
3. In General properties, configure the datasource as necessary so that it can
connect to the ODM Enterprise Server Database set up by your Database
Administrator.
Chapter 2. IBM ILOG ODM Enterprise Optimization Server and Data Server Installation Guide for WebSphere Application Server
25
4. Make sure the connection is valid by testing it.
Tip:
You will need to setup authentication credentials for the database connection.
There are several ways to do this on WAS, either by setting the JDBC username
and password properties in the datasource custom properties. Note that the
default set of Custom properties of a datasource does not include user name
and password. You need to define these two properties yourself. Alternatively,
you can define a JAAS authentication alias and associate it to the datasource.
Note:
It is possible, when working with DB2 as your datasource, to receive at runtime
an error indicating that the system cannot find the necessary TEMP file. See the
“Troubleshooting” on page 44 section in this manual for more information.
Manual Installation step 3 – configuring the ODM Enterprise
messaging
This section contains the procedures the WebSphere administrator should follow to
set up messaging for ODM Enterprise Optimization Server and Data Server.
26
Optimization Server and Data Server Installation Guide
About this task
The ODM Enterprise Server requires a JMS Topic which is used by the ODM
Enterprise Server components to communicate with each other.
All of the installation instructions below assume a standard WebSphere 6.1 or 7.0
installation. If your WebSphere installation is not standard, please contact your
IBM sales representative for additional support.
Attention:
In order to simplify your EAR installation, we recommend that you use the
Resource reference names defined in bold type in this document. You are free to
use any other name but then you will have to review name bindings during
installation to match the names you select.
Procedure
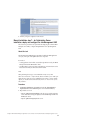
1. Before creating a Topic you must create a service integration bus if you don't
already have one. If you need to create one, name it OptimizationServerBus.
2. Add all servers where you plan to deploy the ODM Enterprise Server
components as members of this bus.
The properties could be created from clicking the corresponding links in this
page:
Chapter 2. IBM ILOG ODM Enterprise Optimization Server and Data Server Installation Guide for WebSphere Application Server
27
3. Create a new Topic with the following properties:
v Make it available to all servers where ODM Enterprise Server components
will be deployed.
v Set its name to OptimizationServerTopic.
v Set its JNDI name to jms/optimserver/Topic.
v Select the service integration bus mentioned earlier.
v Use the default Topic space.
4. Create a new Topic Connection Factory with the following properties:
v Make it available to all servers where ODM Enterprise Server components
will be deployed.
v Set its name to OptimizationServerTopicConnectionFactory.
v Set its JNDI name to jms/optimserver/TopicConnectionFactory.
v Select the service integration bus mentioned earlier.
5. Create a new Queue Connection Factory with the following properties:
v Make it available to all servers where ODM Enterprise Server components
will be deployed.
v Set its name to OptimizationServerQueueConnectionFactory.
v Set its JNDI name to jms/optimserver/QueueConnectionFactory.
v Select the service integration bus mentioned earlier.
6. Create a new Activation specifications with the following properties:
v Make it available to all servers where ODM Enterprise Server components
will be deployed.
v Set its name to OptimizationServerTopicSpec.
v Set its JNDI name to jms/optimserver/TopicSpec.
v Select Topic as the destination type.
v Set the destination JNDI name to jms/optimserver/Topic (the Topic
previously created).
v Select the service integration bus mentioned earlier.
28
Optimization Server and Data Server Installation Guide
Manual Installation step 4 – deploying the common ODM
Enterprise Server EAR (Application Management)
This procedure shows how to deploy the common application management EAR
for ODM Enterprise Server.
About this task
The application management J2EE Enterprise Application handles the server side
deployment of ODM applications for use by both Data Server and Optimization
Server. It is made of a Web application which provides Web Services accessed by
the ODM Enterprise IDE and the ODM Studio clients, and another Web application
which provides a common management User Interface console for deployed ODM
Applications.
Note:
When performing these steps, we recommend the Prompt me only when
additional information is required mode, because it enables you to install your
application more easily. If you have redefined resource names or want to modify
options you should use the advanced mode, Show me all installation options
and parameters.
Procedure
1. In Enterprise Applications, click Install and select the odme-application-mgmtear.ear file from the ODM Enterprise Server installation directory.
2. Map modules to servers:
v Map the odme-application-mgmt-webapp and odme-console-webapp to the
web servers and the application servers that will be serving the requests
from the ODM Enterprise IDE and ODM Studio clients.
3. Finish by saving the configuration to the master.
Manual Installation step 5 – verifying the common ODM
Enterprise Server EAR (Application Management)
This section lists procedures to be performed after deploying the management
application for ODM Enterprise Optimization Server to test the deployment and
verify the installation.
Procedure
Test the deployment:
1. You may need to regenerate the plug-in configuration for your web servers and
to propagate it for the new /server context to be available.
Chapter 2. IBM ILOG ODM Enterprise Optimization Server and Data Server Installation Guide for WebSphere Application Server
29
Tip:
You can find a tutorial on how to generate the plug-in configuration in Guided
Activities
2. Start the application and the servers to which it is deployed.
3. Access the URL http://yourwebserver:port/odme/console/
You should be seeing the console page with two empty tables. This confirms
the web application is correctly deployed and that it can correctly access the
database.
Manual Installation step 6 – for Data Server installation,
deploy and configure the Data Management EAR
This section lists procedures to be performed after deploying the common ODM
Enterprise Server EAR, to configure the Data Server Data Management EAR.
About this task
The Data Management J2EE Enterprise Application handles the server-side
centralized access to the ODM Scenario Repository database, making up the Data
Server component.
It is made of:
v A Web application which provides Web Services accessed by the ODM
Enterprise IDE, ODM Studio clients, and Optimization Server components, for
an ODM application configured for Data Server.
v A Java-2 Connector module used to execute the odmapp file on the server.
v An EJB module for inter-component connectivity.
Note:
When performing these steps, we recommend the Prompt me only when
additional information is required mode, because it enables you to install your
application more easily. If you have redefined resource names or want to modify
options you should use the advanced mode, Show me all installation options
and parameters.
Procedure
1. In Enterprise Applications, click Install and select the odme-data-mgmt-ear.ear
file from the ODM Enterprise Server installation directory.
2. Map modules to servers:
v Map the odme-data-mgmt-webapp to the web servers and the application
servers that will be serving the requests from the ODM Enterprise IDE and
ODM Studio clients.
v Map the odme-data-mgmt-ejb and odme-data-mgmt-rar to the application
server.
30
Optimization Server and Data Server Installation Guide
3. Finish by saving the configuration to the master.
Manual Installation step 7 – for Optimization Server
installation, deploy and configure the Job Management EAR
This section lists procedures to be performed after deploying the common ODM
Enterprise Server EAR, to configure the Optimization Server Job Management
EAR.
About this task
The Job Management J2EE Enterprise Application handles the ODM application
solve jobs, and is part of the Optimization Server component.
It is made of:
v A Web application which will be accessed (through Web Services) by the ODM
Enterprise IDE and the ODM Studio clients.
v An EJB module for inter-component communications, and a timer bean used to
detect stale and failed jobs and restarts them if needed.
Note:
When performing these steps, we recommend the Prompt me only when
additional information is required mode, because it enables you to install your
application more easily. If you have redefined resource names or want to modify
options you should use the advanced mode, Show me all installation options
and parameters.
Procedure
1. In Enterprise Applications, click Install and select the odme-applicationmgmt-ear.ear file from the ODM Enterprise Server installation directory.
2. Map modules to servers:
v Map the optimserver-mgmt-webapp to the web servers and the application
servers that will be serving the requests from the ODM Enterprise IDE and
ODM Studio clients.
v Map the optimserver-mgmt-ejb to the server.
Chapter 2. IBM ILOG ODM Enterprise Optimization Server and Data Server Installation Guide for WebSphere Application Server
31
3. Finish by saving the configuration to the master.
4. Modify the Starting weight field of the optimserver-mgmt-webapp.war, which
must be set to a higher value than the starting weight of the other module
(optimserver-mgmt-ejb.jar), so that the wars are initialized in the proper order:
v In the WAS administration console, navigate to Enterprise Applications >
odme-optimserver-mgmt > Manage Modules > optimserver-mgmtwebapp.war.
v Set the Starting weight field to a value greater than 1.
Note:
If you do not do this, you may experience an exception in the WAS logs when
starting the Optimization Server management application, such as:
[4/14/09 17:53:54:156 CEST] 00000030 WebApp A SRVE0181I: [optimserver-mgmt-ear#optimserver-mgmt-webapp.war] [/optimserver]
[Servlet.LOG]: Failed to initialize job monitoring: com.ibm.websphere.naming.CannotInstantiateObjectException:
A NameNotFoundException occurred on an indirect lookup on the name java:comp/env/ejb/optimserver/JobMonitor. The name
java:comp/env/ejb/optimserver/JobMonitor maps to a JNDI name in deployment descriptor bindings for the application
performing the JNDI lookup. Make sure that the JNDI name mapping in the deployment descriptor binding is correct.
If the JNDI name mapping is correct, make sure the target resource can be resolved with the specified name relative to the default initial context.
[Root exception is javax.naming.NameNotFoundException: Context: IBM-082497Node02Cell/nodes/IBM-082497Node02/servers/server1, name: ejb/optimserver/JobMonitor: First component
Manual Installation step 8 – for Optimization Server
installation, deploy and configure the Job Processor EAR
This section lists procedures to be performed after deploying the common ODM
Enterprise Server EAR, to configure the Optimization Server Job Processor EAR.
About this task
The Job Processor application handles the jobs submitted by ODM Studio. It polls
the database at regular (configurable) interval for new jobs. It can be configured to
handle only a limited number of jobs in parallel. It is made of:
v A resource adapter which starts an external process (odmsolver) and delegates to
this process the optimization
v One bean to serve as a gateway to the Optimization Server datasource
v One bean listening on a topic to receive the end-user interactions sent by the
ODM Studio through the management application over the topic
Important:
Because the external process acts as another ODM client (think of it as an ODM
Studio without the user interface), when deploying ODM Applications, you must
make sure that the ODM Scenario Repository database is accessible (reachable) by
32
Optimization Server and Data Server Installation Guide
the servers on which you have deployed the processor application can reach either
the ODM Scenario Repository database or the ODM Enterprise Data Server when
it is enabled for the ODM application.
Procedure
1. In Enterprise Applications, click Install and select the optimserver-processorear file from the installation directory.
On Windows, its name is optimserver-processor-ear-x86_win32.ear.
On AIX, its name is optimserver-processor-ear-power64_aix5.3_7.0.ear.
Note:
When performing these steps, we recommend the Prompt me only when
additional information is required mode, because it enables you to install
your application more easily. If you have redefined resource names or want to
modify options you should use the advanced mode, Show me all installation
options and parameters.
2. Map modules to servers:
v Map the optimserver-processor-ejb and optimserver-processor-rar to one or
more servers.
3. Finish by saving the configuration to the master.
Chapter 2. IBM ILOG ODM Enterprise Optimization Server and Data Server Installation Guide for WebSphere Application Server
33
Results
The configuration could be updated from this page after installation:
Manual Installation step 9 – configuring the Deployment
Directory
This section contains procedures to be performed to configure the Deployment
directory.
About this task
Once the job processor and data management EARs are added, you may configure
the directory to which they will extract the OPL runtime and the deployed ODM
applications. If you don't do so, the job processor and data server will pick a
generated folder (in the machine's temporary directory) whenever the EAR is
restarted. We recommend you configure this directory.
Procedure
1. To configure this directory, in the Administration console, go to Enterprise
Applications.
2. Select the odme-optimserver-processor EAR and then the Data management
EAR, and apply the following steps to each module.
Click Manage modules under Modules.
Click optimserver-processor-rar (or odme-data-mgmt-rar).
Click Resource Adapter under Additional Properties.
Click Custom Properties under Additional Properties.
Change the value of the property DeploymentDirectoryLocation to a fixed
directory on the application server machine.
8. Repeat steps 3 through 7 above for odme-data-mgmt-rar, if you started with
optimserver-processor-rar.
3.
4.
5.
6.
7.
34
Optimization Server and Data Server Installation Guide
Results
At this point, IBM ILOG ODM Enterprise Optimization Server should be fully set
up and usable on your WAS installation.
If you have access to the IBM ILOG ODM Enterprise Developer Edition, see the
“Optional – Deploying your ODM applications to an ODM Enterprise
Optimization Server and Data Server” section of this installation guide, and refer
to the Working with the Deployment Configuration editor section of the IBM ILOG
ODM Enterprise User Manual for information on how to configure and deploy your
ODM applications to use Optimization Server.
Optional – Deploying your ODM applications to an ODM Enterprise
Optimization Server and Data Server
This section covers the basic steps of configuration and deployment of an ODM
application to a configured server.
Deployment
About this task
Applications cannot be solved on ODM Enterprise Optimization Server or viewed
in Data Server until they have been configured and deployed to the server using
the ODM Enterprise IDE. The procedures to do this are covered in detail in the
Working with the Deployment Configuration Editor section of the ODM Enterprise
User Manual.
Note:
Please note that the protocols used to connect to Optimization Server and Data
Server do not implement any security model or secured protocol. That is, they do
not require any credentials from the client.
What this means is that once Optimization Server and Data Server are deployed,
any client in the enterprise (that is, any user with an installed copy of the ODM
Enterprise IDE) can use its tools and APIs to:
v Deploy ODM applications to the Optimization Server.
v Submit and control solve jobs in the Optimization Server.
v Create and view scenarios using Data Server.
As a result, if security is an issue for you, you should limit access to the ODM
Enterprise IDE to trusted developers.
Important: Initial goal weights in an ODM Enterprise application are not retrieved
from the OPL model when running on the Optimization Server. Unless explicitly
set, all initial weights are set to 1.0. You must explicitly set the initial goal weights
in a deployed ODM Enterprise application to have them taken into account.
The basic steps of configuration and deployment are covered briefly below.
Procedure
1. In the ODM Enterprise IDE, double-click on your application's ODM
Application > <application_name > _deployment_prod.odms file to open the
Deployment Configuration Editor.
Chapter 2. IBM ILOG ODM Enterprise Optimization Server and Data Server Installation Guide for WebSphere Application Server
35
2. On the Target Environment tab of the editor, make sure that the Enterprise
option is active, and that the correct ODM Scenario Repository database has
been specified in the Database area.
3. Still on the Target Environment tab, enter the URL of the application server on
which Optimization Server and Data Server are installed in the Server Location
field, select the Use Data Server for scenario data management and the Use
Optimization Server for performing solve checkboxes.
4. On the Datasources and Additional JARs and Resources tabs, specify any
custom data sources and custom JAR files or resources needed by the
application.
5. Finally, on the Deployment tab, enter the proper To directory and With file
name entries and click the Deploy button to deploy the application to the
Optimization Server instance. All custom data sources and additional resources
that you specified in step #4 will be copied to the target directory when you
deploy.
Changing the 'Clear ended jobs' option
About this task
By default, completed jobs on Optimization Server can be deleted manually using
the Clear ended jobs command in the Optimization Server Console. If no one uses
this command, the completed jobs stay forever and may, over time, overload the
database. To avoid this, a deployment option has been introduced to periodically
delete completed or expired jobs. The expiration date defines the time
Optimization Server keeps completed jobs in its database.
This option must be set at the time of deployment. If you want to reset it after
having deployed an application to an instance of Optimization Server, you must
re-deploy, after having followed the procedures below.
Cleaning options are defined by editing the XML of the relevant deployment
settings file (usually the deployment_prod.odmds file), which contains the
Optimization Server deployment properties, as follows:
<deploymentSettings>
<deployment>
...
<optimserver location="http://localhost/optimserver">
<properties>
<property name="JOBS_CLEAN_AGE" value="-1"/>
<property name="JOBS_CLEAN_KEEP_ERROR" value="-1"/>
</properties>
</optimserver>
...
</deployment>
</deploymentSettings>
where:
v JOBS_CLEAN_AGE is defined in seconds. The completed jobs are deleted after this
specified duration. If not set, or set to -1, cleaning of completed jobs is disabled.
v JOBS_CLEAN_KEEP_ERROR is the number of jobs completed with errors we want to
keep. If not set, or set to -1, all jobs in error are kept. Otherwise keep the
number specified.
By default, auto cleaning is disabled during ODM Enterprise application
development, but it should be adjusted periodically for production by reviewing
these cleaning values Optimization Server Console.
36
Optimization Server and Data Server Installation Guide
Note that this auto clean option is executed periodically using an EJB timer. The
timer expiration period, configured in JobMonitor configuration properties, is
defaulted to 15 minutes. This can explain delay encountered clearing the jobs if
you specify a smaller value than 15 minutes.
Monitoring job status
This section provides information on how to monitor job status for ODM
Enterprise Optimization Server on WebSphere.
In the Optimization Server, a job (a processing operation on a scenario) can have
several states:
The state of current and past jobs can be seen in the ODM Enterprise Optimization
Server console.
The names of these job status types is self-explanatory. Transitional states (shown
in white) are less interesting and can be ignored for monitoring purposes. Instead,
the terminal states (shown in red and green) may be useful.
The transitions to the terminal states are straightforward: NOT_STARTED >
RUNNING > PROCESSED / ABORTED / FAILED /
FAILED_AFTER_TOO_MANY_RETRIES.
If an error is recoverable, the solve process will be restarted, up to 5 times (using
column RETRY_COUNT), then will go into the state
FAILED_AFTER_TOO_MANY_RETRIES.
The transitory states FAILED_AND_TO_CLEAN and
FAILED_AFTER_TOO_MANY_RETRIES_AND_TO_CLEAN are just used
internally to check that the scenario is correctly unlocked after the failure.
Chapter 2. IBM ILOG ODM Enterprise Optimization Server and Data Server Installation Guide for WebSphere Application Server
37
Reuse of solve subprocesses in Optimization Server
IBM ILOG ODM Enterprise Optimization Server V3.5 allows you to reuse solver
subprocesses across solves, instead of being created from scratch for each and
every solve. This reduces the latency by eliminating startup and initialization time
for each new solve.
JobProcessor parameters for solve subprocess reuse
A new set of JobProcessor parameters have been added to ODM Enterprise V3.5
that allow solver processes to be reused to avoid latency and speed solve
processing.
IBM ILOG ODM Enterprise Optimization Server V3.5 introduces a new feature
whereby the solver subprocesses used to run the optimization solve operations can
now be reused across solves, instead of being created from scratch for each and
every solve.
The goal of this feature is to reduce the latency when executing optimization solve
jobs, by saving the time it takes to startup and initialize a new solve subprocess
dedicated to a solve job. This time lapse includes the operating system process
spawning and the ODM application's repository database connections initialization.
This introduces a set of parameters for the JobProcessor which control this
behavior. The new parameters that are introduced are:
v minIdle — The minimum number of idle processes waiting idle in the process
pool for a given deployed ODM application. A value of -1 or 0 means that there
is no minimum.
v maxIdle — The maximum number of idle processes waiting idle in a process
pool for a deployed ODM application. A value of -1 means that there is no
maximum. The value should be greater than or equal to minIdle.
v maxReuse — The number of times a process can be reused before being evicted
from the process pool. A value of -1 means that there is no limit.
v idleTimeLimit — The time limit in minutes of an idle process in a pool for a
deployed ODM application. When a process has been idle for at least the time
limit, it will become a candidate for eviction from the pool. A value of -1 means
that there is no limit.
These parameters' defaults can be set system-wide for the Optimization Server (on
the JobProcessor J2EE Resource Adapter), or individually for each ODM
Application. Procedures for doing this are covered in the following two sections.
Setting Optimization Server JobProcessor solve subprocess
reuse parameters
This section shows how to set the JobProcessor solve process reuse parameters for
an instance of Optimization Server running on WebSphere Application Server
(WAS).
About this task
For an instance of Optimization Server running on WebSphere Application Server
(WAS), the subprocess reuse parameters' system-wide defaults are set in the
optimserverprocessor-rar's resource adapter custom properties, part of the
optimserver-processor-ear enterprise archive.
38
Optimization Server and Data Server Installation Guide
Procedure
To do this:
1. Launch Optimization Server on the WebSphere instance, if it is not already
running.
2. Open the WebSphere Server Console.
3. In the left pane, open the Applications item, expand Application Types, and
click WebSphere enterprise applications.
4. On the next screen, click odme-optimserver-processor.
5. In the right column of the next screen, under Modules, click Manage
Modules.
6. On the next screen, click odme-optimserver-processor-rar.rar.
7. In the right column of the next screen, click Resource Adapter.
8. In the right column of the next screen, click Custom properties.
The parameters are listed on the Enterprise Applications Custom Properties
window, along with their current Value, and a Description.
The Custom Properties names are the same as the parameters listed above,
using initial capitalization and with the prefix Default. The values are taken
as default for this instance of the JobProcessor when no override has been set
up:
v DefaultMinIdle — The default value for the minIdle parameter.
v DefaultMaxIdle — The default value for the maxIdle parameter.
v DefaultMaxReuse — The default value for the maxReuse parameter.
v DefaultIdleTimeLimit — The default value for the idleTimeLimit
parameter.
v NumberOfSessions — This parameter determines the maximum number of
solve processes that may be active at any given time on the JobProcessor.
9. To change any parameter, click its name and a Configuration editor appears,
such as this one for the DefaultIdleTimeLimit parameter:
Chapter 2. IBM ILOG ODM Enterprise Optimization Server and Data Server Installation Guide for WebSphere Application Server
39
10. On the editor, type in a new Value for the parameter and click OK.
11. On the next screen you are asked to save the change to the master
configuration.
What to do next
Note:
Additional ODM application parameters can be set on the Custom Properties
window, using the same procedure. These parameters include
DeploymentDirectoryLocation, NumberOfSessions, OdmJavaArgs, OdmJavaHome,
OdmSolverArgs, OdmSolverNoInheritEnv, ProgressEventsRecordingFrequency, and
SessionAvailableTimeout.
Consult the Description field of each parameter for more information.
Important:
In Websphere Application Server, ODME Server processors use the Default thread
pool to manage optimizations jobs. It is recommended to modify thread pool
configuration based on the configured number of sessions defined to perform
solves concurrently. Five threads should be added per session. To modify the
Default thread pool configuration, open the Administration console page, click
Servers > Server Types > WebSphere application servers > server_name >
Thread pools and select the thread pool named Default. Modify the Maximum
Size threads field to match your needs and save the configuration. Then restart the
server to apply your modifications.
Setting subprocess reuse parameters for individual ODM
applications
This section presents the procedure to set JobProcessor solve subprocess
parameters for an individual ODM application.
The values of the subprocess reuse parameters can be set individually for each
ODM application in the application's .odmds deployment descriptor file. They are
prefixed with optimserver.pool.
40
Optimization Server and Data Server Installation Guide
From the ODM IDE, open the ODM application's .odmds file using the plain text
editor, locate the <optimserver> section and insert a set of <properties> as in the
following:
<optimserver ...>
<properties>
<property name="optimserver.pool.minIdle" value="X"/>
<property name="optimserver.pool.maxIdle" value="Y"/>
<property name="optimserver.pool.maxReuse" value="Z"/>
<property name="optimserver.pool.idleTimeLimit" value="T"/>
</properties>
</optimserver>
These values will override the default values set in the Optimization Server
JobProcessor resource adapter.
Guidelines on how to determine subprocess reuse parameters
This section presents some guidelines for determining when to adjust the solve
subprocess parameters for short-running and long-running ODM applications, and
how to disable subprocess reuse entirely.
The setting of the subprocess reuse parameters will have to take into account the
balance between reduced solve startup latency and resources consumption of idle
standby processes.
Depending on operating system and hardware characteristics, starting and
initializing a new solve process can take in the order of 2 to 10 seconds, so the
determining factor will be the average solve time of the ODM Application to
deploy.
Short-running ODM applications
For ODM applications that have a solve profile of frequent, parallel and relatively
short running in the order of minutes or less, with a low memory footprint,
enabling the subprocess reuse feature will be most useful.
The minIdle parameter would then be set to a value greater than 0, corresponding
to the average number of solve jobs that are likely to be submitted in parallel,
bounded by the available resources of the machine to share across the instances.
The maxIdle parameter would be set to the maximum number of solve jobs that
the machine's resources can handle in parallel. The maxReuse parameter's setting
will depend on the stability of the solve processes, and the potential increase in
memory consumption over time.
Long-runnning ODM applications
For ODM applications having a long-running solve jobs profile, taking in the order
of hours to solve, there will probably be no benefit from the reuse, since the slight
reduction in latency will have a low impact relatively to the overall elapsed solve
time. Moreover, long-running jobs are likely to use more resources which would
not necessarily all get freed at solve completion time, due to internal caching of
repository access data or resources held by custom code.
In this case both minIdle and maxIdle could be set to a value equal to the number
of solve jobs expected to be running in parallel, so as to reduce the initial time it
takes to start the first solve by having a blank prepared subprocess ready, but with
a maxReuse set to 0 so that processes get cleaned up after each solve.
Chapter 2. IBM ILOG ODM Enterprise Optimization Server and Data Server Installation Guide for WebSphere Application Server
41
Disabling subprocess reuse
Setting minIdle, maxIdle and maxReuse all to 0 reverts to the default behavior of
ODM Enterprise V3.4.
Note that the overall number of solve sessions (active processes) at any given time
for all ODM applications is still limited per JobProcessor by the NumberOfSessions
resource adapter parameter, so specifying a minIdle or maxIdle number above this
value has no effect other than mobilizing process resources that will never get
used.
Mixed ODM applications
When a mix of several ODM applications with varying solve profiles is deployed,
the system administrator may use the per-ODM application process reuse
parameters to fine-tune and adjust the load of the Optimization Server subsystem.
In particular, a subset of the solve processing slots available may be dedicated to
the long-running solve ODM applications while leaving one or mode slots free for
ODM applications with jobs that complete in a shorter time.
This would be achieved by setting a NumberOfSessions value equal to the sum of
the maxIdle values set for each ODM application. This would ensure that
long-running ODM applications do not exhaust all the available solve slots and
keep some available for jobs that complete in a shorter time.
Notes to the system administrator
When subprocess reuse is enabled, the JobProcessor manages a pool of standby
instances of the solve subprocess, which will get started and connected to the
ODM application's repository database upon JobProcessor startup, then wait in
standby mode for new solve requests to be processed.
The number of standby instances will be equal to the minIdle parameter for each
ODM application (either system-wide default or ODM application-specific).
After having been used for executing a solve, subprocesses will remain active in
the system's list of tasks, until they reach the maximum number of reuses set in
the maxReuse parameter.
When more than minIdle solves are executing in parallel on a given node,
additional instances of the solve subprocess will be started, up to the maxIdle
parameter value. Those subprocesses will remain active until either their maxReuse
is reached, or they reach their idleTimeLimit uptime.
Additional information for WebSphere administrators
This section describes the two J2EE enterprise applications to deploy on
WebSphere — one for managing applications and jobs, one for the optimization —
and troubleshooting information.
JavaEE information
There are four J2EE enterprise applications to deploy on WebSphere:
v One for managing applications (one per platform)
42
Optimization Server and Data Server Installation Guide
v One for managing server-side ODM Repository data access (one per ODM
application)
v One for managing jobs (one per platform)
v One for the optimization (one per node/server)
These are further broken down as:
v One Application Manager is deployed on a platform:
– Deploys applications; that is, it stores the application in the database.
– Undeploys applications.
– Knows deployed applications.
v One Data Manager is deployed on a platform:
– Accesses the ODM Scenario Repository Database clients.
v One Job Manager is deployed on a platform:
– Handles new job submissions/
– Accepts only job submissions for previously deployed applications/
– Provides an interface to interact with a job running on one of the
optimization nodes/
– Detects dead jobs and acts upon them/
v Many Job Processors can be deployed on a platform, only once on a given node:
– Has a pool of job slots available to solve job requests.
– Finds a job to solve when job slots are not used.
– Runs optimization jobs in sub-processes.
– For a given job, each Job Processor:
- Controls the sub-process executing the solve job.
- Listens for notifications from the job being executed.
- Stores log messages.
- Updates job state.
- Updates the job "heartbeat" to detect dead processes.
- Receives interactive commands from the job manager.
- Forwards interactive commands to the job sub-process.
J2EE uses:
v Webapp as the client front-end/
v JMS (Topic/Queue) to communicate internally/
v JCA to execute sub-processes and server-side ODM applications.
Memory management for Data Server
IBM ILOG ODM Enterprise Data Server is a module running on the application
server. Because it can load a great deal of data into memory, it can be useful to
update memory used by Websphere Application Server.
The memory used by the application server when Data Server is deployed
depends on the volume of scenario data handled by deployed ODM applications.
This parameter can be modified by selecting Servers > Server Types > WebSphere
application servers in the WebSphere console navigation tree, and then the server
where Data Server is deployed (in the screenshot that follows, server1)
Chapter 2. IBM ILOG ODM Enterprise Optimization Server and Data Server Installation Guide for WebSphere Application Server
43
Then in section Server infrastruture, select process definition.
Troubleshooting
ODM Enterprise Deployment Edition automated installer log
IBM ILOG ODM Enterprise Optimization Server (also referred to as the
Deployment Edition of ODM Enterprise) is shipped with an automated script to
install and configure the Optimization Server components onto WebSphere
Application Server.
As of V3.4.0.2, for each run of ${ODME_HOME}/server/configure-scripts/wasresources/installServer.[sh|bat], a log file is created as ${ODME_HOME}/
installServer_nnnnn.log, where nnnnnn is a series of digits.
Information gathered in this log can help when troubleshooting installation
problems; for example, when there is a problem with database connectivity, locked
files, or other system related issues.
Please note that although most error conditions or abnormalities are reported
correctly, in the V3.4.0.2 release some errors, especially when creating the Derby
database, may not be reported or not logged properly.
Restriction on ODM Enterprise Developer Edition installation path on Win64
platforms
ODM Enterprise Developer Edition optionally allows you to install an embedded
instance of WebSphere Application Server (WAS) for use by developers using the
ODM Enterprise IDE to test ODM applications deployed on a locally running
Optimization Server.
WAS has some restrictions on its installation path in the file system, which have
consequences on the ODM Enterprise installation folder beneath which the WAS
embedded instance is installed:
v On Windows 64–bit platforms, the ODM Enterprise Developer Edition
installation path cannot contain the following characters:
{}:;*?"<>|%,=+&'#^!`$[]
44
Optimization Server and Data Server Installation Guide
v WAS is installed under the %ODME_HOME%/server/was_70 path, but WAS allows a
root install path with a maximum of 60 characters. This requires the parent
ODM Enterprise Developer Edition installation path (%ODME_HOME%) to be limited
to a maximum of 47 characters.
The Windows 32–bit ODM Enterprise Developer Edition installer does not enforce
these requirements, and can partially fail on Win64 platforms, resulting in the
embedded WAS instance not being installed.
When using the Win32 installer on Win64 platforms, by default it uses C:\Program
Files (x86)\IBM\ILOG\ODME\Developer as the installation directory. But then the
embedded WAS installation fails because this path is not supported for WAS (it
contains parentheses).
Note that the installation path chosen as a default on Win32 platforms is safe, and
this issue only appears when attempting to install 32–bit ODM Enterprise
Developer Edition on a Windows 64–bit system.
Troubleshooting: The symptoms to help diagnose such a failure are the following
or similar lines in the install logs:
(Mmm Dd, 20xx 10:04:47 PM), Process, com.ibm.ws.install.ni.ismp.actions.WasSilentInstallInputValidationAction, err,
A non-valid installation directory was specified: D:\Program Files (x86)\IBM\ILOG\ODME34\Developer\server\was_70
The defined path must be an absolute path.
The following characters are not supported: {}:;*?"<>|%,=+&’#^!`$[]
The maximum path length is 60 characters for Windows 2000, Windows XP and Windows Vista.
(Sept 16, 2010 10:04:56 PM), Process, com.ibm.ws.install.ni.ismp.actions.SettleNIFRegistryAction, msg1, Current install/uninstall process failed.
(Sept 16, 2010 10:04:56 PM), Process, com.ibm.ws.install.ni.ismp.actions.SetExitCodeAction, msg1, CWUPI0000I: EXITCODE=1
(Sept 16, 2010 10:04:56 PM), Process, com.ibm.ws.install.ni.ismp.actions.ISMPLogSuccessMessageAction, msg1, INSTCONFFAILED
This is not a recommended configuration, but if you have a need to install the
32–bit ODM Enterprise Developer Edition on a 64–bit platform (for example, to
develop 32–bit ODM applications on a 64–bit machine), a workaround is to specify
a different installation path than the default path. This can be done in the first step
of the installation process, and should specify a path that is shorter than 47
characters and contains none of the unsupported characters listed above.
DB2 “cannot find TEMP file” error
It is possible, when working with DB2 as your datasource, to receive at runtime an
error indicating that the system cannot find the necessary TEMP file
If you encounter this error, it can be resolved by creating two Custom Properties:
v progressiveStreaming, with a value of 2
v fullyMaterializeInputStreams, with a value of true
The Integrated Systems Console window used to define these Custom Properties is
shown in the following screenshot:
Chapter 2. IBM ILOG ODM Enterprise Optimization Server and Data Server Installation Guide for WebSphere Application Server
45
Oracle “XAException rollback” errors
When using ODM Enterprise Optimization Server with WebSphere and Oracle,
after a sudden shutdown/disconnection of WAS or the database users may
encounter in the WAS logs errors such as:
DSRA0304E: XAException occurred. XAException contents and details are: The
cause is : null.
DSRA0302E: XAException occurred. Error code is: XAER_RMERR (-3). Exception
is: <null>
WTRN0037W: The transaction service encountered an error on an xa_recover
operation. The resource was
com.ibm.ws.rsadapter.spi.WSRdbXaResourceImpl@a040a04. The error code was
XAER_RMERR. The exception stack trace follows: javax.transaction.xa.XAException
at oracle.jdbc.xa.OracleXAResource.recover(OracleXAResource.java:526)
This is due to WAS having insufficient permissions to rollback a XA transaction on
Oracle.
The fix is to, as user SYS (in SQLPlus, login with connect SYS as SYSDBA), run
the following command on your Oracle server:
v grant select on DBA_PENDING_TRANSACTIONS to PUBLIC;
46
Optimization Server and Data Server Installation Guide
Chapter 3. IBM ILOG ODM Enterprise Optimization Server and
Data Server Installation Guide for WebSphere Application
Server Community Edition (WASCE)
This guide gives you installation instructions for the production versions of IBM
ILOG ODM Enterprise Optimization Server and Data Server. These versions
support production deployment of ODM Enterprise applications, and run on
WebSphere Application Server Community Edition version 2.1.1.5.
Manually Installing ODM Enterprise Optimization Server and Data
Server on WASCE
With IBM ILOG ODM Enterprise V3.6 and later, you can use WebSphere
Application Server Community Edition (WASCE) as a Java Enterprise Edition (Java
EE) application server. The currently supported version of WASCE is version
2.1.1.5.
About this task
To set up the resource in WASCE:
Procedure
1. Download WASCE Version 2.1.1.5 from the IBM website archives.
Important: Ensure that your IBM SDK version used for WAS CE and ODME
Runtime version are aligned. For example if you are using a 64 bit version of
ODM Enterprise, then the WASCE IBM SDK that you use must also be 64 bit.
2. Install the server and then launch the administrative console. You can use the
default user name system and password manager to connect.
3. Derby and DB2 drivers are already installed in WASCE 2.1.1.5. If, however,
you want to use a later version of the DB2 JDBC driver or Oracle and
Microsoft SQL servers you must first install the corresponding driver Java
archive (JAR) file. For more information see http://publib.boulder.ibm.com/
wasce/V2.1.0/en/adding-java-libraries.html.
4. Select Services>Database Pools and Create a new database pool: Using the
Geronimo database pool wizard. Enter OptimizationServerDB for the Name
of the Database Pool and for the Database Type, choose a type as
appropriate for your database:
v For Derby, choose Derby embedded.
v For DB2, select the last option Other as the database type to be able to later
specify some required properties in the Java database connectivity (JDBC)
URL.
v For Oracle, choose Oracle local.
v For SQL Server, choose SQL Server 2005 XA.
Click Next.
5. Following the wizard, select the required Java archive (JAR) files for your
database and enter the appropriate connection information.
v For DB2
© Copyright IBM Corp. 1987, 2011
47
– Enter com.ibm.db2.jcc.DB2Driver for the JDBC Driver Class, and for the
Driver JAR select the required JAR files. For example, select
com.ibm.db2/db2jcc/9.5/jar and com.ibm.db2/db2jcc_license_cu/9.5/
jar. You can use the shift key and mouse to select multiple items.
– Enter the username and password for your database.
– Click Next.
– Enter for JDBC Connect URL:jdbc:db2://server:port/
DB:progressiveStreaming=2; using appropriate values for your server,
port and DB instance.
– Select Local for the Transaction Type.
– You can then click Test Connection to validate your entry.
– If your connection is successful, you will obtain a Connected to DB Test
Result.
– If there is a Connection Error displayed in the Test Result, click Edit
Settings to modify your entries and return to the previous step.
v For other databases enter the appropriate connection information and select
Local for the Transaction Type.
6. Click Deploy.
7. After deployment you can see a list of available database pools displayed.
Select OptimizationServerDB in the Use DataSource list .In the SQL
Command/s pane, paste the script content of the XXX-create-tables.sql file
appropriate for your database and click Run SQL. For example, for DB2, the
file db2-create-tables.sql, is located in <ODME_HOME>Developer\server\
databases and contains SQL code for creating tables which you can copy from
and paste into this pane.
8. Select Services>JMS Resources, and click For ActiveMQ in the section Create a
new JMS resource group. In the Resource Group Name field, enter odme as
the name and keep all of the default options. Click Next.
9. Click Add Connection Factory Create the following JMS resources by first
selecting the appropriate item from the JMS Factory Type list and clicking
Next. You can then enter the Connection Factory Name.
v Queue Connection Factory named
OptimizationServerQueueConnectionFactory
v Topic Connection Factory named
OptimizationServerTopicConnectionFactory
10. Click Add Destination. Create the following JMS resource by first selecting
the appropriate item from the JMS Destination Typelist and clicking Next.
You can then enter the Message Destination Name
v Topic destination named OptimizationServerTopic
11. Click Deploy Now.
12. Select Applications>Deployer, browse and install each enterprise archive
located in the ears folder of your server installation directory.
v odme-application-mgmt-ear
v optimserver-mgmt-ear, optimserver-processor-ear and
cplexserver-processor-ear for Optimization Server
v odme-data-mgmt-ear for Data Server
13. Select Applications>Application EARs. ODM Enterprise modules are listed in
the Component Name section of the Installed Application EARs window.
48
Optimization Server and Data Server Installation Guide
Results
You can see the ODM Enterprise server running on WASCE by accessing the URL
http://localhost:8080/odme/console/. The IBM ILOG ODM Enterprise Dashboard
appears showing the current applications and the job queue.
Using the command tool to install IBM ILOG ODM Enterprise
Optimization Server and Data Server on WASCE
You can setup the ODM Enterprise server by using the command line tool.
About this task
To setup the ODM Enterprise server by using the command line tool:
Procedure
1. Download WASCE Version 2.1.1.5 from the IBM website archives.
Important: Ensure that your IBM SDK version used for WAS CE and ODME
Runtime version are aligned. For example if you are using a 64 bit version of
ODM Enterprise, then the WASCE IBM SDK that you use must also be 64 bit.
2. Install the server and then launch the administrative console. You can use the
default user name system and password manager to connect.
3. Derby and DB2 drivers are already installed in WASCE 2.1.1.5. If, however, you
want to use a later version of the DB2 JDBC driver or Oracle and Microsoft
SQL servers you must first install the corresponding driver. For more
information see http://publib.boulder.ibm.com/wasce/V2.1.0/en/adding-javalibraries.html.
4. Update the configuration properties file located in <ODME_HOME>/server/
configure-scripts/wasce-resources/wasce_setup.properties to reference your
server installation directory.
server.home=<WASCE installation directory>
By default, the script will create and embed a Derby database connection pool
as the OptimizationServerDB, but you can update the configuration properties
file to match your needs:
v db.type=<set to one of the following supported database types: derby, db2,
oracle, mssql>
v Then for a specific database type, enter the following connection information:
(ServerName, PortNumber, DatabaseName, UserName, Password)
If you want use a particular driver that you have installed in the WASCE
artifact repository, you must update the script to reference the corresponding
artifacts used by the database. For example, if you want to use an Oracle
database as the optimization server database and have previously installed the
Oracle JDBC driver in the WASCE artifacts repository, then change the property
file as follows:
db.type=oracle
...
db.oracle.ServerName=127.0.0.1
db.oracle.PortNumber=1521
db.oracle.DatabaseName=orcl
db.oracle.UserName=test
Chapter 3. IBM ILOG ODM Enterprise Optimization Server and Data Server Installation Guide for WebSphere Application Server
Community Edition (WASCE)
49
db.oracle.Password=pwd
jdbc.oracle.driver.groupId=com.oracle
jdbc.oracle.driver.artifactId=ojdbc5
jdbc.oracle.driver.version=10.0
5. Launch the installation using the installServer.bat file if you are using a
Windows system or the installServer.sh file if you are using an AIX system.
These files are located in <ODME_HOME>/server/configure-scripts/wasceresources/.
v If you want to install only the Optimization Server use installServer.bat
OptimServer or installServer.sh OptimServer depending on your target
system.
v If you want to install only the Data Server use installServer.bat
DataServer or installServer.sh DataServer depending on your target
system.
v installServer.bat is equivalent to installServer.bat All
v installServer.sh is equivalent to installServer.sh All
Results
You can see the ODM Enterprise server running on WASCE by accessing the URL
http://localhost:8080/odme/console/. The IBM ILOG ODM Enterprise Dashboard
appears showing the current applications and the job queue.
Installation notes, troubleshooting and references for installing IBM
ILOG ODM Enterprise Optimization Server and Data Server on WASCE
Additional information concerning deployment, artifact repository for IBM ILOG
ODM Enterprise Optimization Server and Data Server on WebSphere Application
Server Community Edition (WASCE) is provided here.
References
For more information on WASCE Version 2.1.1, see http://
publib.boulder.ibm.com/wasce/V2.1.1/en/index.html.
For more information on adding Java libraries, see http://publib.boulder.ibm.com/
wasce/V2.1.0/en/adding-java-libraries.html.
For more information on configuring the database connection pool, see
http://publib.boulder.ibm.com/wasce/V2.1.0/en/database-pool.html.
For more information on Java messaging services, see http://
publib.boulder.ibm.com/wasce/V2.1.0/en/java-messaging-services.html.
For more information on deploying Java EE assets, see http://
publib.boulder.ibm.com/wasce/V2.1.0/en/deploying-assets.html.
Using Oracle as the ODM scenario repository
If you want to use an Oracle server as the ODM Scenario Repository for your
development Optimization Server installation (for example, to solve an ODM
application that uses an Oracle database to store scenarios in its ODM Scenario
Repository), you must use the following procedure to add the driver to the artifact
repository.
50
Optimization Server and Data Server Installation Guide
1. For licensing reasons, the Oracle JDBC Driver (ojdbc5.jar) is not included in
the ODM Enterprise distribution. To use Oracle as your datasource, you must
first download Oracle Database 11g JDBC driver from the following location:
http://www.oracle.com/technology/software/tech/java/sqlj_jdbc/index.html .
2. Next, the -ojdbc5.jar must be integrated into the ODM Enterprise distribution
as follows:
v Before deploying EARs to Application Server, you must repackage the optimserver-processor EAR and the - odme-data-mgmt EAR to incorporate
-ojdbc5.jar file in the oplodm/lib folder of the runtime.zip file. This is
located in optimserver-processor-runtimes.jar.
v You can do this manually or use script RepackageEARWithOracle.bat , located
in the server/configure-scripts directory. On AIX64 this script is named
RepackageEARWithOracle.sh .
v Using the script, put the downloaded ojdbc5.jar file in the
server/configure-scripts directory and then launch
RepackageEARWithOracle.bat . The resulting EARs are copied to the
server/ears directory, and the old EARs are backed up with a .BAK
extension.
Using Microsoft SQL as the ODM scenario repository
If you want to use Microsoft SQL Server as the ODM Scenario Repository for your
development Optimization Server / WebSphere Application Server installation (for
example, to solve an ODM application that uses a SQL Server database to store
scenarios in its ODM Scenario Repository), you must use the following procedures.
1. For licensing reasons, the Microsoft SQL Server JDBC Driver file is not included
in the ODM Enterprise distribution. To use SQL Server as your ODM Scenario
Repository, you must first download the appropriate driver from the Microsoft
SQL Server JDBC Driver 3.0 driver from the following location:
http://www.microsoft.com/downloads/en/details.aspx?FamilyID=a737000d68d0-4531-b65d-da0f2a735707&displaylang=en.
The driver distribution contains two different JAR files:
v sqljdbc.jar requires a Java Runtime Environment (JRE) of version 5.0. (The
JDBC Driver does not support JRE 1.4. Using sqljdbc.jar on JRE 6.0 will
throw an exception when connecting to a database.)
v sqljdbc4.jar requires a Java Runtime Environment (JRE) of version 6.0 or
later. (Using sqljdbc4.jar on JRE 1.4 or 5.0 will throw an exception.)
2. Next, the appropriate sqljdbc.jar or sqljdbc4.jar file must be integrated into
the ODM Enterprise distribution. You can do this manually or use script
RepackageEARWithMSSQL.bat, located in the <Install_dir>\Developer\server\
configure-scripts directory.
3. Put the downloaded sqljdbc.jar or sqljdbc4.jar file in the
server\configure-scripts directory and then launch
RepackageEARWithMSSQL.bat. The resulting processor EARs are updated and
copied to the server\ears directory, and the old EARs are backed up with a
.BAK extension.
Adding a driver to the artifact repository
As an example, this section describes how to add an Oracle JDBC driver to the
artifact repository. Other drivers can be added in the same way.
1. Open the administrative console. You can use the default user name system and
password manager to connect.
Chapter 3. IBM ILOG ODM Enterprise Optimization Server and Data Server Installation Guide for WebSphere Application Server
Community Edition (WASCE)
51
2.
3.
4.
5.
6.
Select Services>Repository.
For the File, browse to the location of the ojdbc5.jar file.
For the Group, enter: com.oracle.
For the Artifact, enter ojdbc5.
For the Version, enter 10.0.
7. For the Type, select jar.
Result: The new driver is listed in the Current Repository Entries list.
Troubleshooting
Refer to the following list of frequently asked questions.
How do I resolve Perm out-of-memory issues when I deploy ODM
Enterprise on WASCE?
Adjust the Java options for WASCE. The default PermSize/MaxPermSize is not
sufficient, so reset JAVA_OPTS before starting up the WASCE server.
set JAVA_OPTS=-XX:PermSize=128M -XX:MaxPermSize=256M
How do I modify the connector properties?
Each ear file contains a specific deployment plan in META-INF/
geronimo-application.xml. This deployment plan can be updated to override
connector default properties by specifying a config-property-setting XML
element in the resourceadapter-instance definition. For example, to change the
optimization server processor deployment location (DeploymentDirectoryLocation
in the optimserver connector), edit the META-INF/ geronimo-application.xml
contained in the optimserver-processor-ear as follows:
<resourceadapter>
<resourceadapter-instance>
<resourceadapter-name>MyInboundEvents</resourceadapter-name>
<config-property-setting name="DeploymentDirectoryLocation">c:/temp/override</config-property-setting>
...
How can I redirect ODM Enterprise logging so that it can be
found in <WASCE_HOME>/var/logs/server.log? A problem occurs
because ODM Enterprise uses java.util.logging and WASCE
uses log4j/slf4j.
You can redirect ODM Enterprise logging as follows:set JAVA_OPTS=
-Djava.util.logging.config.file=<new_configuration.properties> and then start
the WASCE server.
#new_configuration.properties:
java.util.logging.FileHandler.level = FINER
java.util.logging.FileHandler.pattern = C:/temp/applevellogging.log
java.util.logging.FileHandler.limit = 50000
java.util.logging.FileHandler.count = 1
java.util.logging.FileHandler.formatter = java.util.logging.SimpleFormatter
# Limit the message that are printed on the console to INFO and above.
java.util.logging.ConsoleHandler.level = CONFIG
java.util.logging.ConsoleHandler.formatter = java.util.logging.SimpleFormatter
You can then find the ODME log file in the directory C:/temp/
applevellogging.log.
52
Optimization Server and Data Server Installation Guide
How do I manually fix the message bean UnavailableException
issue (Only 10 instances can be created)?
1. Browse to the directory $WASCE_HOME/repository/org/apache/openejb/openejbcore/3.0.1
2. Unzip the jar file openejb-core-3.0.1.jar, and locate the file
META-INF/org.apache.openejb.embedded/service-jar.xml.
3. Edit this file and change the parameter InstanceLimit from 10 to 0
(unlimited): InstanceLimit 0. This parameter is only specified in one location
in the file.
4. Update the jar file openejb-core-3.0.1.jar replacing the original
service-jar.xml file with the edited one.
5. Restart the server.
Chapter 3. IBM ILOG ODM Enterprise Optimization Server and Data Server Installation Guide for WebSphere Application Server
Community Edition (WASCE)
53
54
Optimization Server and Data Server Installation Guide
Chapter 4. IBM ILOG ODM Enterprise Optimization Server and
Data Server Installation Guide for JBoss
This guide gives you information on installation, configuration, and start/stop
instructions for IBM ILOG ODM Enterprise Optimization Server and Data Server
on JBoss 4.2.1.
ODM Enterprise Optimization Server and Data Server for JBoss
installation
How to install development instances of IBM ILOG ODM Enterprise Optimization
Server and Data Server using downloaded JBoss 4.2.1 server software.
Installed components for JBoss installation
This section describes the Optimization Server files installed by the
odme<version>-servers-win-x86-<port>.exe IBM ILOG ODM Enterprise
Optimization Server installer.
When the IBM ILOG ODM Enterprise Server installer is run, it does several things
related to the installation of the JBoss implementation of ODM Enterprise
Optimization Server and Data Server:
v It creates a server subdirectory in the ODME installation directory. Under the
server subdirectory, it creates:
– a configure-scripts directory that contains scripts and resources used to
configure the jboss-4.2.1.GA.zip file downloaded from the provider if you
are creating a standalone JBoss application server. Further information on this
is contained in the “Downloading the software and running the configuration
script” on page 56 section of this manual.
– a databases directory that contains SQL scripts used to configure the
Optimization Server and Data Server datasource. There are scripts to
configure the databases supported for the ODM Scenario Repository database.
– an ears directory that contains the components that must be installed on the
WebSphere Application Server; and
v Running the JBoss configuration script described in the following sections
creates an additional jboss-4.2.1.GA directory, which contains the configured
JBoss server and the batch file used to launch it. Again, refer to the
“Downloading the software and running the configuration script” on page 56
section of this manual for step-by-step instructions.
Note:
If you want to use Oracle as your Optimization Server and Data Server datasource
with your JBoss installation, you must use the following procedures.
1. For licensing reasons, the Oracle JDBC Driver (ojdbc5.jar) is not included in
the ODM Enterprise distribution. To use Oracle as your datasource, you must
first download Oracle Database 11g JDBC driver from the following location:
http://www.oracle.com/technology/software/tech/java/sqlj_jdbc/index.html
© Copyright IBM Corp. 1987, 2011
55
2. Next, the ojdbc5.jar must be integrated into the ODM Enterprise distribution.
You can do this manually or use script RepackageEARWithOracle.bat, located in
the <Install_dir>\Deployment\server\configure-scripts directory.
3. Put the downloaded ojdbc5.jar file in the optimserver/configure-scripts
directory and then launch RepackageEARWithOracle.bat. The resulting EAR is
copied to the optimserver/ears directory, and the old EAR is backed up with a
.BAK extension.
Downloading the software and running the configuration
script
How to download the JBoss application server software, and then use the script
provided to configure it to work with ODM Enterprise Optimization Server.
About this task
Before you can work with the standalone version of ODM Enterprise Optimization
Server and Data Server, you must download the JBoss application server software,
and then run a script to configure it.
Note:
For the following procedures to work correctly, you should have a Java
Development Kit (JDK) installed. If you do not have one, you can download it
from http://www.ibm.com/developerworks/java/jdk/.
You should also create a JAVA_HOME environment variable pointing to the parent
Java JDK directory.
Procedure
1. In your Web browser, navigate to:
http://downloads.sourceforge.net/jboss/jboss-4.2.1.GA.zip
and save the jboss-4.2.1.GA.zip file to your computer.
Note:
If you want to use Oracle as a your scenario database, repackage the EARs
with the proper Oracle driver at this point. Refer to the Note in the
previous“Installed components for JBoss installation” on page 55 section for
instructions on how to do this.
2. Move the jboss-4.2.1.GA.zip file to your <Install_dir>\Deployment\server\
configure-scripts directory.
Do not unzip the file.
3. In that directory, open the jboss_setup.properties file and modify it for your
needs. By default, an embedded Derby database is created.
If you are using an Oracle database, for example, you would modify the file as
follows:
jboss.server=AppSrvOptim
jboss.http.port=8180
db.type=oracle
db.user=system
db.password=odm
db.host=localhost
db.port=1521
db.name=XE
56
Optimization Server and Data Server Installation Guide
Then you would download ojdbc5.jar from the Oracle site and put it in the
<ODME_dir>\Deployment\lib directory, as instructed in the Note mentioned in
step #1.
4. In that same directory, launch the ExtractAndConfigureJBoss.bat script.
5. The script runs, extracting the JBoss software from the archive and configuring
it, and at script completion creates a new jboss-4.2.1.GA directory in
<ODME_dir>\Deployment\server. This target directory can be changed by
supplying a different target directory to the script at the command line:
ExtractAndConfigureJBoss.bat <target JBoss directory>.
6. When the installation script is finished, go into your <target JBoss
directory>\bin directory and launch the command run -c AppSrvOptim
(where AppSrvOptim is the default value of jboss.server properties in
jboss_setup.properties).
Starting and stopping the JBoss Optimization Server and Data
Server
How to start the JBoss Optimization Server and Data Server and stop them
Procedure
1. To launch the JBoss Optimization Server and Data Server, double-click the
following file:
<Install_dir>\Deployment\server\jboss-4.2.1.GA\bin\run.bat
2. To stop Optimization Server and Data Server, press Ctrl-C inside the JBoss
console window. When prompted whether you want to Terminate batch job?
type Y.
Optional – Deploying your ODM applications to a JBoss
Optimization Server and Data Server
How to deploy your ODM applications to solve on an instance of JBoss
Optimization Server and Data Server.
About this task
ODM applications cannot be solved on ODM Enterprise Optimization Server and
Data Server until they have been configured and deployed to the server using the
ODM Enterprise IDE. The procedures to do this are covered in detail in the
Working with the Deployment Configuration Editor section of the ODM Enterprise
User Manual.
The basic steps of configuration and deployment are covered briefly below.
Procedure
1. In the ODM Enterprise IDE, double-click on your application's ODM
Application > <application_name > _deployment_prod.odms file to open the
Deployment Configuration Editor.
2. On the Target Environment tab of the editor, make sure that the Enterprise
option is active, and that the correct ODM Scenario Repository database has
been specified and created in the Database area.
3. Still on the Target Environment tab, enter the URL of the application server on
which Optimization Server and Data Server are installed in the Server Location
field, select the Use Data Server for scenario data management and the Use
Optimization Server for performing solve checkboxes.
Chapter 4. IBM ILOG ODM Enterprise Optimization Server and Data Server Installation Guide for JBoss
57
4. On the Datasources and Additional JARs and Resources tabs, specify any
custom data sources and custom JARs or resources needed by the application.
5. Finally, on the Deployment tab, enter the proper To directory and With file
name entries and click the Deploy button to deploy the application to the
Optimization Server and Data Server instances. All custom data sources and
additional resources that you specified in step #4 will be copied to the target
directory when you deploy.
Results
Changing the ‘Clear ended jobs’ option
By default, completed jobs on Optimization Server can be deleted manually using
the Clear ended jobs command in the Optimization Server Console. If no one uses
this command, the completed jobs stay forever and may, over time, overload the
database. To avoid this, a deployment option has been introduced to periodically
delete completed or expired jobs. The expiration date defines the time
Optimization Server keeps completed jobs in its database.
This option must be set at the time of deployment. If you want to reset it after
having deployed an application to an instance of Optimization Server, you must
re-deploy, after having followed the procedures below.
Cleaning options are defined by editing the XML of the relevant deployment
settings file (usually the deployment_prod.odmds file), which contains the
Optimization Server deployment properties, as follows:
<deploymentSettings>
<deployment>
...
<optimserver location="http://localhost/optimserver">
<properties>
<property name="JOBS_CLEAN_AGE" value="-1"/>
<property name="JOBS_CLEAN_KEEP_ERROR" value="-1"/>
</properties>
</optimserver>
...
</deployment>
</deploymentSettings>
where:
v JOBS_CLEAN_AGE is defined in seconds. The completed jobs are deleted after this
specified duration. If not set, or set to -1, cleaning of completed jobs is disabled.
v JOBS_CLEAN_KEEP_ERROR is the number of jobs completed with errors we want to
keep. If not set, or set to -1, all jobs in error are kept. Otherwise keep the
number specified.
By default, auto cleaning is disabled during ODM Enterprise application
development, but it should be adjusted periodically for production by reviewing
these cleaning values Optimization Server Console.
Note that this auto clean option is executed periodically using an EJB timer. The
timer expiration period, configured in JobMonitor configuration properties, is
defaulted to 15 minutes. This can explain delay encountered clearing the jobs if
you specify a smaller value than 15 minutes.
58
Optimization Server and Data Server Installation Guide
Monitoring job status
Information on how to monitor job status for ODM Enterprise Optimization Server
and Data Server in the JBoss console window.
Once the JBoss instance of ODM Optimization Server and Data Server are running,
you can launch a console window to monitor job status. For instructions on how to
start the server, see “Starting and stopping the JBoss Optimization Server and Data
Server” on page 57.
Chapter 4. IBM ILOG ODM Enterprise Optimization Server and Data Server Installation Guide for JBoss
59
60
Optimization Server and Data Server Installation Guide
Index
C
connector properties (WASCE)
modifying 50, 52
D
DB2 JDBC driver
22
G
guidelines for setting Optimization Server
JobProcessor parameters 41
I
IBM ILOG ODM Enterprise Data
Server 1, 3
architecture 4
Before you start 2
Data Server database 4
installation on JBoss 1
installation on WebSphere Application
Server 1
installation overview 3
memory management 43
monitoring 7
overview 3
IBM ILOG ODM Enterprise Optimization
Server 1, 3
architecture 4
Before you start 2
configuring the Deployment
directory 34
configuring the ODM Enterprise
datasource 22
configuring the ODM Enterprise
messaging 27
console 37
deploying and configuring the Data
Server data management EAR 30
deploying and configuring the
Optimization Server Job
Management EAR 31
deploying and configuring the
Optimization Server Job Processor
EAR 32
deploying applications to WAS 35
deploying the common application
management EAR 29
deploying the data management EAR
for Data Server 29
installation on JBoss 1
installation on WASCE 1
installation on WebSphere Application
Server 1
installation overview 3
interacting with ongoing
optimizations 4
J2EE information 42
© Copyright IBM Corp. 1987, 2011
IBM ILOG ODM Enterprise Optimization
Server (continued)
JBoss application server
components 55
JBoss installation – before you start 2
management application 4
monitoring job status 7, 37
monitoring job status on JBoss 59
Optimization Server database 4
overview 3
processor application 4
scalability and load balancing 4
starting the JBoss admin console 59
Troubleshooting 44
WebSphere installation – before you
start 2
IBM ILOG ODM Enterprise Optimization
Server and Data Server
AIX components 13
manually installing Optimization
Server and Data Server on
WebSphere 14, 22
running the installer on an AIX
server 14, 22
running the installer on Windows 14,
22
starting and stopping the JBoss
server 57
Windows components 13
M
memory management for WebSphere
Application Server
with IBM ILOG ODM Enterprise Data
Server 43
Microsoft SQL Server 22
Microsoft SQL Server JDBC driver 22
O
Optimization Server JobProcessor
parameters
guidelines 41
setting for a single ODM
application 38, 40, 41
setting system-wide 38, 41
Oracle 22
Oracle JDBC driver 22
S
setting Optimization Server JobProcessor
parameters 38, 40
setting the ‘Clear ended jobs’ option 35,
57
solve subprocess reuse to reduce latency
and speed solves 38, 40, 41
T
Troubleshooting
modifying connector properties
(WASCE) 50
Perm out-of-memory (WASCE) 50
redirecting ODME logging for
WASCE 50
Unavailable exception issue
(WASCE) 50
U
Unavailable exception issue
Unavailable exception issue
(WASCE) 50, 53
50
W
WASCE
adding JDBC drivers 50
modifying connector properties 50
Perm out-of-memory 50
PermSize 50
redirecting ODME logging for
WASCE 50
Unavailable exception issue 50
WASCE installation
Command Tool 49
database connection pool 47
Java messaging services 47
manual installation 47
ODM Enterprise EAR files 47
property file 49
wasce_setup.properties file 49
WebSphere Application Server
memory management for Data
Server 43
WebSphere Server Console 38
P
Perm out-of-memory (WASCE)
PermSize (WASCE) 50, 52
50, 52
R
redirecting ODME logging for
WASCE 50, 52
61
62
Optimization Server and Data Server Installation Guide
Printed in USA