1
AlvariSTAR™
Administration Manual
February 2006
P/N 214239
Rev. A
Legal Rights
Legal Rights
© Copyright 2006 Alvarion Ltd. All rights reserved.
The material contained herein is proprietary, privileged, and confidential and
owned by Alvarion or its third party licensors. No disclosure thereof shall be made
to third parties without the express written permission of Alvarion Ltd.
Alvarion Ltd. reserves the right to alter the equipment specifications and
descriptions in this publication without prior notice. No part of this publication
shall be deemed to be part of any contract or warranty unless specifically
incorporated by reference into such contract or warranty.
Trade Names
Alvarion®, BreezeCOM®, WALKair®, WALKnet®, BreezeNET®, BreezeACCESS®,
BreezeMANAGE™, BreezeLINK®, BreezeCONFIG™, BreezeMAX™, AlvariSTAR™,
BreezeLITE™, MGW™, eMGW™, WAVEXpress™, MicroXpress™, WAVEXchange™,
WAVEView™, GSM Network in a Box and TurboWAVE™ and/or other products
and/or services referenced here in are either registered trademarks, trademarks
or service marks of Alvarion Ltd.
All other names are or may be the trademarks of their respective owners.
Statement of Conditions
The information contained in this manual is subject to change without notice.
Alvarion Ltd. shall not be liable for errors contained herein or for incidental or
consequential damages in connection with the furnishing, performance, or use of
this manual or equipment supplied with it.
Warranties and Disclaimers
All Alvarion Ltd. ("Alvarion") products purchased from Alvarion or through any of
Alvarion's authorized resellers are subject to the following warranty and product
liability terms and conditions.
Exclusive Warranty
With respect to the Software, Alvarion warrants the correct functionality
according to the attached documentation, for a period of fourteen (14) months
from invoice date (the "Warranty Period"). During the Warranty Period, Alvarion
may release to its Customers software updates, which include additional
performance improvements and/or bug fixes, upon availability (the "Warranty").
Bug fixes, temporary patches and/or workarounds may be supplied as Software
updates.
ii
AlvariSTAR Administration Manual
Legal Rights
Additional hardware, if required, to install or use Software updates must be
purchased by the Customer. Alvarion will be obligated to support solely the two (2)
most recent Software major releases.
ALVARION SHALL NOT BE LIABLE UNDER THIS WARRANTY IF ITS TESTING
AND EXAMINATION DISCLOSE THAT THE ALLEGED DEFECT IN THE PRODUCT
DOES NOT EXIST OR WAS CAUSED BY PURCHASER'S OR ANY THIRD
PERSON'S MISUSE, NEGLIGENCE, IMPROPER INSTALLATION OR IMPROPER
TESTING, UNAUTHORIZED ATTEMPTS TO REPAIR, OR ANY OTHER CAUSE
BEYOND THE RANGE OF THE INTENDED USE, OR BY ACCIDENT, FIRE,
LIGHTNING OR OTHER HAZARD.
Disclaimer
(a) The Software is sold on an "AS IS" basis. Alvarion, its affiliates or its licensors
MAKE NO WARRANTIES, WHATSOEVER, WHETHER EXPRESS OR IMPLIED,
WITH RESPECT TO THE SOFTWARE AND THE ACCOMPANYING
DOCUMENTATION. ALVARION SPECIFICALLY DISCLAIMS ALL IMPLIED
WARRANTIES OF MERCHANTABILITY AND FITNESS FOR A PARTICULAR
PURPOSE AND NON-INFRINGEMENT WITH RESPECT TO THE SOFTWARE.
UNITS OF PRODUCT (INCLUDING ALL THE SOFTWARE) DELIVERED TO
PURCHASER HEREUNDER ARE NOT FAULT-TOLERANT AND ARE NOT
DESIGNED, MANUFACTURED OR INTENDED FOR USE OR RESALE IN
APPLICATIONS WHERE THE FAILURE, MALFUNCTION OR INACCURACY OF
PRODUCTS CARRIES A RISK OF DEATH OR BODILY INJURY OR SEVERE
PHYSICAL OR ENVIRONMENTAL DAMAGE ("HIGH RISK ACTIVITIES"). HIGH
RISK ACTIVITIES MAY INCLUDE, BUT ARE NOT LIMITED TO, USE AS PART OF
ON-LINE CONTROL SYSTEMS IN HAZARDOUS ENVIRONMENTS REQUIRING
FAIL-SAFE PERFORMANCE, SUCH AS IN THE OPERATION OF NUCLEAR
FACILITIES, AIRCRAFT NAVIGATION OR COMMUNICATION SYSTEMS, AIR
TRAFFIC CONTROL, LIFE SUPPORT MACHINES, WEAPONS SYSTEMS OR
OTHER APPLICATIONS REPRESENTING A SIMILAR DEGREE OF POTENTIAL
HAZARD. ALVARION SPECIFICALLY DISCLAIMS ANY EXPRESS OR IMPLIED
WARRANTY OF FITNESS FOR HIGH RISK ACTIVITIES.
(b) PURCHASER'S SOLE REMEDY FOR BREACH OF THE EXPRESS
WARRANTIES ABOVE SHALL BE REPLACEMENT OR REFUND OF THE
PURCHASE PRICE AS SPECIFIED ABOVE, AT ALVARION'S OPTION. TO THE
FULLEST EXTENT ALLOWED BY LAW, THE WARRANTIES AND REMEDIES SET
FORTH IN THIS AGREEMENT ARE EXCLUSIVE AND IN LIEU OF ALL OTHER
WARRANTIES OR CONDITIONS, EXPRESS OR IMPLIED, EITHER IN FACT OR BY
OPERATION OF LAW, STATUTORY OR OTHERWISE, INCLUDING BUT NOT
LIMITED TO WARRANTIES, TERMS OR CONDITIONS OF MERCHANTABILITY,
FITNESS FOR A PARTICULAR PURPOSE, SATISFACTORY QUALITY,
AlvariSTAR Administration Manual
iii
Legal Rights
CORRESPONDENCE WITH DESCRIPTION, NON?INFRINGEMENT, AND
ACCURACY OF INFORMATION GENERATED. ALL OF WHICH ARE EXPRESSLY
DISCLAIMED. ALVARION' WARRANTIES HEREIN RUN ONLY TO PURCHASER,
AND ARE NOT EXTENDED TO ANY THIRD PARTIES. ALVARION NEITHER
ASSUMES NOR AUTHORIZES ANY OTHER PERSON TO ASSUME FOR IT ANY
OTHER LIABILITY IN CONNECTION WITH THE SALE, INSTALLATION,
MAINTENANCE OR USE OF ITS PRODUCTS.
Limitation of Liability
(a) ALVARION SHALL NOT BE LIABLE TO THE PURCHASER OR TO ANY THIRD
PARTY, FOR ANY LOSS OF PROFITS, LOSS OF USE, INTERRUPTION OF
BUSINESS OR FOR ANY INDIRECT, SPECIAL, INCIDENTAL, PUNITIVE OR
CONSEQUENTIAL DAMAGES OF ANY KIND, WHETHER ARISING UNDER
BREACH OF CONTRACT, TORT (INCLUDING NEGLIGENCE), STRICT LIABILITY
OR OTHERWISE AND WHETHER BASED ON THIS AGREEMENT OR
OTHERWISE, EVEN IF ADVISED OF THE POSSIBILITY OF SUCH DAMAGES.
(b) TO THE EXTENT PERMITTED BY APPLICABLE LAW, IN NO EVENT SHALL
THE LIABILITY FOR DAMAGES HEREUNDER OF ALVARION OR ITS EMPLOYEES
OR AGENTS EXCEED THE PURCHASE PRICE PAID FOR THE PRODUCT BY
PURCHASER, NOR SHALL THE AGGREGATE LIABILITY FOR DAMAGES TO ALL
PARTIES REGARDING ANY PRODUCT EXCEED THE PURCHASE PRICE PAID
FOR THAT PRODUCT BY THAT PARTY (EXCEPT IN THE CASE OF A BREACH OF
A PARTY'S CONFIDENTIALITY OBLIGATIONS).
iv
AlvariSTAR Administration Manual
Legal Rights
Important Notice
This user manual is delivered subject to the following conditions and restrictions:
This manual contains proprietary information belonging to Alvarion Ltd. Such
information is supplied solely for the purpose of assisting properly authorized
users of the respective Alvarion products.
No part of its contents may be used for any other purpose, disclosed to any
person or firm or reproduced by any means, electronic and mechanical,
without the express prior written permission of Alvarion Ltd.
The text and graphics are for the purpose of illustration and reference only.
The specifications on which they are based are subject to change without
notice.
The software described in this document is furnished under a license. The
software may be used or copied only in accordance with the terms of that
license.
Information in this document is subject to change without notice.
Corporate and individual names and data used in examples herein are
fictitious unless otherwise noted.
Alvarion Ltd. reserves the right to alter the equipment specifications and
descriptions in this publication without prior notice. No part of this
publication shall be deemed to be part of any contract or warranty unless
specifically incorporated by reference into such contract or warranty.
The information contained herein is merely descriptive in nature, and does not
constitute an offer for the sale of the product described herein.
AlvariSTAR Administration Manual
v
About This Manual
This manual describes the administration procedures performed on
AlvariSTAR.
This manual is intended for personnel that are responsible for
managing the AlvariSTAR Network Management System. It is
assumed that the reader is familiar with the operation and use of
AlvariSTAR. The information provided in this manual is
complementary to the information provided in the AlvariSTAR User
Manual and the AlvariSTAR Installation Manual. Refer to these
manuals for additional information.
This manual includes the following chapters:
Chapter 1 - Introduction to AlvariSTAR Administration. Provides
an overview of the AlvariSTAR components and of the manual’s
content.
Chapter 2 - Administering the Application Server. Details the
administration procedures that should be performed on the
Application Server.
Chapter 3 - Administering the Mediation Agent. Details the
administration procedures that should be performed on the
Mediation Agent.
Chapter 4 - Database Management. Provides information on
managing the database (for Versant and Oracle) and for
controlling the size of the database.
Chapter 5 - Administering the Client Application. Provides
information on administration of the remote client application.
Chapter 6 - Administering the Network Infrastructure. Provides
information on administration of the network infrastructure,
including the discovery mechanism and firewall settings.
About This Manual
Chapter 7 - Activation of Built-In Functionalities. Provides information on
activating some of AlvariSTAR’s built-in tools, including e-mail notification of
alarms and events and Northbound interfaces.
Chapter 8 - Using the AlvariSTAR Tracing Capability. Provides information on
the Tracing capability for analysis and diagnosing problems.
Chapter 9 - Troubleshooting
viii
AlvariSTAR Administration Manual
Contents
Chapter 1 - Introduction to AlvariSTAR Administration
1.1
Introduction ............................................................................................................... 2
Chapter 2 - Administering the Application Server
2.1
Memory Tuning ......................................................................................................... 4
2.2
Removing the Log ..................................................................................................... 6
2.3
Removing the Temp Files ......................................................................................... 7
2.4
Running AlvariSTAR as a Service ........................................................................... 8
2.5
Running AlvariSTAR as Daemon ............................................................................. 9
2.6
Manually Starting and Stopping the AlvariSTAR Daemon .................................. 11
Chapter 3 - Administering the Mediation Agent
3.1
Mediation Agent ...................................................................................................... 14
Chapter 4 - Database Management
4.1
Introducing Databases ........................................................................................... 16
4.2
Versant Database Management ............................................................................. 17
4.3
4.2.1
Embedded Database Sizing ....................................................................... 17
4.2.2
Database Size Warning .............................................................................. 17
4.2.3
dbbackup/dbrestore .................................................................................... 18
4.2.4
Versant Administration Utilities ................................................................... 19
Oracle Database Management ............................................................................... 24
4.3.1
Oracle Backup ............................................................................................ 24
4.3.2
On-line/Off-line Backup (OS) ...................................................................... 24
Contents
4.3.3
4.4
Device Driver Upgrade ............................................................................... 24
Database Growth Control ....................................................................................... 27
Chapter 5 - Administering the Client Application
5.1
Administering the Remote Client Application ...................................................... 30
Chapter 6 - Administering the Network Infrastructure
6.1
6.2
AlvariSTAR Configuration ...................................................................................... 32
6.1.1
AlvariSTAR Client Discovery Mechanism ................................................... 32
6.1.2
Overriding the Discovery Mechanism ......................................................... 32
6.1.3
Configuring the Network Ports Used by AlvariSTAR .................................. 32
Configuring XP SP2 Firewall Settings Used by AlvariSTAR Client .................... 36
6.2.1
Connection Description ............................................................................... 36
6.2.2
Windows XP Verification ............................................................................. 36
Chapter 7 - Activation of Built-In Functionalities
7.1
7.2
Enabling E-Mail Notification of Alarms & Events ................................................. 44
7.1.1
Sending an E-mail Notification Manually .................................................... 45
7.1.2
Sending E-mails Automatically Upon Reception of Events ........................ 47
Activating the Northbound Interface ..................................................................... 50
7.2.1
Setting Up the Environment ........................................................................ 51
7.2.2
Creating a Northbound Filter ...................................................................... 51
7.2.3
Using Northbound Filters ............................................................................ 52
Chapter 8 - Using the AlvariSTAR Tracing Capability
8.1
Using the AlvariSTAR Tracing Capability ............................................................. 56
x
AlvariSTAR Administration Manual
Contents
Chapter 9 - Troubleshooting
9.1
General ..................................................................................................................... 60
9.2
Discovery Issues ..................................................................................................... 61
9.3
Client Connection Issues ....................................................................................... 63
9.4
Application Server Initializing Issues .................................................................... 64
9.5
Support Issues ........................................................................................................ 65
AlvariSTAR Administration Manual
xi
1
Chapter 1 - Introduction to
AlvariSTAR Administration
In This Chapter:
“Introduction” on page 2
Chapter 1 - Introduction to AlvariSTAR Administration
1.1
Introduction
AlvariSTAR is a complex N-Tier type software system that comprises five major
subsystems:
Application Server - The Application Server, which typically runs on a
dedicated workstation, enables the system to process incoming events and
communicate with equipment and network devices.
Mediation Agent Server- The Mediation Agent acts as a bridge between the
managed devices and the Application Server. It routes and translates various
protocol messages (SNMP, TFTP, Telnet, etc.) between the network devices and
the Application Server. Its main purpose is to relieve the Application Server
from performing these tasks. In high-load configurations, several Mediation
Agents can be deployed to provide fail-over and/or load balancing.
Database Server - The Database Server provides the centralized storage for all
data in the AlvariSTAR application.
Client application - An end-user application with a Java based Graphical User
Interface (GUI) that enables user access to AlvariSTAR management
information and processes.
Network infrastructure - The protocol and ports that are used for
communication between the components of the application.
Each of the above components has its specific configuration and administration,
partly independent of actual deployment and partly dependent on the type of
deployment: Unix or Windows, Client/Server or Single Station, etc.
This manual outlines the operations relevant to each component that are
available in order to administer and maintain the whole application, and to
activate other built-in functionalities.
In addition, AlvariSTAR's comprehensive tracing capabilities are described.
The final section comprises basic troubleshooting indications based on the
experience gathered following a large number of field events, and is aimed at
simplifying the problem analysis and solution-finding operations.
2
AlvariSTAR Administration Manual
2
Chapter 2 - Administering the
Application Server
In This Chapter:
“Memory Tuning” on page 4
“Removing the Log” on page 6
“Removing the Temp Files” on page 7
“Running AlvariSTAR as a Service” on page 8
“Running AlvariSTAR as Daemon” on page 9
“Manually Starting and Stopping the AlvariSTAR Daemon” on
page 11
Chapter 2 - Administering the Application Server
2.1
Memory Tuning
As with any server system, proper memory tuning is crucial for the overall
AlvariSTAR system performance. This section details how to configure the memory
allocation for the AlvariSTAR Application Server and Mediation Agents.
To modify the memory allocation settings of the Application Server:
1
In the oware/bin/startappserver script file, locate the line that starts with:
JAVA_OPTS="$SERVER_FLAG -Xconcurrentio -XX:MaxPermSize=128m
-ms256m -mx256m
2
Edit the file using the following options to control the memory allocation
process:
-ms
Specify the initial size, in bytes, of the memory allocation
pool. This value must be a multiple of 1024 greater than
1 MB. Append the letter k or K to indicate kilobytes, or m
or M to indicate megabytes.
Examples:
-ms6291456
-ms6144k
-ms6m
-mx
Specify the maximum size, in bytes, of the memory
allocation pool. This value must a multiple of 1024 greater
than 2 MB. Append the letter k or K to indicate kilobytes,
or m or M to indicate megabytes. The default value is
64 MB.
Examples:
-mx83886080
-mx81920k
-mx80m
For example, in order to increase the maximum allocated memory to 1 GB,
specify the maximum size, in bytes, of the memory allocation pool. This value
4
AlvariSTAR Administration Manual
Memory Tuning
must be a multiple of 1024 greater than 2 MB. Append the letter k or K to indicate
kilobytes, or m or M to indicate megabytes. The default value is 64 MB. Examples:
-Xmx83886080
-Xmx81920k
-Xmx80m
The recommended values are: -ms256m -mx1024m (note that the minimum
memory setting was left unchanged).
To modify the memory allocation settings of the Mediation Agent:
In cases where the Mediation Agents run on different hosts than the Application
Server, the same mechanism can be used with the oware/bin/startmedagent
script file.
AlvariSTAR Administration Manual
5
Chapter 2 - Administering the Application Server
2.2
Removing the Log
The Application Server's log should be removed on a regular basis (depending on
the growth size), in order to keep it from becoming inflated over time.
The log is located as follows:
<AlvariSTAR root>/oware/logs/appserver.log (for Unix)
<AlvariSTAR root>\oware\logs\appserver.log (for Windows)
To remove the Log:
1
Stop the Application Server.
2
Remove the file.
Upon restarting, the Application Server log file will be re-created.
6
AlvariSTAR Administration Manual
Removing the Temp Files
2.3
Removing the Temp Files
In order to refresh the operation environment, such as the partition name or IP
address, remove the contents of the Application Server Temp folder.
The Temp folder is located as follows:
<AlvariSTAR root>/oware/temp (for Unix)
<AlvariSTAR root>\oware\temp (for Windows)
To remove the content of the Temp folder:
1
Stop the Application Server.
2
Remove the files from the Temp folder.
Upon restarting the Application Server, the files in the Temp folder will be
re-created.
AlvariSTAR Administration Manual
7
Chapter 2 - Administering the Application Server
2.4
Running AlvariSTAR as a Service
When running the AlvariSTAR Application Server on the Windows platform, no
further configuration is necessary after installation, in order to run it as a service.
The service is started automatically.
NOTE
The Application Server is initiated only after login.
8
AlvariSTAR Administration Manual
Running AlvariSTAR as Daemon
2.5
Running AlvariSTAR as Daemon
By default, the AlvariSTAR installer configures the system to run the AlvariSTAR
Application Server as a daemon. However, additional configuration procedures,
described in this section, are necessary to enable this feature. This is because the
daemon startup script (/etc/rc2.d/S76owprocmon) needs to have the Oracle
environment variables set. The easiest way to do this is to log on as root and
manually enter the same variable definitions at the beginning of the
/etc/rc2.d/S76owprocmon file:
#!/bin/sh
INSTALL_ROOT=/opt/alvaristar
# Oware Process Monitor start/stop script
# This script is generally in /etc/rc2.d
#
ORACLE_HOME=/opt/oracle
PATH=$ORACLE_HOME/bin:/usr/bin:/etc:/usr/ccs/bin:/usr/openwin/bin:$PATH
LD_LIBRARY_PATH=$ORACLE_HOME/lib:/usr/local/lib:$LD_LIBRARY_PATH
export ORACLE_HOME
export PATH
export LD_LIBRARY_PATH
myname=`basename $0`
logger -p daemon.notice "$myname - Invoked with option(s) '$*'"
…
NOTE
The inserted lines are marked in bold. You need to substitute the ORACLE_HOME value with
the actual home folder used when you installed the Oracle client. Confirm this information with
your DBA or system administrator.
The Oracle server needs to be up-and-running when the /etc/rc2.d/S76owprocmon script is
being executed.
Another way of doing this is to place all the Oracle environment variables in a file
(e.g. initoracleenv) in the home of the user that owns AlvariSTAR and then source
the file both in the profile file of the user (for the installation variables) and the
/etc/rc2.d/S76owprocmon script. Make sure that you have execute permissions
(a+x) for the created file.
For example, if the name of the user that owns the AlvariSTAR installation is
alvari and its home folder is /export/home/alvari, you need to create a file named
/export/home/alvari/initoracleenv:
AlvariSTAR Administration Manual
9
Chapter 2 - Administering the Application Server
#!/bin/bash
ORACLE_HOME=/opt/oracle
PATH=$ORACLE_HOME/bin:/usr/bin:/etc:/usr/ccs/bin:/usr/openwin/bin:$PATH
LD_LIBRARY_PATH=$ORACLE_HOME/lib:/usr/local/lib:$LD_LIBRARY_PATH
export ORACLE_HOME
export PATH
export LD_LIBRARY_PATH
NOTE
You need to substitute the ORACLE_HOME value with the actual home folder used when you
installed the Oracle client. Confirm this information with your DBA or system administrator.
Mark the newly created file as executable: chmod a+x
/export/home/alvari/initoracleenv. Then, in root mode modify the
/etc/rc2.d/S76owprocmon file as follows:
#!/bin/sh
INSTALL_ROOT=/opt/alvaristar
# Oware Process Monitor start/stop script
# This script is generally in /etc/rc2.d
#
source /export/home/alvari/initoracleenv
myname=`basename $0`
logger -p daemon.notice "$myname - Invoked with option(s) '$*'"
…
10
AlvariSTAR Administration Manual
Manually Starting and Stopping the AlvariSTAR Daemon
2.6
Manually Starting and Stopping the
AlvariSTAR Daemon
To manually stop the AlvariSTAR server daemon (for maintenance or other tasks),
use the following command in superuser (root) mode:
/etc/rc2.d/S76owprocmon stop
To start the AlvariSTAR server daemon after a manual stop, use the following
command in superuser (root) mode:
/etc/rc2.d/S76owprocmon start
AlvariSTAR Administration Manual
11
3
Chapter 3 - Administering the
Mediation Agent
In This Chapter:
“Mediation Agent” on page 14
Chapter 3 - Administering the Mediation Agent
3.1
Mediation Agent
The Mediation Agent is usually started on its host tier as a daemon/service
depending on the operating system.
The Mediation Agent is the component of the AlvariSTAR application that
communicates with the network elements. The main protocols used for this
communication are SNMP, via ports 161 and 162 (UDP), and RMI (TCP). These
ports must be unbound by any other processes in order for the mediation server
to be initialized properly.
14
AlvariSTAR Administration Manual
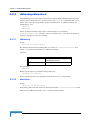
4
Chapter 4 - Database Management
In This Chapter:
“Introducing Databases” on page 16
“Versant Database Management” on page 17
“Oracle Database Management” on page 24
“Database Growth Control” on page 27
Chapter 4 - Database Management
4.1
Introducing Databases
You can manage the size of the AlvariSTAR database as well as plan its backup
and restoration. This chapter discusses these database management procedures,
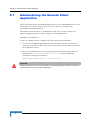
including installation both with the supplied Versant database and the supported
Oracle database.
In addition to correctly sizing your database, it is recommended to develop a plan
to regularly back up the database, including steps to verify this backup with
recovery. The frequency of backups depends on your environment, but you should
back up often enough to minimize data loss.
In order to keep your database on a controllable growth path some indications are
supplied.
16
AlvariSTAR Administration Manual
Versant Database Management
4.2
Versant Database Management
4.2.1
Embedded Database Sizing
You initially install the embedded database as a relatively small instance (see the
setup.ini file for the size). This is important to note, because errors occur when
you reach the size limit of the database. Therefore, after installing, resize the
Versant databases to fit your application. See Section 4.2.4 for information about
the tools to do this.
To estimate your database size, you can use either of two approaches:
Watch it run, adding new volume as your implementation demands it, until
the size demand stabilizes.
Use the following formula for estimating database size depending on O, the
average network element size in the database and N, the number of managed
network elements (the average network element size is device driver dependent
and is specified in the device driver release notes):
Size = 1800K + (1.25 * (O+40) * N)
Use this formula to anticipate database size growth, and add volumes in
advance. This can be accomplished by using the addvol command in
\oware3rd\versant\6_0_0\NT\bin. For a description of the addvol parameters,
see Section 4.2.4.
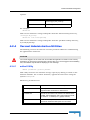
4.2.2
Database Size Warning
A management event occurs when the database size exceeds a threshold value in
the application. If you have Event Services installed, it catches the event and
creates an alarm. You can alter the threshold by overriding the following
properties in Oware/lib/owatabase.properties:
## This property sets the default database size monitor threshold.
## If the percent of space remaining in the busdb drops below
## this threshold, warning messages appear on the appserver console.
com.dorado.bom.space_threshold=10
com.dorado.bom.KB_threshold=5000
##******
## This property sets the default list of databases for size check.
## Example:
com.dorado.bom.space_monitor.dblist=bom,log,classes,metadata,cntl
##
com.dorado.bom.space_monitor.dblist=bom,log
##******
AlvariSTAR Administration Manual
17
Chapter 4 - Database Management
4.2.3
dbbackup/dbrestore
The following section describes the included AlvariSTAR administration tools for
backup and restoration. To run the scripts, type oware at a command line, press
Enter, then type the script name at the command line. To (offline) backup all
applications, use:
dbbackup
dbrestore
These automate backup and restore of all databases to/from the
oware/db/<subdirectory> location, where <subdirectory> is the type of database
(classes, metadata, lrep, cntl, busdb).
4.2.3.1
dbbackup
Usage:
dbbackup [-d <Device Name>]
By default, the database backup files are stored in /owareapps/db_backup. Use
option -d to store backup files in a different location.
Options:
-d <Device name>
Backup device name. Defaults to
/owareapps/db_backup.
-h
Show help.
For example:
dbbackup
Backs up databases to default backup directory
dbbackup -d c:/mybackup
Backs up databases to the specified backup directory, c:/mybackup.
4.2.3.2
dbrestore
Usage:
dbrestore [-d <Device Name>]
By default, this reads the database backup files from /owareapps/db_backup. If the
files are in a different location, use -d on the command line.
18
AlvariSTAR Administration Manual
Versant Database Management
Options:
-d <Device name>
Backup device name. Defaults to
/owareapps/db_backup.
-h
Show help.
For example:
dbrestore
This restores databases using backup files from the default backup directory,
/owareapps/db_backup.
dbrestore -d d:/work/mybackup
This restores databases using backup files from the specified backup directory,
d:/work/mybackup.
4.2.4
Versant Administration Utilities
The following sections describe the Versant-provided utilities for administering
the application's databases.
CAUTION
You must be logged in as the same user who installed the application for these to work correctly,
especially if you are trying to use these from a remote client. If you are not logged in as the installing
user, some utilities may fail without displaying an error message.
4.2.4.1
addvol Utility
addvol parameters [options] dbname
This utility increases the database storage capacity by adding a volume to the
database dbname. For a remote database, append the node name using the
syntax dbname@node.
Mandatory parameters are:
-n volume name
The name for the new volume, for example -n volume2
-p volume path
The full path to the volume file to be created. This can be
expressed either in absolute or relative terms.
-s volume size
The size of the volume to be created. The default size is
128 MB. Indicate kilobytes with K and megabytes with M.
For instance: -s 1024M (for a 1 gigabyte volume).
-i
Pre-allocate disk space and initialize the volume. This
prevents an insufficient disk space error at runtime.
AlvariSTAR Administration Manual
19
Chapter 4 - Database Management
NOTE
The new space is available immediately after the command finishes.
4.2.4.2
dbtool Utility
dbtool [options] dbname
Displays information about the specified database depending upon options
selected.
Options can be one of the following:
-u
Print system usage of shared memory, processes,
threads, and connections associated with the specified
database.
-P
List the names, sizes, and locations of all data storage
volumes associated with the specified database.
For example:
dbtool -P group
Volume 0:
Sysname "sysvol" Size: 131072K
Pathname
"/net/vp/mvp/lang/george/versant/db/group/
system"
In the above case, the database group has one data
storage volume named sysvol. It is 131,072 KB in
size and is in
/net/vp/mvp/lang/george/versant/db/group/system.
-F
Print the free space available in the entire database,
counting all the volumes. The output appears both as a
percentage of free DB space and number of free
kilobytes.
For example, to check the free space available in the
database: spdb.
dbtool -F spdb
Percentage of free space in DB : 98%
Total available free space in DB :
141120KB
20
AlvariSTAR Administration Manual
Versant Database Management
-Fv
Print the free space available in the entire database
counting all the volumes. Also print the space details for
each individual volume in the database. The output is
printed both as a percentage of free DB (or volume)
space and number of free kilobytes. This is the verbose
option and can be used with any of the other options. This
provides a more verbose output as this database has
three additional volumes.
dbtool -Fv spdb
Volume 0:
Sysname "sysvol" Size: 131072K
Pathname "/db/ara/spdb/system"
Percentage of volume space free in sysvol
: 98%
Free space in vol sysvol : 129632KBVolume
256:
Sysname "vol1" Size: 4096K
Pathname "/db/ara/spdb/vol1"
Percentage of volume space free in vol1 :
93%
Free space in vol vol1 : 3840KB
Volume 257:
Sysname "vol2" Size: 4096K
Pathname "/db/ara/spdb/vol2"
Percentage of volume space free in vol2 :
93%
Free space in vol vol2 : 3840KB
Volume 258:
Sysname "vol3" Size: 4096K
Pathname "/db/ara/spdb/vol3"
Percentage of volume space free in vol3 :
92%
Free space in vol vol3 : 3808KB
Percentage of free space in DB : 98%
Total available free space in DB :
141120KB
AlvariSTAR Administration Manual
21
Chapter 4 - Database Management
4.2.4.3
startdb Utility
startdb dbname
Starts the database dbname. For a remote database, append the node name to the
database name using the syntax database@node.
Example:
startdb my_db
If the database was previously interrupted during a transaction, starting the
database automatically starts a database recovery process. Starting a database
with startdb creates an operating environment, performs any necessary recovery
and cleanup operations, and prepares the Versant Manager and Versant Servers
for access.
Starting a database is optional, because an attempt to connect to a database
starts that database if it is not already started. To stop a database explicitly, use
the stopdb utility.
After a crash, a startdb failure may not be reported on the screen and may have to
be read from a file named LOGFILE in the database directory. The absence of the
cleanbe process also indicates a startdb failure.
During execution of startdb the following message may be displayed:
Init SDA failed...
This means that the system does not have enough shared memory. In such cases
either increase system swap space, reduce the server process heap size, or stop
some other database using the same machine.
4.2.4.4
stopdb Utility
stopdb [-noprint] [option] dbname
Stop the database dbname and remove all database resources in memory. For a
remote database, append the node name to the database name using the syntax
database@node.
To stop a database, you must be the user who started it, and thus the owner of its
shared memory. For example, to stop a database named db_test:
stopdb db_test
By default, a database is not stopped if any application is using it. The following
options override the default behavior.
22
AlvariSTAR Administration Manual
Versant Database Management
-noprint
Suppress display messages while stopdb is running.
-st
Wait for active transactions to complete and then safely
stop the database. This option blocks new transactions. If
you attempt to start a new transaction while stopdb is
waiting, the system generates the following error:
SM_TR_XACTS_BLOCKED being returned to the
application.
-s
Wait for active updates to finish and then safely stop the
database. This option blocks both new updates and new
transactions.
This option waits for all active updates to finish before
bringing the database down. If you try to start a new
update while stopdb is waiting, the system generates the
following error:
SM_TR_NEW_UPDATES_BLOCKED being returned
to the application.
This option also waits for all active transactions to finish.
-f
Immediately and forcibly stop the database.
If you do not use -f and the database is in use, the
message Database in Use appears, and the stopdb
utility terminates.
Use the -f option with care.
AlvariSTAR Administration Manual
23
Chapter 4 - Database Management
4.3
Oracle Database Management
4.3.1
Oracle Backup
For Oracle fault tolerance, back up your Oracle database. It is recommended to do
this using Oracle's Recovery Manager (RMAN) backup utility, an Oracle tool that
lets you back up, copy, restore, and recover data files, control files, and archived
redo logs. It is included with Oracle server and does not require a separate
installation.
NOTE
RMAN is only compatible with Oracle release 8.0 and higher.
For details about using RMAN, see the Oracle8i Recovery Manager User's Guide
and Reference provided by Oracle.
4.3.2
On-line/Off-line Backup (OS)
You can back up your database using Operating System (OS) commands along
with Oracle system views. Although OS backups allow database recovery, the
recovery process may be more complex than using RMAN. We recommend OS
backups as an interim backup strategy until RMAN is in place.
A cold backup is a backup performed when the database is completely shut down.
A hot backup is one performed when the database is open and possibly in use. An
Instance is a synonym for an Oracle database. Off-line backups, or cold backups,
require database shutdown before making a backup. Restored cold backups
resolve any kind of database failure, as long as the backed up files are intact.
On-line backups, or hot backups, do not require database shutdown. Active
transactions may run while the backup occurs. On-line backups can recover from
many failures, but some types of failures may require restoring to an off-line
backup and then recovering from there. See the Oracle manuals for instructions
for hot and cold backups.
4.3.3
Device Driver Upgrade
When upgrading device drivers in Oracle deployments, all the device driver
specific schema objects are dropped and recreated by the device driver installer.
As a consequence all data related to the devices managed by the upgraded driver
is lost in the process. To avoid this, the data should be exported prior to the
upgrade and imported after the new database schema is created.
24
AlvariSTAR Administration Manual
Oracle Database Management
To backup the device driver:
1
Locate the <device_driver>_oraclebackup and
<device_driver>_oraclerestore files. The files are located in the
<AlvariSTAR_HOME>/owareapps/ngnms/db folder.
2
The backup/restore process uses the Oracle exp and imp utilities. Copy the
files to the machine that will be used to run these utilities (usually the
database server itself). The Oracle client should be installed on this host in
Database Administrator Mode.
3
Make sure that the desired export location (the drive in which the export file
will be created) has enough space to accommodate all the configuration and
performance monitoring data for all the managed devices in the database (see
the appropriate Device Driver User Manual for specific size considerations).
The Application Server must be stopped when performing the operations
below.
4
For the backup use the following command (do not type the backslashes, they
are used to denote the fact that commands spreading on several lines in the
document should be typed on the same line in the shell prompt):
exp <oracle_user>@<oracle_service_name>
\PARFILE=<device_driver>_oraclebackup FILE=<export_file>
Assuming that AlvariSTAR was installed against a database accessible via the
astar service name with the astaruser username and that the device driver
undergoing backup is called vl, the command will read:
exp astaruser@astar PARFILE=vl_oraclebackup FILE=vl.dump
This will create an export file called vl.dump in the current directory.
5
Perform the device driver upgrade as usual (extract the device driver, create
the database schema and seed the driver).
To restore the data:
In order to restore the data from an export file created in the manner described
above, the following command is used:
imp <oracle_user>@<oracle_service_name> FROMUSER=<oracle_user>
\PARFILE=<device_driver>_oraclerestore FILE=<export_file>
AlvariSTAR Administration Manual
25
Chapter 4 - Database Management
Thus, assuming the same database setup as for the export example, the
command would read:
imp astaruser@astar FROMUSER=astaruser \
PARFILE=vl_oraclerestore FILE=vl.dump
NOTE
See the Oracle Utilities document included with the Oracle Server documentation for detailed
descriptions of the Oracle export and import utilities.
26
AlvariSTAR Administration Manual
Database Growth Control
4.4
Database Growth Control
The growth of the AlvariSTAR database is mainly influenced by the addition of:
Alarms and logs
Performance Monitoring data
To control the database size:
1
Alarms and logs: define the amount of alarms and logs that are kept in the
AlvariSTAR database using the DAP Manager. The database size is controlled
by moving alarms and logs data from the database to secondary storage
(external files) (see Chapter 15 - DAP Manager of the AlvariSTAR User Manual).
2
Performance Monitoring data: adding performance data to the database is
done using an algorithm with built-in growth control, which ensures that the
amount of data added does not depend on the actual time during which data
collection is being performed. As database size is however dependent on the
number of sessions, counters, and devices managed, limiting their number
reduces the database size. It is also recommanded to delete old Performance
Monitoring sessions in order to keep the database size to a minimum.
AlvariSTAR Administration Manual
27
5
Chapter 5 - Administering the Client
Application
In This Chapter:
“Administering the Remote Client Application” on page 30
Chapter 5 - Administering the Client Application
5.1
Administering the Remote Client
Application
The actual using of the AlvariSTAR application is by the AlvariSTAR Client. It can
be installed in a remote client mode or in server mode, according to the
AlvariSTAR Installation Manual.
The Remote Client needs to be administered only if it is used to connect to a
different Application Server than configured at installation time.
The steps to be taken are:
In case of a Remote Client, configure the client discovery mechanism:
1
Locate the AlvariSTAR Application Server host name and use it in the next
step. The host name is the name entry in the Client’s “hosts” file that denotes
the Application Server.
2
In the <AlvariSTAR_Root>/oware/lib/owappserver.properties file, after the
following line: jnp.discoveryAddress=230.0.0.223, enter the following
parameter setting (case sensitive):
OWARE.CONTEXT.SERVER.URL=jnp://<host name>:3100
CAUTION
Performing the above procedure on a local client, may damage AlvariSTAR. Make sure you perform
the procedure only on Remote Client configurations.
30
AlvariSTAR Administration Manual
6
Chapter 6 - Administering the
Network Infrastructure
In This Chapter:
“AlvariSTAR Configuration” on page 32
“Configuring XP SP2 Firewall Settings Used by AlvariSTAR Client”
on page 36
Chapter 6 - Administering the Network Infrastructure
6.1
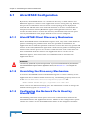
AlvariSTAR Configuration
By default, AlvariSTAR clients use a multicast discovery to allow Clients and
Mediation Agents to connect to the application servers during start-up. However,
this procedure sometimes does not fit the actual topology of the deployment
network and will fail when such network elements as routers and firewalls are
interposed between Clients/Mediation Agents and Application Servers. This
section describes how to override the discovery mechanism and tune the ports
used by AlvariSTAR so that proper firewall access can be configured.
6.1.1
AlvariSTAR Client Discovery Mechanism
When AlvariSTAR Clients and Mediation Agents start, they emit a UDP multicast
packet containing the partition name that was specified at installation. An
Application Server with that partition name that receives the discovery packet will
answer to the Client/Mediation Agent with a UDP unicast packet containing its IP
address and relevant ports to be used for communication. TCP connections are
then established from the Client to the Application Server. In the case of
Mediation Agents, TCP connections are established both to and from the
Application Server.
WARNING
The discovery packet will not pass through routers. If you have routers/firewalls in place between
the Clients/Mediation Agents and the Application Server, see Section 6.1.2 to configure the
system.
6.1.2
Overriding the Discovery Mechanism
In order for AlvariSTAR Clients and Mediation Agents to connect directly to the
Application Server without multicast discovery, the following property must be set
in the <AlvariSTAR home>/oware/lib/owappserver.properties file:
OWARE.CONTEXT.SERVER.URL=jnp://<appserver host name>:3100
where 3100 is the default bootstrap port. For information on how to change the
default bootstrap port see Section 6.1.3.
6.1.3
Configuring the Network Ports Used by
AlvariSTAR
The following table lists all the ports used in the communication between the
AlvariSTAR Clients and Application Servers. All files in the Configuration Option
column are relative to the AlvariSTAR home folder on the designated machine.
32
AlvariSTAR Administration Manual
AlvariSTAR Configuration
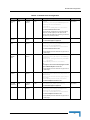
Table 6-1: Network Ports Configuration
Bootstrap
port
Def.Port
Direction
Protocol
Configuration Option
Configure on
3100
Client to
Server
TCP
<mbean
code="org.jboss.ha.jndi.HANamingService"
App. Server
name="jboss:service=HAJNDI">
<attribute
name="Port">@NODE_NUM@3100</attribute>
in oware/conf/cluster-service.xml
You should only configure this in conjunction with the
discovery override property on the client. See the
above section for details on the discovery process and
the discovery override procedure.
Naming
Service
1099
HA RMI
Port
User def
Client to
Server
TCP
Client to
Server
TCP
oware.listenport.appserver
App. Server
in oware/lib/owappserver.properties
<mbean
code="org.jboss.ha.jndi.HANamingService"
name="jboss:service=HAJNDI">
App. Server
<attribute name="RmiPort">0</attribute>
in oware/conf/cluster-service.xml
If left 0 (default) the server will bind to any port in the 0
- 65535 range.
RMI
Adaptor
Port
User def
Client to
Server
TCP
<mbean
code="org.jboss.jmx.adaptor.rmi.RMIAdapt
orService"
name="jboss.jmx:type=Connector,name=RMI"
>
<attribute
name="RMIObjectPort">0</attribute>
App. Server
in
oware/jboss-3.0.8/server/oware/deploy/jmx-rmi-ada
ptor.sar/META-INF/jboss-service.xml
If left 0 (default) the server will bind to any port in the 0
- 65535 range.
JRMP
Invoker
4444
Client to
Server
TCP
<mbean
code="org.jboss.invocation.jrmp.server.J
RMPInvoker"
name="jboss:service=invoker,type=jrmp"><
attribute
name="RMIObjectPort">4444</attribute>
App. Server
in oware/conf/jboss-root-service.xml
SoniqMQ
Client Port
2506
RMI Port
User def
Client to
Server
TCP
Client to
Server
TCP
com.dorado.jms_vendor.port.sonicmq
App. Server
in oware/lib/owappserver.properties
<mbean
code="org.jboss.naming.NamingService"
name="jboss:service=Naming">
App. Server
<attribute name="RmiPort">0</attribute>
in oware/conf/jboss-root-service.xml
If left 0 (default) the server will bind to any port in the 0
- 65535 range.
AlvariSTAR Administration Manual
33
Chapter 6 - Administering the Network Infrastructure
Table 6-2: Ports between Mediation Agents and the Application Server
Bootstrap
port
Port
Direction
Protocol
Configuration Option
Configure on
3100
Mediation to
App
TCP
<mbean
code="org.jboss.ha.jndi.HANamingServic
e"
name="jboss:service=HAJNDI">
App. Server
<attribute
name="Port">@NODE_NUM@3100</attribute>
in oware/conf/cluster-service.xml
You should only configure this in conjunction with
the discovery override property on the client. See
the above section for details on the discovery
process and the discovery override procedure.
HA RMI
Port
User def
Mediation to
App
TCP
<mbean
code="org.jboss.ha.jndi.HANamingServic
e"
name="jboss:service=HAJNDI"><attribute
name="RmiPort">0</attribute>
App. Server
in oware/conf/cluster-service.xml
If left 0 (default) the server will bind to any port in
the 0 - 65535 range.
RMI
Adaptor
Port
User def
Mediation to
App
TCP
<mbean
code="org.jboss.jmx.adaptor.rmi.RMIAda
ptorService"
name="jboss.jmx:type=Connector,name=RM
I">
<attribute
name="RMIObjectPort">0</attribute>
App. Server
In oware/jboss-3.0.8/server/oware/deploy/
jmx-rmi-adaptor.sar/META-INF/jboss-servic
e.xml
If left 0 (default) the server will bind to any port in
the 0 - 65535 range.
Naming
Service
(N)1099
RMI Port
(N)User def
App to
Mediation
TCP
App to
Mediation
TCP
oware.listenport.appserver
Mediation Agent
in oware/lib/owappserver.properties
<mbean
code="org.jboss.naming.NamingService"
name="jboss:service=Naming">
Mediation Agent
<attribute
name="RmiPort">0</attribute>
in oware/conf/jboss-root-service.xml
If left 0 (default) the server will bind to any port in
the 0 - 65535 range.
JRMP
Invoker
(N)4444
App to
Mediation
TCP
<mbean
code="org.jboss.invocation.jrmp.server
.JRMPInvoker"
name="jboss:service=invoker,type=jrmp"
>
Mediation Agent
<attribute
name="RMIObjectPort">4444</attribute>
in oware/conf/jboss-root-service.xml
34
AlvariSTAR Administration Manual
AlvariSTAR Configuration
NOTE
(N) is the index of the mediation agent running on the host (default 1). This will be automatically
prepended by AlvariSTAR in order to avoid conflicts on machines running more than one mediation
agent. Thus, if the port number in the configuration file is 1099, connections will actually be made to
(N)1099 - e.g. 11099.
AlvariSTAR Administration Manual
35
Chapter 6 - Administering the Network Infrastructure
6.2
Configuring XP SP2 Firewall Settings
Used by AlvariSTAR Client
This section describes the firewall settings used by the AlvariSTAR Client
application.
6.2.1
Connection Description
AlvariSTAR comprises the following components:
Application Server
Database Server
Mediation Agent
Client GUI
The Database Server, Mediation Agent and Client GUI must have a TCP/IP
connection to the Application Server. The protocol used over TCP is Remote
Management Interface (RMI).
This section describes the TCP ports being used by the AlvariSTAR system in this
configuration and therefore required to be operative for a proper connection
between a Windows-based Client host and the Application Server.
6.2.2
Windows XP Verification
In the System Properties window verify the following:
The OS information
The existence of Service Pack 2.
36
AlvariSTAR Administration Manual
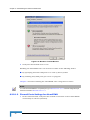
Configuring XP SP2 Firewall Settings Used by AlvariSTAR Client
Figure 6-1: System Properties Window
6.2.2.1
MS Firewall Settings
WinXP Service Pack 2 contains a firewall application that blocks all incoming
traffic by default.
As the AlvariSTAR platform uses several ports as part of the infrastructure
architecture, specific port definition must be applied in order to provide
connectivity.
6.2.2.1.1
Firewall Settings
1
Right-click the Network Interface icon
in the System Tray and select the
Change Windows Firewall settings option.
2
The Windows Firewall window opens:
AlvariSTAR Administration Manual
37
Chapter 6 - Administering the Network Infrastructure
Figure 6-2: Windows Firewall Window
3
Verify that the firewall state is “On”.
Enabling the AlvariSTAR rules can be done in either of the following modes:
By specifying TCP and UDP ports to be used by Server/Client
By enabling TCP/UDP ports per service or program.
Chapter 7 describes enabling the AlvariSTAR rules using both scenarios.
NOTE
To continue firewall definition on specific ports go to Section 6.2.2.1.2. Firewall configuration per
service is covered in Section 6.2.2.1.3.
6.2.2.1.2
Firewall Ports Settings for AlvariSTAR
1
In the Advanced Tab, verify that the network connection used for AlvariSTAR
connectivity is selected (checked).
38
AlvariSTAR Administration Manual
Configuring XP SP2 Firewall Settings Used by AlvariSTAR Client
Figure 6-3: Windows Firewall - Advanced Tab
2
Select it and click the Settings button. The Advanced Settings window opens.
AlvariSTAR Administration Manual
39
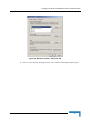
Chapter 6 - Administering the Network Infrastructure
Figure 6-4: Advanced Settings Window
3
Click the Add button:
4
The following ports should be configured to accept Internet connections:
TCP 1121
TCP 1122
UDP 1123 – Used for Client Discovery broadcast
TCP 3100 – Naming Service JNDI
TCP 4444
TCP 2507 – Application Server configuration port
5
After having added all ports, the Services list displays all newly added ports as
selected (9) See Figure 6-4.
6.2.2.1.3
Firewall Service Settings for AlvariSTAR
1
This section describes an alternative method of enabling the required
AlvaiSTAR rules.
2
40
In The Windows Firewall window (Figure 6-2), click on the Exceptions tab.
AlvariSTAR Administration Manual
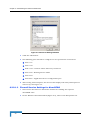
Configuring XP SP2 Firewall Settings Used by AlvariSTAR Client
Figure 6-5: Windows Firewall - Exceptions Tab
3
Verify that “java.exe” is selected. If “java.exe” does not exist, add it using the
Add Program button. The Edit a Program window opens.
4
Specify the AlvariSTAR path to “java.exe”.
Figure 6-6: Edit a Program Window
In order to enhance the security of the AlvariSTAR deployment it is possible to
specify the IP addresses that may use this program (e.g., AlvariSTAR Clients and
the Mediation Agents).
AlvariSTAR Administration Manual
41
Chapter 6 - Administering the Network Infrastructure
To specify the IP addresses permitted to use AlvariSTAR:
1
In the Edit a Program window (Figure 6-6), click the Change scope button. The
Change Scope window appears.
Figure 6-7: Change Scope Window
2
Configure the Access List by select any of the following:
Any computer: enables access to the program to all computers from the
LAN and the Internet
My network: enables access to the program only to computers on the
actual subnet
Custom list: enables to specify a comma-separated list of IP addresses that
have access to the program.
42
AlvariSTAR Administration Manual
7
Chapter 7 - Activation of Built-In
Functionalities
In This Chapter:
“Enabling E-Mail Notification of Alarms & Events” on page 44
“Activating the Northbound Interface” on page 50
Chapter 7 - Activation of Built-In Functionalities
7.1
Enabling E-Mail Notification of Alarms &
Events
This section describes how to configure the Application Server host to send SMTP
based e-mails to notify operators/system users of alarms & events.
The AlvariSTAR Application Server requires an SMTP proxy server to relay the
outgoing e-mails to the public Internet.
Figure 7-1: Setup Scheme
To enable the E-mail sending feature:
1
Shutdown the AlvariSTAR Application Server.
2
Edit the properties file name "redcell.properties" under
/AlvariSTAR_root/owareapps/redcell/lib.
44
AlvariSTAR Administration Manual
Enabling E-Mail Notification of Alarms & Events
3
Modify the variable: "redcell.smtphost" to the host name of the SMTP proxy in
your network.
4
Modify the variable: "redcell.returnaddress" to the reply e-mail address (if
needed).
5
Start up the AlvariSTAR Application Server.
NOTE
SMTP port (25 / TCP) must be reserved for the AlvariSTAR server in order to send the outgoing
E-mails to the SMTP proxy.
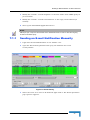
7.1.1
Sending an E-mail Notification Manually
1
Login into the AlvariSTAR Client as an "Admin" user.
2
Open the Event History window and query the database for recent
events/alarms.
Figure 7-2: Event History
3
Select the event to be sent via E-mail and right-click it. The Event Operations
pop-up menu appears.
AlvariSTAR Administration Manual
45
Chapter 7 - Activation of Built-In Functionalities
Figure 7-3: Event Options
4
Select the Email option and fill in the destination e-mail address to which the
notification is to be sent.
5
The pop-up window will be closed automatically once the message has been
sent.
NOTE
You can also select multiple events, then right-click the selection and select the Acknowledge, Clear
or E-mail options.
The message format is as follows:
Redcell Alarm:
Received Date & Time : Sun Aug 28 11:15:17 IDT 2005
Network Element Name : CS-BreezeMAX
Managed Object : SU4 <MAC:00-10-E7-E2-16-38>
Event Name : New BreezeMAX_SU discovered (10.0.16.211)
Location : CS-BreezeMAX
Source : 10.0.16.211
Severity : Information
Status : Open
46
AlvariSTAR Administration Manual
Enabling E-Mail Notification of Alarms & Events
ServiceAffecting : false
VarBinds :
VarBind[0] OID : 1.3.6.1.4.1.12394.1.260.1.1.0 Name : trapSource.0 Data
: SU.00:10:E7:E2:16:38 (String)
VarBind[1] OID : 1.3.6.1.4.1.12394.1.260.1.2.0 Name :
trapSourceIPAddress.0 Data : 10.0.16.211 (IpAddress)
VarBind[2] OID : 1.3.6.1.4.1.12394.1.260.1.6.0 Name : deviceType.0 Data
: BreezeMAX_SU (String)
VarBind[3] OID : 1.3.6.1.4.1.12394.1.260.1.5.0 Name : deviceName.0 Data
: SU4 <MAC:00-10-E7-E2-16-38> (String)
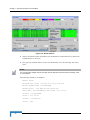
7.1.2
Sending E-mails Automatically Upon
Reception of Events
1
Log into the AlvariSTAR Client as an "Admin" user.
2
Open the User Manager window and fill in the Primary E-mail address field for
each AlvariSTAR user to be sent the notification.
Figure 7-4: User Manager
3
Open the Event Template Manager window and edit the specific event to be
notified by E-mail.
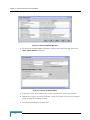
AlvariSTAR Administration Manual
47
Chapter 7 - Activation of Built-In Functionalities
Figure 7-5: Event Template Manager
4
In the Event Template Editor window, click on the E-mail tab and select the
Auto. Send E-mail check box.
Figure 7-6: Event Template Editor
5
Fill in the users to be notified; the users’ e-mails were set in step 2 above.
6
Modify the subject and content of the e-mail as needed and save the changes
made during the working session.
7
48
The E-mail notification is then sent.
AlvariSTAR Administration Manual
Enabling E-Mail Notification of Alarms & Events
Figure 7-7: Notification E-mail Received
AlvariSTAR Administration Manual
49
Chapter 7 - Activation of Built-In Functionalities
7.2
Activating the Northbound Interface
This section describes how to configure the Application Server host for sending
SMTP traps to higher-level management systems (Manager of Managers - MoM)
upon receiving a Trap/Event.
The AlvariSTAR Application Server will forward the SNMP traps on any UDP userdefined port. The default port is 162/UDP.
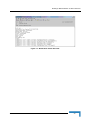
Figure 7-8 shows the Setup used for enabling the events sending feature to
Northbound Managers.
UDP/162
UDP/162
MoM
UDP/162
UDP/162
AlvariSTAR Application Server
Enterprise NMS/EMS
Client
Client
Client
Figure 7-8: Setup Scheme
50
AlvariSTAR Administration Manual
Activating the Northbound Interface
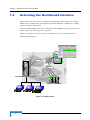
7.2.1
Setting Up the Environment
The following procedure requires the Application Server to be operational and the
AlvariSTAR “admin” Clients to be logged in.
1
Open the Northbound Manager window from the Event Management category.
2
Create a new session of Northbound manager.
3
Fill in all fields of the System Information section. In the IP Address field, enter
the IP address of the Northbound host and leave the UDP port setting on 162.
4
Select the Start Forwarding check box.
Figure 7-9: Northbound System Editor
NOTE
The default SNMP Trap port is 162 / UDP. Consult with the MoM administrator for configuring the
Trap port used by the higher-level hosts.
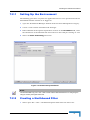
7.2.2
Creating a Northbound Filter
1
Select Open File > New > Northbound System Filter from the menu bar.
AlvariSTAR Administration Manual
51
Chapter 7 - Activation of Built-In Functionalities
2
Create a filter and assign it a name.
3
Select the "Event Type" attribute, the "AND" connector, the "= (Equals)"
operator and from the Event Type list select "Alarm".
4
Click the Save button
in the upper left corner of the window.
Figure 7-10: Filter Editor
NOTE
More advanced filters can be created using different types of attributes, connectors and conditions.
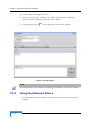
7.2.3
Using Northbound Filters
1
In the Northbound System Editor, click the Filter button at the bottom of the
window.
52
AlvariSTAR Administration Manual
Activating the Northbound Interface
2
Select an existing filter from the list in the left pane (the Select button is at the
bottom of the window).
3
Click again Select to schedule the filter (by default it should read "Always on").
4
Click the Save button
at the upper left corner. The Northbound filter is
now running.
Figure 7-11: Filter and Schedule
AlvariSTAR Administration Manual
53
8
Chapter 8 - Using the AlvariSTAR
Tracing Capability
In This Chapter:
“Using the AlvariSTAR Tracing Capability” on page 56
Chapter 8 - Using the AlvariSTAR Tracing Capability
8.1
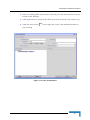
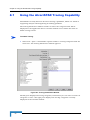
Using the AlvariSTAR Tracing Capability
AlvariSTAR currently features advanced tracing capabilities, which are aimed at
supporting analysis and diagnosing of working problems.
The Tracing Parameters window enables to select the categories that will be
displayed in the Application Server Console window and to define the mode in
which tracing is done.
To enable Tracing:
1
Select File > Open > AlvariSTAR > System Utilities > Tracing categories from the
menu bar. The Tracing Parameters window appears:
Figure 8-1: Tracing Parameters Window
The left pane displays all tracing categories, from which you can select a subset of
categories to trace. The right pane displays the tracing categories currently
displayed in the Console window.
56
AlvariSTAR Administration Manual
Using the AlvariSTAR Tracing Capability
To select Tracing categories:
2
In the left pane, select the tracing category(ies) to be displayed.
3
Click the
button to move the selection to the right pane, and the
button to remove the selection from the right pane.
To select all categories for tracing, click the
button. All categories will be
moved to the right pane.
To remove all categories from the right pane, click the
button. Nothing will
be traced to the Console window.
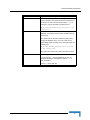
The following options determine the mode in which tracing is done:
Option
Log exceptions
Logs exceptions to the Console window.
Trace logs
Displays logs to the Console window.
Show Category and
Detail Level in trace
output
In addition to the items mentioned above, this option also displays the
category and the detail level string (1, 2 or 3) in the Console window.
The detail level is set using the Trace Detail Level checkbox below.
Trace Detail Level
Low, Medium or High. Selecting ‘Low’ displays trace messages of
level 1, whereas ‘High’ displays messages of level 1, 2 and 3.
The following table lists the tracing group correspondence of some of the most
common functions:
Feature
Tracing Group
Resync
NE Resync Application
Discovery
NE Discovery Application
SW Download
Software Upgrade Application
SNMP Traffic
SNMP Mediation Service
PM Collection
PM Collection Application
AlvariSTAR Administration Manual
57
9
Chapter 9 - Troubleshooting
In This Chapter:
“General” on page 60
“Discovery Issues” on page 61
“Client Connection Issues” on page 63
“Application Server Initializing Issues” on page 64
“Support Issues” on page 65
Chapter 9 - Troubleshooting
9.1
General
A best-practices recommendation is to follow the "Post Installation Checklist"
listed in the Chapter 2 Section 2.2 of the AlvariSTAR User Manual before starting to
use the application, and in case of any problem.
In addition to these, the following sections indicate solutions/hints to some
possible issues sometimes encountered when starting the application.
60
AlvariSTAR Administration Manual
Discovery Issues
9.2
Discovery Issues
Consult the AlvariSTAR Log Report/BWA Network Discovery category to check
the discovery operation log and status.
Although the discovery mechanism is the same for all Alvarion product lines
that are supported by AlvariSTAR, nevertheless, each product line must be
specifically configured in order to be discovered by AlvariSTAR. Particularities
for different product families are listed below:
BreezeMAX: The AlvariSTAR Application Server host (partition) IP must be
set as Authorized Manager.
WALKair 1000: The AlvariSTAR Application Server host (partition) IP must
be set as Authorized Manager, or 255.255.255.255, for "everyone"
From the AlvariSTAR Application Server host, ‘ping’ the specific network
element to confirm accessibility. Consult the AlvariSTAR Installation Manual
for information on multiple NICs located on the AlvariSTAR Application Server
host and confirm proper accessibility.
As the discovery mechanism is SNMP based, SNMP accessibility should first
be checked. Confirm that the community strings are correct for the specific
network element that should be discovered and then try accessing the device
using any SNMP browser or SNMP ping utility. You can also use the
AlvariSTAR System Utilities/SNMP MIB Browser as follows:
Fill in the 'Host' and the appropriate community strings fields
Expand the MIB tree, select iso.org.dod.internet.mgmt.mib2.system and
click Next.
If the sysDescr.0 OID returns an appropriate value, SNMP accessibility is
confirmed.
As discovery is SNMP based, the absence of the Alvarion MIB files will cause
the discovery process to fail, because the SNMP data will not be interpreted
properly and the application will not recognize Alvarion devices. The MIB files
are installed using the Device Driver installation sequence. Failure of this
installation process will cause the Alvarion MIB files to be unavailable.
AlvariSTAR Administration Manual
61
Chapter 9 - Troubleshooting
Configure a reasonably-sized IP range, in order not to wait and retry on
non-existent network elements. A very large discovery range can cause long
inactivity periods, with the application reporting it has not yet discovered any
devices.
Activate AlvariSTAR's tracing capability and monitor the NE Discovery
Application category. For more information, refer to Chapter 8.
62
AlvariSTAR Administration Manual
Client Connection Issues
9.3
Client Connection Issues
The Client application, regardless whether it is a Remote Client or not, also
adheres to certain rules and constraints, such as:
Check that there is no external blocking of communication between the Client
and the Application Server. Communication-hampering applications, such as
firewalls, must be configured according to the AlvariSTAR port list, as
described in Section 6.2.
Check that the configuration has been done properly, e.g.:
For a Remote Client installation, perform checks according to Section 3.4 Client Only Installation of the AlvariSTAR Installation Manual
For Local Client installation, check that the configuration file
<AlvariSTAR_Root>/oware/lib/owappserver.properties does not have the
following entry after the jnp.discoveryAddress=230.0.0.223 line:
OWARE.CONTEXT.SERVER.URL=jnp://<appserver host name>:3100
AlvariSTAR Administration Manual
63
Chapter 9 - Troubleshooting
9.4
Application Server Initializing Issues
The AlvariSTAR Application Server can be stopped/started on demand.
Initialization-related precautions to be taken include the following:
When the environment has changed between the last good initialization and
the current session, follow the instructions in Section 2.3.
There must be a certain time interval between issuing the stop and start
commands to the Application Server. This ensures that the active TCP ports
are closed. It is good practice monitor the Application Server host ports 2506
and 3100 using netstat -a until the ports are closed.
64
AlvariSTAR Administration Manual
Support Issues
9.5
Support Issues
In order for the Customer Support department to better serve its customers,
please attach the following diagnostic data to every call opened with Customer
Support:
AlvariSTAR_Root>/app_setup.log
<AlvariSTAR_Root>/db_setup.log
<AlvariSTAR_Root>/setup.log
<AlvariSTAR_Root>/oware/logs/appserver.log
<AlvariSTAR_Root>/oware/lib/owappserver.properties
<AlvariSTAR_Root>/oware/lib/owpartition.properties
A screen-shot of the AlvariSTAR About window
AlvariSTAR Administration Manual
65