1
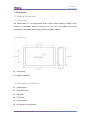
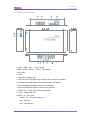
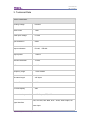
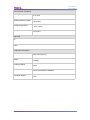
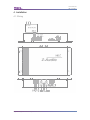
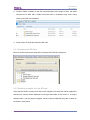
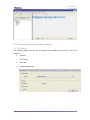
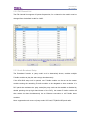
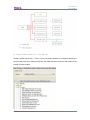
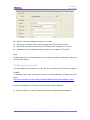
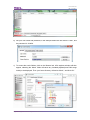
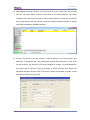
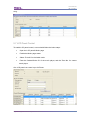
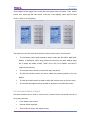
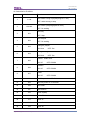
User manual Digital Background Music Player SB-Z-AUDIO www.hdlautomation.com User Manual SB-Z-AUDIO Document updates: Version Date V1.0 2015.05.06 Description Finish new document Digital Background Music Player–User Manual User Manual SB-Z-AUDIO INDEX 1. Overview........................................................................................................................................1 1.1 General Information.......................................................................................................... 1 1.1.1 Description.............................................................................................................. 1 1.1.2 Mounting.................................................................................................................. 1 1.2 Description of functions.................................................................................................... 1 1.3 Device Description............................................................................................................ 2 1.4Tips........................................................................................................................................3 2. Safety Precautions.......................................................................................................................3 3. Technical Data.............................................................................................................................. 4 4. Installation..................................................................................................................................... 6 4.1 Wiring...................................................................................................................................6 4.2 HDL Bus Pro Description................................................................................................. 7 4.3 Commissioning...................................................................................................................7 5. Software Configuration............................................................................................................... 8 5.1 Basic Information...............................................................................................................8 5.1.1 Changing the ID..................................................................................................... 8 5.1.2 Changing the IP and IP MAC address............................................................... 8 5.2 Music Settings....................................................................................................................8 5.2.1 Accessing the SD Card......................................................................................... 9 5.2.2 Selecting a playlist from the SD card..................................................................9 5.3 Function selection and radio settings.......................................................................... 10 5.3.1 Functions...............................................................................................................10 5.3.2FM Channel List.................................................................................................... 11 5.3.3 Audio Broadcast Setup........................................................................................11 5.4 Language synthesis........................................................................................................15 5.5 FTP Settings.....................................................................................................................15 5.5.1Introduction............................................................................................................ 15 5.5.2Playing music from a PC..................................................................................... 16 5.6Setting a button target..................................................................................................... 19 5.7 LCD Panel Control.......................................................................................................... 20 5.8 Universal Switch Control................................................................................................21 6. Note..............................................................................................................................................25 Digital Background Music Player–User Manual User Manual SB-Z-AUDIO 1. Overview 1.1 General Information 1.1.1 Description The SB-Z-AUDIO is a multi-functional audio system which supports multiple music sources. In combination with the i-Life app or a HDL DLP, the module can be fully controlled and integrated with security systems and SMS modules. 1.1.2 Mounting Screw fixing DB Box installation 1.2 Description of functions External input Internal SD Card FM Radio FTP Server Voice prompts HDL Buspro communication Digital Background Music Player–User Manual 1 User Manual SB-Z-AUDIO 1.3 Device Description a. +24V、GND、-24V: Power Supply b.GND、DATA-、DATA+、DC24V:HDL Buspro c.SD CARD d. RJ45 e. Upgrade and Reset hold f. LED: Green LED will flicker when reset or when system is upgraded g. Working signal LED:Green LED will flicker when operational h.Left channel(with amplifier),Connect to 8Ω Speaker i. Right channel(with amplifier),Connect to 8Ω Speaker j. AUDIO-OUT:Audio Output Port (No amplifier) k. CD-IN:Audio Input Port l.SGND、5V、LIN、ANT SGND、5V:5V Power output port LIN:Stand-by ANT:FM Antenna Digital Background Music Player–User Manual 2 User Manual SB-Z-AUDIO 1.4Tips 1、LED flickers every 1.5swhenworking normally,the LED also flickers every0.1s when a playlist is being uploaded. 2、If the module cannot be found using the software, and the LED does not blink every 1.5 seconds, reset the IP. By default the module IP is 192.168.10.250, the IP of a connected PC should be set as 192.168.10..* 3、The SD card must use the FAT 32 file system. 4、After the IP of the module has been modified it will immediately restart, a user should wait at least 5 seconds before using the module after a restart has occurred. 5、Any audio files that a user wishes to play must be in mp3 format, the name of an audio file cannot exceed 21 characters, and its name cannot exceed 25 characters. 6 、 When using a SD card a maximum of 47 playlists are supported, with each playlist supporting 999 songs. The FTP server supports 48 playlists, with each playlist supporting 999 songs. 7、If a voice file is to be played it must have a numerical prefix, as an example the voice file for a locking door would be ‘001lock.mp3’. 8、The SD card must be inserted into the module regardless of which audio source is to be used. 2. Safety Precautions Do not exceed 0.2Nm of torque when attaching the module. Ensure the module is well ventilated. Keep the module away from all liquids and corrosive gases. Digital Background Music Player–User Manual 3 User Manual SB-Z-AUDIO 3. Technical Data Electric Parameters : Working voltage DC±24V Static Power 1.6W Audio input voltage 0.7VPP Input resistance 50KΩ Output resistance RL=8Ω; RR=8Ω Output power Harmonic distortion 20W×2 <0.05% SNR 97dB Frequency range 22Hz~20KHz File name length Music Format SD card capacity Communication protocol ≤25 bytes MP3 ≤8G HDL Buspro, FTP, UDP RJ45, SD card, HDL-BUS, RCA Audio, Audio output, DC Signal interface power input Digital Background Music Player–User Manual 4 User Manual SB-Z-AUDIO Environmental Conditions Working temperature Working relative humidity Storage temperature Storage relative humidity 0℃~45℃ Up to 90% -20℃~+60℃ Up to 93% Approved CE RoHS Production Information Dimensions Weight Housing material Installation Protection degree 224×126×39 (mm) 1266(g) Steel Screw fix /DB Box installation IP20 Digital Background Music Player–User Manual 5 User Manual SB-Z-AUDIO 4. Installation 4.1 Wiring Digital Background Music Player–User Manual 6 User Manual SB-Z-AUDIO 4.2 HDL Bus Pro Description Connector Information buspro DC24V Red COM Black DATA - White DATA + Yellow 4.3 Commissioning Method One: a. Run the HDL-BUS Pro Setup tool. b. On the module long press the “programming button” for three seconds until the LED turns red. c. Using the software, click “Address management”, and then select “Modify address”, the window below will then be displayed. d) Click on “Indicate initial address”, and the current subnet/device ID of the device will then be displayed. To modify the address, fill in the new address, and click the “Modify initial address” then click the “+Add” button. The device will now be added to the “ON-line devices list”. Method Two: a) Run the HDL-BUS Pro Setup tool. b) Search for online devices by clicking the search tab, a new window will then appear. Click the ‘fast search’ tab to search for online devices. If the “Add all” tab is clicked all devices found will be added to the “ON-line devices” list. Digital Background Music Player–User Manual 7 User Manual SB-Z-AUDIO 5. Software Configuration 5.1 Basic Information 5.1.1 Changing the ID It’s recommended to connect it via RJ45 and set the subnet ID difference from the Gateway (typically the SB-DN-1IP or HDL-MBUS01IP.431). 5.1.2 Changing the IP and IP MAC address It is recommended that the default IP and the IP MAC address are changed, to avoid possible conflicts or errors. Default IP: 192.168.10.250 Default MAC: H-D-L-85-85-85 5.2 Music Settings Preparation: 1- Connect the SD card to a PC, right click and select the file system as FAT32. Digital Background Music Player–User Manual 8 User Manual SB-Z-AUDIO 2- Create a folder or folders on the SD card and import some songs to them, the audio format must be MP3 with a folder name less than 21 characters long, and a song name of less than 25 characters. 3- Power off the Z-Audio and insert the SD card. 5.2.1 Accessing the SD Card Files on the SD card can be checked by using the HDL BUS Pro setup tool: 5.2.2 Selecting a playlist from the SD card Using the HDL BUS Pro setup tool, click on the ‘Playlist in SD Card’ tab. When a playlist is selected, its content will be displayed on the right hand side of the screen. If a song is selected then it can be played, stopped, and the volume adjusted using the controls on the bottom of the panel. Digital Background Music Player–User Manual 9 User Manual SB-Z-AUDIO 5.3 Function selection and radio settings 5.3.1 Functions The following audio sources can be played and controlled from the DLP and i-Life interface. SD card FTP Server FM radio External audio input. Digital Background Music Player–User Manual 10 User Manual SB-Z-AUDIO 5.3.2 FM Channel List The FM channel list supports 25 preset frequencies, for a channel to be used it must be changed from the default ‘Invalid’ to ‘Valid’. 5.3.3 Audio Broadcast Setup The ‘Broadcast’ function or ‘party mode’ as it is alternatively known, enables multiple Z-Audio modules to play the same songs simultaneously. If the HDL-BUS setup tool is opened, one Z-Audio module can be set as the master module causing the remaining Z-Audio modules to be relegated to slave modules. If a DLP panel then activates the ‘party mode’(the party mode can be enabled or disabled by double pressing the top right hand button of the DLP), the master Z-Audio module will then stream its data simultaneously via an Ethernet connection to all Z-Audio slave modules. Note: supported music source of party mode: SD Card, FTP(NAS-HDD) and radio. Digital Background Music Player–User Manual 11 User Manual SB-Z-AUDIO a) Create a folder named ‘PA_**’ in the SD card Create a folder named ‘PA_**’ (The ‘**’can be a single character or multiple characters) in the SD card, place your chosen songs into the folder and then insert the SD Card into the master Z-Audio module. Digital Background Music Player–User Manual 12 User Manual SB-Z-AUDIO b) Configuring a Z-Audio module as a master module Take the above Z-Audio as a master module. Broadcast mode - Host: act as the master Z-Audio, to synchronize its audio stream to other slave ones; - Slave: act as the slave Z-Audio, to play the same audio which received from the host; - Host and slave: act as the master Z-Audio and slave Z-Audio. Volume synchronization Enable this function, the master Z-Audio can synchronize the volume to the slave ones. To then enable the ‘broadcast function’, the mode must be set as ‘host’ and the volume synchronization tick box must be checked. Four groups are available, however only the first is able to act as the host/master under host mode. If another Z-Audio module has the same number (e.g. 1) in its four groups, then it can synchronize with the host/master modules music library. Digital Background Music Player–User Manual 13 User Manual SB-Z-AUDIO c) Configuring the Z-Audio slave modules Take below Z-Audio module as a slave module. To then enable the module to receive commands from the master, the ‘slave’ mode must be selected, and if the ‘volume synchronization’ tick box is checked, then it can synchronize the volume of the master one. Four groups are available, and all act as slave ones under slave mode. Set anyone group e.g. Group1 the same number as the host one’s first group number(here it’s 1), it can then synchronize with the host/master modules music library. d) Setting the master Z-Audio module as the music control target To set the master Z-Audio module as the music control target, the subnet ID and the device ID must be entered. Digital Background Music Player–User Manual 14 User Manual SB-Z-AUDIO e) For a LCD panel to display the music page, the ‘Music Page’ tick box must be checked. 5.4 Language synthesis Language synthesis function has been canceled. 5.5 FTP Settings 5.5.1Introduction If a user wishes to play audio from a FTP source via a FTP server, a SD card must be placed into the module’s SD card slot. It is recommended that to select corresponding server type and file encode parameters according to different FTP servers. These parameters should be set in the HDL Bus setup tool. No. Server Name Server Type File Encode 1 Ms-dos IIS ASCII 2 unix Server-U UTF-8 3 HomeFtpServer Server-U ASCII 4 FileZilla Server Server-U ASCII 5 Server-U Server-U UTF-8 Digital Background Music Player–User Manual 15 User Manual SB-Z-AUDIO Server IP: set the IP address of server, PC or NAS. Server type: select the server type according to the FTP server you used User name: input the user name of your account which created in FTP server Password: input the password of your account which created in FTP server Note: To play music from a FTP audio source, the Z-Audio IP should be in the same network as the FTP audio source. 5.5.2Playing music from a PC If a user wishes to play music from a PC, the PC should have the FTP server software installed. An example video using a HomeFTP server can be downloaded by following the link below: https://www.dropbox.com/sh/kcw380yhui8a827/AABtSTke2IKLMrSxo7QN8jQ_a?dl=0 In order to configure the FTP server, the below steps must be followed: a) Open the Home FTP Server software, and when prompted click‘New Member’. Digital Background Music Player–User Manual 16 User Manual SB-Z-AUDIO b) Set your user name and password, in the example below the user name is TEST, and the password is 123456. c) To access the music folders, click on the ‘Browse’ tab. A file explorer window will then appear, selecting the ‘Music’ folder will cause any included playlists(have PM3 songs inside) to be displayed. Then your home directory will end at ‘Music’, and click ‘OK’. Digital Background Music Player–User Manual 17 User Manual SB-Z-AUDIO d) After setting the home directory, a user should click on the ‘Apply’ tab, this will then exit the ‘Ftp Client Editor’ interface, and return to the main interface. The newly created account and its home directory will now be displayed. To start the server click on the ‘Start Server’ tab, this will then cause the bottom left status indicator to change from RED (stopped) to GREEN (Running). e) For the FTP server to be kept running, a user should go to the music player, and select the ‘FTP Settings’ tab. They should then ensure that the server IP is the same as that of the PC on which the FTP server software is running. For HomeFtpServer, the server type is Server-U, the file encoding is ASCII; and the User Name and Password are same as that of the FTP server. If all the information is correct, a user should then click on the ‘Save’ tab. Digital Background Music Player–User Manual 18 User Manual SB-Z-AUDIO f) To refresh the playlists, open the ‘Playing Music Setting’ page, and turn to the ‘Playlist in SD Card’ tab, click the FTP icon to refresh. When the program finishes updating the playlists, ‘Success in updating’ will be displayed on the bottom of the window. The Z-AUDIO module can now play music from a PC. The Home FTP server will now show ‘1 Client(s)’, and the information of the music currently being played will be displayed at the bottom of the window. 5.6Setting a button target The buttons can be set to trigger targets while ‘Audio-in’ source is being played, the targets that can be set in this state are ON, OFF, Play, Stop, Previous song, and Next Digital Background Music Player–User Manual 19 User Manual SB-Z-AUDIO song. 5.7 LCD Panel Control To enable LCD panel control, a user should follow the below steps: Open the LCD panel’s Music page Enable the Music page status Select ‘Z-Audio’ for the Audio mode. Enter the Subnet/Device ID of the music player, and the Zone No. for current music player. One LCD panel can control up to 24 Zones. Digital Background Music Player–User Manual 20 User Manual SB-Z-AUDIO Some targets can be trigger when control the music player from LCD panel. From above screen shot, when play SD Card music, it will turn on the lighting, when stop SD Card music, it will turn off the lighting. The buttons on the DLP panel have distinct functions when used to control music. The first button when short pressed is used to select the SD-CARD, NAS-HDD, RADIO, or AUDIO-IN. When long pressed it enters into the audio settings page this is where the ZONE, SONG, TONE, PLAY LIST, PLAY MODE, and PARTY mode can be selected. The second button serves to control both play and pause. The third and fourth buttons are able to select the previous playlist or the next playlist. The fifth and sixth buttons are able to select the previous song or the next song. The seventh and eighth buttons are able to decrease or increase the volume. 5.8 Universal Switch Control Universal switches can be used to control music, however three commands need to be set to play one song. First: Select music source Second: Select a playlist Third: Select a song in the playlist to play Digital Background Music Player–User Manual 21 User Manual SB-Z-AUDIO UV Switch list for Z-AUDIO: No. UV Switch No. 1 1-149 2 150-200 3 201 4 202 Function ON: Select a song in playlist(song No.1-149) OFF: select a song to stop ON: Select a playlist(playlist No.0-50) OFF: Do nothing ON: Play OFF: Stop ON: Stop All OFF: Do nothing 5 203 Change a playlist ON: Next 6 204 OFF: Pre Change a song ON: Next OFF: Pre Control Audio voice 7 205 8 206 9 207 10 208 ON: Play music on SD-Card 11 209 ON: Play music on FTP server 12 210 ON: Radio 13 211 ON: Audio-in 14 215 Voice 63(Min) 15 216 Voice 55 16 217 Voice 47 17 218 Voice 39 18 219 Voice 28 ON: UP OFF: DOWN TREBLE ON: UP OFF: DOWN BASS ON: UP Digital Background Music Player–User Manual OFF: DOWN 22 User Manual SB-Z-AUDIO 19 220 Voice 20 20 221 Voice 15 21 222 Voice 10 22 223 Voice 5 23 224 Voice 0(Max) 24 225 Play One 25 226 Repeat One 26 227 Order Play 27 228 Repeat All Common rules when using the universal switch To enable voice playback: 1:Send universal switch 208, ON (Select Audio source) 2:Send universal switch 150, ON (Select List) 3:Send universal switch 1-149, ON (Select the number that at front of song) To disable voice playback: 1:Send universal switch 1-149, OFF (Select Song) To play an audio file from a SD card: 1:Send universal switch 208, ON (Select Audio source) 2:Send universal switch 151~200,ON (Select1~50 play list) 3:Send universal switch 1~149, ON (Select a song to Play) To stop playing an audio file from a SD card: 1:Send universal switch 208, ON (Select Audio source) 2:Send universal switch 151~200, ON (Select1~50 play list) 3:Send universal switch 1~149, OFF (Select a song to stop) Digital Background Music Player–User Manual 23 User Manual SB-Z-AUDIO To play an audio file from a FTP source: 1:Send universal switch 209, ON (Select Audio source) 2:Send universal switch 151~200,ON (Select 1~50 play list) 3:Send universal switch 1~149, ON (Select a song to Play) To stop playing an audio file from a FTP source: 1:Send universal switch 209, ON (Select Audio source) 2:Send universal switch 151~200,ON (Select 1~50 play list) 3:Send universal switch 1~149, OFF (Select a song to Stop) To enable the RADIO to be played: 1:Send universal switch 210, ON (Select Audio source) 2:Send universal switch 201, ON (play) To disable the RADIO being played: 1:Send universal switch 210, ON (Select Audio source) 2:Send universal switch 201, OFF (Stop) To play a file from an AUDIO-IN source: 1:Send universal switch 211, ON (Select Audio source) 2:Send universal switch 201, ON (play) To stop playing a file from an AUDIO-IN source: 1:Send universal switch 211, ON (Select Audio source) 2:Send universal switch 201, OFF (Stop) Digital Background Music Player–User Manual 24 User Manual SB-Z-AUDIO 6. Note ………………………………………………………………………………………………………. ……………………………………………………………………………………………………… ……………………………………………………………………………………………………… ……………………………………………………………………………………………………… ……………………………………………………………………………………………………… ……………………………………………………………………………………………………… ……………………………………………………………………………………………………… ……………………………………………………………………………………………………… ……………………………………………………………………………………………………… ……………………………………………………………………………………………………… ……………………………………………………………………………………………………… ……………………………………………………………………………………………………… ……………………………………………………………………………………………………… ……………………………………………………………………………………………………… ……………………………………………………………………………………………………… ……………………………………………………………………………………………………… ……………………………………………………………………………………………………… ……………………………………………………………………………………………………… ……………………………………………………………………………………………………… ……………………………………………………………………………………………………… ……………………………………………………………………………………………………… ……………………………………………………………………………………………………… ……………………………………………………………………………………………………… ……………………………………………………………………………………………………… ……………………………………………………………………………………………………… ……………………………………………………………………………………………………… ……………………………………………………………………………………………………… Digital Background Music Player–User Manual 25