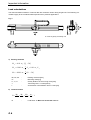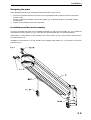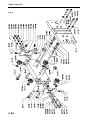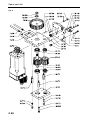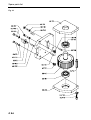
1
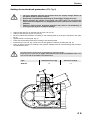
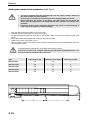
Handling Components
Servo horizontal axis
86(50$18$/
0(&+$1,&$/3$576+$
Edition: 506498
23.03.2000
&
Table of contents
Important information.............................................................................................................. 1
Introduction............................................................................................................................. 1
EC conformance (to EC Directive on Machines, Appendix II A) .............................................. 1
Product description and application ........................................................................................ 1
Dangers.................................................................................................................................. 1
Additional information ............................................................................................................. 2
Validity of the user manual...................................................................................................... 2
Technical data ........................................................................................................................ 3
Load calculations .................................................................................................................... 4
Installation................................................................................................................................ 5
Designing the plant ................................................................................................................. 5
Installation position and assembly .......................................................................................... 5
Connecting the inductive proximity switch............................................................................... 6
Connecting the motor cable and the resolver cable ................................................................ 6
Maintenance / repairs .............................................................................................................. 7
Lubrication .............................................................................................................................. 7
Changing the toothed belt (270, Fig. 6)................................................................................... 7
Repairs ..................................................................................................................................... 8
Changing the toothed belt (180, Fig. 6)................................................................................... 8
Setting the toothed belt pretension (270, Fig. 6) ..................................................................... 9
Setting the toothed belt pretension (180, Fig. 6) ................................................................... 10
Changing shafts and rollers .................................................................................................. 11
Setting the slide play............................................................................................................. 13
Changing the inductive proximity switch ............................................................................... 13
Spare parts list ....................................................................................................................... 14
Spare parts list ....................................................................................................................... 16
General information............................................................................................................... 26
Environmental compatibility and disposal.............................................................................. 26
Important information
,QWURGXFWLRQ
This user manual describes the mechanical design, load limits, installation, maintenance and spare parts
of the servo horizontal axis SHA-470. It forms an integral part of the user manuals of the servo amplifier
and the operator software.
(&FRQIRUPDQFH(to EC Directive on Machines, Appendix II A)
Regulations and standards taken into account:
• EC Directive on Machines 89/392/EEC, 91/368/EEC
Manufacturer
Montech AG
Gewerbestrasse 12
CH-4552 Derendingen
Tel. 032 / 681 55 00
Fax 032 / 682 19 77
3URGXFWGHVFULSWLRQDQGDSSOLFDWLRQ
The servo horizontal axis SHA-470 is an electrically operated position-controlled linear unit which serves
as the base unit in the construction of portal loaders. Depending on the size of the unit, movements in the
x-axis up to 800, 1200, 1600, 2000 or 2400 mm are possible. Linear units (LEP) or compact slides (KSD)
can be fitted to carry out vertical movements. Units of other systems or any tool-bearing units can also be
attached as long as they do not exceed the load limits of the servo horizontal axis SHA-470.
Servo horizontal axes SHA-470 that have been retrofitted to portal loaders are suited for many and varied
tasks such as replenishing machines, small parts assembly, transposition, packaging, palletizing as well
as parts supply from magazines containing workpieces.
'DQJHUV
The use of servo horizontal axes SHA-470 in equipment is permissible only if they provide protection by
moveable separating protective devices to EN 292-2 section 4.2.2.3. Observe the operating conditions and safety notes described in the user manual for the your controller.
It is absolutely essential that you keep within the stated load limits.
Important!
During operation the surface of the motor can reach 100°C. Do not touch the motor
until the temperature has dropped below 40°C (measure the surface temperature).
During maintenance work on the Servo horizontal axis ensure that the power to the
drive is switched off. The servo amplifier must be disconnected from the supply voltage. Switch off the mains switch or mains contactor.
•
•
•
Switch off the enable signal
Switch off the mains power (L1, L2, L3)
Ensure that no unauthorized switching-on of the supply voltage can occur.
Failure to observe these protective measures may result in life-threatening or severe
personal injuries or material damage.
&
Important information
$GGLWLRQDOLQIRUPDWLRQ
The present user manual is intended to allow proper and safe operation of your Servo horizontal axis
SHA-470. Should any information for your particular application be missing, please contact Montech.
When ordering user manuals it is imperative that you quote the serial number on the front panel of the
controller.
Single copies of user manuals are provided free of charge.
Fig. 1
Type / Serial number
Montech AG
Management
U. D. Wagner / A. Trenner
9DOLGLW\RIWKHXVHUPDQXDO
Our products are continually updated to reflect the latest state of the art and practical experience.
In line with product developments, our user manuals are continually updated.
To avoid confusion, please satisfy yourself that the present user manual is valid for the servo horizontal
axis SHA to be commissioned.
Every user manual has an edition number, e.g. 506457 (Fig. 2). The label affixed to the title page shows
the product series number for which the edition number on the user manual is valid.
Fig. 2
Edition
Edizione
Utgava
Edition
Ausgabe
Valable pour
Valido per
Giltig för
Valid for
Gültig für
&
506457
Series
17254
Important information
7HFKQLFDOGDWD
Item no.
SHA-470800
SHA-4701200
SHA-4701600
SHA-4702000
SHA-4702400
48292
48293
48294
48295
48296
max. stroke
[mm]
800
1200
1600
2000
2400
Own weight
[kg]
20.8
24.7
28.5
32.4
36.2
Permissible loads
see load calculations
max. permissible mounting mass
[kg]
15
max. moment MXmax
1)
[Nm]
55
max. moment MYmax
1)
[Nm]
90
100
max. Moment MZmax
1)
[Nm]
max. acceleration
2)
[m/s ]
10
[mm/s]
2300
min. accel. / decel. time
2)
[ms]
230
Repeating accuracy
3)
[mm]
+/- 0.05
max. speed
2
Reference position approach switch
integrated inductive proximity switch PNP
Drive
highly dynamic synchronous servo motor
Motor, nominal rating
[W]
Transmitter system
Enclosure protection for servo motor
max. operating temperature of 4)
motor
Ambient
conditions:
Temperature
470
Resolver
IP64
[°C]
65
[°C]
10 ... 50
Rel. humidity
5% ... 85% non condensing
Air purity
normal workshop atmosphere
Installation position of horizontal axis
horizontal
Sound level
[dBA]
Warranty period
<65
2 years from the date of delivery
1)
See load calculations
2)
At max. permissible mounting mass at max. speed
3)
At constant motor temperature. Maximum position deviations when moving to a defined target position +/- 0.1mm.
Measured at max. load, max. speed and 100 consecutive traverses.
4)
At 20°C ambient temperature
&
Important information
/RDGFDOFXODWLRQV
The load calculations stated in Technical data are maximum values during single load. The following calculations apply to the combined loads experienced in practical applications:
Fig. 3
S: centre of gravity of ancillary unit
a) Existing moments
M X = 0.01 ⋅ ml ⋅ ( LY − 34 )
v
M Y = 0.001 ⋅ ml ⋅ ⋅ LZ + 0.01 ⋅ ml ⋅ L X
t
v
M Z = 0.001 ⋅ ml ⋅ ⋅ (LY − 34 )
t
MX, MY, MZ
ml
LX, LY, LZ
v
t
:
:
:
:
Existing moments [Nm]
Mounting mass [kg]
Gravity distance of the moving mass [mm]
Traversing rate vmax=2300 [mm/s]
Acceleration or deceleration time tmin=230 [ms]
b) Combined loads
B=
B
&
M X M Y M Z ml
+
+
+
≤1
55
90 100 90
:
Load factor Å Must not exceed the value 1!
Installation
'HVLJQLQJWKHSODQW
When designing the plant, the following points must be taken into account:
•
•
•
The servo horizontal axis SHA-470 must only be operated behind a protective device to EN 292-2
section 4.2.2.3.
Ensure unrestricted ventilation of the motor (50/80, Fig. 4) and keep within the permitted ambient
temperatures.
Realize a low-oscillating quick-set construction.
,QVWDOODWLRQSRVLWLRQDQGDVVHPEO\
The servo horizontal axis SHA-470 is installed horizontally so that the motor (50/80, Fig. 4) is positioned
underneath the carrier profile (10, Fig. 4) and the two dovetail guides are in a horizontal position.
Attachment is via the bottom or rear dovetail of the carrier profile (10, Fig. 4) by means of quick-set tension elements SLL-55.
Installation of accessories is via the dovetail of the adapter plate (20/40, Fig. 4) by means of a tension
element SLL-55.
Fig. 4
&
Installation
&RQQHFWLQJWKHLQGXFWLYHSUR[LPLW\VZLWFK
•
•
•
•
The servo amplifier must be disconnected from the supply voltage. Switch off the
mains switch or mains contactor.
Ensure that no unauthorized switching-on of the supply voltage can occur.
During operation the surface of the motor can reach 100°C. Do not touch the motor until the temperature has dropped below 40°C (measure the surface temperature).
Failure to observe these protective measures may result in life-threatening or severe personal injuries or material damage.
The length of the cable of the supplied inductive proximity switch is 5m.
The distance between the proximity switch and the activation surface has been set at the factory. Only
when the switch is being replaced will it become necessary to set this distance anew according to
“Changing and setting the inductive proximity switch”.
Wiring of the proximity switch is according to the following diagram. After wiring, check the function of the
proximity switch.
Fig. 5
brown
+ 24 V DC
control
black
plug 11A
terminal 9
blue
Digital GND
control
&RQQHFWLQJWKHPRWRUFDEOHDQGWKHUHVROYHUFDEOH
•
•
•
•
The servo amplifier must be disconnected from the supply voltage. Switch off the
mains switch or mains contactor.
Ensure that no unauthorized switching-on of the supply voltage can occur.
During operation the surface of the motor can reach 100°C. Do not touch the motor until the temperature has dropped below 40°C (measure the surface temperature).
Failure to observe these protective measures may result in life-threatening or severe personal injuries or material damage.
The supplied motor cables and resolver cables are 5m in length. The cables are ready-made with coded
concentric plugs on the motor side.
&
Maintenance / repairs
/XEULFDWLRQ
•
•
•
•
•
•
The servo amplifier must be disconnected from the supply voltage. Switch off the
mains switch or mains contactor.
Ensure that no unauthorized switching-on of the supply voltage can occur.
During operation the surface of the motor can reach 100°C. Do not touch the motor until the temperature has dropped below 40°C (measure the surface temperature).
Failure to observe these protective measures may result in life-threatening or severe personal injuries or material damage.
Remove both protective plugs (470, Fig. 6).
Push the slide until the lubricating nipples (20/130, Fig. 8) can easily be reached.
Lubrication is via the felt wicks (20/90, Fig. 8) which are pressed to the shafts (10/20, Fig. 7) by springs
(20/120, Fig. 8). Use ONLY Klüber oil “Paraliq 460“ as a lubricant.
•
•
Lubrication interval:
Lubrication points:
800 operating hours.
4 lubricating nipples (20/130, Fig. 8) on the end plates (20/20, Fig. 8).
&KDQJLQJWKHWRRWKHGEHOW(270, Fig. 6)
•
•
Carry out a reference traverse.
Switch the supply voltage off.
•
•
•
•
•
•
•
•
•
•
•
•
•
•
•
•
•
The servo amplifier must be disconnected from the supply voltage. Switch off the
mains switch or mains contactor.
Ensure that no unauthorized switching-on of the supply voltage can occur.
During operation the surface of the motor can reach 100°C. Do not touch the motor until the temperature has dropped below 40°C (measure the surface temperature).
Failure to observe these protective measures may result in life-threatening or severe personal injuries or material damage.
Mark the position of the slide.
Undo screws (380, Fig. 6) and remove top cover (90, Fig. 6).
Mark the position of the motor shaft.
Undo screws (380 and 390, Fig. 6) and remove bottom cover (100, Fig. 6).
Undo screws (280, Fig. 6) and remove guard plate (40, Fig. 6).
Undo screws (300, Fig. 6) and remove them.
Undo screw (320, Fig. 6) and push the motor (50/80, Fig. 9) to the rear stop position.
Replace the toothed belt (270, Fig. 6). The positions of the slide and motor must be in accordance
with the markings.
Lightly tension the toothed belt (270, Fig. 6) by turning the machine screw (320, Fig. 6).
Screw in the machine screws (300, Fig. 6) and ribbed washers (360, Fig. 6) but do not tighten.
Set the toothed belt pretension according to “Setting the toothed belt pretension“ and carry out final
assembly.
Check the work carried out.
Carry out offset correction according to the operator software manual “Commissioning after mechanical maintenance work“.
&
Repairs
&KDQJLQJWKHWRRWKHGEHOW(180, Fig. 6)
•
•
Carry out a reference traverse (homing).
Switch the supply voltage off.
•
•
•
•
•
•
•
•
•
•
•
•
•
•
•
•
•
•
•
•
•
The servo amplifier must be disconnected from the supply voltage. Switch off the
mains switch or mains contactor.
Ensure that no unauthorized switching-on of the supply voltage can occur.
During operation the surface of the motor can reach 100°C. Do not touch the motor until the temperature has dropped below 40°C (measure the surface temperature).
Failure to observe these protective measures may result in life-threatening or severe personal injuries or material damage.
Mark the position of the slide.
Undo machine screws (380, Fig. 6) and remove the top cover (90, Fig. 6).
Push the slide to the marked position and mark the motor shaft position.
Undo screws (380 and 390, Fig. 6) and remove the bottom cover (100, Fig. 6).
Undo the machine screws (370, Fig. 6) and remove the cover (110, Fig. 6).
Undo the counter screw (460, Fig. 6) (do not remove).
Undo machine screws (340, Fig. 6) and remove the toothed belt (180, Fig. 6) including the mounted
clamps (190 and.200, Fig. 6) from the slide.
Undo the machine screws (430, Fig. 6) until the clamps (190 and 200, Fig. 6) can be removed from
the toothed belt (180, Fig. 6).
On the end face, attach a new toothed belt to the old belt. The adhesive tape must adhere reliably,
otherwise extensive dismantling of the servo horizontal axis will be required.
Carefully pull the new toothed belt through the carrier profile (10, Fig. 6) and remove the old toothed
belt.
Install in reverse order but do not tension the toothed belt (180, Fig. 6) and do not install the top cover
(90, Fig. 6). It must be possible to turn the motor shaft without linear movement of the slide.
Push the slide and turn the motor shaft to the marked position.
Set the toothed belt pretension according to “Setting the toothed belt pretension” (180, Fig. 6) and
secure.
Check the marked positions, correct if necessary.
Install the top cover (90, Fig. 6) and screw in and tighten the machine screws (380, Fig. 6).
Check the work carried out.
Carry out offset correction according to the operator software manual “Commissioning after mechanical maintenance work”.
&
Repairs
6HWWLQJWKHWRRWKHGEHOWSUHWHQVLRQ(270, Fig. 6)
•
•
•
•
•
•
•
•
•
•
•
The servo amplifier must be disconnected from the supply voltage. Switch off
the mains switch or mains contactor.
Ensure that no unauthorized switching-on of the supply voltage can occur.
During operation the surface of the motor can reach 100°C. Do not touch the
motor until the temperature has dropped below 40°C (measure the surface temperature).
Failure to observe these protective measures may result in life-threatening or
severe personal injuries or material damage.
Undo screws (380, Fig. 6) and remove top cover (90, Fig. 6).
Undo screws (300, Fig. 6) (do not remove).
Set the toothed belt pretension according to the following table by turning the machine screw (320,
Fig. 6).
Tighten machine screws (300, Fig. 6).
Check the toothed belt pretension according to the following table.
Install the top cover (90, Fig. 6) and screw in and tighten the machine screws (380, Fig. 6).
Carry out offset correction according to the operator software manual “Commissioning after mechanical maintenance work”.
The initial tension values shown in the table are maximum values.
Subjecting the toothed belt to higher initial tension will result in premature wear of the
toothed belt and an increase in the noise level.
Type
SHA-470
Deflection force F [N]
Excursion x [mm]
13
1.4
&
Repairs
6HWWLQJWKHWRRWKHGEHOWSUHWHQVLRQ(180, Fig. 6)
•
•
•
•
•
•
•
•
•
•
The servo amplifier must be disconnected from the supply voltage. Switch off
the mains switch or mains contactor.
Ensure that no unauthorized switching-on of the supply voltage can occur.
During operation the surface of the motor can reach 100°C. Do not touch the
motor until the temperature has dropped below 40°C (measure the surface temperature).
Failure to observe these protective measures may result in life-threatening or
severe personal injuries or material damage.
Push the slide to the stop position on the drive side.
Undo the counter screw (460, Fig. 6) (do not remove).
Set the toothed belt pretension according to the following table by turning the machine screw (340,
Fig. 6).
Check the toothed belt pretension according to the following table.
Tighten the counter screw (460, Fig. 6).
Carry out offset correction according to the operator software manual “Commissioning after mechanical maintenance work”.
The initial tension values shown in the table are maximum values.
Subjecting the toothed belt to higher initial tension will result in premature wear of the
toothed belt and an increase in the noise level.
Type
Initial tension [N]
Deflection force F [N]
Excursion x [mm]
SHA-470-800
330
9.6
6
SHA-470-1200
330
6.4
6
SHA-470-1600
330
8.4
10
SHA-470-2000
330
6.6
10
SHA-470-2400
330
5.5
10
&
Repairs
&KDQJLQJVKDIWVDQGUROOHUV
Always change the shafts (10/20, Fig. 7) together with the associated rollers (20/100, Fig. 8).
'LVDVVHPEOLQJWKHVOLGH
•
•
•
•
•
•
•
•
•
•
•
•
•
•
The servo amplifier must be disconnected from the supply voltage. Switch off
the mains switch or mains contactor.
Ensure that no unauthorized switching-on of the supply voltage can occur.
During operation the surface of the motor can reach 100°C. Do not touch the
motor until the temperature has dropped below 40°C (measure the surface temperature).
Failure to observe these protective measures may result in life-threatening or
severe personal injuries or material damage.
Mark the position of the slide.
Remove the covers (70, Fig. 6).
Mark the position of the clamps (190 and 200, Fig. 6) in relation to the adapter plate (20/40, Fig. 8).
Undo the setscrew (460, Fig. 6) (do not remove).
Undo screws (340, Fig. 6) and remove the clamps (190, 200) from the slide.
Remove the accessories from the adapter plate (20/40, Fig. 8). If the fastening screws(20/150, Fig. 8)
of the adapter plate (20/40, Fig. 8) are easily accessible, you can remove the adapter plate together
with the attached accessories. Be sure not to damage the pinholes of the adapter plate.
Undo the nut (20/70, Fig. 8).
Using a Allen key, turn the eccentric bolt (20/50, Fig. 8) to the bottom position.
Hinge out the lower part of the slide (20, Fig. 6). Because of the activation plate (20/80, Fig. 8), the
upper part of the slide cannot be hinged out.
Remove the slide (20, Fig. 6).
&KDQJLQJWKHUROOHUV
•
•
•
•
Unscrew the eccentric shaft (20/50, Fig. 8) and the concentric shaft (20/60, Fig. 8) from the nut
(20/70, Fig. 8). To do so, hold the hexagon socket head of the eccentric or concentric shaft with a 3
mm Allen key.
Change the rollers (20/100, Fig. 8) (always change all rollers).
Install the concentric shaft (20/60, Fig. 8), shim (20/110, Fig. 8), roller (20/100, Fig. 8) and nut (20/70,
Fig. 8) and tighten. Hold with Allen key.
Install the eccentric shaft (20/50, Fig. 8), shim (20/110, Fig. 8), roller (20/100, Fig. 8) and nut (20/70,
Fig. 8). Eccentric in lower position. Tighten the nut only slightly; it will only be tightened properly when
the slide play is being set.
&KDQJLQJWKHVKDIWV
The shafts (10/20, Fig. 7) can be removed laterally on the side of the deflection roller or on the side of the
drive. If the available space makes it possible to change the shafts on the side of the deflection roller, this
option is preferable to that on the drive side because the latter requires additional work.
If the shaft cannot be de-installed with the servo horizontal axis removed, de-install the latter by undoing
the tension elements SLL-55 (Fig. 4). After this you can remove the shafts on the side of the deflection
roller.
&
Repairs
6LGHRIWKHGHIOHFWLRQUROOHU
•
•
•
•
•
Remove the cover of the deflection roller (110, Fig. 6) by undoing the machine screws (370, Fig. 6).
Remove both cap screws (50/70, Fig. 10).
Pull out the shafts (10/20, Fig. 7).
Insert new shafts to the stop.
Install in reverse order.
'ULYHVLGH
•
•
•
•
•
•
•
•
•
•
•
Remove the toothed belt according to “Changing the toothed belt (270, Fig. 6)“.
Undo the nut (50/200, Fig. 9); remove the washer (50/190, Fig. 9).
Using a special tool, undo the crown gear (50/60, Fig. 9) from the cone of the gear shaft.
Remove the crown gear.
Remove both cap screws (50/110, Fig. 9).
Pull out the shafts (10/20, Fig. 7).
Insert the new shaft to the stop.
Install both cap screws (50/110, Fig. 9).
Install crown gear (50/60, Fig. 9), washer (50/190, Fig. 9) and nut (50/200, Fig. 9).
Carry out final assembly according to the following chapter.
After completion of final assembly, install the toothed belt according to “Changing the toothed belt”
(270, Fig. 6).
)LQDODVVHPEO\
•
•
•
•
•
•
•
•
Slide in the upper part of the slide. Hinge-in the lower part.
Eliminate slide play according to “Setting the slide play“.
Reattach to the adapter plate (20/40, Fig. 8) any accessories that may have been removed. If the
accessories were removed complete with the adapter plate (20/40, Fig. 8), take particular care when
installing the adapter plate to avoid damage to the pin holes.
Install the covers (70, Fig. 6).
Attach the clamps (190, 200, Fig. 6), screws (340, Fig. 6) and washers (350, Fig. 6) in the marked
positions to the adapter plate.
Set the toothed belt pretension according to “Setting the toothed belt pretension“.
Check the work carried out.
Carry out offset correction according to the operator software manual “Commissioning after mechanical maintenance work”.
&
Repairs
6HWWLQJWKHVOLGHSOD\
•
•
•
•
•
•
•
The servo amplifier must be disconnected from the supply voltage. Switch off
the mains switch or mains contactor.
Ensure that no unauthorized switching-on of the supply voltage can occur.
During operation the surface of the motor can reach 100°C. Do not touch the
motor until the temperature has dropped below 40°C (measure the surface temperature).
Failure to observe these protective measures may result in life-threatening or
severe personal injuries or material damage.
Slightly undo the top nuts (20/70, Fig. 8).
Set the rollers (20/100, Fig. 8) so that there is no play, by turning the eccentric bolts (20/50, Fig. 8)
clockwise (without any initial tension).
Tighten the upper nuts (20/70, Fig. 8) while holding the eccentric bolts (20/50, Fig. 8) with a hexagon
secket head wrench to prevent the position of the tension nut from changing.
&KDQJLQJWKHLQGXFWLYHSUR[LPLW\VZLWFK
•
•
•
•
•
•
•
•
•
•
•
The servo amplifier must be disconnected from the supply voltage. Switch off
the mains switch or mains contactor.
Ensure that no unauthorized switching-on of the supply voltage can occur.
During operation the surface of the motor can reach 100°C. Do not touch the
motor until the temperature has dropped below 40°C (measure the surface temperature).
Failure to observe these protective measures may result in life-threatening or
severe personal injuries or material damage.
Undo the machine screws (420, Fig. 6) and remove the cable duct (150, Fig. 6).
Undo the clamping screw (140, Fig. 6) and remove the proximity switch (260, Fig. 6).
Insert the new proximity switch (260, Fig. 6) through the protective hose (540, Fig. 6) into the carrier
profile (10, Fig. 6) and push it to the stop.
Attach the proximity switch (260, Fig. 6) by slightly tightening the clamping screw (140, Fig. 6).
Carry out a collision check by moving the body of the slide.
Install the cable duct (150, Fig. 6) and the screws (420, Fig. 6.
Connect the inductive proximity switch (260, Fig. 6) according to “Connecting the inductive proximity
switch“.
&
Spare parts list
Fig. 6
&
Spare parts list
&
Spare parts list
6HUYRKRUL]RQWDOD[LV6+$
3RV 'HVLJQDWLRQ
,WHPQR
6XSSOLHU
0DWHULDO
6+$
10
Carrier assembly
48311
48312
48313
48314
48315
Montech AG Various
20
Slide assembly
48282
48282
48282
48282
48282
Montech AG Various
30
Hose retainer
48285
48285
48285
48285
48285
Montech AG Aluminum
40
Guard plate
48281
48281
48281
48281
48281
Montech AG Stainless
steel
50
Gear assembly
48276
48276
48276
48276
48276
Montech AG Various
60
Deflection assembly 48284
48284
48284
48284
48284
Montech AG Various
70
Cover with lubrication aperture
46798
46798
46798
46798
46798
Montech AG Aluminum
80
Cover
46799
46800
46801
46802
46803
Montech AG Aluminum
90
Hood, top
48160
48160
48160
48160
48160
Montech AG PUR
100
Hood, bottom
48152
48152
48152
48152
48152
Montech AG PUR
110
Hood, deflection
48151
48151
48151
48151
48151
Montech AG PUR
120
Montech Logo
41176
41176
41176
41176
41176
Montech AG PVC cadmium-free
130
Clamping piece
47906
47906
47906
47906
47906
Montech AG Steel
140
Clamping screw
47904
47904
47904
47904
47904
Montech AG Steel
150
Cable duct
48287
48288
48289
48290
48291
Montech AG Aluminum
160
Spacer
48317
48317
48317
48317
48317
Montech AG Steel
170
Connecting chain
link
46732
46732
46732
46732
46732
Montech AG
180
Toothed belt
46808
46809
46810
46811
46812
Rud. Uiker
AG
190
Clamp, top
46759
46759
46759
46759
46759
Montech AG Aluminum
200
Clamp, bottom
46760
46760
46760
46760
46760
Montech AG Aluminum
210
Type plate CE
41620
41620
41620
41620
41620
Montech AG Polyester
metal.
250
Chain link
505909 505909 505909 505909 505909 FMO SA
260
Proximity switch
506321 506321 506321 506321 506321 Baumer
Various
270
Toothed belt
506190 506190 506190 506190 506190 Rud. Uiker
AG
Fiberglass /
PUR
280
Machine screw
M4x10
501619 501619 501619 501619 501619 Bossard AG
Steel
290
Ribbed washer M4
502364 502364 502364 502364 502364 Bossard AG
Steel
300
Machine screw
M5x16
506191 506191 506191 506191 506191 Bossard AG
Steel
310
Machine screw
M5x25
501767 501767 501767 501767 501767 Bossard AG
Steel
&
Steel / PUR
Spare parts list
3RV 'HVLJQDWLRQ
,WHPQR
6XSSOLHU
0DWHULDO
6+$
320
Machine screw
M5x20
501642 501642 501642 501642 501642 Bossard AG
Steel
330
Machine screw
M5x25
501643 501643 501643 501643 501643 Bossard AG
Steel
340
Machine screw
M5x35
501645 501645 501645 501645 501645 Bossard AG
Steel
350
Washer M5
506304 506304 506304 506304 506304 Bossard AG
Steel
360
Ribbed washer M5
502365 502365 502365 502365 502365 Bossard AG
Steel
370
Machine screw
M5x20
504799 504799 504799 504799 504799 Bossard AG
Stainless
steel
380
Machine screw
M5x35
506193 506193 506193 506193 506193 Bossard AG
Stainless
steel
390
Machine screw
M5x80
506194 506194 506194 506194 506194 Bossard AG
Stainless
steel
400
Washer M5
506305 506305 506305 506305 506305 Bossard AG
Stainless
steel
410
Machine screw
M5x6
506195 506195 506195 506195 506195 Bossard AG
Steel
420
Machine screw
M5x10
506320 506320 506320 506320 506320 Bossard AG
Steel
430
Machine screw
M5x12
506317 506317 506317 506317 506317 Bossard AG
Steel
440
Machine screw
M5x16
506196 506196 506196 506196 506196 Bossard AG
Steel
450
Countersunk screw
M5x12
501810 501810 501810 501810 501810 Bossard AG
Steel
460
Setscrew M5x4
501909 501909 501909 501909 501909 Bossard AG
Steel
470
Protective plug
506199 506199 506199 506199 506199 Angst +
Pfister AG
PE
480
Protective hose
PG36
504645 504645 504645 504645 504645 PMA Elektro PA
AG
490
Circlip ø42
504779 504779 504779 504779 504779 Bossard AG
Steel
500
Circlip ø35
502461 502461 502461 502461 502461 Bossard AG
Steel
390
User manual germ.
506187 506187 506187 506187 506187 Montech AG Paper
391
User manual engl.
506498 506498 506498 506498 506498 Montech AG Paper
392
User manual french 506499 506499 506499 506499 506499 Montech AG Paper
393
User manual ita.
506600 506600 506600 506600 506600 Montech AG Paper
394
User manual span.
506601 506601 506601 506601 506601 Montech AG Paper
395
User manual swed.
506602 506602 506602 506602 506602 Montech AG Paper
&
Spare parts list
Fig. 7
&
Spare parts list
&DUULHUDVVHPEO\
3RV
'HVLJQDWLRQ
,WHP
QR
6XSSOLHU
0DWHULDO
6+$
10
Carrier assembly
48311
48312
48313
48314
48315
10/10
Carrier
46783
46784
46785
46786
46787
Montech AG
Aluminum
10/20
Shaft
46793
46794
46795
46796
46797
Hydrel AG
Steel
10/30
Foam tape
48302
48303
48304
48305
48306
Montech AG
PUR
10/40
Blind rivet nut M5
48276
48276
48276
48276
48276
Bossard AG
Aluminum
&
Spare parts list
Fig. 8
&
Spare parts list
6OLGHDVVHPEO\
3RV
'HVLJQDWLRQ
,WHPQR
6XSSOLHU
0DWHULDO
6OLGHDVVHPEO\
20/10
Slide body
48270
Montech AG
Aluminum
20/20
End plate
48271
Montech AG
Aluminum
20/30
Spacer plate
48273
Montech AG
Aluminum
20/40
Adapter plate
48281
Montech AG
Aluminum / steel
20/50
Eccentric bolt
48267
Montech AG
Steel
20/60
Concentric bolt
48274
Montech AG
Steel
20/70
Nut
48275
Montech AG
Steel
20/80
Activation plate
46804
Montech AG
Steel
20/90
Felt wick
40921
Montech AG
Wool felt
20/100
Roller
503663
Hydrel AG
Steel
20/110
Shim
505919
Bossard AG
Steel
20/120
Pressure spring
504119
Kubo Tech AG
Steel
20/130
Lubricating nipple
504554
Hausammann AG
Brass
20/140
Machine screw M5x20
501642
Bossard AG
Steel
20/150
Machine screw M5x35
501645
Bossard AG
Steel
20/160
Ribbed washer M5
502365
Bossard AG
Steel
20/170
Machine screw M4x16
501622
Bossard AG
Steel
20/180
Ribbed washer M4
502364
Bossard AG
Steel
20/190
Straight pin ø6x36
502066
Bossard AG
Steel
20/200
Straight pin ø5x24
506164
Bossard AG
Steel
&
Spare parts list
Fig. 9
&
Spare parts list
*HDUDVVHPEO\
3RV
'HVLJQDWLRQ
,WHPQR
6XSSOLHU
0DWHULDO
*HDUDVVHPEO\
50/10
Connection plate
48175
Montech AG
Aluminum
50/20
Bearing plate, top
48141
Montech AG
Aluminum
50/30
Bearing plate, bottom
48173
Montech AG
Aluminum
50/40
Deflection shaft
48278
Montech AG
Aluminum / steel
50/50
Gear shaft
48277
Montech AG
Steel
50/60
Crown gear
47932
Montech AG
Steel
50/70
Spacer bolt
47970
Montech AG
Steel
50/80
Servomotor
48269
Montech AG
Various
50/90
Guide rod
48176
Montech AG
Steel
50/100
Elastomer stops
48279
Montech AG
NR / steel
50/110
Cap screws
48263
Montech AG
PUR / steel
50/120
Deep groove ball bearing
504760
Kellenberg + Co. AG
Steel
50/130
Deep groove ball bearing
501378
Kellenberg + Co. AG
Steel
50/140
Machine screw M5x20
501642
Bossard AG
Steel
50/150
Ribbed washer
502365
Bossard AG
Steel
50/160
Machine screw M6x20
501660
Bossard AG
Steel
50/170
Ribbed washer
502366
Bossard AG
Steel
50/180
Straight pin ø5x20
502050
Bossard AG
Steel
50/190
Washer
502419
Bossard AG
Steel
50/200
Hex nut
501998
Bossard AG
Steel
&
Spare parts list
Fig. 10
&
Spare parts list
'HIOHFWLRQDVVHPEO\
3RV
'HVLJQDWLRQ
,WHPQR
6XSSOLHU
0DWHULDO
'HIOHFWLRQDVVHPEO\
60/10
Connection plate
48177
Montech AG
Aluminum
60/20
Bearing plate, top
47974
Montech AG
Aluminum
60/30
Bearing plate, bottom
47975
Montech AG
Aluminum
60/40
Deflection shaft
48266
Montech AG
Aluminum / steel
60/50
Spacer bolt
47970
Montech AG
Steel
60/60
Elastomer stops
48279
Montech AG
Natural rubber /
steel
60/70
Cap screw
48263
Montech AG
PUR / steel
60/80
Deep groove ball bearing
501379
Kellenberg + Co. AG
Steel
60/90
Machine screw M5x20
501642
Bossard AG
Steel
60/100
Ribbed washer
502365
Bossard AG
Steel
60/110
Machine screw M6x20
501660
Bossard AG
Steel
60/120
Ribbed washer
502366
Bossard AG
Steel
60/130
Straight pin ø5x20
502050
Bossard AG
Steel
&
General information
(QYLURQPHQWDOFRPSDWLELOLW\DQGGLVSRVDO
0DWHULDOVXVHG
•
•
•
•
•
•
•
•
•
Aluminum
Steel
Brass
Wool fiber
PUR
Polyurethane
PS
Polystyrene
PA
Polyamide
PE
Polyethylene
NR
Natural rubber
6XUIDFHUHILQHPHQW
•
•
Anodic oxidation of aluminum
Blackening of steel
)RUPLQJSURFHVVHV
•
•
•
Profile extruding of aluminum
Material-removing processes (metals and plastics)
Vacuum-casting of plastics
(PLVVLRQVGXULQJRSHUDWLRQ
•
None
'LVSRVDO
Servo horizontal axes (SHA-470) or handling units retrofitted to portal loaders that are no longer in use,
are to be dismantled and recycled according to the type of material. The type of material for each part is
stated in the spare parts list. Any non-recyclable material is to be disposed of properly according to materials, taking into account the regulations which apply in your location.
&