1
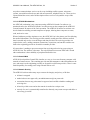
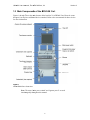
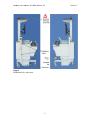
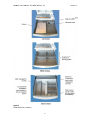
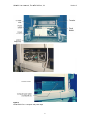
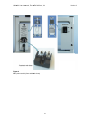
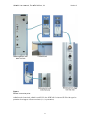
Userr's Manu ual Th he AFHCAN N Carrt V4 Docume ent ID: UM-0 0001 Version V 3 UM-0001 User's Manual, The AFHCAN Cart, V4 Version 3 The names of any providers and patients used in illustrations or examples in this document are fictitious and were developed in accordance with AFHCAN’s deidentification procedures. Every effort has been made to ensure this manual is a highquality product. Check AFHCAN’s website, www.afhcan.org, for updates or additional information. Please let us know if you have any suggestions for improvement using one of the following means of contact: AFHCAN Product Development Team 4000 Ambassador Drive Anchorage, AK 99508 Phone: 888 449-4435 (toll free) Fax: 907 729-2269 Email: [email protected] Copyright © 2010 Alaska Native Tribal Health Consortium (ANTHC). All rights reserved. No part of this publication may be reproduced, stored in a retrieval system, or transmitted, in any form, or by any means, including photocopying, electronic, mechanical, recording or otherwise, without the prior written permission of Alaska Native Tribal Health Consortium. ii UM-0001 User's Manual, The AFHCAN Cart, V4 Version 3 Table of Contents Section Title Page Preface ............................................................................................................................................ v About this Document .................................................................................................................. v Warning and Caution Symbols .................................................................................................. vi For More Information ................................................................................................................ vi Section 1 – Introduction ................................................................................................................ 1 1.1 Introduction to the AFHCAN Cart....................................................................................... 1 1.1.1 Store-and-Forward Telemedicine ................................................................................. 2 1.1.2 The AFHCAN System .................................................................................................. 2 1.1.2.1 AFHCAN tConsult Cart Software ......................................................................... 3 1.1.2.2 Network Servers .................................................................................................... 3 1.1.2.3 Communication Services ....................................................................................... 3 1.1.2.4 AFHCAN Workstations ........................................................................................ 4 1.1.2.5 tConsult Web ......................................................................................................... 4 1.1.2.6 Network Security ................................................................................................... 4 1.2 Main Components of the AFHCAN Cart............................................................................. 5 1.3 Introduction to Peripheral Devices .................................................................................... 12 1.3.1 Standard Equipment.................................................................................................... 12 1.3.1.1 Multimedia Reader .............................................................................................. 12 1.3.1.2 Scanner ................................................................................................................ 12 1.3.1.3 Digital Camera .................................................................................................... 12 1.3.2 External Connections .................................................................................................. 12 1.3.2.1 USB Port.............................................................................................................. 13 1.3.2.2 Audio Out ............................................................................................................ 13 1.3.2.3 Microphone ......................................................................................................... 14 1.3.2.4 Hand Switch ........................................................................................................ 14 1.3.2.5 Composite Video In............................................................................................. 14 1.3.2.6 S-Video In ........................................................................................................... 14 1.3.2.7 VGA Out ............................................................................................................. 15 1.3.2.8 S-Video Out ......................................................................................................... 15 1.3.2.9 Foot Switch.......................................................................................................... 15 1.4 Clinical Considerations ...................................................................................................... 15 1.5 Warnings and Cautions ...................................................................................................... 16 1.6 General Specifications and Operating Limits .................................................................... 17 1.6.1 Device Labeling .......................................................................................................... 17 1.6.2 Operating Limits ......................................................................................................... 18 Section 2 – Operation .................................................................................................................. 19 2.1 Basic Operating Procedures ............................................................................................... 19 2.1.1 Guidelines on Placement and Setup............................................................................ 19 2.1.2 Applying Power .......................................................................................................... 19 2.1.3 Logging Into the Software .......................................................................................... 19 iii UM-0001 User's Manual, The AFHCAN Cart, V4 2.1.4 2.1.5 2.1.6 2.1.7 Version 3 Operating the Scanner................................................................................................. 20 Operating the Digital Camera ..................................................................................... 20 Operating the Media Reader ....................................................................................... 21 Shutting Down ............................................................................................................ 21 Section 3 – Routine Maintenance ............................................................................................... 23 4.1 Care and Cleaning .............................................................................................................. 23 4.2 Elementary Troubleshooting .............................................................................................. 23 Appendix A - Technical Description .......................................................................................... 25 Device Classifications ............................................................................................................... 25 Additional Information ............................................................................................................. 25 Critical Components and Power Distribution ........................................................................... 25 List of Illustrations Figure 1 2 3 4 5 6 7 8 Title Page V4 AFHCAN Cart – front view .......................................................................................... 5 V4 AFHCAN Cart – side views .......................................................................................... 6 V4 AFHCAN Cart – back ................................................................................................... 7 V4 AFHCAN Cart – drawers .............................................................................................. 8 V4 AFHCAN Cart – computer and power bays .................................................................. 9 Main power switch (front and back views) ....................................................................... 10 External connection points ................................................................................................11 Wheel locks ....................................................................................................................... 19 List of Tables Table 1 2 3 Title Page Warning and caution symbols ............................................................................................vi Labeling used on the Cart ..................................................................................................17 Operating limits ................................................................................................................. 18 Non-operating limits.......................................................................................................... 18 iv UM-0001 User's Manual, The AFHCAN Cart, V4 Version 3 Preface About this Document This document introduces the AFHCAN Cart, model V4 for clinical users. Only the baseline configuration is covered. Supplemental technical details are provided in Appendix A. The V4 Cart comes with the following devices as a baseline configuration: power system, including: - main power switch with fused hot and common lines - isolation transformer with on/off switch and circuit breaker - six-outlet and four-outlet power strips with circuit breakers computer system, including: - HP rp5700 computer Flashbus Spectrim Lite video capture card (Spectrim Pro is an option) memory - 1 GB - DIMM DVI-D Adapter firewire / USB 2 PCI host adapter wireless network card - two USB hubs - monitor, keyboard, and mouse scanner digital camera wireless antenna multimedia reader The V4 Cart is a functional system in its out-of-the-box configuration. A variety of additional peripheral devices can be connected to the Cart to expand its functionality. Information about those devices is beyond the scope of this manual. This manual focuses on the hardware aspects of the AFHCAN Cart. For information regarding operation, refer to the current software user’s manual or on-line help system. v UM-0 0001 User's Manual, M The AFHCAN A Cartt, V4 Version 3 Warrning and d Caution n Symbols s The following fo sym mbols and labeels are used th hroughout thiis manual to aalert readers to informationn which h is importantt to safety, equ uipment integ grity, or succeessful operatiion. Symbol Label Meaning Warrning y with the info ormation asso ociated with th he symbol or Failure to comply el may result in personal in njury and/or s erious equipm ment damage e. labe ution Cau Failure to comply y with the info ormation asso ociated with th he symbol or labe el may result in equipment damage. No ote e important for Draws the reader's attention tto something that might be cessful opera ation of the re eferenced item m. succ For More Info ormation n This document d desscribes the equ uipment to a level of detaiil that will meeet most user's needs in thee contex xt of clinical use. For moree information n, contact AFH HCAN Custoomer Support:: AFHCA AN Customerr Support Phone: 888 449-443 35 Fax: 90 07 729-2269 email: customersupp c [email protected] vi UM-0 0001 User's Manual, M The AFHCAN A Cartt, V4 Version 3 Sec ction 1 – Introduction n 1.1 Introduc ction to th he AFHCA AN Cart The AFHCAN A Carrt is a tool forr communicatting medical iinformation oobtained durinng a patient encou unter from one healthcare provider p to an nother. Additiional informaation may be ggenerated by custom mer-purchaseed medical deevices connectted to the Carrt. Outputs froom the devicees feed directtly into the Caart’s computeer, which temp porarily storees and assem mbles the inforrmation into a case. The caase can then bbe transmittedd over any a conventio onal communications netw work includingg telephone lines, satellite linkss, or other avaailable system ms. Because thhe informatioon ovider sees exxactly what thhe remaiins in its origiinal form, thee receiving pro sendin ng provider sees with littlee or no loss off detail. The ssystem is an efficieent, reliable, and a secure means for exch hanging mediccal data. Thiss techno ology is often n used for obttaining a telem medical consuult, but it can suppo ort other functtions such as patient referrrals and schedduling. Depen nding on the types t of user--purchased deevices attacheed to the Cart, the medical m inform mation in a casse could be in n any of the foollowing form ms: digital imagees (originating g from a digittal camera, viideo otoscopee, dental camerra, or other viideo device) mation or doccuments textual inform - the AFH HCAN tConsu ult Cart softwaare includes bbuilt-in formss for assesssment data, patient p historiies, etc. - administtrators can design forms fo or their organiizations usingg tConsult Weeb - commen nts or instructiions can be ad dded to a casee - other documents or im mages can be added as attaachments patient identtification information - patient in nformation caan be entered directly into a database off patient inforrmation - patient in nformation caan be importeed from an eleectronic mediical records syystem - patient in nformation iss available to all providers in the local nnetwork scanned images or docum ments (originaating from a sccanner) data displayss and reports (originating from f an ECG,, digital spiroometer, tympaanometer, audiometer, vital signs mo onitor) video - m a digital cam mera) video cliips can be inccorporated intto a case (origginating from - Carts equ uipped with a video camerra can engagee in live videoo teleconferenncing (this capabilitty is separate from the tConsult Cart sofftware used too develop a case) audio (origin nating from a digital stetho oscope) 1 UM-0001 User's Manual, The AFHCAN Cart, V4 Version 3 1.1.1 Store-and-Forward Telemedicine The AFHCAN Cart uses a store-and-forward strategy for transmitting telemedicine cases. In contrast to live video or live voice communications, store-and-forward allows information to be gathered, saved, transmitted, and subsequently reviewed as a package (a case). The following are some of the problems that can be encountered when obtaining a medical consult using live voice communications: the sending provider and the consulting provider must both be available at the same time the communications system or network must be up and running with adequate bandwidth live communications are limited to audio and video video feeds are prone to lag time and loss of detail In remote areas that depend on satellite networks, communications can be subject to a variety of technical limitations and interruptions. It can also be a problem scheduling a live consult between providers with busy schedules. The store-and-forward strategy overcomes these problems. The following steps outline the basic sequence: a provider sees a patient and gathers information into the Cart using various peripheral devices, forms, and other resources the information being gathered is assembled into a case which is specific to that patient and that particular visit the case is permanently saved to the telemedicine server, and is then available to be sent to another provider over the communications network the AFHCAN system works with the communications network to ensure all images and other components of the case arrive safely at the destination AFHCAN software at the receiving end assembles all the information in the case, and then lets the receiving provider know a case is available for review the receiving provider can then open and review the case at his or her convenience (e.g., between appointments) The store-and-forward strategy does very well at handling large quantities of digital information, such as images or video clips. Store-and-forward can also be used in conjunction with live voice or video communications as a way to provide background information prior to a live session. 1.1.2 The AFHCAN System The AFHCAN Cart functions as one part of a communications network. In the path from one provider to another there are a number of other parts, each contributing to the process. These components are described in the following sections. 2 UM-0001 User's Manual, The AFHCAN Cart, V4 Version 3 1.1.2.1 AFHCAN tConsult Cart Software The heart of the AFHCAN telemedicine system is the AFHCAN tConsult Software. AFHCAN designs the software that runs on the computer in the AFHCAN Cart. The software allows the user to perform the following tasks: identify the patient, either by selecting an existing patient from a database or by entering new patient information into the database describe the patient's condition and history using a variety of forms tailored to various medical specialties use the peripheral devices attached to the Cart to obtain images and data, and save this information into a case decide what to do with the case: - send the case to another provider or group of providers - place the case on hold so you can come back later and add information - send the case to electronic archives, where it can be saved for future reference and viewed by other providers as needed - discard the current changes made during this session with the case The AFHCAN client software that runs on a Cart is called the tConsult Cart software. The software is very intuitive to operate. 1.1.2.2 tConsult Servers To achieve full functionality, each Cart in an AFHCAN system must be connected to a network server running AFHCAN tConsult Server software. The server stores information about all the Carts that are connected to that server. Servers also store the information about all the patients and all the cases that the server has handled. Usually a server connects to a number of Carts in a particular geographic region. All users with Carts connected to a given server can send cases to each other. 1 Servers can also be connected to other servers. This allows users with Carts in one region to send cases to users with Carts at a distant location. If a Cart has temporarily lost network connectivity to a server, it is said to be running in Off-Line mode. Much of a Cart's functionality for creating a case is still available, but the case cannot be sent to another provider until network connectivity is restored. Operations that depend on connection to a network are not active when a Cart is running off-line. The temporarily inactive functions are grayed out when displayed in the software. 1.1.2.3 Communication Services The communications between a Cart and a server, as well as the communications between one server and another, can take place over a variety of communication services. There are many 1 From a technical standpoint, Carts communicate only with servers, not with each other. Servers forward the information (in the form of a case) to the appropriate provider when he or she logs in at a Cart or workstation running AFHCAN software. 3 UM-0001 User's Manual, The AFHCAN Cart, V4 Version 3 ways these communications services can be set up including satellite systems, microwave systems, terrestrial-based local-area and wide-area networks, telephone lines, etc. These services operate behind the scenes, and a full description of these services is beyond the scope of this manual. 1.1.2.4 AFHCAN Workstations An AFHCAN workstation is any computer running AFHCAN tConsult Cart software. As mentioned earlier, the AFHCAN tConsult Cart software runs on the computer in the AFHCAN Cart and controls all aspects of the Cart's operation. The AFHCAN tConsult Cart software can also be loaded on ordinary personal computers or laptops, allowing those computers to create, send, and receive cases. When a healthcare provider originates a case, the AFHCAN Cart is the primary tool for collecting the medical information. The receiving provider normally would not need to add new medical data, but would only need to view the images and data provided. The receiving provider can respond to the case by adding comments, instructions, or questions, and can then send the case back to the originating provider or forward it to another provider. Of course there is nothing to prevent someone from receiving and reviewing a case using an AFHCAN Cart. The software is the same. The only difference between an AFHCAN Cart and other workstations is the availability of peripheral medical devices. 1.1.2.5 tConsult Web AFHCAN developed the tConsult Web interface as a way to view cases from any computer with network or Internet access. The consulting provider can add comments or other information to the case, and return it to the originating provider (or forward it to a different provider). There is some limited capability for creating cases using tConsult Web as well. 1.1.2.6 Network Security The AFHCAN software takes many steps to ensure the integrity and privacy of all data: all data is encrypted authorized users are approved by an administrator and given passwords connections between any points must be approved and certified at both the sending and receiving sites all activity within a case and on the network is tracked as a unique event custody of a case is systematically transferred so that only one person can open and add to a case at any given time 4 UM-0 0001 User's Manual, M The AFHCAN A Cartt, V4 Version 3 1.2 Main Componentts of the AFHCAN A Cart Figures 1 through 7 show the main m features of o the baselin e V4 AFHCA AN Cart. Pleaase be aware y Cart may y have additio onal devices attached. a Refeer to the user m manuals for tthose devices that your for more information. Figurre 1 V4 AF FHCAN Cart – front view Note: The terms "m main power sw witch" and "syystem power"" are used interch hangeably thrroughout this manual. 5 UM-0 0001 User's Manual, M The AFHCAN A Cartt, V4 Figurre 2 V4 AF FHCAN Cart – side views 6 Version 3 UM-0 0001 User's Manual, M The AFHCAN A Cartt, V4 Figurre 3 V4 AF FHCAN Cart – back 7 Version 3 UM-0 0001 User's Manual, M The AFHCAN A Cartt, V4 Figurre 4 V4 AF FHCAN Cart – drawers 8 Version 3 UM-0 0001 User's Manual, M The AFHCAN A Cartt, V4 Figurre 5 V4 AF FHCAN Cart – computer and power bay ys 9 Version 3 UM-0 0001 User's Manual, M The AFHCAN A Cartt, V4 Figurre 6 Main power switch (front and ba ack views) 10 Version 3 UM-0 0001 User's Manual, M The AFHCAN A Cartt, V4 Version 3 Figurre 7 Extern nal connectio on points Asidee from the foo otswitch, whicch is rated IP--X8, the AFH HCAN Cart iss rated IP-X0 with regard to protecction from ing gress of dust or o moisture (ii.e., no protecction). 11 UM-0001 User's Manual, The AFHCAN Cart, V4 Version 3 1.3 Introduction to Peripheral Devices The model V4 AFHCAN Cart is equipped with a computer system (CPU, monitor, keyboard, mouse, network cable, and wireless network antenna). It also includes three peripheral devices: a media reader, a scanner, and a digital camera. 1.3.1 Standard Equipment The items described below are included as standard features of the model V4 AFHCAN Cart. 1.3.1.1 Multimedia Reader The media reader allows digital images or documents to be read into a case from the various media cards such as those used in digital cameras. This functionality is activated via the Digital Camera button in the software. The media reader is located in the right rear area of the top drawer. 1.3.1.2 Scanner The scanner allows documents or photographs to be scanned in and added to a case. The scanner is controlled by the AFHCAN software, so it is not necessary to use the buttons located on the front panel of the scanner (in fact, the buttons are disabled in the AFHCAN application). The scanner function is activated by the Scanner button in the software. The scanner is located on the left side of the top drawer. 1.3.1.3 Digital Camera A digital camera is included with the Cart. It is housed in a docking station in the front right compartment in the bottom drawer. Cabling for the USB connection and DC power for charging the battery are permanently installed in the bottom drawer. Images are read in from the digital camera’s memory via the Digital Camera button in the software. The digital camera is a primary tool for dermatology, general trauma, or other visible medical situations. 1.3.2 External Connections There are nine external connection points on the V4 AFHCAN Cart: USB Audio Out Microphone Hand Switch Composite Video In S-Video In VGA Out S-Video Out Foot Switch 12 UM-0001 User's Manual, The AFHCAN Cart, V4 Version 3 1.3.2.1 USB Port The USB port allows any USB device to be connected to the Cart. However, in order for the device to function with the AFHCAN tConsult Software, the software must include the programming and drivers needed to control and communicate with the device. The following functionality is built into the tConsult Software: A thumb drive or external hard drive can be connected and can be used with the following software features: - when used with the Digital Camera function, the tConsult Software will interrogate the attached USB device and read the following types of files into a case: .jpg, .bmp, .png, , .mpg, .wmv, .avi, .mov, .mp3, .wma, , .pdf, .doc, and .tif - when viewing an image in a case, the thumb drive can be used for saving a copy of the image. Right-click on the image and select Save As. A window will open allowing you to browse to the thumb drive Notes: 1. Be aware of HIPAA requirements when copying images. 2 The system prevents users from viewing the C: and D: drives. 3. Right-clicking on an image also accesses advanced image editing. Digital cameras can be connected to the USB port provided they conform to one of the following standards: - the camera functions as removable media (similar to a thumb drive) - the camera conforms to the Windows Image Acquisition (WIA) standard Note: For details on how to connect a particular camera to a computer, refer to the manufacturer’s user manual. The Midmark digital spirometer can be connected to the USB port and used with the Digital Spirometer function. All software and drivers needed to support this device are included in the tConsult Cart software. Any USB device that generates a video signal (a webcam, for example) can be connected, but the following steps are necessary to make it work: - the drivers for the device must be installed - the Video Source button must be activated via the Client Setup Utility Pushing the Video Source button brings up a menu where you can select the driver for the video device. If drivers for more than one video device have been installed, it will necessary to know the name (filename) of the driver associated with the device in order to use it. If a PTZ VTC camera is installed on the Cart, this feature allows you to capture still images into a case from the video stream the camera produces. It is not possible to capture a live video feed into a case using this feature. 1.3.2.2 Audio Out The Audio Out jack allows users to listen to audio from the computer on headphones. Connecting a 1/8-inch plug into the jack cuts out the audio feed to the built-in speakers in the monitor. Good headphones will have improved audio quality over the monitor speakers, or they can be used for 13 UM-0001 User's Manual, The AFHCAN Cart, V4 Version 3 private listening. The audio can originate with video sessions (VTC camera installed), video clips from the digital camera, or audio clips brought into a case. 1.3.2.3 Microphone The Microphone jack allows a microphone input to be connected to the computer. This applies primarily to video sessions when a VTC camera is installed. When a 1/8-inch plug is inserted into the Microphone jack, it cuts the signal from the microphone installed with the VTC camera. At the time of this writing, it is not possible to record an audio clip directly into a case. 1.3.2.4 Hand Switch The Hand Switch jack allows still images from a video device to be captured into a case. An input from the hand switch triggers the Spectrim Lite video capture card (or Spectrim Pro video capture card, if installed) to capture the available video feed as a still image. Note: Some devices that can be attached to a Cart have their own trigger switch. For example, the Evolution M-Series Dental Camera has a trigger switch on the handpiece. When that device is installed, it is wired in parallel with the hand switch. The hand switch, the trigger switch, and the foot switch (discussed later) can activate the capture. 1.3.2.5 Composite Video In The Composite Video In connection allows an external composite video source to be connected to the video capture card. With the Spectrim Lite (standard in the baseline V4 build), the Composite Video In connector is wired in parallel (via a Y cable) with internal wiring for permanently attached composite video devices (such as a dental camera). The following points pertain to the Spectrim Lite video capture card: - a suitable button must be enabled in the Client Setup Utility so the functionality is available in the Add To Case screen - in general, the Spectrim Lite video capture card can only handle one composite video source at a time the default input for a dental camera (if one is mounted on a Cart) is the composite video input, wired internally to a Y cable it is necessary to turn off any other video sources (e.g., the dental camera) when connecting an external video source to the Composite Video In connector 1.3.2.6 S-Video In The S-Video In connection allows an external s-video source to be connected to the video capture card. With the Spectrim Lite (standard in the baseline V4 build), the S-Video In connector is wired in parallel (via a Y cable) with internal wiring for permanently attached s-video devices (such as an otoscope). The following points pertain to the Spectrim Lite video capture card: - a suitable button must be enabled in the Client Setup Utility so the functionality is available in the Add To Case screen 14 UM-0001 User's Manual, The AFHCAN Cart, V4 - Version 3 in general, the Spectrim Lite video capture card can only handle one s-video source at a time the default input for a video otoscope (if one is mounted on a Cart) is the s-video input, wired internally to a Y cable it is necessary to turn off any other video sources (e.g., the otoscope) when connecting an external video source to the S-Video In connector 1.3.2.7 VGA Out The VGA Out connector allows the computer’s monitor output to be displayed on an external device such as an overhead projector. The monitor on the Cart receives its signal from an internal DVI card. The signal going to the monitor on the Cart is separate from the VGA Out signal, so both display devices can be used at the same time. 1.3.2.8 S-Video Out The S-Video Out connection applies only when a Spectrim Pro video capture card is installed. It is not used on the baseline V4 Cart. If the optional Spectrim Pro video capture card is installed, the S-Video Out provides a parallel output of the active video device (either composite or S-video) for display on other monitors or overhead projectors, or for use with S-video recording devices. 1.3.2.9 Foot Switch The foot switch jack is located in the upper left corner of the power bay. It is wired in parallel with the hand switch and any additional trigger switches from other devices (such as the Evolution M-Series Dental Camera). An input from any one of these devices will trigger the Spectrim Lite or Spectrim Pro video capture card to capture a still image from an incoming video feed into a case. The footswitch is rated IP-X8, indicating it is suitable for use in environments where it may be subject to complete immersion. (All other parts of the AFHCAN Cart are not rated with regard to protection from ingress of dust or moisture.) 1.4 Clinical Considerations The following are some points worth considering when incorporating an AFHCAN Cart into a clinical setting: in general, the AFHCAN Cart is designed to support screening-level medical examinations and consults the Cart is designed to supplement and enhance existing channels of communication - it is good to have a working relationship with a provider in place before sending cases to that provider for a consult - never hesitate to use voice communications as a way to follow up on cases or as a way to make sure the needed information is collected 15 UM-0 0001 User's Manual, M The AFHCAN A Cartt, V4 Version 3 a little practiice and experiience goes a long l way in ddeveloping yoour skills as a user - the moree experience people p have in n using the C Cart, the easierr it is to use - we encou urage new ussers to take ad dvantage of trraining opporttunities proviided by AFHCA AN your use of the t Cart must always remaain within the bounds of: - good clin nical practicee - HIPAA regulations r - the policcies and proceedures of you ur facility - your own n clinical traiining, experieence, and judggment 1.5 Warning gs and Ca autions Pleasee observe the following po oints: Warning g: Follow all warnings and d cautions in tthe manufactuurer's literatuure for any devices attacched to the Caart, as applicaable. Warning g: Do not exp pose the Cart or any of its pperipherals too water (asidee from a slightly dam mpened cloth for f cleaning). (The footswiitch is rated IP P-X8, meaninng it is protected du uring use from m ingress of water w at moistuure levels up to and includding completee immersion.) Warning g: Do not rem move any of th he protective covers or wirring shrouds dduring normaal operation. Warning g: Once the Cart C is position ned, push thee locking leveers down on thhe wheel lockks (front wheels only) to preevent the Cartt from accidenntally movingg during use. Warning g: Do not con nnect items which w are not sspecified as ccompatible wiith this system m. Doing so maay compromisse safe use off the equipmennt. Caution n: As a compu uter-based sysstem, the Cart rt should not bbe subjected tto unusually strong electrromagnetic fieelds such as might m occur w with large HV VAC motors oor MRI machines. Caution n: As a compu uter-based sysstem, the Cart rt can generatee small amouunts of electromagnetic energy, much m of which h is shielded by the sheet m metal surrounnding the he Model 192 28L user guid de for the toucchscreen monnitor includes the followingg computer. Th statement: "T The ET1928L L uses RF eneergy only for iits internal fuunction. Thereefore, its RF emissions arre very low an nd are not likeely to cause aany interferennce in nearby electronic equipment. " 16 UM-0001 User's Manual, The AFHCAN Cart, V4 Version 3 1.6 General Specifications and Operating Limits 1.6.1 Device Labeling Table 1 shows the labels used on the Cart and the meaning of each label (refer to Figure 6 and Figure 7 for locations). Table 1 Labeling used on the Cart Label Meaning System Power ON OFF Identifies the Cart's main power switch. Placing the rocker switch into the ON position (I) applies power to the computer and all attached peripheral devices. Each peripheral device can then be turned on using its own power switch. Placing the rocker switch into the OFF position (O) removes power from the computer, attached peripheral devices, and any other components on the Cart. Alaska Federal Health Care Access Network a division of Alaska Native Tribal Health Consortium www.afhcan.org Indicates the Cart's manufacturer. Telehealth Workstation Model V4 Serial #: ___________ Indicates device name, model number, and serial number. IPX0 Power Input: 120VAC - 60Hz @ 10A Indicates device's overall rating with regard to protection from ingress of dust and moisture (not protected) Indicates device input power characteristics. Power Switch Fuses: 10A 250V Fast Acting Identifies the rating and type of externally accessible fuses. Two fuses are located on the back of the power switch where the AC power cable connects to the assembly, one for each leg of the power connection (but not ground). The fuses are Bussman GDB fast-acting, glass tube, 5 x 20 mm. USB Identifies a general purpose USB port that allows additional peripheral devices to be connected. Audio Out Identifies a 1/8-inch stereo headphone jack for audio output. Microphone Identifies a 1/8-inch microphone input. 17 UM-0001 User's Manual, The AFHCAN Cart, V4 Label Hand Switch Version 3 Meaning Identifies a 1/4-inch jack for connecting the hand switch. Composite Video In Identifies a composite video input port that allows a video signal from an additional device to be brought into a case. S-Video In Identifies an S-Video input port that allows a video signal from an additional device to be brought into a case. VGA Out S-Video Out Identifies a VGA output port which allows a second monitor or overhead projector to be connected to the Cart. Anything that is being displayed on the Cart's touchscreen monitor will be displayed simultaneously on the second device. Not applicable to the standard V4 Cart. Used only when a Spectrim Pro video capture card is installed, which includes an S-Video Out signal. 1.6.2 Operating Limits Tables 2 and 3 list the environmental limits for the AFHCAN V4 Cart. Table 2 Operating limits Parameter Range Temperature 50°F to 95°F (10°C to 35°C) Humidity (non-condensing) Pressure 30% to 70% 227 mmHg to 760 mmHg (303 hPa to 1,013 hPa) Table 3 Non-operating limits Parameter Range Temperature 4°F to 120°F (-16°C to 49°C) Humidity (non-condensing) Pressure 30% to 85% 227 mmHg to 760 mmHg (303 hPa to 1,013 hPa) 18 UM-0 0001 User's Manual, M The AFHCAN A Cartt, V4 Version 3 Se ection 2 – Ope eration 2.1 Basic Op perating Procedurres The following fo is an n introduction n to Cart operration suited tto a basic funnctional checkkout. 2.1.1 1 Guidelines on Plac cement and d Setup Find a location for the Cart wheere there is room for both tthe user and thhe patient to bbe seated nearby. Make sure there is a pow wer outlet avaailable, as weell as a networrk cable connnection point if wireleess access is not n being used d. Warning: W Be sure s to lock th he wheels wh hen the Cart iss in the desireed position. Push the lockin ng levers dow wn by gently stepping s on th he tip of the leever. Figurre 8 Whee el locks 2.1.2 2 Applying g Power Turn the SYSTEM M POWER sw witch to ON (I). This makess power available to all devvices installedd on thee Cart. Note: With just a feew exceptionss, the standarrd practice is tto leave mostt heral devices switched s on at a all times wiith power to iindividual periph devicees being contrrolled by the Cart's C System m Power switcch. This includes the monito or and scannerr. The digital camera is noormally left off wh hen in the doccking station. Once the System Power P switch is turned on, the computerr will boot upp to the AFHC CAN shell. hell allows yo ou to either op pen the AFHC CAN softwarre or shut dow wn the system m. To move too The sh the login screen, to ouch the Telemedicine buttton or click oon it with the mouse. 2.1.3 3 Logging Into the Software At thee login screen n, enter a userrname and passsword. Conttact your systeem administraator or AFHC CAN for assisstance. Note that t the passw word is case-ssensitive. Presss the Login bbutton. 19 UM-0001 User's Manual, The AFHCAN Cart, V4 Version 3 On successful log-in, the Start screen will be displayed (the name of the screen is in the upper left corner). 2.1.4 Operating the Scanner To operate the scanner, proceed as follows: 1. From the Start screen, select Create a New Case. 2. At the next window, select Real Case or Test Case. (Test cases use fictitious patients and are used for training. Test patients are safe for testing and training because they are never confused with real patient information.) This takes you to the Add To Case screen. Note: If the devices below are only going to be functionally checked out, it is not necessary to select a patient or enter patient data. 3. From the Add To Case screen, select the Scanner button. This takes you to the Scanner screen. 4. From the Scanner screen, select the Black and White, Gray Scale, or Color button. The scanner will automatically scan whatever is on the scanner table, and create a thumbnail image that appears at the left on the screen. A larger version of the image appears in the middle of the screen. 5. The presence of a thumbnail image indicates a successful scanner test. 6. To discard the image or images, click the Back button. A window will pop up advising you that images will be lost. Click Yes to confirm the operation and return to the Add To Case screen. 2.1.5 Operating the Digital Camera To operate the Kodak V1233 digital camera, proceed as follows: 1. Remove the digital camera from the cradle, press the camera power button to turn it on, and press the shutter button to take a photograph. 2. Press the power button to turn the camera off. 3. Place the camera in the docking station. 4. Press the bar at the front of the docking station. This allows the camera to communicate with the computer. (This must be done before the next step.) Note: Pressing the Digital Camera button in the software before activating the digital camera (as described in step 4) results in an error message explaining the correct sequence. Press Cancel and resume with step 4. 5. From the Add To Case screen, select the Digital Camera button. Thumbnail images of all photographs on the camera will appear at the left of the screen. The appearance of thumbnails successfully tests the camera. 20 UM-0001 User's Manual, The AFHCAN Cart, V4 Version 3 6. To discard the image or images, click the Back button. A window will pop up advising you that images will be lost. Click Yes to confirm the operation and return to the Add To Case screen. Note: After about ten minutes of not communicating with the system, the camera will automatically return to it's previous status (off and recharging). 2.1.6 Operating the Media Reader To use the media reader, proceed as follows: 1. Place a suitable media card with an image file stored on it into the correct slot in the media reader. Note: For the purposes of initial familiarization and operational checkout, you can use the SD memory card from the digital camera. Take a photograph, then remove the SD memory card by sliding the battery cover on the bottom of the camera open and pressing down on the SD card to unlatch it. 2. From the Add To Case screen, select the Digital Camera button. Thumbnail images of all photographs on the card will appear at the left of the screen. The appearance of thumbnails successfully tests the media reader. 3. To discard the image or images from the case, click the Back button. A window will pop up advising you that images will be lost. Click Yes to confirm the operation and return to the Add To Case screen. 2.1.7 Shutting Down Close the software and turn off the Cart as follows: 1. Press the Log Out button in the upper right corner of the software. A window will pop asking you to verify your intent to log out. Click Yes. This returns you to the AFHCAN shell. 2. From the AFHCAN shell, press Shutdown. A window will pop asking you to verify your intent to shut down the computer. Click Yes. A message will appear reminding you to place the digital camera in the drawer. 3. The software will automatically shut itself down, and display a message that says, "It is now safe to turn off your computer." It is now safe to turn the Cart off. 4. Once the message above is displayed, simply turn the System Power switch to OFF (0). 21 UM-0001 User's Manual, The AFHCAN Cart, V4 22 Version 3 UM-0001 User's Manual, The AFHCAN Cart, V4 Version 3 Section 3 – Routine Maintenance 4.1 Care and Cleaning Routine maintenance is limited to cleaning of external surfaces. In general, the surfaces of the Cart can be wiped down with a cloth slightly dampened with a mild detergent or dilute disinfectant solution. The monitor screen surface and scanner top can be cleaned with a soft cloth lightly moistened with a suitable glass cleaner. It is recommended that routine cleaning be performed once a month, or more often if local conditions warrant. 4.2 Elementary Troubleshooting On the whole, the Cart is robust. The computer automatically reboots to the AFHCAN software after any power outage. Note: It is always best to initiate Cart shutdown from within the AFHCAN software. This ensures no data is lost. The first step in troubleshooting consists of verifying that power is available: ensure the Cart is plugged into a working wall outlet ensure the power cable is connected to the box housing the main power switch ensure the main power switch is on ensure the power switches of the various devices are ON as needed (e.g., the monitor) In addition, check any cable connections which are in view or readily accessible without removing any protective shrouds or covers. 23 UM-0001 User's Manual, The AFHCAN Cart, V4 24 Version 3 UM-0001 User's Manual, The AFHCAN Cart, V4 Version 3 Appendix A - Technical Description Device Classifications The footswitch is classified as IP-X8, meaning it can be used while subject to complete immersion in water. All other parts of the AFHCAN cart are classified IP-X0 (no protection from ingress of dust or moisture). The AFHCAN V4 Cart is rated as Class I equipment. It is not suitable for use in the presence of a flammable anesthetic mixture with air or with oxygen, or with nitrous oxide. The normal mode of operation is continuous. Additional Information AFHCAN will make available, on request, circuit diagrams, component parts lists, descriptions, and calibration instructions that will assist the user's qualified technical personnel to repair those parts that are designated by AFHCAN as repairable. Critical Components and Power Distribution A diagram showing the power distribution for critical components is included as an attachment immediately following the last page of this manual. 25 UM-0001 User's Manual, The AFHCAN Cart, V4 26 Version 3