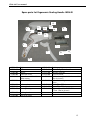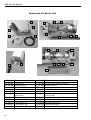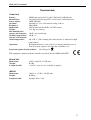
1
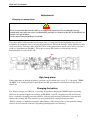
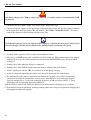
Biosealer CR6-AA
Including
Bench Unit
Ergonomic Handle MSH-III
User Manual
Ljungberg & Kögel AB
CR6-AA User manual
This page is consciously left empty
2
CR6-AA User manual
Important
This user’s manual is written for the person responsible for the operation of Biosealer CR6-AA. The
operational methods and routines are developed and tested to ensure a reliable, safe and effective
operation of CR6-AA. It is important that the operator has studied and understood the contents of this
manual before using CR6-AA.
This instrument is a sealing equipment using radio frequency for welding and the electrical
emission, at the operating frequency 40,68 MHz, is high. Make sure that other instruments and
equipment near the sealing unit can withstand this emission.
Never touch the electrodes with your fingers during the sealing process! This may cause burn
damages!
Ensure that the tubing is dry on the surface.
Electrical safety
Only use the battery charger intended for CR6-AA and make sure it is marked with the accurate mains
voltage.
Battery
The battery used in CR6-AA contains NiMh and is not considered to be dangerous for the environment
but should be left to a recycling centre for recycling.
Environmental effects
Biosealer CR6-AA contains none or insignificant parts of the forbidden hazardous substances in RoHS
directive 2002/95/EG but should be left to a recycling station when disposed.
Manufacturer
Manufacturer and service
Abelko Innovation
Box 808
Industrivägen 17
971 25 Luleå
Tel. +46920220360
Product owner and marketing:
Ljungberg&Kögel AB
Box 1032
251 10 Helsingborg
Tel. +4642139860
Abelko Innovation is committed to develop high-quality equipment and technical services to all our
customers. We welcome any inputs on technical issues that are encountered so that they can be resolved
quickly and in the most appropriate manner. Please submit your comments/feedbacks through your local
distributors or alternatively email us directly at [email protected]
3
CR6-AA User manual
Table of contents
Important .................................................................................................................................................... 3
Electrical safety .......................................................................................................................................... 3
Battery......................................................................................................................................................... 3
Environmental effects ................................................................................................................................. 3
Manufacturer .............................................................................................................................................. 3
Table of contents ........................................................................................................................................ 4
Properties .................................................................................................................................................... 5
Function ...................................................................................................................................................... 6
Description ................................................................................................................................................. 6
Ergonomic handle (MSH-III) ................................................................................................................. 6
Bench Unit (BU) ..................................................................................................................................... 6
Operation .................................................................................................................................................... 7
Connecting the MSH-III ......................................................................................................................... 7
Sealing with manual handle.................................................................................................................... 7
Connecting the Bench Unit..................................................................................................................... 8
Sealing with Bench Unit ......................................................................................................................... 8
Adjustments ................................................................................................................................................ 9
Changing to manual timer. ..................................................................................................................... 9
High temp alarm ......................................................................................................................................... 9
Charging the battery ................................................................................................................................... 9
Maintenance and service .......................................................................................................................... 11
Cleaning the electrodes ......................................................................................................................... 11
Change of batteries ............................................................................................................................... 12
Trouble shooting ................................................................................................................................... 13
Spare parts list Power Unit ....................................................................................................................... 14
Spare parts list Ergonomic Sealing Handle MSH-III .............................................................................. 15
Spare parts list Bench Unit ....................................................................................................................... 16
Technical data ........................................................................................................................................... 17
Power Unit ............................................................................................................................................ 17
Bench Unit ............................................................................................................................................ 17
MSH III................................................................................................................................................. 17
Limited Warranty...................................................................................................................................... 18
Declaration of Conformity........................................................................................................................ 19
Revision history:
2012-11-09 JA
2012-12-13 DC
2013-01-13 DC
2013-11-20 DC
2014-04-17 DC
4
Added Abelko Innovation commitment concerning technical feedback
Partlist for MSH3 updated with 5.1
DoC updated from Tube-sealer to BioSealer
DoC updated
Address in DoC updated
CR6-AA User manual
Properties
Biosealer CR6-AA is a battery operated sealing unit for PVC-tubes, especially suitable for tubing from
blood bags and tubing from sets for plasmapheresis.
It can also seal PVC/EVA and some types of pure EVA tubes.
CR6-AA has automatic timer sensing when the seal is ready for optimal seal time and battery endurance
independent of type of tubes and thickness.
Appliances are either manual handle or Bench Unit (BU)
With new and fully charged battery it can make 1500 seals (1200 with BU) 4-5 mm PVC tubes.
This high capacity makes it suitable to use CR6-AA either mobile or stationary in donation rooms and
laboratories.
CR6-AA also works with older L&K handles and BU:s.
Biosealer CR6-AA is comprised of 3 units:
• Ergonomic manual handle MSH-III, or BU including associated cables.
• Power Unit including battery, high frequency generator and timer unit.
• Battery charger.
Optional there is a carry bag for mobile use.
5
CR6-AA User manual
Function
Sealing is done in 1-2 sec depending on type of tube and the width of the seal is about 3 mm with a
marking in the middle which makes it easier to pull the tubes apart. Before sealing, the microprocessor
controlled timer board checks that the tube is not damp, to avoid sparks and thereby leakage. After each
seal a multicolored diode is lit indicating remaining capacity of the battery.
Description
Ergonomic handle (MSH-III)
(1)
Seal indicator. Lamp blinking blue during seal process and turns green when ready.
(2)
Electrodes. Transfer the high frequency energy to the tube to be sealed
(3)
Protective cover. Protects the electrodes from damage and also prevent unintentional
finger contact with electrodes.
(4)
Coaxial cable
(1)
(2)
(3)
(4)
Bench Unit (BU)
Coax
cable
Signal
cable
6
Inlet for
the tube
Indication
lamp for HF
on
CR6-AA User manual
Operation
Always turn the power off before you connect or disconnect the coax cable!
Connecting the MSH-III
Connect the MSH-III to the power unit with the coax cable.
Use only hand power for connection.
Pulling too hard with a tool may damage the connector.
Turn on the power switch, the lamps for STATUS and BATTERY will turn green. If the BATTERY
lamp is orange or red the battery must be recharged before operation, see charge of battery on page 8.
Sealing with manual handle
Place the PVC-tube in the slot of the handle unit and press the
handle.
The sealing will start directly and a blue lamp on the handle
will start blinking and STATUS will blink orange on the
power unit.
When the seal is ready the lamp on the handle and STATUS
will turn green.
If the tube is easy welded or a great number of seals has been done in a short time making the
electrodes hot it can happen that the plastic melts that much that the electrodes make contact and if
this happens the green lamp will not be lighted. This is not an error, the seal will be satisfactory.
7
CR6-AA User manual
Connecting the Bench Unit
Connect the BU to the power unit with the coax cable and signal cable.
Turn on the power switch, the lamps for STATUS and BATTERY will turn green. If the BATTERY
lamp is orange or red the battery must be recharged before operation, see charge of battery on page 8.
Sealing with Bench Unit
Hold the tube with both hands and place it in the opening on the BU. The sealing will start directly and
STATUS will blink orange on the power unit and an orange lamp on the BU will be lighted during the
time high frequency is on. The intensity will go down during the melting process and turns off when
ready.
Check of battery capacity is done regularly and BATTERY is green when it is 50-100% left, orange for
25-50% and red when there is less than 25% left.
A new seal may be done immediate after STATUS is green on power unit.
Don’t make seals with shorter distance than 5 cm since the pressure in the tube may cause leakage.
Don’t stretch the tube during sealing since this may cause leakage.
Don’t make more than 50 continuous seals without a pause. Try to keep a seal rate of max 33% duty
cycle.
8
CR6-AA User manual
Adjustments
Changing to manual timer.
This is an operation that must be done by an authorized technician. We recommend not using
manual timer since this may cause overheated HF generator or solenoid in the BU. It should only be
used for very special tubes.
Please contact Ljungberg&Kögel if in doubt.
If you have hard sealed tubes that needs longer timer i.e. more time for the high frequency, you can
disconnect the automatic state by turning the potentiometer TP2 on the timer PC board clockwise with a
small screwdriver. Turning it more than 20% turns on the manual timer and the timer will be set from 2
to 10 sec. (potentiometer 20-100%). To be able to locate TP2 you have to lift off the cover by
unscrewing the 4 screws on the side.
TP2
High temp alarm
If the temperature of the high frequency generator exceeds alarm level, set to 75ºC, the diode ”TEMP
ALARM” is lit. Sealing can not be done before the RF- generator has cooled down and the diode is
turned off.
Charging the battery
The "Battery charger for CR6-AA" is specially designed for charging the NiMH batteries powering
CR6-AA. It is medical approved according to EN 60601-1 and UL recognized for US and Canada.
It has a controlled charging procedure which is vital to avoid overcharge of batteries since this will
shortens the working life. The controller is using both DeltaV sensing and timeout limits.
(DeltaV sensing is a method to recognize when battery is fully charged since at this point the voltage
starts to decrease instead of increase depending on temperature rise in battery).
9
CR6-AA User manual
Only battery charger type ”Battery charger for CR6-AA” or another charger recommended by L&K
may be used.
1. Check that the local mains supply corresponds to the charger type sign.
2. Connect the power supply cord to the charger and then to the AC-line and the low voltage connector
to the input at the back side of the CR6-AA marked ”BATTERY CHARGER INLET”. It is ok to
connect the charger to CR6-AA first and then to AC-line.
Check that the charging led on the charger will be orange or red when the charging is started. If it is
green directly after start the mains cable must be unplugged and reconnected once again.
3. A battery with a capacity of 25% is fully loaded within 6-8 hours.
4. Since this is a NiMH battery pack it should never be overcharged. The recommendation for longest
working life is to use the sealer unconnected to mains until the BATTERY turns orange and then
recharge it.
5. Sealing can be done when the charger is connected.
6. Sealing can be done with the needle in the arm with or without connected charger.
7. It lacks significance whether CR6-AA is turned on or off during charging.
8. Avoid to completely unloading the battery since this will shorten the life of the battery.
9. The working life of the battery depends on the amount of charging cycles and the surrounding
temperature included the temperature rise that occurs when batteries are overcharged. Typical
expected working life is 3 years with a charging frequency of 200 cycles/year and 25ºC. Deep
discharging and overcharging shortens working life.
10.If the sealer is not used for a while the battery needs maintenance recharging every 3 months.
11.If the battery has been completely discharged during some time it may need repeatedly charging and
discharging to obtain full capacity.
10
CR6-AA User manual
Maintenance and service
Maintenance to be done by the operator is limited to cleaning. All other service must be done by an
approved service personnel.
For the best seal performance it is important that the electrodes always are clean. After a leakage it is
very important to clean the electrodes carefully.
Always turn off the Power Unit and disconnect the battery charger from the mains supply before
cleaning the equipment.
The Power Unit and the handle can be cleaned with a mild soap solution.
Cleaning the electrodes
MSH-III
1. Remove the coaxial cable from the handle unit
2. Remove the protective cover by first pressing the front down as
shown in the picture.
3. Then pull the cover forwards.
4. Clean both electrodes with distilled water or alcohol.
5. Dry up the electrodes carefully with a soft and lint-free cloth.
6. Replace the protective cover and the coax cable.
Bench Unit (BU)
1. Unplug the coaxial cable from the BU.
2. Turn BU upside down, see picture.
3. Clean both electrodes with distilled water or alcohol.
4. Dry up the electrodes carefully with a soft and lint-free cloth.
5. Replace the protective cover and the coax cable.
A more complete cleaning may be done by opening the cover. Unplug the coax cable and pull the
locking clamp backwards.
11
CR6-AA User manual
Change of batteries
When the battery capacity begins to be insufficient for one days sealing, the batteries has to be changed.
Change of batteries must be done by approved service personnel. The battery charger and the handle
must be disconnected when the batteries are changed.
CR6-AA must be turned OFF. Always use battery packs from L&K
1. Unscrew the 4 screws holding the cover and remove it.
2. Loosen the battery cables (red and black).
3. Unscrew the 2 screws to the battery holder, now the battery pack can be removed.
4. Change battery pack and reassemble in reversed order.
The battery used in CR6-AA contains NiMh and is not considered to be dangerous for the
environment but should be left to a recycling station for recycling.
12
CR6-AA User manual
Trouble shooting
The blue lamp on the handle stops blinking
but the green lamp is not lightened.
This may occur if the welding makes the
plastic melts until the electrodes makes
contact. This is no error, the seal will be
satisfactory.
Sealing does not start and the lamp ”Status” is Test another handle.
not blinking when the handle is pressed
Test another coax cable.
The lamp ”Status” is blinking orange but not
the lamp on the handle or the Bench Unit.
Test another handle.
Test another Bench Unit.
Change the coax cable
Change the HF-generator. (Only for service
personnel).
The lamp ”Temp Alarm” is lit and sealing
does not start.
The HF-generator is overheated. Let it cool
down until the alarm is turned off.
The lamp ”Status” flashes red and sealing
does not start.
Sparks appear by the electrodes during
sealing.
The tube is damp, dry it.
This can happen if the electrodes are
overheated due to too many seals in a short
time. Let the electrodes cool down.
If there has been a leakage and flashes have
created carbon particles on the electrodes,
these particles must be removed completely
before sealing can continue.
It can indicate that the electrodes are not
parallel. Contact service personnel.
The electrodes must be adjusted by an authorized service technician. They can be damaged by
erroneous performed adjustment.
More detailed troubleshooting, training of technician and service instructions can be obtained by
Ljungberg & Kögel on demand.
13
CR6-AA User manual
Spare parts list Power Unit
5
6
3
10
9
4
11
12
7
8
1
2
9-31601-00
9-31602-00
9-31603-00
9-31604-00
9-31605-00
9-31606-00
9-31607-00
9-31608-00
9-31609-00
9-31610-00
9-31611-00
9-31612-00
9-31613-00
9-31614-00
9-31615-00
14
5
Battery pack
Battery holder
HFG incl. timer board
Front board
Internal coaxial cable
Ferrite ring
C91 contact, (signal to BU)
Inlet for charger including cable
On/Off switch
20-pole FFC cable
Overlay front
Overlay back
Rubber feet x 4, not in picture
Chassis
Cover, not in picture
13
CR6-AA User manual
Spare parts list Ergonomic Sealing Handle MSH-III
15
11
1
13
12
4
14
9
10
5
6
8
2
7
3
16 17
18
19
9-35401-00
9-35402-00
9-35403-00
9-35404-00
9-35405-00
9-35411-00
9-35412-00
9-35413-00
9-35414-00
9-34515-00
9-35405-01
Right cover
Left cover
Handle
Protection cover
Internal coax cable with
SMA contact
Washer for SMA contact
9-35406-00
9-35407-00
9-35408-00
Indicator lens
Screen plate bottom
Screen plate top
9-35417-00
9-35418-00
9-35419-16
9-35409-00
9-35410-00
Pushing knob
Pull back spring
9-34516-00
Pushing spring
Piston complete incl. coil
Moving electrode
Fixed electrode
PC board complete incl. micro switch
(Not in picture)
3 Socket head cap screw for screen
plates
Screw Torx T25x8
Screw Torx T30x8
Coax cable coiled, BNC-SMA
175cm (Not in picture)
15
CR6-AA User manual
Spare parts list Bench Unit
5
19
12
7
6
1
11
10
2
13
4
14
15
3
16
8
9
21
18
22
17
20
9-33401-00
9-33402-00
9-33403-00
9-33404-00
9-33405-00
9-33406-00
9-33407-00
9-33408-00
9-33409-00
9-33410-19
9-33410-42
9-33410-91
16
Cover
Signal cable
Locking device
Chassis BNC contact
Hot moving electrode
Fixed electrode
Circuit board for
connections
Solenoid
Chassis
Coax cable 1.9m
Coax cable 4.2m
Coax cable 9.1m
9-33411-00
9-33412-00
9-33413-00
9-33414-00
9-33415-00
9-33416-00
9-33417-00
9-33418-00
9-33419-00
9-33420-00
9-33421-00
9-33422-00
Micro switch
Welding house chassis complete
Pull back spring
Steering pin complete
Pin compl. with cases and locking nut
Clamp spring
Piston complete incl. coil and dim
glowing lamp
Dim glowing lamp
Welding house cover, micro switch side
Welding house cover
Coax cable internal
HF-cable flexible
CR6-AA User manual
Technical data
Power Unit
Battery:
NiMh battery pack 24V/ 3,8Ah, 170x34x68 (LxWxH) mm.
Internal fuse:
Overload protection type PTC, self-recovery, and thermo fuse.
Power output:
100W /50 Ohm.
Seal time:
Automatic 1-2 sec, also manual setting 2-10 sec.
Frequency:
40,68 MHz.
Dimensions:
266x119x88 mm (LxWxH) incl. HF contact.
Weight:
2,15 Kg incl. battery.
Rel. humidity incl.
storage and transport: 10-95% not condensing
Working temperature: 10-40 ºC
Storage- and transportation temperature:
-40- +50 ºC. (The working life of the batteries is shortened at high
temperatures).
Operation:
Recommended max 1 seal each 3rd sec during continuous use or
max 50 seals in sequence and after that 15 minutes rest.
Protection against electrical chock:
Class II type B
This equipment complies with the demands in medical directive MDD 93/42 EEC
Bench Unit
Dimensions:
Weight:
Length of cable:
150 (L) x 60 (W) x 73(H) mm
0.9 Kg
1.9 m (4.3 m or 9.1 m is available as option)
MSH III
Dimensions:
Weight:
Length of cable:
180 (L) x 35 (W) x 145 (H) mm
0.220 kg
Straight cable 1.74m
17
CR6-AA User manual
Limited Warranty
Ljungberg & Kögel AB (L&K) hereby guarantees the original buyer that Biosealer CR6-AA is
manufactured in a professional and quality manner, and will be free from all faults during a period of
one year from the date of delivery from L&K. The warranty includes equipment and components that
proves to have faults during the warranty period.
L&K will without cost for the customer, repair or replace the equipment that is faulty. The warranty is
not valid for the battery pack since this is considered to be expendable supply. The warranty is not valid
if the equipment has been repaired by anyone else than qualified personnel, that is approved by L&K.
The warranty is not valid if the equipment has been changed in any way that according to L&K:s
opinion, affects the reliability or stability of the instrument. The warranty is not valid when the serial
number has been changed, crossed over or been removed, or if the fault has been caused by misuse or
abnormal use. In these cases L&K or L&K:s representative will inform the customer about the decision,
and if wished by the client will repair the equipment for normal rate. An estimated price can be given on
request.
18
CR6-AA User manual
Declaration of Conformity
according to the
Medical Devices Directive, 93/42/EEC
and
RoHS directive, 2011/65/EU
STANDARDS TO WHICH CONFORMITY IS DECLARED:
EN 60 601-1:2005
EN 50581:2012
EN 60 601-1-2
Including: EN 61000-3-2, EN 61000-3-3, EN 55011 Kl A, EN 61000-4-2, EN 61000-4-3, EN 61000-4-4, EN 61000-4-5,
EN 61000-4-6, EN 61000-4-8, EN 61000-4-11
Manufacturer:
Address:
Telephone:
Telefax:
Abelko Innovation
972 54 Luleå
+46 920-220360
+46 920-220068
Marketing:
Address:
Telephone:
Telefax:
Ljungberg&Kögel AB
Box 1032, 251 10 Helsingborg
+46 042-139860
+46 042-132181
Type of Equipment:
Model:
Product class:
Biosealer
CR6-AA
Class 1
I, the undersigned, hereby declare that the equipment specified above conforms to the above Directive
and Standards.
Date of issue: 17 April 2014
Signature:
/ Thommy Lundström
Position/title: CEO
19
CR6-AA User manual
Ljungberg & Kögel AB
20