1
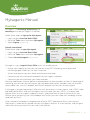
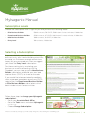
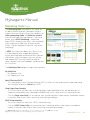
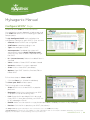
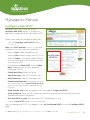
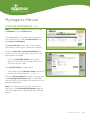
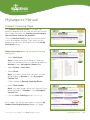
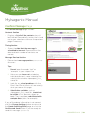
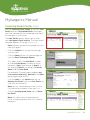
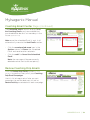
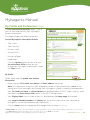
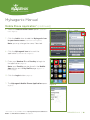
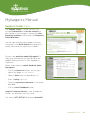
Version 2.0 Manual
UPDATED 3.22.11
MyIsagenix Manual
Overview
MyIsagenix is a marketing, prospecting and
coaching online tool for Isagenix Associates.
Follow these steps to sign-up for MyIsagenix:
1. Log in to your Associate Back Office.
2. Go to the Tools menu and select MyIsagenix.
3. Select Signup. (circled in red)
Already subscribed?
Follow these steps to open MyIsagenix:
1. Log in to your Associate Back Office.
2. Go to the Tools menu and select MyIsagenix.
3. Choose Go to MyIsagenix. (circled in red)
MyIsagenix is your Isagenix Front Office which will enable you to:
• Market your Isagenix business on the Internet using SPOT Marketing and two personal
marketing pages (Web sites) for each Associate.
• Attract and capture your own leads and also purchase leads
• Communicate with and convert prospects to new Isagenix members
• Communicate with and coach your team members
We have modified our Internet policies and procedures to allow members to take full advantage of
marketing your business on the Internet. We have been teaching our members how use the new
social media sites, such as Facebook and Twitter, to boost your business to new heights!
In MyIsagenix you get two pre-built Web sites with testimonials, success stories, and a SPOT video
and lead capture form. And with MyIsagenix you can create your own SPOTs - customer lead
capture forms with an Isagenix video or without – and place them all over the Internet: on your
favorite social networking sites like Facebook and Twitter, your own Web sites and blogs, or even
send them by Email.
When someone (a prospect) completes one of these SPOT lead capture forms, their contact
information is automatically placed into your MyIsagenix account, as a new contact, and you get a
notification to let you know that you have a new contact.
UPDATED 3.22.11 |
1
MyIsagenix Manual
Subscription Levels
Choose the subscription that is right for you and your business-building needs:
•
Elite Business Builder
5000 contacts, 50 SPOTs, 500 Instant Contact minutes, 2 Web sites
•
Experienced Business Builder
2500 contacts, 25 SPOTs, 200 Instant Contact minutes, 2 Web sites
•
New Business Builder
1000 contacts, 10 SPOTs, 2 Web sites
•
Entry Level
100 contacts, 2 Web sites
Selecting a Subscription
If you are relatively new to network marketing,
but want to try your hand at building a business,
or would just like to earn enough commissions
to pay for your own products, then we suggest
you select the Entry Level subscription.
For those wanting to try marketing your
business on a social networking site, like
Facebook, you can step up to the New Business
Builder subscription and build your own lead
capture forms (SPOTs) to share on the web.
If you would like to be contacted immediately
when a prospect completes one of your SPOTs,
select either the Experienced Business Builder
or Elite Business Builder subscriptions which
both include Instant Contact minutes.
Follow these steps to change your MyIsagenix
subscription*:
• Go to your Associate Back Office.
• Go to the Tools menu and select MyIsagenix.
(circled in red)
• Choose Change Subscription.
*Please note that any changes you make today will go into effect during the next billing cycle.
UPDATED 3.22.11 |
2
MyIsagenix Manual
Home Page
The Home page includes these sections:
MyIsagenix Announcements
Be sure to check this area often for important
information about MyIsagenix.
My Prospecting Summary
• Offers a snapshot of any unread notifications
indicating recent activity by contacts listed
as Prospects in your Contact List
• Use the View All Notifications link to see all
unread notifications
My Coaching Summary
• Offers a snapshot of any unread notifications
indicating recent activity by contacts listed
as Members in your Contact List
• Use the View All Notifications link to see all
unread notifications
Marketing Summary
• Catch a glimpse of how your Marketing
Pages and most effective SPOTs* are
performing
My Upcoming Appointments
• Shows a 2-week snapshot of your MyIsagenix Calendar, with link to view your full calendar.
Need Help?
• Support Center
Provides coaching on the use of MyIsagenix, and for tips and techniques for prospecting and
business building.
• Contact Us
Note: Firefox is the preferred browser for MyIsagenix. However, if you are encountering issues
with the MyIsagenix interface, please use the Contact Us button (circled in red) to let us know, and
we will respond as soon as possible.
*The Entry Level MyIsagenix subscription does not include access to the Configure a SPOT functionality.
Upgrade your subscription to take advantage of this powerful tool!
UPDATED 3.22.11 |
3
MyIsagenix Manual
Manage Contacts Page
Use the Manage Contacts page to view and edit
all of your contacts.
You can add your own contacts manually or
import or export your contacts using a .CSV
file.
Contact List
• Displays all of your contacts.
• Click the column title to sort by that field.
• Click the View/Edit icon (yellow pencil) in
the Options column to update information
for a contact.
• Click the Email icon to create and send a
customized message for a specific contact.
• Click the Calendar icon to set up an
appointment for a specific contact.
• Create Groups to organize your contacts.
Purchased is a default group. You will not
be able to edit/delete this group. All leads
purchased from our preferred vendors are
automatically added to the Purchased group.
• At the bottom of the list, you will find Search
and Refresh icons to help you when working
your contacts.
• Use the arrow icons at the bottom of the list
to navigate to another page of contacts.
Upcoming Appointments
• Gives you a 2-week snapshot of your
calendar, with links to add notes or
appointments.
Contact Count
• Shows you a graphical representation of the
number of contacts you have, broken down
by the month they were added.
UPDATED 3.22.11 |
4
MyIsagenix Manual
Contact List: Adding Contacts
Follow these steps to manually enter a contact:
• Click the Add Manually button. (circled in red)
• Enter the contact’s First Name, Last Name,
Email and Telephone number. (outlined in red)
Note: you will be add more information for
this contact later using the View/Edit icon in
the Options column.
• Click the Add Contact button.
The contact will be added to your Contact List.
Contact List: Importing Contacts
Follow these steps to import a list of contacts:
• Click the Import Contacts button. (circled in red)
• Click the Browse button to select a CSV file
(outlined in red)
Note: CSV stands for Comma-Separated
Values. Export your database to as CSV file
using a program like Excel, for example.
• Click the Import File button.
The Uploaded Contacts page opens. (not shown)
Be sure to review this information before
continuing.
• Click the Save button. (not shown)
The contacts will be added to your Contact List.
UPDATED 3.22.11 |
5
MyIsagenix Manual
Save Outlook Contacts as CSV File
Follow these steps to save a Microsoft Outlook
contact list as a CSV file:
• Open Outlook, go to the File menu and
select Import and Export...(circled in red)
The Import and Export Wizard window opens
(not shown).
• Under Choose an action to perform, select
Export to a file.
• Click the Next button.
• Under Create a File of Type, select Comma
Separated Values.
• Click the Next button.
• Under Select folder to export from, select
Contacts (under Mailbox).
• Click the Next button.
• Enter a name for the CSV file under Save
exported file as.
• Click the Next button.
• Select Export “Contacts” from folder:
Contacts.
• Click the Finish button.
UPDATED 3.22.11 |
6
MyIsagenix Manual
Contact List: Exporting Contacts
Follow these steps to export your contact list:
• Click the Export Contact button. (circled in red)
A pop-up window opens. (outlined in red)
• Select an option for your exported CSV file:
either Open with or Save File.
Contact List: View/Edit Contact Details
Follow these steps to view/edit your contact
details.
• Click the View/Edit Details icon (yellow pencil)
in the Options column (outlined in red) for the
contact you would like to view/edit.
The View/Edit Details window opens.
• Edit the Contact Information, if necessary.
• Click the Add Detail button (circled in red) to
see additional fields, such as, Best Time to
Call and Time Zone.
• Enter as much information as you would like
in the fields provided.
• Click the Save Contact Info button when
finished.
UPDATED 3.22.11 |
7
MyIsagenix Manual
Contact Types
Type allows you to categorize your contacts.
• Use the drop-down list to select a Contact
Type for this contact. (outlined in red)
There are two pre-set Types:
1. Member (for those who have enrolled in Isagenix)
2. Prospect (set as default)
Note: All of your contacts will fall in to one of
these Types.
• Click the Save Contact Info button when
finished. (circled in red)
Contact Groups
You may also create custom Groups to better
suit your needs and organize your contacts even
further.
Follow these steps to create a new group:
• Click the Manage Groups button. (circled in red)
• Enter a Name for your new group. (outlined in
red)
• Click the Add button (outlined in red).
Follow these steps to assign a contact to a
Group:
• Click the View/Edit Details icon in the
Options column for the contact you would
like to assign to a Group.
The View/Edit Details window opens.
• Use the drop-down list to select the Contact
Group. (outlined in red)
• Click the Save Contact Info button when
finished.
UPDATED 3.22.11 |
8
MyIsagenix Manual
My Calendar Page
Use the My Calendar page to manage your
appointments and follow-up calls.
There are 2 types of events on your calendar:
1. Appointments/Follow-up Calls (created by
you)
2. Isagenix Corporate Events (Read-only)
Note: the current date is highlighted green.
Click on any existing event to view more details.
Follow these steps to add an event:
• Locate the date for your event on the
calendar.
Tip: use the green arrow navigation buttons
at the top to go to the next month, if
necessary.
• Click on the event date to select it.
• Enter the event details in the pop-up
window.
• Click the Create Event button. (circled in red)
Follow these steps to remove or edit an event:
• Click on the event.
• Select either Remove Event or Edit Event in
the pop-up window. (outlined in red)
If you selected Edit Event, the Event Details
pop-up window opens. (not shown)
• Enter the updated information in the fields
provided.
• Click the Update Event button when finished.
UPDATED 3.22.11 |
9
MyIsagenix Manual
My Calendar Page (continued)
Easily synchronize your MyIsagenix calendar to
many common software packages or devices.
Note: This is a one-way sync.
Follow these steps to sync your calendar:
• Click the Calendar Sync button at the top of
the My Calendar page. (circled in red)
The Calendar Sync pop-up window appears,
displaying links to the available options. (outlined
in red)
• Select the desired software application or
device.
• Follow the on-screen instructions.
Note: Setup will vary depending on the
option selected.
Outlook XP/2003 Users Only
The Outlook XP/2003 option does not sync
automatically with MyIsagenix.
Follow these steps to sync your calendar with
Outlook XP/2003:
• Select the Outlook XP/2003 option from the
list.
• Select Save File in the pop-up window.
• Click the OK button.
• Open Outlook XP/2003 and import the
mycalendar_ics.ics file into your calendar.
Note: Outlook XP/2003 only allows you to view
the events in the file by importing them into
your calendar. There is no synchronization after
the file is imported, it must be re-imported to
get updated information.
UPDATED 3.22.11 | 10
MyIsagenix Manual
Marketing Tools Page
The marketing tools provided on this page are
all about attracting quality prospects to your
Isagenix business by giving you the capability to
share compelling video and Web site content.
Use the two Web sites provided or, if you have
access to the SPOT Marketing*, create and
place SPOTs wherever you want - social network
sites, on personal Web sites, or even send in
Emails. These are powerful tools for “attraction”
marketing!
A SPOT (Social Prospect Orientation Technology)
is a lead capture form widget designed to
attract qualified leads and capture their contact
information. With MyIsagenix, you can create
and embed SPOTs on any Web site, blog or
social network site (like Facebook, Myspace, etc)
or in an Email.
The Marketing Tools page includes these sections:
My Web Sites
• My Products Site
• My Opportunity Site
Most Effective SPOTs
• This area displays your 3 top performing SPOTs in terms of view and contacts captured along
with a button to quickly Share each SPOT.
View Page Views Monthly
• This chart shows you how your marketing pages (replicated Web sites) are performing. It is
important to compare your web pages to determine what is and what isn’t working for you.
• Click the Page View Daily link to monitor your marketing efforts more closely. Immediate impact
is normally seen shortly after launching a marketing campaign.
SPOT Views Monthly
• This chart shows you how your SPOTs are performing.
• Click the SPOT Views Daily link to monitor your marketing efforts more closely. Immediate
impact is normally seen shortly after launching a marketing campaign.
*The Entry Level MyIsagenix subscription does not include access to the SPOT functionality.
Upgrade your subscription
to take advantage of this powerful tool!
UPDATED 3.22.11 | 11
MyIsagenix Manual
Configure SPOTs* Page
Create and reuse SPOTs all over the Internet!
Your marketing success depends on being seen, and
your SPOTs are terrific tools for helping you capture
new prospects.
The My Configured SPOTs section displays the
configuration settings for each SPOT in your account:
•
Created: date the SPOT was configured
•
SPOT Name: named according to use
•
Type: size and type of SPOT
•
Autoresponder: If enabled, the system will
automatically send a simple Thank You email
(without links) when a lead is captured through
the SPOT.
•
IC** (Instant Contact): feature is enabled if box is
checked
•
Views: number of times SPOT has been viewed
•
Contacts: number of contacts captured
•
Share: click to share SPOT (see below)
•
Options: View SPOT Statistics, Preview, Edit or
Delete SPOT
Follow these steps to Share a SPOT:
•
Click the Share icon. (circled in red above)
The Share your SPOT window opens.
The following options are available:
•
Share: Quick links to share SPOTs on popular
platforms.
•
Bookmark: Quick links to bookmark your SPOT
on popular social bookmarking sites.
•
Link: Share the link provided (Click in box and
Copy, CRTL-C) then place (Paste) your SPOT link
to any web page or Email.
•
Embed: Select a social network or copy the text provided to embed your SPOT on any web page.
•
Preview: Click the link to preview your SPOT. (not shown)
*The Entry Level MyIsagenix subscription does not include access to the SPOT functionality.
** Instant Contact (IC) minutes are only available on certain subscriptions and use of IC requires available call minutes on your account.
Upgrade your subscription to take advantage of these powerful tools!
UPDATED 3.22.11 | 12
MyIsagenix Manual
Configure a New SPOT*
To create a new SPOT, just click on the
Configure New SPOT button. A window will
open on this page where you can create a SPOT.
Follow these steps to Configure a New SPOT:
• Click the Configure a New SPOT button
(circled in red)
Note: your SPOT preview (outlined in red) will load
automatically as you make your selections.
• Select a Type: Video, Prospect or Call
• Select a Size: Medium, Large, Small (if applicable)
• Select a Theme: Tip: choose a color scheme
that will compliment the site where you plan
to share your SPOT.
• If configuring a Video SPOT, select a Video.
Note: Video features will only appear on
Video type SPOTs.
• Enable Auto-Play? Select yes or no.
• Add A Message. Note: 70 characters max.
• Edit button text. Note: 30 characters max.
• Enable Autoresponder? If enabled, the system
will automatically send a simple Thank You email
(without links) when a lead is captured through
the SPOT.
• Show Contact Info? Note: this option is only available on Large-size SPOTs.
• Send Contact to: Enter the URL where you would like to send your contact after they have
entered their contact information.
• Give your SPOT a name. Tip: name each SPOT according to its use.
• Click the Save SPOT button (circled in red) to save.
After you configure a SPOT it will appear in your My Configured SPOTs list on the Configure SPOTs
page.
*The Entry Level MyIsagenix subscription does not include access to the SPOT functionality.
UPDATED 3.22.11 | 13
MyIsagenix Manual
Video Manager* Page
Create and upload your own videos to further
customize and personalize your SPOTs.
Note: All uploaded videos will be reviewed for
appropriateness by the Isagenix Compliance
Department, usually within 48 hours. (Check the
Status in the Videos Available section at the
bottom of the page for current availability).
Important things to keep in mind:
You must have approval from copyright owners
to use copyrighted materials in your videos, i.e.
music, voices, non-Isagenix owned items, etc. All videos that contain misrepresentations of
our products or compensation plans will not be
approved for use.
Our goal is to support all files that are commonly
uploaded by users. The suggested file size is
50mb or less.
Supported formats include: asf, 3gp, mov, flv,
f4v, wmv, avi, raw, dat, divx, xvid, m1v, m21, m2v,
m4e, m4v, mjp, mkv, movie, mp4, mpg, mpeg,
ogm, qt, rm, vob, wm, wmv, yuv.
If you experience difficulty uploading your video, please contact Customer Support.
* This feature available on the Experienced Business Builder and Elite Business Builder subscriptions.
UPDATED 3.22.11 | 14
MyIsagenix Manual
Purchase Leads Page
Isagenix has partnered with two lead providers
to give MyIsagenix users the option of
purchasing leads. These providers give you the
ability to select leads based on geographical
location and other criteria.
The benefit of using our preferred vendors is
that once your purchase is complete, all of the
lead information will be automatically entered
into your MyIsagenix Contact List.
To get started, click the Go to Responsive Data
or Go to Peak Impact button on the top of the
page. A new browser window will open as these
sites are independent of MyIsagenix. You will
be required to set up an account with the lead
provider and purchase leads directly from them.
Be sure to record your username and password
for each lead provider as you’ll need this
information to make future purchases.
You can also purchase leads from any other
leads vendor and simply import them into your
MyIsagenix account. Importing contacts is as
simple as clicking the Contacts tab, and then
clicking the Import Contacts button.
If you prefer, you can purchase leads from any
other vendor and simply import them into your
MyIsagenix account. You do this on the Manage
Contacts page using the Import Contacts
button.
UPDATED 3.22.11 | 15
MyIsagenix Manual
Marketing Agent Page
Use the Marketing Agent page to view your
prospects with the highest chance of being
converted based on their recent activity.
Click the Email me My Marketing Agent button
to send this report to your email address listed
under the My Profile tab.
You can also set up your Marketing Agent
to be automatically emailed to you for your
convenience.
Follow these steps to change your Marketing
Agent settings:
1. Click the My Profile tab in the main
navigation bar.
2. Scroll down to the My Marketing Agent
section.
3. Select the option that best fits your needs:
• Reminder Mode: Only send my
Marketing Agent when I have not logged
in for at least 20 days before the 15th of
the month.
• Every Month: Send me my Marketing
Agent email on the 15th of every month.
• Disabled: My Marketing Agent email
will only be sent by my request on the
Marketing Agent page.
UPDATED 3.22.11 | 16
MyIsagenix Manual
Prospecting Notifications Page
Note: This page only applies to contacts listed
as Prospects in your Contact List.
This page displays all notifications of contacts
that have activity in their Contact Details that
you have not viewed yet.
The red circle icon shows how many unread
notifications there are for a particular contact.
If there is more than 1 unread notification for
a contact, only the most recent activity will be
displayed on this page.
• Click the View/Edit Details icon (yellow
pencil) to see all of the unread notifications
for each contact listed.
The Contact Details window opens.
• Scroll down to the Contact History section to
view all of the notifications. (outlined in red)
Once the Contact Details window is closed, and
the Prospecting Notifications page is refreshed,
the notification for that particular contact will no
longer be displayed.
Note: Any future activity for that contact will
show up in the Prospecting Notifications page,
so you will be able to stay up-to-date on all of
their activity.
UPDATED 3.22.11 | 17
MyIsagenix Manual
Isagenix Revealed Interactive Video*
Isagenix Revealed is an interactive, conversational
video that lets prospects make choices based on
who they are and what they desire out of life. By
answering a series of simple questions, Isagenix
Revealed will help steer your prospect towards
personal success.
Note: We highly recommend you first establish
a relationship with the prospect, understanding
their needs and their interest level in Isagenix.
Once you’ve determined that the prospect could
be viable, you should send the Isagenix Revealed
Email to them.
Follow these steps to send the Isagenix Revealed
Email:
Note: In order to send the Isagenix Revealed
Email to someone, they must first be entered in
your MyIsagenix Contact List.
Step 1
Steps 2 & 3
1. Hold your mouse over the Prospecting tab and
select Isagenix Revealed from the menu. (circled in
red)
2. Now, use the drop-down list to select the
recipient’s name.
3. Click the Send button. (circled in red)
Easily track who you sent the invitation to (incuding
the date sent) using the My Isagenix Revealed List
on the bottom of this page.
* This feature is not available
on the Entry Level subscription.
UPDATED 3.22.11 | 18
MyIsagenix Manual
Isagenix Revealed Interactive Video* (continued)
Once you click the Send button, the receipient will
instantly receive an Email (shown on right) that includes a
link to view the Isagenix Revealed Interactive Video.
The Email will also include your name, phone number,
Email address, and a link to your marketing Web site.
What happens if my prospect forwards the Email to
someone?
If the original recipient (your prospect) forwards the
Isagenix Revealed Email to someone, that person will be
required to fill out a contact form with their name, phone
number and Email address when they click the link to
open the video.
Once they submit the form, you will receive an Email
notification that includes the new prospect’s contact
information.
The new prospect will not be able to view the video until
you manually add them to your MyIsagenix Contact List
and then send the Isagenix Revealed Email directly to
them.
Follow Steps 1-3 on the previous page to send the
Isagenix Revealed Email to your new prospect.
When will I receive the Email notification that my
prospect has viewed Isagenix Revealed?
Once the receipient views Isagenix Revealed, you will
receive an Email (shown on bottom right) with information
detailing exactly what your prospect selected and how
much time they spent viewing the video.
If someone watches the entire video, including Kathy
Coover’s section, they are considered a Hot Lead, and you
should receive the Email within 15 minutes.
If someone opens the video, but does not watch Kathy
Coover’s section, they are considered a Warm Lead, and
you should receive the Email by 3:00am (EST) the day
after they opened the link.
* This feature is not available
on the Entry Level subscription.
UPDATED 3.22.11 | 19
MyIsagenix Manual
Create Prospecting Email Page
This page allows you to communicate via
email with contacts listed as Prospects in your
Contact List.
Follow Steps A, B & C to create your own Email
messages, or use one of the customizable
Email templates provided:
Step A: Select Recipients (choose one)
Note: for Coaching Email, recipients must be designated as
“Prospect” in your Contact List.
1. Single Recipient
2. Multiple Recipients (default is All Contacts)
• Use the drop-down list to select a
Contact Type or Contact Group.
Select one of the following options:
• Everyone in the selected Type or Group
• Contacts added within a certain number
of days (determined by you)
• Contacts captured from a specific SPOT
(determined by you)
Step B: Schedule Delivery (choose one)
• Today
• Select Date (use drop-down calendar to select date)
Step C: Create Email Content (choose one)
1. Use Custom Email Template
• Email Template (select from drop-down list)
• Subject* (type your own, or use template)
• Body* (customize your message, or use template)
2. Select Drip Email Campaign (see next page
for details)
• Product Series
• Product and Business Series
• Business Series
Click the Next button (circled in red) when you are
ready to preview the selections you made on
this page.
* Please, no non-compliant words or phrases in your messages. Subject and Body will be checked for use of restricted words.
UPDATED 3.22.11 | 20
MyIsagenix Manual
Create Prospecting Email Page (continued)
Follow these steps to Preview/Configure Drip
Email Campaigns.
1. Select one of these options: (outlined in red)
• Product Series
• Product and Business Series
• Business Series
2. Click the Preview/Configure link next to the
selected series.
Note: these configurations are universal, any
changes made will impact current and future
campaigns. They are not contact-specific.
3. Use the Delay drop-down lists to select
when you would like the system to send each
Email in the series.
4. Use the Enable boxes to select the Emails
you would like to include in the campaign.
(checked is the default setting)
5. Click the View icon (circled in red) to preview
each message.
The Preview pop-up window opens.
• The contact’s first name is automatically
entered as the greeting.
• The body of the Email contains a message
that is pre-set in the system. At this time, you
are not allowed to edit this message.
• Your first name, telephone, Email and link
to your replicated Isagenix website are
automatically entered in the closing.
Tip: check your My Profile page in MyIsagenix
to be sure your contact information is correct
before sending out any Drip Email Campaigns.
Click the X icon in the upper-right corner to close
the Preview window.
UPDATED 3.22.11 | 21
MyIsagenix Manual
Create Prospecting Email Page (continued)
Follow-up Reminders are automatically sent to
you, according to the schedule that you set.
• Use the Delay drop-down lists to select
when you would like the system to send
each reminder to you.
• Use the Enable boxes to select the Emails
you would like to include in the campaign.
(checked is the default setting)
• Click the Edit icon (circled in red) customize
each reminder.
Note: these reminders are for you, they are
not sent to your contacts.
If you would like to return to the original
configurations, click the Restore to Default
button.
UPDATED 3.22.11 | 22
MyIsagenix Manual
Confirm Message Page
The Confirm Message page includes:
Contacts Section
• Displays a list of all the contacts who will
be Emailed. Please briefly review the list and
revise your selection criteria on the previous
page if necessary.
Timing Section
• Shows the date that the message is
scheduled to be sent. Please confirm the
date and total number of contacts are
correct.
Message Preview Section
• Please check message preview (outlined in red)
for errors.
Tips:
1. Do not leave the words “test” or
“example” in your subject line.
2. Make sure you have not included an
individual person’s name instead of the
substitution variable, <#prospect_first_
name/#>
3. Look for any visual problems with the
Email. Most Email clients will see exactly
what you see on this page.
4. Substitution variables, such as
<#prospect_first_name/#>, should not
be visible in this preview subject or
body. They have been substituted with
example data (John, for example).
If any of the above information is not correct, click the Change Settings button to return to the
Create Prospecting Email page, or click the Confirm and Send button if you are ready to send this
message. (circled in red)
UPDATED 3.22.11 | 23
MyIsagenix Manual
Prospecting Email Center Page
Use the Prospecting Email Center to see
your Sent Emails and your Scheduled Emails
(messages you have created that are scheduled
to be sent 1 or more days in the future).
The Sent Emails section allows you to track
your MyIsagenix Email activity. The most recent
message appears at the top. (outlined in red)
• Date indicates the day the message was sent
from MyIsagenix.
• Click the Subject link to see the message
that was sent.
• Click the Read column link (percentage) to
view the Email Campaign Report.
This report shows the Send Date, number
of intended Recipients, number of actual
recipients (Sent) and number of Opens. It
will also give Details, including the Contact
Name and the Date Read.
For example, if the message had been sent
to 4 contacts and only 1 opened it, the Open
percentage would be 25%.
• Click the red X in the Options column to
Remove this Email from your Sent Emails list
(not from the recipient).
Note: you will not be able to reuse it in the
future once you remove it from your list.
• Click the envelope/red arrow icon to Reuse
the Email.
Note: this allows you to send the exact
Email (including content and links) to other
recipients.
UPDATED 3.22.11 | 24
MyIsagenix Manual
Prospecting Email Center Page (continued)
The Scheduled Emails section displays all of the
custom Prospecting Emails you have created
that are scheduled to be sent 1 or more days in
the future. (outlined in red)
Note: once the scheduled Email is sent, it will
automatically move to the Sent Emails section.
• Click the envelope/red arrow icon in the
Options column to Reuse the Scheduled
Email and send to other recipients.
• Click the red X to Cancel the Scheduled
Email.
Note: the message will be permanently
deleted and not sent to the recipient(s).
Review Prospecting Drip Emails
Click the Review Drip Emails button (circled in red
above) to see the history of all your Prospecting
Drip Email Campaigns.
Use this list to keep track of who you sent
campaigns to, and the date sent, as well as
Recent Activity associated with each campaign.
UPDATED 3.22.11 | 25
MyIsagenix Manual
Coaching Notifications Page
Note: This page only applies to contacts listed
as Members in your Contact List.
This page displays all notifications of contacts
that have activity in their Contact Details that
you have not viewed yet.
The red circle icon shows how many unread
notifications there are for a particular contact.
If there is more than 1 unread notification for
a contact, only the most recent activity will be
displayed on this page.
• Click the View/Edit Details icon (yellow
pencil) to see all of the unread notifications
for each contact listed.
The Contact Details window opens.
• Scroll down to the Contact History section to
view all of the notifications. (outlined in red)
Once the Contact Details window is closed, and
the Coaching Notifications page is refreshed,
the notification for that particular contact will no
longer be displayed.
Note: Any future activity for that contact will
show up in the Coaching Notifications page, so
you will be able to stay up-to-date on all of their
activity.
UPDATED 3.22.11 | 26
MyIsagenix Manual
Product Coaching Page
Our Product Coaching system is a simple, yet
powerful program that will help you efficiently build
your Isagenix business by learning to teach people
how to cleanse and use the products.
Click the Preview Emails button to view each email
in the series before sending. Then, when you are
ready to set up a new participant, click the Set-Up
Participant button.
Follow these steps to Set Up a Product Coaching
Participant:
1. Select Participant.
Note: In order to send the Product Coaching
emails to someone, they must be designated as a
Member in your MyIsagenix Contact List.
2. Select System & Start Date.
3. Select Coach.
Note: Any coach (other than yourself) must be
designated as a Member in your MyIsagenix
Contact List.
Check the box to Receive Coaching Emails.
4. Select Team Leader.
Note: Any team leader (other than yourself) must
be designated as a Member in your MyIsagenix
Contact List.
5. Click the Start Coaching button. (circled in red)
Easily keep track of your participants using the My
Product Coaching Participant List on this page.
* This feature is not available
on the Entry Level subscription.
UPDATED 3.22.11 | 27
MyIsagenix Manual
Create Coaching Email Page
This page allows you to communicate via email
with contacts listed as Members in your Contact
List.
Follow Steps A, B & C to create your own Email
messages, or use one of the customizable
Email templates provided:
Step A: Select Recipients (choose one)
Note: for Coaching Email, recipients must be designated as
“Member” in your Contact List.
1. Single Recipient
2. Multiple Recipients (default is All Contacts)
• Use the drop-down list to select a
Contact Type or Contact Group.
Select one of the following options:
• Everyone in the selected Type or Group
• Contacts added within a certain number
of days (determined by you)
• Contacts captured from a specific SPOT
(determined by you)
Step B: Schedule Delivery (choose one)
• Today
• Select Date (use drop-down calendar to select date)
Step C: Create Email Content (choose one)
1. Use Custom Email Template
• Email Template (select from drop-down list)
• Subject* (type your own, or use template)
• Body* (customize your message, or use template)
2. Select Drip Email Campaign (see next page
for details)
• IsaDiary 9-Day Series
• IsaDiary 30-Day Series
Click the Next button (circled in red) when you are
ready to preview the selections you made on
this page.
* Please, no non-compliant words or phrases in your messages. Subject and Body will be checked for use of restricted words.
UPDATED 3.22.11 | 28
MyIsagenix Manual
Create Coaching Email Page (continued)
Follow these steps to Preview/Configure Drip
Email Campaigns.
1. Select one of these options: (outlined in red)
• IsaDiary 9-Day Series
• IsaDiary 30-Day Series
2. Click the Preview/Configure link next to the
selected series.
Note: these configurations are universal, any
changes made will impact current and future
campaigns. They are not contact-specific.
3. Use the Delay drop-down lists to select
when you would like the system to send each
Email in the series.
4. Use the Enable boxes to select the Emails
you would like to include in the campaign.
(checked is the default setting)
5. Click the View icon (circled in red) to preview
each message.
The Preview pop-up window opens.
• The body of the Email contains a message
that is pre-set in the system. At this time, you
are not allowed to edit this message.
• Your first name, telephone, Email and link
to your replicated Isagenix website are
automatically entered in the closing.
Tip: check your My Profile page in MyIsagenix
to be sure your contact information is correct
before sending out any Drip Email Campaigns.
Click the X icon in the upper-right corner to close
the Preview window.
UPDATED 3.22.11 | 29
MyIsagenix Manual
Confirm Message Page
The Confirm Message page includes:
Contacts Section
• Displays a list of all the contacts who will
be Emailed. Please briefly review the list and
revise your selection criteria on the previous
page if necessary.
Timing Section
• Shows the date that the message is
scheduled to be sent. Please confirm the
date and total number of contacts are
correct.
Message Preview Section
• Please check message preview (outlined in red)
for errors.
Tips:
1. Do not leave the words “test” or
“example” in your subject line.
2. Make sure you have not included an
individual person’s name instead of the
substitution variable, <#prospect_first_
name/#>
3. Look for any visual problems with the
Email. Most Email clients will see exactly
what you see on this page.
4. Substitution variables, such as
<#prospect_first_name/#>, should not
be visible in this preview subject or
body. They have been substituted with
example data (John, for example).
If any of the above information is not correct,
click the Change Settings button to return to
the Create Coaching Email page, or click the
Confirm and Send button if you are ready to
send this message. (circled in red)
UPDATED 3.22.11 | 30
MyIsagenix Manual
Coaching Email Center Page
Use the Coaching Email Center to see your Sent
Emails and your Scheduled Emails (messages
you have created that are scheduled to be sent 1
or more days in the future).
The Sent Emails section allows you to track
your MyIsagenix Email activity. The most recent
message appears at the top. (outlined in red)
• Date indicates the day the message was sent
from MyIsagenix.
• Click the Subject link to see the message
that was sent.
• Click the Read column link (percentage) to
view the Email Campaign Report.
This report shows the Send Date, number
of intended Recipients, number of actual
recipients (Sent) and number of Opens. It
will also give Details, including the Contact
Name and the Date Read.
For example, if the message had been sent
to 4 contacts and only 1 opened it, the Open
percentage would be 25%.
• Click the red X in the Options column to
Remove this Email from your Sent Emails list
(not from the recipient).
Note: you will not be able to reuse it in the
future once you remove it from your list.
• Click the envelope/red arrow icon to Reuse
the Email.
Note: this allows you to send the exact
Email (including content and links) to other
recipients.
UPDATED 3.22.11 | 31
MyIsagenix Manual
Coaching Email Center Page (continued)
The Scheduled Emails section displays all of
the Coaching Emails you have created that
are scheduled to be sent 1 or more days in the
future. (outlined in red)
Note: once the scheduled Email is sent, it will
automatically move to the Sent Emails section.
• Click the envelope/red arrow icon in the
Options column to Reuse the Scheduled
Email and send to other recipients.
• Click the red X to Cancel the Scheduled
Email.
Note: the message will be permanently
deleted and not sent to the recipient(s).
Review Coaching Drip Emails
Click the Review Drip Emails button (circled in
red above) to see the history of all your Coaching
Drip Email Campaigns.
Use this list to keep track of who you sent
campaigns to and the date sent, as well as
Recent Activity associated with each campaign.
UPDATED 3.22.11 | 32
MyIsagenix Manual
My Profile and Preferences Page
The My Profile and Preferences page is where
you can view and maintain your MyIsagenix
account information.
This page includes the following sections:
Current MyIsagenix Subscription Details:
• Total Views
• Total Contacts
• Minutes Used*
• Active SPOTs**
• Marketing Pages
• Need More?
Click the Options button to return to your
Associate Back Office where you can
change your MyIsagenix subscription (under
the Tools menu).
My Profile
Follow these steps to update your contact
information:
• Make sure your First Name, Last Name and Email address are correct.
Note: this information, along with your telephone number, will be automatically added as the
closing of all Email messages sent through your MyIsagenix system (including Autoresponders).
Your First and Last Name and Email address will be displayed on a SPOT (large size only) when
you select the Show contact info? option in the SPOT configurations.
• Your Display Name is only visible to you. It is displayed on the Home page, for example.
• Your Isagenix Member Number and Country are set by the system when you subscribe to
MyIsagenix. You are not allowed to edit these fields.
• Click the Save button at the bottom of the page when finished. (circled in red)
* Instant Contact (IC) minutes are only available on certain subscriptions and use of IC requires available call minutes on your account.
**The Entry Level MyIsagenix subscription does not include access to the SPOT functionality.
UPDATED 3.22.11 | 33
Upgrade your subscription
to take advantage of these powerful tools!
MyIsagenix Manual
My Profile and Preferences Page (continued)
My Instant Contact Details
The Instant Contact* settings determine how
the system will perform when a contact fills out
the lead capture form on one of your SPOTs.**
You can set it to call you only during those
hours you are available, as well as send you
an Email. Remember to update your Instant
Contact settings or it will not function properly.
Follow these steps to set up your Instant Contact Details:
• Enter the telephone number you would like the system to use.
Note: use the following format: Country Code - (Area Code) - Telephone Number.
Example: +1-(786)-111-2222
• Select the Call Me Between time frame that works with your schedule.
• Use the drop-down list to select your GMT (Greenwich Mean Time) Offset.
Examples:
New York offset is -05:00 United States (ET), California offset is -08:00 United States (PT)
• The Also Send box allows you to turn off/on Email notification.
Note: this box is enabled as default, which means you will receive a call and an Email.
• The Disable Calls box allows you to turn off all Instant Contact telephony features, but keep all
of your IC settings.
Check this box if your are going on vacation, for example.
• Click the Save button at the bottom of the page when finished.
Follow these steps to set up a SPOT with Instant
Contact option:
• Go to the Marketing tab, select Configure
SPOTs.
• Check the IC box next to each SPOT to add
the Instant Contact option. (outlined in red)
* Instant Contact (IC) minutes are only available on certain subscriptions and use of IC requires available call minutes on your account.
**The Entry Level MyIsagenix subscription does not include access to SPOT Technology.
UPDATED 3.22.11 | 34
Upgrade your subscription
to take advantage of these powerful tools!
MyIsagenix Manual
Mobile Phone Application*
The Mobile Phone Application lets you take your
marketing system with you, giving you access to
your Contact List, quick links to telephone and Email
Contacts, view your SPOT performance statistics,
Calendar Events and more.
Figure 1
Follow these steps to install the Mobile Phone
Application on your smartphone:
Figure 2
1. Click the My Profile tab in the MyIsagenix main
navigation bar. (circled in red on Figure 1)
2. Scroll down to the Mobile App section on the My
Profile page. (bottom of Figure 2)
Option 1: Text a link to your cell phone:
Note: use this option only if your cell phone
number is entered in the Phone Number field in
the My Instant Contact Details section on the My
Profile page. (outlined in red on Figure 2)
3. Click Text a link to... (circled in red on Figure 2) in the
Mobile App section.
4. Once you receive the text, click the link to open
the URL on your cell phone. (Figure 3)
Now, skip to Step 5 below.
Figure 3
Figure 4
Option 2: Open the URL from your cell phone.
Note: use this option if your cell phone number is
not entered in the Phone Number field in the My
Instant Contact Details section on the My Profile
page. (outlined in red on Figure 2)
3. Open the Internet browser on your phone.
4. Go to http://www.myisagenix.com/my/mobile
5. Follow the instructions on the How to Install
screen. (Figure 4)
* This feature is only available with the MyIsagenix Experienced Business
Builder and Elite Business Builder subscriptions.
UPDATED 3.22.11 | 35
MyIsagenix Manual
Mobile Phone Application* (continued)
6. Select the Add to Home Screen option. (outlined in
Figure 5
Figure 6
Figure 7
Figure 8
red on Figure 5)
7. Click the Add button to add the MyIsagenix icon
to your home screen. (outlined in red on Figure 6)
Note: you may change the name, if desired.
8. Click the MyIsagenix icon to launch the
application. (outlined in red on Figure 7)
9. Enter your Member ID and PassKey to login to
the application. (Figure 8)
Note: your PassKey can be found in the Mobile
App section on the My Profile page. (Figure 2 on
previous page)
10.Click the Login button. (Figure 8)
11. The MyIsagenix Mobile Phone Application opens.
(Figure 9)
* This feature is only available with the MyIsagenix Experienced Business
Builder and Elite Business Builder subscriptions.
Figure 9
UPDATED 3.22.11 | 36
MyIsagenix Manual
Support Center Page
The Support Center is where you can find
valuable information and on-line tutorials to
get started using MyIsagenix, along with sales
coaching, resources, and answers to Frequently
Asked Questions.
Use the tabs to browse by category, or enter
a keyword in the Quick Search area to quickly
locate information on a particular subject.
Do you have questions about MyIsagenix? Is
there an enhancement you would like to see
added? Please, contact us. Your feedback is
important!
Follow these steps to submit feedback about
MyIsagenix:
• Click the Contact Us button, on the right
side of any page. (circled in red above)
• Select a topic from the drop-down list.
• Enter a rating (if applicable)
• Type your questions/comments in the space
provided.
• Click the Send Feedback button.
Isagenix Customer Service is also available to
answer any questions you may have.
Call them at 877-877-8111 and select option #5.
UPDATED 3.22.11 | 37