1
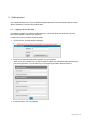
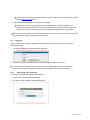
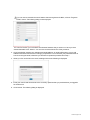
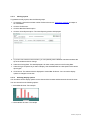
User Manual
Merchant Services Online
Table of Contents
1
1.1
1.1.1
1.2
Introduction
About merchants
Merchant numbers
Supported browsers
5
5
6
6
2
2.1
2.2
2.2.1
2.2.2
2.2.3
2.2.4
2.3
2.4
2.5
2.6
2.7
2.7.1
2.7.2
2.7.3
2.7.4
2.7.5
2.7.6
2.8
2.8.1
2.8.2
2.8.3
2.8.4
2.8.5
2.9
2.10
2.11
2.11.1
2.11.2
2.11.3
2.11.4
2.11.5
Getting started
Logging in for the first time
Logging in
Requesting a new password
Changing your password when it has expired
Changing your password at other times
Password rules
Unlocking a session
Logging out
The homepage
Using the menu bar
Using the toolbar icons
Using the Quick Links option
Browsing visited pages
Adding favourites
Selecting a favourite page
Editing/deleting a favourite
Collapsing/expanding the banner
Using the banner selection box
Viewing merchant details
Selecting a merchant using the merchant number
Selecting a merchant using the trade name
Searching for a merchant
Selecting an account
Downloading output
Sorting data
Generating reports
Viewing reports
Selecting display options
Zooming in and out
Viewing daily figures
Chart report types
7
7
8
8
10
10
11
11
12
12
12
13
13
14
15
15
16
16
17
17
17
17
18
19
19
20
21
22
22
23
23
24
3
3.1
3.1.1
3.1.2
3.1.3
3.1.4
3.1.5
3.1.6
3.1.7
3.1.8
3.1.9
Profile details
Viewing the merchant details
General information
Bank info tab
Addresses tab
Service/Entitlements tab
Terminals tab
References tab
Requests tab
Notes tab
Sales Statistics tab
25
25
26
27
27
28
28
28
28
28
28
23/02/2015 | Page 3 of 64
3.2
3.3
3.3.1
3.4
Viewing account fees
Viewing settlement instructions
Settlement instructions
Viewing transaction charges
29
30
31
31
4
4.1
4.2
4.2.1
4.2.2
4.3
4.3.1
4.3.2
4.3.3
4.3.4
Transaction activity
Viewing processed batches
Viewing the batch details
Filtering the batch details
Viewing Addendum pages
Viewing processed transactions
Viewing the Processed Transactions page
Searching for transactions
Viewing the merchant details
Viewing the batch details
35
35
36
36
37
38
38
38
42
42
5
5.1
5.2
5.2.1
5.2.2
5.2.3
Chargeback details
About the Acquirer Reference Number
Viewing chargeback status
Filtering the search
Viewing the results
Viewing the Chargeback Status Detail page
43
43
43
44
45
46
6
6.1
6.1.1
6.1.2
Retrieval requests
Viewing retrieval requests
Filtering the search
Viewing the results
49
49
49
49
7
7.1
7.1.1
7.1.2
Suspense transactions
Viewing suspense transactions
Filtering the search
Viewing the results
51
51
51
51
8
8.1
8.1.1
8.1.2
8.2
Funding
Viewing the account summary details
Filtering the search
Viewing the results
Viewing the account details
53
53
53
54
55
9
9.1
9.1.1
9.1.2
9.2
9.2.1
9.2.2
Merchant Activity
Viewing the most recent authorisations
Filtering the search
Viewing the results
Viewing authorisation history
Filtering the search
Viewing the results
57
57
58
58
59
59
60
10
10.1
10.2
10.3
Customer Service
Viewing contact details
Viewing exchange rates
Changing your password
63
63
63
64
23/02/2015 | Page 4 of 64
1
Introduction
This is the user manual for Merchant Services Online (MSO).
Using MSO you can view and download:
l
l
Profile details, including merchant details, account fees, settlement details and transaction charges
Transaction activity for processed batches, processed transactions, chargeback, retrieval requests
and suspense transactions
l
Information on the postings to your merchant account
l
Details of authorisations
In addition, customer service information is supplied which provides extra support while using MSO.
1.1
About merchants
Use the merchant log-in details provided to log into MSO. The log in will provide you with access based
on one of the following merchant types:
l
Group merchant
l
Sub-group merchant
l
Member level merchant
Group or sub-group merchants are only relevant if your merchants are part of a hierarchy. If you are
logged in as a group or sub-group merchant, you can view data for all merchants at a lower level in the
hierarchy of the group or sub-group. At these levels, transactions cannot be acquired, although the groups
can be used for aggregation of billing and settlement.
If you are a member level merchant, you can acquire transactions and view your own data. You cannot
view the data of any other merchants.
The merchant number displayed will have one of the following suffixes, depending on the type of
merchant selected:
l
(M) - The selected merchant is a member level merchant.
l
(S) - The selected merchant is a sub-group merchant.
l
(G) - The selected merchant is a group merchant.
23/02/2015 | Page 5 of 64
1.1.1
Merchant numbers
Two numbers are used to identify merchants:
l
External
The longer of the 2 numbers is the external number. This is the number registered for the merchant
consisting of Merchant ID, Contract ID or Site Number. The Merchant ID, Contract ID and Site ID are
included in the letters sent to the merchant confirming registration of the contract and site. Examples
of these letters are shown in Annex 1.
l
Internal
The shorter number is a unique number generated for use in MSO. This is useful for quickly searching
for merchants.
You can use both the external and the internal number wherever a Merchant Number can be filled in.
1.2
Supported browsers
To be able to log in to MSO, you must have an internet connection. Use with following browsers is
approved:
l
Internet Explorer 7 or later
l
Mozilla Firefox 2 or later
l
Chrome
23/02/2015 | Page 6 of 64
2
Getting started
This chapter describes how to log in to MSO and explains the layout of the user interface and the various
options available to you while using the application.
2.1
Logging in for the first time
To be able to use MSO, you will be provided with a link. You will also receive an email with your user
name and a separate e-mail with your password.
To log in for the first time, take the following steps.
1. Click on the link. The login dialog is displayed.
2. Enter the user name and password provided to you by PaySquare.
When you log in for the first time, you will be asked to change your password and provide answers to
two security questions. You can select any of the questions provided in the drop-down list.
3. Enter and confirm your new password.
23/02/2015 | Page 7 of 64
You must take into account the password rules required for MSO. For more information, see the
section Password rules below.
4. Select and provide responses to the 2 security questions.
The answers to the security questions are only required again if you have forgotten your
password and request a new one. However this means that it is important that you select the
questions for which it will be easiest for you to remember the answers that you provided.
Every user must have their own user name and password. For security reasons and to prevent fraud,
you should never share your login details with anyone.
2.2
Logging in
Once you have set up your log in details as described above, the next time you log in, you use the
following procedure.
1. Click on the MSO link. The login dialog is displayed.
2. Enter the user name and password you provided during the initial log in process.
If you already have an MSO session open and you log in again with the same user name and
password, a message is displayed informing you that the first session will be terminated.
2.2.1
Requesting a new password
If you forget your password, take the following steps.
1. Click on the Forgotten Password? button.
2. Fill in your contact details in the dialog displayed:
23/02/2015 | Page 8 of 64
If you do cannot remember the email address that was registered for MSO, click the 'Forgotten
Email?' button. The following dialog is then displayed:
You can then re-enter your user details and the email address that you want to us.Once you have
entered the details click 'Submit'. You can now continue with the rest of the procedure.
3. Click Submit after entering your username and email address. An email will be sent to your e-mail
address with instructions on how to change your password. You must reset your password within an
hour of receiving the email, otherwise you will have to repeat the procedure from step 1.
4. When you click on the link in the email, a dialog similar to the following is displayed.
5. Enter your user ID and the answers to the 2 security questions that you provided when you logged in
for the first time.
6. Click Submit. The following dialog is displayed:
23/02/2015 | Page 9 of 64
7. Enter and confirm your new password.
You must take into account the password rules required for MSO. For more information, see the section
Password rules below.
2.2.2
Changing your password when it has expired
For security reasons, you must change your password every month. When you log in a message will be
displayed to inform you that your password must be changed, or changed soon.
1. When you enter your log in details and your password has expired, the following screen is displayed.
2. Enter and confirm your new password.
You must take into account the password rules required for MSO. For more information, see the section
Password rules below.
2.2.3
Changing your password at other times
You can also change your password manually at any time.
To change your password, take the following steps.
1. Click the Customer Service menu option.
2. Click the Change password option. The following page is displayed.
23/02/2015 | Page 10 of 64
3. Enter your existing password.
4. Enter your new password and then re-enter it.
5. Click Change Password to confirm the change.
See also the section Password rules below.
2.2.4
Password rules
When changing your password, you should take the following into account:
l
Your password must consist of at least 8 characters, of which at least 4 must be letters and 1 must be
a number.
l
Your password cannot be the same as any of the last 13 passwords that you have used.
l
You should never share your password with other users.
l
You should never use the option to remember you password if offered by the browser.
l
Take any other precautions necessary to make sure your password remains secret.
2.3
Unlocking a session
For security purposes, if you have not been active in MSO for 15 minutes, your session will be locked.
This means that when you try to select an option, the Unlock session screen will be re-displayed and you
will have to re-enter your password to continue working. Once you have entered your password
successfully, you will return to the page that was displayed before the session was locked.
If a session times-out for a second time, the session is 'killed'. In this case you must log in again using
the normal process.
23/02/2015 | Page 11 of 64
2.4
Logging out
When you have finished working in MSO, click Log out at the top right-hand side of the page.
It is recommended that you always use the Log out option to log out. This ensures that your session is
ended. If you do not log out, but just close the browser, you are still registered as logged in. In this case,
when you log in again, you will be informed that the previous session has been terminated.
2.5
The homepage
Once you have logged in to MSO, the homepage is displayed.
The page is divided into several areas:
l
Menu bar
l
Toolbar
l
Selection banner
The following sections describe the options available in these 3 areas.
You are advised to use the options and buttons in the user interface to navigate and not the Back and
Forward buttons in your browser, as these may sometimes give unexpected results.
2.6
Using the menu bar
The menu bar at the top of the screen contains the options available to you in MSO.
Each of the menu options contains one or more sub-options:
l
Profile
l
Merchant Details
l
Account Fees
l
Settlement
l
Transaction Charges
23/02/2015 | Page 12 of 64
l
l
l
l
Transaction Activity
l
Processed Batches
l
Chargeback Status
l
Retrieval Request
l
Suspense Transactions
l
Processed Transactions
Funding
l
Account
l
Account Summary
Merchant Activity
l
Authorisation History
l
Recent Authorisations
l
Merchant Commission Report
Customer Service
l
Contact Details
l
FX Rate
l
Change Password
l
File Transfer
You can also access these options using the Quick Links icon on the toolbar and using the My Favourites
icon if you have added the page to your favourites.
2.7
Using the toolbar icons
Several icons are available in the toolbar to help you navigate and locate pages in MSO.
When you move your cursor over an icon, the name of the icon is displayed briefly below the cursor. For
example, when you move your cursor over the left-most icon, the text Quick Links is displayed, as shown
below.
Each of the icons is described below.
2.7.1
Using the Quick Links option
As an alternative to selecting a menu option, you can directly access a page using the Quick Links icon.
23/02/2015 | Page 13 of 64
When you click the button, a list of all the available menu items is displayed.
You can select an item directly. You can also filter the list by entering a letter or part of a menu name in
the search box.
For example:
2.7.2
Browsing visited pages
You can use the Browse History icon to go back to a page that you have already visited in the current
session.
The icon is only displayed once you have visited more than one page since you last logged in.
When you click the button, a list of all the pages you have visited for the currently selected merchant.
23/02/2015 | Page 14 of 64
You can then select a previously selected page, if required.
If you select another merchant, the history will be cleared.
2.7.3
Adding favourites
You can use the My Favourites icon to add pages to your list of favourites.
1. If you want to add the current page to your favourites, click the My Favourites icon. A drop-down list
similar to the following is displayed.
2. Click Add Current Page. The following dialog is displayed.
3. Click Add to add the page to your favourites.
2.7.4
Selecting a favourite page
You can use the My Favourites icon to select a favourite page that you already added.
1. If you want to select one of your favourites, click the My Favourites icon. A drop-down list similar to
the following is displayed.
2. Select the appropriate favourite. The page is then displayed.
23/02/2015 | Page 15 of 64
2.7.5
Editing/deleting a favourite
You can use the My Favourites icon to edit the text displayed for a favourite or to delete a favourite from
the list.
1. If you want to want to edit or delete a favourite, click the My Favourites icon. A drop-down list similar
to the following is displayed.
2. Right-click the appropriate favourite.
3. Select the appropriate option to edit or delete the favourite.
2.7.6
Collapsing/expanding the banner
You can collapse or expand the banner using the following icon.
This is useful if you want to maximise the space available to you on the page, as shown in the example
below.
Click the button again to redisplay the banner.
23/02/2015 | Page 16 of 64
2.8
Using the banner selection box
You can use the banner selection box to select a merchant by merchant number or trade name. Once you
have selected a merchant you can also select an account if the merchant uses more than one account.
When you log in to MSO, a merchant is automatically selected based on the login details.
2.8.1
Viewing merchant details
In MSO, you can view the details of one or more merchants.
l
l
If you are a member level merchant, the number displayed will always be your own merchant number.
You cannot select any other merchant number.
If you are logged in as a group or sub-group merchant, a default merchant number will be selected
based on your login details. However, you can view data for all merchants at a lower level in the
hierarchy of the group or sub-group by selecting that merchant.
When you are using MSO, make sure you have selected the correct merchant as the content of many
of the pages displayed depends on the selected merchant.
For more details on the different merchant types, see the section 'About merchants'.
2.8.2
Selecting a merchant using the merchant number
If you can view the data for more than one merchant, you can take the following steps to change the
merchant.
1. In the Banner Selection box, click on the arrow next to the currently selected merchant number.
2. Select or enter the merchant number required.
3. Click Change.
2.8.3
Selecting a merchant using the trade name
You can select a merchant by entering or selecting the merchant's trade name
If the merchant only has one account, no selection is available.
1. In the Banner Selection box, click on the arrow next to the currently selected trade name.
23/02/2015 | Page 17 of 64
2. Enter the trade name. You can also use an asterisk (*) as wildcard to replace one or more
characters. For example, Hotel* will match Hotel001, Hotel002, Hotel003 etc.
3. Click Search. If the merchant is found, a dialog similar to the following is displayed:
4. You can then click the merchant name to select it.
2.8.4
Searching for a merchant
If you belong to a merchant group or sub-group, you can search for a merchant using additional search
criteria.
1. In the Banner Selection box, click on the arrow next to the currently selected merchant number.
2. Click the Search button. The following screen is displayed.
3. You can enter search criteria in the fields displayed.
4. Click Search.
If you do not enter any search criteria, any merchants in the group or sub-group which you are authorised
to view will be displayed in the search results.
For some functions, a merchant must be selected before you can view the data. In this case, if you have
not already selected a merchant, the Select Merchant screen is displayed when you select the option.
You can enter search criteria as described above and then select the required merchant from the search
results.
23/02/2015 | Page 18 of 64
2.8.5
Selecting an account
Transactions can be credited and debited to various accounts. Each account is maintained in a particular
currency (for example, EUR, USD and so on). Any transactions posted to the account in other currencies
are converted using the appropriate foreign exchange rates.
Typically all merchants have at least two accounts:
l
l
Payment account retail
Merchant batches are posted and payments generated from this account.
Acquirer Dispute Account
Chargebacks are posted to this account and then either debited from the account, written off or represented.
The account types and usage of accounts for each merchant vary depending on the merchants
requirements.
On various pages in MSO, you can select a specific account using the banner selection box, if you do not
want to use the default account.
You must first select a merchant, before you can select an account.
If the merchant only has one account, no selection is available.
1. In the banner selection box, click on the arrow next to the currently selected account.
2. Select the required account.
2.9
Downloading output
On most pages, an option is available to download the data displayed on the screen.
When you click on the option, you may be given the choice of whether you want to download the data
directly to an Excel file or to a CSV file.
In some cases, you may not be able to choose the Excel option, in which case the data will be
downloaded to a CSV file.
23/02/2015 | Page 19 of 64
If the data is downloaded as Excel (which also uses the CSV file type), the column headers and data
format are preserved.
If you use the CSV download option, the header information and data formats are not preserved. This
format is useful if you want to import the data into your own systems.
You should always treat the downloaded file as confidential and delete the file when it is no longer
required.
2.10 Sorting data
In some cases, you can rearrange and sort data in tables to your own requirement, for example when
viewing the transaction charges.
l
You can increase or decrease the width of any column by dragging the edge of the column using the
mouse. For example:
23/02/2015 | Page 20 of 64
l
You can change the sorting order of the data by clicking on any column header. For example:
You can reverse the order, that is from ascending to descending or vice versa by clicking on the
column header again.
l
You can change the order of columns by dragging a column to another position using the mouse.
The next time you open the page, the default values will be restored.
2.11 Generating reports
You can use the Generate report option to generate various reports in chart and tabular format that show
various aspects of transaction activity.
When you generate a report, the figures are displayed per month. However for some reports, you can
select a month to drill down to the daily figures.
23/02/2015 | Page 21 of 64
2.11.1
Viewing reports
To generate monthly reports, take the following steps.
1. If necessary, select the merchant number. Refer to the section, Selecting a merchant in Chapter 2
for more details.
2. Click the Profile menu.
3. Click the Merchant Details option.
4. Click the Chart Reports option. The Chart Reporting window is displayed.
5. If you can view more than one merchant, you can optionally enter a different merchant number at the
top of the window and click Change.
6. Select the Posting Date. The data displayed is for the 6 months previous to the Posting Date.
7. Select the type of report that you want to display. See the table below for a description of the various
report types.
8. Click Search. The selected chart is displayed in Vertical Bar 3D format. You can use the display
options to change the chart view.
2.11.2
Selecting display options
You can select various display options for the chart and also increase and decrease the size of the chart.
You can choose from the following options:
l
Vertical Bar 3D chart. For example:
l
Horizontal Bar 3D chart. For example:
23/02/2015 | Page 22 of 64
l
Line chart
l
Tabular report
2.11.3
Zooming in and out
You can increase the magnifying glass icons to increase and decrease the size of the chart, when using
the Vertical Bar 3D, Horizontal Bar 3D and Line chart options.
l
Zoom in
Hover your cursor over the
icon to zoom in on the chart. The chart size will gradually increase.
Move your cursor away from the icon when the required magnification is reached.
l
Zoom out
Hover your cursor over the
icon to zoom out on the chart. The chart size will gradually decrease.
Move your cursor away from the icon when the required magnification is reached.
l
Cancel zoom
Click on the
icon to reset the chart to the original size.
You cannot zoom in or out if you choose the 'Tabular' display option.
2.11.4
Viewing daily figures
When you display charts using the Vertical Bar 3D, Horizontal Bar 3D and Line chart options, you can
click on a month to view the daily figures for the selected month.
This option is not applicable for the 'Tabular' display option.
To view the daily figures:
23/02/2015 | Page 23 of 64
1. View a chart and select the view option as described in the previous sections.
2. To view the daily figures:
l
l
If you are viewing a bar chart, click on the column of the month for which you want to view the
daily figures.
If you are viewing a line chart, click on the point above the applicable month. You can see when it
is possible to drill down as the cursor changes to a hand.
The daily figures are displayed as a vertical bar chart when you drill down, but after the chart is
displayed you can select one of the other display options.
An example of a vertical bar chart is shown below:
2.11.5
Chart report types
The following table provides a description of the various types of chart that can be displayed and
downloaded.
Report
Description
Sales v Chargebacks Amount
Analysis
Analysis of the sales amounts compared to the chargeback
amounts for the 6 months previous to the selected posting date, or
the daily figures for the selected month.
Sales v Chargebacks Count
Analysis
Analysis of the transactions amounts compared to the chargeback
transactions for the 6 months previous to the selected posting date,
or the daily figures for the selected month.
Network Outgoing Amount
Amounts of outgoing network (card schemes) presentments
(Purchase + Cash - Refunds) over the 6 months previous to the
selected posting date, or the daily figures for the selected month.
Network Outgoing Count
Number of outgoing network (card schemes) presentment
transactions (Purchase + Cash - Refunds) for the 6 months
previous to the selected posting date, or the daily figures for the
selected month.
Sales, Cash Advance & Refund Analysis of the Sales versus Cash Advance versus Refund amounts
Amount
for the 6 months previous to the selected posting date, or the daily
figures for the selected month.
Sales, Cash Advance & Refund Analysis of the Sales versus Cash Advance versus Refund
Count
transactions for the 6 months previous to the selected posting date,
or the daily figures for the selected month.
Sales Amount Analysis
Analysis of the Sales amount based on the institution's local
currency for the 6 months previous to the selected posting date, or
the daily figures for the selected month.
Chargebacks Amount Analysis
Analysis of the Chargeback amount based on the institution's local
currency for the 6 months previous to the selected posting date, or
the daily figures for the selected month.
23/02/2015 | Page 24 of 64
3
Profile details
This chapter provides details about the various Profile pages, which enable you to view information such
as merchant data, account and transaction charges and settlement details.
3.1
Viewing the merchant details
You can view the merchant details as known by PaySquare, for example the name and address details,
accepted brands, bank details and terminal details.
To view the merchant details, take the following steps.
1. If necessary, select the merchant number. Refer to the section, Selecting a merchant in Chapter 2
for more details.
2. Click the Profile menu.
3. Click the Merchant Details option. The following page is displayed.
23/02/2015 | Page 25 of 64
The top part if the page contains general information, including:
l
Company details
l
Merchant contract details
l
Account details
At the bottom of the screen, the following tabs enable you to view additional information:
l
Bank Info
l
Addresses
l
Services/Entitlements
l
References
l
Sales Statistics
For more information, see the appropriate section below.
3.1.1
General information
The following general merchant information is displayed.
Field
Description
Company Name
The name of your company.
Registration No
The number under which your company is registered in MSO.
VAT No./TAX ID
Your VAT number.
Country
The country in which your business is located.
State
Only applicable for the USA and Canada.
City/URL/Tel No
Depending on your business, you will either see the name of the town/city in which
you are located, the address of your website or your telephone number.
Merchant Category
The Merchant Category Code (MCC) and description of your business.
Retailer Category
The Retailer Category Code (RCC) and description.
Legal Form
The type of business entity.
Service Tel No
Your service telephone number
Client Language
The language used for communication between you and PaySquare for MSO.
Client Region
Not applicable.
Credit Delta Indicator:
Not applicable.
Billback Indicator
Not applicable.
Merchant Status
The current merchant status.
Active Date:
The date you were boarded to MSO.
Service Contract id/Status/Date
The applicable service contract processing/the status of the contract/the start
date of the contract.
Client Tariff
The client tariff assigned to you.
Posting Method
Not applicable.
Settlement Method
The settlement method assigned to your merchant’s service contract.
Billing level
Indicates whether the account is at a billing level.
Parent Client No
The parent client number.
23/02/2015 | Page 26 of 64
Field
Description
Parent Trade Name
The parent trade name.
Statement Generation
Indicates whether a statement is to be generated for this account.
Statement Type
The type of statement to be generated.
Account Number
Internal account number.
Account Active Date
The date the first transaction was posted to the currently selected account.
Account Current Balance
The balance of the currently selected account.
Chart reports
You can use this option to generate various reports concerning transaction
activity. For more information, see the section Generating reports.
3.1.2
Bank info tab
The Bank info tab provides information about the Payable and Receivable accounts: that is, the accounts
you use for making and receiving payments.
The following information is displayed for both Payable and Receivable accounts:
Field
Description
Bank Sort Code
The sort code of your bank.
BIC/Swift Code
The BIC/swift code of your bank.
Bank Account
The merchant bank account.
IBAN
The IBAN of the account.
Funding narrative
This is a specific reference applied to a merchant's bank account.
DDays
The number of days a payment is held.
Calendar Days
The number of days added to the posting date to calculate the payment or collection funding date
Payment Format
Not applicable.
Clearing Entity
Not applicable.
3.1.3
Addresses tab
The Addresses tab contains information about all the addresses registered for you.
23/02/2015 | Page 27 of 64
3.1.4
Service/Entitlements tab
This tab contains information about the brands that you can accept.
3.1.5
Terminals tab
This tab contains details of the merchant's POS terminals, if relevant.
3.1.6
References tab
This tab shows details of any references configured for a merchant. References are used to specify
merchant reporting options or user-defined data.
3.1.7
Requests tab
This tab is currently not applicable.
3.1.8
Notes tab
This tab is currently not applicable.
3.1.9
Sales Statistics tab
This tab displays information about:
l
Purchases
l
Refunds
l
Chargebacks
23/02/2015 | Page 28 of 64
You can sort the data in the table as described in the section Sorting data in Chapter 2.
The information is displayed for three periods:
l
The past 4 days
l
The month to date (MTD)
l
The previous 6 months
In each case, the following information is displayed:
l
Total value of the transactions for the period
l
Number of transactions in the period
l
Average value of transactions for the period
3.2
Viewing account fees
The Account Fees page provides information about active account charges for the merchant.
A merchant account may not have any fees directly associated with it or there may be one or more. If
fees are charged on the account, the amount and frequency of the charge are displayed for each type of
fee. The fees may be specific to the account or the default fees for a service contract, but they are
always applicable to the current merchant.
To view the fees, take the following steps.
1. If necessary, select the merchant number. Refer to the section, Selecting a merchant in Chapter 2
for more details.
2. Click the Profile menu.
3. Click the Account Fees option. The following page is displayed.
23/02/2015 | Page 29 of 64
You can sort the data in the table as described in the section Sorting data in Chapter 2.
The following fields are displayed on the Account Fees page.
Field
Description
Effective Date
The date the fee comes into effect.
Expiry Date
The date the fee expires.
Fee Name
The description of the type of fee.
Trigger Source
The condition that triggers the fee.
Account Type
The type of account associated with the fee.
Fee Curr.
The currency for the amount shown in the Base, Min. or Max fields.
Account Curr
The currency of the account associated with the fee.
Percentage
If this is not set to zero, it displays the percentage of the transaction amount to be charged. See
also the description of the Min. and Max. fields.
Base
If this is not set to zero, it displays the base amount to be charged.
Min.
If this is not set to zero, it displays the minimum amount to be charged. This is the amount that
will be charged if the calculated percentage amount is less than the specified minimum amount.
Max.
If this is not set to zero, it displays the maximum amount to be charged. This is the amount that
will be charged if the calculated percentage amount is more than the specified maximum
amount.
Trigger High Value
This value may be used in conjunction with the Trigger Source to define the condition that
triggers the fee. It is only relevant in certain circumstances. For example, if activity is less than a
pre-defined high value, a minimum processing fee may be generated.
Trigger Low value
This value may be used in conjunction with the Trigger Source to define the condition that
triggers the fee. It is only relevant in certain circumstances.
Fee Mode
Indicates whether the fee is generated or suppressed.
Fee Level
Indicates the level at which fees will be generated: Billing or Member.
3.3
Viewing settlement instructions
The Settlement page displays details of the settlement instructions associated with the currently
selected merchant account.
The settlement instructions define how the account is to be settled. Generally this would be through a
payment interface such as ACH. However, it could also be an intra-account settlement where the
instruction moves the money to another merchant account.
To view the settlement instructions, take the following steps.
1. Click the Profile menu.
2. Click the Settlements option. The following page is displayed.
23/02/2015 | Page 30 of 64
3.3.1
Settlement instructions
If the Settlement Category field is set to 'Intra-Account', the Intra-Account field shows the account type
to which the settlement is posted, otherwise the field is not displayed.
A message at the top of the page indicates if the account is either:
l
l
l
3.4
The billing level account
Not the billing level account
If the billing level for the member merchant group or sub-group level, the page displays the merchant
and account for which the billing is carried out; the settlement instructions for the billing level
merchant are also displayed.
Not settled
In this case, no settlement information is shown . This could be the case for example for a group
merchant whose billing level is set at a sub-group or member level, or for an account that does not
settle, for example, the Acquirer Dispute Account.
Viewing transaction charges
The Transaction Charges page displays all active transaction charges for services associated with the
currently selected merchant.
The page only displays charge currently applicable.
To view the transaction charges, take the following steps.
1. If necessary, select the merchant number. Refer to the section, Selecting a merchant in Chapter 2
for more details.
2. Click the Profile menu.
3. Click the Transaction Charges option. The following page is displayed.
23/02/2015 | Page 31 of 64
The charges displayed can be refined using the various selection drop-down lists available:
l
l
l
l
Services
The active services for the merchant.
Charge Type
The active charge types that can be generated for the merchant.
Transaction Type
The different transaction types that have active transaction charges.
Fee Category
The active pricing mechanism for the merchant.
You can sort the data in the table as described in the section Sorting data in Chapter 2.
The following fields are displayed on the Transaction charges page.
Field
Description
Percentage
If this is not set to zero, it displays the percentage of the transaction amount to be charged.
Base
If this is not set to zero, it displays the base amount to be charged.
Fee Currency
The currency of the amount shown in the Base, Minimum and Maximum fields.
Inward Fee
Description of the fee generated.
Charge Type
The type of charge being generated, for example, Commission.
Service Id
Acquiring service against which the charge applies, for example Acq - Maes, Acq - Visa etc..
Transaction Type
The transaction type for which the charge applies.
Card Service Type
The Card service type against which the charge will apply. This is generally set to Credit Card,
Debit Card or All.
Service Contract
The service contract defines the processing applicable to you and is set up in accordance with your
processing requirements.
Minimum
If this is not set to zero, it displays the minimum amount to be charged. This is the amount that will
be charged if the calculated percentage amount is less than the specified minimum amount.
Maximum
If this is not set to zero, it displays the maximum amount to be charged. This is the amount that will
be charged if the calculated percentage amount is more than the specified maximum amount.
23/02/2015 | Page 32 of 64
Field
Description
Capture Method
The capture method describes the method used to capture the transaction data: for example, for
e-commerce, the transaction can be authenticated, non-authenticated or non-secure. This field
displays the capture method(s) against which the charge will apply.
Fee Category
The pricing mechanism used, for example, Interchange Plus, Pricing Plus Fees.This field is only
applicable if Charge Type is Commission.
Tran Currency
Original transaction currency. 999 signifies all transaction currencies.
Area of Event
Card schemes may apply different charges depending on the card network region. If the area of
event is All, the charge applies for all regions.
Charge Tier Level
Not applicable
Fee Id
This field may be used for special pricing mechanisms to link the merchant price level to a particular
interchange category (or Fee Program Identifier).
Posting Method
Indicates whether the charge will be GROSS PLUS CHARGES or NET.
Outward Fee
Not applicable.
Fee Mode
Indicates whether the charge is being generated or if it is suppressed.
Effective Date
Date that the charge becomes effective.
Expiry Date
Date that the charge expires.
23/02/2015 | Page 33 of 64
4
Transaction activity
This chapter describes how you can view activity relating to transactions made.
4.1
Viewing processed batches
The details of the processed transactions displayed in MSO are sent in by the Payment Service Provider
(PSP) in batches. Batches are a convenient way of bundling transactions and you can use them as a
starting point for viewing the transactions. They way transactions are bundled in a batch has no direct
effect on the way the transactions are processed.
This Processed batches page displays information about the batches processed for a merchant or
merchant group within the specified posting date range.
To view the processed batches, take the following steps.
1. If necessary, select the merchant number. Refer to the section, Selecting a merchant in Chapter 2
for more details.
2. Click the Transaction Activity menu option.
3. Click Processed Batches.
4. Use the Start and End fields to select the required date range.
l
The default date range is one day.
l
The date range is limited to 31 days.
You can also enter a batch number to filter the search results.
A page similar to the following is displayed. The information displayed includes the total value of the
transactions processed in the batch. You can view information about the individual transactions by
clicking the View Batch link in the Batch Detail column.
23/02/2015 | Page 35 of 64
The following details are displayed:
Field
Description
Batch Date
The date assigned to the batch when it was submitted for processing. Typically, this is copied from a
batch header record in the submitted transaction file and the field is filled with the local date at the
point of sale.
Posting Date
The internal posting date on which the batch is processed.
Batch No.
The batch number assigned by the submitter of the transaction. The batch numbers need not be
unique (many merchants use the same batch number for all batches).
Terminal ID
The terminal ID of the point of sale system that produced the batch (if included in the submitted
transaction file).
Description
A text description of the transaction type. The two most common values are “Misc. DR transaction”
for purchases and “Misc. CR transaction” for refunds.
No of Items
The number of transactions in the batch.
Amount Total
The total value (net) of the batch.
Batch Detail
View Detail is a hyperlink to the “Processed Batch Detail” page (see Viewing the Processed Batch
Details), which displays the individual transactions that make up the batch.
Batch Less MSC
Amount
The total transaction net amount. This value is also a hyperlink to the Batch Transaction Fees page
(see Viewing the Batch Transaction Fees Page).
4.2
Viewing the batch details
You can view the details of the transactions in a batch on the Transactions page. You can access this in
one of two ways.
l
Click the View Batch link on the Processed Batches page
l
Click the Batch No link on the Processed Transactions page
A screen similar to the following is displayed.
The page displays details of all the transactions processed within a batch.
It is possible to search for transactions with a particular card number or item number (internal 11 digit
slip number) within the batch. To search for a particular card number across all batches; it is
necessary to use the Processed Transactions page (see Using the Processed Transactions Page).
4.2.1
Filtering the batch details
If there are a lot of transactions in the batch, you can filter the search for:
l
A transaction made with specific card number
23/02/2015 | Page 36 of 64
Enter the card number in the Card no field and click the Search button. If a card number matches a
card number in the batch, all transactions for that card will be displayed.
l
A specific transaction
Entering the transaction number in the Transaction Item No. and click Search. If a transaction is
found in the batch matching the transaction number, it will be displayed in the detail overview.
4.2.2
Viewing Addendum pages
Addendum records are supplementary transaction records used for specific applications such as car
rental, hotel (lodging) data or airline data. A separate page is displayed for each type of addendum.
If one or more addendum pages are available for a transaction, you can view it by clicking on the
Addendum link on the Processed batch detail page.
For example, the following information might be displayed:
If the Next Page button is available, you can navigate through any other addendum records for the transaction.
23/02/2015 | Page 37 of 64
4.3
Viewing processed transactions
You can use the Processed transactions page to display all transactions for all the merchants in a
merchant group or all the transactions for a particular merchant. You can also use the filter criteria at the
top of the page to refine your search. For example, you can search for all transactions for a particular card
number within a specified period.
4.3.1
Viewing the Processed Transactions page
To view the Processed Transactions page, take the following steps.
1. If necessary, select the merchant number. Refer to the section, Selecting a merchant in Chapter 2
for more details.
2. Click the Transaction Activity menu option.
3. Click Processed Transactions.
The following page is displayed.
4.3.2
Searching for transactions
Use the search criteria to find the transactions that you want to view. If you do not fill in any values, all
transactions will be displayed for the specified date range when you click Search.
You can choose one of the following options if you belong to a merchant group:
l
Selected merchant only
Only results for the currently selected merchant will be shown.
l
All merchants
Results will be shown for all merchants in the merchant group.
You can enter or select the following search criteria.
Field
Description
Card No
You can enter a card number to search for transactions from a specific card. You must
enter the complete card number even although only the last 4 numbers of the card will be
displayed in the Card No column for any transactions found. Transactions will only be
displayed if the card number exactly matches the card number entered. This means
when you use the Card No. field to search for transactions, the results displayed will
always be for one specific card number.
Transaction Type
You can select one of the transaction types available to you, or select All to view all
transaction types
23/02/2015 | Page 38 of 64
Field
Description
Acquirer BIN/ICA
You can select from all or any of the issuer identification numbers from Visa primary BINs,
MasterCard member IDs (ICAs),JCB Licence IDs, Union Pay and Diners or All.
Acquirer Ref
You can enter an acquirer reference number here if you only want to find results for a
specific acquirer reference number.
Merchant Name
You can search for a merchant based on the merchant name used in the clearing
transaction. Wildcards are supported in this field (for example, you can use Blue* to
search for merchant names beginning with Blue). Please note that the search is case
sensitive.
Internal Merchant Account
Leave this field blank to search independently of the internal merchant account.
Auth Code
You can enter an Authorisation code in combination with the card number and/or
acquirer reference number.
Transaction country
You can select a country to search for transactions made in that country. The default
value is all countries.
FPI
You can search for the card network Fee Program Indicator (3 alphanumeric
characters). This code is used to assess the applicable interchange rate for a transaction.
Batch number
You can search for transactions with a specific batch number.
Transaction currency
You can search for transactions in a specific currency, by selecting a currency from the
list.
Terminal Id
You can use this field to search for transactions from a specific terminal.
Trans. Amt.
You can use the From and To fields to search for a specific amount (by entering the same
amount in both fields) or an amount range.
Posting Date
You can use the Start and End fields to search for transactions within a specific date
range.
l
l
If you have selected the option Selected Merchant only, the date range can be a
maximum of 7 days.
If you have selected the option All Merchants, the date range is restricted to 1 day.
Once you have entered or selected the required Search criteria, click Search.
A page similar to the following is then displayed.
23/02/2015 | Page 39 of 64
If necessary, use the scrollbars at the right-hand side and bottom of the report to view the remaining
columns and transactions if necessary. A maximum of 100 transactions can be displayed on one page.
The following fields are displayed for each transaction.
Field
Description
Merchant No
The external merchant number. You can click on the link to view the merchant details. For more
information, see Viewing the merchant details below.
Batch No
The batch number assigned to the transaction. If the number contains a hyperlink, you can click
on it to view the details of the batch. For more information, see Viewing the batch details below.
Transaction Date
The transaction date supplied. This is normally the date of the transaction on the payments page
or at the point of sale.
Posting Date
The date the transaction was posted.
Type
The transaction type. This is normally either:
l
Purchase
l
Refund
Card No.
The number of the card. Only the last 4 numbers of the card are shown. Note that when you
search for a card using the card number, you must enter the complete card number.
Status
The status of the transaction. This can be:
l
Cleared: The transaction is included in an outgoing clearing file to the card scheme.
l
Processed: The transaction has been loaded but not yet included in the clearing file.
l
l
Reprocessed. The transaction originally had an error status but has now been successfully
reprocessed or transferred to another account
Error status: A status indicating a problem with the transaction or a technical problem.
Trans Curr
The currency used for the transaction on the payments page or at the point of sale.
Trans Amount
The value of the transaction in the currency of the transaction.
23/02/2015 | Page 40 of 64
Field
Description
Acct. Curr
The currency of the account to which the transaction is posted.
Acct. Amount Gross
The value of the transaction before the deduction of charges, in the account currency.
Acct. Total Charges
The charges for the transaction.
Acct Amount Net
The amount paid to the merchant for the transaction in the account currency, after the deduction
of charges.
Capture Method
Describes how the transaction was captured: for example, chip read, swiped, keyed etc.
Internal Batch No.
Internal reference number of the batch.
This is displayed as a hyperlink if the Batch No. field is defined as a hyperlink. Clicking the
hyperlink brings you to the Processed Batch Details page.
Merch Tran Ref
The merchant's transaction reference number.
Acquirer Ref
Acquirer Reference Number
Auth. Code
The authorisation code.
Merchant Name
The name of the merchant as used in the clearing transaction.
Transaction Country
The country in which the transaction was made.
Acquirer BIN/ICA
Visa BIN or MasterCard ICA under which the transaction was acquired.
Area of Event
Card network region applicable for the transaction.
FPI
Card network Fee Program Indicator.
Expiry Date
The expiration date of the card.
Internal Merchant
Account
Internal Merchant Account Number.
E-Wallet type
This can be one of the following values:
l
V : V.Me by VISA
l
S: V.Me by VISA including shipping address service
l
M : MasterCard PPOL/MasterPass
l
blank : not an eWallet transaction
23/02/2015 | Page 41 of 64
4.3.3
Viewing the merchant details
You can view the merchant details by clicking on a merchant number in the Merchant No. column on the
Processed Transactions page. The Merchant Details page is displayed. For more details, see Viewing
the merchant details in Chapter 3.
4.3.4
Viewing the batch details
In the Batch No. column of the Processed Transactions page, the batch number is displayed as a link, if:
l
It is the first batch in a transaction
l
It is the first transaction on a page
As the batch name does not have to be unique, more than one batch can have the same number.
To view the details of a batch, click on the link. The Transactions page is displayed, which provides
details of all the transactions in the batch.
23/02/2015 | Page 42 of 64
5
Chargeback details
You can use the Chargeback Status page to view the details of disputed transactions. You may, for
example, want to view all the chargebacks for a specific day. You can then download the result to a
spreadsheet.
The following types of information can be displayed:
l
Ist chargebacks
l
2nd chargebacks
l
Representments
l
Transfers
l
Transfer reversals
l
Retrieval requests
The currency of the chargeback transaction may be a currency other than the Euro. You can view the
applicable exchange rates using the FX rate option described in Chapter 10.
5.1
About the Acquirer Reference Number
An Acquirer Reference Number (ARN) is a number that uniquely identifies every presentment
transaction, and is used to identify all related transactions (chargebacks, representments etc.) in a
chargeback lifecycle. This ensures that it is possible to identify and group the transactions that belong
together in the chargeback process.
The 11 digit slip number of the original presentment is embedded in positions 12 to 22 of the ARN and is
also shown in the Orig Slip Number field.
5.2
Viewing chargeback status
To view the Chargeback Status page, take the following steps.
The acquirer dispute account is selected automatically when viewing chargeback details.
1. If necessary, select the merchant number. Refer to the section, Selecting a merchant in Chapter 2
for more details.
2. Click the Transaction Activity menu option.
3. Click Chargeback Status.
A screen similar to the following is shown.
23/02/2015 | Page 43 of 64
Use the horizontal and vertical scrollbars to view all the fields and rows.
5.2.1
Filtering the search
You can choose one of the following options if you belong to a merchant group:
l
Selected merchant only
You must first select a merchant. Only results for the currently selected merchant will be shown.
l
All merchants
Results will be shown for all merchants in the merchant group.
You can enter or select the following search criteria.
When you search for chargeback transactions, you must always enter a date range. The other fields
are optional.
Field
Description
Posted date
Use the Start and End fields to select the required date range. The range is limited to a
specific date range. If you select the All merchants option, the range is limited to 7 days.
Reason code
You can search for a specific reason code by selecting a code from the list. The default is:
All codes.
Cardholder No.
If you want to search for a card number, you must enter the complete number in this field.
ARN
Use this field, for example, if you want to see the history of a particular Aquirer Reference
Number. You must also adjust the date range to several months to ensure all the
transactions in the chargeback process are included. For more information on the ARN,
see About the Aquirer Reference Number.
Card Scheme
You can search for chargeback transactions from a particular card scheme.
Alternate Merchant ID
This number corresponds to the Internal Merchant Account data in the 80 byte addendum
record C of the original presentment.
Once you have entered or selected the required search criteria, click Search.
23/02/2015 | Page 44 of 64
5.2.2
Viewing the results
The following fields are displayed for each chargeback transaction.
Field
Description
Merchant No/Client No.
The external and internal merchant numbers.
Posting Date
The date the transaction was posted.
Item type
Indicates the phase of the ARN:
l
l
1st chargeback (from issuer)
Chargeback transfer: Transfer of the chargeback to another account, usually the merchant’s
“payment account retail”.
l
Transfer reversal: Reversal of previous chargeback transfer
l
Representment: Second presentment to issuer
l
2nd chargeback: (from issuer)
Card No.
The number of the card. Only the last 4 numbers of the card are shown.
ARN
The Acquirer Reference Number. You can click on the number to view the Chargeback Status
Detail page, which provides more information about the chargeback.
Reason code
Reason description
The chargeback reason code for the applicable card scheme, with a description of the reason.
This field is not filled if it is not applicable for the item type.
Cur
The currency of the account to which the transaction is posted.
Amount
The value of the transaction in the currency of the account.
CCN
Chargeback Control Number. The issuer reference number for the transaction. This field is not
filled if it is not applicable for the item type.
Orig. Post Date
The posting date of the original presentment.
Orig. Tran Date
The transaction date of the original presentment.
Orig Type
The transaction type of the original presentment.
Orig Tran Amt
Transaction amount in the currency of the original transaction.
Merch Sett Amt
The amount of the original presentment posted to the merchant account in the currency of the
merchant before the deduction of any charges.
Netwk Sett Amt
Currency and amount of interchange fee for the presentment settled with the payment network
before deduction of charges.
Original Slip
The internal slip number of the original presentment. This is also embedded in position 12 to 22 of
the ARN.
Item Slip
The 11-digit internal slip number used for the transaction item types (1st chargeback,
representment etc.)
Auth code
The authorisation code of the original presentment.
Batch No.
Number provided by original submitter of presentment.
Merchant DBA name
The 'Doing Business As' name of the merchant. This is the name sent to the scheme during
clearing; that is, the trade name at the time of the transaction.
Merch Tran Ref
The transaction reference number of the merchant.
Capture Method
Method used to capture the transaction data: for example, chip read, swiped.
E-Wallet Type
This can be one of the following values:
l
V : V.Me by VISA
l
S: V.Me by VISA including shipping address service
l
M: MasterCard PPOL/MasterPass
l
blank : not an eWallet transaction
23/02/2015 | Page 45 of 64
5.2.3
Viewing the Chargeback Status Detail page
You can view the details of a specific transaction which is part of the chargeback lifecycle.
To do this, click the ARN of the required transaction on the Chargeback Status page. The Chargeback
Status Detail page is displayed.
The following fields are displayed for the chargeback selected.
Field
Description
Transaction type
Describes the phase of the chargeback cycle that the transaction belongs to, as
described for Item type in the previous table.
Reason Code
Free text description of the chargeback reason code. This is not always entered.
Card No
The last four digits of the card number.
ARN
The Acquirer Reference Number.
Issuer Ref
The Chargeback Control Number (CCN). This is not always entered.
Transfer/Chargeback Depending on whether you are viewing the details of a chargeback or transfer,
Acct Amount
this is the chargeback amount or the amount to transfer in the posted account
currency.
Transfer/Chargeback Depending on whether you are viewing the details of a chargeback or transfer,
Trans amount
this is the chargeback amount or the amount to transfer in the transaction
account currency.
Posted:
Acct amount
The posted account amount of the associated transaction.
Posted:
Trans. Amount
The transaction amount of the associated transaction.
Pres. Details:
Type
Trans Date
Trans amount
The transaction type, date (format yyymmdd) and amount of the original
presentment.
Pres. Details:
Settle Amount
The merchant account currency and amount of the original presentment.
Message Text
Text supplied by the issuer with the incoming first or second chargeback.
Transfer acct.
The number of the account into which the chargeback has been transferred.
Merchant No.
The internal merchant number (client number), external merchant number and
merchant name.
23/02/2015 | Page 46 of 64
Field
Description
Acct. type
The type of the account into which the chargeback has been transferred. Set to
“Payment Acct Retail” if the merchant has been debited with the chargeback
value.
Remainder Acct
The number of the account where any remainder amount from the chargeback
has been transferred. This applies where merchants are “FX protected”, that is,
protected from any loss or gain due to foreign exchange rate fluctuations. For
“FX Protected” merchants, the foreign exchange gain or loss is not debited or
credited to the merchant, but rather is transferred to a remainder account.
Merchant No
The number of the merchant who has been debited or credited with any
remainder amount. This is typically the “top level” merchant for the institution.
Acct. Type
The account type of the remainder account. For example a “EUR FX p/l
chargeback” account is a Euro foreign exchange profit and loss chargeback
account.
Rental Agreement
No.
The Rental Agreement Number (RAN) that was associated with the original
presentment. May be used for car hire transactions.
Note Text
A free-text note provided when transferring the chargeback to another account.
E-Wallet Type
This can be one of the following values:
l
V : V.Me by VISA
l
S: V.Me by VISA including shipping address service
l
M : MasterCard PPOL/MasterPass
l
blank : not an eWallet transaction
V.Me Additional Auth
Method
Possible Visa V.Me authorisation method values are:
l
01 : V.me authenticated
l
02 : Additional 3D Secure authenticated
l
03 : Additional 3D Secure attempted
l
04 : Additional one-time password
l
Space : not a V.me Visa Europe transaction
V.Me Additional Auth
Reason Code
PPOL program data
Possible values are:
l
101 : PPOL/MasterPass Remote PPOL/MasterPass
l
102 : Remote NFC Payment
l
blank : not a MasterCard transaction
23/02/2015 | Page 47 of 64
6
Retrieval requests
The can view details of the incoming retrieval request sent by the card schemes.
6.1
Viewing retrieval requests
To view the Retrieval request page, take the following steps.
1. If necessary, select the merchant number. Refer to the section, Selecting a merchant in Chapter 2
for more details.
2. Click the Transaction Activity menu option.
3. Click Retrieval request.
A screen similar to the following is shown.
6.1.1
Filtering the search
You can enter or select the following search criteria.
When you search for retrieval requests, you must always enter a date range. The other fields are
optional.
Field
Description
Posted date
Use the Start and End fields to select the required date range. The range is limited to a
specific date range. If you select the All merchants option, the range is limited to 7 days.
Reason code
You can search for a specific reason code by selecting a code from the list. The default is:
All codes.
Cardholder No.
If you want to search for retrieval requests for a specific card number, you must enter the
complete number in this field.
ARN
Use this field, for example, if you want to see the retrieval requests for a particular Aquirer
Reference Number. For more information on the ARN, see About the Aquirer Reference
Number.
Card Scheme
You can search for retrieval requests from a particular card scheme.
6.1.2
Viewing the results
The following fields are displayed for each retrieval request.
23/02/2015 | Page 49 of 64
Field
Description
Merchant No/Client No.
External and internal merchant numbers.
Item type
This is always Retrieval Request.
RR Date
Retrieval request posting date
Reason code
Reason description
Retrieval request reason code from the issuer, with a description of the reason.
ARN
Acquirer Reference Number.
Issuer No.
Issuer reference number for the retrieval request.
Item Slip Number
Internal transactions slip number for the retrieval request.
Card scheme
Card scheme from which the retrieval request was received.
Fulfillment date
Date the retrieval request was fulfilled. This is empty or it has not yet been fulfilled.
(Fulfillment) Description
Text description provided by card scheme.
Orig. Post Date
The posting date of the original presentment.
Orig. Tran Date
The transaction date of the original presentment.
Orig Tran Curr/Amt
Transaction amount in the currency of the original presentment.
Merch Sett Curr/Amt
The amount of the original presentment posted to the merchant account in the currency of
the merchant before the deduction of any charges.
Netwk Sett Curr/Amt
Currency and amount of interchange fee for the presentment settled with the card scheme
before deduction of charges.
Card No.
The number of the card used.
Orig Type
The original transaction type. This is usually Purchase.
Original Slip Number
The 11-digit internal slip number used for the original presentment.
Auth code
The authorisation code of the original presentment.
Orig Batch No.
Number provided by original submitter of presentment (merchant of institution).
RAN
Car rental agreement number, if supplied with the presentment by the original submitter.
23/02/2015 | Page 50 of 64
7
Suspense transactions
The can view details of the suspense transactions for a merchant. These are transactions that have been
processed but have not been posted to the merchant's account because they failed the validation
checks.
7.1
Viewing suspense transactions
To view the Suspense Transactions page, take the following steps.
1. If necessary, select the merchant number. Refer to the section, Selecting a merchant in Chapter 2
for more details.
2. Click the Transaction Activity menu option.
3. Click Suspense Transactions.
A screen similar to the following is shown.
7.1.1
Filtering the search
When you search for suspense transactions, you must always enter a date range. Optionally, you can
also search using the cardholder number.
7.1.2
Viewing the results
The following fields are displayed for each suspense transaction.
Field
Description
Proc. Date
Date posted in MSO.
Batch date
Date submitted in batch header.
Trans Date
Date of transaction.
Batch No.
Number of batch submitted by merchant.
Tran Ref.
Transaction reference submitted by merchant.
Card No.
The last four digits of the Cardholder number.
Type
Type of transaction.
Currency
Currency of transaction.
Amount
Amount of transaction.
23/02/2015 | Page 51 of 64
Field
Reject reason
Description
Reason the transaction was rejected. If the rejected transaction is reprocessed successfully, the
transaction will continue to be displayed on the Suspense Transactions page, but the Reject Reason
will change to Reprocessed. If the reprocessed transaction is processed successfully, the Proc. date
field will change to the new processing date.
23/02/2015 | Page 52 of 64
8
Funding
You can use the Account Summary option to view a summary of the postings on your merchant account
over a specific period.
This includes the following information:
l
Total gross amount of transactions for each card brand
l
Commission charged on the transactions
l
Net amount of the transactions
The transactions posted for each day are grouped depending on the transaction type. If applicable, the
transactions are subdivided depending on the brands used.
For example, the total Merchant Purchase Deposit transactions for a particular day are shown on
separate lines for MasterCard and VISA.
You can also use the Account option to view more detailed information about the postings.
8.1
Viewing the account summary details
To view the Account Summary page, take the following steps.
1. If necessary, select the merchant number. Refer to the section Selecting the merchant in Chapter 2
for more details.
2. Select the required account.
2. Click the Funding menu option.
3. Click Account summary.
A screen similar to the following is shown.
8.1.1
Filtering the search
When you search for transactions in the account summary, you must always enter a date range.
23/02/2015 | Page 53 of 64
8.1.2
Viewing the results
The following fields are displayed for each transaction.
Field
Description
Posted date
The date the item was posted to the account
Trans Type
For each posting date, transactions of the same type and, if applicable, card brand, are grouped
together on the overview. The following are the most common types:
l
l
l
l
Merchant Purchase Deposit
The total gross amount of the transactions per card type.
Merchant Purchase Fee
Charges deducted for the transactions.
Merchant Payments
Net amount paid to the merchant.
Summary Payment Totals
Total gross amount of all the transactions per posting date.
Slips
The number of transactions included in the transaction amount.
Ref No
The internal reference number used to identify the posting.
Rev
Is either Yes if this is a Reversal or blank.
The value could be Yes, for example, if a chargeback was processed earlier, but you have
successfully defended it.
Trans. Curr
Currency of the transaction.
Trans. Amt
Amount of the transaction.
Acc. Amt
Gross amount posted to the account in the currency of the account. This may therefore be different
than the currency of the transaction.
Acc. Charges
Charges for the item, displayed in the currency of the account.
Acc. Amt. Net
The net amount of the item in the currency of the item.
Card Type
The card brand used for the transactions. This is only applicable for:
Batch No.
l
Merchant Purchase Deposits
l
Merchant Debits
l
Chargebacks
Batch number used to submit the transaction. This is applicable for:
l
Merchant Purchase Deposits
l
Merchant Debits
If you want to view more detailed information about the batch, you can click on the batch number to
display the Processed Batches page or the Processed Transaction page. The page displayed
depends on the page you selected in your profile details, as described in Chapter 2.?????
ARN
Acquirer Reference Number. Only available for chargebacks.
Addendum ARN
ARN created by transferring a transaction.
Fee Sequence Code
Not applicable.
Fee Sequence
Description
Not applicable.
23/02/2015 | Page 54 of 64
8.2
Viewing the account details
In general, you can use the Account Summary screen to view details of the postings to account. If you
require more detailed information, you can also use the Account screen.
To view the Account page, take the following steps.
1. If necessary, select the merchant number. Refer to the section Selecting the merchant in Chapter 2
for more details.
2. Select the required account.
2. Click the Funding menu option.
3. Click Account .
A screen similar to the following is shown.
See the description of Account summary for details of the fields displayed.
23/02/2015 | Page 55 of 64
9
Merchant Activity
You can use the options in the Merchant Activity menu to view details of transaction authorisations.
Authorisations are initially only visible in the Recent Authorisations page for a short period. The
authorisations can then be found in the Authorisation History page. This means that very recent
authorisations can be found quickly as the information stored is limited. You can always still retrieve
information on older authorisations using the Authorisation History option.
9.1
Viewing the most recent authorisations
You can view the most recent authorisations using the Recent Authorisations page.
If you can no longer find the authorisations in the Recent Authorisations page, you can then use the
Authorisation History page.
To view the Recent Authorisations page, take the following steps.
1. If necessary, select the merchant number. Refer to the section Selecting the merchant in Chapter 2
for more details.
2. Click the Merchant Activity menu option.
3. Click the Recent Authorisations option.
A screen similar to the following is shown.
23/02/2015 | Page 57 of 64
9.1.1
Filtering the search
The maximum date range allowed is 2 days. In other words, the End Date can be 1 day later than the
Start Date.
You can further refine the search by:
Searching for one or more types of authorisation of the following:
l
l
Approvals
l
Referrals
l
Declines
Selecting the switch. You can select one of the following options:
l
l
OmniPay Auth Switch (Primary)
l
OmniPay Auth Switch (Backup)
The switch is the system used to route the transactions for authorisation. Most authorisations are
carried out using the Primary switch, so in general selecting this option will display all authorisations.
However if the Primary switch is not available for any reason, authorisation takes place via the
Backup switch. Select the Backup option to check for any authorisations done using the backup
switch.
l
Entering a specific card number
l
Entering a specific amount
l
Entering a specific terminal ID
9.1.2
Viewing the results
The following fields are displayed for each authorisation.
Field
Description
Trace No
Internal authorisation switch trace number for the authorisation
Trans Date
The date of the transaction on the payments page.
Trans Time
The time of the transaction on the payments page.
Card No
Card number.
Expiry MMYY Card expiry date.
Trans Curr
Transaction currency code
Amount
Transaction amount
Auth code
Authorisation code.
Reversed
Displays Reversed if the authorisation was reversed, otherwise the field is blank.
RC
Internal authorisations switch response code.
Vce
Not applicable.
MTID
The ISO 8583 Message Type Identifier (MTID) of the response message.
Trans Date
The date of the transaction.
Trans Time
The time of the transaction.
23/02/2015 | Page 58 of 64
9.2
Viewing authorisation history
The Authorisation History page contains information on all authorisations, except those carried out very
recently. You can view the most recent authorisations using the Recent Authorisations option.
To view the Authorisation History page, take the following steps.
1. If necessary, select the merchant number. Refer to the section, Selecting a merchant in Chapter 2
for more details.
2. Click the Merchant Activity menu option.
3. Click Authorisation History option.
A screen similar to the following is shown.
9.2.1
Filtering the search
You must always enter a date range. The range is limited to 365 days
You are advised to limit the amount of results found by entering additional search criteria. If more than
10,000 results are found, an alert is displayed on the page. You will not be able to view more than the
first 10,000 results found. However, if you download the result of the search, all authorisations will be
included in the download.
23/02/2015 | Page 59 of 64
To filter the search further, you can also enter the following criteria:
l
Merchant No.
If there is more than one merchant in your merchant group, you can search for a specific merchant by
filling in the merchant number.
l
Amount of the transaction
l
Card number
l
Authorisation code
9.2.2
Viewing the results
The following fields are displayed for each authorisation.
Field
Description
Merchant No
Internal/external merchant number.
Card No
Card number.
Expiry MMYY
Expiry date of card.
Amount
Transaction currency and amount.
Auth Code
Authorisation code.
Auth Date
Authorisation date and time.
Resp Code
Description of the response code shown in the Int RC column.
Int RC
3 digit internal response code. The description of the code is shown in the Resp Code
column.
Ext RC
External 2 character ISO 8583 response code received in reply to authorisation request.
This is empty if the authorisation request was not forwarded to the card scheme (because
the authorisation switch declined the request).
R
R is displayed if the authorisation has been reversed. The field is empty if the authorisation is
not reversed or if the reversal happened after the authorisation was copied to the
authorisation history.
POS Entry Mode
The values displayed are in the range 810 to 819, which are the values used for ecommerce. The field is empty if the Entry Mode is not available.
V
V is displayed if voice authorisation was used, otherwise the field is empty.
AVS Rslt
Address Verification Service (AVS) result code, if available, otherwise the field is empty.
23/02/2015 | Page 60 of 64
Field
CV2 Rslt
Description
The CVC2 Result Code (MasterCard) or CVV2 Result Code (Visa).
For Visa, the expected values are (see also Visa manual, VIP field 44.10/ CVV2 Results
Code):
l
M: CVV2 Match.
l
N: CVV2 No Match.
l
P: Not processed.
l
S: The CVV2 should be on the card but the merchant indicates it is not.
l
U: The issuer is not certified or has not provided Visa with encryption keys.
For MasterCard, the expected values are (see also MasterCard manual, data element 48,
PDS 89):
l
Y: CVC1 incorrect (magnetic stripe error).
l
M: Matched (correct) CVC2.
l
N: CVC2 not valid
l
P: Processing not performed.
l
U: Unregistered (the issuer does not support this service).
Code 10
Y is displayed if this is a “code 10” (merchant suspicious) authorisation request, otherwise it
is empty.
T
Card type. This can be:
ecomm Type
l
M - MasterCard
l
V -Visa
Used to identify electronic commerce transactions.
Possible values are:
l
ecomm: An electronic commerce transaction.
l
VbV: A Verified by Visa electronic commerce transaction.
l
UCAF: A MasterCard UCAF (SecureCode) electronic commerce transaction.
The field is left blank if it is not an e-commerce transaction.
Note: For some acquirers it is not possible to identify Verified by Visa and UCAF
authorisations specifically; for these acquirers, Verified by Visa and UCAF authorisations
appear as normal electronic commerce (“ecomm”) authorisations.
Mast SLI/Visa ECI
Where the merchant offered to perform the transaction, this field shows the actual
corresponding values for the Visa card scheme ECI /MasterCard SLI.
l
l
VbV CAVV Rslt
For Visa authorisations: the 2 digit Visa ECI is displayed.
For MasterCard authorisations: the first 2 positions of PDS 42 (the Security Level
Indicator) is displayed.
Result code for Verified by Visa authorisations. The most common values expected are:
l
2: CAVV failed validation — authentication
l
3: CAVV passed validation — attempt.
l
8: CAVV passed validation — attempt (for U.S. issued cards only)
l
D: CAVV was not validated — authentication.
The field is empty if it is not a Visa e-commerce transaction or the merchant does not support
Verified by Visa.
23/02/2015 | Page 61 of 64
Field
UCAF Ind
Description
MasterCard UCAF indicator. Possible values are:
l
1=UCAF data collection is supported by the merchant, but UCAF data is not populated.
l
2=UCAF data collection is supported by the merchant, and UCAF data is populated.
The field is empty it is not a MasterCard e-commerce transaction or the merchant does not
support UCAF.
Ret Ref No
The Retrieval Reference Number per transaction.
Subm Tran Id
Submitter transaction ID. Filled with a non-space value only when the corresponding field
was filled on the authorisation log file
Card Acceptor Name and
Location
This field contains the information necessary for printing on credit card billing statements.
Auth Source
The layout is as follows:
l
Subfield 1: Merchant Name.
l
Subfield 2: Merchant City.
l
Subfield 3: Country Code.
Indicates the source of the authorisation if known.
23/02/2015 | Page 62 of 64
10 Customer Service
This chapter describes the various customer service options available.
You can use the Customer Service menu to:
l
View contact details of the help desk for your region
l
View information about currency exchange rates
l
View alert and report notifications
l
Change the password that you use to log in to MSO
l
View any documents available to you
10.1 Viewing contact details
To view the contact details of the help desk, take the following steps.
1. Click the Customer Service menu option.
2. Click the Contact details option.
A page similar to the one below is displayed.
The details of how to contact the help desk are displayed for each region.
10.2 Viewing exchange rates
You can use the FX Rate page to view details of currency exchange rates. For example, if a chargeback
transaction is paid out in a currency other than the Euro (because the original transaction was in a foreign
currency), you can use this page to check the exchange rate. You can choose from any of the rates
available in MSO.
To view the FX rates, take the following steps.
1. Click the Customer Service menu option.
2. Click the FX rate option.
23/02/2015 | Page 63 of 64
The following page is displayed.
3. Select the rate category required. This can be one of the rates from the card schemes.
4. Enter the date range.
5. Optionally, you can also search for exchange rates for a specific currency. By default, the rates for
all available currencies will be displayed for the rate category.
6. Click Search to display the results.
10.3 Changing your password
For information on changing you password, refer to Changing your password at other times in Chapter 2.
23/02/2015 | Page 64 of 64