1
© MPN, LLC 2007 macCompanion
Page May 2007, Volume 5 Issue 5
Publisher MPN, LLC
Editor-in-Chief
Robert L. Pritchett
Assistant Editors
Mike Hubbartt,
Harry {doc} Babad,
Michele Patterson
Consultant Ted Bade
Advertising and Marketing Director Robert L Pritchett
Web Master
Robert L Pritchett
Public Relations and Merchandising Robert L Pritchett
Contacts
[email protected]
[email protected]
[email protected]
Skype: maccompanion
Correspondence macCompanion
1952 Thayer, Drive,
Richland, WA 99352 USA
1-509-210-0217
macCompanion Staff
Harry {doc} Babad
Ted Bade
Matt Brewer (MacFanatic)
Ken Crockett (The Mac Update)
Kale Feelhaver (AppleMacPunk)
Dr. Eric Flescher
Eddie Hargreaves Jonathan Hoyle III
Mike Hubbartt
Daphne Kalfon (I Love My Mac)
Wayne Lefevre
Daniel MacKenzie
Michele Patterson (Dixie Graphics)
Mike Potter (For Mac Eyes Only)
Robert Pritchett
Dennis Sellers (Macsimum News)
Rick Sutcliffe (The Northern Spy)
Mike Swope (Swope Design)
Tim Verpoorten (Surfbits)
Guest Authors
Derek C. Caudill (Mid-Columbia Macintosh User Group)
Grover Saunders (Ars Technica)
Application Service Provider for the macCompanion
website: http://www.stephousehosting.com
Our special thanks to all those who have allowed us to review
their products! In addition, thanks to you, our readers, who
make this effort all possible.Please support this effort by going
to the back of the magazine and to our website and clicking
and purchasing from our affiliates and advertisers.
© MPN, LLC 2007 macCompanion
Page macCompanion
May 2007
This is our second issue to focus on
something the Mac excels at: writing. We
have software reviews of desktop publishing, script writing, and strucutre development commercial products, as well as
some excellent shareware writing software. And, as always, we cover a number
of other typcs of products as well.
In March, it was rumored that Leopard
shipments would be delayed, and we now
that to be true. Apple released a statement that the iPhone needed resources
that impacted the Leopard ship date, so
don’t expect to see the final product until
October.
I know I’m not the only Mac user
bummed by this news. Sound off. Send us
your feelings on this move by Apple:
[email protected]
For the subject, use:
“LEOPARD RELEASE DELAY!”
No new rumors on iLife ‘07 and iWork
‘07, so hopefully we’ll get and review
both products sometime this summer. And
we do have those rumored new iPods and
iMacs to look forward to - again, hopefully this summer.
SURVEY
Did you like the Writing theme for our
April and May issues? Send your comments to:
[email protected]
For the subject, use:
“WRITING THEME COMMENTS”
Enjoy - macCompanion Editors
May 2007, Volume 5 Issue 5
May 2007 Table of Contents
Letter from the CEO 9
13
Leopard and Beyond 14
Fad or Future? 16
Protecting Airspace:Securing Your Home Wireless NEtwork, Pt 2 17
View from the Ivory Tower 19
Who’s On First? 20
Errata for April 24
25
1Passwd 2.3.1 27
CocoaSuite 1.0.4 29
CopyCatX 4.0 32
Desk Doctor 1.1.9 35
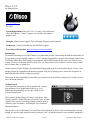
Disco 1.0.2 40
Dramatica Pro 45
Lineform 1.3.1 50
Meander 1.5 54
Montage 1.2/1.2.1 60
NeoOffice 2.1 Writer 63
Opal 1.0.8 69
Power Structure 1.8.2 77
QuarkXPress 7.1/7.2 83
The Salazar Brothers Reggaeton Refill 86
© MPN, LLC 2007 macCompanion
Page May 2007, Volume 5 Issue 5
macCompanion Magazine
Ubercast 1.0 Virtual Historian:Doctrine and Covenants 1.0 Evoluent-VerticalMouse 2 and 3-5 Button Optical Mouse Illuminated Rollup Keyboard Fujitsu S500M SnapScan Scanner Goldtouch for Mac Impact 3.5” SATA HDD Enclosure AT-MC116XM 10/100TX to 10FL/100SX Converter TruePower AC Adapter 89
93
Real World Mac OS X Fonts 98
100
105
108
114
116
118
122
124
125
130
GhostAction 131
© MPN, LLC 2007 macCompanion
Page May 2007, Volume 5 Issue 5
May 2007 Table of Contents
133
According to Hoyle... 134
Doc Babad’s Macintosh Tips 142
Links in Acrobat 8 and Kinks in MS Word 149
Too Many References, Too Little Space 153
MacMini:The Original Apple TV 159
Roller Coaster Tycoon 3 and Soaker Expansion Pack 171
April Updates of Interest 173
© MPN, LLC 2007 macCompanion
Page May 2007, Volume 5 Issue 5
macCompanion Magazine
Advertisers Index 176
Amazon.com 176
Apple Store for Individuals 176
Apple Store for Businesses in the USA 176
ecamm networks 176
DigitalMediaTraining 176
Parallels 176
QuickerTek 176
TeachMac 176
Advertising Information 177
© MPN, LLC 2007 macCompanion
Page May 2007, Volume 5 Issue 5
© MPN, LLC 2007 macCompanion
Page May 2007, Volume 5 Issue 5
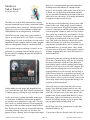
Letter from the CEO
Miraculous Technological Changes and Why I Write for macCompanion
By Robert Pritchett
I actually woke up in the middle of the night thinking about the technological changes I’ve experienced through
life so far and felt I had to write down my thoughts and feelings on the subject.
Some Reminisces and Near Misses
I came through the Nuclear age, the Space age and the Microcomputer age. I had to do the
1st grade over because I was in the hospital a lot and I struggled to learn to read. I didn’t have
Sesame Street back then to help me. I fought “b”s and “d”s, because they were the same to me
(I didn’t know at the time and until I reached adulthood that I was suffering from dyslexia).
Using my head was always a struggle, but I could always use my hands.
We were not exactly prospering on a music teacher’s salary and writing was never my strong point during my
youth. Paper was scarce to write on, thus I wrote little. Thus, writing was not my strong point.
I still remember the day I had to use a Brillo pad while our family was camping. My mother thought I must have
been blind not to have known what one was or how it was used to wash dishes. I was dumbfounded. I’d never
been exposed to it before, so it was new and strange to me. I was baffled at it and thought it was a great idea.
Dry soap in a scratch pad! Who’d a thought? I thought it was innovative.
I learned to “keyboard” on my mom’s manual Royal typewriter http://www.
typewritermuseum.org with the extra long carriage. She would do genealogy group sheets
and family pedigree charts and I helped out when I stayed home from public school with
all the colds, flu and whatever other childhood maladies that happened along, such as
measles, mumps, chickenpox, etc.
We used plastic Tupperware http://en.wikipedia.org/wiki/Tupperware for glasses and leftovers and they seemed
to always be greasy, because we washed dishes by hand. For some odd reason we thought it was more important
to “save” water rather than use it to clean with (must be the well water on the farm thinking), so the soapy
detergent didn’t last long in the sink. Much later, when I used automatic dishwashers, a lot of my illnesses went
away.
We cleaned out dirty cotton diapers and plastic pants by hand in the toilet and you can probably imagine what
that was like. Thankfully, now disposable diapers are used instead – and eco-friendly cloth diapers are making a
comeback.
We’ve come a long ways from washerboards and 2 and 3-holer outhouses http://waltonfeed.com/old/out.html to
indoor plumbing, running hot and cold water and electricity that works 24/7. We now have the luxury of having
appliances and other electronics that can be left on all night.
Somehow as I look back now, only through prayers and miracles did I
survive childhood when I wasn’t working on my grandparents dairy farm
and living with my parents during the school year. I was the oldest of the
children in our family, so all the parenting mistakes were tried on me first.
It’s true, kids don’t come with operating manuals! And I must have been a
big burden for my parents, being sick most of the time.
© MPN, LLC 2007 macCompanion
Page May 2007, Volume 5 Issue 5
I can remember when we got our first color TV, our first automatic power steering car with in-dash air
conditioning, our first clothes washer and dryer, so we didn’t have to put clothes on the clotheslines anymore.
And when I got married I had to do it all over again. It was a long time before we got a microwave oven, an
electric lawn mower and a house big enough for our own dishwasher and clothes washer and dryer. Now we
have one of those glass-top ovens and an ice dispenser along with the water in the front of the fridge. And we
have our own deep freezer in the garage. And we use vehicles with air conditioning (we live in a very warm
climate for much of the year and our first car as a married couple didn’t have air conditioning). Oh and we have
a DVD player along with the other living room “essentials”, like stereo entertainment equipment, distributed
speakers and even wall-to-wall indoor carpeting. We have been truly blessed with modern day miracles!
The Fix Is In
While in college, I discovered rather quickly that I could make
more money fixing office machines (copiers, typewriters and word
processors) than milking cows, working in the forest as a lumberman,
or working all night in a food processing plant or cleaning buildings as
a custodian, so I started my own business and learned how to fix just
about everything that was mechanical or electro-mechanical as office
equipment from manual typewriters and calculators to copiers and
word-processing systems.
Later I enjoyed working in cleaner environments around computer
mainframes, minis and micros and maintained support equipment,
including such things as IBM card equipment.
Those systems had to be programmed using what I called bullet-boards, because they appeared to use militarygrade bullet points soldered to wires to program from point A to point B. I doubt the latest generation has even
seen a “Don’t fold, spindle or mutilate” IBM card that used to come in the mail for subscription services and
membership drives back in the ‘60s and ‘70s. http://en.wikipedia.org/wiki/Punch_card
When I went to work for a government nuclear facility, I stepped back in time and worked on some of the first
mechanical typewriters ever built (pre-1940’s) for business (used in secured TEMPEST environments http://
www.officemuseum.com/typewriters_office_models.htm), rotary calculators, stapling and binding equipment,
and all sorts of electro-mechanical typewriters and other office equipment like the Wang, the Xerox an the
IBM word processing systems, among a host of others. (We still maintained some mechanical typewriters for a
Tempest environment up through the early ‘90’s.)
I saw the inevitable transitions from real desktop clutter to screen clutter as the electro-mechanical devices we
took so long to learn to maintain were gradually replaced. Penny parts were replaced by micro-electronic boards
that that cost hundreds of dollars to install.
I serviced early IBM typebar equipment up through Selectrics
http://www.etypewriters.com/history.htm and the pseudoelectronic devices up through the Microcomputer age. Many
of the office equipment manufacturers no longer exist. Not
too long ago, I threw out all the 25 years of Service Manuals,
User Guides, Parts Manuals, books and other detritus that I
had gathered as the backbone of business for years. They could
have been “office equipment” museum pieces http://www.
© MPN, LLC 2007 macCompanion
Page 10 May 2007, Volume 5 Issue 5
ideafinder.com/history/category/office.htm.
We went from rollers, pins, screws, shims, oil and grease and small parts to doing electronic board repairs on
multi-layers boards. We used oscilloscopes to home in errant floppy drives (requiring “cat’s eyes” for proper
alignment). We replaced lots of bad memory chips on full-sized memory cards that snapped into motherboards.
We even worked on the portable sewing-machine sized portable computers. And eventually we ended up
becoming board-swappers instead of keyboard repairers as electronics went down in price and wages went up.
We began the computer network revolution with network cards that cost thousands of dollars each and yes, we
even repaired those too http://en.wikipedia.org/wiki/Ungermann-Bass.
I learned about structured wiring and became a Telecom Engineer and we developed the first network standards,
as folks debated the best technologies to do the job. Ethernet won out (Token Ring can still be found in use
and don’t even get me started on Category 6 and Category 7 shielded vs. twisted pair cabling issues) and we
gradually shifted from broadband to baseband and centralized “dumb terminal” networking to distributed
microcomputer networking.
We went from hubs to switches to routers and I remember the hot debates we had about router “wish list”
requirements, until we settled on Cisco gear. I saw the price drop from thousands of dollars for equipment to
literally tens of dollars. And I’ve watched as “Murphy’s Law” http://en.wikipedia.org/wiki/Murphy’s_law seems
to have been replaced by “Moore’s Law” http://en.wikipedia.org/wiki/Moore’s_law.
I participated in getting best-of-breed shootouts for replacing copper with fiber
and I actively participated in those debates as well - and still do! But I think
we got end-runned by insecure wireless technology. Fiber won’t be the “next
big thing” until the cost of fiber electronics drops to copper electronic prices as
demand increases for product. I still marvel at how glass fiber cables can be had
for less than $20. But then at one time, USB cables were expensive and so were
Category 5 network cables (not nearly as expensive as the baseband drop cables
and Ethernet cable “vampire taps” used to be though!). http://en.wikipedia.org/
wiki/Vampire_tap
Why Write for macCompanion?
Out of weaknesses, if we focus on improvement, we can make strengths, mostly because of the mistakes we
make along the way. And I admit, I’ve made a few. I thought Baseband cabling was pretty cool, until I learned
why structured cabling was important. I thought HTML web page coding was a fad and I missed out on a
great opportunity when it first came along. When I graduated from college, I could have gone to work for
Microsoft, but didn’t. I had no idea folks by nature are “lazy” and are willing to pay for stuff they don’t want to
do themselves. Some think Podcasting may be a fad. Perhaps it will be replaced with Streamcasting. Overbuilt
“dark fiber” bandwidth will get lit up and utilized. When it does, I want to learn about it.
I struggled with learning to put my thoughts on paper, research topics and present and train others on
maintaining and using their equipment. I learned how to do it. I learn by doing, not by being shown. I know a
lot of our readers and listeners learn the same way.
By running macCompanion, I’ve had opportunities to learn about hardware and software most folks can only
dream about, because either they don’t have the time or inclination to explore, to study, or to really dig into the
esoterica of computerdom. I make the time to do so. I explore these things along with others on our staff, so you
don’t have to. And I found that effort to be fun. Learning should be fun!
© MPN, LLC 2007 macCompanion
Page 11 May 2007, Volume 5 Issue 5
I still use pen and paper for a lot of things. I also occasionally use my mind. However, I marvel at all the
modern miracles we’ve been blessed with and the inspiration that must have occurred over many lifetimes to
give us the best that mankind has to offer to make life just a little better each day.
For close to little or no money our staff do the same thing for you by showing how the Marvels of Macdom can
change lives for the better as together, we explore books, hardware and software that very well could be your
meal ticket to a better life. And if we can make a positive difference in the lives of others by doing what we do
– making a weakness into a strength. Eventually, all this effort will be worth the time and sweat-equity put into
it.
And that is why I write for macCompanion Magazine. We know what it feels like to be called a “dumb little kid
who doesn’t know anything”. We don’t want you to feel that way here. There are no “Lusers” who use Macs.
Please enjoy this issue and let others know about what can be accomplished using a Macintosh computer for
both home and business.
See you next month.
Robert
© MPN, LLC 2007 macCompanion
Page 12 May 2007, Volume 5 Issue 5
Section 1 contains macCompanion’s regular monthly columns. Writers from the US and Canada offer their
insight into a variety of issues affecting Mac users. These columns cover trends in the Mac community, Mac
software, hardware and books.
This month’s issue includes:
• Leopard and Beyond – by Matt Brewer, the Mac Fanatic
• Fad or Future? – by Wayne LeFevre
• Security 101: Protecting Your Home Wireless Network, Pt 2 – by AppleMacPunk
• Views from the Ivory Tower – by Ted Bade
• Who’s on First? – by The Northern Spy
• Errata for April – from Mike Hubbartt
© MPN, LLC 2007 macCompanion
Page 13 May 2007, Volume 5 Issue 5
development of the iPhone over Leopard, Apple
has created a precedent and sent the community a
message.
As I mentioned, the delay is not necessarily a bad
thing. While I’m now unable to defend myself against
the jabs from Vista users who taunt with phrases such
as: You were always teasing me about Vista being
late. Haha, now Leopard is late too! I still believe
that in the end Leopard’s delay will be for the best.
The couple extra months can seem like a long time
to someone waiting to upgrade hardware, but for the
rest of us, Tiger is pretty darn good right now. With
the extra time, Apple should be able to release a more
stable and mature product initially, something that
will benefit us all. And if the delay is because of some
super-crazy top-secret features, then I’m even more in
favor.
Geek Speak: Random Mac Stuff
You Need to Know
http://www.macfanatic.net/blog/ Copyright © 2007
Matt Brewer
Leopard and Beyond
by Matt Brewer
End rant...
I’m sure that by the time we finally see Leopard on
our Macs, all of us will be sick of reading about it.
However, I feel like I should touch on a few topics
since Leopard has made the news in the last few
weeks, so just bare with me.
What’s After Leopard?
It’s still a little early in the game to be asking this
question since there are a very select few (and I’m not
one of them) who really know what features Leopard
will have. That doesn’t mean we can’t all speculate!
Apple Sends Mac Users a Message
I like to consider myself a special type of customer
for Apple. I own an iPod Nano, but only use it
sporadically. I don’t own an Airport or TV. I’m
pretty much a Mac user without all the extras that go
with it. With the introduction of the iPhone this past
January, it suddenly became apparent that Apple was
adding something else in the lineup that would change
the balance in the world.
By announcing that Leopard will ship in October
instead of “Spring” as originally planned, Apple has
sent the dedicated Mac users a message: You’re not the
most important thing anymore. Now to be fair, I think
that the decision was a most difficult one and probably
for the best. Allow me to elaborate.
Apple publicly admitted to reallocating resources
(read: human beings) to work on the iPhone instead
of Leopard. This action alone best speaks for
Apple’s direction. By actively deciding to promote
© MPN, LLC 2007 macCompanion
Advanced Interface. This term is left open to broad
interpretation. However, in this sense I’m referring
more to a new way to interact with your computer.
Speech recognition is not a new concept, but one that
is slowly and steadily evolving. I’d like to see this
integrated more tightly into the OS and improved
upon. I’d also like to add here that the visual aspects
of the interface should increase as well. Stuff like
“stacks” (originally touted as a feature of Leopard.
Almost like a folder, you stack your files in a neat pile)
and more liquid, 3D interface elements would be nice
to see. Maybe even support for iPhone-like interaction
with your new Mac laptop. And because we’re talking
about Apple, I think we’re likely to see it.
Better support for web-services. Cocoa is by no
means a poor mans language. It is very powerful and
mature and I love working in it. However, with the
introduction of features such as garbage collection,
Page 14 May 2007, Volume 5 Issue 5
properties and fast enumeration, I feel like Apple
should look to integrate more tightly with webservices the next go around. If web applications are
the future, then make it easier for developers to cash in
on that and provide that to Mac users.
AbolitionofMailTemplates. Mail 3.0 hasn’t even been
released yet, but I just cringe to think of all the horrid
HTML email that will be on the net with Leopard’s
release.
Kill dot Mac. iTools was something amazing in its
day. Free web space and tons of cool features and
services. Then Apple got greedy. It’s never been the
same. Apple either needs to seriously (I mean groundup) rework the .Mac service, or scrap it.
That’s a very short list of features I’d like to see for
OS X after Leopard, but it’s hard to predict a feature
set some two years or more in advance. If you’d like
to chime in with your two-cents, you can drop me a
line at [email protected].
Google Released Cocoa-API
Google released a Cocoa framework for accessing
theirweb-servicesthispastweek.Ifindthispretty
cool for a few reasons. First, anything to make my life
easier is awesome. Continuing on that note, I have
typically found working with anything web related in
my adventures to be pretty scary. However, Google
has created a framework that seems at a casual glance
to be stable and intuitive to use and integrate in a
seemingly limitless number of applications. Enough
said about Google’s new framework. Check the
release of Google Data API here. http://googlemac.
blogspot.com/2007/04/google-data-apis-connectcocoa.html
Mac Fanatic Software Giveaway
I’m now going to entertain you with this thought:
hundreds of dollars worth of free and amazing Mac
software. Do I have your attention? I feel like a car
salesman these last few weeks, trying to sell my site
to several prominent software developers and working
© MPN, LLC 2007 macCompanion
hard to implement the actual contest and iron out
details with everyone involved.
All of that hard work can pay off for you. I have a
long list of software available including titles such as
Rapidweaver, Tangerine, CSSEdit, Billings 2.5, ChaChing, Parallels, Disco and several more. And some of
those are more than just one copy.
I’m not asking much of you either. If you’re interested,
then you can head on over to the Mac Fanatic site and
read the brief contest details and learn more about
each application. Maybe even take the time to listen to
a review of that app for more info. And then you can
enter to win a copy of one title of your choice.
If you’re interested in sharing the word with the rest
of the world, and I wish you would, then go ahead
and make some noise. Talk about it on your podcast.
Blog it. Digg it. Tell your dog. Just let people know
that there is a lot of free and awesome Mac software
available and people need to enter to win it!
Contest entries will be accepted between April 23 and
June 1. That is well over a month and should give
everyone plenty of time to enter. By all means, see the
contact info below if you have questions or concerns.
Artwork for the giveaway available for your use free
of charge as well.
Contact Info
You can always send me an email at mbrewer at
macCompanion.com or visit my website at http://
www.macfanatic.net/blog/ for more information
about me and my ramblings. I also produce a weekly
audio podcast taking an in-depth review of cool and
new Mac applications, along with tips, developer
interviews, tutorials, and the occasional contest.
Page 15
May 2007, Volume 5 Issue 5
MacFevre
Fad or Future?
think twice, considering their personal information
including name and company is contained in the
image as well as highly visible on the front. If the card
is altered, say you open it up in Photoshop and blur
out your personal information on the front of the card,
when you re-save the image, all licensing information
is stripped leaving it useless anyway.
The folks over at Agile Web Solutions have recently
started to implement a new license verification feature,
and not without some controversy. Their star product,
1Passwd, as well as 1Passwd Reader for Palm and
AllBookMarks are all using this new verification.
The naysayers of this technology do have some valid
points of their own. Some people, myself included,
have a nice print out of all application names, which
e-mail it’s connected to, and the actual license number.
I use the program Yojimbo to track all of my licenses.
This system has worked so far, and Yojimbo’s F8 key
command is a lifesaver. You do have to jump through
a few hoops to print them all off to have a hard
copy. That’s not to say that this is the perfect system,
either. Just because key codes have been used for
years doesn’t mean that there can’t be a better system
implemented as we go into the future. I have found
it’s just as easy to keep track of these graphic cards in
Yojimbo, dragging them into a Note file instead of a
Serial Number file.
by Wayne LeFevre
Instead of receiving a long, long cryptic number to
type in, you can now receive via e-mail a very smart
looking image of a card. A card akin to a credit card or
identification card, complete with your name, program
and even a holographic image to complete the look.
I will use their sample as an image, because I’m not
quite sure yet, (meaning I haven’t looked it up yet,)
the procedure for stripping the personal information
from the cards.
Arguments against this technology include not being
able to have a printed backup copy, the fear of losing
the image or having it wiped out with a hard drive
crash, and the space created by backing up an image
instead of a few lines of text. All valid, I suppose, but
really, in this day and age there is no excuse for not
keeping backups. For you can easily not only keep a
folder of these images in a regular backup routine, but
also just as easily save thousands of images to a CD.
If you did have a drive crash, how much easier would
it be to drag images into programs than having to cut
and paste all that information?
Simply taking the card image and dragging it from
your e-mail into the Agile Web Solution’s application,
a window pops up verifying the copy and registration.
I really don’t have a problem personally on this type
of verification, it definitely has that Mac graphical
use and feel, not to mention it’s really cool. The first
time I tried it, it worked flawlessly. Even copying the
image into a folder and then using the image worked
fine, for there are those who are worried about having
or needing a backup. Also, this way, the ones who
happen to enjoy “sharing” their new application might
© MPN, LLC 2007 macCompanion
There will always be those who don’t like or trust
change. They think this graphics stuff is just a fad.
Matter of fact, when I had the choice of getting a card
with 16K of memory on it, or the fancy new 4 color
graphics card for the original IBM 8086 PC, I chose
the memory. Figured it would be nice to be able to
load all of Zork into memory to play it quicker than
some graphics fad that nothing used. Yet.
David Teare, one of the programmers at Agile Web
Solutions had this to say;
“I’m not sure if the new license cards will “catch on”
Page 16 May 2007, Volume 5 Issue 5
or not; we’re not interested in making money off of
these cards, but rather wanted to “raise the bar” when
it comes to registration. You’ll see all the code for
these cards open-sourced soon.
The reason we changed was because I don’t think
anyone would ever use the word “natural” when
speaking about entering hexcodes. However, “natural”
and “Mac-like” are often applied to graphics and dragand-drop. Hence the reason we used them both. (BTW
— natural can be applied to using links in emails
like 1passwd://registration. We tried that, and while
it did work well, the number of CS complaints about
“broken links” was untenable).
While I personally love the new licenses, and most
paying customers have given us wonderful applause,
there have been many people who said they prefer
text based registration codes. That’s cool. We won’t
be forcing anyone to use the graphics; they can use
the text-based ‘backup’ mechanism that is already
available in 1Passwd, and will be expanded in the next
version.
It’s all about giving users the best experience possible.
I wonder, is that the definition of Mac?”
‘Nuff said.
Mac Security 101
http://www.applemacpunk.com
Protected Airspace: Securing Your Home
Wireless Network, Part II
your Airport base station to protect your airspace. This
article will focus on ways to add hardware to your
network to further secure your wireless network from
intruders. Adding hardware to any network always
has a dollar value attached, but can be the difference
between a fairly secure network, and a very secure
network. This article requires a little background in
TCP/IP and networking. This is for more advanced
users, and users with a knowledge of general
networking.
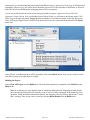
6. Segment the Networks
The best way to secure your wireless network is to
segment it from your wired network. Segmenting
is the process of creating separate networks inside
of a larger network. You use a firewall (or router) to
segment the individual networks and define exactly
what traffic is allowed to pass from one network to the
other. For instance, if you had a development network
that needed to be secluded from a production network,
you could use a firewall to separate the two networks.
Then you could configure the firewall rules (See Mac
Security 101, October 2006) to allow all traffic from
production to development, and deny all traffic from
development to production. That way, the production
systems could access the development systems, but
the development systems would have no access to
production systems. This is a common tactic in many
enterprise networks. The firewall rules can even be
configured to allow development systems access to
the Internet, without allowing access to the production
systems.
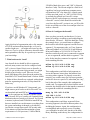
Building on this example, let’s think of the wireless
network as development, and the wired network as
production. The wireless network can be segmented
so it has no access to the wired network. However,
the wired network has access to the wireless network,
and both networks have access to the Internet. For the
sake of explanation, we’ll refer to the wired network
as Zone A, the wireless network as Zone B, and the
Internet as Zone C. Both A and B can access C. A can
access B, but B can not access A. The example on the
next page illustrates this.
by Kale Feelhaver
This begins part II in the series on securing your home
wireless network. Part I focused on ways to configure
© MPN, LLC 2007 macCompanion
Page 17 May 2007, Volume 5 Issue 5
250 MB of hard drive space, and 3 NIC’s (Network
Interface Cards). The last one might be a little bit of
a problem, but keep in mind most computer stores
sell brand new NIC’s for about $10. A quick search
of eBay may land your 2 or 3 NIC’s for $10. IPCop
is currently not offered in a PowerPC version.
However the IPCop developers are currently creating
a PowerPC version, which should be out later this
year. Once the PowerPC version is out, you’ll be able
to take an old Mac out of the closet and put it back to
work as a firewall.
8. How do I configure the firewall?
Again, this kind of segmentation takes a fair amount
of TCP/IP and networking knowledge, so if you’re
confused right now… you might not want to try this.
However, if you’re tying to learn more about firewalls
and segmentation, this may be a good way to increase
your knowledge.
7. What hardware do I need?
Any firewall device should be able to segment a
network, many routers can also be configured with
ACL’s (Access Control Lists) to act as firewalls, so
if you’ve got an old router laying around, you might
be able to put it back to work. There are several
small office/home office firewalls on the market like
SonicWall’s TZ170 and WatchGuard’s Firebox SOHO
6. Either of these firewalls are equipped with multiple
ports for segmenting networks, so setup should be
rather easy.
If you have an old Windows PC lying around, you
might want to put it back to work as a firewall. You
can download and install IPCop (http://www.ipcop.
org) for free and turn any Windows-capable system
into a firewall. IPCop is a totally self-contained Linux
distribution that acts strictly as a firewall. You’ll need
a monitor, keyboard, and CD-ROM to install IPCop,
but once installed you can disconnect everything from
the system and manage it through a web interface,
just like the average home router. IPCop only takes
a few minutes to install and has minimum system
requirements of a 386 processor, 12 MB of RAM,
© MPN, LLC 2007 macCompanion
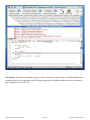
Once you have procured your hardware, it’s just a
matter of hooking everything up and configuring the
firewall rules. Of course… that’s the hard part. Using
the example above, you would want to configure
the firewall to allow both segment A and B to access
segment C. For arguments sake, we’ll say Segment
A has an IP address of 192.168.1.0/24 and Segment
B has an IP address of 192.168.2.0/24. There are 3
interfaces on the firewall; one is connected to segment
A, one to segment B, and the third to segment C. The
rules for the interface connected to segment C would
look something like this.
Allow ip 192.168.1.0/24 any
Allow ip 192.168.2.0/24 any
This configuration would allow both segments to
access the Internet, but not deny the Internet from
accessing either segment. To properly secure this
network, you would want to get a lot more granular,
and lock it down to a port level, rather than just “any”,
but for the sake of the example, this configuration
would work. To segment the wireless from the wired
networks, the firewall rules for the interface connected
to segment B would look something like this.
Deny ip 192.168.2.0/24
192.168.1.0/24
Allow ip 192.168.2.0/24 any
This configuration would deny segment B from
accessing segment A, but allow them anywhere else,
including the Internet. Again, this configuration is
oversimplified and to properly secure everything
you could add a lot more rules, but this is the basic
theory. Building on this theory, the configuration for
Page 18 May 2007, Volume 5 Issue 5
the interface on segment A would look something like
this.
Allow ip 192.168.1.0/24 any
Basically, you are allowing segment A to reach
segment B and segment C, but traffic coming from the
other direction will be blocked. This is not always an
easy topic to grasp, but to process of setting it up will
clarify things.
This is a brief overview of the segmentation process
and this article is meant to be informative and is not
an ‘end all be all’ solution. Network segmentation is a
skill that can take years to master, and may require an
advanced knowledge of networking. If you are further
interested in segmenting your network and want to
know more, feel free to contact me directly using the
email address above.
Views from the Ivory Tower
May 2007
By Ted Bade
There is quite a lot of turmoil in the land of the Apple
faithful right now. The people in Cupertino seem
to have lost interest in computers, replaced by an
interest in creating the next great gadget. Apple, once
called Apple Computer, is putting it’s effort toward
perfecting the iPhone. In the mean time, other Apple
products are taking a back seat. For instance, the
next version of Mac OS X, called Leopard, has been
delayed until this coming fall. Rumor has it this is
because resources were moved from creating the next
great Mac OS to perfecting the iPhone.
© MPN, LLC 2007 macCompanion
Oh well, Mr. Jobs and the Apple team have decided
to pass up this golden opportunity to pursue the
iPhone. I just hope their lackluster attitude toward
the Macintosh is only temporary and doesn’t infect
that of the many Macintosh users that enjoy or even
love their Macs.
So this month, the majority of the news about Apple
has been delays, problems, and other news about the
iPhone. TV was released and shipped, and while it
is a nice idea, I don’t think that it will take the home
market by storm as the iPod did.
On another note, it seems things aren’t going well
for Vista. From what I can tell there are two major
problems plaguing it. First of all it has some problems.
I haven’t personally used it, so I cannot attest to this
personally. I can say I have read a lot of complaints.
This is really disappointing to me for a couple of
reasons. First of all, I was looking forward to some
of the features they promised would be in Leopard.
Installing a new version of Mac OS X gives me a
chance to clean up things, as well as the opportunity
to play with all the new features. I, for one, will not
buy a new Mac until I am certain the new version
of Mac OS X either comes installed or as part of an
inexpensive upgrade.
The other item is that it would have been really cool
to release Leopard a month or two after Vista. This
would give the media pundits a juicy opportunity to
compare Vista to Leopard. I expect that if this had
happened, Mac OS X would have come up on top!
Releasing the new Mac OS X right after Vista would
have made it even more apparent that Mac OS X is
superior.
Probably the biggest piece of news in this regard is the
fact that Dell computers has decided to offer new PCs
that include some variety of XP instead of Vista. This
is really significant because Dell was one of Vista’s
most vocal supporters before it’s release. Apparently
Vista is unable to perform well for gamers. Check out
the article on the Electronista web site: http://www.
electronista.com/articles/07/04/19/dell.casts.doubts.
on.vista/.
Vista does have some problems and even the
magazines that are Pro Microsoft are pointing this
out. One interesting article I found was published
in PC magazine Titled: Quick Fixes for Five
Nasty Vista Problems. (http://www.pcmag.com/
article2/0,1895,2104022,00.asp). Early in the article
the author sets the tone by saying:
“A great deal of the problems we’ve encountered
aren’t really fixable. It’s more a matter of finding a
workaround or waiting for a patch...”
Ouch! The people at Microsoft must cringe when they
hear a statement like that. But all the problems aren’t
created directly by Microsoft. Apparently hardware
companies have been slow to provide hardware drivers
Page 19 May 2007, Volume 5 Issue 5
that support Vista. What this means is that peripherals
attached to a computer won’t work properly. check out
this article: http://www.crn.com/software/197006899.
What does this mean for Mac OS X and Mac Users?
I don’t really think that Mac OS X will take over the
computer OS market. I do believe it will become a
major player. What I really think will happen is that
the market will spread into a variety of current and
new methods of providing operating systems to users.
Both Linux and Mac OS X will be major players. As
Microsoft looses market share, other companies will
createnewsystemstofillthegap.Anothereffectof
this is a reduction in malicious software.
Let’s face it, one of the main reasons there is so much
malicious software for Windows is that one piece of
code can negatively affect millions upon millions
ofcomputers.Whatiftherewerefiveequallyused
computer operating systems, would the person writing
theviruslearntowritecodeforallfive?Howaboutif
there were twenty OS choices?
While it would be nice to dream that the world will
turn to Apple for the next great OS, I don’t think
this will happen. Apple has been cemented in user’s
minds as, “That other Operating System”, as Linux
is considered the OS of real geeks. I see a lot of
opportunity for a new operating systems. Something
outside the box, new, and exciting. I also see the
possibility of a web based OS, one in which a user
needs to log onto a site on the internet to gain access
to the features and programs. I guess one could say the
future looks interesting and full of options!
statement: Apple posted a revenue of $5.26 billion and
netquarterlyprofitof$770million.Thiscompares
torevenueof$4.36billionandnetquarterlyprofitof
$410 million of a year ago quarter. Pretty nice!
Sales of Macs and iPods were up as well. They sold
1,517,000 Macs and 10,549,000 iPods, which is a 36%
growth in Mac sales and 24% for the iPod.
This is the best quarter ever for Apple. To quote the
statement:
“Weareverypleasedtoreportthemostprofitable
March quarter in Apple’s history,” said Peter
Oppenheimer, Apple’s CFO.”
WhileApplehadsomenicefigurestoreport,media
financial-relatedmediapunditshadsomepositive
things to say about this. Many of the companies that
offer stock information indicated that they expected
Apple’s share values to rise to around $140/share
and that Apple stock was a good buy right now. This
followed by Apple’s stock jumping to over $100/share
and hovering in the upper $90s by the end of the week.
It had been jumping between the low $90s and upper
$80s for the past month.
The Wall Street Journal posted a nice article
concerningApple’sfinancialstatement.Youcan
read this by visiting: http://www.thestreet.com/_dm/
newsanalysis/techgames/10353181.html.
Let’s close our eyes, hop into the future and see what
really happens!
Financially things look good – At the end of April,
ApplepostedthefinancialstatementfortheMarch
quarter.Thingslookverygoodforthemfinancially.
In fact, the results are well above the market
expectations! Which is to say that everyone expected
Apple couldn’t continue to grow the sales of Macs and
iPods the way they did.
The Northern Spy
YoucancheckouttheofficialstatementfromApple
by visiting: http://www.apple.com/pr/library/2007/04/
25results.html.
Here are some of the interesting facts about that
© MPN, LLC 2007 macCompanion
Who’s On First?
By Rick Sutcliffe - May 2007
Apple’s priorities, like those of any corporation, are
enhancing value for the shareholders. While this can
sometimes mean other things, the only productive
way to do this is to concentrate on lowering costs
and raising sales. If this means the entity has to be
Page 20
May 2007, Volume 5 Issue 5
periodically re-invented to suit the current market, so
be it.
The second item addresses the same issue in
a different way. Leopard appeared a month ago to be
in the last throes of testing. The issues list was down
to near zero, few changes were being made, and the
signs pointed to a March-April release. Suddenly
the issues list has become lengthy, Apple has pulled
programming resources to work on iPhone, and now
talks October for the next OS X. While this doesn’t
yet seem to be on the MS-scale, where “progress” is
measured in units of megaslippage per annum, the
delay is concerning for those of us who depend on
iSteve for computers more than for entertainment toys.
Evidently the change of name that saw the
word “computer” expunged from the Cupertino’s
masthead was no mere symbolism. iSteve lives at the
leading edge of the technological revolution. With
computing per se approaching a relative stability that
will see only intermittent incremental upgrades for the
foreseeable future, and no true breakthroughs on the
horizon, that leading edge lies elsewhere.
OTOH, should this lack of attention continue,
iSteve could run out of computing mindshare in two
or three years, stalling growth of market share around
the 10% mark, making hay of the Spy’s predictions of
15++%. OTOH, it’s also worth noting Vista is such a
turkey (never has so much bumph been expended by
so many people on so little, or been delivered so late
with zero impact). Leopard may thus look far better
for the delay if it does arrive relatively bug free. In
fact new purchasers are better off buying Tiger on a
Mac than any version of W*nd*ws. at this point, never
mind what may be coming down the pike. OTTH, if
the inattention to the Mac proves transitory, Apple
gets back on the computing track with minimal delay,
and is able to press its advantage, that 15% will look
conservative. After all, absolute growth in unit sales
is now approaching the 30% mark. This is no time for
iSteve to be taking his hand from the MS jugular.
A possible consequence of the delay: Blu-Ray
on all Apple models now seems likely on or before the
Leopard launch, perhaps as a peace offering.
There’s also the matter of ongoing testing of
Leopard’s “secret feature(s).” Last month’s kidding
aside, it’s just as hard as it is for hardware to imagine
what directions software innovation could now take
that would be in any sense revolutionary. Who needs
more features in a word processor, spreadsheet,
or database? Even the most bloated software can
usually be rescued with a hardware upgrade, so bad
application code design just isn’t a consumer-level
issue. If it were, one extraordinarily large vendor
would long since have ceased to exist.
© MPN, LLC 2007 macCompanion
Not much different could be said about an
OS. Foreseeable change is incremental, not earth
shattering. So, to speculate, what could Apple do
to make a significant difference, to underscore that
there’s no one else in the technological revolution
business, keeping in mind that iSteve has decided
there’s no glamour in designing and making chips,
and little in the traditional computer business itself?
Several things:
On the ease of use level: better integration
among appliances people use, or can be persuaded
to use, daily. This is the want Apple is creating with
iPhone and AppleTV (no, silly, it’s not a need) , and
could provoke with a series of new tablets, including
one sized as a book reader and video viewer with PDA
functions. (Think of this PIEA as Newton on steroids,
an upsized iPod, or a pocket brain.) Other possibilities
include integrated digital home theatre systems and
better home automation--all under the Mac’s control.
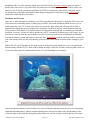
On the presentation level (secret features?):
better 3D rendering down to the 2D media of screen
and paper, with an eye to ramping up to genuine 3D
display technologies once the wrinkles have been
sufficiently ironed out.
On the application level (pet peeve): Someone
really ought to get the word processor right. This basic
tool has been neglected, twisted, bloated to the point
where writing is more a struggle with the software
than a joy, and now ignored. But if Apple is interested,
there’s no evidence of this.
Also in the long-delayed department
is the next release of the venerable Nisus Writer word
processor. This product reached its epitome with
classic version 6.5, whose speed (especially with
very large documents) and feature list competitors
could only envy. However, as with many products
of uncertain code design and execution (the Lotus
1-2-3 syndrome), it had to be rewritten (and partly
purchased) from scratch for OS X. While the current
“Express” version at 2.7 is much faster than earlier
attempts, its features pale in comparison to the Classic
product, and the Spy finds himself still using 9.2.2 at
times to run that one application. Oh, Express is O.K.
for memos, reports, letters, and exams. But when it
comes to maintaining large documents in multiple
merging files with dual formatting cum invisible
HTML markup, full indexing and table of contents,
graphics layer, etc., it cannot hold any better a candle
to Nisus 6.5 than the other pretenders.
Under another of his many hats, the Spy has
two large, long-standing textbooks and seven hefty
novels (two more coming) in over two thousand Nisus
files, some of which need periodic maintenance,
most of which depend on 6.5’s features. He’s been
using this as his main writing tool since version
one, once maintained the unofficial public bug list,
Page 21 May 2007, Volume 5 Issue 5
and has written dozens of macros to enhance Nisus’
functionality (none of which work in Express). He is
not alone.
Thus the faithful were expecting big things
from NisusWriter Pro (version 3.0, but could be
renumbered), whose public beta was released this
month (public = we can talk about it). Indexing
and table of contents are now there, and also better
compatibility with the classic files (the graphics layer
is now read properly, for instance). But there’s still
no invisible style, no file merge (often called mail
merge), and the table of contents and indexing markup
from a classic file are not preserved in file translation.
The latter may be a beta bug, but the other two are
evidently again not on the feature list this, for Pro
simply discards any 6.5 text in invisible style, and
lacks one of its own. Files with the .html suffix are
read, but only as formatted text. Markup in the original
carries no semantic value in the conversion. Mail
merge appears to require someone to write a macro (in
Perl), but this lack in the main product appears to the
Spy as unprofessional.
On the plus side, the beta is remarkably stable,
and has run without crashing (except on some file
reads, and that problem went away with a reboot,
so...) for two weeks now. Moreover, the new version
writes decent html when you ask it to, though that’s
only partially helpful (the header apparatus and
ECMAScripts still have to be manually inserted). This
is better than the last iteration, whose HTML writer
was only marginally less pathetic than the wretched
attempt W*rd makes.
However, on balance, the Spy can’t give the
Pro product more than a C+ or a B- at this stage.
OTOH, he can’t give any word processing product a
higher grade. The whole genre suffers from neglect
these days. C’mon, Steve. Why not buy NisusWriter,
finish it, and knock the competition dead? ‘Course,
there wouldn’t be much glamour in that.
With a wedding coming up this Summer,
and the create to give a pictorial retrospective on the
life of number one son, the Spy decided it was time
to scan some of his slides into digital form. (He will
eventually spring for a high-end digital camera to
replace his c1972 Miranda SLR, too.)
Diligent research pointed him to assorted
Canon, Epson, and HP products. He wanted a flatbed
for photos and documents, so he eliminated various
film scanners as overly specialized. He is leery of
multifunction products (what if some other function
breaks and you have to buy a new one?) He has
approximately 7000 slides, so wanted to mount more
than the typical three to five in the machine at once.
He wanted high-end resolution and light specs.
reviews eventually led him to the Epson Perfection
V700 Photo scanner. At about $700CDN, this is pretty
high steep, exceeded in consumer/pro models only by
the V750, which also allows wet mounting of film,
something he doesn’t need. The speed, resolution,
reputation, and versatility seemed unmatched, so he
bit, despite advice from some photographers that
optical enlargement of the slides and a digital photo
was a better route.
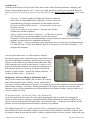
The V700 is everything Epson and the
reviewers claimed. If has one scanner under the
bed for reflective media, and a second in the lid for
transparencies. One can use a pressure pad for the
former, or any of a variety of film holders for the
latter. The film holder takes twenty-four negatives in
strips, and another holder mounts twelve slides under
plastic clips. (There are more holders for other film
sizes, and extra spacers for adjusting where the holders
sit relative to the scanning head--not tried yet.) Also
included: Epson’s own software, DigitalIce, SilverFast
(limited) Photoshop Elements, USB port and cable,
and a FireWire port.
So far it appears to be doing the job well-rescuing essential images from some slides that are
in worse shape than the Spy imagined, and producing
excellent scans of good photos and better quality
slides. (He hasn’t tried it on negative film as yet.) It’s
worth noting in passing that while diamonds may
be forever, storage media are certainly not, and this
is true in spades of positive film, some of which has
faded badly over the years.
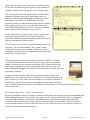
The only quarrel one could pick with this
scanner is over the instructions. The TWAIN
plugin (works in Photoshop, SilverFast and
GraphicsConverter, among others) has a bewildering
array of scanning options, and the online help
gives the most scanty and nominal descriptions for
each, with no recommendations on typical setting
combinations for various tasks. The buyer is left to
experiment endlessly until finding something that
seems to work, without having much confidence that
the chosen settings are really the best for the task.
Also, one can select “all” thumbnails to apply some
settings, but cannot for others, which makes the task
more tedious than it need be. Also, the mapping
of thumbnail images from the slide holder is nonintuitive, starting at the top right and going down
rather than across.
Highly recommended for the quality, but the
user interface needs work, and real documentation
would be nice.
These considerations and several online
© MPN, LLC 2007 macCompanion
Page 22 May 2007, Volume 5 Issue 5
Speaking of non-intuitive,
the Spy had occasion recently to edit some PDF
documents for perhaps the first time ever. He fired
up Acrobat Pro, spent half an hour discovering that it
doesn’t edit, found out how editing was supposed to
be done (select advanced editing-touch-up object tool,
select object, control click it, select edit object, which
transfers control to Illustrator, edit the text there then
save it (!!), which doesn’t save but sends it back to
Acrobat, suffer a few crashes of both programs along
the way and some lost changes, and struggle through
to a final document after a couple of hours). C’mon,
folks, the computing revolution has already happened.
No doubt a reader will tell us there is an easier way if
we’d only guessed differently, but this level of grief
in modern software is ridiculous, enough to reassign
the great lemon award. Say, lots of programs can write
PDF. How about a word processor that can read it?
OTOH, does it matter?
On to the truly broken,
can there be an industrial age industry more out of
date, more broken than the music business? Indeed
there can. The book industry remains stuck in denial,
attempting to ignore new technologies, trying to
mass produce profits from a model so out-of-gas
it’s a wonder any of its participants are still rolling,
even on past momentum. A small handful of past
superstar authors get the full publicity apparatus by
industry execs who perpetually dance one step away
from failure and job termination, their companies cut
corners to the point where editing seems to have gone
out the window, and new authors with better quality
works are simply ignored. What little money comes
back to the publisher after book returns never sees
the inside of an author’s wallet, and the talent pool is
getting thinner with each passing year.
The eBook industry hasn’t yet eaten the pBook
industry’s shorts, but the Spy thinks the up -andcoming generation will want to read on a screen, and
well they should. The first company to get the eBook
reader right (light, compact, pocketbook sized screen,
no DRM, $3/ book) will own the industry Is anybody
listening?
Shameless self-promotion department
If you are hosting, using a Windows server and have
been bit by the W32/Delbot-AI spyware worm, for
which MS currently has no fix, run (do not walk)
to your nearest Mac (there are a few) or Linux (the
majority server) web host or dedicated provider.
Security may not be perfect on the competition,
but it is better. Ahem. Any customers out there for
WebNameHost’s Linux/ CPanel system?
On a related front, the spy note the success of
a hacker breaking in to take control of a Mac at the
recent CanSecWest security conference in Vancouver
(a suburb of Bradner, where he lives) exploited an
© MPN, LLC 2007 macCompanion
application flaw in Safari, not an OS vulnerability.
Security fix coming? The real lesson: there are lots of
very nasty web sites out there, folks.
R.I.P.
a dozen or so old Mac sites no longer being updated,
snagged by the pornos, or vanished altogether. The
Spy was checking the links on his own site (not a
bad idea every once in a while), and at the halfway
point has removed quite a few. Anyone out there who
knows of a Mac-related site that should be added, let
us know.
--The Northern Spy
Rick Sutcliffe, (a.k.a. The Northern Spy) is
professor of Computing Science and Mathematics at
Trinity Western University. He’s written two textbooks
and several novels, one named best ePublished
SF novel for 2003. His columns have appeared in
numerous magazines and newspapers, and he’s
a regular speaker at churches, schools, academic
meetings, and conferences. He and his wife Joyce
have lived in the Aldergrove/Bradner area of BC since
1972.
Want to discuss this and other Northern Spy
columns? Surf on over to ArjayBB.com. Participate
and you could win free web hosting from the
WebNameHost.net subsidiary of Arjay Web Services.
Rick Sutcliffe’s fiction can be purchased in various
eBook formats from Fictionwise, and in dead tree
form from Bowker’s Booksurge.
URLs
The Northern Spy Home Page: http://www.
TheNorthernSpy.com
The Spy’s Laws collected: http://www.thenorthernspy.
com/spyslaws.htm
The Spy’s Shareware download site: http://downloads.
thenorthernspy.com/
WebNameHost :�� http://www.WebNameHost.net
WebNameSource :�� http://www.WebNameSource.net
nameman :�� http://nameman.netopundo ��: http://opundo.
com
Sheaves Christian Resources :�� http://sheaves.org
Arjay Books��: http://www.ArjayBooks.com
Booksurge: http://www.booksurge.com
Fictionwise: http://www.fictionwise.com
Nisus: http://www.nisus.com
Epson: http://www.epson.com
Page 23 May 2007, Volume 5 Issue 5
Errata for April
Looks like MacWorld UK nailed this one. Why did
Apple deny the late release of Leopard earlier in
April? And why did Analysts believe Leopard would
ship on time?
By Mike Hubbartt
LAST MINUTE NEWS
According to Apple’s website, their second quarter
fiscal results consist of revenue of $5.26 billion, and
a net profit of $770 million – better than the same
quarter last year ($4.36 billion revenue and $410
million profit).
For a sneak peek of Leopard features (when released),
go to: http://www.apple.com/macosx/leopard
RUMORS
Analysts still suspect that Apple intends to release
a subnotebook with flash memory instead of a
traditional hard drive.
CORRECTION
In March, there was a rumor of the late release
of Leopard posted on MacWorld UK’s website
(3/26/2007). Early April, Apple denied this rumor, but
on April 12th the following was posted on the Apple
website:
Apple Statement
MACCOMPANION UPDATE
Robert Pritchett, our Editor-In-Chief, resumed a more
active roll starting in this issue. He resumed editing
the magazine as well as taking care of day-to-day tasks
needed to produce this magazine each month. Glad to
have you back, Robert.
See you next month…
iPhone has already passed several of its
required certification tests and is on schedule
to ship in late June as planned. We can’t wait
until customers get their hands (and fingers)
on it and experience what a revolutionary
and magical product it is. However, iPhone
contains the most sophisticated software
ever shipped on a mobile device, and
finishing it on time has not come without
a price — we had to borrow some key
software engineering and QA resources
from our Mac OS X team, and as a result
we will not be able to release Leopard at
our Worldwide Developers Conference in
early June as planned. While Leopard’s
features will be complete by then, we cannot
deliver the quality release that we and our
customers expect from us. We now plan to
show our developers a near final version
of Leopard at the conference, give them a
beta copy to take home so they can do their
final testing, and ship Leopard in October.
We think it will be well worth the wait. Life
often presents tradeoffs, and in this case
we’re sure we’ve made the right ones. [Apr
12, 2007]
© MPN, LLC 2007 macCompanion
Page 24 May 2007, Volume 5 Issue 5
The section 2 software reviews in this issue of macCompanion are:
• 1Passwd 2.3.11 – password management software, reviewed by Wayne LeFevre
• CocoaSuite 1.0.4 – a suite of utilities to control Cocoa applications, reviewed by Robert Pritchett
• CopyCatX 4.0 – disk duplication software, reviewed by Robert Pritchett
• Desk Doctor 1.1.9 – desktop computing exercise program to address RSI, reviewed by Robert Pritchett
• Disco 1.0.2 – interesting disk burning software, reviewed by Michael Potter
• Dramatica Pro – Write Brothers excellent story structure software, reviewed by Mike Hubbartt
• Lineform 1.3.1 – create graphics art goodies, reviewed by graphic designer Mike Swope
• Meander 1.5 – map plotting software for the Mac, another excellent review from Michael Potter
• Montage 1.2/1.2.1 – Mariner Software’s maturing Mac scriptwriting package, reviewed by Mike
Hubbartt
• NeoOffoce 2.1 Writer – you might now seriously consider ditching MS Word, reviewed by Harry {doc}
Babad
• Opal 1.0.8 – outlining software reviewed by our favorite Assistant Editor, Harry {doc} Babad
• Power Structure 1.8.2 – another good story structure organizing application from Write Brain, reviewed
by Mike Hubbartt
• QuarkXPress 7.1/7.2 – pretty much the desktop publishing software on any platform, reviewed by Mike
Hubbartt
• The Salazar Brothers Reggaeton Refill – a collection of sounds influenced from Bomba, Reggae and
hiphop, reviewed by Daphne Kalfon
• Ubercast 1.0 – podcast producing software reviewed by our resident expert, Wayne LeFevre
• Virtual Historial: Doctrine and Covenants 1.0 – LDS Bible scripture software, reviewed by Robert
Pritchett
© MPN, LLC 2007 macCompanion
Page 25 May 2007, Volume 5 Issue 5
Parallels – award-winning software at MacWorld Expo 2007
http://www.parallels.com
© MPN, LLC 2007 macCompanion
Page 26 May 2007, Volume 5 Issue 5
1Passwd 2.3.11
Reviewed by Wayne LeFevre
1Passwd version 2.3.11
http://1passwd.com/
$29 USD, $32 CND, £14 UK
System Requirements: Mac OS X 10.4 or later;
Universal binary; Most web browsers minus Opera.
Strengths: Manage all your passwords with one master key, integrated with most browsers, prevents
phishing,importallyourpreviouspasswordsandforms,multipleforms,abilitytoautofill.
Weaknesses: Huge list to go through if importing from many browsers plus your keychain, the sudden need
to change all your passwords on many, many sites.
For a demo of this product: http://1passwd.com/downloads
Introduction
1Passwd is what the Keychain was supposed to be. It is technically a “Password Manager and Form Filler that
goes beyond the basic AutoFill features while also working seamlessly across browsers. With 1Passwd you will
never need to manually transfer passwords or saved forms between browsers each time you need to switch.” It
allowsyoutofillinmoreinformation,yetstilluseskeychaintotakeadvantageofit’ssecurity.Theapplication
allowsyoutocreatemultipleidentities,keepingtrackofmultiplecreditcards,andtheabilitytofilloutformsin
every browser, including Firefox. It too can generate and remember strong passwords and prevents phishing by
onlyfillingouttheproperformthatyouoriginallysignedinon.
Getting Started
1Passwd is one of those programs that you don’t really hear about, and you don’t know that you really need it
(until you have it.) It’s an application that I found through Don McCallister’s ScreenCastsOnline, then had the
opportunity to try it out for myself when I received a copy from MacHeist. As soon as I started using it, I knew
that I needed to have and buy an upgradeable copy.
1Passwd installs as well as a Mac program should. After installation, it can basically take over your keychain
andbrowserauto-fillfunctions.Atfirst,itcanimporteverythingfromyourkeychainandallyourauto-fill
browser information. You can decide which browser you would like it integrate with, usually putting a 1Passwd
symbol right next to the Address Bar.
Speakingofinstallations,AgileWebSolutionshasimplementedanewlicenseverificationfeature.Findout
more about it in my column this month, MacFevre.
© MPN, LLC 2007 macCompanion
Page 27
May 2007, Volume 5 Issue 5
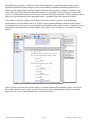
Using the Software
After importing your keychain and your browsers information, the database can become a little unwieldy at
first. To keep your data most secure, you should now turn off your browsers ability to save your passwords and
auto–fill. This will all be taken over by 1Passwd. One of the apps new features is when you fill in a password
for the first time, or use 1Passwd’s ability to create a new password for you, it now gives you a pop-up window
asking what you would like to name the new 1Passwd title for that particular item. Trust me when I say this is
a good thing. For after the initial imports and before this feature I have pages of passwords and forms that start
with (Imported:) or (Auto saved;) Sometimes when I use the key symbol to pull out the password for a site, I’m
greeted with three or four different choices for that site. One it imported from the site before I had 1Passwd, one
that auto saved it when I imputed the information by hand, and another that who-knows where it came from.
I’ve been slowly going through and clearing out all the debris, whittling it down to one input form a website. It
becomes very easy to input after that.
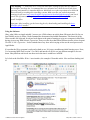
Passwords, of course, are not the only things that 1Passwd is good at. Besides keeping your web forms, It will
keep Secure Notes, different identities for different online personalities, e-mails, addresses, credit cards and the
like. It also keeps a Password History of the last 100 passwords that you let the application create for you, just
in case you forgot to save it when you inputted the form.
Folders and smart folders are also an integrated part of the program, letting you decide which folders you can
place which forms, passwords, or notes. After all these are to your liking, you can lock down 1Passwd, and the
only way to input or retrieve any passwords or notes is through the master key. If you are at home and there
is not much of a chance of people getting into your stuff, you can be very liberal with the key, having to input
it only after the computer comes out of sleep or the initial logon. If you use it at work, you might want to reinput the master key when coming out of screensaver or actually have a time limit, putting the key in every
hour or so. Again stressing that if you lose the master key, you lose it all. You will have to start over with a new
keychain.
Conclusion
Again, this is one of those “desert island” programs. I couldn’t live without it now that it has become so
integrated with my workflow. At the beginning of the review I mentioned that one of the weaknesses of the
program is getting the sudden urge to change all your passwords. That’s because I, unfortunately, used to use
basically the same password, with a little change here and there, for every site I signed up at. I know, bad habit.
But with 1Passwd this is a habit that is in the past because of the ease of creating new ones, and not having to
remember every one of them. There are other abilities that it will do (like .Mac integration,) and programs that
go along with it, such as 1Passwd for Palm and Allbookmarks that should also be checked out.
Recommendation
If anything, try the free version of 1Passwd! It only lets you create 1 identity and 12 forms, but it will give you a
good idea of the time it will save you. There are also screencasts on the website, as well as a ScreenCastsOnline
screencast on the application. Take a look at them and see if 1Passwd is for you.
© MPN, LLC 2007 macCompanion
Page 28 May 2007, Volume 5 Issue 5
CocoaSuite 1.04
Reviewed by Robert Pritchett
Developer: Gerd Knops
BiTart
13619 Summit Lane
Minnetonka, MN
Fax: 1-952-932-2847
http://www.bitart.com/
[email protected]
http://www.cocoasuite.com
Released: June 6, 2006
$15 USD 30-day free trial.
FAQs: http://www.cocoasuite.com/faq.html
Manual: http://www.cocoasuite.com/Manual/index.html
Requirements: Mac OS X 10.3.9 or later.
Strengths: Control Cocoa Apps.
Weaknesses: Is not located in the Applications Folder. Found in Username > Library > InputManager. Be
cautious about localizations. There may be some program interference.
For a demo of this product: http://www.cocoasuite.com/download.html
Other Reviews: http://www.rousette.org.uk/blog/archives/2004/08/08/cocoasuite/
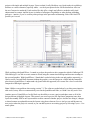
Introduction
CocoaSuite is a suite of utilities that enhance the ways in which you can control Cocoa applications: Mouse
Gestures, add or modify keyboard shortcuts, Mnemonics, TextSnippets and a virtual scroll wheel/jog dial for
laptop users are amongst the many features. CocoaSuite replaces the earlier CocoaGestures.
All features can be mixed freely. For instance, you can assign a Mnemonic to insert text into your application.
Or use a Mouse Gesture to execute a script. The possibilities are endless.
Gestures are especially useful in situations when you are using your mouse and don’t want to move your hands
to the keyboard to execute a command.
CocoaSuite comes with English, Japanese, German and French localization, the manual is available in English
and Japanese.
Getting Started
The app loads off the website just fine, but it takes a while to find it. It lands in Username > Library >
InputManager.
© MPN, LLC 2007 macCompanion
Page 29 May 2007, Volume 5 Issue 5
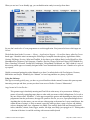
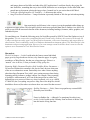
When you are in a Cocoa-friendly app, you can find the mint-candy icon and go from there.
So you don’t need to be a Cocoa programmer to use this application. You just need to know which apps are
Cocoa!
The defaults found in the Username > Library > Applications Support > CocoaSuite shows .plists for Cocoabased apps. I found the mint icon among the following as I sampled down through my Applications folder;
Camino, FileMerge, Preview, Safari and TextEdit. It also shows up in Address Book, Audio Hijack Pro, Alias
SketchBook Pro, Business Card Composer, ClamXav, DayLite, Deeper, Delicious Library, DEVONthink Pro,
Disco, DoorStop X Firewall, FeedforAll, FotoMagico, GarageBand, GeekBench, etc. This is kind of a way of
discovering which apps were actually designed with Cocoa in mind and which are not. I found it to be quite an
eye-opener.
I highly recommend getting the online Manual to see how CocoaSuite deals with Text Snippets, Gestures,
Mnemonics and Scripts. Thankfully, the “Manual” isn’t too long and there are plenty of pictures.
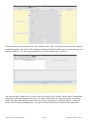
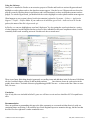
Using the Software
This app is so totally geekily easy, you have to get real familiar with the manual, because this opens up some
interesting concepts and ideas you may not have been aware of before. Gestures? Mnemonics?
Argy1 wrote in VersionTracker –
This gestures app is absolutely amazing and Text Edit is at the mercy of my mouse now. Making a
gesture is basically squiggling some shape or other with your mouse while holding down Ctrl, or alt or
any one of three other “modifiers”. Cocoa apps recognise the gesture and depending on what you have
programmed into the preferences, the app will open new files for you, save, open print dialogue boxes.
Anything that is in the menu, you can activate without going to the menu bar. It may sound bizarre, but
within an hour of using it, it feels so natural, especially when you have a page of text to edit. Adding
colours, changing fonts, sizes, alignment is a doddle. You can flick backwards and forwards between
italics, underline, colours, fonts, bigger, smaller, left align, need Help, just squiggle an “h”. Editing takes
a fraction of the time it would be working with a mouse and keyboard.
© MPN, LLC 2007 macCompanion
Page 30 May 2007, Volume 5 Issue 5
The Gestures install very easily – i.e., you drag the downloaded Input Managers folder into your home >
library. Done. Thereafter a gestures item will appear in any Cocoa application menu THE NEXT TIME
YOU OPEN THAT APP. Don’t loose heart like I did and neglect to close Safari, Mail, Address book
before taking a look and wondering where on earth the Cocoa gestures option had gone!
So, for Text Edit for instance, launch it, click on Text Edit in the menu bar and open the preference panel
for Cocoa Gestures. You have to define a modifying key and a mouse button. I chose Ctrl and elected for
the left mouse button. Then you record your preferred gesture, say a circle to “O”pen a new window. It
is like adding a playlist in iTunes. You select ADD, double click the blue cell, and then its nothing like
iTunes, because a big empty window/drawing pad appears for you to record your custom gesture. Then
define the action by going to Text Edit and selecting File > Open. That’s it. The next time you make a
rough circle on a Text Edit window with Ctrl and left mouse button pressed down, another window will
open. Do an “S” for save, select File > Save “u”ndo, “h”elp, “b”old “p” for print and so it goes on. Z for
zoom, f for fonts... I think anyone used to writing “shorthand” on a Handspring type device will pick this
up in no time. I can’t stop grinning, this is so neat. I trust that it is stable, it is very OS X and just feels so
Mac.
Now that I’m using this left-handed Evoluent VerticalMouse 2 (reviewed elsewhere in this issue of
macCompanion), I have found that Gestures are important enough that I can do things I would otherwise be
fiddling with, by taking my hand off the mouse and migrating to the keyboard. Now I don’t have to as often,
again depending on which Cocoa-friendly app I’m in.
Conclusion
Are you ready and open to reaching outside your comfort zone a little and trying new things? Because
CocoaSuite is all Cocoa programming, I’m guessing the functionality will either be in Leopard or it will
continue to work with Leopard.
Recommendation
This is a try-before-you-buy application for Mac OS X. Gerd Knops keeps working on this app that is well
over 2 years old, so it has had time to mature. If you are familiar with CocoaGestures (there were over 100,000
downloads listed at one time), than this is the replacement program.
Go give it a try. You have nothing to loose and maybe some timesaving things to gain. After all, isn’t that what
the Mac is all about?
© MPN, LLC 2007 macCompanion
Page 31 May 2007, Volume 5 Issue 5
CopyCatX 4.0 – Disk Duplication Software for Mac OS X
Reviewed by Robert Pritchett
SubRosaSoft, Inc.
[email protected]
http://www.subrosasoft.com/
Released: November 5, 2006
There is a try-before-you-buy option demo.
System Requirements: Mac OS X 10.3 or later;
256MB RAM; CD/DVD-ROM Drive; Secondary
storage device.
Strengths: Will duplicate using “Sector Copy” then it
will resize, so no space is wasted. Allows for graceful
recovery from bad data.
Weaknesses: Will not duplicate software RAID arrays. When duplicating volume sonly works with Apple’s
HFS+ file system format.
Introduction
CopyCatX is designed for data backup, recovery and restoration in Mac OS X;
• Backup and restore a volume.
• Duplicate a device or volume to a disk image or other devices.
• Recover to an image the contents of a faulty device or media.
CopyCatX is device and file system-independent application, which means that you can create disk images
from any normal Mac OS hard drive, Windows or Linux device. It can also recover data from a faulty device or
scratched CD, and almost any other media or file system that can be recognized in Mac OS X.
Despite its advanced features and high-performance, CopyCatX is very straightforward to handle. The easy-touse interface is designed with any level of OS X user in mind and is highly accessible to all with, at its core, the
entire application being designed to be able to complete any task within just a few clicks.
Written specifically for Mac OS X, CopyCatX includes powerful features that give the user greater control and
flexibility in backup, restore, recovery and the duplication of data:
Safety first - CopyCatX will never write to the device being duplicated. This makes the software “risk-free”.
Instead it simply reads the device, block-by-block, using the fastest means possible to copy the data to any
given destination.
Backup and restore – CopyCatX can be used to backup or restore a device, to or from any readable. With just a
few clicks a device can be backed up or restored, making the task of securing data an easy one.
© MPN, LLC 2007 macCompanion
Page 32 May 2007, Volume 5 Issue 5
Multi-volume output - CopyCatX can output to up to 15 devices at a time. This is useful for lab deployment of a
single system, allowing the user to make multiple copies of either a single device or volume.
Duplicate Windows – CopyCatX has the ability to duplicate a single Windows volume, which can then be
mounted and restored back at a later date. This is exceedingly useful for BootCamp users on Intel-based
Macintosh systems.
Faulty hardware - CopyCatX also has the ability to recover data from mechanically unsound devices or
scratched media. The software uses proprietary methods to securely read the data, automatically skipping areas
of the file system that are unreadable. As a result, by employing these methods, CopyCatX is able to recover
data from sources that other software would be completely unable.
Optimized for Intel – The latest version of CopyCatX not only has been optimized to run with Intel-based Apple
Macs but now comes with a dual boot CD, making the entire process of backup, recovery and duplication a
much simpler one.
Getting Started
If you are unable to get a copy of MacForensicsLab (reviewed earlier in macCompanion Magazine), CopyCatX
is essentially a subset tool of that product, as is FileSalvage (also reviewed earlier).
Loading from the CD was no problem. There is a rather long Serial Number that has to be registered though.
The DVD comes with a 41-page PDFed version of the Manual that becomes the Help tab.
Instead of being placed in the Applications Folder, CopyCatX gets installed in the Username > Library >
Application Support folder.
Using the Software
If you intend to do a disc copy of a software-based RAID array, this app is not the one to use for that purpose. It
does 3 things really well – and that is a 4th thing it does not do.
© MPN, LLC 2007 macCompanion
Page 33 May 2007, Volume 5 Issue 5
CopyCatX is a volume or complete device backup app and does not backup individual files or folders and
requires both the source and target volumes to be unmounted. You will want to work off the CD/DVD when
using CopyCatX, because you cannot work from the same physical disc the computer uses to boot from and the
CD is a Boot CD.
In Recover mode, writing to CD-R or DVD-R is permitted, allowing for either breaking up data across new
media or if failed media is encountered, to pick up where it left off.
Conclusion
If you are looking for “peace of mind” for protecting your computer’s crown jewels, then this might be a good
way to go.
Recommendation
Sometimes the simple solutions work best. Why not give it a try?
© MPN, LLC 2007 macCompanion
Page 34 May 2007, Volume 5 Issue 5
Desk Doctor 1.1.9
Reviewed by Robert Pritchett
Developer: Dr. Russ Hornstein
Einspine Ltd.
PO Box 106
Sliema SLM 01
Malta (Europe)
365-2122-6733
[email protected]
http://www.einspine.com/
Released: December 13, 2006. Updated February 5, 2007.
$129 USD download, $139 USD CD, 30-day money back
guarantee. 14-day trail http://www.einspine.com/support/download_index.html
Low-Res - either 29 MB (Mac) or 23 MB (PC) or High-Res – 298 MB (Mac) or 180MB (PC).
Requirements: Mac OS X 10.2.7 or later; QuickTime 7 (Mac) or Windows Media Player (PC) 256 MB
RAM, 500 MB Disk Space.
Strengths: Cross-platform. Provides a process to practice healthier computing.
Weaknesses: Audio feed apparently does not work as advertised? Sucks up considerable computing
resources.
Other Reviews: http://www.einspine.com/company/press_clippings.html
Introduction
“Desk Doctor is new software that identifies Repetitive Strain Injury (RSI) and targets it accurately with a
personal treatment plan. First the program guides you through on-screen medical tests. Then Desk Doctor uses
its built-in reasoning to compile the optimum video-guided exercise program to reverse problems and keep you
healthy.
It is important to set up your work area so that
it supports a balanced posture. This is a passive
measure. Breaking up periods of work with
regular exercises is an active measure. Such
active measures do more than just reduce RSI
risk, they promote greater strength and resilience
to stress and injury.
Passive measures
Passive measures include changes to the
environment that support a balanced body
© MPN, LLC 2007 macCompanion
Page 35 May 2007, Volume 5 Issue 5
posture, neutral positioning of keyboard, mouse and monitor and as well as glare free lighting, fresh air, etc.
Well implemented passive measures reduce stress and strain on the body and thus limit the risk of injury.
Active measures
Active measures produce physical changes in the
body through physical activity - typically exercises.
These make the body stronger and more capable
of withstanding the stress and strain of using a
computer. A good exercise program, such as those
provided by the Desk Doctor program, comprise
‘specific’ exercises. These are specific in two ways.
Firstly, they are designed to counteract a specific
problem in a joint, muscle, nerve or tendon, in
the most effective way. Secondly, the program
is constructed especially for a specific person.
Necessarily based on the results of medical tests, a
specific exercise program is carefully tailored to a
person’s own particular condition and needs.
Active measures rehabilitate problems
Active measures not only prevent musculoskeletal problems from arising but also rehabilitate problems that
already exist. This is something that passive measures alone cannot do. The Assessment module of Desk Doctor
detects existing problems and includes rehabilitation exercises in the resulting Personal Exercise Plan.
Recommendation
The most complete and effective approach for computer use health is to invest in both a good ergonomic
workplace setup and a system that provides a specific exercise plan.”
Getting Started
There are two versions of this software. One is a low-res and the other is high-res. The High-res download
is 298MB for the Mac and 180 MB for the Windows environment. For the Mac, a folder is created that goes
into the Applications folder. When I upgraded from the Low-res to the high-res I had to re-register, but the app
remembered my assessment info from the low-res version.
There are 5 parts to this program –
1) Assessment with orthopedic tests (upper-body health to detect RSI conditions - http://www.einspine.
com/deskdoctor/features_rsis.html),
2) Personal Plan (prevention and rehab with 100 exercises - http://www.einspine.com/deskdoctor/3_
personal_plan.html),
3) Health Score (health risk monitor - http://www.einspine.com/deskdoctor/4_health_score.html),
4) Exercises (workstation breaks - http://www.einspine.com/deskdoctor/5_exercises.html) and
5) Monitoring “hover” (mouse gripping without moving alert - http://www.einspine.com/deskdoctor/6_
hover.html).
There is a Tutorial for Part 1 of 2 parts of the Assessment.
© MPN, LLC 2007 macCompanion
Page 36 May 2007, Volume 5 Issue 5
Using the Software
There are 15 tests in the Assessment process. I
think the instructress must be double-jointed,
because I sure can’t bend my body parts like
she does!
The evaluation runs from no pain, slight
pulling sensation without pain, moderate puling
sensation and/or discomfort, sharp pain and
numbness and/or pins and needles sensation.
When I tried to get the “Speak text when video
plays” to run, the resources used went way up
and I heard no sound, so turned it off because
it really affected the video presentation.
© MPN, LLC 2007 macCompanion
Page 37 May 2007, Volume 5 Issue 5
Next after going through the 15 tests, the
results appeared and a Create Exercise Profile
button appeared. There is an option to redo
any of the tests.
Now the fun begins –
Indeed, there are a number of exercises
and the instructress shows how for the time
allotted for the exercises.
The Desk Doctor will pop up on the
screen while the computer is on and show
exercises that can improve my physical
stress situation.
Here is a snapshot of my Activity
Summary. It looks like I have a ways to go
to improve my Physical Fitness regimen on
my Mac.
As you can see, the on-screen DeskDoctor
window changes interactively as the
day progresses. I am obviously not very
healthy with my computer practices.
The background of the Desktop window
changes color as well. Red is in the danger
zone. ;^)
And as long as Desk Doctor is on, it will
keep monitoring my health as I work on
my computer.
Preferences can be changed so that alerts can come on every 10 points of the Health Score goes up or down.
© MPN, LLC 2007 macCompanion
Page 38 May 2007, Volume 5 Issue 5
The program does tend to be a resource hog and sucks up a lot of CPU time and interferes with response from
other memory-intensive programs. Be aware that this app does take considerable CPU resources to run over
time and may interfere (it does on my machine anyway) with other apps that are also CPU-intensive. But then
again, the video exercises are excellent.
Conclusion
If you want to still do computing and get yourself rehabilitated without having to go to a physical therapist, this
program may fit the bill. What does it cost to go in for surgery for Carpal Tunnel or Repetitive Stress Injuries?
This app is cheap insurance.
Recommendation
When you have your health, you have everything. When you don’t, you cannot get work done and life can just
be a pain. By using this app either on a Mac or other computers, the practice of preventive medicine can go a
long way in improving your computing quality of life.
This app is more than just a stretch of your imagination. Desk Doctor helps with upper body muscle and skeletal
relief from stress and strain caused by sitting at a computer all day and/or night.
© MPN, LLC 2007 macCompanion
Page 39 May 2007, Volume 5 Issue 5
Disco 1.0.2
by Michael Potter
www.discoapp.com
$30 USD
System Requirements: Mac OS X 10.4.3 or later; Universal binary;
CD or DVD Burner. “Smoke” requires a recent Mac with modern
graphics card.
Strengths: Motion sensor support, Disc cataloging, Elegantly simple interface.
Weaknesses: Currently lacks Blu-ray and HD-DVD support.
For a demo of this product: http://discoapp.com/download.php
Introduction
CDandDVDburningisoneofthoseutilitiesyoueitherfindyourselfcontentusingthebuiltinfunctionalityof
the operating system or quickly outgrow it. OS X’s burning functionality is spread across multiple applications.
UseFindertoburnfiles,DiskUtilitytoopenandburnISOorDMGimagestodiscandifyouwanttocreate
amusicCDfromacollectionofMP3orAACfiles,useiTuneswhich,asweallknow,doesnotverifyburned
discs to ensure they’re coaster-free.
Onthecommercialsideofthings,theestablishedburningapplicationforyearshasbeenRoxio’sToast,afine,
thoughperhapsbitoverstuffedwithfeatures,programifallyou’relookingtodoiscreatediscimagefilesor
burn your data off to DVD for long term storage.
Disco steps in quite comfortably between the two extremes to provide all those features plus a couple extras in
one, convenient, interface.
Getting Started
As all good Mac programs do, Disco installs with a simple
drag and drop to your Applications folder. It is a very
lightweight program taking up a meager 4 MB of your
precious storage space.
Whenstarted,thefirstthingyou’llnoticeisthesparse,high
contrast, interface. Rather than the typical OS X grey on white
window, Disco sports a refreshingly unique window made up
of blacks, grays and whites – including the close, minimize
and zoom buttons!
This interface is one of the things I’ve heard Disco criticized the most about. I don’t understand this criticism
though. It’s not like Apple themselves don’t break this “rule” of interface design. From a usability standpoint, I
© MPN, LLC 2007 macCompanion
Page 0
May 2007, Volume 5 Issue 5
reallyliketheblackwindowbecauseithelpsmequicklylocateDiscoinExposéwhenI’mdraggingfilestoit
from a Finder window. Frankly, one of the reasons we’re Mac users is because we “Think Different” so aren’t
the calls for conformity from the likes of a simple disc burning application a bit hypocritical?
Joking aside, there arefolksforwhomthiswhiteonblackinterfacemightbedifficulttoworkwithandfor
them, it would be nice if Disco allowed for simple adjustment of the color scheme in the preferences.
Speaking of preferences, Disco has a few you may want to tweak from the start.
The General tab is where you can turn interface transparency on or off, check for updates, enable a cool
featurecalledDiscography,tweakfilenamingandsetyourdiscimagepreferences.TheBurningtabletsyou
setupSessionCDs,turnoffdiscverificationandadjustthesettingsforyourburner.Finally,theSmoketab
is what’s been giving Disco all the press because, not only does Disco burn your discs, but it smolders in the
process!I’mthesortofpersonwholikesabitofeye-candyinmysoftwareandSmokeisdefinitelyeye-candy
– interactive eye-candy at that!
Withthesmokeeffectturnedon,you’llseesomethinglikethiswhileyourfilesareburning:
© MPN, LLC 2007 macCompanion
Page 1
May 2007, Volume 5 Issue 5
What makes it interactive is quickly discovered if you drag the mouse cursor through the smoke as it billows
from the top of your Disco window. In an amazingly realistic bit of animation, the smoke is “pushed” around
by your mouse cursor. You’ll discover other fun things to do like blocking the smoke with your cursor and
watchingitflow aroundthearrow.AdjustingtheSmokepreferencesallowsyoutoenableothercoolfeatures
like microphone input that lets Disco “listen” to the noises around it and react to them. Lastly, you can switch
to other styles of smoke such as Fire, Goo or even Purple Haze. If you’re feeling particularly creative, you can
modify the smoke to your own style, though there’s no option to name and save it. Of all the styles, I found
Smoke and Steam to be the most realistic looking with Fire in a close third.
Smoke is one of those features you’ll either like or dislike intensely. I doubt anyone will be ambivalent about
it. Fortunately for those folks on the “dislike” side of the fence, disabling Smoke is a simple checkbox in
Preferences.Smokeisafeaturethatiscertainlycool,butIwouldhesitatetosaythatSmokeiswhatdefinesthe
program and you shouldn’t think this way either. Disco is a very capable disc burning application – with one
feature I’ve not come across before – and its strengths as a disc burning tool are what the rest of this review will
focus on.
Using the Software
There is no better way to put a program like Disco through its
paces than to burn a couple discs with it. So with a few gig of
filesgatheringdustonmyharddriveplusastackofDVDsat
my side, I got to work.
Preparingadiscisasimplematterofdraggingthefilesyou
wanttoburntotheDiscowindow.Asyouplacefiles,Disco
keeps running totals for you. The top left corner lists the total
ofallfiles droppedandeachfileorfolderalsohasitssize
listed next to it. This, in particular, makes it quite handy to help
determine what should be pulled off if you need to make room
on the disc you’re burning. The top right corner shows the total
space available of the blank disc inserted into your drive. A nice feature of Disco is that you don’t have to tell it
thetypeofdiscyouwanttoburn.Itjustlooksatthemediaandfiguresthatoutallonitsown.
The top middle of the screen is where you enter the volume label. By default it reads “Untitled” and will remain
that wayunlessyouchangeit.ThereisanoptioninPreferencestohaveDiscopromptyouifyouneglecttofill
this in. Though off by default, I’d recommend turning this preference on because it is easy to forget to name
adiscintheheatofburning.Whenyouhaveallofyourfilesgatheredandablankdiscinserted,simplyclick
Burn andtheprocesswillstart.IfyourgoalistocreateafileforInternetdistribution,thenyoucanclickthe
Image button instead of Burn to create a DMG, CDR or ISO disc image.
As a more visual application, it should come as no surprise
that the window you see while the disc is burning has not
one, not two, but THREE progress indicators. You have a
percentage complete, an elapsed / remaining time counter,
and a nifty graphic indicating the disc space (dark grey),
spaceallocatedbyyourfiles(mediumgrey)andtheamount
burned so far (light grey). And, as an extra bonus, the Disco
dock icon also gives you a percentage complete status. So you
really have no excuse for not knowing when your disc will be
finished!
© MPN, LLC 2007 macCompanion
Page 2
May 2007, Volume 5 Issue 5
When the disc is complete, Disco will automatically check the structure to ensure everything
worked correctly. Though you can turn this double check off – or skip it once it’s begun – I’d
recommend leaving it on unless you’re really pressed for time.
In all the time I’ve used Disco, I think I’ve created a “coaster”
onlytwiceanditwasalwaysfoundoutduringthisverification
stage.
In another nice touch, when the disc is complete, you’re
presented the option to create a New disc, Eject the just
completed disc or, what I use all the time, Reburn the disc.
Very handy, if you want to make a few copies for archival
purposes.
Disco is one of those programs that will make a best guess at
what you might want to do based on the actions you take, but, unlike many other programs of this variety, Disco
letsyouoverridetheseguessesbeforeproceeding.Ourexampleabovewasasimpleoneofburningdatafiles
toaDVD,butifIweretodragMP3filestotheDiscowindowitautomaticallyswitchestoAudioDiscburning
mode or if I drag an ISO to the window it knows that I am likely to want to burn that image as a CD or DVD.
However in each of those cases I can click a drop down menu in the top right corner and change it to a “File
Disc” if I intend it to be that way.
IfyoudragtoomanyfilestotheDiscowindowtofitonthe
media you’ve chosen, Disco will not throw a bunch of ugly
warnings up on screen telling you what a dolt you are for
going over the limit. Instead, it will automatically switch to
“Spanning”modeanddividethefilesoverasmanydiscsasit
takestofit.Anditwon’tuseanyspecialformattingtodoso.
It just makes a logical split and prompts for discs as needed.
If you don’t want to span discs for some reason – and I could
think of many – then the information presented to you in the
Disco window is enough to let you know that Spanning will
occurandgiveyouthechancetopullsomefilesbackoutof
the disc layout.
ThelastfeatureIwanttodiscussistheDiscography.Thisisagreattooltohelpyoulocatefileslongsince
burned to disc. A real world example of where it could be used would be the creative department at my day
job.Theyareconstantlyburningoldfilesofftodiscandthenuseanarchaicmethodoflocatingthosefiles
should a client come back 8 months later looking for a particular design. With Discography, each disc burned
is cataloged and the content made available through a search window. A few keywords typed in will help locate
aparticularfileorfolder.Whenafileisfound,you’llbegiventheDiscname,thedateitwasburnedaswellas
thepathtothatfile on thedisc.
© MPN, LLC 2007 macCompanion
Page May 2007, Volume 5 Issue 5
A nice touch added to Discography is the ability to add discs
to the catalog that weren’t necessarily burned by Disco. Insert
the disc and click the “+” button next to the search bar to add
the disc to the catalog. It would be cool if Disco could utilize
Bonjour on a local area network to search other Discography
catalogs but currently this is not an option.
Unfortunately, the only problems I ever encountered with
Disco happened when accessing Discography. Though it’s
only happened to me two or three times, I’ve had my MacBook
Pro crawl to a stand-still after calling up the Discography
window. Funny thing is that Force Quitting Disco didn’t always bring things back to normal. In one case, I had
to log out and back in to restore order. Strange for certain and not always reproducible, but I thought I should
point it out. Being a relatively young application – an application that is in very active development – I don’t
expect this problem to linger too long.
Conclusion
Throw in extra features such as Session CD creation, DVD burning from VIDEO_TS and AUDIO_TS folders,
simple disc copying and working with RW discs, and you can see that as a burning application, Disco is very
capableandlikelytofillallofyourimmediateneeds.TheareaDiscofallsshortatthemomentislackof
support for the new hi-def disc formats; Blu-ray and HD-DVD. Though this is promised for Disco’s future, if
you are ahead of the curve and need to burn these disc types today, then you’ll have to look elsewhere, but for
everything else, Disco should take care of you.
Recommendation
IwoulddefinitelyrecommendDiscotoanyonewhofindsthemselveslimitedbyOSX’sbuiltindiscburning
but doesn’t want to shell out nearly $100 to get an overstuffed application like Toast. Disco has been my
primary disc burning application since its early development days and I’ve come to rely on it to create discs I
canconfidentlyhandofftoanyonerunningMacorWindowsandknowthey’llbeabletoreadit.Ilikeitso
much, I have multiple licenses: one for each of the Macs I regularly burn discs at. Download the demo and give
it a spin to see if you don’t agree.
© MPN, LLC 2007 macCompanion
Page May 2007, Volume 5 Issue 5
Dramatica Pro
Reviewed by Mike Hubbartt, © 2007
Company: Write Brothers, Inc
(818) 843-6557
www.screenplay.com
$269 USD
System Requirements: PowerPC G3 or greater CPU; OSX 10.2 or greater
(10.3 or greater recommended); 128 MB RAM; 30 Megabytes of Hard Disk
Space; CD-ROM drive
Strengths: excellent way to keep story elements organized, can export story content into Screenwriter, easy to
learn, export content to Movie Magic Screenwriter or as text.
Weaknesses: some people do not believe a tool like this is useful and may be critical of people that use it to
produce a story; a bit pricy unless you want serious help with story structure
Download a free demo: http://www.screenplay.com/products/demoform.asp?productKey=macdramatica (9.1
MB)
Introduction
Novelists, screenwriters and Playwrights have something in common: their material needs to be structured.
Let’s be clear on something: structure does not imply formula – the terms are not synonymous. Novels have
structure, as do plays and television shows and movies. Story structure is like the structure of a house. The
house frame provides the place to add the walls, windows, doors, plumbing, and electrical wiring. Without the
frame, a house is a pile of rubble waiting to become a home. The same paradigm applies to stories. Stories have
characters facing problems. These elements are the framework of stories – novels, plays, television, movies, etc
– and another important piece of the framework called conflict drives the story forward.
Some authors like Stephen King have the education and ability to keep novel elements in their heads and use it
while they create their tales that enthrall us. I’m not a horror fan, but I truly love reading some of King’s books
as they are so well crafted and I have a hard time preventing myself from turning to the next page. Stephen King
and authors like him that consistently produce quality stories year after year, and they are wonderful.
On the other hand, some people with less education or no experience writing novels find they experience
roadblocks when trying to tell a story that sustains itself throughout the book. It is difficult to tell a story about
characters on a different world or that live in a different time than in the current world. To sustain key setting
or political or sociological details of a story with characters in an unfamiliar place requires a tremendous
imagination and memory, copious notes, or a product like Dramatica Pro. We can’t help you with options 1 or 2,
so let’s look at option 3 – Dramatic Pro.
© MPN, LLC 2007 macCompanion
Page 45 May 2007, Volume 5 Issue 5
Getting Started
Dramatica Pro is available on disk or by download. I ordered and installed the product on my G5 iMac and it
was fast and easy. No errors and no problems. I started Dramatic Pro and saw there are two options: create a
new blank story or create a story using the Novel, Screenplay or Short Story templates. In either case, you see
the main options toolbar.
This is where you:
- LaunchtheStoryGuideandfillinstorybackground
- Get online Help from the Write Bros website
- Open an existing Story
- Work on existing or add new Characters
- View Plot Progression
- See a graphic view of story theme elements
- Use the Dramatica Dictionary to look up terms and synonyms
- Create a story form with the Story Engine
- View and enter Story Points
- Generate Reports and export content to other applications
- Do Brainstorming and create new characters
To initiate an option, just click on the area and follow the prompts, but before you get started, you should check
and set any personal preferences. There are four types of user preferences in Dramatica: General, Report, Query
System and Term Swap.
© MPN, LLC 2007 macCompanion
Page May 2007, Volume 5 Issue 5
Select any of the four categories on the left of this screen, then you’re ready to start work on your story. To
create a story, select File - New – BlankStory from the menu (or click on the StoryGuide area of the main
toolbar) and you see this screen:
After selecting Level One, Level Two or Level Three from this screen, you will answer 60 to 250 background
questions for your story. An example of the title screen is shown below:
There are various questions to answer, depending on the Level you chose in the previous step. After entering
character background information in section one, it is time to create the story structure. Just as in section one,
answer the questions then move on to the next areas: Illustrating, Storyweaving and the Epilogue.
© MPN, LLC 2007 macCompanion
Page 7
May 2007, Volume 5 Issue 5
After you answer the questions in the StoryGuide section of the product, you can still work on the details.
To work on characters already entered during Section One of the StoryGuide interview process, select the
Characters area of the main options toolbar. You not only see the characters already created, you can modify,
remove or add characters as needed – no need to go back through the interview process you did when starting
the story. And yes, you can add new characters that occurred to you at other points of the interview process.
If you want to see the plot progression for the story – really useful for scripts – select the PlotProgression area
of the main options toolbar. If you want help with story structure elements, select the ThemeBrowser area of the
main options toolbar. This is helpful to new writers need to better understand the aspects of situation, activity,
manipulationandfixedattitudethataffecttheevolutionofeventsthatpropelastory.
For help understanding the elements of this product select the Dictionary area of the main options toolbar. The
listofinformationisdisplayedbyclassificationoralphabetically.
If you start a story and want to return later to add details or modify the materials, select the QuerySystem area
of the main options toolbar. If you feel comfortable as a writer or comfortable with Dramatica Pro, you’ll want
to bypass the StoryGuide and work with the advanced controls in the Story Engine, accessed by selecting the
StoryEnginearea of the main options toolbar.
If you want to work directly on the story points of your work, select StoryPoints area of the main options
toolbar.Thisiswhereyoucanenterinformationtofinetunestorydynamics.Andifyouwanttogeneratereports
© MPN, LLC 2007 macCompanion
Page May 2007, Volume 5 Issue 5
on your story, select Reports area of the main options toolbar. This is the place where you can export character
and scene information from Dramatica Pro to Movie Magic Screenwriter, or you can export the information as
text for importing into another application.
The last area of the main options toolbar is Brainstorming. This is the place to see if there is an existing
storyboard that already matches the information you already entered, or generates new characters for you to
help add interest and depth. You can use this to create 1 to 9 new characters, or you can let the software modify
existing characters.
Conclusion
Dramatica Pro will not create a story for you – it prompts you for the needed structural elements and you do the
creating. For people wanting to write stories but without the literary skills of an English major, this product is
useful and fun. While testing it I really enjoyed the process and found it helpful in crafting a story and keeping
track of the details that acted as the framework glue – my story made sense from beginning to ending.
Recommendation
It’s hard to fault a product that gets an endorsement from someone as talented as Wes Craven. His quote at
Write Bros’ website “At the beginning of the project, Dramatica Pro is great...It saves you time because you’re
not writing stuff you’ll eventually have to throw away because you hadn’t thoroughly thought it through.”
I feel this product is worth the time and money to purchase. If the price is too steep for your budget, consider
The Writer’s DreamKit, at $60 USD, a beginner’s version of Dramatica from Write Bros.
© MPN, LLC 2007 macCompanion
Page 49 May 2007, Volume 5 Issue 5
Lineform 1.3.1
By Mike Swope
Freeverse, Inc.
447 West 24th St.
New York, NY 10011
1 (212) 929 3549
Fax: (212) 647 0562
[email protected]
http://www.freeverse.com
Released: February 23, 2007 for version 1.3
$79 USD
Macintosh System Requirements: Mac OS X 10.3.9 or later; Universal Binary to run on G4/5 and Intel
Macs; Core Image Filters, Media Browser and Parse PDF requires Mac OS X 10.4 or later.
Strengths: Simple, well designed and implemented interface. Promising features comparable to other
illustration software.
Weaknesses: Core Image Filters, Media Browser and the ability to parse PDF all require Mac OS X 10.4
or later. Only PNG, TIFF and SVG can be exported with a transparent background. Raster export formats
limited to 300 dpi maximum. Does not export to GIF.
For a demo of this product: http://www.freeverse.com/download/select.php?name=lineform&platform=osx
Introduction
I’m a freelance graphic designer, creating and massaging
images for print and the web. I was interested in
reviewing Lineform as a possible replacement to the
expensive upgrade to Adobe Illustrator CS2 or CS3 in the
near future.
Like many freelance graphic designers, my needs are
relatively simple. I need to be able to create logos, import and edit logos and PDFs that have been emailed
to me, create and edit simple logos and illustrations, and reliably prepare all final files for offset press or the
Internet.
Since Lineform is marketed as an application to create simple logos to complex designs and illustrations, similar
to Adobe Illustrator, Macromedia Freehand and CorelDraw, I thought that Lineform might meet my modest
needs and those of other freelance graphic and web designers. Lineform, however, I’m sorry to say, is not ready
to take the place of these more capable illustration packages, despite its strengths.
© MPN, LLC 2007 macCompanion
Page 50 May 2007, Volume 5 Issue 5
Getting Started
Installing Lineform is easy. After download, just copy the application to your Applications folder, then launch it.
The Lineform download also comes with example artwork, including some outstanding illustrations created by
Lineform Contest Winners. These examples are, of course, professional quality, a testament to the potential of
Lineform.
Using the Software
Lineform’s interface is simple. Each document window features a customizable tool palette, like other modern
illustration software, so your preferred tools are always at your fingertips, as it were, never hidden behind other
palettes. That this menu is included in each document window is a simple but nice feature that reduces screen
clutter. By default, Lineform’s tool palettes contain 10 common illustration tools: selection tool, edit tool, brush,
pen, rectangle, oval, text, zoom, drag and dropper, and also includes buttons to access color and font palettes.
To add or remove items from the toolbar, right click on an item and remove it, or choose Customize Toolbar
from the menu. Other helpful items to have in the toolbar, for example, are alignment and combine tools.
Lineform’s palettes, called inspectors, are also well designed and implemented. Lineform’s inspectors are both
dockable and collapsible, to increase screen real estate, but still accessible with a single click, when needed.
Lineform’s inspectors are perhaps its best interface feature because they can be viewed or hidden with a single
click and docked together for convenience. They are novel in their simplicity. Unfortunately, the color and font
palettes are not inspectors and cannot be collapsed or docked to the inspectors or each other.
Lineform’s features compare favorably to other modern illustration packages, and in some cases surpass them.
Lineform supports layers, grouping, combining, clipping paths, strokes, fills, flip, image cropping (similar to
InDesign or QuarkXPress), opacity, blend mode transparency, complex gradients, grids (for alignment and
snapping), text fill for vector objects, arrows at the ends of lines, artistic strokes, text on paths, outline (make
text and strokes vector objects themselves to be filled and edited), rulers, guides, CMYK preview, outline view,
numerical transformation, export selection, and more.
Although I do not own the latest versions of Illustrator, Freehand or CorelDraw, I do own the latest version of
Canvas. With this in mind, it might be of interest to know that one feature in Lineform that I found particularly
unique and enticing is the ability to convert a bitmap image to Bezier and then manipulate it like a standard
vector object, including the ability to give it a stroke. A simple thing, I know, but something that I’ve not been
able to do before so easily. Ever try stacking a vector rectangle over a bitmap image such as a screenshot just
to give it a stroke? How about several bitmap images in a single document? Adding a stroke to screenshots and
images of book covers doesn’t get any simpler or convenient, even in Photoshop!
I was disappointed, however, to discover at least three features – Media Browser, Core Image Filters and the
ability to parse PDFs – are only available in OS X 10.4, so I could not effectively test these features without
upgrading my operating system. The Core Image Filters rely on Apple’s Core Image features in 10.4 to create
blur, make color adjustments and halftones, sharpen, and other alterations impossible with native vector objects.
The Media Browser provides access to images in iPhoto or anywhere on your hard drives for drag-and-drop
insertion into Lineform, but Media Browser is not required to insert files into your Lineform documents, since
drag-and-drop from the Finder into Lineform is also supported and functional in OS X 10.3.x. The ability to
parse PDFs is only available in OS X 10.4, but even then it is highly problematic (see chart below). If you want
to be able to use Lineform to its full potential, you will need to upgrade to OS X 10.4. This is a recommended
upgrade for stragglers like myself anyway. Lineform just gives us another reason to upgrade.
© MPN, LLC 2007 macCompanion
Page 51 May 2007, Volume 5 Issue 5
File Format
Import
Export
BMP
Yes
Yes
JPG
Yes
GIF
Yes
No
PDF
Yes
Yes
EPS
Yes
Yes
TIFF
Yes
Yes
PNG
Yes
Yes
SVG
Unknown
Yes
PSD (7)
Yes
No
AI (8)
No
No
Notes
Import met my expectations. Export likewise met my
expectations.
Import met my expectations. Export, however, does
not provide any control for quality or compression like
other illustration software. JPGs have more artifacts than
desired.
Importing met my expecations. Export to GIF not
available.
PDFs can be imported but not edited in OS X 10.3.9.
Parsing PDFs emailed to me for ads crashed Lineform
repeatedly in OS X 10.4.9. If Lineform does not crash,
text is unrecognizable, even with PDFs created on the
same computer with all fonts used in the PDF installed.
Exporting also performs as expected, but with white
background (see EPS below). Interestingly enough, PDFs
exported from Lineform can be opened in Illustrator 8
while EPSs cannot!
Imported EPS from Illustrator 8, but it is not editable,
treated as an image fill in rectangle. Exported EPS cannot
be read in Illustrator 8 or CorelDraw 10, and importing
into Canvas X results in strange, skewed CMYK colors.
Can be parsed by Photoshop without incident and placed
into InDesign 2, and may fare well in newer versions of
Illustrator. However, the background for a simple text logo
exports as white, not transparent as expected. A checkbox
for transparent background is available in the export dialog
box, but it is grayed out for the EPS option.
Import met my expectations. Export met my expectations.
Transparent background checkbox active for this format
when exporting, and background is exported as transparent
when this option is checked.
Import met my expectations. Export met my expectations.
Transparent background checkbox active for this format
when exporting, and background is exported as transparent
when this option is checked.
I’ve never used SVG for anything, but Freeverse makes
much of SVG. Unfortunately, I was not able to adequately
test this format.
Imported PSD from Photoshop 7, treated as an image fill in
rectangle, like a TIFF or JPG. No PSD export available.
Native Illustrator 8 file, imported but blank.
No review of illustration software would be complete without real world testing of importing and exporting.
Lineform itself is not designed to be used as an import/edit/export tool, apparently, since Lineform’s user
manual only lists the file formats it will export: BMP, JPG, PDF, EPS, SVG, PNG, and TIFF. Nevertheless, this
is common use for illustration software, so I tested Lineform’s import capabilities for BMP, JPG, GIF, PDF,
EPS, PNG, TIFF, PSD and AI(8), the latter out of curiosity. I tested on Mac OS X 10.4.9 (I upgraded my OS to
test import/export capabilities) using drag-and-drop from the Finder.
© MPN, LLC 2007 macCompanion
Page 52 May 2007, Volume 5 Issue 5
Conclusion
Having used Lineform for this review, I have found it more frustrating than enlightening. Though it has
some well-designed and engineered interface features, its compatibility falls far short of replacing Illustrator,
Freehand, CorelDraw or Canvas. In fact, I cannot honestly recommend it even for a companion for these
applications.
I’ve developed a short wish list for Lineform’s developers. Freeverse appears to be responsive, if their forums
are any indication, so perhaps we’ll find a considerably more capable application after a few releases. For future
releases, the following features will make Lineform more robust and useful for its target market:
• Stacking order, i.e. move to back and move to front, available by right clicking on objects, not just
through menu at the top of the screen.
• Improved PDF parsing capabilities (echoed in the Lineform forums). At least Lineform should not crash
when parsing a simple 2” x 1.5” ad.
• Improved EPS export to match other illustration software, i.e. transparent backgrounds.
• Improved JPG export with controls for quality and compression like other illustration software.
• GIF export for web images.
Recommendation
Before spending $79, consider what you really need your illustration software to do. If Lineform meets your
needs, Lineform’s the perfect choice. If you need greater compatibility and reliability, as one needs in the
professional graphics market, you should put your $79 toward acquiring Illustrator, CorelDraw or Canvas.
© MPN, LLC 2007 macCompanion
Page 53 May 2007, Volume 5 Issue 5
Meander 1.5
by Michael Potter
Meander 1.5
http://meander.macpaq.com
$20 USD
System Requirements: Mac OS X 10.2 or later; Universal binary.
Strengths: Quick map plotting, measure nearly anything.
Weaknesses: Limited export, minor interface quirks.
For a demo of this product: http://meander.macpaq.com
Introduction
I love maps, all sorts of maps. One of my favorite features of the National Geographic subscription are the pullout maps found in every other issue. And my greatest disappointment with the Mac platform is the lack of a
decent, consumer-grade mapping program similar to Microsoft’s Streets and Trips. So it was with great pleasure
that I had the opportunity to take a look at Actus Trading Ltd.’s Meander.
I’d taken a glance at Meander previously, but never paid much attention because I couldn’t quite grasp why,
withaccesstoGoogleMapsoranofflineprogramlikethepreviouslymentionedStreetsandTrips,youmight
needit.AfterfiringMeanderupforthisreview,however,Iquicklyfoundoutjusthowusefultheprogramwas
– and for more than just maps. More on that shortly.
Getting Started
Meander installs via the usual drag and drop method and takes just a few scant megabytes of hard drive space
once planted in the Applications folder. Removing the program is equally as easy, and a quick check with
AppZappershowedaverysmallfootprintwithonlyacoupletinysupportfilesinthePreferencesfolderand
Application Support folder respectively.
The interface of Meander is very clean and straightforward as well. As the following screen shot shows, you’re
presented with a simple toolbar across the top, a sheet of clear-blue “acetate” which serves as your overlay
on which you’ll plot your route, and a small scale “widget” that is used to help Meander accurately report
the distances of points plotted on the map you’re working with. The scale at the bottom can be relocated and
stretchedtofitthescaleofthemapyouracetateisfloatingover,andtheScaleDistancedropdownmenuallows
you to specify the distances in miles, kilometers, meters, feet, inches, centimeters and millimeters. Setting these
properly before you start your plots ensures accurate measurements.
© MPN, LLC 2007 macCompanion
Page 5
May 2007, Volume 5 Issue 5
Some of the more interesting features of Meander are positioned on the toolbar by default: Snapshot is used
to “link” a map image to the route plotted on the acetate and Journal is a simple notepad, but it can be used to
typeupinterestinginformationabouttherouteandstorethosenoteswithintheroutefile.Tokeepthingsfun,
Meander presents your journal in a top-bound spiral notebook format just like you might stuff in your back
pocket before trudging off to hike in the woods.
Using the Software
My initial thought was to grab a couple screen shots from Google Maps to get a feel for how Meander worked
and, while that was okay, it failed to show the uniqueness of this application. So I turned to a Google Image
searchtofindafewtopographicalmapstoplayaroundwith.Surprisingly,thisturnedouttobethehardest
thingaboutusingMeander.Icouldnotfindatopomapwithascaleonit!WhenIfinallydid,though,Ifiredup
Meander and got down to business.
To begin plotting out a route or take measurements, simply place and size the open Meander window over
the map you want to work with. That map could be in a web browser, Preview, Photoshop, iPhoto, or even
your Mac’s wallpaper. It doesn’t matter. What does matter is that you can see the scale on the original map
because, as I mentioned above, you want to ensure you’re working at the right proportions. In a wonderful
bit of usability, Meander’s scale can be dragged anywhere on the acetate and then easily resized to the proper
dimensions – even at an angle. I noticed the location of Meander’s scale tended to wander around the window a
bit – especially after retrieving saved routes – but it never lost its dimensions, so accuracy was never a concern.
Once the program is calibrated to your map, you can start plotting your paths. Simply pick a starting point and
click. Then each subsequent click plots another point at the location clicked.
© MPN, LLC 2007 macCompanion
Page 55
May 2007, Volume 5 Issue 5
When you’re ready to end your route, double click to place an end-point. The entire time you’re plotting the
path, Meander is keeping track of distances based on what you told it about the map.
In this example, I switched the line style to something a bit more visible than the default thin black line which
was nearly impossible to locate on the topographical map. In my testing, it appears Meander remembers your
preference for line style which is really nice.
You can see, based on the scale and Scale Distance setting, that this plotted route is just over 1.8 miles long.
A nice feature of Meander is the ability to “continue” the route from the last point added. So if I decided
that marching scouts two miles through these hills was not enough, I could add a couple more miles before
distributing the route to everyone.
I found the editing of plots made on the map to be twiddly. I could do it, but unlike the rest of the program, this
didn’t feel as natural as it should. I also had issues when I wanted to change the route by adding points to it. I
found the only way to do this was not to click the line to insert a new point as you might expect, but to add a
waypoint and then convert it to a regular point. I would also like to see more of these functions moved from the
menus to the context menus, because in this example of adding a point, I had to use the “Route” menu to add
the waypoint, but then I had to right-click that new point to convert it.
After spending so much time plotting out your route, the last thing you want to have happen is lose the map you
traced. Meander takes care of that problem with the Snapshot button. Pressing Snapshot embeds a picture of
whatever is under the acetate within your saved route. Sharp-eyed users will notice that after clicking Snapshot,
the button changes to “Clear Acetate”. If you have not yet saved the route with an embedded snapshot, don’t
press Clear Acetate unless you’re absolutely sure you want to lose the picture linked to your route.
After spending a considerable time plotting out a route, I clicked Clear Acetate to see what it would do and
quickly discovered it is a way to return to the non-snapshot view with noundo. I would like to see a warning
© MPN, LLC 2007 macCompanion
Page 5
May 2007, Volume 5 Issue 5
pop up before clearing the acetate, though I expect once you’ve clicked that button, you aren’t likely to click it
again unless you mean to! Though this does not touch your route, it’s still a critical feature to be aware of when
working with maps that you found on the Internet and maybe didn’t save a local copy of thinking that you had
it locked up with the Snapshot feature. Of course there are “outs” to this mistake. The most tedious is trying to
locate the map you used to plot your route and then lining your route up with it once again. The other is to open
up a saved copy of your route which should put you back where you were – provided you haven’t saved over it
in the interim.
In one testing session of Meander, I encountered a bit of trouble with the Snapshot button. It would not
automatically switch to Clear Acetate after taking the snapshot as it had on previous tests. Instead, it would just
keep taking snapshots. I thought for a moment that I had been misunderstanding the way Snapshot worked, but
a quick restart of the program restored its functionality.
A cool feature of Meander is the ability to attach images to your routes. Let’s say you’re plotting out a hike for
a group of scouts and you want to point out a cool rock formation or help them identify flora and fauna they
might encounter on the trail. You can attach images of those objects along with some comments to help explain
what they’re seeing.
I ran into an annoying problem when I used the Attach Image function to put interesting points on my route. I
found that if I deleted an attached image and saved the route, the attached image would reappear again the next
time I loaded the route. I could move it or make changes to it and those changes would stick through the saves,
but I could not delete it without it popping back up again the next time I loaded the map.
When your route is complete, you’re likely going to want to share that route with friends. This is where the
Export comes in. Unfortunately, export is somewhat hobbled at this point. In my testing, exporting your map to
a JPEG saves the image and the plotted route, but nothing else. There scale is there, but no distance information
and, more importantly, no image attachments – or even their locations.
© MPN, LLC 2007 macCompanion
Page 57 May 2007, Volume 5 Issue 5
When I tested the Export for E-mail command I had higher hopes, but those were quickly dashed when I
realized that the map could only be used by other Meander users. In all other respects, however, Export for Email worked as promised: As long as the person you’re sending the map to owns Meander, they’ll be able to
open the route, check out your attached images and even make changes to the route to suit their needs.
It seems to me that the Export function could be made much more useful if it would have an Export to HTML
function that would generate a “Web 2.0” page containing the snapshot, the route and all attached images and
present them all using CSS and JavaScript so that image attachments could be clicked to reveal the photo and
comments contained within. This would allow me to upload the interactive route to my web site or package it
together to e-mail to someone who doesn’t own Meander.
As long as I’m wandering down “Wishlist Lane” I thought more than once that an Import Google Map feature
would be great. Imagine pasting a link to a Google Map into Meander and letting it locate and grab the snapshot
without needing to find and line-up the map yourself. I think this would be handy for anyone who regularly gets
Google Map links in e-mail and needs to mark up those routes.
The joy of Meander is that, if you can apply a scale to an image, you can measure and plot points on it, so after
playing around with various maps, it dawned on me that perhaps Meander could be used for things outside
the intended scope of the program such as measuring objects in a graph or an architectural drawing, sizing up
family members in a photo, or even applying its plotting and measuring abilities to small interior decorating
projects around the house.
Snagging a somewhat reluctant volunteer, I asked my daughter to pose with a yard stick at the far end of the
living room to see what else I could make Meander do.
© MPN, LLC 2007 macCompanion
Page 58 May 2007, Volume 5 Issue 5
I placed Meander’s scale on the ends of the yard stick, set the scale distance to 3 feet and the route distance to
inches. With a couple points plotted on the acetate, I could get a rough estimate of the window’s width of 74
inches. I realize this is not a precision measurement, but for quick estimating it would work just fine.*
This silly exercise highlights another limitation of Meander I encountered when using it on maps however:
what if I want to plot multiple routes on one map? Unfortunately you can’t at this time. The ability to mark
two potential hiking trails on a map in two different colors (“easy” and “difficult” for instance), or, in my
crazy interior decorating example, measuring not only the entire width of the window, but the height as well, is
something I think is sorely needed. I hope this will be added at some point in the future
Conclusion
As you can tell from my rating, I like Meander a lot. I was torn between 3 ½ stars and 4 stars, but eventually
decided on the higher rating because the sheer versatility of Meander far outweighs the weird bits and bobbles
I found working with this program. Looking in the Meander, About screen, it’s easy to see the program is in
active development and a number of updates and new features have been released recently. With that in mind,
I’m sure most of the buggies I encountered will be squashed pretty rapidly.
Recommendation
If you’re a map geek like me, I don’t think you can go wrong to drop twenty bucks on Meander. I found the
program to be very intuitive and useful and feel it would make a great addition to anyone’s toolbox.
* After reviewing a final proof of the article (and measuring the windows seen in the picture for blinds this past
weekend), I realized the measurement of 74 inches in this alternative use experiment is considerably off the
mark. Of course this is because my daughter is standing approximately 3 - 4 feet in front of the window and not
immediately alongside it. Because I still feel Meander could be used for approximating measurements outside
of its intended uses, I decided to leave this part of the review intact rather than excise it for no other reason than
to emphasize the program’s flexibility. If you decide to use Meander for things other than maps, please take into
account the basic geometry principles than I have, apparently, forgotten.
© MPN, LLC 2007 macCompanion
Page 59 May 2007, Volume 5 Issue 5
Mariner Montage 1.2/1.2.1
Reviewed by Mike Hubbartt, © 2007
www.marinersoftware.com
$139 USD (Download), $149 USD (Boxed edition),
Version 1.2/1.2.1 free to existing Montage version 1.x owners
Released: 3/05/2007
Requirements: Mac OS 10.3.9 or later; G4 or higher processor;
Universal binary; 128 MB RAM; 20 MB Hard Drive Space.
Strengths: Reasonable system requirements, decent performance, very reasonable price, easy and intuitive
interface, full screen mode, improved importing capablities.
Weaknesses: still lacks the power of industry standard screenplay applications, no support for importing
Movie Magic scripts.
Download the update: http://www.marinersoftware.com/download.php
Introduction
Mariner Software released Montage - their Mac-only screenwriting software – last year. Final Draft and Movie
Magic are the two industry standard screenplay programs, so it will be interesting to see how Montage fares in
head-to-head competition with the professional writers. Mariner released the version 1.2 update in late February,
then followed with release 1.2.1 a week later to fix issues that cause the application to crash in full screen mode.
Getting Started
I reviewed Montage 1.0 for MacAddict last year, so I was familiar enough
with it to want to review version 1.2 for macCompanion. The only item in
the package is a CD., which contains the application and documentation.
Mariner offers a printed copy of the manual for $15, which is reasonable and I
appreciate they let me decide whether or not I need it – manuals in PDF format
are a better choice for most people, especially since this product is so easy to
use.
I installed version 1.2 of the software from the CD and after it launched it
brought up a dialogue box asking if I wanted to check for updates and I said
yes, and the 1.2.1 update downloaded and installed. Nice and clean – just want
you want in a good application, and something we often see with good Mac software.
After starting version 1.2.1, I opened a script created with Montage 1.0 and encountered no problems viewing
© MPN, LLC 2007 macCompanion
Page 60 May 2007, Volume 5 Issue 5
and editing the script. Next, I wanted to test the improved support for importing scripts created by other
programs Final Draft and Movie Magic are the two main industry standard screenwriting applications, so
Mariner should support writers wanting to migrate from these other products to Montage. I opened a script
created and saved in Final Draft format and it looked fine, so I imported a script saved as text (improved in
version 1.2) with format and the layout was not as neat as the Final Draft format file. I did try to import a Movie
Magic script, but Montage does not support that format – something I hope they change in the future.
A new feature I tested was adding Scene Numbers. Just select Add Scene Numbers from the Montage
Production menu, use the default Courier 12 pt font or chose something different, and select OK to add the
scene numbers to your script. Nice, but to be honest this should have been in the 1.0 release. Another good case
that Mariner listens and acts on customer requests. I do not have a .mac account, so I was unable to test that
support.
One new feature I especially like was the ability to select the template when importing content. It may seem
like a simple feature, but it is useful, especially for writers moving to Montage from another screenwriting
application. For a list of other enhancements, see the table on page 62.
© MPN, LLC 2007 macCompanion
Page 61 May 2007, Volume 5 Issue 5
Summary of the new features inversions 1.2 and 1.2.1:
• Fixed a major cause of a crash that could occur when exiting Full Screen mode.
• Significantly improved the speed of transitions into and out of Full Screen mode.
• Improved overall performance within Full Screen mode.
• Fixed a major cause of a crash that could occur when exiting Full Screen mode.
• Added Scene Numbering.
• Added .mac integration.
• Re-implemented smart type system (Tab-Return works more like Final Draft).
• Improved Final Draft file importing.
• Improved text file importing.
• Added Keywords to preferences, views, and smart views.
• Added Elements are now assignable by keyboard shortcut in Full Screen mode.
• Added ability to customize the auto-type system.
• Added ability to select Next Element in File>Document Properties... - Styles tab.
• Added “Duplicate” command for duplicating scenes.
• Added Page centering in Script view.
• Added category field to Contacts view.
• Added ability to select Template on file import.
• Added new templates for better Final Draft® and Screenwriter® compatibility.
• Added ability to assign element to multiple selected paragraphs.
• Several bug fixes.
Conclusion: Although it lacks features of more mature screenwriting applications, I liked using Montage. The
integration with the Address Book is nice, but I still don’t like that they didn’t integrate Montage Tasks with
iCal. I don’t keep tasks and appointments in two separate calendars – too much trouble – and believe this should
be one of the enhancements for the next major update of this product. The full screen mode support is excellent,
and I’m glad they were fast to respond to bugs affecting this mode in version 1.2. Nice work by Mariner.
Recommendation: This product is new, but the intuitive interface and low cost and good product support by
Mariner make this product a good buy and recommended, especially for someone new to screenplay writing.
NOTE: Mariner released another update to this product after the review was complete – the new current version
is 1.2.2. See May Updates of Interest (in the Goodies section) for a list of enhancements and bug fixes in release
1.2.2.
© MPN, LLC 2007 macCompanion
Page 62 May 2007, Volume 5 Issue 5
NeoOffice 2.1 Writer (the word processing module only)
By Harry {doc} Babad
Planamesa Software and NeoOffice.org
http://www.neooffice.org/
http://neowiki.neooffice.org/index.php/Main_Page
Freeware but donations help! http://neowiki.neooffice.org/index.php/NeoWiki:
Site_support
System Requirements: Mac OS X 10.3 or higher, 512 MB of memory, 400 MB
of free disk space.
Released March 27th, 2007.
Writer Only
Available in Universal binary. Download size is 139.1 MB (power PC Version).
Multilingual Language Support: English plus 57 others, which range from
Afrikaans to Welch. Just download the free language package.
Strengths: This stable, fast, Macintosh-like actively developed version, is the first recommended for new
users with little word processing experience, and a viable alternative to MS Word.
Weaknesses: Having no interest in anything but NeoOffice Writer, the other parts of the suite were not
reviewed.
For a free download of this product: http://www.neooffice.org/neojava/en/download.php
Copyright Notice: Product and company names and logos in this review may be registered trademarks of
their respective companies.
The software was tested on a 1 GHz dual processor PowerPC G4 Macintosh with 2 GB DDR SDRAM
running under OS X 10.4.9.
Disclaimer: When briefly reviewing share-freeware I will often use the developer’s product, functions and
features descriptions. All other comments are strictly my own and based on testing. Why need I rewrite the
developer’s narratives, if they are clearly written?
Introduction in Including Publisher’s Summary
I have had, as our readers know, a love-hate relationship with MS Word (MSW). Therefore, I seek every
opportunity to check out alternatives to that program. Don’t misunderstand me, I know there’s a learning curve
when adopting a new word processor. I’ve invented much time in getting comfortable with and in customizing
MSW, but that doesn’t forgive its faults. No, carpe diem is not my goal, but with NeoOffice Writer, my biting
the bullet and walking away from MSW becomes just a bit closer.
“NeoOffice is a fully-featured set of office applications for Mac OS X. Here’s the foundational pieces of
© MPN, LLC 2007 macCompanion
Page 63 May 2007, Volume 5 Issue 5
OpenOffice.org that you get with NeoOffice 2.1:
•
•
•
•
•
•
Writer: a word processing and desktop publishing tool
Calc: an all-purpose spreadsheet tool
Impress: a slideshow/presentation creator
Base: A database program
Draw: a graphics package for creating sketches and drawings
Math: an equation editor
Here’s how NeoOffice compares to MS Office:
Features — NeoOffice vs. Microsoft Office
“Based on the OpenOffice.org office, NeoOffice has integrated dozens of native Mac features and can import,
edit, and exchange files with other popular office programs such as Microsoft Office. Unlike the Mac OS X
release of OpenOffice.org, NeoOffice does not require the X11 windows system.” The result is an easy to use
full-featured Macintosh application whose interface will be familiar to users of MS Word and ThinkFree Office
or AbiWord.
This review focuses only on the word processing application. In a future review I will likely test
the NeoOffice database module and compare it against FileMaker Pro.
Getting Started
Installing NeoOffice 2.1 — To install, double-click on the downloaded file in the
Finder. This should cause the Disk Copy application to open. The Disk Copy
application should automatically open the downloaded file and display a volume
called NeoOffice on your desktop. Double-click on the NeoOffice volume. This
should open a Finder window that contains a NeoOffice.pkg file. Double-click
on the NeoOffice.pkg file and the NeoOffice installer should start. By default, the
installer will create an application called NeoOffice in your /Applications folder.
To launch NeoOffice, just double-click on the NeoOffice application icon in the
Finder. Piece of cake; wonderful, a well-trained installer!
© MPN, LLC 2007 macCompanion
Page 64 May 2007, Volume 5 Issue 5
User Warning — I found little to be concerned about after reading the files that are linked in
the NeoOffice warnings but, I recommend that every potential user check the out. Each of our
operating environments is somewhat different. Macintosh users often experiment a lot both with
shareware and by tweaking their operating systems. Make sure that you read the important
warnings for all users http://www.neooffice.org/neojava/en/download.php#warnings and check
out the list of features and bugs http://www.neooffice.org/neojava/en/features.php before you
install NeoOffice.
Important: After installing, get the latest bug fixes by downloading and installing the latest
NeoOffice patch installer.
Using the Software
Okay, what I did was simple minded. I wrote a new eTalk column, an article about folk music that I do for our
local folklife society in Writer. I both formatted the documented and added illustrations. This first trial of the
Writer module felt awkward. It took me back almost to the point of starting to write on a computer in MacWrite,
having given up my IBM Selectric Typewriter. Those were the days that Robin Williams invokes in her eloquent
The Mac Is Not a Typewriter. It also reminded me of my slow start in trying to first use the word processor in
AppleWorks.
It’s not that the Writer program is awkward or hard to use. It’s just my troublesome initial learning curve. Note,
I’ve been using MSW from version 3.5 to 2004, and interface in Writer are just different enough to slow me
down. Okay that first article took me about twice the time it would have in MSW.
Let’s look at the NeoOffice Writer’s user interface, the example if from this article. Nice and clean looking isn’t
it?
© MPN, LLC 2007 macCompanion
Page 65 May 2007, Volume 5 Issue 5
My Next Move— Let’s up the ante, and do a second article, from scratch, in NeoOffice’s Writer. That new draft
article, focuses on the checking of obscure sites for unique recipes. It was easier to do.
First, I was still doing stream of consciousness inputs, just dumping my ideas onto paper. That mean I did not
have to worry about formatting, styles or any of the other display oriented strengths provided by a good word
processing program. In addition, I was beginning to recognize structural similarities between for NeoOffice tool
bars and menus to those in MS Word.
A Future Test — Okay, what’s next, perhaps to try replicating my custom toolbars from MS Word to Neo Office
Writer and do some more test writing. The old practice makes perfect adage, is probably appropriate when
contemplating abandoning MS Word. (Or should that be Familiarity Breeds…) That’s a test for after I complete
this review — I’ve run out of time.
In another test, one that was surprisingly successful, I dropped three almost completed review articles, formatted
as .doc, into NeoOffice’s icon in my dock. NeoOffice Writer opened and all the formatting and images I added
in MSW were correctly captured. Wow!
Finally, I exported this entire illustrated article, done in MS Word, into text. I then imported the text file into
NeoOffice, by pasting into a new document. I then checked to see how much trouble it was to format its
contents appropriately. Okay, I’m not yet familiar with the program as I am with MSW. This sas-backwards test
demonstrates I can achieve MS Word like formats (tables, graphics, indents, links, and all the styles I normally
use) in NeoOffice Writer. I have not yet worked with templates in NeoOffice but that capability is available
should I need it.
Enough said, what I tried worked. I was able, with only an occasional check in the product HELP to do
everything I needed to, to write or modify my articles.
An Annotated Overview of NeoOffice’s Features
In this section, I’ve identified in NeoOffice Writer the publisher’s most touted features and fed back my twocents worth of experience with them.
• Handles Microsoft Office 2007 Word Files — We’ll have to wait until the Office 1008 (Mac) is released
to use this feature unless you’ve Word 2007 installed on your Intel Macintosh.
• Native Aqua Menus — includes file open and save dialogs, print dialogs, buttons, scrollbars, and many
other native Aqua user interface elements.
• No X11 software required – A requirement with OpenOffice.
• Integrated with Finder and Mail — This all works seamlessly. The Mac OS X Finder will automatically
launch NeoOffice and open OpenOffice.org and Microsoft Office documents that you double-click
on. I don’t use Apple’s Mail.app so did not test whether the Mac OS X Mail application will open
OpenOffice.org and Microsoft Office attachments in NeoOffice.
• Uses Mac OS X fonts — Yep, it sure does. But it does not support my Unsanity FontCard haxie forcing
me to scroll down a couple of hundred fonts, or at least to type the font’s name correctly.
• Handles international keyboards — I did not test this feature.
• Native OS X printing support — NeoOffice supports printing using Mac OS X’s native printing
functionality. Like other Mac OS X applications, you can use NeoOffice to print, preview, or save a
document to a PDF file. Tested only with my HP Color LaserJet 3500.
• Native copy and paste support — NeoOffice supports copying and pasting using Mac OS X’s native
clipboard so you can copy and paste text and images between NeoOffice and other Mac OS X
applications. If I hadn’t known this was of concern for OpenOffice, I’d not noticed the feature.
• Native drop and drag support —NeoOffice supports native drag-and-drop so you can drag and drop text
© MPN, LLC 2007 macCompanion
Page 66 May 2007, Volume 5 Issue 5
and images between NeoOffice and other Mac OS X applications. I could not directly drag a jpeg file
into NeoOffice, something that easy to do in MSW, but had to use cut and paste. On the other hand, once
pasted into my document, placing the image where I wanted it to be was easier than in MS Word.
• NeoLight a Spotlight importer for NeoOffice — I did not test this add-on.
• Image Resolution Limitation — Image resolution is presently limited to 300 dots per inch when printing.
One surprisingly useful feature is the compass icon in the standard toolbar brings up
a separate navigator palette. This navigator, which is much more powerful than Word’s Outline view, allows for
quick access to all the structural elements of the document, including headings, footnotes, tables, graphics, and
embedded objects.
To round things out, I found the following praise for NeoOffice posted by SERGIUS on a MacUpdate review of
this product. “No one seems to have mentioned this and I found out by accident - this seems to be the only OS
X office suite that can easily open Corel Word Perfect documents, with correct formatting, and convert them to
other formats. That’s wonderfully useful in a Windows-dominated environment where Corel Word Perfect is the
dominant word processing application. However, for some strange reason NeoOffice doesn’t seem to offer the
option to save documents in Corel Word Perfect format.
Discomforts:
The $#%^& frames — I wish I could make the frames around individual
pages go away. Page breaks are obvious, why frame the pages. It vaguely
reminds me of Word Perfect, but that was a long time ago. If there is a
“normal” view in Writer, I’d not yet found it. Picky, picky doc.
Exporting Highly Formatted Graphics Rich NeoOffice Writer Documents —
I’m not sure whether this comment is fair, but it wasn’t obvious what some
of the save as alternatives meant. Particularly since when I chose anything
other than Open Document Text (.odt) I got a waning message about losing
formatting and by inference, perhaps content. For example, when exporting
a NeoOffice .odt document to .rtf, I lost all the images but my tables and
bulleted lists were preserved. However, when I exported, save as, to a MSW
97/2000/XP (.doc) everything was perfect. Okay, there’s the help file, which I
should have first read, but who was to know there was a need for that resource?
Spelling Dictionary — Yuck, I have to repopulate my custom MSW
dictionary into NeoOffice.
Fonts, An Endless list — Although I’ve mentioned it earlier in my
review, I wish I could use the Unsanity FontCard haxie in Writer. I do
hate the hassle of long font lists.
© MPN, LLC 2007 macCompanion
Page 67 May 2007, Volume 5 Issue 5
Conclusions
After getting over the initial part of learning a new word processing interface, I have come to like the Writer
program. Although, I suspect intentionally, that there are enough parallels to how the features in MSW are laid
out to keep me challenged, using the program productively turned out to be easier than I expected. I found the
word processor easier to use and perhaps a bit more intuitive that other MS Word alternatives I’ve tried, but
perhaps I’m getting smarter.
I should point out that Dennis Olsten, who had previously tested earlier versions of NeoOffice which he found
too slow wrote in an MacUpdate Review: “With this release of NeoOffice I will forget Microsoft Office. This
product is just great, it looks good (as good as an office app can look (;-), it performs great and the ability to
exchange documents in Open document format (ODF), PDF or .doc makes it fully compatible.”
Be that as it may, the developers (in the product FAQ) note the ever-present warning: Who
should use NeoOffice? — NeoOffice is not perfect. Although we try very hard to make
NeoOffice free of bugs and crashes, our users still find new bugs and new cases that cause
NeoOffice to crash. So, if you feel that you need software that has been heavily tested, we
recommend that you use a commercially supported product like Microsoft Office.
Doc_Sez: NONSENCE! I understand the need for the developers to be conservative about their
recommendations. However, I routinely crash MSW, so that is not a basis for choice. In addition, there are lots
of articles posted on the web that note: One of the best features of the open source software movements is the
army of folks who step up to fix bugs. It doesn’t take a committee of marketing and executive types to approve
a patch of an update.
No I’m not yet ready to switch to NeoOffice. I’m too comfortable with my customized version of MSW 2004.
However, NeoOffice (Writer) will remain on my hard drive. Once I’m actually using it, I still find it harder to
ignore NeoOffice’s Writer as an application, than to focus on my document. But I’ll be experimenting, writing a
few more of my articles in that software and that unfamiliarity too shall pass.
Recommendation
If you are either a new user of word processing software, graduating from TextEdit or perhaps even
contemplating using Apples iWork (Pages and Keynote), this might be a good time to try the free NeoOffice
suite. Another user group that should give the program a try are all of us who are contemplating updating MS
Word 2000 or 2004 to Office 2008 for the Macintosh. (Need I add Intel Mac users who want to jump-start their
upgrade to MS Office 2007 for Windows.)?
The word processing program, after all is free, the interface well thought out and in my hands was crash free. I
found the Help files well thought out and clear, which enabled me to quickly bypass my MSW trained reflexes
and become comfortable with NeoOffice Writer’s interface. The price is right, give the program a try.
© MPN, LLC 2007 macCompanion
Page 68 May 2007, Volume 5 Issue 5
Opal 1.0.8 — Start Outlining and Get Back Into the ACTA
By Harry {doc} Babad
A-Sharp, LLC
http://a-sharp.com/
$32 USD, I could not find an academic or NFR organization Discount. Opal is
only available electronically.
System Requirements: Mac OS X.4 or later; Universal binary; ca. 5.1 MB
Hard Drive Space
Localizations: English and Japanese
Strengths: Opal, a born-again ACTA, has arrived maintaining ACTA’s strong features and enhancing its ease
of use by tuning it to Mac OS X standards. For those not familiar with the benefits of outlining, there’s a 24
page PDF file called All About Outliners, a part of the download file.
Weaknesses: Nothing worth listing upfront.
Previous Reviews: None for either Opal or ACTA.
Demo: For a 30 day free demo of this product: http://a-sharp.com/opal/
Copyright Notice: Product and company names and logos in this review may be registered trademarks of
their respective companies.
The software was tested on a 1 GHz dual processor PowerPC G4 Macintosh with 2 GB DDR SDRAM
running under OS X 10.4.9.
Introduction
Once upon a time I was an outline freak. In the days of the classic Macintosh operating system, before I retired,
my professional life was filled with the need to write reports, document technical strategies and storyboard and
create presentations.
All of this on one of the very few non-graphics use Macintosh computers in the large company for which I
worked. Initially documents were written in Word Perfect, which was the word processing standard. Eventually
the standard changed to MS Word (MSW) and I breathed a small sigh of relief. Well almost.
One big problem, the outlining capabilities of MSW sucked. (Worse than in Word 2004, much worse.) But as a
charter subscriber to both MacWorld and MacUser (not the UK Edition) I learned about a program, an outliner,
called ACTA.
Buying software for work use was easy; I was allowed my toys as long as I met two requirements. First I
needed to create final documents that were compatible with the company standard… no, well almost no sweat.
© MPN, LLC 2007 macCompanion
Page 69 May 2007, Volume 5 Issue 5
Those were the days when MacLink from DataViz really repaid its cost since the native export function in
MSW to Word Perfect was petty flaky http://www.dataviz.com/products/maclinkplus/index.html. Except for
network support (e.g., cc:MAIL), I was gladly on my own.
Look it. I can Outline in MS Word.
But I gotta learn all the tricks and
gimmicks first.
In Opal all I do is drag and drop
Now, back to my early days of to outlining. I’ve been a fan of ACTA ever since using it both at work and at
home under classic operating systems. Because I became comfortable with planning documents using the
outliner, my management required me to bring them fewer rocks when working as lead author on multicontributor documents. References to the art of using outliners are found at the end of this review.
Folks I missed Acta, which I abandoned when switching to Mac OS X, but I hated working in the classic
environment. Now I get to use its reincarnation, Opal once more.
Product Overview
Opal is a full-featured, flexible and most importantly easy to use outliner. It let’s you organize just about
anything - ideas, reports, lists, notes, projects, and graphics - as an outline. It stands out for its uncluttered,
fluid interface. The creator of my favorite classic outlier Acta developed it. Opal makes it easy to capture and
organize your notes.
An Outline in Brief — An outline is an arrangement of text (usually) topics into an ordered
hierarchy. By the way, when dealing with outlines and outlining forget most of what you learned
in elementary school — most teachers in days before computers and outliner software — didn’t
have a clue. They had not grasped the fact that an outliner is nearly as flexible, but more
organizationally and perhaps logically focused then a word processing program. It can enable
you to: make a list, keep track, take notes, store information, make plans or storyboard and even
capture elusive ideas (brainstorming).
Hey folks, I’ll still keep some of you hanging on what this outlining stuff all means. Sharing outlining 101 with
you all would stretch my editors’ patience and good humor; I am already too gabby in my reviews.
Read the reference materials at the end of this review. It will all become clear to you. So what have I used
ACTA for in for in the past and will be using Opal from now on. I will organize and manage every thing from
simple database functions to detailing complex projects, those whose needs are not well accommodated to my
existing software.
Opal will neither replace my ToDo X list nor my collections of stuff in FileMaker Pro or DEVONnote.
However, there’s so much I write and plan, that will be facilitated by using this product.
© MPN, LLC 2007 macCompanion
Page 70 May 2007, Volume 5 Issue 5
Getting Started
One nice thing about Macintosh OS X compliant
software is both ease of installation and instant
accessibility. Opal, with one exception, was ready
to use with just as click of a mouse. The download
created an Opal application in my downloads folder;
rather then stopping at the .dmg stage. So for
consistency and perhaps safety I moved the folder to
Mac OS X Applications folder.
My first and most detailed test of the software
was to determine how Opal deals with the task of
planning the myriad details for a benefit concert. I’d used that project previously for evaluating a
graphics oriented mind-mapping program called
MindManager (4.0 macCs) reviewed in the January
2007 macCompanion, Volume 5 Issue 1.
In addition to putting Opal though its paces, I wondered how the differences between a graphic and verbally
oriented interface affected my ability to focus on content not the mechanics of outlining, In 20-20 hindsight,
planning any activity goes smother if the tools don’t get in the way. No I’m not going to bore you with the
concert planning details.
I also need to plan a long report on how to produce an acoustic music concert album for a folk-life society. Our
team had done this for a first album www.3RFS.org, last summer, somewhat inefficiently. I need to capture
information to avoid the same mistakes on our second album, which may be a year-or-two away.
© MPN, LLC 2007 macCompanion
Page 71 May 2007, Volume 5 Issue 5
Working with Opal 1.0.8 has given me the opportunity to get started on that obligation I deferred for over six
months.
My bottom line is that if I’d have worked in Opal rather than in MS Word, the evolution of the concert planning
would have gone smoother. With Opal I would have been able to focus on the fine details of planning rather
than being distracted by the task of creating and maintaining an outline.
Relative to using MindManager, which was my initial Mac OS X based planning tool Alas I’m not really a
graphics oriented person and the process of interpreting words in a sequence of logical graphics is difficult for
me. Therefore, using a text-oriented outline would likely have gotten me to my goal, faster. Perhaps that’s a bit
harsh, I’ve had years of ACTA experience under my belt, and am a relatively newbie to MindManager.
But it’s easier to insert wild-card ideas (tasks or reminders) into an outline then a mind map and moving untethered words around is easier than shifting graphics to change relationships between topics or their motherdaughter relationships.
Using the Software’s Features
During my tests I took full advantage of most of Opal’s feature. In the annotated list below, I’ve noted the ones
I’ve neglected. That being so, the obvious things one does in an outline were almost intuitive. (But I was an
ATCA user.)
© MPN, LLC 2007 macCompanion
Page 72 May 2007, Volume 5 Issue 5
Feature
Starting a New Outline
Entering Topics
Rearranging Topics
Navigating and Seeing the outline
Finding and searching
Opal’s Glossary
Linking to other documents and
opening ATA documents
A Bookmarking Feature (new in
1.0.8)
Details and Comments
Okay boot Opal and start typing
Its all about creating sisters and aunts to the mother topic.
• Altering the mother-daughter relationships.
• Applying alphabetic and numeric sorting
• Collapsing and expanding topics
• Shrinking and growing topic views
• Focus and unfocus outline details.
• Selecting Multiple selections of outline parts
Topic filtering via toolbar Search field worked well as did
spotlight searches of an outline’s contents.
From the Help file, you can access opal’s extensive
glossary. This is an excellent way to check out outlining
terms that you’re not familiar with. I actually used it to
figure out how to create a link in an outline to remind
myself what an aunt was in relationship to a sister or
mother.
• I no longer have any ACTA documents.
• I did not seriously test the linking feature.
David one of Opal’s developers shared “when I take
notes, I often jump back and forth between a few places
in an outline. The bookmark menu at the bottom of the
window allows me to specify those places.” It’s a nice
feature that I have to experiment with. Doc
Ways to Export your Outlines
Documentation, A Kudo to A-Sharp
Exemplary Outliner Use Tutorials and Product Use Guides — Beyond introducing user to the art of outlining,
All About Outliners, Another great tool provided by the A-Sharp team is the 25-page PDF document called
“Introducing Opal – a tutorial”. Talk about extraordinary service — thanks David and Elise, would that other
developers were as devoted to teaching their users about the art underlying the software tool.
© MPN, LLC 2007 macCompanion
Page 73 May 2007, Volume 5 Issue 5
As my readers know, I’ve an almost boilerplate ding (discomfort) that I add to many of the otherwise fine
products I review. Inadequate manuals or help files — I costs them at least 1.0 macC unless so totally intuitive
that it can be used by a complete newbie in 5 minutes or less.
Outline Software Rules — I’m guessing that someone at A-Sharp has been a teacher or trainer, a good one at
that. In their documental About Outliners the developers presented the most concise listing of rules a good
outlining program must follow — Opal does.
Rule 1:
Rule 2: Rule 3:
Daughters stay with their mother
Daughters can be hidden.
The hierarchy is navigable
Daughters
or
No
Daughters?
Seems simple, but I’ve fooled around with some shareware products I didn’t chose to review. They were
outliners or ToDo tools that violated these rules – Instant Trash.
Minor Discomforts
Downloading and Installing Opal — Instead of opening us as an installer file .pkg or dmg the Opal application
folder was created in my downloads file. I found the Opal .dmg file in the trash, strange. This behavior was not
discussed in the developer’s readme file. Since I was concerned on how the software would function, I moved
its folder to my applications folder. There it remains both during this review and for my future outlining needs.
Creating a Linked Entry — I found the Opal interface for adding a linked interface a bit limited. It required
dragging and dropping a file from my hard disk or a website into my outline. As an additional alternative, I’d
like to be able to type a URL or email Address into the outline and to be able to designate it as a links. This is
what I can now do in either MS Word or DEVONnote
A Jewelers Frustration — Now if only I could find a gold colored bolo with a 2 x 1” opal that looks as good as
the A-sharp Opal logo… damn that would be great.
Changing Custom Dictionaries — Almost all of the words I’ve added to dictionaries when I write are in my
custom MSW dictionary. I’ve slowly, since readopting Spell catcher, transferred my of my MSW dictionary to
that program. Now it would really be great if the creative types at A-Sharp could make that happen after all a
custom dictionary is just a list of words. Why, because I expect to use Opal heavily and using a common custom
dictionary would save me re-entry time.
© MPN, LLC 2007 macCompanion
Page 74 May 2007, Volume 5 Issue 5
Recipes in Opal — Humbug, why should any want to use Opal as a recipe-collecting tool? Introducing Opal
had such examples. I’m much happier with extensively cross-linked database recipe tools. However, the
example is an excellent one for teaching about hierarchy.
Conclusion
Opal, just like its ACTA progenitor, is has a small footprint, fast, easy to use, and reliable. Although I use, and
will continue to use ToDo X for that purpose [Omicron Software - http://www.nomicro.com/Products/ToDo/]
that’s a case of inertia, and not any deficiency in Opal. But for my mainstream writing and brains-storming
tasks, I’m re-acta-vating my outlining skills with Opal.
Recommendation
If you fit into any one of these categories go straight to your computer and download the free trial of Opal. Use
it for 30 days. If you’re not convinced that it’s elegant and extremely useful, you’ve only yourselves to blame.
•
•
•
•
•
•
•
•
Any one who writes documents, more than three pages long.
Thinking about and writing a business plan
Trying to organize all those bit and pieces (facts) for the review of a complex product.
Creating and Maintaining your shopping lists
Keeping up with your ToDos
Needs to organize a PTA, School Board Church Group or other presentation
Needs to create a simple database of let’s say friends phone number and B’days.
… And the list goes on but doesn’t include recipes, but not for obvious reasons.
An ACTA PS:
For those of you who have not updated to Macintosh OS X, Acta is available as a fee download. http://a-sharp.
com/acta/download.html/. Remember, this classic software is provided as-is, with no support. The folks at A#
used it under System 9.1, and under Classic in Mac OS X 10.3. It doesn’t run on Intel-based Macs — but Opal
does.
To Learn More About Outlining and Outliners
No, I’m not going to write a tutorial on the benefits of using outlines or an assessment of the outline paradigm
oriented programs available to both Classic and Macintosh OS X users. Its been done. What this section
contains is an annotated list of reference for you to check out outlining for your self.
© MPN, LLC 2007 macCompanion
Page 75 May 2007, Volume 5 Issue 5
A-Sharp’s Opal Documentation — The best place to start, is provided with the Opal download, by the folks
at A-Sharp. It’s a free download as a part of the trial version of Opal. It’s a 24 page illustrated PDF file called
appropriately enough All About Outliners. It covers the soup to nuts about this topic. You get to read about What
is an Outline? through How to use an Outline. In addition, “Introducing Opal – a tutorial” contains an added
depth to the users knowledge of this venerable data organizational tool.
Check out Wikipedia —I’m a Wikipedia fan. The online encyclopedia is my favorite first source for information.
http://en.wikipedia.org/wiki/Outliner “An outliner is a special text editor that allows text to be structured as
an outline. Outliners are typically used for computer programming, collecting or organizing ideas, Getting
Things Done, or project management. It is generally acknowledged that Doug Engelbart was the first to see the
advantages of the expandable-outline user interface paradigm in software.” http://en.wikipedia.org/wiki/Doug_
Engelbart/.”
Read Ted Goranson‘s Fine ATPM Articles in the About this Particular Outliner Series — Between September
2003 and the present two and a half dozen fine articles on outliners and their uses appeared in ATPM. That’s
ATPM (About this Particular Macintosh), another maccentric eZine. Written clearly with loving attention, and
with focused illustration by Ted Goranson. I’ve followed this series for years. I’ve not persuaded Ted to share
his article with the macC readers but I am referencing them to allow you to tune in. Check out these articles
at http://www.atpm.com/Back/atpo.shtml/. Ted mentioned that he would be branching out to discuss a broader
range writing environments and tools in future issues of ATPM (About this Particular Macintosh). The first
article in his new “series” appeared in February. Check: http://www.atpm.com/12.11/atpo.shtml Subscribe to
ATPM, it’s free.
Last But Not Least — To round thing outs you might want to browse the information at Outliner.com — http://
www.outliners.com/.
The site provides a good historical look at outliners and their strengths and limitations. The discussions include
some of my early favorite outline based software tools.
These sites should wet your appetite for participating in the world of outline users.
© MPN, LLC 2007 macCompanion
Page 76 May 2007, Volume 5 Issue 5
Power Structure 1.8.2
Reviewed by Mike Hubbartt, © 2007
Company: Write-Brain
(800) 450-9450 (US)
(858) 270-7204 (International)
www.write-brain.com
$180 USD (List)
$100 USD (Academic/Military)
System Requirements: Mac OS 8.6 or later; 17 MB hard drive
space; Internet access useful but not required.
Strengths: helps but doesn’t try to write the story for you, excellent section on story conflict, useful section to
show index cards to help organize story flow, nice auto-update support, good pricing for students and military
(thank you for your support, Write-Brain).
Weaknesses: provides the base structure, but not the lists of questions like Dramatica Pro.
Watch a Flash Walkthrough of Power Structure:
http://www.viewletcentral.com/vc/viewlet.html?id=22942551
Introduction
How many people do you know that ever said “Some day I’ll write my novel” but never do? I’ve lost track of
the people that uttered that infamous line at some party or social gathering of friends. Only one acquaintance
of mine ever did write a story, he did many rewrites and finally took the self publish route to get his book
published. This guy was willing to put in the hours to get his story right, but I wonder if a structure product
would have made his life easier and saved time as well.
Getting Started
After installing the software, I launched it and created a new story, using the Novel template. There are
templates for plays, screenplays, TV and Mythic 12-step stories. The only template I hadn’t seen before was the
Mystic 12 Step template, which seems ideal for creating fantasy novel stories. Nice idea. I wanted to get back to
my great American novel, so I started with the Novel template.
© MPN, LLC 2007 macCompanion
Page 77 May 2007, Volume 5 Issue 5
After selecting StartNew, I saw the new story screen, with a tip of the day popup. Now some people loathe
these things, but I really like them. I can always press OK if I don’t feel like reading them, and you never know
when a tip could help under a story just waiting to be told. Let’s look at the Story/Theme section.
After you select OK to get rid of the tip of the day, it’s time to get to work entering the backstory, pitch,
premise,synopsisandtheme(oruser-definedcategories)foryournovel.Ididn’tfollowthesequenceofitems
inthe dropdownlist,butfirstwrotemyideathemeandpremise.NextIenteredthehistoryofmyworld,and
characters then a brief synopsis of the current events. The last thing I entered was a short description to use as
the pitch when I see my Editor. Then I switched to the next tab – the Characters section.
© MPN, LLC 2007 macCompanion
Page 7
May 2007, Volume 5 Issue 5
At this screen, I entered background information on the main character, obstacle characters, other major
characters,subplotcharacters,andothercharactersthatfailtofitoneoftheexistingcategories.Thiswasthe
place to enter name, age, sex, profession, education and marriage status – good background material to really
fleshoutyour characters.
I should point out that the information entered at this section is not prompted for by a list of questions like with
Dramatica Pro, but is more like an outline or structure guide published in some books. This type of system is
similartocreatingatemplateinWordandfillingitin–theproductactslikeawordprocessorwhilethewriter
providestheintelligencebyfillingin thematerialsintheappropriatesections.
After entering the character information, I moved on to the Chapters section. This section has areas for a writer
to answer several important questions.
1. What is the Chapter’s Opening Hook?
2. How does this Chapter move the story forward?
3. What has to happen in this Chapter?
4. What’s the Chapter’s Ending Hook?
You create new pages for each chapter until you have the basic novel structure in place for every chapter in the
book, then it’s time to move on to the Plot Points section.
Entertheplotpointsinfreeflowingtext,thenprogressontotheGestaltView section, where you start to see the
big picture of material you’ve already entered. This area shows the Chapters, plot points in each act, and the plot
point details. This section does not merely show what you’ve entered; it lets you add more content (chapters
and plot points) as you look at the entire story layout. Very useful and probably a favorite for heavy users of this
software.
© MPN, LLC 2007 macCompanion
Page 79
May 2007, Volume 5 Issue 5
Thenextsectionwasapersonalfavorite–theConflictsection.Thisiswhereyoucanenterandtheconflictas
itbuildsthroughoutyourstory.Excellentaddition!Defineandbuildtheconflictuntilyoubringthestorytoit’s
rousing conclusion – very nice concept and the best I’ve seen with this type of software.
Nowthatyourstoryconflictisset,it’stimetomovetotheIndexCardssection.ThefirsttimeIlearnedabout
usingindexcardstohelporganizestoryflowwaswhenIstudiedbooksonwritingscreenplay.Iusedindex
cards to track the action and gain better perspective of time, especially as it related to time for commercial
breaks, as well as tying in multiple plots – very good tool and I like that it is included in this application.
© MPN, LLC 2007 macCompanion
Page 0
May 2007, Volume 5 Issue 5
Now the last thing I wanted to cover in this product is the ability to export content. Story information can be
exported for Screenwriter or ScriptThing, as RTF, as RTF with sytle sheets and HTML with style sheets. Part or
all of the information can be exported, as shown in the screen below.
Conclusion
Power Structure is displaying but not providing the underlying structure of your novel – it isn’t writing it for
you, butishelpingyoufindthestructurebeforeyoustartenteringthestoryinyourwordprocessorofchoice.
I’dratherkeepmystoryinformationinelectronicformatthanwriteitdowninanotebook,soIfindthisproduct
useful and worthwhile.
Some people – writers and readers – disdain the idea of using a tool like Power Structure to produce a story.
They often argue that this type of product produces a formulaic story and hence is unworthy of use by serious
© MPN, LLC 2007 macCompanion
Page 1
May 2007, Volume 5 Issue 5
authors. I don’t buy that view. A tool is a tool is a tool. As long as you use it to craft a better story, why should it
be an issue?
Recommendation
For people having problems keeping track of story elements, for those unfamiliar with story structure, this is a
good application and the inexpensive price tag makes it worth the cost.
© MPN, LLC 2007 macCompanion
Page 82 May 2007, Volume 5 Issue 5
QuarkXPress 7.1/7.2
Reviewed by Mike Hubbartt, © 2007
http://www.quark.com
$749 USD, £749 UK
Upgrade from version 7.0 to 7.1/7.2 – free to 7.0 owners
Released: Version 7.1 - 1/10/2007, Version 7.2 – 4/5/2007
System Requirements: Mac OS 10.4 or later; Universal
binary; 128 MB RAM; 850 MB Hard Drive Space;
DVD-ROM or CD-ROM; QuarkXPress 7.01.
Strengths: Export direct to HTML, superb graphics support, multiple layouts per project, share elements
between project layouts, package includes training CD from Lynda.com, good tech support.
Weaknesses: Version 7.1 crashed once while working with a table, but the QuarkRescueFolder automatically
generated by the software saved my work. No crashes encountered while testing version 7.2 of the software.
Download: http://www.quark.com/service/desktop/downloads/details.jsp?idx=684
Introduction
Most people working in desktop publishing know about QuarkXPress. Initially released in 1987, this product
has seen numerous updates to computer hardware and operating systems and version 7.1 of QuarkXPress
- announced at MacWorld Expo 2007 - provides Universal binary support, as well as a host of new features.
Version 7.2 was released in April and this review was done with the 7.1 and 7.2 releases.
Getting Started
The product box includes the usual goodies and a few extras: two installation CDs and two printed manuals,
plus a nice tutorial from Lynda.com. Installation was a simple process – the most complicated thing was
entering the long validation code. I installed version 7.01 with the first CD, registered the product online, then
used the second CD to update the software to version 7.1. I downloaded the 7.2 update in early April from
Quark’s website, and the update took quite awhile to complete, even though the update was run from my local
system.
Before running QuarkXPress, I ran the free Lynda.com training CD. The video covers the new features in
version 7 of the software, rather than demonstrating how to use QuarkXPress. Useful information and I’m glad
Quark included this Lynda.com course, but I’m glad I was able to find more detailed information on using
QuarkXPress when I visited www.Lynda.com/. For information on new features in version 7.2, Quark provides
a readme file in PDF format as well as information on their website.
To test QuarkXPress, I worked with the software for more than a month. During that time I created new
© MPN, LLC 2007 macCompanion
Page 83 May 2007, Volume 5 Issue 5
projects with single and multiple layouts. I have to admit I really liked how easy Quark makes it to add drop
shadows to various elements (especially tables – see the layout picture below for the shadowbox effect on
the macCompanion masthead). Little touches like this offer a simple and effective method to add visual
enhancement to content. And the layout is similar to InDesign or PageMaker or other desktop publishing
packages–intuitiveifyou’veusedanyotherpackageinthepastandataddauntingifthisisthefirstDTP
product you’ve used.
While working with QuarkXPress, I wanted to see how the product works compared to Adobe’s InDesign CS2.
With InDesign, I was able to create content in Word, bring the content into InDesign and do minor touchup to
the text and graphics. With QuarkXPress, I found that I needed to bring in the text and graphics separately, so
I had to create a second Word document without the graphics, save the images in a folder and then manually
place them in QuarkXPress. I understand why Quark took this approach, but it seems like a lot of work when
compared to InDesign’s approach.
Note: I did have one problem when testing version 7.1. The software crashed when I was doing some intensive
tablework,butmyfileswereautomaticallysavedintheQuarkRescueFolder,soIdidn’tloseanywork.Nice.
Another aspect of QuarkXPress I really liked was the ability to create a project and share some or all of the
design elements in multiple layouts. This means I can create a project like April macCompanion issue, then
layout the monthly PDF in one layout and the website content in another project. And the nice thing is, changes
to shared content are updated between the layouts using those elements. Sweet. And you can add layouts to a
new project when the project is created, or you can add layouts to an existing project by Selecting Layout – New
menu option.
© MPN, LLC 2007 macCompanion
Page May 2007, Volume 5 Issue 5
New Features
There are too many new features in releases 7.1 and 7.2 to include in this review – to see the list, go to:
http://www.quark.com/products/xpress/features.html (top 10 features in release 7.1)
http://www.quark.com/products/xpress/72update.html (release 7.2)
If you need one good reason to move to 7.1 or 7.2, then Universal Binary support is probably the best reason. It
took several minutes to load both QuarkXPress 7.1 and 7.2 on my G5 iMac, even though I have 1.5GB memory
and plenty of drive space. Quark’s documentation says that release 7.1 runs up to 5X faster on Intel platform
Macs than on PowerPC Macs, so now you have another great (and valid) reason to order that new Mac…
Conclusion: I liked using QuarkXPress 7.1/ 7.2. Although there are two installation CDs, version 7.1 was easy
to install and the printed manuals are well written and adequately illustrated. The 7.2 update took more time to
run than I’d like, but there were no errors and I just walked away while the update ran unattended.
The built-in Photoshop image processing functionality was nice – useful, but I can’t imagine anyone serious
about DTP not already having Photoshop in-house to handle graphic manipulation tasks. And QuarkXPress does
integrate well with Photoshop.
In the past, Quark had a reputation for not having the best customer support. I called them twice and both
times found them to be helpful, friendly and knowledgeable. I also found the Quark website useful when I had
questions.
I used PageMaker a lot in the past and feel it was easier to go from PageMaker to InDesign than from
PageMaker to QuarkXPress. However, once I became more familiar with QuarkXPress I found it quite intuitive
and enjoyed using it.
Recommendation: This mature product is a powerhouse DTP package. Run the Lynda.com tutorial before
you install the software, and new comers should consider one or more of Lynda.com’s excellent QuarkXPress
courses. A good buy and definitely recommended purchase.
© MPN, LLC 2007 macCompanion
Page 85 May 2007, Volume 5 Issue 5
The Salazar Brothers Reggaeton Refill
by Daphne Kalfon
Reggaeton Refill
http://www.propellerheads.se
$67 USD, $75 CAD, £33 GBP, €9.00 EUR
System Requirements: Must already own Reason software.
Available by download from online store only. The link is on the Propellerhead website.
Strengths: The beats, loops, drum kits, individual drum sounds and percussion collections are of a very high
quality and can be applied to any project.
Weaknesses: Other than all drums, percussion, vocal FX and a few other specialized sounds, I didn’t find the
other sounds in the collection particularly suitable or usable for this genre although that may be because I am
not familiar enough with the stylistic variations of this hybrid genre.
Demo:
For a demo of this product, visit the main website where you can read about this new Refill, and from there
click on the link to listen to the audio demos and download the Reggaeton demo Refill which contains: 2 song
starters, 5 Combinator patches, 9 Rex loops, 5 drums and percussion patches, and 17 synth and FX patches.
Introduction
Reggaeton Refill is a collection of sounds that are influences from Bomba, Reggae and hiphop all blended into
one, hence the name Reggaeton. The collection of sounds can be used to create completely new pieces of music
or can be used as additions to any other music to infuse it with a Latin-Jamaican flavor.
Getting Started
Reggaeton comes with 20 song starters (demos) to give a good idea of what can be done with it. I listened to
them all and was impressed with the variety of music. Each time you choose a demo file to open and listen to,
a “Details” window appears below it, providing information about the stylistic basis and influences in the song,
who the song was written and produced by, its length, tempo and time signature.
Apart from the song starters, Reggaeton comes with 12 Combinator Patches, Drum Loops which consist of
collections of loops at 88 bpm, 92 bpm and 95 bpm as well as a collection of Percussion Loops which use
bongos, cajon, cascara, congas, guirro, shakers, shekere, snare, surdu, tamburin and timbales. In addition to that
there are Malstrom Patches, Drum Kit, Percussion and Synth Midi Files, NN-XT Sampler Patches for Drums,
FX, Percussion, Stabs, Synth, Vinyl FX, and Vocals, Redrum Drum Kits and Subtractor Patches.
© MPN, LLC 2007 macCompanion
Page 86 May 2007, Volume 5 Issue 5
Using the Software
I usually start a new project by laying down a beat first. So I decided to listen to a few of the drum loops from
each of the three folders. As you click on each one, you can listen to the loop play through once to see what it
sounds like, and it shows up as the one playing in the Dr.Rex loop player as well.
I ended up picking one from the 88 bpm folder called “Dance hall 1g”. From there I went on to preview the
sounds in the percussion folder. Again, clicking on each sample has it play through once, to allow you to
preview it while in the file browser. I decided it would be easier to have the drum loop I’ve already chosen,
play in my project window while I listen and browse through the percussion loops, to really find a good fit. The
other way to do it is to scroll through the percussion loops on the actual Dr. Rex loop player and use the preview
button to listen while the other loop plays, and that works well too.
The only adjustment I had to make was to the tempo of the drum loop, which had loaded in at 88bpm, whereas
the bongo loops I was previewing were all at 95 bpm. After listening to the ones in that collection, I chose one
of the bongo loops that seemed to go well with my drum loop.
Then using the same method, I browsed through the Cajon loops and chose one that I really liked and that went
well with the two loops I now had. And I did the same for an Sdrumloop loop, Shaker loop, snare loop, and
finally a Timbale loop. Now I have a really pleasing rhythm track to build on!
I first browsed the sounds for the NN-XT Sampler. There are lots of individual drum sounds there, such as
snares, kicks and hihats and there is a great variety to choose from, as well as other assorted sounds and drum
kits, so that you can build your own entirely customized drum track if you want to go that route, or simply to
add onto your existing drum loop combination.
Also included in the NN-XT sampler patches are brass sounds, organ, FX such as sweeps, blasts, and air horns,
various percussion, stabs both wet and dry, a folder of various synth sounds, Vinyl FX, and all kinds of male
vocal samples. I was really impressed with the variety and quality of those vocal samples and I picked one for
my arrangement.
Among the sounds for the SubTractor, I really didn’t hear anything that I felt made for a good fit with the
rhythm track I had created.
From the Malstrom patch folder I chose a subby bass which I doubled with a bass sound from the Reason
Factory sound bank, and I also chose an accordion sound the latter of which I added reverb to, using a preset
from the RV7000.
As well there are 20 Redrum drum kits - once again the sounds here are all of great quality and using the
Redrum machine, the combinations and beats you can create are literally endless. For my example however, I
just stuck to the Dr Rex drum loops.
I really wanted a kind of lean melody line above everything else going on so I chose a xylophone sound from
the Orkester Sound Bank to round out my music. From the Combinator patches, the sounds in the Sound Box
folder really stood out for me and I used the Bachata Gtr 4 patch to add another melodic layer in the mix. I
should mention that I couldn’t preview the Combinator patches in the other folders - not sure why. It could be a
bug, or a shortcoming on my part.
At any rate, I created a fun, rhythmic little piece of music using Reggaeton, which you can listen to by clicking
this link: http://www.maccompanion.com/archives/May2007/Software/Reggaetonpiece.mp3
© MPN, LLC 2007 macCompanion
Page 87 May 2007, Volume 5 Issue 5
Conclusion
I would say the highlights of this collection for me were the tremendous variety and high quality of all drum
loops, drum kits, individual drum sounds, and all percussion sounds, as well as the vocal samples and some of
the FX. Overall a fun and versatile addition to whatever one already has in their Reason arsenal.
Recommendation
Always try before you buy. As mentioned earlier in this review, there is a downloadable demo version of
Reggaeton on the main website, and this will allow you to evaluate whether or not you would want to use
Reggaeton in your own music creation projects.
© MPN, LLC 2007 macCompanion
Page 88 May 2007, Volume 5 Issue 5
Übercaster 1.0
Reviewed by Wayne LeFevre
Übercaster version 1.0
http://www.ubercaster.com
$79 USD, $89 CND, £39 UK
System Requirements: Mac OS X 10.4.4 or later; Universal binary.
Strengths: Ability to use templates, Record interview live with iChat, Skype,
Gizmo, Record audio live, stealth mode, One click encoding and uploading.
Weaknesses: No loops, stingers, bumpers, or any audio included.
For a demo of this product: http://www.ubercaster.com/download.shtml
Introduction
Übercasterhasrecentlyjustcomeoutofbeta.Version1.0wasfinallyreleasedjustafterwewenttopressfor
the April issue, and so far it’s been a very smooth, and for the most part, bug free release. For those who have
never heard of Übercaster before, it is podcasting producing software, pure and simple. In the words on their
website, “Leave your garage and feel at home. Übercaster has been made with podcaster’s needs in mind. With
itsversatileoptionsyoumayrecordyourshowthewayyou’reusedtoandprofitfromÜbercaster’sadvanced
cut and release tools. But you may also take advantage of Übercaster’s ground breaking live audio recording.
Auto ducking, effects, chapters for enhanced podcasts, ID3 tags, album cover art, mp3/AAC/AIFF encoding you name it. It’s all there. Seamlessly integrated.”
Getting Started
Installation was simple with a normal drag and drop into the Applications folder. It comes with an easy to read
PDF for the installation of the other folder it comes with, an Extras Folder. The Extras folder containes the
PleasantConnect installer package that installs Übercaster’s drivers for recording Skype, iChat and Gizmo. It
also gives you the option to install Smart Crash Reports from Unsanity, and sample AppleScripts.
Using the Software
I’vebeenusingÜbercasterforseveralmonths,andwasimpressedwithitthefirsttimeIusedit.It’sreallylike
no other podcasting software out there, no matter what the cost.
First things first. I would suggest, since it is different than other podcasting software, to visit Übercaster website
andwatchatleastthefirst,ifnotall,theavailablescreencasts.Evenifyouwindupnotusingtheapplication,
they are well done and will teach you a lot about the product, and it will very quickly get you up to speed on the
newtypeofworkflow.
Speakingofanewtypeofworkflow,therearefourmainsectionsofÜbercaster.Thefirstpartisthepreparation
layer. You are basically presented with a blank slate, with nothing but a microphone panel. On this layer you
can organize your whole podcast. In the mic panel, you select which microphone you would like to use, enter
a custom title, color and keyboard shortcut. Switching to the Audio button you control your mics gain, pan,
© MPN, LLC 2007 macCompanion
Page 9
May 2007, Volume 5 Issue 5
and channel. Here is where you also
can select to monitor your output.
By switching to Effects, you can
select to Enhance the mic. Though
the enhancement the mic goes
through is pretty much shrouded in
mystery, it can be controlled with a
slider and obviously has to do with
compression, gain, gating, reverb
maybe and other bits of magic.
You can also apply any number of
standard AU plug in options.
For your podcast you might have
some intro music, an interview, some
comments and some outro music. It
now becomes as simple as dragging
and dropping each clip onto your
blank “palette.” Each audio clip
becomes it’s own selectable panel, each with it’s own gain control, hot key and assignable effects. The effects
are especially cool because you have the ability to “switch” them on and off, literally on the fly. You can control
the start, end, and duration as well as if it loops or not. By selecting each panel, you can add whether it auto
ducks, and if it’s the master or slave. The auto ducking is genius, it actually lets you select the amount of gain
you want the music to decrease. It doesn’t sound like much, but after using GarageBand, I’ve always had to
go back in and adjust the volume because I never thought GarageBand decreased the volume enough. In the
preferences, you can now input the percentage of decrease, and it works like a dream. I’m personally fond of
70% with a medium sensitivity and low gap tolerance. Now that you have everything set up, turn the select
knob to Record.
There’s not much difference in the look between
Prepare and Record. You have all your audio panels set
up, there is a button for Record, Stop, Play and Pause.
The Record button highlights when you start recording.
You’ve got your standard dB meters with clipping
lights, a master gain control, and a small recording
monitor not made but for the simplest of editing. If you
belong to the school of recording that uses very little, if
any, post production, than this is definitely your product.
Clicking on the mic panel, selecting the hot key, or, if
you have the “stealth” option on so you don’t hear any
mouse clicks during your cast by hovering the cursor
over the mic selection for a few seconds, will start a
3-2-1-Record countdown and your off. If you want to play other clips you select them in the same way. If you
want your voice to have a deep reverb in the middle of a sentence, you can just assign that effect to a virtual
switch on your microphone panel, then just switch it on and off at the appropriate times. When a clip is almost
completed, the panel will start flashing to give you time to get ready for the next segment.
The next step on our dial is Cut. When selected, it starts looking like other podcasting software does. All your
tracks are laid out on the top part of the edit window. Each selectable track has four buttons on it for soloing,
© MPN, LLC 2007 macCompanion
Page 90 May 2007, Volume 5 Issue 5
muting, editing the volume track, and
effects, to display and edit switch able
effects. The lower half of your edit window
you can edit 4 separate sets. There is a
Track Edit, where you select one track,
edit the name, AU effects, etc. Pretty
much a large version of the top. The
Source view shows all source material
of a selected track in the cut view. The
source material will always be shown in
full length in source view. You can select
in and out points by dragging markers in
this view. The next view is Media View,
that looks similar to the Source view. The
main difference is which audio material
is showed: While the Track source view
shows the source material of a selected
track in the cut view, the Media view shows all used and unused audio material in the whole document. The
last view to select is Chapters. Here is where you can take care of all the enhanced podcasts pictures, chapter
titles, URLs and the like. One of the biggest features that I really like is the sound graphical line lays on top of
your track, so if you change the volume with the volume line, you can move your track around, and the volume
adjustments follow!
The last button on our big
silver selector dial is Release,
and here Übercaster shines.
First it’s where you place
all your normal meta data,
cover art, titles, etc. The big
difference is the ability to
create many slots.
A slot is your podcast, the
name you assign to it, it’s
destination and encoding.
You can even have it upload
directly to an ftp server. This
information can all stay the
same podcast after podcast.
Say, you want an mp3 version
to go to your .Mac account,
an enhanced AAC version to
go to your podcasting server,
and an AIFF version to be stored on your backup drive. After creating a separate slot for each of the encoded
versions, all you need to do is press Release, and Übercaster will do the rest. It will mixdown your podcast,
encode all three versions and upload each respective version to the .Mac account, the ftp server, and save the
third on your hard disk. All with one press of a button.
© MPN, LLC 2007 macCompanion
Page 91 May 2007, Volume 5 Issue 5
Conclusion
As you can probably tell by now, I am a big fan of Übercaster. There has been some talk in the community that
its $79 price tag is too high. I think that the price is fair, especially if you podcast on a regular basis. The time
saved alone is worth the cost. This argument is one of the poorest I’ve seen yet, for there is always freeware that
does what another program does for monetary compensation for the developer. If you try the program out and
don’t want to pay the $79, by all means, go back to using Audacity for free. I personally think that Übercaster is
worth the money. It’s a polished, professional application that only does podcasting, and does it extremely well.
There is a timed try–out version that gives you the opportunity to record one full length podcast, and some
5 minute versions that puts a wonderful sounding jingle at the end. Really, the jingle is top notch and sounds
great. Once your past the very shallow learning curve, you’ll wonder how you ever podcasted with the archaic
software that is out now.
© MPN, LLC 2007 macCompanion
Page 92 May 2007, Volume 5 Issue 5
Virtual Historian: Doctrine and Covenants (D&C) Version 1.0
Reviewed by Robert Pritchett
Blue Mango Learning Systems
[email protected]
28245 Avenue Crocker
Suite 220
Valencia, CA 91355
(661) 775-8300
Fax: (661) 775-8352
http://www.virtual-historian.com/
Released: March 30, 2004
$35 USD http://www.virtual-historian.com/store.html
Requirements: Color Monitor Capable of displaying thousands
of colors with 800x600 or greater monitor resolution; CD-ROM
Drive; Disk Space: Partial Install - 42 MB, Full Install 430 MB;
Macintosh: OS 9 or OS X, 400 MHz PowerPC G3 or later, at
least 128 MB of RAM; Windows 98/Me/2000/XP, Pentium II
Processor, at least 128 MB of RAM.
Cross-platform
Blog: http://blog.virtual-historian.com/
FAQs: http://www.virtual-historian.com/userarea/faqs.html
Media Downloads: http://www.virtual-historian.com/vh/downloads.html
Strengths: Great use of QTVR panorama picture technology. Cross-platform.
Weaknesses: No direct printing capability or picture exporting yet.
Other Reviews: http://lds.about.com/od/productreviews/gr/vh_dandc_review.htm
http://www.ldsmag.com/lineuponline/040325virtual.html
Interview of Greg DeVore: http://www.meridianmagazine.com/radio/040520.html
I met Greg DeVore over on the Macintosh Software Business Forum (linked on our macCompanion home page)
so we could do a review of ScreenSteps. Greg mentioned that he had this other software I might be interested as
well that his team developed for use in the Brigham Young University religious studies department (BYU is part
of a university network of The Church of Jesus Christ of Latter-day Saints). So he sent me a boxed copy of this
Interactive History Software developed on a Mac named Virtual Historian: Doctrine and Covenants.
Be aware that I received Version 1 and Version 2 will be integrating the Blue Mango Learning “Lesson Engine”
- http://blog.virtual-historian.com/version_20_features/index.html
© MPN, LLC 2007 macCompanion
Page 93 May 2007, Volume 5 Issue 5
What They Say
We love history. But we don’t want to hear just a few
random anecdotal stories or interesting statistics. We
want a complete understanding. We want to experience
the places where history happened. We want to know
the factors that motivated major events. We want to
know the background of the people involved.
But we are lazy. If we are to get all of this information
about the Doctrine & Covenants by using traditional
tools we would have to have scriptures, multiple
historical volumes, biographies, maps, timelines, as
well as videos and photographs of the locations. Our
study table would be a mess. Looking up information to
understand the context of one book would send us on chases through multiple volumes and resources.
This is fine for hardcore academics but we believe there
is a better way to cram all of that knowledge into the head
of the average person. Virtual Historian is your personal
research assistant. By instantly providing context on any
section you are studying it allows you to understand the
history of the D&C more completely and more quickly
than ever before possible.
Scriptures
Each section as well as the two Official Declarations, are
contained in the program. Right alongside each section is
historical commentary on that section. You never have to
go searching through another resource. You can always see
the history right alongside the scripture.
Maps
Virtual Historian takes “page 167” and puts it front and
center. The maps are always visible in the program.
One click on the mouse will load a map of where the
location you are studying was received.
Clicking on different areas of the maps will “zoom in”
on that area, providing maps with more detail.
© MPN, LLC 2007 macCompanion
Page 94 May 2007, Volume 5 Issue 5
Media Viewer
Virtual Historian: Doctrine & Covenants has over 100
Virtual Reality Photographs. But we don’t just provide you
with a cutting edge multimedia experience. Each location
has historical background telling you why the location is
important and where it fits into Church History.
People
You cannot understand history without at least a basic
understanding of the people involved in making that
history. Virtual Historian: Doctrine & Covenants contains
“Who’s Who in the Doctrine & Covenants” by Dr. Susan
Easton Black. This book contains biographies on everyone
mentioned in the Doctrine & Covenants.
But we have made it infinitely more useful. The book
has been cut up into the individual biographies. These
biographies have then been linked to the scriptures,
historical commentary, location commentary, and timeline
events in the program.
This means that anywhere in the program that Newel K.
Whitney’s name is mentioned you can click on his name and read a biography on him. Each biography lists all
of the sections that mention the person. These can be clicked on and instantly studied.
A Shift in Paradigms
For decades, history has been taught in much the same way. Slideshows have evolved into videos.
Textbooks now have color. These have been incremental steps that mainly focused on refining the look of
old presentation methods.
The problem we face is that history is constantly being created. This means that in 2004 we are responsible
for understanding more history than we were in 1950. We cannot continue to use traditional methods and
still learn everything we need to know. We need accelerated teaching tools that deliver understanding more
completely and more quickly.
Virtual Historian represents a complete departure from the old paradigms of the textbook and the video
presentation. We believe the Virtual Historian will not only revolutionize the way in which the Doctrine &
Covenants is taught but how history in general is delivered.
There are two keys to the Virtual Historian Concept:
• Non-linear presentation
• Instant Context
Non-linear Presentation
Traditional resources start at the beginning of a story and take you to the end. They are a seven-course meal,
where you must eat everything that is put on your plate. Virtual Historian is a buffet of resources that allows
you to stroll through and only pick out the items that interest you. There is no beginning and there is no end.
You can start wherever you want and follow your curiosity.
© MPN, LLC 2007 macCompanion
Page 95 May 2007, Volume 5 Issue 5
For example, you could click on a link to a biography, open up the media viewer for a location that was
mentioned in the biography, then see a map containing the location and finally, read other sections that were
received in the same place. Since you are controlling the experience you are only studying subjects that
interest you. This increases your attention span and your retention of information.
Instant Context
The problem with a non-linear presentation is that it is very easy to arrive at information for which you
have no context. Linear presentations organize information so that each new bit of information builds on
information that has previously been presented.
Studying in a non-linear fashion has traditionally been like skipping randomly to various scenes in a movie.
You have no context of the scene and thus have no idea what is going on.
Virtual Historian solves this problem by always providing instant context on anything you are studying.
• Historical background for each section is always present right alongside that section.
• One click of the mouse will load a map of where the section was received and jump the timeline to
when it was received.
• All names mentioned in the Doctrine & Covenants can be clicked on. A biography opens up on that
person.
• Locations mentioned in the D&C can be clicked on. A window opens up with historical background
on the location as well as Virtual Reality photographs of that location.
These are just a few of the examples of how Virtual Historian solves many of the problems inherent in a
non-linear presentation of history.
Virtual Historian: Doctrine & Covenants is just the first of many similar products that will be developed on
both Religious and Secular History. We will keep you posted as new Virtual Historian Products are developed.
Timeline
Right alongside all of these resources is the Timeline. One click of a button will jump the timeline to when
the section you are studying was received. Instantly you can see the historical context of the current section.
Timeline events are linked to biographies, locations and scriptures so that additional information is just one
click away.
What I Say
Wow, full-emersion study! “Follow your curiosity” should be their motto. If this program is any indication of
future activities, such as the promised New Testament and US History packages, this is infinitely expandable for
all kinds of history, don’t you think? And it can go much deeper and you can spend a lot more time with it than
can be done watching the History Channel on TV.
Each Virtual Reality (VR) panoramic shot is a conglomeration of around 50 photos stitched together, which is
almost as good as “being there”.
I really enjoy the melding of both “Instant Concept” and non-linear presentation in doing research and study of
both religious and secular history. One of the neat features is that the timeline colorations are matched by the
maps that also tie into documentation relevant to a given map. They system is self-contained and works on both
Mac and non-Mac systems.
The downside is that the current version does not have printing capabilities and the workaround is to copy/paste.
© MPN, LLC 2007 macCompanion
Page 96 May 2007, Volume 5 Issue 5
This kind of technology has been needed for some time. I originally purchased the Infobase Library for the Mac
OS that was created for Mac OS 9 before Folio Views was sold off and the Infobase Library went online and
eventually was replaced by http://www.ldslibrary.com/LDSLibrary2006/ That application does not have a Mac
version today and none is being planned for the foreseeable future.
I’m looking forward to the integration of the “Learning Engine” technology that is being integrated in for
Version 2.0 from Mango Blue Learning Systems.
Thanks to the DeVore brothers, we again have a way to learn by involving technological strengths found only
with Macs. Why not Email them to request work for your favorite history? Perhaps they already have it in the
queue…
© MPN, LLC 2007 macCompanion
Page 97 May 2007, Volume 5 Issue 5
The section 3 hardware reviews and articles in this issue of macCompanion are:
• Evoluent VerticalMouse 2 and 3 - 5 Button USB Optical Mouse– a couple of mice, reviewed by Robert
Pritchett
• Illuminated Rollup Keyboard – an interesting thing to do to an unsuspecting keyboard, reviewed by
Robert Pritchett
• Fujitsu S500M SnapScan Scanner– a high-end scanner that really impressed reviewer Harry {doc}
Babad
• Goldtouch for Mac – nice ergonomic keyboard for the Mac, reviewed by Robert Pritchett
• Impact 3.5” SATA HDD Enclosue – a hard drive enclosure for those mobile data needs, reviewed by
Eddie Hargreaves
• AT-MC116XL Standalone Ethernet and Fast Ethernet Copper to Fiber Media Converter – reviewed by
Robert Pritchett
• TruePower AC Adapter – replacement power converter for G4 PowerBook or white iBook, reviewed by
Eddie Hargreaves
© MPN, LLC 2007 macCompanion
Page 98 May 2007, Volume 5 Issue 5
ecamm network
http://www.ecamm.com
© MPN, LLC 2007 macCompanion
Page 99 May 2007, Volume 5 Issue 5
Evoluent - VerticalMouse 2 and 3 – 5-Button USB Optical Mouse with
“Handshake Grip”
Reviewed by Robert Pritchett
Developer: Jack Lo
Evoluent
617 Viewridge Drive
Pacifica, CA 94044 U.S.A.
650-355-2467
650-355-5550
Right-hand VerticalMouse 3
[email protected]
http://www.evoluent.com/vm3.html
Support: http://www.evoluent.com/support.htm
Released: August 2004.
Left-hand (VM2) - $105 USD, Right-hand (VM3) - $80 USD, USB Drive
for use with a Mac - $20 USD.
30-day return guarantee.
Left-hand VerticalMouse 2
Requirements: USB Overdrive ($20USD) to use all buttons. USB Port. Mac
OS X 10.4.8 or later.
Comes with: PS/2 –USB converter; mini-CD driver disc.
Strengths: Light optical “vertical” palm-mouse. Cross-platform (Linux, Mac, Windows). Ergonomically
designed to reduce forearm fatigue. No extra training required.
Weaknesses: Requires buying USB Overdrive to use all buttons for the Mac. Hand-drag on the table surface
may become an issue or not. The hand “lip” is on the right-hand VerticalMouse 3 and not available for the
left-hand - yet.
Other Reviews:
http://www.extremetech.com/article2/0,1697,1920653,00.asp
http://hardware.earthweb.com/peripherals/article.php/3497581
http://www.evoluent.com/user_reviews.htm
Video review - http://reviews.cnet.com/Evoluent_VerticalMouse_2/4505-3148_7-31242024.html?tag=prod.
txt.1
Development Story - http://www.evoluent.com/story.htm
Support: http://www.evoluent.com/support.htm
© MPN, LLC 2007 macCompanion
Page 100 May 2007, Volume 5 Issue 5
Introduction
Eliminates arm twisting
The patented shape supports your hand in a fully
upright handshake position that eliminates forearm
twisting. Many users said earlier models relieved
their hand, wrist, or arm pain. See these actual user
comments.
An ordinary horizontal mouse requires your forearm to twist away from its natural position.
Familiar grip
The grip is the same as an ordinary mouse, just turned sideways. Many
users said they got used to it very quickly.
The VerticalMouse does not move sideways when clicking with normal
force because the thumb naturally opposes the fingers. Pointer control is
as accurate as any other good mouse when the pointer speed settings are
properly adjusted.
Easy to use buttons
All 5 buttons are easily operable without contorting your fingers. The
button force is light for easy clicking, but still firm enough to avoid accidental actuation.
Fits different size hands
The shape has been improved to fit larger hands as well as smaller hands.
Prevents desk rubbing
A small lip on the bottom edge prevents the little finger from rubbing the desk.
Ultra fast response
A 2200 dpi true optical resolution sensor moves the pointer quickly to reduce hand movements. The pointer can
be moved across a 17” monitor with only 1/2” (13 mm) or less movement of the mouse. Most other mice have
400-800 dpi and require more hand movement.
Programmable buttons (XP Pro, XP Home, Vista 32)
5 buttons each programmable with different functions in different applications. For example, a button can be
Double Click in one application and Ctrl in another application.
Special functions (XP Pro, XP Home, Vista 32)
Speed toggle - cycle among up to 3 pointer speed settings with a keyboard shortcut or mouse button. For
example, a high speed for ordinary tasks, and a slow speed for graphics work.
Auto click - automatically perform a single or double click by pausing the pointer. Adjustable time delay for
activation.
Click lock - press and hold a button momentarily to simulate continued pressing without holding down the
button. Adjustable time delay for activation.
Break Reminder - visual and/or audio alerts to remind you to take a break.
© MPN, LLC 2007 macCompanion
Page 101 May 2007, Volume 5 Issue 5
Repositioning
The VerticalMouse 3 can be repositioned without moving the pointer:
Tilt it to the side to disable tracking.
Slide it without moving the pointer.
Compatibility PC
- Includes driver for Windows XP Pro and XP Home for programming all 5 buttons.
- The driver is not required. The VerticalMouse 3 still has basic functionality without it.
- Freeware driver for Windows Vista (32 and 64 bit), XP x64, 2003, and 2000 at http://www.highrez.
co.uk/downloads/XMouseButtonControl.htm Although it is freeware, please make a donation to the
author if you like it. (Evoluent has no business relationship with this vendor.)
- USB only. Not compatible with PS2.
Mac
- 1 button in OS 9 without a driver.
- 5 buttons in OS X 10.4.5 without a driver: left click (top), right click (middle), expose’ (bottom), show
desktop (wheel), select window (thumb).
- http://www.usboverdrive.com universal Mac driver that enables button programming. (Evoluent has no
business relationship with this vendor.)
- USB port.
Unix
- 3 buttons without a driver. Wheel button is middle click.
- USB port.
Linux
- 5 buttons in XFree 4.0.1 or higher and Knoppix Linux 3.9 or higher without a driver: left click (top),
right click (middle), middle click (bottom), middle click (wheel), right click (thumb).
- USB port.
Specifications
- Resolution: 2600 dpi true optical resolution
- Dimensions: L 4.45” (113 mm), W 3.15” (80 mm), H 3.03” (77 mm)
- Cable: 6.6’ (2 m)
© MPN, LLC 2007 macCompanion
Page 102 May 2007, Volume 5 Issue 5
Getting Started
Now my turn. Simple as a handshake is this device and almost as nice.
One thing this “mouse” is, is light! It weighs next to nothing. As an optical mouse, it practically floats on the
tabletop and works fine without a mousepad. It just glides.
The left-handed unit I specifically requested, VerticalMouse 2 (VM2), came in the best package ever for plastic.
No sealed pack here! I didn’t have to use a pair of scissors or try to slice myself getting the package open. In
fact, the back just slide right off. I hope the other packagers pay attention to this instead of giving us those
forever impossible-to-open sealed-forever plastic packs.
Now, it isn’t immediately obvious from the get-go, but this does have 5 – count ‘em! – 5 buttons. Yet it fits
naturally in the palm of my hand. But I’m left-handed, so I have to try and get the USB Overdrive to work “in
reverse” with the buttons and the interface to the Mac OS X System Preferences for the Keyboard & Mouse. I
accepted the defaults.
The latest VerticalMouse 3 is not in a left-handed version yet, so I get 1200 dpi instead of 2600 (apparently the
numbers need to get correlated on their website - 2600 vs. 2200) dpi for optical action, but that doesn’t seem to
be much of a problem. I set it for “system” and it plays just fine. If I want to tweak for options, I can.
Using the Hardware
Used on an iMac G5 with Mac OS X 10.4.9 and USB Overdrive software.
For the VerticalMouse 2 device to use more than one button with the Mac, a copy of Alessandro Levi
Montalcini’s USB Drive is needed. I loaded the beta version, since Alessandro is working on the next release of
his USB-driver-does-all. I could use the “one button” function with Mac OS X out-of-the-box. But to really use
it, I needed to fork over the $20 USD for the USB Drive software to use this mouse as intended, so I did. The
USB Overdrive 10.0.0b4 arrived instead of 10.4.5, but it works!
There is a small, doesn’t-fit-in-Macs mini-CD that contains a Windows-based driver.
Supposedly there is a “lip” that the hand can rest on, but in reality it does not exist and the hand rests directly
on the tabletop or working surface. That offers better control of the device, so should not be an issue. After all,
with regular mice, I bet you have a shiny palm or palm calluses, right? The “lip” is found on the VerticalMouse
3 (right-hand) and not on the VerticalMouse 2 (not available for left-hand yet).
If you do a lot of mousing around, you will want to keep a hand on this unit, because it is easy to knock over
when moving back and forth between mouse and keyboard. Maybe it is time to learn to use those keyboard
shortcuts so a mouse is not needed, but then there is the scroll wheel function…with no detents or click sounds
when scrolling (thank you!) and it does act like a button - if you push down on it, it does click once. I see that
the VM3 does have the clicks again however.
I can get used to this real fast. I see why some folks have tried it and don’t ever want to go back to “horizontal”
mice or to other “ergonomic” mice. Thank you Jack Lo! (Now make the VerticalMouse 3 for lefties and please
don’t continue to penalize those of us who are left-handed with higher prices than for righties.)
I was rather frustrated with the multibutton interface issues with this device initially and goofing around with
the beta version of the USB Drive and interface issues with Mac OS X, but love the fit and finish of the mouse
itself. Those issues were resolved once I paid for the software and I updated to Mac OS X 10.4.9. Instead of
palm calluses, I’m getting a “Karate” callous on the edge of my left hand now.
© MPN, LLC 2007 macCompanion
Page 103 May 2007, Volume 5 Issue 5
Conclusion
Why doesn’t this mouse come with a copy of the USB Drive software, if they add the microdrive-based CD
with the Windows driver?
And why should a left-handed mouse cost $30 more than a right-handed mouse?
This was recently posted on the Evoluent website –
These are the improvements of the Evoluent VerticalMouse 3 over the Evoluent VerticalMouse 2:
1. Reshaped to better fit a greater range of hand sizes.
2. A 2200 dpi true optical resolution sensor instead of a 1200 dpi sensor.
3. An optical scroll wheel with detents (clicks) instead of a smooth rolling wheel.
4. A small flange along the bottom edge to prevent the little finger from dragging on the desk.
5. Additional driver functions, such as button programming customizable for different applications.
6. A completely new internal mechanical design for improved parts fit and button feel.
7. A completely new electrical design for improved reliability.
Drivers are not yet available for MS 64-bit XP or MS Vista either, but drivers were updated for the Windows
environment back in December 2006.
If you suffer from “mouse-pain” (Repetitive Stress Syndrome or Carpal Tunnel Syndrome), then this is a viable
alternative to not being able to work at all with a mouse. You can literally give this one a “Thumb’s Up”.
© MPN, LLC 2007 macCompanion
Page 104 May 2007, Volume 5 Issue 5
Illuminated Rollup Keyboard
Reviewed by Robert Pritchett
Tianyu Technology
24B, Block 3, Yangguang Mansion, No 6017,
Shennan Road,
Shenzhen, 518050, China
86-755-82047945
86- 755- 82047945
[email protected]
http://www.tianyutek.com/ArticleShow.asp?ArticleID=781
http://www.usbgeek.com/prod_detail.php?prod_id=0618
$27 USD, £30 GBP, € 46 Euro.
Comes With: Flexible 109-key keyboard, USB to PS/2 adapter. And the
User Manual.
Strengths: It rolls up and can handle chemical spills. Waterproof and dustproof.
Weaknesses: It puts out an irritating electronic noise. The keys require extra pushing to make contact. Not for
”touch-typists”.
Other Reviews: http://www.lanaddict.com/rev/155/1/
http://www.coolest-gadgets.com/20060922/bendi-light-up-keyboard/
Introduction
Do you remember Captain Jean-Luc Picard and the flexible piano keyboard (Lessons episode of The Next
Generation)?
http://en.wikipedia.org/wiki/Lessons_%28TNG_episode%29
Well, how about using a computer keyboard that rolls up?
Sapphire Blue EL Illumination on Keys Water resistant and virtually indestructible keyboard. No poisonous and
evil smell. Roll it up and bring it everywhere.
© MPN, LLC 2007 macCompanion
Page 105 May 2007, Volume 5 Issue 5
Features & Specification:
• 111 keys in a standard QWERTY layout.
• Sapphire Blue EL Illumination on Keys.
• Flexible/foldable, soft without any sound while
typing.
• Made by high-quality silicone.
• Water resistant and dust-proof
• Acid and alkaline-proof.
• Washable and hygienic.
• Soft-touch, quick tactile key action, more
comfortable than traditional hard plastic
keyboards.
• Fits easily in your briefcase, backpack or
notebook carrying bag and you don't have to
worry about any sharp edges.
• Choose from PS/2 only or both USB & PS/2
connectivity.
• EL Illumination ON/OFF
• Support: Windows 98/2000/ME/XP
• Weight: 333gm
• Size: 49.5 x 14cm
Getting Started
This arrived rolled up in a bubblepack envelope in the mail from
Hong Kong. It out-gassed for about a day due to the silicon rubber
and finally dissipated. (No poisonous gas, but it sure smelled!)
I plugged it into the USB port and the computer asked to identify it
and it did successfully.
The keyboard is designed for a PC and not a Mac, but it works.
There are a few warning statements and pictures in the tri-fold
brochure or handout, requesting that we not use anything sharp on
it, keep away from oils or organics like acetone or Toulon, not to press it when rolled (which was funny because
it came “pressed” in the mail and it took quite a while to lay flat with parts of it refusing to go flat), not to put
anything heavy on it, or to be used in an oven or “putted on the fire to teast”, or to be twisted or pulled.
Using the Hardware
This is not a light-touch keyboard, You have to get “manly” with it,
meaning you have to get tough with the keys, because they are tough
to push. Depending on how you “touch” the keys, they may or may
not register. They have to be touched in the middle and not on the
corners. This is an issue with the Enter and Space keys. And for some
unknown reason, there are a few blank “placebo” keys onboard. Two
next to the Spacebar have no function whatsoever and there are three
more up on the right side.
© MPN, LLC 2007 macCompanion
Page 106 May 2007, Volume 5 Issue 5
The keyboard made this high whine that never went away. Now if I were in a factory environment, the noise
would be hidden, but next to my iMac, this was one noisy keyboard!
When it was plugged into the iMac, it lit up with the underlayment being blue. The magic is in that rectangle to
the right (transformer, etc.) where there are also 3 LEDs as indicators.
Conclusion
Bottom line? If you need a flexible chemical resistant lighted keyboard for low-light environments, you might
try this one.
Just remember that it does not have any “Macintosh keyboard” keys. Let the silicon rubber cure before using
when you first get one of these keyboards. And who knows? Perhaps the one you get won’t send out any
electrical/audible noises from the transformer.
© MPN, LLC 2007 macCompanion
Page 107 May 2007, Volume 5 Issue 5
Fugitsu S500M ScanSnap Scanner — A dream machine dedicated to
document scanning
By Harry {doc} Babad
Fujitsu Computer Products of America
Website: www.vendorwebsiteURL.com or
http://www.fujitsu.com/us/services/computing/peripherals/scanners/workgroup/
s500m.html/.
List: $495, Street $379 (NexTag) USD; $ 550 CND; £315 GBP; or € 419 Euro
Requirements: Power PC G4 Processor 800 MHz or higher.
Recommended: Power PC G5 Processor 1.6 GHz or Higher. Mac OS X 10.4 or later;
Universal binary. The specifications indicate Mac OS X 10.2.8, and later (PowerPC),
Mac OS X 10.4 recommended. RAM 512 MB Recommended, Disk Space needs: 20
MB for ScanSnap Monitor application and 450 MB for Adobe Standard.
Warranty — The ScanSnap S500M scanner is covered by a one-year Limited Warranty.
Strengths: Scan to PDF with the touch of a button and digitize both sides of a document in a single pass, in
color, and at an impressive speed of up to 18 pages per minute (36 images per minute in duplex). The canner
comes with Acrobat 7 Standard and Readiris Pro 11.5 and Cardiris 3, the later two tuned to the scanners
function.
Weaknesses: The S500M’s photo scans aren’t in the same league as my HP ScanJet 8250 flatbed scanner’s at
its normal setting of 150 dpi, but works wonderfully for its designated task capturing the contents documents
so you can dispose of the paper copy.
The software was tested on a 1 GHz dual processor PowerPC G4 Macintosh with 2 GB DDR SDRAM
running under OS X 10.4.9.
Copyright Notice: Product and company names and logos in this review may be registered trademarks of
their respective companies.
Introduction
In the accompanying article in this issue, I rambled about how one could initially organize and ultimately
make electronic, a large collections of references. In my column entitled Too Many References — Too Little
Space — No way to Search for Them, I focused on technical papers and science articles. What I’d discussed,
the organization of paperwork, and the devolution of the subject oriented filing cabinet, would work from
everything from product descriptions to business letters and contracts, from legal briefs to articles about plants
and gardening.
© MPN, LLC 2007 macCompanion
Page 108 May 2007, Volume 5 Issue 5
There are two parts to the challenge of collecting and the reaccessing paperwork or electronic documents. The
first is organizing the documents, be they paper or electronic, in such a way you can find stuff again, perhaps in
five minutes or less in 1000 documents. The other is to convert your paper collection to electronic form to free
up closet, file draw or bookshelf space. This article about the Fugitsu ScanSnap focuses on the later.
What one needs to go all-electronic are two tools and one scarce asset — First and most importantly, a flexible
and reliably fast scanner. Second, the software accompanying the scanner must be easy to use and bug free. The
scanner vendor must also provide you with software that enables trouble free conversion of the scanned page to
the format(s) you need to be able to use them. I prefer PDF files, either in graphic or editable format to text or
word processor based formats. In addition, for those who require editable documents, the vendor must supply a
reliable and accurate OCR program. Such software is available as part of Acrobat and as separate application in
Readiris.
Product Specifications
• Output resolution: Up to 600 dpi
• Measuring 6.2 by 11.2 by 9.2 inches (HWD) including the output tray, 6.2 inches with the tray retracted.
• Scan Speeds:
• Normal Mode (Color 150 dpi, B&W 300 dpi) — 18 pages per minute / 36
images per minute (duplex mode.)
• Better Mode (Color 200 dpi, B&W 400dpi) — Duplex 12 pages per
minute/24 images per minute.
• Best Mode (Color 300 dpi, B&W 600dpi) — Duplex 6 pages per minute/12
images per minute.
Note: Normal mode is the fast one, and it’s ideal for black and white text
documents. Better mode is slightly slower but with a visible increase in output
quality. In best mode, throughout drops to 6 pages (12 sides) per minute, the
setting I used to copy photographs and documents containing color images.
• Paper Size: A4 to custom sizes
• Capacity of ADF: Up to 50 sheets
• Interfaces: USB 2.0
Time —However, above all else, you must own one rare asset — time. (Motivation too,
but that’s even scarcer then time.) Unless you are wealthy enough to have staff perform
the scanning and organizing of you documents, you need to be prepared to take the time
to do it. No not all at once — it will never happened; but 2-3 hours on Sunday afternoon
or Wednesday evening, would work. You also need to be prepared to continue doing so
for as long as you gather up documents, on paper. With the right tools, turning you paper
documents into paperless files can be accomplished in a surprisingly short time. Indexing
and filing all your documents requires time and system. For a description of my system and
how I got there, read Too Many References — Too Little Space — No way to Search for Them
in this issue.
Let’s look Deeper — First and foremost a scanner capable of handling multiple page documents easily and with
relative speed. Such a tool should also be capable of dealing with feeding stacks of paper in various conditions.
These range from documents that are well read in which the pages don’t stick together but may not lie flat. At
the other extreme there’s a new document you not gotten around the reading with its pages close packed.
Bindings and Other Variations — Scanning challenges include dealing with document that were edge punched
and held together with plastic coils of various types or document that were made pretty after being stapled by
© MPN, LLC 2007 macCompanion
Page 109 May 2007, Volume 5 Issue 5
having a tape binding added. Documents can also be held together with a heavy duty or a lightweight staple.
All of these types of document bindings pose problems with the ability to feed single sheets. I’ll discuss dealing
with bindings and how to avoid paper jams when using the Fugitsu scanner later in this review.
Getting Started
Basically, you install the software, plug in the power cord and USB cable,
and let your Macintosh Windows recognize the scanner. The software
consists of three items, on separate CDs. The Fujitsu scanner Setup CD is
accompanied by a copy of Acrobat 7 Standard and the device optimized
copies of Readiris 11.5 and Cardiris 3. Since I have Acrobat 8 Professional
installed, I did not use the provided copy of Acrobat 7. Acrobat 8, once
selected in the Fugitsu software’s settings worked just fine. I installed
the I.R.I.S. software, after taking with the I.R.I.S technical support.
The software, which is mostly identical to my Readiris Pro 11.03, has
been optimized to make converting ScanSnap output to searchable PDF
documents more automatic. I found that to be so.
Its user interface is somewhat different from that with my HP flatbed scanner. You define profiles from
within the scan software, ScanSnap Manager, to specify the programs to scan to, and the scanning mode and
characteristics including image resolution and naming. These settings remain the default, until you change them.
When you are ready to scan, you pick a profile and then press the scan button on the front panel to start the scan.
This is a bit different, but easy to get used to.
Using the Hardware
To use the ScanSnap S500M, just insert a stack of paper and press a button to initiate the scan process. The
scanner will automatically create and store a PDF file and hand it over to Adobe Acrobat. If you chose to use the
provided OCR functionality you can select Readiris as the application that processes your scanned document.
Alternatively, use the full version of Acrobat, which is included within the ScanSnap S500M package, your
scanned document can easily be converted to a fully searchable PDF file. The process for a 10 page double
sided document, only took a minute or two longer to complete.
I jumped into using the product by grabbing several dozen documents (ca. 2000 pages) from my — I need to
index these #$@&&# documents and file them — pile.
I was careful to select documents that represented all of the conditions discussed with respect to “Bindings and
Other Variations.” The table below describes my test findings. In all cases as recommended in the product’s
131-page Operators Guide, I followed the instructions on How to Load Documents.
© MPN, LLC 2007 macCompanion
Page 110 May 2007, Volume 5 Issue 5
Document Condition
Special Extra Handling
(Note 1)
Scan Result
Well read – handled pages
Well read pages with a light
weight staple (remove staple)
Newly printed pages w-w/o staple
Edge punched bound document
Unread document with a heavy
staple
None
None
Trouble free scan
Trouble free scan
None
None
The dimples left after removing
the staple made loosing the
pages more difficult. The printer
jammed one or twice until I got
it right
Unread document edge strip bound
and heavily stapled
Residual glue on the bound edge
required trimming the edge with
a paper cutter. I removed about 2
mm and then loosened the pages.
None
Trouble free scan
Trouble free scan
The residual dimples caused the
stacker (scanned pages) to misbehave,
zigzagging the pages as they caught on
the dimple. They were however in the
correct order. There was no easy fix to
this problem. (Note 2)
Depending on the weight of the staples,
I got a repeat of the dimple related
problem.
Otherwise trouble free.
The Fugitsu scanner’s software
automatically rotates the pages
appropriately. It even effectively
accommodates mixed pages in
landscape and portrait mode.
Trouble free scan
Upside down or Sideways Pages
Color Photographs
Required setting higher resolution
[scanned to JPEG]
Note 1: Prior to feeding the document to the scanner and before taking any special action I followed the vendor
instructions about “loosening” the pages.
Note 2: I did not need the original document after I scanned it so did not concern myself about straightening out
the pages.
Scanning Options and Output Results
Acrobat 8 Pro — Scanning to Acrobat creates a PDF file that is only an image. To be able to extract text, you
will then need to OCR the pages with ether ReadIris or from within Acrobat. Acrobat 7 Standard was provided
with the scanner but my Acrobat 8 Professional worked just fine.
© MPN, LLC 2007 macCompanion
Page 111 May 2007, Volume 5 Issue 5
Scan to ReadIris Pro 11.5 for Fugitsu (Provided with the scanner) — The scanned pages go directly to the OCR
software and the text portions are automatically selected. You then only need to recognize the text to what ever
output you prefer, for me either RTF or PDF which can be edited, works fine.
Scan to ReadIris Pro 11.0.3 (Which I own) — After the scan to Read Iris is complete, you must then analyze
each page manually. After that step, you can recognize (OCR) the text and images, and save the result as a RTF
or an editable PDF file.
Scan to Apples Preview – Your output is a graphic only PDF file that cannot be edited.
Scan to Photoshop Elements 4.0 – This works in a manner similar to importing a PFD file in the software.
Other Features
Auto Paper Size Detection — The S500M’s auto-size detection function automatically recognizes the size of
every page that it scans for the following paper sizes (A4, B5, A5, B6, A6, Business card, Legal and Letter).
Auto de-skew — The S500M eases scanning tasks by automatically straightening all images and showing them
in their proper orientation.
Auto Blank Page Detection — The S500M saves storage space and editing time by automatically deleting blank
pages.
Owners Manual — Downloadable 131 page Operations Guide, a manual, that is more detailed than either the
software’s help files or the Getting Started Manual.
Minor Discomforts
Need An Alternative Means to Initiate Scanning - Once you’ve established your preferences you can start
scanning by either pushing the scan button on the deice or by selecting either duplex or simplex mode from the
ScanSnap Manager that’s in your dock. Since my scanner is not on my desk, I need to get up to push the button.
Therefore I wish I could just double click on the software’s dock icon to start a scan. It is important to note
© MPN, LLC 2007 macCompanion
Page 112 May 2007, Volume 5 Issue 5
that if you set the preferences (settings) to duplex mode, back pages are skipped. When scanning 25-50 page
documents, which were printed only on one side, the duplex setting did not seem to slow down the scanning
process.
Note: To increase the speed of converting my paper collection to PDF I select that mode. When I need an
accessible copy for editing or extracting test, I can do that later. Note: The scanned (in normal mode) Acrobat
formatted image files are about 50% smaller in size than the OCR’d versions.
Pages Limit — Many of my documents are about a cm thick, the scanner requires I split these into two setups of
about 50 pages each. Not a serious problem, but for collectors of fat documents, a minor inconvenience.
Scan To File Setting — I couldn’t figure out what this setting did until I read the Operators Manual. I expected
it to scan to a temporary file and ask what format I wanted the file save to. Nope, it just scanned to a graphic
PDF without showing the scanned file on the screen. The setting works fine if you’re not worried about
checking the individually scanned documents.
Conclusion
ScanSnap S500M defines the Fujitsu way that an efficient document scanner for the office professional’s
personal every-day use should look like. Now for the first time I have, until I return the loaner to Fugitsu, a
means for simply and accurately doing high quality scanning of typical documents I collect. As Ed Eubanks, Jr,
noted in his recent ATPM review: “Though the price is well above most home/consumer scanners, the return
on investment is immediate. ScanSnap is bundled with Adobe Acrobat Standard (though version 7.0 came with
mine, not the latest version 8.0) and ReadIris Pro 11. With Acrobat selling for $150 (street price) and ReadIris
Pro for $129, you could say the scanner itself only costs $100—though that would imply a value far below its
worth. The real return on investment will come on the hours saved by what this scanner offers.” http://www.
atpm.com/13.03/scansnap.shtml. Check out Ed’s article, its well worth the side-trip. (Note: I didn’t benefit by
the identified savings since I already own both software products – doc.)
The Fujitsu ScanSnap scanning solution’s reasonable-price, small footprint, ease of use and exceptional
functionality make it the ideal document management solution for small- and mid-sized offices or for document
collecting packrats. The ScanSnap scanner’s “one-button” approach eliminates elaborate scanning applications
and cumbersome driver interfaces. Its amazingly small footprint allows the scanner to sit comfortably beside
your computer keyboard and monitor or on that file cabinet you’re going to empty out.
Recommendation
What can I tell you folks? If I had the cash, I would instantly purchase this excellent flexible scanner. As a
document junkie who’s paper collections is outgrowing accessible storage space, it is the best solution I’ve
found for reducing my paper collection. In addition, working with scanned materials makes it easier to enter
document information into my references database. That reduces the effort to maintain access to my collection
by doing real-time indexing.
I wonder what I could get for my ADF equipped HP ScanJet 8250? Oh well, perhaps the family can chip in for a
X’mas present.
© MPN, LLC 2007 macCompanion
Page 113 May 2007, Volume 5 Issue 5
Goldtouch for Mac - Ergonomic Keyboard
Reviewed by Robert Pritchett
Key Ovation, LLC
2111 W Braker Lane, Suite 200
Austin, TX 78758
(512) 795-9994
(866) 277-9994
Fax: (512) 795-9997
[email protected]
http://www.keyovation.com/
Released: October 11, 2006
$140 USD
Requirements: Mac OS X 10.4 or later.
Strengths: Flexible adjustable ergonomic keyboard with “Mac” keys. Plug&Play.
Weaknesses: Needs external palmrests. No USB ports. May take a little getting used to due to key locations
compared to other keyboards.
Other Reviews: http://www.macsimumnews.com/index.php/archive/review_goldtouch_a_solid_ergonomic_
keyboard/
http://www.pomcast.com/wp/?lp_lang_pref=en&s=keyovation
Introduction
The Adjustable Ergonomic Keyboard allows you to adjust the two alphanumeric sections both horizontally
and vertically to suit your individual body requirements. This helps you assume a more natural posture that is
conducive to improving comfort and productivity while using your computer.
FEATURES INCLUDE
•
•
•
•
•
•
•
•
•
•
USB connector
Adjustment for wrist splay in the horizontal plan: 0°-30°, continuously variable
Adjustment for wrist pronation - vertical tenting 0°-30°, continuously variable
Easily adjusted, locking ball and socket latch mechanism
Small, space saving foot-print to bring your mouse inside your ergonomic "comfort zone"
Editing key layout for left-right work distribution
Large space bars for easy thumb use
Full size, full travel, tactile feedback keys with soft end-stop
Low noise key actuation
Standard alphanumeric key layout (QWERTY)
© MPN, LLC 2007 macCompanion
Page 114 May 2007, Volume 5 Issue 5
APPLE KEY FEATURES
•
•
•
•
Apple Control Key
Right and Left Apple and Option Keys
CD Eject
Mute and Volume Control
Getting Started
Even though this keyboard has no USB ports, it does have a power button that works and it is quiet (no real
or imagined “clickity” key click sounds). Even though some of the keys are “misplaced”, it didn’t slow
productivity nor did it take 2 weeks (reference the Kinesis keyboard review) to learn.
The keys are the typical keys that feel cheap, but work great. I don’t know if the lettering will come off over
time or not yet. They are decaled on, but the keytops are not intended to “come off”. There is an extra numeric
keypad for doing calculations, but it is “built-in” on the right hand unit if the Num Lock key is on. And the Num
Lock and Caps Lock both have separate LEDs that are green when on, so there is no mistake if you are using
those functions. I missed that in wireless keyboards.
Using the Hardware
The company sells a palmrest, but it is not included with this unit from Key Ovation. There is no keystand in the
back to raise the corners. And what I am learning about ergonomics, there also is no keystand in front to allow
the wrists to rest either so the keyboard slopes away from the hands instead of parallel to the table surface.
I ding the keyboard for not having an extra USB port on board as a “true” Apple keyboard replacement, since
it is a “hardwired” keyboard. I figure for the price they could have added the USB ports, so it would be a “true”
Apple keyboard replacement.
The way the keyboard is designed it tends to flex a bit with the one piece holding the two sides together and the
lever over time may not keep the friction/tension, since it too is made of plastic. But then again, who knows.
With this tilt/rotate design you can adjust the keyboard to fit your hands. I found that in order for the flex to
function, I had to “float” my hands above the keyboard.
Conclusion
Thankfully the “gold touch” is in the key play and the keys are not wobbly, nor is it necessary to push the keys
all the way down in order for them to function properly. And I appreciate the split spacebar. With 2 inches off
the sides from a “regular” keyboard, this one does bring the hands closer together, but the keys are designed for
those of us who have “fat fingers”.
© MPN, LLC 2007 macCompanion
Page 115 May 2007, Volume 5 Issue 5
Impact 3.5in SATA HDD Enclosure
Reviewed by Eddie Hargreaves
RadTech
http://www.radtech.us
$110 USD
Requirements: 3.5in SATA hard disk drive
Strengths: Quiet; Simple drive installation; Necessary cables included;
Aluminum styling matches professional Macs; Horizontal or vertical
standing.
Weaknesses: No FireWire 400 port; Flimsy back panel.
Introduction
Most modern Macs use SATA hard drives, which provide tremendous data transfer speed over regular ATA
drives. But if you pull that drive out of your computer, it can be difficult to find a compatible enclosure to put it
in. RadTech’s Impact line is one such enclosure, but there are some caveats.
Getting Started
It is very simple to install a naked SATA drive into the Impact enclosure (provided you have Philips
screwdrivers #0 and #1): simply screw the drive into the sled, slide the sled into the back of the enclosure and
screw closed the back cover. Unfortunately, the model I tested had a very flimsy back cover that did not stay
securely attached at all four corners. This did not affect the performance of the enclosure, which is otherwise
very rugged. In fact, it’s sturdy enough you can stack other external drives on top. Of course, that’s only if you
lay it horizontally. You can also stand it vertically using the provided stand.
The enclosure is also pretty compact for a 3.5in drive, helped by the fact that there is no fan. The aluminum
alloy shell cools the interior through convection. The absence of a fan also means the enclosure is very quiet.
There is very little noise when the drive is spun up and no noise when it’s spun down.
The SATA enclosure has four connection ports: two FireWire 800, one USB 2.0 mini-port and one eSATA port.
No current Macs ship with eSATA connectivity, so that’s not yet a big bonus point for Mac users (although it
may come in handy in the future).
Using the Hardware
Thankfully, the enclosure came with all the necessary cables, including a FW800 to FW400 adapter. Since there
are a lot of Macs that do not have FW800, this is extremely useful. But if you want to daisy-chain this device
to your other FW400 drives, you’ll need another cable. Otherwise it’ll need to sit at the end of the chain. And
© MPN, LLC 2007 macCompanion
Page 116 May 2007, Volume 5 Issue 5
when it was at the end, I discovered the drive would not mount on the Mac unless one of the in-between drives
was powered up.
Conclusion
If you have a homeless SATA drive, RadTech’s Impact enclosure isn’t inexpensive, but it’s incredibly quiet and
unobtrusive. And if you have a professional Mac (PowerBook G4, PowerMac G5, Mac Pro, MacBook Pro) it’ll
be especially speedy and stylish.
© MPN, LLC 2007 macCompanion
Page 117 May 2007, Volume 5 Issue 5
AT-MC116XL 10/100TX to 10FL/100SX (SC) Standalone Ethernet and
Fast Ethernet Copper to Fiber Media Converter
Reviewed by Robert Pritchett
Allied Telesis Inc.
19800 North Creek Parkway, Suite 200
Bothell, WA 98011
1-800-424-6596
Fax: 1-425-481 3895
http://www.alliedtelesyn.com
Released: February 2004
$165 USD (can be obtained for $35 USB refurbished), £81 GBP
Requirements: Multimode (850 nm) Fiber SC ports. Dual port 62.5/125 um multimode fiber patch cord.
Category 5 patch cord.
Strengths: Plug and play optical fiber converter. No fan.
Weaknesses: The LINK TST button will keep communications from running, if in the “off” position when
electronics at either end of the fiber are turned off. And the company has a terrible return policy – “You
bought it, you keep it”. And you wonder why fiber-to-the-desktop isn’t popular?
Introduction
“Our media converters allow you to connect disparate cable types in your network. SC fiber connectors are
used primarily for Fast Ethernet and Gigabit, while ST fiber connectors are used primarily for Ethernet and Fast
Ethernet. Media conversion offers you the ability to:
» Extend network distances by adding fiber only where it is needed
» Add new devices without replacing costly cable
» Keep pace with changing technology
» Integrate high-bandwidth devices into the network
The Allied Telesyn range of 850nm fiber Fast Ethernet media converters allows users to extend the size of UTP
networks with the use of fiber cabling. Converting between 10T and 10FL or 100TX and 100SX fiber quickly
and reliably, the AT-MC116XL addresses the growing demand for a low-cost solution for fiber installations of
300 meters or less. To maximize flexibility, the converter is available in SC fiber connector style.
The AT-MC116XL auto-negotiates during the link up phase of the connection to set the speed (10/100) and
operation mode (Full or Half Duplex). When connecting media converters to autonegotiating Fast Ethernet
switches, this media converter will automatically connect the link in either Full or Halfduplex mode, allowing
the link to be established with the greatest bandwidth. The MissingLink feature allows accurate reporting to
network management systems as well as allowing devices with redundant link capability to be inter-connected
with these media converters, failure in one fiber link will be signaled to the switch, allowing the second link to
become active.”
© MPN, LLC 2007 macCompanion
Page 118 May 2007, Volume 5 Issue 5
Interfaces/Ports:
Interfaces/Ports
1 x RJ-45 10/100Base-TX Port LAN
1 x SC 10Base-FL/100Base-SX Port LAN
Media & Performance:
Connectivity Media
10/100Base-TX UTP
10Base-FL/100Base-SX 850 nm Fiber
Data Transfer Rate
10Mbps Ethernet
100Mbps Fast Ethernet
Management & Protocols:
Protocols
Ethernet
Fast Ethernet
Physical Characteristics:
Dimensions
1” Height x 4.12” Width x 3.75” Depth
Weight
0.65 lb
Warranty:
Standard Warranty
Lifetime Limited
Getting Started
Order the part from an electronics distributor. I discovered via Amazon.com that I could have purchased these
for as low as $35 USD as refurbished units, but I got these for $165 USD via a distributor. I looked at other
media converters, but these are small, don’t use fans to cool and are-plug-and play simple, without having to
resort to management software to configure.
Using the Hardware
One of my brothers is building an innovative showplace home and he agreed that we could add fiber to the
rooms for the network. Why fiber instead of going wireless? Security. Futureproofing. It’s cool technology
(literally).
After doing some due diligence and searching for products, I landed these boxes for both the headend cabinet
and the end locations. The criteria we used; the units had to be small, unobtrusive, handled multimode fiber and
worked with Macs. Competing products cost more, had fans that seemed were designed for turbo engines (the
dB levels were incredible!) and needed management software (non-Mac environments) to operate.
Allied Telesyn met our needs nicely. They have been doing these boxes for some time.
© MPN, LLC 2007 macCompanion
Page 119 May 2007, Volume 5 Issue 5
The Macs in this particular network do not run 1 Gigabit, so we needed an autonegotiating device that senses
the speed at the business end of the network – (which in our case is the computer) and played nice with existing
network protocols.
Fiber electronics do not run 10/100/1000 yet because of fiber standards. The fiber electronics industry has, over
time, figured out how to get the 10/100 thing, but the 1 Gigabit speeds require separate electronics. So if you
need something running at that speed, you will need to get a different box. Allied Telesyn has those too.
The AT-MC100XL series media converters do have a couple of switches to look at. One is a link test, much like
what one found on baseband/broadband drops for copper systems. And there is a MDI-MDI-X switch for letting
the box work either at the headend (the central area where all the communications into the home are located)
or at the computer. “MDI-X” for either interfacing with a modem, switch or router and “MDI” at the computer.
These are so the twisted pair copper cables do not have to have the wires “swapped over” physically at one end.
Technically, fiber can operate at lots of different light color levels, so 1 strand could be used to both send and
receive at lots of different wavelengths – again only limited by the electronics used. But the industry treats
multimode fiber like it treats copper. Each fiber runs the converted signal in one direction and not in both
directions at the same time. Single-mode is altogether a different animal and the fancier electronic systems are
designed to go kilometers and not meters do use technology at different wavelengths over the same fiber strand.
The expense for moving to fiber is not the fiber, but rather, the electronics. We face the same obstacles that
the all-electric cars and solar-powered homes face. The initial costs can be daunting, but I think the “what,
me worry?” feeling is worth the financial pain. If you bought a Mac after experiencing the non-Mac computer
systems, you get the idea.
Security Soapbox
A fiber system runs on light and not copper, so there is no electrical path established between systems that might
otherwise cause such nasty things as ground loops (something the pending Category 7 copper cabling industry
has to face) or even paths for lightening to follow to zap equipment.
And of course, there is the “security issue” that is not an issue as it is with a wireless system. An optical fiber
is just a lot more difficult to compromise than a copper system that can easily be tapped. And with a wireless
system, frankly, there is no “real” security. We learned that back in the 1960’s with vanfuls of monitoring
equipment driving down Wallstreet. And those experiences were justification for TEMPEST systems that were
supposedly designed to protect against electrical or electronic tapping.
Today we live in a social environment where nothing seems to be sacred or where we have any degree of
privacy. A fiber system makes access to private information just a little more secure by limiting prying eyes and
ears from seeing and hearing what they ought not.
So obviously we need at least 2 boxes to make this work. And there are more expensive solutions for using
fiber, but this is a great introduction to using a fiber backbone in the home or business. We used Leviton jacks
at the wall outlet and decided to use LC connectors instead of SC. They are smaller and designed for 1 GB
networks, but they work just fine and have a smaller footprint than the SC connectors. ST connectors are so
1980s and there are different types of connectors – which is probably why the fiber industry has been slow to
get out the gate for fiber-in-the-home or business http://www.thefoa.org/tech/connID.htm
http://www.ertyu.org/steven_nikkel/fiberconnect.html
http://en.wikipedia.org/wiki/Optical_Fiber_Connector
© MPN, LLC 2007 macCompanion
Page 120 May 2007, Volume 5 Issue 5
SC Connectors (EIA/TIA 568)
LC Connectors (Lucent)
The connectors are easy enough to install from Leviton http://www.leviton.com and can be easily obtained at
outlets such as Graybar http://www.graybar.com/ or Anixter http://www.anixter.com. These are not yet available
at The Home Depot or other Home improvement stores yet. While Category 5 copper network cabling is now
universally available for installation by the typical “Do It Yourselfer”, fiber is still a “professional” game.
I found that in my case, the Link Test button needed to be “out” (LINK TST) instead of “in” (NML) in order for
the system to work correctly, because the link shuts down if either the computer or electronics at the headend
shut off. It is designed that way to let us know there is a problem. In other words, “NML” isn’t normal, but
LINK TST is.
There is a 35-page Installation Guide that offers all the details needed - and then some.
Conclusion
If you are into optical fiber communications, Allied Telsyn makes some great products that tie it all together.
However, they have a really bad return policy. They do not take back equipment that has been bought. I had to
return a 1 GB optical fiber system because it was too large to fit in the headend cabinet and it has a constantly
running fan that sounds like a jet engine. (Think of an iMac that gets overheated and ramps up its fan every
once in a while. Now think of that being “on” all of the time.) This is totally unacceptable in a home or Small
Business environment. I ended up paying a restocking fee with the distributor that cost me hundreds of dollars
and he is stuck with equipment he may not be able to resell. Allied Telsyn’s competitors do not play that game
– so “Caveat Emptor”.
The AT-MC16XL is one solution for local area networks that reaches out to 300 meters (984 feet) at 100MB
over fiber. Allied Telesyn has lots of other equipment that extends further over multi-mode fiber (2 kilometers)
and even greater distances still for single-mode fiber systems. Just be aware of their “No Return” policy. 300
meters is plenty for a home or small business.
© MPN, LLC 2007 macCompanion
Page 121 May 2007, Volume 5 Issue 5
TruePower AC Adapter
Reviewed by Eddie Hargreaves
FastMac
http://www.fastmac.com
$36 USD, £19.95, €29.41
1-Year Warranty
Requirements: Any G4 PowerBook or white iBook.
Strengths: Rugged; Compatible; Affordable.
Weaknesses: Can only be used in extended length; Doesn’t have charging ring.
Introduction
The AC Adapters that Apple shipped with its G4 PowerBooks and white iBooks are stylish, useful and
(generally) superior. But what about when they break down? A replacement adapter from Apple costs $80. Or
what if you just want to have an extra adapter – one for your home and one for your work. FastMac has stepped
up to meet those situations with its TruePower AC Adapter.
Using the Hardware
The 65-Watt adapter can power both white iBooks and PowerBooks, including 17” models. Of course, while
FastMac’s adapter is considerably less expensive than Apple’s, it has fewer features. First, it doesn’t have the
illuminated ring that lights up green or orange when the battery is full or charging. Second, it can only be used
in its extended, 12’ length.
But the TruePower adapter has its own strength: durability. Because FastMac’s adapter has no moving pieces,
it is more rugged than Apple’s. FastMac even went to the trouble to drive over it with a truck to prove its
durability. And if that doesn’t satisfy you, there’s still a one-year warranty.
Conclusion
The bottom line is that if you have a G4 PowerBook or white iBook and need an extra or replacement AC
adapter, FastMac’s TruePower 65-Watt AC Adapter is an affordable, reliable choice.
© MPN, LLC 2007 macCompanion
Page 122 May 2007, Volume 5 Issue 5
QuickerTek
http://www.quickertek.com
© MPN, LLC 2007 macCompanion
Page 123 May 2007, Volume 5 Issue 5
The section 4 book review in this issue of macCompanion contains:
• Real World Mac OS X Fonts, First Edition – what you want and need to know about Mac fonts,
reviewed by Harry {doc} Babad
© MPN, LLC 2007 macCompanion
Page 124 May 2007, Volume 5 Issue 5
Real World Mac OS X Fonts, First Edition
By Harry {doc} Babad
Author: Sharon Zardetto Aker
Publisher: Peachpit Press
http://www.peachpit.com/bookstore/product.asp?isbn=0321498372&rl=1
Series: Real World
Released: Feb 14, 2007
Dimensions 7-1/2 X 9-1/8; Pages: 360;
$32 USD, Street $26.40; CND $40, UK £29
ISBN-10: 0-321-49837-2
ISBN-13: 978-0-321-49837-3
Audience: All but über-expert level font users.
Strengths: From introduction to Mac OX X font basics to advanced troubleshooting. If you use more than
TextEdit to create type containing documents, this is a must have book.
Weaknesses: None I could credibly identify.
Product and company names and logos in this review may be registered trademarks of their respective
companies.
Introduction
With the advent of Tiger Mac OS X, fonts, in my eyes turned from a minor collecting vice, to an instrument
or torture. With a little bit of reading other Tiger related books, I had learned that there were at were 4 places
(folders) the operating system stashed fonts.
These are, as Sharon Zardetto Aker notes:
•
•
•
•
In the System directory (/System/Library/Fonts)
At the "shared by all users" level (/Library/Fonts)
In your home directory (~/Library/Fonts)
In the Mac OS 9 System Folder (/System Folder/Fonts) if you've installed Classic.
Indeed all of these folders have a reason for existing. They serve to accommodate the operating system, and
fonts shared by all users. In addition, individual users on a shared Macintosh can have their own captive fonts.
Furthermore, you guessed it; there are the Classic font collections. What I was only vaguely conscious of was
that applications like those in the MS Office Suite install their own fonts, but that the new version of MacKiev’s
ThePrintShop for Tiger does not.
From Ms. Aker’s book I leaned that Adobe’s Creative Suite (and Acrobat Pro) adds another Fonts folder (in/
Library/Application Support/Adobe/Fonts) – Yep, it’s there, despite the fact that I’m only have Acrobat 8 and
Adobe PhotoShop Elements on my Hard Drive.
© MPN, LLC 2007 macCompanion
Page 125 May 2007, Volume 5 Issue 5
And of course without knowing any better, I committed the cardinal
sin, at least according to Ms. Aker’s Tid-Bits article; “Of the many (font
related) misunderstandings and management mistakes users make, one
stands out as the most common: consolidating fonts into a single Fonts
folder” http://db.tidbits.com/article/8546/.
No I didn’t quite do that, I let my systems fonts alone, still at 32
font labeled items. That’s still two more than Ms. Aker recognizes.
However, in some late night moment of madness, I worked to
consolidate all my other fonts in my user folder and perhaps elsewhere,
into my Harry‘s Tiger/Library/Fonts folder. After all, I don’t share this
computer with anyone else, so what harm?
I don’t remember what I did with my Microsoft Fonts. Hmmm — time
to check. They’re still in my Office application folder (/Applications/
Microsoft Office 2004/Office/Fonts) but seem also to be duplicated in
my Harry‘s Tiger/Library/Fonts folder. (That’s exactly where the book
said they’d be.)
I do indeed, at this time, have 156 items in my and none in my Harry‘s Tiger/Users/Harry/Library/Fonts folder.
So far, I’m not having any font related problems in MS Word, but that may be more a blessing that pre-ordained
based on the mucking around I’ve done with my fonts. I suspect its time to straighten this mess out. Sharon
Zardetto Aker’s book Real World Mac OS X Fonts provides me with just the guidance I needed, so that’s the
first thing I did.
Publisher’s Summary
“As someone who works with fonts every day, you need to know exactly how fonts work in Mac OS X. Longtime Mac author Sharon Zardetto Aker has the answers you need. Explaining where your fonts reside, why
they are there, and what to do about duplication and long Font menus. Once that’s under control, you’ll learn
things like the ins and outs of different font installation methods; how to use Font Book to manage, validate,
and organize fonts; ways of dealing with legacy Mac OS 9 fonts; and how to make the most of character-rich
Unicode fonts.
“And to help with those maddening font problems, Sharon provides troubleshooting steps and real-world advice
for solving problems fast. If you’ve experienced seemingly inexplicable trouble with characters displaying
incorrectly, an inability to type a particular character, fonts missing from Font menus, confusing behavior in
Microsoft or Adobe programs, Font Book crashing, or Character Palette misbehaving, Real World Mac OS X
Fonts has the help you need.” I agree.
In this book…
Okay, I’ve messed my font organized up by moving thing around. I needed to put things back where they
belonged. Therefore chapter 2 Organize Your Fonts (step by step guidance) was a good place to start. The good
news, I was able to make things right, over several hours. The bad news, it seemed to make no difference on
how either MS Word, Acrobat or other fonts using applications worked.
After experimenting with organizing my fonts I did a little experimentation with Installing few fonts (Chapter
4) that I’ve recently collected, and also tossed some non-critical fonts (see Appendix C) I hadn’t used since I
installed OS X Tiger. I no longer have Classic installed on my computer so all those fonts went into to the trash
© MPN, LLC 2007 macCompanion
Page 126 May 2007, Volume 5 Issue 5
along with all of my classic applications.
Following the instruction provided, I was able to work my way through the first seven chapters of the book. The remaining chapters, although interesting, were not information I was going to immediately use, so I read
them with voyeuristic interest.
Somewhere along the way, I destroyed Font Book and am now chasing a new updated copy for my Mac OS
X 10.4.9 system. This had nothing to do with Ms. Aker’s suggestions. Rather during writing the remainder
this months review and trouble shooting other problems, that glitch occurred. This is for me is another case of
Murphy’s gremlins, which aperiodically appear on my much stressed operating system.
Note: When my Macintosh starts doing weird things, Mike a
knowledgeable troubleshooter has often given me the following advice.
Either do my macCompanion testing on another startup hard drive or at
least to set up another account just for testing. What me listen?
As a result I was able to read but able, past chapter 7, to implement or test some of the other suggestions
Sharon made in this book. I don’t feel badly about this because I really have very little interest in Master Menu
Fonts, Font character(s) Identification, and other advanced topics in fort awareness and control. These are all
necessary to the success of those who do desktop publishing and page design, which I don’t.
In addition, since I’m using primarily fonts provided with my operating system Adobe and Microsoft, I don’t
find myself in trouble with passing on my simple documents to other PC or Macintosh users. However if you
need to synchronize (your documents) with the Rest of the World, I highly suggest you read Chapter 12.
For now working without Font Book, all is not lost. Although available w/o Font Book, I dislike Keyboard
Viewer and don’t need Apple’s Character Palette. I use two other tools that allow me to work with my fonts.
PopChar X 3.1 and Unsanity’s FontCard 1.4. Note: because I did not know whether the later might interfere
with Apple’s Font Book, I turned it off during my font reorganization and other book related test activities.
What’s In The Book? — In this book, you’ll find the answers to questions like these:
What types of fonts can I use with Mac OS X? In what order does Mac OS X access fonts from all their possible
locations? How can I figure out what characters are available in a Unicode font? How can I minimize fontrelated troubles when sharing documents across platforms? How do I go about troubleshooting a font problem?
How do I enter special characters? How do I print font samples? How do I work with legacy fonts?
Ms. Aker’s discussion (see the book’s TOC) includes: Font basics, font organization, an overview of Font
Book, installation of new fonts, removal of unwanted fonts, disabling fonts and dealing with duplicate fonts.
Read about Font Book collections and libraries, updating legacy fonts, mastering font menus and formatting,
characters in fonts. There detailed information on controlling character entry, preventing and analyzing
problems, and solutions to specific font problems.
In addition the well organized and complete index make the book’s contents easy to find. The information
appendices (A-G) and augment the font users knowledge on subjects ranging from font specs and tiger fonts to
Mac OS X Font samples.
Adam Engst noted in a Amazon.com review of this book: “…then came Mac OS X, which introduced a plethora
of new font types, font behaviors, and font folders. Since Mac OS X, I’ve struggled every time I run into a
problem with fonts, whether it’s not having the right font for a document or having a conflict between similar
(but not quite identical) fonts in different font folders. Despite having read the text of this book several times in
© MPN, LLC 2007 macCompanion
Page 127 May 2007, Volume 5 Issue 5
editing passes, font problems still flummox me, but at least
now I know where to look for the answer.”
Whether a user of the basic fonts provided by your operating
system and applications, or a designer with a computer full
of added fonts, probably the most important chapter in the
book, in case of font problems is Chapter 13, Prevent and
Analyze Problems. In addition to Chapter 13,
Chapter 14 deals with solving more narrowly defined
specific font problems. For example, those associated with
Apples Character Palette or Keyboard Viewer, PostScript
Fonts, MS Office, Adobe Applications, and/or Safari. These
chapters, even if you a knowledgeable of fonts in Macintosh
OS X Tiger are well worth the price of the book. This is truly so if your time is worth more then minimum
wage.
Minor Discomfort
Although Appendix G contains a section on Mac OS X font samples, what
I would have like was a brief appending on the general types of fonts,
comparable to the brief description provided by Robin Williams in either the
Non-Designers Type Book (Peachpit Press.)
Conclusion
I am always delighted by Sharon Zardetto Aker’s ability to explain the most
complex topics in a user-friendly way. Whether I run across a tid-bit or read
a book she’s authored, complex topics become understandable when penned by Sharon’s hand. For a purported
technophobe — now where did I read that — she has created a logically organized book on working with fonts
in Apple’s Tiger environment moving from the simple to complex potential user problems when using fonts in
they every-day computing life. She is both knowledgeable, as demonstrated in her two Take Control eBooks
(Take Control of Fonts in Mac OS X: Tiger Edition, and Take Control of Font Problems in Mac OS X) as well
as her contributions in my well thumbed though Macintosh Bible. This is an exceptional book, and a great
resource. It is full, of easy-to-use flow charts to help trouble shoot all sorts of font problems. The flow charts are
accompanied not only by step-by-step guidance, but sidebar comment why the method proposed is necessary,
when compared to what seem to be simpler alternatives.
Although I find Sharon’s humor less captivating than Scott Kelby’s my favorite techno-comic, Real World Mac
OS X Fonts is an easy book to browse or better yet, when facing font problems, read, and implement her sage
advice.
Author BIO
Sharon Zardetto Aker has been writing about the Macintosh professionally since 1984. She has authored nearly
a thousand articles for Macintosh magazines, starting with articles in the earliest issues of Macworld and the
premiere issue of MacUser. Her book writing credits span over 20 books, and include several editions of the
best-selling Peachpit compendium The Macintosh Bible, along with The Mac Almanac.
© MPN, LLC 2007 macCompanion
Page 128 May 2007, Volume 5 Issue 5
Recommendation
What you’d suggest a friend consider before spending hard-earned cash...
Additional References to read while waiting for your book to arrive:
Apple’s Mac 101: Font Book — http://docs.info.apple.com/article.html?artnum=304764
Get Acquainted with Font Book: Informit.com Mar 16, 2007 By Sharon Zardetto Aker http://www.informit.
com/articles/printerfriendly.asp?p=705690&rl=1 A sample chapter form the Real World Mac OS X Fonts book.
© MPN, LLC 2007 macCompanion
Page 129 May 2007, Volume 5 Issue 5
The section 5 shareware review in this issue of macCompanion is:
• Hyperwords for Firefox Version 2.1.6 – an interactive Text Search Engine, reviewed by Robert Pritchett
From Assistant Editor Harry {doc} Babad:
macCompanion Help Wanted
Shareware and freeware reviewers for macCompanion
Motivation - There’s so much out there to share
Rewards - Seeing your name in print
- Sharing new toys with soon to be friends
Contact – Robert Pritchett, and CC Harry
Expected salary - The product is yours all yours.
macCompanion is looking for a few good people that want to write informative reviews of
shareware products. Writing experience is useful, but not an absolute requirement.
© MPN, LLC 2007 macCompanion
Page 130 May 2007, Volume 5 Issue 5
Hyperwords for Firefox - Version 2.1.6
Reviewed by Robert Pritchett
Developers: Frode Hegland and Mikhail Seliverstov
http://www.liquidinformation.org/index-fr.html
The Hyperwords Company
[email protected]
http://www.hyperwords.net
Donationware
Released: March 11, 2007
FAQs: http://www.hyperwords.net/faq_user.html
Requirements: Firefox Browser or Flock. JavaScript needs to be turned on.
Blog: http://hyperwords.wordpress.com/
Strengths: Highlight or double-click any word or words in Firefox and walk through dropdown menus to
“dig deeper”. Cross-platform.
Weaknesses: Requires Internet Explorer, Firefox or Flock. Does not work in other browsers yet.
Demo: http://www.hyperwords.net/demo.html
Introduction
Frode Hegland has been able to establish a company focusing on rethinking how we communicate with one
another and capture what we’ve learned into “Hyperwords”. His desire (as ours should be) is to convert the
electronic technologies we use to be as fluid and portable as paper, yet allow for instant access for further
knowledge that electronic connectivity permits – or in his words - “liquid information”. Thus was born the
Liquidinformation Research Project.
Hyperwords for Firefox works by highlighting a word and then it provides links to language translations,
reference sources, other search engines and allows for Email, print, tag, Blog, WordPress and also links to maps,
time, weather, shopping links and package tracking and also can provide server information.
Getting Started
First, you will need to install a copy of Firefox 2, if you do not already have it on your system - http://www.
mozilla.com or Flock - http://www.flock.com/download/ Next, go here to download the Hyperwords Extension
- http://www.hyperwords.net/firefox.html This app was also optimized for use with WordPress. To see how it
works, the Demo video presentation (linked above) does about the best job.
© MPN, LLC 2007 macCompanion
Page 131 May 2007, Volume 5 Issue 5
Using the Software
Once you’ve installed in Firefox as an extension, pop out of Firefox and back in to activate Hyperwords and
highlight a word or phrase and see the dropdown menus appear. I checked to see if Hyperwords was based on
pop-up screens by blocking those in preferences and it still functioned, so these are dropdown menus and not
popups. To activate Hyperwords, just doubleclick the word or highlight a word or phrase and the menu appears.
What happens to your system is that a JavaScript extension is placed in Username > Library > Application
Support > Firefox > Profiles folder. If you want to see it in Firefox, go to Tools > Add-ons to see it. For the
geekset, the name of the file is hyperwords.xpi.
In Firefox, we can now highlight any word and “dig deeper” by also getting the word equivalent in a variety
of other languages besides English similar to what we have imbedded on the macCompanion website, but this
essentially makes such searching universal. Bu tthis tool does so much more!
There is one funny little thing though. Apparently we can flag items and add them in the Preferences Edit Menu
tab, but I could not figure out how to add anything on those _____ lines that are shown in each section in the
graphic shown above. So think of them as programming placebos for now – at least on the Mac. More to come
later, I’m sure…
Conclusion
Now if only this were included in Safari! I guess we will have to wait and see what Mac OS X Leopard has to
offer.
Recommendation
I have no problem recommending this app to the Mac community as a research tool that fits nicely with our
continuing theme on Writing. I do not know how Frode Hegland expects to monetize this app, but the fact that
he offers it as free right now is rather wonderful to me.
© MPN, LLC 2007 macCompanion
Page 132 May 2007, Volume 5 Issue 5
The section 6 extra goodies in this issue of macCompanion are:
• According to Hoyle – Moving from CodeWarrior to Xcode (Part II), continuing the excellent coding
tutorial by Jonathan Hoyle
• Doc Babad’s Macintosh Tips – a really good group of useful tips compiled by our own Shareware
Editor, Harry {doc} Babad
• Links in Acrobat 8 and Kinks in MS Word – Rants, Raves and Revolutions from Harry {doc} Babad and
Derek C. Caudill
• Too Many References, Too Little Space – Rants, Raves and Revolutions Part 2, from Harry {doc} Babad
• Mac Mini: The Original Apple TV – reprint of an article from Grover Saunders
• Roller Coaster Tycoon and Soaked Expansion Pack – fun game and expasion pack reviewed by Daniel
MacKenzie
• April Updates of Interest – Some software updates, plus shameless book and Astronomy plugs, by Mike
Hubbartt
© MPN, LLC 2007 macCompanion
Page 133 May 2007, Volume 5 Issue 5
According to Hoyle...
Moving From CodeWarrior to Xcode (Part II)
by Jonathan Hoyle
We continue our discussion of porting CodeWarrior projects into Xcode. Last month, we discussed a number of
modifications you can make to your CodeWarrior project to help prepare for porting. This month, we continue
by looking at the Xcode side of the equation. If you wish to follow along, you should have both Metrowerks
CodeWarrior 9.x and Xcode 2.4.x installed on your system. Although this process will work with some different
versions of these compilers, the screen captures and directions I outline will assume these versions.
Whether you are a expert Xcode user being tasked with converting an old Codewarrior project or a long-time
CodeWarrior user having to port your project to Xcode, this article is or you.
Configuring Xcode for a more CodeWarrior-Compatible Experience
For those coming from a CodeWarrior background, this section discusses some preference settings to help make
your transition to Xcode a bit easier. If you are comfortable with Xcode as is, you may skip to the next section.
Changing applications after nearly a decade’s use will entail a bit of discomfort. You will no doubt experience
some of this your self with your move to Xcode. These discomforts include a wide range of aspects of this
products use; however, many of these can be ameliorated by taking advantage of a few simple preference
changes. One common area of cognitive friction comes from having to relearn a new set of menu key
equivalents for common tasks, such as Build or Run. Although Xcode does indeed have a different set
of command-key equivalents, Xcode does allow you to modify these within the Key Bindings pane of its
Preferences. In fact, there is a Metrowerks Compatible key binding set already available for you:
© MPN, LLC 2007 macCompanion
Page 134 May 2007, Volume 5 Issue 5
Since my personal tastes are for key binding in earlier versions of CodeWarrior, I create a new key binding
set using the CodeWarrior set as the default, but making Command-M for Build, Command-R for Run and
Control-R for Debug. As you can see, Xcode allows you the same flexibility for menu key assignments as
CodeWarrior does. Other visual differences between these two environments can be diluted by other Xcode
preference settings. For example, within the Fonts & Colors pane, you can adjust the Editor Font to Monaco 9.0 and change the Syntax Coloring for comments to red to match the CodeWarrior defaults, if you wish.
The most fundamental difference in workflow use between these two environments is the window and control
layout. Whereas CodeWarrior separates its project, file editors and compiler responses into separate windows,
Xcode’s default layout is to combine them all into a single window:
Fortunately, Xcode provides the ability to change the layout in its preferences for users coming from other
development environments. The Xcode Layout can be found under the Preferences’ General pane. The Layout
popup menu allows for three settings: Default (the Project Builder layout), Condensed (the CodeWarrior
layout), and All-In-One (the Microsoft Visual Studio layout):
© MPN, LLC 2007 macCompanion
Page 135 May 2007, Volume 5 Issue 5
This layout is disabled if a project is already open, so close any open windows if you wish to make changes.
If you wish to have the CodeWarrior user experience in Xcode, change the Layout option to Condensed, and
reopen your project. It will now appear a little more familiar to you:
© MPN, LLC 2007 macCompanion
Page 136 May 2007, Volume 5 Issue 5
This Condensed layout is also more useful for developers in a two monitor system, who like to have multiple
edit windows viewable simultaneously. Note that this preference is disabled when any projects are open. You
must close down all project files to adjust this setting and reopen them afterwards.
Importing a CodeWarrior Project
To illustrate the Xcode conversion process, we will be importing the Appearance Demo.mcp project found on
the CodeWarrior 9 Reference CD. If you wish to follow along, you can find this project folder in CW Reference
9.0/(CodeWarrior Examples)/Mac OS Examples/PowerPlant Examples/Appearance Demo/. Double-clicking
on the Appearance Demo.mcp file will launch CodeWarrior and present you with the project file window
containing two targets:
Those with a long familiarity with CodeWarrior already know this, but the target you will be interested in is
Appearance Demo - Carbon. The poorly named Appearance Demo - PPC target is not, as the name might
suggest, the only PowerPC target. Both targets compile for PPC; the PPC target is actually a Classic build and
should have been named Appearance Demo - Classic. We will concentrate only on the Carbon target, as the
Classic target will be unnecessary by Xcode.
Select the Carbon target from the popup menu and build the project. There should be no warnings or errors
upon completion; if you do experience build errors, verify that your CodeWarrior installation is complete and
your libraries have been fully built. Running the application will present the following window:
© MPN, LLC 2007 macCompanion
Page 137 May 2007, Volume 5 Issue 5
You may wish to test out some of the controls to satisfy yourself that the project built properly. When you are
finished, quit the CodeWarrior application.
Now it is time to import this project into Xcode. Launch Xcode 2.4 and select Import Project... from the File
menu. From Xcode’s Import assistant will be presented. Select the Import CodeWarrior Project item and press
the Next button:
© MPN, LLC 2007 macCompanion
Page 138 May 2007, Volume 5 Issue 5
In this next screen, the importer allows you to choose the project file; select Choose... and navigate to the
Appearance Demo.mcp file. Once selected, press the Finished button:
Xcode’s Project Importer will launch Codewarrior and begin porting the files. The process will take a few
seconds. Upon completion, the file Appearance Demo.xcodeproj will be created:
© MPN, LLC 2007 macCompanion
Page 139 May 2007, Volume 5 Issue 5
At this point, it is worth noting that your original CodeWarrior project, Appearance Demo.mcp, is still intact and
functioning. That is to say, you will be able to build the Appearance Demo with either CodeWarrior or Xcode or
both. This may be useful during the debugging phase of your own project.
As you may recall from the previous section, this project had two targets: Appearance Demo PPC and
Appearance Demo Carbon. As it is redundant to have both in Xcode, we will remove the former target. Click
on the Targets tab and click on the Targets disclosure triangle to reveal the two targets. Select the Appearance
Demo PPC target. Right-Click or Control-Click on this item to reveal a contextual menu and select the Delete
menu item:
Once selected, a confirmation sheet will be presented; click on the Delete button. Now you are ready to for the
next phase: getting your application to compile.
Building the Project
Select Clean All Targets from the Build menu. Once the clean operation is completed, select Build from the
Build menu.
Note: It is vital that you wait until the clean is completely finished before attempting to build; Xcode
has a known bug/feature that will cause the clean to stop if a build is attempted in the midst of a clean
operation. When the build command has finished, the compiler will tell you that it failed with 17 errors
and 1 warning. These errors can be viewed by selecting Build Results from the Build menu:
© MPN, LLC 2007 macCompanion
Page 140 May 2007, Volume 5 Issue 5
Next Month: Now that our Appearance project is fully converted over into Xcode, we will fix the build errors,
explaining why they are happening, and offer helpful suggestions for similar problems you may encounter for
your own projects. See you in 30!
© MPN, LLC 2007 macCompanion
Page 141 May 2007, Volume 5 Issue 5
Doc_Babad’s Macintosh Tips
A Macintosh Tip or Three…
May 2007 Edition
By Harry {doc} Babad
Product and company names and logos in this review may be registered trademarks of their respective
companies.
The software related tips were tested on a 1 GHz dual processor PowerPC G4 Macintosh with 2 GB DDR
SDRAM; running under Macintosh OS X OS X 10.4.8.
This month I continue sharing occasional tip related finds with you. Where I use any one else’s tips for this
column, I acknowledge both their source and their contributors.
Oh, I almost forgot! Unless otherwise noted, all the tips and tidbits I share, where appropriate, work on my
computer. If I don’t own the software, but the tip sounds interesting, I’ll so note at the end of the write-up.
Tips I’ve provided this month, as always in a random order, include:
•
•
•
•
•
•
•
•
•
Tip on Where To Find Word Tips
White Letters in a Black Screen — Rub You’re Eyes and Say Rumpelstiltskin Three Times Backwards
The Stuck in the Drive CD Blues
Using the Clipboard in a Snippet — A TextExpander Tip
Rotate a single PDF Page in Tiger’s Preview
Open a Second Mail.app Window to Stay Productive
Two Entourage Tips
Create New Blank Text Files Via the Contextual Menu
Effectively Using Drop and Drag
§§§§§§§§§§§§§§§§§§
Tip on Where To Find Word Tips
A gentleman, by the name of Allen Wyatt, has been publishing an e-newsletter for the past 10 years on the
subject of Microsoft Word Tips. I have been receiving this newsletter but have often complained that it was
only for Windows users. Well, Allen Wyatt has started publishing a MacWordTips newsletter. As with his
original newsletter, it is FREE for all who send in their e-mail address. The only fundraising Allen does, to raise
some income, is his annual solicitation to sell a CD Version of an Annual Archive of his Word Tips. In some ways this is similar to Paul Tailors Request to help defray the Cost of his Hints & Tips column. Like
everything else, get used to it — There’s no free lunch — (doc).
Bob Horgos wrote; “I guess that Allen has received a sufficient number of complaints regarding the lack of a
Word Tips newsletter for Macintosh that he recently started issuing a periodic newsletter of MacWordTips. You
can access and read the MacWordTips newsletter at the address below. If you so desire, you can also sign on to
receive his newsletter, avoiding the need to log into the site.
© MPN, LLC 2007 macCompanion
Page 142 May 2007, Volume 5 Issue 5
Horgos notes, “Be aware that the Mac version is not anywhere as extensive as the Windows version, but it still
might offer you some insights on the use of Microsoft Word http://www.macwordtips.com/. Doc-Sez you can
also send Allen some tips, I plan to. You can also sign up for Allen’s MacExcelTips newsletter.
If you’re full of pent up emotions about the peculiarities and idiotsyncracis of MS Word, check
out my review of Word Annoyances: How to Fix the Most Annoying Things About MSW, by
Guy Hart-Davis, O’Reilly Press in the August 2005 macCompanion. Although it’s mostly
focused on the pee-cee version of word, it’s still full of things that work, even for Word 2004.
Received from Bob Horgos of the Mid-Columbia
Macintosh Users Group (MC-MUG) I’ve edited Bob’s comment for this tip.
§§§§§§§§§§§§§§§§§§
White Letters in a Black Screen — Rub you’re eyes and say Rumpelstiltskin three times backwards
Ever get a screen on a website in which in their infinitely bad taste the site developer chose to use white letters
on a back or other dark background. Of course you can grab the screen‘s image and open it up with a graphics
program such as GraphicConverter. Then a click of the mouse using the invert feature gets you back into a more
readable format.
But a recent tip from our Editor-In-Chief provided another way; With your web page wide open Click Controloption-command-8. [Cmd-Opt-Ctrl-8 = Invert Screen colors] The result is an instant negative – In this case
a readable positive. Repeat the keystrokes and instant positive. Now for this to work you must have universal
access enabled. [Why doesn’t it always work for Harry?]
More of Mike Sivcevic’ keyboard shortcuts at http://www.silvermac.com/mac-os-x-keyboard-shortcuts/
From Robert Pritchett at macCompanion.com
Used with Mike Sivcevic’s permission
§§§§§§§§§§§§§§§§§§
The Stuck in the Drive CD Blues
Put in a CD or DVD. The computer balks. It can’t recognize your disk… Ups it will not eject it either. [It’s
mine! All mine, Sez you computer!]
Unlike in the days of old when you put an unreadable 3.5” floppy in to a drive, you were given, after a spin or
three, the choice of initializing the disk or ejecting it. Yep right there and then in a new dialog window. Hello
Apple, are you listening?
There are two styles of CD/DVD drives … but you knew that already. They’re tray and slot loading.
If you’ve a tray style reader/burner the heavy straighten paper clip trick works fine. Since I’m a jeweler, or was,
I bent the clip into an almost pretty shape and keep in my desk draw, right under the computer. Why waste paper
clips. Anyway…
© MPN, LLC 2007 macCompanion
Page 143 May 2007, Volume 5 Issue 5
Find the pinhole that hides behind the flip-up burner
cover. Poke it gently but firmly with the straightened paper clip. As you push, you can feel the eject mechanism
move and out slides the stuck disk.
But the slot-loading burner like those in the iMac doesn’t have a disk ejection hole to poke. Don’t despair
doc_Babad is here!
Restart your machine and then as startup begins, hold down the button on your mouse. Now don’t let go! Whee
— out comes the disk, your computer finishes starting up, and you can get on with your computing life. (This
trick is what I use when I do my bi-weekly repair of my directory with Disk Warrior) http://www.alsoft.com/.
Oh, I’ve only been able to make this eject disk mode work with a USB hard-wired mouse, mine is an Apple
mouse. The trick fails with my Logitech wireless mouse. I’m guessing this is because of the way the drivers
load on startup, but that’s only an assumption.
§§§§§§§§§§§§§§§§§§
Using the Clipboard in a Snippet — A TextExpander tip
In the April 2007 macC Issue I reviewed TextExpander, a tool that I’m really becoming addicted to. http://www.
smileonmymac.com/textexpander/index.htmlHere’s another great Tip from the TUAW site.
Mat Lu notes, “Oftentimes I want to paste a link into a forum post and I want to make it a hyperlink, not merely
text. So all you need to do is add the following snippet to TextExpander, which I called “hlink” Now when you
want to paste in a link, just copy the URL to the clipboard (e.g. from your browser), and type “hlink” and you’ll
get the hyperlinked URL.
In case you want to cut and paste, the Content is:
<a href=”%clipboard”>%clipboard</a>
© MPN, LLC 2007 macCompanion
Page 144 May 2007, Volume 5 Issue 5
“Sometimes you don’t want the text to be the link itself, so I created another snippet I called “htext”:
The content is: <a href=”%clipboard”>% |</a>
“When you copy a URL to the clipboard and then type “htext” it will paste in the URL with the cursor
automatically placed before the </a> so you can immediately start typing your link text (“%|” will position the
cursor at that point after expansion).
“Needless to say, this tip can be expanded in any number of ways. Be sure to check out the other options
TextExpander allows, including date and time variables, cursor placement, and delimiter abandonment
(convenient for addresses and telephone numbers, etc. in forms).
Posted Mar 8th 2007 7:00AM by Mat Lu from tuaw.com
http://www.tuaw.com/bloggers/mat-lu
§§§§§§§§§§§§§§§§§§
Rotate a Single PDF Page in Tiger’s Preview
In Preview, selecting Rotate from the Tools menu rotates every page of a PDF left or right. This can be a pain if
(say) you have a portrait-format brochure, which includes one landscape-format map. An undocumented feature,
though, is that you can hold Option while selecting Tools » Rotate, and this will rotate the current page only.
Wed, Mar 14 ‘07 at 7:30AM PDT • Submitted by Anonymous
http://www.macosxhints.com/article.php?story=20070312031649116
© MPN, LLC 2007 macCompanion
Page 145 May 2007, Volume 5 Issue 5
§§§§§§§§§§§§§§§§§§
Open a Second Mail.app Window to Stay Productive
This whole ‘electronic mail’ really seems to have taken off with
the Internets, and we need to rely on it for an increasing amount of
communication with email lists, coworkers, friends and more. While
many Mail.app users have at least some sort of Rules system for
filing messages into folders (or tagging them with Scott Morrison’s
spectacular MailTags plugin — http://www.indev.ca/MT2Beta.html ),
I have recently been getting cozy with a lesser-known feature that can
save a lot of time with hopping between folders. Under Mail.app’s File
menu is a New Viewer Window option (opt-cmd-n) that opens - drum
roll please - a second window in which you can browse through your
messages.
This is particularly useful if you have a folder (or perhaps a Smart
Folder) which you keep checking throughout the day; this way, you
can simply keep one viewer open to your inbox (or whatever default
location that suits you), with the second viewer set on that other folder.
Go up to View > Hide Mailboxes (Cmd-shift-m) for either window to give you some extra room to stretch out
those From or Subject headings, and you just took another step up the ladder of email Zen. Finally: have no fear
if you need to quit Mail or restart - Mail remembers your multi-viewer setup and will put everything right back
where it belongs the next time your get your email on.
Posted Mar 19th 2007 12:00PM by David Chartier
http://www.tuaw.com/2007/03/19/tuaw-tip-open-a-second-mail-window-to-stay-productive/
http://www.tuaw.com/bloggers/david-chartier
§§§§§§§§§§§§§§§§§§
Two Entourage Tips
The Daylight Savings Time Glitch — I was having all sorts of Entourage problems with goofy times since
the new time zone went into effect — Entourage wasn’t recognizing the changes. I found an update on the
MSN website that I somehow missed. It took care of the problem. (Strange) I have been updating MS Office
whenever the updates are available. I usually see a notice posted on some of the websites I visit daily so can
keep current
Doc sez that from the help item in the menu bar for MS Office and other Microsoft application,
you can enable the check for updates features. Even check them manually. No the updates don’t
auto install, you stay in control!
More Entourage Weirdness — By the way, when I recently had to reinstall my system software, Entourage was
acting weird and giving me 2 or 3 emails instead of one from some people. I fixed it by quitting Entourage and
holding down on the Option key when re-opening Entourage--it lets you repair the database.
Linda Cameron of the Mid-Columbia Macintosh Users Group
I’ve edited Linda comment for this tip.
© MPN, LLC 2007 macCompanion
Page 146 May 2007, Volume 5 Issue 5
§§§§§§§§§§§§§§§§§§
Create New Blank Text Files Via the Contextual Menu – An Automator Tip
Whenever I open TextEdit (rarely), I am dismayed to find out that when I save the file, it only gives me four
choices: RTF, HTML, Word, and Word XML. But what happens when I don’t care about the formatting, and all
I want is plain old txt? For a while I found myself opening a blank text file on my desktop downloaded from a
website and then doing File » Save As, or even opening up Terminal and typing in touch Desktop/file.txt.
Well, today I got off my lazy butt and wrote a script (two lines of code). I then put it into Automator and saved it
as a plug-in in the Finder’s contextual menu.
Here’s the script:
do shell script “touch ~/Desktop/file.txt”
do shell script “open ~/Desktop/file.txt”
What the script does is first create a file named file.txt and puts it on the desktop, then opens it in TextEdit. I
suppose someone could save the script as an application and have it open on a keyboard shortcut through Butler
or Quicksilver as well. Just copy the code into Script Editor or Automator in a Do Shell Script action. [This hint
works only in Tiger.]
[robg adds: There are third-party tools that make this process pretty simple, too. DocumentPalette http://www.
coldpizzasoftware.com/documentpalette/ and NuFile http://www.growlichat.com/NuFile.php are two that come
to mind.]
Submitted by ecbtln - Wed, Mar 28 ‘07 at 7:30AM PDT
http://www.macosxhints.com/article.php?story=20070324202548410
§§§§§§§§§§§§§§§§§§
Effectively Using Drop and Drag
Nothing shows off the power of Mac OS X better than drag-and-drop, as support for dropped files is built into
nearly every program. It should come as no surprise, then, that there are a number of commands that can be
used to aid in the drag-and-drop process.
Command-drag — After dragging a file on the desktop while holding the Command key, the dropped icon gets
instantly aligned to the invisible grid used to keep icons tidy. This is handy if you want to drag a bunch of files
and make them fairly organized when they are put in their place. This behavior changes slightly when dealing
with multiple disks or mounted disk images. When dragging files in this case, the default behavior is to copy
files, and holding Command forces them to be moved instead. See the endnote.
Command-Option-drag — When dropping a file and holding Command and Option, the resulting file will
actually be an alias to the original. So, if you start dragging the original, hold the keys, then drop, an alias will
be created at the destination point. When performing this command, an arrow appears under the mouse cursor to
let you know what’s about to happen.
© MPN, LLC 2007 macCompanion
Page 147 May 2007, Volume 5 Issue 5
Option-drag — Similar to dropping an alias, Option-drag copies the original file to the destination. For this
command, a green (+) symbol is placed under your arrow.
Command-Tab while dragging — I’ve saved the most impressive combination for last. It’s often useful to drop
a file or two into a window of a running program, but sometimes other programs may obscure this window.
If you start dragging a file, you can then use Command-Tab to cycle through running programs and bring the
destination app forward. This is especially helpful when combined with Exposé, where entire programs can be
whisked out of the way, a file grabbed, then dropped on the window of your choice.
Doc sez… Remember that command-dragging from one disc to another disc moves, not just copies the file. The
file is deleted from the original disc and a new file is created on the new disc. This works great if you keep your
startup disk uncluttered and collect images and music to an external hard drive. That collection is 36 GB and
growing.
Posted Oct. 19, ’06, 1:30 PM PT by Collin Allen
http://www.macuser.com/tips/quick_tip_drag_and_drop.php
That’s all folks…
Harry {doc} Babad
© MPN, LLC 2007 macCompanion
Page 148 May 2007, Volume 5 Issue 5
Rants, Raves and Revelations
Links in Acrobat 8 and Kinks in MS Word
by Harry doc Babad and Derek C. Caudill
Since this is a writing and writer’s issue, macC Volume II, I thought we’d share both my
misadventures with MS Word save copy feature and provide the answer to Mike Hubbartt,
our editor’s question of about maintaining links when converting an MSW or Word formatted .rtf document to
Acrobat.
These were too much fun to hide in my usual longish tips and hints columns, so they’ll be our latest revelation.
Solving The Thrice Cursed MS Word “Can’t Delete Backup” Message
Research results, cure and procedure developed by Derek.
Every once in a while I get a problem that I cant solve. The Hints book ms I own don’t help and when I was
for feedback from either the McMUG or macCompanion staff I come up dry. That’s when I turn to a friend,
Derek C., who has a knack for ferreting teckie information from the web about things Macintosh that glitch.
Somehow he knows how to both how phrase the question and as always more patience then I do in searching
for a solution.
The Problem
My most important, much to my regret, application Microsoft Word 2004, is sick. No not dying, that would be a
mixed blessing, just sick, sick, sick! One does try to save documents when done with them — at least I do. After
all you might want to either add to your purple prose or recheck it in the future.
Every time I try to save a document when closing it, I get
this furschulgena XXW#$@XXX message. This goes
on, despite rebuilding my preferences and even despite
doing a complete reinstall including updates to the current
version, my MS Word is sick. [No I don’t use AppZapper
or the uApp.app for the deinstallation — See the macC
review index for my reviews of these products. I have too
much invested in customizing my version of word. A full
application removal would force me to spend several hours rebuilding them.
MSW Save Preferences I Use — With respect to MSW Save preferences settings — MSW > File > Preferences
> Save — I do have create backup copy enabled and Auto Recover turned off. I killed the latter when I started
having problems that froze MS Word, in the middle of typing. After attempted recovery of my text always
failed, I gave up on this so-called protective feature. Using the auto-save, led me to having to re-input my
thoughts. (That solution, after the fact, also turned up in a hint I read somewhere – instant gratification.)
The Symptoms
If I save a file and then close it, I get the following (see Image) message.
If I close an unsaved document, sometimes it does what I expect it simply saved. However at times, I get the
dumb message even when I don’t save a document. With no MSW documents open, if I quit MS Word, I get the
same dumb message.
© MPN, LLC 2007 macCompanion
Page 149 May 2007, Volume 5 Issue 5
Indeed, with MS word booted, if I try to shut down my computer, or to just restart it, it will not restart unless I
jump thought the same old “can’t delete” dialog hoops.
But if that’s not enough, there’s the indignity of dealing with a
second dialog window to get the document saved or MSW to quit.
This puppy can’t even be dealt with the enter key, you must mouse
it out of existence. …And unless you’re a MS Basic programmer,
don’t press the help button.
So this became a “call for Derek’s help” problem.
Derek found the first vague lead to my problem at: http://support.microsoft.com/kb/887298/enus?spid=2490&sid=216. I envy his patience. After 15 minutes on the Microsoft site, I start having reality
withdrawal symptoms.
“Harry, he first asked — have you messed up the “normal Template?” After all, It’s likely the same one that
I (doc) created when first installing MS Word X. “Your normal template file might have gotten corrupted
somehow. Now why didn’t I think of that? After all, the dialog box does have the word normal in it.
Derek wrote;
“Try doing this:
• Quit all running MS Office applications.
• Navigate to the /Users/user_name/Documents/Microsoft User Data folder.
• Remove the Normal template file to your desktop.
• Restart Word 2004, it will create a new Normal template.
• Quit Word and see if you get the error.
If you don't get the error, reopen Word, create a new document and just type some gibberish, and then save it to
see if you get the error after you close the document.
If you still don't get the error, open a copy of a document you had been working on previously, one where you
experienced the problem. Make a few changes, and then save it, and then close the document.
If you still don’t get the error, have Word open, and try to restart your computer, if you don’t get the error, then
it seems that the problem is fixed.”
The Results
— It worked!
The bad news, it demolished, yes obliterated, all my custom settings. Who would guess Microsoft’s great secret.
The customization you create for MS Word, are stored in the normal template. Humbug! But I keep screenshots
and list of shortcuts so I was able to reset these customizations. [I also keep a copy of the .plst file and my
custom dictionary]
© MPN, LLC 2007 macCompanion
Page 150 May 2007, Volume 5 Issue 5
But it took about 45 minutes, playing enie, meanie, minie, mo in the customization windows.
Maintaining Link or Adding Links to a PDFs Created from MS Word Documents
Question
Despite having active links in my MS Word [MSW] documents (.doc or .rtf) format, these do not always
transfer to the pdf file I create for document distribution. [Mike]
The Answer
Background — One can create three kinds of active links in any MS Word document.
Full Internet and email addresses such as that activate your selected browser or email client.
Web Links — http://www.macCompanion.com or www.macCompanion.com
Email Addresses —[email protected].
Or…
Links embedded in a sentence such as the MacUpdate site, which when clicked translates to
and activates an internet or email link http://www.macupdate.com/
In addition one can use links in MSW to move to other parts of your document. A good example of this is the
creation and use of Table of Contents for a long document to speed navigation between sections. But that’s
another future tip topic. Okay, more fussy details.
Ways of Creating PDF from a Word Document
Assuming you own Acrobat, now version 8, there are three ways to create a PDF from a MS Word document;
[I’m using Word 2004, but the earlier version “X” also works.]
1. You can print to PDF using Apples print utility.
2. You can use the Adobe installed plugins to print your document to pdf. That uses a tool called Acrobat
PDF Maker.
3. You can use Acrobat’s Create a PDF from file function.
© MPN, LLC 2007 macCompanion
Page 151 May 2007, Volume 5 Issue 5
In addition you can create or activate a link, from within an Acrobat document. Simply select
and create a link, as I explain below.
Doc’s Test Results
I created a test set of links using two formats for Internet URLs, an email addressed and the phase to URL
examples I used in the tip introduction.
In either the .doc or .rtf examples both using the Apple or the Acrobat plugin worked. The traditional links
(URLs and emails) were active. However, Acrobat will not allow you to convert either a Macintosh .doc or .rtf
document to PDF by way of its file menu.
Nothing I tried kept the MacUpdate (the words) linked to the sites URL. The word MacUpdate is not recognized
as a link in the PDF.
Creating a Link In Acrobat 8 Is Also Easy
Open your PDF document. Go to (Tools > Advanced Editing > Link Tool) — Follow the Adobe provided
instructions…
First, use the marquee tool to highlight text you want to
create into a link. Set your appearance preference and say
“okay”.
Type in the link, or better yet paste it in — you’re done.
Enjoy!
…Doc
© MPN, LLC 2007 macCompanion
Page 152 May 2007, Volume 5 Issue 5
Rants, Raves and Revelations, Pt 2
Too Many References — Too Little Space — No way to Search for
Them: A Quintessential Enigma
by Harry {doc} Babad
The Enigma — to keep or not to keep, that is my question. Is it better to search for information each time I
need it? — OR — After collecting needed information, usually in documents, spend time cataloging it for easy
retrieval. Too much to do — so little time to do it in!
Pros and Cons
— A new search will turn up other interesting and appropriate goodies
— Much of what I want, and often know exists, has never been stored electronically
— Dealing with the problem by cataloging is sooo boring, en with my favorite music playing
— Over the years, you’ve created great, if I say so my self, systems for cataloging, and retrieving stored
documents.
— Doc, you’re likely too attention scatters to maintain even the best of systems. It’s like quitting smoking
or eating after 9:00 pm.
My Problem
Floor to Ceiling Paper References – in a walk in closet bookcase,
cataloged in a database)
File draws — six plus, full of references including my published papers,
mostly uncataloged.
Uncounted Electronic References — documents, mostly uncataloged,
with likely duplicate copies, in folders scattered all over my hard disk.
These are randomly organized by project, client or by subject matter or
in folders of several of these categories.
Needs
If wishes were horses, beggars would ride…
• Reclaim Closet and File Draw Space by canning the documents I want to keep— Paper reduction
101 — it all goes to recycle.
• Catalog all those references into a searchable database. For cataloged items, shifting the existing
information to a newly designed more easily searchable catalog. More about that later.
• Alternatively, with great pain, toss the ones I no longer connect with, knowing they’ll become
needed next week… month… year.
• Maintain the updated database and document storage system. The rule, new document, new
database entry — golly doc is getting organized again.
• Create a reference library to stare my document collection on a separate hard drive. This will
allow me to store archive but interesting documents.
• Change by collecting ways to avoid duplicate copies of things I use — I can use aliases, in
project files, of the documents I need to refer to, in support of my clients. I could even give the
aliases a more useful name, rather than the short alphanumeric used when cataloging and storing
the original.
© MPN, LLC 2007 macCompanion
Page 153 May 2007, Volume 5 Issue 5
Available Tools
I actually for the first time in my life have all the tools I need to make document collection, cataloging, and
storage an almost painless process. At 71, some of you might question my sanity, but as sayeth the Bard, The
time is out of joint; O cursed spite, that ever I was born to set it right! Hamlet, Prince of Denmark, Act I. Scene
V.
— A Scanner — A scanner capable of dealing with documents, automatic
sheet feeder, in a dependable fashion. (Super fast, accurate, easy to use
with minimal miss fed pages.) Read about it in this months article on
the Fugitsu S500M ScanSnap Scanner — A dream machine dedicated to
document scanning.
— A Universal Catalog for my Documents — My, now more flexible,
FileMaker Pro references database.
— A Way to Getting into the Meat of a Reference — OCR software, Acrobat
Pro or Readiris Pro, for extracting editable text from the archived
documents, if in PDF format. An added advantage, doing so makes the contents more searchable in
spotlight or its hopefully more controllable replacement.
— Finding It Again — An easy to maintain storage approach to allow two-step retrieval of the documents
I’ve collected. Step 1: Find it in the database. Step Two: Do not pass Go or Collect 200 dollars — Go
straight to the document.
Over my professional career I’ve collected lots of technical
documents in paper format. Initially these were stored in file draws
associated, depending on complexity, with their project or project
subtask. It soon became obvious that the method had a flaw. Many
of the documents were useful on other projects. I was never very
good at Xeroxing the documents cover page and writing down its
main file draw location as a tool to cross reference a document
location, so stuff was filed — then as file cabinets proliferate — a
corollary of Moore’s Law — lost forever.
Background – 50 Years of Being an Information Junkie
Okay I needed a better idea. Initially, this was before PCs and my
beloved Macintoshes became available, I set up, with the help of
a secretary, a needle sorted punch card system. I was working as new products manager in a specialty chemical
manufacturing company —references, including patents grew like Topsey. Our task was to develop, in the
laboratory, process to batch manufacture the various chemicals our salesmen said they could get orders for: of
course at a profit. Great fun!
EZ Sort Punch Cards - My First Try [1968 – Story Chemical Co.]
I read about and decided to create a set of rim edge-punched-punch cards as a means for cataloging the
references and to break our company’s traditional method of filing information by customer and project. As
long as I was not dealing with record information, I was allowed to play — the group was productive and the
products we took to the pilot plant and ultimately scaled-up were profitable.
So I initially bought 500 5 x 8” punch cards from EZ Sort, a company that seems to no longer exist. These
had a double row of holes around the periphery, which could be used to define the document’s contents. After
developing a coding system, that our needs, I would use a special punch to cut away a narrow wedge at the edge
© MPN, LLC 2007 macCompanion
Page 154 May 2007, Volume 5 Issue 5
of the card. The later was easier than it now would be because
EZ Sort LTD was kind enough to supply us with a pamphlet of
examples I could build on. (Remember, no PCs in those days.)
The center portion of the card would contain an index number
defining the location of the article in our filing system. In
addition we added the full bibliographic citation to the article,
traceability in case what we’d synthesized was process
patentable. Finally we added an abstract of the articles’ contents,
either typing or pasting a Xerox copy from the article itself.
The coding information about the card’s contents was notched
into the edge of the card making for easy retrieval.
To get visual, the center portion of my “EZ Sort” punch Card
was a large expensive index card. I could have has these
preprinted to hold bibliographic information, that that cost more
than may management wanted to spend.
So my secretary, as time allowed, typed information about each
document… the usual stuff author(s), title, journal or other
citation, and an abstract of its contents. In addition, and most
importantly, each card contained a sequential number that I used
as the basis of a filing system.
The first document, no mater what its subject, became file 00001. The second
was 00002. No matter what the content, each new item got the next sequential
number. I allowed only one variation on this theme. My secretary did not want
to put large documents (book size) or loose-leaf binders, into a file draw so we
added a bookshelf designator such as 00073B. That bookshelf’s contents were also
sequentially organized.
To find a reference, anyone would search my collection with a needle or two,
think fancy ice pick, the selected item would drop out of the stack that ultimately
grew to 2,500 or so cards. These were the database of my reference collection. If
the references were what we needed, we’d pull the document from its file draw.
If not, off to the library. (The image is wish fulfillment, but represents a real collection of isotope data that was
commercially sold.)
The Computer Revolution — I get my First Macintosh
My job responsibilities either as a manager or senior scientist always, in great part, revolved around finding and
understanding the literature of my science. Once again, over the 30 years at the Hanford Site, I accumulated
scads and scads, a plethora or cornucopia of documents. Some with technical reports generated by DOE
contractors, others journal articles. Many items were detailed technical correspondence, process records or
event occurrence reports. For most of this stuff, there were no central records, so one collection of stuff was
critical to maintaining institutional memory.
© MPN, LLC 2007 macCompanion
Page 155 May 2007, Volume 5 Issue 5
For those of you who wonder why, it was all about the DOE or GSA definition of record
items. The listed items were the only things it was mandatory for a company to retain. Alas
was a very small subset of the technical information needed to maintain operating safety,
trouble shoot unanticipated events, and to ultimately dispose of the radioactive waste stored
on the site. Such technical documentation was often tossed when an employee took a new
job or moved to another company. After all that material was a copy, not the original.
In addition, such files, non-records, were deemed to be the property of the operating
contractor and were either tossed or removed when contactors changed. — I worked for
four contractors over my 30 years on the site, but fortunately was able to keep my personal
files, although non-record libraries of documents were trashed. They could have been turned
over the R&D contractor for cataloging and archiving, but there was never the funding for
that effort.
Personal computers and database programs became available at that time. Here was a possible way to make
order out of file draws of technical information. At the time, I was being swamped with documents I knew I had
but could not find, and my office was invaded by zombie-grey file cabinets. I took up the challenge.
I had kept alive the concept of using a database, for keeping track of reference material. Instead of storing
catalog and summary contents information on punch cards I created a reference database, once again assigning
each new document a consecutive number. The types of information I needed to catalog was the same as I’d had
typed on the punch card. By having the information in an electronic database, records are more searchable. By
overcoming the coding limits, and ultimate fragility of an edge-hole punch card, the documents became were
more accessible.
My first references database was created in the Macintosh version MS File. When Microsoft discontinued
support for that product, I first migrated my data to what is now AppleWorks, but finally settled on FileMaker
as the database of choice. The result, I now have a sort of topsy-turvy patchwork database entries in FileMaker
Pro, to which I’ve added references over the years, connected to that closet full of cataloged documents.
Okay the indexing system worked. Coupling sequential numbering of documents with a database entry for each
item worked well for me, even in the absence of secretarial privileges.
© MPN, LLC 2007 macCompanion
Page 156 May 2007, Volume 5 Issue 5
Our fathers that are in Washington DC or corporate HQ, know that it is more efficient to have
high-priced engineers and scientist do their own typing than to have a secretary do that work.
They did buy us all high-priced PCs, which initially were typewriters on steroids.
As a result, I only had the problem of data entry to deal with. I got my system started working weekends, much
to my wife’s chagrin. As is usual, in the real world, my pile of documents as well as the other annoying job
related tasks, interfered with timely cataloging. Second, my two -finger typed input occasionally got in the way
of searching for information; computers are so literal. Be that as it may, I’ve kept the system alive for almost 40
years — it remains functional. Okay I graduated Hanford; it’s called retirement, and kept several thousand nonrecord documents containing useful technical information mostly stored in that closet I keep mentioning.
Start Of The Golden or perhaps Bronze Age Of Document Collecting
A new paradigm began about 10-15 years ago, the distribution of documents in electronic format. Most of the
documents initially produced were in limited use proprietary graphics formats, but that soon began to change.
“The Portable Document Format (PDF), is an open file format created by Adobe Systems in 1993. It is now
being prepared for submission as an industry standard.” [Wikipedia] With the ever increasing popularity of PDF
format, now a defacto standard, documents in electronic form could be universally read and shared
But this too caused problems. How could I find what I’d collected, now scattered about my ever larger series
of hard drives. After all, like a kid in a candy shop with two bits clutched in my hand, I did not now need
to limit myself to only a key reference or two. I could download associated papers, peripheral information.
The reference documents cited in the references were also for the most part available. The groundswell
of electronically available information grew and grew. A particularly rich source of otherwise had to get
information were documents generated by the federal government and its contractors including federally funded
universities research programs. Look, a random Sample =>
My gravy train, DOE’s Information Bridge (Office of Science and Technology Information) http://www.osti.
gov/bridge/ the DOE Information Bridge was among the first to make
documents available, usually as PDF files. Medical information,
which is not a subject I follow, is made available by the NIH.
Comparable access to technical documents was soon to available from
the department of Defense (NSTI) and Homeland Security.
This alternate format document form gave an individual the choice
whether to store a document as a paper copy of as an electronic one.
With the availability of fast low-cost laser printers, the decision for
me became a non-brainer. I chose to store electronic copies, printing
on paper only as needed.
Therefore, Back to my Challenge — Converting my existing paper
collections to PDF and updating my database (index to include all my
electronic documents.
The rub with organizing my accumulated technical electronic
document files was not my paper collection. Rather, I a hard drive
full of documents, often with cryptic titles. Remember we once were
limited to 27 letters in a title. Okay, though it may take the rest of
my active professional life, unless I can find a Macintosh literate
minimum-wage salaried helper with some smarts.
© MPN, LLC 2007 macCompanion
Page 157 May 2007, Volume 5 Issue 5
First things First — You might ask why bother? Well I’m compulsive. However, I’ve talked about my quandary
the data chase enigma “save stuff or re-search for it all over again” earlier in this article.
Decisions, Decisions, Decisions — My Path Forward
— Initially ignore the technical documents on my hard drive – They’re not indexed but well backed up.
— Tune the fields and create a new database to so that it is easier to capture and search for information
about my documents. (Done, a half hours work.)
— Convert my paper collection, to PDF files. I started this in testing the Fugitsu Scanner. I will, however,
not routinely OCR them. If needed that can be done later, one reference at a time. Such documents are
already cataloged.
— Migrate the information from my existing catalog (database) to the new one (cut/paste and correct
spelling errors. (A minute or two a document) as I create the scanned electronic copies.
— On an existing external hard drive; store the electronic documents in elegantly organized folders each
containing 50 documents each (e.g., document 0000l to 00050.)
— Name the new documents cleverly so I can remember what they contain. — Nonsense, that’s what the
database is for. (Document 00001, 00002, … 0XXXX.) However, for flavor, combining the document
index number and a few pithy words would not hurt. (D00018_Vadose Zone Chemistry or D00293_A
History of Punch Cards.)
— Rename and index, when I get to it, the existing electronic documents on my hard drive. Well, I believe
in the tooth fairy and Never-Never Land, so there’s a place under the rainbow where even this is
possible. However, if I index a document when I again use it, that‘s a good start.
That’s all for today folks.
Read my review of Fugitsu S500M ScanSnap Scanner. Its part of what can make document collection control
feasible for you.
And for more about punch cards read Robert V. Williams’s article Punched Cards: A Brief Tutorial http://www.
computer.org/portal/site/annals/menuitem.8933248930f8c11dbe1fbe108bcd45f3/index.jsp?&pName=annals_
level1&path=annals/content&file=punchedcards.xml&xsl=article.xsl&
Doc.
© MPN, LLC 2007 macCompanion
Page 158 May 2007, Volume 5 Issue 5
Mac mini: The original Apple TV alternative
grover.saunders at gmail dot com Reprinted with permission.
Copyright © 1998-2007 Ars Technica, LLC
By Grover Saunders
Apple TV is certainly the talk of the town these days, but with its file format limitations and refurb Mac minis
going for less than $500, it’s worth considering the alternatives. Ever since its introduction, home theater buffs
have been trying to squeeze a Mac mini between the receiver and the cable box to turn it into a multimedia
jukebox (and—to a lesser extent—a PVR). But the key to this is an interface that allows you to access of this
media from the carefully-crafted dent in your couch. And Apple seems to realize this, since every Mac mini now
comes pre-installed with an IR remote and a 10’ interface (an interface that can be used from 10’ away, usually
without a keyboard and mouse) in Front Row. But is Front Row really the best interface?
One thing worth noting before we dive in to all the options is that you really need to decide if the TiVo-like
functionality of a PVR is a crucial feature for you. If PVR is a crucial feature, then your choices become quite
a bit more limited when sticking with Mac OS X. That being said, even if PVR functionality isn’t built into the
interface, there are options for getting your stories recorded, encoded and delivered into any of these interfaces.
But the majority of the options we’ll discuss here focus on creating a multimedia jukebox where you can access
your entire library of movies, music, TV shows, and pictures like the Apple TV rather than recording and
watching live television. Another aspect we’ll be addressing is how comfortable non-technical users feel using
it. TiVo excels at this, seeming less like a computer and more like an appliance that “just works” and is the key
to creating a system the everyone will really use. Finally, it’s worth noting that the test system I used for all of
my testing is a 1.6Ghz Intel Core Duo Mac mini with 1GB of RAM.
© MPN, LLC 2007 macCompanion
Page 159 May 2007, Volume 5 Issue 5
Front Row
Since Front Row is the default choice, let’s start there. Front Row sticks with the basics of
Movies, DVDs, Pictures and Music and is clearly the easiest to set up since it comes preinstalled on every Mac mini currently shipping (there are trickier, but reasonable options
for older Macs as well). As should be expected, Front Row has the most polished and eyepleasing interface of the group, and integrates perfectly with the iApps for access to your
media. You can also browse for video files placed in your Movies folder, which allows you to view file types
that are incompatible with iTunes (such as .avi files or Video_TS folders), though that will require additional
components such as Perian and DVD Assist respectively.
As soon as you go down this road though, cracks start to show up in the interface since these are essentially
workarounds. For example, DVD Assist just opens the Video_TS folder in the Apple DVD player and the
switch is clearly visible. There’s also a noticeable slowdown scrolling through a file list with .avi files due to
the live preview of each video to the left. Front Row also suffers from its own special version of the spinning
beachball of death where opening Movies will bring up a spinning wheel that can not be dismissed and can take
more than 60 seconds before actually moving on.
Front Row is going to be the choice for a lot of people since it’s already installed, which does encourage the
development of add-ons like DVD Assist and the fullscreen interface for EyeTV meant to mimic Front Row.
There’s also the strong possibility that it will be greatly enhanced with Leopard. But the native file limitations
probably aren’t going to change any time soon, and this is where other options will get their chance to shine.
Pros: Great-looking interface. Pre-installed. Pre-installation attracts developers for additional functionality. Cons: Limited file format support out of the box. Additions can harm presentation and performance.
Performance isn’t that great to begin with. No appearance options at all. One-Sentence Summation: The most polished presentation and simplest solution, but with the most limitations
on file formats and features.
Xhub
Feature-wise, Xhub has the most to offer North American TV viewers. In addition to the
essential music, movies, and pictures, Xhub also offers internet radio, RSS feeds, and EyeTV
integration. The default theme is very Front Row-like and is entirely customizable including
hiding functions that you don’t use. In my testing, Xhub offered all the file-format support one
could hope for (Video_TS, DivX, Xvid in addition to QT supported formats) with the notable
except of Matroska and flv (if you’re looking for Matroska support, go ahead and skip down to MythTV). Xhub
was built as a supplement to Salling Clicker, software that allows you to use a bluetooth cell phone or PDA as
a high-end remote control. This gives Xhub some of the most sophisticated control options available on any
system. The EyeTV integration is the closest thing to an integrated PVR we’ll see outside of MythTV. It works
pretty well, though the interface is a little clumsy to operate (you scroll through a big list of channels). Another
nice touch in the newest version is a direct link to the full screen cover flow option in iTunes 7.1.
© MPN, LLC 2007 macCompanion
Page 160 May 2007, Volume 5 Issue 5
Performance is good, but not great. It’s better than Front Row in most cases, but there’s a noticeable lag between
choosing a video file and it actually playing on my test system due to the fact that the included MPlayer has
to start up separately for each file. An annoying aspect that it shares with Front Row is that an iTunes update
behind the scenes can lock up the interface when you try to access any section that lists your iTunes library,
mostly due to iTunes waiting for you to accept the new license.
This illustrates Xhub’s biggest weakness in that it’s not so much a media jukebox in itself as it is an interface to
other media playback components, and therefore relies on many other components to do its job. So when things
go wrong with one of those components, Xhub is left standing around with a clueless expression on its face.
Xhub runs as a background process and so there’s nothing to force quit and you can’t switch to the Finder to
access activity viewer. The only option I could find when things locked up (which happened more than I would
like) was to restart the machine.
The reliance on external components also introduces interface inconsistencies. For example, watching TV uses
one set of control options to get into EyeTV, but once you’re there you must switch to EyeTV’s control scheme.
Xhub also doesn’t hide any of this switching from the user, so it takes the polish off the interface a bit. Also, it’s
one of only two that aren’t free.
Don’t take that paragraph of complaints the wrong way though. Overall, Xhub is a nice solution and if you’re
looking to have TV-viewing capabilities built right in, then it’s the clear choice. But its Wife Acceptance Factor
(WAF) is low because it doesn’t hide the complexity of what’s going on so you can never forget that you’re
using a computer.
© MPN, LLC 2007 macCompanion
Page 161 May 2007, Volume 5 Issue 5
Pros: Nice-looking interface with tons of file format support and a fully themeable interface. Only real option
for North American TV viewing built right in.
Cons: Easy to lock up the interface by doing “unexpected” things. Cracks in the presentation. Inconsistent
controls, though you can customize around this. Costs actual money ($20).
One-Sentence Summation: An appealing interface with a lot of functionality and options including live TV,
but the presentations isn’t as polished as it could be.
Media Central
Media Central began its a life as the first really usable alternative to Front Row as a way to
get around the file format limitations. After being bought by German developer Equinux,
the updates came fast and furious, but at a price (currently $29). But it’s been worth it in my
opinion. Media Central has grown into one of the most full-featured, stable, and consistent
interfaces to be found in HTPC on the Mac OS. The downside of the purchase has been a
heavy case of feature-itis, with lots of features that distract from the central functions of accessing your media
collection. A good example of this are the “online components” littered throughout the interface. One nice
feature is the ability to subscribe to photo streams from Flickr or .Mac under the pictures section. But by default,
you’ll find a half a dozen or so photo streams chosen completely at random (as far as I’m concerned—I’m
sure they make complete sense to the developers of Equinux). It clutters up the interface quite a bit. A similar
instance puts an Evanescence stream in my music area. You can turn all of these options off with a single check
box in the preferences, but it’s an all or nothing deal. That being said, I absolutely recommend doing so in order
to cut more than half of the initial startup time (which is absurdly long by default).
Media Central offers the best format support and playback options of any solution presented here (though
Matroska and flv are still missing). Video_TS playback is flawless and has an interface for choosing audio
tracks and even an option to direct AC3 audio output to the optical line out. Once you turn off the online
content, performance is also top notch. Selecting a video results in instant playback. It also seems quite stable as
I’ve not had a lockup or unexpected quit since I started using it (did I just give away the ending?).
© MPN, LLC 2007 macCompanion
Page 162 May 2007, Volume 5 Issue 5
It’s not all candy and sunshine. The interface—while nice—isn’t as pretty as Front Row or as customizable as
Xhub. All of your media has to be arranged into Media Central’s particular folders (My Media, My Music). You
can get around it with aliases, but it’s still annoying.
Sometimes media that has been added won’t show up until you restart a couple times. Europeans with DVB
tuners get built-in TV, but no options for TV here in North America. The only glitch I came across is when
browsing the My Music Folder directly. When selecting a song, it would actually play the next song in the list
instead of the one I chose. I did not have this problem when browsing my iTunes library. Along with Xhub, it’s
the only other option that costs actual, real dollars. Currently it’s $29 for one license or $39 for three.
Pros: Good, polished interface with the best format support yet. Lots of options for disabling unwanted features
(there are a lot).
Cons: There are a lot of unwanted features. No TV support outside of DVB-ridden Europe. Interface not very
customizable. Costs even more actual money ($29).
One-Sentence Summation: A great, snappy, reasonably good-looking interface that plays most of your files
and my personal pick despite being the most expensive.
© MPN, LLC 2007 macCompanion
Page 163 May 2007, Volume 5 Issue 5
iTheater
As I mentioned in the intro, ever since the day Steve unveiled the mini, slavering Mac fanboys
have dreamed of sticking one into their home theaters. iTheatre is one of the original opensource projects to come about from that excitement. Unfortunately, their enthusiasm is the
most tangible result. While the most recent release (0.1.3) at first seemed like it might be
usable, I’ve found it unstable and flaky at best. The transport controls only work about half the
time. They claim support for Video_TS folders, but I’ve not been able to make this work even once. I wish them
all the best, but they have a long way to go before iTheater is a viable alternative.
Pros: N/A
Cons: Unstable to the point of uselessness.
One-Sentence Summation: Perhaps a fine option one day, but it still has a long way to go.
CenterStage
In the courses I teach, I always stress that functional and simple is always preferred over
ambitious and broken. CenterStage is a perfect example of that philosophy—or rather the
consequences of failing to heed its warning. CenterStage has the most ambitious interface
aside from Front Row itself. It’s also packed together with BackStage, a terrific attempt to
help you catalog your video titles and not be restricted by a folder hierarchy (something I’d be
interested in outside of a HTPC). I truly wish I could report to you how well these ambitions have turned out,
but unfortunately, both CenterStage and BackStage are just as likely to crash as not, so I’ve not been able to
spend more than two minutes of solid time with either. In fact, neither would run at all on my test system. Like
iTheater, this one is simply not ready for prime time.
Pros: N/A
Cons: Unstable to the point of uselessness.
One Sentence Summation: BackStage is a great idea and the interface is interesting, but it’ll be a while before
anyone can give it serious consideration.
© MPN, LLC 2007 macCompanion
Page 164 May 2007, Volume 5 Issue 5
MythTV
Of course, I’d be remiss not to at least mention MythTV. MythTV is definitely the most
flexible and powerful option here, including the most advanced PVR functionality of any
of our previous choices (maybe of all, period). Unfortunately, that power comes at a price.
While there are pre-compiled versions for Mac OS available for the front end, in order to
do anything with your MythTV front end, you’ll need to install the MythTV back end on a
separate machine running the UNIX variant of your choice. For many of you this may be a breeze, but it’s clear
that the complexity of the project just took a giant leap up.
In addition to the PVR decision we talked about in the beginning, another decision you have to make when
building any home theater PC is whether you want a solid, usable device or a project to keep you busy. In my
experience, MythTV is more of the latter. MythTV installations tend to encourage a lot of tinkering. It’s not
impossible to run a maintenance-free setup, and I’m sure several of you are rushing to the comment box to
tell me about your MythTV installations that have run untouched for months (but I find it to be the exception
instead of the rule). Constant tinkering can drive the WAF all the way to zero quicker than almost anything else
(at least in my house). If you are interested though, the Myth on Mac x86 wiki has lots of great info such as
getting the Apple Remote to work and tips for integrating with iTunes.
Pros: Incredibly powerful PVR, fully skinnable interface, strongest file format support of any option.
© MPN, LLC 2007 macCompanion
Page 165 May 2007, Volume 5 Issue 5
Cons: Be prepared to spend a week or so setting the thing up. You might want to clear out some space in your
calendar six weeks from now when the new version comes out as well.
One Sentence Summation: If you’re not adverse to compiling your own code, this is definitely the most
powerful option, but if you’ve never compiled anything, one of the other options might be more your speed.
Other Notes
If you’re going to embark on your own experiment, I highly recommend installing only one of these at a time.
They generally will live fine together on the same system, but each will try to take control of the remote from
the others. In doing the research for this article, I ended up with both Front Row and XHub running at the same
time over and over again (Xhub always on top), and each would intercept button presses meant for the other. I
actually managed to get Xhub to play music and a video simultaneously, while at the same time getting Front
Row to play a video.
Also, I’ve heard a lot of discussion about the mini’s ability to handle HD video sources, especially 1080p.
While I don’t have a 1080p display to see them in their full glory, I was able to watch 1080p files in both H.264encoded .mp4s as well as Xvid .avi files in both Media Central and Xhub. The lack of Matroska support did not
allow me to check H.264-encoded .mkvs.
I feel an obligation to at least mention that Windows is always an option. A Mac mini and Boot Camp make for
an excellent Windows-based HTPC, though it’s beyond the realm of this article to cover everything involved.
But when I first decided to buy a mini to replace my aging HTPC, it was initially going to run MediaPortal. The
PVR options are MUCH stronger on the Windows side and worth a look if you don’t feel like any of the Mac
options meet your needs, but you’re in love with the hardware.
Conclusion
If you’ve read this far, it shouldn’t be a surprise that my pick is Media Central. Its lackluster performance out
of the box made me wary at first, but once I turned the online options off, Media Central became the snappiest,
most full-featured option available and well worth the $39 for three licenses. The lack of a PVR doesn’t bother
me as I’ve not found a software solution that beats TiVo in terms of its WAF, and TivoDecodeManager can
automate the process of getting my recordings into Media Central. If you require a PVR and can handle the
maintenance requirements, MythTV is a strong choice. If not, Xhub combined with an EyeTV device is really
your only choice.
Mac mini HTPC Followup: Core Skills
We received a lot of great comments in response to our article on turning a Mac mini into an HTPC that rivals
Apple TV. It also brought up some questions that I thought deserved addressing.
Why Mac OS X?
Something that we failed to address in the initial article is the question of why you might want to use Mac OS
X for an HTPC in the first place. After all, there certainly are a lot more Windows-based options. For me, it’s an
issue of workflow and compatibility. Since I use a Mac for all of my editing and encoding, using Mac OS X for
my HTPC allows me to make use of Mac-only features like labels to indicate the resolution of video, and AFP
as my transfer protocol (which has been more reliable on my home network, though your mileage may vary).
But what really seals the deal for me is the wide support for H.264-based .mp4 files in practically any Macbased HTPC. As long as we’re talking about standard definition files, I can have one file that works both in my
© MPN, LLC 2007 macCompanion
Page 166 May 2007, Volume 5 Issue 5
HTPC and on my iPod, allowing me to easily take my video files with me without transcoding. If you’ve ever
taken a stack of DVDs on a family vacation for use with an in-car video system to entertain the kids on a 12hour car ride, only to return with a scratched and ruined pile of ash that used to be your DVD collection, you’ll
no doubt understand the value of leaving the DVDs at home.
Making the Connection: Standard Definition
Several of the comments in the initial article revolved around how one goes about connecting a Mac mini to a
TV. The answer to that is going to depend a lot on the TV in question. While Arsians certainly trend toward the
early adopter, I’m betting that a lot of you reading this are still using standard definition CRT TVs. In that case,
the hardware side of the equation is deceptively simple. You just need this $20 adapter from Apple. It plugs
directly into the DVI port on the back of the mini and gives you a composite and S-Video connection on the
other end. It’s worth noting that this is not converting the DVI single into a composite signal; the mini’s DVI
port actually includes an S-Video connection in there and the adapter just makes use of it. In other words, this
adapter won’t work on a regular DVI connection, so don’t get any bright ideas. From there you just need an SVideo or composite video cable to connect directly to the TV.
Making the Connection: High Definition
If you have a high definition TV, you will usually just need the correct cable. HDMI, DVI, and 15-Pin Dsub (the
classic computer monitor connection usually labeled VGA) are all fairly common on HD displays. If you have
a DVI connection labeled as PC Input, that’s likely to be your best bet since it will be treated just like a standard
computer display. HDMI is the next best choice (since it’s essentially just a specialized DVI connection), and
it’s easily adapted to the mini’s DVI with inexpensive adapters or cables, though doing so will strip out the
audio signal normally carried by HDMI. It’s increasingly rare to see a VGA connection on HDTVs, but the
adapter included with the mini will meet your needs just fine.
Regardless of your connection method, your audio signal will be handled separately from the video. Audio is
handled either with the headphone out for stereo audio (combined with yet another adapter to adapt 3.5mm
© MPN, LLC 2007 macCompanion
Page 167 May 2007, Volume 5 Issue 5
headphone to RCA), or the extremely handy optical out (let’s hear it for another adapter) that you can feed
directly into your receiver. If you don’t have a separate receiver handling your audio, the former will be your
best bet. If you’d like the surround sound from your DVDs to remain intact, then optical is the only way to
go, though keep in mind that only MediaCentral supports using optical out directly (using DVD Assist in
conjunction with Front Row also works).
Resolution and Overscan
Once you’ve made the physical connection, you’ll need to adjust how the picture is displayed. This can be one
of the most time-consuming aspects of setting up your HTPC and worth considering ahead of time if you’re
in the market for a new TV. In most cases where you use the PC Input connection, the mini will be able to
automatically choose the correct resolution for your display. Fixed pixel displays, which should include any
LCD, plasma or DLP display, will look their best at one particular resolution and you should try to match this
resolution if you can. You may be able to find this in your TV’s manual or by hitting up ye olde Google. If your
mini doesn’t come up with the correct numbers on its own, you may need access to resolutions not normally
found in the Displays system preference. If that’s the case, SwitchResX could be your best friend. It can also be
your worst enemy since you can easily damage your television, so be careful and listen to the warnings it gives
you.
With a CRT TV, you’ll also have to deal with overscan. Analog television signals have a level of imprecision
built into them, which a CRT TV deals with by hiding the edges of the tube. In other words, anywhere from 5 to
15 percent of the picture in a traditional television is cut off depending on your display.
Anyone producing content for television has to be aware of the title safe and action safe areas to avoid putting
important information there, whereas computer displays have always been able to take full advantage of the
screen. In order to deal with this discrepancy and to make sure you can actually see the menu bar, your mini’s
© MPN, LLC 2007 macCompanion
Page 168 May 2007, Volume 5 Issue 5
desktop will likely be shrunken and displayed with a black border all the way around its edge, which is called
Underscan. You can tell your mini to push the display to the edge of the tube by checking the Overscan check
box in the Displays system preference (you’ll only see this with the S-Video adapter we talked about earlier),
but be aware the this will almost always put the menu bar out of sight. Also, many of the front ends we talked
about assume a digital display, so the overscan won’t look very good. For example, in Front Row, the icon at the
top of each category gets cut off on my CRT TV.
The aforementioned fixed pixel displays should not be affected by overscan. However, I have read some reports
of this happening, most notably in Jason Snell’s article for MacWorld where he asserts that this is the main
reason he prefers Apple TV to a Mac mini-based solution, though I have no explanation for why this would
occur on a fixed pixel display.
Uh... I’d like to watch something now?
The single most common request I received in response to the original article was asking for some help getting
content to the Mac mini. Once again, the route you take will depend on where you want to start and where you
want end.
DVD
The simplest solution for getting a DVD collection onto your HTPC is going to be Handbrake aka MediaFork
aka Handbrake. Handbrake allows you to encode a DVD (even encrypted discs, which we’ll talk about more
later) into a single file so that managing and playing titles is eased as well as saving you quite a bit of disk
space. Handbrake focuses on MPEG-4 or H.264-encoded .mp4 files, which give excellent efficiency (i.e. great
looking files for relatively small files sizes). There are some downsides to going this route though. You’ll be
losing all the extras normally included on a DVD, including AC-3 audio (surround sound) and chapter markers.
While you can encode additional audio tracks (i.e. commentary) in Handbrake, none of the HTPC interfaces we
covered supports switching between them, so it’s a moot point. You’re also losing some visual quality, though
you’ll have to have a fairly discerning eye to tell. Still, the bigger the screen, the more this will be an issue so
it’s worth keeping in mind.
If you’re looking to retain extras or the maximum amount of quality from your DVDs, you’ll want to pull an
© MPN, LLC 2007 macCompanion
Page 169 May 2007, Volume 5 Issue 5
exact copy of the DVDs’ contents to your hard drive. The challenge is that most publishers of feature films
fear that you’d use any such copy to pirate their films, so they’ve gone to great lengths to prevent you from
doing so by encrypting practically every DVD released by a major publisher. MacTheRipper is the traditional
solution for decrypting the contents of the disc and saving the contents of the DVD, which are contained in a
Video_TS folder, to your hard drive. Despite the gains in quality and functionality, the downside to this route is
that support for playing a Video_TS folder is not something you can take for granted in any media player, and
especially in a HTPC interface. And file size also becomes a major issue, as DVDs are generally between 4 and
8GB, versus less than 2GB for your average feature film in a .mp4 file.
MacTheRipper is an essential tool for a HTPC, especially in conjunction with other tools. For example, it
allows you to take advantage of Handbrake’s queue support, which allows you to give Handbrake a series of
Video_TS folders to process in sequence. Its ability to remove region restrictions will also serve you when
Handbrake refuses to rip a DVD from another region. It’s worth noting that you may have to jump through
some hoops to get the most current version, but a few minutes with Google should take care of things.
TiVo
As I mentioned in the HTPC article, my PVR of choice is still TiVo after all these years, so a common task for
me is to get programs off of TiVo on onto the HTPC. Step one is to get the files off of the TiVo, which can be
accomplished with the pricey TiVoToGo included with Toast 8, or the free TivoDecode Manager. Combined
with AppleScipts or Automater, you can automate the entire process of downloading, encoding, and moving
files to your HTPC—a process that works equally well in conjunction with your Apple TV as well.
I personally like to edit out commercials before adding a show to the library, so I use TDM to download and
decrypt the files direct from my TiVo,. This is where you’ll run into problems. The MPEG-2 files that TiVoToGo
uses do not conform to what QT believes a MPEG-2 file should be, so any QT-based video editing application
(which is pretty much all of them for Mac OS) will fail to properly decode the file for editing (including the
otherwise-excellent MPEG Streamclip)—you’ll need to use an intermediary format. This is probably for the
best since MPEG-2 can not support frame accurate editing, even if you could. But even this can be a challenge
as most encoders for the Mac are also QT-based. Those that are not QT-based seem to focus primarily on
distribution file formats that are unsuitable for editing. The only acceptable solution I’ve found that can encode
the TiVo MPEG-2 into a high-quality format is 3ivx Crush and Telestream’s Episode, neither of which are cheap
but both support exporting to a more suitable format for editing. From there, you can use Final Cut or any other
NLE to edit and encode your files. I’ve been fairly pleased with the results of using MJPEG on the sometimes
less-than-perfect recording, and Episode’s H.264 encoder is excellent. The only frugal option with acceptable
quality that I’ve been able to come up with is using VisualHub to encode to DV and then using iMovie to edit. EyeTV
EyeTV is by far the most dominant PVR for the Mac (though Miglia and Equinux look like they may be
trying to change that), so there’s bound to be someone interest in getting video from there into your HTPC.
It’s actually pretty simple, as EyeTV provides direct export of any recording right to iTunes. EyeTV is also
extremely scriptable, allowing you to once again automate the entire process directly to an Apple TV or HTPC.
I found this thread in the MacScripter forums to be wildly helpful in that regard.
Wrapping it up...
Hopefully this will help you get started on hooking up the mini to the mac. I think there’s at least one more
article to come with more specific instructions on the whole automation procedure for TiVo to HTPC (or Apple
TV), but if there’s something else you’re interested in, let us know in the comments.
Original articles posted online at –
http://arstechnica.com/journals/apple.ars/2007/03/30/mac-mini-the-original-apple-tv-alternative
© MPN, LLC 2007 macCompanion
Page 170 May 2007, Volume 5 Issue 5
Roller Coaster Tycoon 3 and Expansion Pack Soaked!
By Daniel MacKenzie
Aspyr Inc. and Frontier Developments, LTD for Atari
http://www.aspyr.com/product/info/9 (View Video)
http://www.aspyr.com/software/news/70/123
Released: September 11, 2006, Soaked! March 12, 2007.
$50 USD, Expansion Pack, $20 USD,
Requirements: Mac OS 10.3.9 or later; 1Ghz Processor;
256 MB RAM; 2 GB or more free hard drive space; DVD Drive; ATI
Radeon 9000 or NVidea GeForce FX5200 video coard
Forum: http://www.ataricommunity.com/forums/forumdisplay.php?f=261
Universal
Strengths: Fun game play, great tutorials, fair graphics.
Weaknesses: Long loading times, hard to play unless you go through tutorials.
Learn more: http://en.wikipedia.org/wiki/RollerCoaster_Tycoon_3
Other Reviews: http://www.insidemacgames.com/reviews/view.php?ID=658
Introduction
I have always enjoyed the RollerCoaster
Tycoon series but it always used to be for the
PC. Then Aspyr came in and made it available
for the Mac. I was quite pleased and this
game didn’t let me down. You get to build
and experience your own theme parks, test the
rides and a whole lot more.
Getting Started
A good thing about most of the Aspyr games
is that there is no installer. You just drag the
folder off the DVD and into your applications
folder. This game is no exception. After it
copied from the disc, I was ready to go. Now,
with the expansion pack you need an installer,
but you just point the installer to the right
folder and hit “install”. I had no problems whatsoever.
© MPN, LLC 2007 macCompanion
Page 171 May 2007, Volume 5 Issue 5
Playing the Game
The first time I launched it I went straight
for the Career mode, because I wanted to get
going, but after I started, I didn’t know how
to do a lot of the things I needed to do. So I
went back to the tutorials. There are detailed
interactive tutorials that show you what to do
and do it well. Unfortunately, there are a fair
amount of tutorials and you have to go through
a long loading screen before you start each
one. It’s inevitable, but they could have made
one tutorial of “The Basics” and spared all of
the loading screens. Anyway, after you learn
how to play the game, it is really fun. You get
to build your own rides and place stores and
attractions. One of the great things is you have
objectives. There are three ranks per park.
Tycoon, Entrepreneur and Amateur. Each rank has a certain kind of objective or objectives. Once you complete
the objectives, you receive a cash bonus or a new park is open for you to use. Occasionally, a challenge screen
will come up. It asks you if you want to do something like build a coaster with a certain length in a certain
amount of time. If you complete it, you get more money. A good thing is that if you accept the challenge and
don’t complete it on time, you don’t lose anything.
The Soaked expansion pack adds a large chunk
to the game. You get more rides, shops and
attractions than the original game had. It also
give you the ability to create water parks, pools,
pool complexes and more. It also lets you make
your own fireworks and laser shows. You create
the kinds of effects and sounds it makes and you
can have it go off every simulated night. It’s
pretty cool.
Conclusion
Overall, I have enjoyed this product. The fair
graphics are backed up by the awesome game
play which, I think, is better. The music is good
and I barely had any problems with it. I would
give it a 4 out of 5.
Recommendation
Anyone who likes simulation games or likes the idea of running their own theme park should defiantly check
this out. It is worth your money.
© MPN, LLC 2007 macCompanion
Page 172 May 2007, Volume 5 Issue 5
April Updates of Interest
By Mike Hubbartt
1. Apple Updates general site: http://www.apple.com/support/downloads/
An important Apple update for this month:
• Apple Security Update 2007-004, released 4/20/2007 – 10 MB (improves MacBook and MacBook Pro
compatibility and addresses a security issue)
• QuickTime 7.1.6, released 4/02/2007 – 45.1 MB (delivers numerous bug fixes, addresses a critical
security issue with QuickTime for Java)
IMPORTANT! Apple announced that Leopard will NOT be available until October, even though they
vehemently denied the rumor earlier in the month.
2. Quark
A. QuarkXPress 7.2 (April 5, 2007) free upgrade from 7.1 (305 MB)
* QuarkXPress 7.2 ReadMe (PDF 750Kb)
* QuarkXPress 7.2 known issues - http://www.quark.com/products/xpress/72knownissues.html
QuarkXPress 7.2 issues resolved - http://www.quark.com/products/xpress/72issuesresolved.html
QuarkXPress 7.2 Updater for Mac OS, requires QuarkXPress 7.01 or 7.02 - http://www.quark.com/service/
desktop/downloads/details.jsp?idx=684
B. Quark XPert Tools Pro free (39.6 MB)
Info - http://www.quark.com/products/xpress/xtensions/products/xptpro7/
Download from - http://www.quark.com/service/desktop/downloads/details.jsp?idx=682
3. Adobe
A. Creative Suite CS3 began shipping mid April. Nice!
4. Shameless Book Plugs
A. The Children of Hurin, started by J.R.R. Tolkien in 1918 and finished by his son, was released 4/19/2007.
Excellent book, especially if you read The Silmarillion and Peter Jackson’s The Lord of the Rings movies. Initial
sales for HarperCollins are excellent.
© MPN, LLC 2007 macCompanion
Page 173 May 2007, Volume 5 Issue 5
5. Montage
A. Mariner released an update in March, April, and now a third on May 2, 2007.
• Element (character, location, camera location, time of day) suggestion lists now popup after a single
character (previously required you to type 2 or more characters)
• Fixed a problem that prevented Annotations from working
• Fixed a problem where applying styles (Format, Bold, Italic) would fail in Scenes view, and would not
be saved or printed although style changes appeared to be applied in Script View.
• Fixed a performance issue where Montage's CPU usage would sometimes increase when a blank
unsaved file is open
• Fixed scene insertion location when inserting scene in Full Screen mode
• Fixed a problem where tab key failed to work on page 2 or higher in script view
• Fixed a problem where suggestion lists would disappear upon typing the 3rd character on page 2 or
higher in script view
• Text boxes are now centered in Scenes View
• Fixed a number of problems related to inserting scenes in script view: - Page count now remains correct
- Page no longer scrolls incorrectly - Cursor placement after scene insertion remains correct - New scene
is inserted in the correct location
• Fixed a problem in Script View in Mac OS X - 10.3.9 where keyboard input would fail when typing a
scene header, character or anywhere else a popup list was expected
• Fixed a problem in Script View in Mac OS X - 10.3.9 where typing the start of a slug line would make
typed text disappear
• Fixed a problem where changing name of one character (such as Fred) may affect name of another
similarly-named character (such as Alfred)
• Fixed a problem where inserting a scene in a numbered script would result in typing problems in new
scene
• Increased the width of popup suggestion lists to accommodate longer names
• Fixed a problem where typing dialogue in Script View across pages resulted in dialogue text at top of
new page gets formatted as Scene Heading
• Inserting a scene in Scenes view: New scene now has Scene Heading element selected, and cursor is
placed at the correct margin for Scene Heading
• Made Script view background same as the dark grey in Scenes View
• Added Category column to the Contact list
• Fixed problem with Apply To popup menu in Scene Numbering sheet so that menu updates correctly,
and all menu options can be selected
© MPN, LLC 2007 macCompanion
Page 174 May 2007, Volume 5 Issue 5
6. May Shameless Astronomy Plug
A. May 2007 issue of Starry Night Times
B. New Starry Night Widget, released 4/19/2007
A new scrolling banner across the bottom of the widget for up-to-date news, plus a few other UI enhancements
make this a must-have. Download it today!
To see Starry Night online – http://www.space.com/snserver/snweb.html?zip=55311
C. Pending Eclipses
* 2007 Aug 28: Total Lunar Eclipse
* 2007 Sep 11: Partial Solar Eclipse
© MPN, LLC 2007 macCompanion
Page 175
May 2007, Volume 5 Issue 5
Advertisers Index
Amazon.com
http://www.amazon.com/gp/homepage.html/002-5842389-7443202
Apple Store for Individuals
http://store.apple.com/AppleStore/WebObjects/BizCustom.woa/wo/StoreReentry.wo?cid=AOSA10000025758
&siteID=%2Foi97eu4uMU-AtGr6EOxXtw%2FIzYZGve3Aw&qprm=78313&family=iMac
Apple Store for Businesses in the USA
http://store.apple.com/AppleStore/WebObjects/BizAgent?qprm=126559
ecamm networks
http://www.ecamm.com/
(Right after the Hardware Heading.)
DigitalMediaTraining
http://www.digitaltraining.com/ispecial/maccom
Parallels
http://www.parallels.com
(Right after the Software Heading.)
QuickerTek
http://www.quickertek.com
(Found in the Hardware Section.)
TeachMac
http://www.teachmac.com
(Found in the Software Section.)
© MPN, LLC 2007 macCompanion
Page 176 May 2007, Volume 5 Issue 5
Advertising Information
Contact Robert Pritchett, our Ad and Marketing Director, for working through the process of advertising with
us.
[email protected]
We are the Macintosh Professional Network (MPN), Limited Liability Corporation (LLC). MPN, LLC
continues to evolve, ever since its creation in 1996 as a way to reach out to those who use computers for a living
in an effort to make their lives easier and their work both enjoyable and profitable.
We also provide monthly book, hardware and software reviews at macCompanion. We offer ways and means
for folks to get comfortable using the Macintosh created by the Apple Corporation in the multibillion-dollar
computer industry. We know that bad software doesn't live long in the Mac™ environment. On the other hand,
good computer equipment and software becomes great as the word spreads, and we are very good at helping
to spread it. Our suggestions over the years have also helped improve many successful products in use today.
Through kind and gentle efforts, we have been able to help many people move to better tools-of-the-trade so
they can be more productive in their work.
Besides our website and consulting efforts, we also create macCompanion as a freely available PDF-based
monthly. It averages about 100 pages per month. July 2006 was the 4th-year anniversary of this labor of love.
The macCompanion staff is an all-volunteer team of writers and reviewers from many parts of the globe,
and they also have a great wealth of knowledge and experience in their backgrounds. That base of talent also
continues to keep growing as the Macintosh Professional Network expands.
Statistical Analysis
We are very excited about our site statistics! The multilingual-capable macCompanion website is close to 2
million page views a month and readership continues to increase rapidly through our “whisper campaign”.
We continue to get greater visibility every day. Many of the various 35 computer operating systems (with many
moving towards the Mac® OS X™ environment), 115 online search engines, 269 countries and domains and
319 online robots have discovered us – and continue to do so. So far, over 201 other websites have also linked
to us. Many of our readers have made our site one of their favorites. While nearly 70% of our readership stops
by for a quick visit via RSS feeds, over 23% spend between 1/2 to 1 hours at a time going through over 250
different pages on our site (mostly archives). Many of those who quickly drop by, come to get the monthly PDF
issue of macCompanion. Over 35GB of bandwidth was used in December 2005 alone for download purposes.
Previous months have averaged around 20GB. Trend analysis indicates that will continue to increase as folks
decide to “Move to the Mac”.
© MPN, LLC 2007 macCompanion
Page 177 May 2007, Volume 5 Issue 5
Advertising with macCompanion
We have some advertising options you may choose from, and multiple months receive a 20% discount for
both website and PDF-based ads. All advertising must be paid in advance. We accept credit card payments via
PayPal, checks, money orders, by regular mail and cash in US currency by hand, if you meet us face-to-face.
Site Ad Rate
We offer website ads for a fixed-budget price of only $100 per month on our site. Following the KISS principle,
we accept banner ads in only one size at this time - 468x60 pixels (per the Interactive Advertising Bureau
standards for a Full Banner Ad Interactive Marketing Unit.) The ad will be rotated through with other ads, and
there is no limit to how many you want to include.
The billing cycle begins based on the first day the ad placed on the site and is renewable on a monthly basis.
This can begin immediately or at any time.
Affiliations
We do affiliations, and work with those who have made arrangements with online affiliate systems, or we
deal directly with you if you have created code, and have a contract we can sign. Check out the Bazaar on our
website at http://www.maccompanion.com/bazaar/bazaarindex.html
Sponsorships
We also accept sponsorships. Please let us know if you would like to sponsor macCompanion!
If you are as excited about our macCompanion readership as we are, please download the contractual terms and
conditions documentation that are online in PDF format, or we can send them to you as an attachment. We’d
enjoy having an ongoing working relationship with you too.
Well that’s it for this issue. Please come back again next month!
The macCompanion Staff
© MPN, LLC 2007 macCompanion
Page 178 May 2007, Volume 5 Issue 5