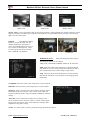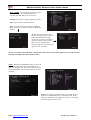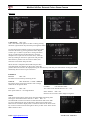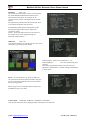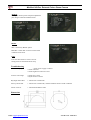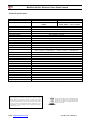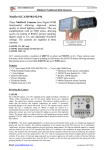
1
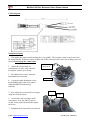
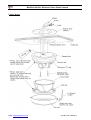
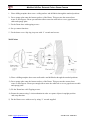
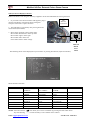
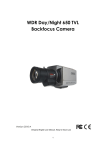
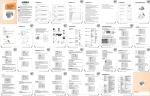
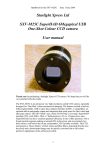
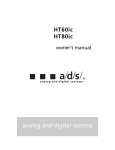
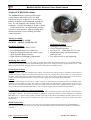
www.nitedevil.com
Doc XCAM751
NiteDevil Hi-Res External Colour Dome Camera
NiteDevil WDR Hi-Res Dome
The NiteDevil Dome Camera produces high
quality images and works in very low light
conditions down to 0.00019 Lux. It has many
features including a solid aluminium waterproof
base, 3D axis mounting inner bracket for wall
mounting, a SONY SuperHad CCD and a 2.8mm
~ 12mm varifocal lens. An OSD facility provides
options for wide dynamic, High Sensitivity BLC,
motion detection, privacy masking and other
camera functions.
Models Available
CAM751 540TVL, 12VDC
CAM752 540TVL, 12VDC/24VAC
xElectronic Features
1/3” SONY SUPER HAD CCD II
Low illumination down to 0.0008 Lux
Menu for Motion Detection & camera setup
Wide Dynamic Range Function.
High Sensitivity Backlight Compensation
MMechanical Features
Vandalproof & Weatherproof
3 Axis 3D built-in bracket
Vari-focal 2.8 ~ 12mm Auto DC Iris Lens
Aluminium housing with Polycarbonate
Smoked Cover
Two Allen screws to stop tampering
Mounting the Camera
The camera is for mounting on a wall, ceiling or outdoor facia board. Note that this camera has a 3D gimble allowing
wall mounting or ceiling mounting. Note that fitting the screws into a ceiling will require support for the screws. N.B
Please be aware that when refitting camera, the dome cowling does not obscure the lens.
Powering the Camera
CAM751
The dome requires a 12V DC regulated power supply. Connections are polarity sensitive so therefore ensure that the
positive and negative cables are connected correctly. The camera is provided with a fly lead with a 2.1 jack connector
for power. This camera draws a maximum of 140mA at 12v DC. Ensure that a regulated power supply is used if using
12vDC and allow adequate headroom i.e only use a power supply with a minimum rating of 200mA.
CAM752
This dome is dual voltage. It will work on 12vDC or 24vAC. Connections are not polarity sensitive so therefore power
connections can be either way round. The camera is provided with a fly lead with a 2.1 jack connector for power. This
camera draws a maximum of 230mA at 12v DC or 110mA at 24vAC. Ensure that a regulated power supply is used if
using 12vDC and allow adequate headroom i.e only use a power supply with a minimum rating of 300mA.
Connecting the camera to control equipment.
The dome camera comes with a fly lead for video out. To reduce installation time the video out lead is terminated into
a male BNC connector. This allows the installer to effortlessly connect the camera to control equipment via a female
BNC-BNC lead. A special setup joystick controller is located on the side of the PCB board and this allows access to
the OSD menu. A special socket is located to the right of the joystick controller to connect an optional test video
monitor lead.
RS485 Connection
The RS485 connection allows access to the menu using a keyboard or DVR PTZ operation using an IRIS OPEN to
open menu and select options using near, far, open and closed. Red needs to be connected to Transmit + and Black to
Transmit -.
Email: [email protected]
Last Revised: 12/09/2011
www.nitedevil.com
Doc XCAM751
NiteDevil Hi-Res External Colour Dome Camera
Cable Diagram
Setup Instructions
1. First adjust the camera position using the 3 way gimble. The complete camera can be moved in
the metal housing. Hold the camera at either side of the camera bracket where the locking screws are
located. Do not grip the camera lens.
2. Adjust the vertical angle by
releasing the two side screws and the
moving the camera up or down.
Plastic fitting
behind PCB
3. Re-tighten these screws when the
adjustment has been made.
Side Screw
4. A separate small adjustment can be
made holding either side of the plastic
fitting behind PCB and moving
sideways.
5. Now adjust the zoom and focus settings
using the controls shown.
Zoom
Focus
6. Loosen the controls using a small
screwdriver. You may find it easier to
set the Zoom control first and then adjust
the Focus.
7. Retighten the Zoom and Focus controls.
Email: [email protected]
Last Revised: 12/09/2011
www.nitedevil.com
Doc XCAM751
NiteDevil Hi-Res External Colour Dome Camera
Ceiling Mount
Email: [email protected]
Last Revised: 12/09/2011
www.nitedevil.com
Doc XCAM751
NiteDevil Hi-Res External Colour Dome Camera
1. Place drilling template sheet onto a ceiling surface and drill holes through the marked positions.
2. Put a sponge plate onto the bottom surface of the Dome. This prevents the camera from
water or dust ingress. Please put sufficient silicon onto the cable hole to cover gaps between
cable and sponge plate.
3. Fix the Dome base with tapping screws.
4. Set up camera functions.
5. Fix the dome cover /slip ring /top case with ‘L’ wrench and screws.
Wall Fitting
1) Place a drilling template sheet onto wall surface and drill holes through the marked positions.
2) Put a sponge plate onto the bottom surface of the Dome. This prevents the camera from
water or dust ingress. Please put enough silicon onto the cable hole to cover gaps between cable
and sponge plate.
3) Fix the Dome base with Tapping screws.
4) Rotate the camera using 3-Axis mechanism in order to capture objects in upright position
and setup function.
5) Fix the Dome cover with screws by using ‘L’ wrench supplied
Email: [email protected]
Last Revised: 12/09/2011
www.nitedevil.com
Doc XCAM751
NiteDevil Hi-Res External Colour Dome Camera
OSD (On Screen Display) Function.
Remove the dome cover using the Allen key supplied to access the PCB board for entering the menu.
Test
Monitor
Connection
1. If you want to use the test monitor lead supplied, plug it
into the Test Monitor Connection shown in diagram.
The spare short lead is a spare extension.
2. The OSD menu is accessed by first pressing down the
centre button (SET Button).
3. Move button upwards to move down menu.
Move button downwards to move up menu
Move button right to move right
Move button left to move left
Press button down to Enter change
The following menu will be displayed on your monitor on pressing SET button (Joystick controller):
Menu Set
Button
Press
Down
Menu Structure Functions
LENS
EXPOSURE
WHITE BAL
DAY NIGHT
3 DNR
SPECIAL
ADJUST
RESET
EXIT
DC
SHUTTER
SENSE-UP
AWB
INDOOR
COLOUR
ON
CAM TITLE
PRIVACY
SHARPNESS
FACTORY
BRIGHTNESS
BLC / HSBLC
AWC-SET
OUTDOOR
AUTO
OFF
D-EFFECT
SYNC
BLUE
AGC
D-WDR
MANUAL
ATW
EXT
B/W
RS485 (N/A)
LANGUAGE
RED
MOTION
NOTE: All items with the
icon allow you to access a submenu by pressing the SET button down.
Any item showing - - - icon functionality is not available on this camera.
Email: [email protected]
Last Revised: 12/09/2011
www.nitedevil.com
Doc XCAM751
NiteDevil Hi-Res External Colour Dome Camera
LENS
This option allows the screen brightness to be adjusted. Range of brightness setting is 0 ~ 100.
EXPOSURE
SHUTTER
The shutter speed is set at 1/50, x2,
X4, x8, x16, x32, x64, x128, x256, 1/100000, 1/10000,
1/5000, 1/200, 1/500, 1/250, FLK.
NOTE: Changing shutter speed affects brightness.
BRIGHTNESS Same as LENS menu setting
AGC
Low / Middle / High / OFF
You can adjust the gain level, but the brighter the screen
the higher the noise level.
SENSE-UP
When it is dark the camera automatically
detects the light level and maintains a clear picture.
The following options can be set: x256, x128, x64, x32, x16,
X8, x4, x2.
NOTE: This function deactivates if AGC and/or DAY/NIGHT
is switched off. Also the higher the setting, ghosting increases.
BLC The backlight compensation balances strong
Light evenly across the video image. The options are:
OFF, BLC and HSBLC.
The BLC option allows the desired area in a picture
to be viewed more clearly.
GAIN Can be set to Low, Middle or High.
The other settings allow the BLC area to be defined.
HSBLC This where high sensitivity for light levels are required and a similar menu to BLC is used. This is shown
below:
Email: [email protected]
Last Revised: 12/09/2011
www.nitedevil.com
Doc XCAM751
NiteDevil Hi-Res External Colour Dome Camera
HSBLC OFF
HSBLC ON
HSBLC MENU
NOTE: HSBLC can be activated for both day and night conditions. When headlights for example reduce the overall
light level making car number plate recognition more difficult, using the HSBLC option can help to provide more
light to see the number plate.
D-WDR
Wide Dynamic Range
If there is a bright and dark area, for
example shaded area, displayed on
screen, the D-WDR option can be set to
even out the overall brightness. There
are three options that can be selected,
OFF / INDOOR / OUTDOOR
D-WDR OFF
WHITE BALANCE
D-WDR ON
Alters the background white balance
The following options can be selected:
AWB, ATW, OUTDOOR, INDOOR, MANUAL & AWC-SET
AWB Select this when colour temperature is between 2000°K
and 18000°K. This uses stored settings for white balance and is
most suitable where there is little change in light source.
ATW Select this when colour temperature is between 2500°K
and 9800°K. Suitable for viewing objects with changing colour
temperature.
OUTDOOR Select this when colour temperature is around 5100°K.
INDOOR Select this when colour temperature is around 3100°K.
MANUAL Set this to fine tune the white balance manually. Set the
White Balance first by using the ATW or AWC mode. After that
switch to MANUAL mode. Adjust the BLUE and RED for optimum
settings.
AWC-SET This is used to set the white level according to the
current luminance level. Point the camera at a sheet of white paper
and press the SET button. If the overall white level changes make
adjustments using other settings.
NOTE: Use AWC mode if you have problems settings white balance options.
Email: [email protected]
Last Revised: 12/09/2011
www.nitedevil.com
Doc XCAM751
NiteDevil Hi-Res External Colour Dome Camera
DAY / NIGHT You can display pictures in colour
or black & white. The following options are
available: COLOR, B/W, EXT and AUTO.
COLOR The picture is always displayed in colour.
EXT This deactivates the EXT function.
B/W The picture is always displayed in Black &
White. You have the option to switch on BURST if
required.
AUTO This option allows colour
pictures during day and switches to
B/W mode when ambient light
levels drop. A menu is provided to
smooth out switching by allowing
DELAY to set seconds before
switching and the S start and E end
light levels for switching.
NOTE: You cannot control the DAY / NIGHT menu when AGC in the EXPOSURE menu is switched to OFF.
Both Day and Night mode will remain in colour.
3DNR DIGITAL NOISE REDUCTION OFF / ON
Digital Noise Reduction reduces the background
noise in low light levels. If the SET button is pressed
when switched ON, you can adjust the level of noise
reduction.
NOTE: You cannot set 3DNR to OFF or ON when the AGC
mode in the EXPOSURE menu is switched to OFF. When
setting the 3DNR level, the higher the level is set, the higher
the level of ghosting will be seen.
Email: [email protected]
Last Revised: 12/09/2011
www.nitedevil.com
Doc XCAM751
NiteDevil Hi-Res External Colour Dome Camera
SPECIAL
CAM-TITLE OFF / ON
This is the camera title option. Set this to ON by pressing
the left or right direction keys and then pressing SET button.
Use the four direction buttons to move to the desired letter
and select the letter by pressing the SET button. Repeat
to enter up to 15 letters. If you enter a wrong title move
cursor to CLR and press the SET button to clear the
complete title. If you enter an incorrect letter, select the
letter by clicking on the left or right arrow and press the
SET button to position over the incorrect letter, then
select the correct letter and press SET.
When the title is completed select POS and press SET.
The entered title now appears on the screen. Select the
position where the title is to be displayed using the direction keys and then press SET button. If okay press END
followed by SET to return to previous menu.
D-EFFECT
FREEZE
OFF / ON
The frame can be frozen by switching to ON.
MIRROR
OFF / ROTATE / V-FLIP / MIRROR
The image can be inverted to provide a mirror image,
rotated or turned upside down.
D-ZOOM
OFF / ON
This option allows 0 ~ 32x magnification.
GAMMA
0.45 Standard Value
This value can be altered between 0.05 ~ 1.00
NEG. IMAGE OFF / ON
Select to ON to reverse colour images to negative.
RS485
This option allows setting of the menu using the RS485 connecting lead.
If using an Alien DVR connect lead to T+ and T-. Red = T+.
Set camera ID in camera to same as in DVR PTZ menu and ensure both
are set to same baud rate. Set the Protocol to PELCO-D in DVR. Then
set Preset 95 in DVR to display menu. In the PTZ menu use the down arrow
key to move to menu line and the right arrow key to alter value. Then use the
IRIS+ button to enter.
Email: [email protected]
Last Revised: 12/09/2011
www.nitedevil.com
Doc XCAM751
NiteDevil Hi-Res External Colour Dome Camera
MOTION
OFF / ON
The motion detection facility if set to ON will display
the words MOTION DETECTION whenever the
camera detects movement. The motion can be
selected in each of the 4 areas defined in the camera
picture.
The parameters available allow each of the four areas
to be selected for motion and sensitivity.
The MOTION VIEW option if selected to ON the
area displaying movement will be outlined in a
contrasting colour.
NOTE: As the four motion areas are not shown on
the monitor, they can be displayed using the
MOTION VIEW function.
PRIVACY
OFF / ON
This function enables you to hide an area on the screen.
Select this by pressing the SET button.
AREA SELECT Select an area between 01 ~ 08
AREA DISPLAY
ON / OFF Switch OFF area
required.
The remaining parameters allow each area size to be
adjusted to requirements. To delete settings select RESET
in main menu.
SYNC In areas where the AC power is 60Hz you
can synchronise the output phase of camera using the
power synchronisation function (Line Lock) without
using a sync generator.
When using 12v DC, the SYNC menu is fixed to the
INTERNAL (INT) sync mode.
LANGUAGE ENGLISH / KOREAN / CHINESE / JAPANESE
You can select from the above languages which will initiate 5 seconds later.
Email: [email protected]
Last Revised: 12/09/2011
www.nitedevil.com
Doc XCAM751
NiteDevil Hi-Res External Colour Dome Camera
ADJUST
This option allows picture sharpness adjustment
plus changes to BLUE and RED colour.
RESET
This is the factory RESET option.
RETURN Select RET to return to main menu
or END to close menu.
EXIT
Press the SET button to save the current
settings and exit the MAIN menu setup.
Troubleshooting
No screen display
* check power supply to camera
* check video line
* check brightness of Auto Iris Lens
Unclear video image
* check lens is clean
* adjust monitor contrast
Day/Night menu fault
* Check AGC switched off
Sens-Up menu fault
* Check AGC switched off, check that Shutter menu is FLK or Manual
Colour incorrect
* Check White Balance setup
Dimensions
Email: [email protected]
Last Revised: 12/09/2011
www.nitedevil.com
Doc XCAM751
NiteDevil Hi-Res External Colour Dome Camera
Technical Specifications
Function
Model
Power Source
Imaging Sensor
Total Pixels
Effective Pixels
Signal System
Scanning system
Scanning Frequency
S/N Ratio
Horizontal Resolution
Video Output Level
Lens
Minimum Illumination
Sync System
OSD
Electronic Shutter Speed
White Balance
Backlight Compensation
D-WDR
Gain Control
Motion Detection
Mirror
Sharpness
Day & Night
Digital Zoom
Privacy Masking
DNR (digital noise reduction)
Sens-up (Frame Integration)
Operational Temperature/Humidity
Storage Temperature/Humidity
Dimensions
Weight
Specification
CAM751
12vDC
140mA
CAM752
12vDC / 24vAC Dual Power
12vDC 230mA / 24vAC 110mA
1/3” SONY Super HAD CCD II
PAL: 795(H) x 595(V)
PAL: 752(H) x 582(V)
PAL 625 lines
2:1 Interface
H:15.625 kHz / V:50 Hz
More than 52 dB (AGC Off)
Horizontal: 560 TVL Colour / 600 TVL Black & White
1.0 v p~p (75 , composite)
Built-in DC Iris Vari-focal Lens (2.8 ~ 12mm)
0.0008 Lux (DSS), 0.2 Lux (DSS OFF) at F1.2
Internal
Built-in(Multi-language support – English/Korean/Japanese/Chinese 1, 2)
Auto / Manual
PAL: (1/50 sec ~ 1/100,000 sec) / NTSC: (1/60 sec ~ 1/100,000 sec)
ATW/PUSH/AWC/Manual (2000°K ~ 20000°K)
ON/OFF/HSBLC
Indoor / Outdoor / Off
Low / Middle / High / Off
On/Off (4 zones)
V-Rev, H-Rev, Freeze On/Off
Level Adjustable
Auto / B&W / Colour
On / Off (0x ~ 32x)
On / Off (8 zone selectable)
On / Off (0~100)
Auto / Off (selectable limit 2x ~ 256x)
-10°C ~ +50°C / 30% ~ 80% RH
-20°C ~ +60°C / 20% ~ 90% RH
Base diameter 128mm x 89.5mm Height
Approximately 700g
All specifications are approximate. nitedevil.com reserves the
right to change any product specifications or features without
notice. Whilst every effort is made to ensure that these
instructions are complete and accurate, nitedevil.com cannot
be held responsible in any way for any losses, no matter how
they arise, from errors or omissions in these instructions, or the
performance or non-performance of the equipment that these
instructions refer to.
Email: [email protected]
This symbol on the products and/or accompanying documents means
that used electronic equipment must not be mixed with general
household waste. For treatment, recovery and recycling please return
this unit to your trade supplier or local designated collection point as
defined by your local council.
WEE/CG0783SS
Last Revised: 12/09/2011